AEE Technology AEEAP110001 Aerial photography equipment User Manual
Shenzhen AEE Technology CO., LTD. Aerial photography equipment
UserManual.wiki
>
AEE Technology
>
AEEAP110001 User Manual
User Manual
Navigation menu
Upload a User Manual
Namespaces
Wiki Guide
HTML
PDF
Info
Views
User Manual
Discussion / Help
Navigation
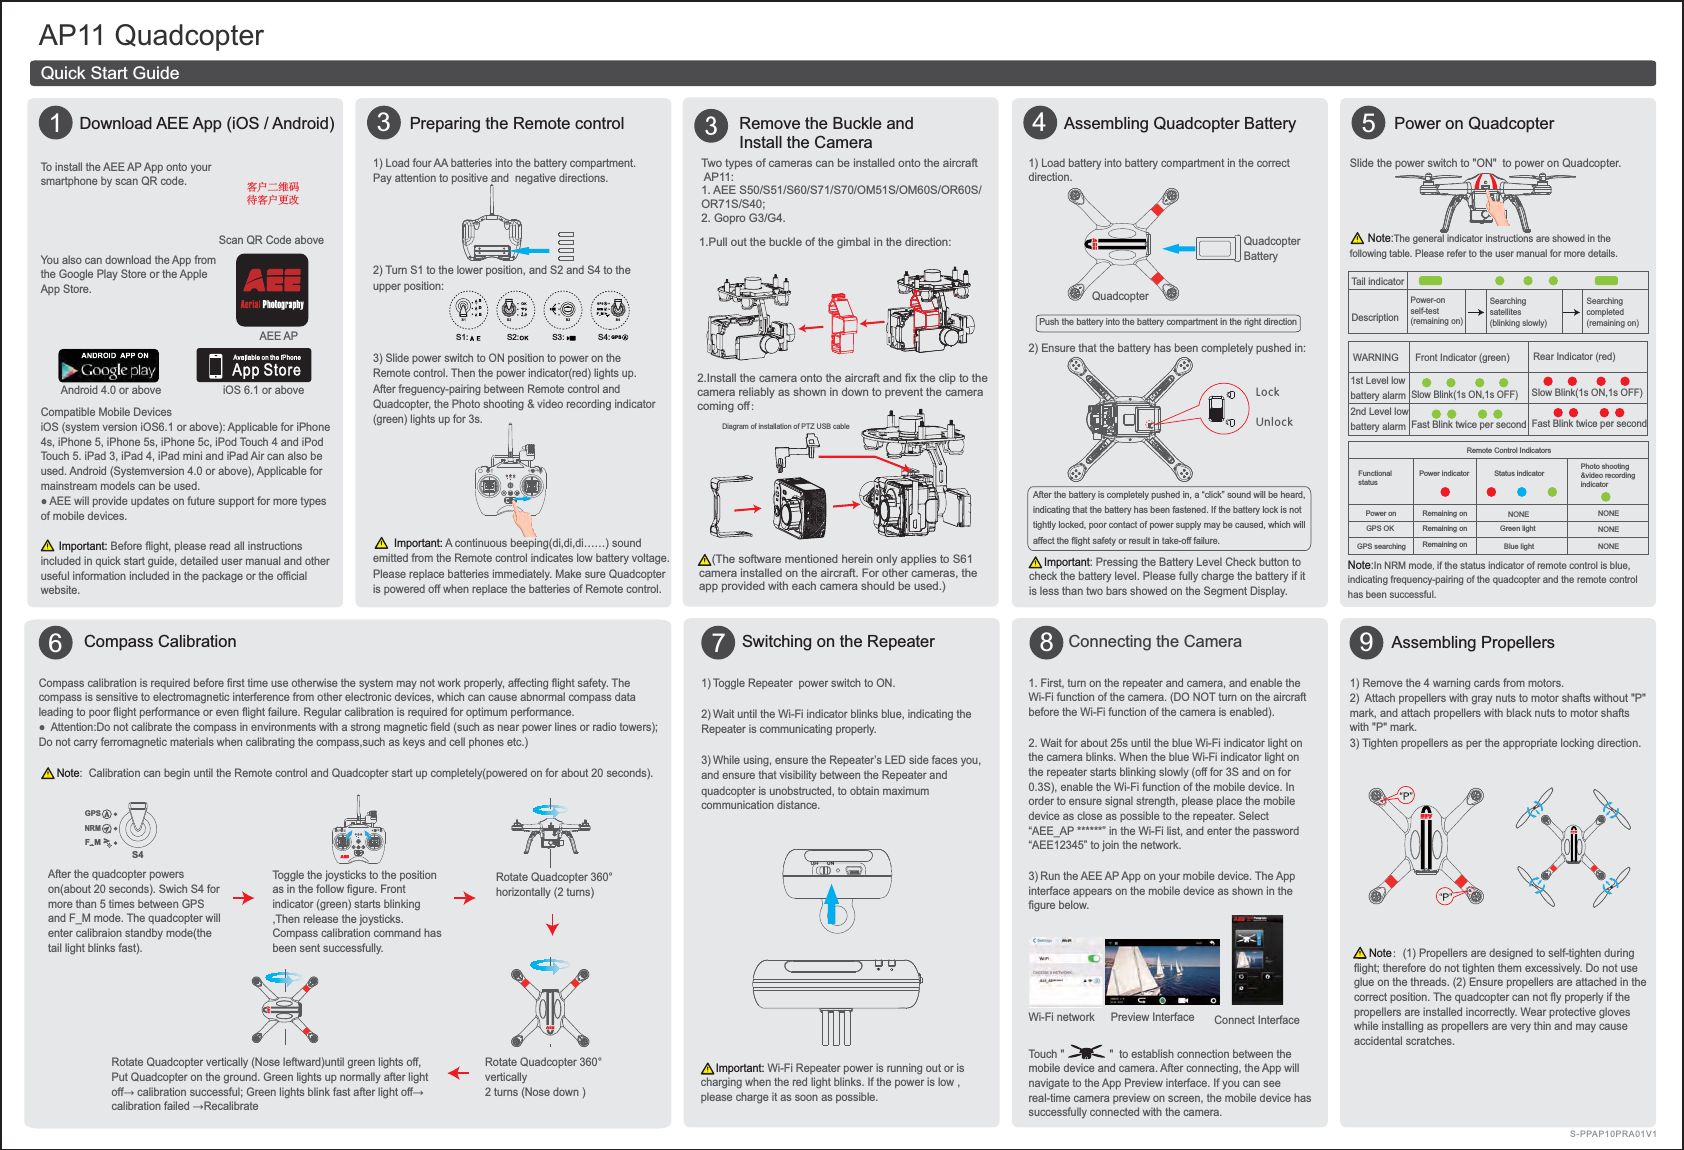
![DisclaimerPlease read this disclaimer carefully before using the product of Quadcopter. This product is not suitable for people under the age of 18. By using this product, you hereby agree to this disclaimer and signify that you have read them fully. You agree that you are responsible for your own conduct and content while using this product, and for any consequences there of. You agree to use this product only for purposes that are proper and in accordance with the terms and any applicable or guidelines AEE may make available. 1. Shenzhen AEE Technology Co., Ltd. reserves the right of final interpretation of this disclaimer. 2. Any part of this disclaimer is subject to change without prior notice.3. This disclaimer is available in multiple languages. In case of any discrepancy, the Chinese version shall prevail. 4.For more detailed or latest product information, please visit www.aee.com. AP11 Taking off and Landing(Outdoors)Taking offS2 S3 S4GPSNRMS1EDSF MS1: S2: S3: S4: GPS1) Place Quadcopter (with full power battery) on a flat and open ground, and ensure Tail Indicator faces toward you.2. Turn on the remote control, repeater and camera and enable the Wi-Fi function of the camera in sequence; last, turn on the aircraft (Do Not turn on the aircraft before the Wi-Fi function of the camera is enabled); 3) Be sure the Remote control is set exactly as the figure below.4) Starting motors: toggle the left joystick to left bottom corner and toggle right joystick to right bottom corner at the mean time to start motors. Once the motors start please release the joysticks immediately.5) Push the left joystick slowly, then Quadcopter take off. Please refer AEE Quadcopter User Manual for more details. Note: The motors can not be started until GPS signal is ready (Tail Indicator (green) remains on).1. Upon startup, the airborne camera and the repeater will pair with each other. Please wait for about 30S to ensure that pairing is completed, so that the airborne camera can record videos normally. 2. After the aircraft is powered on, the aircraft and the PTZ will start self-test. Do not shake the aircraft or the PTZ at this moment; otherwise, the aircraft and the PTZ will fail the self-test. (The PTZ can be used only when the camera is installed; otherwise the PTZ may be damaged)3. Before installing the camera onto the aircraft, it is suggested that the auto standby function of the camera should be disabled.4. When the aircraft complete searching for GPS satellites, the tail light (green) will remain on. During flight, please do not turn the joysticks of the remote control to a lower toe-out pattern, which will stop the motors. Landing:1) Slowly pull the left joystick to lower Quadcopter until it touches the ground(only on flat and open ground).2) After landing, pull the left joystick to the lowest position and hold for more than 3 seconds until the motors stop.3) Power off Quadcopter by sliding the switch to OFF.4) Remove the battery.5) Power off Remote control and Wi-Fi Repeater. Important:1) Control the flight height under your control during your first flight.2) Do not stop the motors during flight, or it will cause the Quadcopter to drop without control.AP11Remote control and Wi-Fi Repeater DescriptionRemote control (U.S. Mode)UPUP LEFT LEFT FORWARD FORWARDLEFTTURN LEFTTURN TURN RIGHTTURN RIGHTRIGHT RIGHTBACKBACKDOWNDOWNQuadcopter Direction(" " indicates nose direction)Note: The Remote Control is set to U.S. mode by default.[ 1 ] Propeller [ 2 ] Motor [ 3 ] Front Indicator [ 4 ] Landing Gear [ 5 ] Camera [ 6 ] 3-Axials Gimbal [ 7 ] Quadcopter Battery [ 8 ] Tail Indicator[ 9 ] Power Switch [ 10 ] Rear Indicator [ 11 ] Battery Level LCD Segment Display [ 12 ] Battery Level Check Button[ 1 ][ 2 ][ 3 ][ 4 ][ 7 ][ 5 ][ 6 ][ 8 ][ 9 ][11][10][12]Power Switch Charging Port (mini USB port) Pairing Button Repeater BasePower IndicatorWi-Fi IndicatorLock Screw Strap Hole Right Joystick Video Stop ButtonRemote Control Power SwitchPhoto Shooting & Video Recording Indicator Flight mode switch S4Angle control switch S3 Wi-Fi RepeaterRepeater BaseAntennaSmartphone HolderCalibration switch S2 Speed control switch S1Power IndicatorStatus IndicatorLeft JoystickAirborne Video Recording ButtonReturn buttonAirborne Shutter ButtonS2 S3 S4GPSNRMS1F MHook open/close button](https://usermanual.wiki/AEE-Technology/AEEAP110001/User-Guide-2732194-Page-1.png)