AEE Technology AEEAP11A001 Aerial Photography Equipment User Manual
Shenzhen AEE Technology CO., LTD. Aerial Photography Equipment
UserManual.wiki
>
AEE Technology
>
AEEAP11A001 User Manual
User Manual
Navigation menu
Upload a User Manual
Namespaces
Wiki Guide
HTML
PDF
Info
Views
User Manual
Discussion / Help
Navigation
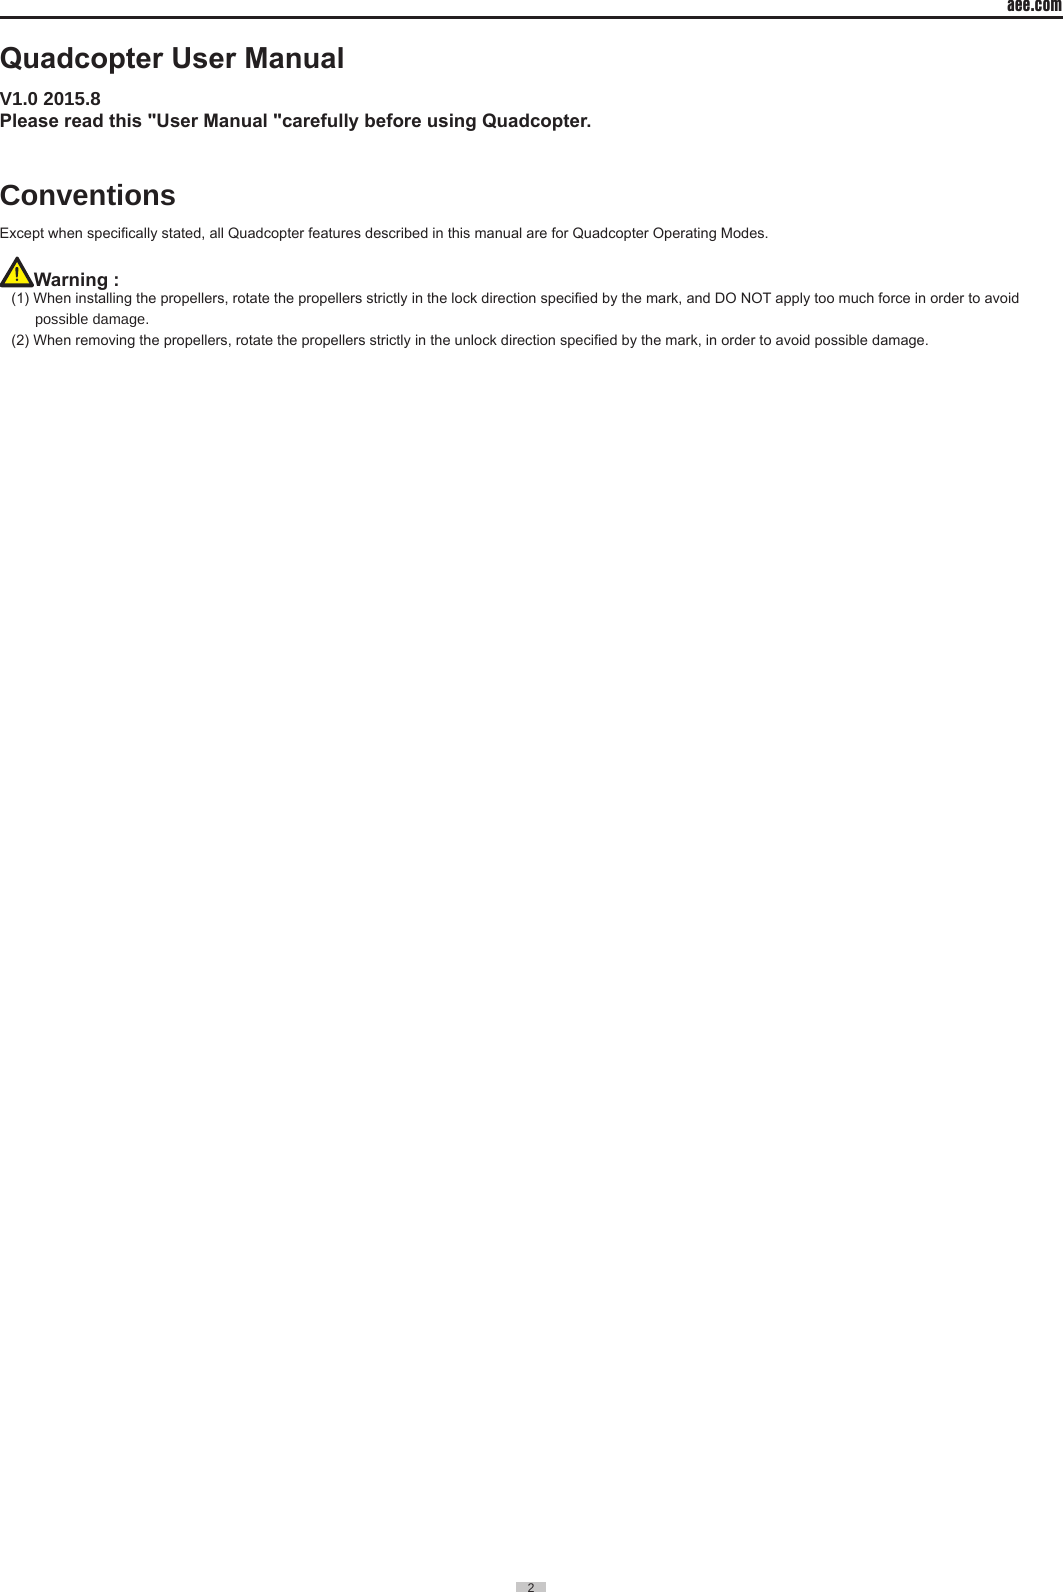
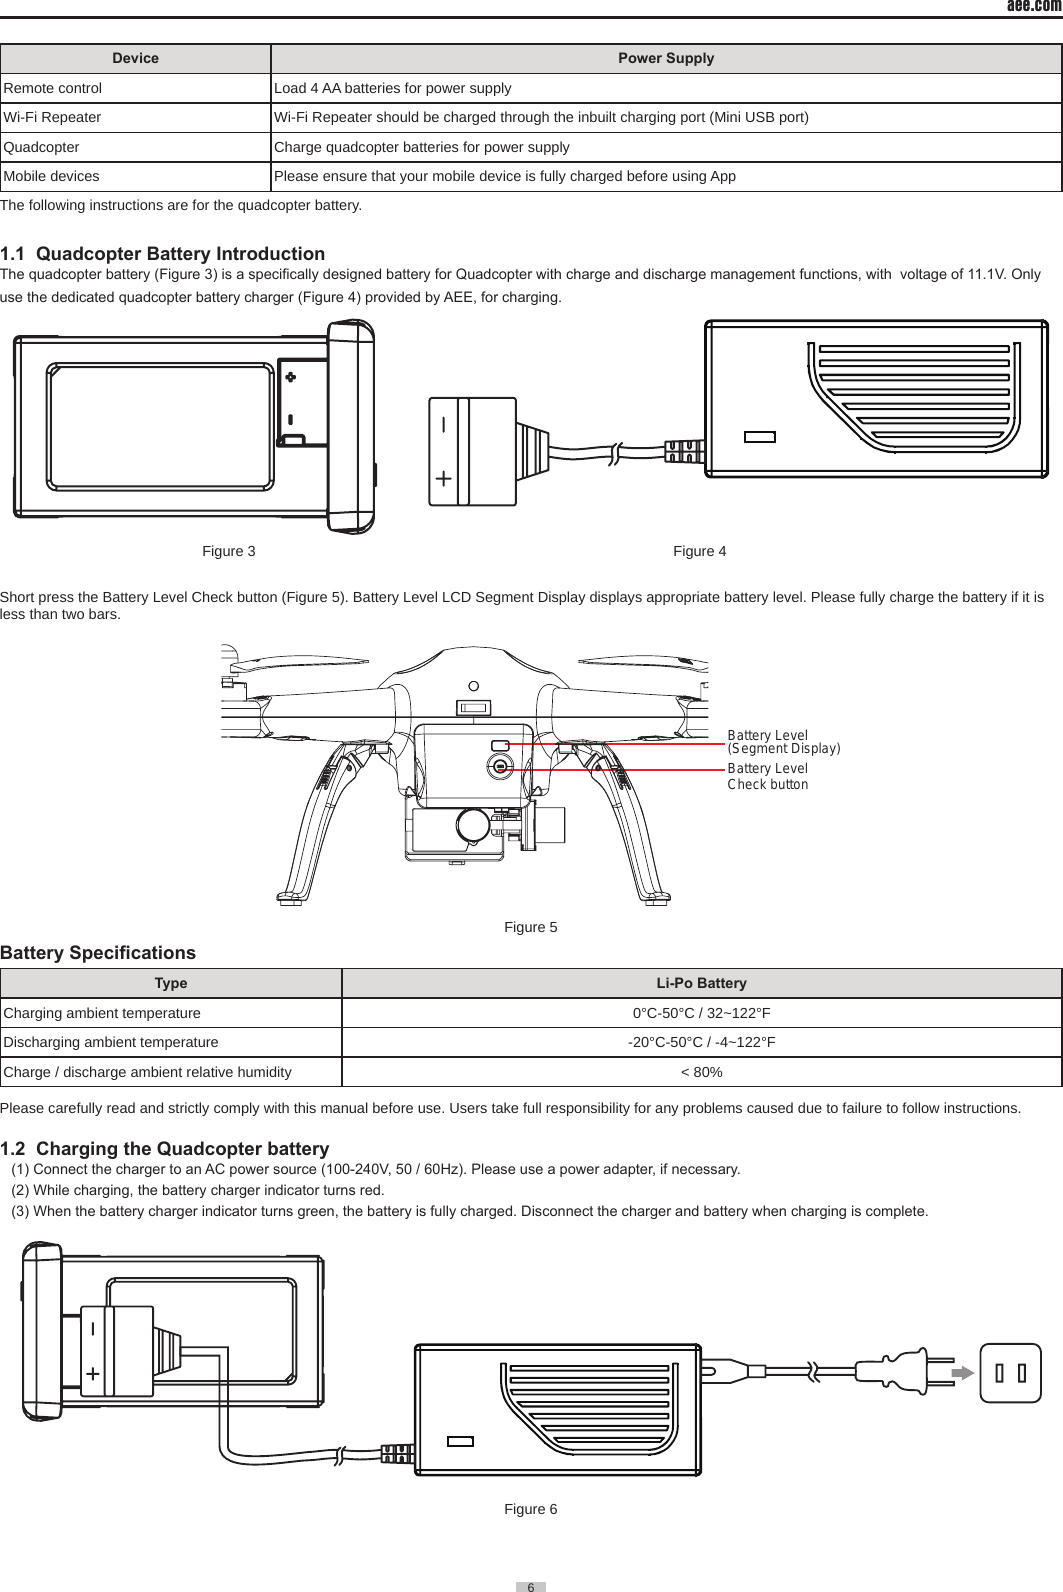
![7 aee.com7 1.3 Quadcopter Battery InstallationPush the battery into the battery compartment in the correct direction (Figure 7). After the battery is properly installed, a “click” sound will be heard, indicating that the battery has been fastened� Figure 71.4 Caution(1) Do not directly pull out the battery when the Quadcopter is switched on as it may damage the power supply connector�(2) For long term storage, discharge the battery to 40%-50% power, and store in a specied battery box. Discharge/charge the battery once every three months to maintain battery life�(3) Replace the battery after it has been discharged over 300 times� Completely discharge a battery prior to disposal� (4) Replace the battery if your current battery swells up or is damaged in any way, to avoid re and explosion.(5) Do not charge expanded or damaged batteries�(6) Please pay attention to the battery charging process in order to avoid accidents, and make sure there are no ammable or combustible materials around the battery and the charger� (7) Battery safety is extremely important� Please refer to Disclaimer for more precautions�2 Preparing the Quadcopter The Quadcopter consists mainly of the ight control system, gimbal, camera (optional) and power unit.2.1 Introduction [ 1 ][ 2 ][ 3 ][ 4 ][ 7 ][ 5 ][ 6 ][ 8 ][ 9 ][11][10][12]Figure 8 [ 1 ] Propeller [ 2 ] Motor [ 3 ] Front Indicator [ 4 ] Landing Gear [ 5 ] Camera [ 6 ] 3-Axials Gimbal [ 7 ] Quadcopter Battery [ 8 ] Tail Indicator[ 9 ] Power Switch [ 10 ] Rear Indicator [ 11 ] Battery Level LCD Segment Display [ 12 ] Battery Level Check ButtonAn incorrectly installed battery may cause● Bad contact● Affect ight safety● Inability to take off.](https://usermanual.wiki/AEE-Technology/AEEAP11A001/User-Guide-2754840-Page-6.png)
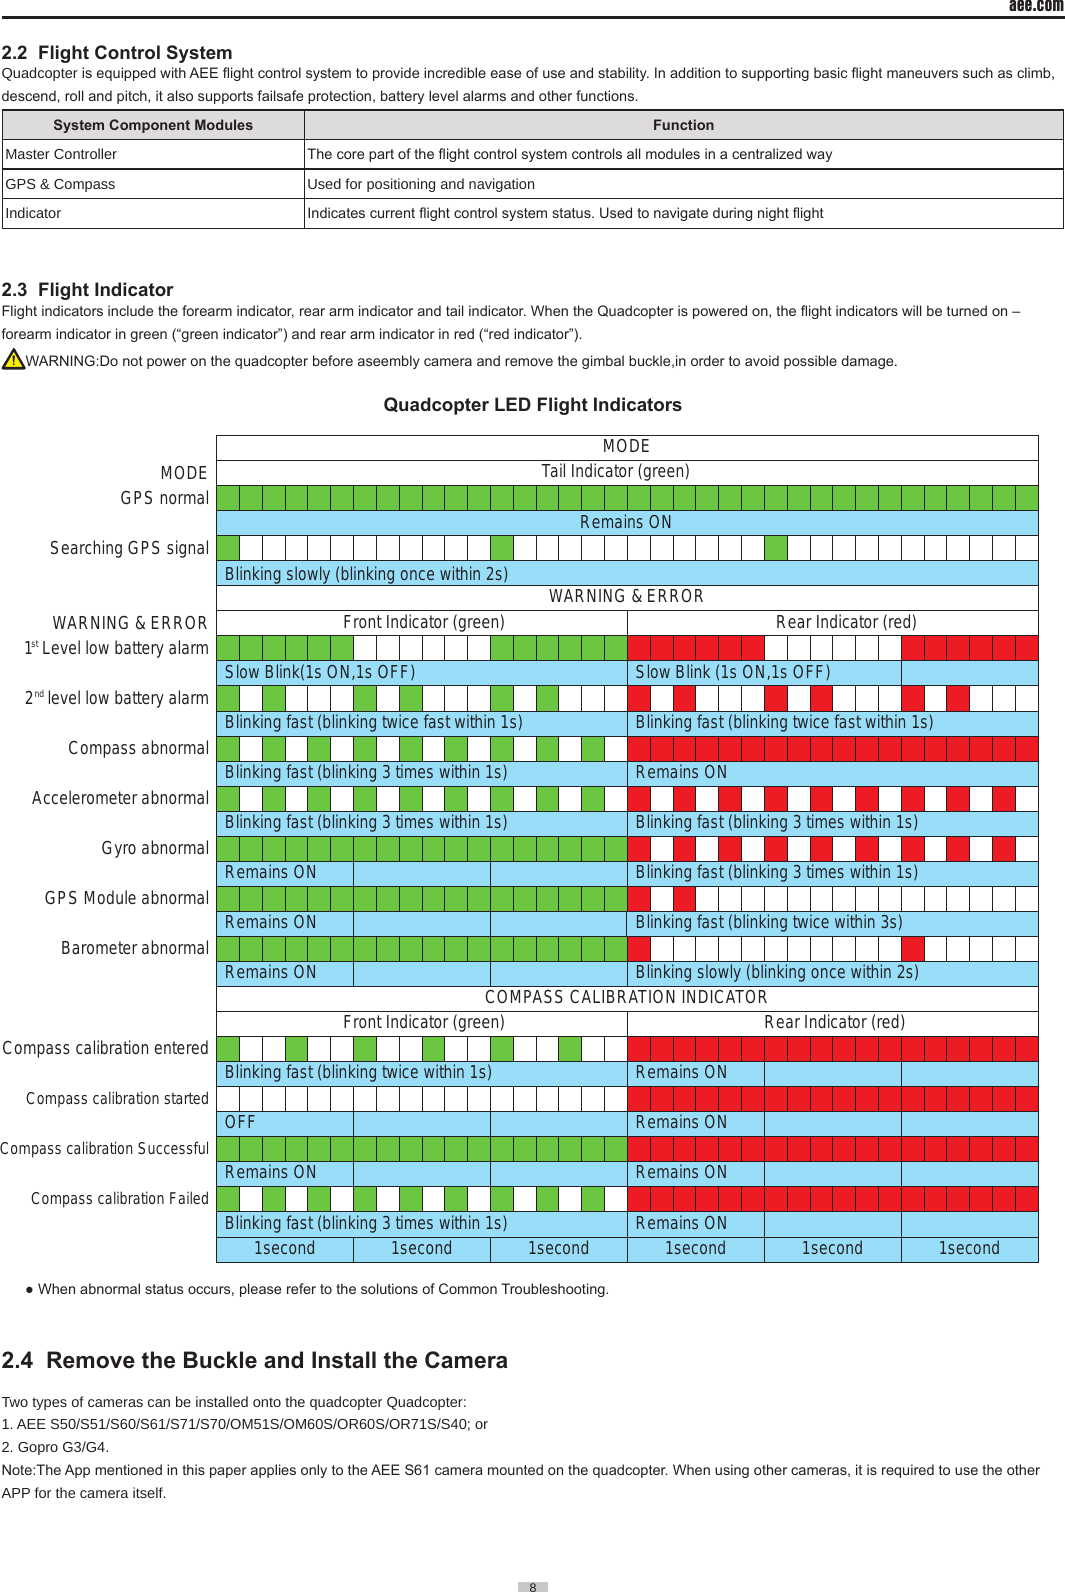
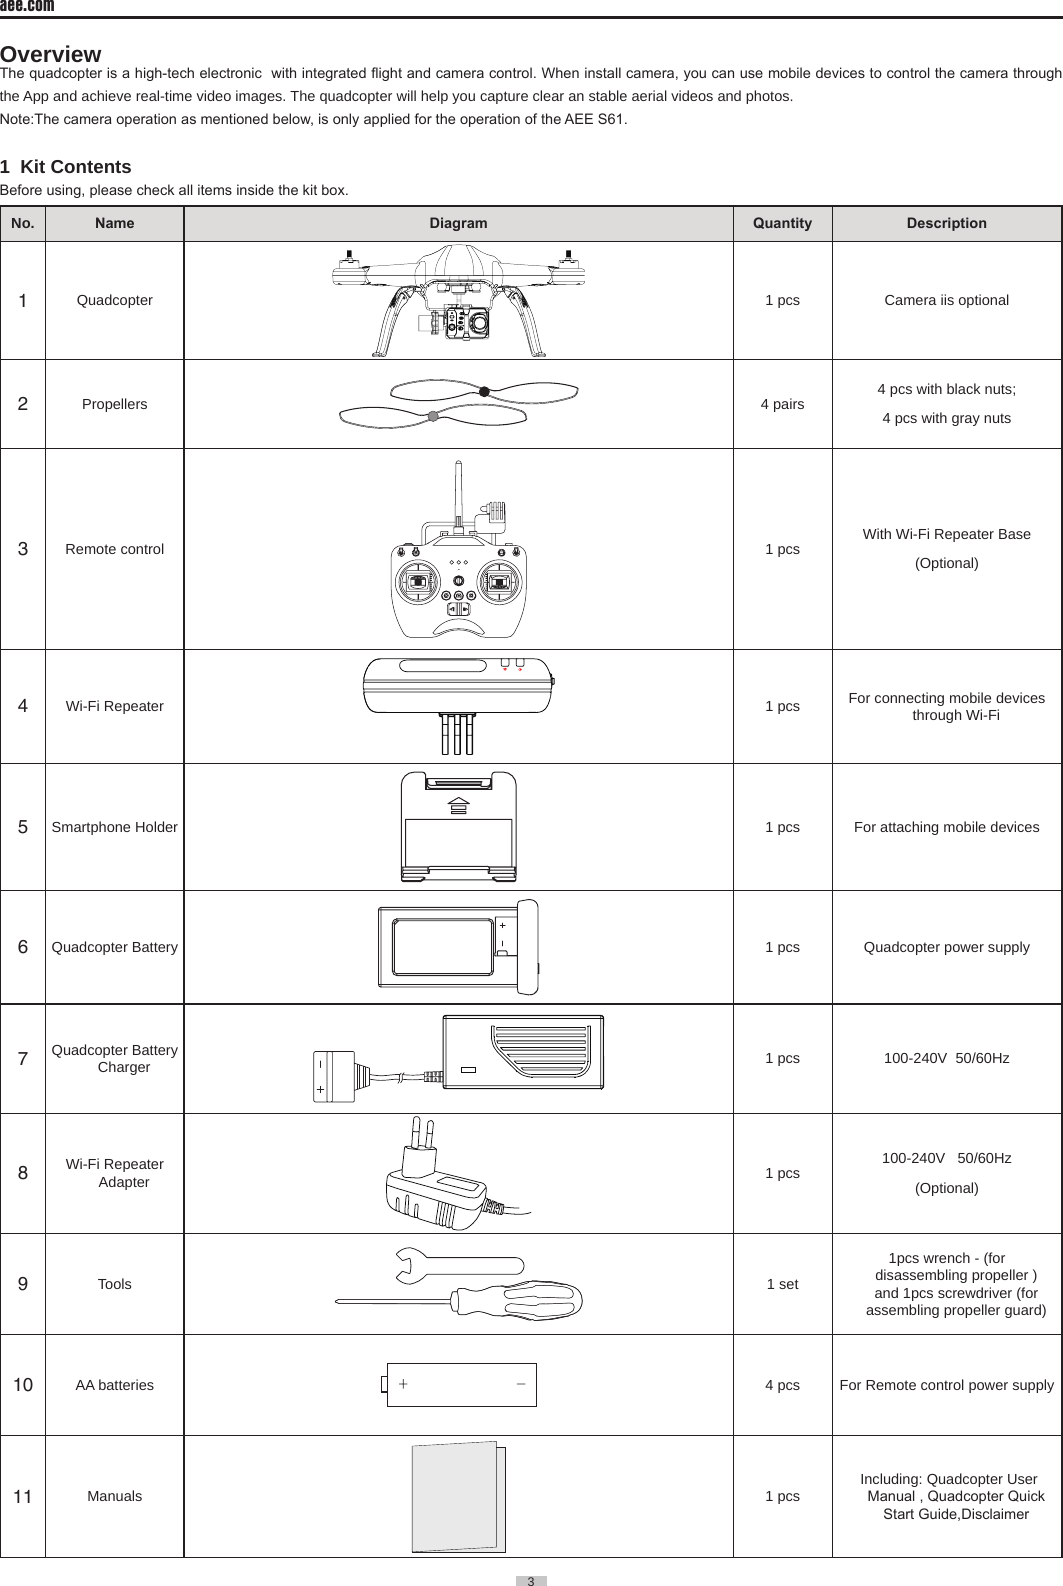
![aee.com12 GPSNRMS1 S2 S3 S4GPSNRMDF MSENULL[ 22 ][ 21 ][ 20 ][ 17 ][ 13 ][ 10 ][ 9 ][ 6 ][ 2 ][ 5 ][ 15 ][ 1 ][ 3 ][ 8 ][ 7 ][ 4 ][ 11 ][ 12 ][ 14 ][ 16 ][ 18 ][ 19 ] Figure 14 No. Description Specification Definition 1 Antenna Remote control signal transmission 2 Repeater For extending Wi-Fi signal reception range3 Mobile device holder For attaching mobile devices4 Hook open/close button Short press it once to open the hook on the quadcopter; press it again to close the hook (Remark: The hook is an optional accessory) 5 Repeater base It is used to fix the repeater6 Return button Long press it for 3s to send a go-home command to the quadcopter7 Speed switch S1 There are three speed modes; the speed decreases from up to down: 1. Sport mode S; 2. Drive mode ;3. Economic mode ;8Calibration switch S2 It is a 3-channel switch. 1. (joystick calibration is OK); 2. NULL(Reserved function); 3. (start the joystick calibration procedure)9 Gimbal control switch S3 Diagram of PTZ motion control switch positions Lens turns upward (upper position)Lens stops (middle position) Lens turns downward (lower position) When it is turned upward/downward, the lens direction changes slowly till the allowable maximum angle is reached10 Flight mode switch S4 It is a 3-channel switch. 1. GPS: GPS mode; 2. NRM: NRM mode (normal mode); 3 F M : Following mode Remark: When the quadcopter is in the auto fly mode (auto return, low-battery auto landing), at the time when the remote control signal is restored, switch between the GPS and NRM modes twice to end the auto fly mode and now the remote control can regain control of the quadcopter 11 Remote control power indicator Red, indicating the remote control power ON/OFF status (red light remains on when the power is turned on, and blinks slowly in low-battery status)12 Status indicatorTri-color indicatorIt can indicate the GPS signal status and flight mode of the quadcopter, and also the joystick calibration status.Remark: For the sake of safety, the quadcopter should be turned off before joystick calibration13 Photo shooting & video recording indicator Green light blinks slowly:Video recording. Blinks once:When one photo is taken (single shot by Remote Control).Green light remaining on: Indicates Remote Control starting up successfully. 14 Buzzer hole Warning tone15 Strap hole Used to hang the remote control 16 Left joystick 2 channels;"up-down" channel controls gas, "left-right" channel controls yaw.17 Right joystick 2 channels;"up-down" channel controls roll, "left-right" channel controls pitch18 Airborne video recording button Short press it to send command to the quadcopter to start video recording(only to the AEE S61 camera mounted on the quadcopter)19 Airborne photo shooting button Short press it to send command to the quadcopter to take a photo(only to the AEE S61 camera mounted on the quadcopter)20 Video recording stop button Short press it to send command to the quadcopter to stop video recording(only to the AEE S61 camera mounted on the quadcopter)21 Remote control power switch Slide it to the left position to power OFF the remote control; slide it to the right position to power ON the remote control22 Battery compartment It is where the battery is installed](https://usermanual.wiki/AEE-Technology/AEEAP11A001/User-Guide-2754840-Page-11.png)
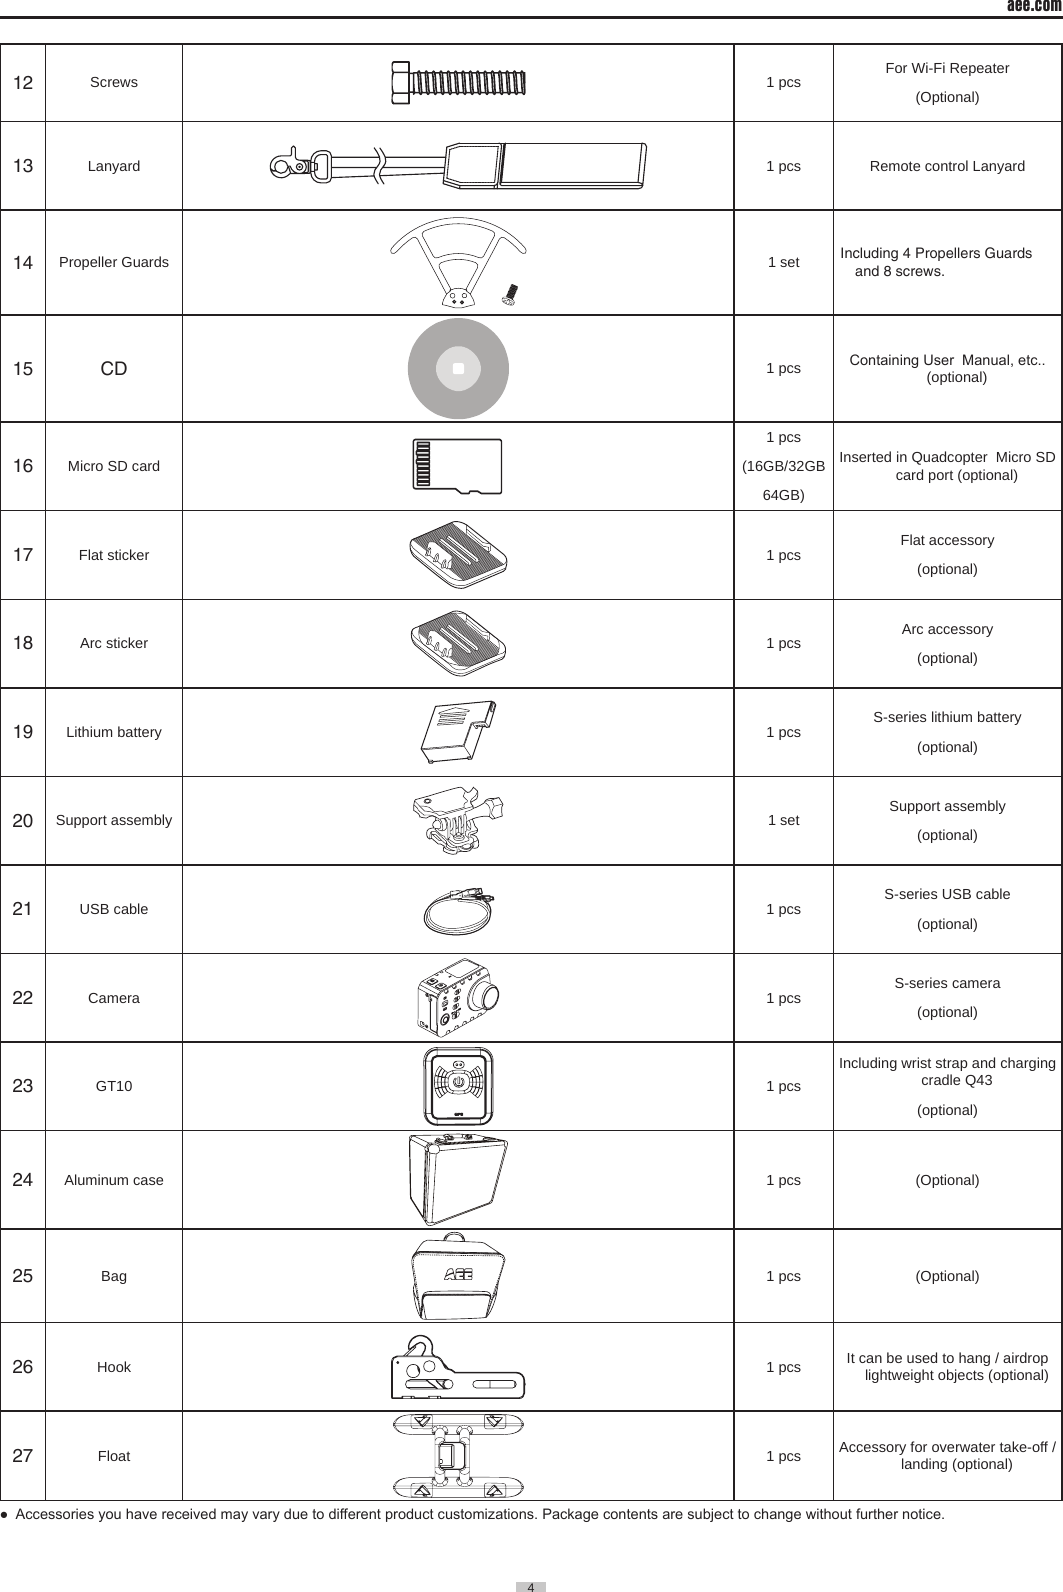
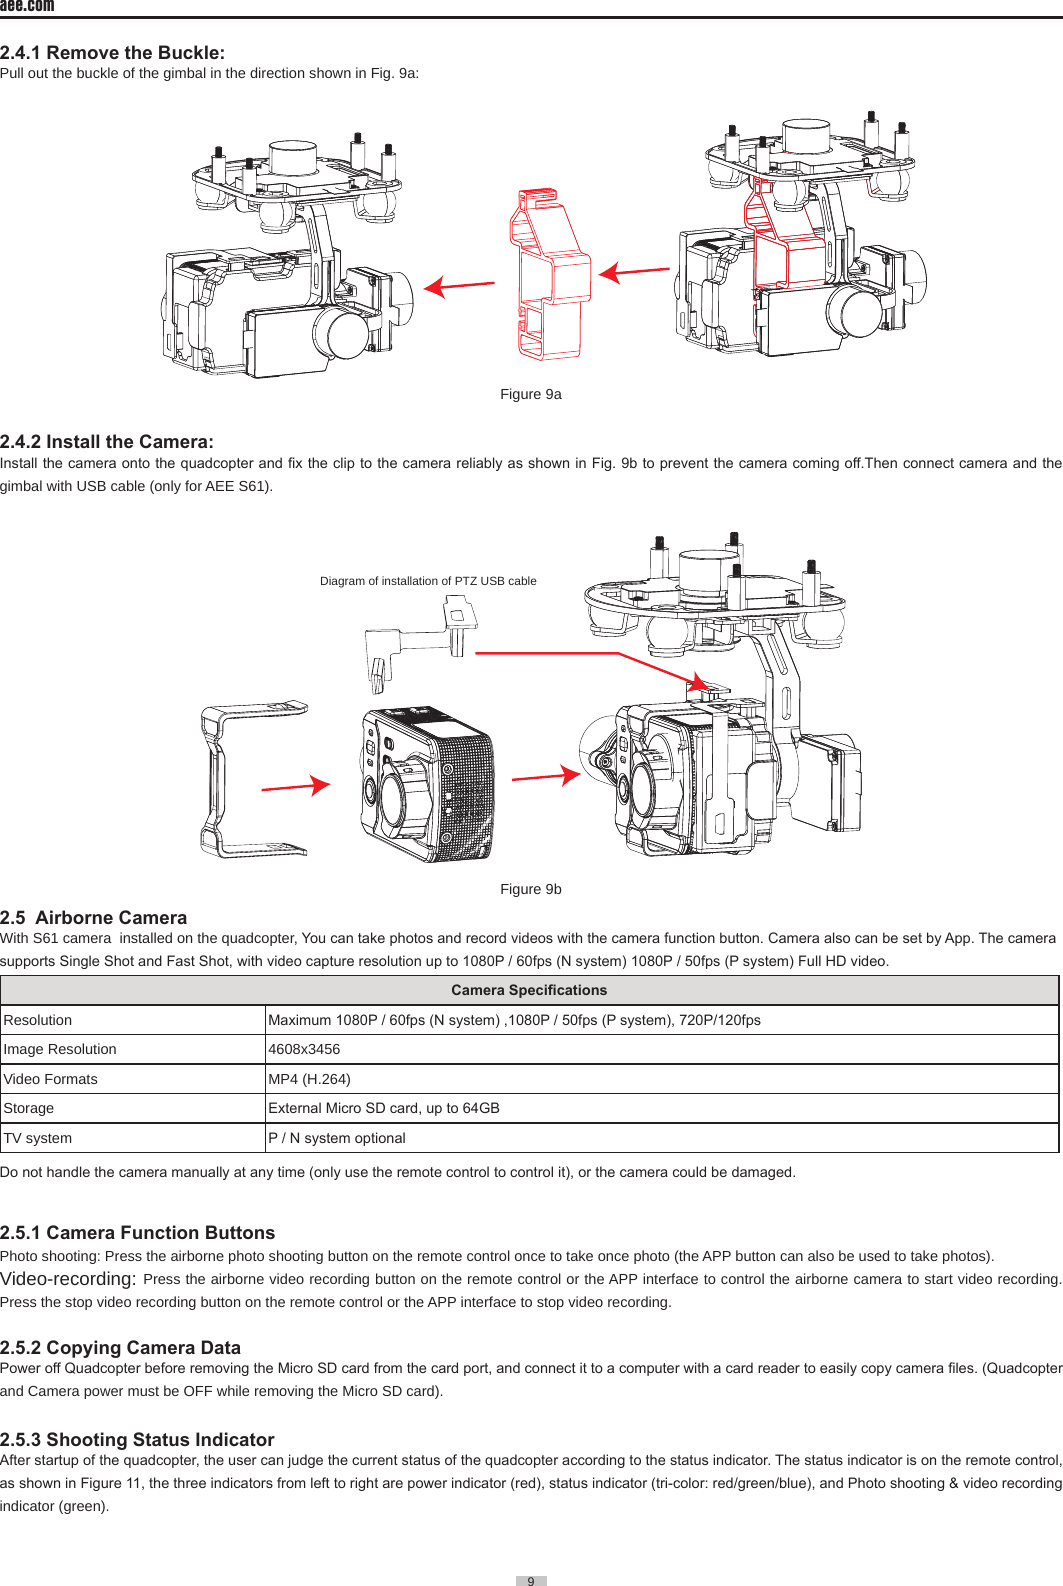
![15 aee.com15 [ 1 ][ 2 ][ 3 ][ 4 ][ 5 ][ 6 ][ 7 ]Figure 16 [ 1 ] Power Indicator [ 2 ] Wi-Fi Indicator [ 3 ] Lock screw [ 4 ] Power Switch [ 5 ] Charging Port (Mini USB port) [ 6 ] Pairing Button [ 7 ] Repeater Base 5.1.1 Wi-Fi IndicatorIndicates Repeater’s Wi-Fi statusWi-Fi Indicator Description Blue light is ON Wi-Fi Repeater is working properlyBlue light blinks fast (1.5s OFF, 0.3s ON) Wi-Fi Repeater is pairing with airborne CameraBlue light blinks slowly (3s OFF,0.3 ON) Wi-Fi Repeater is successfully paired5.1.2 Power Indicator Indicates Repeater’s power supply status�Power Indicator DescriptionRed light is ON Repeater power supply is normal or charging completesRed light blinks Repeater is charging, or Repeater power is running out, please charge as soon as possible5.1.3 Pairing Button When the repeater is on, press and hold the Pairing Button for 3 seconds, the repeater will automatically restart for code re-pairing. Press and release the Pairing button to check repeater's power level�Press Pairing buttonPress Pairing button once: If Power Indicator blinks once, indicates that repeater has over 80% charge availableIf Power Indicator blinks twice, indicates that repeater has over 50% charge availableIf Power Indicator blinks three times, indicates that repeater is running out of PowerLong press Pairing button (3 seconds) Repeater restarts and you can re-pair codes5.1.4 Code Pairing If the Wi-Fi indicator fast blinks blue (1.5 seconds OFF, 0.3 seconds ON), or keeps ON, it is necessary to carry out pairing please re-pair with following steps:(1)Switch on the power switch and Wi-Fi switch of came,then switch on the power switch of repeater.(2)After the Wi-Fi indicator of camera blinks, and Wi-Fi indicator of repeater is on, press Paring Button of repeater until Wi-Fi indicator(blue) of repeater blinks fast(0.3s on,1.5s off). Then press the "video recording stop button"of camera immediately (1 time per second).When the repeater blue light indicator slow blinks(0.3s on,3s off), this indicates the paring completes.(3)If pairing fails, please repeat step 1 and step 2.5.2 How to useCharging the Repeater Connect the repeater to the repeater Adapter through the Mini USB port� It takes about 2 hours to fully charge the battery�● Ensure the repeater has sufcient charge before each ight.Switching on the Repeater (1) Toggle Repeater power switch to ON.(2) Wait until the Wi-Fi indicator blinks blue, indicating the Repeater is communicating properly. (3) While using, ensure the Repeater’s LED side faces you, and ensure that visibility between the Repeater and quadcopter is unobstructed, to obtain maximum communication distance�● After the ight, in addition to switching off the quadcopter and remote control, remember to switch off the Reapeater, or else the Repeater’s battery will be depleted�6. Use the Tracker GT106.1 Keys and Indicators:](https://usermanual.wiki/AEE-Technology/AEEAP11A001/User-Guide-2754840-Page-14.png)
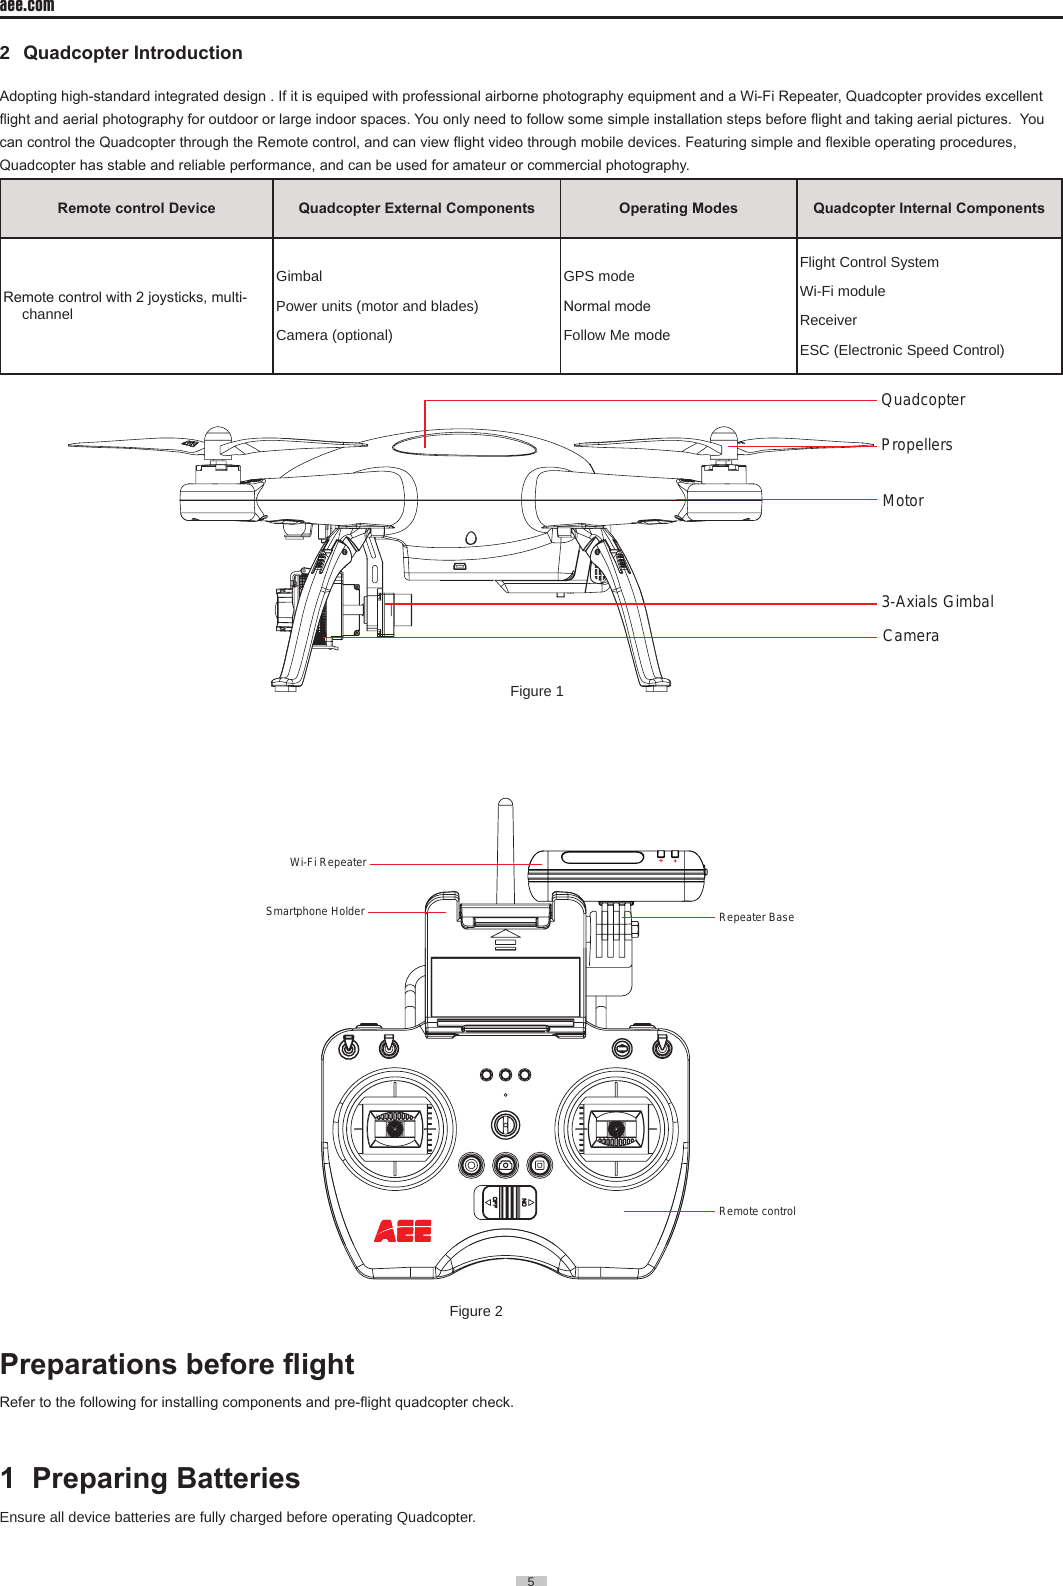
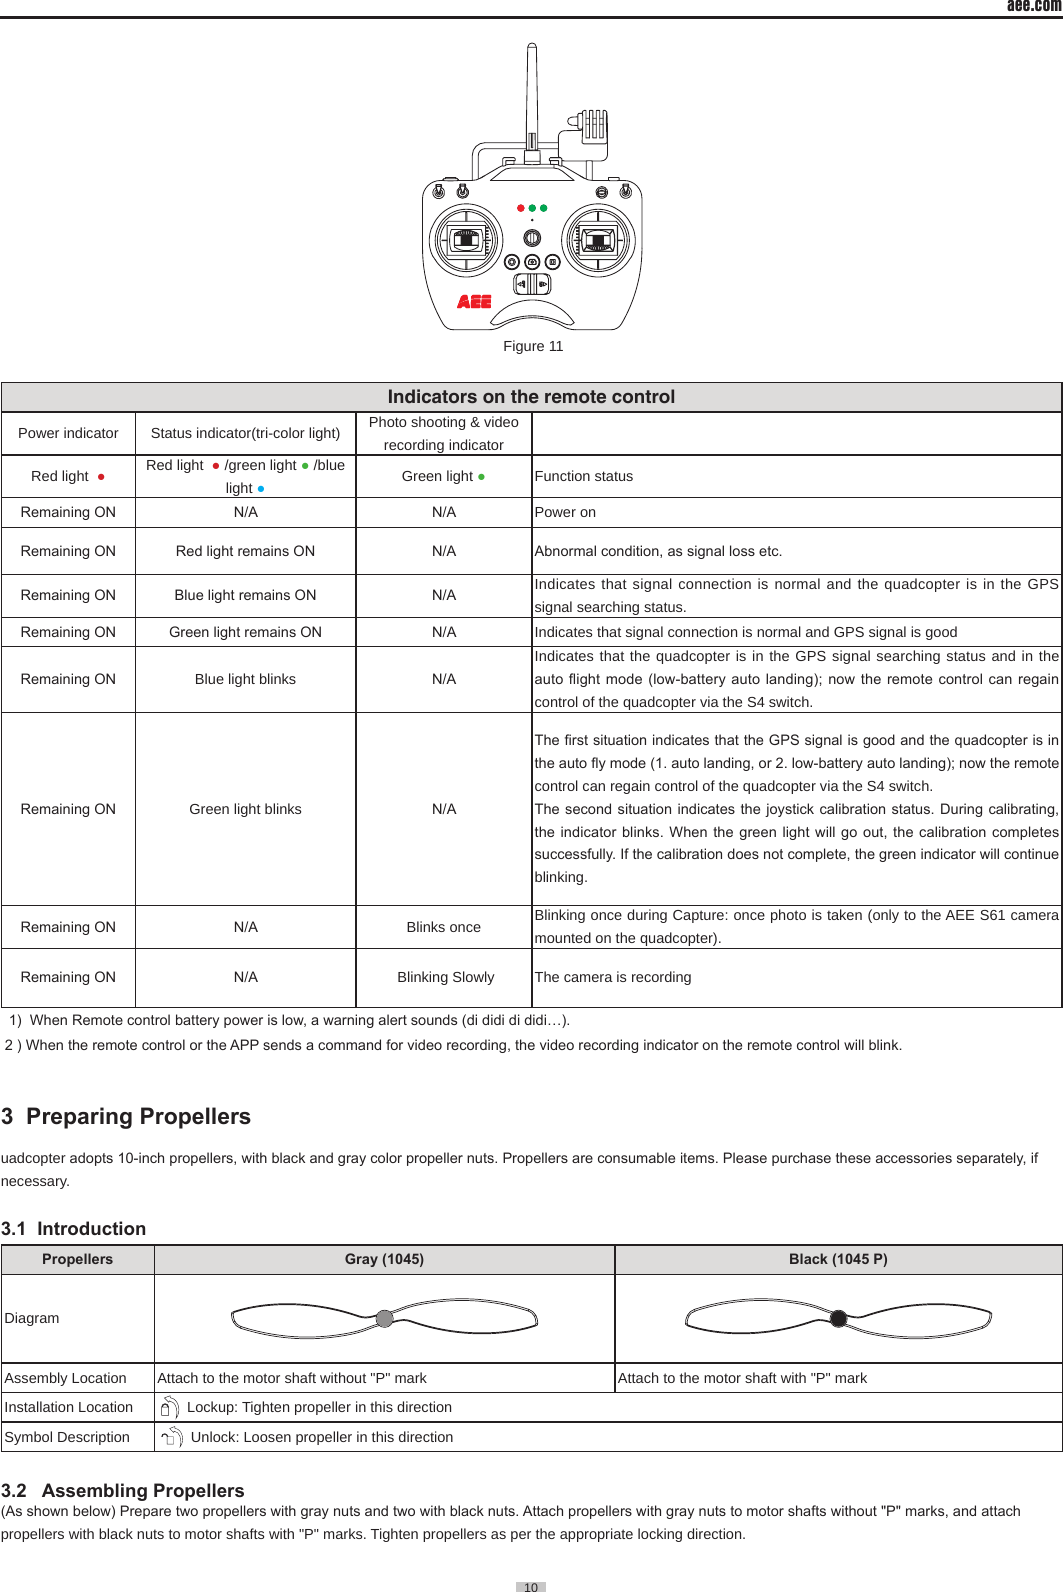
![aee.com16 Charging contactsPower indicatorStatu indicatorPower / function key6.2 Description of Keys and Indicators:No. Name Description[ 1 ] Power/function keyIn power-off state, long press it for 3s to power on the tracker. Press and hold the Power button until the red indicator is lit. After 3 seconds, the green indicator starts blinking, indicating the startup is completed. In power-on state, long press it for 3s to power off the tracker. Press and hold the Power button until the green indicator goes out. After 3 seconds, the red indicator goes out, indicating the shutdown is completed. Initial code pairing: press it for 3 times at an interval of 2s to trigger the code pairing function�[ 2 ] Power indicator Power indicator is red[ 3 ] Statu indicator Status indicator is green[ 4 ] Contacts Charging contacts�※Note:1. Code pairing process: turn on the tracker and trigger its code pairing function; turn on the quadcopter, and its built-in 5.8GHz module will auto proceed with the code pairing process. In the code pairing process, the distance between the tracker and quadcopter should be less than 10m.2. After the code pairing function is triggered, the tracker will auto exit the code pairing state if the code pairing process is nished successfully within 30s. If no code pairing device is found or the code pairing process fails within 30s, the tracker will also auto exit the code pairing function.6.3 Indicators on the trackerSN Status Red indicator Green indicator Notes1 During startup process ON Green indicator blinks after 3 seconds Press and hold the Power button until the red indicator is lit. After 3 seconds, the green indicator starts blinking, indicating the startup is completed� 2During shutdown processRed indicator goes out after 3 seconds OFFPress and hold the Power button until the green indicator goes out. After 3 seconds, the red indicator goes out, indicating the shutdown is completed�3No device to pair with / Blinking fast Blinking 10 times per second4 During code-pairing / Blinking fast Blinking 5 times per second5 Searching GPS signal / Indicator’s blinking sequence 1 Remaining on → blinking fast for 3 times 6 GPS signals are OK / Green indicator remains on 7 Abnormal system / Green indicator goes out Restarting is required8 Charging battery Blinking slowly / Blinking 1 times per second9 Battery charged fully Remaining on /10 Low battery power Blinking fast / Blinking 10 times per second6.4 Operating Instructions6.4.1 Operating Steps:Component Startup TimeTurn on the quad-copterStart the APP on the mobile devicePerform the takeoff operation of the quadcopterTurn the mode switch of the remote control to “F-M”The quadcopter will enter the follow-me video recording mode.Camera 20sRepeater 22sRemote control 10sTracker 10s](https://usermanual.wiki/AEE-Technology/AEEAP11A001/User-Guide-2754840-Page-15.png)
![19 aee.com19 [2][1] [13][14][15][16][17][18][3][4][5][6][7][8][9][10][11][12] Figure 19No� Function Description[ 1 ] Number of GPS satellites searched Indicates that currently the positioning signals of 6 satellites have been received[ 2 ] Quadcopter battery levelThere are totally four bars used to indicate in a real-time manner the remaining battery level of the quadcopter; 1 bar indicates 25% of the battery life is left; 2 bars indicate 50% left; 3 bars indicate 75% left; 4 bars indicate battery is full.The level status changes with the flight.[ 3 ] Wi-Fi signal intensity Shows in a real-time manner the intensity of Wi-Fi signal of mobile device. more bars indicate stronger Wi-Fi signal[ 4 ] Flight parameter icon After clicking it, the interface will display the flight parameters: distance, altitude and speed, as shown in the figure below; after clicking it again, the flight info bar will be closed[ 5 ] Distance between quadcopter and home point Shows the horizontal distance between the quadcopter and the home point [ 6 ] Flight height of quadcopter Shows the vertical distance between the quadcopter and the home point [ 7 ] Zoom in button Click it once to zoom in once; maximum 4x zooming is supported[ 8 ] View angle indication W indicates wide (W) view angle is adopted[ 9 ] Video recording resolutionIn video recording mode: Indicates the video recording resolution is 1080/30fpsClick the triangle drop-down button to expand the available resolution optionsIn photo shooting mode: Indicates the photo shooting resolution is 12M pixelsClick the triangle drop-down button to expand the available resolution options[ 10 ] Remaining video recording time In video recording mode, this number indicates that the Micro-SD card allows another 2.5h of recording under the current camera settingsIn photo shooting mode, this number indicates that the Micro-SD card allows another quantity of photos to be taken under the current resolution setting[ 11 ] Number of video files / photo files savedNumber of video files saved: The number of files shown varies with different modes (video recording, photo shooting)In recording mode: indicates that 55 video files have been recorded by the cameraIn photo shooting mode: this number indicates 55 photos have been taken by the camera.[ 12 ] Playback button Click it to access the album interface [ 13 ] Current flight speed of quadcopter Shows in a real-time manner the current horizontal flight speed of the quadcopter[ 14 ] Return button Return to the previous level [ 15 ] Zoom out button Click it once to zoom out once; maximum 4x zooming is supported[ 16 ] Camera setting button Click it to access the camera setting interface; see the “Camera Settings” section for details[ 17 ] Camera function selection button Click the icon to expand the camera function options [ 18 ] Camera function operation button This button can be operated to achieve different functions in different shooting modes](https://usermanual.wiki/AEE-Technology/AEEAP11A001/User-Guide-2754840-Page-18.png)
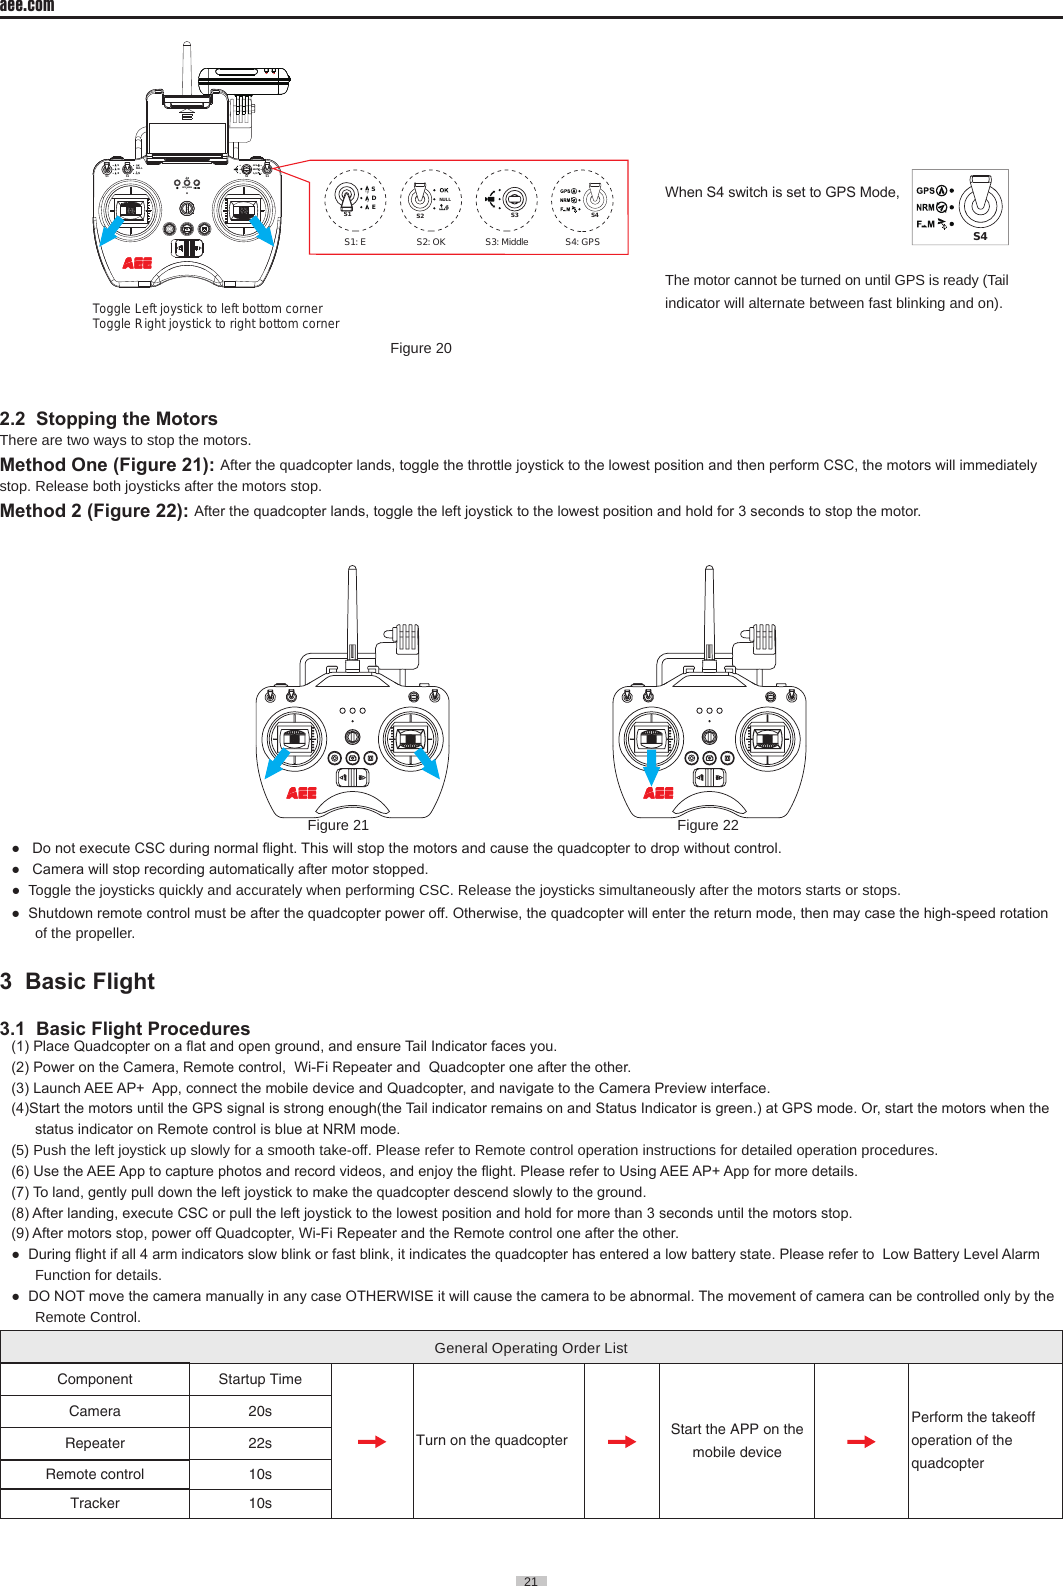
![aee.com20 FlightAfter installation, please conduct ight training (for example: Flight simulator training or professional training). Ensure that all ights are carried out in a suitable environment�Flight Environment Requirements(1) Do not use the quadcopter in severe weather conditions, such as strong winds (category 4 and above), snow, rain and fog. (2) Fly in an open area without tall buildings� Presence of large number of steel buildings in the area will affect the onboard compass�(3) Keep Quadcopter away from obstacles, people, power lines, trees, shelters, surface of the water, etc., during ight.(4) Reduce the chance of electromagnetic interference by not ying in areas with high levels of electromagnetism (such as near mobile phone base stations or towers)�(5) This product cannot be used in The Antarctic Circle and The Arctic Circle�(6) Do not y the quadcopter within restricted or no-y zones, and abide by local laws or regulations.Pre-ight Check:(1) Ensure Remote control, Quadcopter, Wi-Fi Repeater and mobile device are fully charged.(2) Ensure propellers are correctly assembled�(3) Ensure the Micro SD card is properly loaded before photo capture and video recording�(4) Ensure the Quadcopter, Remote control and other equipment are working properly after powering on.(5) Check if motors start properly after the quadcopter is switched on. At this time, disassembling propellers is recommended for safety.(6) Check if the AEE AP+ App is properly connected to the camera�1 Compass Calibration Compass calibration is required before rst time use otherwise the system may not work properly, affecting ight safety. The compass is sensitive to electromagnetic interference from other electronic devices, which can cause abnormal compass data leading to poor ight performance or even ight failure. Regular calibration is required for optimum performance�● Do not calibrate the compass in a strong magnetic eld. ● Do not carry ferromagnetic material, such as keys, cell phones, etc., while calibrating the compass.1.1 Calibration Procedures Choose an open space to conduct calibration� Start the Remote control and quadcopter and ensure they work properly� Follow the below procedures to calibrate the compass:1 2 3 4 5S4GPSNRMF MAfter the quadcopter powers on(about 20 seconds). Swich S4 for more than 5 times between GPS and Follow Me mode. The quadcopter will enter calibraion standby mode(the tail light blinks fast).Toggle the joysticks to the position as in the follow figure. Front indicator (green) starts blinking ,Then release the joysticks.Compass calibration command has been sent successfully.Rotate Quadcopter 360° horizontally (2 turns)Rotate Quadcopter 360° vertically2 turns (Nose down )Rotate Quadcopter vertically (Nose leftward)until green lights off, Put Quadcopter on the ground. Green lights up normally after light off→ calibration successful; Green lights blink fast after light off→calibration failed →Recalibrate Warning Be sure to remove propellers before calibration, to avoid accidental injury or loss.1.2 When to Recalibrate(1) When compass data is abnormal, front indicator (green) blinks fast.(2) The ight location is far from the place where last compass calibration was conducted. (3) There are changes in quadcopter’s physical structure�(4) The quadcopter drifts a lot while ying , such as it ies along a circle when hovering.2 Starting / Stopping the Motor 2.1 Starting the motor Toggle the joysticks as shown in the illustration (Combination joystick Command [CSC]) to start the motor� Release the joysticks simultaneously after the motors start, then the camera will start to record video automatically.](https://usermanual.wiki/AEE-Technology/AEEAP11A001/User-Guide-2754840-Page-19.png)