AGV S p A AGVOICE01 BlueTooth Communication System User Manual
AGV S.p.A. BlueTooth Communication System
User Manual
AGVOICE OWNER INSTRUCTIONS

Index
1 Introduction................................................................................................. Page 4
2 Intended use and preliminary information ................................................. Page 4
3 Safety information and warnings ................................................................ Page 5
4 Installing the system in a helmet ………………...…….....…………………Page 7
5 Battery charging .......................................................................................... Page 8
6 Network configurations ............................................................................... Page 9
6.1 Helmet-telephone configuration ....................................................... Page 10
6.2 Helmet (M)-helmet(S) configuration................................................ Page 10
6.3 Helmet(S)-helmet(M)-telephone configuration ............................... Page 11
6.4 Helmet(S)-GPS(M)-telephone configuration ................................... Page 11
7 Switching the system on and off ................................................................ Page 12
8 Pairing ....................................................................................................... Page 12
8.1 Pairing with an HFP (Hands-Free Profile) ........................................ Page 13
8.2 Pairing with an HSP (Headset Profile) .............................................. Page 13
8.3 Pairing helmets via intercom ............................................................ Page 14
8.4 Choice of language…………… ……………………………………Page 14
8.5 Resetting pairings ............................................................................. Page 15
9 Using an AGVoice-equipped helmet .......................................................... Page 15
9.1 Using a helmet with an HFP (Hands-Free Profile) device ................. Page 15
9.1.1 Pairing ........................................................................................ Page 15
9.1.2 Connection with an HFP (telephone or GPS) device ................... Page 15
9.1.3 Voice recognition........................................................................ Page 16
9.1.4 Incoming calls ............................................................................ Page 16
9.1.5 Outgoing calls ............................................................................. Page 16
9.1.6 Adjusting the volume .................................................................. Page 16
9.1.7 Ending a call ............................................................................... Page 16
9.2 Using a helmet with an HSP (Headset Profile) device ...................... Page 17
9.2.1 Pairing ........................................................................................ Page 17
9.2.2 Connecting to an HSP (telephone or GPS) device…......................Page17
9.2.3 Voice recognition........................................................................ Page 17
9.2.4 Incoming calls ............................................................................ Page 17
9.2.5 Outgoing calls ............................................................................. Page 18
9.2.6 Adjusting the volume .................................................................. Page 18

9.2.7 Ending a call ............................................................................... Page 18
9.3 Using the intercom ............................................................................ Page 18
9.3.1 Pairing ........................................................................................ Page 18
9.3.2 Activating the intercom ............................................................... Page 18
9.3.3 Deactivating the intercom ........................................................... Page 18
9.3.4 Managing a helmet(S)-helmet(M)-telephone connection ............. Page 19
10 Maintenance .............................................................................................. Page 19
Diagrams
Diagram 1. Helmet-telephone configuration page 10
Diagram 2. Helmet-helmet configuration page 10
Diagram 3. Helmet-helmet-telephone configuration page 11
Diagram 4. Helmet-GPS-telephone configuration page 12
List of Abbreviations
BT Bluetooth
GPS Global Positioning System
HSP Headset Profile
HFP Hands-Free Profile
M Master
S Slave
N Null

1. Introduction
This user manual does not offer any specific guarantees. AGV Spa reserves the right to
make changes due to printing errors, inaccuracies, information updates or software
and/or hardware updates at any time and without prior notice.
All changes will be published in future editions of this user manual.
All rights reserved.
The AGVoice communication system brand name, design and production are all the
property of AGV S.p.A.
BLUETOOTH brand names belong to BLUETOOTH SIG Inc.
The AGVoice system complies with all the technical requirements applicable to
products that are covered by the following European Union directives:
2006/95/EC, 2004/108/EC and 1999/5/EC.
ETSI EN 301 489-1 + ETSI EN 301 489-17
ETSI EN 300 328
EN 60950-1
EN 50 371
2. Intended use and preliminary information
The AGVoice system allows two helmets and/or a helmet and a mobile phone and/or
GPS unit to communicate with each other without the need for connecting cables,
provided that they are BLUETOOTH* enabled.
(Please note: BLUETOOTH is a system that allows you to transmit data across
relatively short distances without the need for cables, using a microchip that transmits
on a specific radio frequency. Many of the latest mobile phones are Bluetooth-enabled
and are therefore able to work with the AGVoice system, regardless of the telephone
network chosen).
AGV helmets that are equipped to use the AGVoice system look the same as normal
motorcycle helmets, but inside they are designed to hold an accessory kit with a
sophisticated BLUETOOTH intercom wireless device.
The entire system is contained inside the kit, including batteries that can be recharged
without removing them from the helmet, using the battery charger provided.
The AGVoice system has no external connection cables or plugs (except for the battery
charger plug).

3. Safety information and warnings
AGV motorcycle helmets equipped with the AGVoice system allow wearers to talk
on their mobile phones, to speak to their passengers or listen to GPS directions in
complete safety, leaving the driver’s hands free.
!!! WARNING: IN ANY CASE, OBSERVANCE OF THE HIGHWAY CODE
AND CONCENTRATION ON COMPLETING THE CORRECT
MANOEUVRES WHEN DRIVING A MOTORCYCLE MUST TAKE
ABSOLUTE PRECEDENCE OVER THE USE OF A HELMET EQUIPPED
WITH AN AGVoice SYSTEM.
DO NOT ADJUST THE AGVoice SYSTEM WHILE DRIVING –
CONCENTRATE ON THE ROAD.
!!! WARNING: ANY ADJUSTMENT TO A HELMET EQUIPPED WITH THE
AGVOICE SYSTEM (including, among other things:
- pairing;
- configuration;
- recharging;
- activating;
- deactivating;
- volume adjustment;
- answering a call;
- making a call;
- general use of an AGVoice-equipped helmet;
- etc.)
MUST BE DONE WHEN THE VEHICLE IS STATIONARY.
!!! WARNING: IF THE VOLUME IS TOO HIGH, IT CAN DISTRACT YOU
WHILE DRIVING AND CAN CAUSE DANGEROUS SITUATIONS OR
REDUCE YOUR ABILITY TO HEAR OUTSIDE NOISES. ADJUST THE
VOLUME IN SUCH A WAY THAT YOU CAN HEAR OUTSIDE NOISES AND,
IN ANY CASE, WHEN THE VEHICLE IS STATIONARY.
!!! WARNING: When a helmet equipped with the AGVoice system is connected to
any mobile phone or a motorcycle navigation system, please consult the user
manual for detailed safety information.
!!! WARNING: Do not dismantle, modify or tamper with a helmet equipped with
the AGVoice system and/or with the electronic unit inside; any tampering with the
helmet or with its electronic unit inside can be dangerous, and will also invalidate
the product warranty.
!!! WARNING: Do not wear an AGVoice-equipped helmet when recharging the
battery and do not leave the battery to charge for more than 12 hours.
!!! WARNING: When the helmet is not being used for long periods of time,
recharge the AGVoice kit’s batteries every three months.

!!! WARNING: Do not allow the inside of the helmet to get wet. Should you notice
anything unusual (for example smoke or smells), take off the AGVoice-equipped
helmet immediately, and should this occur while the battery is being recharged,
unplug the battery immediately.
!!! WARNING STATEMENT: Unauthorized repairs, changes or modification
could result in permanent damage to the equipment and void your warranty and
your authority to operate this device under Part 15 of the FCC Rules
****************
This guide describes the basic functions of the AGVoice device, which includes three
communication profiles based on the Bluetooth communications protocol:
HFP (Hands-Free Profile): for connecting to devices with a similar HFP
communication profile
- HSP (HeadSet Profile): for connecting to devices with a similar HSP communication
profile,
- InterCom Profile (ICP): for allowing communication between two AGVoice-equipped
helmets.
Using these profiles, the system can offer various working modes:
connection to a Bluetooth-enabled mobile phone;
connection to a Bluetooth-enabled GPS navigation system;
communication between two helmets using the intercom mode.
In this way, the AGVoice system is able to communicate with all mobile phones that
can support an HSP or HFP profile. How the device functions may vary depending
on a number of parameters that differ from one mobile phone brand to another, or
from one GPS navigation system to another.
We advise you to consult your mobile phone’s user manual, or that of your GPS
navigation system, to ascertain which of these profiles is installed and to check that it
works properly before purchasing.

4 Installing the system in a helmet
The AGVoice device is a BT communications kit that is designed to be fitted to the
inside of S-4 SV and Stealth SV AGV helmets only.
Do not install the AGVoice device in any other type of helmet.
To install the AGVoice kit inside one of these specifically designed helmets, follow
these instructions:
- Remove the chin strap in the middle of the chin guard, at the base of the helmet;
- Remove the helmet’s left and right cheek pads, unbuttoning the necessary press-
studs;
- Remove the plastic cap that covers the microphone housing in the centre of the chin
guard inside the helmet, which aligns with the front air inlet;
- Remove the polystyrene caps in the AGVoice kit’s housing, located near the edges
of the front chin guard;
- Place the AGVoice kit in the helmet, making sure to position the device’s ON
button in the lower left of the helmet;
- Secure the helmet’s fastening straps in the AGVoice kit’s specially designed
housings;
- Place the AGVoice kit’s edges in the specially created housings located in the
helmet’s shell after having removed the polystyrene caps, placing the device with
the ON button to the left;
- Press the AGVoice kit’s microphone into its housing located inside the helmet’s
chin guard;
- Re-insert the helmet’s left and right cheek pads, using the press-studs in the
housings provided inside the helmet’s shell;
- Re-insert the chin strap, pressing it into the lower part of the helmet’s chin guard.

5 Battery charging
(!!! IMPORTANT: always make sure you read chapter 3 – Safety
information and warnings)
Before using the AGVoice communications system, you need to charge the batteries
located inside the helmet.
The system will run for around 8 hours when the batteries are fully charged.
If the device is not used for long periods of time (over three months), you will need to
recharge the battery.
Turn the AGVoice system off when you recharge the batteries.
How to recharge the batteries
Plug in the battery charger provided with the AGVoice kit to the mains.
The battery charger works with a voltage of between 100 V up to a maximum of 240 V.
Plug in the battery charger to the appropriate plug in the lower part of the helmet. A
blue LED display on the battery charger’s plug will light up to indicate that the batteries
are charging. The blue light will switch off once the batteries are fully charged.
Charge the batteries completely before using the AGVoice system for the first time.
In future you can also charge the batteries for shorter times, though it is always best to
charge the batteries completely when possible: a partial recharge will not guarantee a
full running time.
(Recharging a flat battery can take up to six hours).
IMPORTANT: only use the battery charger provided. Do not charge the batteries
using other devices. The battery has all the safety systems it requires.

6 Network configurations (!!! IMPORTANT: always make sure you
read chapter 3 – Safety information and warnings)
PLEASE NOTE: NOT ALL BLUETOOTH-ENABLED TELEPHONES AND/OR GPS
NAVIGATION SYSTEMS ARE EQUALLY COMPATIBLE WITH THE AGVoice
SYSTEM.
BEFORE BUYING AN AGVoice KIT, ASK YOUR RETAILER IF THE
TELEPHONE OR GPS SYSTEM YOU WISH TO PAIR IT WITH IS COMPATIBLE.
Below is a list of Bluetooth network options that can be used with the AGVoice system.
Bluetooth devices that are connected to the network configurations are the following:
Driver’s helmet;
Passenger’s helmet;
Driver’s telephone;
Passenger’s telephone;
Motorcycle GPS navigation system.
Owing to the characteristics of these Bluetooth devices, a few basic Bluetooth network
configurations have been developed. Below is a brief description of each, though the
performance of each – as mentioned earlier – may vary according to some parameters
that differ from one mobile phone or motorcycle GPS navigation system to another,
according to how the manufacturers apply the Bluetooth protocol to their products.
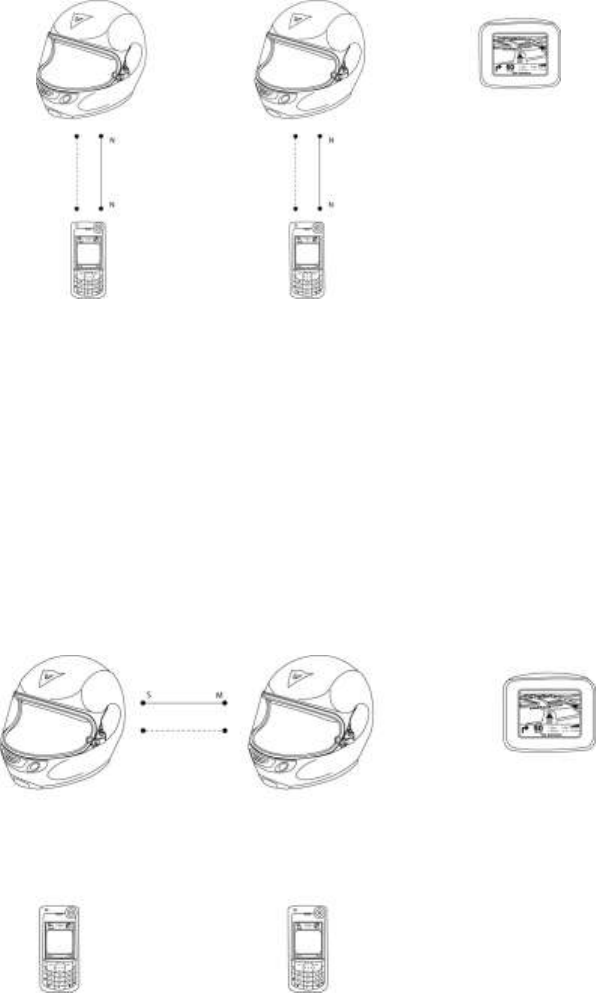
6.1 Helmet-telephone configuration
Using this configuration, the driver’s and passenger’s helmets are each connected to
their own mobile phones. The helmets can work both in HSP and in HFP modes,
irrespective of the kind of telephone that has been paired, but not with the intercom.
Both helmets can make and receive calls.
Diagram 1. Helmet-telephone configuration.
In the diagrams, the continuous line represents the Bluetooth data connection that links
two BT devices, and the dotted line represents the Bluetooth audio link.
6.2 Helmet (Master)-helmet (Slave) configuration
Using this configuration, the driver’s helmet is ONLY connected to the passenger’s
helmet using the intercom mode.
Diagram 2. Helmet-helmet configuration.
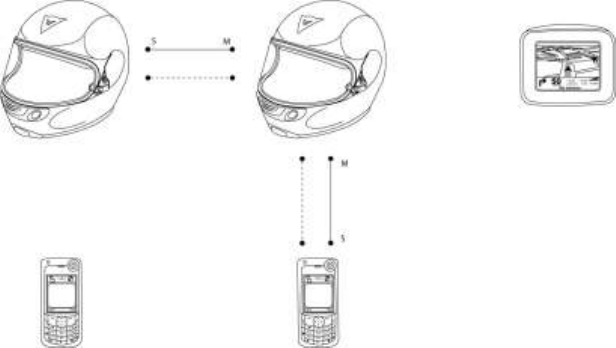
6.3 Helmet (Slave)-helmet (Master)-telephone configuration
Using this configuration, the driver’s helmet is connected to BOTH a paired mobile
phone and the passenger’s helmet. The driver’s helmet can work both in HSP and in
HFP mode and using the intercom, while the passenger’s helmet ONLY communicates
using the intercom.
Only the driver’s helmet can make or receive calls.
Diagram 3. Helmet-helmet-telephone configuration.
When using this configuration, some mobile phones require an exclusive voice
connection that cannot be shared with the intercom-mode S helmet. In such cases, it is
necessary to disconnect the telephone before switching to intercom mode, and so using
the network configuration described in paragraph 0.
6.4 Helmet (Slave)-GPS(Master)-telephone configuration
Using this configuration, the driver’s helmet is connected to the GPS navigation system,
while the passenger’s helmet is connected to a mobile phone. Both helmets can work in
HSP and in HFP mode, but not with the intercom. If the GPS system is Audio Gateway
enabled (as in the case of the Tom Tom Rider), the driver’s helmet can make and
receive calls, or the driver can choose to communicate exclusively with the GPS
navigation system. The passenger’s helmet can only make and receive calls.
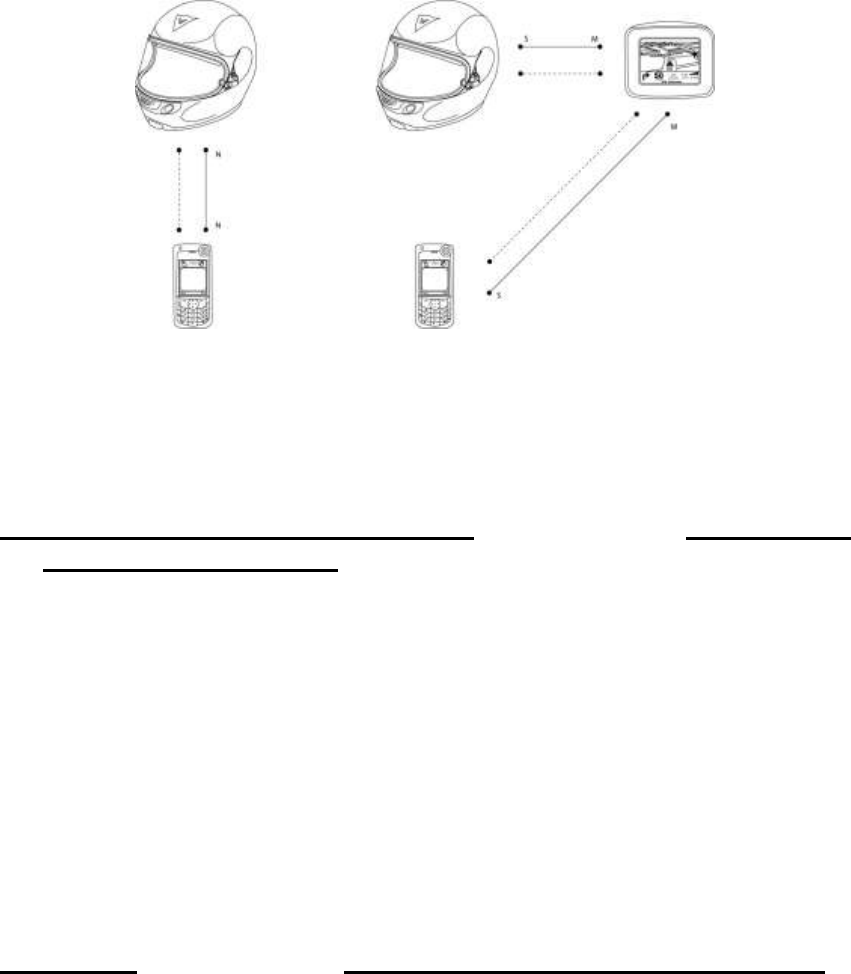
Diagram 4. Helmet-GPS-telephone configuration.
7 Switching the system on and off (!!! IMPORTANT: always make
sure you read chapter 3 – Safety information and warnings)
In order to activate the AGVoice kit in your helmet, press the button at the bottom of the
helmet’s shell for around three seconds, until you hear the message ‘AGVoice On’ and
let go. If no pairing has been saved, the device will immediately shut off after having
been switched on.
To switch off the system, press the button for around 10 seconds, until you hear the
message ‘AGVoice Off’ and then let go of the button.
8 Pairing (!!! IMPORTANT: always make sure you read chapter 3 –
Safety information and warnings)
In order for two Bluetooth-enabled devices to communicate with each other, they need
to be paired, i.e. they need to be ‘introduced’ to each other.
Below you will find instructions on how to do this, depending on the profile used by the
device you wish to connect the helmet to using the AGVoice kit.
In order to check the Bluetooth profile applicable (Headset or Hands-Free),
carefully read through the user manual of the mobile phone you wish to pair.

Switch off and then switch back on both the helmet and the phone (or the GPS
navigation system) after having completed the pairing procedure.
8.1 Pairing with an HFP (Hands-Free Profile)
Switch on the system by keeping the button pressed down and, without letting
go, wait until you hear the first message ‘HANDS-FREE PAIRING’ and then
immediately let go of the button.
Now the device can be searched for by a telephone (or another device) with a
Hands-free Bluetooth protocol. Once the phone finds the device, it can be
connected by typing the PIN code ‘1234’ in the phone or other device.
Connect the phone (or the HFP device) to the AGVoice kit by typing in the PIN
code ‘1234’, as mentioned above.
The two devices are now paired and the AGVoice kit can be used in a hands-free
network configuration.
Switch off and then switch back on both the helmet and the phone (or the GPS
navigation system) after you have completed the pairing procedure.
8.2 Pairing with an HSP (Headset Profile)
Switch on the system by pressing the button and, without letting go, wait until
you here the second message ‘HEADSET PAIRING’ and immediately let go of
the button.
The device can now be searched for by a telephone (or another device) with a
Head-Set type Bluetooth communications protocol. When it has found it, they
can be connected by typing in the PIN code ‘1234’.
Connect the telephone (or the HSP device) to the AGVoice kit by typing in the
PIN code ‘1234’, as mentioned above.
The two devices are now paired and the HBT card can be used in a headset network
configuration.
Switch off and then switch back on both the helmet and the telephone once you
have completed the pairing procedure.
8.3 Pairing helmets via intercom
You must first decide which helmet will be the Master (M) of communications
and which will be the slave (S). The M helmet, as seen in paragraph 6.3, can be
connected to the intercom and a telephone at the same time, while the S helmet
can only be connected to the M helmet via intercom. Furthermore, the M helmet
differs from the S helmet in that it is the only one able to activate the intercom
connection with a passenger by pressing the button.
Switch the helmet on (using the AGVoice kit) that you have chosen as the
MASTER by pressing on the button and, without letting go, wait for the third
message ‘INTERCOM MASTER PAIRING’ and then immediately let go of the
button.
Switch the helmet on (using the AGVoice kit) that you have chosen to be the
SLAVE by pressing on the button and, without letting go, wait for the fourth
message ‘INTERCOM SLAVE PAIRING’ and then immediately let go of the
button.
Pairing may take a few seconds and both helmets will hear a beep when the
pairing is confirmed.
8.4 Choice of language
Switch the helmet on (using the AGVoice kit) by keeping the button pressed
down and, without letting go, wait until you hear the fifth message ‘SELECT
LANGUAGE’ and immediately let go of the button.
o Push the button and release when you see your preferred language
among the five options, which appear in order:
o ‘ITALIANO’
o ‘ENGLISH’
o ‘FRANÇAIS’
o ‘DEUTSCH’
o ‘ESPAÑOL’
Once you have chosen your language, the AGVoice system will
automatically turn itself off.

The next time the AGVoice kit is switched on, it will start up in your
chosen language.
8.5 Resetting pairings
Switch the helmet on (using the AGVoice kit) by keeping the button pressed
down and, without letting go, wait until you hear the sixth message ‘RESET
PAIRINGS’ and immediately let go of the button.
All previously created pairings on the AGVoice kit will be cancelled.
9 Using an AGVoice-equipped helmet (!!! IMPORTANT: always make
sure you read chapter 3 – Safety information and warnings)
9.1 Using a helmet with an HFP device (Telephone, GPS, etc)
9.1.1. Pairing
Using the AGVoice kit, pair the helmet with an HFP device as described in paragraph
8.1.
After the pairing procedure is completed, it is advisable to restart the system so as
to activate the new configuration. Some models of mobile phone also need to be
switched off and back on after pairing.
9.1.2 Using the AGVoice kit to pair the helmet to an HFP
device (telephone or GPS navigation system)
After have completed the pairing procedure as described above, you will be
automatically connected to the HFP device.
Should the AGVoice kit be turned off to connect to the telephone or GPS navigation
system or the last device connected, it will be necessary to first switch on the device as
explained previously and then keep the button pressed down until you hear the message
‘CONNECT BLUETOOTH DEVICE’.
In order to ensure that the device works properly, it is advisable to always start the
Bluetooth connection from the AGVoice kit.
9.1.3 Voice recognition
When the AGVoice kit is connected to a telephone in HFP mode, you can activate the
voice recognition function by pressing on the button. When this is switched on, you can
make voice calls when this function is activated on the connected telephone. By
pressing on the button again, you can exit from the voice recognition function.
9.1.4 Incoming calls
To receive a phone call, which you will be notified of with beeps or with the HFP
device’s ring tone, you need only briefly press the button. Pressing on the button for
about 2 seconds allows you to decline the call.
9.1.5 Outgoing calls
In order to make a call, you can enter into the voice recognition mode as described
above and make a voice call or make a call from your mobile phone or from your GPS
navigation system.
9.1.6 Adjusting the volume
By pressing down slightly on the button you can adjust the volume (there are four
volume levels to choose from). A voice signal will indicate the volume level chosen
(volume 1, volume 2, volume 3 and volume 4).
9.1.7 Ending a call
By pressing down on the button for around two seconds, you can end the current call.
NB : So as to achieve the best audio quality possible, it is important to keep your visor
lowered.
9.2 Using a helmet with an HSP (Headset Profile) device
9.2.1 Pairing
Pair the HBT card with an HSP device following the instructions in paragraph 8.2.
After the pairing procedure is completed, it is advisable to restart the system to
activate the new configuration. Some models of mobile phone will need switching
off and then back on after pairing.
9.2.2. Connecting to an HSP (telephone or GPS) device
The AGVoice kit and HSP telephones will connect automatically only when the
Bluetooth link is required (when there is an incoming call, the telephone will
automatically connect to the helmet).
A first connection with the device can be made in the same way as when using an HFP
connection, by pressing on the button until you hear the message ‘CONNECT
BLUETOOTH DEVICE’.
Where using a mobile device that requires a preliminary connection, it is advisable
to start the connection from the helmet using the AGVoice kit to ensure that the
device works properly.
9.2.3 Voice recognition
By pressing on the button for around 2 seconds, which will end with a beep, you will
activate the voice recognition function in order to make voice calls, if this function has
been activated on a phone paired with the AGVoice kit. To exit the voice recognition
function, simply press on the button again.
9.2.4 Incoming calls
In order to receive a call, which will be notified with beeps heard in the helmet or with
the telephone’s own ring tone, press the button for around 2 seconds. The call can be
declined only by NOT pressing the answer button.
9.2.5 Outgoing calls
To make a call, you can either go into voice recognition mode, if available, and make a
voice call, or you can make the call from your mobile phone or from your GPS
navigation system.
9.2.6 Adjusting the volume
A slight pressure on the button allows you to adjust the volume (there are 4 volume
levels available). You will hear a message indicating the level you have chosen (volume
1, volume 2, volume 3 and volume 4).
9.2.7 Ending a call
You can end the current phone call by pressing on the button for around 2 seconds.
9.3 Using the intercom
9.3.1 Pairing
Pair the two AGVoice kit-equipped helmets following the instructions in paragraph 8.3.
9.3.2 Activating the intercom
If both helmets are equipped with the AGVoice system, then it is possible to activate the
intercom connection at any time by pressing the button on the M(aster) helmet for
around 4 seconds until you hear the message ‘CONNECT INTERCOM’, as long as you
are near the paired helmet (maximum distance: 10 metres). The connection between the
two helmets will be notified with a beep in both helmets.
9.3.3 Deactivating the intercom
To end the intercom connection, you will need to press the button for around 4 seconds
until you hear the message ‘DISCONNECT INTERCOM’. This can be done from both
the M(aster) helmet and the S(lave) helmet.

9.3.4 Managing a helmet (S)-helmet (M)-telephone network
Should you wish to use the network shown in Diagram 3 (where the master helmet is
connected with both a phone and the passenger’s helmet by intercom), the telephone
will always take precedence over the intercom connection. Therefore, should the
telephone be in use (receiving or making a call or simply while pressing its keypad) this
will interrupt the intercom connection. For this reason, it is advisable to lock the keypad
while using the intercom if you are using a phone that does not have a cover.
NB : Automatic ICP reconnection
Every time an intercom connection is interrupted by a phone call or by pressing the keys
on the telephone’s keypad, the system will endeavour to re-establish the intercom
connection after around 10 seconds (which usually will only succeed if the helmets are
still near each other). Nevertheless, it is also possible to re-establish the intercom
connection manually as described above (by pressing the button on the M(aster) helmet
for around 4 seconds until you hear the message ‘CONNECT INTERCOM’).
10. MAINTENANCE (!!! IMPORTANT: always make sure you
read chapter 3 – Safety information and warnings)
1
In case of anomalies or malfunctioning, always talk to your AGVoice retailer.
Technical assistance on this product can only be carried out by qualified
personnel.
Only use the batteries and battery charger recommended by AGV for this device;
ask your retailer what is available.
When unplugging the system, grab and pull the plug, not the cable.