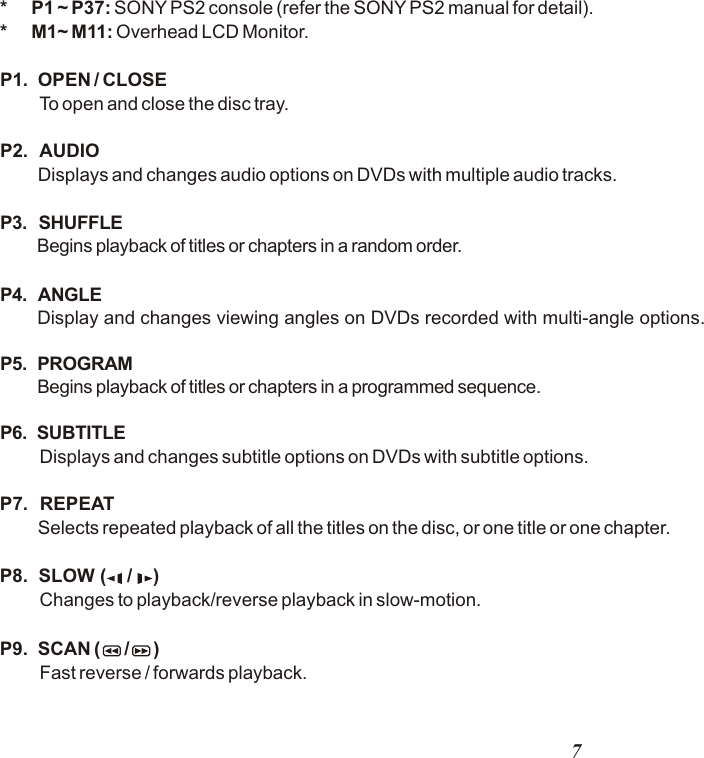
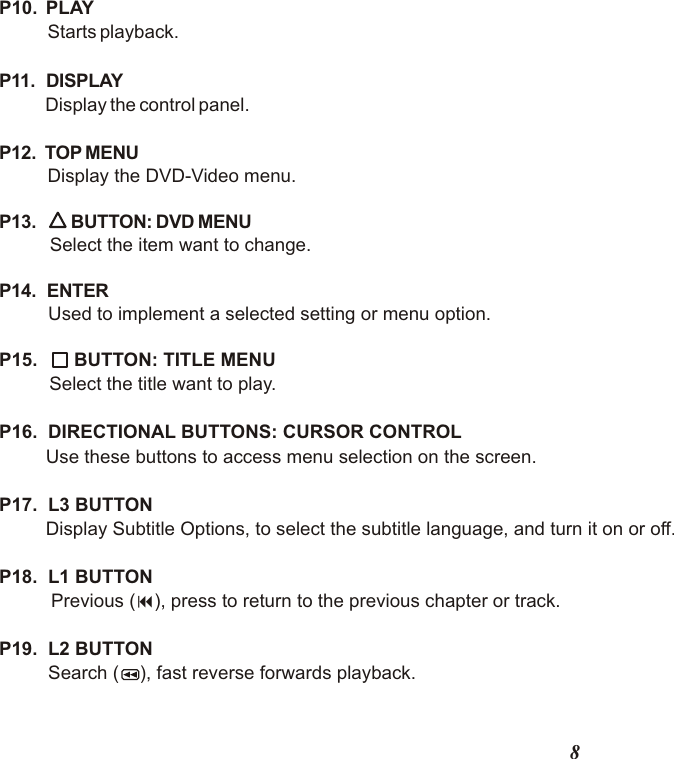
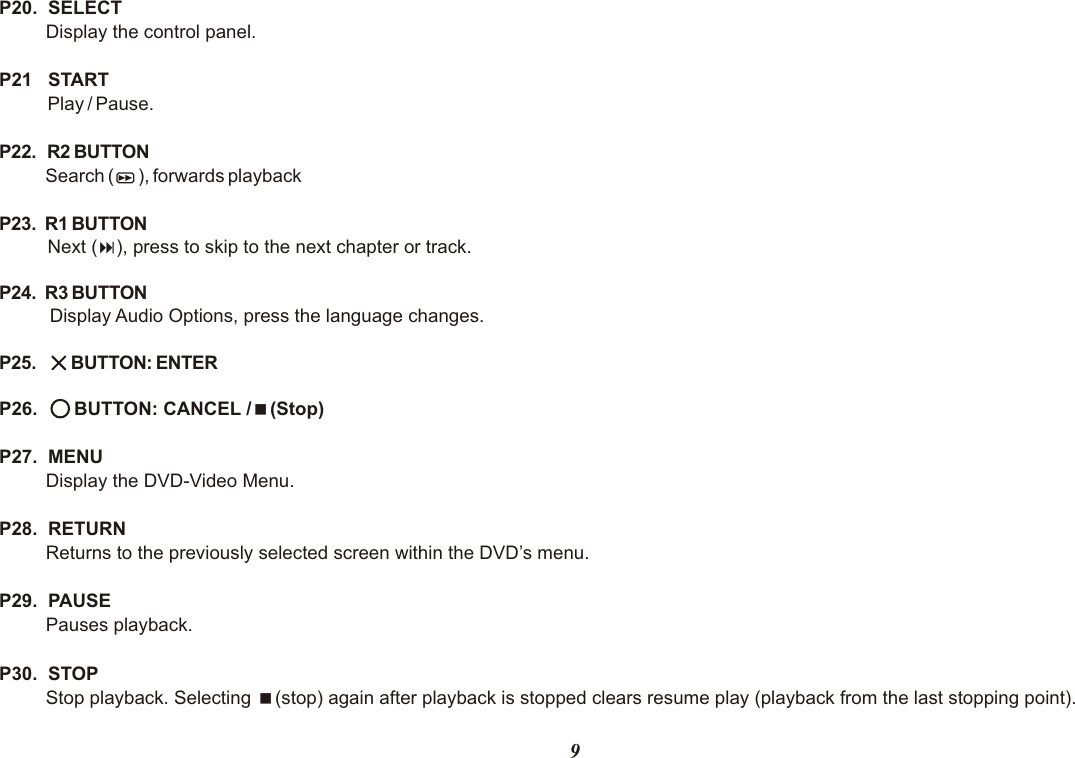
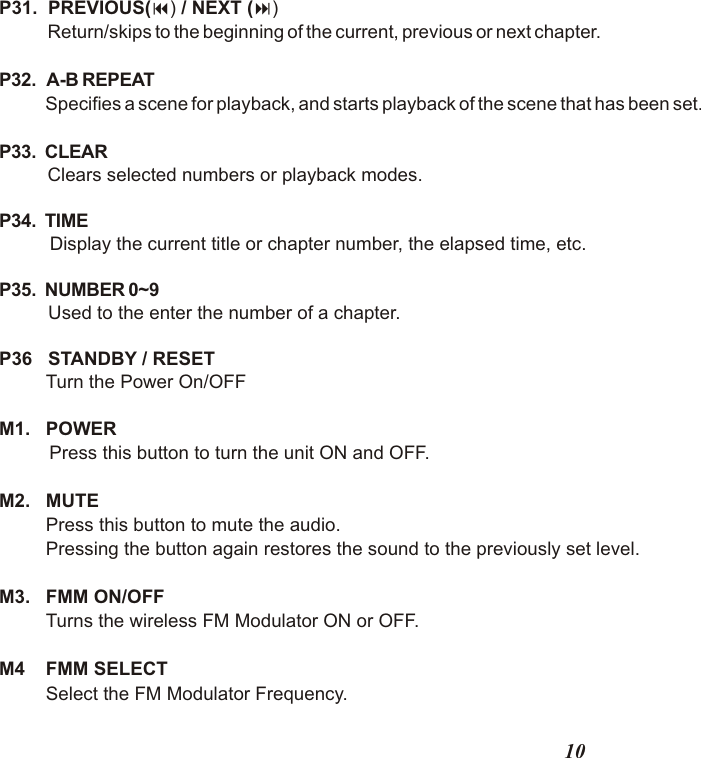
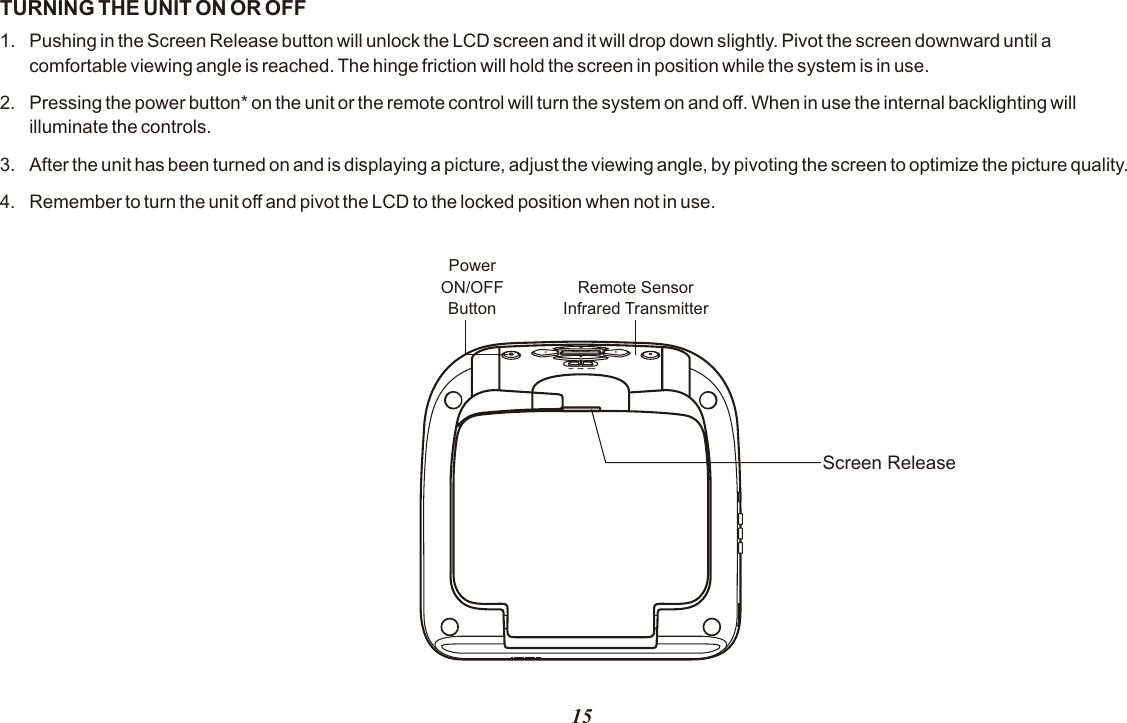
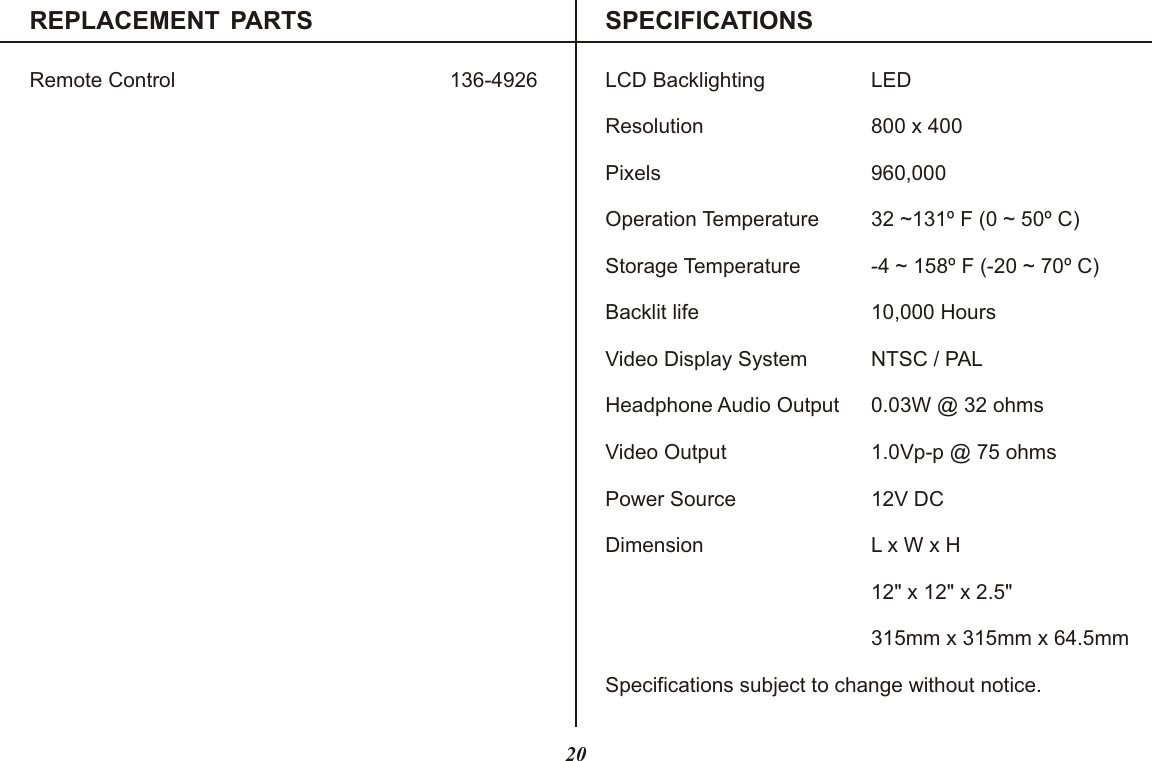
Action Electronics 9R3VOD10PS2 10.2" DIGITAL AUDIO VIDEO PLAYER User Manual 91 N7 10010G ADV10PS2 IB Rev0

Action Electronics Co.,Ltd. 10.2" DIGITAL AUDIO VIDEO PLAYER 91 N7 10010G ADV10PS2 IB Rev0

User manual

OPERATIONMANUALADV10PS210.2"  OVERHEAD LCDMONITOR WITHSONY PS2 PLAYER128-8669RMENU / ENTER
Important NoticeInstallation of overhead products requires careful planning and preparation.  Be extremely careful when working on a vehicle with side curtain air bags.  Do not route wires near any portion of the side curtain air bag assemblies.  This includes any anchor points in A, B, C or D pillars of the vehicle.  Routing wires in these areas or running wires by the side curtain air bags can prevent the side curtain air bag from fully deploying which can result in personal injury to vehicle occupants.  If you have any questions regarding wire routing in a vehicle, please contact Audiovox Technical Support at 1-800-225-6074.When connecting power and ground in a mobile video installation ensure that the ACC wire is fused at the point where it is connected to the vehicle ACC wiring.  Failure to do so can result in damage to the vehicle if a short circuit develops between the vehicle connection point and the mobile video product.An LCD panel and/or video monitor may be installed in a motor vehicle and visible to the driver if the LCD panel or video monitor is used for vehicle information, system control, rear or side observation or navigation. If the LCD panel or video monitor is used for television reception, video or DVD play, the LCD panel or video monitor must be installed so that these features will only function when the vehicle is in “park” or when the vehicle's parking brake is applied. An LCD panel or video monitor used for television reception, video or DVD play that operates when the vehicle is in gear or when the parking brake is not applied must be installed to the rear of the driver's seat where it will not be visible, directly or indirectly, to the operator of the motor vehicle.Licensed under one or more of the following patents,Patent NOS.   5,775,762  and  5,927,784Warnings•Do not use any solvents or cleaning materials when cleaning the video monitor.•Do not use any abrasive cleaners, they may scratch the screen.•Use only a lightly dampened lint free cloth to wipe the screen if it is dirty.•Lock the LCD screen in the fully closed position when not in use.•Before putting on headphones always adjust the volume setting to the lowest position.•Remember to leave the dome light switch in the off or auto positions when the vehicle is unattended, as the dome lights, if left on, can drainthe vehicle's battery.•Do not put pressure on the screen.•Caution children to avoid touching or scratching the screen, as it may become dirty or damaged.
3FEATURESCongratulationsCongratulations  on  your  purchase  of  the  ADVENT ADV10PS2  Player  with  Drop-Down  Video  /  Monitor.  The ADV10PS2 has been designed to give you and your family many  years  of  video  entertainment  in  the  mobile environment.  Please  read  the  directions  that  follow  to familiarize yourself with the product to ensure that you obtain the best results from your equipment.Please  note:  Installation  options  vary,  see  the  individual owner's  manuals  for  each  component  in  your  system  to obtain a full understanding of each component's operation.Safety PrecautionFor  safety  reasons,  when  changing  video  media  it  is recommended that the vehicle is not in motion, and that you do not allow children to unfasten seat-belts to change video media  or  make  any  adjustments  to  the  system.  System adjustments can be accomplished using the remote control, while  seat-belts  remain  fastened.  Enjoy  your  ADVENT entertainment  system  but  remember  the  safety  of  all passengers remains the number one priority.• 10.2” TFT (Thin Film Transistor) Active Matrix LCD (Liquid Crystal Display) Monitor•Built-in SONY PS2 Player• OSD (On Screen Display) for Control of Picture Quality and Functions••Four Audio/Video Source Inputs (AV1, AUX, PS2).• Dome Lights with 3-Position Switch.•Built-in 16 Channel Frequency Wireless FM Modulator.•• SONY PS2 ••••Playing DVD, CD and SONY PS2 Games. Single Channel Infrared Transmitter for IR Wireless HeadphonesAV Output Via RCA PigtailScreen Mode Selection (4:3, 16:9)Wireless Game ControllerFull Function Remote ControlBacklit Controls
4CONTROLS AND  INDICATORS  DIAGRAM    (FRONT  VIEW)1. SOURCE Button (S)Use to select the sources: AV1, AUX and PS2.2.   CURSOR Button (pqtu)      Use these buttons to access menu selections on the screen.3. MENU/ENTER Button      Use these buttons to access SYSTEM MENU.4. Infrared Transmitter and SensorTransmits  audio  to  wireless  headphones,  allows  the  remote control to operate the unit and to control other accessories in the system.5. POWER Button (    )Used to turn the system on/off (standby).6. Dome LightsProvide additional interior illumination.7. Three Position Dome Light SwitchON - Turns on the dome lights.OFF - The dome lights will not turn on in this position.AUTO - Automatically switches on the dome lights in              Conjunction with the vehicle's interior illumination.8. PS2 CONSOLE9. MEMORY CARD SLOT 1 & MEMORY CARD 210. PS2 WIRELESS FORCE 2 CONTROLLERMEM ORY CARD MEM ORY CARD RESE T  I / MENU / ENTERFORCE LINK12345678121191013151614FORCE LINK
511. LCD Panel12. Screen ReleasePress to release the screen.13. LCD Cut Off SwitchUsed to turn off the LCD backlit when the LCD is in the closed position.14.  OPEN       Push to open the PS2 tray. 15. OPEN ()The disc tray opens.16. RESET (      )      ON/Standby and RESET indicator.CONTROL  FUNCTION  DESCRIPTION (SIDE  VIEW)1. HEADPHONE JACKThe jack is applicable for wired headphone with a 1/8” (3.5mm) plug to listen audio output.2. Auxiliary Audio Right Input3. Auxiliary Audio Left Input4. Auxiliary Video Input VIDEOAUDIO LR1 2 3 4
6MAIN  FUNCTION  OPERATION REMOTE  CONTROL  OPERATION Battery InstallationBefore  attempting  to  operate  your  Remote  Control,  install  the batteries as described below.1) Turn the Remote Control face down. Using your finger, slidethe battery cover off in the direction of the arrow.2) Install  Two  “AAA”  batteries.  Make  sure  that  proper  polarity(+ or -) is observed.3) Align the cover tabs with the remote control and slide thecover until it locks.The remote control will operate the unit. It is not a universal remote control  and  will  not  c o ntrol  e q uipment  from  other  manufacturers.Back ViewBattery CoverOPEN/CLOSEAUDIO SHUFFLE14253678 9ANGLE PROGRAMSUBTITLE REPEATCLEARSLOWSCAN PREV NEXT A-BRESETDISPLAY TOP MENU MENU RETURNPAUSE STOPPLAYENTERSTARTSELECTR1L1 L3 R3L2 R2ENTERSOURCEMUTE DISPLAYFMM ON/OFFFMM SELECT SYSTEMMENUIR ON/OFFPIXVOLUME0TIMEDVD /PLAYSTATIONP1P2P3P4P5P6P8P9P7P10P11P12P13P15P14P16P17P18P19P20M1M2M3M4M5M6P37M7M8M9M10M11P22P23P25P24P26P27P28P29P30P31P32P33P34P35P36
7*     P1 ~ P37: SONY PS2 console (refer the SONY PS2 manual for detail).*     M1~ M11: Overhead LCD Monitor.P1.  OPEN / CLOSE         To open and close the disc tray.P2.  AUDIO   Displays and changes audio options on DVDs with multiple audio tracks.P3.  SHUFFLE Begins playback of titles or chapters in a random order.P4.  ANGLE   Display and changes viewing angles on DVDs recorded with multi-angle options.P5.  PROGRAM Begins playback of titles or chapters in a programmed sequence.P6.  SUBTITLE        Displays and changes subtitle options on DVDs with subtitle options.P7.  REPEAT   Selects repeated playback of all the titles on the disc, or one title or one chapter.P8.  SLOW (    /    )         Changes to playback/reverse playback in slow-motion.P9.  SCAN (     /     )        Fast reverse / forwards playback.
8P10.  PLAY    Starts playback.P11.   DISPLAYDisplay the control panel.P12.  TOP MENU  Display the DVD-Video menu.P13. BUTTON: DVD MENU   Select the item want to change.P14.  ENTER   Used to implement a selected setting or menu option.P15. BUTTON: TITLE MENUSelect the title want to play.P16.  DIRECTIONAL BUTTONS: CURSOR CONTROLUse these buttons to access menu selection on the screen.P17.  L3 BUTTON         Display Subtitle Options, to select the subtitle language, and turn it on or off.P18.  L1 BUTTON       Previous (9), press to return to the previous chapter or track. P19.  L2 BUTTON    Search (    ), fast reverse forwards playback.
9P20.  SELECT         Display the control panel.P21   START    Play / Pause.P22.   R2 BUTTONSearch (     ), forwards playbackP23.  R1 BUTTONNext (:), press to skip to the next chapter or track. P24.  R3 BUTTON   Display Audio Options, press the language changes.P25.       BUTTON: ENTER  P26.       BUTTON: CANCEL /<(Stop)P27.  MENU         Display the DVD-Video Menu.P28.  RETURN         Returns to the previously selected screen within the DVD’s menu.P29.  PAUSE         Pauses playback.P30.  STOP         Stop playback. Selecting <(stop) again after playback is stopped clears resume play (playback from the last stopping point).
P31.  PREVIOUS(9) / NEXT (:)     Return/skips to the beginning of the current, previous or next chapter.P32.   A-B REPEAT Specifies a scene for playback, and starts playback of the scene that has been set.P33.  CLEAR  Clears selected numbers or playback modes.P34.  TIME   Display the current title or chapter number, the elapsed time, etc.P35.  NUMBER 0~9   Used to the enter the number of a chapter.P36   STANDBY / RESET         Turn the Power On/OFFM1.   POWER    Press this button to turn the unit ON and OFF.M2.   MUTE         Press this button to mute the audio.         Pressing the button again restores the sound to the previously set level.M3.   FMM ON/OFF          Turns the wireless FM Modulator ON or OFF.M4    FMM SELECT         Select the FM Modulator Frequency. 10
M5.   SYSTEM MENU         Allows the user to access the main menu.M6.   IR ON/OFF    Turn Infrared Transmitter power ON/OFF for IR Wireless Headphone.M7.    CURSOR BUTTON (pqtu)Use these buttons to access menu selections on the screen.M8.    ENTER  Used to implement a selected setting or menu option.M9.    VOLUME  ( – PIX  + )M10.  SOURCE   Each time the button is pressed, the audio/video source will change: AV1, AUX, PS2.M11.  DISPLAY    Press to display current information.        Each time this button is pressed, the OSD will display  the “adjustment bars” for BRIGHTNESS, CONTRAST, COLOR or TINT.    Once the desired adjustment bar is displayed, use the ("+" / "–") buttons to adjust the setting.  The display will automatically     turn off if no adjustments are made after 6 seconds, or if any other button is pressed.  11
SYSTEM  MENU ADJUSTMENTThe System Menu Contains features and options that let you customize your system to change the screen mode display, OSD language and source default.1) Press the MENU/ENTER button on unit  to enter System Menu, the main page of the system  menu will appear on screen.2) Use the cursor buttons p or q to select the desired item in the main page and press the MENU/ENTER button to select.3) The sub menu will appear on screen.4) Use the cursor buttons p or q to select an item in the sub menu and then press the MENU/ENTER button to select.5)    6) Press and hold the MENU/ENTER button to exit System Menu.Note: System Menu can be controlled via unit and remote control. (Items selected in the menu will have a green background)PICTURE CONTROL SELECTWhen watching program, the picture quality can be adjusted to suit satisfactory.1)  Each time this button is pressed, the on screen picture adjustment displays the “adjustment” for BRIGHTNESS, CONTRAST,     COLOR, TINT (for NTSC only) or RESET.2)  Once the desired adjustment bar is displayed, use the Volume(+)/Volume(-)button to adjust the setting. The display will automatically     turn off if no adjustment are made within 6 seconds, or is any other button is pressed.3)  Press the qbutton four time to select RESET, then press either Volume(-)or the Volume(+)button on the remote or the main unit and     all of the picture settings (BRIGHTNESS, CONTRAST, COLOR and TINT)will return to the factory setting.Use the cursor buttons t or u to adjust picture control and press the MENU/ENTER button to confirm setting. 12BRIGHTNESSCONTRASTCOLORTINTRESETSYSTEM MENUSCREEN MODEOSD LANGUAGESOURCE DEFAULT PS2PICTURE CONTROLFMM PICTURE CONTROL CONTRAST16
FMM SELECTFMM ON/OFF options - Turns the wireless FM Modulator on or off.FMM SELECT option - Selects the wireless FM Modulator Frequency (CH1  88.1MHz, CH2  88.3MHz, CH3  88.5MHz, CH4  88.7MHz, CH5  88.9MHz, CH6  89.1MHz, CH7  89.3MHz, CH8  89.5MHz, CH9  89.7MHz, CH10  89.9MHz, CH11  90.1MHz, CH12  90.3MHz, CH13  90.5MHz, CH14  90.7MHz, Ch15  90.9MHz, CH16  91.1MHz)OSD LANGUAGEThis allows the user to select the language for the on-screen display. The user can either select English, Spanish, French, German for the OSD language.13OSD LANGUAGEENGLISHSPANISHFRENCHGERMANSYSTEM MENUOSD LANGUAGESOURCE DEFAULT PS2SCREEN MODEPICTURE CONTROLFMM FMM ONFMM OFFFMM SELECTSYSTEM MENUOSD LANGUAGESOURCE DEFAULT PS2SCREEN MODEPICTURE CONTROLFMM FMM
SOURCE DEFAULT PS2This allows the user to set the system default source to PS2 (via System Menu).Note:•  If selected default source is set to PS2 every time the unit’s power is cycled with the source set to something other then PS2, the unit will power up and automatically switch the source over to PS2.•  Unit will be set to Last Memory on as the default mode of operation.•  Selection of Source default can only be made from within the system menu.SCREEN MODE SELECTThis allows the user to change the screen format (aspect ratio 4:3, 16:9). To select the screen aspect ratio format highlight SCREEN MODE and press MENU/ENTER button to enter the submenu. Then press theCursor button p or q to select from 4:3 or 16:9. Press MENU/ENTER button to confirm the setting.SOURCE DEFAULT PS2ONOFFSYSTEM MENUOSD LANGUAGESOURCE DEFAULT PS2SCREEN MODEPICTURE CONTROLFMM SYSTEM MENUOSD LANGUAGESOURCE DEFAULT PS2SCREEN MODEPICTURE CONTROLFMM 4:316:914SCREEN MODE
TURNING THE UNIT ON OR OFF1. Pushing in the Screen Release button will unlock the LCD screen and it will drop down slightly. Pivot the screen downward until a comfortable viewing angle is reached. The hinge friction will hold the screen in position while the system is in use.2. Pressing the power button* on the unit or the remote control will turn the system on and off. When in use the internal backlighting will illuminate the controls.3. After the unit has been turned on and is displaying a picture, adjust the viewing angle, by pivoting the screen to optimize the picture quality. 4. Remember to turn the unit off and pivot the LCD to the locked position when not in use.Remote SensorInfrared TransmitterPowerON/OFFButtonScreen Release15MENU / ENTER
OVERHEAD  DOME  LIGHTSThe Dome Lights integrated into the unit are controlled by a three position slide switch. Sliding the switch to the ON position will turnthe lights ON. The OFF position will prevent the lights from turning ON with the vehicle's interior lighting, and the auto position will allow thelights to turn ON and OFF with the vehicle's interior lighting. Refer to the Installation Guide for wire connections. Do not leave the vehicle unattended with the dome light switch in the ON position, as this could result in a discharged battery. ACCESSORIES WIRELESS HEADPHONESWIRED HEADPHONES (OPTIONAL) The unit includes a built-in infrared transmitter for use with the supplied wireless headphones. The headphone volume is adjusted using the controls on each headset. Any number of wireless headphones may be used but they must be used within a line of sight from the transmitter, as infrared transmissions, like visible light travel only in a straight line. See the documentation accompanying your wireless headphones.There is one 1/8” headphone jack on the unit that can be used with any standard wired stereo headphones with a 1/8” plug. This jack is controlled by the volume up/down buttons on the remote control.16
SOURCE  FEATUREAV1The AV1  input  may  be  connected  to  a  external  video  source,  video  game  system,  or  other  audio  /  video  devices.  To  access  the audio  /  video  inputs,  turn  the  unit  on  and  press  the  S  (source)  button  or  the  Source  button  on  the  remote  control  until  "AV1"  is displayed  on  the  screen.  Turn  the  video  source  component  on  with  its  power  button  or  remote  control  and  it  is  now  ready  to  play the  audio  and  video  signals  from  the  source  connected  .Note: AV1 sources are available only if pre-installed during your video product installation.AUXThe AUX input may be connected to a external video source, video game system, or other audio / video devices. To access the audio / video inputs, turn the unit on and press the S (source) button or the Source button on the remote control until "AUX" is displayed on the screen. PS2Press the units SOURCE button till the screen displays PS2.Press (      ) RESET on unit/remote control to turn ON  the PS2 Console.17
18TROUBLESHOOTINGPROBLEMIR remote inoperative Verify that the batteries in the remote are fresh.Verify that the remote sensor eye is not obstructed.Disc won't playNo sound or distorted soundPlay starts, but then stops immediatelyCan’t advance through a movieInsert a disc with the label side facing up.Check the type of disc you put into disc tray. This PS2 only plays PS2 GAME, DVDs, audio CDs.Both the unit and the disc are coded by region. If the regional codes don’t match, the disc can’t be played.Make  sure  your  DVD  is  connected  properly.  Make  sure  all  cables  are  securely inserted into the appropriate jacks. Make sure the Modulator is ON and the proper Frequency has been selected.Make sure that unit is using Single Channel Headphones.The disc is dirty. Clean it.Condensation has formed. Allow player to dry out.It can’t advance through the opening credits and warning information that appear at the beginning of movies because the disc is programmed to prohibit that action.SOLUTION
19PROBLEMPicture is distorted The disc might be damaged. Try another disc.It is normal for some distortion to appear during forward or reverse scan.SOLUTIONNot allowed at the moment The feature or action cannot be completed at this time because:1. The disc’s software restricts it.2. The disc’s software doesn’t support the feature (e.g., angles)3. The feature is not available at the moment.4. 4 title or chapter number that is out of range.No forward or reverse scan Some discs have sections that prohibit rapid scanning or title and chapter skip.If you try to skip through the warning information and credits at the beginning of a movie, you won’t be able to. This part of the movie is often programmed to prohibit skipping through it.
REPLACEMENT  PARTS SPECIFICATIONSRemote Control 136-4926 LCD Backlighting LEDResolution 800 x 400Pixels 960,000Operation Temperature 32 ~131º F (0 ~ 50º C)Storage Temperature -4 ~ 158º F (-20 ~ 70º C)Backlit life 10,000 HoursVideo Display System NTSC / PALHeadphone Audio Output 0.03W @ 32 ohmsVideo Output 1.0Vp-p @ 75 ohmsPower Source 12V DCDimension L x W x H315mm x 315mm x 64.5mmSpecifications subject to change without notice.12" x 12" x 2.5"20
21AUDIOVOX ELECTRONICS CORP. (the Company) warrants to the original retail purchaser of this product that, should this product or any part thereof (except game controllers), under normal use and conditions, be proven defective in material or workmanship within 36 months from the date of original purchase, such defect(s) will be repaired or replaced with reconditioned product (at the Company's option) without charge for parts and repair labor.To obtain repair or replacement within the terms of this Warranty, the product is to be delivered with proof of warranty coverage (e.g. dated  bill of sale), specification of defect(s), transportation prepaid, to the Company at the address shown below.This Warranty does not extend to the elimination of externally generated static or noise, to correction of antenna problems, to costs incurred for installation, removal or reinstallation of the product, or to damage to digital memory/media devices, gaming devices, discs, speakers, accessories, or vehicle electrical systems.This Warranty does not apply to any product or part thereof which, in the opinion of the Company, has suffered or been damaged through alteration, improper installation, mishandling, misuse, neglect, accident, or by removal or defacement of the factory serial number/bar code label(s).  THE EXTENT OF THE COMPANY'S LIABILITY UNDER THIS WARRANTY IS LIMITED TO THE REPAIR OR REPLACEMENT PROVIDED ABOVE AND, IN NO EVENT, SHALL THE COMPANY'S LIABILITY EXCEED THE PURCHASE PRICE PAID BY PURCHASER FOR THE PRODUCT.This  Warranty  is  in  lieu  of  all  other  express  warranties  or  liabilities.    ANY  IMPLIED  WARRANTIES,  INCLUDING  ANY  IMPLIED  WARRANTY  OF MERCHANTABILITY, SHALL BE LIMITED TO THE DURATION OF THIS WRITTEN WARRANTY.  ANY ACTION FOR BREACH OF ANY WARRANTY HEREUNDER INCLUDING ANY IMPLIED WARRANTY OF MERCHANTABILITY MUST BE BROUGHT WITH IN A  PERIOD  NOT EXCEEDING 12 MONTHS AFTER EXPIRATION OF THE WARRANTY. IN NO CASE SHALL THE COMPANY BE LIABLE FOR ANY CONSEQUENTIAL OR INCIDENTAL DAMAGES FOR BREACH OF THIS OR ANY OTHER WARRANTY. No person or representative is authorized to assume for the Company any liability other than expressed herein in connection with the sale of this product.Some states do not allow limitations on how long an implied warranty lasts or the exclusion or limitation of incidental or consequential damage so the above limitations or exclusions may not apply to you.  This Warranty gives you specific legal rights and you may also have other rights which vary from state to state.If your new vehicle’s radio, CD/DVD player is covered by the manufacturer’s warranty for a period of 48 months as set forth in the OEM Warranty Booklet, the company will extend the Advent Mobile Video product warranty for the same period of time.  This is not applicable to extended warranty purchases beyond the original manufacturer’s warranty.  A game controller, if supplied, is similarly warranted for ninety (90) days.Audiovox Electronics Corporation, 150 Marcus Blvd., Hauppauge, New York 11788   1-800-645-4994 128-7188BRADVENT LIMITED WARRANTYApplies to ADVENT Mobile Video Products
Notice : The changes or modifications not expressly approved by the party responsible   for compliance could void the user’s authority to operate the equipment.IMPORTANT NOTE: To comply with the FCC RF exposure compliance requirements, no change to the antenna or the device is permitted. Any change to the antenna or the device could result in the device exceeding the RF exposure requirements and void user’s authority to operate the device.This device complies with Part 15 of the FCC Rules. Operation is subject to the following two conditions: (1) this device may not cause harmful interference, and (2) this device must accept any interference received, including interference that may cause undesired operation.
128-8669© 2009 ADVENT,150 Marcus Blvd. Hauppauge, NY 11788

Navigation menu