Airgo Networks AGN0901AP0100 2.4GHz True MIMO Broadband Gateway User Manual
Airgo Networks Inc. 2.4GHz True MIMO Broadband Gateway
UserManual.wiki
>
Airgo Networks
>
AGN0901AP0100 User Manual
User manual
Navigation menu
Upload a User Manual
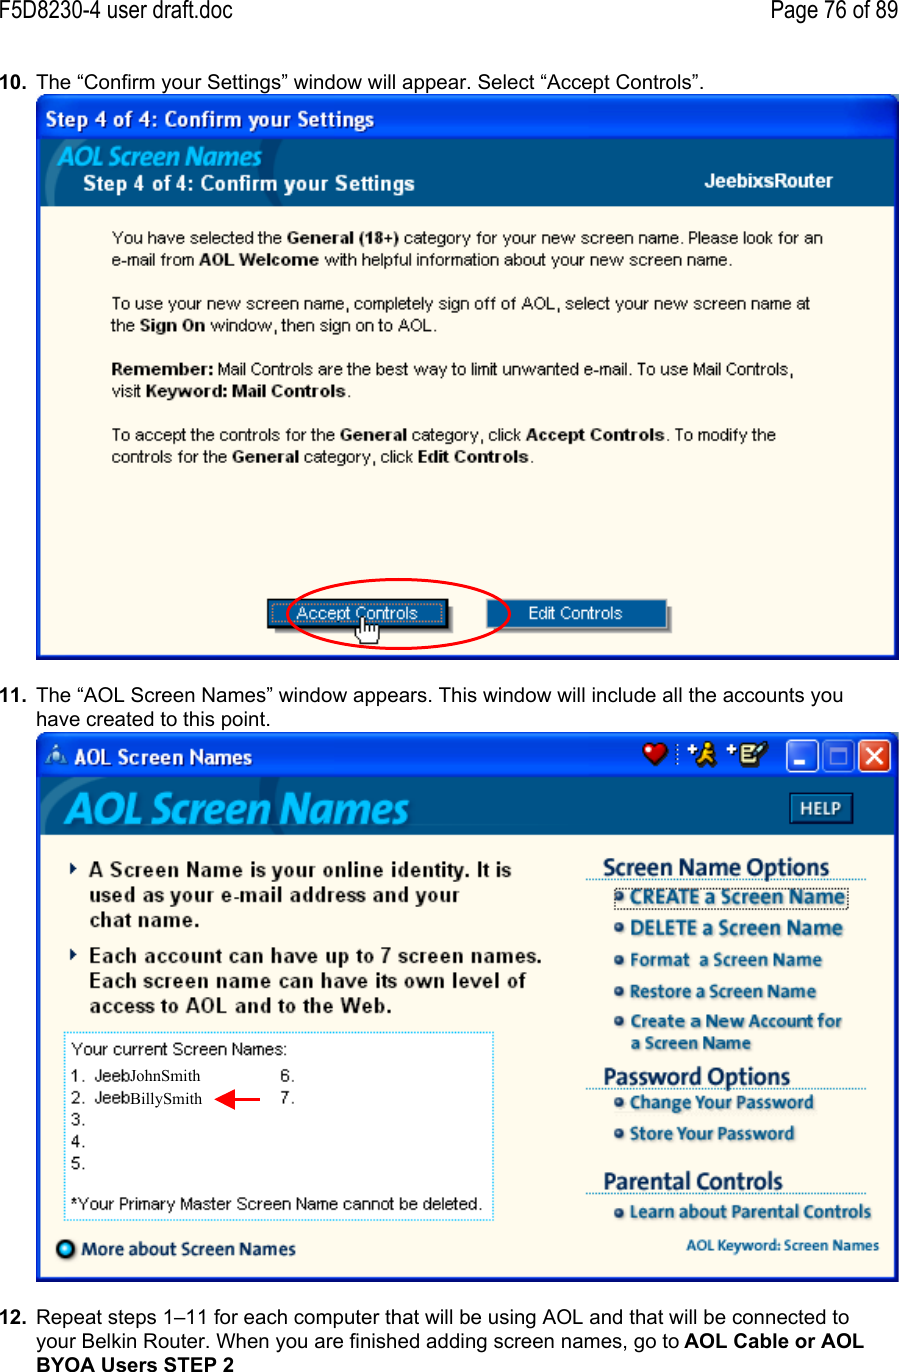
Namespaces
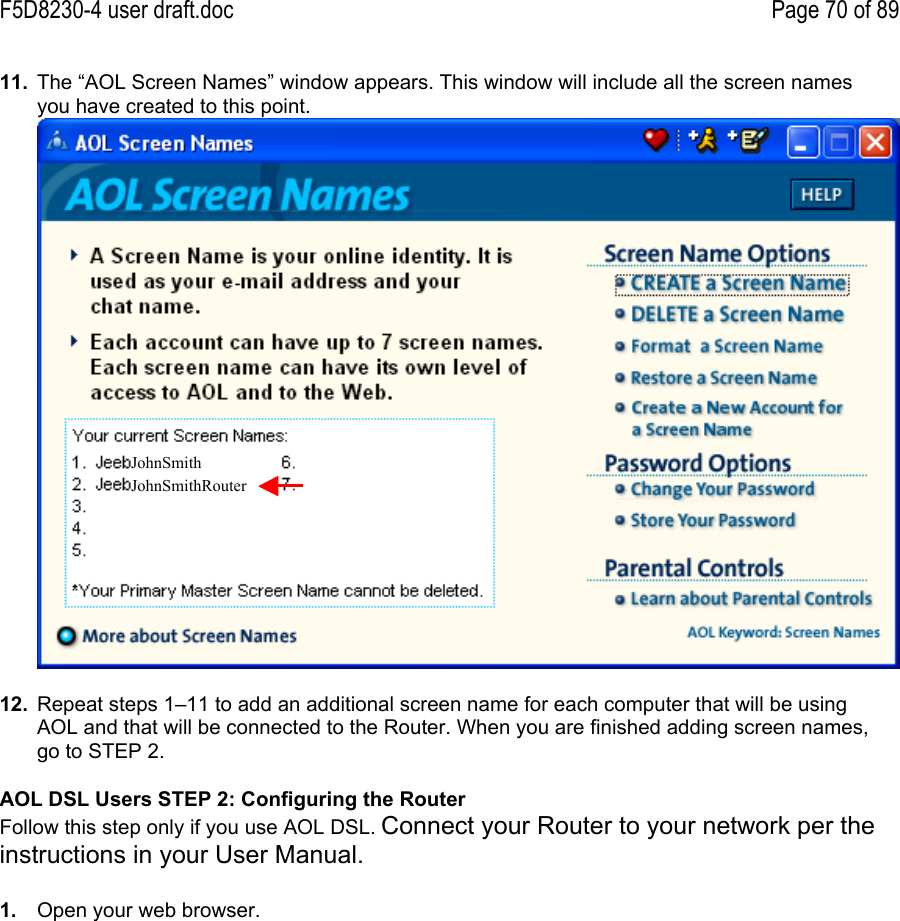
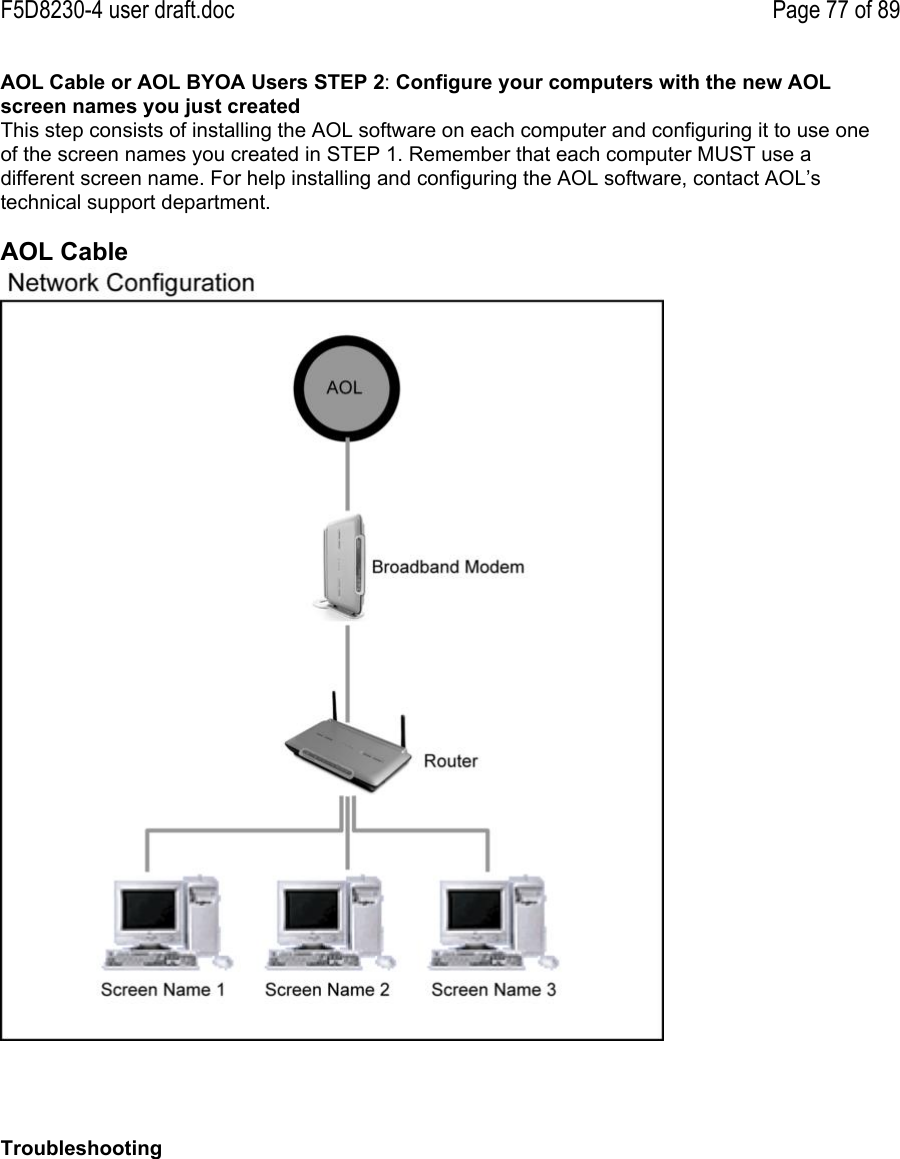
Wiki Guide
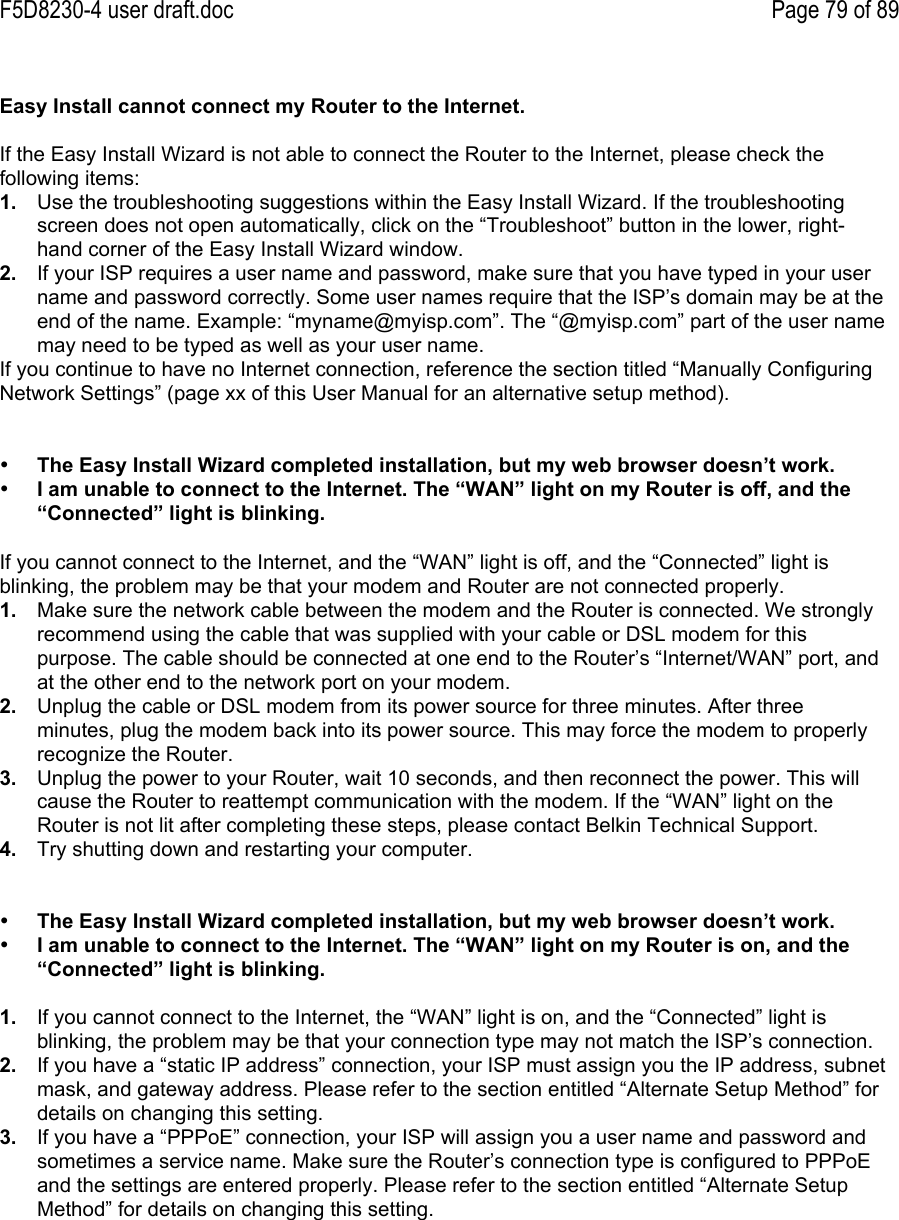
HTML
PDF
Info
Views
User Manual
Discussion / Help
Navigation
![F5D8230-4 user draft.doc Page 1 of 89[insert title page per branding standard]Wireless Pre-N RouterShare your high-speed Internet connection without cables [this should match pkg]User ManualF5D8230-4Table of Contents1 Introduction . . . . . . . . . . . . . . . . . . . . . . . . . . . . . . . . . . . . . .xRevolutionary 108Mbps Wireless Pre-N Technology with MIMO .xPlacement of your Wireless Pre-N Router . . . . . . . . . . . . . . . . .x2 Product Overview . . . . . . . . . . . . . . . . . . . . . . . . . . . . . . . . . .xProduct Features . . . . . . . . . . . . . . . . . . . . . . . . . . . . . . . . .x3 Knowing your Router . . . . . . . . . . . . . . . . . . . . . . . . . . . . . . .xPackage Contents . . . . . . . . . . . . . . . . . . . . . . . . . . . . . . . .xSystem Requirements . . . . . . . . . . . . . . . . . . . . . . . . . . . . .xEasy Install Wizard Software System Requirements . . . . . .x4 Connecting and Configuring your Router . . . . . . . . . . . . . . .x5 Alternate Setup Method . . . . . . . . . . . . . . . . . . . . . . . . . . .x6 Using the Web-Based Advanced User Interface . . . . . . . . . .xChanging LAN Settings . . . . . . . . . . . . . . . . . . . . . . . . . . .xViewing the DHCP Client List Page . . . . . . . . . . . . . . . . . xConfiguring the Wireless Network Settings . . . . . . . . . . . xSetting WPA Security. . . . . . . . . . . . . . . . . . . . . . . . . . . . . . . . . .xSetting WEP Encryption . . . . . . . . . . . . . . . . . . . . . . . . . . . . . . . . . .xUsing the Access Point Mode . . . . . . . . . . . . . . . . . . . . . .xSetting MAC Address Control . . . . . . . . . . . . . . . . . . . . . .xConfiguring the Firewall . . . . . . . . . . . . . . . . . . . . . . . . . . xUsing Dynamic DNSUtilities. . . . . . . . . . . . . . . . . . . . . . . . . . . . . . . . . . . xRestarting the Router . . . . . . . . . . . . . . . . . . . . . . . . . xUpdating the Firmware . . . . . . . . . . . . . . . . . . . . . . . . x7 Manually Configuring Network Settings . . . . . . .x8 Recommended Web Browser Settings . . . . . . . . . . . . . . . . .x9 How to Set Up your Network to Operate with AOL® for Broadband andyour New Belkin Router . . . . . . . . . . . . . . . .x10 Troubleshooting . . . . . . . . . . . . . . . . . . . . . . . . . . . . . . .x11 Information . . . . . . . . . . . . . . . . . . . . . . . . . . . . . . . . . . .x](https://usermanual.wiki/Airgo-Networks/AGN0901AP0100/User-Guide-463806-Page-1.png)
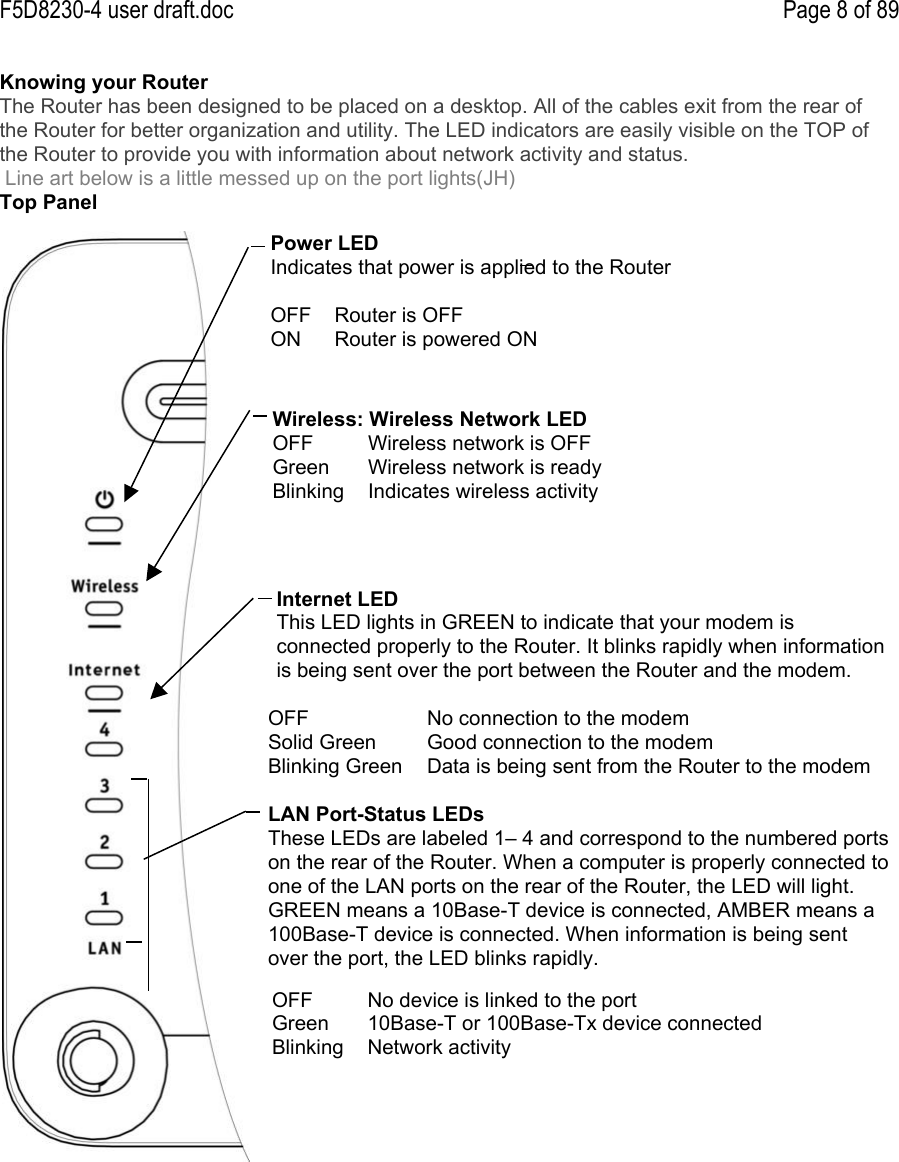
![F5D8230-4 user draft.doc Page 6 of 89Works with Both PCs and Mac® ComputersThe Router supports a variety of networking environments including Mac OS® 8.x, 9.x, X v10.x,AppleTalk®, Linux®, Windows® 95, 98, Me, NT®, 2000, and XP, and others. All that is needed isan Internet browser and a network adapter that supports TCP/IP (the standard language of theInternet).LED DisplayLighted LEDs on the top of the Router indicate which functions are in operation.Web-Based Advanced User InterfaceYou can set up the Router’s advanced functions easily through your web browser, without havingto install additional software onto the computer. There are no disks to install or keep track of and,best of all, you can make changes and perform setup functions from any computer on thenetwork quickly and easily.NAT IP Address SharingYour Router employs Network Address Translation (NAT) to share the single IP addressassigned to you by your Internet Service Provider while saving the cost of adding additional IPaddresses to your Internet service account.SPI FirewallYour Router is equipped with a firewall that will protect your network from a wide array ofcommon hacker attacks including IP Spoofing, Land Attack, Ping of Death (PoD), Denial ofService (DoS), IP with zero length, Smurf Attack, TCP Null Scan, SYN flood, UDP flooding, TearDrop Attack, ICMP defect, RIP defect, and fragment flooding.Integrated 10/100 4-Port SwitchThe Router has a built-in, four-port network switch to allow your wired computers to shareprinters, data and MP3 files, digital photos, and much more. The switch features automaticdetection so it will adjust to the speed of connected devices. The switch will transfer data betweencomputers and the Internet simultaneously without interrupting or consuming resources.Universal Plug and Play (UPnP)UPnP is a technology that offers seamless operation of voice messaging, video messaging,games, and other applications that are UPnP-compliant.Support for VPN Pass-ThroughIf you connect to your office network from home using a VPN connection, your Router will allowyour VPN-equipped computer to pass through the Router and to your office network.Built-In Dynamic Host Configuration Protocol (DHCP)Built-In Dynamic Host Configuration Protocol (DHCP) on-board makes for the easiest possibleconnection of a network. The DHCP server will assign IP addresses to each computerautomatically so there is no need for a complicated networking setup.Easy Install WizardThe Easy Install Wizard takes the guesswork out of setting up your Router. This automaticsoftware determines your network settings for you and sets up the Router for connection to yourInternet Service Provider (ISP). In a matter of minutes, your Router will be up and running on theInternet.Note: Easy Install Wizard software is compatible with Windows 98SE, Me, 2000, XP, and MacOS 9.X and Mac OS X. If you are using another operating system, the Router can be set up usingthe Alternative Method described in this User Manual (see page xx) [VERIFY PAGE NUMBER].](https://usermanual.wiki/Airgo-Networks/AGN0901AP0100/User-Guide-463806-Page-6.png)

![F5D8230-4 user draft.doc Page 10 of 89Verify the contents of your box. You should have the following:• Belkin Wireless Pre-N Router• Category 5 Networking Cable (for connecting the Router to the computer)• Power Supply• Belkin Easy Install Wizard Software CD• User ManualModem RequirementsYour cable or DSL modem must be equipped with an RJ45 Ethernet port. Many modems haveboth an RJ45 Ethernet port and a USB connection. If you have a modem with both Ethernet andUSB, and are using the USB connection at this time, you will be instructed to use the RJ45Ethernet port during the installation procedure. If your modem has only a USB port, you canrequest a different type of modem from your ISP, or you can, in some cases, purchase a modemthat has an RJ45 Ethernet port on it.[USB and Ethernet connector.tif]Easy Install WizardBelkin has provided our Easy Install Wizard software to make installing your Router a simple andeasy task. You can use it to get your Router up and running in minutes. The Easy Install Wizardrequires that your Windows 98SE, Me, 2000, or XP computer be connected directly to your cableor DSL modem and that the Internet connection is active and working at the time of installation.If it is not, you must use the “Alternative Setup Method” section of this User Manual to configureyour Router. Additionally, if you are using an operating system other than Windows 98SE, Me,2000, or XP, you must set up the Router using the “Alternative Setup Method” section of this UserManual.Run the Easy Install Wizard Software1. Shut down any programs that are running on your computer at this time.2. Make sure you have the following items at the computer that is now directly connected to thecable or DSL modem. DO NOT CONNECT THE ROUTER AT THIS TIME.• The Easy Install Wizard CD-ROM• The Router• The Router Power Supply• Category 5 Networking Cable• This User Manual3. Turn off any firewall or Internet-connection-sharing software on your computer.4. Insert the Easy Install Wizard software CD into your CD–ROM drive. The Easy Install Wizardscreen will automatically appear on your screen within 15 seconds. If it does not, select yourCD-ROM drive from “My Computer” and double-click on the file named “Setup” on the CD-ROM.5. Follow the Easy Install Wizard to complete the installationEthernetUSBIMPORTANT: Run the Easy Install Wizard from the computer that is directly connected to the cable orDSL modem. DO NOT CONNECT THE ROUTER AT THIS TIME.](https://usermanual.wiki/Airgo-Networks/AGN0901AP0100/User-Guide-463806-Page-10.png)
![F5D8230-4 user draft.doc Page 11 of 89Welcome ScreenAfter you insert the CD into your CD-ROM drive, the Wizard’s welcome screen will appear. Makesure you have not connected the Router at this point. If you have connected your Router, pleasereconnect your computer directly to the modem. Click “Next” when you are ready to move on.[01.tif] (that’s the wrong screenshot, we know that, right? It says “4 Port Router”)Progress ScreenEasy Install will show you a progress screen each time a step in the setup has been completed.Each time you see the progress screen, click “Next” when you are ready to move to the next step.[02.tif]](https://usermanual.wiki/Airgo-Networks/AGN0901AP0100/User-Guide-463806-Page-11.png)
![F5D8230-4 user draft.doc Page 12 of 891.1 Examining SettingsThe Wizard will now examine your computer’s network settings and gather informationneeded to complete the Router’s connection to the Internet. When the Wizard is finishedexamining your computer, click “Next” to continue.[03.tif]1.2 Multi-NICs ScreenThis screen will appear ONLY if you have more than one network adapter installed in yourcomputer. If you have more than one network adapter installed in your computer, the Wizardwill need to know which adapter is connected to your modem. Select the network card that isconnected to your modem from the list and click “Next”. If you are not sure which adapter tochoose, select the adapter at the top of the list. If you mistakenly choose the wrong adapternow, you will be able to choose a different one later.[multiple adapters screen.tif]Step 2: Hardware Setup - Connect the Router to your Modem and ComputerThe Wizard will walk you through connecting your Router to your computer and modem.Follow the steps on the screen using the pictures as a guide.](https://usermanual.wiki/Airgo-Networks/AGN0901AP0100/User-Guide-463806-Page-12.png)
![F5D8230-4 user draft.doc Page 13 of 892.1 This step instructs you to locate the cable connected between your modem and thenetworking port on your computer. Unplug this cable from the computer and plug it intothe GREEN port on the Router. Click “Next” to continue.[04.tif]2.2 This step instructs you to locate the BLUE cable that is included with your Router. Plugone end of this cable into ANY one of the BLUE ports on your Router. Plug the other endof the cable into the networking port on your computer. Click “Next” to continue.[05.tif]](https://usermanual.wiki/Airgo-Networks/AGN0901AP0100/User-Guide-463806-Page-13.png)
![F5D8230-4 user draft.doc Page 14 of 892.3 This step instructs you to locate the power supply that is included with your Router. Plugthe power supply’s small connector into the GRAY port on the Router. Plug the powersupply into an empty power outlet. Click “Next” to continue.[06.tif]2.4 This step instructs you to look at the lights on the front of your Router. Make sure theappropriate lights are ON. Refer to the Easy Install Wizard software on your computer’sscreen for more details. Click “Next” to continue.[07.tif]](https://usermanual.wiki/Airgo-Networks/AGN0901AP0100/User-Guide-463806-Page-14.png)
![F5D8230-4 user draft.doc Page 15 of 89Step 3: Checking the Connection3.1 Once you have completed connecting the Router, the Wizard will check the connection tothe Router then go on to determine what type of Internet connection you have.[09.tif]3.2 User Name and Password NeededIf you have a connection type that requires a user name and a password, the Wizard will askyou to type in your user name and password. If your connection type does not require a username and password, you will not see this screen.Your user name and password is provided to you by your Internet Service Provider. If youhave to type in a user name and password to connect to the Internet, then type that sameuser name and password in here. Your user name looks something like “jsmith@myisp.com”or simply “jsmith”. The service name is optional and is very rarely required by your ISP. Ifyou don’t know your service name, leave this blank. When you have entered yourinformation, click “Next” to move on.[10.tif]](https://usermanual.wiki/Airgo-Networks/AGN0901AP0100/User-Guide-463806-Page-15.png)
![F5D8230-4 user draft.doc Page 16 of 893.3 Wireless SetupThis Step Is Optional. Click “Next” if you want to skip it.Using this step, you can customize your wireless network settings if you want to. Follow thesteps on the screen to complete this step. Click “Next” to continue.[11.tif]Step 4: Configuring the RouterThe Wizard will now transfer all of the configuration information to the Router. This will takeapproximately one minute. During this time, do not turn off the Router or computer. TheRouter will restart itself at the end of this step.[13.tif]](https://usermanual.wiki/Airgo-Networks/AGN0901AP0100/User-Guide-463806-Page-16.png)
![F5D8230-4 user draft.doc Page 17 of 894.1 Checking InternetThe Wizard will now check for an Internet connection. This can take a few minutes. TheWizard may not detect a connection right away. If not, it will retry a number of times. The“Connected” light on the front panel of the Router will flash during this time. Please bepatient through this process. [16.tif] Need correct picture4.2 FinishedWhen the Internet connection is complete, the Wizard will tell you that you are finished.The “Connected” LED on the front of the Router will be solid GREEN, indicating that theRouter is now connected to the Internet.[finished.tif]Your Router is now connected to the Internet. Now you can begin surfing the Internet byopening your browser and going to your favorite web page.Congratulations! You have finished installing your new Belkin Router. You are ready to set upthe other computers in your home. You can also add computers to your Router any time youwant.Alternative MethodStep 1: Connecting your Gateway Router](https://usermanual.wiki/Airgo-Networks/AGN0901AP0100/User-Guide-463806-Page-17.png)
![F5D8230-4 user draft.doc Page 18 of 891.1 Turn off the power to your modem by unplugging the power supply from the modem.1.2 Locate the network cable that is connected between your modem and your computer andunplug it from your computer, leaving the other end connected to your modem.1.3 Plug the loose end of the cable you just unplugged into the port on the back of the Routerlabeled “Internet/WAN”.1.4 Connect the included network cable from the back of the computer to one of the portslabeled “1–4”. Note: It does not matter which numbered port you choose.1.5 Turn your cable or DSL modem on by reconnecting the power supply to the modem.1.6 Before plugging the power cord into the Router, plug the cord into the wall, then plug thecord into the Router’s power jack.[Need correct illustration]1.7 Verify that your modem is connected to the Router by checking the lights on the TOP ofthe Router. The green light labeled “WAN” should be ON if your modem is connectedcorrectly to the Router. If it is not, recheck your connections.1.8 Verify that your computer is connected properly to the Router by checking the lightslabeled “LAN 1,2,3,4”. The light which corresponds to the numbered port connected toyour computer should be ON, if your computer is connected properly. If it is not, recheckyour connections.Alternative MethodStep 2: Set your Computer’s Network Settings to Work with a DHCP ServerSee the section in this User Manual called “Manually Configuring Network Settings” for directions.To power adapterCable or DSLmodemExisting networkcable (that camewith modem)Supplied Blue Ethernetcable (to computer)Mac or PC computerthat was originallyconnected to the cableor DSL modem](https://usermanual.wiki/Airgo-Networks/AGN0901AP0100/User-Guide-463806-Page-18.png)
![F5D8230-4 user draft.doc Page 19 of 89Alternative MethodStep 3: Configuring the Router Using the Web-Based Advanced User InterfaceUsing your Internet browser, you can access the Router’s Web-Based Advanced User Interface.In your browser, type “192.168.2.1” (do not type in anything else such as “http://” or “www”). Thenpress the “Enter” key.[http_bar.tif]Logging into the RouterYou will see the Router’s home page in your browser window. The home page is visible to anyuser who wants to see it. To make any changes to the Router’s settings, you have to log in.Clicking the “Login” button or clicking on any one of the links on the home page will take you tothe login screen. The Router ships with no password entered. In the login screen, leave thepassword blank and click the “Submit” button to log in.[login screen.tif]](https://usermanual.wiki/Airgo-Networks/AGN0901AP0100/User-Guide-463806-Page-19.png)
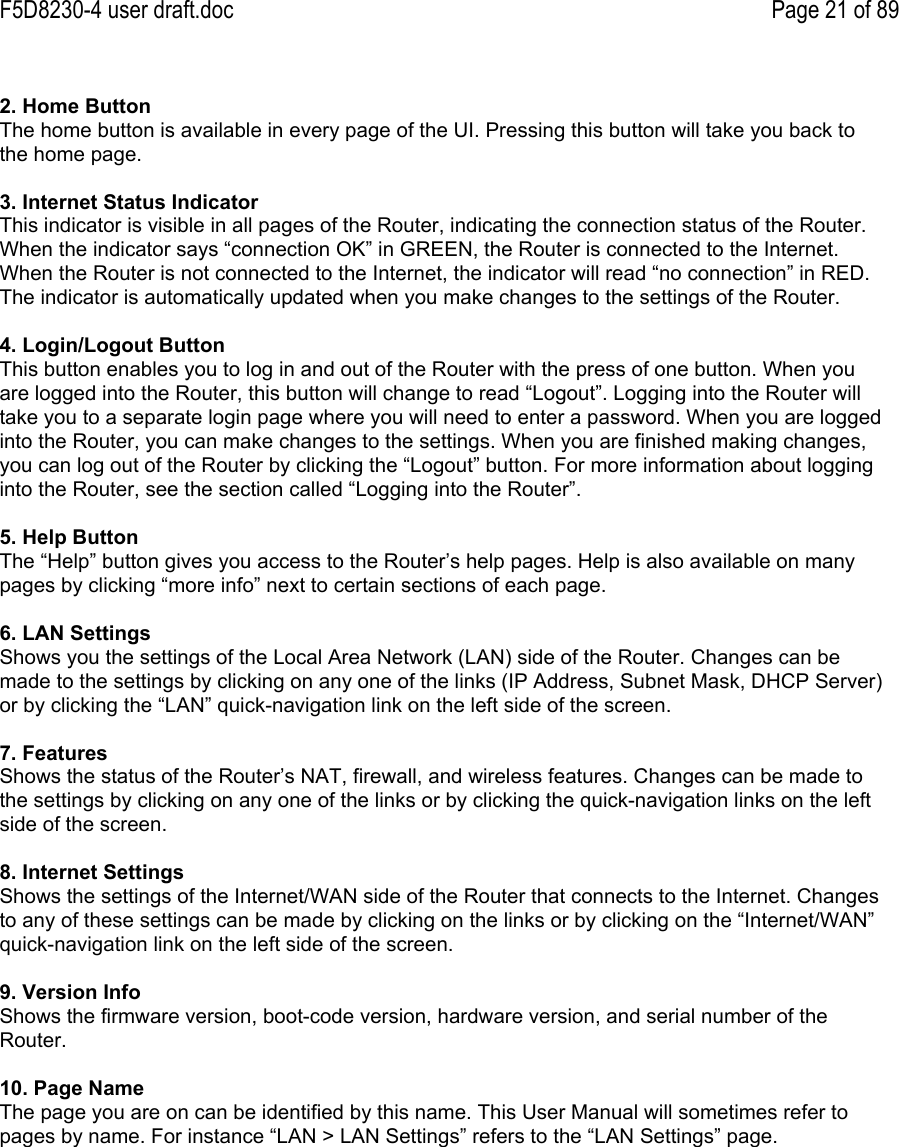
![F5D8230-4 user draft.doc Page 20 of 89Logging out of the RouterOne computer at a time can log into the Router for the purposes of making changes to thesettings of the Router. Once a user has logged in to make changes, there are two ways that thecomputer can be logged out. Clicking the “Logout” button will log the computer out. The secondmethod is automatic. The login will time out after a specified period of time. The default logintimeout is 10 minutes. This can be changed from one to 99 minutes. For more information, seethe section in this manual titled “Changing the Login Timeout Setting”.Understanding the Web-Based Advanced User InterfaceThe home page is the first page you will see when you access the Advanced User Interface (UI).The home page shows you a quick view of the Router’s status and settings. All advanced setuppages can be reached from this page.[status.tif] [PM: pls verify screenshot, it’s showing wrong part number]1. Quick-Navigation LinksYou can go directly to any of the Router’s advanced UI pages by clicking directly on these links.The links are divided into logical categories and grouped by tabs to make finding a particularsetting easier to find. Clicking on the purple header of each tab will show you a short descriptionof the tab’s function.(1)(2)(5)(3)(4)(9)(6)(8)(7)(10)](https://usermanual.wiki/Airgo-Networks/AGN0901AP0100/User-Guide-463806-Page-20.png)
(B)(C)](https://usermanual.wiki/Airgo-Networks/AGN0901AP0100/User-Guide-463806-Page-22.png)
(2)](https://usermanual.wiki/Airgo-Networks/AGN0901AP0100/User-Guide-463806-Page-23.png)
(2)(3)(4)(5)](https://usermanual.wiki/Airgo-Networks/AGN0901AP0100/User-Guide-463806-Page-25.png)
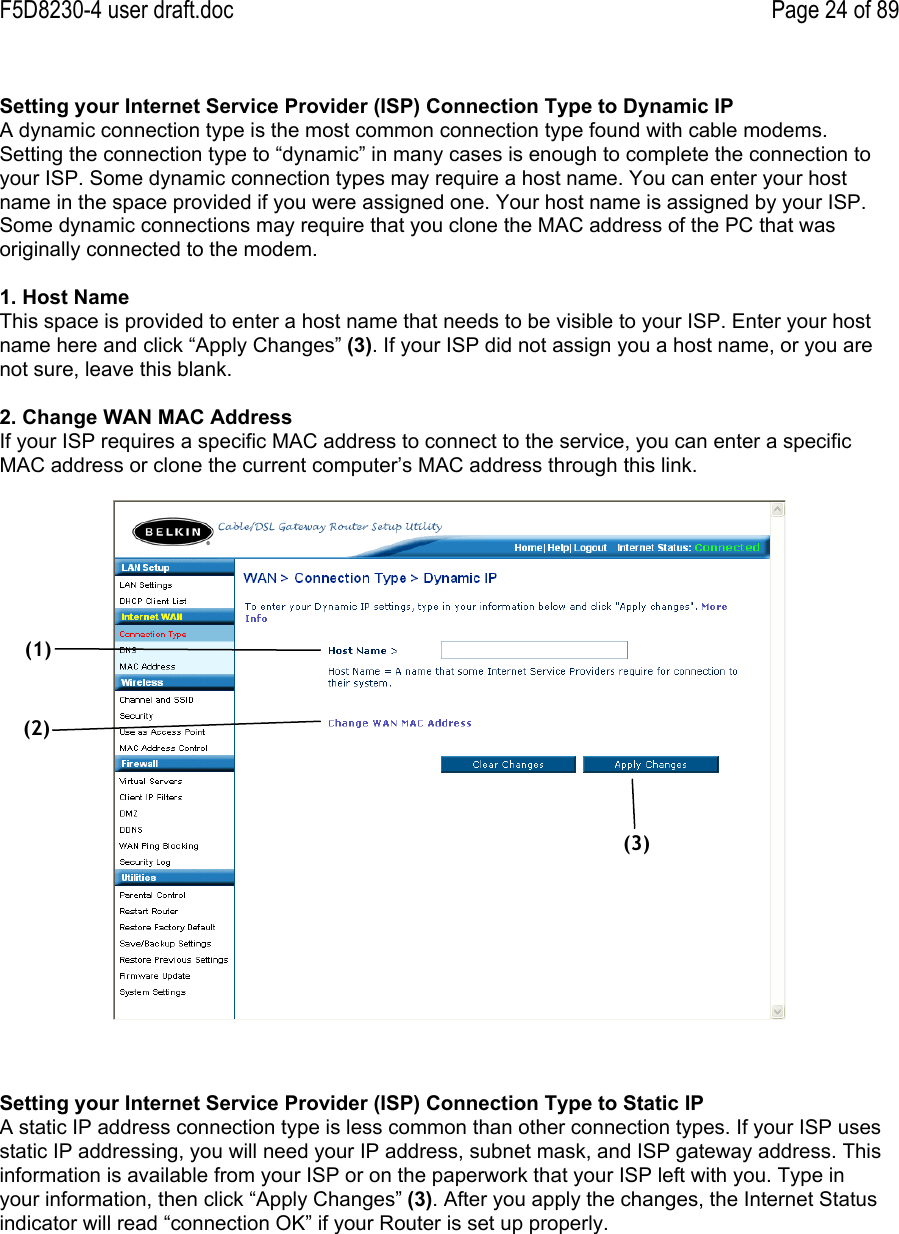
![F5D8230-4 user draft.doc Page 26 of 89Setting your ISP Connection Type to PPPoEMost DSL providers use PPPoE as the connection type. If you use a DSL modem to connect tothe Internet, your ISP may use PPPoE to log you into the service. If you have an Internetconnection in your home or small office that doesn’t require a modem, you may also use PPPoE.Your connection type is PPPoE if: 1) Your ISP gave you a user name and password, which is required to connect to the Internet.2) Your ISP gave you software such as WinPOET or Enternet300 that you use to connect to theInternet.3) You have to double-click on a desktop icon other than your browser to get on the Internet.[pppoe.tif]1. User NameThis space is provided to type in your user name that was assigned by your ISP.2. PasswordType in your password and retype it into the “Retype Password” box to confirm it.3. Service NameA service name is rarely required by an ISP. If you are not sure if your ISP requires a servicename, leave this blank.4. MTUThe MTU setting should never be changed unless your ISP gives you a specific MTU setting.Making changes to the MTU setting can cause problems with your Internet connection includingdisconnection from the Internet, slow Internet access, and problems with Internet applicationsworking properly.5. Disconnect after X...The “Disconnect” feature is used to automatically disconnect the Router from your ISP whenthere is no activity for a specified period of time. For instance, placing a check mark next to thisoption and entering “5” into the minute field will cause the Router to disconnect from the Internetafter five minutes of no Internet activity. This option should be used if you pay for your Internetservice by the minute.(1)(2)(3)(4)(5)](https://usermanual.wiki/Airgo-Networks/AGN0901AP0100/User-Guide-463806-Page-26.png)
![F5D8230-4 user draft.doc Page 27 of 89Setting your Internet Service Provider (ISP) Connection Type to Point-to-Point TunnelingProtocol (PPTP) [European Countries Only].Some ISPs require a connection using PPTP protocol, a type of connection most common inEuropean countries. This sets up a direct connection to the ISP’s system. Type in the informationprovided by your ISP in the space provided. When you have finished, click “Apply Changes” (9).After you apply the changes, the Internet Status indicator will read “connection OK” if your Routeris set up properly.[PPTP.tif]1. PPTP AccountProvided by your ISP. Enter your PPTP account name here.2. PPTP PasswordType in your password and retype it into the “Retype Password” box to confirm it.3. Host NameProvided by your ISP. Enter your host name here.(1)(2)(3)(4)(5)(6)(7)(8)(9)](https://usermanual.wiki/Airgo-Networks/AGN0901AP0100/User-Guide-463806-Page-27.png)
![F5D8230-4 user draft.doc Page 29 of 89Setting your Connection Type if You Are a Telstra® BigPond User [Australia Only]Your user name and password are provided to you by Telstra BigPond. Enter this informationbelow. Choosing your state from the drop-down menu (6) will automatically fill in your login serverIP address. If your login server address is different than one provided here, you may manuallyenter the login server IP address by placing a check in the box next to “User decide login servermanually” (4) and type in the address next to “Login Server” (5). When you have entered all ofyour information, click “Apply Changes” (7). After you apply the changes, the Internet Statusindicator will read “connection OK” if your Router is set up properly.[TELSTRA.tif]1. Select your StateSelect your state from the drop-down menu (6). The “Login Server” box will automatically be filledin with an IP address. If for some reason this address does not match the address that Telstrahas given, you can manually enter the login server address. See “User decide login servermanually” (4).2. User NameProvided by your ISP. Type in your user name here.(1)(2)(3)(4)(5)(6)(7)](https://usermanual.wiki/Airgo-Networks/AGN0901AP0100/User-Guide-463806-Page-29.png)
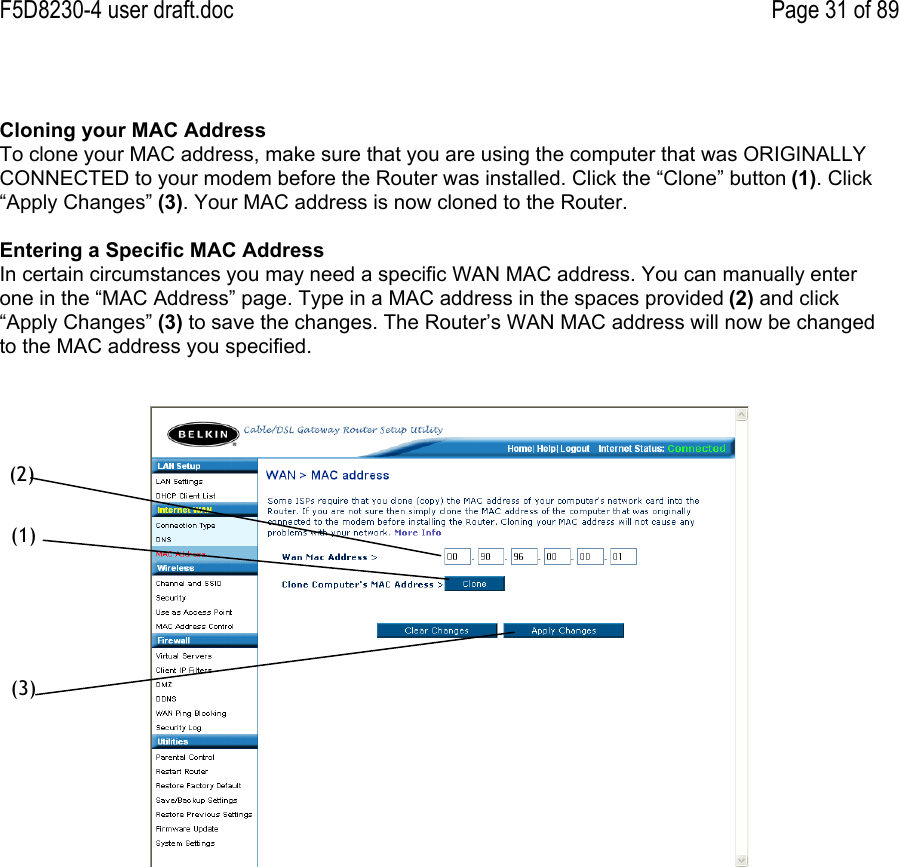
![F5D8230-4 user draft.doc Page 30 of 893. PasswordType in your password and retype it into the “Retype Password” box to confirm it.4. User Decide Login Server ManuallyIf your login server IP address is not available in the “Select Your State” drop-down menu (6), youmay manually enter the login server IP address by placing a check in the box next to “Userdecide login server manually” and type in the address next to “Login Server” (5).Setting Custom Domain Name Server (DNS) SettingsA “Domain Name Server” is a server located on the Internet that translates Universal ResourceLocaters (URLs) like “www.belkin.com” to IP addresses. Many Internet Service Providers (ISPs)do not require you to enter this information into the Router. The “Automatic from ISP” box (1)should be checked if your ISP did not give you a specific DNS address. If you are using a staticIP connection type, then you may need to enter a specific DNS address and secondary DNSaddress for your connection to work properly. If your connection type is dynamic or PPPoE, it islikely that you do not have to enter a DNS address. Leave the “Automatic from ISP” box checked.To enter the DNS address settings, uncheck the “Automatic from ISP” box and enter your DNSentries in the spaces provided. Click “Apply Changes” (2) to save the settings.[WAN_DNS.tif]Configuring your WAN Media Access Controller (MAC) AddressAll network components including cards, adapters, and routers, have a unique “serial number”called a MAC address. Your Internet Service Provider (ISP) may record the MAC address of yourcomputer’s adapter and only let that particular computer connect to the Internet service. Whenyou install the Router, its own MAC address will be “seen” by the ISP and may cause theconnection not to work. Belkin has provided the ability to clone (copy) the MAC address of thecomputer into the Router. This MAC address, in turn, will be seen by the ISP’s system as theoriginal MAC address and will allow the connection to work. If you are not sure whether your ISPneeds to see the original MAC address, simply clone the MAC address of the computer that wasoriginally connected to the modem. Cloning the address will not cause any problems with yournetwork.(1)(2)](https://usermanual.wiki/Airgo-Networks/AGN0901AP0100/User-Guide-463806-Page-30.png)
![F5D8230-4 user draft.doc Page 32 of 89Using the Web-Based Advanced User InterfaceUsing your Internet browser, you can access the Router’s Web-Based Advanced User Interface.In your browser, type “192.168.2.1” (do not type in anything else such as “http://” or “www”) thenpress the “Enter” key.[http_bar.tif]You will see the Router’s home page in your browser window.Viewing the LAN SettingsClicking on the header of the LAN tab (1) will take you to the LAN tab’s header page. A quickdescription of the functions can be found here. To view the settings or make changes to any ofthe LAN settings, click on “LAN Settings” (2) or to view the list of connected computers, click on“DHCP client list” (3).[lan setup.tif](1)(2)(3)](https://usermanual.wiki/Airgo-Networks/AGN0901AP0100/User-Guide-463806-Page-32.png)
![F5D8230-4 user draft.doc Page 33 of 89Changing LAN SettingsAll settings for the internal LAN setup of the Router can be viewed and changed here.[LAN Settings.tif]1. IP AddressThe “IP address” is the internal IP address of the Router. The default IP address is“192.168.2.1”. To access the advanced setup interface, type this IP address into the addressbar of your browser. This address can be changed if needed. To change the IP address, typein the new IP address and click “Apply Changes”. The IP address you choose should be anon-routable IP. Examples of a non-routable IP are:192.168.x.x (where x is anything between 0 and 255)10.x.x.x (where x is anything between 0 and 255)2. Subnet MaskThere is no need to change the subnet mask. This is a unique, advanced feature of yourBelkin Router. It is possible to change the subnet mask if necessary; however, do NOT makechanges to the subnet mask unless you have a specific reason to do so. The default settingis “255.255.255.0”.3. DHCP ServerThe DHCP server function makes setting up a network very easy by assigning IP addressesto each computer on the network automatically. The default setting is “On”. The DHCP servercan be turned OFF if necessary; however, in order to do so you must manually set a static IPaddress for each computer on your network. To turn off the DHCP server, select “Off” andclick “Apply Changes”.4. IP PoolThe range of IP addresses set aside for dynamic assignment to the computers on yournetwork. The default is 2–100 (99 computers). If you want to change this number, you can doso by entering a new starting and ending IP address and clicking on “Apply Changes”. TheDHCP server can assign 100 IP addresses automatically. This means that you cannot specifyan IP address pool larger than 100 computers. For example, starting at 50 means you haveto end at 150 or lower so as not to exceed the 100-client limit. The starting IP address mustbe lower in number than the ending IP address.(2)(3)(4)(5)(6)(1)](https://usermanual.wiki/Airgo-Networks/AGN0901AP0100/User-Guide-463806-Page-33.png)
![F5D8230-4 user draft.doc Page 34 of 895. Lease TimeThe length of time the DHCP server will reserve the IP address for each computer. Werecommend that you leave the lease time set to “Forever”. The default setting is “Forever”,meaning that any time a computer is assigned an IP address by the DHCP server, the IPaddress will not change for that particular computer. Setting lease times for shorter intervalssuch as one day or one hour frees IP addresses after the specified period of time. This alsomeans that a particular computer’s IP address may change over time. If you have set any ofthe other advanced features of the Router such as DMZ or client IP filters, these aredependent on the IP address. For this reason, you will not want the IP address to change.6. Local Domain NameThe default setting is “Belkin”. You can set a local domain name (network name) for yournetwork. There is no need to change this setting unless you have a specific advanced needto do so. You can name the network anything you want such as “MY NETWORK”.Viewing the DHCP Client List PageYou can view a list of the computers (known as clients), which are connected to your network.You are able to view the IP address (1) of the computer, the host name (2) (if the computer hasbeen assigned one), and the MAC address (3) of the computer’s network interface card (NIC).Pressing the “Refresh” (4) button will update the list. If there have been any changes, the list willbe updated.[DHCP_client_list.tif]Configuring the Wireless Network SettingsThe “Wireless” tab lets you make changes to the wireless network settings. From this tab you canmake changes to the wireless network name (SSID), operating channel, encryption securitysettings, and configure the Router to be used as an access point.Changing the Wireless Network Name (SSID)(2)(3)(4)(1)](https://usermanual.wiki/Airgo-Networks/AGN0901AP0100/User-Guide-463806-Page-34.png)
![F5D8230-4 user draft.doc Page 35 of 89To identify your wireless network, a name called the SSID (Service Set Identifier) is used. TheSSID is your network name. The default network name of the Router is “Belkin Pre-N_” followedby six digits that are unique to your Router. Your network name will look something like “BelkinPre-N_012345”. You can change this to anything you choose, or you can leave it unchanged.Keep in mind, if you decide to change your wireless network name, and there are other wirelessnetworks operating in your area, your network name needs to be different from other wirelessnetworks that may be operating in your area. To change the SSID, type in the SSID that you wantto use in the SSID field (1) and click “Apply Changes” (2). The change is immediate. If you makea change to the SSID, your wireless-equipped computers may also need to be reconfigured toconnect to your new network name. Refer to the documentation of your wireless network adapterfor information on making this change.[channel and SSID.tif]Using the Wireless Mode SwitchThis switch allows you to set the Router’s wireless modes. There are three modes.1) 802.11g onlySetting the Router to this mode will allow only Pre-N and 802.11g-compliant devices to join thenetwork, keeping out any slower 802.11b devices.2) 802.11g & 802.11bSetting the Router to this mode will let Pre-N-, 802.11g-, and 802.11b-compliant devices to jointhe network.3) OffThis mode will turn OFF the Router’s access point, so no wireless devices can join the network.Turning off the wireless function of your Router is a great way to secure your network when youare away from home for a long period of time, or don’t want to use the wireless feature of theRouter at a certain time.Changing the Wireless ChannelThere are a number of operating channels you can choose from. In the United States, there are11 channels. In the United Kingdom and most of Europe, there are 13 channels. In a smallnumber of other countries, there are other channel requirements. Your Router is configured tooperate on the proper channels for the country you reside in. The channel can be changed if(1)(2)](https://usermanual.wiki/Airgo-Networks/AGN0901AP0100/User-Guide-463806-Page-35.png)
![F5D8230-4 user draft.doc Page 36 of 89needed. If there are other wireless networks operating in your area, your network should be set tooperate on a channel that is different than the other wireless networks.Auto Channel Selection Feature and Changing the ChannelFor best performance, your Router should use a channel that is at least five channels away fromthe other wireless networks in the area. For instance, if another network is operating on channel11, then set your network to channel 6 or below. The auto channel selection mode will choose theclearest channel to operate on when the Router is first powered up. Your Router ships from thefactory with the auto channel feature enabled. You can manually select a channel if you wish;however, it is recommended to use the auto channel mode. To change the channel, select thechannel from the drop-down list. Click “Apply Changes”. The change is immediate.[change_channel.tif]Using the Broadcast SSID FeatureNote: This advanced feature should be employed by advanced users only. For security, you canchoose not to broadcast your network’s SSID. Doing so will keep your network name hidden fromcomputers that are scanning for the presence of wireless networks. To turn off the broadcast ofthe SSID, remove the check mark from the box next to “Broadcast SSID”, and then click “ApplyChanges”. The change is immediate. Each computer now needs to be set to connect to yourspecific SSID; an SSID of “ANY” will no longer be accepted. Refer to the documentation of yourwireless network adapter for information on making this change.Protected Mode SwitchProtected mode will ensure proper operation of 802.11g devices on your Pre-N network when802.11b devices are present or when there is heavy 802.11b traffic in the operating environment.If you are using a mix of Belkin Pre-N Wireless Cards and 802.11b or 802.11g cards on yournetwork, protected mode should be used. If you are in an environment where there is no other (orvery little) 802.11b wireless network traffic, best 802.11g performance may be achieved withprotected mode OFF. If you are operating in an environment with HEAVY 802.11b traffic orinterference, best 802.11g performance may be achieved with protected mode ON. Wireless Pre-N performance is not affected by this setting.QoS (Quality of Service) ConfigurationQoS prioritizes important data on your network such as multimedia content and voice-over-IP(VoIP) so it will not be interfered with by other data being sent over the network. Based on802.11e, this feature can be turned on or off and you can choose the acknowledgement mode](https://usermanual.wiki/Airgo-Networks/AGN0901AP0100/User-Guide-463806-Page-36.png)
![F5D8230-4 user draft.doc Page 38 of 894. Click “Apply Changes” to finish. You must now set all clients to match these settings.[WPA password.tif]Setting WEP EncryptionNote to Mac users: The “Passphrase” option will not operate with Apple® AirPort®. To configureencryption for your Mac computer, set the encryption using the manual method described in thenext section.1. Select “128-bit WEP” or “64-bit WEP” from the drop-down menu.[choose_security.tif2. After selecting your WEP encryption mode, you can enter you WEP key manually by typing inthe hex WEP key manually, or you can type a passphrase in the “PassPhrase” field and click“Generate” to create a WEP key from the passphrase. Click “Apply Changes” to finish. Youmust now set all of your clients to match these settings.](https://usermanual.wiki/Airgo-Networks/AGN0901AP0100/User-Guide-463806-Page-38.png)
![F5D8230-4 user draft.doc Page 39 of 89[128-bit WEP.tif]3. Encryption in the Router is now set. Each of your computers on your wireless network willnow need to be configured with the same passphrase. Refer to the documentation of yourwireless network adapter for information on making this change.Using a Hexadecimal KeyA hexadecimal key is a mixture of numbers and letters from A–F and 0–9. 64-bit keys are 10digits long and can be divided into five two-digit numbers. 128-bit keys are 26 digits long and canbe divided into 13 two-digit numbers.For instance:AF 0F 4B C3 D4 = 64-bit keyC3 03 0F AF 0F 4B B2 C3 D4 4B C3 D4 E7 = 128-bit keyIn the boxes below, make up your key by writing in two characters between A–F and 0–9. You willuse this key to program the encryption settings on your Router and your wireless computers.[encryption chart.tif]Note to Mac users: Original Apple AirPort products support 64-bit encryption only. Apple AirPort2 products can support 64-bit or 128-bit encryption. Please check your product to see whichversion you are using. If you cannot configure your network with 128-bit encryption, try 64-bitencryption.Using the Access Point ModeNote: This advanced feature should be employed by advanced users only. The Router can beconfigured to work as a wireless network access point. Using this mode will defeat the NAT IPsharing feature and DHCP server. In AP mode, the Router will need to be configured with an IPaddress that is in the same subnet as the rest of the network that you will bridge to. The default IP](https://usermanual.wiki/Airgo-Networks/AGN0901AP0100/User-Guide-463806-Page-39.png)
![F5D8230-4 user draft.doc Page 40 of 89address is 192.168.2.254 and subnet mask is 255.255.255.0. These can be customized for yourneed.1. Enable the AP mode my selecting “Enable” in the “Use as Access Point only” page. Whenyou select this option, you will be able to change the IP settings.2. Set your IP settings to match your network. Click “Apply Changes”.3. Connect a cable from the WAN port on the Router to your existing network.The Router is now acting as an access point. To access the Router advanced user interfaceagain, type the IP address you specified into your browser’s navigation bar. You can set theencryption settings, MAC address filtering, SSID, and channel normally.Setting MAC Address ControlThe MAC address filter is a powerful security feature that allows you to specify which computersare allowed on the wireless network. Note: This list applies only to wireless computers. This listcan be configured so any computer attempting to access the wireless network that is notspecified in the filter list will be denied access. When you enable this feature, you must enter theMAC address of each client (computer) to which you want to allow network access. The “Block”feature lets you turn on and off access to the network easily for any computer without having toadd and remove the computer’s MAC address from the list.[MAC address control.tif]Setting up an Allow Access List1. Select the “Allow” radio button (1) to begin setting up a list of computers allowed to connect tothe wireless network.2. Next, in the “MAC Address” field that is blank (3), type in the MAC address of the wirelesscomputer you want to be able to access the wireless network, then click “<<Add” (4).3. Continue to do this until all of the computers you want to add have been entered.4. Click “Apply Changes” (5) to finish.(1)(3)(4)(5)(2)](https://usermanual.wiki/Airgo-Networks/AGN0901AP0100/User-Guide-463806-Page-40.png)
![F5D8230-4 user draft.doc Page 42 of 89Configuring the FirewallYour Router is equipped with a firewall that will protect your network from a wide array ofcommon hacker attacks including:• IP Spoofing• Land Attack Ping of Death (PoD)• Denial of Service (DoS)• IP with zero length• Smurf Attack• TCP Null Scan• SYN flood• UDP flooding• Tear Drop Attack• ICMP defect• RIP defect• Fragment flooding• The firewall also masks common ports that are frequently used to attack networks. These portsappear to be “stealth” meaning that for all intents and purposes, they do not exist to a would-behacker. You can turn the firewall function off if needed; however, it is recommended that youleave the firewall enabled. Disabling the firewall protection will not leave your network completelyvulnerable to hacker attacks, but it is recommended that you leave the firewall enabled.[firewall.tif]Configuring Internal Forwarding SettingsThe Virtual Servers function will allow you to route external (Internet) calls for services such as aweb server (port 80), FTP server (Port 21), or other applications through your Router to yourinternal network. Since your internal computers are protected by a firewall, computers outsideyour network (over the Internet) cannot get to them because they cannot be “seen”. A list ofcommon applications has been provided in case you need to configure the Virtual Server functionfor a specific application. If your application is not listed, you will need to contact the applicationvendor to find out which port settings you need.](https://usermanual.wiki/Airgo-Networks/AGN0901AP0100/User-Guide-463806-Page-42.png)
![F5D8230-4 user draft.doc Page 43 of 89[virtual_servers.tif]Choosing an ApplicationSelect your application from the drop-down list. Click “Add”. The settings will be transferred to thenext available space in the screen. Click “Apply Changes” to save the setting for that application.To remove an application, select the number of the row that you want to remove then click“Clear”.Manually Entering Settings into the Virtual ServerTo manually enter settings, enter the IP address in the space provided for the internal (server)machine, the port(s) required to pass (use a comma between multiple ports), select the port type(TCP or UDP), and click “Apply Changes”. You can only pass one port per internal IP address.Opening ports in your firewall can pose a security risk. You can enable and disable settings veryquickly. It is recommended that you disable the settings when you are not using a specificapplication.](https://usermanual.wiki/Airgo-Networks/AGN0901AP0100/User-Guide-463806-Page-43.png)
![F5D8230-4 user draft.doc Page 44 of 89Setting Client IP FiltersThe Router can be configured to restrict access to the Internet, e-mail, or other network servicesat specific days and times. Restriction can be set for a single computer, a range of computers, ormultiple computers.[client_IP_filters.tif]To restrict Internet access to a single computer for example, enter the IP address of the computeryou wish to restrict access to in the IP fields (1). Next, enter “80” in both the port fields (2). Select“Both” (3). Select “Block” (4). You can also select “Always” to block access all of the time. Selectthe day to start on top (5), the time to start on top (6), the day to end on the bottom (7), and thetime to stop (8) on the bottom. Select “Enable” (9). Click “Apply Changes”. The computer at the IPaddress you specified will now be blocked from Internet access at the times you specified. Note:Be sure you have selected the correct time zone under “Utilities> System Settings> Time Zone”.[|F5D7230-4_client_ip_filters_example.tif](1)(3)(2)(4)(5)(6)(7)(8)(9)](https://usermanual.wiki/Airgo-Networks/AGN0901AP0100/User-Guide-463806-Page-44.png)
![F5D8230-4 user draft.doc Page 45 of 89Enabling the Demilitarized Zone (DMZ)The DMZ feature allows you to specify one computer on your network to be placed outside of thefirewall. This may be necessary if the firewall is causing problems with an application such as agame or video conferencing application. Use this feature on a temporary basis. The computer inthe DMZ is NOT protected from hacker attacks.[DMZ.tif]To put a computer in the DMZ, enter the last digits of its IP address in the IP field and select“Enable”. Click “Apply Changes” for the change to take effect. If you are using multiple staticWAN IP addresses, it is possible to select which WAN IP address the DMZ host will be directedto. Type in the WAN IP address you wish the DMZ host to direct to, enter the last two digits of theIP address of the DMZ host computer, select “Enable” and click “Apply Changes”.Using Dynamic DNSThe Dynamic DNS service allows you to alias a dynamic IP address to a static host name in anyof the many domains DynDNS.org offers, allowing your network computers to be more easilyaccessed from various locations on the Internet. DynDNS.org provides this service, for up to fivehost names, free to the Internet community.The Dynamic DNSSM service is ideal for a home website, file server, or to make it easy to accessyour home PC and stored files while you’re at work. Using the service can ensure that your hostname always points to your IP address, no matter how often your ISP changes it. When your IPaddress changes, your friends and associates can always locate you by visitingyourname.dyndns.org instead!To register free for your Dynamic DNS host name, please visit http://www.dyndns.org.Setting up the Router’s Dynamic DNS Update ClientYou must register with DynDNS.org’s free update service before using this feature. Once youhave your registration, follow the directions below.](https://usermanual.wiki/Airgo-Networks/AGN0901AP0100/User-Guide-463806-Page-45.png)
![F5D8230-4 user draft.doc Page 46 of 891. Enter your DynDNS.org user name in the “User Name” field (1).2. Enter your DynDNS.org password in the “Password” field (2).3. Enter the DynDNS.org domain name you set up with DynDNS.org in the “Domain Name” field(3).4. Click “Update Dynamic DNS” to update your IP address.Whenever your IP address assigned by your ISP changes, the Router will automatically updateDynDNS.org’s servers with your new IP address. You can also do this manually by clicking the“Update Dynamic DNS” button (4).[dyndns.tif] [pm: text in screenshot above doesn’t make sense, looks like a word ismissing after “Router”]Blocking an ICMP PingComputer hackers use what is known as “pinging” to find potential victims on the Internet. Bypinging a specific IP address and receiving a response from the IP address, a hacker candetermine that something of interest might be there. The Router can be set up so it will notrespond to an ICMP ping from the outside. This heightens your Router’s security level.(1)(2)(3)(4)](https://usermanual.wiki/Airgo-Networks/AGN0901AP0100/User-Guide-463806-Page-46.png)
![F5D8230-4 user draft.doc Page 47 of 89[block_WAN_ping.tif]To turn off the ping response, select “Block ICMP Ping” (1) and click “Apply Changes”. TheRouter will not respond to an ICMP ping.UtilitiesThe “Utilities” screen lets you manage different parameters of the Router and perform certainadministrative functions.[F5D7230-4_Utilities.tif]Parental ControlSee the included Parental Control User Manual for more information on the Parental Controlfeature.Restarting the RouterSometimes it may be necessary to restart or reboot the Router if it begins working improperly.Restarting or rebooting the Router will NOT delete any of your configuration settings.[restart router_1.tif] [pm: “restarting” misspelled in screenshot above, it’s been like thatfor …. umm ….. two years??? Can we get it fixed someday?]Restarting the Router to Restore Normal Operation1. Click the “Restart Router” button.(1)](https://usermanual.wiki/Airgo-Networks/AGN0901AP0100/User-Guide-463806-Page-47.png)
![F5D8230-4 user draft.doc Page 48 of 892. The following message will appear. Click “OK”.[restart router_2.tif]3. The following message will appear. Restarting the Router can take up to 60 seconds. It isimportant not to turn off the power to the Router during the restart.[restart router_3.tif]4. A 60-second countdown will appear on the screen. When the countdown reaches zero, theRouter will be restarted. The Router home page should appear automatically. If not, type inthe Router’s address (default = 192.168.2.1) into the navigation bar of your browser.Restoring Factory Default SettingsUsing this option will restore all of the settings in the Router to the factory (default) settings. It isrecommended that you back up your settings before you restore all of the defaults.[restore_defaults.tif]1. Click the “Restore Defaults” button.2. The following message will appear. Click “OK”.[restore_2.tif]](https://usermanual.wiki/Airgo-Networks/AGN0901AP0100/User-Guide-463806-Page-48.png)
![F5D8230-4 user draft.doc Page 49 of 893. The following message will appear. Restoring the defaults includes restarting the Router. Itcan take up to 60 seconds. It is important not to turn the power to the Router off during therestart.[restore_3.tif]4. A 60-second countdown will appear on the screen. When the countdown reaches zero, theRouter’s defaults will be restored. The Router home page should appear automatically. If itdoes not, type in the Router’s address (default = 192.168.2.1) into the navigation bar of yourbrowser.Saving a Current ConfigurationYou can save your current configuration by using this feature. Saving your configuration will allowyou to restore it later if your settings are lost or changed. It is recommended that you back upyour current configuration before performing a firmware update.[save_settings.tif]1. Click “Save”. A window called “File Download” will open. Click “Save”.[save_2.tif]](https://usermanual.wiki/Airgo-Networks/AGN0901AP0100/User-Guide-463806-Page-49.png)
![F5D8230-4 user draft.doc Page 50 of 892. A window will open that allows you to select the location where you want to save theconfiguration file. Select a location. You can name the file anything you want, or use thedefault name “Config”. Be sure to name the file so you can locate it yourself later. When youhave selected the location and name of the file, click “Save”.[save_3.tif]3. When the save is complete, you will see the window below. Click “Close”.[save_4.tif]The configuration is now saved.Restoring a Previous ConfigurationThis option will allow you to restore a previously saved configuration. [restore_settings.tif]](https://usermanual.wiki/Airgo-Networks/AGN0901AP0100/User-Guide-463806-Page-50.png)
![F5D8230-4 user draft.doc Page 51 of 891. Click “Browse”. A window will open that allows you to select the location of the configurationfile. All configuration files end with a “.bin”. Locate the configuration file you want to restoreand double-click on it.[restore config_2.tif]2. You will be asked if you want to continue. Click “OK”.[restore config_3.tif]3. A reminder window will appear. It will take up to 60 seconds for the configuration restorationto complete. Click “OK”.[restore config_4.tif]4. A 60-second countdown will appear on the screen. When the countdown reaches zero, theRouter’s configuration will be restored. The Router’s home page should appear automatically.If not, type in the Router’s address (default = 192.168.2.1) into the navigation bar of yourbrowser.](https://usermanual.wiki/Airgo-Networks/AGN0901AP0100/User-Guide-463806-Page-51.png)
![F5D8230-4 user draft.doc Page 52 of 89Updating FirmwareFrom time to time, Belkin may release new versions of the Router’s firmware. Firmware updatescontain feature improvements and fixes to problems that may have existed. When Belkin releasesnew firmware, you can download the firmware from the Belkin update website and update yourRouter’s firmware to the latest version.[firmware_update.tif]Checking for a New Version of FirmwareThe “Check Firmware” (1) button allows you to instantly check for a new version of firmware.When you click the button, a new browser window will appear informing you that either no newfirmware is available or that there is a new version available. If a new version is available, you willhave the option to download it.Downloading a New Version of FirmwareIf you click the “Check Firmware” button and a new version of firmware isavailable, you will see a screen similar to the one below:1. To download the new version of firmware, click “Download”.(1)(2)(3)](https://usermanual.wiki/Airgo-Networks/AGN0901AP0100/User-Guide-463806-Page-52.png)
![F5D8230-4 user draft.doc Page 53 of 892. A window will open that allows you to select the location where you want to save the firmwarefile. Select a location. You can name the file anything you want, or use the default name. Besure to locate the file in a place where you can locate it yourself later. When you haveselected the location, click “Save”.[save_3.tif]3. When the save is complete, you will see the following window. Click “Close”.[save_4.tif]The download of the firmware is complete. To update the firmware, follow thenext steps in “Updating the Router’s Firmware”.Updating the Router’s Firmware1. In the “Firmware Update” page, click “Browse” (2). A window will open thatallows you to select the location of the firmware update file.](https://usermanual.wiki/Airgo-Networks/AGN0901AP0100/User-Guide-463806-Page-53.png)
![F5D8230-4 user draft.doc Page 54 of 89[browse to FW.tif]2. Browse to the firmware file you downloaded. Select the file by double-clickingon the file name.3. The “Update Firmware” box will now display the location and name of thefirmware file you just selected. Click “Update”.[F5D7230-4_update_firmware_choose.tif]4. You will be asked if you are sure you want to continue. Click “OK”.[update firmware_3.tif]5. You will see one more message. This message tells you that the Router maynot respond for as long as one minute as the firmware is loaded into the](https://usermanual.wiki/Airgo-Networks/AGN0901AP0100/User-Guide-463806-Page-54.png)
![F5D8230-4 user draft.doc Page 55 of 89Router and the Router is rebooted. Click “OK”.[update firmware_4.tif]6. A 60-second countdown will appear on the screen. When the countdownreaches zero, the Router firmware update will be complete. The Router homepage should appear automatically. If not, type in the Router’s address (default= 192.168.2.1) into the navigation bar of your browser.Changing System SettingsThe “System Settings” page is where you can enter a new administrator password, set the timezone, enable remote management, and turn on and off the NAT function of the Router.Setting or Changing the Administrator PasswordThe Router ships with NO password entered. If you wish to add a password forgreater security, you can set a password here. Write down your password andkeep it in a safe place, as you will need it if you need to log into the Router in thefuture. It is also recommended that you set a password if you plan to use theremote management feature of your Router. [F5D7230-4_administrator_password.tif]Changing the Login Timeout SettingThe login timeout option allows you to set the period of time that you can be logged into theRouter’s advanced setup interface. The timer starts when there has been no activity. Forexample, imagine you have made some changes in the advanced setup interface, then left yourcomputer alone without clicking “Logout”. Assuming the timeout is set to 10 minutes, 10 minutesafter you leave, the login session will expire. You will have to log into the Router again to makeany more changes. The login timeout option is for security purposes and the default is set to 10minutes. Note: Only one computer can be logged into the Router’s advanced setup interface atone time.](https://usermanual.wiki/Airgo-Networks/AGN0901AP0100/User-Guide-463806-Page-55.png)
![F5D8230-4 user draft.doc Page 56 of 89Setting the Time and Time ZoneThe Router keeps time by connecting to a Simple Network Time Protocol (SNTP) server. Thisallows the Router to synchronize the system clock to the global Internet. The synchronized clockin the Router is used to record the security log and control client filtering. Select the time zonethat you reside in. If you reside in an area that observes daylight saving, then place a check markin the box next to “Enable Daylight Saving”. The system clock may not update immediately. Allowat least 15 minutes for the Router to contact the time servers on the Internet and get a response.You cannot set the clock yourself.[time and time zone.tif]Enabling Remote ManagementBefore you enable this advanced feature of your Belkin Router, MAKE SURE YOU HAVE SETTHE ADMINISTRATOR PASSWORD. Remote management allows you to make changes to yourRouter’s settings from anywhere on the Internet. There are two methods of remotely managingthe Router. The first is to allow access to the Router from anywhere on the Internet by selecting“Any IP address can remotely manage the Router”. By typing in your WAN IP address from anycomputer on the Internet, you will be presented with a login screen where you need to type in thepassword of your Router. The second method is to allow a specific IP address only to remotelymanage the Router. This is more secure, but less convenient. To use this method, enter the IPaddress you know you will be accessing the Router from in the space provided and select “Onlythis IP address can remotely manage the Router”. Before you enable this function, it isSTRONGLY RECOMMENDED that you set your administrator password. Leaving the passwordempty will potentially open your Router to intrusion.[remote management.tif]Enabling/Disabling NAT (Network Address Translation)Note: This advanced feature should be employed by advanced users only. Before enabling thisfunction, MAKE SURE YOU HAVE SET THE ADMINISTRATOR PASSWORD. Network AddressTranslation (NAT) is the method by which the Router shares the single IP address assigned byyour ISP with the other computers on your network. This function should only be used if your ISPassigns you multiple IP addresses or you need NAT disabled for an advanced systemconfiguration. If you have a single IP address and you turn NAT off, the computers on your](https://usermanual.wiki/Airgo-Networks/AGN0901AP0100/User-Guide-463806-Page-56.png)
![F5D8230-4 user draft.doc Page 57 of 89network will not be able to access the Internet. Other problems may also occur. Turning off NATwill not affect your firewall functions.[NAT enabling.tif]Enabling/Disabling UPnPUPnP (Universal Plug-and-Play) is yet another advanced feature offered by yourBelkin Router. It is a technology that offers seamless operation of voicemessaging, video messaging, games, and other applications that are UPnP-compliant. Some applications require the Router’s firewall to be configured in aspecific way to operate properly. This usually requires opening TCP and UDPports, and in some instances, setting trigger ports. An application that is UPnP-compliant has the ability to communicate with the Router, basically “telling” theRouter which way it needs the firewall configured. The Router ships with theUPnP feature disabled. If you are using any applications that are UPnP-compliant, and wish to take advantage of the UPnP features, you can enable theUPnP feature. Simply select “Enable” in the “UPnP Enabling” section of the“Utilities” page. Click “Apply Changes” to save the change.[UPnP.tif] Screenshot based on old 54g router FW, need new screenshottaken.Enabling/Disabling Auto Firmware UpdateThis innovation provides the Router with the built-in capability to automatically check for a newversion of firmware and alert you that the new firmware is available. When you log into theRouter’s advanced interface, the Router will perform a check to see if new firmware is available. Ifso, you will be notified. You can choose to download the new version or ignore it.[auto update firmware enabling.tif]Manually Configuring Network Settings](https://usermanual.wiki/Airgo-Networks/AGN0901AP0100/User-Guide-463806-Page-57.png)
![F5D8230-4 user draft.doc Page 58 of 89Set up the computer that is connected to the cable or DSL modem FIRST usingthese steps. You can also use these steps to add computers to your Router afterthe Router has been set up to connect to the Internet.Manually Configuring Network Settings in Mac OS up to 9.x1. Pull down the Apple menu. Select “Control Panels” and select “TCP/IP”.2. You will see the TCP/IP control panel. Select “Ethernet Built-In” or “Ethernet” in the “Connectvia:” drop-down menu (1). [xxxxxxx]3. Next to “Configure” (2), if “Manually” is selected, your Router will need to be set up for a staticIP connection type. Write the address information in the table below. You will need to enterthis information into the Router.[MacOS9 chart.tif](1)(2)](https://usermanual.wiki/Airgo-Networks/AGN0901AP0100/User-Guide-463806-Page-58.png)
![F5D8230-4 user draft.doc Page 59 of 894. If not already set, at “Configure:”, choose “Using DHCP Server”. This will tell the computer toobtain an IP address from the Router. [xxxxxxx]5. Close the window. If you made any changes, the following window will appear. Click “Save”.[xxxxxxx]Restart the computer. When the computer restarts, your network settings are nowconfigured for use with the Router.Manually Configuring Network Settings in Mac OS X1. Click on the “System Preferences” icon.[xxxxxxx]2. Select “Network” (1) from the “System Preferences” menu.[xxxxxxx]22(1)](https://usermanual.wiki/Airgo-Networks/AGN0901AP0100/User-Guide-463806-Page-59.png)
![F5D8230-4 user draft.doc Page 60 of 893. Select “Built-in Ethernet” (2) next to “Show” in the Network menu.[xxxxxxx]4. Select the “TCP/IP” tab (3). Next to “Configure” (4), you should see “Manually” or “UsingDHCP”. If you do not, check the PPPoE tab (5) to make sure that “Connect using PPPoE” isNOT selected. If it is, you will need to configure your Router for a PPPoE connection typeusing your user name and password.5. If “Manually” is selected, your Router will need to be set up for a static IP connection type.Write the address information in the table below. You will need to enter this information intothe Router.[MacOS9 chart.tif]6. If not already selected, select “Using DHCP” next to “Configure” (4), then click “Apply Now”.Your network settings are now configured for use with the Router.Manually Configuring Network Settings in Windows 2000, NT, or XP1. Click “Start”, “Settings”, then “Control Panel”.2. Double-click on the “Network and dial-up connections” icon (Windows 2000) or the “Network”icon (Windows XP).3. Right-click on the “Local Area Connection” associated with your network adapter and select“Properties” from the drop-down menu.(2)(3)(4)(5)](https://usermanual.wiki/Airgo-Networks/AGN0901AP0100/User-Guide-463806-Page-60.png)
![F5D8230-4 user draft.doc Page 61 of 894. In the “Local Area Connection Properties” window, click “Internet Protocol (TCP/IP)” and clickthe “Properties” button. The following screen will appear:[XP TCPIP.tif]5. If “Use the following IP address” (2) is selected, your Router will need to be set up for a staticIP connection type. Write the address information the table below. You will need to enter thisinformation into the Router.[win2k settings chart.tif]6. If not already selected, select “Obtain an IP address automatically” (1) and “Obtain DNSserver address automatically” (3). Click “OK”.Your network settings are now configured for use with the Router.(1)(2)(3)](https://usermanual.wiki/Airgo-Networks/AGN0901AP0100/User-Guide-463806-Page-61.png)
![F5D8230-4 user draft.doc Page 62 of 89Manually Configuring Network Settings in Windows 98 or Me1. Right-click on “My Network Neighborhood” and select “Properties” from the drop-down menu.2. Select “TCP/IP -> settings” for your installed network adapter. You will see the followingwindow.[98 Me IP properties.tif]3. If “Specify and IP address” is selected, your Router will need to be set up for a static IPconnection type. Write the address information in the table below. You will need to enter thisinformation into the Router.4. Write the IP address and subnet mask from the “IP Address” tab (3).5. Click the “Gateway” tab (2). Write the gateway address down in the chart.6. Click the “DNS Configuration” tab (1). Write the DNS address(es) in the chart.[win2k settings chart.tif](1)(2)(3)](https://usermanual.wiki/Airgo-Networks/AGN0901AP0100/User-Guide-463806-Page-62.png)
![F5D8230-4 user draft.doc Page 64 of 89Recommended Web Browser SettingsIn most cases, you will not need to make any changes to your web browser’s settings. If you arehaving trouble accessing the Internet or the Web-Based Advanced User Interface, then changeyour browser’s settings to the recommended settings in this section.Microsoft® Internet Explorer 4.0 or Higher1. Start your web browser. Select “Tools” then “Internet Options”.[IE Setup 1.tif]2. In the “Internet Options” screen, there are three selections: “Never dial a connection”, “Dialwhenever a network connection is not present”, and “Always dial my default connection”. Ifyou can make a selection, select “Never dial a connection”. If you cannot make a selection,go to the next step.[IE Setup 2.tif]3. Under the “Internet Options” screen, click on “Connections” and select “LAN Settings…”.](https://usermanual.wiki/Airgo-Networks/AGN0901AP0100/User-Guide-463806-Page-64.png)
![F5D8230-4 user draft.doc Page 65 of 894. Make sure there are no check marks next to any of the displayed options: “Automaticallydetect settings”, “Use automatic configuration script”, and “Use a proxy server”. Click “OK”.Then click “OK” again in the “Internet Options” page.[IE Setup 3.tif need to fix]Netscape® Navigator® 4.0 or Higher1. Start Netscape. Click on “Edit” then “Preferences”.2. In the “Preferences” window, click on “Advanced” then select “Proxies”. In the “Proxies”window, select “Direct connection to the Internet”.[NS6 Setup 1.tif]](https://usermanual.wiki/Airgo-Networks/AGN0901AP0100/User-Guide-463806-Page-65.png)
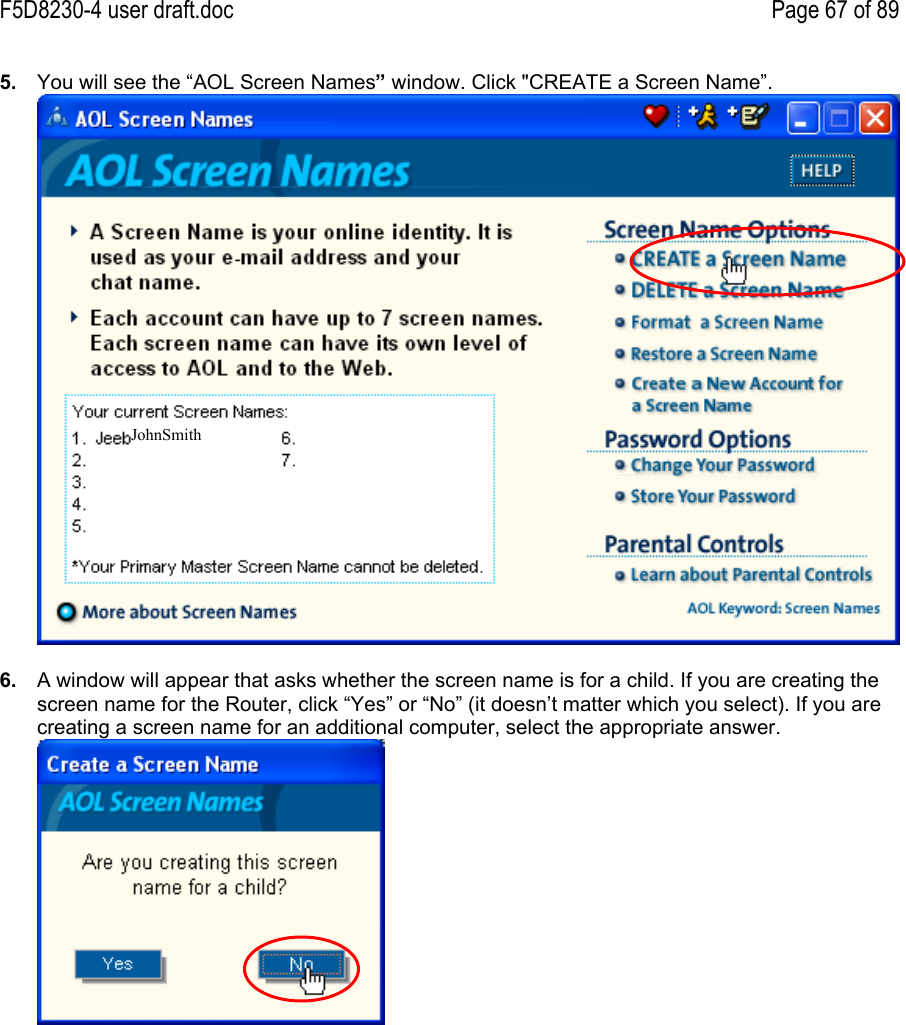
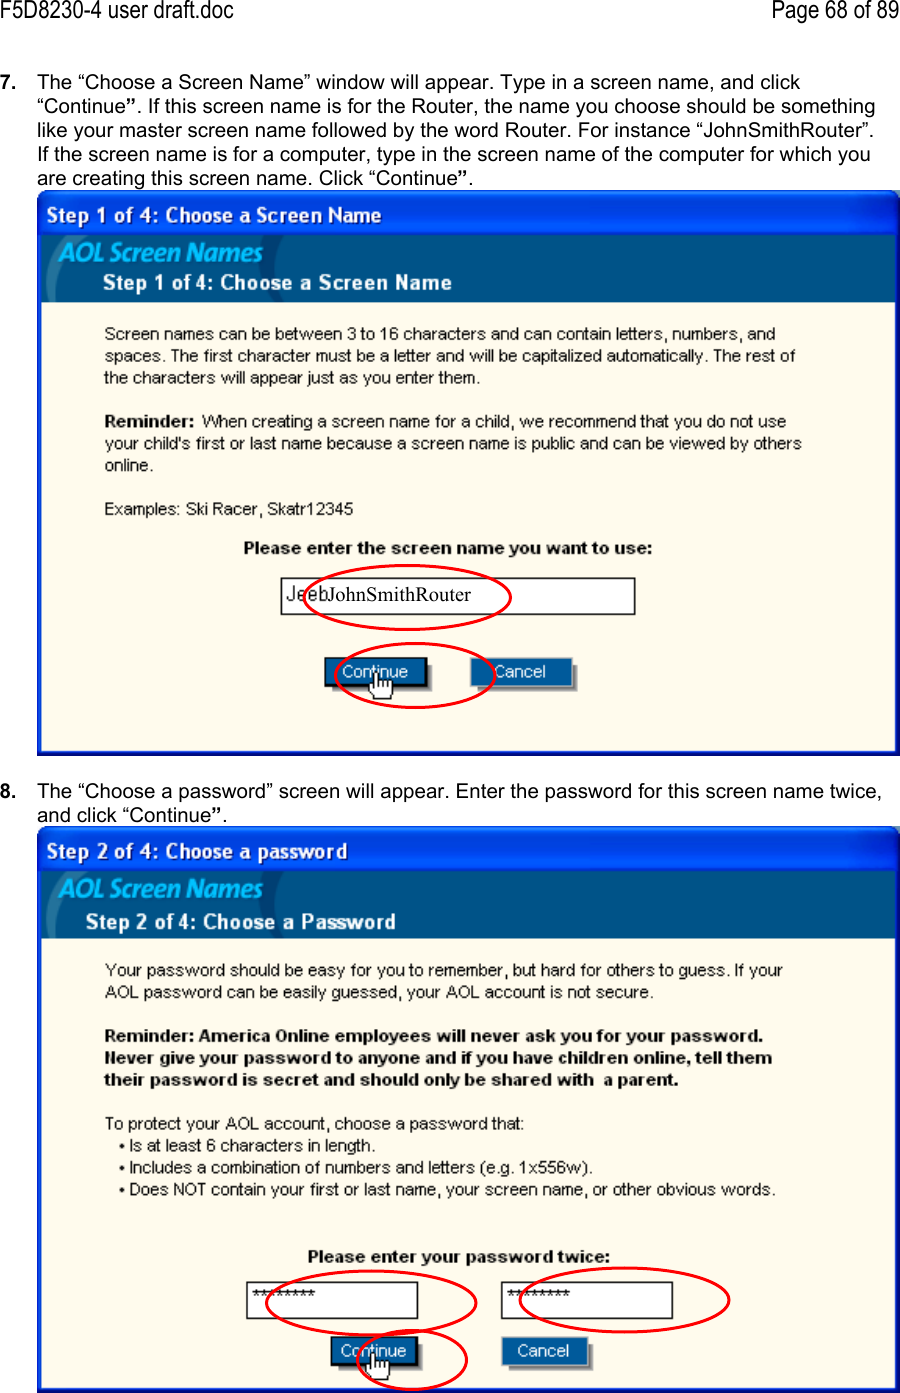
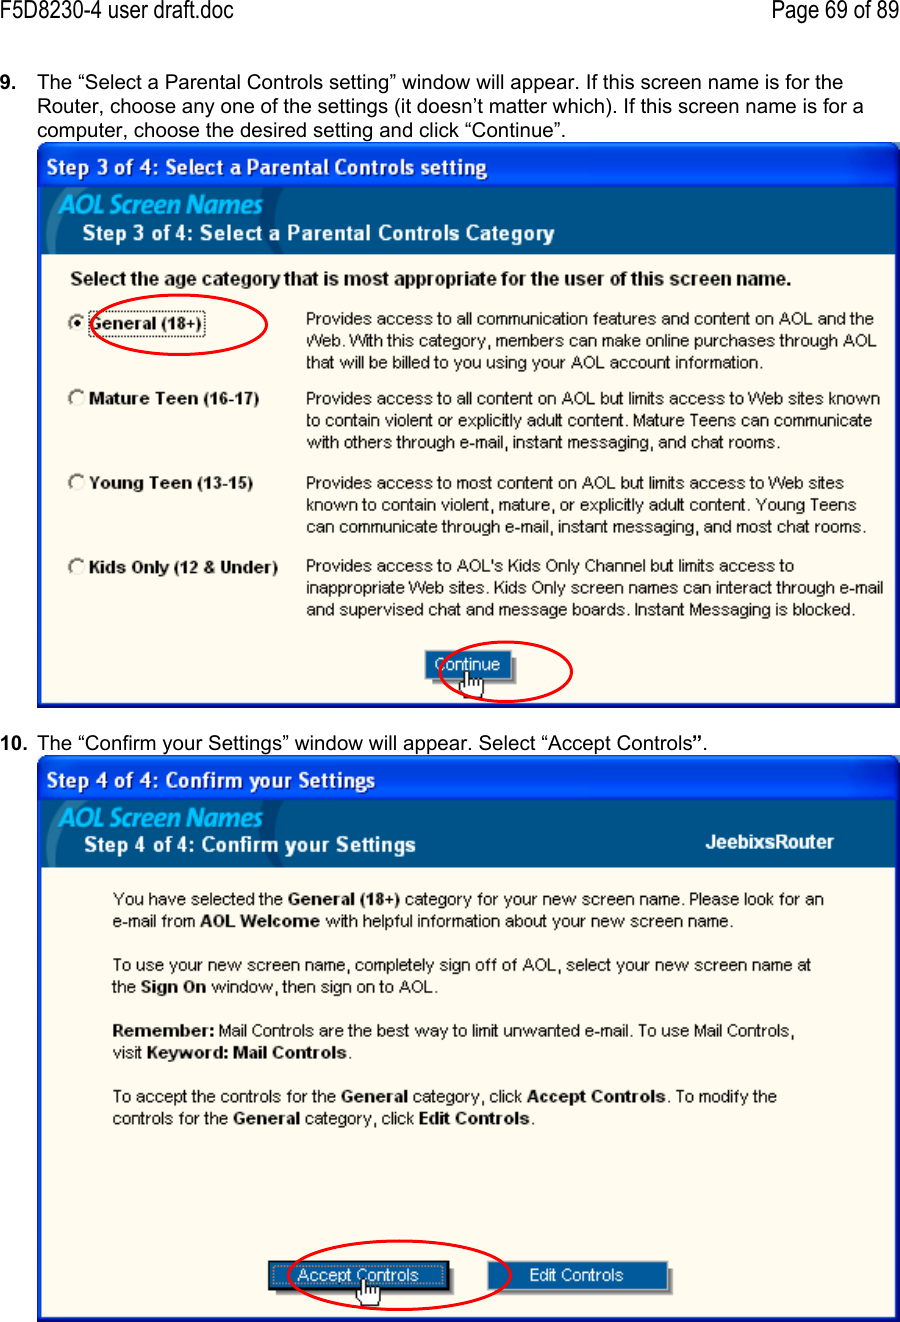
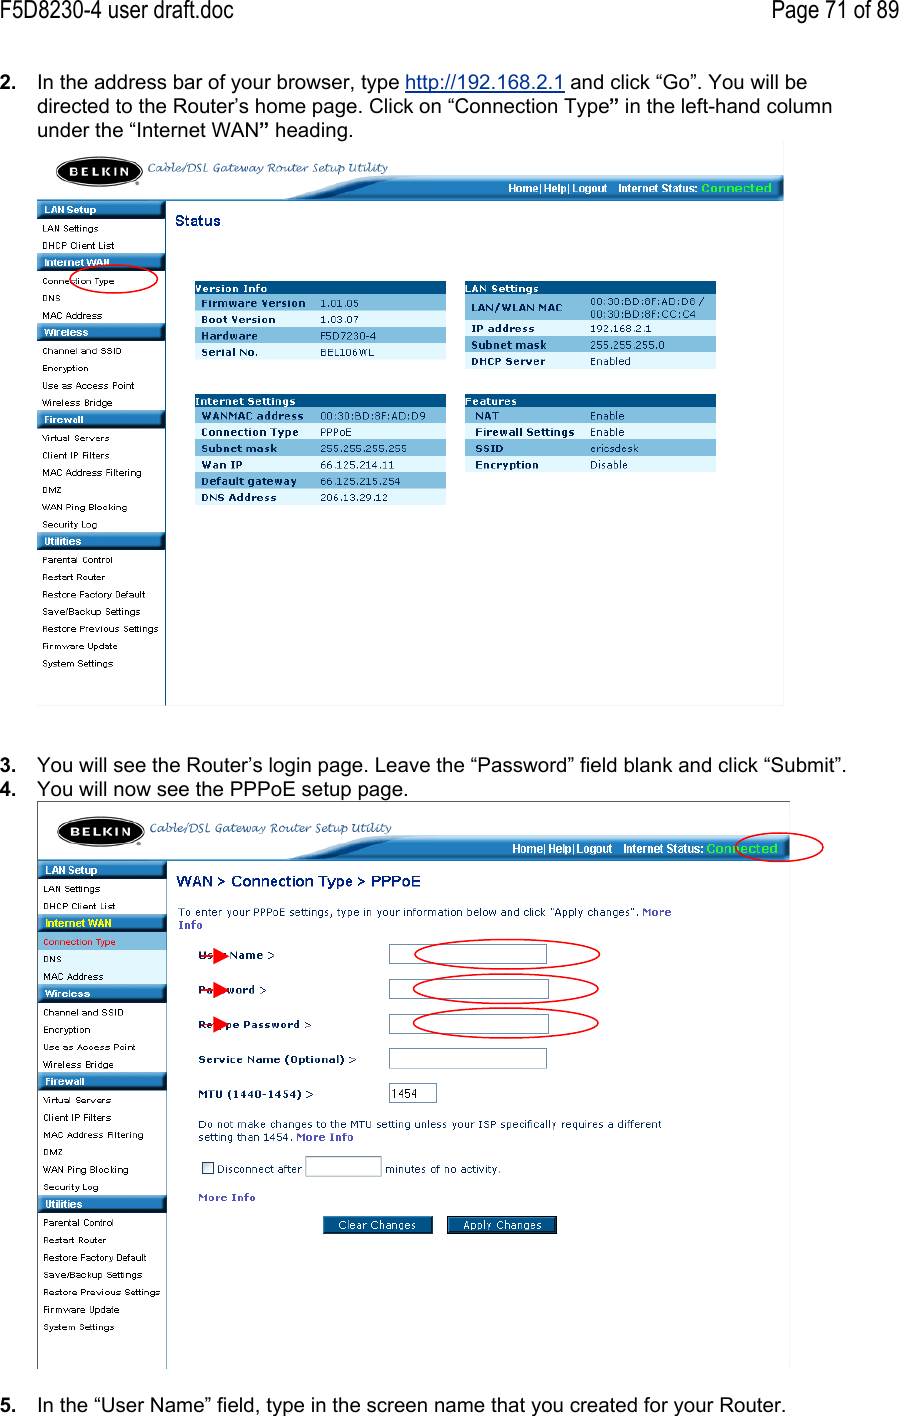
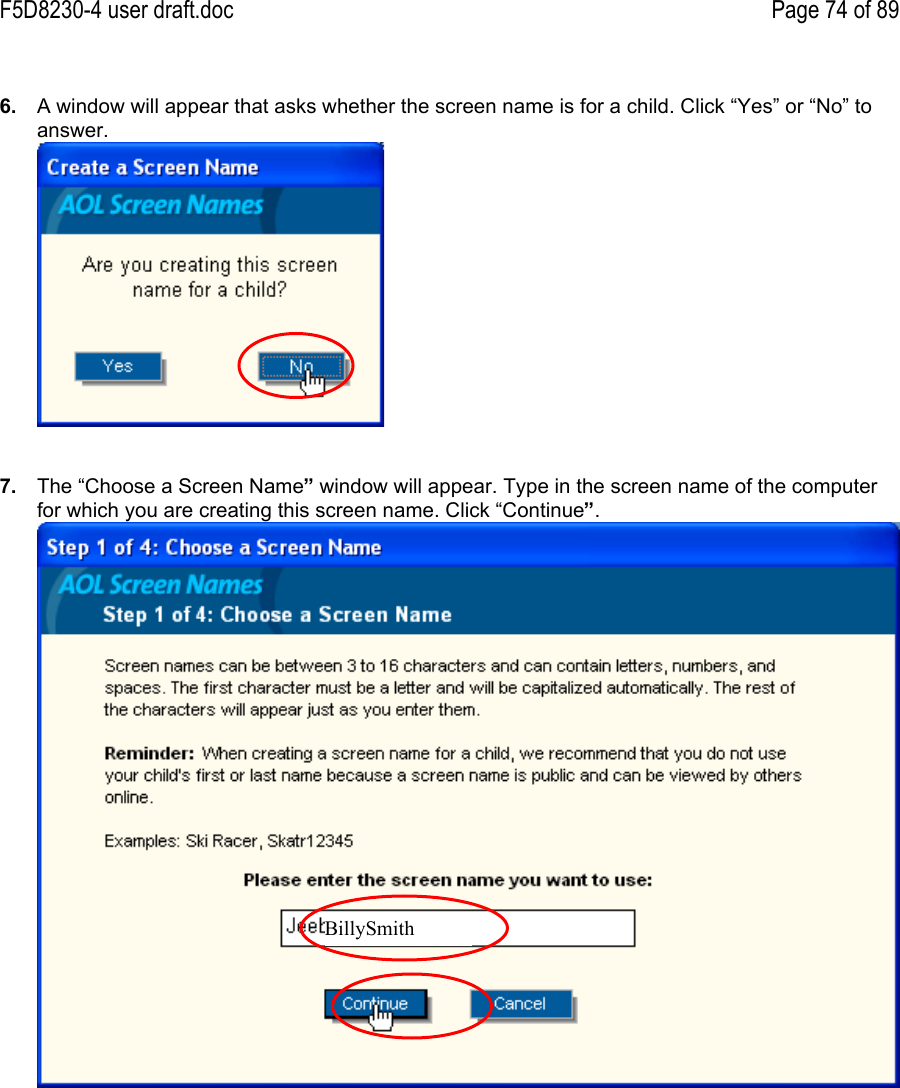
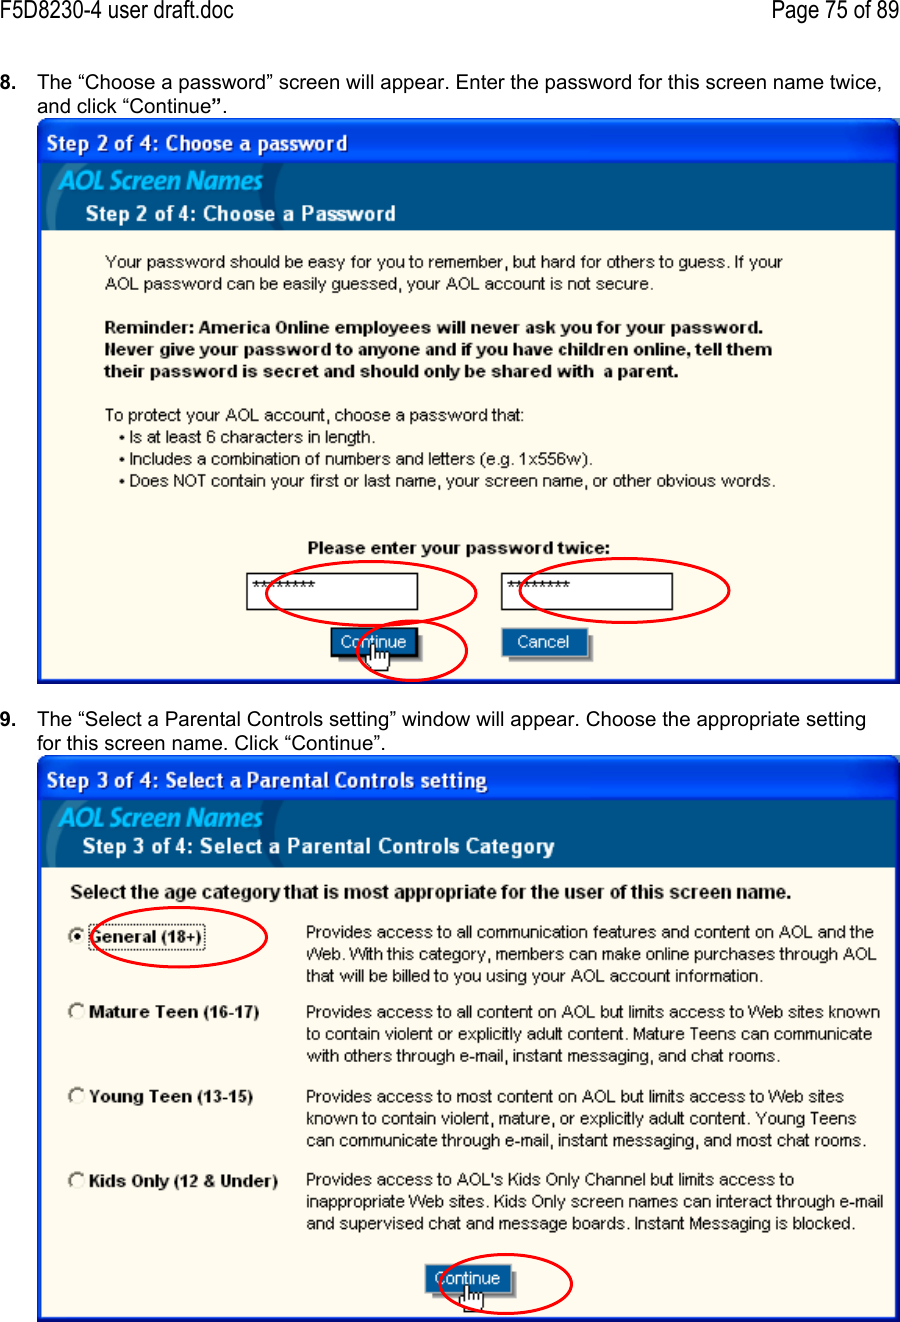
![F5D8230-4 user draft.doc Page 66 of 89How to Set Up your Network to Operate with AOL® for Broadband and yourNew Belkin RouterThere are two types of AOL connections available—either AOL DSL or AOL Cable. A thirdservice is called AOL BYOA (Bring Your Own Access). This is used along with an existingbroadband connection, supplied by your Internet Service Provider (ISP). If you have AOL DSL,please refer to “Directions for AOL DSL Users” below for setup instructions. If you have eitherAOL Cable or the AOL BYOA service, please go to the “Directions for AOL Cable Users” sectionof this guide, on page XX [confirm page no.].Directions for AOL DSL Users• STEP 1: Create AOL screen names for the Router and for each computer that will beusing your AOL service.• STEP 2: Configure the Router for AOL for Broadband.• STEP 3: Configure your computers with the new AOL screen names you just created.AOL DSL Users STEP 1: Creating new AOL screen namesNote: Your AOL connections must be set to operate on the TCP/IP standard. If you havedesignated another protocol, reset them to TCP/IP before proceeding.1. If your Router is currently connected to the network, remove it from the network and connectit directly to your broadband modem. Then, log on to AOL as you normally do.2. Log on to your AOL master account.3. Perform a keyword search on “names” by clicking “Keyword”, and then “Go to Keyword”.4. In the “Keyword” window, type in “names” then click “Go”.](https://usermanual.wiki/Airgo-Networks/AGN0901AP0100/User-Guide-463806-Page-66.png)
![F5D8230-4 user draft.doc Page 72 of 896. In the “Password” fields, type in the password you created for the Router’s screen name.7. Leave the “Service Name” field blank. Do not change the MTU setting.8. Click on “Apply Changes”.9. Click on the “Home” link at the top of the screen. The Internet Status indicator should read“Connected”.10. Go to AOL DSL Users STEP 3.AOL DSL Users STEP 3: Configure your computers with the AOL screen names you justcreatedThis step consists of installing the AOL software on each computer and configuring it to use oneof the screen names you created in STEP 1. Remember that each computer MUST use adifferent screen name. For help installing and configuring the AOL software, contact AOL’stechnical support department.AOL DSLAOL Cable or AOL BYOA (Bring Your Own Access) User DirectionsAOL Cable users need to follow these directions. If you have AOL DSL, go to the “Directions forAOL DSL” section beginning on page xx [confirm page no].1. AOL Cable Users STEP 1: Create AOL screen names for each computer that will be usingyour AOL service.](https://usermanual.wiki/Airgo-Networks/AGN0901AP0100/User-Guide-463806-Page-72.png)

![F5D8230-4 user draft.doc Page 78 of 89Installation CD does not automatically start.If the CD-ROM does not start the Easy Install Wizard automatically, it could be that the computeris running other applications that are interfering with the CD drive.1. If the Easy Install Wizard screen does not appear within 15-20 seconds, open up your CD-ROM drive by double-clicking on the “My Computer” icon that is located on your desktop.2. Next, double-click on the CD-ROM drive that the Easy Installation CD has been placed in tostart the installation.3. The Easy Install Wizard should start within a few seconds. If, instead, a window appearsshowing the files on the CD, double-click on the icon labeled “EasyInstall.exe”.If the Easy Install Wizard still does not start, reference the section titled “Manually ConfiguringNetwork Settings” (page xx [confirm page no. ] of this User Manual for an alternative setupmethod).Easy Install Wizard cannot find my Router.If the Easy Install Wizard is not able to find the Router during the installation process, pleasecheck the following items:1. If the Easy Install Wizard is not able to find the Router during the installation process, theremay be third-party firewall software installed on the computer attempting to access theInternet. Examples of third-party firewall software are ZoneAlarm, BlackICE PC Protection,McAfee Personal Firewall, and Norton Personal Firewall. If you do have firewall softwareinstalled on your computer, please make sure that you properly configure it. You candetermine if the firewall software is preventing Internet access by temporarily turning it off. If,while the firewall is disabled, Internet access works properly, you will need to change thefirewall settings to function properly when it is turned on. Please refer to the instructionsprovided by the publisher of your firewall software for instructions on configuring the firewallto allow Internet access.2. Unplug power to the Router for 10 seconds, and then plug the power back into the Router.Ensure that the Router’s Power light is on; it should be solid green. If not, check to make surethat the AC adapter is connected to the Router and plugged into a wall outlet.3. Ensure that you have a cable (use the cable included with the Router) connected between (1)the network (Ethernet) port on the back of the computer and (2) one of the LAN ports, labeled“1” through “4”, on the back of the Router.Note: The computer should NOT be connected to the port labeled “Internet/WAN” on theback of the Router.4. Try shutting down and restarting your computer, then rerunning the Easy Install Wizard.If the Easy Install Wizard is still unable to find the Router, reference the section titled “ManuallyConfiguring Network Settings” for installation steps.](https://usermanual.wiki/Airgo-Networks/AGN0901AP0100/User-Guide-463806-Page-78.png)
![F5D8230-4 user draft.doc Page 81 of 89I can’t connect to the Internet wirelessly, but my network name is listed.If the name of your network is listed in the “Available Networks” list, please follow the steps belowto connect wirelessly:1. Click on the correct network name in the “Available Networks” list.2. If the network has security (encryption) enabled, you will need to enter the network key. Formore information regarding security, see the page entitled “Setting Up Wireless Security”.3. Within a few seconds, the tray icon in the lower, left-hand corner of your screen should turngreen, indication of a successful connection to the network.I can’t connect to the Internet wirelessly, and my network name is not listed.If the correct network name is not listed under “Available Networks” in the wireless utility, pleaseattempt the following troubleshooting steps:1. Temporarily move computer, if possible, five to 10 feet from the Router. Close the wirelessutility, and reopen it. If the correct network name now appears under “Available Networks”,you may have a range or interference problem. Please see the suggestions discussed in thesection titled “Placement of your Wireless Networking Hardware” of this User Manual.2. Using a computer that is connected to the Router via a network cable (as opposed towirelessly), ensure that “Broadcast SSID” is enabled. This setting is found on the Router’swireless “Channel and SSID” configuration page.If you are still unable to access the Internet after completing these steps, please contact BelkinTechnical Support.• My wireless network performance is inconsistent.• Data transfer is sometimes slow.• Signal strength is poor.• Difficulty establishing and/or maintaining a Virtual Private Network (VPN) connection.Wireless technology is radio-based, which means connectivity and the throughput performancebetween devices decreases when the distance between devices increases. Other factors that willcause signal degradation (metal is generally the worst culprit) are obstructions such as walls andmetal appliances. Note also that connection speed may decrease as you move farther away fromthe Router (or access point).In order to determine if wireless issues are related to range, we suggest temporarily moving thecomputer, if possible, five to 10 feet from the Router.Changing the wireless channel—Depending on local wireless traffic and interference, switchingthe wireless channel of your network can improve performance and reliability. The defaultchannel the Router is shipped with is channel 11; you may choose from several other channelsdepending on your region. See the section on page XX [insert the correct pg no.] entitled“Changing the Wireless Channel” for instructions on how to choose other channels.Limiting the wireless transmit rate—Limiting the wireless transmit rate can help improve themaximum wireless range and connection stability. Most wireless cards have the ability to limit thetransmission rate. To change this property, go to the Windows Control Panel, open “NetworkConnections” and double-click on your wireless card’s connection. In the properties dialog, selectthe “Configure” button on the “General” tab (Windows 98 users will have to select the wirelesscard in the list box and then click “Properties”), then choose the “Advanced” tab and select therate property.](https://usermanual.wiki/Airgo-Networks/AGN0901AP0100/User-Guide-463806-Page-81.png)

![F5D8230-4 user draft.doc Page 85 of 89I am NOT using a Belkin client card for a home network and I am having difficulty settingup Wireless Protected Access (WPA) security.If you are not using a Belkin Wireless Desktop or Wireless Notebook Network Card that is notequipped with WPA-enabled software, a file from Microsoft called “Windows XP Support Patch forWireless Protected Access” is available for free download. Download the patch from Microsoft bysearching the knowledge base for Windows XP WPA.Note: The file that Microsoft has made available works only with Windows XP. Other operatingsystems are not supported at this time. You also need to ensure that the wireless card’smanufacturer supports WPA and that you have downloaded and installed the latest driver fromtheir support site.Supported Operating Systems:• Windows XP Professional• Windows XP Home EditionEnabling WPA-PSK (no server)1. Under Windows XP, click “Start > Control Panel > Network Connections”.2. Right-clicking on the “Wireless Networks” tab will display the following screen. Ensure the“Use Windows to configure my wireless network settings” check box is checked. [needimage]3. Under the “Wireless Networks” tab, click the “Configure” button and you will see the followingscreen. [need image]4. For a home or small business user, select “WPA-PSK” under “Network Administration”.Note: Select WPA (with radius server) if you are using this computer to connect to a corporatenetwork that supports an authentication server such as a radius server. Please consult yournetwork administrator for further information.5. Select “TKIP” or “AES” under “Date Encryption”. This setting will have to be identical to theWireless Router (or Access Point) that you set up.6. Type in your encryption key in the “Network Key” box.Important: Enter your pre-shared key. This can be from eight to 63 characters and can be letters,numbers, or symbols. This same key must be used on all of the clients that you set up.7. Click “OK” to apply settings.[REPLACE BELOW WITH TEXT FROM RECENT F5D8010 manual]What’s the difference between 802.11b, 802.11g and 802.11a?Currently there are three levels of wireless networking standards, which transmit data at verydifferent maximum speeds. Each is based on the designation 802.11x, so named by the IEEE,the board that is responsible for certifying networking standards. The most common wirelessnetworking standard, 802.11b, transmits information at 11Mbps; 802.11a and 802.11g work at54Mbps. See the following chart for more detailed information.Wireless Comparison[REPLACE BELOW WITH CHART FROM RECENT F5D8010 manual]](https://usermanual.wiki/Airgo-Networks/AGN0901AP0100/User-Guide-463806-Page-85.png)