Angelcare Canada AC1300R Video Baby Monitor - Parent Unit User Manual
Angelcare Monitors Inc. Video Baby Monitor - Parent Unit
UserManual.wiki
>
Angelcare Canada
>
AC1300R User Manual
User Manual
Navigation menu
Upload a User Manual
Namespaces
Wiki Guide
HTML
PDF
Info
Views
User Manual
Discussion / Help
Navigation
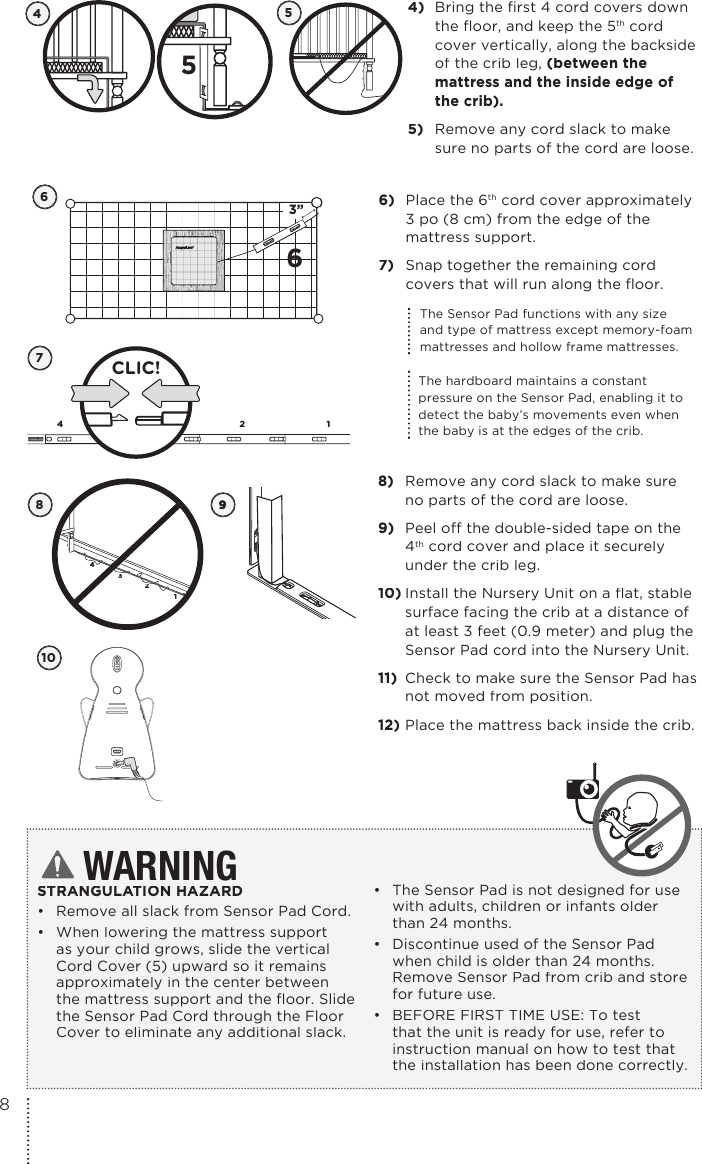
![1. THIS PRODUCT CANNOT REPLACE RESPONSIBLE ADULT SUPERVISION. This product is designed to aid in the monitoring of your child. When using the monitor, you must still provide the supervision necessary for the continued safety of your child. Monitoring of premature babies, or those considered to be at risk, should always be carried out under the supervision of a health professional. This monitor is not intended to be used as a medical monitor.2. WARNING Strangulation Hazard — Children have STRANGLED in cords. Keep adapter cords out of the reach of children (more than 3 feet [0.9 meter] away). NEVER use Sensor Pad(s) without the protective cord covering. Check protective cord covering before each use. Immediately discontinue use of Sensor Pad(s) if protective covering is damaged or broken.3. Never use extension cords with adapters. ONLY use the adapters provided. 4. When an adapter is plugged into an electrical outlet, DO NOT touch the exposed end.5. ALWAYS be sure that both the transmitter and receiver are working properly and are within range of each other. Test the monitor before fi rst use, periodically and when changing location of the Nursery Unit.6. ALWAYS be sure to immediately check on baby whenever an alarm sounds. 7. DO NOT use monitor near water (such as bath tub, sink, etc.). CAUTIONRISK OF ELECTRIC SHOCKDO NOT OPENDO NOT EXPOSE TO RAIN OR MOISTURE8. Keep monitor AWAY from heat sources (such as stoves, radiators, etc.). 9. ALWAYS place both the Nursery Unit and the Parent Unit on a fl at surface in an upright position and allow for proper ventilation. DO NOT place on sofas, cushions, beds, etc. which may block ventilation.10. This monitor uses public airwaves to transmit signals. The Parent Unit may pick up signals or interference from other nursery monitors in your area. Your monitor may even be picked up by other households. To protect your privacy, make sure both units are turned OFF when not in use. If you experience interference, change the channel on both units.11. This product is NOT a toy. DO NOT allow children to play with it. 12. This product contains small parts. Adult assembly required. Exercise care when unpacking and assembling the product and keep small parts away from children.13. When using the monitor, the room temperature should be between 50°F (10°C) and 104°F (40°C). BATTERY WARNING14. Use ONLY the enclosed lithium rechargeable battery that came with the Parent Unit. In the Nursery Unit, DO NOT mix old and new batteries. DO NOT mix alkaline, standard or rechargeable batteries. Insert batteries with correct polarity. DO NOT short-circuit supply terminals. ONLY use the recommended batteries or equivalent (volts and size) and the correct adapter. Remove batteries in the Nursery Unit when product is stored for long periods of time or when batteries are exhausted. Dispose exhausted batteries properly. Keep all batteries away from children.15. IMPORTANT SAFETY INSTRUCTIONS15.1 Heed all warnings – All warnings on the product and in the operating instructions should be adhered to.15.2 Follow all instructions – All operating and use instructions should be followed.15.3 Water and moisture - DO NOT use this apparatus near water. For example, near a bath tub, wash bowl, kitchen sink, laundry tub, in a wet environment or near a swimming pool and the like. Care should be taken so that objects DO NOT fall onto units and that liquids are not spilled into either unit or Sensor Pad through its openings.15.4 Cleaning - Disconnect all units before cleaning. DO NOT immerse in water any part of the monitor. Clean only with dry cloth. 15.5 Ventilation - DO NOT block any ventilation openings. Allow for proper ventilation when units are in use. DO NOT cover the Nursery Unit or the Parent Unit with any object such as a blanket. DO NOT place it in a drawer or in any location which would muffl e the sound or interfere with the normal fl ow of air.15.6 Heat sources - DO NOT install near any heat sources such as radiators, heat registers, stoves, TVs or other apparatus (including amplifi ers) that produce heat. Heat can damage the case or electrical parts.15.7 Power cord protection - Protect the Sensor Pad cord and Adapter’s power cord from being walked on or pinched by furniture or other items – Power supply cords should be routed so that they are not likely to be walked on or pinched by items upon or against them, paying particular attention to cords and plugs, convenience receptacle, and the point where they exit from the product. The socket outlet shall be installed near the equipment and shall be easily accessible. Make sure to plug the adapter to the socket outlet nearest to the equipment and that is easily accessible. To disconnect from mains, unplug the adapter.15.8 Accessories - Only use attachments/accessories specifi ed by the manufacturer. DO NOT place this product on an unstable cart, stand, tripod, bracket or table. The product may fall, causing serious injury to a child or adult and serious damage to the product. Use ONLY with a WARNINGS3EN](https://usermanual.wiki/Angelcare-Canada/AC1300R/User-Guide-2828906-Page-3.png)
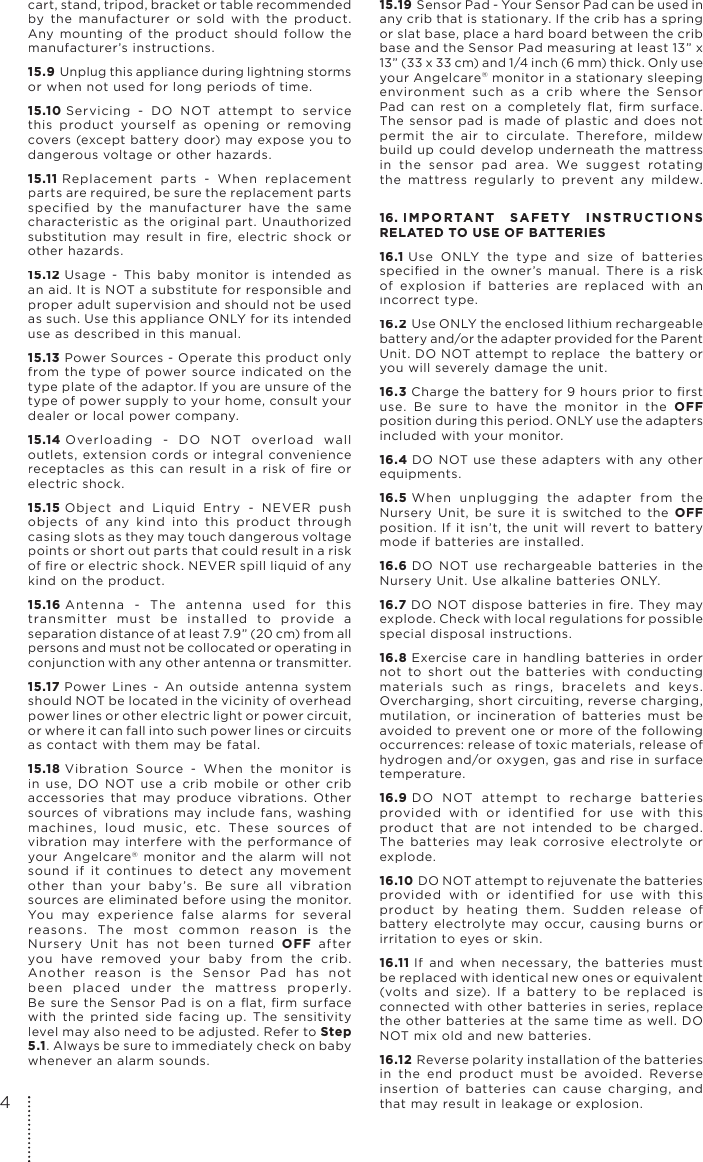
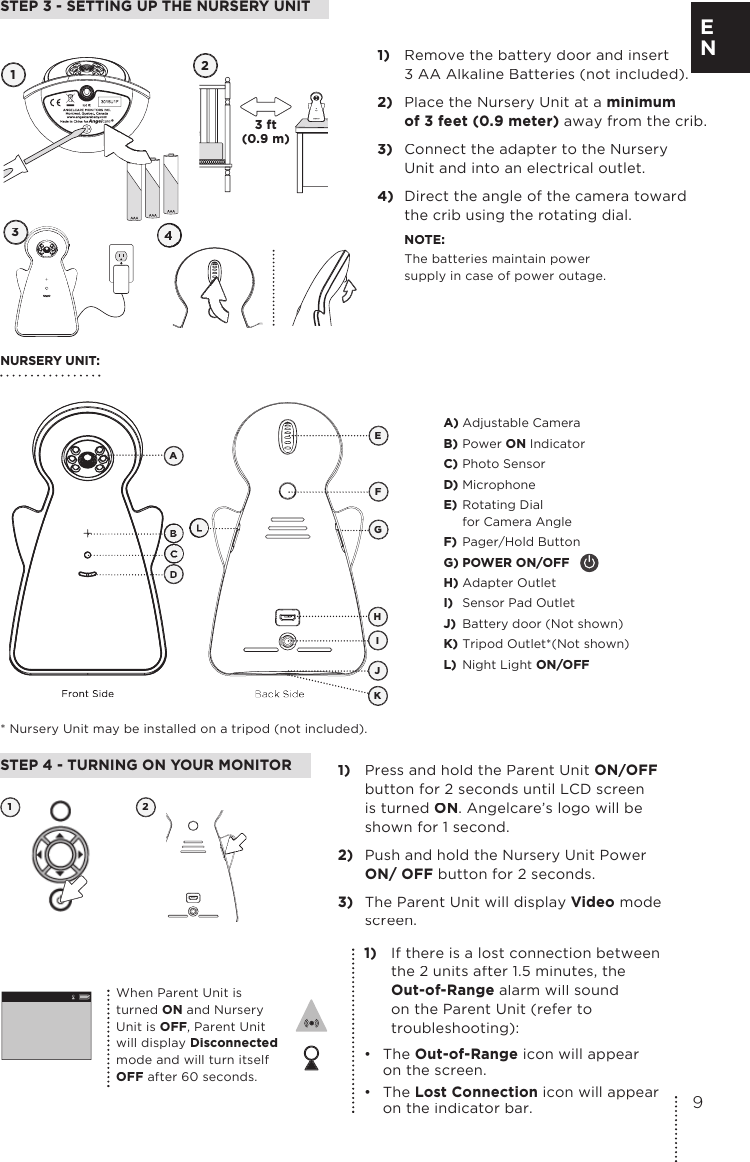
![STEP 1 - CHARGING THE PARENT UNIT (9 HOURS)1) Connect the adapter to theParent Unit and into an electrical outlet.2) Charge the unit for 9 continuoushours (prior to first use). IMPORTANTThe Parent Unit uses a non-removable rechargeable lithium battery. DO NOT attempt to change it.NOTE:To optimize your battery performance please refer to Battery Guidelines in the Troubleshooting section.12PARENT UNIT:Front SideRight SideA) 3.5” LCD ScreenB) Power ON/OFFIndicatorC) VOX IndicatorD) Sound Light IndicatorE) Zoom buttonF) VIDEO ON/OFF buttonG) MENU/SELECT buttonH) Brightness (+ or -)I) Power ON/OFFJ) UP/DOWN buttonK) Adapter Outlet L) Speaker (not shown) M) TripodKMLWARNINGSTRANGULATION HAZARD.Children have STRANGLED in cords: • Keep adapter cords out of the reach of children (more than 3 feet [0.9 meter] away).• Because of the serious strangulation risk to infants and toddlers, parents and caregivers should never place the Nursery Unit within 3 feet (0.9 meter) of a crib.• NEVER use Sensor Pad without the cord covers. Check cord covers before each use to ensure it is securely placed under the leg of the crib. Discontinue use of Sensor Pad if any cord covers are damaged or broken. • NEVER use extension cords with adapters. ONLY use the adapters provided. This product is not a toy. Never allow children to play with it.BCDAEFGHIJ6](https://usermanual.wiki/Angelcare-Canada/AC1300R/User-Guide-2828906-Page-6.png)
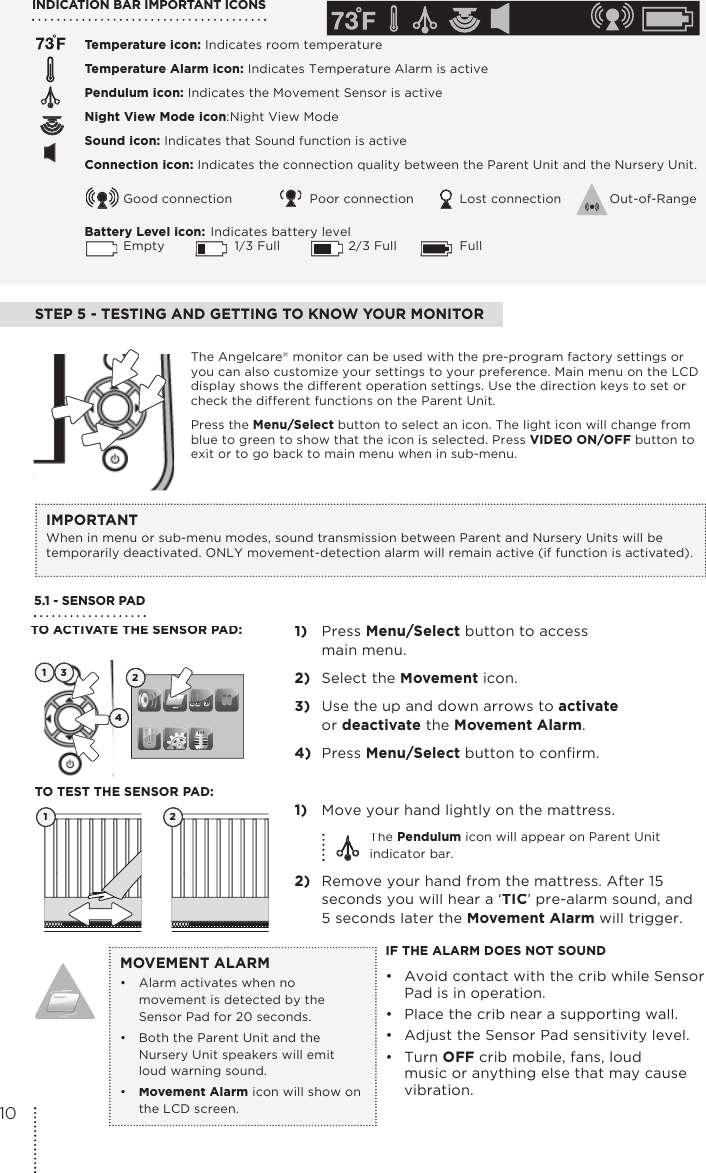
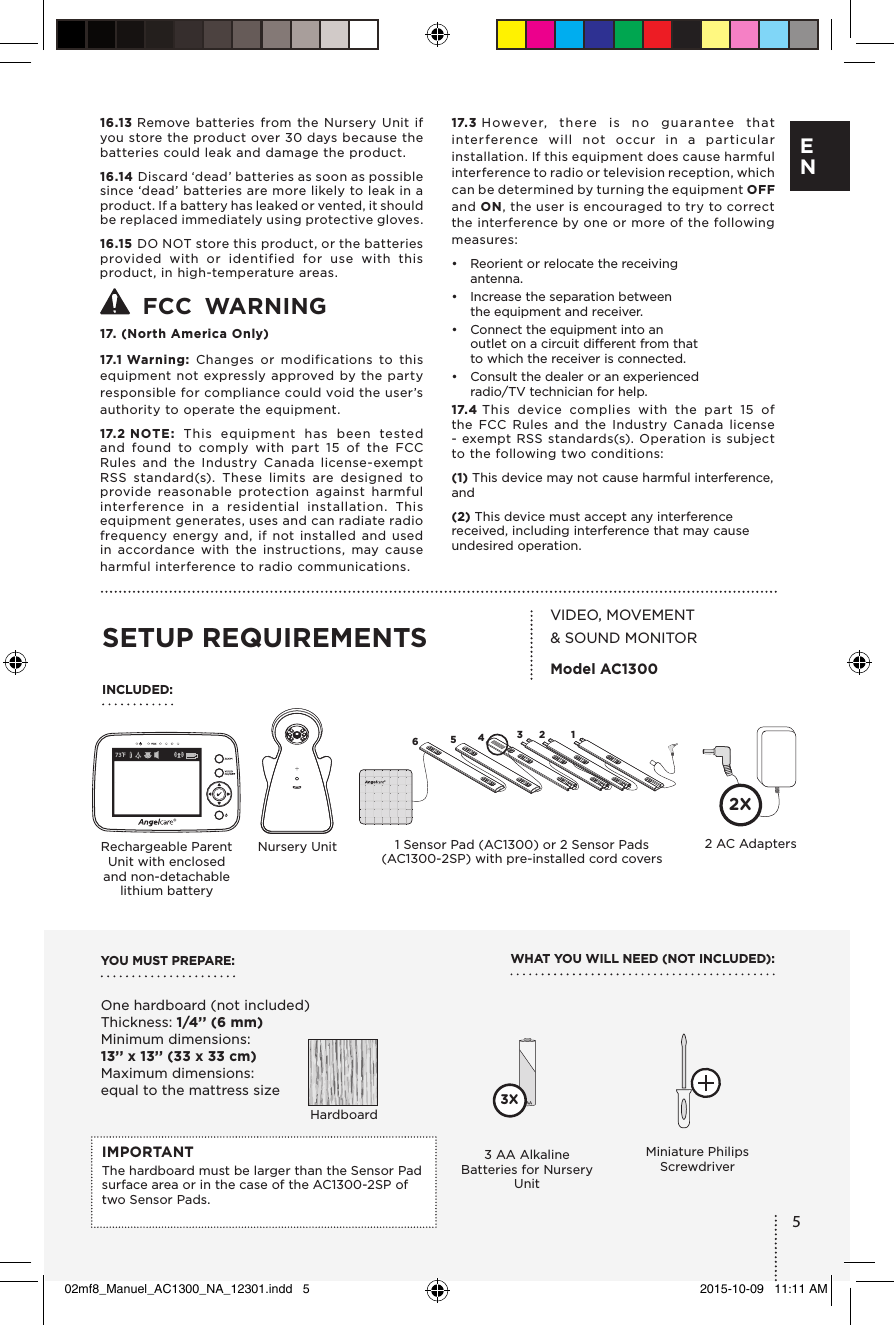
![STEP 2 - INSTALLING THE SENSOR PAD65432 1Cord covers 1, 2, 3, 4: Position on fl oor Cord cover 4:Contains double sided tape to securely install beneath crib legCord cover5:Position vertically between mattress support and fl oorCord cover6:Place under the mattressSensor Pad with pre-installed cord covers2.1 - SELECT A LOCATION FOR THE NURSERY UNIT Select a location for the Nursery Unit that is at least 3 feet [0.9 meter] away from the crib.IMPORTANTPlace the crib near a supporting wall and far from air currents. Install the Nursery Unit on a fl at, stable surface facing the crib at a distance of at least 3 feet (0.9 meter). Make sure to plug the adapter to the socket outlet nearest to the equipment and that is easily accessible.654321654321Figure 1Figure 21) Use the crib leg by the wall closest to the Nursery Unit (Figure 1). In cases where the Nursery Unit is across the room, use the leg closest to the Nursery Unit to position the covered wire (Figure 2). It is always preferable that the covered cord run along a wall.2.2 - SELECT THE CRIB LEG YOU WILL BE USING TO SECURE THE CORD COVERSRECOMMENDEDOR1) Remove the mattress from the crib.2) Place the Sensor Pad(s) – printed side up – on top of the hardboard.3) Run the connection pin, warning label and the fi rst 5 cord covers down along the backside of the crib leg, between the mattress support and the inside edge of the crib.2.3 - INSTALL THE SENSOR PAD ON THE MATTRESS SUPPORT1 Sensor Pad(depending on model)236543127EN](https://usermanual.wiki/Angelcare-Canada/AC1300R/User-Guide-2828906-Page-7.png)