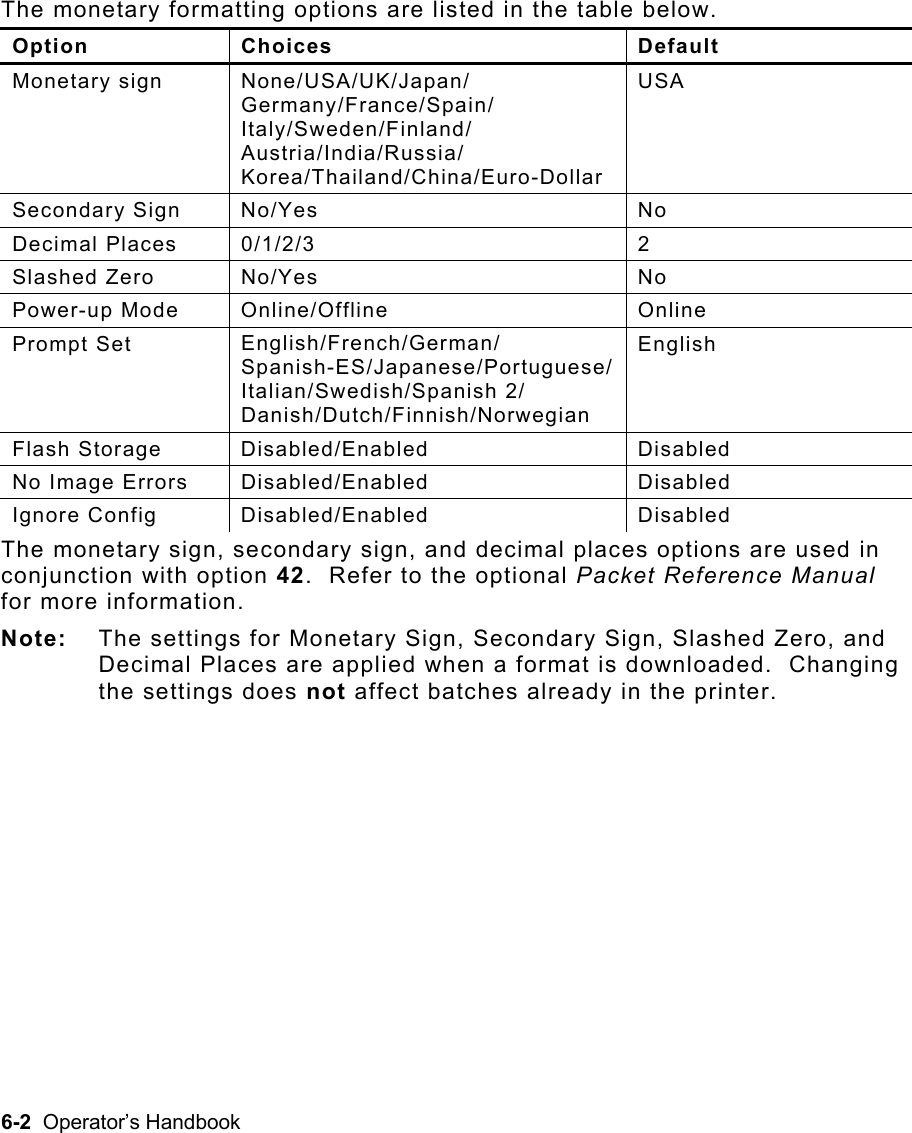
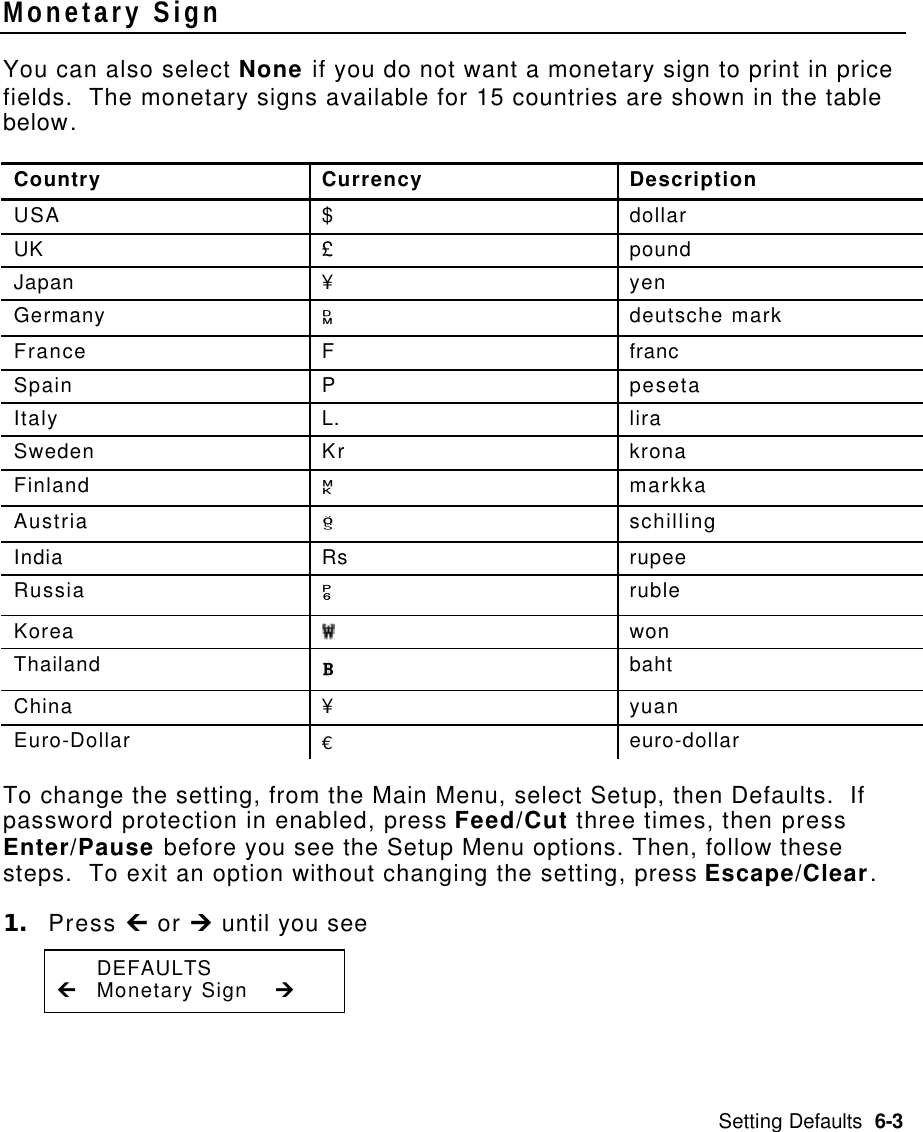
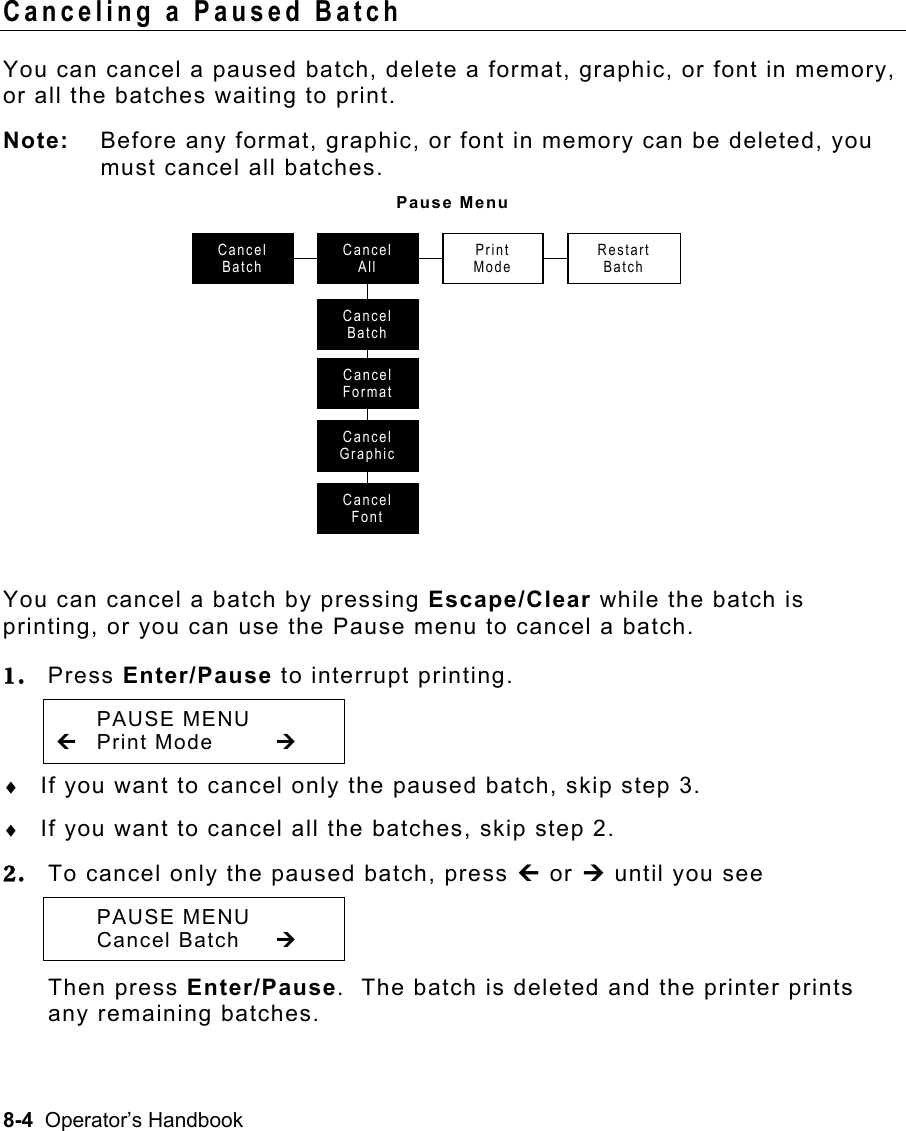
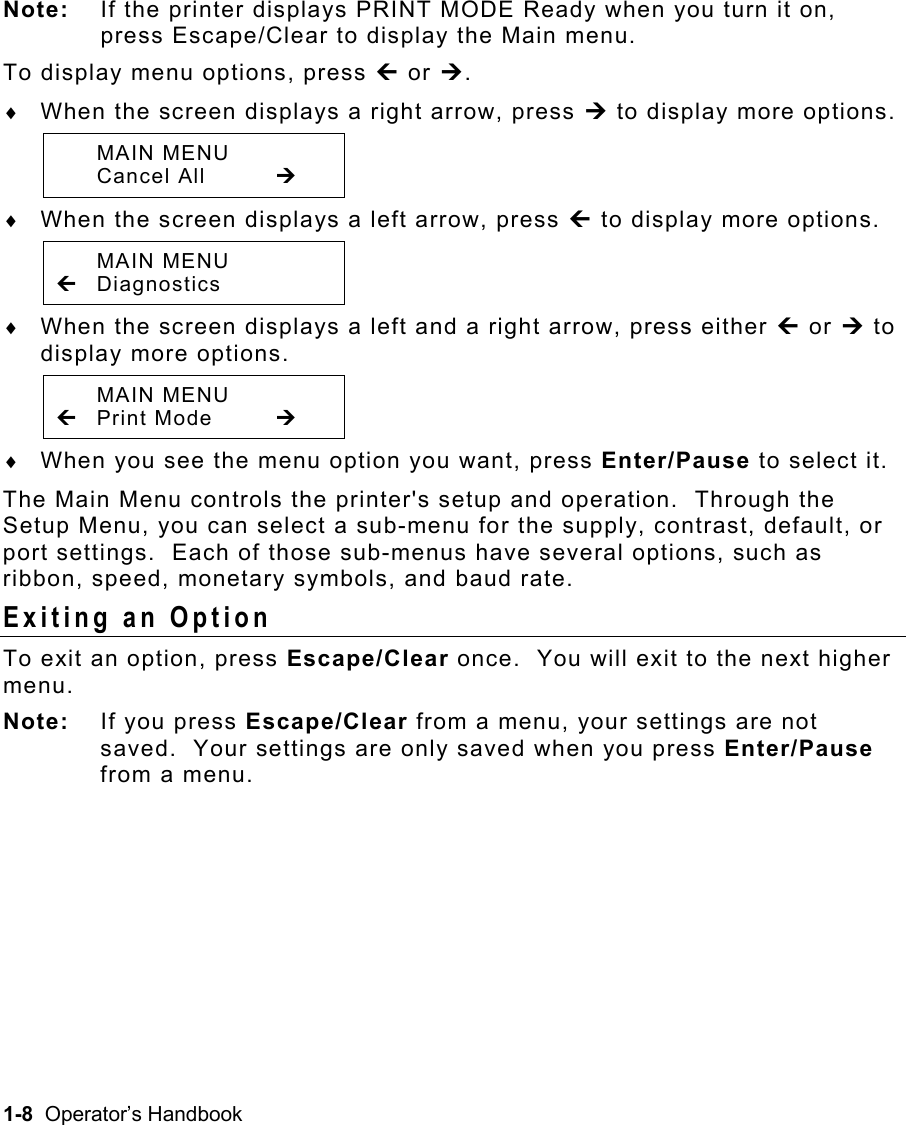
Avery Dennison Retail Information Services SX10WGPM 802.11b/g Module User Manual 9855rfidoh cvad
Avery Dennison Retail Information Services, LLC 802.11b/g Module 9855rfidoh cvad
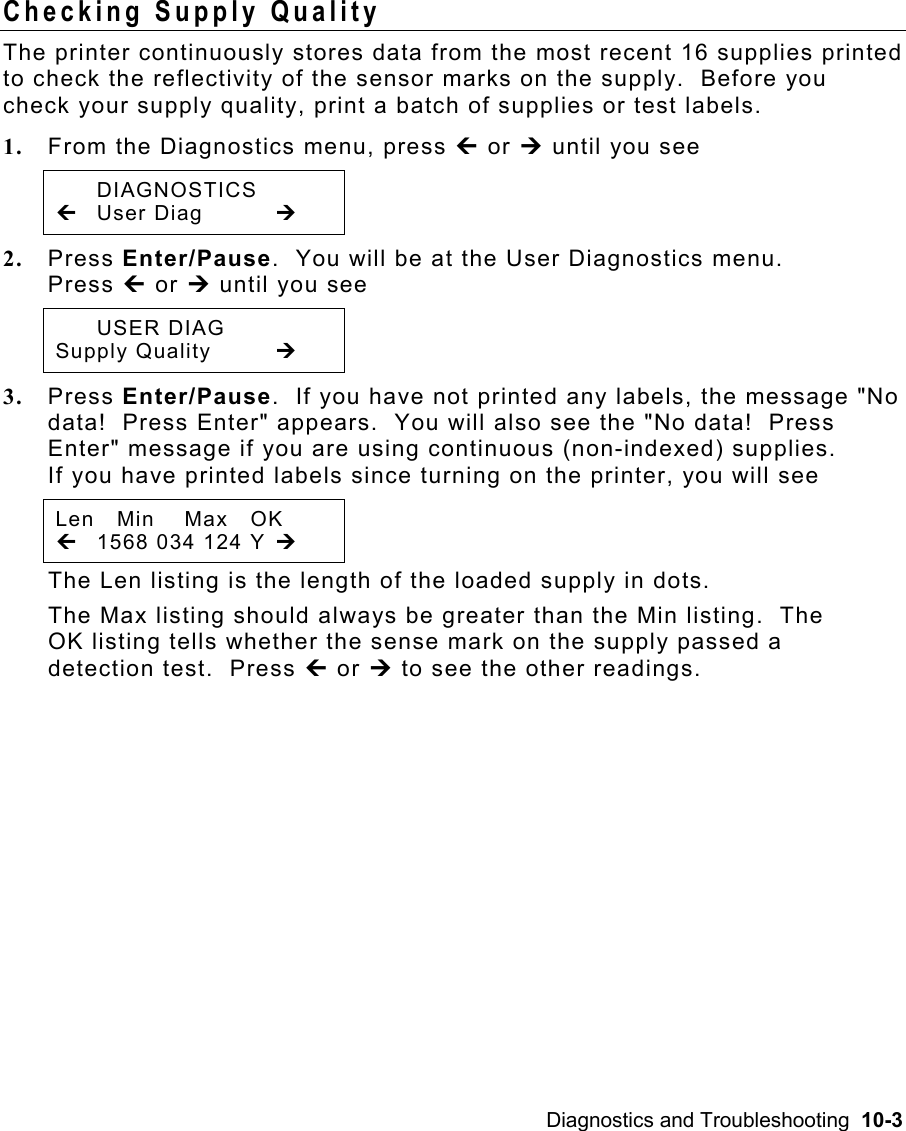
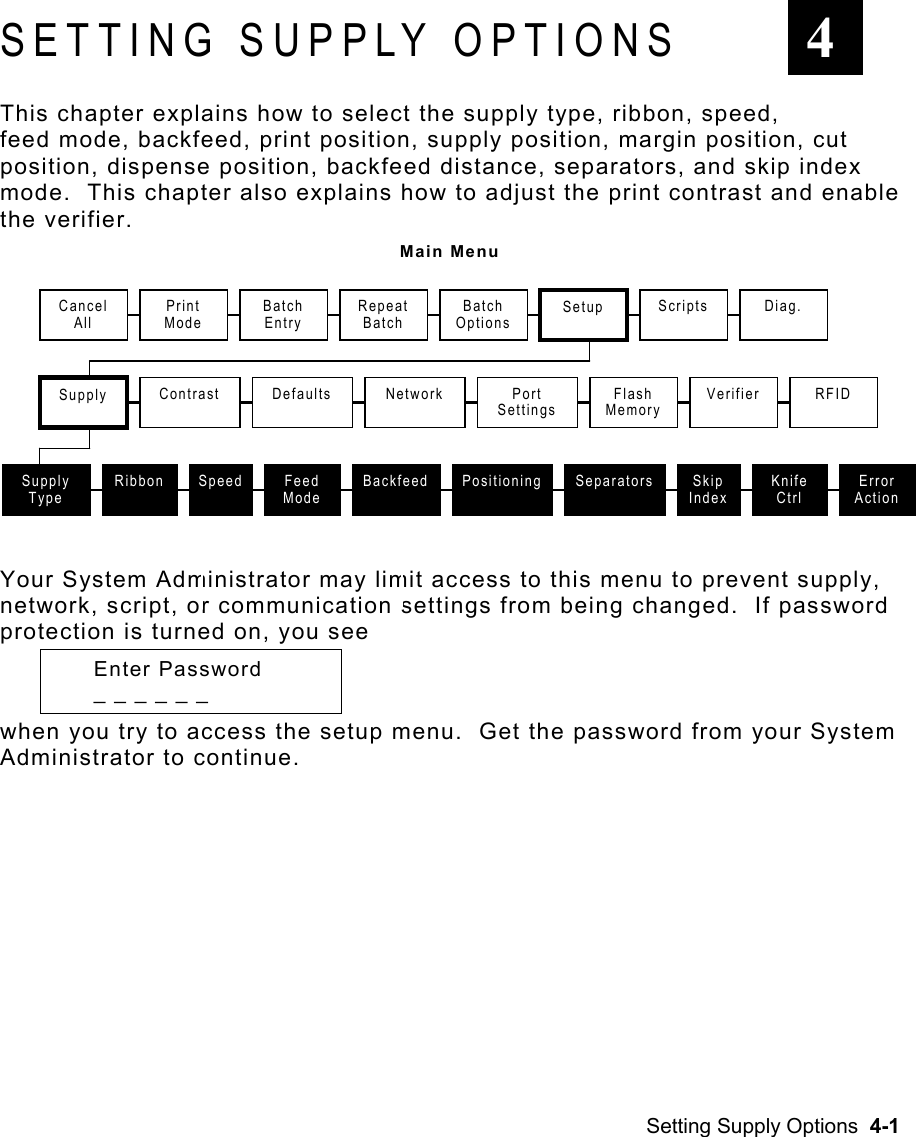
Contents
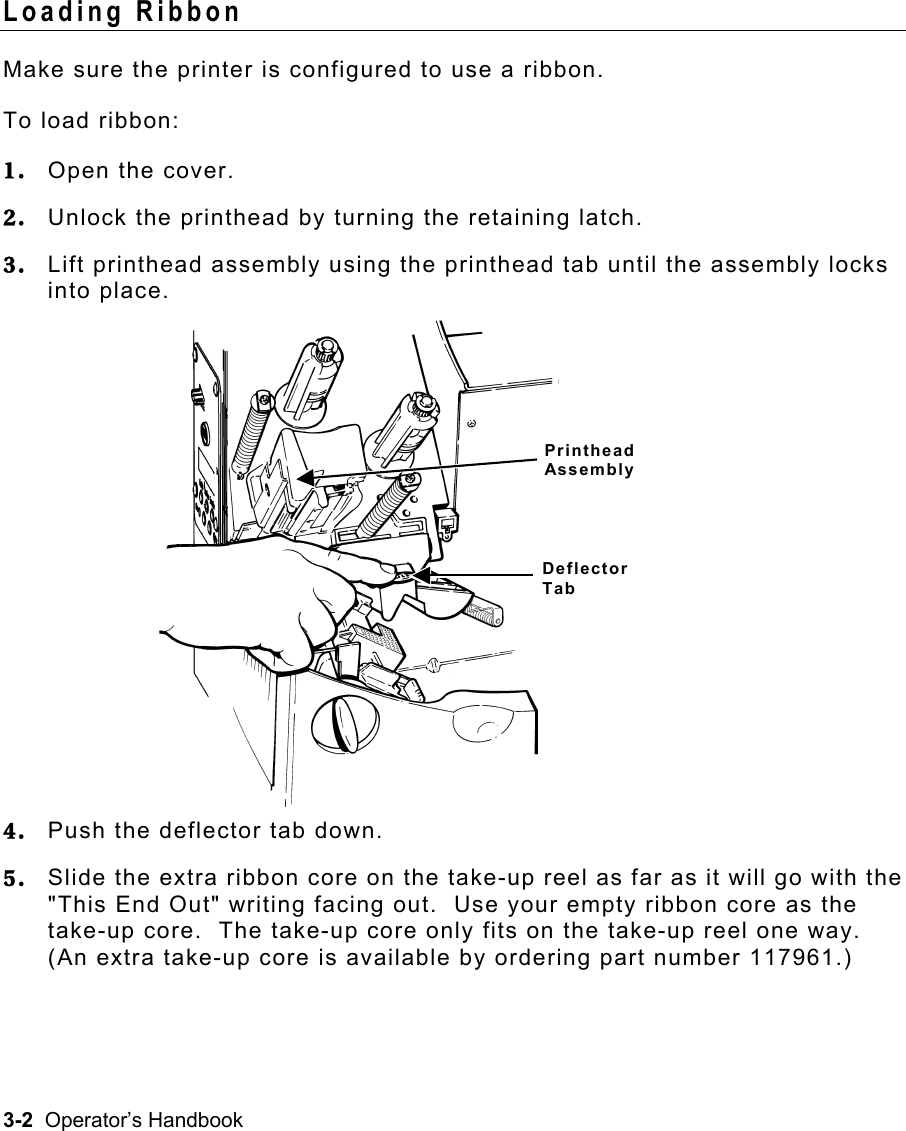
- 1. Users Manual - 1
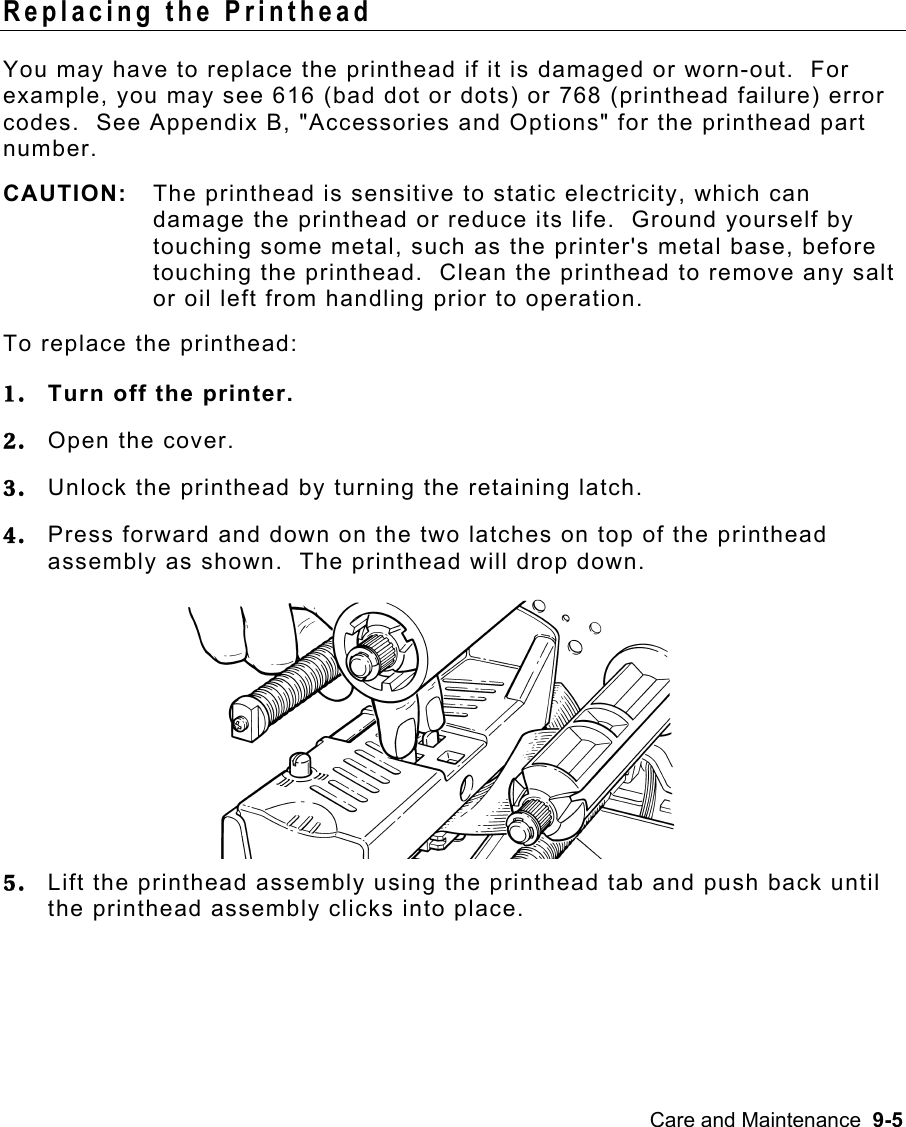
- 2. Users Manual - 2
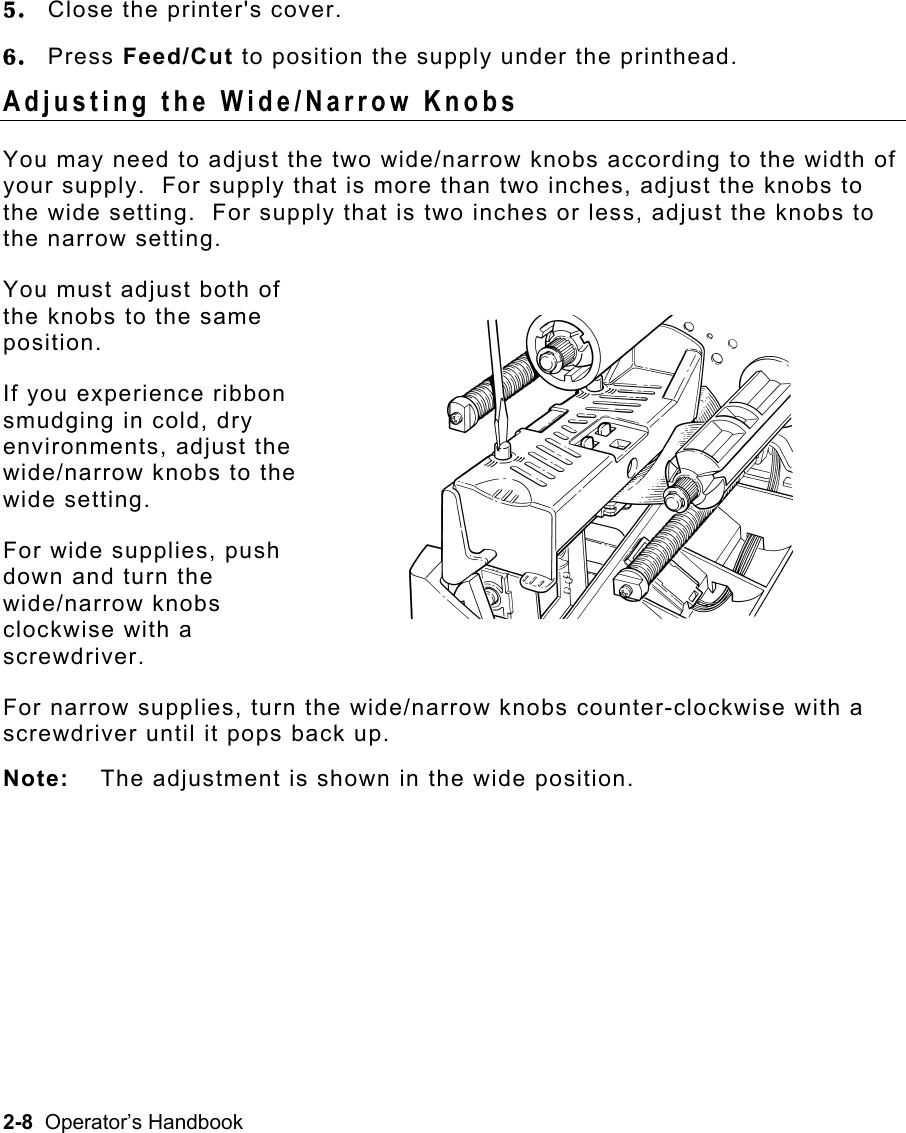
- 3. User Manual 1 of 2
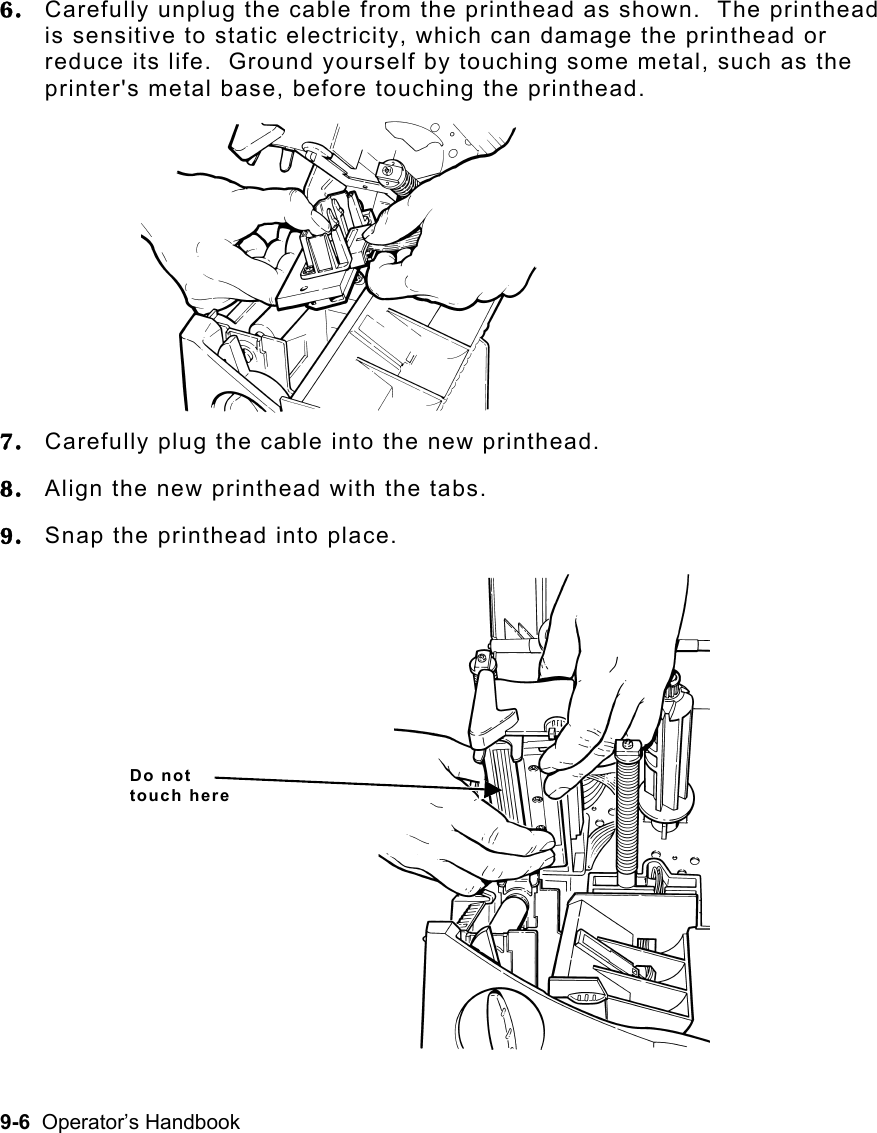
- 4. user manual 2 of 2
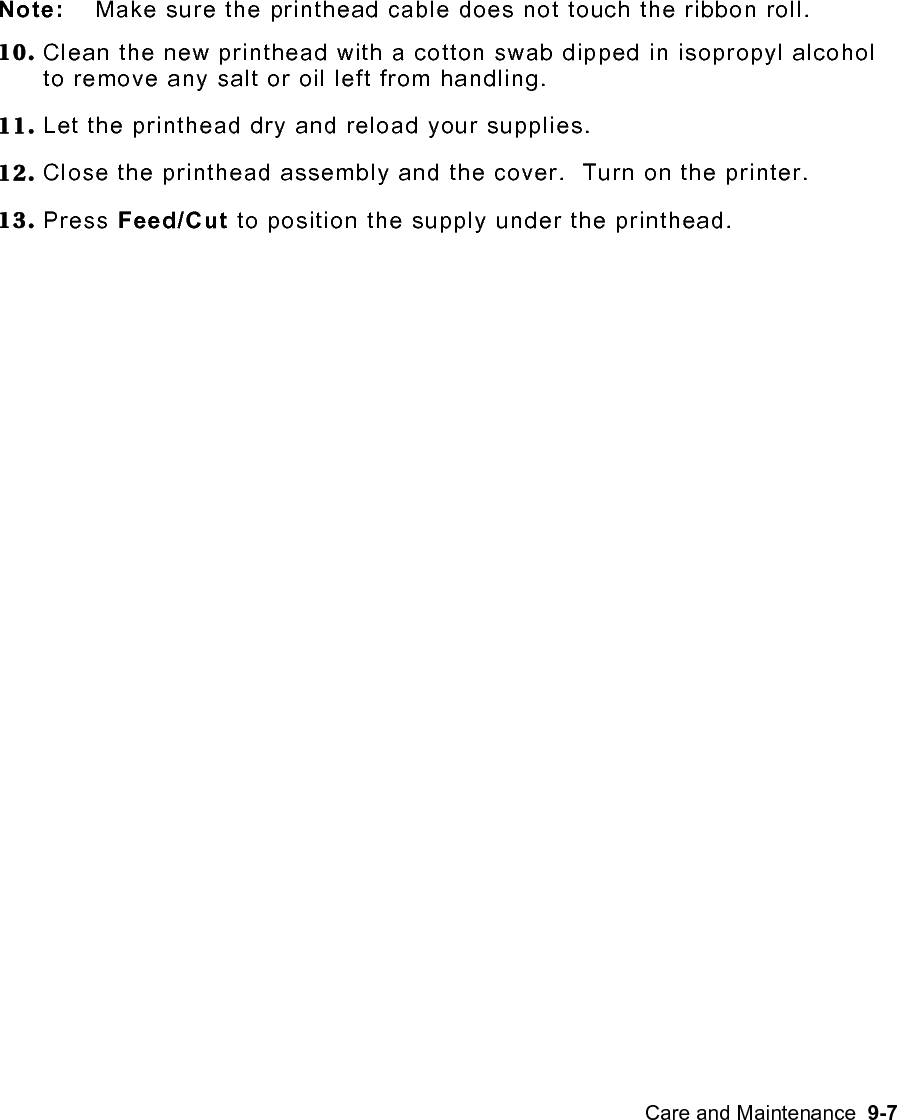
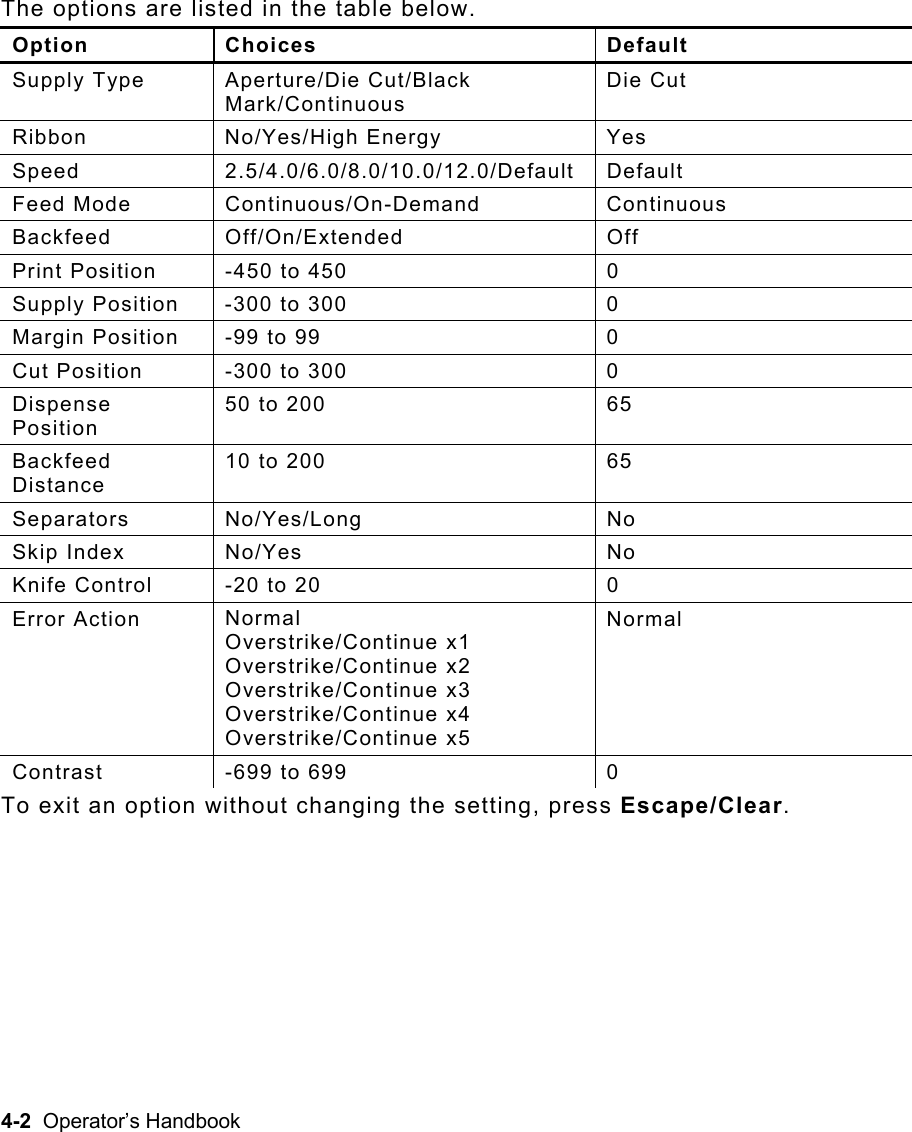
User Manual 1 of 2


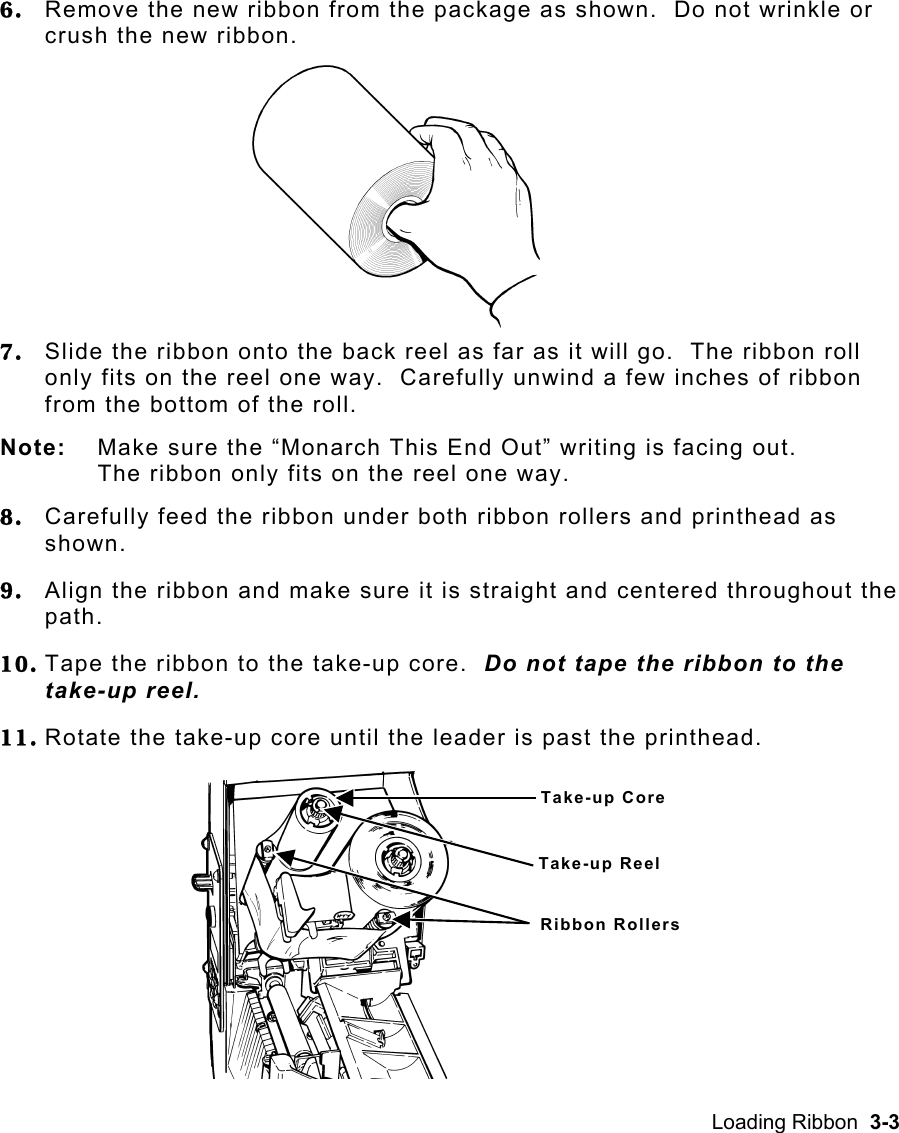
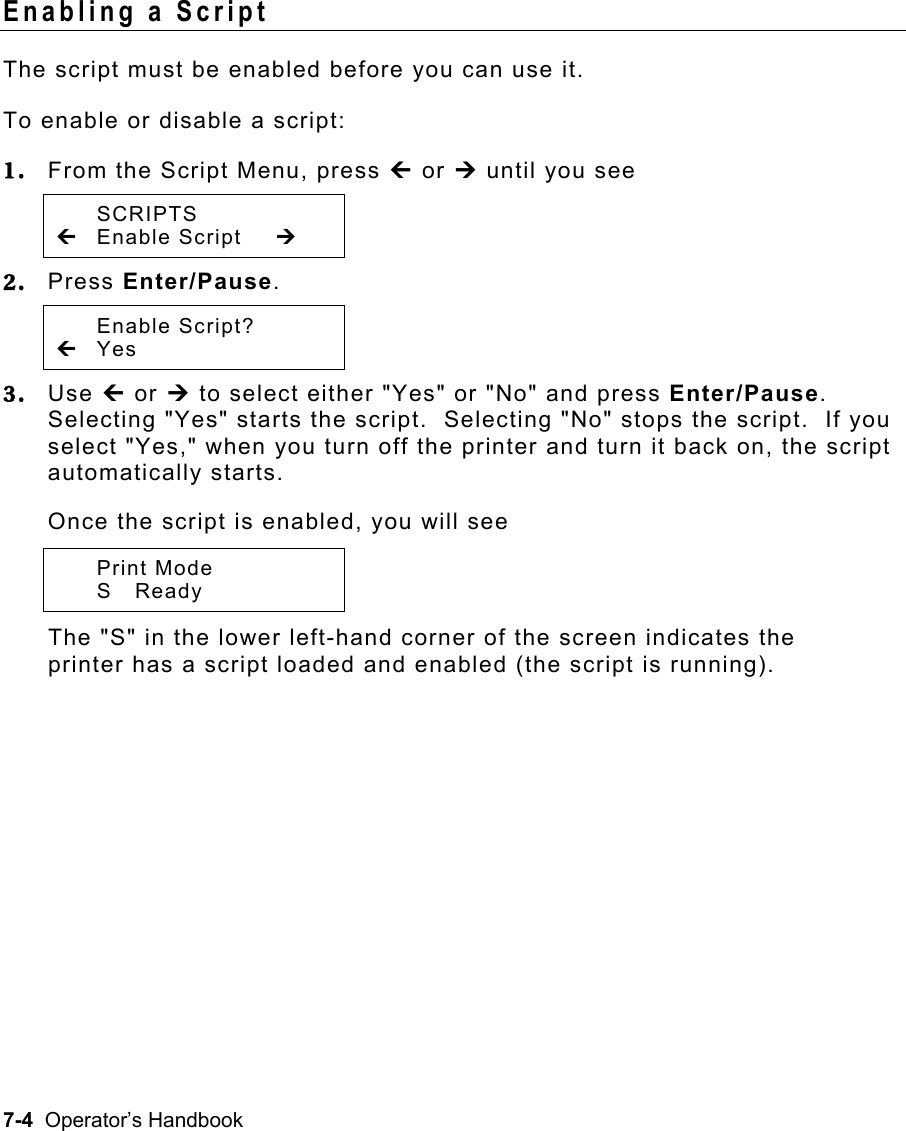
![4-8 Operator’s Handbook Positioning This menu includes selections to change the print, supply, margin, cut, and dispense positions along with the backfeed distance. When you see Enter print pos [-450/450]: +0 Feed/Cut acts as a toggle switch to change the value by 10 or 1. For example, to make the print position 23 (from the default of 0), press Feed/Cut, then press » twice (20), press Feed/Cut again and press ¼ three times (23). Print Position This function adjusts where data prints vertically on the supply. Adjust the print if it is too close to the top or bottom of the supply, or overtypes the pre-printed area. One dot is 0.0049 inch. For RFID supplies with a one-inch feed length, adjust the print position and/or the supply position as shown in the RFID Setup Guide & Supply Chart or the HF Setup Guide & Supply Chart. ♦ If the data is too close to the bottom, increase the number. ♦ If the data is too close to the top, decrease the number. Note: Changing this setting only affects new formats sent to the printer.](https://usermanual.wiki/Avery-Dennison-Retail-Information-Services/SX10WGPM.User-Manual-1-of-2/User-Guide-1366955-Page-36.png)
![Setting Supply Options 4-9 To change the setting, from the Main Menu, select Setup, Supply, then Positioning. Then, follow these steps. 1. Press » or ¼ until you see POSITIONING » Print Pos ¼ 2. Press Enter/Pause. The current setting is displayed, for example: Enter print pos [-450/450]: +0 3. Press » or ¼ to change the print position. Pressing » decreases the value (moves the image down); ¼ increases it (moves the image up). 4. Press Enter/Pause when the number you need appears. Press Escape/Clear until you see the Main Menu.](https://usermanual.wiki/Avery-Dennison-Retail-Information-Services/SX10WGPM.User-Manual-1-of-2/User-Guide-1366955-Page-37.png)
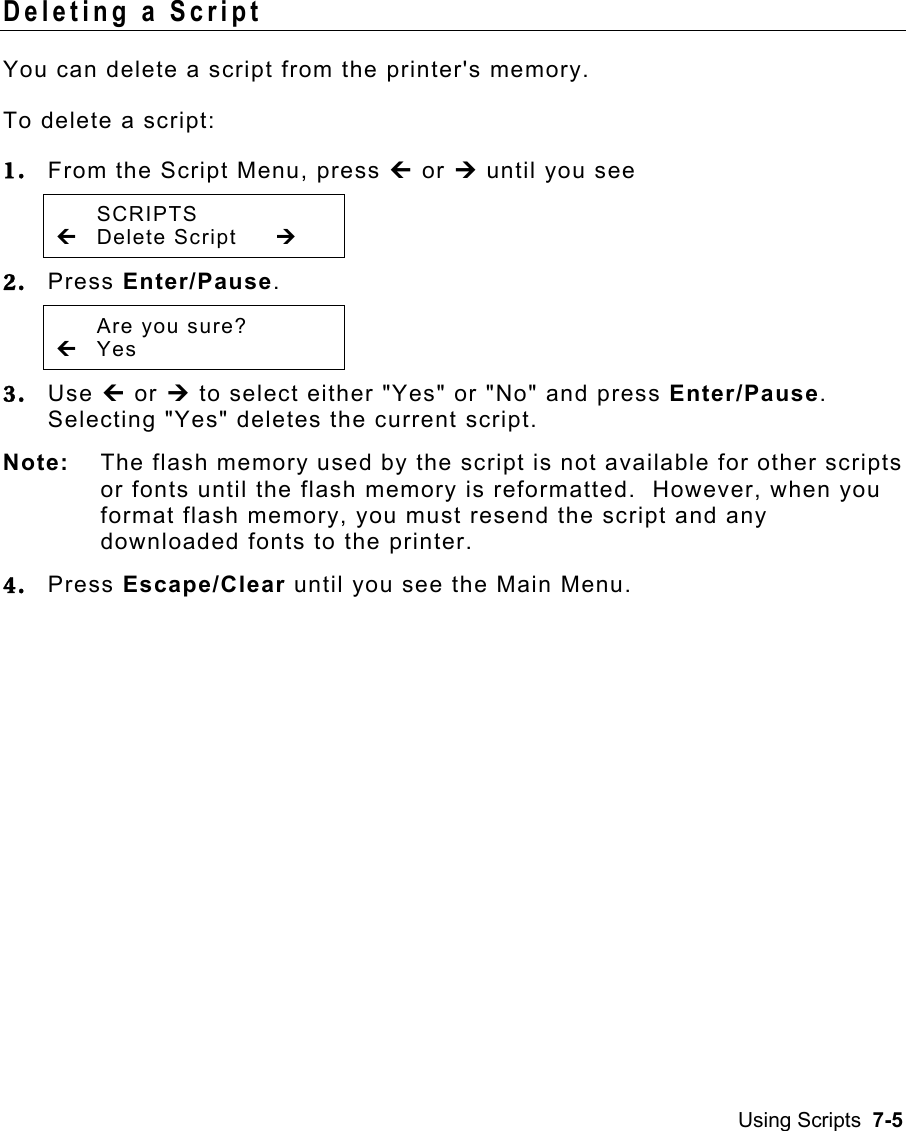
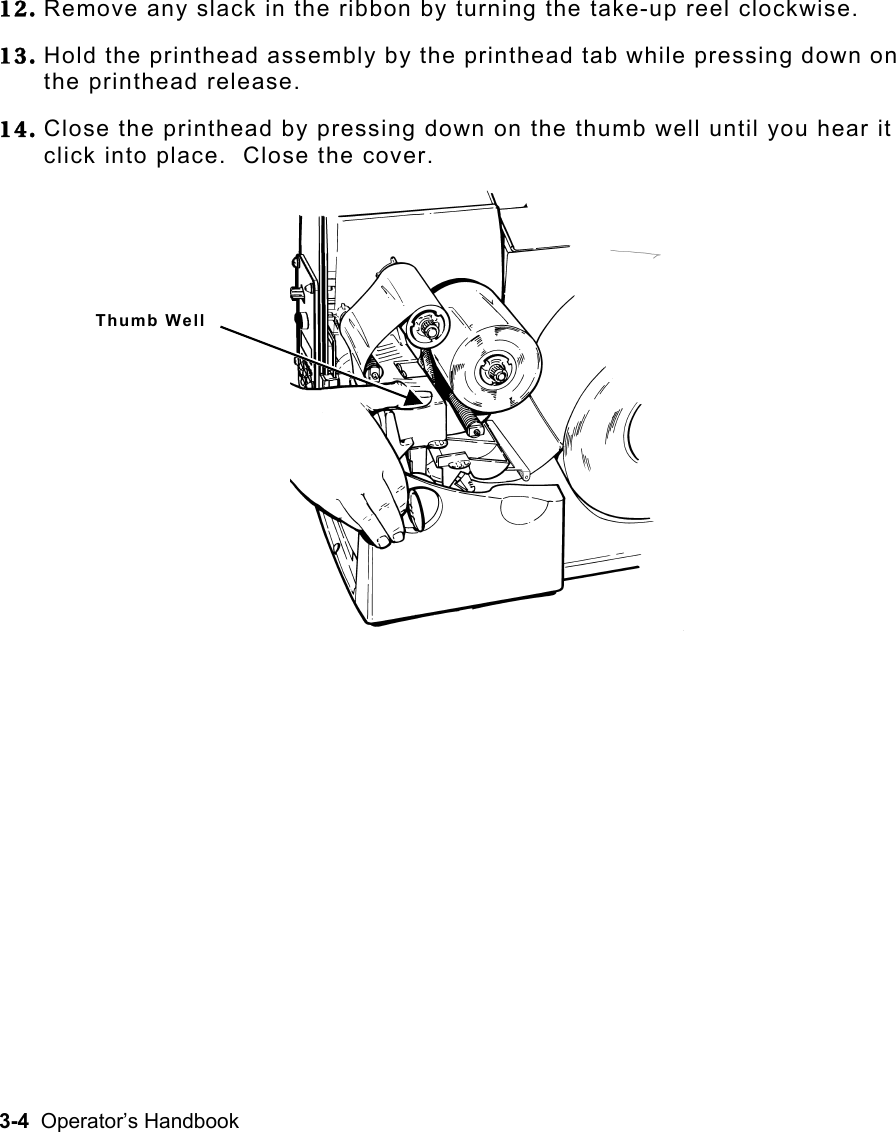
![4-10 Operator’s Handbook Supply Position This function adjusts the machine to print at the vertical 0,0 point on the supply. For RFID supplies with a one-inch feed length, refer to the RFID Setup Guide & Supply Chart or the HF Setup Guide & Supply Chart to adjust the print position and/or the supply position. Note: The supply position adjustment should only be made on initial printer setup. For format adjustments, change the print position. You may need to adjust the supply in or out to allow ♦ tags and labels to be removed. ♦ die cut labels to be removed easily. The adjustments are in dots (0.0049 inch). ♦ Increase the number to feed more supply out of the chute. ♦ Decrease the number to feed less supply out of the chute. This option takes effect on the next label or tag printed. Changing supply position may also affect print position. To change the setting, from the Main Menu, select Setup, Supply, then Positioning. Then, follow these steps. 1. Press » or ¼ until you see POSITIONING » Supply Pos ¼ 2. Press Enter/Pause. The current setting is displayed, for example: Enter supply pos [-300/300]: +0 3. Press » or ¼ to change the supply position. Pressing » decreases the value (feeds less supply); ¼ increases it (feeds more supply). 4. Press Enter/Pause when the number you need appears. Press Escape/Clear until you see the Main Menu.](https://usermanual.wiki/Avery-Dennison-Retail-Information-Services/SX10WGPM.User-Manual-1-of-2/User-Guide-1366955-Page-38.png)
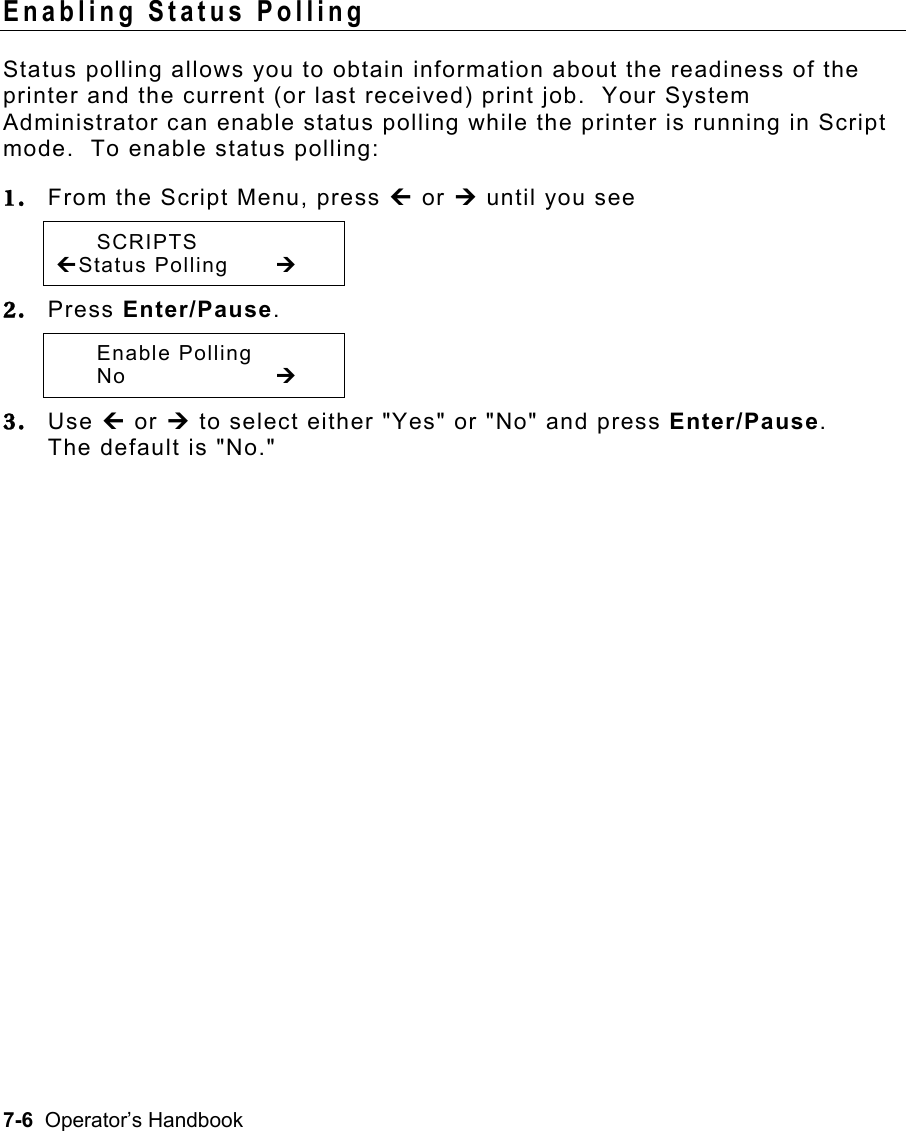
![Setting Supply Options 4-11 Margin Position This function adjusts where the format prints horizontally on the supply. The adjustments are in dots (0.0049 inch), which is the smallest measurement the printer recognizes. The width of the print area depends on your supply size. Maximum width is four inches. When you move the image to the right or left on the supply, avoid moving the image too close to either edge, because it may not print. Print too far to the left. Print too far to the right. ♦ If the data is too close to the left side, increase the number. ♦ If the data is too close to the right side, decrease the number. Note: Changing this setting only affects new formats sent to the printer. To change the setting, from the Main Menu, select Setup, Supply, then Positioning. Then, follow these steps. 1. Press » or ¼ until you see POSITIONING » Margin Pos ¼ 2. Press Enter/Pause. The current setting is displayed, for example: Enter margin pos [-99/99]: +0 3. Press » or ¼ to change the margin position. Pressing » decreases the value (moves the image toward the left side of the supply); ¼ increases it (moves the image toward the right side of the supply). 4. Press Enter/Pause when the number you need appears. Press Escape/Clear until you see the Main Menu.](https://usermanual.wiki/Avery-Dennison-Retail-Information-Services/SX10WGPM.User-Manual-1-of-2/User-Guide-1366955-Page-39.png)
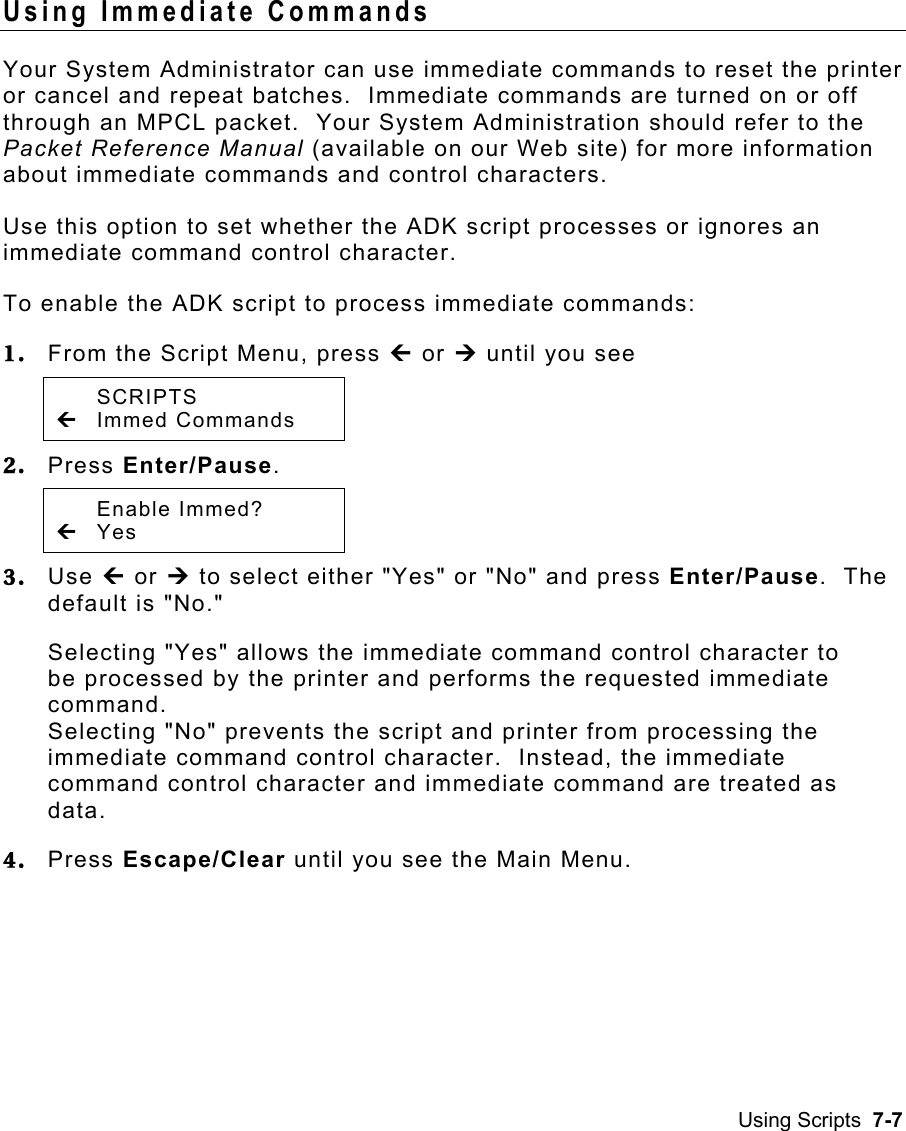
![4-12 Operator’s Handbook Cut Position This function adjusts where the tag is cut. The printer adjusts the cut position according to the black marks on the supply. You may need to adjust for aperture supplies. Increase to move the cut up; decrease to move the cut down. To change the setting, from the Main Menu, select Setup, Supply, then Positioning. Then, follow these steps. 1. Press » or ¼ until you see POSITIONING » Cut Pos ¼ 2. Press Enter/Pause. The current setting is displayed, for example: Enter knife adj [-300/300]: +0 3. Press » or ¼ to change the cut position. Pressing » decreases the value (moves the cut down); ¼ increases it (moves the cut up). 4. Press Enter/Pause when the number you need appears. Press Escape/Clear until you see the Main Menu. Dispense Position This function adjusts the stopping point of the label. To change the setting, from the Main Menu, select Setup, Supply, then Positioning. Follow these steps. 1. Press » or ¼ until you see POSITIONING » Dispense Pos ¼ 2. Press Enter/Pause. DISPENSE POS [50/200]: +65 3. Press » or ¼ to change the dispense position. Pressing » decreases the value; ¼ increases it. 4. Press Enter/Pause when the number you need appears. Press Escape/Clear until you see the Main menu.](https://usermanual.wiki/Avery-Dennison-Retail-Information-Services/SX10WGPM.User-Manual-1-of-2/User-Guide-1366955-Page-40.png)
![Setting Supply Options 4-13 Backfeed Distance This is the amount to move the label backwards. The backfeed distance cannot be greater than the dispense position. If you make the backfeed distance greater than the dispense position, the dispense position automatically changes to match the backfeed distance. The backfeed distance should equal the dispense position. An exception is when you are tearing labels, instead of peeling. Then, the backfeed distance must be 30 dots (0.15 inches) less than the dispense position to account for improper tearing of butt cut supplies. You will have a 30-dot non-print zone on your supply, but this prevents exposed adhesive under the printhead. To change the setting, from the Main Menu, select Setup, Supply, then Positioning. Follow these steps. 1. Press » or ¼ until you see POSITIONING » Backfeed Dis 2. Press Enter/Pause. BACKFEED DIS [10/200]: +65 3. Press » or ¼ to change the dispense position. Pressing » decreases the value; ¼ increases it. 4. Press Enter/Pause when the number you need appears. Press Escape/Clear until you see the Main menu.](https://usermanual.wiki/Avery-Dennison-Retail-Information-Services/SX10WGPM.User-Manual-1-of-2/User-Guide-1366955-Page-41.png)
![4-16 Operator’s Handbook Knife Control You may notice unevenly cut tags on one end or the other of your supply (one end may appear longer than the other). Use the knife control adjustment to balance the cut tag length from tag-to-tag. You may need to make this adjustment ♦ on initial printer setup. ♦ if you load a different supply type (thickness) from the last ones printed. ♦ when you change the print speed. ♦ when you change to a different tag size from the last ones printed. To change the setting, from the Main Menu, select Setup, then Supply. Then, follow these steps. 1. Press » or ¼ until you see SUPPLY » Knife Ctrl 2. Press Enter/Pause. The current setting is displayed, for example: Enter knife ctrl [-20/20]: +0 3. Press » or ¼ to change the knife control. You may need to experiment and cut a few test tags to check the tag cut length. Pressing » decreases the value; ¼ increases it. Note: Depending on how unevenly the tags are cut, always start with a small number, such as +- 1 or 2. 4. Press Enter/Pause when the number you need appears. Press Escape/Clear until you see the Main Menu.](https://usermanual.wiki/Avery-Dennison-Retail-Information-Services/SX10WGPM.User-Manual-1-of-2/User-Guide-1366955-Page-44.png)
![4-20 Operator’s Handbook Setting Contrast The print contrast controls the darkness of the printing on your supply. The range is -699 to +699 and the default is 0. You may need to increase the print contrast for linerless supplies. Having the correct print contrast setting is important because it affects how well your bar codes scan and how long your printhead lasts. You can use a verifier to check the bar code print quality. Main Menu High contrast settings may ♦ require additional printhead cleaning. ♦ create bar code growth, leading to reduced scanning. 1. From the Main Menu, press » or ¼ until you see MAIN MENU » Setup ¼ 2. Press Enter/Pause. You will be at the Setup menu. Press » or ¼ until you see SETUP » Contrast ¼ 3. Press Enter/Pause. The current setting is displayed, for example: Enter contrast [-699/+699]: +0 4. Press » or ¼ to change the contrast. Pressing ¼ darkens the print; » lightens the print. Print Mode Repeat Batch Supply Contrast Setup Defaults Port Settings Flash MemoryScripts Diag. Batch Entry Batch OptionsVerifier Network RFID Cancel All](https://usermanual.wiki/Avery-Dennison-Retail-Information-Services/SX10WGPM.User-Manual-1-of-2/User-Guide-1366955-Page-48.png)