Benq 56E18 GSM / GPRS Mobile Phone User Manual Pages from Updated A520 EN Part

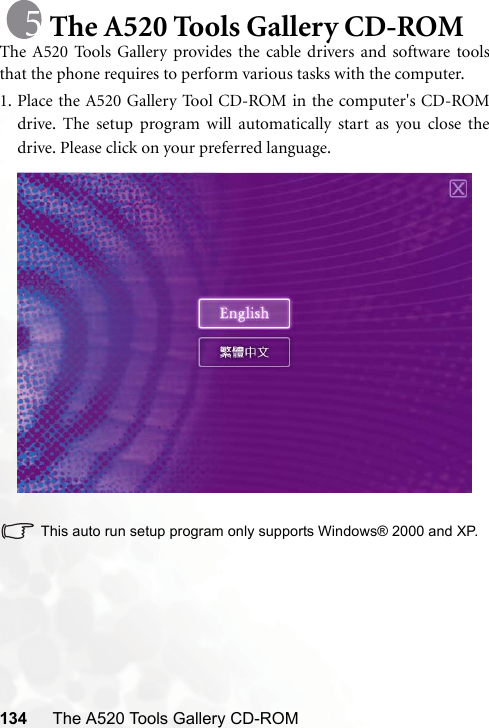
Benq Corporation GSM / GPRS Mobile Phone Pages from Updated A520 EN Part
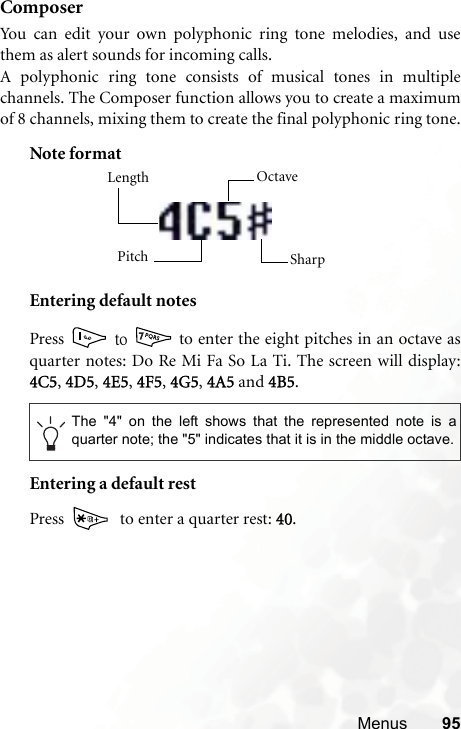
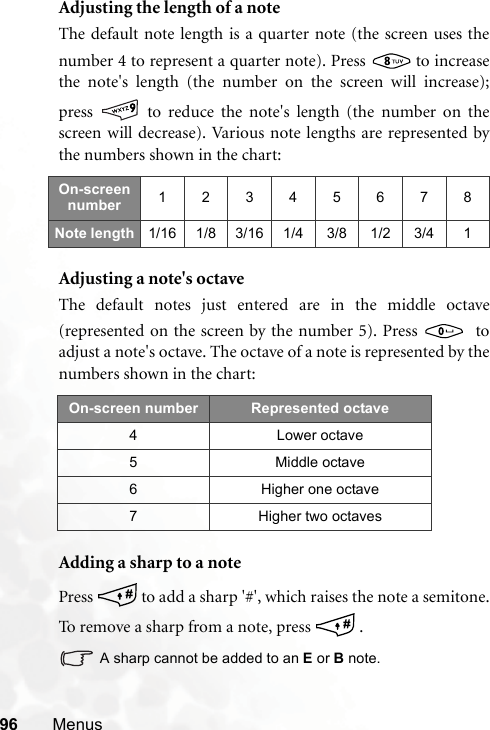
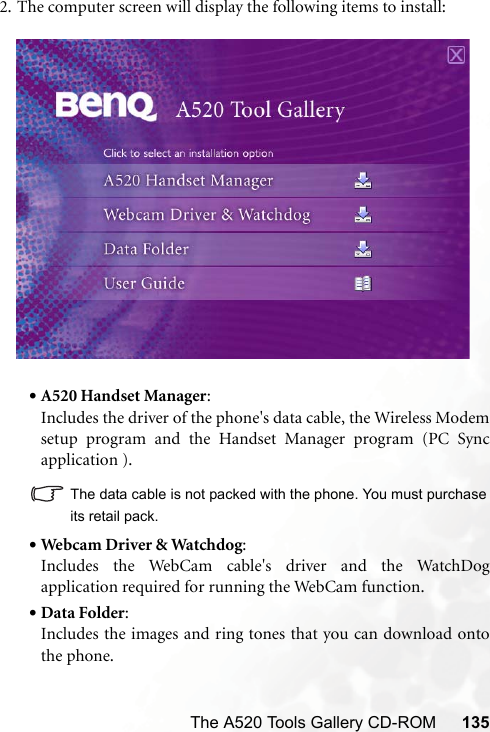
Contents

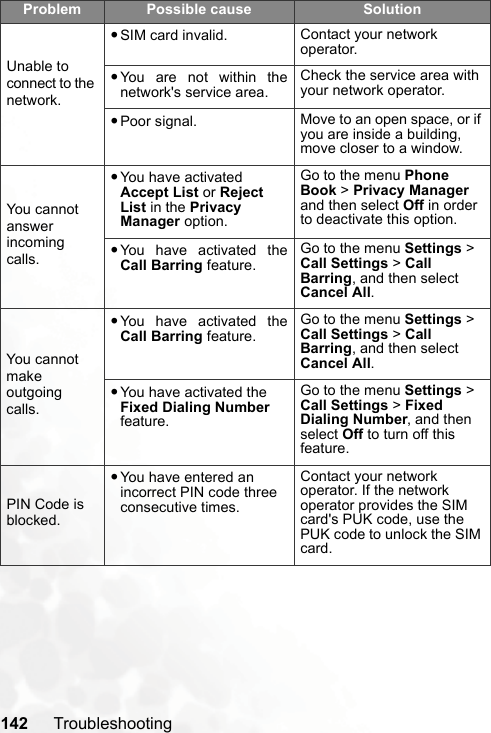
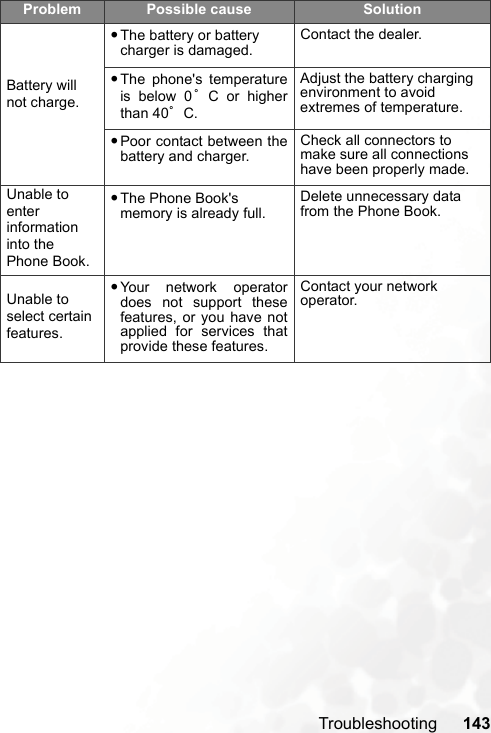
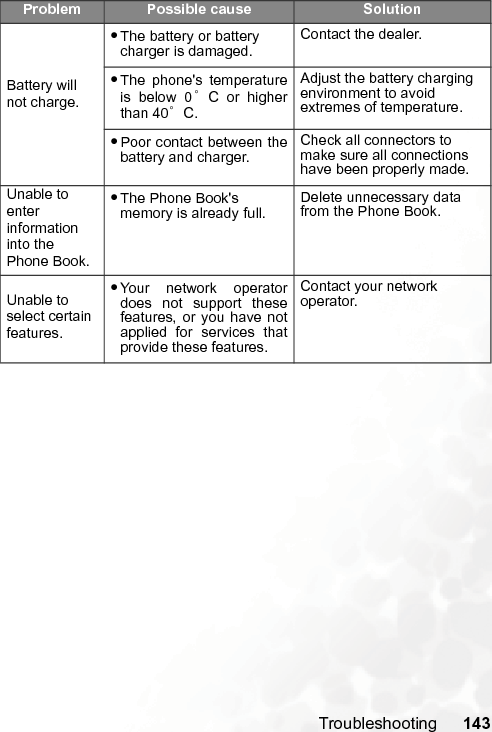
Users Manual Part 2 Revised

60 Using Your PhonevCard: You can select a contact's data from your Phone Book toattach to your message. After receiving your message, therecipient can save the attached contact data to their own PhoneBook.vCalendar: You can select a Calendar memo and then attach it toyour message. After receiving your message, the recipient can savethis attached memo to their own Calendar.•Text  Alignment: Used to select the type of text alignment for themessage's content.3. After you have finished editing the message, press  . A screen inwhich you can edit the recipient's number will appear. There are twoways you can enter the recipient's phone number:•Key in the recipient's phone number in the number editing screen.•Before entering any phone number, you can press   (SSelect) andthen select a recipient from the list of contacts in the Phone Book.Follow the steps below:a. Press   to scroll to the name of contact, and thenpress  (SSelect) to select that contact.b. The display will show all the phone numbers stored forthe contact you selected. Press  (SSelect) to select thedesired phone number.If the number is too long, press   to display thecomplete number.c. After the number has been selected, you must press to return to the list of contacts in the Phone Book. Acheck mark will appear beside the contact whosenumber you selected as recipient for your message. Youcan use the same steps to select the numbers of other
Using Your Phone 61contacts.d. After you have selected all the numbers you wish to dial,press   and the display will show all these numbers.4. After the numbers to be dialed have appeared on the screen, press to use the following options with this message:•Send Message: Sends the message to the numbers selected previously.When a message is to be sent, a copy of the message will be saved to theOutbox folder.•Preview: Allows you to view the contents of the message.•Save to Draft: Saves the message to the DDrafts folder, for sending at alater time.•Edit Content: Allows you to edit the contents of the message.MMSYou can edit and send MMS messages using this menu.Before you start to use MMS, you have to subscribe to both GPRSand MMS services provided by your operator. Then you have to adjustMMS settings in your phone to be able to use MMS.Because MMS uses your operator's MMS server on a GPRS networkto send messages to phones, you need to adjust the following settingscorrectly in order to use MMS:Oper.Services > WAP Settings, and select the server you wish to activatein order to configure its settings.For information on configuring an MMS server's settings, see page 116,"WAP Settings".Messages > Settings > MMS > Server Info, and select the server youwant to use for sending and receiving MMS messages.
62 Using Your PhoneEditing and sending MMS messages1. Access the menu: Messages  >New >MMS to open up the MMSediting screen. You can now edit the first page of your MMS message:2. Edit text: Enter text into the first page's editing screen.3. Insert objects: From the editing screen, press   (Option), and thenselect Insert. The types of objects you can insert into an MMS pageare as follows:•Animation: Scroll to highlight the file name of the desiredanimation, and then press  (View) to display this animation.After entering the viewing mode, you can press   to display thenext/previous animation; pressing   will display the animationin full screen. Finally, press   to insert the selected animationinto the page you are editing.•Picture: You can insert the desired picture into the page you areediting.•Photo: You can select a photo saved in the Album menu to insertinto an MMS page.•Voi ce Me mo: Select the voice memo to be attached to an MMSpage.You can also compose an MMS message using a preset MMStemplate by going to the menu: Messages > Template > MMSTemplate. See page 72 for details.
Using Your Phone 63•Melodies: You can select a ring tone saved in the phone to insertinto an MMS page.Each MMS page is only able to accommodate one image andone audio file. If you insert another image or audio file into thesame page, the newly inserted file will replace the existing one.After an audio file such as a voice memo or a ring tone isinserted into an MMS page, the icon   will appear on the top ofthat page.•Tex t: You can select a text template to insert into the messageinstead of entering all the characters individually. You can use thefactory default templates or templates of your own that youpreviously saved to the template list.To create and save your own text templates, go to the menu:Message > Template  > SMS Template. See page 71.•New Photo: Enables you to shoot a new photo using the phone'scamera and then insert that photo into the currently edited page.4. When you have completed your message's first page, from this page'sscreen press  (Option), and then select Insert >Page Before/PageAfter to add a new page before or after the existing one.5. When you are editing an MMS page, you can also press  (Option)to perform the following tasks:•Preview: Plays all of the pages you have created in sequence.•Remove Picture: Removes an image or photo from the currentlydisplayed page.•Remove Sound: Removes a ring tone or voice memo from thecurrently displayed page.•Remove Text: Deletes all of the text from the current page.
64 Using Your Phone•Remove Page: Deletes the current page from your MMS message.•Previous Page: Displays the previous page.•Next Page: Displays the next page.•Page Duration: This option allows you to set the length of timethat each page is displayed on the screen when playing your MMSmessage.6. When you have completed all of the pages of your message, press to display the following data fields required to send your MMSmessage.Press   to scroll to the field you want, and then press   or beginentering data to directly edit the data in the currently selected field.•To: You can send your MMS message to a recepient's phone or e-mail address.There are two ways to enter a recepient's mailing information:a. You can directly enter a recipient's phone number or e-mailaddress into the recipient list.When there are multiple phone numbers or e-mailaddresses being entered, you can press   to open upthe symbols field along the bottom of the screen. Use to move the selection box to a comma, semicolon or space,and then press   to place it in the editing screen toseparate different phone numbers or e-mail addresses.b. You can press   (Select) and select a contact's phonenumber or e-mail address directly from your Phone Book.When the recipient list displays all of the recipients' numbers or e-mail addresses, press   to return to the screen showing the datafields for your MMS message.
Using Your Phone 65•Subject: Enter your message's subject here.•Cc: You can send your message as a carbon copy to others.•Bcc: You can send your message as a confidential carbon copy toothers.You are able to send an MMS message to a maximum of tenrecipients.7. When the screen shows the data fields required to send your MMSmessage, pressing  (Option) will bring up the options below:•Preview: Plays all of the pages you have created.•Save to Draft: Saves the message to the Drafts folder, for sendingat a later time.•Receipt: Press   to choose from the following receipt modes:Both Delivery Read: Asks the recipient to return aconfirmation after receiving and reading your message.Only Delivery: Asks the recipient to return a confirmationafter receiving your message.Only Read:  Asks the recipient to return a confirmation afterreading your message.None: Cancels this function.•Priority: Determines this MMS message's priority.After you have completed all of the information and settings required foryour message, pressing   will send this MMS message to the designatedrecipients. Its backup copy will be stored in the Outbox folder as well.
66 Using Your PhoneSIM FolderThe messages in the SIM folder are the ones stored in your SIM card'smemory.InboxThe procedure for using this option is largely identical with thatdescribed below for using the phone's IInbox. However, afterselecting a message and pressing  (OOption), the menu displayedincludes four additional options:•Move to Phone: Moves the selected message from your SIM card'smemory to the phone's memory.•Copy to Phone: Copies the selected message from your SIMcard's memory to the phone's memory.•Move All to Phone: Moves all messages to the phone's memory.•Copy All to Phone: Copies all messages to the phone's memory.The messages moved to the phone will be erased from the SIMcard's memory, and cannot be moved back.When there is 1K or less of free space in the phone's memory,the screen will display the message "Memory Insufficient!" andyou will not be able to move or copy messages from the SIM cardto the phone.Only complete messages can be copied to the phone's memory.OutboxIf your SIM card was previously used in another phone, savedmessages or backups of sent messages will be stored here.
Using Your Phone 67Inbox1. When new messages are received, you can press   to read themessages in the Inbox. You can also press   (BBack) to return to thestandby screen (The    icon will appear in the standby screen'sstatus bar, indicating that there are unread messages) and then enterthe menu MMessages >Inbox to read messages.2. Press   to scroll to the message record you would like to view.Depending on the type of message to read, there are two scenarios:Reading an SMS/EMS message• Press   (OOption), which will present the following choices:Create: Allows you to write and send a new message.Delete: Deletes the selected message.Call: You can use the phone number used to send the message tocall the sender.Forward: Allows you to edit the content of this message andforward it to another person.Save to  Phone  Book: Saves the phone number of the message'ssender to the Phone Book. For information on how to save, seepage 32, "Adding Contacts to the Phone Book".Delete All: Deletes all the messages in the inbox.•Press   to read the message's content. Then press  (OOption) todisplay the following options:Reply: Allows you to write and send a reply message.Delete: Deletes the message being read.
68 Using Your PhoneCall: Uses the number from which the message was sent to call thesender (listed in the "Sender" item on the display), or dial a phonenumber shown in the contents of the message (the displayednumber option). Scroll to the desired number, and then press to dial the number.Forward: Lets you edit the message's contents, and then forward itto another person.Details: Allows you to view the date and time when the messagewas sent.Save: Allows you to save the following content:•Save the phone number from which the message was sent(the number shown on the display in the "Sender Info"  item)to the Phone Book.•Save the phone number displayed in the message's contents.(the option for a directly displayed number).•If the message is an EMS message with an attached picture orring tone, you can save these objects to your phone's memory(such as by selecting the option for "Picture/Animation"shown on the display). Depending on the type of the object,the phone will save it to the corresponding EMS objectlibrary in the MMedia Center menu. For example, if the objectis an EMS animation, it will be saved to an available positionin the MMedia Center > Animation menu where you can use itin composing future messages.If you are saving a picture or animation, you can select theSave as Wallpaper option, setting it as the wallpaper for thestandby screen. If you are saving a melody, you can also select the Save asRing Tone option, setting it as the ring tone that will playwhen there is an incoming call.
Using Your Phone 69For details on the Media Center menu, see page 92.•If the message has a contact's information attached to it, youcan save that contact's information to your Phone Book.•If the message has a Calendar memo attached to it, you cansave that memo to your Calendar.Save All: Saves all the objects attached to the message (contactsand Calendar memos cannot be saved in this way).Reading an MMS message•Press (Option) to choose from the following options:Create: Allows you to write and send a new message.Delete: Deletes the selected message.Call: You can use the phone number used to send the message tocall the sender.Forward: Allows you to edit the content of this message andforward it to another person.Save to  Phone  Book: Saves the phone number of the message'ssender to the Phone Book. For information on how to save, seepage 32, "Adding Contacts to the Phone Book".Delete All: Deletes all the messages in the inbox.•Press   to play the message's pages in sequence. While playing, youcan perform the following tasks:a. When playing the message, you can press (Pause) totemporarily stop playing the message. When the message hastemporarily stopped playing, you can either press (Play)to resume playing the message starting with the currentlydisplayed page, or first press   to scroll to the page youwant, and then press (Play) to resume playing themessage starting with that page.
70 Using Your Phoneb. When playing the message, press  (Stop) to stop playingthe message.c. When the phone finishes playing the entire message, fromthe message's last page press   to replay the last page. Ifyou want to replay the other pages, you must return to thefirst page using  , and then press   to restart.•When the phone finishes playing the entire message, you can alsopress (Option) which will present the following choices for you tomanage the message:Reply: Allows you to write and send a reply message.Delete: Deletes the message being read.Call: Uses the number from which the message was sent to call thesender (listed in the "Sender" item on the display), or dial a phonenumber shown in the contents of the message (the displayednumber option). Scroll to the desired number, and then press to dial the number.Forward: Lets you edit the message's contents, and then forward itto another person.Details: Allows you to view the date and time when the messagewas sent.Save: Allows you to save the following content:•Save the phone number from which the message was sent(the number shown on the display in the "Sender Info"  item)to the Phone Book.•Save the phone number displayed in the message's contents.(the option for a directly displayed number).•If the message is an MMS message with an attached pictureor ring tone, you can save these objects to your phone'smemory (such as by selecting the option for "Picture/Animation" shown on the display). Depending on the type of
Using Your Phone 71the object, the phone will save it to the corresponding MMSobject library in the Media Center menu. For example, if theobject is an MMS animation, it will be saved to an availableposition in the Media Center >  Animation menu where youcan use it in composing future messages.If you are saving an image, animation or a photo, you canselect the Save as Wallpaper option, setting it as thewallpaper for the standby screen. If you are saving a melody, you can also select the Save asRing Tone option, setting it as the ring tone that will playwhen there is an incoming call.Save All: Saves all the objects attached to the message.TemplatesSMS TemplateYou can use the quick message templates in this menu to compose amessage without having to enter the entire text character bycharacter. You can use the factory default templates, or templatesthat you previously saved to the list.Scroll to the desired template and then press   to enter its textinto your message. You can then edit the text as you wish and thensend the message.To create your own quick message templates, press   (OOption)and then select AAdd. You can then enter the text for the template,pressing    to save it.If a template is one of the factory defaults, you will not be able touse the editing function to modify it.
72 Using Your PhoneMMS TemplateYou can select a preset MMS template from this menu to composeyour MMS message. Scroll to highlight the name of the templateyou want and then press   to edit that template into your desiredMMS message.OutboxThis option preserves a backup copy of messages that you previouslysent.DraftsThis option allows you to preserve message drafts that you have saved.Voicem a i lUsed to dial the voicemail number provided by your network vendor tolisten to your voicemails.Your network vendor will provide you with your voicemail inboxnumber and a number for accessing any other voicemail services. Fordetailed information about voicemail services, contact your networkoperator to see if you need to save a specific phone number to yourphone in order to access your voicemail inbox.SettingsThis menu item includes a number of options for adjusting messagesettings:Voi cem a i l  No.You can save your voicemail phone number here.
Using Your Phone 73SMSSave Msg toHere you can determine whether a new message will be savedto the phone's memory or to your SIM card's memory.Service Center No.This feature allows you to save the message center's phonenumber for sending your messages. The messages that yousend are sent to recipients through this message center.Bearer ModeThis can be set according to whether you are using a GPRSnetwork system or a regular GSM dialup network. If you areusing a GPRS network, you can use both the GPRS and dialupnetwork to send and receive SMS messages. If however you areusing a dialup network, you are restricted to using only thedialup network for sending and receiving SMS messages.•GPRS: Use only the GPRS network to send and receive SMSmessages.•CSD: Use only the dialup network to send and receive SMSmessages.•GPRS Preferred: Use the GPRS network preferentially. Only ifthere is no GPRS network present will the dialup network beused.•CSD Preferred: Use the dialup network preferentially. Only ifthere is no dialup network will the GPRS network be used.
74 Using Your PhoneValidit y Perio dThis sets the duration that an undeliverable SMS message thatyou send can be stored at the message center. During thisperiod, the message center will continue to attempt to deliverthe message to the designated number.Reply TypeThis determines whether you want to use an SMS message orMMS message in reply to an MMS message you have received.Message TypeYou can request that your network operator convert your textmessages to different types.Status ReportAfter activating this function, the network vendor will reportto you when a message has been delivered.Direct ReplyYou can request that your reply to an SMS be sent directlythrough the sender's message center.MMSFilterYour phone will reject all MMS messages from the senderslisted here.ExpirySets the length of time your outgoing MMS message stays onthe server before it reaches the recipient successfully.
Using Your Phone 75Reply TypeYou can determine here whether you want to use an SMSmessage or MMS message in reply to an MMS message youhave received.Size LimitSets the maximum size for a message that the phone receives. Ifan incoming message exceeds this size, the phone will not beable to download that message.Server InfoActivates the MMS server used for sending and receiving MMSmessages.Deferred DownloadAfter you activate this function, the phone will only downloadthe information associated with the sender when it receives anMMS message. You can then decide whether to download thismessage's content after you have read the information relatedto the sender.Delivery ReportAsks the recipient to return a confirmation after receiving yourMMS message.Read ReportAsks the recipient to return a confirmation after reading yourmessage.
76 Using Your PhoneCell BroadcastCell broadcast messages are general messages that your networkoperator broadcasts to all phones within a particular area. Thesemessages are broadcast in numbered channels. For example,channel 030 might be for local weather, 060 for traffic reports, 080for information about local hospitals, taxis, pharmacies, and soforth.You can receive cell broadcast messages that your network operatorbroadcasts, and select your preferred topics and languages.For more information about available channels and a list of theinformation they provide, contact your network operator.When you receive a cell broadcast, the content will be displayedtwice in ticker-tape fashion.Set StatusAllows you to select whether or not to receive cell broadcastmessages.Top i csAllows you to decide what information you wish to receivefrom your network operator's cell broadcasts. The topics listedin the TTopics list represent the broadcast information that youhave selected to receive from your network operator.If you have not previously saved any topics, you can press(OOption) and then select the AAdd option so that you canenter the desired range of topic numbers (that is, the channelnumbers). The upper and lower limits of the range are thehighest and lowest channel numbers, respectively. The largestpossible range is 0 to 65534. You are no longer limited toselecting only single channels, but can specify a range.
Using Your Phone 77LanguageYou can limit the cell broadcast information that you receivefrom your network operator to a specific language.Press (SSelect) to select your preferred language, and thenpress .CleanupAllows you to erase specific messages based on the message categorythat you select in this menu.Memory StatusDisplays the amount of remaining available memory, includingpictures, animations and ring tones stored on the phone.
78 Using Your PhoneThe Games menuTo e n te r  th e Games menu, press  (Games) from the standby screen,or select   in the main menu.This menu contains the games prestored in the phone or downloadedfrom WAP websites.God Damn FishIntroductionThis game allows you to torture the animated fish by stirring,heating, adding ice, etc.The fish's appearance will change as it continues to suffer variousabuses.Game controlsPress   or  ,  ,  ,   to decide how totorture the fish and press   or   to confirm your choice.Pilates TutorIntroductionThe Pilates Tutor provides step-by-step illustrations of Pilatesmovements, helping you stay in good shape at anytime, anywhere.Game controlsPress   or   and  to select the contents. Press or   to confirm your choice.
Using Your Phone 79ExtreMe_RacingIntroductionThis car racing game provides two playing modes--the challengemode and one-race mode.•You can choose your preferred race car.•In the challenge mode, you must finish five different tracks usingthe same car. To advance to the next track, you must finish first orsecond.•In the one-race mode, you can choose the track that you prefer.•The challenge mode will record a game's status.Game controls•Press  or   to accelerate.•Press  or   to brake.•Press  or   to turn left.•Press   or   to turn right.•Press   to accelerate and turn left.•Press   to accelerate and turn right.•Press   to stop a game.
80 Using Your PhoneDiamondIntroduction•To prevent the gems from reaching the top of the board, you mustremove them by forming vertical or horizontal lines of threeidentical gems.To form a line of three identical gems, swap the positions of thegems using   or  ,  ,  ,  .•You have three lives in each game. You lose one life as the gemsreach the top of the board.SettingsSize LimitThis sets a file size limit for Java downloads.Java VersionShows the phone's Java Virtual Machine Version, as well asremaining free space for downloading Java games.Internet SettingsPress (EEdit) to complete the Java settings below. When you arefinished making all settings, you must press    to save them.•Profile Name: Provides a name for this Internet setting.•Network  Access: Some types of Java games are only playableonline (for example, mahjong), and using the phone to go onlineentails an extra cost. However, it may not be possible to determinefrom a game's name alone whether or not it is an online game.Therefore, this setting allows you to be presented a prompt askingif you wish to go online to play a game before actually running theprogram.
Using Your Phone 81Always Ask: Each time you attempt to launch an online game,you will be asked if you want to connect to the Internet.Ask Once per AP: You will only be asked if you want to goonline the first time you attempt to launch an online game.The next time you attempt to launch the game, the samechoice that you made the first time will be applied.Never Ask: Each time you launch an online game, the phonewill automatically connect to the Internet, and you will notbe asked to confirm.•DNS: Here you can enter the IP address of the Domain NameServer that you wish to use for downloading Java programs.•Bearer Mode: Before you download a Java application from theInternet, you must set the network system that you are using toeither GPRS or CSD (dialup).•Based on the bearer mode that you have set, you will need tomake further settings for either the GPRS or dialup network. Fordetails on configuring GPRS and dialup network access, see page117.Downloading JAVA applicationsPlease use the WAP browser to download Java games. The browserscreen will first display information about the available games. Afteryou have read this information, you can run the download commandshown on the screen to begin downloading the desired Java game to theGames menu.Use only BenQ-certified Java applications in order to ensure that theywill run properly on your phone.
82 Using Your PhoneVoi ce  Mem o1. When the phone is in the standby mode, long press    .2. Press (OOption) to bring up a pop-up menu. Select AAdd and thevoice memo screen will appear. Perform the Voice Memo tasks usingthe following keys:a. Press  to record.b. Press   to stop recording.c. Press   to play the voice memo.3. After you are finished recording, press  (SSave) to save the voicememo. Enter the name of the recording and then press  .4. After you save the voice memo, the display will show the name of thevoice memo. You can now:a. Press (OOption), and then select whether you wish to record anew voice memo, rename the current voice memo, delete thecurrent voice memo, or send the current voice memo to othersvia MMS.For details on composing and sending an MMS message, seepage 62, "Editing and sending MMS messages"b. Press   to play the voice memo. In the voice memo screen,you can press   to play the previous or next memo.The default Java games contained in the Games  menu may differaccording to localized configurations. Once you begin running agame, simply follow the on-screen instructions. You can delete it inorder to install other games.
Menus 83MenusThe phone's menus provide various features. The main menu consistsof 9 icons. Each icon represents a particular menu item, which is used toaccess related sub-menus.For information about navigating menus, see page 23, "MenuNavigation".Phone BookThis menu provides various functions for managing the Phone Book,including the ability to add, locate, and copy contact data; add contactsto a caller group; and so forth.FindUsed to locate a contact in the Phone Book. You can enter the full nameof the desired contact, or if you are not sure about the spelling of thecontact's name, simply enter the first letter, and then press  . Thephone will locate all contacts whose names begin with this letter, andyou can scroll to the field containing the contact you want. Alternatively, you can press   to open the Phone Book directly as youare asked to enter a contact's name, and then scroll to the preferredcontact.For details on what to do after locating the desired contact, see page 35,"Finding Contacts in the Phone Book".AddUsed to add a new contact to the Phone Book. You can follow theprocedure described on page 32, "Adding Contacts to the Phone Book".
84 MenusEditAfter selecting a particular contact, you can follow the proceduredescribed on page 32 for editing the data for this contact.CopyIf you are using the phone book stored in the phone's memory, you cancopy contact data to the SIM card's phone book, and vice versa. You canselect a contact to copy from one phone book to the other, and copy allcontacts in one phone book to the other by choosing the option  AllPhone to SIM (AAll SIM to Phone).DeleteDeletes a contact from the Phone Book. You can delete one contact at atime, or delete all contacts at once. If you select the option to delete allcontacts, you will be asked for your phone code (the default password is"1234").Caller GroupCaller groups are combinations of phone settings used to identify aparticular group of contacts, such as work colleagues, family members,or friends. For example, you can associate a ring tone and animationwith one group, and when a member of that group calls, the phone willuse the group's ring tone and display its animation.After you scroll the caller group that you wish to configure, you canperform the following tasks:•Press (OOption): Used to select the ring tone or animation/image that will help you identify the caller group to which aparticular caller belongs, or to rename the caller group.
Menus 85•Press   : Allows you to view a list of all contacts that belong tothe caller group. Press   to highlight the desired contact, andthen press  (OOption) to add a contact to the caller group, orto delete the selected one from the group.Privacy ManagerThis option allows you to set your phone to reject certain calls, oralternatively, specify which calls to accept, rejecting all others.1. First, create a list of calls that you wish to accept (AAccept List) or a listof calls that you wish to reject (RReject  List), by scrolling to thecorresponding item. Then press (EEdit) and the names of thecontacts who are already on the selected list will be displayed. If thelist is empty, press (OOption) and then select Add to choosecontacts to include in the list.2. You can select all the members of a caller group to be added to a list,or you can select contacts from the Phone Book individually (thescreen will first display the caller group options). Scroll to the callergroup or contacts that you wish to add to the list, and then press (SSelect) to make your selections; press  (CCancel) to clear the callergroup or contacts that you have selected.3. When you are finished, press   . The screen will display the namesof the contacts you have added to the list. If needed, you can press (OOption) to add or remove contacts. When you have confirmed thelist, press  (BBack) to return to the PPrivacy Manager menu.
86 Menus4. Lastly, select whether to activate the Accept List or the Reject List.Press   to scroll to the list that you wish to activate, and then press to confirm your choice.If you choose to activate the Accept List, from now on your phonewill only be able to receive calls from contacts in the Accept List. If,on the other hand, you choose to activate the Reject List, your phonewill not be able to receive calls from contacts in the Reject List.If you are currently using the phone book on your SIM card, youwill not have access to the Privacy Manager feature.Business CardYou can use this option to enter your own business card information.The data fields are as follows:Press   to scroll to the data field you wish to edit, and thenpress (EEdit), press   , or begin entering text to edit the data inthis field. After you are finished entering the data, press   to save allthe business card data.Your name.Your mobile phone number.Your e-mail address.Your company's address.Your job title.
Menus 87ActivateUsed to activate the phone book stored in the phone's memory or onyour SIM card. Press   to highlight the desired phone book and thenpress  .My NumberThis option allows you to save your SIM card number and name to yourSIM card's memory.SIM StatusUsed to view how many additional entries can be stored in the SIMcard's phone book and the maximum number of entries that it canstore.MessagesFor a description of the features available in the Messages menu, seepage 57, "Messages Menu".
88 MenusCallsYour network operator must support this feature in order for you to beable to use it.This menu includes a list of your missed calls, dialed calls, and receivedcalls. Call costs and time are also recorded.MissedShows your most recent missed calls.Press   to scroll to the missed call that you wish to select. You cannow choose to view, edit, or delete the number for the missed call. Theprocedure is the same as that described on page 37, "Last Missed,Dialed, and Received Calls".ReceivedShows your most recent received calls.DialedShows your most recent dialed calls.Delete AllDeletes all call records.DurationThis feature is only accessible if supported by your network operator.LastShows the duration of the last call.
Menus 89AllShows the total time for all calls.ReceivedShows the total time for all received calls.DialedShows the total time for all dialed calls.ResetClears all call time records.CostLastShows the cost of your last call.Requires the support of the network operator.AllShows the total cost of all calls.Requires the support of the network operator.
90 MenusResetClears all call cost records.Requires entry of the PIN2 code.LimitShows the current limit set for total call costs.Set LimitAllows you to set a limit for total call costs. If call costs exceed thislimit, the phone will no longer be able to dial pay calls. When thisfeature is activated, the remaining cost will be displayed on thescreen each time you end a call.Requires entry of the PIN2 code.Set UnitsAllows you to first enter the unit price and a currency forcalculating call costs.Requires entry of the PIN2 code.What is a PIN2 code?•The PIN2 is the second PIN code. Its main use is in controllingrestricted services--for example, call time limits and restrictedphone numbers.•If the PIN2 code is incorrectly entered three times consecutively, thePIN2 code will be locked. To unlock the PIN2 code, you will need toenter the PUK2 code, which you obtain from your network operator.
Menus 91GamesFor information on the Games menu, see page 78, "The Games menu".CameraFor information on using the camera, see page 44, "Camera Function".
92 MenusMedia CenterAlbumFor information on the Album menu, see page 47, "Using the Album".VideosYou can playback the recorded videos in this menu.Scroll to the preferred video and press   to playback the video. Press(OOption) to perform the following tasks:•Rename: Allows you to give the video a new name.•Delete: Deletes the video.•Information: Displays the video's name and file size.PictureThis image library stores the phone's default pictures, as well as imagesreceived in EMS/MMS messages, or downloaded through WAP servicesor using multimedia communications tools.Scroll to the desired picture to access the following options:•Press   to display this picture. Pressing   will display the next orprevious picture; pressing   will show the full-screen picture.•Press (OOption) to perform the following tasks with the picture:Rename: Allows you to provide the picture with a new name.The phone's default picture cannot be renamed, so this option isThe file formats supported by the phone are BMP, PNG, GIF, JPEG(progressive or marithmetic-encoded saves not supported), and EMSpicture.
Menus 93not present for it.Delete: Deletes the picture.The phone's default picture cannot be deleted, so this option isnot present for it.Send: Sends the picture in an EMS/MMS message.Information: Displays the picture's name, file size, and whetherthe file is a default picture, a picture you have saved or one youdownloaded yourself (noted as UUser Defined).Set Wallpaper: Use the picture as the wallpaper for the standbyscreen.AnimationThis animation library stores the phone's default animations, as well asanimations received in EMS/MMS messages, or downloaded throughWAP services or using multimedia communications tools. Theprocedure for using this menu is the same as that described above forthe PPicture menu.MelodiesMy MelodiesThis ring tone library includes the phone's default ring tones, aswell as ring tones received in EMS/MMS messages, or downloadedthrough WAP services or using multimedia communications tools,or that you have created yourself with the CComposer function.The phone supports the following animation file formats: GIF, EMSanimation.The phone supports the following music file formats: MIDI,SMAF.
94 MenusScroll to the desired ring tone, and press   (OOption) to performthe following tasks with the ring tone:•Set Ringtone: Makes the ring tone the alert sound for incomingcalls.Ring tones that support the EMS format (such as Chimes High)cannot be set as the phone's alert sound for incoming calls, sothey do not offer this menu option.•Rename: Allows you to give a new name to the ring tone.The phone's default ring tones cannot be renamed, so they donot present this option.•Edit: Allows you to edit the ring tone.The phone's default ring tone cannot be edited, and onlyComposer offers this option. For information on how to edit ringtones, see page 95, "Composer".•Delete: Deletes user-edited ring tones.The phone's default ring tones cannot be deleted. Only user-created or downloaded ring tones provide this option.•Information: Displays the name of the ring tone, its file size, andwhether it is a default ring tone, or a file that you have saved ordownloaded yourself (noted as UUser Defined).•Send: Sends the ring tone in a message.
Menus 95ComposerYou can edit your own polyphonic ring tone melodies, and usethem as alert sounds for incoming calls.A polyphonic ring tone consists of musical tones in multiplechannels. The Composer function allows you to create a maximumof 8 channels, mixing them to create the final polyphonic ring tone.Note formatEntering default notesPress  ʳ̇̂ʳ  to enter the eight pitches in an octave asquarter notes: Do Re Mi Fa So La Ti. The screen will display:4C5,44D5,  4E5,  4F5,  4G5,  4A5 and 44B5.Entering a default restPress    to enter a quarter rest: 440.The "4" on the left shows that the represented note is aquarter note; the "5" indicates that it is in the middle octave.Length Octave SharpPitch
96 MenusAdjusting the length of a noteThe default note length is a quarter note (the screen uses thenumber 4 to represent a quarter note). Press   to increasethe note's length (the number on the screen will increase);press   to reduce the note's length (the number on thescreen will decrease). Various note lengths are represented bythe numbers shown in the chart:Adjusting a note's octaveThe default notes just entered are in the middle octave(represented on the screen by the number 5). Press    toadjust a note's octave. The octave of a note is represented by thenumbers shown in the chart:Adding a sharp to a notePress   to add a sharp '#', which raises the note a semitone.To remove a sharp from a note, press   .A sharp cannot be added to an E or Bnote.On-screen number 12345678Note length 1/16 1/8 3/16 1/4 3/8 1/2 3/4 1On-screen number Represented octave4 Lower octave5 Middle octave6 Higher one octave7 Higher two octaves
Menus 97Steps for creating a polyphonic ring tone1. The first time you enter the CComposer menu, you will see 8channels that you can select for editing. Each channel can beused to save one passage of music that you have created.Scroll to the channel that you wish to edit, and then press to enter the ring tone editing window to begincomposing the music for this channel.2. Edit notes according to the procedures described above.•To modify a note after you have entered several notes,press   to move the cursor to the right of the note thatyou wish to change. You can then proceed with adjustingthe length, octave, sharp/unsharp, and so on.•Press to delete a highlighted note.3. When editing the music in a channel, press  (OOption) toaccess the following options:•Play: Plays the notes in the channel.•Instrument: Allows you select the instrument that willplay the notes in the channel.•Time Beat: Sets the tempo (tempo range: 40 to 200).4. After you are finished editing the notes in the channel, press  to return to the channel list. You can now repeat theabove steps to create another channel of music.5. When you are finished with all the channels that you wish tofill with notes, press  (OOption) in the channel list screen toaccess the following options:
98 Menus•Play All: Plays the polyphonic ring tone that results frommixing all channels.•Play  Channel: Plays the channel you have currentlyscrolled to (if this channel does not contain any musicthat you created, this option will not appear).•Save: Select this option and your phone willautomatically mix the music you have created in thechannels into a polyphonic ring tone, and save this ringtone to the menu MMedia  Center >Melodies  >MyMelodies. Press   and enter a name for the ring toneand it will be saved.HelpDisplays information on how to use the phone's keys in composingring tones.
Menus 99Too lsAlarmUse the following steps to set an alarm:If you activate the Alarm Clock feature, when the specified date andtime arrive, the phone will sound the alarm, even if your phone isturned off.DayUsed to set the alarm to go off ona particular day from Monday toSunday. Press   (EEdit) to displaythe days of the week. Press (SSelect) to make your selection.When done, press   to returnto the Alarm Ring screen. TheDay field will now indicate thedays on which the alarm will gooff.TimeAllows you enter the time when an alarm will go off.1. Select an alarm you wish to set and activate.2. Press   to select the feature for activation. The configurationfields for the alarm will appear in the lower part of the screen.The days on which thealarm will go off.
100 Menus3. Lastly, you must press    to save all your current Alarm Clocksettings. After completing Alarm Clock settings,   will appear inthe external display's status bar;   will appear in the main display'sstatus bar.Time DurationAllows you to set the length of the alarm. Press (EEdit) to select thedesired alarm duration and then press   .When the alarm rings, there are two ways to turn it off:•Press (Snooze)  to stop the alarm. The alarm will ring againfive minutes later.•Press  to turn off the alarm. The alarm will not ring until the nextscheduled time.
Menus 101CalendarYou can use the Calendar to set up memos for forthcoming events suchas a meeting, an appointment, or a friend's birthday. The Calendar willalso remind you about events you have previously scheduled.3. Scroll to the data field you wish to edit, and then press   (EEdit) or , or press alphanumeric keys to begin entering data. You canenter data in these fields:Change the memo's assigned date. In the Calendar screen, press to scroll to the date where you wish to create the memo, andthen press  .1. When you open the Calendar, the phone willshow the calendar for the current date.If you have not set the current date on yourphone, go the menu Settings > Date & Time.See page 119.In the Calendar screen, press   to move thered box to the date where you wish create amemo. You can also press  (OOption) andselect the Go to Date option, then enter thedesired date, pressing   to confirm yourselection of that date.When the Calendar isopened, the current date will be highlighted by a red box.2. When the red box is highlighting the desired date,press (OOption) and select the AAdd option to open the memoeditor.
102 Menus4. After completing entry of data in each of the fields, you must press to save the memo to that date. The phone will display this date'smemo list, including the event name and time for the memo you justsaved. If the Alarm Clock has been set to remind you about the eventassociated with the memo, the   icon will appear beside the eventname.5. You can now perform the following tasks:a. Press  (OOption) to select whether to edit or delete thememo, or select Send vCal to send this memo to othersthrough SMS.b. Press   to view the information in the memo. Then press (OOption) to edit or delete the memoEnter a time for the event associated with the memo.Enter a name for the event associated with the memo.Enter the scheduled location for the event associated with thememo.Enter the names of the participants in the event associated with thememo.Record any notes about the event associated with the memo.Scroll to this option to set up your phone to remind you about anevent. On the appointed date, when the scheduled time arrives, thememo will appear on the screen and the Alarm Clock  will ring.First press   to activate this feature. The time field will appearbeneath, and you can enter the time when you wish to be remindedabout the event.
Menus 103c. Press  (BBack) to return to the Calendar screen. You canmove the red box to other dates to create additional memos(dates that already contain memos will be marked by ayellow box).6. After creating all the event memos you wish, return to the Calendarscreen. You can now press (OOption) and select:•Delete All: Deletes all currently saved memos.•Auto Delete: If this feature is activated, all event memos for dates priorto the current date will be automatically deleted.To D o Lis tYou can use this feature to create a list of work tasks or personalprojects.1. Press (OOption) and then select AAdd to bring up the editorwindow. After entering the name of the task, press    to create thisto do item.2. In the list screen, scroll to the desired to do item, and then press(OOption) to add a new to do item, or to edit or delete theselected to do item. If there are two or more items in the list, you canselect DDelete All to delete all of them.3. In the list screen, if there are any to do items that have already beencompleted, you can scroll to the item and then press   to mark it toremind yourself that the task has been done. If youpress (OOption), you can activate the Auto Delete, which willautomatically clear any to do items that you have marked ascompleted.
104 MenusNoteYou can use this feature to create a list of notes.1. Press (OOption) and select AAdd to bring up the editor screen.Enter the desired text and press    .2. A message on the screen will ask whether you wish to add a passwordfor this note. If you press   (YYes), you will from then on need toenter the phone code in order to view the contents of the note. Press (NNo) to save the note without adding a password.The default phone password is 1234. To change the password, goto the menu Settings > Security > Phone Lock. See page 131.ShortcutsFor a description of the features accessible through the Shortcuts menu,see page 52, "Shortcuts Menu".Voice MemoFor a description of the features accessible through the Voice Memomenu, see page 82, "Voice Memo".
Menus 105CalculatorCurrency Converter1. To set the currencies for conversion, press  (OOption) and selecteither CCurrency  1 (to set the currency at the top of the screen) orCurrency 2 (to set the currency in the lower part of the screen), thenpress   to confirm. After selecting a currency from the list, press .Allows you to use the phone as acalculator. Use   to performthe mathematical operationsshown on the screen.You can enter numbers up toa maximum of 8 digits inlength.Entered numbers and calculation results will appear in this field.Press  to enter a decimal point.Currency 1: EUR (euros)The current exchangerate settingCurrency 2: USD(US dollars)For entering the amountfor conversionOnce you enter the Currency Converter screen, the default currencieswill be displayed, as shown in this example:
106 Menus2. Set the exchange rate.Press (Option) and select Rate Setting, then enter the rate forconverting from Currency 1 to Currency 2. Use the   to show thecalculation result at the bottom. The calculation can provideprecision up to two decimal places.The exchange rate field can accommodate a maximum of five digits(including decimal digits).Press to enter a decimal point.3. After returning to the Currency Converter screen, you can select oneof the currencies and then enter an amount that you wish to convertinto the other currency.You can enter amounts up to six digits long.4. After pressing   the converted amount will appear in the field forthe other currency.
Menus 107Stopwatch4. Once the stopwatch is halted, press  (RReset) to zero the stopwatch.Countdown Timer1. Enter the amount of time to count down. You can set any time up to23 hours, 59 minutes and 59 seconds.2. When you press   , the countdown timer will begin countingdown to zero. When the countdown is finished, the screen willdisplay the "Time's Up" message and an alert sound will be played.Press  (EExit) to leave the screen.3. Press   to stop the countdown timer.4. After the countdown timer is stopped, you can press  (RReset) andenter a new time to count down.1. Press   to start the stopwatch.2. While the stopwatch is running, you can press    (SSplit) to save upto four elapsed times (such as in a race). The display will show thesaved times in the lower part of the screen.Pressing (Back) while the stopwatch is running will bring up the"Quit?" warning message (the stopwatch will continue to run). Press (Yes) to stop the stopwatch or   (No) to return to the timerscreen.3. Press   to halt the stopwatch.
108 Menus5. When the countdown timer is running, press  (BBack). The "StopTimer?" message will appear. If you press  (YYes), the countdowntimer will stop and return to the timer screen. If you press   (NNo),you will exit the countdown timer screen, but the countdown timerwill continue the countdown. You can then perform other tasks, andwhen the countdown is finished, the "Time's Up" message will appearand an alert sound will be played. Press  (EExit) to exit the screen.Service NumberThis option can be used to display the service number that the networkoperator has stored on the SIM card.Requires network operator support.SIM Toolkit MenuYour network operator provided you with the mobile services in thisSIM Toolkit (STK, for short) menu. Depending on the particularservices provided by the network operator, this menu may contain anumber of extra options. However, if the network operator has notprovided any STK services, this menu will not appear on the screen. Fordetailed information, contact your network operator.Requires network operator support.
Menus 109Oper.ServicesYour phone includes a built-in WAP browser, allowing you to use thephone for mobile Internet connectivity. To use the phone to get online,necessary WAP and GPRS settings must be made in this menu.You must apply to a network operator for WAP services and completeWAP and GPRS settings in this menu before you will be able to takeadvantage of mobile Internet connectivity. In general, once the serviceyou have applied for has been activated, the network operator willautomatically transmit the needed settings to your phone. If this is notthe case, you must perform this configuration yourself. For informationabout WAP and GPRS services and configuration details, contact anetwork operator providing these services.You can activate the browser from the three options in the menuOper.Services:•Start Browser: Starts up the browser and connects to thehomepage.•WAP Message:Starts up the browser and accesses the WAPinbox for reading WAP messages.•Goto URL:Starts up the browser and connects to the URL thatyou enter.
110 MenusStart BrowserStarts up the browser and connects to the homepage.Browsing a webpageReferring to the soft key commands at the bottom of the screen,press  and  to perform needed tasks while browsing awebpage. Press to scroll up or down a webpage. For details onbrowsing a webpage, inquire with the network operator providingWAP services. Your Internet connectivity service will determine thelayout and content of the webpages you view. Depending on thespecifics of your service, they way you browse the Internet on yourphone will differ.How to close the browser and end the online session•While getting online, press   or long-press  .•If you are already viewing a WAP webpage, long-press   orfrom the browser's menu select EExit.How to display the browser's menuWhile viewing a WAP webpage, press   to display the browser'smenu. Referring to the soft key commands at the bottom of thescreen, press   and   to access the various options. Press thecorresponding alphanumeric keys to directly select an option. Thebrowser menu contains the following items:BackSelecting this option will take you to the page you viewedpreviously.
Menus 111HomeReturns to the home page. To designate a particular page to beyour home page, go to 99Settings >1 Homepage.ExitCloses the browser and returns you to the main menu screen.InboxWhen your phone receives a message that can only be viewedusing a WAP browser, you enter this WAP inbox to read themessage.BookmarksYou can open the Bookmarks menu and select webpagebookmarks.ViewAllows you to see the current bookmarks and bookmarksfolders. Scroll to the desired bookmark or bookmarksfolder, and you can:•Press  (GGo) to link to the webpage that the bookmarkrepresents. If you have selected a bookmarks folder, selectthe desired bookmark from within the folder, and thenpress  (GGo).•Press  (MMenu) to display the following options:Details: Displays the bookmark's title and the URL itrepresents.Delete: Deletes the bookmark or bookmarks folder.New Bookmark: Creates a new bookmark.New Folder: Creates a new bookmarks folder.
112 MenusMove  to  Folder: Moves a bookmark to thedesignated folder.Delete  All: Deletes all bookmarks and bookmarksfolders.Hotkeys: Allows you set a numerical key as a hotkeyfor a bookmark. After completing the setting, youcan press this numerical key to directly link to thewebpage represented by the bookmark.Mark SiteAdds the current webpage to your bookmarks list.GoTo URLPress  (EEdit) and enter the URL of the webpage that youwish to browse, and then scroll to the Go option and press (GGo) to link to that URL.Save ItemsWhen viewing a webpage, if you discover that it contains animage that can be downloaded, you can access this option tosave the image to your phone.ReloadReloads the current webpage.SettingsYou can enter this item to making the following settings:For detailed information about the following settings, contactyour ISP.
Menus 113HomepageDesignates a homepage. When you start up the WAPbrowser or if you select HHome from the browser's menu,the screen will display the homepage you designate.a. Press (EEdit) and then enter the URL of the webpagethat you wish to use as your homepage.b. Select the SSave option to designate the URL you enteredas your homepage. Select UUse  Default to use thehomepage designated by your WAP service provider.Scroll ModeYou can select two scrolling modes: BBlock or SSmooth. Inthe Block mode, as many words as will fit in a line areshown for a few seconds, then the next line is shown, andso on. In the Smooth mode, the content scrolls smoothlyon the screen. You can also adjust the scrolling speed: FFast,Medium,SSlow.Send ReferrerThis option allows you to determine whether the browserwill send an HTTP referrer header.Key Press TimeoutThis option sets the amount of time that the phone waitsduring text entry before automatically advancing thecursor to the next entry position. As long as the same key isre-pressed within the interval of time set here, it willcontinue to cycle through the characters available throughthat key.Circuit PromptThe Circuit Prompt is a message displayed before eachcircuit data call is made. It reads, "Circuit is down. Start adata call?" You can choose to enable or disable this feature.
114 MenusSecuritySecure PromptThe Secure Prompt message is displayed before youleave a secure area. It reads, "Entering a non-securearea. OK?" You can choose to enable or disable thisfeature.Current CertificateDisplays information on the certificate currently inuse.CA CertificatesDisplays information on the built-in certificate. Acertificate is a digital ID issued by a trusted third partyknown as a certificate authority (CA). The phone usesCA certificates to authenticate websites that sendinformation to the phone.AuthenticationYou can decide whether your phone should store youruser name and passwords for websites that requirethem. If you allow your phone to authenticate youautomatically, you will not need to re-enter your username and password each time you visit the samewebsite.AdvancedRestart BrowserRestarts the browser, and automatically returns to thedesignated homepage. This feature is provided foryour convenience if network errors occur, allowingyou to restart the browser and re-establish yourInternet connection.
Menus 115DownloadsIf this option is enabled, you will not be able todownload images, background audio, and objects.View Title RegionYou can choose whether or not to have the browserdisplay webpage titles. You can also set this option sothat titles exceeding a certain length will be split intoseparate lines. (The first line of the browser displays a"G" and a globe image, while the second is the "titleregion". The actual webpage content begins on thethird line.)AboutƥFrom here, you can view information about theversion of the browser that you are using.
116 MenusWAP MessageStarts up the browser and displays the WAP inbox so you can readWAP messages.Goto URLStarts up the browser and connects to the URL you enter.ResumeReturns to the last webpage you viewed.Clear CacheClears webpage content that the browser temporarily stores inmemory.WAP  S et t i ng sYou can make settings for the WAP servers of six different networkoperators, and select the server to use when connecting to theInternet.To activate another set of WAP server settings, scroll to the group ofsettings you wish to use and then press  . The phone will activatethese settings for use in connecting to the Internet.By scrolling to a particular group of WAP server settings that youwish to modify, and then pressing (OOption), you can create anew group of settings, edit the settings, or delete the settings.WAP server settings include the fields listed below. Select (EEdit) toedit the setting in each field.•Profile Name: Gives the WAP server settings a name.•Homepage: Sets the webpage that the browser will link to when itis started up.•IP  Address: Enter the IP address used for accessing the mobileInternet.
Menus 117•Port: Enter the connection port specified by the networkoperator.•Bearer Mode: Before connecting to the Internet, you must set thisitem according to whether your Internet connection bearer modeis a GPRS network system or a GSM dialup network. Doing sowill allow you to properly link to the data network to browse WAPpages, download Java programs, and so forth. If you are using aGPRS network, you can use both the GPRS and dialup network toconnect to the Internet. If, however, you are using a dialupnetwork, you are restricted to using only the dialup network toconnect to the Internet.GPRS/CSD: Use the GPRS network preferentially. Only ifthere is no GPRS network present will the dialup network beused.GPRS: Use only the GPRS network.CSD/GPRS: Use the dialup network preferentially. Only ifthere is no dialup network will the GPRS network be used.CSD: Use only the dialup network.•GPRS: To modify settings for a GPRS account, press  (EEdit).GPRS settings include the following fields:APN: Enter the APN (Access Point Name) assigned by yournetwork operator.User Name: If needed, enter the user name provided by yournetwork operator.Password: If needed, enter the account password provided byyour network operator.•CSD: If you are using a GSM network, you must configure andactivate a CSD account. Press   (EEdit) to edit the settings in thefollowing fields:
118 MenusDial Number: When you start up the browser to connect tothe Internet, you phone will dial this number. Your networkoperator or ISP will provide this number to you.User  Name: This is your user account name, provided byyour network operator.Password: The account password provided by your networkoperator.Line Type: This is the type of dialup connection. Press  to select.Baud  Rate: The default value is 9.6, which is the standardspeed for data connections with a GSM mobile phone.Auth  Type: This is information needed fortelecommunications protocol authentication.
Menus 119SettingsDate & TimeUsed to set the time and date, as well as the format in which the timeand date will be displayed on the standby screen.Time2. After selecting the  Set mode, you can complete the date and timefields.FormatThis option is used to decide the format in which the time and datewill appear in the standby screen.1. Press   to select either the AAuto or SSet mode for this item:Auto: Automatic time zone adjustment. If during travel, youmove between time zones, the phone will automatically adjustthe time displayed on the screen based on the time zoneprompts provided by the local network operator so that youalways have access to accurate local time.Set: You phone will display the time you have set, and when youtravel to other time zones, the phone will ignore time zoneprompts issued by the local network operator.
120 MenusSecondary  TimeAuto Power On/OffAllows you turn the phone on and off at specified times to conservepower.Power OnDesignates a time for the phone to be automatically turned on. Ifthis option is activated, the phone will be automatically turned onat the designated time each day.Power OffDesignates a time for the phone to be automatically turned off. Ifthis option is activated, the phone will be automatically turned offat the designated time each day.ProfilesFor information on the Profiles menu, see page 49, "Profiles".When riding in an airplane or in any other situation where you cannotuse a mobile phone, remember to deactivate the Auto Power On/Offoption.Allows you to display the time inanother designated time zone. If youchoose to activate this option, thestandby screen will display the time inthat time zone along with your localtime.Time in secondary time zone
Menus 121DisplayThemeA display theme consists of a combination of display color and thestandby screen wallpaper. Different display colors are paired withdifferent preset wallpapers, so when you change the display color,the standby screen wallpaper will also change.Wallpap erDesignates the wallpaper used for the main display's standbyscreen.Image: Here you can select an image/animation to use as the maindisplay's wallpaper. After you press (VView) to enter the previewmode, pressing   will display the next or previous image/animation; pressing   will display it in full screen. Press    toconfirm your selection.Photo: Here you can select a photo saved in the phone memory asthe wallpaper.After you press (View) to enter the preview mode, pressing will allow you to browse the wallpapers matched to thecolors.You can also use this feature to change the wallpaper matchedwith a color in the Theme option.
122 MenusWelcome MessageUsed to select and configure the animation/picture/text that isdisplayed when the phone is turned on, as well as the music that isplayed.•Animation: Only the animation selected in this option will bedisplayed when the phone is turned on.•Picture: Only the picture selected in this option will be displayedwhen the phone is turned on.•Text: Only the welcome message entered in this option will bedisplayed when the phone is turned on.Limit on length of entered text: 15 letters or numbers.•Picture  and  Text: The picture and welcome message set in thisoption will be displayed when the phone is turned on.•Off: Returns the settings for startup music and animation to theirfactory default values.ContrastPress   to adjust the contrast of the screen's display. Press    toconfirm the setting.BrightnessPress   to adjust the brightness of the phone's displaybacklighting.Regardless of the settings you have made for the animation/picture/text to be displayed when the phone is turned on, thephone will play the music set in this option. Therefore, aftermaking settings for the animation/picture/text used for thestartup screen, the startup music must also be set.
Menus 123Keypad BacklightYou can turn the phone's keypad backlighting and displaybacklighting on or off, as well as set the length of time thatbacklighting will remain activated after the flip is opened or a key ispressed. After turning backlighting on, you can scroll to the TimeDuration option and then press (EEdit) to set this length oftime.OLED Duration•Default: After the external display cycles through displays of thetime and animations, it will power off, and will only power onagain when you press the upper or lower part of the volume key on the left side of the phone, or open and then close the flip (ifa new message is received or there is an incoming call, the externaldisplay will also power on and then, after cycling through theprogrammed items, power off once more).•Cycle: After the external display cycles through displays of thetime and animations, it will power off. After 15 seconds, theexternal display will automatically power on and again cyclethrough the programmed items.•Always  On: The external display will remain on, cyclingcontinuously through displays of the time and animations.Because the phone's external display drains power from thebattery when it is on, selecting Cycle or Always On will reducebattery life.
124 MenusOLED Animation SettingYou can set the animations to show on the external display. Press (SSelect) to make your selections; press  (CCancel) to clear theanimations that you have selected. When you are finished, press to confirm your selections.AudioThis menu allows you to set various sounds that the phone uses.Some of the options provided in this menu and the Profiles menu areidentical (for example, Call Ring). Therefore the particular setting thatthe phone uses will depend on which menu you last used to make thesetting.Power Saving ModeAfter you activate the power saving mode, keypad and displaybacklighting will be turned off, as will the status indicator lights on theflip, in order to conserve power.Call SettingsCall Divert Requires the support of the network operator.Forward AllForwards all incoming calls to a designated phone number orvoicemail inbox. When you use this feature, you must enter aphone number to which to forward incoming calls.After the Forward All mode is activated, the standby screenwill display the  icon.
Menus 125When BusyThe phone will divert incoming calls to another number whenyou are in the middle of another call.No ReplyForwards incoming calls to another number when you do notanswer.Not ReachableDiverts incoming calls when your phone is turned off oroutside network coverage.Cancel AllCancels all call divert options.Call BarringYou can request that your network operator block the dialing orreceiving of certain calls. The call barring services below require thesupport of your network operator. To activate or cancel any of theoptions below, you must enter the network password provided bythe network operator.All OutgoingBlocks dialing of any calls from the phone.Intl. OutIf this option is activated, no international calls can be madewith your phone.Intl. Except HomeIf this option is activated, your phone can only be used to diallocal calls and calls to your home country from abroad. Otherinternational calls will be barred.
126 MenusAll IncomingRejects all incoming calls.Incoming When RoamingIf you are in another country (using roaming), activating thisoption will cause the phone to reject all incoming calls.Cancel AllCancels all call barring settings.Change PasswordYou can change the network password, which can be obtainedfrom the network operator.Call WaitingIf there is an incoming call when you are in the middle of anothercall, the screen will display the number of the incoming call and callwaiting message to alert you.You must apply to the network operator for the call waitingservice in order to use this feature.Auto RedialIf there is no answer at a number you have dialed, the phone willautomatically redial.Show NumberYou can decide whether or not to display your phone number onthe recipient's phone when you make a call.On: When you call someone, the recipient's phone will display yourphone number.
Menus 127Off: Your phone number will not be shown on the recipient'sphone.If this feature is turned off, you may not be able to make phonecalls in certain countries, such as Singapore and China.Preset: Whether your phone number will be displayed on arecipient's phone will be determined by the default set by thenetwork operator.Fixed Dialing NumberAfter this feature is activated, the phone will only be able to dialnumbers on the Fixed Dialing Number list. If a number is not onthe list, calls cannot be made to this number.When you activate or cancel this feature, you must enter thePIN2 code.Before activating the Fixed Dial Number feature, you mustpress (VView), then press (OOption) and select AAdd to create aFixed Dial Number list. You must enter the PIN2 code, and thenadd a new number to your Fixed Dialing Number list.After creating the list, you can view, edit and delete numbers in thelist.If the PIN2 code is entered incorrectly three consecutive times,the PIN2 code will be locked down. You will need the PUK2 codeto unlock the PIN2 code. Contact your network operator to obtainthe PUK2 code.
128 MenusActive LineThis feature allows you to use two different phone numbers on onephone. You can designate one number for dialing calls, whileaccepting incoming calls dialed to both numbers without needingto use two phones. Select either LLine 1 or LLine 2. The number youselect (   or  ) will appear on the standby screen.This feature requires the support of the network operator.Connect AlertThis feature allows the phone to provide a ring tone or vibratingalert, or flash the backlighting when the recipient of a call hasanswered.Minute MinderOnce this option is activated, the phone will emit a beep once everyminute during a call.NetworkGenerally speaking, the choice of the network that your phone uses isconfigured automatically. When turned on, the phone willautomatically connect to the network provided by your networkoperator, or will automatically connect to the roaming network whenyou are outside the coverage of your regular network.If you wish to change the connection network, this menu will allow youto select the network you want to use. When outside the coverage ofyour regular network in your home country or when abroad, you canmanually select the local network system.Your network operator must be able to support network selection inorder for you to use this feature.
Menus 129Network ModeYou can choose whether the network selection mode that the phonewill use when it is turned on is automatic or manual.Automatic: If this option is selected, when outside the coverage ofyour regular network, the phone will automatically search forusable networks.Manual: If this option is selected, when outside the coverage ofyour regular network, the phone will list all the networks of telecomvendors and allow you to choose.Available ListAllows you to manually select a network. Your phone will list all thenetworks of telecoms vendors so you can choose.Not all networks listed will necessarily be available for use. If yourequire further information, contact your network operator.Band SettingAccording to your requirements, you can set an appropriate bandin the GSM network system.ConnectionUsed to set whether the phone will also search for a GPRS networkwhen it is turned on.•GPRS  &  GSM: When it is turned on, the phone will search foravailable GPRS and GSM networks.•GSM Only: When it is turned on, the phone will search only for aGSM network.
130 MenusSecurityYou can use a PIN code, phone code, and SIM card lock authenticationto prevent unauthorized use of the phone.PIN Code A PIN (Personal Identification Number) code is a code provided bya network operator. When PIN code authentication is activated, itwill prevent unauthorized use of the SIM card. Unless the correctPIN code is entered when the phone is turned on, the SIM cardcannot be used, even if it is inserted in another phone.PIN1 CodeUsed to activate/deactivate or change the PIN1 code. Beforechanging settings for the PIN1 code feature, the previously setPIN1 code must be entered.If you wish to change the PIN1 code, you must press    inthe Enable item to select On, so that you will be able to enterand confirm the new code.PIN2 CodeUsed to change the PIN2 code. The procedure is the same as forthe PIN1 code.If the PIN code is entered incorrectly three consecutive times,this will cause the SIM card to lock down, and a PUK1 codeprovided by the network operator will be required to unlock it.After unlocking, the PIN code will be automatically set to activateonce the phone is turned on.
Menus 131Phone LockActivates/deactivates or changes the phone's startup code. Thestartup code prevents unauthorized persons from using yourphone. Once the phone's code is activated, the phone will be lockeddown when it is turned on unless this code is correctly entered. Ifan incorrect code is entered, your phone will remain locked down,and cannot be unlocked even if the SIM card is replaced by anotherone. When the phone is locked, you will only be able to makeemergency calls.Once the phone code is activated, you must enter the code eachtime the phone is turned on in order to unlock the phone (there isno limit on the number of attempts to enter the phone code).The procedure for setting the phone code is the same as for thePIN1 code (the default phone code is 1234).SIM LockUsing this feature, you can prevent unauthorized persons fromusing your phone with other SIM cards. After you activate the SIMLock feature, only the SIM card present when the feature wasactivated will be accepted by the phone. If a new SIM card isinserted in the phone, when the phone is turned on and a PIN codeis entered, the phone will request entry of a SIM Lock code (there isno limit on the number of attempts to enter the SIM Lock code).If the code is entered correctly, the phone will be able to recognizethe new SIM card and use it normally. The next time the phone isturned on with this SIM card inserted, the phone will not ask againfor you to enter the SIM Lock code.Your phone can recognize a maximum of three different SIMcards.
132 MenusBefore setting the SIM Lock feature, you must enter the previouslyset SIM Lock code (the default SIM Lock code is 1234). The codemust be between 4 and 8 digits in length.Screen LockUsed to create a security screensaver. When youhave not performed any tasks with the phone for aset period of time, the phone will automaticallyactivate the screensaver shown on the left, thepurpose being to prevent personal information onthe phone from being viewed by others. To returnto the original screen, after pressing any key, you must enter thepassword you set for this feature.The steps for setting the Screen Lock feature are as follows:1. You must first enter the Screen Lock password that waspreviously set (the default password is 1234).2. Press  in the EEnable option to select OOn, and then press  to scroll to the TTimeout item.3. In the TTimeout item, press   (EEdit) or press   to set theperiod of inactivity before the phone will enter the Screen Lockmode.4. After completing settings, press  . The phone will prompt youto enter and confirm the Screen Lock password. You have twochoices:a. If you do not wish to change the password, press   toactivate the Screen Lock feature using the previously setpassword.b. If you wish to change the password, enter the new passwordin the New Password and Confirmed fields, then press
Menus 133to use the new password and activate the Screen Lockfeature.LanguageYou can select the language that the phone will use to displayinformation.InputYou can set the default input mode that will be automatically activatedwhenever you open the editing window for entering information into amessage, the Phone Book, and so forth.User GroupUser GroupUsed to create a closed group of callers based on a service providedby the network operator. The members of a User Group can calleach other, but cannot conduct calls with anyone outside the groupunless special provisions are made. This option can be used toselect whether or not to activate this service.Outside AccessWhen the User Group service is activated, enabling Outside Accesswill allow users in the group to make calls to numbers outside thegroup. However, incoming calls will still be restricted to calls fromwithin the group.RestoreRestores all of the phone's settings to their factory defaults.
134 The A520 Tools Gallery CD-ROMThe A520 Tools Gallery CD-ROMThe A520 Tools Gallery provides the cable drivers and software toolsthat the phone requires to perform various tasks with the computer.1. Place the A520 Gallery Tool CD-ROM in the computer's CD-ROMdrive. The setup program will automatically start as you close thedrive. Please click on your preferred language.This auto run setup program only supports Windows® 2000 and XP.
The A520 Tools Gallery CD-ROM 1352. The computer screen will display the following items to install: •A520 Handset Manager:Includes the driver of the phone's data cable, the Wireless Modemsetup program and the Handset Manager program (PC Syncapplication ).The data cable is not packed with the phone. You must purchaseits retail pack.•Webcam Driver & Watchdog:Includes the WebCam cable's driver and the WatchDogapplication required for running the WebCam function.•Data Folder:Includes the images and ring tones that you can download ontothe phone.
136 The WebCam FunctionThe WebCam FunctionYou can use the phone as a WebCam. The camera lens on the back ofthe phone will serve as the WebCam lens.1. Install onto the computer the WebCam data cable's driver andWatchDog required for performing the WebCam function.Please use the A520 Tool Gallery CD-ROM to install the WebCamcable's driver and WatchDog (see the installation instructions in theA520 Tool Gallery CD-ROM).WatchDog will be automatically turned on after installedsuccessfully. The WatchDog indicator   will appear at thebottom right of the computer screen.
The WebCam Function 1372. Plug the WebCam cable's bigger connector into a USB port and thesmaller one into the WebCam cable jack on the left side of the phone(the phone must be turned on with the SIM card inserted).The WebCam cable used to perform the WebCam function isdifferent from the data cable designed for the PC Sync and Modemfunctions.3. The WatchDog indicator will turn into   when WatchDog detectsthe connection between your phone and the computer.4. Start the communications tool (e.g. MSN Messenger, Yahoo!Messenger) on the computer, and now you can use your phone as aWeb Cam .WebCam Cable
138 The WebCam FunctionWhen using the WebCam function, you are allowed to answer andmake calls and receive and send messages. The WebCamconnection will not be stopped.When using the WebCam function, if you press   or enter themenu: Camera > Camera, the phone will ask you whether to stop theWebCam connection and start the camera mode. If you select Yes,the phone will stop the WebCam connection and enter the cameramode; if you select No, the phone will continue to work as a WebCam,and you are not allowed to use the phone's camera.If the WebCam cable still connects the phone and the computer afteryou exit from the camera mode, the WebCam connection will resumeautomatically.
Care and Maintenance 139Care and MaintenanceTake note of the points noted below to ensure that you are using thephone properly and to extend the lifespan of the phone.•Store the phone and its accessories out of the reach of children.•Keep the phone and accessories dry, and use the phone inenvironments where the temperature is between -10° C (+ 14° F) and45° C (+ 113° F). High or low temperatures outside this range maydamage the phone.•If possible, do not use or store the phone in excessively dusty or dirtyenvironments.•Do not remove the warranty seal on the phone yourself, nor allow anunauthorized dealer to do so.•Do not use strong detergents or organic solvents to wipe or clean thephone.•If your phone or its accessories are not operating normally, contact anauthorized dealer immediately.•Use only genuine BenQ accessories such as batteries, battery chargerand hands-free kit to ensure the phone's normal operation andpreserve battery life, as well as protect the safety of your person andbelongings. Use of non-BenQ accessories will not allow your phone toachieve optimal performance, and may cause the phone tomalfunction. Any malfunctions or damage caused by the use of third-party accessories are not be covered by the terms of the productwarranty, and will void the product warranty.•Avoid allowing objects that may discharge electricity to contact thecharging socket on the bottom of the phone or the metal contacts onthe battery, as this may cause short circuits and put you in danger.
140 TroubleshootingTroubleshootingIf you encounter problems while using the phone, or if it performserratically, you can consult the information in the chart below. If yourparticular problem cannot be resolved using the information in thechart, contact the dealer where you purchased the phone.Problem Possible cause SolutionPoor reception•The network signal is tooweak at your currentlocation Ϋfor example, ina basement or near a tallbuilding-because wirelesstransmissions can noteffectively reach it. Move to a location where thenetwork signal can beproperly received.•The network is busy atthe current time (forexample, during peaktimes, there may be toomuch network traffic tohandle additional calls).Avoid using the phone atsuch times, or try again afterwaiting a short time.•You are too far away froma base station for yournetwork operator.You can request a servicearea map from your networkoperator.Echo or noise•Poor network trunk qualityon the part of yournetwork operator.Hang up the phone and dialagain. You may be switchedto a better-quality networktrunk or phone line.•Poor local telephone linequality.
Troubleshooting 141Shortened standby time•The standby time is related to your network operator's system configuration. The same phone used with different network operators' systems will not provide exactly the same length of standby time.If you are located in an areawhere signaling is weak,temporarily shut off thephone.•The battery is depleted. In high-temperature environments, battery life will be shortened.Use a new battery.•If you are not able to connect to the network, the phone will continue to send out signals as it attempts to locate a base station. Doing so consumes battery power and will consequently shorten standby time.Change your location to onewhere the network isaccessible, or temporarilyturn off your phone.You cannot switch your phone on.•Battery power has beendepleted.Recharge the phone's battery.SIM card error•SIM card malfunction ordamage.Take the SIM card to yournetwork operator for testing.•SIM card inserted improperly.Insert the SIM card properly.•Debris on the SIM cardcontacts.Use a soft, dry cloth to cleanthe SIM card contacts.Problem Possible cause Solution
142 TroubleshootingUnable to connect to the network.•SIM card invalid. Contact your network operator.•You are not within thenetwork's service area.Check the service area with your network operator.•Poor signal. Move to an open space, or if you are inside a building, move closer to a window.You cannot answer incoming calls.•You have activated Accept List or Reject List in the Privacy Manager option.Go to the menu Phone Book > Privacy Managerand then select Off in order to deactivate this option.•You have activated theCall Barring feature.Go to the menu Settings >Call Settings > Call Barring, and then select Cancel All.You cannot makeoutgoing calls.•You have activated theCall Barring feature.Go to the menu Settings >Call Settings >Call Barring, and then select Cancel All.•You have activated the Fixed Dialing Numberfeature.Go to the menu Settings > Call Settings > Fixed Dialing Number, and then select Off to turn off this feature.PIN Code is blocked.•You have entered an incorrect PIN code three consecutive times.Contact your network operator. If the network operator provides the SIM card's PUK code, use the PUK code to unlock the SIM card.Problem Possible cause Solution
Troubleshooting 143Battery will not charge.•The battery or battery charger is damaged.Contact the dealer.•The phone's temperatureis below 0ĄC or higherthan 40ĄC.Adjust the battery charging environment to avoid extremes of temperature.•Poor contact between thebattery and charger.Check all connectors to make sure all connections have been properly made.Unable to enter information into the Phone Book.•The Phone Book's memory is already full.Delete unnecessary data from the Phone Book.Unable to select certain features.•Your network operatordoes not support thesefeatures, or you have notapplied for services thatprovide these features.Contact your network operator.Problem Possible cause Solution
144 Troubleshooting

Navigation menu