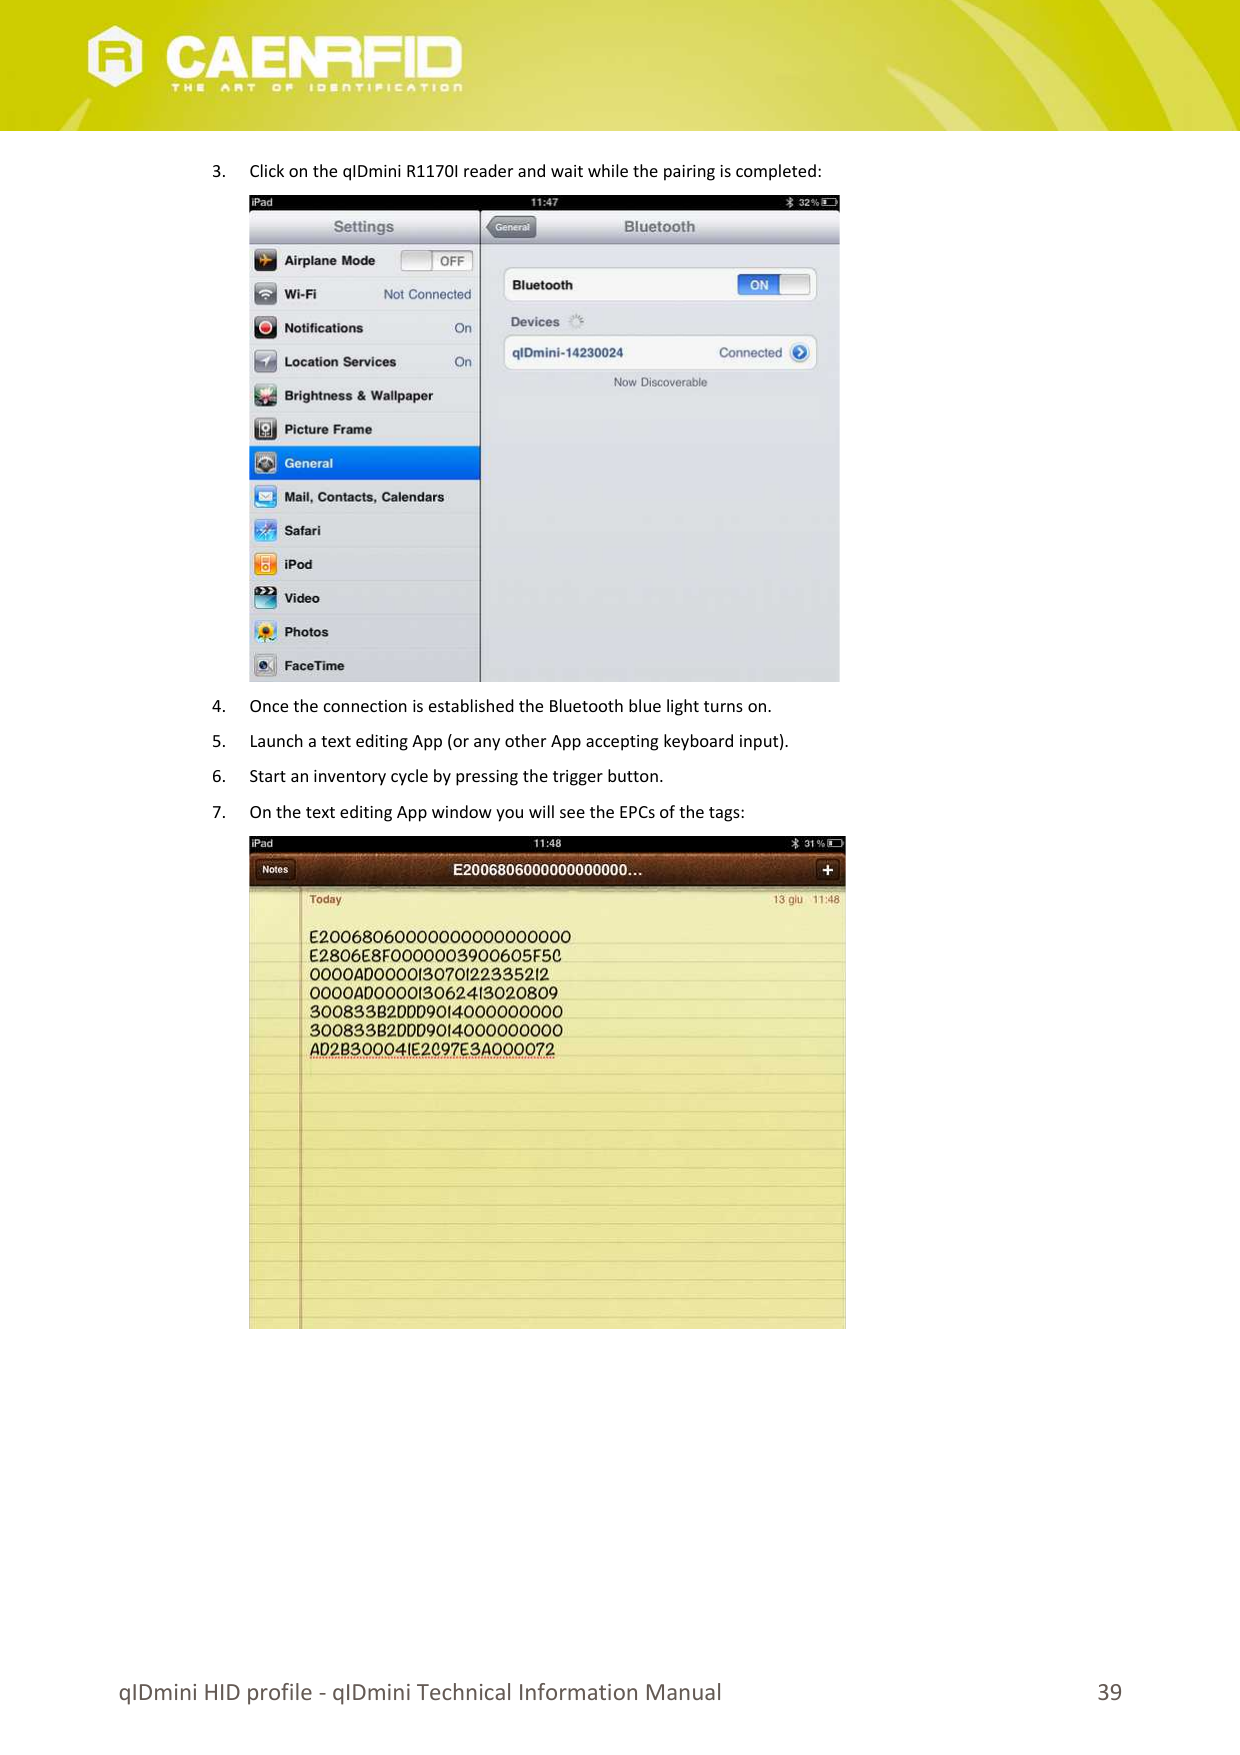
CAEN RFID srl CAENRFID026 R11701 - qIDmini Keyfob Bluetooth UHF RFID Reader User Manual SLATE Technical Information Manual Rev 01

CAEN RFID srl R11701 - qIDmini Keyfob Bluetooth UHF RFID Reader SLATE Technical Information Manual Rev 01

Contents

User Manual 3

TECHNICAL INFORMATION MANUALRevision 0.2 - 27 April 2017             R1170IKeyfob Bluetooth UHF RFID Reader
Scope of ManualThe goal of this manual is to provide the basic information to work with the qIDmini R1170I Keyfob Bluetooth UHF RFIDReader.Change Document RecordDate Revision Changes Pages23 June 2014 00 Preliminary release  -13 February 2017 0.1 Updated FCC compliance declaration 5127 April 2017 0.2Added note for RF power of FCC compliant models  42, 44Changed RF power level for FCC compliant models 47Updated FCC compliance declaration 51Reference Document[RD1] EPCglobal: EPC Radio-Frequency Identity Protocols Class-1 Generation-2 UHF RFID Protocol for Communicationsat 860 MHz – 960 MHz, Version 1.1.0 (December 17, 2005).CAEN RFID srlVia Vetraia, 11 55049 Viareggio (LU) - ITALYTel. +39.0584.388.398  Fax +39.0584.388.959info@caenrfid.comwww.caenrfid.com© CAEN RFID srl – 2017DisclaimerNo   part  of this manual may be reproduced   in  any form or by any means, electronic,   mechanical,  recording,   orotherwise, without the prior written permission of CAEN RFID.The information contained herein has been carefully checked and is believed to be accurate; however, no responsibilityis assumed for inaccuracies. CAEN RFID reserves the right to modify its products specifications without giving anynotice; for up to date information please visit www.caenrfid.com.Preliminary Product InformationThis document contains information for a new product. CAEN RFID reserves the right to modify this product withoutnotice.“Preliminary” product information describes products that are ready for production, but for which full characterizationdata is not yet available. CAEN RFID believes that the information contained in this document is accurate and reliable.However, the information is subject to change without notice and is provided “AS IS” without warranty of any kind(Express or implied). You are advised to obtain the latest version of relevant information to verify, before placingorders, that  information  being relied on is  current  and  complete. All  products  are sold  subject  to  the  terms   andconditions of sale supplied at the time of order acknowledgement, including those pertaining to warranty, patentinfringement, and limitation of liability.  No responsibility is assumed by CAEN RFID for the use of this information,including use of this information as the basis for manufacture or sale of any items, or for infringement of patents orother rights of third parties.Visit qIDmini R1170I web page, you will find the latest revision of data sheets, manuals, certifications, technical drawings, software and firmware.All you need to start using your reader in a few clicks!
Federal Communications Commission (FCC) Notice This device was tested and found to comply with the limits set forth in Part 15 of the FCC Rules. Operation is subject to the following conditions: (1) this device may not cause harmful interference, and (2) this device must accept any interference received including interference that may cause undesired operation. These limits are designed to provide reasonable protection against harmful interference when the equipment is operated in a commercial environment. This device generates, uses, and can radiate radio frequency energy. If not installed and used in accordance with theinstruction manual, the product may cause harmful interference to radio communications. Operation of this product ina residential area is likely to cause harmful interference, in which case, the user is required to correct the interferenceat their own expense. The authority to operate this product is conditioned by the requirements that no modificationsbe made to the equipment unless the changes or modifications are expressly approved by CAEN RFID.Disposal of the product Do not dispose the product in municipal or household waste. Please check your local regulations fordisposal/recycle of electronic products.
Index …Scope of Manual......................................................................................................................................................................... 2Change Document Record..........................................................................................................................................................2Reference Document..................................................................................................................................................................2Index …..........................................................................................................................................................................................4List of Figures.................................................................................................................................................................................5List of Tables..................................................................................................................................................................................51 INTRODUCTION...................................................................................................................................................................6Product Description.................................................................................................................................................................... 6Front panel..................................................................................................................................................................... 7Charging......................................................................................................................................................................... 8USB connector................................................................................................................................................................8Accessories................................................................................................................................................................................. 8Development Kit......................................................................................................................................................................... 9Ordering Options...................................................................................................................................................................... 102 GETTING STARTED.............................................................................................................................................................11Introduction.............................................................................................................................................................................. 11Bluetooth Communication Setup using the Easy Controller for Android..................................................................................113 QIDMINI EASY2RD PROFILE...............................................................................................................................................16Introduction.............................................................................................................................................................................. 16Android devices........................................................................................................................................................................17Bluetooth Communication Setup using the Easy Controller for Android......................................................................17Windows PCs............................................................................................................................................................................ 22Bluetooth Communication Setup.................................................................................................................................22USB Communication Setup...........................................................................................................................................24Connecting the qIDmini using the Easy Controller for Windows..................................................................................26iOS devices................................................................................................................................................................................28Bluetooth Communication Setup.................................................................................................................................284 QIDMINI HID PROFILE........................................................................................................................................................31Introduction.............................................................................................................................................................................. 31Android devices........................................................................................................................................................................31Bluetooth Communication Setup.................................................................................................................................31Windows PCs............................................................................................................................................................................ 33Bluetooth Communication Setup.................................................................................................................................33USB Communication Setup...........................................................................................................................................36iOS devices................................................................................................................................................................................38Bluetooth Communication Setup.................................................................................................................................385 RESET THE QIDMINI READER..............................................................................................................................................406 QIDMINI CONFIGURATION MENU......................................................................................................................................41Introduction.............................................................................................................................................................................. 41PROFILE..................................................................................................................................................................................... 43BEEP.......................................................................................................................................................................................... 43VIBRATE....................................................................................................................................................................................44POWER...................................................................................................................................................................................... 447 QIDMINI FIRMWARE UPGRADE.........................................................................................................................................45Firmware Upgrade....................................................................................................................................................................458 QIDMINI TECHNICAL SPECIFICATIONS................................................................................................................................47Technical Specifications Table...................................................................................................................................................47Reader – Tag Link Profiles.........................................................................................................................................................48Radiation Patterns....................................................................................................................................................................49Model R1170IE (ETSI version).......................................................................................................................................49Model R1170IU (FCC version).......................................................................................................................................509 QIDMINI REGULATORY COMPLIANCE................................................................................................................................514
List of FiguresFig. 1.1: qIDmini R1170I Keyfob Bluetooth UHF RFID Reader.................................................................................................................6Fig. 1.2: qIDmini R1170I Front Panel...................................................................................................................................................... 7Fig. 1.3: qIDmini R1170I Accessories......................................................................................................................................................8Fig. 1.4: R1170IDK – qIDmini Keyfob Bluetooth UHF RFID Reader Development Kit..............................................................................9Fig. 8.1: qIDmini R1170IE Radiation pattern H plane...........................................................................................................................49Fig. 8.2: qIDmini R1170IE Radiation pattern V plane............................................................................................................................49Fig. 8.3: qIDmini R1170IU Radiation pattern H plane...........................................................................................................................50Fig. 8.4: qIDmini R1170IU Radiation pattern V plane...........................................................................................................................50List of TablesTab. 1.1: qIDmini R1170I Front Panel LEDs and Buttons........................................................................................................................7Tab. 1.2: qIDmini R1170I Power LED Status Table..................................................................................................................................8Tab. 1.3: qIDmini R1170I Bluetooth LED status table.............................................................................................................................8Tab. 1.4: Compatibility table between the Apple/HID models and different OS..................................................................................10Tab. 3.1: Compatibility table between the Apple/HID models and different OS in the EASY2RD profile.............................................16Tab. 4.1: Compatibility table between the Apple/HID models and different OS in the HID profile......................................................31Tab. 8.1: qIDmini R1170I Technical Specifications Table......................................................................................................................47Tab. 8.2: qIDmini R1170I Reader to tag link profiles............................................................................................................................485
1 INTRODUCTIONProduct DescriptionThe qIDmini (Model R1170I) is a handheld reader of the easy2read©  product family, compliant with UHF RFID ISO18000-6C/EPC C1G2 standards.The qIDmini has an integrated antenna suited for short to medium range applications and, thanks to the Bluetooth®communication interface, it is a perfect UHF RFID add-on for any Bluetooth® enabled host such as a PC, a smartphone,a PDA or a tablet. The reader is compatible with Windows XP/7, Windows CE/Mobile, Android, iPhone and iPad.The   HID   version   supports   native   keyboard   emulation   allowing   to   interact   directly   with   legacy   application,   officeautomation SW or any other generic solution requiring manual input.When paired to a smartphone or a tablet, the qIDmini is a cost effective alternative to more expensive handhelddevices.Designed for mobile operators in indoor or outdoor areas, the qIDmini is ideal for in-store inventory management, fieldsales mobility, service and maintenance applications.Fig. 1.1: qIDmini R1170I Keyfob Bluetooth UHF RFID ReaderThe reader is available either in ETSI or FCC version (see § Ordering Options page 10):865.600÷867.600 MHz (ETSI EN 302 208 v. 1.4.1) (Mod. R1170IEHIDP and R1170IEAPLP)902÷928 MHz (FCC part 15.247) (Mod. R1170IUHIDP and R1170IUAPLP) Introduction - qIDmini Technical Information Manual 6
The reader is available in two models: APPLE or HID (see § Ordering Options page 10):APPLE modelEASY2RD profile: the reader can be connected to all the devices supporting the Bluetooth SPP profileand to iOS devices.HID profile: not supported.HID modelEASY2RD profile: the reader can be connected to all the devices supporting the Bluetooth SPP profilebut not to iOS devices. HID   profile:   the   reader   can   be   connected   to   all   the   devices   supporting   the   Bluetooth   HID   profile(keyboard emulation),  including iOS devices.For more information about EASY2RD and HID profiles, please refer to § PROFILE paragraph page 43.Front panelThe qIDmini R1170I front panel houses the following LEDs and buttons (see figure below):Fig. 1.2: qIDmini R1170I Front PanelNo. Name Description1 Display LCD Alphanumeric (8 chars x 2 lines)2 Link LED Indicates the Bluetooth and USB/charger connection (see  §  Tab. 1.3: qIDmini R1170IBluetooth LED status table)3 Power LED Indicates the reader status and battery level (see § Tab. 1.2: qIDmini R1170I Power LEDStatus Table)4 Trigger buttonInventory mode: press to perform an inventory cycle (hold down the button to repeatinventory cycles)Menu mode: quick press to scroll, hold down for a few seconds to activate an option5 Power button Press the button to switch on the reader, press for at least 2 seconds to switch it offMenu mode: press to return to the main menu Tab. 1.1: qIDmini R1170I Front Panel LEDs and ButtonsIntroduction - qIDmini Technical Information Manual 7
Status DescriptionGreen Reader is active and the battery charge is in the range 35÷100%Orange Reader is active and the battery charge is in the range 15÷35%Red Reader is active and the battery charge is in the range 0÷15%Tab. 1.2: qIDmini R1170I Power LED Status TableStatus DescriptionOFF No connection establishedOrange USB cable connected (both to a PC or to the AC power adapter)Blue Bluetooth connectedTab. 1.3: qIDmini R1170I Bluetooth LED status tableChargingThe qIDmini R1170I is supplied with an USB cable and a power supply for charging (see § Accessories page 8).When you put the reader in charge, the display lights up and shows the blinking charge indicator. The fixed indication"charge 100%" informs you that the charging is complete.USB connectorA micro USB Type B socket connector is located in the bottom side of qIDmini R1170I and can be used to connect thereader to an USB host port or to an AC/DC battery charger.AccessoriesCheck for the supplied accessories below:Fig. 1.3: qIDmini R1170I AccessoriesIntroduction - qIDmini Technical Information Manual 8
Development KitR1170IDK – Keyfob Bluetooth UHF RFID Reader Development Kit is available:Fig. 1.4: R1170IDK – qIDmini Keyfob Bluetooth UHF RFID Reader Development KitThe qIDmini R1170IDK development kit is a complete RFID set up, for a quick implementation of RFID solutions. Itincludes:n. 1 R1170I qIDmini Keyfob Bluetooth UHF RFID Readern. 1 Set of Labelsn. 1 A927Z Temperature Logger Tagn. 1 RT0005 Temperature Logger Tagn. 1 Lanyardn. 1 Retractable Rollern. 1 Power supplyn. 1 USB cableIntroduction - qIDmini Technical Information Manual 9
Ordering OptionsCode DescriptionReaderWR1170IEAPLP R1170IEAPLP - qIDmini  Keyfob Bluetooth UHF RFID Reader (ETSI) with Apple profileWR1170IEHIDP R1170IEHIDP - qIDmini  Keyfob Bluetooth UHF RFID Reader (ETSI) with HID profileWR1170IUAPLP R1170IUAPLP - qIDmini  Keyfob Bluetooth UHF RFID Reader (FCC) with Apple profileWR1170IUHIDP R1170IUHIDP - qIDmini  Keyfob Bluetooth UHF RFID Reader (FCC) with HID profileDevelopment kitWR1170IDKEAP R1170IDKEAP - Development kit with qIDmini  R1170I Reader (ETSI with Apple profile) and demo tagsWR1170IDKEHI R1170IDKEHI - Development kit with qIDmini  R1170I Reader (ETSI with HID profile) and demo tagsWR1170IDKUAP R1170IDKUA - Development kit with qIDmini  R1170I Reader (FCCwith Apple profile) and demo tagsWR1170IDKUHI R1170IDKUA - Development kit with qIDmini  R1170I Reader (FCCwith HID profile) and demo tagsIn the following table it is shown the compatibility between the Apple/HID models and different Operating Systems(Android, PC and iOS):APPLE MODEL1PROFILESEASY2RD HIDANDROID √ -PC √ -iOS √ -HID MODEL2PROFILESEASY2RD HIDANDROID √ √PC √ √iOS - √Tab. 1.4: Compatibility table between the Apple/HID models and different OS1 APPLE Model Ordering Options: WR1170IEAPLP, WR1170IUAPLP, WR1170IDKEAP, WR1170IDKUAP2 HID Model Ordering Options: WR1170IEHIDP, WR1170IUHIDP, WR1170IDKEHI, WR1170IDKUHIIntroduction - qIDmini Technical Information Manual 10
2 GETTING STARTEDIntroductionThis quickstart guide will help you to get started with your qIDmini (Model R1170I) reader.The   qIDmini   R1170I   has   two   communication   interfaces:   USB   and   Bluetooth.   The   last   one   is   the   preferredcommunication interface using the SPP profile (Serial Port Profile).After   powering   on   the   reader,   the   Bluetooth   interface   is   available   to   accept   incoming   connection   requests(discoverable) from Bluetooth enabled hosts like PCs, PDAs, Tablets, Smartphones and so on.In the qIDmini Configuration Menu you can choose between two different profile options:EASY2RD  (factory   default):   choosing   this   option   you   select   the   CAEN   RFID   easy2read   communicationprotocol. Select this option in order to control the reader using the CAEN RFID Easy Controller Application orthe SDK (Software Development Kits) library. For details on the use with the EASY2RD profile please refer to§ qIDmini EASY2RD Profile chapter page 16.HID3: choosing this option you select the keyboard emulation protocol. For details on the use on the HIDprofile please refer to § qIDmini HID profile chapter page 31.The reader is sold with the factory profile set to EASY2RD. This guide helps you to getting started with your readerusing the EASY2RD profile.Bluetooth Communication Setup using the Easy Controller for Android1. Download the CAEN RFID Easy Controller for Android App from the qIDmini R1170I web page, by clicking on theAndroid APP on Google Play icon.2. Launch the CAEN RFID Easy Controller for Android App.3 HID profile is not available for qIDmini R1170I with APPLE profile (ordering options: WR1170IEAPLP, WR1170IUAPLP, WR1170IDKEAP, WR1170IDKUAP)Getting Started - qIDmini Technical Information Manual 11
3. Click on “Add reader”:4. Click on “Bluetooth” in the “Connection Type” window:Getting Started - qIDmini Technical Information Manual 12
5. Click on “yes” to confirm the Bluetooth permission request:6. Select the qIDmini R1170I reader from the list of Bluetooth devices:Getting Started - qIDmini Technical Information Manual 13
7. Confirm the passkey:8. Once the connection is established the Bluetooth blue light turns on.9. To start using your qIDmini R1170I, click on the reader line:Getting Started - qIDmini Technical Information Manual 14
10. Click on “Start Inventory”:11. A list of the read tags is shown:Getting Started - qIDmini Technical Information Manual 15
3 QIDMINI EASY2RD PROFILEIntroductionChoosing the EASY2RD profile option you select the CAEN RFID easy2read communication protocol. Select this optionin order to control the reader using the CAEN RFID Easy Controller Application or the SDK (Software Development Kits)library. For details on the available profiles and on the activation method please refer to § PROFILE paragraph page 43.Note that the APPLE model reader (see § Ordering Options page 10) can be connected to all devices using the EASY2RDprofile, while the HID model reader can be connected through the EASY2RD profile to all devices except the iOS ones.In the following table it is shown the compatibility between the Apple/HID models and different Operating Systems(Android, PC and iOS) in the EASY2RD profile:ANDROID PC iOSAPPLE MODEL4√ √ √HID MODEL5√ √ -Tab. 3.5: Compatibility table between the Apple/HID models and different OS in the EASY2RD profile4 APPLE Model Ordering Options: WR1170IEAPLP, WR1170IUAPLP, WR1170IDKEAP, WR1170IDKUAP5 HID Model Ordering Options: WR1170IEHIDP, WR1170IUHIDP, WR1170IDKEHI, WR1170IDKUHIqIDmini EASY2RD Profile - qIDmini Technical Information Manual 16
Android devicesBluetooth Communication Setup using the Easy Controller for Android1. Download the CAEN RFID Easy Controller for Android App from the qIDmini R1170I web page, by clicking on theAndroid App on Google Play icon.2. Launch the CAEN RFID Easy Controller for Android App.3. Click on “Add reader”:qIDmini EASY2RD Profile - qIDmini Technical Information Manual 17
4. Click on “Bluetooth” in the “Connection Type” window:5. Click on “yes” to confirm the Bluetooth permission request:qIDmini EASY2RD Profile - qIDmini Technical Information Manual 18
6. Select the qIDmini R1170I reader from the list of Bluetooth devices:7. Confirm the passkey:qIDmini EASY2RD Profile - qIDmini Technical Information Manual 19
8. Once the connection is established the Bluetooth blue light turns on.9. To start using your qIDmini R1170I, click on the reader line:10. Click on “Start Inventory”:qIDmini EASY2RD Profile - qIDmini Technical Information Manual 20
11. A list of the read tags is shown:qIDmini EASY2RD Profile - qIDmini Technical Information Manual 21
Windows PCsBluetooth Communication Setup 1. In case of Windows 8 Operating System:Right click on the Bluetooth icon in the taskbar -> Add a Bluetooth Device:Select the qID mini R1170I reader and click on “Pair”:qIDmini EASY2RD Profile - qIDmini Technical Information Manual 22
Click on “yes” to confirm the passcode:In case of Windows XP Operating System, when discovered by the host, the qIDmini reader can be identified byits Bluetooth device name and paired using the pass-key; both parameters are provided below:Bluetooth device name: “qIDmini“ + device serial numberPass-key: 12342. Once the connection is established the Bluetooth blue light turns on.Now you can use the CAEN RFID Easy Controller Application to control the reader. For details refer to § Connecting theqIDmini using the Easy Controller for Windows page 26.Warning:  Note that, in the EASY2RD profile, holding down the trigger  button activates the tag inventory only if thecontinuous mode is active (see the function EventInventoryTag Method in the CAEN RFID API Reference Manual thatcan be download from qIDmini R1170I web page, Documents section).qIDmini EASY2RD Profile - qIDmini Technical Information Manual 23
USB Communication SetupThe qIDmini reader can be connected to a PC using the provided USB cable and it is detected by the PC as an emulatedserial port. In order to correctly operate with the reader you need to install a driver.1. Power ON the reader and plug the USB cable into the qIDmini USB port.2. In order to connect the qIDmini reader to the PC you need to install the VCP (Virtual Com Port) drivers for youroperating system. You can download VCP drivers for Windows based systems from the CAEN RFID Web Site fromthe qIDmini R1170I web page, SW/FW section or from the Software and Firmware download area.3. Open   the  System   properties:   go   to  Control  Panel  →  All  Control   Panel   Items →   System  and   click   on  DeviceManager.qIDmini EASY2RD Profile - qIDmini Technical Information Manual 24
4. After having installed the driver, the reader is detected by the PC as an emulated serial port (VCP):Now you can use the CAEN RFID Easy Controller Application to control the reader. For details refer to § Connecting theqIDmini using the Easy Controller for Windows page 26.Warning:  Note that, in the EASY2RD profile, holding down the trigger  button activates the tag inventory only if thecontinuous mode is active (see the function EventInventoryTag Method in the CAEN RFID API Reference Manual thatcan be download from qIDmini R1170I web page, Documents section).qIDmini EASY2RD Profile - qIDmini Technical Information Manual 25
Connecting the qIDmini using the Easy Controller for WindowsBoth USB and Bluetooth interface creates virtual COM ports on the host PC that can be used to connect to the readerwith the CAEN RFID Easy Controller application.The activation of the EASY2RD profile is required to connect the qIDmini using the Easy Controller application forWindows.Follow the steps below to connect the qIDmini reader using the Easy Controller for Windows via Bluetooth:1. Download from  the CAEN  RFID web  site the  latest version  of the  CAEN RFID  Easy  Controller  for  Windowssoftware and install it.2. Connect the qIDmini reader to your PC using either the USB or the Bluetooth connection.3. Right click on the Bluetooth icon in the taskbar -> Open Settings:qIDmini EASY2RD Profile - qIDmini Technical Information Manual 26
4. Look for the emulated serial port in the “Bluetooth Settings”:5. Launch the CAEN RFID Easy Controller application.6. On the main application window click on File → Connect; the connection dialog box will appear.7. Select RS232 from the Connection Type combo box and the right COM port number from the RS232 Port combobox.8. Click on Connect.9. Place a tag in front of the reader and click on Start Inventory to see the tag information displayed on the mainwindow.For more information on the CAEN RFID  Easy Controller for Windows application usage, please refer to the relevantuser manual: you can download it from the qIDmini R1170I web page, Documents Section, from the CAEN RFID EasyController for Windows web page or in the Manual and Documents web area.A CAEN RFID Easy Controller for Android application is also available. For more information please refer to the CAENRFID Easy Controller for Android web page.qIDmini EASY2RD Profile - qIDmini Technical Information Manual 27
iOS devicesBluetooth Communication Setup 1. On your iOS device, go to Setting and enable the Bluetooth:2. A list of the Bluetooth available devices is shown:qIDmini EASY2RD Profile - qIDmini Technical Information Manual 28
3. Click on the qIDmini R1170I reader and wait while the pairing is completed:4. Once the connection is established the Bluetooth blue light turns on.5. Download the CAEN RFID qID Start App from the qIDmini R1170I web page, by clicking on the App Store icon.6. Launch the qID Start App:qIDmini EASY2RD Profile - qIDmini Technical Information Manual 29
7. Now you can start the tag inventory just clicking on            button. You can see the EPC of the tags displayed on thescreen:qIDmini EASY2RD Profile - qIDmini Technical Information Manual 30
4 QIDMINI HID PROFILEIntroductionChoosing the HID profile option you select the keyboard emulation protocol. For details on the available profiles and on the activation method please refer to § PROFILE paragraph page 43.Note that  the APPLE  model reader (see § Ordering Options page 10) does not implement the Bluetooth HID profile,while the HID model reader can be connected through the HID profile to all the devices, including the iOS ones.In the following table it is shown the compatibility between the Apple/HID models and different Operating Systems(Android, PC and iOS) in the HID profile:ANDROID PC iOSAPPLE MODEL6- - -HID MODEL7√ √ √Tab. 4.6: Compatibility table between the Apple/HID models and different OS in the HID profileAndroid devicesBluetooth Communication Setup 1. On your Android device, go to Setting and enable the Bluetooth. A list of the Bluetooth available devices is shown:6 APPLE Model Ordering Options: WR1170IEAPLP, WR1170IUAPLP, WR1170IDKEAP, WR1170IDKUAP7 HID Model Ordering Options: WR1170IEHIDP, WR1170IUHIDP, WR1170IDKEHI, WR1170IDKUHIqIDmini HID profile - qIDmini Technical Information Manual 31
2. Click on the qIDmini R1170I reader and wait while the pairing is completed:3. Once the connection is established the Bluetooth blue light turns on.4. Launch a text editing App (or any other App accepting keyboard input).5. Start an inventory cycle by pressing the trigger button. 6. On the text editing App window you will see the EPCs of the tags:Note that, when configured in HID profile and paired to a device, the qIDmini will automatically reconnect to thesame device every time the Bluetooth link is active (qIDmini switched ON and Bluetooth activated on the host).You can verify this behaviour looking at the blue LED that, in this case, turns ON automatically as soon as youswitch on the qIDmini. qIDmini HID profile - qIDmini Technical Information Manual 32
Windows PCsBluetooth Communication Setup 1. In case of Windows 8 Operating System:Right click on the Bluetooth icon in the taskbar -> Add a Bluetooth Device:Select the qID mini R1170I reader and click on “Pair”:qIDmini HID profile - qIDmini Technical Information Manual 33
Click on “yes” to confirm the passcode:In case of Windows XP Operating System, when discovered by the host, the qIDmini reader can be identified byits Bluetooth device name and paired using the pass-key; both parameters are provided below:Bluetooth device name: “qIDmini“ + device serial numberPass-key: 12342. Once the connection is established the Bluetooth blue light turns on.3. Launch a text editing App (or any other App accepting keyboard input).4. Start an inventory cycle by pressing the trigger button. 5. On the text editing window you will see the EPCs of the tags:Example with a .txt file:qIDmini HID profile - qIDmini Technical Information Manual 34
Example with Microsoft Excel:Note that, when configured in HID profile and paired to a device, the qIDmini will automatically reconnect to the samedevice every time the Bluetooth link is active (qIDmini switched ON and Bluetooth activated on the host). You canverify this behaviour looking at the blue LED that, in this case, turns ON automatically as soon as you switch on theqIDmini.qIDmini HID profile - qIDmini Technical Information Manual 35
USB Communication SetupThe qIDmini reader can be connected to a PC using the provided USB cable and it is detected by the PC as an emulatedserial port. In order to correctly operate with the reader you need to install a driver.1. Power ON the reader and plug the USB cable into the qIDmini USB port.2. In order to connect the qIDmini reader to the PC you need to install the VCP (Virtual Com Port) drivers for youroperating system. You can download VCP drivers for Windows based systems from the CAEN RFID Web Site fromthe qIDmini R1170I web page, SW/FW section or from the Software and Firmware download area.3. Open the System properties (right click on My computer icon) → All Control Panel Items → System and click onDevice Manager.qIDmini HID profile - qIDmini Technical Information Manual 36
4. After having installed the driver, the reader is detected by the PC as an emulated serial port (VCP):Warning: Note that, when configured in the HID profile, the qIDmini reader cannot be controlled using the  CAEN RFIDEasy Controller Application.The qIDmini reader, when configured in the HID profile and connected via USB to a PC, sends the EPCs of the detectedtags on the serial port as ASCII characters. So, in order to operate with the reader in this configuration, follow thesesteps:1. Launch a terminal emulator application (e.g Hyperterminal)2. Connect the terminal emulator application to the virtual COM port assigned to the qIDmini reader3. Press the trigger button to perform an inventory cycle (hold down the button to repeat inventory cycles)4. The EPCs are displayed on the terminal emulator windowqIDmini HID profile - qIDmini Technical Information Manual 37
iOS devicesBluetooth Communication Setup 1. On your iOS device, go to Setting and enable the Bluetooth:2. A list of the Bluetooth available devices is shown:qIDmini HID profile - qIDmini Technical Information Manual 38
3. Click on the qIDmini R1170I reader and wait while the pairing is completed:4. Once the connection is established the Bluetooth blue light turns on.5. Launch a text editing App (or any other App accepting keyboard input).6. Start an inventory cycle by pressing the trigger button. 7. On the text editing App window you will see the EPCs of the tags:qIDmini HID profile - qIDmini Technical Information Manual 39
5 RESET THE QIDMINI READERTo reset the reader, press the  power  and the  trigger  buttons (see §  Fig. 1.2: qIDmini R1170I Front Panel  page  7)simultaneously for about six seconds and then release the buttons. The reader restarts by itself. Warning: Note that the reader SHALL NOT be connected to the USB port or to the battery charger during the reset,otherwise the reader enters in the firmware upgrade state. If, by mistake, you entered in the firmware upgrade state,in order to restore the normal reader operation, disconnect the USB cable and repeat the reset procedure.Reset the qIDmini reader - qIDmini Technical Information Manual 40
6 QIDMINI CONFIGURATION MENUIntroductionTo access the main menu, turn on the device and hold down the trigger button within two second.To scroll through the main menu, press quickly the trigger button.The qIDmini R1170I menu options are the following:PROFILEBEEPVIBRATEPOWERTo select a menu option, hold down the trigger button.qIDmini Configuration Menu - qIDmini Technical Information Manual 41
The complete structure of the qIDmini R1170I menu is the following:EASY2RDPROFILEHIDPWR UPBEEP PWR DOWNSCAN TAGPWR UPVIBRATE PWR DOWNSCAN TAG25 mW50 mWPOWER 100 mW200 mW500 mW88 500mW is not available for FCC compliant models (R1170IUAPLP and R1170IUHIDP)qIDmini Configuration Menu - qIDmini Technical Information Manual 42
PROFILEAccess the configuration menu as explained in the Introduction paragraph page 41.The PROFILE menu is the first option of the main menu. To select it, hold down the trigger button.To scroll through the PROFILE options, press quickly the trigger button.The PROFILE submenu options are the following:EASY2RD  (factory   default):   choosing   this   option   you   select   the   CAEN   RFID   easy2read   communicationprotocol. Select this option in order to control the reader using the CAEN RFID Easy Controller Application orthe SDK (Software Development Kits) library. For details on the use with the EASY2RD profile please refer to§ qIDmini EASY2RD Profile chapter page 16.HID9: choosing this option you select the keyboard emulation protocol. For details on the use on the HIDprofile please refer to § qIDmini HID profile chapter page 31.To return to the main menu, quickly press the power button.The currently active profile is marked with an asterisk. You can activate only one profile at a time.To activate a different profile, scroll  through  the PROFILE options by pressing quickly  the  trigger  button until thedesired profile is displayed. Hold down the trigger button for a few seconds: the name of the profile will begin to flash.Once activated, the device returns to the main menu.When you turn on the reader, the display shows the currently active profile and then the message "ready" to informyou that the reader is ready to operate.Warning: Note that if the reader is in the HID profile you must disconnect it from any connected device before toselect another profile.BEEPAccess the configuration menu as explained in the Introduction paragraph page 41.To scroll through the menu options, press quickly the trigger button.The BEEP menu is the second option of the menu. To select it, hold down the trigger button. The BEEP submenu options are the following:PWRUP: beep at the power on of the readerPWRDOWN: beep at the power off of the readerSCANTAG: beep at the identification of a tagTo enable/disable the submenu options, scroll through the BEEP options menu by pressing quickly the trigger buttonuntil the desired BEEP option and then hold down the trigger button for a few seconds. Scroll through enable and disable options by pressing quickly the trigger button and hold down the trigger button for afew seconds to activate one of them. The  enable  (or  disable) option will begin to flash. Once activated, the devicereturns to the main menu.The currently active state is marked with an asterisk. By default, all the BEEP options are disabled.Note that you can enable or disable the beeper for any option independently so that the beeper can be active on morethan one option simultaneously.To return to the main menu, quickly press the power button.9 HID profile is not available for qIDmini R1170I with APPLE profile (ordering options: WR1170IEAPLP, WR1170IUAPLP, WR1170IDKEAP, WR1170IDKUAP)qIDmini Configuration Menu - qIDmini Technical Information Manual 43
VIBRATEAccess the configuration menu as explained in the Introduction paragraph page 41.To scroll through the menu options, press quickly the trigger button.The VIBRATE menu is the third option of the menu. To select it, hold down the trigger button. The VIBRATE submenu options are the following:PWRUP: vibration at the power on of the readerPWRDOWN: vibration at the power off of the readerSCANTAG: vibration at the identification of a tagTo enable/disable the submenu options,  scroll  through the VIBRATE options menu by pressing quickly  the  triggerbutton until the desired VIBRATE option and then hold down the trigger button for a few seconds. Scroll through enable and disable options by pressing quickly the trigger button and hold down the trigger button for afew seconds for the activation of one of them. The enable (or disable) option will begin to flash. Once activated, thedevice returns to the main menu.The currently active state is marked with an asterisk. By default, all the VIBRATE options are disabled.Note that you can enable or disable the vibration for any option independently so that the vibration can be active onmore than one option simultaneously.To return to the main menu, quickly press the power button.POWERThrough the POWER menu you can set the conducted RF power level transmitted by RFID section.Note that, when the reader is configured in the EASY2RD profile, to set the power you can also use the CAEN RFID EasyController Application or the SetPower function of the SDK (Software Development Kits) library.Access the configuration menu as explained in the Introduction paragraph page 41.To scroll through the menu options, press quickly the trigger button.The POWER menu is the fourth option of the menu. To select it, hold down the trigger button. The POWER submenu options are the following:25 mW50 mW100 mW200 mW500 mW10To scroll through the POWER options, press quickly the trigger button.To return to the main menu, quickly press the power button.The currently active power is marked with an asterisk. By default, the 200 mW power level is active.You can activate only one power level at a time.To activate a different power level, scroll through the POWER options by pressing quickly the trigger button until thedesired power level is displayed. Hold down the trigger button for a few seconds: the power level option will begin toflash. Once activated, the device returns to the main menu.10 Maximum power setting for FCC compliant models (R1170IUAPLP and R1170IUHIDP) is internally limited via FW to 200mWqIDmini Configuration Menu - qIDmini Technical Information Manual 44
7 QIDMINI FIRMWARE UPGRADEFirmware UpgradeThe qIDmini   R1170I  firmware  upgrade can  be  managed  via  USB  by   using  the SW  upgrade   program.  The qIDminiUpgrade Tool is available for free at the qIDmini R1170I web page of the CAEN RFID Web Site, SW/FW section.In order to upgrade the firmware follow the steps described below:1. Connect the qIDmini reader to the USB port of the PC. 2. Press simultaneously the trigger and the power button for about six seconds.3. Open the FW upgrade program.4. Click on Next button:5. In the window you will see the message “Found 1 device” (if the message is “No device connected” repeat thepoints 2,3, 4 and 5).qIDmini Firmware Upgrade - qIDmini Technical Information Manual 45
6. Select the FW image file by clicking on the “Browse” button:7. Click on the “Upgrade Firmware” button and wait for the upgrade process to be completed.8. At the end of procedure, if the upgrade has been successfully performed, you will see the messages reported inthe image below and the module is ready for normal operation. qIDmini Firmware Upgrade - qIDmini Technical Information Manual 46
8 QIDMINI TECHNICAL SPECIFICATIONSTechnical Specifications TableFrequency Band 865.600÷867.600   MHz   (ETSI   EN   302   208   v.   1.4.1)   (Mod.   R1170IEHIDP   andR1170IEAPLP)902÷928 MHz (FCC part 15.247) (Mod. R1170IUHIDP and R1170IUAPLP)RF PowerProgrammable in 18 levels from 5dBm e.r.p. (3mW e.r.p.) to 22dBm e.r.p. (150mWe.r.p.); (Mod. R1170IEHIDP and R1170IEAPLP)Programmable in   13 levels  from 5dBm   e.r.p. (3mW  e.r.p.) to   18dBm e.r.p.  (60mWe.r.p.); (Mod. R1170IUHIDP and R1170IUAPLP)Antenna Integrated linear (horizontal)Number of Channels4   channels   (compliant   to   ETSI   EN   302   208   v.   2.1.1.)(Mod.   R1170IEHIDP   andR1170IEAPLP)50   hopping   channels   (compliant   to   FCC   part   15.247)(Mod.   R1170IUHIDP   andR1170IUAPLP)Standard Compliance  ISO 18000-6C/EPC C1G2Read Range  up to 90cm (typical)Connectivity USB Interface: USB 2.0 Full Speed (12 Mbit/s) device portBluetooth Interface: Class 2 with output power 4dBm e.i.r.p.Virtual COM port parameters:- Baudrate: up to 230.400kbps- Databits: 8- Stopbits: 1- Parity: none- Flow control: noneHID profile available (mod. R1170IEHIDP and R1170IUHIDP)Apple compatibility available (mod. R1170IEAPLP and R1170IUAPLP)User Interface Button #1:ON/OFFButton #2: TriggerLed #1: power indication and battery status (green: high; red: low)Led #2: communication activity (blue: Bluetooth; orange: USB)Buzzer: bitonal for events signallingVibration: for events signallingDisplay: LCD Alphanumeric (8 chars x 2 lines)Internal Buffer Size  48kByte (equivalent to 4096 EPC codes@96bit) (TBC)Battery Type Li-Ion 3.7V, 570mAhBattery Life  Operating: > 12h with 40.000 tag readingsStandby: > 15 daysBattery Charging Time  2h (typical)IP Rating  IP 32Dimensions  (W)99 x (L)54 x (H)20 mm3 max.(3.9 x 2.1 x 0.8 in3)Length of USB cable  1.5 mOperating Temperature  -10 °C to +55 °CWeight  57 gTab. 8.7: qIDmini R1170I Technical Specifications TableWarning: The RF settings must match the country/region of operating to comply with local laws and regulations. qIDmini Technical Specifications - qIDmini Technical Information Manual 47
The usage of the reader in different countries/regions from the one in which the device has been sold is not allowed.Reader – Tag Link ProfilesThe  qIDmini  R1170I  reader  supports   different  modulations   and  return   link  profiles   according  to  EPC  Class1  Gen2protocol 1.All profiles that have been tested for the compliance with ETSI and FCC regulations are reported in the following table:Link profile # Regulation Modulation Return Link0 ETSI - FCC PR–ASK; f=40kHz FM0; f = 40kHz1 ETSI - FCC PR–ASK; f=40kHz Miller (M=4); f = 256kHz112 ETSI - FCC PR–ASK; f=40kHz Miller (M=4); f = 320kHzTab. 8.8: qIDmini R1170I Reader to tag link profiles11 Default value.qIDmini Technical Specifications - qIDmini Technical Information Manual 48
Radiation PatternsThe radiation patterns of qIDmini R1170I are shown in the following figures. Model R1170IE (ETSI version)Fig. 8.5: qIDmini R1170IE Radiation pattern H planeFig. 8.6: qIDmini R1170IE Radiation pattern V planeqIDmini Technical Specifications - qIDmini Technical Information Manual 49
Model R1170IU (FCC version)Fig. 8.7: qIDmini R1170IU Radiation pattern H plane Fig. 8.8: qIDmini R1170IU Radiation pattern V planeqIDmini Technical Specifications - qIDmini Technical Information Manual 50
9 QIDMINI REGULATORY COMPLIANCEFCC Compliance This equipment has been tested and found to comply with the limits for a Class B digital device, pursuant to Part 15 ofthe FCC Rules. These limits are designed to provide reasonable protection against harmful interference in a residentialinstallation. This equipment generates uses and can radiate radio frequency energy and, if not installed and used in accordancewith the instructions, may cause harmful interference to radio communications. However, there is no guarantee thatinterference will not occur in a particular installation. If this equipment does cause harmful interference to radio ortelevision reception, which can be determined by turning the equipment off and on, the user is encouraged to try tocorrect the interference by one of the following measures: a. Reorient or relocate the receiving antenna. b. Increase the separation between the equipment and receiver. c. Connect the equipment into an outlet on a circuit different from that to which the receiver is connected. d. Consult the dealer or an experienced radio/TV technician for help. This device complies with Part 15 of the FCC Rules. Operation is subject to the following two conditions: (1) This devicemay not cause harmful interference, and (2) this device must accept any interference received, including interferencethat may cause undesired operation. Any changes or modification not approved by CAEN RFID could void the user’s authority to operate the equipment. qIDmini Technical Specifications - qIDmini Technical Information Manual 51

Navigation menu