CalAmp Wireless Network GPDB Gemini/PD User Manual Gemini PD Technical Manual
CALAMP WIRELESS NETWORKS INC. Gemini/PD Gemini PD Technical Manual
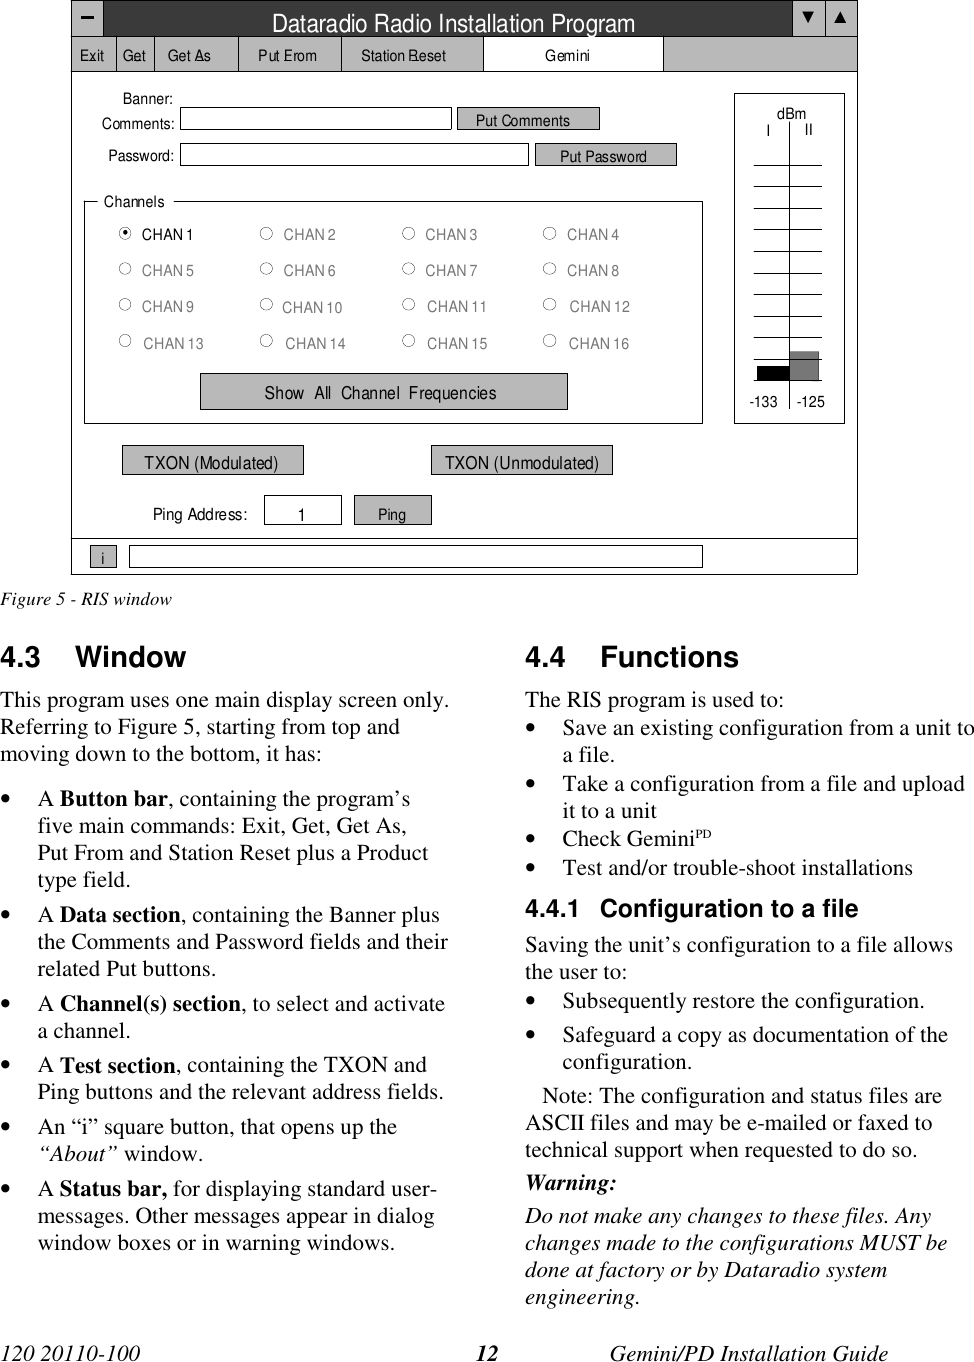
Contents
- 1. preliminary version of user manual
- 2. Installation Guide 1 01
- 3. revised pages 7 and 8 for preliminary ver1 11
- 4. installation guide
- 5. Annex B Installation manual
- 6. Appendix A preliminary version 1 42
- 7. preliminary installation manual
- 8. preliminary version
- 9. preliminary updated user manual
- 10. preliminary version of updated installation manual
- 11. updated user manual
Installation Guide 1 01
![120 20110-100 Gemini/PD Installation Guide134.4.1.1 “Get” buttonOn the button bar, press the “Get” button to:• Establish linking• Download and automatically save the con-nected unit’s configuration setting to a filenamed with the unit' serial number: The RISstatus bar will then report “All parametersare successfully retrieved and saved in file[unit' s/n].GM2. Any previous configurationin the program is overwritten.• All test buttons and fields are now activated.If you do not wish to overwrite an existing con-figuration or prefer to name the file yourself,use the “Get As” button.4.4.1.2 “Get As” buttonOn the button bar, press the “Get As” button to:• Establish linking• Open the “File, Save As” window with theASCII file *.gm2 (already selected).• Save the connected unit’s operating charac-teristics (configuration setting) to a file, di-rectory or drive of your choice.The program will ask before overwriting anexisting file.• Status bar reports “All parameters are suc-cessfully retrieved and saved in [filename].• All buttons and fields are now activated.4.4.2 Configuration from a FileLoading a configuration from a file to a unit isuseful to:• Restore the operating characteristics of aunit (Requires intervention with technicalsupport.)• Carry out field updates using Dataradiosystem engineering supplied diskette(s).Warning:Do not make any changes tothese files. Any changes made tothe configurations MUST bedone at factory or by Dataradiosystem engineering.4.4.2.1 “Put From” button1- On the button bar, press the “Put From”button.2- In the opened “File, Put From” window,locate the drive, directory and file name ofthe relevant file.• This may be a configuration saved ear-lier from a unit.• It can also be from a Dataradio (factoryor system engineering) diskette.4- Select the appropriate file5- Press the “OK” button.• The status bar reports: “[filename] isdownloading into unit” and up to 30seconds later displays: “All parameters aresaved. Apply Station Reset to take effect!” .• All buttons and fields are now activated.6- Press the “Station Reset” button. See thenext paragraph for details.4.4.2.2 “Station Reset” buttonPress the Station Reset button as a last step afterdoing a “Put From”. The Station Reset buttoncauses downloaded parameters from a file ordiskette to take effect in the connected unit.Pressing Station Reset is not required after do-ing any Comments or Password configurationchange as these have their own Put Commentsand Put Password buttons.Station Reset does not break the connection.](https://usermanual.wiki/CalAmp-Wireless-Network/GPDB.Installation-Guide-1-01/User-Guide-92321-Page-18.png)
![120 20110-100 Gemini/PD Installation Guide144.4.3 Special FunctionsThe following RIS fields and buttons are used togather specific information concerning the con-nected unit:• Banner field• “i” button• Comments field and Put Comments button• Password and Put Password button4.4.3.1 Banner Field and “i” buttonThis field displays a string made up of the serialnumber of the connected unit followed by thefirmwares used and their version number.Format is:[serial number]:firmware 1 name, its version #,firmware 2 name, its version #.The serial number portion uniquely identifiesthe unit. It is a variable length, maximum eight-character alphabetic string assigned at the timeof manufacture. It is identical to the serial num-ber printed on the label of the unit. This numbercannot be changed and is used as part of the on-air protocol.Gemini/PD's firmwares resides in flash EPROMand are designed to allow field upgrades.When contacting your supplier, give the fullbanner string and the version of the RIS used.You will find the version number in the “About”window. To open it, click the lower left squarebutton (with a lowercase letter “i” in it).This field is blank prior to doing "Get", "Get As"or "Put From".4.4.3.2 Comments1- Type comments directly in the “Comments”field. These can be text up to 24 characters.Use this field to enter user-convenient de-scription(s) (customer name, location,etc…).2- Press the button “Put Comments” to makethe entry permanent. This field may be leftblank.On subsequent Get, Get As or Put From, thisfield displays entered comments. If no commentwas entered, the field will remain blank.4.4.3.3 PasswordThe password feature is useful where two (ormore) fleets share the same radio channel. Mo-biles without the proper password would stillreceive the message but the contents would notbe intelligible.1- Type your password directly in the “Pass-word” field. It is a string of 32 hexadecimalcharacters (exactly).2- Press the button “Put Password” to make theentry permanent. This field may be leftblank.On subsequent Get, Get As or Put From, thisfield will require that the correct password beentered. If none was entered, the field will re-main blank.Password information is NOT retrieved andsaved to a file, along with the configuration.Clearing a Password is done by entering 32 zeros.The Dataradio supplied password algorithm isdesigned to thwart the casual observer only. Itprovides a limited form of data privacy. There-fore, if your security requirements are high,Dataradio urges you to use external encryptiontechnology (such as Data Encryption Standard(DES)) in the Host and Mobiles computers.](https://usermanual.wiki/CalAmp-Wireless-Network/GPDB.Installation-Guide-1-01/User-Guide-92321-Page-19.png)