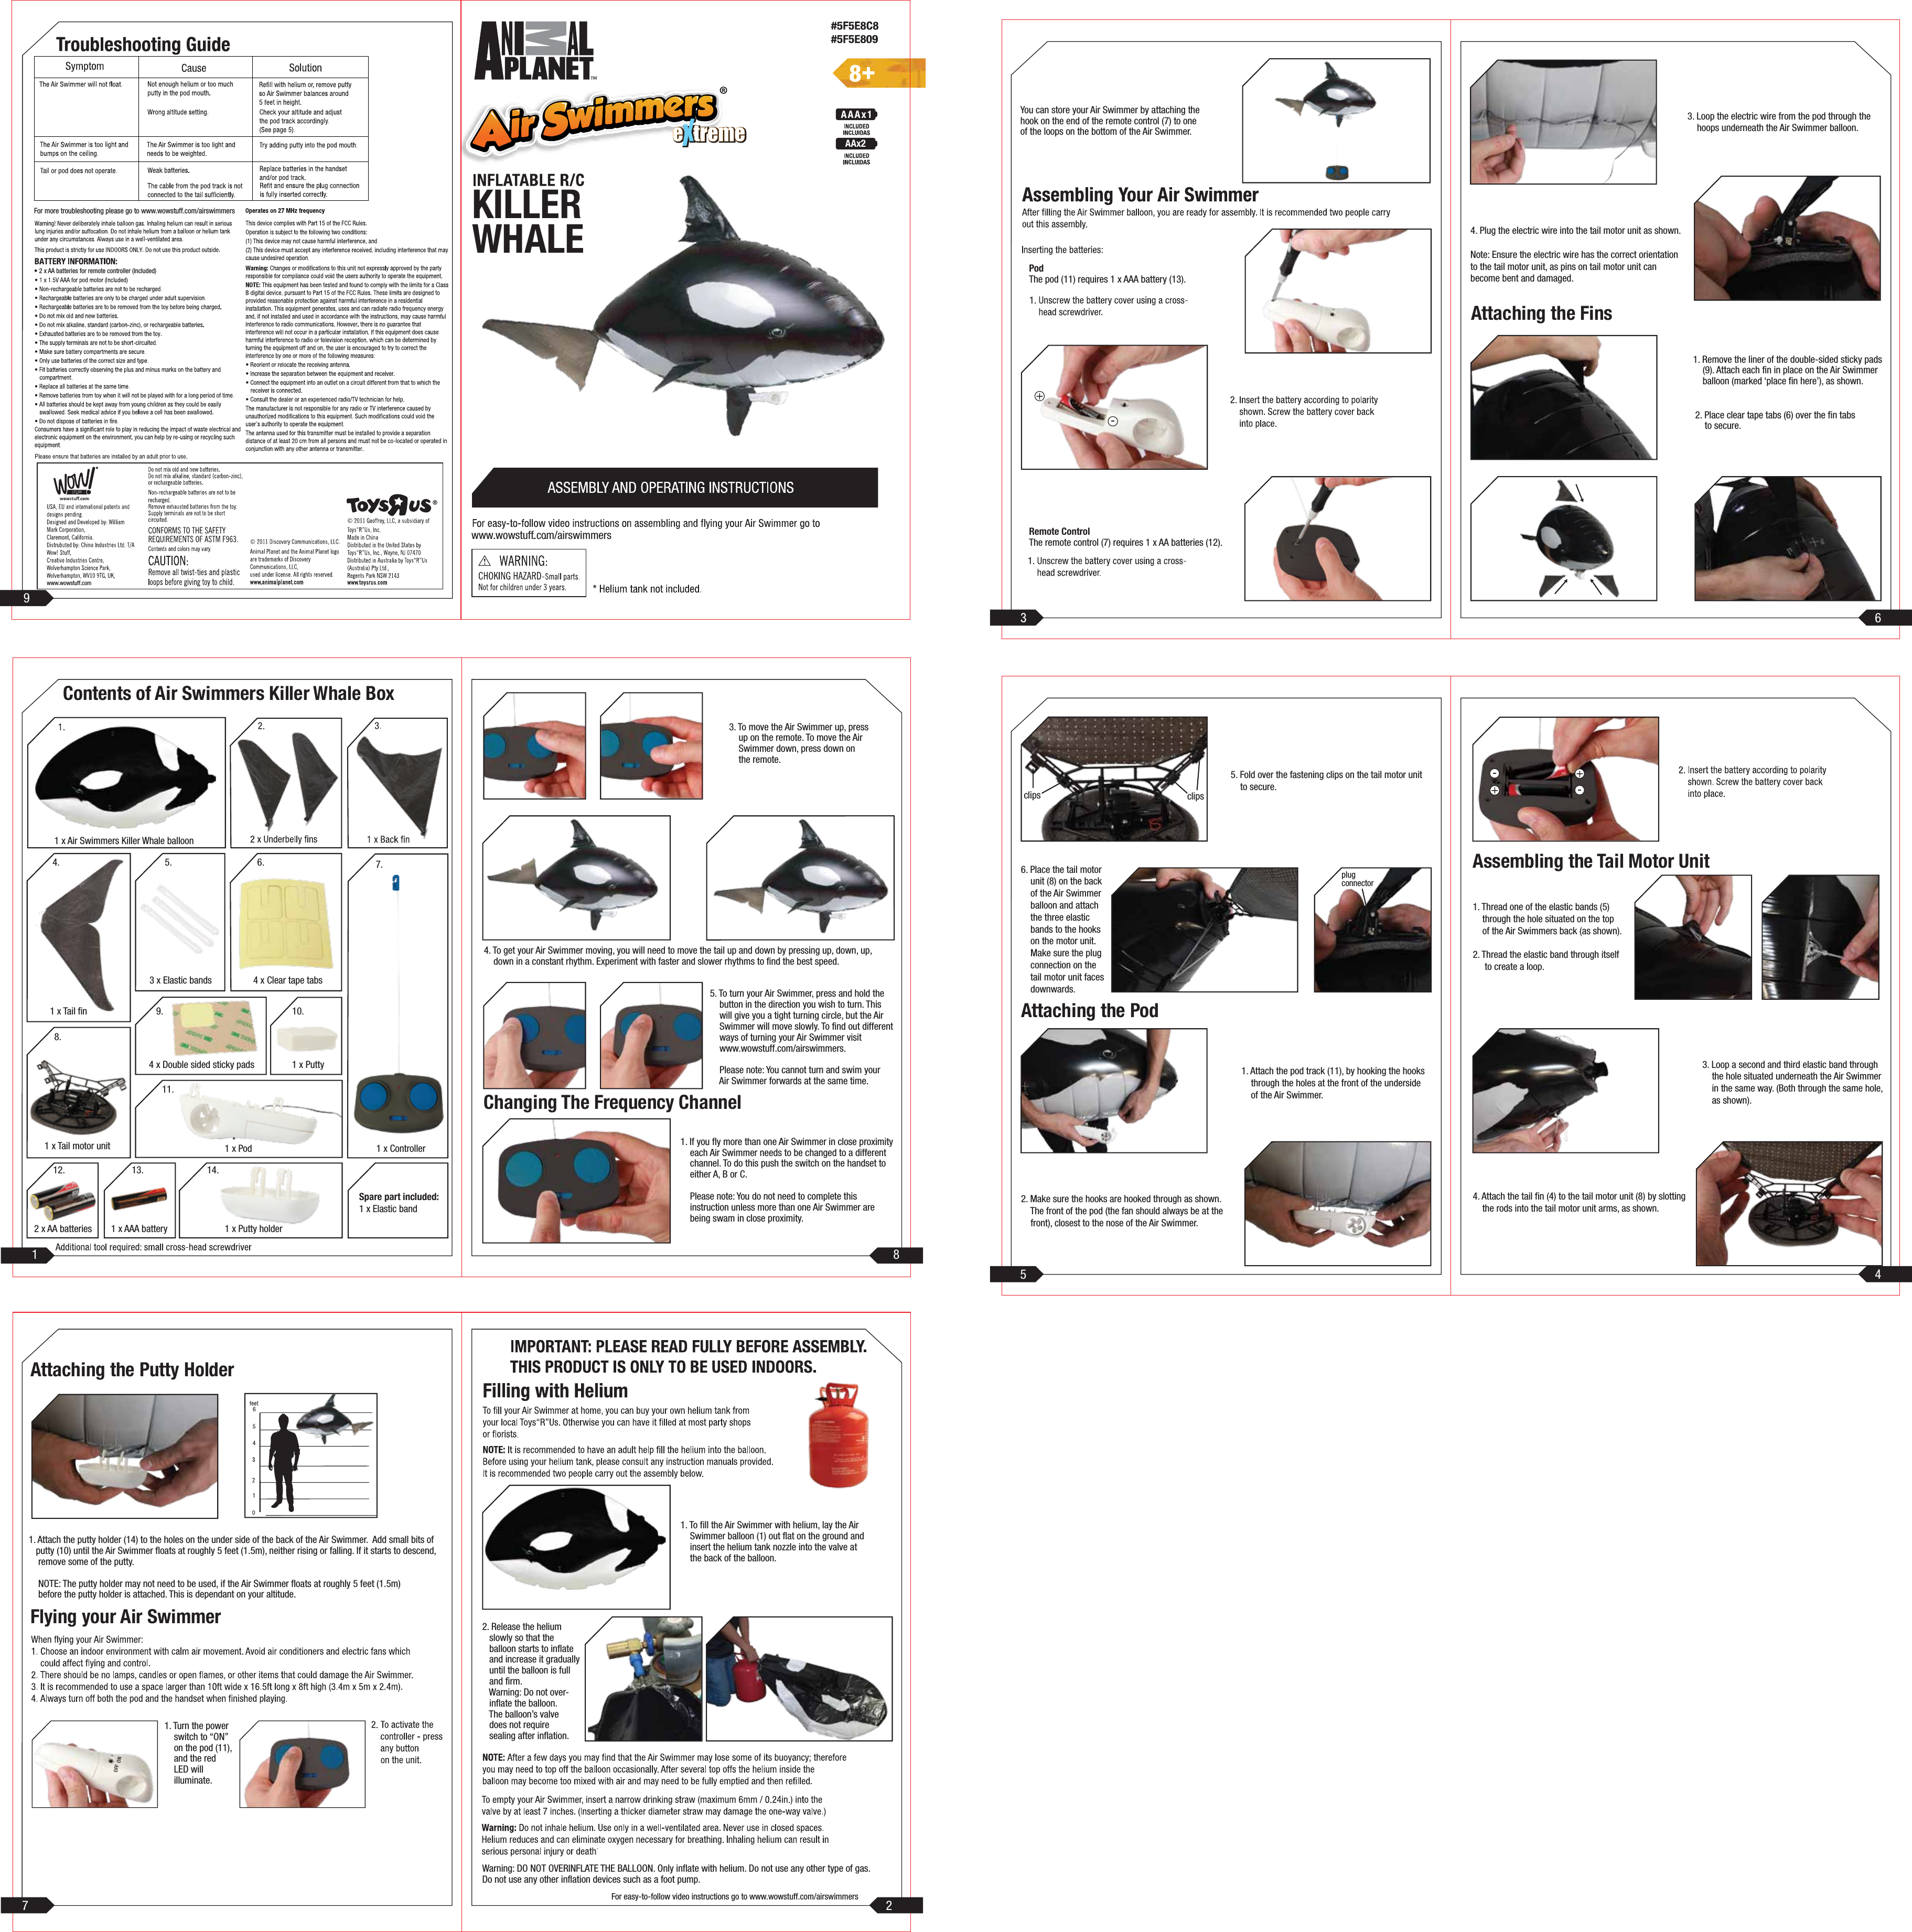
China T A Wow Stuff AR-SWR-3C AIR SWIMMERS SHARK & AIR SWIMMERS CLOWN FISH & AIR SWIMMERS-PIRANHA & AIR SWIMMERS-KILLER WHALE User Manual whale IM

China Industries Ltd T/A Wow! Stuff AIR SWIMMERS SHARK & AIR SWIMMERS CLOWN FISH & AIR SWIMMERS-PIRANHA & AIR SWIMMERS-KILLER WHALE whale IM

User Manual

Contents of Air Swimmers Killer Whale Box1 x Air Swimmers Killer Whale balloon1 x Tail fin1 x Tail motor unit2 x AA batteries3 x Elastic bands4 x Double sided sticky pads1 x Pod 1 x Controller1 x Putty holderSpare part included:1 x Elastic band1 x Putty4 x Clear tape tabs4. 5. 7.8.9.11.12. 13. 14.10.6.1 x AAA battery1. To fill the Air Swimmer with helium, lay the Air    Swimmer balloon (1) out flat on the ground and    insert the helium tank nozzle into the valve at    the back of the balloon.2. Release the helium   slowly so that the   balloon starts to inflate   and increase it gradually   until the balloon is full   and firm.   Warning: Do not over-   inflate the balloon.   The balloon’s valve   does not require   sealing after inflation.Warning: DO NOT OVERINFLATE THE BALLOON. Only inflate with helium. Do not use any other type of gas.Do not use any other inflation devices such as a foot pump.For easy-to-follow video instructions go to www.wowstuff.com/airswimmersYou can store your Air Swimmer by attaching thehook on the end of the remote control (7) to oneof the loops on the bottom of the Air Swimmer.PodThe pod (11) requires 1 x AAA battery (13).Remote ControlThe remote control (7) requires 1 x AA batteries (12).5. Fold over the fastening clips on the tail motor unit    to secure.6. Place the tail motor     unit (8) on the back     of the Air Swimmer     balloon and attach     the three elastic     bands to the hooks     on the motor unit.      Make sure the plug     connection on the     tail motor unit faces     downwards.plugconnectorAttaching the Podclips clips1. Attach the pod track (11), by hooking the hooks    through the holes at the front of the underside    of the Air Swimmer.2. Make sure the hooks are hooked through as shown.     The front of the pod (the fan should always be at the     front), closest to the nose of the Air Swimmer.1. Remove the liner of the double-sided sticky pads    (9). Attach each fin in place on the Air Swimmer    balloon (marked ‘place fin here’), as shown.2. Place clear tape tabs (6) over the fin tabs     to secure.Attaching the Fins3. Loop the electric wire from the pod through the     hoops underneath the Air Swimmer balloon.4. Plug the electric wire into the tail motor unit as shown.Note: Ensure the electric wire has the correct orientationto the tail motor unit, as pins on tail motor unit canbecome bent and damaged.1. Turn the power    switch to “ON”    on the pod (11),    and the red    LED will      illuminate.Flying your Air SwimmerAttaching the Putty Holder1. Attach the putty holder (14) to the holes on the under side of the back of the Air Swimmer.  Add small bits of    putty (10) until the Air Swimmer floats at roughly 5 feet (1.5m), neither rising or falling. If it starts to descend,    remove some of the putty.          NOTE: The putty holder may not need to be used, if the Air Swimmer floats at roughly 5 feet (1.5m)     before the putty holder is attached. This is dependant on your altitude.3. To move the Air Swimmer up, press    up on the remote. To move the Air     Swimmer down, press down on     the remote.1. If you fly more than one Air Swimmer in close proximity     each Air Swimmer needs to be changed to a different     channel. To do this push the switch on the handset to     either A, B or C.    Please note: You do not need to complete this     instruction unless more than one Air Swimmer are     being swam in close proximity.5. To turn your Air Swimmer, press and hold the     button in the direction you wish to turn. This     will give you a tight turning circle, but the Air     Swimmer will move slowly. To find out different     ways of turning your Air Swimmer visit     www.wowstuff.com/airswimmers.    Please note: You cannot turn and swim your     Air Swimmer forwards at the same time.Changing The Frequency Channelwww.wowstuff.com• 2 x AA batteries for remote controller (Included)For more troubleshooting please go to www.wowstuff.com/airswimmers1. Thread one of the elastic bands (5)     through the hole situated on the top     of the Air Swimmers back (as shown).2. Thread the elastic band through itself     to create a loop. 3. Loop a second and third elastic band through     the hole situated underneath the Air Swimmer      in the same way. (Both through the same hole,    as shown).4. Attach the tail fin (4) to the tail motor unit (8) by slotting    the rods into the tail motor unit arms, as shown.Assembling the Tail Motor UnitKILLERWHALEAAx2www.wowstuff.com/airswimmers4. To get your Air Swimmer moving, you will need to move the tail up and down by pressing up, down, up,     down in a constant rhythm. Experiment with faster and slower rhythms to find the best speed.21 894675ONOFF
CE REQUIREMENT  Hereby, China Industries Ltd. t/a Wow! Stuff, declares that this AR-1001 & AR-1002 &AP-1008 are in compliance with the essential requirements and other relevant provisions of Directive 1999/5/EC.  To which must be added: - the exact location from which a copy of the DoC may be obtained (internet or postal address) or - a copy of the DoC in the original language is enclosed with the equipment   FCC NOTE This device complies with Part 15 of the FCC Rules. Operation is subject to the following two conditions: (1)this device may not cause harmful interference, and (2) this device must accept any interference received, including interference that may cause undesired operation.  The manufacturer is not responsible for any radio or TV interference caused by unauthorized modifications to this equipment. Such modifications could void the user's authority to operate the equipment.  The antenna used for this transmitter must be installed to provide a separation distance of at least 20 cm from all persons and must not be co-located or operated in conjunction with any other antenna or transmitter.  NoticeThis device intent to market to EU member states and U.S,use in other countries may cause a risk.

Navigation menu