Clearsounds Communications AC100 CLEAR DIGITAL AMPLIFIED CELLULAR HANDSET User Manual Rev1
Clearsounds Communications Inc. CLEAR DIGITAL AMPLIFIED CELLULAR HANDSET Rev1
User manual_Rev1

AC100 CL-3605
USER' S MANUAL

Contents
Prior To Use Basic Functions
Congratulations
Important Safety Information
Unpacking
Phone Layout and Keys Function
Keys Description
LCD Icons Description
Inserting SIM Card and Battery
Charging the Mobile Phone
Switching On/Off
Making a Call
Receiving a Call
Handsfree
Amplification Function
OptionsDuringaCall
1
13
113
114
315
4
15
716
9
10
11
12
Menu Functions
Menu Navigation
Menu Map
Call Log
Set M1/M2/M3
Phone Settings
Message
Phone Book
17
17
18
19
31
37
41
43
Fit for 900MHz 1800MHz public mobile
communication network
0
10
s
adjustable in Profiles menu
25
10
tone
3 Profiles selectable (standard, elder and
sleep mode)
Speed dialling (M1~M3)
10
10
Keypad volume
SOS short message auto-sending
Phonebook with at least 4
Outgoing call list with up to entries
5 ring melodies with 8 volume level
Amplification control up to dbm
Tone control up to dbm
Alarm tone & SMS Alert selectable
Audio volume adjustable (8 levels)
entries in phone
Incoming call list with up to entries
Missed call list with up to entries
Numbers in call history list can be called
back/added to phonebook/deleted/edited
selectable
Hands-free speakerphone
6 SOS auto-dialling with synchronally dialling
Torch function
Adjustable LCD contrast (20 levels)
Call duration display
Date & Time setting
Keypad locking
Security setting & SIM card locking
LCD backlight time selectable
Shortcut setting
Any key answer
Auto redialling
Call waiting
Call forwarding
Call barring
8 languages selectable
Alarm clock include snooze function
Check the phonebook and message during a
conversation
Note:
The caller ID feature is only available if
you activate a Caller Display service.
Feature List
68

Contents
Password Input
67
Feature List
68
67
Clock Settings
Shortcut Settings
Setting Alarm
Profiles
Network Settings
Call Settings
SOS Setting
52
56
60
61
63
64
There are several passwords that are used by your phone and its SIM card. These passwords help
you protect your phone against unauthorized use.
Phone Code
he password is preset to .
PIN (Personal Identification Number) code protects your SIM card against unauthorized use. The
PIN code is usually supplied with the SIM card. When the PIN code request is enable, the code is
asked each time the phone is switched on.
If you enter incorrect PIN code 3 times, the SIM card will be locked and you will be prompted to
enter the PUK code.
The PUK (Personal Unblocking Key) code is used for changing a blocked PIN code. To obtain this
code please contact your service provider.
1234
PIN Code
PUK Code
The phone password is used for restoring the factory settings. It can be also used to avoid
unauthorized use of your phone. T
Password Input
50

Congratulations
on purchasing our high quality product.
Please read the manual carefully to find all features and better understand how your telephone
works, so you can get the best out of your new phone. Be sure to observe the instructions in this
manua
Particularly easy operation, extra-loud receiving and ringtone volume, large keypad and
characters and a one-click emergency call button (SOS) - with these specialized features this
mobile phone can offer you increased safety and fit your needs.
l. Please note that this manual may be revised at any time without notice.
Important Safety Information
WARNING: These warning notice must be observed in order to prevent any injury to the user or
to third parties.
Prior To Use
In different countries, different regulations may apply to the use of mobile phone (e.g. When
driving, in hospitals, at petrol stations, in aircrafts). Note the law for using a mobile phone in
your country, and turn the device off when usage is not permitted, or when dangerous
situations or interference could occur.
1.
166
5.
among upper, lower case and digit mode
, the LCD display shows .Done!
Enter the message text (up to 160 characters) using the alphanumeric keys. Press the key
to switch while press soft key to edit it. Then
press soft key to confirm
#
Delete
Save
Use SOS Function
In emergency cases, the user can press button for help. If the user has preset a SOS
message and selected the relative SMS receiver, after pressing the button, the phone will
send the SOS message before entering this SOS list calling. Up to 6 numbers can be preset as
SOS list. After entering the mode, the phone will dial numbers on this SOS list automatically
one by one. If a busy tone is detected or a call is aborted by user, the next number will be dialed
directly. It will dial up to 2 circles. After that the calling ends but the phone still sounds warning
tone and the light still flashes. In this mode:
1. when the phone rings with an incoming call, it will be taken automatically. After the call the
warning tone and the flash continues.
2. When a short message is received or the alarm sounds, the relevant ringer will be delayed
automatically.
If you want to quit the SOS mode, press and hold the button followed by soft key.
SOS
SOS
SOS
SOS OK

Use only ,
o
batteries, adapter cable and charger approved by the manufacturer
therwise this can cause the danger of explosion.
Follow all warnings marked on the unit. Be sure not to carry the phone in your breast pocket
or use it during the charging.
If you suspect that there has been interference between the phone and a medical device,
please seek advice from your doctor before using the phone again.
Keep the phone out of reach of small children or sick or disabled people. Do not leave the
device unattended when it is connected to the power supply.
Do not expose the phone to a moist, extremely heated or cold environment. Avoid drops,
shocks or pressure.
If you are sure you are not going to use the handset over a month, please take out the
battery from the battery compartment.
The phone can cause interference in the vicinity of televisions, radios and other electronic
devices.
Stop using the phone if it becomes damaged, then take it to qualified service personnel only.
3.
4.
5.
Prior To Use
2
3.
4.
65
Predefine SOS Message
1. Press soft key in standby mode.
2. Repeatedly press or key to select , press soft key.
3. Press or key to select , press soft key.
soft key
soft key Repeatedly press the or
key to move to the desired entry
Menu
SOS Setting OK
Predefine SOS Message OK
OK SOS
OK
4. Press to select .
5. Press again to choose a number from Phonebook.
, press , the LCD display shows .
Set Message Receiver
OK Done!
1. Press soft key in standby mode.
2. Repeatedly press or key to select , press soft key.
3. Press or key to select , press soft key.
Press key , press soft key.
Menu
SOS Setting OK
Predefine SOS Message OK
SOS OK4. to select Set Message Context
SOS Message Receiver
SOS Message Context
2.
CAUTION: Alerts you to possible damage to the device or other objects.
2.
1.
Using this function, you can predefine an SOS message and set a receiver for it.

Unpacking
Once you have unpacked your phone, make sure that all the parts shown below are available. If
any pieces are missing or broken, please promptly call your dealer.
Adapter
User's manual
Charger
Cellular Phone
3
User’s Manual
364
Rechargeable Li-Polymer
battery pack
+
1
M1 M2 M3
4
7
2
5
8
0
3
6
9
ab
c
gh
i
de
f
jk
l
mn
o
pq
rs tu
v
wx
yz
A/a
SOS Setting
Set SOS Numbers
Using this function, you can set up to 6 SOS numbers.
1. Press soft key in standby mode.
2. Repeatedly press or key to select , press soft key.
3. Press soft key to select .
or
soft key Repeatedly press the or
key to move to the desired entry
Menu
SOS Setting OK
OK Set SOS Number
SOS SOS
OK
4. Use key to choose from to , press .
5. Press again to choose a number from Phonebook.
, press , the LCD display shows .
No.1 No.6 OK
OK Done!
SOS Call Duration
Using this function, you can set the duration of each SOS number dialling.
1. Press soft key in standby mode.
2. Repeatedly press or key to select , press soft key.
3. Press key to select , press soft key.
or
Menu
SOS Setting OK
SOS Call Duration OK
4. Use key to choose among , , and , you can
also choose to dial all the SOS numbers continuously. Press , the LCD display shows
.
1 Minute 2 Minutes 3 Minutes 5 Minutes
Off OK
Done!
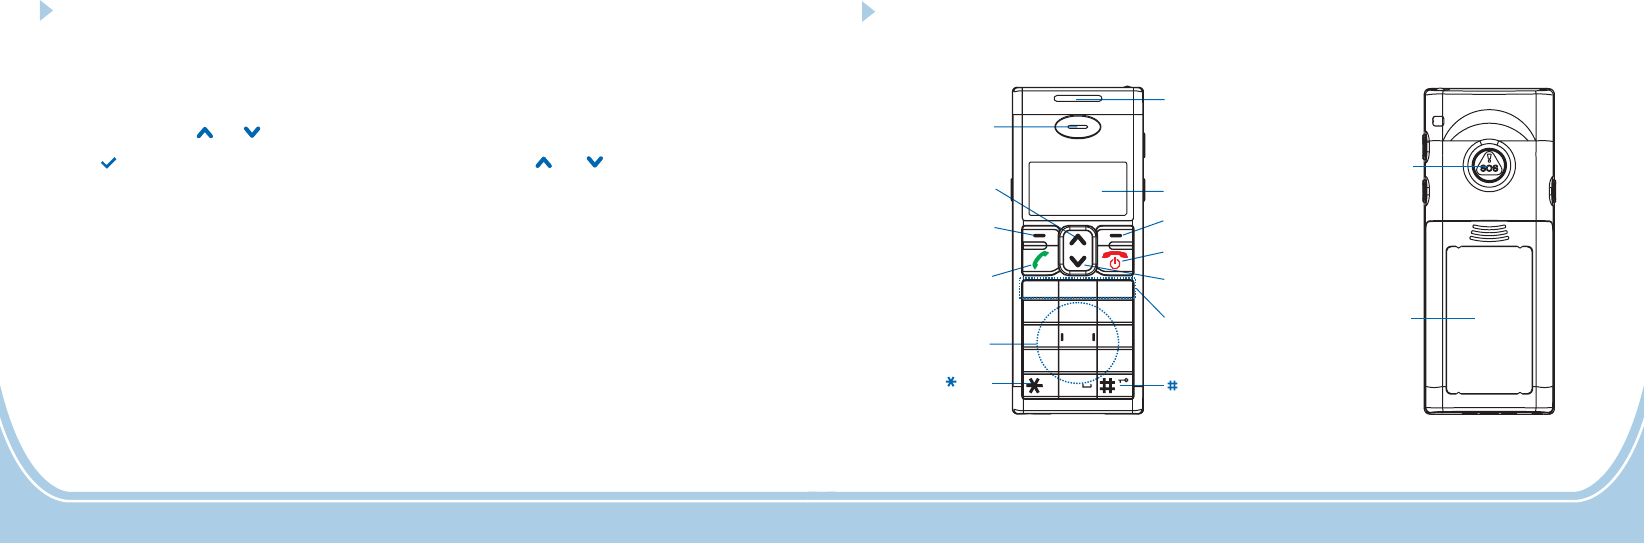
Phone Layout and Keys Function
Handset
39
Earpiece
Left soft key
Dial key
End/Power key
Alph numeric
keys
a
Display
key key
Right soft key
SOS button
Battery
compartment
cover
Up key
Down key
63 4
Speed dial
buttons
Visual ringer &
Amplifier indicator
+
1
M1 M2 M3
4
7
2
5
8
0
3
6
9
ab
c
gh
i
de
f
jk
l
mn
o
pq
rs tu
v
wx
yz
A/a
Profiles
There are 3 kinds of profiles: Standard, Elder and Sleep. You can select desired profile and make
relative detail setting.
1. Press soft key in standby mode.
2. Repeatedly press or key to select , press soft key.
3. The icon appears on the left of the current option. Use or key to choose among
, and , then press soft key.
4. Select , or . If you select , you can set the
Ringtone, SMS Alert Tone, Alert Type, Ring Volume, Keypad Volume, Vibrator and Alarm Tone
according to your necessary and preferences.
Menu
Profiles OK
Standard Elder Sleep OK
Activate Personalization Reset Personalization
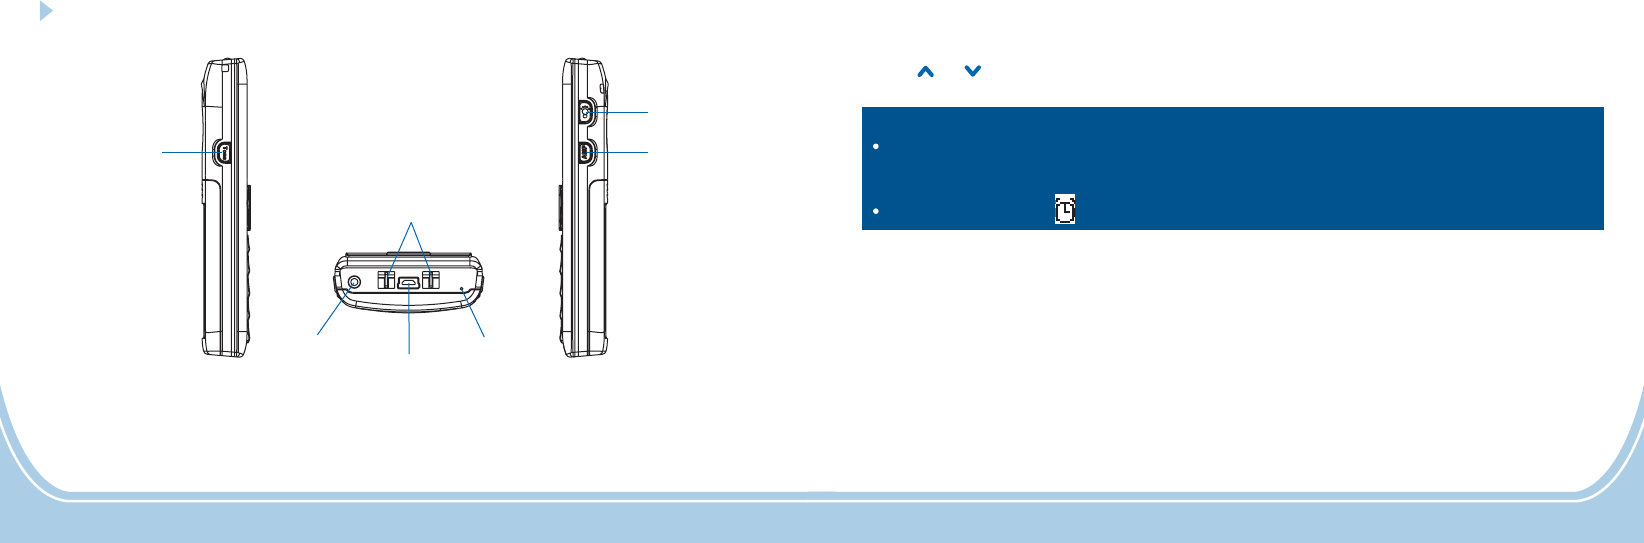
Phone Layout and Keys Function (continued)
Tone Control Amplify ( )
Button
AMP
Torch Button
Mini USB port
5
Charging contacts
Microphone
Headset Jack
62
Deactivating the Alarm Feature
1. Perform the steps 1 to 3 of the previous paragraph.
2. Use or key to select to deactivate the alarm, then press soft key.Off OK
Notes
12 Hours Time Format
AM PM
:
At step 5 if you have selected in menu, you need to enter the time
in a 12-hour format and select or , otherwise you should enter the time in a 24-hour
format.
In standby mode, the icon will appear on the LCD if you have activated the feature.
6
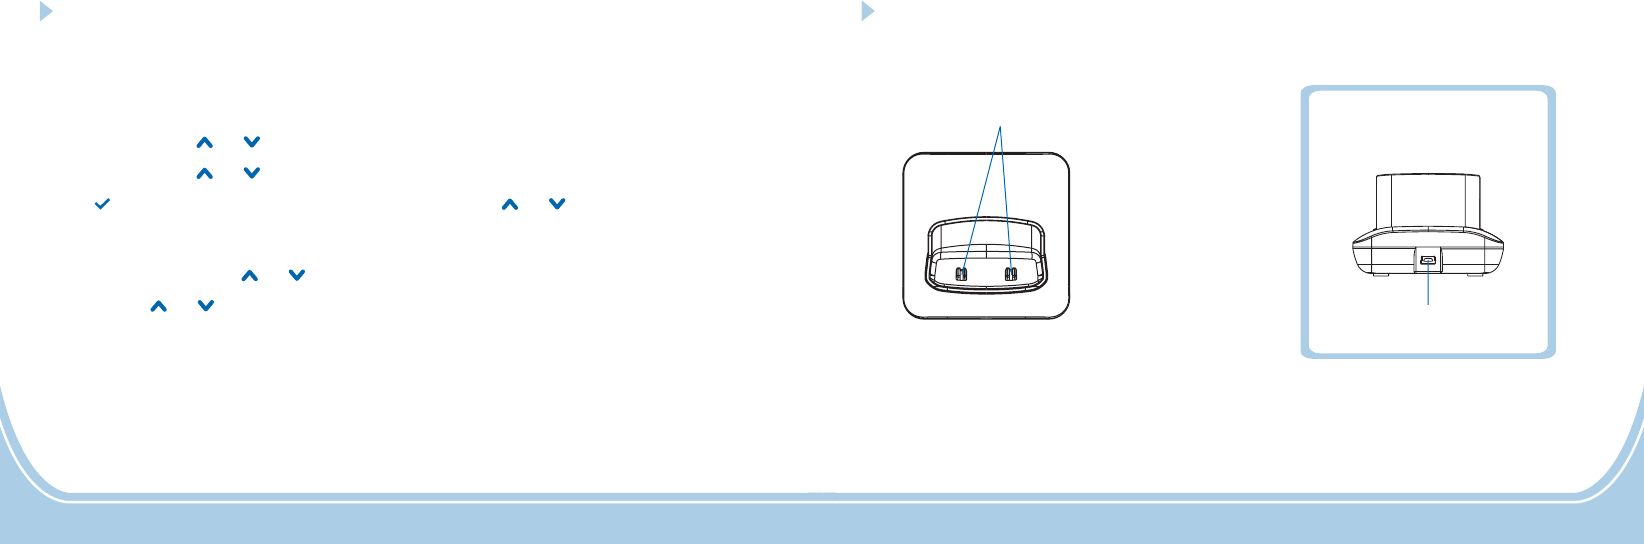
Phone Layout and Keys Function (continued)
Charger
Rear View
Charge pins
Mini USB port
61
Setting Alarm
This function allows you to set a one shot alarm or a weekly alarm.
1. Press soft key in standby mode.
2. Repeatedly press or key to select , press soft key.
3. Repeatedly press or key to select , press soft key.
4. The icon appears on the left of the current option. Use or key to select to activate
the alarm, then press soft key.
5. You are now on the time field. Use the numeric keypad to set the time in the (i.e.
12:05) format and use or key to move the cursor, press soft key.
6. Then press or key to select or according to your need,
press to confirm.
7. When you hear the alarm sound, press soft key to turn it off or press soft key
to let it ring again after .
Menu
Settings OK
Set Alarm OK
On
OK
HH:MM
OK
One shot Alarm Weekly Alarm
OK
Cancel Snooze
5 minutes
Activating the Alarm Feature

760
Keys Description
Dial key
End/Power key
Up key
Down key
Make/Answer a call.
Press this key in standby mode to enter the dialed calls list.
End a call.
Hold down to switch the phone on/off.
Scroll up through lists and menu options.
Increase the earpiece/speakerphone volume during a call.
Press this key in standby mode to enter a menu quickly according to
you tings.
Scroll down through lists and menu options.
Decrease the earpiece/speakerphone volume during a call.
Press this key in standby mode to enter a menu quickly according to
yo s.
r shortcut set
ur shortcut setting
Navigation key:
Shortcut Settings
Using this function, you only need to press one key to enter the desired setting mode directly.
1. Press soft key in standby mode.
2. Repeatedly press or key to select , press soft key.
3. Repeatedly press or key to select , press soft key.
4. Press soft key to select or press the key to move to , then press
key.
5. The icon appears on the left of the current option. Use the or key to choose among
, , and .
6. After the setting, press soft key to confirm and exit.
Menu
Settings OK
Shortcut Settings OK
OK Up Key Down Key OK
Inbox Phonebook Call Logs Alarm
OK

59 8
A/a
+
Left/Right soft key
Speed dial buttons
M1 M3
key
# key
Perform the functions indicated by the text immediately over it (on the
bottom line of the display) which changes time by time.
Youcanstoreupto3numbersinSpeeddialbuttons( to ).
Press this key to insert one or more symbols while composing a message
or editing a phonebook entry name.
In standby mode, press and hold this key to lock the keypad. When the
keypad is locked, press soft key then long press this key to unlock
it.
Press this key to switch among different input method while composing a
message or editing a phonebook entry name.
Press this key on the right side of the phone to turn on the torch function.
Press it again to turn it off.
Unlock
Torch button
Keys Description (continued)
M3M1 ~
Any Key Answer
If you activate this feature, when a new call is coming,
1. Press soft key in standby mode.
2. Repeatedly press or key to select , press soft key.
3. Repeatedly press or key to select , press soft key.
4. Repeatedly press or key to select , press soft key.
5. Use or key to choose to activate the feature or choose to deactivate it.
6. Press soft key to confirm and exit.
Menu
Settings OK
Call Settings OK
Any Key Answer OK
On Off
OK
you can press any key to answer it.

958
LCD Icons Description
Mute
Indicates that the microphone
is temporarily muted during a
conversation.
Battery Icon
Signal Icon
Indicates the battery charge
level.
Fully charged status
Low battery status
Low battery warning
status
Indicates the current signal
strength. The greater the
number of bars, the stronger
the signal.
Ring Off
This icon appears when you turn
the ringer off.
Alarm
New SMS
Keypad Lock
This icon appears when you set
an alarm to ring at a specified
time.
This icon appears when you
have one or more new short
messages.
This icon appears when the
keypad is locked.
Auto Redial
If you activate the Auto redial function, when the line does not get through, the phone will auto
redial this number after 3 seconds if you have not cancelled the call.
1. Press soft key in standby mode.
2. Repeatedly press or key to select , press soft key.
3. Repeatedly press or key to select , press soft key.
4. Repeatedly press or key to select , press soft key.
5. Use or key to choose to activate the feature or choose to deactivate it.
6. Press soft key to confirm and exit.
Menu
Settings OK
Call Settings OK
Auto Redial OK
On Off
OK
57 10
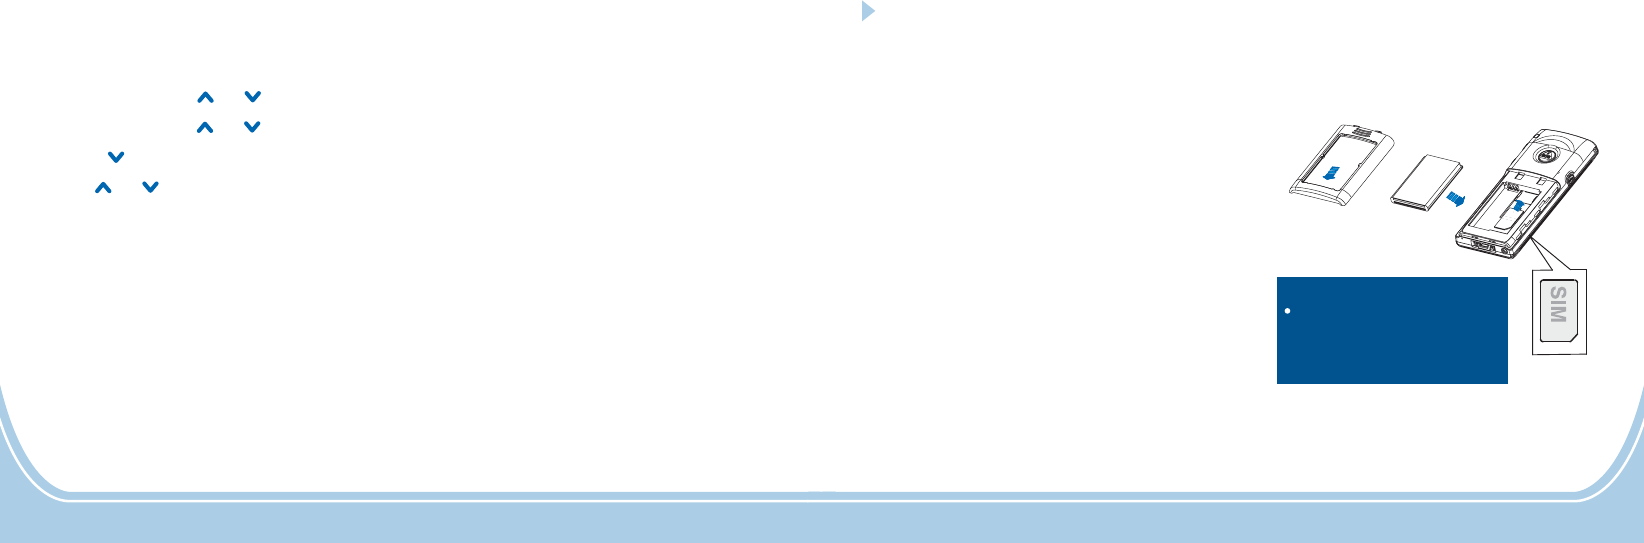
Inserting SIM Card and Battery
Turn off the power of the phone.
Slide the battery cover in the direction
of the arrow and pull it out. Remove
battery as shown in the figure.
Keep the golden connectors of SIM card
facing to the phone and push in the SIM
card into the slot with care.
Insert new battery into the battery
compartment as indicated.
To replace the battery cover, slide the
cover up until it snaps in place.
The comes with your mobile phone. Insert the battery
andvalidSIMcardbeforeusingthephone.
Rechargeable Li-Polymer battery pack
2.
1.
3.
4.
5.
Do not touch the metal
area of SIM card. Put the
card away from electricity
and magnetism.
Note:
Calling Line Identificat on Restrictioni
Using this function, you can set the restriction for calling line identification.
1. Press soft key in standby mode.
2. Repeatedly press or key to select , press soft key.
3. Repeatedly press or key to select , press soft key.
4. Press key to select , press soft key.
5. Use or key to choose among , and .
6. Press soft key to confirm and exit.
Menu
Settings OK
Call Settings OK
Calling Line Identification Restriction OK
Default Setting On Off
OK

11 56
Inserting SIM Card and Battery (continued)
Charging the Mobile Phone
Forbid to insert or take out the card when there
is power supply connected.
The battery needs to be replaced if it does not
recover its full storage capacity after recharging.
Notes:
! Important Note YOU SHOULD
FULLY CHARGE THE battery
: Before initial operation,
for about 4~5 hours.
To charge, plug the connector on the adapter cable in the mini
USB port on the charger, then place the phone on the charger.
During the charging, the battery icon starts filling.Result:
+
1
M1 M2 M3
4
7
2
5
8
0
3
6
9
ab
c
gh
i
de
f
jk
l
mn
o
pq
rs tu
v
wx
yz
A/a
Call Settings
Speaker Volume
Using this function, you can set the speaker volume.
1. Press soft key in standby mode.
2. Repeatedly press or key to select , press soft key.
3. Repeatedly press or key to select , press soft key.
4. Press soft key to select .
5. Use or key to choose the speaker volume level you want (up to 8 levels).
6. After the setting, press soft key to confirm and exit.
Menu
Settings OK
Call Settings OK
OK Speaker Volume
Back
Hold down key for 3 seconds or longer.
If no SIM card is inserted in the cellular
phone, a message window that
is displayed. In this case, only
emergency call can be made and other
functions cannot be used.
Insert SIM
Card
Switching On/Off
Note
YOU SHOULD
FULLY CHARGE THE PHONE BEFORE
USING.
:
Nothing will appear on the LCD when
battery power is very low.
Switching On
55 12
Hold down key for 3 seconds until the
icon appears on the LCD, then the display
disappears.
Switching Off
Network Selection
This function allows you to choose a network when you are using an international roaming service
whether by manual or by automatic selection. However, a roaming network is available to choose
when your network provider has an agreement on roaming service with the roaming provider.
1. Press soft key in standby mode.
2. Repeatedly press or key to select , press soft key.
3. Repeatedly press or key to select , press soft key.
4. Repeatedly press or key to select , press soft key.
5. Use or key to choose or , press soft key.
Menu
Settings OK
Network Settings OK
Network Select Mode OK
Automatic Selection Manual Selection OK
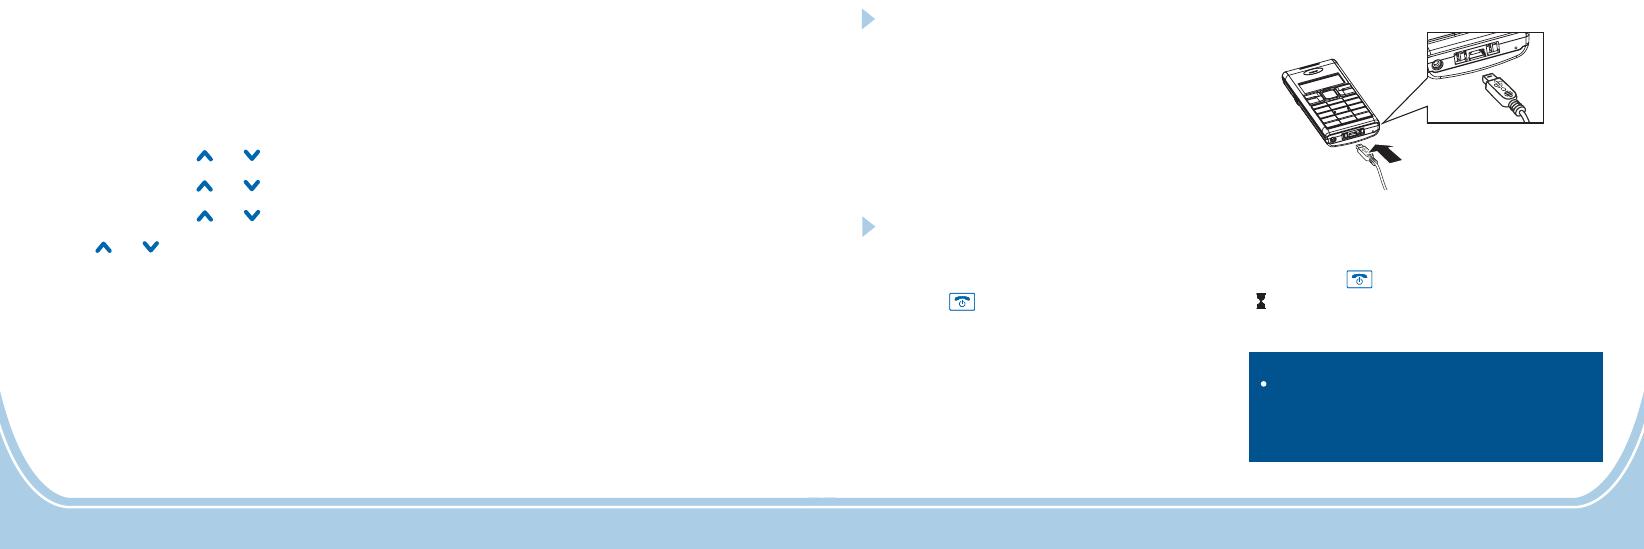
Charging the Mobile Phone (continued)
You can also plug the connector in the mini
USB port on the phone directly to charge
the mobile phone. Please refer to the
figures on the right.

Making a Call
Making a call
1. Enter a phone number in standby mode.
2. Press key.
If you make a mistake, press soft
keytoeraseonedigitatatime.
3. To end the call, press the key.
Delete
Basic Functions
Dialing
Making a call
You can make a call using the phone book.
For more details, please see par.
.
Phone
Book
Making a call from phone book
Making a call
You can make a call using the outgoing call
list.
1. Press key to display the outgoing call
list.
enter by accessing -> ->
.
2. Select desired number using or
key.
3. Press key again.
For more details, refer to par. .
Menu
Outgoing Call
Call Log
Outgoing Calls
Outgoing Call List
Or
13 54
Call Barring
Using this network service, you can limit incoming and outgoing calls from your phone.
1. Press soft key in standby mode.
2. Repeatedly press or key to select , press soft key.
3. Repeatedly press or key to select , press soft key.
4. Repeatedly press or key to select , press soft key.
5. The display shows the following options:
Cancels all barring settings. You need to enter the Call-bar password (please contact
with the service provider).
Press or key to select one, press soft key.
6. Use or key to choose among , and , press soft
key. If you choose , you need to enter the Call-bar password.
7. After all the setting, press soft key.
Menu
Settings OK
Network Settings OK
Call Barring OK
Cancel All:
OK
Check Status Activate Deactivate OK
Activate
OK
All Outgoing Calls:
All Incoming Call:
Incoming While Roam:
You cannot make an outgoing call from your phone.
You cannot receive an incoming call.
You cannot receive an incoming call when you are not in a serviced area.

Speed Dial Memory
You can make a call using speed dial buttons.
If you have enable the speed dial function,
you can also press one of ~ buttons to
dial out the matching number.
For more details, refer to par. .
M1 M3
Speed Dial
53 14
Receiving a Call
When there is an incoming call, the call s
information will appear.
If a caller ID service is activated and if the
incoming phone number is already stored in
phone book, the name you have stored for
this number is displayed.
2. You can speak. To hang up, press key.
After you hang up, the LCD displays
the call duration.
’
1. To answer the call, press key.
Result:
Call Forwarding
Using this function, you can
1. Press soft key in standby mode.
2. Repeatedly press or key to select , press soft key.
3. Repeatedly press or key to select , press soft key.
4. Press key to select , press soft key.
5. The display shows the following options:
Configures call diverting to apply to all incoming calls.
Diverts incoming calls to the specified number if your line is busy.
Diverts incoming calls to the specified number if you do not answer the call.
Diverts incoming calls to the specified number if your phone is
turned off, not in a service area or unreachable for other reason.
Releases all the call diverting settings.
Press or key to select one, press soft key.
6. Use or key to choose among , and , press soft
key. If you choose , you need to enter a number to divert the incoming call to.
7. After all the setting, press soft key.
Menu
Settings OK
Network Settings OK
Call Divert OK
Unconditional Divert:
Busy Divert:
No Answer Divert:
No Service/Power Off Divert:
Cancel All Divert:
OK
Check Status Activate Deactivate OK
Activate
OK
divert incoming calls to a specified phone number.

15
Handsfree
During a call, you may turn on the
speakerphone built in the handset. In this
mode you can simply put your handset on
asurface(e.g.adesk)andenjoythe
comfort of the handsfree conversation.
, press the
softkeyduringacall(lineengaged).
, and keep on
talking in normal mode, press the
soft key.
To turn the feature on
To turn the feature off
Spk On
Spk Off
Note:
Before putting the phone near your ears, be
sure you have turned the speakerphone off.
15 52
Amplification Function
Your phone is equipped with a specialized
amplification function designed to fit your
needs. During a conversation you can use the
or key and the key on the right
side to adjust the receiver volume. You can
also press the control on the left side of
the phone repeatedly to fit the levels to your
hearing requirements. The selected level will
be displayed on the LCD (High Tone/Normel
Tone/Low Tone).
When you press the key in receiver
mode during a conversation, the Amplifier
indicator on the handset lights on. If you
press the key again, the indicator will go
out.
This telephone can produce very
high (loud) sound levels. Repeated
incremental exposure to amplification levels
greater than 18 dB may be harmful to people
without hearing loss.
AMP
Tone
AMP
AMP
CAUTION:
Network Settings
Call Waiting
Using this function, you can activate or deactivate the call waiting function.
1. Press soft key in standby mode.
2. Repeatedly press or key to select , press soft key.
3. Repeatedly press or key to select , press soft key.
4. Press soft key to select .
5. Use or key to choose among , and , press soft
key.
6. After the setting, press soft key again.
Menu
Settings OK
Network Settings OK
OK Call Waiting
Check Status Activate Deactivate OK
OK
Using this function, you can configure various network services. Before using this service, check
available services from your service provider.

Options During a Call
You can use a variety of functions during a
call by pressing soft key.Option
Disconnect
Main Menu
Hold/Unhold
You can hold the current call.
You can end the current call.
You can enter the main menu during a call.
Mute/Unmute
You can turn off the microphone so that the
callerontheothersidecannothearyou.
51 16
1. Press soft key in standby mode.
2. Repeatedly press or key to select , press soft key.
3. Press key to select , press soft key.
4. Press soft key again to select .
5. Use the numeric keypad to enter the current time, press .
6. Use the numeric keypad to enter the current date, press .
Menu
Settings OK
Clock Settings OK
OK Date & Time
OK
OK
Date & Time Settings
Notes
12 Hours Time Format
AM PM
:
At step 5 if you have selected in menu, you need to enter the time
in a 12-hour format and select or , otherwise you should enter the time in a 24-hour
format.
At step 6 you should enter the current date in the format the system indicates you.

Menu Functions
Menu Navigation
Toaccessamenuoption
1. To display menu items, press soft
key.
2. To scroll through menu options, press
or key repeatedly.
3. To select a menu, press soft key when
the desired menu appears on the LCD.
4. Repeat if necessary.
Menu
OK
To return to Standby mode from
any menu
If you press soft key from any menu,
the phone returns to the previous screen.
To return to Standby mode from any menu,
press the key.
Back
17 50
1. Press soft key in standby mode.
2. Repeatedly press or key to select , press soft key.
3. Press key to select , press soft key.
4. Press key to select , press soft key.
5. Use or key to select among , , and ,
press to confirm.
Menu
Settings OK
Clock Settings OK
Date Format OK
DD-MM-YY MM-DD-YY DD-MM-YYYY MM-DD-YYYY
OK
1. Press soft key in standby mode.
2. Repeatedly press or key to select , press soft key.
3. Press key to select , press soft key.
4. Repeatedly press or key to select , press soft key.
5. Use or key to select between and , press to confirm.
Menu
Settings OK
Clock Settings OK
Time Format OK
12 Hours 24 Hours OK
Date Format
Time Format
Clock Settings

Menu Map
Message
Phonebook
Call Log
Set M1/M2/M3
WriteMessage/Inbox
Outbox/SentFailBox
Draftbox / Settings
Storage Status / Delete All
Voice Mail
Search
Add New
Copy All
Delete All
Storage Status
Incoming Call
Outgoing Call
Missed Call
Call Duration
Settings
Profiles
SOS Setting
Phone Settings
Clock Settings
Network Settings
Call Settings
Shortcut Settings
Set Alarm
Standard
Elder
Sleep
Predefine SOS Message
Set SOS Number
SOS Call Duration
49 18
Language
Display Settings
Security Settings
Keypad Locking Settings
Factory Default
Factory Default
If you choose to reset the handset to restore the initial settings,
1. Press soft key in standby mode.
2. Repeatedly press or key to select , press soft key.
3. Press soft key again to select .
4. Repeatedly press or key to select , press soft key.
Menu
Settings OK
OK Phone Settings
Factory Default OK
all the user selectable features
are restored to the factory defaults:
5. You will be asked to enter the current Phone Code (the default code is ). Use the numeric
keypad to enter the code and press soft key.
6. If the Phone Code you have entered is correct, the LCD display shows , otherwise you
will be indicated to enter it again.
1234
OK
Done!

Message
SMS - Short Message Service
Using this function, you can write, send, receive, check and edit messages.
Writing/Sending/Storing a new message
You can create a text message containing up to 160 alphanumeric characters and send it. To do
this, proceed as follows:
1. Press soft key in standby mode.
2. Press soft key to select .
3. Press soft key again to select .
4. Enter the message text (up to 160 characters) using the alphanumeric keys. Press the key
to switch between hile press soft key to edit it. Then press
soft key to choose:
- To send the message without storing it in outbox.
- To store the message in the outbox folder without sending it.
- To send the message and store it in outbox.
-
Menu
OK Message
OK Write Message
#
Delete
Option
Only Send
Only Save
Send And Save
Insert Name
different inputting mode w
To insert a contact name in your message.
19 48
Keypad Locking
You can lock the keypad for your privacy. When the keypad is locked, icon appears.
1. Press soft key in standby mode.
2. Repeatedly press or key to select , press soft key.
3. Press soft key again to select .
4. Repeatedly press or key to select , press soft key.
5. Use or key to choose the keylock time between and . You can
also select to deactivate this function. Press soft key. If you activate this function, the
keypad will be automatically locked after the time you have set if no key is pressed.
Menu
Settings OK
OK Phone Settings
Keypad Locking Settings OK
30 Seconds 60 Seconds
Off OK
6. When the keypad is locked, press soft key then long press the key to unlock it.Unlock #

Insert Number - To insert a contact number in your message.
If you have previously selected or , enter the phone number to which
you want to send the message by using the keypad, or press soft key to enter the phone
book in order to choose a desired contact. Then press to confirm and send the message.
When the message is being sent, the display shows , or it shows
followed by . You can press soft
key to send it again or press to quit.
Only Send Send And Save
Search
OK
Message Sent Successfully
Sending Failed Message Sent Unsuccessfully. Retry? Retry
Cancel
20
47
Change Phone Code
You can change your phone password.
1. Press soft key in standby mode.
2. Repeatedly press or key to select , press soft key.
3. Press soft key again to select .
4. Repeatedly press or key to select , press soft key.
6. Press key to select , press soft key.
7. Enter the current Phone Code, press . Then enter the new code you want to use and press
. Then enter the new code again to confirm and then press . If the
old password is correct and the two entering for new password is the same, the display will
show to complete the setting.
Menu
Settings OK
OK Phone Settings
Security Settings OK
Change Phone Code
OO
Done!
5. You will be asked to enter the current Phone Code (the default code is ). Use the numeric
keypad to enter the code and then press soft key.
to save the setting
1234
OK
OK
OK
KK

Inbox
The Inbox stores the messages you have received. You can forward, reply, delete, edit these
messages or store the sender s number to your phone or SIM card. When a new short message is
received, the LCD display shows , and you can press soft key to read it.
’
1 New Message Select
1. Press soft key in standby mode.
2. Press soft key to select .
3. Press key to select , press soft key.
4. Select the desired message by using or key. If the message has been reviewed, it is
marked with , otherwise it is marked with . Press soft key, the display will show the
whole message.
5. You can access the following options by pressing :
- To delete the selected message.
- To send a reply to the selected message.
- To send the received message to another person.
- To edit the selected message.
- To call the sender back.
- To extract the sender s number and store it to .
Menu
OK Message
Inbox OK
OK
Option
Delete
Text Reply
Forward
Edit
Dial Back
Extract Number ’the phone or SIM card
21 46
Security Settings
You can activate or deactivate SIM card lock function.
1. Press soft key in standby mode.
2. Repeatedly press or key to select , press soft key.
3. Press soft key again to select .
4. Repeatedly press or key to select , press soft key.
6. Press key again to select .
7. Use or key to choose or , press soft key. You can also select
to modify it.
8. If you choose , you will need to enter the PIN1 cod
Menu
Settings OK
OK Phone Settings
Security Settings OK
Power On PIN1
ON OFF OK Change PIN1
ON
ompt you to enter the PUK code.
5. You will be asked to enter the current Phone Code (the default code is ). Use the numeric
keypad to enter the code and then press soft key.
e after switching on the phone. Then you
can use it.
1234
OK
OK
Please note that if you enter the wrong PIN for three times, the phone will
pr
SIM Lock

Outbox Sent Fail Box&
The Outbox stores successfully sent and saved messages while the Sent fail box stores saved
messages which are sent unsuccessfully.
1. Press soft key in standby mode.
2. Press soft key to select .
3. Repeatedly press or key to select or , press soft key.
4. Select the desired message by using or key, press soft key. The display will show the
whole message.
5. You can access the following options by pressing :
- To delete the selected message.
- To send the selected message to another person.
- To edit the selected message.
- To call the recipients back.
- To extract the recipients number and store it to .
Menu
OK
Outbox Sent Fail Box OK
OK
Option
Delete
Forward
Edit
Dial Back
Extract Number ’
Message
the phone or SIM card
22
45
Date Time Display
The LCD display will show standby mode if you have activated this function.
1. Press soft key in standby mode.
2. Repeatedly press or key to select , press soft key.
3. Press soft key again to select .
4. Press key to select , press soft key.
5. Repeatedly press or key to select , press soft key.
6. Use or key to select to activate or select to deactivate, then press soft key.
Menu
Settings OK
OK Phone Settings
Display Settings OK
Date Time Display OK
On Off OK
the time in

Draftbox
The Draftbox stores messages which you select option after editing.
1. Press soft key in standby mode.
2. Press soft key to select .
3. Repeatedly press or key to select , press soft key.
4. Select the desired message by using or key, press soft key. The display will show
the whole message.
5. You can access the following options by pressing :
- To delete the selected message.
- To send the selected message to another person.
- To edit the selected message.
Only Save
Menu
OK
Draftbox OK
OK
Option
Delete
Forward
Edit
Message
23 44
3. Press soft key again to select .
4. Press key to select , press soft key.
5. Press soft key to select .
6. Use or key to choose among the available contrast levels then press soft key.
OK Phone Settings
Display Settings OK
OK LCD Contrast
OK20
LCD Backlight
The phone features a backlight LCD that is illuminated whenever you touch a key, place the
phone on the charger or remove the phone from the charger. You can adjust the backlight time.
1. Press soft key in standby mode.
2. Repeatedly press or key to select , press soft key.
3. Press soft key again to select .
4. Press key to select , press soft key.
5. Press key to select , press soft key.
6. Use or key to select among , , and
, then press soft key.
Menu
Settings OK
OK Phone Settings
Display Settings OK
Backlight OK
Always On Always Off 15 Seconds On 30 Seconds
On OK

Delete
Service Center
You can delete messages in the Inbox, Sentbox, Outbox, Draftbox or all the messages stored.
1. Press soft key in standby mode.
2. Press soft key to select .
3. Repeatedly press or key to select , press soft key.
4. Press or key to choose , ,
,or
according to your necessary. The phone will prompt you to check. Press to confirm or
press to quit.
Menu
OK
Delete All OK
Delete All Messages Delete Inbox Messages Delete
Outbox Messages Delete Sent Fail Box Messages Delete Draftbox Messages
OK
Cancel
Message
To enable the SMS feature you should ask your service supplier the service centre numbers and
store it in your phone as below:
1. Press soft key in standby mode.
2. Press soft key to select .
3. Repeatedly press or key to select , press soft key.
Menu
OK
Settings OK
Message
24
43
Phone Settings
Language
You can change the language used to display the menu messages. There are
selection, English, Russian, Spanish, Swedish, Dutch,
You can also select option, then the phone will select a language
automatically.
1. Press soft key in standby mode.
2. Repeatedly press or key to select , press soft key.
3. Press soft key again to select .
4. Press soft key to select .
5. Press or key to select the language you want and then press to confirm.
Auto select
Menu
Settings OK
OK Phone Settings
OK Language
OK
8 different
languages for Portuguese, French and
German.
Contrast
The adjustment allows you to optimize the way items appear on the display by changing the
contrast according to the environmental conditions.
1. Press soft key in standby mode.
2. Repeatedly press or key to select , press soft key.
Menu
Settings OK

4. Press soft key to choose .
5.
OK Service Center
Enter the service center number (up to 20 digits), then press soft key. The display shows .OK Done!
Validity Period
Set the validity period of the message you are sending. If it run over time and the message is still
sent unsuccessfully, it will not be sent again.
Message
, then press soft key. The display shows .OK Done!
1. Press soft key in standby mode.
2. Press soft key to select .
3. Repeatedly press or key to select , press soft key.
4. Press key to choose , press soft key.
5. Use or key to select among , , , , ,
and
Menu
OK
Settings OK
Validity Period OK
1 Hour 12 Hours 24 Hours 1 Week 1 Month 3
Months Maximum
25 42
4. Press soft key again to choose , then you can press the key to clear the
digits then enter the desired ones, press to confirm.
OK Set/Edit Delete
OK
Deleting a Speed Dial Number
1. Press soft key in standby mode.
2. Repeatedly press or key to select , press soft key.
3. Use or key to select the desired position , or , press soft key.
Menu
Set M1/M2/M3 OK
M1 M2 M3 OK
4. Use or key to select , press soft key to clear this number.Delete OK

Status Report
If you have activated this feature, after sending a message, the system will r
1. Press soft key in standby mode.
2. Press soft key to select .
3. Repeatedly press or key to select , press soft key.
4. Press or key to choose , press soft key.
5. Use or key to select to activate this function or select to deactivate it
Menu
OK Message
Settings OK
Status Report OK
On Off , then press
soft key.OK
eport whether the
sent message was delivered or not.
Reports whether or not the sent message was delivered.
Does not report whether or not the sent message was delivered.
On:
Off:
26
41
There are 3 buttons ( ~ ) for frequently used numbers, each number can be up to
20 digits.
M1 M3speed dial
1. Press soft key in standby mode.
2. Repeatedly press or key to select , press soft key.
3. Use or key to select the desired position , or , press soft key.
4. Press soft key again, then enter a number that you want to use, press to save.
Menu
Set M1/M2/M3 OK
M1 M2 M3 OK
OK OK
Storing Speed Dial Numbers
Dialing Speed Dial Numbers
After the setting, you can press , or in standby mode, then press to dial out the
corresponding number.
M1 M2 M3 OK
Editing a Speed Dial Number
1. Press soft key in standby mode.
2. Repeatedly press or key to select , press soft key.
3. Use or key to select the desired position , or , press soft key.
Menu
Set M1/M2/M3 OK
M1 M2 M3 OK
Speed Dial

Reply Path
If you have activated this feature, which is often used in reverse charging, when replying a
message, you can use the setting of the other party s SMS service center number.
1. Press soft key in standby mode.
2. Press soft key to select .
3. Repeatedly press or key to select , press soft key.
4. Press or key to choose , press soft key.
5. Use or key to select to activate this function or select to deactivate it
’
Menu
OK Message
Settings OK
Reply Path OK
On Off , then press
soft key.OK
27 40
Displays the duration of selected calls including received and dialed.
Call Duration
1. Press soft key in standby mode.
2. Repeatedly press or key to select , press soft key.
3. Repeatedly press or key to select , press soft key.
4. The LCD display shows , and .
Press or key to scroll through, you can also press soft key to clear them or press
to quit.
Menu
Call Log OK
Call Duration OK
Outgoing Duration Incoming Duration Last Call Duration
Reset
Back

Storage Medium
You can set the short message storage mode. If you select option, when you
receive a new short message, it will be stored in SIM card by default. When the memory of SIM
card is full, new messages will be stored in the phone. Otherwise new messages will be stored in
the phone firstly.
1. Press soft key in standby mode.
2. Press soft key to select .
3. Repeatedly press or key to select , press soft key.
4. Press or key to choose , press soft key.
5. Use or key to select or
SIM Preferred
Menu
OK Message
Settings OK
Storage Medium OK
SIM Preferred ME Preferred, then press soft key. The display
shows .
OK
Done!
28
39
Missed Call
When you have a missed call, the message appears on the display. For
example: . Press soft key to review the details or press to cancel.
You can also review missed calls in menu as follows:
r, press soft
key. Yo
To send a short message to the selected number.
To delete all the numbers in missed calls list.
To show the selected missed calls number.
x Missed Call(s)
2 Missed Call(s) Select Back
Call Log
Select
1. Press soft key in standby mode.
2. Repeatedly press or key to select , press soft key.
3. Repeatedly press or key to select , press soft key.
4. Use or key to scroll through the list until you find the desired numbe
u can review call s information such as phone number, calling date and time. If you
have stored the caller s number in phone book, caller s name will be displayed.
5. Press soft key to display the following options:
- To dial this number out.
-
- To delete the selected number.
- To save this number in your phone book.
-
-
Menu
Call Log OK
Missed Call OK
Option
Dial
Send Message
Delete
Save Number
Delete All
Show Number
’
’’

You can check the number of messages stored in the SIM card and the phone.
Repeatedly press key to select , press soft key.
4. You can view the current message memory status. For example,
. Press soft key to quit.
Storage Status
OK
SIM Total:40, SIM Used:13,
ME Total:20, ME Used:0
1. Press soft key in standby mode.
2. Press soft key to select .
3. or
Menu
OK Message
OK
Storage Status
29 38
Outgoing Calls
Displays phone numbers of dialed calls you made.
1. Press soft key in standby mode.
2. Repeatedly press or key to select , press soft key.
3. Press key to select , press soft key.
4. Use or key to scroll through the list until you find the desired numbe
u can review call s information such as phone number (or , the date and time.
5. Press soft key to display the following options:
- To dial this number out.
-
- To delete the selected number.
- To save this number in your phone book.
-
- If you have store this number in phone book, the list will show the name only,
select this option t
Menu
Call Log OK
Outgoing Call OK
Option
Dial
Send Message
Delete
Save Number
Delete All
Show Number
’
r, press soft
key. Yo name)
To send a short message to the selected number.
To delete all the numbers in outgoing calls list.
o show the calls number.
Select

Voice Mail
Using this function, you can listen to your voice mail if someone leaves a voice mail to you.
Mailbox number setting
You need to set the mailbox number before receiving a voice mail.
1. Press soft key in standby mode.
2. Press soft key to select .
3. select
4. Press key to select
5. Enter the mailbox number using the numeric keypad and then press
Menu
OK Message
Voice Mail
Mailbox Number
Repeatedly press or key to , press soft key.
, press soft key.
to confirm.
OK
OK
OK
30
37
Listen to Voice mail
1. Press soft key in standby mode.
2. Press soft key to select .
3. select
4. Press soft key to select
Menu
OK Message
Voice Mail
OK Listen To Voice Mail Messages
Repeatedly press or key to , press soft key.
.
OK
Call Log
Using this function, you can check recent calls you made, calls received and missed calls.
Incoming Calls
Displays phone numbers of calls you
1. Press soft key in standby mode.
2. Repeatedly press or key to select , press soft key.
3. Press soft key to select .
4. Use or key to scroll through the list until you find the desired number
can review call s information such as phone number, calling date and time. If you
have stored the caller s number in phone book, caller s name will be displayed.
5. Press soft key to display the following options:
- To dial this number out.
-
- To delete the selected number.
- To save this number in your phone book.
-
-
Menu
Call Log OK
OK Incoming Call
Option
Dial
Send Message
Delete
Save Number
Delete All
Show Number
’
’’
have answered.
, press soft
key. You
To send a short message to the selected number.
To delete all the numbers in incoming calls list.
To show the selected incoming calls number.
Select

Phone Book
You can store phone numbers and name in the phone book and retrieve to make a call. Data can
be stored both in SIM card and your cellular phone.
Note that the maximum amount of data stored depends on the type of SIM card.
Storing Phone Book Entries
You can store phone book entries by using the phone book menu or in standby mode.
Way 1: by using the phone book menu
1. Press soft key in standby mode.
2. Press key to select , press soft key.
3. Press key to select , press soft key.
4. Use or key to select or , press soft key.
5. Enter a name that
you want to use press soft key. Please refer to the Character Map.
6. Press key to move to number field,
nter the appropriate number (up to 40 digits), press soft key.
7. After the setting, the LCD
display shows .
Menu
Phonebook OK
Add New OK
Save To SIM Save To ME OK
OK
OK
Done!
Press soft key then press soft key to select option.
(up to 14 characters),
press soft key then press soft key to select
option. E
press soft key then select option, press soft key,
Option OK Detail/Edit
Option OK
Detail/Edit
Option Save OK
31 36
You can check the number of the phonebook entries stored in SIM card and the phone.
1. Press soft key in standby mode.
2. Press key to select , press soft key.
3. Repeatedly press or key to select , press soft key.
4. You can view the current phone book memory status. For example,
.
Menu
Phonebook OK
Storage Status OK
SIM Total:250, SIM Used:4,
ME Total:40, ME Used:0
Storage Status
You can delete all the phonebook entries or copy all the entries between the phone and SIM card.
Copy/Deleting all the Phone Book Entries
1. Press soft key in standby mode.
2. Press key to select , press soft key.
3. Repeatedly press or key to select or , press soft key.
4. If you select , you can select between and
. If you select , you can select between and
. Press , the phone will prompt you to check . Press to confirm or press
to quit.
Menu
Phonebook OK
Copy All Delete All OK
Copy All From SIM Card To Phone From Phone
To SIM Card Delete All Delete All ME Delete All
SIM OK OK
Cancel
the deletion

Notes
#
Delete
Delete
:
In step 5, to press the key while entering
the text.
If you make a mistake while entering a number or a name, use soft key to delete the
last character. You can also use the or keys to move on to other incorrect characters
and press soft key to delete them.
switch among upper, lower case and digit mode,
Way 2: in standby mode
1. Enter a phone number while in standby mode and then press .
2. Use or key to select among , and ,
press .
3. Complete the storing of the entry by starting from step 5 described in Way 1.
Save
Save To SIM Save To ME Save To Existed Record
OK
35 32
You can edit, delete, copy or move an entry between the phone and SIM card. You can also send
a message to the number you select.
Using Phone Book Entries Options
1. Find the desired entry in the phone book.
2. Press soft key. Then press or key to choose the desired option:
-.
- To dial out the selected entry number.
- To send a short message to the number of this entry.
/ - To view the details or edit the selected entry.
- To extract and store the number to SIM or the phone.
- To delete the selected phonebook entry.
- To add a new phone book entry.
- To check the number of phonebook entries stored in SIM card and the phone.
Option
Search
Dial
Send Message
Detail Edit
Extract Number
Delete
Add New
Storage Status
To search for phonebook entries

Character Map
To enter a specific alphanumeric character, press one or more times the relevant key for the
required character according to the following table: once for the first character, twice for the
second and so on.
33 34
AEAC
E
f f
OON
U
Key
Characters in the displayed order
0
1
2
3
4
5
6
7
8
9
(spc) (spc)
00
..
11
ABC22
DEF33
GHI44
JKL55
MNO66
PQ
RS77
TUV
88
WXYZ99
,,
??!!
abc
def
ghi
jkl
mno
pqrs
tu
v
wxyz
$$
ABC abc
a
e
c
aa
e
on
o
I
u
o
u
You can search the entries stored in the phone book by entering the first character of their name
(alphabetic search). You can also scroll through the whole list of the phone book entries in phone
book menu.
Reviewing/Dialing a Number in Phone Book
Way 1: alphabetic search
Way 2: searching by scrolling the phone book list
1. Press soft key in standby mode.
2. Press key to select , press soft key.
3. Press soft key again to select .
4.
Menu
Phonebook OK
OK Search
You can press soft key then press soft key to select option. Enter the first
letter of the name by using the alphanumeric keys, press soft key. All the entries ahead
with this letter appears. Repeatedly press the or key to move to the desired one.
Option OK Search
OK
1. Perform steps 1 to 3 of Way 1.
2. Repeatedly press the or key to move to the desired entry.
3. Press then select / option to view the details or edit the selected entry. You
can also select option or press the key to dial this number out.
Option Detail Edit
Dial
e
e

1. This equipment has been tested and found to comply with the limits for a Class B digital device,
pursuant to Part 15 of the FCC Rules. These limits are designed to provide reasonable protection
against harmful interference in a residential installation. This equipment generates uses and can radiate
radio frequency energy and, if not installed and used in accordance with the instructions, may cause
harmful interference to radio communications. However, there is no guarantee that interference will not
occur in a particular installation. If this equipment does cause harmful interference to radio or television
reception, which can be determined by turning the equipment off and on, the user is encouraged to try to
correct the interference by one or more of the following measures:
2. We declared that the product is installed with battery separately in the box. The FCC ID label is placed
on the mobile phone clearly visible to all persons at the time of purchase.
3. The exposure standard for wireless mobile phones employs a unit of measurement known as the
Specific Absorption Rate, or SAR. The SAR limit set by the FCC is 1.6W/kg.The highest SAR value for
the model phone as reported to the FCC when tested for use at the ear is 0.894 W/kg(1g) and when
worn on the body, as described in this user guide, is 0.381W/kg (1g).
4. Caution: Changes or modifications not expressly approved by the manufacturer could void the user s
authority to operate the equipment. This device complies with part 15 of the FCC Rules. Operation is
subject to the following two conditions: (1) This device may not cause harmful interference, and (2) this
device must accept any interference received, including interference that may cause undesired operation.
28
NOTE: This equipment has been tested and found to comply with the limits for a Class B digital device,
pursuant to part 15 of the FCC Rules. These limits are designed to provide reasonable protection against
harmful interference in a residential installation. This equipment generates, uses and can radiate radio
frequency energy and, if not installed and used in accordance with the instructions, may cause harmful
interference to radio communications. However, there is no guarantee that interference will not occur in a
particular installation. If this equipment does cause harmful interference to radio or television reception,
which can be determined by turning the equipment off and on, the user is encouraged to try to correct
the interference by one or more of the following measures:
Reorient or relocate the receiving antenna.
Increase the separation between the equipment and receiver.
Connect the equipment into an outlet on a circuit different from that to which the receiver is connected.
Consult the dealer or an experienced radio/ TV technician for help.
The device complies with the RF specifications when the device is used near your ear or at a distance of
1.5 cm from your body. Ensure that the device accessories such as a device case and a device holster
are not composed of metal components. Keep your device 1.5cm away from your body to meet the
requirement earlier mentioned.