Clicka XCA01 Action Camera User Manual ACTIVEON SOLAR XG UM v1 0 5
Clicka Holdings, Inc. Action Camera ACTIVEON SOLAR XG UM v1 0 5
UserManual.wiki
>
Clicka
>
XCA01 User Manual
Users Manual
Navigation menu
Upload a User Manual
Namespaces
Wiki Guide
HTML
PDF
Info
Views
User Manual
Discussion / Help
Navigation


![4How to unlock the Touch operation● SOLAR XG includes special power saving features.1. Auto Backlight Dimming : When you set [Auto LCD O], auto backlight dimming will start at mid- point of your setting time.2. Quick LCD OFF : [During video recording] Tap and hold the screen for 2-3 seconds. LCD will go o automatically. * For turning on the LCD again, please press the ( ) button once. * If lock image appears, please refer to How-to-Unlock-the-Touch-Operation guide.Power saving features● If you want to use touch operation, tap the screen rst. And then it will show " Lock image". Tap and hold the "Lock image" until the live screen is ready.3. Getting Started1. Open the battery cover and insert ACTIVEON SOLAR XG Li-ion battery.2. Insert microSD Card on the microSD Card slot. (The camera will not record when microSD Card is not inserted.)3. Press the ( ) button and hold for two seconds. (The camera will turn on and LCD screen will display live screen.)](https://usermanual.wiki/Clicka/XCA01/User-Guide-3237938-Page-6.png)


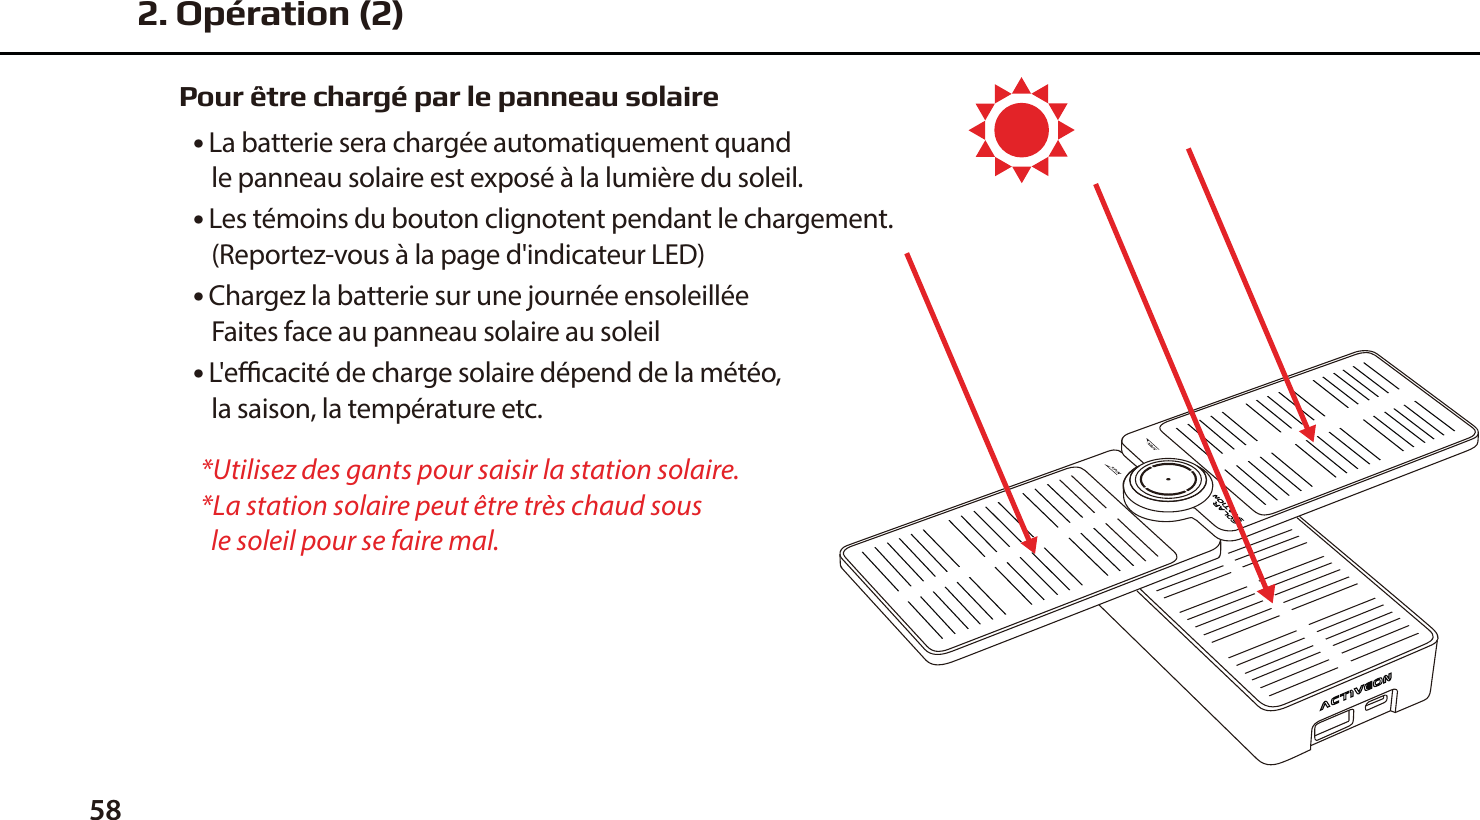
![● Pour une utilisation tactile, tapotez l'écran. L'écran achera ensuite “Lock image”. Tapotez et maintenez “Lock image” jusqu'à ce que l'écran soit prêt.3. Allumez la caméra1. Ouvrez le compartiment de la batterie et insérez-y la batterie Li-ion ACTIVEON SOLAR XG.2. Insérez la carte microSD dans le compartiment prévu à cet eet. (La caméra n'enregistre pas si la carte microSD n'est pas insérée.)3. Appuyez sur le bouton ( ) et maintenez-le enfoncé pendant 2 secondes. (La caméra s'allume et l'écran LCD ache l'image visualisée.)Comment débloquer le fonctionnement tactile36● SOLAR XG comprend des caractéristiques spéciales d'économie d'énergie.1. Auto rétro éclairage par palier : Lorsque vous réglez sur [Arrêt auto LCD], l'auto rétro éclairage par palier débutera au mileu de votre temps de réglage.2. Pour éteindre l'écran LCD : [Pendant l'enregistrement vidéo] Appuyez et maintenez l'écran pendant 2-3 secondes. L'écran LCD s'éteindra automatiquement. * Pour ré allumer l'écran LCD à nouveau, s'il vous plaît appuyez sur le bouton ( ) une fois. * Si l'image de cadenas apparaît, s'il vous plaît consulter le guide-du-Touch-Opération How-to-Unlock.Fonction d'économie d'énergie](https://usermanual.wiki/Clicka/XCA01/User-Guide-3237938-Page-38.png)


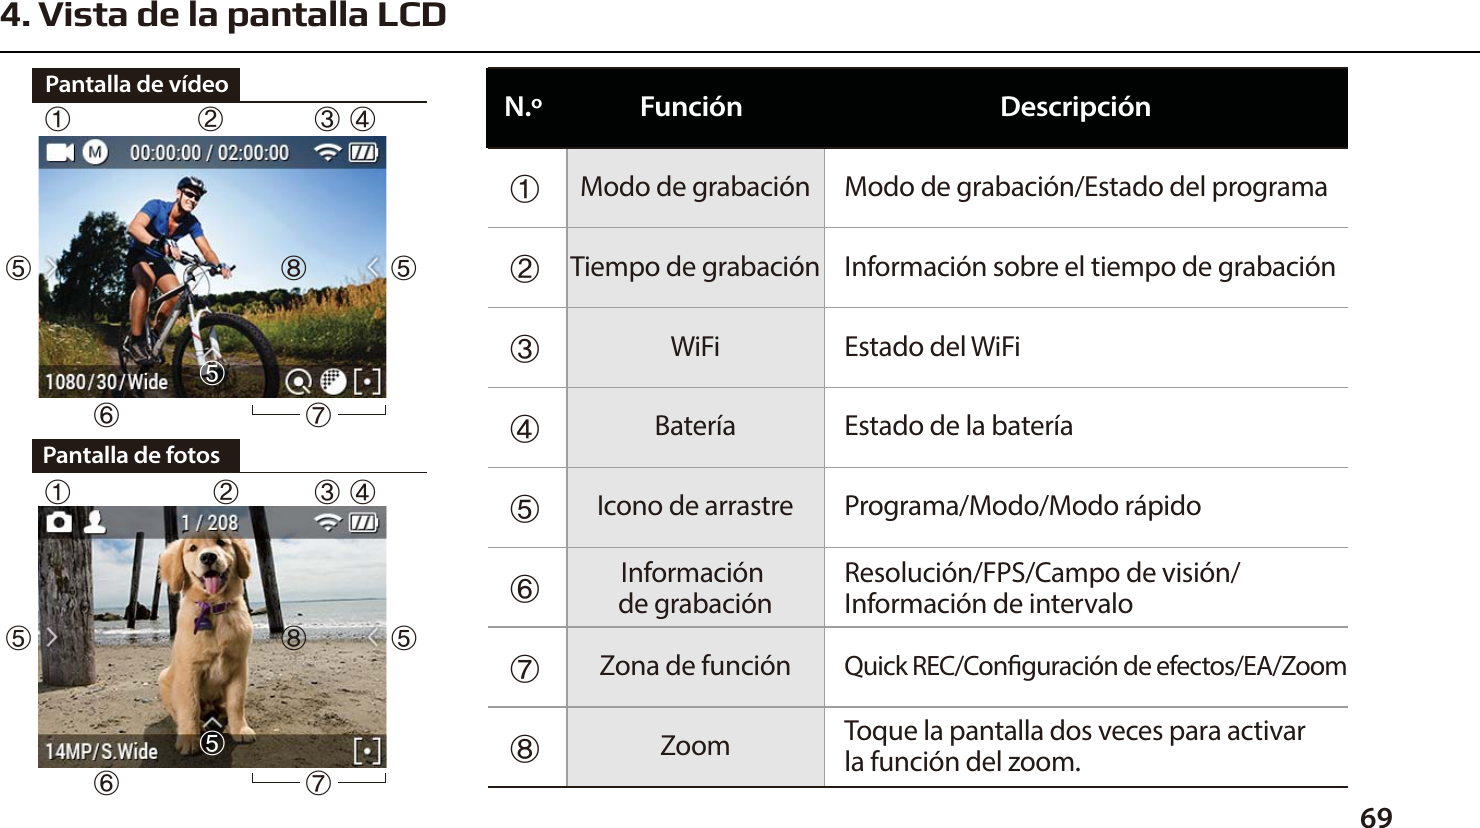
![68Cómo desbloquear el funcionamiento táctil● SOLAR XG incluye características especiales de ahorro de energía.1. Atenuación de la Auto-retroiluminación : Cuando se ajusta [ Auto LCD O ] , El nivel de atenuación de la auto-retroiluminación se iniciará en el punto medio del ajuste de tiempo.2. Apagado rápido del LCD : [Durante la grabación de vídeo] Toque y mantenga pulsada la pantalla durante 2-3 segundos. La pantalla LCD se apagará automáticamente. * Para encender la pantalla LCD de nuevo, por favor, pulse el botón ( ) una vez. * SI la imagen de bloqueo aparece, por favor, consulte la guía “Como desbloquear la función táctil”.Función de ahorro de energíaSi desea usar el funcionamiento táctil, toque primero la pantalla. A continuación aparecerá "Bloquear imagen". Pulse y mantenga "Bloquear imagen" hasta que esté lista la pantalla en directo.3. Encienda la cámara1. Abra la tapa de la batería e introduzca la batería de ion litio ACTIVEON SOLAR XG.2. Inserte la tarjeta microSD en la ranura para tarjetas microSD. (La cámara no grabará sin una tarjeta microSD insertada)3. Presione el botón ( ) y manténgalo durante 2 segundos. (La cámara se encenderá y la pantalla LCD mostrará la pantalla en directo)](https://usermanual.wiki/Clicka/XCA01/User-Guide-3237938-Page-70.png)