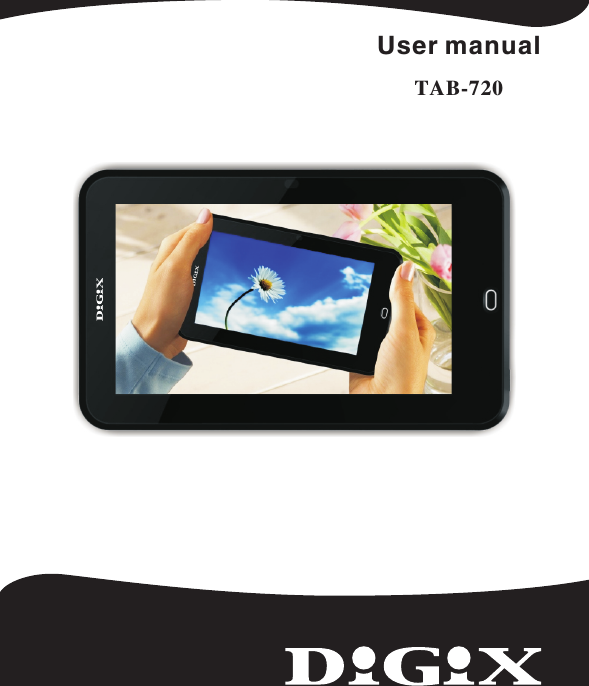
Contel Electronics Technology TAB720 7" Digix Tablet Model Number: Tab-720; Tab-710 User Manual TAB 720 manual 100x140 110927

Shenzhen Contel Electronics Technology Co.,LTD 7" Digix Tablet Model Number: Tab-720; Tab-710 TAB 720 manual 100x140 110927

Contents

TAB-720-User manual_Part1

User manualTAB-720
Table of Contents18. Customized settings      8.1 Wireless operation and network      8.2 Sound      8.3 Display      8.4 Location & security      8.5 Application     8.6 Ac co un ts  & sync      8.7 Search      8.8 Privacy      8.9 SD card & device storage      8.10 Language and  keyboard      8.11 Date and time      8.12 Touch screen calibrate      8.13 G-Sensor calibrate      8.14 A bo ut  the device 9. Using HDMI 10. Locking the device 11. Troubleshooting      11.1 Turning off applications      11.2 Compulsory power-off      11.3 Restore defaults   15  16  19  19  13  13  13  14  14  15  16  16  17  17  18  18  18  19  19  20  201.Appearance 2. Getting started     2.1 Charging the battery     2.2 Using a Micro SD card     2.3 Hot plug of Micro SD card and external flash disk     2.4 Power-on/off     2.5 USB Connected      2.6 Wi-Fi Settings3. Inputting     3.1 Keyboard      3.2 Touch screen     3.3 Mouse4. Desktop     4.1 Status bar     4.2 Home page     4.3 Shortcut mode     4.4 Shortcut way to add gadgets     4.5 Using gadgets5. Browsing web pages6. Typical applications     6.1 Email      6.2 My Pad     6.3 Gallery     6.4 Music      6.5 Camera 7. Tips and other information     7.1 Some fast operations     7.2 Setting for shortcut operations           7.2.1 Access to Internet in           7.2.2 Access to Internet      7.3 About the battery      2     2     2    3    3     4    4    5    5     5    5    6    6    6    6    7    8    8    8    9    9    9 10  11  11  11  11  12  12  12  12a wireless way
21.  Appearance 2.  Getting started2.1 Charging the batteryA battery is embedded in your Digix tablet, which should be charged  whenever the power is low.Power adapter:To charge the battery, insert one end of the adapter into the outlet and the other end into the power jack on the device.1. After the adapter is inserted, the battery indicator will turn red, which means that charging is in process. When the battery is fully charged, the indicator will turn green. At that time, you should unplug the adapter, while  the indicator still remains green.Note: Our Company spares no efforts to improve the product quality. Therefore, if there is any difference between the delivered product and the contents of the User's Guide because of the upgrading of thesoftware, the former shall prevail. Thank you for your understandingin this respect!Production structure: POWER VOLUME-  VOLUME+  MENU HOMEEarphone JaekDCUSBUSBHDMIT-FLA
32.You can also use the handheld tablet when the battery in it is being charged. 2.2 Using a Micro SD cardInserting Micro SD card:Place the Micro SD card into the groove and press it with a finger till you hear the     a "click". At that time, the information on the left  sound of corner of the screen says: " .Preparing memory device "Viewing the files in the Micro SD card:When you run the File Browser, all files under the root directory of the card will be displayed. At that time, you can choose "SD1" to open the Removing the Micro SD card:First close all files already opened from the card.  Then click the menu,  and select Setting   SD card  &  device storage    SD1    Uninstall remove.  After that,  press the card  gently to allow it to project one part of it,  and hold that part to pull out the whole card.  Then the 2.3 Hot plug of Micro SD card and external flash disk Note: It  takes longer to charge the  battery fully when  the tablet is  powered on.Note: 1. Insert the Micro SD card properly. Otherwise, it may damage the card.Otherwise, it may damage the card.3. It is suggested  using the name  brand memory card  to ensure    compatibility. contents in the card.screen will indicate that  "Memory device was removed."Do not hot plug the Micro SD card and external flash disk when they are being used or their contents are browsed. If, in such software as My Video, My Music and My Photo, the files in the Micro SD card and external flash disk are being used or browsed, and the card or the disk is pulled out directly, it may damage them, and the program may exit for self protection. For details of plugging and unplugging the card, please refer to  part *2.2--"Using the SD card". Before you remove the external flash disk, you must close all its files being used.
42.4 Power-on/off1. Power-on: When the battery is fully charged, press the power switch for two seconds to power on the device. At that time, the device will vibrate once. After powered on, the system will enter the screen-locking interface, where you can move up the unlocking icon to enter the main interface and down to the icon of you electronic photo frame to enter the interface where 2. Power-off: Press the power switch for four seconds, and the system will pop the power-off slider at the up a interface for confirmation. Glide bottom of the screen, and the device will be turned off. At that time, it will vibrate once. Move up the power-off icon, the system will return to the 3. Sleep mode: Press the power switch for one second, and the system will enter the sleep mode, in which the LCD screen will turn black. In this mode, you can press power key to wake up the system. Once waken up, the system enters the screen-locking interface. To save energy, if  electricity is insufficient in sleep mode, the system can power off itself 2.5 USB Connected 1. Use the USB cable that we attached to connect your Digix tablet mini USB port.2. Glide3. Tap USB connected.5. Tap OK on the “turn on USB storage” button that is displayed.and tap turn off USB storage.can play the pictures. power-off interface.after it is automatically powered on. Then tap “turn on USB storage” on the lower part of your tablet.
52.6 Wi-Fi Settings3.1 Keyboard When you  need to enter  a letter, number,  or symbols, the  touch keyboard will  appear on the  screen.3.2 Touch screenThe touch screen can sense the movement of the finger, through which you can perform the operations below: Click: Click the icon or option you select.1. Select settings on home screen shortcut.2. Select "wireless & network" in the settings menu.3. Select "WI-FI settings" to set the WI-FI network.4.  All APs found by the device will be listed. You can click the AP  name to be  connected.5.  If the connection is successful before the AP,  the information of  AP will be  saved.  To start connecting,  select  "connect"  in the pop-up  window.  To eliminate  the AP information,  select  "forget".6. If AP is not encrypted, you can select in the pop-up "connect" window to start connecting.7. If AP is encrypted, you should enter the password in the pop-up window  "connect" and then click to start connecting.8. If the connection is successful, an icon indicating the successful connection will appear on the transfer bar at the top of the desktop. You can directly select on main package, then you also can setup Or 3.   InputtingWi-Fi.Note:  Never attempt to place objects on the touch screen,  with which the  screen can be scratched or damaged. Note: The device is compatible with USB keyboard. However,  when a USB keyboard is connected to the device, some keys may become ineffective.
6Long press: You can long press the icon to select your desired option,  or drag the icon to the shortcut bar at the bottom of the desktop.Drag:  You can drag the icons  to change their  positions on the  desktop or  between pages,  or move the application icons to the 3.3 Mouse4. Desktopshortcut bar. The device is compatible with external mouse. After a mouse is connected, you can use the mouse for such operations as clicking, selecting, dragging, sliding or for right clicking to pop up menu’s. 4.1 Status barAt  the  uppermost  part  of  the  screen  is  the  status  bar,  at  the  left  of which  is  one  software  button,  and  to  the  right  are  five  more.The buttons are defined as Home,  Prt Sc,  Vol-  and Vol  +,  Menu and Back.  on  the status  bar  other  information  is  indicated,  such  as  the  strength  of  3G  and of  WI-FI  signals,  the  state  of  Ethernet  and  how  much  of  the  battery  is  left.4.2 Home pageThe home page of your Digix tablet consists of two modes:  Gadget Mode and Icon Mode. The two modes can be toggled through the button at the middle of the shortcut bar. The interface of Gadget Mode is shown in the picture below:
74.3 Shortcut modeIn the main interface of the Gadget Mode, you can press the menu  button or click the icon Menu at the status bar. Then the shortcut menu icons will appeared, which are Add Widget, Wallpaper,  Notification, To enter the interface of application icons, click the button         at the shortcut bar, as shown below: To enter the interface of Gadget Mode, click         .Setting, as shown below:
84.4 Shortcut way to add gadgets4.5 Using gadgetsIn the desktop gadget interface, long press the gadget icon, and a small square graphic and a recycling bin icon at the middle of the shortcut bar will pop up. Drag the recycling bin icon to any place on the desktop, or drag it to the recycling bin to delete it. 5. Browsing web pagesThe user can access the Internet through the browser.Click the browser icon         on the desktop, and you can access web pages.The pop-up interface is shown below:   The user can add,  delete and install the gadgets,  add and delete application icons,  and move the icons.  You can also drag the icons between the operation areas or between operation area and shortcut bar. To add the widgets to the main screen,  press Menu    Add    Widgets in the gadget mode interface. And then select the widget you want to add. Once added, the related you can click the shortcut icon to perform operations.
96.1 EmailClick the email icon        ,   you  can enter the email interface,  where you can  perform the operations below:1. Set the account for the email.2. Write new emails.3. Send and receive the emails.4. Download or print the attachments. Tip: To pop up the shortcut menu, press the menu button. 6.2 My PadTo enter the file explorer interface, click the icon         , as shown below:6. Typical applications
10Press the files and your file is selected, then you can use Copy, Cut,  Paste, New, Rename,  Delete as shown below: 6.3 GalleryClick the iconand         then click          ,  and the interface will be shown Then you can click an image and video to view.Tap the menu key to access more functions(see first page of device information).as below: Installing filesIf you want to install files in explorer, you only need to click the installation files with an extension name “APK”.   At that time, a prompt window will pop up,   and then you can select install to install the file into the device.

Navigation menu