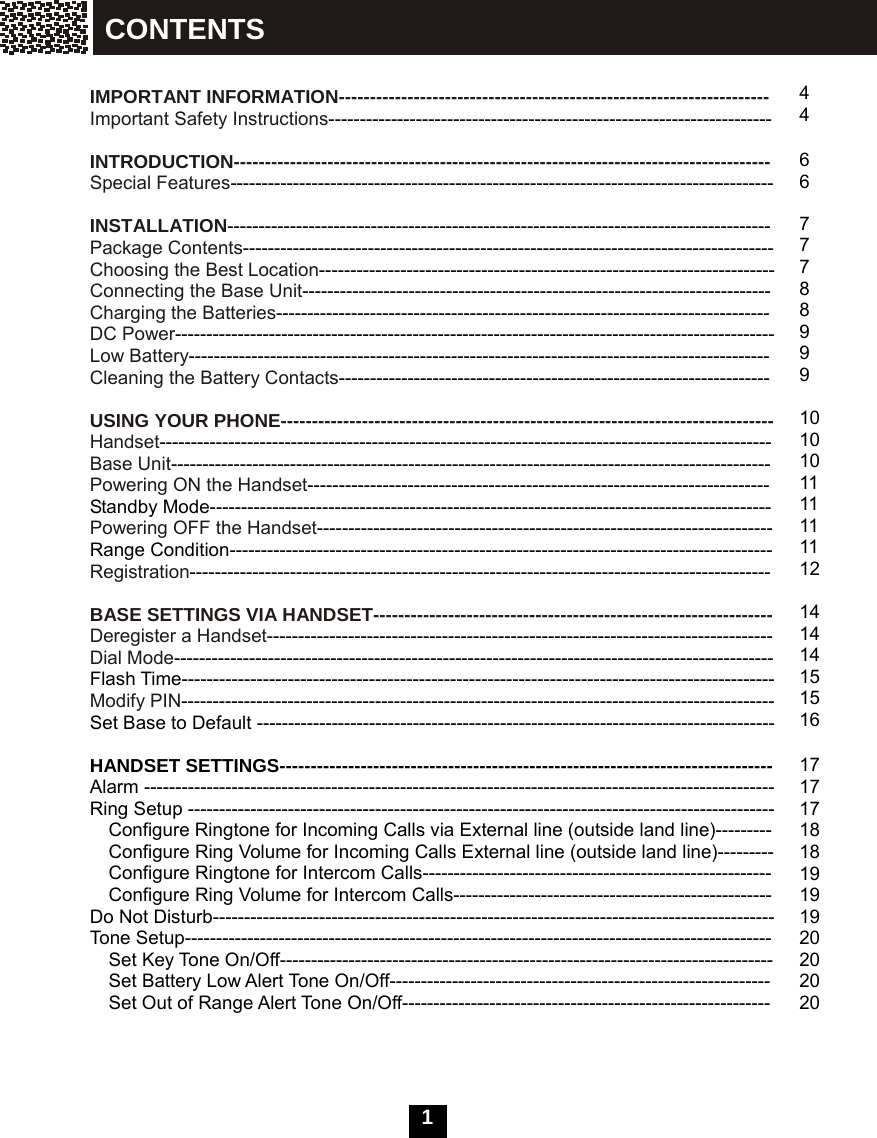
Cybiotronics 936001 1.9GHz CORDLESS PHONE User Manual
Cybiotronics Limited 1.9GHz CORDLESS PHONE Users Manual
UserManual.wiki
>
Cybiotronics
>
936001 User Manual
Users Manual
Navigation menu
Upload a User Manual
Namespaces
Wiki Guide
HTML
PDF
Info
Views
User Manual
Discussion / Help
Navigation
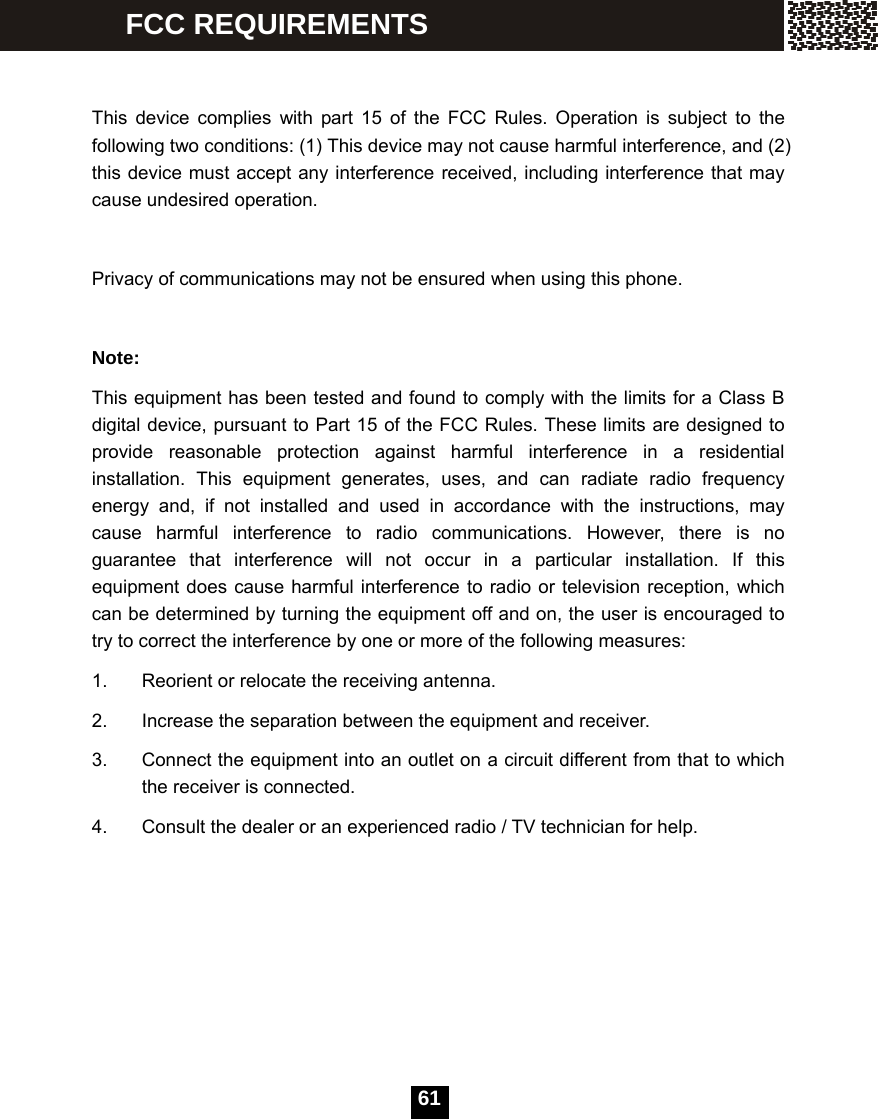
![13 Registration Before registering a handset to the base unit, the base unit should first enter the registration mode. Press the [Page] key on the base for more than 3 seconds until the ‘Line-in-use’ indicator begins to flash quickly. An unregistered handset displays as shown. Press the [MENU] softkey, and then the [OK] softkey to enter ‘REGISTRATION’. After pressing the [OK] softkey, a list of bases will be displayed. There are 4 base positions available for registration. Select the BASE among BASE1 - BASE4, (For the first time of use, select ‘BASE1’), then press the [SEL] softkey. Now the handset begins searching for the base. UNREGISTEREDMENUDIR. REGISTRATIONOKEXITBASE1↓BASE2SELEXIT SEARCHING1EXIT USING YOUR PHONE](https://usermanual.wiki/Cybiotronics/936001/User-Guide-1131057-Page-14.png)
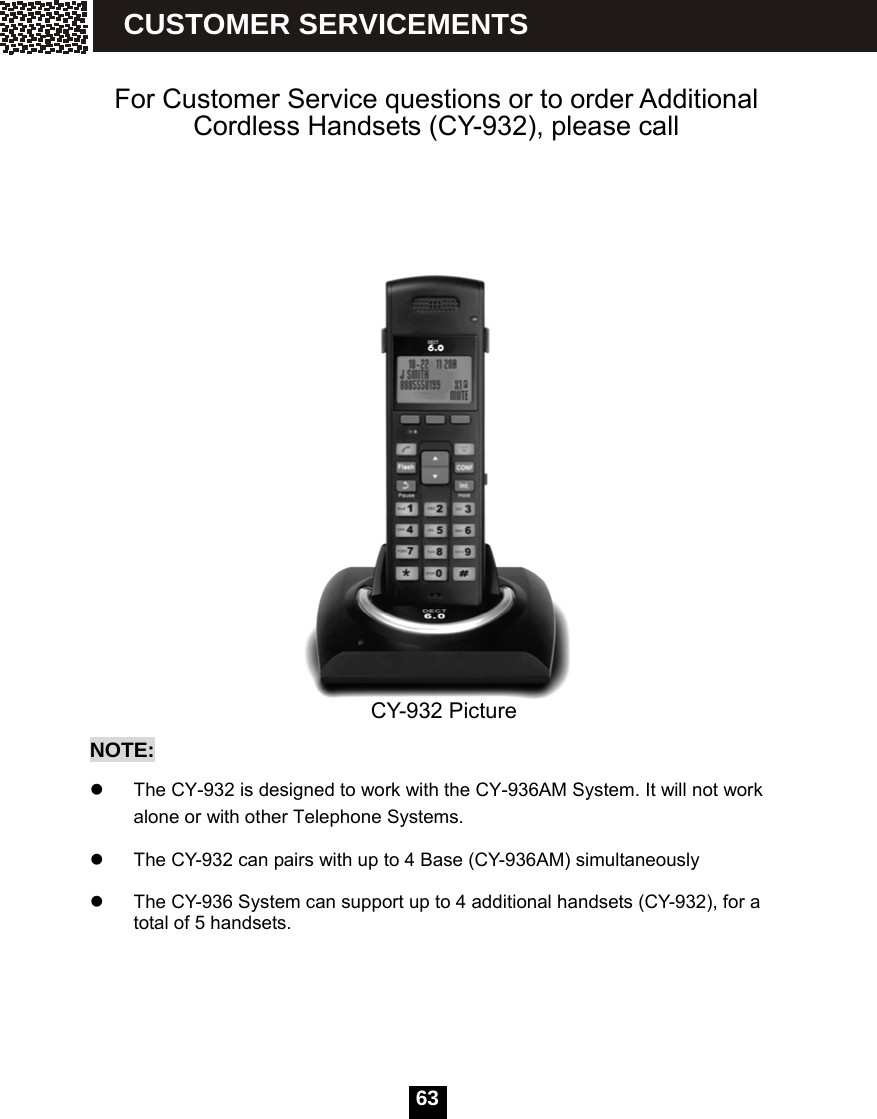
![15 The base options can be set using a handset registered to this base. Press the [MENU] softkey, select ‘BS SETTINGS’ and press [OK]. Deregister a Handset Select ‘TERMINATE HS’, and press [OK]. Input the 4-digit PIN code. The default PIN is 0000. Use ▲ / ▼ to scroll the list of handsets (HS). Press the [DEL] softkey to select a handset (except for the current handset which cannot be deregistered). Dial Mode Press the [MENU] softkey, select ‘BS SETTINGS’ and press [OK]. Use ▲ / ▼ to select ‘DIAL MODE’, and press [OK]. Press ▲ / ▼ to scroll the two options. Press [SAVE] to save your setting. TERMINATEHSDIALMODEOKEXIT PIN?****OKDELEXIT HS1↓HS2DELEXIT TONE ↓ PULSE SAVEEXIT BASE SETTINGS VIA HANDSET](https://usermanual.wiki/Cybiotronics/936001/User-Guide-1131057-Page-16.png)
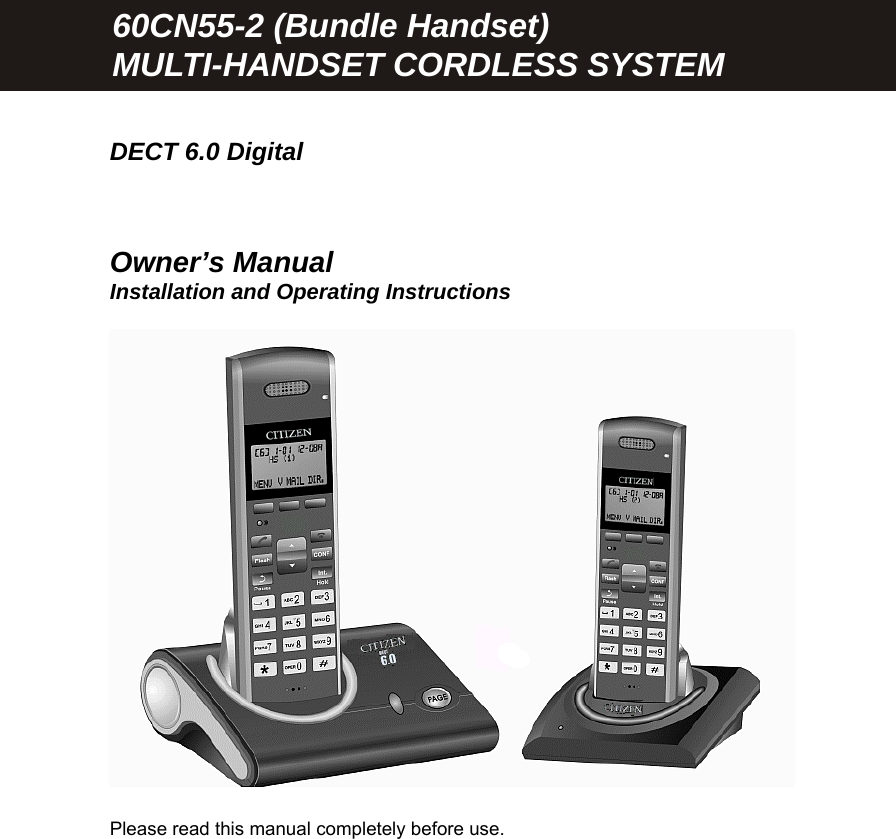
![16 Flash Time This function allows the user to set the flash time parameter according to your local telephone network settings when using the [Flash] key in some services, such as call waiting service and conference calling service, etc. Press the [MENU] softkey, select ‘BS SETTINGS’ and press [OK]. Use ▲ / ▼ to select ‘FLASH TIME’ and press [OK]. Use ▲ / ▼ to choose between the two options and then press [SAVE] to save your setting. (‘SHORT’ = 300ms, ‘LONG’ = 650ms) Modify PIN Press the [MENU] softkey, select ‘BS SETTINGS’, and press [OK]. Use ▲ / ▼ to select ‘MODIFY PIN’ and press [OK]. Input the current 4-digit PIN. Press [OK] to complete. The default PIN is 0000. DIALMODEFLASHTIMEOKEXIT SHORT↑LONGSAVEEXIT PIN ? **** OKDELEXIT BASE SETTINGS VIA HANDSET](https://usermanual.wiki/Cybiotronics/936001/User-Guide-1131057-Page-17.png)
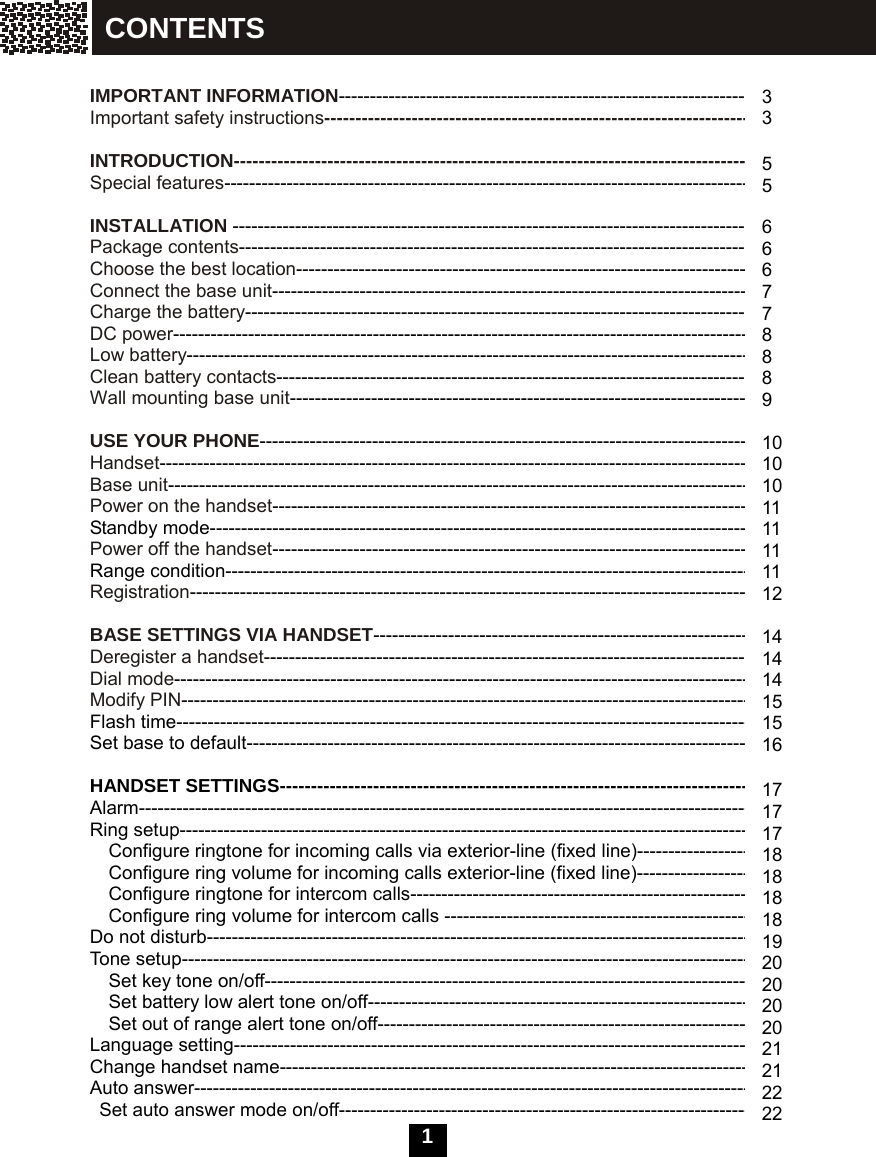
![17 Input the new 4-digit PIN. Press [OK] to complete. Input the new PIN again to confirm. Press [OK] to complete. Please do not forget this new PIN code. Now the new PIN will be stored in the base unit. Set Base to Default This function allows the user to restore the base settings to the factory default settings. Press the [MENU] softkey Use ▲ / ▼ to select ‘BS SETTINGS’ and press the [OK] softkey. Select ‘BASE DEFAULT’ and press the [OK] softkey. Input the 4-digit PIN. The default PIN is 0000. Press the [OK] softkey to complete. Then settings of the base will revert to the factory default values. NEWPIN****OKDELEXIT CONFIRM****OKDELEXIT MODIFYPIN↑BASEDEFAULTOKEXIT PIN?****OKDELEXIT BASE SETTINGS VIA HANDSET](https://usermanual.wiki/Cybiotronics/936001/User-Guide-1131057-Page-18.png)
![18 Alarm Press the [MENU] softkey, select ‘HS SETTINGS’ and press the [OK] softkey. Select the ‘ALARM CLOCK’ and press the [OK] softkey. Use ▲ / ▼ to select ‘ON’ or ‘OFF’ Press the [SAVE] softkey, to save your setting. Select “ON’ and Press the [SAVE] Use the keypad to input the time consecutively. (If the ‘TIME FORMAT’ is ‘12-HOUR’ format, you need to choose ‘a.m.’ or ‘p.m.’ by using the [AM/PM] softkey). Press [SAVE], to save your setting. Use ▲ / ▼ to select ‘ON’ or ‘OFF’ Press the [SAVE] softkey, to save your setting. Ring Setup Press the [MENU] softkey, use ▲ / ▼ to select ‘HS SETTINGS’ and press [OK]. Select ‘RING SETUP’ and press [OK]. ALARMCLOCK ↓ RINGSETUP OKEXIT OFF ↓ ON SAVEEXIT 12:32PMSAVEAM/PMEXIT SNOOZEON ↓ SNOOZEOFF SAVEEXIT ALARMCLOCK RINGSETUP OKEXIT HANDSET SETTINGS](https://usermanual.wiki/Cybiotronics/936001/User-Guide-1131057-Page-19.png)
![19 Use ▲ / ▼ to select the type of ring that you want use. You can assign different ringtones and volumes for incoming intercom calls, and outside land line call (‘INTC’ is for intercom calls and ‘LINE’ is for outside landline call). Press the [OK] softkey. Use ▲ / ▼ to select ‘MELODY’ or ‘VOLUME’ setting. If you enter the ‘MELODY’ setting Use ▲ / ▼ to select a melody. Press the [SAVE] softkey, to save your setting. If you enter the ‘VOLUME’ setting. Use ▲ / ▼ to select a volume level. Press the [SAVE] softkey, to save your setting. Configure Ringtone for Incoming Calls via External line Press the [MENU] softkey, select ‘HS SETTINGS’ and press [OK]. Select ‘RING SETUP’ by using ▲ / ▼ and then pressing [OK]. Select ‘LINE RING’, and then press [OK]. Select ‘MELODY’, and then press [OK]. Press ▲ / ▼ to select the desired ringtone, then press the [SAVE] softkey to save your setting. Configure Ring Volume for Incoming Calls via External line Press the [MENU] softkey, select ‘HS SETTINGS’ and press [OK]. Select ‘RING SETUP’ by using ▲ / ▼ and then pressing [OK]. Select ‘LINE RING’, and then press [OK]. Select ‘VOLUME’, and then press [OK]. Press ▲ / ▼ to select the desired volume, then press the [SAVE] softkey to save your setting. INTCRING ↓ LINERINGOKEXIT MELODY ↓ VOLUME OKEXIT MELODY1↓MELODY2SAVEEXIT VOLUME2↑VOLUME1SAVEEXIT HANDSET SETTINGS](https://usermanual.wiki/Cybiotronics/936001/User-Guide-1131057-Page-20.png)
![20 Configure Ringtone for Intercom Calls Press the [MENU] softkey, select ‘HS SETTINGS’ and press [OK]. Select ‘RING SETUP’ by using ▲ / ▼ and then pressing [OK]. Select ‘INTC RING’, and then press [OK]. Select ‘MELODY’, and then press [OK]. Press ▲ / ▼ to select the desired ringtone, then press the [SAVE] softkey to save your setting. Configure Ring Volume for Intercom Calls Press the [MENU] softkey, select ‘HS SETTINGS’ and press [OK]. Select ‘RING SETUP’ by using ▲ / ▼ and then pressing [OK]. Select ‘INTC RING’, and then press [OK]. Select ‘VOLUME’, and then press [OK]. Press ▲ / ▼ to select the desired volume, then press the [SAVE] softkey to save your setting. Do Not Disturb Press the [MENU] softkey, select ‘HS SETTINGS’ and press [OK]. Select ‘RING SETUP’ by using ▲ / ▼ and then pressing [OK]. Select ‘DO NOT DISTURB’, and then press [OK]. Press ▲ / ▼ to choose ‘OFF’ or ‘ON’, then press [OK] to save your setting. If this option is set to ‘ON’, the screen will display “DO NOT DISTURB” in standby mode. Then no ring will be heard from any external line (outside land line) call; however the call information will still be displayed on the screen, and the call can still be answered. LINERING↑DONOTDISTURBOKEXIT OFF ↓ ON OKEXIT HANDSET SETTINGS](https://usermanual.wiki/Cybiotronics/936001/User-Guide-1131057-Page-21.png)
![21 Tone Setup Press the [MENU] softkey, select ‘HS SETTINGS’ and press [OK]. Select ‘TONE SETUP’ by using ▲ / ▼ and pressing [OK]. Then you can configure the displayed 3 types of tones. Set Key Tone On/Off Press the [MENU] softkey, select ‘HS SETTINGS’ and press [OK]. Select ‘TONE SETUP’ by using ▲ / ▼ and press [OK]. Select ‘KEY TONE’ and press [OK]. Use ▲ / ▼ to select ‘OFF’ or ’ON’, then press [SAVE], to save your setting. Set Battery Low Alert Tone On/Off Press the [MENU] softkey, select ‘HS SETTINGS’ and press [OK]. Select ‘TONE SETUP’ by using ▲ / ▼ and press [OK]. Select ‘BATTERY LOW’ and press [OK]. Use ▲ / ▼ to select ‘OFF’ or ‘ON’, then press [SAVE] to save your setting. Set Out of Range Alert Tone On/Off Press the [MENU] softkey, select ‘HS SETTINGS’ and press [OK]. Select ‘TONE SETUP’ by using ▲ / ▼ and pressing [OK]. Select ‘RANGE ALARM’ and press [OK]. Use ▲ / ▼ to select ‘OFF’ or ‘ON’, then press [SAVE], to save your setting. RINGSETUPTONESETUPOKEXIT KEYTONE↓BATTERYLOWOKEXIT HANDSET SETTINGS](https://usermanual.wiki/Cybiotronics/936001/User-Guide-1131057-Page-22.png)
![22 Language Setting Press the [MENU] softkey, select ‘HS SETTINGS’ and press [OK]. Select ‘LANGUAGE’ by using ▲ / ▼ and then pressing [OK]. Use ▲ / ▼ to scroll through the 6 available language options (English, German, French, Italian, Spanish, and Dutch). Select the desired language and then press [SAVE], to save your setting. Change Handset Name ‘HS (N)’ is the default name of a handset after registering it to a base unit. The handset extension number ‘N’ (1—5) shows the handset as the ‘N’th handset that registered to the base. The name will be shown on the screen when the handset is in standby mode. A handset must be registered to the base before it can be assigned to a name. To change the handset name to text format. Press the [MENU] softkey. Use ▲ / ▼ to select ‘HS SETTINGS’ and press [OK]. Select ‘HS LABEL’ and press [OK]. Press [DEL] to delete the current name, and use the keypad to input the new name. Then press [SAVE], to save your change. TONESETUP↓LANGUAGEOKEXIT ENGLISH↓DEUTSCHSAVEEXIT LANGUAGEHSLABELOKEXIT NAME?JOHNSAVEDELABC HANDSET SETTINGS](https://usermanual.wiki/Cybiotronics/936001/User-Guide-1131057-Page-23.png)
![23 Auto Answer The handset can be set to answer incoming calls automatically. When the handset is not on the base unit or the charger cradle, must be pressed to answer incoming calls. Auto answer mode can only be activated when the handset is on the base unit or charger cradle, in which case, the line will be automatically connected when the handset is picked up from the base unit or charger cradle. Set Auto Answer Mode On/Off Press the [MENU] softkey. Use ▲ / ▼ to select ‘HS SETTINGS’ and press [OK]. Select ‘AUTO ANSWER’ and press [OK]. Use ▲ / ▼ to select ‘OFF’ or ‘ON’. Press [OK] to save your setting. Call Barring Handset can be set to disable outgoing outside land line calls. To set the call barring mode ‘ON’ or ‘OFF’ Press the [MENU] softkey. Use ▲ / ▼ to select ‘HS SETTINGS’ and press [OK]. Select ‘CALL BARRING’ and press [OK]. Input the 4-digit PIN. The default PIN is 0000. Press [OK] to confirm. HSLABELAUTOANSWEROKEXIT OFF↓ONOKEXIT AUTOANSWERCALLBARRINGOKEXIT PIN?****OKEXIT HANDSET SETTINGS](https://usermanual.wiki/Cybiotronics/936001/User-Guide-1131057-Page-24.png)
![24 Use ▲ / ▼ to select ‘OFF’ or ‘ON’. Press [SAVE], to save your setting. If you set to ‘ON’, the screen will display “CALLS BARRED” in standby mode. Date & Time Settings Set Time Format Press the [MENU] softkey. Use ▲ / ▼ to select ‘HS SETTINGS’ and press the [OK] softkey. Select ‘DATE & TIME’ and then press the [OK] softkey. Select ‘TIME FORMAT’ and then press the [OK] softkey. Use ▲ / ▼ to select your desired format. Press [SAVE] to save your setting. Then the time will be displayed in the format you have set when return to standby mode. Set Date & Time Press the [MENU] softkey. Use ▲ / ▼ to select ‘HS SETTINGS’ and press the [OK] softkey. Select ‘SET DATE&TIME’ and press the [OK] softkey. OFFONSAVEEXIT TIMEFORMAT↓SETDATE&TIMEOKEXIT 12‐HOUR↓24‐HOURSAVEEXIT TIMEFORMAT↑SETDATE&TIMEOKEXIT HANDSET SETTINGS](https://usermanual.wiki/Cybiotronics/936001/User-Guide-1131057-Page-25.png)
![25 Use the keypad to input the date and time consecutively. (If you have already set the ‘TIME FORMAT’ to ‘12-HOUR’ format, then you also need to choose ‘a.m.’ or ‘p.m.’ by using the [AM/PM] softkey). Press [SAVE], to save your setting. Set Handset to Default Press the [MENU] softkey. Use ▲ / ▼ to select ‘HS SETTINGS’ and press the [OK] softkey. Select ‘SET WEEKDAY’ and press the [OK] softkey. Press the [CHANGE] softkey to choose the day and then press the [OK] softkey Set Handset to Default This function allows the user to restore the handset settings to the factory default settings. Press the [MENU] softkey. Use ▲ / ▼ to select ‘HS SETTINGS’ and press the [OK] softkey. Select ‘HS DEFAULT’ and press the [OK] softkey. Input the 4-digit PIN. The default PIN is 0000. Press the [OK] softkey to complete. Then all settings on the handset will revert to the factory default values. MM/DDHH:MM00/0000:00AMSAVEAM/PMEXIT SETDATE&TIME↑SETWEEKDAYOKEXIT WEEKDAY:MON↑OKCHANGEEXIT SELECTBASE↑HSDEFAULTOKEXIT PIN?****OKDELEXIT HANDSET SETTINGS](https://usermanual.wiki/Cybiotronics/936001/User-Guide-1131057-Page-26.png)
![26 Display the Phonebook Entries In standby mode, press the [DIR.] softkey to enter the telephone directory. Then the phonebook screen will be displayed. Use ▲ / ▼ to access and scroll the phonebook entries. Add Entries to the Phonebook In standby mode, press the [DIR.] softkey to enter the telephone directory. Then the phonebook screen will be displayed. Press the [ADD] softkey to add a new entry. Use the keypad to input the name. Press the [ABC] ([123]) softkey, to switch the input mode between numerical mode and alphabetical mode. If you input the wrong words or numbers, use ▲ / ▼ and the [DEL] softkey to erase the errors. Press [OK] to complete the input. In alphabetical mode, each numeric key is assigned a set of letters and symbols as shown below. Press the corresponding key until your desired letter is displayed. If two consecutive letters from the same key are required, just wait until the cursor moves to the next blank space before inputting. Numeric: 1 2 3 4 5 6 7 8 9 0 Alpha: space,-,@ ,_ A,B,C D,E,F G,H,I J,K,L M,N,O P,Q,R,S T,U,V W,X,Y,Z ?,&,/ ,, PHONEBOOK38ENTRIESADDDELEXIT #1812345678JOHNSMITHPHONEBOOKEDITDELEXIT PHONEBOOK38ENTRIESADDDELEXIT NAME?JOHNOKDELABC HANDSET SETTINGS](https://usermanual.wiki/Cybiotronics/936001/User-Guide-1131057-Page-27.png)
![27 Symbols You can also use [½] or [#] to insert the following special symbols in the name field. ½ + , - . / @ : ; < = > ? { ¦ } ~ [ \ ] ^ _ ` ! ″ # $ % & ´ … Note: Name must start with an alphabetic character. Use the keypad to input the number. Press the [OK] softkey when finished. Press the [DEL] softkey to erase the digit(s) you inputted in error, and then input the correct ones. Use ▲ / ▼ to select a distinct ringtone for this entry. Press [SAVE] to complete. Edit an Entry in the Phonebook In standby mode, press the [DIR.] softkey to enter the telephone directory. Use ▲ / ▼ to access and scroll the phonebook entries. When the entry that you want to edit appears, press the [EDIT] softkey. Then follow the steps as adding an entry to the phonebook. NUMBER?12345678OKDELEXIT MELODY1↓MELODY2SAVEEXIT #1812345678JOHNSMITHPHONEBOOKEDITDELEXIT HANDSET SETTINGS](https://usermanual.wiki/Cybiotronics/936001/User-Guide-1131057-Page-28.png)
![28 Delete an Entry from the Phonebook In standby mode, press [DIR.] softkey to enter telephone directory. Use ▲ / ▼ to access and scroll the phonebook entries. When the entry that you want to delete appears, press [DEL] softkey. Press [YES] to confirm your deletion. Then this entry is deleted. Delete All Entries in the Phonebook In standby mode, press the [DIR.] softkey to enter the telephone directory. Press the [DEL] softkey to delete all entries. Press [YES] to confirm the deletion. Then all entries are deleted. #1812345678JOHNSMITHPHONEBOOKEDITDELEXIT SURETODELETE?YESNO PHONEBOOK38ENTRIESADDDELEXIT DELETEALL?YESNO HANDSET SETTINGS](https://usermanual.wiki/Cybiotronics/936001/User-Guide-1131057-Page-29.png)
![29 Review the Caller ID List In standby mode, press ▲ / ▼ to enter the Caller ID List. Then the Caller ID book screen will be displayed. Press ▲ to review the latest calls, press ▼ to review the earlier calls. The date and time is also displayed in the format you have set. Save Caller ID Information to the Phonebook In standby mode, press ▲ / ▼ to enter the Caller ID List. Use ▲ / ▼ to access and scroll the Caller ID List. When the record that you want to save appears, press the [SAVE] softkey. Then follow the same steps as adding an entry to the phonebook. Delete a Record from the Caller ID List In standby mode, press ▲ / ▼ to enter the Caller ID List. Use ▲ / ▼ to access and scroll the Caller ID List. When the record that you want to delete appears, press the [DEL] softkey. CIDBOOK20ENTRIESDELEXIT #125/123:58PJOHNSMITH12345678X2SAVEDELEXIT #125/123:58PJOHNSMITH12345678X2SAVEDELEXIT #112/253:58PJOHNSMITH12345678X2SAVEDELEXIT HANDSET SETTINGS](https://usermanual.wiki/Cybiotronics/936001/User-Guide-1131057-Page-30.png)
![30 Press [YES] to confirm the deletion. Then this record is deleted. Delete All Records in the Caller ID List In standby mode, press ▲ / ▼ to enter the Caller ID List. Then the Caller ID book screen will be displayed. Press the [DEL] softkey to delete all records. Press [YES] to confirm the deletion. Then all records are deleted. Review the Dialed Numbers List Every handset can store its own last 9 dialed numbers independently, each number of up to 24 digits. Press the [Redial] key, use ▲ / ▼ to review the dialed number(s). If the displayed number matches with an entry in the phonebook, the corresponding name will also be shown. Add a Dialed Number to the Phonebook When the number you want appears, press the [SAVE] softkey. Then follow the steps as adding an entry to the phonebook. SURETODELETE?YESNO CIDBOOK20ENTRIESDELEXIT DELETEALL?YESNO #112345678JOHNSMITHREDIALBOOKSAVEDELEXITHANDSET SETTINGS](https://usermanual.wiki/Cybiotronics/936001/User-Guide-1131057-Page-31.png)
![31HANDSET SETTINGS Delete a Dialed Number When the number that you want to delete appears, press the [DEL] softkey. Press the [OK] softkey. Press [YES] to confirm the deletion. Then this number is deleted. Delete All Dialed Numbers Press the [Redial] key. Press the [DEL] softkey. Press ▼ to select ‘DELETE ALL’. Then press the [OK] softkey. #112345678JOHNSMITHREDIALBOOKSAVEDELEXIT DELETE↓DELETEALLOKEXIT SURETODELETE?YESNO #112345678JOHNSMITHREDIALBOOKSAVEDELEXITDELETE↓DELETEALLOKEXIT](https://usermanual.wiki/Cybiotronics/936001/User-Guide-1131057-Page-32.png)
![32 Press [YES] to confirm the deletion. Then all numbers are deleted. DELETEALL?YESNO HANDSET SETTINGS](https://usermanual.wiki/Cybiotronics/936001/User-Guide-1131057-Page-33.png)
![33 Method 1: Dial a Number Press . Input the number. Or: Input the number. (You may use the [DEL] softkey to delete the digits). Press the [CALL] softkey or . During the call: Press the softkey to toggle hands-free mode. Press it again to quit this mode. Press the [MUTE] softkey to disable the microphone. For private discussions, press ▲ / ▼ to adjust the volume. Press to terminate the call. Method 2: Call from the Phonebook Press the [DIR.] softkey to review the phonebook. Use ▲ / ▼ to scroll to the number you need. Press . Press to terminate the call. Method 3: Call from the Caller ID List Press ▲ / ▼ to review the Caller ID list. Use ▲ / ▼ to scroll to the number you need. Press . Press to terminate the call. 1234567MUTEDIR. 1234567CALLDELEXIT LINE00:00:01MUTEDIR.#1812345678JOHNSMITHPHONEBOOK EDITDELEXIT MAKING A CALL](https://usermanual.wiki/Cybiotronics/936001/User-Guide-1131057-Page-34.png)
![34 Method 4: Call from Dialed Numbers List Press [Redial] key to review the dialed numbers. Use ▲ / ▼ to scroll to the number you need. Press . Press to terminate the call. Method 5: Call the Last Dialed Number Press . Press the [Redial] key to dial out the last dialed number. Press to terminate the call. Note: Putting the handset on the base unit can also terminate the call. Enter a Pause in the Dialing Sequence The [Redial/Pause] key allows you to add a 3-second pause during pre-dialing or when storing a number in the phonebook. To add a pause, press the [Redial/Pause] key at your desired position when inputting or editing a phone number, and a “P” appears on the screen. For a longer delay, press the [Redial/Pause] key additional times. Note: The number you want to store cannot have more than 24 digits, including the pause. One “P” counts as one digit.MAKING A CALL](https://usermanual.wiki/Cybiotronics/936001/User-Guide-1131057-Page-35.png)
![35 Locate Misplaced Handset(s) with Base Unit To locate the handset(s) while not on the base unit, press the [Page] key on the base unit. Then the handset(s) in range will display ‘PAGING FROM BASE’ and emit an alert signal that is different from the external line (outside land line) calls. No response from the handset(s) if it is battery power failure or turned to Power OFF. To stop the paging, press [Page] on the base again or press any key on the handset. If no handset answers, the paging will stop automatically after 1 minute. Note: 1.The handset being paged will ring even if the ringer has been set to ‘OFF’. Intercom between Handsets (in this case an expandable handset is required) Press the [Int.] key on a handset in standby mode. Then the screen will show all the other available handsets in range of the base unit. (‘HS’ is for ‘handset’). Use ▲ / ▼ to scroll to the handset you want to intercom with and press [CALL]. For instance, if HS (2) is being paged by HS (1), HS (1) will display ‘PAGING HS (2)’. HS (2) will ring and display ‘PAGING FROM HS (1)’. Press the [Int.] key, or the [OK] softkey on HS (2) to answer the intercom call. If HS (2) does not want to answer, press HS2↓HS3CALLEXITPAGINGHS(2) EXIT PAGINGFROMHS(1) OKEXIT INTC 00 : 00 : 0 MUTEEXIT PAGING AND INTERCOM](https://usermanual.wiki/Cybiotronics/936001/User-Guide-1131057-Page-36.png)
![36 the [EXIT] softkey, then the ring will stop. Note: If two handsets are engaging in an intercom talk when an external line incoming both handsets can hear one beep tone. Transfer a Call to another Handset During a call, the current call can be transferred to another handset as described below. (in this case an expandable handset is required) When a handset is engaging in an external line (outside land line) call. Press the [Int.] key and use ▲ / ▼ to scroll to the handset you want to transfer this call to, then press the [CALL] softkey. If you do this from HS (1) to HS (2), then HS (2) rings and displays ‘PAGING FROM HS (1)’. On Handset (2), press , [Int.] or [OK] to answer the paging and then talk with Handset (1). (Internal talk). Now the initiator of the transfer can talk with the party to be transferred to, and then the initiator can press to complete the transfer. If the party being transferred to does not want to answer the paging, press or the [EXIT] softkey to reject it. Then the handset being paged stops ringing and returns to standby mode, and the initiating handset resumes the external line talk. HS2HS3CALLEXITPAGINGFROMHS(1)OKEXITINTC00:00:01MUTEEXIT 12–25 13:59 P HS (1)MENUDIR.PAGING AND INTERCOM](https://usermanual.wiki/Cybiotronics/936001/User-Guide-1131057-Page-37.png)
![37 Call Conferencing This cordless system supports ‘conference calls’ up to 3 parties (2 handsets and 1 external line call and in this case an expandable handset is required). When one handset is engaging in an external line (outside land line) call, press the [Int.] key on that handset to put the current call on hold and call another handset by way of intercom. Use ▲ / ▼ to scroll to the handset you want. Then press the [CALL] softkey to page. If you do this from HS (1) to HS (2), then HS (2) rings and displays ‘PAGING FROM HS (1)’. On Handset (2), press , [Int.] or [OK] to answer the paging and talk with Handset (1). (Intercom talk). LINE00:00:01MUTEDIR. HS2HS3CALLEXIT PAGINGFROMHS(1)OKEXIT INTC00:00:01MUTEEXIT CALL CONFERENCING](https://usermanual.wiki/Cybiotronics/936001/User-Guide-1131057-Page-38.png)
![38 When the intercom call is established, on the initiating handset {in this case is Handset (1)}, pressing the [Int.] key can switch between the intercom talk and external line talk. After the initiating handset being switched to ‘INTC’ (intercom) call, press the [CONF] key on the initiating handset can talk with the two parties (external line party, and intercom party) simultaneously, which is the conference mode. On any handset, pressing or [EXIT] can retreat from the current conversation and return to standby mode. The other handset will continue the external line call. To end the call, make sure that both handsets have quit. Note: If your handset has already retreated from the conversation; you can still join into the conversation again by following the procedures stated on Page 36. LINE00:00:09INTCONHOLDMUTE CONF00:00:23MUTEEXIT LINE00:02:48MUTEDIR. CALL CONFERENCING](https://usermanual.wiki/Cybiotronics/936001/User-Guide-1131057-Page-39.png)
![39 Via External line (outside land line) Caller ID service is not available With Caller ID When the phone rings, if you want to mute the ringer, press the [MUTE] softkey or . Press the [UNMUTE] softkey to resume the ringer. Press to answer the call. Press ▲ / ▼ to adjust the volume. Press to end the call. Note: If ‘auto answer mode’ is set to ‘ON’, when the ring sounds, there is no need to press , just picking the handset up off the base (or charging cradle) can answer the call automatically. CALLVIALINEMUTE 12–25 13:59 PJOHNSMITH12345678×2MUTE CALLVIALINELINERINGMUTEDUNMUTELINE00:00:01MUTEDIRRECEIVING A CALL](https://usermanual.wiki/Cybiotronics/936001/User-Guide-1131057-Page-40.png)
![40 During Intercom (in this case an expandable handset is required) During intercom talk, if an external line call comes, the handset(s) will hear intermittent beeps. Press key to end the current intercom and answer the incoming call. Press ▲ / ▼ to adjust the volume. Press to end the call. Switch to a Waiting Call Note: This service may require subscription from your local telephone company. During an external line call, press the [Flash] key to put the current external line call on hold and answer the incoming waiting external line call. Pressing the [Flash] key again can resume the first external line call. INTC00:00:49MUTEEXIT LINE00:00:01 .MUTE LINE00:02:17MUTEDIR. RECEIVING A CALL](https://usermanual.wiki/Cybiotronics/936001/User-Guide-1131057-Page-41.png)
![41 Mute a Call You can mute a call while discussing matters with a nearby person in privacy without transmitting your voice over. During an External line call Press the [MUTE] softkey. Then ‘MUTE’ is shown on the screen to indicate it is muting the microphone. Press the [MUTE] softkey again to un-mute the microphone. During Intercom Press the [MUTE] softkey. Then ‘MUTE’ is shown on the screen to indicate it is muting the microphone. Press the [MUTE] softkey again to un-mute the microphone. MUTE00:00:58MUTEDIR. MUTE00:00:31MUTEEXIT RECEIVING A CALL](https://usermanual.wiki/Cybiotronics/936001/User-Guide-1131057-Page-42.png)
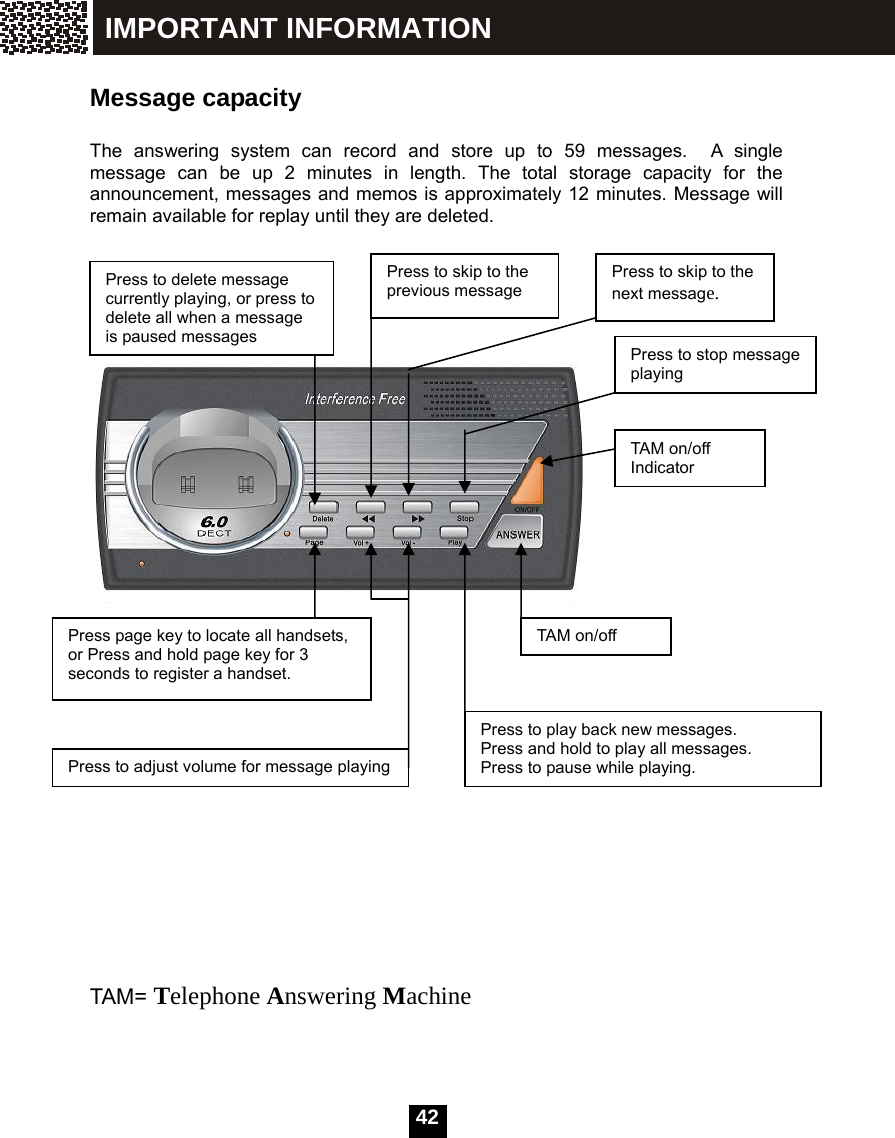
![43 Activate the answering machine Activate via the base: The answering system must be turned on to answer and record messages. Press [ANSWER] in the base unit to turn the answering system on or off. If the answering system is turned on, it will announce “answering machine on”, and then play the greeting words which the answering system will tell the phone caller to leave a message. The light above the [ANSWER] button will be On. If the answering system is turned off, it will announce “answering machine off”, and the light above the [ANSWER] button will be off. Activate via the handset: The answering system can be turned on/off through a registered handset. 1. Press [MENU] key to display the menu when the handset is not in use. 2. Press ▲ or ▼ to select TAM then press [OK]. 3. Press ▲ or ▼ to select TAM SETTING then press [OK]. 4. Press ▲ or ▼ to select TAM ON/OFF then press [OK]. 5. Press ▲ or ▼ to select ON or OFF then press [SAVE]. You will hear a confirmation tone Answering System REGISTRATION↑TAM Note: You can record memo, greeting words to the caller, who will leave message (out going message), through handset only, but you can play any message through either handset or base unit.TAMON/OFF↓AMALERTOFF↑ONMEMO↑ TAMSETTING OKEXIT](https://usermanual.wiki/Cybiotronics/936001/User-Guide-1131057-Page-44.png)
![44 Telephone Answering Machine setting You can change the TAM setting via a registered handset. Set date/time/weekday Prior to playing a message, the answering machine announces when the message was received. Before using the answering machine, set the date, time and weekday, so that messages are dated correctly. To change these settings, refer to handset setting for detailed operation (see page 24). Set message alert tone Your telephone base can be set to beep every 1 minute to alert you of the new messages ready for your review. To enable this feature: 1. On your handset, press [MENU] key to display the menu when the handset is not in use. 2. Press ▲ or ▼ to select TAM then press [OK]. 3. Press ▲ or ▼ to select TAM SETTING then press [OK]. 4. Press ▲ or ▼ to select TAM ALERT then press [OK]. 5. Press ▲ or ▼ to select ON or OFF then press [SAVE]. You will hear a confirmation tone MEMO↑ TAMSETTING OKEXITREGISTRATION↑TAM TAMON/OFF↓TAMALERTOKEXITOFF↑ONAnswering System](https://usermanual.wiki/Cybiotronics/936001/User-Guide-1131057-Page-45.png)
![45 Set number of rings This feature allows you to select the number of rings before the answering machine answers a call. You can choose from 2 to 9 rings or time saver. When time saver is selected, the answering machine answers after three rings if you have new messages and after seven rings if there are no new messages. To set the number of rings: 1. On your handset, press [MENU] key to display the menu when the handset is not in use. 2. Press ▲ or ▼ to select TAM then press [OK]. 3. Press ▲ or ▼ to select TAM SETTING then press [OK]. 4. Press ▲ or ▼ to select SET RINGS then press [OK]. 5. Press ▲ or ▼ to select desired number of rings then press [SAVE]. You will hear a confirmation tone. Answering System TAMALERT SETRINGSSETRINGS6RINGS SAVERIGISTRATION↓AMALERTMEMO↑ TAMSETTING OKEXIT](https://usermanual.wiki/Cybiotronics/936001/User-Guide-1131057-Page-46.png)
![46 Set TAM mode You can decide whether the answering machine will prompt the caller to leave message or not when answering a call. Two modes can be selected for the answering machine: Answer with recording: Play the greeting with OGM1 to prompt the caller to leave a message, and save the message in the telephone base for you to review later. Answer without recording: Play the greeting with OGM2 to prompt the caller to hang up. To set the TAM mode: 1. On your handset, press [MENU] key to display the menu when the handset is not in use. 2. Press ▲ or ▼ to select TAM then press [OK]. 3. Press ▲ or ▼ to select TAM SETTING then press [OK]. 4. Press ▲ or ▼ to select TAM MODE then press [OK]. 5. Press ▲ or ▼ to select “ANS WITH REC” to set TAM mode as answering with recording, or “ANS NO REC” to set TAM mode as answering without recording. ANSWITHREC↑ ANSNOREC SAVEEXITREGISTRATION↑TAM OK MEMO TAMSETTING OKEXITSETRINGS TAMMODE Answering System](https://usermanual.wiki/Cybiotronics/936001/User-Guide-1131057-Page-47.png)
![47 Set OGM (Out Going Message) The answering machine has 2 different OGM, used in different TAM mode. The OGM is the greeting announcement played to the phone caller when the answering machine answers the call. OGM 1 is used for “Answer with recording” mode; OGM2 is for “Answer without recording” mode. The system has a default OGM for both TAM modes. And you can record your own greeting as OGM for either TAM mode. To change the OGM: 1. On your handset, press [MENU] key to display the menu when the handset is not in use. 2. Press ▲ or ▼ to select TAM then press [OK]. 3. Press ▲ or ▼ to select TAM SETTING then press [OK]. 4. Press ▲ or ▼ to select SET OGM then press [OK]. 5. Press ▲ or ▼ to select “ANS WITH REC” to set OGM for answering with recording mode, or “ANS NO REC” to set OGM for answering without recording mode, then press [OK]. Note: OGM1 is greeting one OGM2 is greeting two Default OGM1 is “no one is available to take your call, please leave a message after the tone”. Default OGM2 is “no one is available to take your call, please hang up” ANSWITHREC↓ANSNOREC OKEXITAnswering System REGISTRATION↑TAM MEMO↑ TAMSETTING OKEXITTAMMODE SETOGM OKEXIT](https://usermanual.wiki/Cybiotronics/936001/User-Guide-1131057-Page-48.png)
![48 6. Now press ▲ or ▼ to select between PLAYBACK: to play the current OGM for the selected mode RECORD: to record a new OGM for the selected mode. DEFAULT: to set the OGM as default for the selected mode. If you selected RECORD, a voice will announce “record the greeting one (or two) after the tone”, then a beep sounds, then you can say your greeting for the selected TAM mode, i.e. greeting one for answer with recording, greeting two for answer without recording. You have 30 seconds to record your greeting. The screen will show the rest time you can record. Press [SAVE] when finish The answering machine will playback the recorded OGM for you to confirm. If you selected DEFAULT, the screen prompts you to confirm, press YES to confirm, then the OGM will be set to default, and the default greeting will be played for your sure Note: You can record your own greetings, or set it to the default greetings. PLAYBACK↑RECORD SPEAKAFTERTONERECORDINGOGM1 EXITRECORDINGOGM1TIME:30 SAVEEXITNote: The DEFAULT option will not appear in the menu if you have not recorded your own OGM CONFIRM? YESNOAnswering System](https://usermanual.wiki/Cybiotronics/936001/User-Guide-1131057-Page-49.png)
![49 Set remote access PIN A 4-digit security code is required to access the answering machine remotely from any touch tone telephone. The preset PIN is 0000. To set the remote access PIN: 1. On your handset, press [MENU] key to display the menu when the handset is not in use. 2. Press ▲ or ▼ to select TAM then press [OK]. 3. Press ▲ or ▼ to select TAM SETTING then press [OK]. 4. Press ▲ or ▼ to select TAM PIN then press [OK]. 5. Use the dialing keys to enter 4 digits PIN code, then press [SAVE]. You will hear a confirmation tone. Answering System SETOGM TAMPIN OKEXIT TAMPIN: 0000SAVEREGISTRATION↑TAM MEMO↑ TAMSETTING OKEXIT](https://usermanual.wiki/Cybiotronics/936001/User-Guide-1131057-Page-50.png)
![50 Restore TAM default setting You can set all settings of answering machine to a default value. TAM default setting value ITEM STATUS Answer machine ON TAM alert ON Answer Rings 5 Rings TAM mode answer with recording TAM PIN 0000 To set TAM to default setting: 1. On your handset, press [MENU] key to display the menu when the handset is not in use. 2. Press ▲ or ▼ to select TAM then press [OK]. 3. Press ▲ or ▼ to select TAM SETTING then press [OK]. 4. Press ▲ or ▼ to select TAM DEFAULT then press [OK]. 5. Use the dialing keys to enter 4-digit registration PIN code, then press [OK]. You will hear a confirmation tone. Refer to page16 for the registration PIN. TAMPIN↑TAMDEFAULT OKEXITPIN?**** OKDELREGISTRATION↑TAM MEMO↑ TAMSETTING OKEXITAnswering System](https://usermanual.wiki/Cybiotronics/936001/User-Guide-1131057-Page-51.png)
![51 New message indication If the new message alert tone is turned on, the telephone base will beep every 1 minute when there are un-reviewed messages. When there are new messages, the handset’s screen will show the number of new messages when the handset is not in use. Message playback Press Play on the telephone base to listen to new messages, press Play and hold down for 3 seconds to listen to all messages(include listened messages). To play new messages on the handset: 1. On your handset, press [MENU] key to display the menu when the handset is not in use. 2. Press ▲ or ▼ to select TAM then press [OK]. 3. Press ▲ or ▼ to select NEW MSG then press [OK] to listen to new messages; or select SAVED MSG then press [OK] to listen to all messages. 4. The handset will play “you have XX new messages”, then play the messages one by one. Before playing each message, the weekday and time ,when the message is received, are announced. As displayed on the screen. The earliest of new or all messages will be played first according to your selection... 03:0103:50P HS(1)ANSON03NEWMENUDIR NEWMSG↓SAVEDMSG OKEXITYOUHAVES3NEWMSGS Answering System REGISTRATION↑TAM](https://usermanual.wiki/Cybiotronics/936001/User-Guide-1131057-Page-52.png)
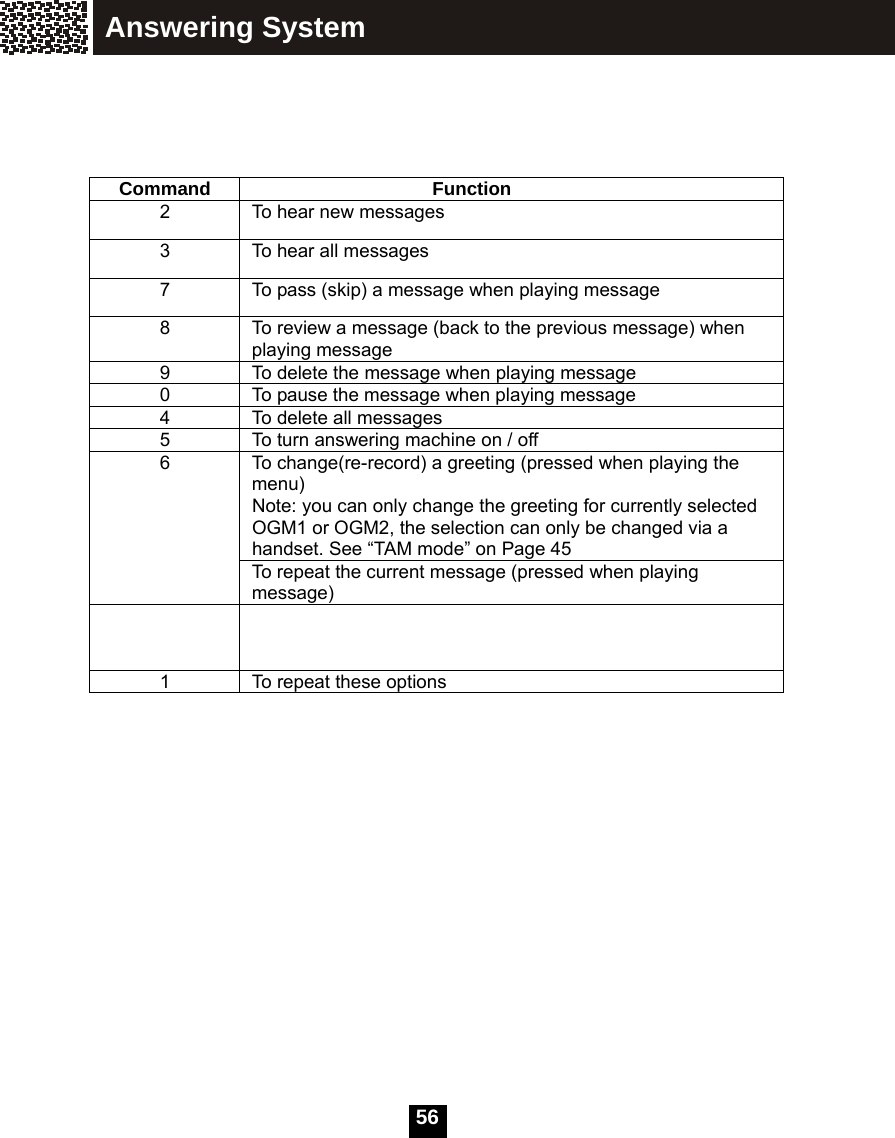
![52 Options during playback on the telephone base Press Vol+ / Vol- to adjust the speaker volume. Press to skip to the next message. Press to listen to the previous message. Press [Play] to pause when playing a message, press [Play] again to continue. Press [Delete] to delete the current message when playing, press [Delete] to delete all messages when a message is paused. Press and hold Delete longer than 2 seconds when the telephone is not in use to delete all messages. Options during playback on the handset When playing messages, there are 2 stages for each message playing. The first stage is playing the basic information about the message, including sequence number of the message, the weekday and time when the message is received. On this stage, the key is displayed. You can press to switch between speaker and earpiece to listen to the message. The second stage is playing the message itself. On this stage, the key DEL is displayed. You can press DEL to delete the message. You can also press pause key to pause message playing, On the pause state, a countdown timer appears showing the time left for the message staying in pause state, 60 seconds given. When the timer reaches 0, playing is stopped and the screen exited to the previous menu. MESSAGE#01THU10:12P MESSAGE#01THU10:12P Answering System Note: Press to switch between speaker and earpiece to listen the message. You can press [EXIT] to end playing at any time.](https://usermanual.wiki/Cybiotronics/936001/User-Guide-1131057-Page-53.png)
![53 On the pause state, you can press [DELALL] to delete all the messages, press [YES] to confirm. Then all messages are deleted. On all playing stages, You can: press << to listen to the previous message. Press >> to skip to the next message. Press ▲ or ▼ to adjust volume. Delete all messages On the base: Press and hold Delete longer than 2 seconds when the telephone is not in use to delete all messages. On the handset: 1. On your handset, press [MENU] key to display the menu when the handset is not in use. 2. Press ▲ or ▼ to select TAM then press [OK]. 3. Press ▲ or ▼ to select DELETE ALL then press [OK]. 4. Press YES to confirm. You will hear “All messages deleted”. DELETEALL CONFIRM? YESNONote: You have 2 ways to delete all messages Answering System SAVEDMSG DELETEALL CONFIRM? YESNONote: If there is no message, the DELETE ALL will not appear in the menu MESSAGE#01PAUSE59REGISTRATION↑TAM OK](https://usermanual.wiki/Cybiotronics/936001/User-Guide-1131057-Page-54.png)
![54 Record and play memos Memos are your own recorded messages used as reminders for yourself or others using the same answering machine. They are saved, played back and deleted in the same way as incoming messages. Record a memo 1. On your handset, press [MENU] key to display the menu when the handset is not in use. 2. Press ▲ or ▼ to select TAM then press [OK]. 3. Press ▲ or ▼ to select MEMO then press [OK]. The handset will announce “record memo after the tone”, after a beep, you can start to say the memo. The screen shows the remaining time for your memo, 120 seconds in maximum. 4. Press [SAVE] when finish. When the memory is full, the screen will show “MEM IS FULL” temporarily. TAM will play “memory full”. RECORDINGMEMOTIME:120 SAVEEXITNote: Press SAVE immediately when you finish speaking your memo to save recording memory. REGISTRATION↑TAM DELETEALL MEMOAnswering System](https://usermanual.wiki/Cybiotronics/936001/User-Guide-1131057-Page-55.png)

![59 This equipment complies with Part 68 of FCC rules and the requirements adopted by the ACTA. On the bottom of this equipment is a label that contains, among other information, a product identifier in the format US:CACW400B******. If requested, this number must be provided to the telephone company. The REN is used to determine the number of devices that may be connected to a telephone line. Excessive RENs on a telephone line may result in the devices not ringing in response to an incoming call. In most but not all areas, the sum of the RENs should not exceed five (5.0). To be certain of the number of devices that may be connected to a line, as determined by the total RENs, contact the local telephone company. [For products approved after July 23, 2001, the REN for this product is part of the product identifier that has the format US:CACW400B******. The digits represented by 00B are the REN without a decimal point (e.g., 03B is a REN of 0.3B). For earlier products, the REN is separately shown on the label.] Should you experience trouble with this equipment, please contact Customer Service at 1-800-988-7728 for repair or warranty information. If the equipment is causing harm to the telephone network, the telephone company may request that you disconnect the equipment until the problem is resolved. NOTICE: If your home has specially wired alarm equipment connected to the telephone line, ensure the installation of this equipment ID does not disable your alarm equipment. If you have questions about what will disable alarm equipment, consult your telephone company or a qualified installer. If your equipment should cause harm to the telephone network, the telephone company may temporarily disconnect your service. If possible, they will notify you in advance that temporary discontinuance of service may be required. However, when advance written notice is not possible, the telephone company may temporarily discontinue service without notice if such action is necessary under the circumstances. FCC REQUIREMENTS](https://usermanual.wiki/Cybiotronics/936001/User-Guide-1131057-Page-60.png)

![12 Registration Before registering a handset to the base unit, the base unit should first enter the registration mode. Press the [Page] key on the base for more than 3 seconds till the ‘In Use’ indicator begins to flash quickly. An unregistered handset displays as this. Press [MENU] softkey, select ‘REGISTRATION’, then press [OK] After pressing [OK] softkey, a list of bases will be displayed. There are 4 base positions available for registration. Select the BASE among BASE1 - BASE4, (For the first time of use, select ‘BASE1’), and then press [SEL] softkey. Now the handset begins searching for the base. UNREGISTEREDMENUV.MAILDIR. REGISTRATIONOKEXITBASE1↓BASE2SELEXIT SEARCHING1EXIT USE YOUR PHONE](https://usermanual.wiki/Cybiotronics/936001/User-Guide-1131057-Page-77.png)
![14 The base options can be set through the operation on a handset registered to this base. Press the [MENU] softkey, select ‘BS SETTINGS’ and press [OK]. Deregister a Handset Press the [MENU] softkey, select ‘BS SETTINGS’ and press [OK]. . Select ‘TERMINATE HS’, and press [OK]. Input the 4-digit PIN code. The default PIN is printed on the backside label of the base. Use ▲ / ▼ to scroll the list of handsets (HS). Press the [DEL] softkey to select a handset (except for the current handset). Dial Mode Press the [MENU] softkey, select ‘BS SETTINGS’ and press [OK]. Use ▲ / ▼ to select ‘DIAL MODE’, and press [OK]. Press ▲ / ▼ to scroll the two options. Press [SAVE] to save your setting. TERMINATEHS↓DIALMODEOKEXIT PIN?****OKDELEXIT HS1↓HS2DELEXIT TONE↓PULSESAVEEXIT BASE SETTINGS VIA HANDSET](https://usermanual.wiki/Cybiotronics/936001/User-Guide-1131057-Page-79.png)
![15 Modify PIN Press the [MENU] softkey, select ‘BS SETTINGS’ and press [OK]. Use ▲ / ▼ to select ‘MODIFY PIN’ and press [OK]. Input the current 4-digit PIN. Press [OK] to complete. The default PIN is on the backside label of the base. Input the new 4-digit PIN. Press [OK] to complete. Input the new PIN again to confirm. Press [OK] to complete. Please do not forget this new PIN code. Now the new PIN will be stored in the base unit. Flash Time This function allows the user to set the flash time parameter according to your local telephone network settings when using the [Flash] key in some services, such as call waiting service and conference calling service, etc. Press the [MENU] softkey, select ‘BS SETTINGS’ and press [OK]. Use ▲ / ▼ to select ‘FLASH TIME’ and press [OK]. PIN?****OKDELEXIT NEWPIN****OKDELEXIT CONFIRM****OKDELEXIT DIALMODEFLASHTIMEOKEXIT BASE SETTINGS VIA HANDSET](https://usermanual.wiki/Cybiotronics/936001/User-Guide-1131057-Page-80.png)
![16 Use ▲ / ▼ to choose between the two options and then press [SAVE] to save your setting. (‘SHORT’ = 300, ‘LONG’ = 650) Set Base to Default This function allows the user to restore the base settings to factory default. Press the [MENU] softkey Use ▲ / ▼ to select ‘BS SETTINGS’ and press [OK] softkey. Select ‘BASE DEFAULT’ and press [OK] softkey. Input the 4-digit PIN. The default PIN is on the backside label of the base. Press [OK] softkey to complete. Then all settings of the base will revert to factory default values. SHORT↑LONGSAVEEXIT MODIFYPIN↑BASEDEFAULTOKEXIT PIN?****OKDELEXIT BASE SETTINGS VIA HANDSET](https://usermanual.wiki/Cybiotronics/936001/User-Guide-1131057-Page-81.png)
![17 Alarm Press the [MENU] softkey, select ‘HS SETTINGS’ and press [OK] softkey. Select ‘ALARM CLOCK’ and press [OK] softkey. Use ▲ / ▼ to select ‘ON’ or ‘OFF’ Press [SAVE] softykey to save your setting. Ring Setup Press the [MENU] softkey, use ▲ / ▼ to select ‘HS SETTINGS’ and press [OK]. Select ‘RING SETUP’ and press [OK]. Use ▲ / ▼ to select a type of ring that you want to set. (You can assign different ringtones and volume for incoming intercom call, fixed line call respectively, ‘INTC’ is for intercom.) Press [OK] softkey. Use ▲ / ▼ to select ‘MELODY’ or ‘VOLUME’ setting. ALARMCLOCK↓RINGSETUPOKEXIT OFF↓ONSAVEEXIT ALARMCLOCKRINGSETUPOKEXIT INTCRING↓LINERINGOKEXIT MELODY↓VOLUMEOKEXIT HANDSET SETTINGS](https://usermanual.wiki/Cybiotronics/936001/User-Guide-1131057-Page-82.png)
![18 If you enter the ‘MELODY’ setting Use ▲ / ▼ to select a melody. Press [SAVE] softkey to save your setting. If you enter the ‘VOLUME’ setting Use ▲ / ▼ to select a volume level. Press [SAVE] softkey to save your setting. Configure Ringtone for Incoming Calls via Exterior-line Press the [MENU] softkey, select ‘HS SETTINGS’ and press [OK]. Select ‘RING SETUP’ by using ▲ / ▼ and then press [OK]. Select ‘LINE RING’, then press [OK]. Select ‘MELODY’, then press [OK]. Press ▲ / ▼ to select the desired ringtone, then press the [SAVE] softkey to save your setting. Configure Ring Volume for Incoming Calls via Exterior-line Press the [MENU] softkey, select ‘HS SETTINGS’ and press [OK]. Select ‘RING SETUP’ by using ▲ / ▼ and then press [OK]. Select ‘LINE RING’, then press [OK]. Select ‘VOLUME’, then press [OK]. Press ▲ / ▼ to select the desired volume, then press the [SAVE] softkey to save your setting. Configure Ringtone for Intercom Calls Press the [MENU] softkey, select ‘HS SETTINGS’ and press [OK]. Select ‘RING SETUP’ by using ▲ / ▼ and then press [OK]. Select ‘INTC RING’, then press [OK]. Select ‘MELODY’, then press [OK]. Press ▲ / ▼ to select the desired ringtone, then press the [SAVE] softkey to save your setting. Configure Ring Volume for Intercom Calls Press the [MENU] softkey, select ‘HS SETTINGS’ and press [OK]. Select ‘RING SETUP’ by using ▲ / ▼ and then press [OK]. Select ‘INTC RING’, then press [OK]. Select ‘VOLUME’, then press [OK]. Press ▲ / ▼ to select the desired volume, then press the [SAVE] softkey to save your setting. MELODY1↓MELODY2SAVEEXIT VOLUME2↑VOLUME1SAVEEXIT HANDSET SETTINGS](https://usermanual.wiki/Cybiotronics/936001/User-Guide-1131057-Page-83.png)
![19 Do Not Disturb Press the [MENU] softkey, select ‘HS SETTINGS’ and press [OK]. Select ‘RING SETUP’ by using ▲ / ▼ and then press [OK]. Select ‘DO NOT DISTURB’, then press [OK]. Press ▲ / ▼ to choose ‘OFF’ or ‘ON’, then press [OK] to save your setting. If this option is set to ‘ON’, the screen will display “DO NOT DISTURB” in standby mode. Then no ring will be heard from any exterior-line (fixed line) call; but the call information will still be displayed on the screen, and you can also answer the call if you want. LINERING↑DONOTDISTURBOKEXIT OFF↓ONOKEXIT HANDSET SETTINGS](https://usermanual.wiki/Cybiotronics/936001/User-Guide-1131057-Page-84.png)
![20 Tone Setup Press the [MENU] softkey, select ‘HS SETTINGS’ and press [OK]. Select ‘TONE SETUP’ by using ▲ / ▼ and press [OK]. Then you can configure the displayed 3 types of tones. Set Key Tone On/Off Press the [MENU] softkey, select ‘HS SETTINGS’ and press [OK]. Select ‘TONE SETUP’ by using ▲ / ▼ and press [OK]. Select ‘KEY TONE’ and press [OK]. Use ▲ / ▼ to select ‘OFF’ or ’ON’, then press [SAVE] to save your setting. Set Battery Low Alert Tone On/Off Press the [MENU] softkey, select ‘HS SETTINGS’ and press [OK]. Select ‘TONE SETUP’ by using ▲ / ▼ and press [OK]. Select ‘BATTERY LOW’ and press [OK]. Use ▲ / ▼ to select ‘OFF’ or ‘ON’, then press [SAVE] to save your setting. Set Out of Range Alert Tone On/Off Press the [MENU] softkey, select ‘HS SETTINGS’ and press [OK]. Select ‘TONE SETUP’ by using ▲ / ▼ and press [OK]. Select ‘RANGE ALARM’ and press [OK]. Use ▲ / ▼ to select ‘OFF’ or ‘ON’, then press [SAVE] to save your setting. RINGSETUPTONESETUPOKEXIT KEYTONE↓BATTERYLOWOKEXIT HANDSET SETTINGS](https://usermanual.wiki/Cybiotronics/936001/User-Guide-1131057-Page-85.png)
![21 Language Setting Press the [MENU] softkey, select ‘HS SETTINGS’ and press [OK]. Select ‘LANGUAGE’ by using ▲ / ▼ and then press [OK]. Use ▲ / ▼ to scroll through the 6 available language options (English, German, French, Italian, Spanish, Dutch). Select the desired language and then press [SAVE] to save your setting. Change Handset Name ‘HS (N)’ is the default name of a handset after registering it to a base unit. The handset extension number ‘N’ (1—5) shows the handset is the ‘N’th handset that registered to the base. The name will be shown on the screen when the handset is in standby mode A handset must be registered to the base before it can be assigned to a name. To change the handset name in text format Press the [MENU] softkey. Use ▲ / ▼ to select ‘HS SETTINGS’ and press [OK]. Select ‘HS LABEL’ and press [OK]. Press [DEL] to delete the current name, and use keypad to input the new name. Then press [SAVE] to save your change. TONESETUP↓LANGUAGEOKEXIT ENGLISH↓DEUTSCHSAVEEXIT LANGUAGE↓HSLABELOKEXIT NAME?SAVEDELABC HANDSET SETTINGS](https://usermanual.wiki/Cybiotronics/936001/User-Guide-1131057-Page-86.png)
![22 Auto Answer Handset can be set to answer incoming calls automatically. When the handset is not on the base unit or the charger cradle, must be pressed to answer incoming calls. Auto answer mode can only be activated when the handset is on the base unit or charger cradle, in which case, the line will be automatically connected when the handset is picked up from the base unit or charger cradle. Set Auto Answer Mode On/Off Press the [MENU] softkey. Use ▲ / ▼ to select ‘HS SETTINGS’ and press [OK]. Select ‘AUTO ANSWER’ and press [OK]. Use ▲ / ▼ to select ‘OFF’ or ‘ON’. Press [OK] to save your setting. Call Barring Handset can be set to disable outgoing fixed line calls. To set the call barring mode ‘ON’ or ‘OFF’ Press the [MENU] softkey. Use ▲ / ▼ to select ‘HS SETTINGS’ and press [OK]. Select ‘CALL BARRING’ and press [OK]. Input the 4-digit PIN. The default PIN is on the backside label of the base. Press [OK] to confirm. HSLABEL↓AUTOANSWEROKEXIT OFF↓ONOKEXIT AUTOANSWER↓CALLBARRINGOKEXIT PIN?****OKEXIT HANDSET SETTINGS](https://usermanual.wiki/Cybiotronics/936001/User-Guide-1131057-Page-87.png)
![23 Use ▲ / ▼ to select ‘OFF’ or ‘ON’. Press [SAVE] to save your setting. If you set to ‘ON’, the screen will display “CALLS BARRED” in standby mode. Date & Time Settings Press the [MENU] softkey. Use ▲ / ▼ to select ‘HS SETTINGS’ and press [OK] softkey. Select ‘DATE & TIME’ and press [OK] softkey. OFFONSAVEEXIT CALLBARRINGDATE&TIMEOKEXIT HANDSET SETTINGS](https://usermanual.wiki/Cybiotronics/936001/User-Guide-1131057-Page-88.png)
![24 Set Date Press the [MENU] softkey. Use ▲ / ▼ to select ‘HS SETTINGS’ and press [OK] softkey. Select ‘DATE & TIME’ and press [OK] softkey. Select ‘SET DATE&TIME’ and press [OK] softkey. Use the keypad to input the date consecutively. Press [SAVE] to save your setting. Set Time Format Press the [MENU] softkey. Use ▲ / ▼ to select ‘HS SETTINGS’ and press [OK] softkey. Select ‘DATE & TIME’ and press [OK] softkey. Select ‘TIME FORMAT’ and press [OK] softkey. Use ▲ / ▼ to select your desired format. Press [SAVE] to save your setting. Then the time will be displayed in the format you have set when return to standby mode. TIMEFORMAT↑SETDATE&TIMEOKEXIT DD/MMHH:MM00/0000:00SAVEEXIT DATEFORMATTIMEFORMATOKEXIT 12‐HOUR↓24‐HOURSAVEEXIT HANDSET SETTINGS](https://usermanual.wiki/Cybiotronics/936001/User-Guide-1131057-Page-89.png)
![25 Set Time Press the [MENU] softkey. Use ▲ / ▼ to select ‘HS SETTINGS’ and press [OK] softkey. Select ‘DATE & TIME’ and press [OK] softkey. Select ‘SET DATE&TIME’ and press [OK] softkey. Use ▲ / ▼ to shift the position of cursor. Use the keypad to input the time consecutively in the format you have set. (If you have already set the ‘TIME FORMAT’ to ‘12-HOUR’ format, then you also need to choose ‘a.m.’ or ‘p.m.’ by using the [AM/PM] softkey.) Press the [SAVE] softkey to save your setting. TIMEFORMAT↑SETDATE&TIMEOKEXIT DD/MMHH:MM00/0000:00AMSAVEAM/PMEXIT HANDSET SETTINGS](https://usermanual.wiki/Cybiotronics/936001/User-Guide-1131057-Page-90.png)
![26 Set Handset to Default This function allows the user to restore the handset settings to factory default. Press the [MENU] softkey Use ▲ / ▼ to select ‘HS SETTINGS’ and press [OK] softkey. Select ‘HS DEFAULT’ and press [OK] softkey. Input the 4-digit PIN. The default PIN is on the backside label of the base. Press [OK] softkey to complete. Then all settings of the handset will revert to factory default values. SELECTBASE↑HSDEFAULTOKEXIT PIN?****OKDELEXIT HANDSET SETTINGS](https://usermanual.wiki/Cybiotronics/936001/User-Guide-1131057-Page-91.png)
![27 Display the Phonebook Entries In standby mode, press [DIR.] softkey to enter the telephone directory. Then the phonebook screen will be displayed. Use ▲ / ▼ to access and scroll the phonebook entries. Add Entries to Phonebook In standby mode, press [DIR.] softkey to enter telephone directory. Then the phonebook screen will be displayed. Press [ADD] softkey to add a new entry. Use keypad to input the name. Press [ABC] ([123]) softkey to switch the input mode between numerical mode and alphabetical mode. If you input wrong words or numbers, use ▲ / ▼ and [DEL] softkey to erase the errors. Press [OK] to complete the input. In alphabetical mode, each numeric key is assigned a set of letters and symbols as printed below. Press the corresponding key until your desired letter is displayed. If two consecutive letters from the same key is required, just wait until the cursor moves to the next blank space. Numeric: 1 2 3 4 5 6 7 8 9 0 Alpha: Space A,B,C D,E,F G,H,I J,K,L M,N,O P,Q,R,S T,U,V W,X,Y,Z PHONEBOOK38ENTRIESADDDELEXIT #1812345678JOHNSMITHPHONEBOOKEDITDELEXIT PHONEBOOK38ENTRIESADDDELEXIT NAME?JOHNOKDELABC HANDSET SETTINGS](https://usermanual.wiki/Cybiotronics/936001/User-Guide-1131057-Page-92.png)
![28 Symbols You can also use [½] or [#] to insert the following special symbols in the name field. ½ + , - . / @ : ; < = > ? { ¦ } ~ [ \ ] ^ _ ` ! ″ # $ % & ´ ( ) Note: Name must be started with an alphabetic character. Use keypad to input number Press [OK] softkey when finished. Press [DEL] softkey to erase the digit(s) you input in error, and then input the correct one. Use ▲ / ▼ to select a distinct ringtone for this entry. Press [SAVE] to complete. Edit an Entry in Phonebook In standby mode, press [DIR.] softkey to enter telephone directory. Use ▲ / ▼ to access and scroll the phonebook entries. When the entry that you want to edit appears, press [EDIT] softkey. Then follow the steps as adding an entry to phonebook. NUMBER?12345678OKDELEXIT MELODY1↓MELODY2SAVEEXIT #1812345678JOHNSMITHPHONEBOOKEDITDELEXIT HANDSET SETTINGS](https://usermanual.wiki/Cybiotronics/936001/User-Guide-1131057-Page-93.png)
![29 Delete an Entry from Phonebook In standby mode, press [DIR.] softkey to enter telephone directory. Use ▲ / ▼ to access and scroll the phonebook entries. When the entry that you want to delete appears, press [DEL] softkey. Press [YES] to confirm your deletion. Then this entry is deleted. Delete All Entries in Phonebook In standby mode, press [DIR.] softkey to enter telephone directory. Press [DEL] softkey to delete all entries. Press [YES] to confirm the deletion. Then all entries are deleted. #1812345678JOHNSMITHPHONEBOOKEDITDELEXIT SURETODELETE?YESNO PHONEBOOK38ENTRIESADDDELEXIT DELETEALL?YESNO HANDSET SETTINGS](https://usermanual.wiki/Cybiotronics/936001/User-Guide-1131057-Page-94.png)
![30 Review Caller ID List In standby mode, press ▲ / ▼ to enter the Caller ID List. Then the Caller ID book screen will be displayed. Press ▲ to review the latest call, press ▼ to review the earliest call. The date and time is also displayed in the format you have set. Save Caller ID Information to Phonebook In standby mode, press ▲ / ▼ to enter the Caller ID List. Use ▲ / ▼ to access and scroll the Caller ID List. When the record that you want to save appears, press [SAVE] softkey. Then follow the steps as adding an entry to phonebook. Delete a record from Caller ID List In standby mode, press ▲ / ▼ to enter the Caller ID List. Use ▲ / ▼ to access and scroll the Caller ID List. When the record that you want to delete appears, press [DEL] softkey. CIDBOOK20ENTRIESDELEXIT #125/123:58PJOHNSMITH12345678X2SAVEDELEXIT #125/123:58PJOHNSMITH12345678X2SAVEDELEXIT #112/253:58PJOHNSMITH12345678X2SAVEDELEXIT HANDSET SETTINGS](https://usermanual.wiki/Cybiotronics/936001/User-Guide-1131057-Page-95.png)
![31 Press [YES] to confirm the deletion. Then this record is deleted. Delete All Records in Caller ID List In standby mode, press ▲ / ▼ to enter the Caller ID List. Then the Caller ID book screen will be displayed. Press [DEL] softkey to delete all records. Press [YES] to confirm the deletion. Then all records are deleted. Review Dialed Numbers List Every handset can store its own last 10 dialed numbers independently, each number of up to 32 digits. Press [Redial] key, use ▲ / ▼ to review the dialed number(s). If the displayed number matches with an entry in the phonebook, the corresponding name will also be shown. Add a Dialed Number to Phonebook When the number you want appears, press [SAVE] softkey. Then follow the steps as adding an entry to phonebook. SURETODELETE?YESNO CIDBOOK20ENTRIESDELEXIT DELETEALL?YESNO #112345678JOHNSMITHREDIALBOOKSAVEDELEXIT HANDSET SETTINGS](https://usermanual.wiki/Cybiotronics/936001/User-Guide-1131057-Page-96.png)
![32 Delete a Dialed Number When the number that you want to delete appears, press [DEL] softkey. Press [OK] softkey. Press [YES] to confirm the deletion. Then this number is deleted. Delete All Dialed Numbers Press [Redial] key. Press [DEL] softkey. Press ▼ to select ‘DELETE ALL’. Then press [OK] softkey. #112345678JOHNSMITHREDIALBOOKSAVEDELEXIT DELETE↓DELETEALLOKEXIT SURETODELETE?YESNO #112345678JOHNSMITHREDIALBOOKSAVEDELEXIT DELETE↓DELETEALLOKEXIT HANDSET SETTINGS](https://usermanual.wiki/Cybiotronics/936001/User-Guide-1131057-Page-97.png)
![33 Press [YES] to confirm the deletion. Then all numbers are deleted. DELETEALL?YESNO HANDSET SETTINGS](https://usermanual.wiki/Cybiotronics/936001/User-Guide-1131057-Page-98.png)
![34 Method 1: Dial a Number Press . Input the number. Or: Input the number. (You may use [DEL] softkey to delete the digits) Press [CALL] softkey or . During the call: Press softkey to toggle hands-free mode. Press it again to quit this mode. Press [MUTE] softkey to disable the microphone. (For private discussion) Press ▲ / ▼ to adjust the volume. Press to terminate the call. Method 2: Call from Phonebook Press [DIR.] softkey to review the phonebook. Use ▲ / ▼ to scroll to the number you need. Press . Press to terminate the call. Method 3: Call from Caller ID List Press ▲ / ▼ to review the Caller ID list. Use ▲ / ▼ to scroll to the number you need. Press . Press to terminate the call. 1234567CALLMUTEDIR. 1234567CALLDELEXIT LINE00:00:01MUTEDIR. #1812345678JOHNSMITHPHONEBOOK EDITDELEXIT MAKING A CALL](https://usermanual.wiki/Cybiotronics/936001/User-Guide-1131057-Page-99.png)
![35 Method 4: Call from Dialed Numbers List Press [Redial] key to review the dialed numbers. Use ▲ / ▼ to scroll to the number you need. Press . Press to terminate the call. Method 5: Call the Last Dialed Number Press . Press [Redial] key to dial out the last dialed number. Press to terminate the call. Note: Put the handset on the base unit can also terminate the call. Enter a Pause in Dialing Sequence The [Redial/Pause] key allows you to add a 3-second pause during pre-dialing or when storing a number in phonebook. To add a pause, press [Redial/Pause] key at your desired position when inputting or editing a phone number, and a “P” appears on the screen. For longer delay, press [Redial/Pause] key additional times. Note: The number you want to store cannot have more than 24 digits, including the pause. One “P” counts as one digit.MAKING A CALL](https://usermanual.wiki/Cybiotronics/936001/User-Guide-1131057-Page-100.png)
![36 Locate Misplaced Handset(s) with Base Unit To locate the handset(s) while not on the base unit, press [Page] key on the base unit. Then the handset(s) in range will display ‘PAGING FROM BASE’ and emit an alert signal that is different from exterior-line (fixed line) calls. To stop the paging, press [Page] on the base unit again or press any key on the handset. If no handset answers, the paging will stop automatically after 1 minute. Note: 1.The handset being paged will ring even if the ringer has been set to ‘OFF’. 2. If two handsets are engaging in an intercom talk, then both handsets can only hear one beep instead of alert. Intercom between Handsets Press [Int.] key on a handset in standby mode. Then the screen will show all the other available handsets in range of the base unit. (‘HS’ is for ‘handset’) Use ▲ / ▼ to scroll to the handset you want to intercom with and press [CALL]. For instance, if HS (2) is being paged by HS (1), HS (1) will display ‘PAGING HS (2)’. HS (2) will ring and display ‘PAGING FROM HS (1)’. Press [Int.] key, or [OK] softkey on HS (2) to answer the intercom call. If HS (2) does not want to answer, press [EXIT] softkey, then the ring will stop. HS2↓HS3CALLEXITPAGINGHS(2)EXIT PAGINGFROMHS(1)OKEXITINTC00:00:01 MUTEEXIT PAGING AND INTERCOM](https://usermanual.wiki/Cybiotronics/936001/User-Guide-1131057-Page-101.png)
![37 Transfer a Call to Another Handset . During a call, the current call can be transferred to another handset as described below. When a handset is engaging in an exterior-line (fixed line) call. Press [Int.] key and use ▲ / ▼ to scroll to the handset you want to transfer this call to, then press [OK] softkey. If you do this from HS (1) to HS (2), then HS (2) rings and displays ‘PAGING FROM HS (1)’. On Handset (2), press , [Int.] or [OK] to answer the paging and then talk with Handset (1). (Internal talk) Now the initiator of the transfer can talk with the party to be transferred to, and then the initiator can press to complete the transfer. If the party being transferred to does not want to answer the paging, can press or [EXIT] softkey to reject it . Then the handset being paged stops ringing and returns to standby mode, and the initiating handset resumes the exterior-line talk. HS2HS3OKEXITPAGINGFROMHS(1)OKEXITINTC00:00:01MUTEEXIT 12–25 13:59 P HS (1)MENUDIR.PAGING AND INTERCOM](https://usermanual.wiki/Cybiotronics/936001/User-Guide-1131057-Page-102.png)
![38 Call Conferencing CY-936 cordless system supports ‘conference call’ that up to 3 parties (2 handsets and 1 exterior-line call). When one handset is engaging in an exterior-line (fixed line) call, press [Int.] key on that handset to put the current call on hold and call another handset by way of intercom. Use ▲ / ▼ to scroll to the handset you want. Then press [CALL] softkey to page. If you do this from HS (1) to HS (2), then HS (2) rings and displays ‘PAGING FROM HS (1)’. On Handset (2), press , [Int.] or [OK] to answer the paging and talk with Handset (1). (Intercom talk) LINE00:00:01MUTEDIR. HS2HS3CALLEXIT PAGINGFROMHS(1)OKEXIT INTC00:00:01MUTEEXIT CALL CONFERENCING](https://usermanual.wiki/Cybiotronics/936001/User-Guide-1131057-Page-103.png)
![39 When the intercom call is established, on the initiating handset { in this case is Handset (1) }, press [Int.] key can switch between the intercom talk and exterior-line talk. After the initiating handset being switched to ‘INTC’ (intercom) call, press [CONF] key on the initiating handset can talk with the two parties (exterior-line party, intercom party) simultaneously, which is the conference mode. On any handset, press or [EXIT] can retreat from the current talk and return to standby mode, the other handset will continue the exterior-line call. To end the call, make sure that both handsets have quit. Note: Even a handset has already retreated from the talk; you can still join it in the talk again through the procedures stated on Page 38. LINE00:00:09INTCONHOLDMUTE CONF00:00:23LINEMUTEEXIT LINE00:02:48MUTEDIR. CALL CONFERENCING](https://usermanual.wiki/Cybiotronics/936001/User-Guide-1131057-Page-104.png)
![40 Via Exterior-line (Fixed line) Without Caller ID With Caller ID When the phone rings, if you want to mute the ringer, press [MUTE] softkey or . Press [UNMUTE] softkey to resume the ringer. Press to answer the call. Press ▲ / ▼ to adjust the volume. Press to end the call. Note: If ‘auto answer mode’ is set to ‘ON’, when the ring sounds, no need to press , just pick up the handset off the base (or charger cradle) can answer the call automatically. CALLVIALINEMUTE 12–25 13:59 PJOHNSMITH12345678X2HIDEEXIT CALLVIALINELINERINGMUTEDUNMUTE LINE00:00:01MUTEDIR. RECEIVING A CALL](https://usermanual.wiki/Cybiotronics/936001/User-Guide-1131057-Page-105.png)
![41 During Intercom During intercom talk, if an exterior-line call comes, both handsets will hear intermittent beeps. Then on any handset, press can terminate the current intercom and answer the incoming call. Press ▲ / ▼ to adjust the volume. Press to end the call. Switch to a Waiting Call Note: This service may require subscription from your local telephone company. During an exterior-line call, press [Flash] key to put the current exterior-line call on hold and answer the incoming waiting exterior-line call. Press [Flash] key again can resume the first exterior-line call. INTC00:00:49MUTEEXIT LINE00:00:01MUTEDIR. LINE00:02:17MUTEDIR. RECEIVING A CALL](https://usermanual.wiki/Cybiotronics/936001/User-Guide-1131057-Page-106.png)
![42 Mute a Call You can mute a call while discussing matters with nearby person in privacy without transmitting your voice over. During an exterior-line call Press [MUTE] softkey. Then ‘MUTE’ is shown on the screen to indicate it is muting the microphone. Press [MUTE] softkey again to un-mute the microphone. During intercom Press [MUTE] softkey. Then ‘MUTE’ is shown on the screen to indicate it is muting the microphone. Press [MUTE] softkey again to un-mute the microphone. MUTE00:00:58MUTEDIR. MUTE00:00:31MUTEEXIT RECEIVING A CALL](https://usermanual.wiki/Cybiotronics/936001/User-Guide-1131057-Page-107.png)

![46 This equipment complies with Part 68 of FCC rules and the requirements adopted by the ACTA. On the bottom of this equipment is a label that contains, among other information, a product identifier in the format US:CACW400B******. If requested, this number must be provided to the telephone company. The REN is used to determine the number of devices that may be connected to a telephone line. Excessive RENs on a telephone line may result in the devices not ringing in response to an incoming call. In most but not all areas, the sum of the RENs should not exceed five (5.0). To be certain of the number of devices that may be connected to a line, as determined by the total RENs, contact the local telephone company. [For products approved after July 23, 2001, the REN for this product is part of the product identifier that has the format US:CACW400B******. The digits represented by 00B are the REN without a decimal point (e.g., 03B is a REN of 0.3B). For earlier products, the REN is separately shown on the label.] Should you experience trouble with this equipment, please contact Customer Service at 1-800-988-7728 for repair or warranty information. If the equipment is causing harm to the telephone network, the telephone company may request that you disconnect the equipment until the problem is resolved. NOTICE: If your home has specially wired alarm equipment connected to the telephone line, ensure the installation of this equipment ID does not disable your alarm equipment. If you have questions about what will disable alarm equipment, consult your telephone company or a qualified installer. If your equipment should cause harm to the telephone network, the telephone company may temporarily disconnect your service. If possible, they will notify you in advance that temporary discontinuance of service may be required. However, when advance written notice is not possible, the telephone company may temporarily discontinue service without notice if such action is necessary under the circumstances. FCC REQUIREMENTS](https://usermanual.wiki/Cybiotronics/936001/User-Guide-1131057-Page-111.png)