Davis Instruments DWW6326 ISS PLUS User Manual ISS FARS D014
Davis Instruments ISS PLUS ISS FARS D014
UserManual.wiki
>
Davis Instruments
>
DWW6326 User Manual
Manual
Navigation menu
Upload a User Manual
Namespaces
Wiki Guide
HTML
PDF
Info
Views
User Manual
Discussion / Help
Navigation

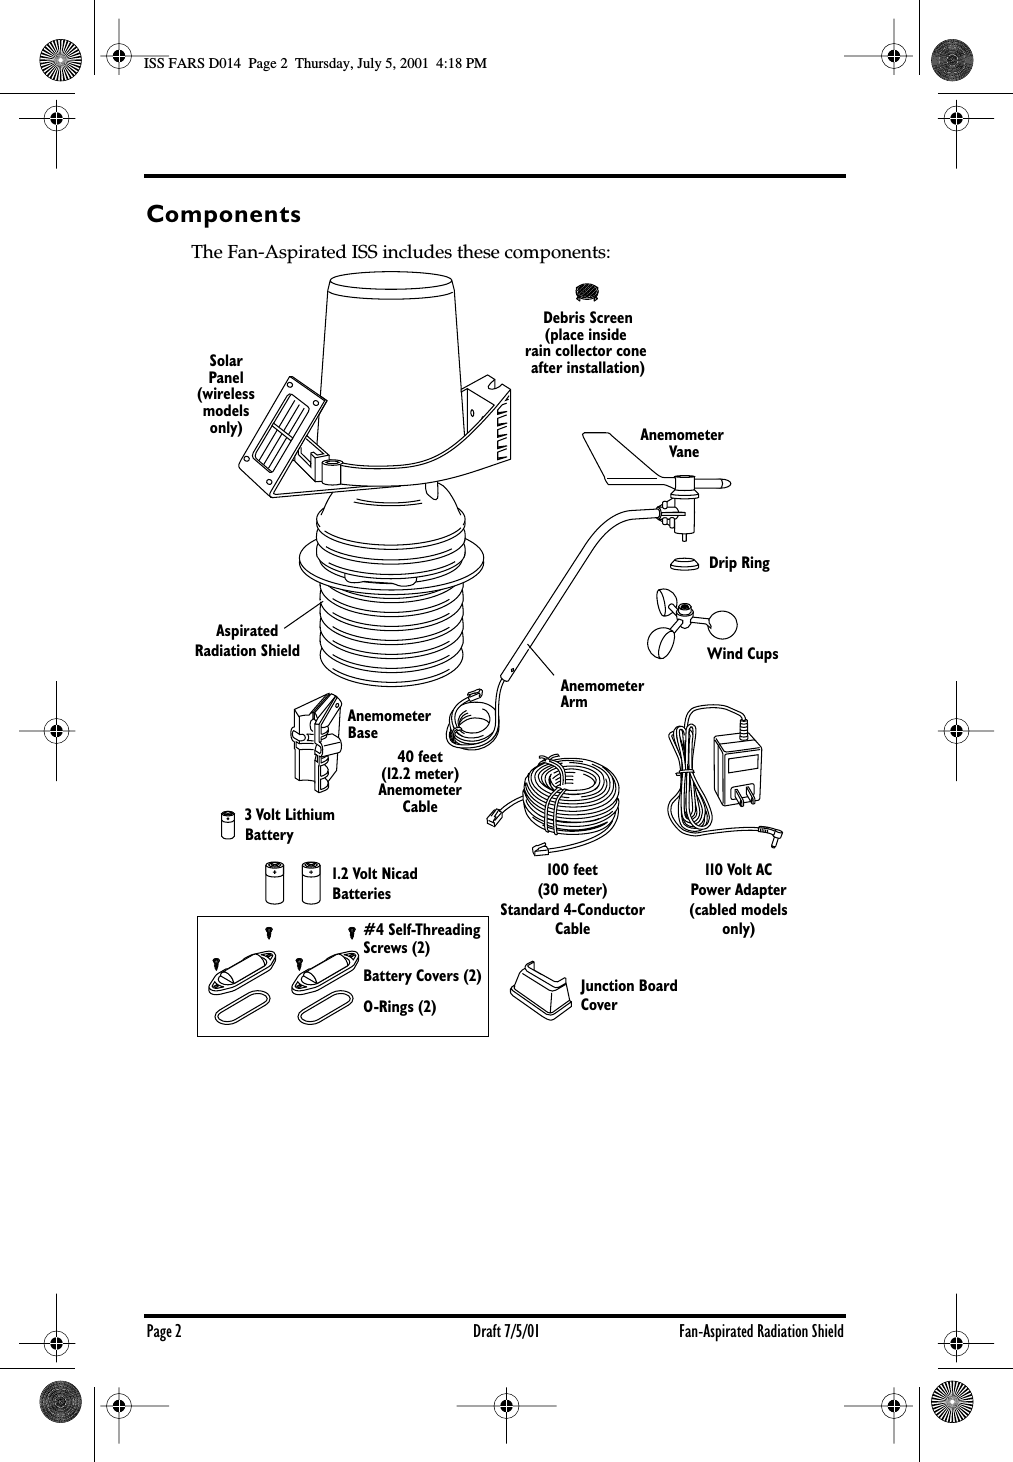

![Fan-Aspirated ISS Troubleshooting Draft 7/5/01 Page 11Fan-Aspirated ISS TroubleshootingIf you are unable to solve a problem with your Fan-Aspirated Radiation Shield, please call Davis Technical Support. We’ll be glad to help. Most questions can be answered while you’re on the phone. You can also email us for support, or visit our website. Sorry, we are unable to accept collect calls.Contacting Davis Instruments(510) 732-7814 for Technical Support, Monday – Friday, 7:00 a.m. – 5:30 p.m. Pacific Time. (510) 732-9229 For callers outside the USA or Canada.(510) 670-0589 Fax to Customer Service or Tech Support.www.davisnet.com Copies of User Manuals are available on the “Support” page. Watch for FAQs and other updates. Subscribe to the e-newsletter.support@davisnet.com E-mail to Technical Support.sales@davisnet.com E-mail to Customer Service.info@davisnet.com General e-mail. Note: Please do not return items to the factory for repair without prior authorization.Fan-Aspirated ISS SpecificationsAspiration Rate . . . . . . . . . . . . . . . . . . . . . . . . . 215 feet/min. (1.1 m/s)Radiation-Induced Temperature Error . . . . . . . . 0.5°F (0.3°C) [At solar noon, insolation = 1040 W/m2] (Reference: RM Young model 43408)Note: The above error specification is an estimate, based on data from a solar-powered model, which has a measured error of 0.6°F at the above conditions and an aspiration rate of 190 ft/min vs. the rate of 215 ft/min in model 7750. Temperature range . . . . . . . . . . . . . . . . . . . . . . –40 to 140° Fahrenheit (–40 to 60° Celsius)ISS Primary Power InputWireless ISS . . . . . . . . . . . . . . . . . . . . . . . . . . . solar panelCabled ISS . . . . . . . . . . . . . . . . . . . . . . . . . . . . receives power from Vantage Pro ConsoleISS secondary power (Wireless Only) . . . . . . . . . CR-123A 3-volt lithium battery (approx. two years battery life.) Fan Primary Power InputWireless ISS . . . . . . . . . . . . . . . . . . . . . . . . . . . solar panelCabled ISS. . . . . . . . . . . . . . . . . . . . . . . . . . . . . AC power adapter, 5VDC, 200 mA, regulatedFan secondary power (Wireless Only) . . . . . . . . 1 or 2 - 1.2 Volt NiCad C-cellsISS FARS D014 Page 11 Thursday, July 5, 2001 4:18 PM](https://usermanual.wiki/Davis-Instruments/DWW6326/User-Guide-159581-Page-11.png)