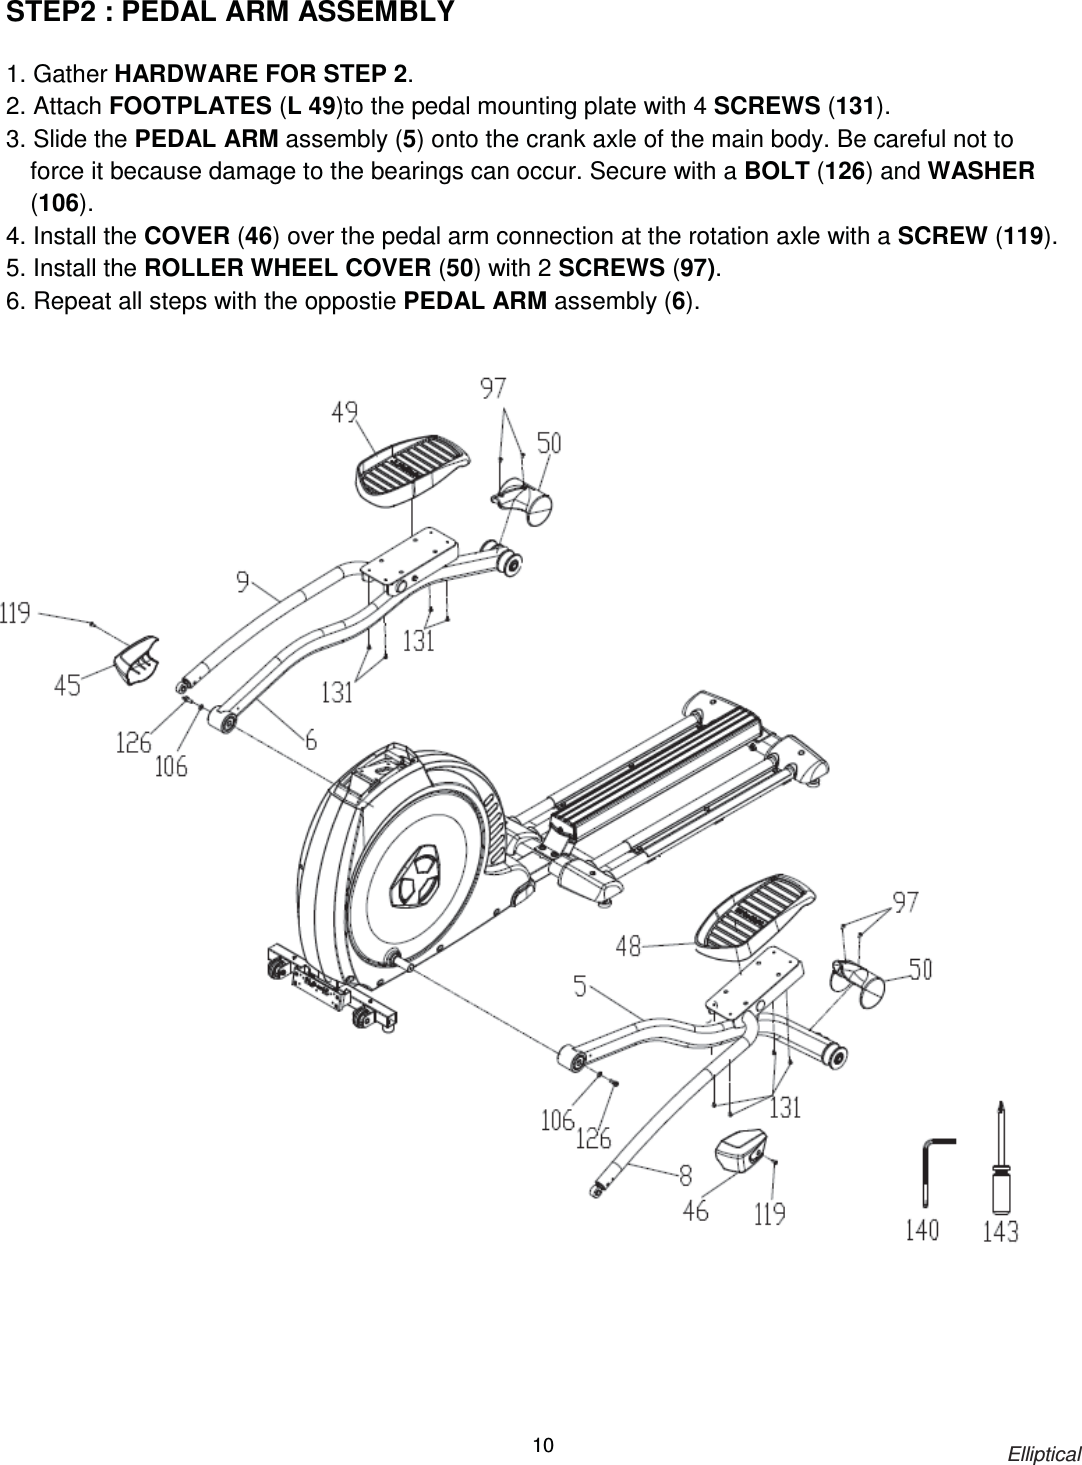
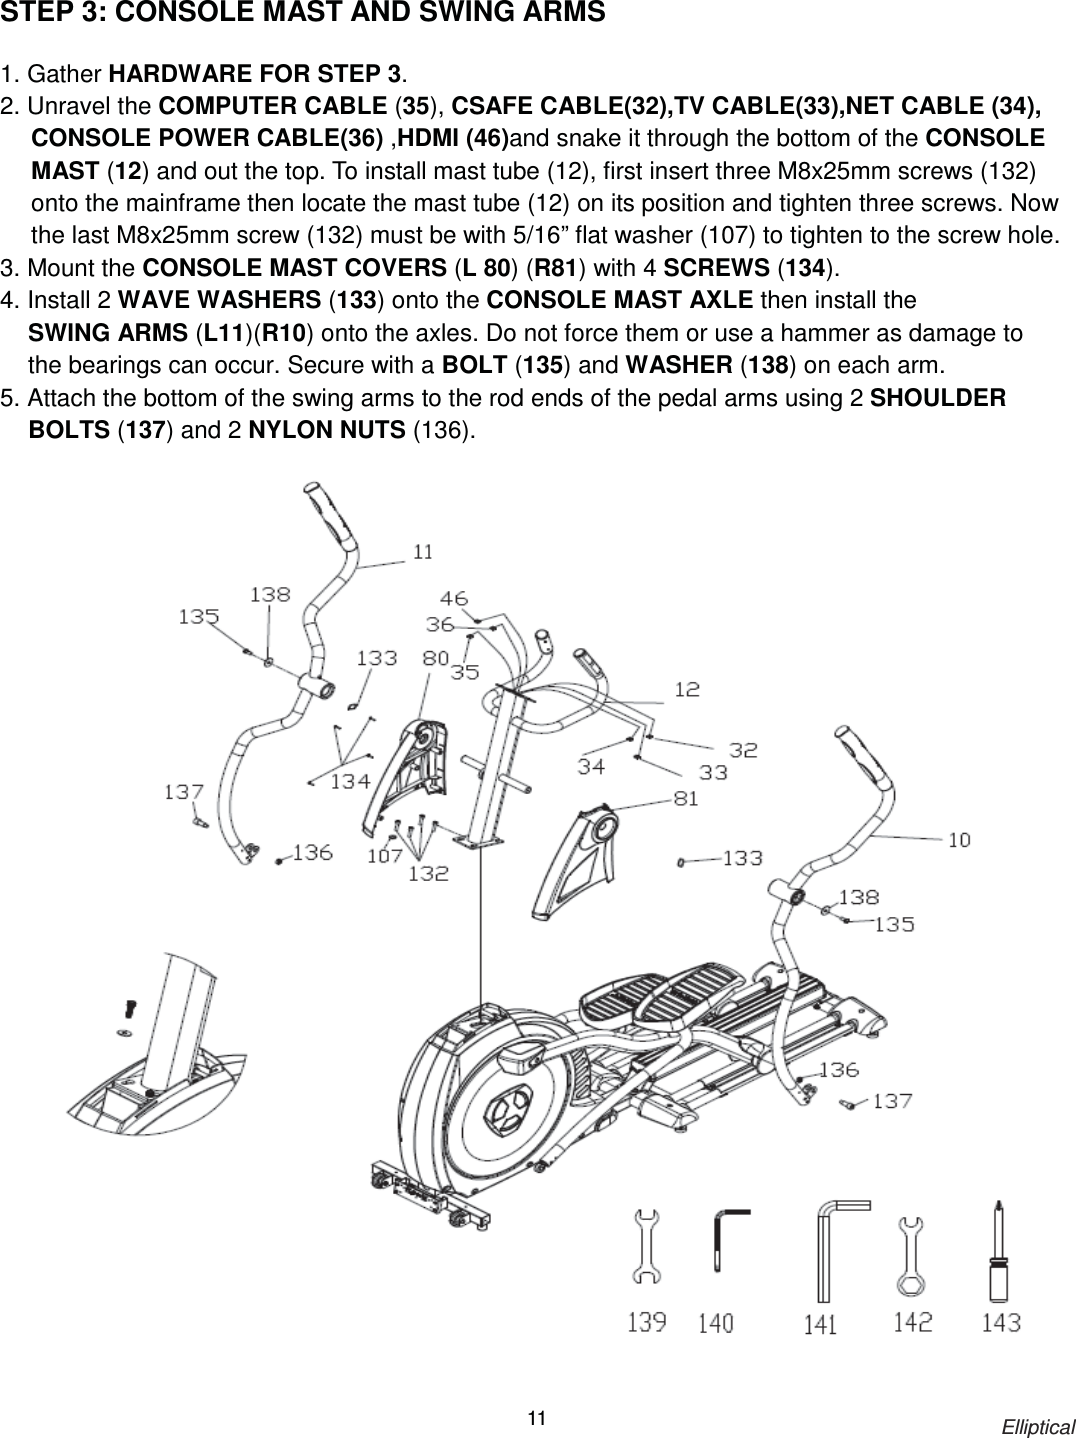
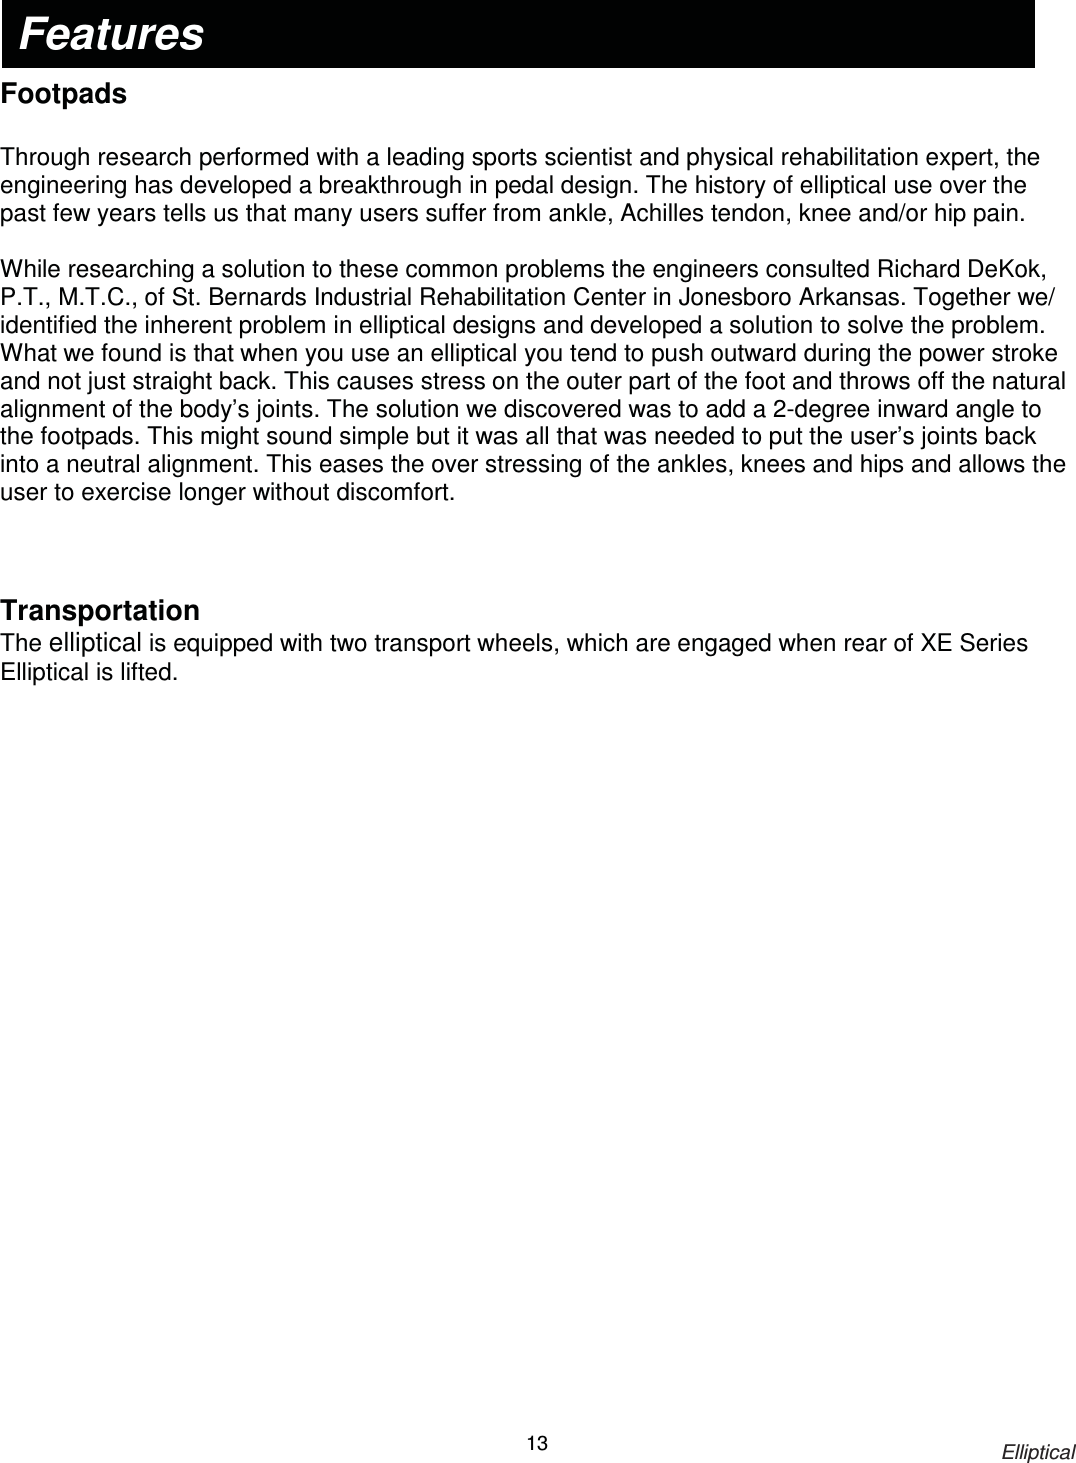
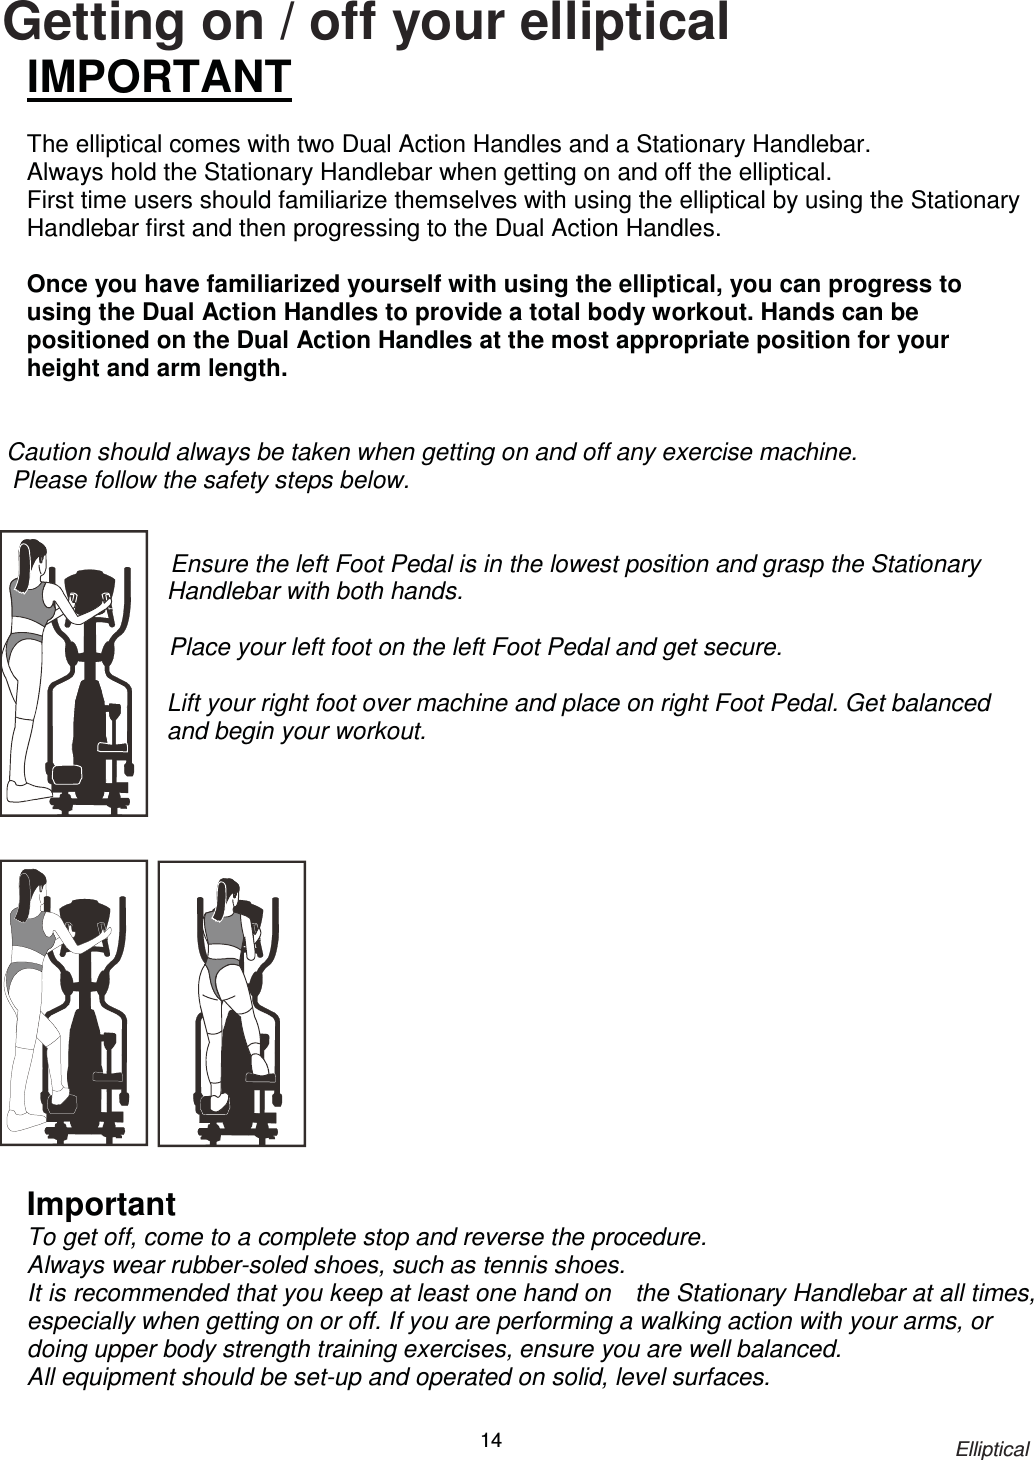
Dyaco IEITB1DYACO ENT CONSOLE User Manual CE800 ENT WB001 included

Dyaco International Inc. ENT CONSOLE CE800 ENT WB001 included

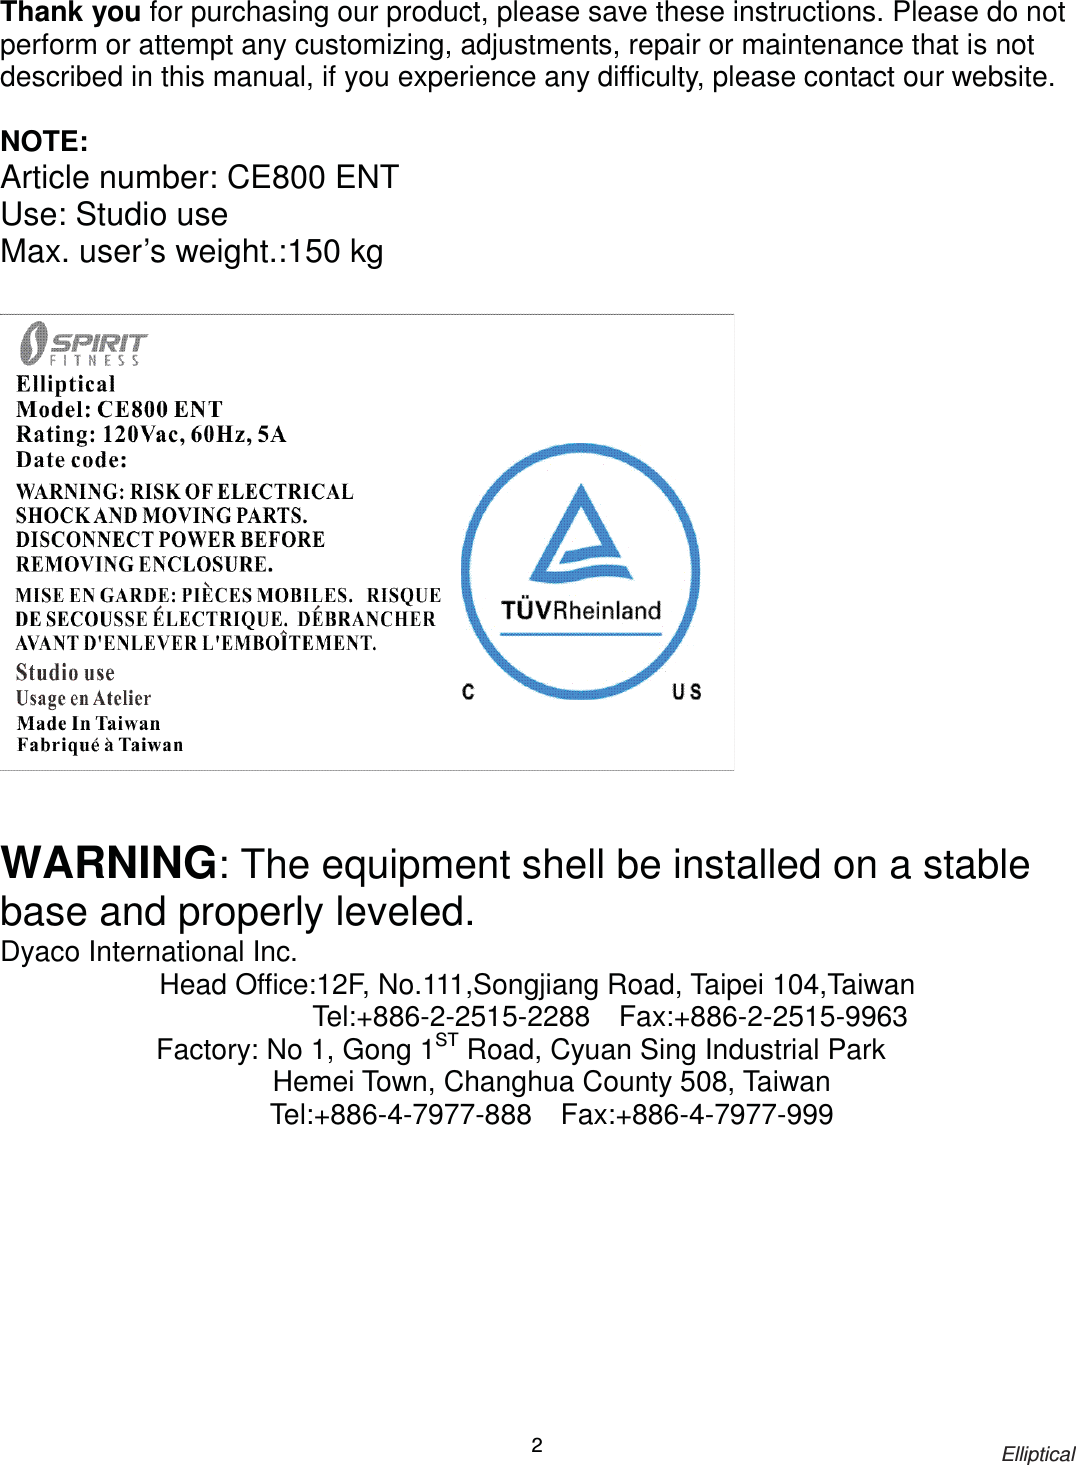
User Manual CE800 ENT(WB001 included)

           &( (17ġġġġ( O O L S W L F D O 2:1(5§60$18$/Please carefully read this entire manual before  operating  yourġnew ellipticalįġ
                                                                           Elliptical 1    Important Safety Instructions………………………………………………………….….……2 Important Operation Instructions……………………………………………………….….…..3 Assembly Instructions………………………………………………………………….….……6 Features…………………………………………………………………………………………10 Operation of Your Elliptical…………………………………………………………………….11 Exploded View Diagram and Parts List………………………………………………..……..31      Thank you for purchasing our product, please save these instructions.     Please do not perform or attempt any customizing, adjustments, repair   or maintenance that is not described in this manual.                     Table of Contents
                                                                           Elliptical 2 Thank you for purchasing our product, please save these instructions. Please do not perform or attempt any customizing, adjustments, repair or maintenance that is not described in this manual, if you experience any difficulty, please contact our website.  NOTE: Article number: CE800 ENT Use: Studio use Max. user’s weight.:150 kg      WARNING: The equipment shell be installed on a stable base and properly leveled. Dyaco International Inc. Head Office:12F, No.111,Songjiang Road, Taipei 104,Taiwan                       Tel:+886-2-2515-2288  Fax:+886-2-2515-9963 Factory: No 1, Gong 1ST Road, Cyuan Sing Industrial Park     Hemei Town, Changhua County 508, Taiwan                      Tel:+886-4-7977-888  Fax:+886-4-7977-999
                                                                           Elliptical 3     WARNING - Read all instructions before using this appliance. DANGER - To reduce the risk of electric shock disconnect your elliptical from the electrical outlet prior to cleaning and/or service work.  WARNING  - To reduce the risk of burns, fire, electric shock, or injury to persons, install the elliptical on a flat level surface with access to a 120-volt,15-amp grounded outlet with only the elliptical plugged into the circuit.  DO NOT USE AN EXTENSION CORD UNLESS IT IS A 14AWG OR BETTER. WITH ONLY ONE OUTLET ON THE END.  Do not operate elliptical on deeply padded, plush or shag carpet. Damage to both carpet and elliptical may result.  Keep children away from the elliptical. There are obvious pinch points and other caution areas that can cause harm.  Keep hands away from all moving parts.  Never operate the elliptical if it has a damaged cord or plug. If the elliptical is not working properly, call your dealer.  Keep the cord away from heated surfaces.  Do not operate where aerosol spray products are being used or where oxygen is being administered. Sparks from the motor may ignite a highly gaseous environment.  Never drop or insert any object into any openings.  Do not use outdoors.  To disconnect, turn all controls to the off position and then remove the plug from the outlet.  Do not attempt to use your elliptical for any purpose other than for the purpose it is intended.  The hand pulse sensors are not medical devices. Various factors, including the user’s movement, may affect the accuracy of heart rate readings. The pulse sensors are intended only as exercise aids in determining heart rate trends in general.  Wear proper shoes. High heels, dress shoes, sandals or bare feet are not suitable for use on your elliptical. Quality athletic shoes are recommended to avoid leg fatigue.  CAUTION:  To assure continued FCC compliance:   1. Any changes or modifications not expressly approved by the grantee of this device could void the user's authority to operate the equipment. 2. This equipment complies with FCC radiation exposure limits set forth for an uncontrolled environment. This equipment should be installed and operated with minimum distance of 20 cm between the radiator and your body. 3. Keep children under the age of 13 away from this machine. SAVE THESE INSTRUCTIONS - THINK SAFETY!  Important Safety Instructions
                                                                           Elliptical 4 MODEL: WB001    This device complies with Industry Canada license-exempt RSS standard(s). Operation is subject to the following two conditions:   (1) this device may not cause interference, and (2) this device must accept any interference, including interference that may cause undesired   operation of the device.   This equipment complies with IC radiation exposure limits set forth for an uncontrolled environment. This equipment should be installed and operated with minimum distance 20cm between the radiator and your body.    Cet appareil radio est conforme au CNR d’Industrie Canada. L’utilisation de ce dispositif est autorisée seulement aux deux conditions suivantes :   (1) il ne doit pas produire de brouillage, et (2) l’utilisateur du dispositif doit être prêt à accepter tout brouillage radioélectrique reçu, même si ce brouillage est susceptible de compromettre le fonctionnement du dispositif.   Cet équipement est conforme aux limites d’exposition aux rayonnements IC établies pour un environnement non contrôlé.   Cet équipement doit être installé et utilisé avec un minimum de 20 cm de distance entre la source de rayonnement et votre corps.
                                                                           Elliptical 5   WARNING! NEVER remove any cover without first disconnecting AC power. If voltage varies by ten percent (10%) or more, the performance of your elliptical may be affected. Such conditions are not covered under your warranty. If you suspect the voltage is low, contact your local power company or a licensed electrician for proper testing. NEVER expose this elliptical to rain or moisture. This product is NOT designed for use out-doors, near a pool or spa, or in any other high humidity environment. The operating temperature specification is 40 to 120 degrees Fahrenheit, and humidity is 95% non-condensing (no water drops forming on surfaces).      Ɣ  NEVER operate this elliptical without reading and completely understanding the results of anyġoperational change you request from the computer. •    Understand that changes in resistance do not occur immediately. Set your desired resistance level on the computerġconsole and release the adjustment key. The computer will obey the command gradually. •   NEVER use your elliptical during an electrical storm. Surges may occur in your household power supply that could damage elliptical components. Unplug the elliptical during an electrical storm as a precaution. •    Use caution while participating in other activities while pedaling on your elliptical; such as watchingġtelevision, reading, etc. These distractions may cause you to lose balance which may result in serious injury. •    Do not use excessive pressure on console control keys. They are precision set to function properly with littleġfinger pressure.   •    Always hold on to a handle bar while making control changes. •  Do not use excessive pressure on console control keys. They are precision set to function properly with little finger pressure. If you feel the buttons are not functioning properly with normal pressure contact your dealer. Important Operation Instructions IMPORTANT ELECTRICAL INSTRUCTIONS
                                                                           Elliptical 6     This product must be grounded. If the elliptical’s electrical system should malfunction or breakdown grounding provides a path of least resistance for electric current, reducing the risk of electric shock. This product is equipped with a cord having an equipment-grounding plug. The plug must be plugged into an appropriate outlet that is properly installed and grounded in accordance with all local codes and ordinances. DANGER - Improper connection of the equipment-grounding conductor can result in a risk of electric shock. Check with a qualified electrician or serviceman if you are in doubt as to whether the product is properly grounded. Do not modify the plug provided with the product if it will not fit the outlet; have a proper outlet installed by a qualified electrician.  This product is for use on a nominal 120-volt circuit, and has a grounding plug that looks like the plug illustrated below. A temporary adapter that looks like the adapter illustrated below may be used to connect this plug to a 2-pole receptacle as shown below if a properly grounded outlet is not available. The temporary adapter should be used only until a properly grounded outlet, (shown below) can be installed by a qualified electrician. The green colored rigid ear-lug, or the like, extending from the adapter, must be connected to a permanent ground such as a properly grounded outlet box cover. Whenever the adapter is used, it must be held in place by a metal screw.   Grounding Instructions
                                                                           Elliptical 7 Assembly Pack Check List    #127 - 3/8” x 2-1/4” Button Head Socket Bolt (4 pcs) #130- 3/8” X19 Flat Washer (4 pcs) #129 - 3/8” X23 Curved Washer (6 pcs) #128 - 3/8” x 3-3/4”   Button Head Socket Bolt (6 pcs) #106 - 5/16”   Flat Washer (2 pcs) #126 - 5/16" × UNC18 × 15L   Socket Head Cap Bolt (2 pcs) #119 – M6 x 15mm Phillips Head Screw (2 pcs) Step1 #131 - M5 x 10mm Phillips Head Screw (8 pcs) #97 - M5 x 12mm Phillips Head Screw (4 pcs)  Step2 #97 - M5 x 12mm Phillips Head Screw (4 pcs)
                                                                           Elliptical 8                                                 #132 - M8 x 25mm Socket Cap Bolt (4 pcs) #135 - 3/8” x 3/4” Hex Head Bolt   W / Loctite (2 pcs) #136 - M10 Nylon Nut (2 pcs) #137 - M10 x 12mm Shoulder Bolt (2 pcs) #138 - 3/8”   Flat Washer (2 pcs)       #134 - 3.5 x 12mm Sheet Metal Screw (14 pcs) #97- M5 x 12mm   Phillips Head Screw (16 pcs)  Step4 #134 - 3.5mm x 12mm Sheet Metal Screw (4 pcs) Step3 #133 - 25mm Wave Washer (2 pcs) #107 - 5/16" Flat Washer (1 pcs)
                                                                           Elliptical 9    STEP 1 : RAIL ASSEMBLY    1.  Gather HARDWARE FOR STEP 1. 2.  Slide the RAIL ASSEMBLY (2) under the rear oval stabilizer tube of the main frame. Secure together with 2 BOLTS (127) and 2 WASHERS (130) from the top of the tube and 4 BOLTS (128) and 4 CURVED WASHERS (129) from the front of the tube. Make sure all 6 BOLTS are tightened securely. 3.  Install the CENTER ALUMINUM RAIL (89) with 2 BOLTS (127) and 2 CURVED WASHERS (128) at the rear and 2 BOLTS (130) and 2WASHERS          (129) at the front. 4.  Install the 2 TUBE STABILIZER COVERS (84 LEFT & 83 RIGHT) with 2 SCREWS (97) to the middle STABILIZER TUBE and the 2 STABILIZER COVERS (83 left & 84 right) with 2 SCREWS (97) to the rear stabilizer tube.   Assembly Instructions
                                                                           Elliptical 10STEP2 : PEDAL ARM ASSEMBLY    1. Gather HARDWARE FOR STEP 2. 2. Attach FOOTPLATES (L 49)to the pedal mounting plate with 4 SCREWS (131). 3. Slide the PEDAL ARM assembly (5) onto the crank axle of the main body. Be careful not to force it because damage to the bearings can occur. Secure with a BOLT (126) and WASHER (106). 4. Install the COVER (46) over the pedal arm connection at the rotation axle with a SCREW (119). 5. Install the ROLLER WHEEL COVER (50) with 2 SCREWS (97). 6. Repeat all steps with the oppostie PEDAL ARM assembly (6).
                                                                           Elliptical 11 STEP 3: CONSOLE MAST AND SWING ARMS  1. Gather HARDWARE FOR STEP 3. 2. Unravel the COMPUTER CABLE (35), CSAFE CABLE(32),TV CABLE(33),NET CABLE (34), CONSOLE POWER CABLE(36) ,HDMI (46)and snake it through the bottom of the CONSOLE MAST (12) and out the top. To install mast tube (12), first insert three M8x25mm screws (132) onto the mainframe then locate the mast tube (12) on its position and tighten three screws. Now the last M8x25mm screw (132) must be with 5/16” flat washer (107) to tighten to the screw hole.   3. Mount the CONSOLE MAST COVERS (L 80) (R81) with 4 SCREWS (134). 4. Install 2 WAVE WASHERS (133) onto the CONSOLE MAST AXLE then install the SWING ARMS (L11)(R10) onto the axles. Do not force them or use a hammer as damage to the bearings can occur. Secure with a BOLT (135) and WASHER (138) on each arm. 5. Attach the bottom of the swing arms to the rod ends of the pedal arms using 2 SHOULDER BOLTS (137) and 2 NYLON NUTS (136).
                                                                           Elliptical 12 STEP 4: CONSOLE AND BEAUTY COVERS  1. Gather HARDWARE FOR STEP 4. 2. Plug the COMPUTER CABLE (35), CSAFE CABLE(32),TV CABLE(33),NET CABLE (34), CONSOLE POWER CABLE(36) ,HDMI (46) and HEART RATE CABLES (40/41) into the corresponding connectors on the back of the console (31). Mount the CONSOLE (31) to the MAST with 4 SCREWS (97). 3. Install 4 SWING ARM COVERS (77/76 left & 78/79 right) with 6 SCREWS (134). 4. Install 4 COVERS (74X2 & 75X2) to the ends of the PEDAL ARMS with 4 SCREWS (97)and 4 SCREWS (134). Be careful not to install these covers upside down! There is an arrow on the inside of each cover to indicate the correct installation direction. 5. Install the 4 COVERS (72 X 2 & 73 X 2) to the connection point at the bottom of the SWING ARMS using 4 SCREWS (134) and 4 SCREWS (97). 5.  Install the FRONT STABILIZER COVER (66) with 4 SCREWS (97).
                                                                           Elliptical 13   Footpads  Through research performed with a leading sports scientist and physical rehabilitation expert, the engineering has developed a breakthrough in pedal design. The history of elliptical use over the past few years tells us that many users suffer from ankle, Achilles tendon, knee and/or hip pain.    While researching a solution to these common problems the engineers consulted Richard DeKok, P.T., M.T.C., of St. Bernards Industrial Rehabilitation Center in Jonesboro Arkansas. Together we/ identified the inherent problem in elliptical designs and developed a solution to solve the problem. What we found is that when you use an elliptical you tend to push outward during the power stroke and not just straight back. This causes stress on the outer part of the foot and throws off the natural alignment of the body’s joints. The solution we discovered was to add a 2-degree inward angle to the footpads. This might sound simple but it was all that was needed to put the user’s joints back into a neutral alignment. This eases the over stressing of the ankles, knees and hips and allows the user to exercise longer without discomfort.      Transportation The elliptical is equipped with two transport wheels, which are engaged when rear of XE Series Elliptical is lifted. Features
                                                                           Elliptical 14Getting on / off your elliptical IMPORTANT  The elliptical comes with two Dual Action Handles and a Stationary Handlebar. Always hold the Stationary Handlebar when getting on and off the elliptical. First time users should familiarize themselves with using the elliptical by using the Stationary Handlebar first and then progressing to the Dual Action Handles.  Once you have familiarized yourself with using the elliptical, you can progress to using the Dual Action Handles to provide a total body workout. Hands can be positioned on the Dual Action Handles at the most appropriate position for your height and arm length.   Caution should always be taken when getting on and off any exercise machine. Please follow the safety steps below.   Ensure the left Foot Pedal is in the lowest position and grasp the Stationary Handlebar with both hands.  Place your left foot on the left Foot Pedal and get secure.  Lift your right foot over machine and place on right Foot Pedal. Get balanced and begin your workout.                  Important To get off, come to a complete stop and reverse the procedure. Always wear rubber-soled shoes, such as tennis shoes. It is recommended that you keep at least one hand on    the Stationary Handlebar at all times, especially when getting on or off. If you are performing a walking action with your arms, or doing upper body strength training exercises, ensure you are well balanced. All equipment should be set-up and operated on solid, level surfaces.
                                                                           Elliptical 15Correct Position   Your body should be in an upright position so that your back is straight. Keep your head up to minimize neck and upper back strain. Always try and use the elliptical in a rhythmical and smooth motion. If you find yourself feeling uncomfortable, or experience a surging type feeling, there is probably too much tension.       The elliptical can be used in forward or reverse notion.         When going in reverse, bend your knees slightly more. More emphasis is on the buttocks and hamstrings in the reverse motion.       MOVING YOUR ELLIPTICAL The elliptical can be easily moved from room to room.   1.Move to the front of the machine and ensure swing arms are even (one foot pedal at top of Elliptical Disk and other at bottom).          2.Grasp both Dual Action Handles together and pulling back on handles, tip machine towards you.
                                                                           Elliptical 16   Console ( WB001 )                           Starting the operation • Plug in the power cord and switch on the main power switch located at the front, below the console. • When the power is turned on, the screen will show the initial image and then enter the ready mode which is the beginning of the elliptical operation.   First page image for you to operate by touching the icons.         Quick operating functional buttons are installed.   Operation of Your Elliptical
                                                                           Elliptical 17Quick-start operation: • Press “START” button and the console start performing the program. Press “LEVEL” up/down buttons further to change the resistance level you desire. • Press first page “HOME” button or “STOP” button to stop the belt.  Featuring functions of this elliptical: Touch-control screen is installed for the operation. You can directly touch any functional button on the screen or through quick buttons on the bottom to control. On the bottom, there are “Resistance” up/down buttons to control the resistance level, “START” button to begin the workout, “STOP” button to pause/stop running and “FAN” button to the fan on or off.  Pause/Stop: • Press “STOP” button once or “HOME” button on the screen, the elliptical will stop and keep values of time, distance and calorie on the screen. The screen will count down for 5 minutes then reset and return to the initial status. • Press “START” button to continue the workout during pause. • Press “STOP” button twice will terminate the setting and display the workout summary. If “STOP” button is pressed the third time, the console will return to the initial status (the beginning).  Heart rate testing feature: Pulse (heart rate) on the screen shows the current value of the heart beats per minute. You must hold both left and right stainless steel sensors to test the pulse. The pulse value will be shown on the screen continuously. You can also use hand pulse sensors for heart rate control. The console can also detect the pulse from heart rate stripe which is bipolar including signal transmitting.  To turn off the elliptical: The screen will turn it off (sleep status) when there is no command within 30 minutes. This is called sleeping mode and the elliptical will stop most of its activity except the minimum circuit detecting system for press buttons so that when there is any button activation, the elliptical restarts. There is only very little electric current (like a TV turned off) in the sleeping mode. It is fine to leave the main power switch on during sleeping mode.
                                                                           Elliptical 18Below is the instruction for touch screen operation: • First page HOME               There are four selections. Usually the “Language” is the first selection.    •When you press “Language” button on the first page HOME, it enters the menu with all languages selection.                    There are 12 languages to choose. Touch the desired language button to set and the system will return to the first page for the program operation. If you don’t want to change the language, press HOME button at the upper left corner to return to the first page or touch the return button at right upper right corner to return to the previous page to continue the operation.
                                                                           Elliptical 19• When TV button on the first page HOME is pressed, it enters TV interface.                       Now you can enjoy TV programs. If you want to workout and enjoy TV program simultaneously, press “START” button to start the elliptical.                    You can change the TV channel by using up/down buttons on the TV channel or channel remote control at bottom right to change the channel. Use up/down buttons on the volume to change the sound volume. Press “Mute” button to switch to silence. Touch Max Screen icon to switch to full screen. When you want to resume the original screen display, just touch the image and the screen resumes. Use level up/down buttons to control the resistance level. When you want to pause, just press “HOME” button at left top of the screen or press “STOP” button once and the pause window will show up. If you want to stop, you can choose to end the program or press “STOP” button again to end the program and display the workout summary. Pressing the “STOP” button third time and the console returns to the initial status (the beginning).
                                                                           Elliptical 20• When you touch “Internet” button on HOME first page, it rapidly enters internet interface.                       There are 6 internet connections to choose for you to go internet while you are exercising. (internet cable connection or WIFI connection is required) Press “START” button of the elliptical to start it.  Use “level up/down buttons to control the resistance level during the exercise. When you want to pause, just press “HOME” button at left top or press “STOP” button once and the pause window will show up. If you want to end, you can choose to end the program or press “STOP” button again to show the workout summary. If “STOP” button is pressed the third time, the console will return to the initial status. (the beginning)
                                                                           Elliptical 21• When you touch “Exercise Program” button on HOME first page, it enters “Menu“ interface.                     There are 10 program modes in Menu interface. If you want to choose Manual Program, just touch Manual button on the screen to enter the program for Manual.    MANUAL program:                 Then touch the “Profile” button to enter profile interface. If you do not want to do this program, just touch “HOME” icon at left top corner to return to the first page or press “Return” icon at right top corner to return to continue the previous operation. If profile selection is desired, press left or right arrow button to select the program you want.
                                                                           Elliptical 22The image entering the “Profile” interface is as below.                 After entering the profile image which is the program you want to perform, press “ENTER” button to enter next image. If not, touch “HOME” icon at left top corner to return to the first page or press “Return” icon at right top corner to return to continue the previous operation. If profile selection is desired, press left or right arrow button to select the program you want.                 This image is for setting program time, user’s age and weight. Press “ENTER” button after entering parameters to confirm. Then press “START” button to start the Manual Program. If not, press “HOME” button at left top corner to return to the first page or press “Return” icon at right top corner to return to continue the previous operation.
                                                                           Elliptical 23 The “SIMPLE” image after start is as below.                   The image after start is “SIMPLE” which is with all values on the bottom concerning your workout. The resistance level is at the right side and is adjustable with “UP” or “DOWN” button.  The bar chart for the resistance level is in the middle. TV interface button is on top to touch for entering the TV mode, or touch “INTERNET” for entering the internet interface. If “PROGRAM” button is touched, the system will ask you if you want to return to the first page for program selection with a field track and dashboard interfaces for the selection. Touch“TRACK” button to enter the track interface.                  The operating is similar with different interface only. The image shows the track with number of laps and other values.
                                                                           Elliptical 24 Touch “DASHBOARD” button on the bottom to enter the dashboard interface.                  The operating is similar with different interface only. You can choose one of three interfaces on the bottom with your own preference.  When using the first page button or “STOP” button to end the program, it enters the summary image.                On the summary image, all accumulating values concerning the workout are displayed.  You can touch the HOME button at left top or press “STOP” button to return to the first page image.
                                                                           Elliptical 25Programmable Features The New SPORTS offers ten preset programs, HILL, FAT BURN, CARDIO, TRENGTH, INTERVAL, HR, CUSTOM, Fitness Test and one Manual program.                   Preset Features: To choose and start preset program: •  Select a program then press the ENTER key to begin customizing the program with your personal data, or just press the start key to begin the program with the default settings.  •  After selecting a program and pressing ENTER to set your personal data, the touch Time window will darken with the default value of 20 minutes. You may use numeric keypads to adjust the time. After adjusting the time, press ENTER confirm and continue.   (Default time is 20 minutes)    •  The touch Age window will now be darken a value indicating your Age. Entering the correct Age will affect the Heart rate bar graph accuracy and also needed for the HR programs. use numeric keypads to make adjustments, and then press ENTER confirm and continue.               (Default age is 30 years old. Range=10 to 110)  •  The touch Weight window will now be darken a value indicating your Bodyweight. Entering your correct bodyweight affects the Kcal readout accuracy. use numeric keypads to make adjustments, and then press ENTER confirm and continue. (Default weight is 70KG. Range=10 to 150)  •  The touch Mix Level window will now be darken a value indicating your resistance. Entering your correct level affects the Mix level readout accuracy. use numeric keypads to make adjustments, and then press ENTER confirm and continue. (Default mix Level is 5. Range=5 to 40)  •  Now press the START key to begin your workout.
                                                                           Elliptical 26Preset program  The elliptical has five different programs that have been designed for a variety of workout goals. These five programs have factory preset profiles for achieving these different goals. The initial built-in level of difficulty for each program is set to a relatively easy level. You may adjust the level of difficulty (Max level) for each program before beginning by following the instructions in the touch Mix Level window after selecting your program.  Prog  SEG  1  2  3  4  5  6  7  89  10  11  12  13  14  15  16  17 18  19  20 Hill  Resistance  50  62.5  62.5  70  70  75 75  87.5  87.5  100  100  87.5  87.5  75  75  70  70 62.5  62.5  80 Fatburn Resistance  50  62.5  75  100  100  100  100  100  100  100  100  100 100  100  100  100  100  100 75  50 Cardio Resistance  50  62.5  62.5  70  70  75 75  80  80  87.5 95   95  100  100  100  100  100  87.5  75  50 Strength Resistance  50  62.5  62.5  70  70  75 75  80  80  87.5 95  95  100  100  100  100  100  87.5  75  50 Interval  Resistance  50  62.5  62.5  100  100  62.5  62.5  100  100  62.5 62.5  100 100  62.5  62.5  100  100  62.5  62.5  50  Hill program: The Hill program simulates going up and down a hill. The resistance in the pedals will steadily increase and then decrease during the program.  Work Profile ġ ġ  ġ ġ  ġ ġ ġ  ġ ġ ġ  ġ ġ ġ  ġ ġ ġ ġ ġ ġ ġ ġ ġ  ġ ġ  ġ ġ ġ  ġ ġġ ġ ġ ġ  ġ ġ ġ ġ ġ ġ ġ ġ ġ  ġ ġ  ġ ġ ġ  ġ ġġ ġ ġ ġ  ġ ġ ġ ġ ġ ġ ġ ġ ġ  ġ ġ  ġ ġ ġ  ġ ġ ġ  ġ ġ ġ  ġ ġ ġ ġ ġ ġ ġ ġ ġ  ġ ġ  ġ ġ ġ  ġ ġ ġ  ġ ġ ġ  ġ ġ ġ ġ ġ ġ ġ ġ ġġ ġ ġ ġ  ġ ġ ġ  ġ ġ ġ  ġ ġ ġ ġ ġ ġ ġ ġġ ġ ġ  ġ ġ ġ  ġ ġ ġ  ġ ġ ġ  ġ ġ ġ ġ ġ ġ ġ ġ ġ  ġ ġ  ġ ġ ġ  ġ ġ ġ  ġ ġ ġ  ġ ġ ġ ġ ġ ġ ġ  Fatb Burn program: The Fat Burn program is designed, as the name implies, to maximize the burning of fat. There are many schools of thought on the best way to burn fat but most experts agree that a lower exertion level that stays at a steady workload is the best. The absolute best way to burn fat is to keep your heart rate at around 60% to 70% of its maximum potential. This program does not use heart rate but simulates a lower, steady exertion workout.  Work Profile ġ ġ  ġ ġ  ġ ġ ġ  ġ ġ ġ  ġ ġ ġ  ġ ġ ġ ġ ġ ġ ġ ġ ġ  ġ ġ  ġ ġ ġ  ġ ġ ġ  ġ ġ ġ  ġ ġ ġ ġ ġ ġ ġ ġ ġ  ġ ġ  ġ ġ ġ  ġ ġ ġ  ġ ġ ġ  ġ ġ ġ ġ ġ ġ ġ ġ ġ  ġġ ġ ġ ġ  ġ ġ ġ  ġ ġ ġ  ġ ġ ġ ġ ġ ġ ġ ġ ġ  ġġ ġ ġ ġ  ġ ġ ġ  ġ ġ ġ  ġ ġ ġ ġ ġ ġ ġ ġ ġ  ġ ġ  ġ ġ ġ  ġ ġ ġ  ġ ġ ġ  ġ ġ ġ ġ ġ ġ ġ ġġ ġ ġ  ġ ġ ġ  ġ ġ ġ  ġ ġ ġ  ġ ġ ġ ġ ġ ġ ġ ġ ġ  ġ ġ  ġ ġ ġ  ġ ġ ġ  ġ ġ ġ  ġ ġ ġ ġ ġ ġ ġ
                                                                           Elliptical 27Cardio program: The Cardio program is designed to increase your Cardio vascular function. This is exercise for your heart and lungs. It will build up your heart muscle and increase blood flow and lung capacity. This is achieved by incorporating a higher level of exertion with slight fluctuations in work.  Work Profile ġ ġ  ġ ġ  ġ ġ ġ  ġ ġ ġ  ġ ġ ġ  ġ ġ ġ ġ ġ ġ ġ ġ ġ  ġ ġ  ġ ġġ ġ ġġ ġ ġ ġ  ġ ġ ġ ġ ġ ġ ġ ġ ġ    ġ ġ ġ ġ  ġ ġ ġ  ġ ġġ ġ ġ ġ ġ ġ ġ ġ ġ ġ  ġġ ġ ġ ġ  ġ ġ ġ  ġ ġ ġ  ġ ġ ġ ġ ġ ġ ġ ġ ġ  ġġ ġ ġ ġ  ġ ġ ġ  ġ ġ ġ  ġ ġ ġ ġ ġ ġ ġ ġ ġ  ġ ġ  ġ ġ ġ  ġ ġ ġ  ġ ġ ġ  ġ ġ ġ ġ ġ ġ ġ  ġ ġ ġ  ġ ġ ġ  ġ ġ ġ  ġ ġ ġ  ġ ġ ġ ġ ġ ġ ġ ġ ġ  ġ ġ  ġ ġ ġ  ġ ġ ġ  ġ ġ ġ  ġ ġ ġ ġ ġ ġ ġ  Strength program: The Strength program is designed to increase muscular strength in your lower body. This program will steadily increase in resistance to a high level and then keeps you there. This is designed to strengthen and tone your legs and glutes.  Work Profile ġ ġ  ġ ġ  ġ ġ ġ  ġ ġ ġ  ġ ġ ġ  ġ ġ ġ ġ ġ ġ ġ ġ ġ  ġ ġ  ġ ġ ġ  ġ ġ ġ  ġ ġġ ġ ġ ġ ġ ġ ġ ġ ġ ġ  ġ ġ  ġ ġ ġ  ġ ġ ġ  ġ ġ ġ  ġ ġ ġ ġ ġ ġ ġ ġ ġ  ġ ġ  ġ ġ ġ  ġ ġġ ġ ġ ġ  ġ ġ ġ ġ ġ ġ ġ ġ ġ  ġ ġ  ġ ġ ġ  ġ ġ ġ  ġ ġ ġ  ġ ġ ġ ġ ġ ġ ġ ġ ġ  ġ ġ  ġ ġ ġ  ġ ġ ġ  ġ ġ ġ  ġ ġ ġ ġ ġ ġ ġ ġ ġ  ġġ ġ ġ ġ  ġ ġ ġ  ġ ġ ġ  ġ ġ ġ ġ ġ ġ ġ  ġ ġ ġ  ġ ġ ġ  ġ ġ ġ  ġ ġ ġ  ġ ġ ġ ġ ġ ġ ġ ġ ġ  ġ ġ  ġ ġ ġ  ġ ġ ġ  ġ ġ ġ  ġ ġ ġ ġ ġ ġ ġ  Interval program: The Interval program takes you through high levels of intensity followed by periods of low intensity. This program increases your endurance by depleting your oxygen level followed by periods of recovery to replenish oxygen. Your cardio vascular system gets programmed to use oxygen more efficiently this way.   Work Profile ġ ġ  ġ ġ  ġ ġ ġ  ġ ġ ġ  ġ ġ ġ  ġ ġ ġ ġ ġ ġ ġ ġ ġ  ġġ ġ ġ ġ  ġ ġġ ġ ġ ġ  ġ ġ ġ ġ ġ ġ ġ ġ ġ  ġġ ġ ġ ġ  ġ ġġ ġ ġ ġ  ġ ġ ġ ġ ġ ġ ġ ġ ġ  ġġ ġ ġ ġ  ġ ġġ ġ ġ ġ  ġ ġ ġ ġ ġ ġ ġ ġ ġ  ġġ ġ ġ ġ  ġ ġġ ġ ġ ġ  ġ ġ ġ ġ ġ ġ ġ ġ ġ  ġġ ġ ġ ġ  ġ ġġ ġ ġ ġ  ġ ġ ġ ġ ġ ġ ġ ġġ ġ ġ  ġ ġ ġ  ġ ġ ġ  ġ ġ ġ  ġ ġ ġ ġ ġ ġ ġ ġ ġ  ġ ġ  ġ ġ ġ  ġ ġ ġ  ġ ġ ġ  ġ ġ ġ ġ ġ ġ ġ
                                                                           Elliptical 28Custom Program:  •  Select a Custom program then press the ENTER key to begin customizing the program with your personal data, or just press the start key to begin the program with the default settings.  •  The window will show the corresponding level profile, user can choose rename program by touching rename icon and entering profile. After new setting, level profile will be show on screen for adjustment.  •  Press next key save icon for new level profile then pop out next message window for Time Age, Weight and Mix level entry.  •  Now press the START key to begin your workout test for new program.  Fit-Test program:  The fitness test is based on the YMCA protocol and is a sub-maximal test that uses pre-determined, fixed work levels that are based on your heart rate readings as the test progresses. The test will take anywhere between 6 to 15 minutes to complete, depending on your level of fitness. The test ends when your heart rate reaches 85% of maximum at any time during the test or your heart rate is between 110 bpm and 85% at the end of two consecutive stages. At the end of the test a VO2max score will be given. VO2max stands for Volume of Oxygen uptake which is a measurement of how much oxygen you need to perform a known amount of work.  The YMCA protocol uses two to four, 3 minute stages of continuous exercise (see charts below). You will be asked to choose either, Male or Female at the beginning of the test. This choice determines which test parameters will be used during the test as shown in the charts below. The only caveats are that if you are a very de-conditioned Male you need to choose option Female. If you are a very conditioned female you need to choose option Male.
                                                                           Elliptical 29 Workload chart for male or very fit female:  1st Stage     50 watts - 300 kgm/min      HR   < 90      90 - 105      > 105   2nd Stage  150 watts - 900 kgm/min   125 watts - 750 kgm/min   100 watts - 600 kgm/min  HR HR <120 HR 120-135 HR >135  HR <120 HR 120-135 HR >135  HR <120 HR 120-135  HR >135 3rd stage 225 watts - 1350 kgm/min 200 watts - 1200 kgm/min 175 watts - 1050 kgm/min 200 watts - 1200 kgm/min 175 watts - 1050 kgm/min 150 watts - 900 kgm/min 175 watts - 1050 kgm/min 150 watts - 900 kgm/min 125 watts - 750 kgm/min    Workload chart for female or de-conditioned male    1st Stage  25W 150 kgm/min   Heart Rate  HR<80  HR: 80-90  HR: 90-100  HR>100 2nd Stage  125W 750 kgm/min 100W 600 kgm/min 75W 450 kgm/min 50W 300 kgm/min 3rd Stage  150W 900 kgm/min 125W 750 kgm/min 100W 600 kgm/min 75W 450 kgm/min 4th Stage  175W 1050 kgm/min 150W 900 kgm/min 117W 700 kgm/min 100W 600 kgm/min  Before the test:  •  Make sure you are in good health; check with your physician before performing any exercise if you are over the age of 35 or persons with pre-existing health conditions. •  Adjust the seat to the proper position so that when your leg is extended during pedaling there is a slight bend at the knee of about 5 degrees. •  Make sure you have warmed up and stretched before taking the test. •  Do not take in caffeine before the test. •  Hold the hand grips gently, do not tense up.
                                                                           Elliptical 30 Fitness test programming:  Press the Fitness-test button and press enter.  1.  The message window will ask you to enter your gender. You may adjust the Age and Weight setting by using numeric keypads.   2.  Now press START to begin the test.  During the test:  •  The console must be receiving a steady heart rate for the test to begin. You may use the hand pulse sensors or wear a heart rate chest strap transmitter. •  You must maintain a steady 50 RPM pedal speed. If your pedal speed drops below 48 RPM or goes above 52 RPM the console will emit a steady beeping sound until you are within this range. •  You may through the various data readings in the message window by pressing the change under the message window. 1.  The message window will always display your pedal speed on the right side to help you maintain 50RPM.   2.  The data shown during the test is: a.  Work in KGM is actually an abbreviated form of kg-m/min. which is a work measurement of kilogram-force meter/minute b.  Work in Watts (1 watt is equal to 6.11829727787 kg-m/min.) c.  HR is your actual heart rate; TGT is the target heart rate to reach to end the test. d.  Time is the total elapsed time of the test.   After the test:  •  Take note of your score because the console will automatically return to the start-up mode after a few minutes.
                                                                           Elliptical 31 What your score means:  VO2max Chart for males and very fit females    18-25  26-35  36-45  46-55  56-65  65+ years old  years old  years old  years old  years old  years old  excellent   >60   >56  >51   >45   >41   >37  good   52-60   49-56   43-51   39-45   36-41   33-37 above average  47-51  43-48  39-42  35-38  32-35  29-32 average  42-46  40-42  35-38  32-35  30-31  26-28 below average  37-41  35-39  31-34  29-31  26-29  22-25 poor   30-36  30-34  26-30  25-28  22-25  20-21 very poor   <30   <30  <26   <25   <22   <20   VO2max Chart for females and de-conditioned males    18-25  26-35  36-45  46-55  56-65  65+ years old  years old  years old  years old  years old  years old  excellent  56 52 45 40 37 32 good   47-56   45-52   38-45   34-40   32-37   28-32 above average  42-46  39-44  34-37  31-33  28-31  25-27 average  38-41  35-38  31-33  28-30  25-27  22-24 below average  33-37  31-34  27-30  25-27  22-24  19-22 poor   28-32  26-30  22-26  20-24  18-21  17-18 very poor   <28   <26  <22   <20   <18   <17
                                                                           Elliptical 32Heart Rate Training A word about Heart Rate: The old motto, “no pain, no gain”, is a myth that has been overpowered by the benefits of exercising comfortably. A great deal of this success has been promoted by the use of heart rate monitors. With the proper use of a heart rate monitor, many people find that their usual choice of exercise intensity was either too high or too low and exercise is much more enjoyable by maintaining their heart rate in the desired benefit range.  To determine the benefit range in which you wish to train, you must first determine your Maximum Heart Rate. This can be accomplished by using the following formula: 220 minus your age. This will give you the Maximum heart rate (MHR) for someone of your age. To determine the effective heart rate range for specific goals you simply calculate a percentage your MHR. Your Heart rate training zone is 50% to 90% of your maximum heart rate. 60% of your MHR is the zone that burns fat while 80% is for strengthening the cardio vascular system. This 60% to 80% is the zone to stay in for maximum benefit.  For someone who is 40 years old their target heart rate zone is calculated: 220 – 40 = 180 (maximum heart rate) 180 x .6 = 108 beats per minute (60% of maximum) 180 X .8 = 144 beats per minute (80% of maximum)  So for a 40 year old the training zone would be 108 to 144 beats per minute.  If you enter your age during programming the console will perform this calculation automatically. Entering your age is used for the Heart Rate control programs. After calculating your Maximum Heart Rate you can decide upon which goal you would like to pursue.    The two most popular reasons for, or goals, of exercise are cardiovascular fitness (training for the heart and lungs) and weight control. The black columns on the chart above represent the Maximum Heart Rate for a person whose age is listed at the bottom of each column. The training heart rate, for either cardiovascular fitness or weight loss, is represented by two different lines that cut diagonally through the chart. A definition of the lines’ goal is in the bottom left-hand corner of the chart. If your goal is cardiovascular fitness or if it is weight loss, it can be achieved by training at 80% or 60%, respectively, of your Maximum Heart Rate on a schedule approved by your physician. Consult your physician before participating in any exercise program.    With all Heart Rate Control elliptical machines you may use the heart rate monitor feature without using the Heart Rate Control program. This function can be used during manual mode or during any of the nine different programs. The Heart Rate Control program automatically controls resistance at the pedals.  ”WARNING” Heart rate monitoring system may be inaccurate. Over exercise may result in injury or death. If you feel faint stop exercising immediately. 90
                                                                           Elliptical 33Rate of Perceived Exertion  Heart rate is important but listening to your body also has a lot of advantages. There are more variables involved in how hard you should workout than just heart rate. Your stress level, physical health, emotional health, temperature, humidity, the time of day, the last time you ate and what you ate, all contribute to the intensity at which you should workout. If you listen to your body, it will tell you all of these things.  The rate of perceived exertion (RPE), also know as the Borg scale, was developed by Swedish physiologist G.A.V. Borg. This scale rates exercise intensity from 6 to 20 depending upon how you feel or the perception of your effort.  The scale is as follows:  Rating Perception of Effort  6 Minimal 7 Very, very light 8 Very, very light + 9 Very light 10 Very light + 11 Fairly light 12 Comfortable 13 Somewhat hard 14 Somewhat hard + 15 Hard 16 Hard + 17 Very hard 18 Very hard + 19 Very, very hard 20 Maximal  You can get an approximate heart rate level for each rating by simply adding a zero to each rating. For example a rating of 12 will result in an approximate heart rate of 120 beats per minute. Your RPE will vary depending up the factors discussed earlier. That is the major benefit of this type of training. If your body is strong and rested, you will feel strong and your pace will feel easier. When your body is in this condition, you are able to train harder and the RPE will support this. If you are feeling tired and sluggish, it is because your body needs a break. In this condition, your pace will feel harder. Again, this will show up in your RPE and you will train at the proper level for that day.
                                                                           Elliptical 34   How to wear your wireless chest strap transmitter: 1. Attach the transmitter to the elastic strap using the locking parts. 2. Adjust the strap as tightly as possible as long as the strap is not too tight to remain comfortable. 3. Position the transmitter with the logo centered in the middle of your body facing away from your chest (some people must position the transmitter slightly left of center). Attach the final end of the elastic strap by inserting the round end and, using the locking parts, secure the transmitter and strap around your chest. 4. Position the transmitter immediately below the pectoral muscles. 5. Sweat is the best conductor to measure very minute heart beat electrical signals. However, plain water can also be used to pre-wet the electrodes (2 black square areas on the reverse side of the belt and either side of transmitter). It’s also recommended that you wear the transmitter strap a few minutes before your work out. Some users, because of body chemistry, have a more difficult time in achieving a strong, steady signal at the beginning. After “warming up”, this problem lessens. As noted, wearing clothing over the transmitter/strap doesn’t affect performance. 6. Your workout must be within range - distance between transmitter/receiver – to achieve a strong steady signal. The length of range may vary somewhat but generally stay close enough to the console to maintain good, strong, reliable readings. Wearing the transmitter immediately against bare skin assures you of proper operation. If you wish, you may wear the transmitter over a shirt. To do so, moisten the areas of the shirt that the electrodes will rest upon. Note: The transmitter is automatically activated when it detects activity from the user’s heart. Additionally, it automatically deactivates when it does not receive any activity. Although the transmitter is water resistant, moisture can have the effect of creating false signals, so you should take precautions to completely dry the transmitter after use to prolong battery life (estimated transmitter battery life is 2500 hours). If your chest strap has a replaceable battery the replacement battery is Panasonic CR2032.  Erratic Operation: CAUTION! Do not use this elliptical for Heart Rate Control unless a steady, solid Actual Heart Rate value is being displayed. High, wild, random numbers being displayed indicate a problem. Areas to look at for interference, which may cause erratic heart rate: (1) Microwave ovens, TVs, small appliances, etc. (2) Fluorescent lights. (3) Some household security systems. (4) Perimeter fence for a pet. (5) Some people have problems with the transmitter picking up a signal from their skin. If you have problems try wearing the transmitter upside down. Normally the transmitter will be oriented so the logo is right side up. (6) The antenna that picks up your heart rate is very sensitive. If there is an outside noise source, turning the whole machine 90 degrees may de-tune the interference. (7) If you continue to experience problems contact your dealer. Using a Heart Rate Transmitter
                                                                           Elliptical 35Heart Rate Control (HR) Program operation:  To start the HR program follow the instructions below or just press the HR key then the Enter button and follow the directions in the message window.  1.  Press the HR key then press the Enter key.   2.  The touch window will ask you to enter your Time. You may use numeric keypads to adjust the time. After press ENTER confirm and continue. 3.  The touch window will ask you to enter your Age. You may use numeric keypads to adjust the Age. After press ENTER confirm and continue. 4.  The touch window will ask you to enter your Weight. You may use numeric keypads to adjust the Weight. After press ENTER confirm and continue. 5.  The touch window will ask you to enter your Target HR(65%). You may use numeric keypads to adjust the Target HR(65%), After press ENTER confirm and continue.     (Default HR is 124. Range=60 to 200) 6.  Now you are finished editing the settings and can begin your workout by pressing the Start key. 7.  If you want to increase or decrease the workload at any time during the program press the Up or Down key. This will allow you to change your target heart rate at any time during the program. !!!!Constant Power program:  A Watts program is a controllable constant power whose Level adjusts when the speed is changed. To start the Constant Power program follow the instructions below or just press the Constant Power key, then the Enter button and follow the directions in the Message Window.    1.  Press the Constant Power key, then press the Enter key.   2.  The touch window will ask you to enter your Time. You may use numeric keypads to adjust the time. After press ENTER confirm and continue. 3.  The touch window will ask you to enter your Age. You may use numeric keypads to adjust the Age. After press ENTER confirm and continue. 4.  The touch window will ask you to enter your Weight. You may use numeric keypads to adjust the Weight. After press ENTER confirm and continue. 5.  The touch window will ask you to enter your Target Watts. You may use numeric keypads to adjust the Target Watts. After press ENTER confirm and continue. (Default Target Watts is 50. Range=50 to 200) 6.  Now you are finished editing the settings and can begin your workout by pressing the Start key.   7.  If you want to increase or decrease the workload at any time during the program, press the Up/Down key. This will allow you to change your target Watt level at any time during the program.   8.  When the program ends, you may press Start to begin the same program again or Stop to exit the program.
                                                                           Elliptical 36     EXPLODED VIEW DIAGRAM
                                                                           Elliptical 37   Dwg #  Part description  Qty 1  Main Frame  1 2  Rear Rail Assembly  1 3  Rail Support Assembly  1 4  Cross Bar  2 5  Pedal Arm(L)  1 6  Pedal Arm(R)  1 7  Connecting Arm (L)  1 8  Connecting Arm (R)  1 9  Swing Arm (L)  1 10  Swing Arm (R)  1 11  Console Mast  1 12  Crank Axle  1 13  Idler Wheel Plate  1 21  6005_Bearing(NTN) 10 23  6203_Bearing 6 24  6003_Bearing 8 25  Rod End Bearing    2 26  Retaining Bracket, Aluminum Track  6 27  Drive Belt  1 28  Ø330_Drive Pulley  1 29  Flywheel 1 30  Ø15 × 7T_Magnet  1 31  Console Assembly  1 32  1600m/m_CSAFE  Connecting Wire  1 33  1600m/m_TV Signal Cable  1 34  1600m/m_network W/Cable  1 35  1300m/m_Computer Cable  1 36  1350m/m_Console Power Cord  1 37  700m/m_Wire Brake Coil Harness  1 38  200m/m_Power Cord(Heat-Shrinkable Tube)  1 39  450m/m_Reed Switch  1 40  850m/m_Handpulse Assembly(XHP-3)  1 41  850m/m_Handpulse Assembly(XHP-4)  1 42  Coaxial Connector  1 43  Power Cord  1 44  Generator/Brake Controller  1 45  Power Adaptor  1 46  1600m/m_HDMI Cable  1 47  AC Electronic Module  1 48  80m/m_Connecting Wire (White)  1 49  80m/m_Connecting Wire (Black)  1 50  200m/m_Ground Wire  1 51  combo board-HDMI/TV/CSAFE/etwork  1 53  Interface Board  1 54  Attaching Bracket  2 PARTS LIST
                                                                           Elliptical 38 Dwg #  Part description  Qty 55  Attaching Plate    1 56  Ø72_Slide Wheel , Urethane    4 57  Ø35 × 10_Rubber Foot  4 58  Side Case (L)  1 59  Side Case (R)  1 60  Round Disk    2 61  Round Disk Cover  2 62  Handle Bar Axle Inner Cover  2 63  Incline Bottom Cover  1 64  Pedal Arm Cover (L)  1 65  Pedal Arm Cover (R)  1 66  Front Stabilizer Cover  1 67  Pedal (L)  1 68  Pedal (R)  1 69  Slide Wheel Cover  2 70  Ø32(1.8T)_Button Head Plug  2 71  Pedal  End Cover  2 72  Connecting Arm Cover A (R)  2 73  Connecting Arm Cover A (L)  2 74  Connecting Arm Cover B (R)  2 75  Connecting Arm Cover B (L)  2 76  Front Handle Bar Cover (L)  1 77  Rear Handle Bar Cover (L)  1 78  Front Handle Bar Cover (R)  1 79  Rear Handle Bar Cover (R)  1 80  Console Mast Cover (L)  1 81  Console Mast Cover (R)  1 82  25 × 25 × 15T_Rubber Foot Pad  2 83  Rear Stabilizer Cover (A)  2 84  Rear Stabilizer Cover (B)  2 85  Aluminum Axle End Cap  2 86  Board Stand  1 87  Drink Bottle Holder  1 88  Aluminum Track  2 89  Rail Support Aluminum Track  1 90  Idler Wheel Bushing    3 91  Ø62_Transportation Wheel  2 92  M4 × 5T_Nyloc Nut  2 93  M4 × 12L_Phillips Head Screw  2 94  Ø17 × 117L_Carriage Bolt  2 95  5/16" × UNC18 × 3/4"_Hex Head Bolt  6 96  5/16" × 2"_Button Head Socket Bolt  2 97  M5 × 12L_Phillips Head Screw  37 98  1/4" × UNC20 × 3/4"_Hex Head Bolt  8 99  Ø25_C Ring  2 100  Ø17_C Ring  5 101  M8 × 9T_Nyloc Nut  1
                                                                           Elliptical 39 Dwg #  Part description  Qty 102  1/4" × 8T_Nyloc Nut  4 103  5/16" × 7T_Nyloc Nut  2 104  3/8" × 7T_Luck Nut  8 105  Ø3/8" × Ø19 × 1.5T_Flat Washer  4 106  Ø5/16" × Ø35 × 1.5T_Flat Washer  4 107  Ø5/16" × Ø23 × 1.5T_Flat Washer  6 108  M8 × 170L_J Bolt  1 109  Ø17_Wave Washer  12 110  Ø5 × 16L_Tapping Screw  6 111  4 × 15L_Sheet Metal Screw  1 112  4 × 19L_Sheet Metal Screw  7 113  5 × 16L_Tapping Screw  16 114  3 × 20L_Tapping Screw  4 115  Ø1/4" × 19_Flat Washer  17 116  5 × 19L_Tapping Screw  2 117  Ø1/4" × 13 × 1.0T_Flat Washer  8 118  Ø1/4"_Spring Washer  8 119  M6 × 15L_Phillips Head Screw  6 120  5/16" × UNC18 × 5/8"_Phillips Head Screw  2 121  Woodruff Key  2 122  M8 × 30L_Socket Head Cap Bolt  2 123  3/8" × 2"_Flat Head Socket Bolt  4 124  5/16" × 12L_Hex Head Bolt  2 125  M14 × 7L_Luck Nut  2 126  5/16" × UNC18 × 15L_Socket Head Cap Bolt  2 127  3/8" × 2-1/4"_Button Head Socket Bolt  4 128  3/8" × UNC16 × 3-3/4"_Button Head Socket Bolt  6 129  Ø3/8" × 23 × 2.0T_Curved Washer  6 130  Ø3/8" × Ø19 × 1.5T_Flat Washer  4 131  M5 × 10L_Phillips Head Screw  8 132  M8 × 25L_Socket Head Cap Bolt  4 133  Ø25_Wave Washer  3 134  3.5 × 12L_Sheet Metal Screw  18 135  3/8" × 3/4"_Hex Head Bolt  2 136  M10 × 8T_Nyloc Nut  2 137  M10 × 1.5(14L)_Bolt  2 138  Ø3/8" × 30 × 2.0T_Flat Washer  2 139  13/14m/m_Wrench 1 140  L Allen Wrench  1 141  L Allen Wrench(M12)  1 142  Combination Wrench  1 143  Phillips Head Screw Driver  1 144  M3 × 10L_Phillips Head Screw  9

Navigation menu