Electronics Tomorrow 964F110813 BLE Alarm Clock User Manual 964F
Electronics Tomorrow Ltd. BLE Alarm Clock 964F
UserManual.wiki
>
Electronics Tomorrow
>
964F110813 User Manual
User Manual
Navigation menu
Upload a User Manual
Namespaces
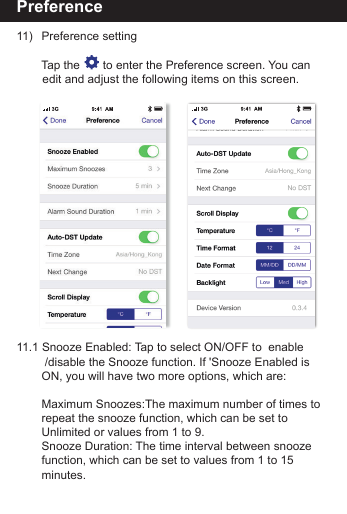
Wiki Guide
HTML
PDF
Info
Views
User Manual
Discussion / Help
Navigation
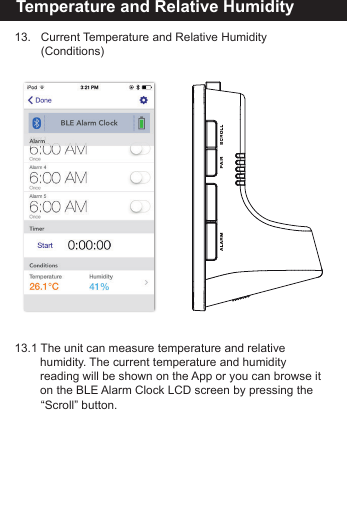
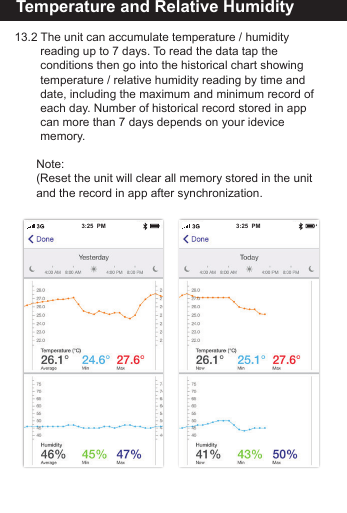
![Instruction Manual [For iPod, iPhone and iPad User]BLE Alarm Clock](https://usermanual.wiki/Electronics-Tomorrow/964F110813/User-Guide-2391828-Page-1.png)
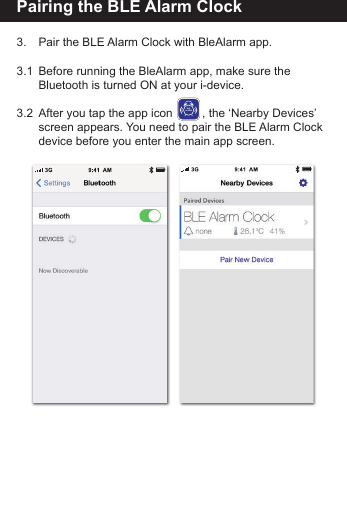
![Pairing the BLE Alarm Clock3.3 Tap “ Pair New Device” to search for nearby devices.3.4 Press and hold the [PAIR] button on the BLE Alarm Clock device for 5 seconds. You can find that the icon start to blink.3.5 The new BLE Alarm Clock will be displayed on App and is ready for pairing. Tap the "BLE Alarm Clock" will start the pairing and connection process. Once the BLE Alarm Clock is paired, it will start time and data synchronization.BLE Alarm Clock](https://usermanual.wiki/Electronics-Tomorrow/964F110813/User-Guide-2391828-Page-6.png)

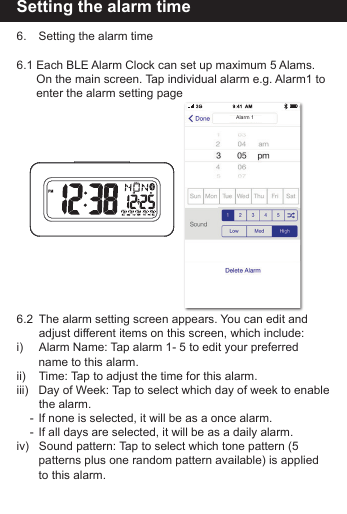
![Setting the alarm timev) Alarm volume level: Tap to select the alarm sound volume level (three options: Low, Med and High).6.3 Complete the alarm setting.i) Tap [Done] to save the alarm setting and turn on the alarm.ii) At the main screen,user can turn the alarm on / off by scrolling the right and leftOnOff](https://usermanual.wiki/Electronics-Tomorrow/964F110813/User-Guide-2391828-Page-12.png)
![Snooze operation7. Using the SNOOZE function7.1 When the alarm sounds, press the [Snooze] button to get an extra 5 minutes of sleep. The snooze will repeat up to three times. 7.2 The above default value is set by the factory. User can set the “Maximum Snooze” and “Snooze Duration” in the preference screen.](https://usermanual.wiki/Electronics-Tomorrow/964F110813/User-Guide-2391828-Page-13.png)
![To turn off the alarm8. To disable the alarm8.1 When the alarm sounds, press the [Snooze] button once or press [Alarm] to disable the alarm. 8.2 The alarm will sound for 1 minute and stop automatically. If Snooze Enabled setting is ON, the alarm will repeat every 5 minutes. You can press the [Snooze] button to interrupt the alarm momentarily, or can press [Alarm] button to turn off the alarm and stop the snooze function completely.8.3 User can tap the alarm time to disable the alarm completely ( Please make sure your app is paired with the device)](https://usermanual.wiki/Electronics-Tomorrow/964F110813/User-Guide-2391828-Page-14.png)
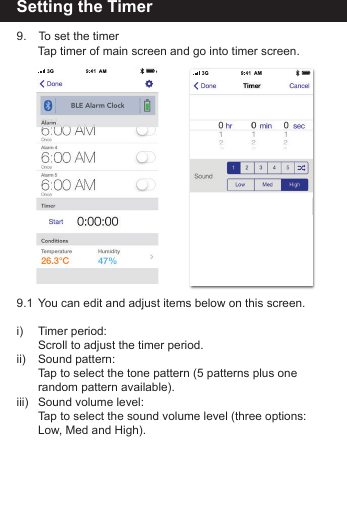
![Setting the timer9.2 Using the Timer In the Home screen, you can tap “Start” under Timer to start counting. Then you can tap “Stop” to stop the current timer and “Start” to re-continue the timer again. The timer can be reset by tapping the [Reset].](https://usermanual.wiki/Electronics-Tomorrow/964F110813/User-Guide-2391828-Page-16.png)
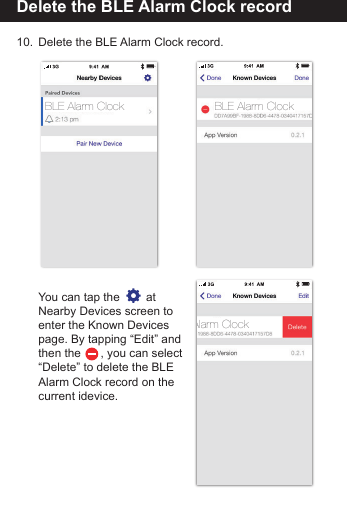
![Reset the BLE Alarm Clock12. Reset the BLE Alarm ClockAfter reset, all data in the BLE Alarm Clock is deleted. Press and hold the [PAIR] button againto re-pair the BLE Alarm Clock.If it has been paired previouslywith the same idevice, you canselect “Restore” to resume all setting and data or select “Erase” to start all from scratch.If the BLE Alarm Clock is not working properly, try to press RESET button to resume default setting. The LED flashes twice in (purple) color, then the LED will flash once per 6 seconds inred color.BLE Alarm Clock](https://usermanual.wiki/Electronics-Tomorrow/964F110813/User-Guide-2391828-Page-20.png)
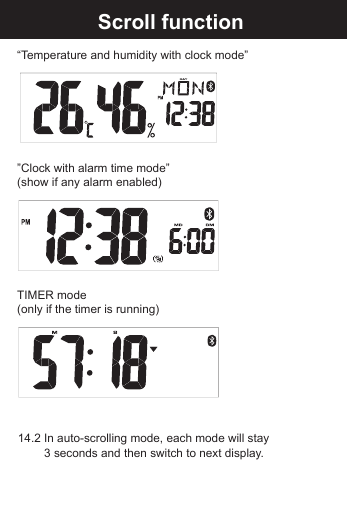
![Reset the BLE Alarm C14. You can press the [Scroll] button on the BLE Alarm Clock to switch between different information manually. Or you can press and hold the [Scroll] button to enable/disable auto-scrolling display function. 14.1 The scrolling display will be in following order:“Clock with calendar mode” ”Calendar Mode”Scroll function](https://usermanual.wiki/Electronics-Tomorrow/964F110813/User-Guide-2391828-Page-23.png)