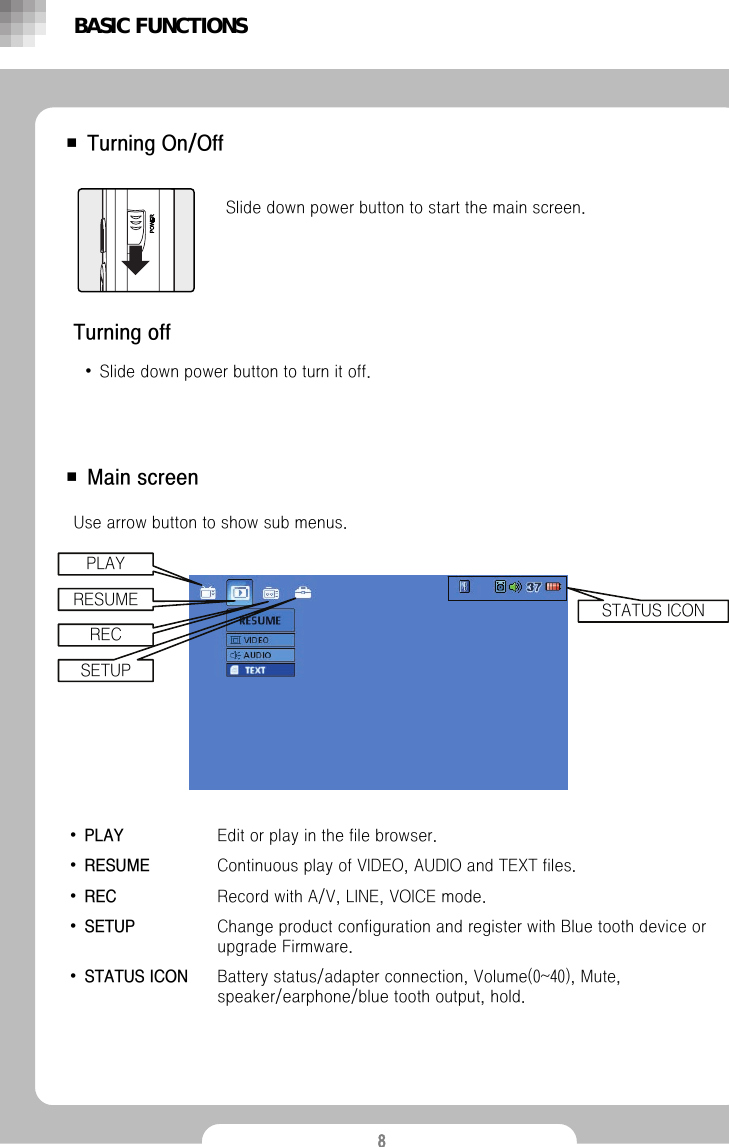
Elentec PMP2500 PORTABLE MULTIMEDIA PLAYER WITH BLUETOOTH User Manual Microsoft PowerPoint Merlin manual eng 0621
Elentec Co.,Ltd. PORTABLE MULTIMEDIA PLAYER WITH BLUETOOTH Microsoft PowerPoint Merlin manual eng 0621
Elentec >
users manual
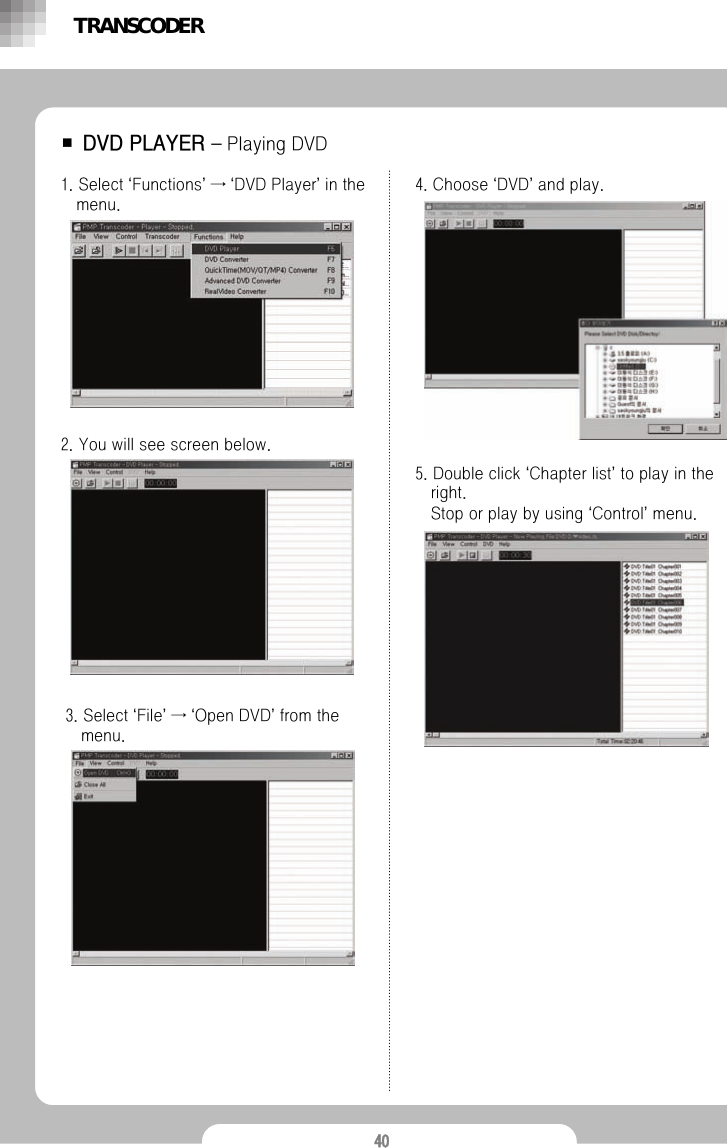
![10■ PLAY MenuOpen browser window with play menu. Choose files to play and press play button.•Select file and press [▶II] to play. •It plays same files repeatedly within the folder where the first files were selected.Audio player (Refer to page 15)BASIC FUNCTIONSMovie player (Refer to page 13)Image player (Refer to page 18) Text player (Refer to page 19)](https://usermanual.wiki/Elentec/PMP2500/User-Guide-688779-Page-10.png)
![12■ Browser POP UP MenuSelect files in browser and press [M], then a pop up will turn up for setting up play lists, file copy/past/delete and file sorting. Press [II] after selecting wanted menu.Press[■] to close pop up after finishing setup.BASIC FUNCTIONSAdd to Audio listA pop up will turn up after selecting audio file and pressing [M button]. Select files and select “Add to Audio list”to add audio files to play lists.Play Audio list‘Play Audio list‘plays files selected by previous user. To view play lists, press [M] in audio play screen and select “List set”again. CopyCopy files or folders.PastePastes copied files or folders.DeleteDelete files or folders.Sort by nameSort files by its name.Sort by extensionSort files by its extension.Sort by typeSort files by its type.PreviewTurn on/off preview of movie or image in the browser.Set WallpaperSet wallpaper you want. Select image files (jpg,bmp,tiff.gif) and press [M], then select “Set Wallpaper”in the pop up window and press [▶II].Use 480x272 pixels for image size which is optimized resolution for PMP.](https://usermanual.wiki/Elentec/PMP2500/User-Guide-688779-Page-12.png)
![13■ Playing Video fileszPlaying Video files with browserSelect PLAY in the main menu and use [arrow key] to choose files to play, then use [▶II] or [▶▶].Movies will be played in movie player screen. zViewing movies in RESUME MenuSelect ‘VIDEO’under ‘RESUME’Menu and the most recently played file will be displayed. Press [▶II] will play from the last played position.BASIC FUNCTIONSCheck below when no sub menus are available under ‘Resume’menu.•After shipment from factory or no files were previously played.•System/Syetem ini files were deleted.•System default is set in ‘Set up’menu.•Files to be played are deleted. •File name has been changed.•Abnormal power-off or reset.](https://usermanual.wiki/Elentec/PMP2500/User-Guide-688779-Page-13.png)
![14■ Setting options for playing moviesPress [M] during playing movie to change settings in the option.Press [◀◀/▶▶] to move between menus and use [+/-] to change settings. Press [■] to finish.PLAYEROperations to play movies. BASIC FUNCTIONSOP 1•REPEATFOLDER : Repeat all ONE : Repeat current file only OFF : No Repetition •RATIOChange screen ratio•SUBTITLESub-title on•SYNCSub-title synchronization•MUTE MODE Turn the sound off•SPEAKER Turning on/off internal speaker•LCD BRIGHT LCD brightness tuning•PIC BRIGHT Screen brightness tuningOP 2VolumeStopMove to option menu Play/PauseRewind backward/forward up to x2>x4>x8>x16>x32>x64>x128or vice versa](https://usermanual.wiki/Elentec/PMP2500/User-Guide-688779-Page-14.png)
![15■ Playing music fileszPlaying music files with browserSelect ‘PLAY’in the main menu and choose files to play, then press [▶II]. Press [◀◀/▶▶] to change menus and use [+/-] to change settings. Press [■] to finish. Press [M] to edit play lists. (Refer to page 13)Audio files will be played in audio play mode.zPlaying audio files in RESUME menuSelecting ‘Audio’under ‘RESUME’menu will display the file one after last flayed file. Press [▶II] to play.BASIC FUNCTIONSCheck below when no sub menus are available under ‘Resume’menu.•After shipment from factory or no files were previously played.•System or System ini files were deleted.•System default is set in Set up menu.•Files to be played are deleted.•File name’s been changed.•Abnormal power-off or reset.](https://usermanual.wiki/Elentec/PMP2500/User-Guide-688779-Page-15.png)
![16■ Setting options for playing audio filesPress [M] during playing audio files to change setting in the right.Press [◀◀/▶▶]to move between menus and use [+/-] to change settings. Press [■] to finish.PLAYEROperations to play audio files.BASIC FUNCTIONSLYRICSA preview window for viewing Lyrics will appear only for audio files with sub title.Press : Play next musicPress and hold : rewindRepeatPress : setting the length of session to be repeated. Press and hold : toggling repeat mode (Off→One→All)VolumePress : Move to the beginning of file after 10 seconds’playMove to the previous file back to 10 second’s playPress and hold : rewindMove to menuStopPlay/Pause](https://usermanual.wiki/Elentec/PMP2500/User-Guide-688779-Page-16.png)
![17•EQ SELECTSetting EQ mode•WOLFSON3DSetting WOLFSON3D •3D DEPTHSetting 3D DEPTHBASIC FUNCTIONSLIST SETPress [M] and select “LISTSET”to see file list. Press [+/-] to choose audio files and press [M] or [▶II] to bring pop up window. File list pop upPlay File : Pplay current fileAdd To List : Move to selected file list.EQ SET•BASS BOOSTTuning for low frequency sound•TRBL BOOSTTuning for high frequency sound•BALANCETuning speaker output•MUTEMODETurning off sound•REPEATALL : Repeat all ONE : Repeat current file onlyOFF : Canceling Repeat mode•SHUFFLERandom playOP 1Switch-over between file list and play listPress [◀◀/▶▶] to switchoverPlay list pop upPlay File : Play current fileDel from List : Delete file](https://usermanual.wiki/Elentec/PMP2500/User-Guide-688779-Page-17.png)
![18■Viewing ImagezViewing Image in PLAY menu with browserSelect ‘PLAY’in the main menu and choose the image file to play and press [▶II].Image player will appear and images will be played. BASIC FUNCTIONS■ Setting options for playing imagesPress [M] during playing images to change settings in the option window. Press [◀◀/▶▶] to move between menus and [+/-] to change settings. Press [■] to finish.PLAYEROperations for playing image. OP 1•SLIDESHOW START Displays images from current image•SLIDESHOW TIME Setting slideshow frame rate•LCD BRIGHT LCD brightness tuning•PIC BRIGHT Display brightness tuningMove to option menuGo to Previous/Next imagePan in zoon modeStopReleasing zoom modePan in zoom modeZoom in 200%](https://usermanual.wiki/Elentec/PMP2500/User-Guide-688779-Page-18.png)
![19■Viewing TextsSelect ‘PLAY’in the main menu and choose text file to play and press [▶II].Compatible files have ‘.txt’extension.Text will be viewed after preview. Selecting ‘Text’under RESUME menu will show the file viewed last time. Press [▶II] to resume from previously played position. BASIC FUNCTIONSzViewing Text in PLAY menu with browserzViewing Text in RESUME menuCheck below when no sub menus are available under ‘Resume’menu.•After shipment from factory or no files were previously played.•System or System ini files were deleted.•System default is set in Set up menu.•Files to be played are deleted.•File name’s been changed.•Abnormal power-off or reset.](https://usermanual.wiki/Elentec/PMP2500/User-Guide-688779-Page-19.png)
![21■ RecordingzRecording (Audio/Video)Connect this product to external devices and select ‘A/V’under ‘REC’menu.Press [▶II] after preview to start recording. Press [■] to save “av rec0.asf”file into PMP hard disk. [Line] Recording - Connect this product to external device and select ‘LINE’under ‘REC’menu. [VOICE] Recording - No Connection is required.Select ‘LINE(VOICE)’under the ‘REC’menu.After ‘Recording player screen’shows up, press [▶II] to record voice through ‘AV IN’(using internal microphone).Press [■] to save “line(voice) rec0.asf”file into PMP hard disk. zLINE/VOICE RecordingBASIC FUNCTIONS](https://usermanual.wiki/Elentec/PMP2500/User-Guide-688779-Page-21.png)
![22■ Setting options for RecordingPress [M] during recording to change setting in the option window right side.Press [◀◀/▶▶] to move between menus and press [+/-] to change settings. Press [■] to finish.PLAYEROperations for Audio/Video Recording.BASIC FUNCTIONSVolumeStop/Back to main menuMove to option menuStart/Pause Recording Start/Stop Recording OP 1•REC TIMEOUT Setting recording time•REC QUALITY Recording quality tuningOP 2•MUTE MODETurning off sound•SPEAKERTurning off internal speaker•LCD BRIGHT LCD brightness tuning•PIC BRIGHTDisplay brightness tuning](https://usermanual.wiki/Elentec/PMP2500/User-Guide-688779-Page-22.png)
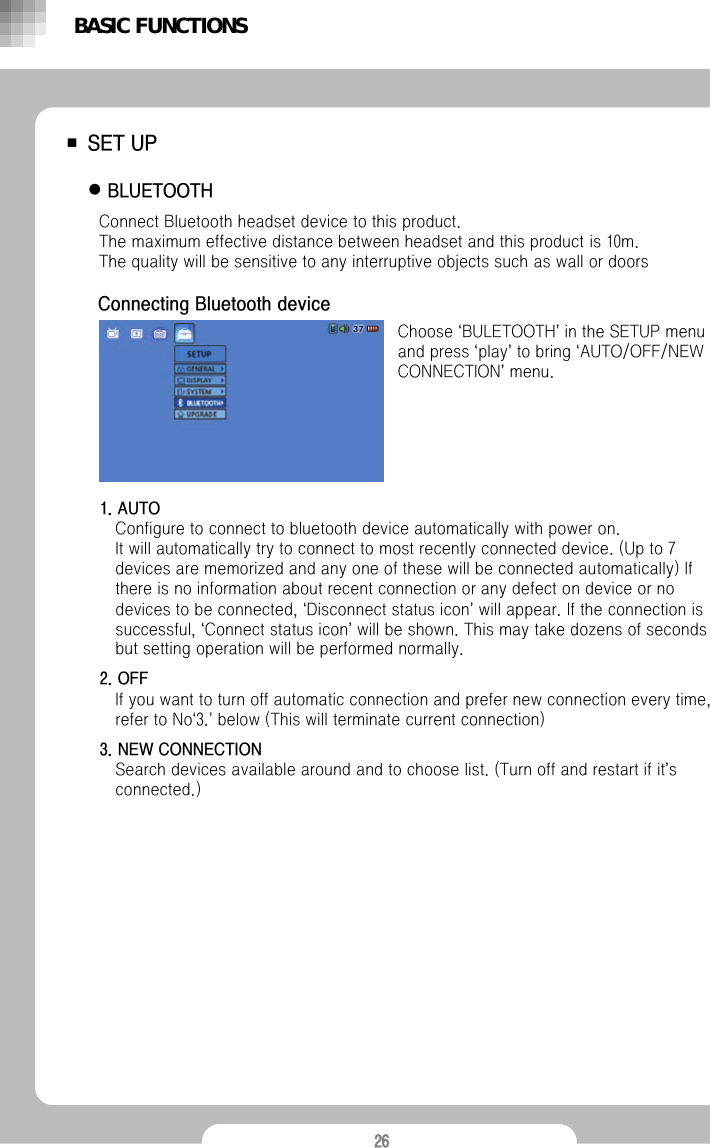
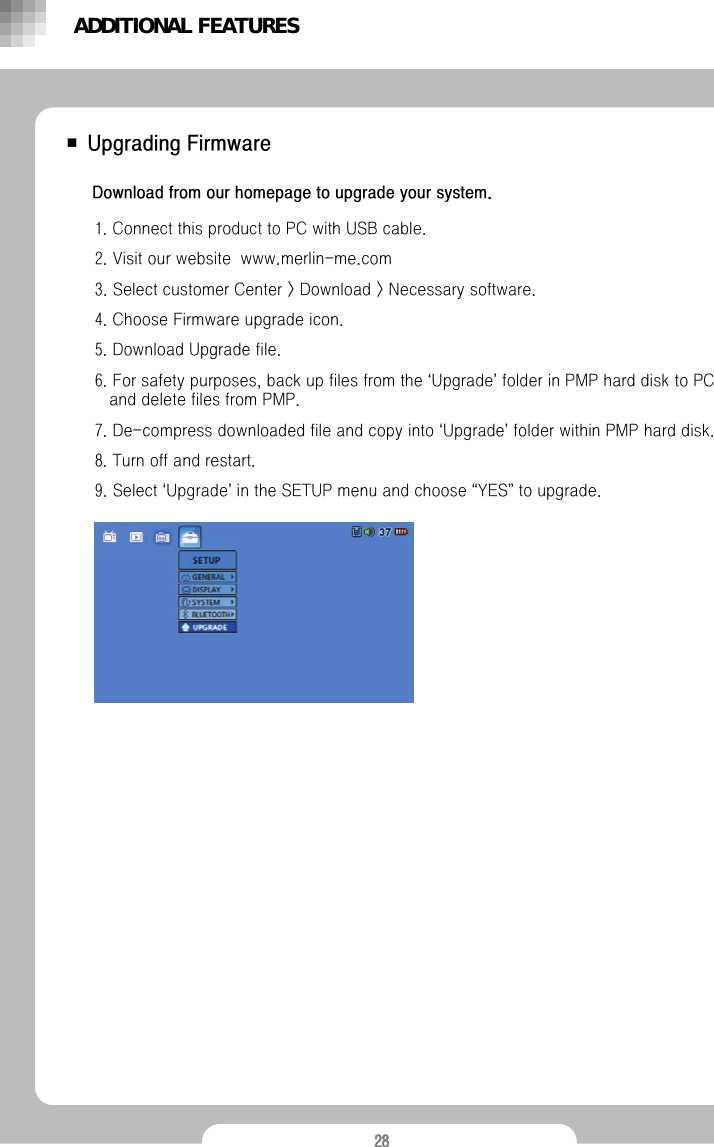
![23■SET UPzGENERALSelect ‘GENERAL’under ‘Setup’menu and press [▶II]. Then press [M] in the ‘Setting’window to change menu.Press [◀◀/▶▶] to move between menus and use [+/-] to change settings. Press [■] to finish.VIDEO•SUBTITLETurning on sub title•REPEATFOLDER : Repeat all ONE : Repeat current file only OFF : No repetition•RATIOSetting Display RatioAUDIO•PRESETSSetting EQ mode•REPEATONE : Repeat current file onlyALL : No repetition USER LIST : Repeat the fist in the current folderOFF : No repetition•SHUFFLERandom playBASIC FUNCTIONSIMAGE•SLIDE SHOWSetting slide show frame rate.](https://usermanual.wiki/Elentec/PMP2500/User-Guide-688779-Page-23.png)
![24■SET UPzDISPLAY Select ‘DISPLAY’under ‘SETUP’menu and press [▶II]. Then press [M] in the setting option window to change menus.Press [◀◀/▶▶] to move between menus and use [+/-] to change settings.Press [■] to finish.•LCD BRIGHTNESSLCD brightness tuning•PIC BRIGHTNESS Screen brightness tuning•LCD TIMEOUT LCD backlight timeout tuning•VIDEO TYPESetting output typeBASIC FUNCTIONS](https://usermanual.wiki/Elentec/PMP2500/User-Guide-688779-Page-24.png)
![25■SET UPzSYSTEMSelect ‘SYSTEM’under ‘SETUP’menu and press [▶II]. Then press [M] in the setting option window to change menu.Press [◀◀/▶▶] to move between menus and use [+/-] to change settings. Press [■] to finish.SYSTEM•MUTETurning off sound •SPEAKER Turning off internal speaker•POWER TIMEOUTSetting System Power timeout •PASSWORD Set up or change passwordNEW : Set up a new password ON : Password function ON OFF : Password function off•FACTORY RESETSetting back to Factory Default settingVERSIONCheck current firmware version.BASIC FUNCTIONS](https://usermanual.wiki/Elentec/PMP2500/User-Guide-688779-Page-25.png)
![29■USB HostingYou can transfer data to external devices by connecting USB cable. -Camera, USB storage, External Hard diskConnect to external devices by using USB host cable.OTG connection Icon will appear in the main screen.When OTG icon appears in browser, press [M] to move/copy/delete file or folder in the pop up menu. Always make it sure to turn on external devices when you make connection to external devices by using USB host cable.ADDITIONAL FEATURES](https://usermanual.wiki/Elentec/PMP2500/User-Guide-688779-Page-29.png)
![30■ Connecting Player to PC■ Disconnecting PC •Do not turn off when USB cable is connected. This may cause malfunction or failure.•When using USB hub, PC may get unstable for interface reason and Data may be corrupted. •Using extended USB cable may cause damages on data. •This product is compatible both to USB2.0 and USB1.1.Run ‘Safely remove hardware’to disconnect USB cable to protect your system.● When using Windows 98 or below1. Double-click [My computer] in the Desktop screen.2. Right click [Removable disk].3. Click [Eject] in the menu and check [Removable Disk] icon disappears. If it still remains, wait for a moment and try again.4. Disconnect USB cable from PC.● Windows 2000/ME/XP or Above1. Double click [Safely Remove Hardware] from the status bar. 2. A dialogue window for [Safely Remove Hardware] will appear.3. Click stop (S) button.4. Completion message will appear in the bottom of screen.1. Menus and messages may be different according to operating system and personal settings.2. If the product does not function correctly after removing USB cable, use [RESET] button in the lower part of the product as there may be problems with data trasferring. 3. When upgrading Firmware, or disconnecting USB cable during data transferring, or if there was interruption during file downloading, the product may not work properly even after restarting. Complete downloading and remove any hardware safely to disconnect USB cable. If the product still does not work try upgrade again.ADDITIONAL FEATURES](https://usermanual.wiki/Elentec/PMP2500/User-Guide-688779-Page-30.png)
![33■ Before using TranscoderFunctions of Transcoder•File converter •DVD Player •DVD Converter •QuickTime(MOV/QT/MP4) Converter •Advanced DVD Converter •RealVideo ConverterFiles that can be converted•Movies : Unsupported file types need to be converted.•Setting out Transcoder options : No option settings required as files will be converted automatically on importing. •Check if the files corrupted when errors occur or change image size by using [Image Resizing] button in the left lower part.•When performing first after program installation, connecting this product to PC will disable security code, which will enable you to use afterwards. Recommended system requirementPentium3 1G or above | Memory 256MB or above | Microsoft DirectX supported VGA | SoundcardOSMicrosoft Windows 98 | Microsoft Windows ME | Windows 2000 | Windows XPRequired systemTRANSCODER](https://usermanual.wiki/Elentec/PMP2500/User-Guide-688779-Page-33.png)

![35■ Using TranscoderPress [Start] in the lower left part then go to [Program(P)] → [PMP Transcoder] →[PMP Transcoder] , or double click PMP Transcoder icon in background.Transcoder window1. File lists window : Displays currently opened files.2. Status bar : Show status for currently running command.3. Playing time and estimated file converting time : displays Playing time or estimated time for file converting.4. Play and converting status sign : Displays play or file converting status.5. Assigning file size : Use when converted file needs to be divided into sections. 6. Setting audio file synchronization : Use to match sound to the original audio file.Menu bar•Opening files to be converted will set out options automatically.•Image Resizing : Decide file size (Limit the resolution under 640x480 when the original size is 640x480 or over)•Destination : Locate converted file.•Frame Rate : Setting out the frame rate.•Audio Format : Setting audio file sampling frequency and bit-rate.Defaults are 192kBit/s, 44.100Hz, stereo.•Video Format : Video option setting window (Automatic setup)Icons1. Open2. Close3. Play4. Stop5. converting selected files6. Set starting point of a section file converting7. Set ending point of a section file converting8. Convert all of the current file9. Run section convertingTRANSCODER3456121 2 3 4 5 6 7 8 9](https://usermanual.wiki/Elentec/PMP2500/User-Guide-688779-Page-35.png)