Eratech Co EVR-500 Portable Digital Audio Player User Manual Eratech FCC EVR 500
Eratech Co, Ltd Portable Digital Audio Player Eratech FCC EVR 500
UserManual.wiki
>
Eratech Co
>
EVR 500 User Manual
User Manual
Navigation menu
Upload a User Manual
Namespaces
Wiki Guide
HTML
PDF
Info
Views
User Manual
Discussion / Help
Navigation


![Setting of Mono/Stereo Sound(Only for Voice Mode)1. Select from menu screen.Setting of Internal/ExternalMicrophone(Only for Voice Mode)2. Move to either Mike or Line In item with, button and select one by pressingbutton.1. Select from menu screen.2. Move to either sound item, Mono or Stereo,with , button and select one by pressing button.Stereo can be selected only when an external appliance was connected and [LINE IN] item selected in [MENU] – [SOURCE] window.Mono mode is a default setting when [MIC] item is selected in [MENU] – [SOURCE] window.28](https://usermanual.wiki/Eratech-Co/EVR-500/User-Guide-330080-Page-29.png)
![Setting of BacklightBacklight shall be set from [MENU] – [SYSTEM]window of each mode.1. Select from menu screen.Setting of Recording Quality(Only for Voice Mode)2. Move to a desired recording quality level with , button and select one by pressing button.1. Select from [MENU] – [SYSTEM] window.2. Move to a desired item with , button and select it by pressingbutton.29](https://usermanual.wiki/Eratech-Co/EVR-500/User-Guide-330080-Page-30.png)
![Setting of VORUsers may set a period after the lapse of whichrecording is prohibited until there is a voice. Thisfunction is possible only for Voice mode.1. Select from [MENU] – [SYSTEM] window.Setting of LCD BrightnessLCD Brightness shall be set from [MENU] –[SYSTEM] window of each mode.2. Move to a desired level with , button and select it by pressingbutton.1. Select from [MENU] – [SYSTEM] window.2. Move to a desired value with , button and select it by pressingbutton.Available values are 10 s, 15 s, 20 s, 25 s, and 30 s.This function may not be performed in noisy surroundings.30](https://usermanual.wiki/Eratech-Co/EVR-500/User-Guide-330080-Page-31.png)
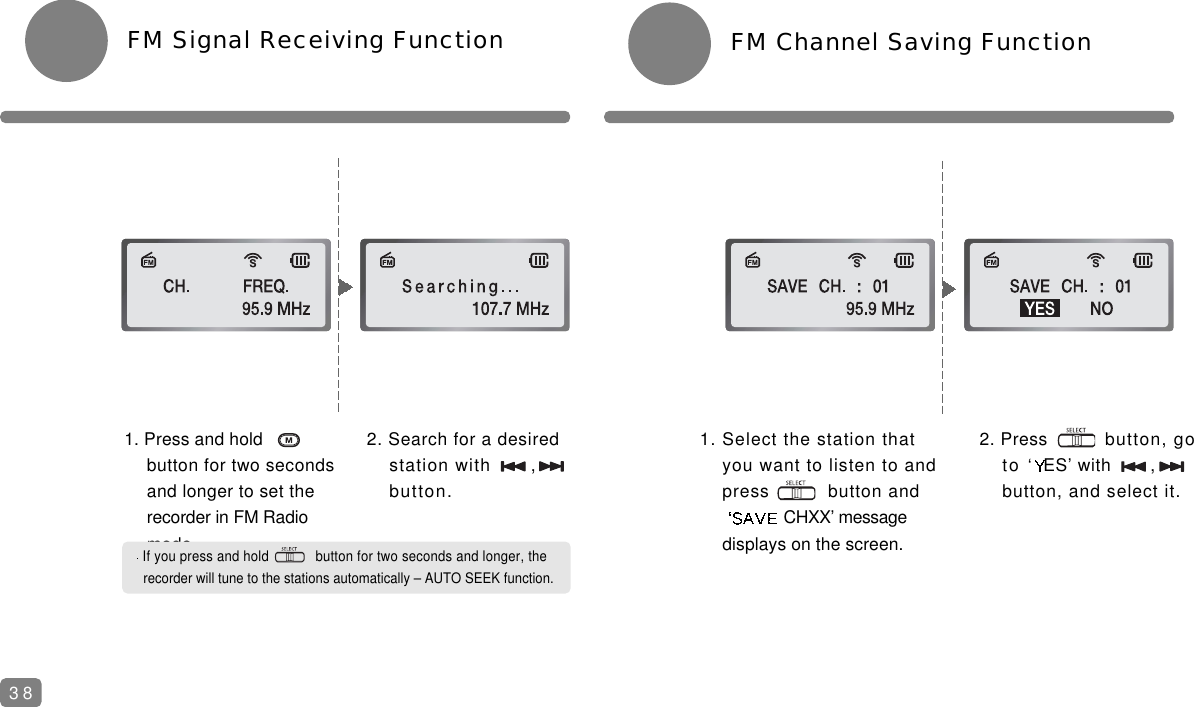
![Download of FontsIt is possible only when users install suppliedsoftware in the recorder. Connect the built-in USBconnector to USB jack of PC. 1. Select from [MENU] – [SYSTEM] window.FM BandsUsers may select FM bands for radio broadcasts inKorea, U.S.A., EC, and Japan.2. Move to a desired band with , button and select it by pressingbutton.1. Select from [MENU] – [SYSTEM] window.2. Select .Every country uses the same frequency except Japan.31](https://usermanual.wiki/Eratech-Co/EVR-500/User-Guide-330080-Page-32.png)
![Setting of CD SyncUsers may create a new file during intervalsbetween tracks.1. Select from [MENU] – [SYSTEM] window.Language Setting 2. Choose a language with , button and select it by pressing button.1. Select from [MENU] – [SYSTEM] window.2. Move to a desired value with , button and select it by pressingbutton.32](https://usermanual.wiki/Eratech-Co/EVR-500/User-Guide-330080-Page-33.png)
![File Erase1. Select from [MENU] – [SYSTEM] window.Format2. Choose an item with , button and select it by pressing button.1. Select from [MENU] – [SYSTEM] window.2. Choose a file or folder to delete with , button and select it by pressing button.3. Delete the selected file by pressing button, or cancel File Erase function.33](https://usermanual.wiki/Eratech-Co/EVR-500/User-Guide-330080-Page-34.png)
![Setting of Time and DateIt enables to set or change time and date.1. Select from [MENU] – [SYSTEM] window.Power TimerIt enables to put off power automatically after thelapse of period set.2. Move to a desired time with , button and select it by pressingbutton.1. Select from [MENU] – [SYSTEM] window.2. Move to a desired setting with , button and reset it with , button.Numbers go up and down by pressing button and button, respectively.34](https://usermanual.wiki/Eratech-Co/EVR-500/User-Guide-330080-Page-35.png)
![Voice RecordingYou need to set Mike or Line In, Mono or Stereo, and VOR function before starting recording.Setting of functions is allowed only in Voice mode. Please refer to pages 28 to 30.1. Go to [MENU] – [SOURCE] window and set [MIC] window.2. Voice starts to be recorded by pressing button in Pause mode.3. Recording is stopped by pressing button, and a new voice file is generated.The default setting of Mike is Mono.You have to connect the cord of an external appliance to the jack when recording with an external microphone.Recording is paused by pressing button during playback and resumed bypressing it again.When you resume recording after stopping by pressing button, the content of recording will be saved behind the last taken number.Recording stops automatically if memoryis full.35Microphone](https://usermanual.wiki/Eratech-Co/EVR-500/User-Guide-330080-Page-36.png)
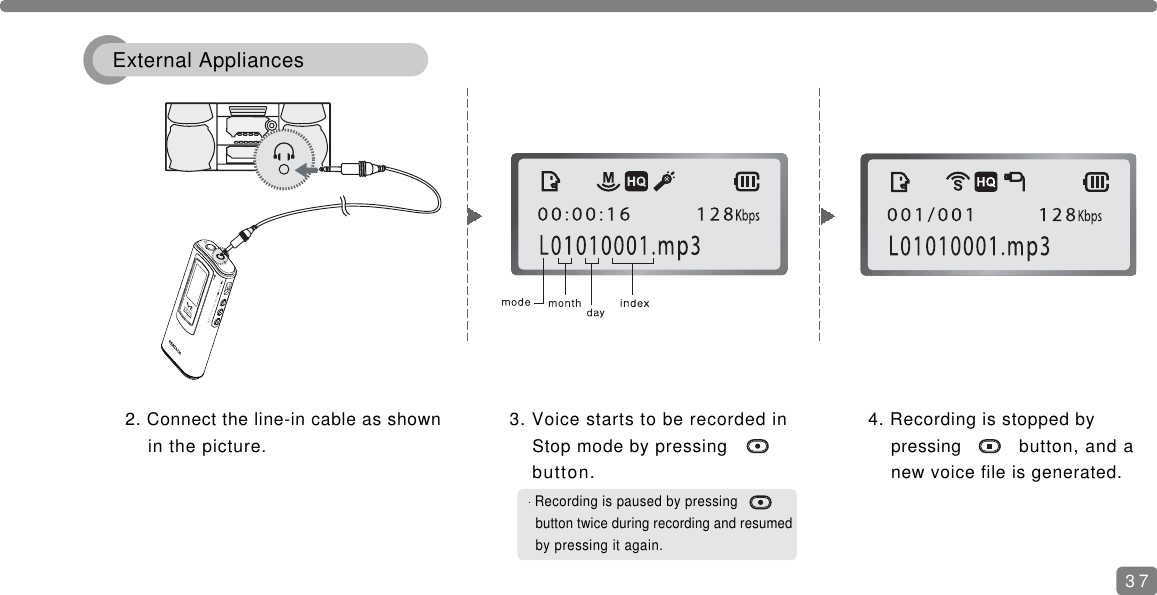
![VOLUME REC/PAUSE HOLDSELECTPLAY/PAUSESTOPMENUWhen recording through an external appliance (PC or audio), turn down the volume of the appliance lest it should distort recorded sound.You may get high quality recording from external appliances, if you record in Stereo/HQ mode. The recording time, however, comes to be shorter.Recording is possible only for Mobile phone with an earphone jack. Some models do not assist this function.1. Go to [MENU] – [SOURCE] and set [LINE IN] window.4. Connect the Line-in cable as shown in the picture.Go to [MENU] – [SOURCE] window and set[MIC] window as for the recording with anexternal mike.5. Connect the Line-in cable as shown in the picture.36Connection with Telephone (Option) Connection with MobilePhone(Option) LINE-IN](https://usermanual.wiki/Eratech-Co/EVR-500/User-Guide-330080-Page-37.png)