Fisher and Paykel Appliances DD7INTTX A RF REMOTE CONTROL TRANSMITTER TO ALLOW CONTROL OF A DISHWASHER User Manual 590199A DishDrawerP7 userguide USCANZAUGBIE indd

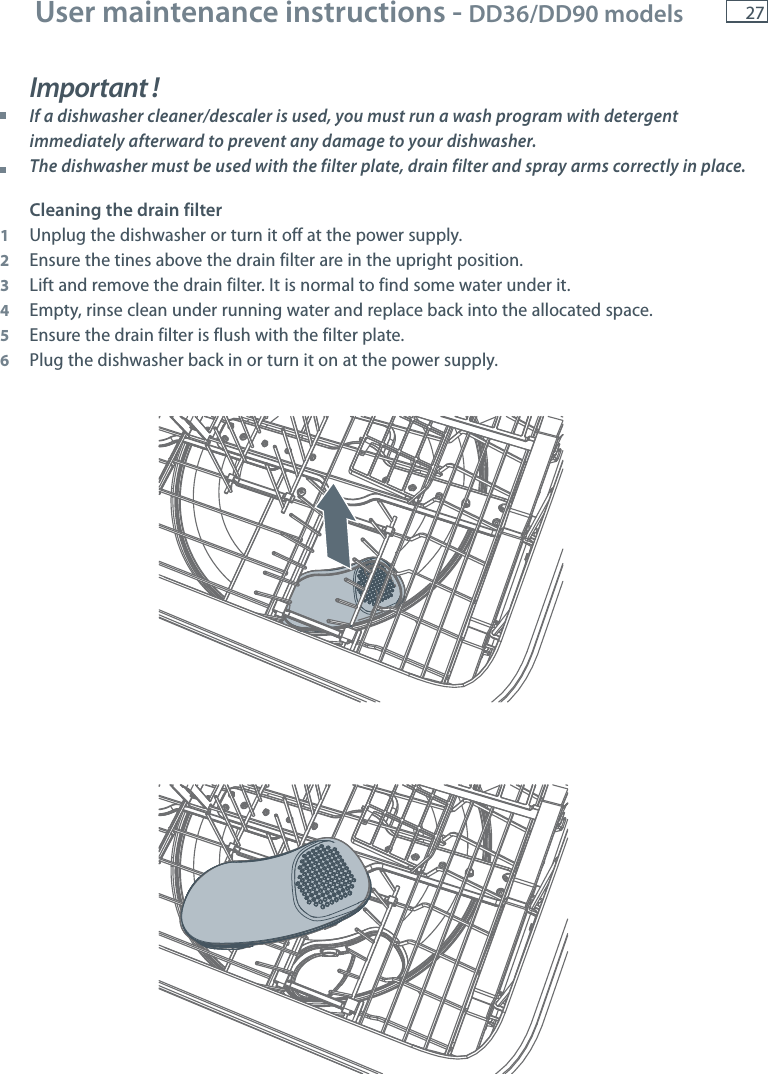
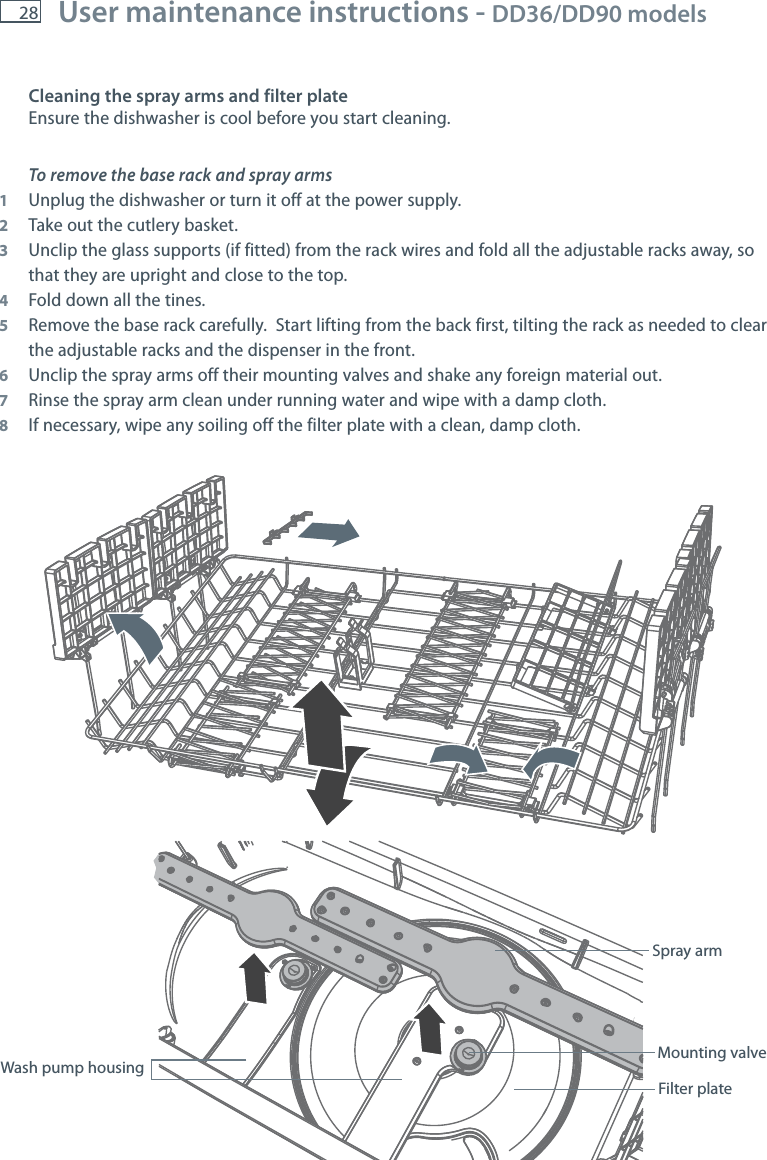
Fisher & Paykel Appliances Limited A RF REMOTE CONTROL TRANSMITTER TO ALLOW CONTROL OF A DISHWASHER 590199A DishDrawerP7 userguide USCANZAUGBIE indd

Users Manual

US CA NZ AU GB IEUser guideDishDrawerTM   dishwasherDD24, DD60DD36, DD90 models
This user guide is an accompaniment to your  ‘Quick start guide’ which is included with your dishwasher.For operating instructions, see your ‘Quick start guide’. If you no longer have your ‘Quick start guide’, you can download it from our local website, listed on the back cover.Refer to your  ‘Quick start guide’ for information on: Starting a wash Wash programs and when to use them Controls Dos and don’ts of loading Preference options and how to change their settings
1ContentsElectrical connection (GB IE only)    3Safety and warnings    4Caring for your dinnerware    7Racking features    8Loading suggestions    8Water hardness and dishwashing 14Wash programs and detergent quantities 19Adding detergent    20Using rinse aid     22Water softener     23User maintenance instructions    29Troubleshooting    32If there is a fault    34How to attend to a fault  Classic models       34  Designer and Integrated badge models  34  Integrated models with remote control 34Warranty and service    37Wash program data  38Standards test   USA and Canada  38  New Zealand and Australia  38  Great Britain and Ireland  38Important!    SAVE THESE INSTRUCTIONSThe models shown in this user guide may not be available in all markets and are subject to change at any time. For current details about model and specification availability in your country, please visit our local website listed on the back cover or contact your local Fisher & Paykel dealer.
2For Great Britain onlyImportant! This appliance must be earthed.Fuse replacementThe mains lead of this appliance is fitted with aBS 1363A 13 A fused plug. To change a fuse inthis type of plug, use an ASTA approved fuse toBS 1362 type and proceed as follows:1  Remove the fuse cover and fuse.2  Fit the replacement 13A fuse into the fuse cover.3  Refit both into plug.Important! The fuse cover must be refitted when changing a fuse and if the fuse cover is lost, the plug must not be used until a correct replacement is fitted. Correct replacements are identified by the colour insert or the colour embossed in words on the base of the plug. Replacement fuse covers are available from your local electrical store.For the Republic of IrelandThe information given in respect to Great Britain will frequently apply, but a third type of plugand socket is also used: the 2-pin, side earth type.Socket outlet / plug (valid for both countries)If the fitted plug is not suitable for your socket outlet, please contact an Authorised ServiceAgent. Please do not attempt to change the plug yourself. This procedure must be carried outby a qualified service technician in compliance with the manufacturer’s instructions and currentstandard safety regulations.Fuse coverFuseElectrical connection (GB IE only)
3Safety and warningsYour dishwasher has been carefully designed to operate safely during normal dishwashing procedures. Please keep the following instructions in mind when you are using your dishwasher. IMPORTANT SAFETY INSTRUCTIONS WARNING! - When using your dishwasher, follow basic precautions, including the following: Read all instructions before using the dishwasher.  The information in this manual must be followed to minimise the risk of fire or explosion or to prevent property damage, personal injury or loss of life.  Use the dishwasher only for its intended function as described in this user guide and in your ‘Quick start guide’..  This appliance is intended to be used in household and similar applications such as:   – staff kitchen areas in shops, offices and other working environments;   – farm houses;   – by clients in hotels, motels and other residential type environments; – bed and breakfast type environments. Use only detergents or rinse aid recommended for use in a domestic dishwasher and keep them out of reach of children. Check that the detergent dispenser is empty after the completion of each wash program. When loading items to be washed, locate sharp items so that they are not likely to damage the internal lid of the dishwasher and load sharp knives with the handle up to reduce the risk of cut-type injuries. Do not touch the filter plate (the round metal disc in the dishwasher base) during or immediately after use, as it may be hot from the heater plate underneath. Do not operate your dishwasher unless all enclosure panels are properly in place. Do not tamper with the controls. Do not abuse, sit on, stand in or on the drawer or dish rack of the dishwasher. The drawer should not be left in the open position since this could present a tripping hazard. The adjustable racks are designed to support cups, glasses and kitchen utensils. When the adjustable racks are in the drawer do not lean on or use them to support your body weight. To reduce the risk of injury, do not allow children to play in or on the dishwasher. Under certain conditions, hydrogen gas may be produced in a hot water heater system that has not been used for two weeks or more. HYDROGEN GAS IS EXPLOSIVE. If the hot water system has not been used for such a period, before using the dishwasher, turn on all hot water taps and let the water flow from each for several minutes. This will release any accumulated hydrogen gas. As the gas is flammable, do not smoke or use an open flame during this time. Remove the door to the washing compartment when removing an old dishwasher from service or discarding it.  Some dishwasher detergents are strongly alkaline. They can be extremely dangerous if swallowed. Avoid contact with the skin and eyes and keep children away from the dishwasher when the door is open. Check that the detergent receptacle is empty after completion of the wash cycle.
4Safety and warningsIMPORTANT SAFETY INSTRUCTIONSInstallation This dishwasher must be installed and located in accordance with the Installation instructions before it is used. If you did not receive Installation instructions with your dishwasher, you can order them by calling your Authorised Repairer or download them from our local Fisher & Paykel website, listed on the back cover. Installation and service must be performed by a qualified technician. If the power supply cord is damaged, it must be replaced by a dealer or Authorised Repairer or a similar qualified trades person in order to avoid a hazard. Ensure the dishwasher is secured to adjacent cabinetry using the brackets provided. Failure to do so may result in an unstable product, which may cause damage or injury. Do not operate this appliance if it is damaged, malfunctioning, partially disassembled or has missing or broken parts, including a damaged power supply cord or plug. Do not store or use petrol, or other flammable vapours and liquids in the vicinity of the dishwasher. Connect to a properly rated, protected and sized power supply circuit to avoid electrical overload. Make sure that the power supply cord is located so that it will not be stepped on, tripped over or otherwise subject to damage or stress. Do not install or store the dishwasher where it will be exposed to temperatures below freezing or exposed to weather. Do not use an extension cord or a portable electrical outlet device (e.g. multi-socket outlet box) to connect the dishwasher to the power supply. This appliance must be grounded. In the event of a malfunction or breakdown, grounding will reduce the risk of electric shock by providing a path of least resistance for electric current. This appliance is equipped with a cord having an equipment-grounding conductor and a grounding plug. The plug must be plugged into an appropriate outlet that is installed and grounded in accordance with all local codes and ordinances. WARNING - Improper connection of the equipment-grounding conductor can result in a risk of electric shock. Check with a qualified electrician or service representative if you are in doubt as to whether the appliance is properly grounded. Do not modify the plug provided with the appliance; if it will not fit the outlet, have a proper outlet installed by a qualified technician. If the dishwasher is installed as a permanently connected appliance: GROUNDING INSTRUCTIONS - This appliance must be connected to a grounded metal, permanent wiring system, or an equipment-grounding conductor must be run with the circuit conductors and connected to the equipment-grounding terminal or lead on the appliance.
5Safety and warningsIMPORTANT SAFETY INSTRUCTIONSMaintenance Disconnect the appliance from the power supply before any cleaning or maintenance. When disconnecting the appliance pull the plug rather than the power supply cord or junction of cord to avoid damage. Do not repair or replace any part of the appliance or attempt any servicing unless specifically recommended in this user guide. We recommend that you contact Customer Care to arrange service. See your ‘Service and warranty’ booklet for contact details. Keep the floor around your appliance clean and dry to reduce the possibility of slipping. Keep the area around/underneath your appliance free from the accumulation of combustible materials, such as lint, paper, rags and chemicals. Models with a remote control: Do not attempt to recharge, short-circuit, disassemble, heat or throw the remote control battery into a fire. Dispose of an old battery responsibly, keeping it out of reach of children.Operational Under no circumstances should you open the drawer whilst the dishwasher is in operation. Always press the   button to pause and wait until you hear the three additional beeps before opening the drawer. The dishwasher must be used with the motor assembly, filter plate, drain filter and spray arm in place. To identify what these parts are, see drawings in section ‘User maintenance instructions’ of this user guide. Take care when loading the drawer not to load dishware items so they prevent the internal lid from properly sealing with the drawer. Items should be placed so they do not protrude above and/or forced into the drawer, otherwise a service call may result. Household appliances are not intended to be played with by children. Children or persons with a disability which limits their ability to use the appliance, should have a responsible person instruct them in its use. The instructor should be satisfied that they can then use the appliance without danger to themselves or their surroundings. Close supervision is necessary if this appliance is used by or near children. Do not allow children  to play inside, on or with this appliance or any discarded appliance. If a dishwasher cleaner is used, we would strongly recommend a wash program with detergent should be run immediately afterward, to prevent any damage to the dishwasher. The dishwasher is designed for washing normal household utensils. Items that are contaminated by petrol, paint, steel or iron debris, corrosive, acidic or alkaline chemicals are not to be washed in the dishwasher. If the dishwasher is not being used for long periods of time, turn the electricity and water supply to the dishwasher off.
6Safety and warningsIMPORTANT SAFETY INSTRUCTIONS  Operational - models with remote control To prevent unauthorized use, keep the remote control out of reach of children. Make sure that you keep the remote away from water and steam. Do not immerse and take care not to drop the remote control into water. This may damage the parts or lead to malfunction. Damage or malfunction caused by exposure to water or steam is not covered by warranty. Do not drop, step on or otherwise impact the remote control. This may damage the parts or lead to malfunction. This device complies with part 15 of the FCC Rules. Operation is subject to the following two conditions: (1) This device may not cause harmful interference, and (2) this device must accept any interference received, including interference that may cause undesired operation. Do not tamper with or modify the remote control in any way, as doing so will void the certification of the device. This device complies with Industry Canada licence-exempt RSS standard(s). Operation is subject to the following two conditions: (1) this device may not cause interference, and (2) this device must accept any interference, including interference that may cause undesired operation of the device. Complies withIDA StandardsDB104887
7 Caring for your dinnerwareThe combination of high temperatures and dishwasher detergent may cause damage to some items if they are washed in the dishwasher. Remember, if in any doubt about any aspect concerning items washed in the dishwasher, follow the instructions from the manufacturer of the items, or wash the item by hand.Cutlery & silverware All cutlery and silverware should be rinsed immediately after use to prevent tarnishing caused by some foods. The Rinse wash program is useful for this. Silver items should not come into contact with stainless steel, eg other cutlery. Mixing these items can cause staining. Remove silver cutlery from the dishwasher and hand dry it immediately after the program has finished.AluminiumAluminium can be dulled by dishwasher detergent.  The degree of change depends on the quality of the product.Other metalsIron and cast iron objects can rust and stain other items.  Copper, pewter and brass tend to stain.WoodwareWooden items are generally sensitive to heat and water.  Regular use in the dishwasher may cause deterioration over time.  If in doubt, wash by hand.GlasswareMost everyday glassware is dishwasher safe.  Crystal, very fine and antique glassware may etch that is, become opaque. You may prefer to wash these items by hand.PlasticSome plastic may change shape or colour with hot water.  Check manufacturer’s instructions about washing plastic items.  Washable plastic items should be weighed down so they do not flip over and fill with water or fall through the base rack during the wash. Use the multi-purpose clip (supplied with some models only) to hold plastic items in place.Decorated itemsMost modern china patterns are dishwasher safe.  Antique items, those with a pattern painted over the glaze, gold rims or hand painted china may be more sensitive to machine washing.  If in doubt, wash by hand.Glued itemsCertain adhesives are softened or dissolved in machine washing.  If in doubt, wash by hand.
8Cutlery basket To reduce the risk of injury, we recommend loading knives and sharp utensils with handles facing up. Mix spoons, knives and forks within each section to stop cutlery nesting together and to ensure the water circulates freely. Keep stainless steel from touching silver cutlery to avoid staining.Removable small items container Small, light items like baby bottle teats are best placed into the small items container to prevent them from being displaced during the wash. You can extend your cutlery basket by clipping the container on its side.Racking featuresCutlery baskets will vary depending on model.
9 Racking featuresRemovable small items container To optimise the cutlery space within the basket, the small items container can be placed elsewhere on the base rack. If laid flat, make sure the solid plastic side is facing up. If you place a fully laden small items container under the adjustable racks, it is best to leave the rack space directly above the container empty: there may not be enough water reaching items that are placed there.Removable tablet tray If you are using dishwasher tablets, place them on the removable tablet tray, as shown.  See also ‘Adding detergent’ for more information.Important!Dishwasher tablets should not be in direct contact with dishes or cutlery.
10 Racking features Racking features will vary depending on model. Stemware notches These notches help support long-stemmed glassware.Glass supports These clip on the rack wires to give your tall glasses extra stability.Spacing-adjustable tines (DD24/DD60 models only) Designed to fit deep bowls (wide spacing) or small plates (narrow spacing), depending on adjustment. To adjust between wide and narrow spacings, slide the tines backward or forward by the handle at the front.Cup rack with folding support wire(DD36/DD90 models only)  Fold the wire up to support tall glasses.
11 Racking features Adjustable racks You can adjust these independently of each other to any height: 1  Fold up to unlock the rack. 2  Adjust the height to suit by sliding up or down. 3  Fold down to lock in position. Fold the racks away if you need the space.Folding tines For optimum stability, place larger plates between the longer tines in the front. Release and fold the tine sections down towards each other if you need the space for pots or other large items.Knife clip This clips onto the adjustable racks and supports knives and other utensils during the wash. Always ensure that knife blades are facing down.Multi-purpose clip(DD36/DD90 models only) This keeps flimsy items (eg plastic lids and bottles) or large platters and plates stable, so they cannot be dislodged during the wash. Slide the item between the prongs of the clip.
12 Loading suggestionsWhen loading your drawer, make sure that  you place items so that water coming from the rotating spray arms below can reach all areas (wash performance will be reduced if it can’t) nothing blocks the water from getting to items on the adjustable racks. How NOT to load your drawer  Overcrowded and wash water will not reach some of the dinnerware.   Cups, glasses and bowls must have their openings facing down. The plates are nesting together and wash water may not get through.   Ensure cutlery are not nesting or stuck together.  They need to be evenly spread out. Ensure dishware items are not forced into or protrude out of the drawer, as this may prevent the internal lid of the drawer from properly sealing which could result in a service call. Locate sharp items safely to prevent injuring the user and damaging the lid assembly. Check the bottom of the cutlery basket to ensure sharp or pointed items have not come through as they may stop spray arm rotation. Ensure cutlery has not fallen through the base rack and stopped the spray arms from rotating. The large bowl is blocking wash water reaching the adjustable racks. Large utensils should be on the adjustable racks so they do not become dislodged and stop the spray arms from rotating. Sharp or pointed items must be placed horizontally or with sharp edges/points facing down to avoid risk of injury.
13 Water hardness and dishwashingWhat is water hardness?Hard water is water with a high concentration of minerals such as calcium and magnesium. In soft water, this concentration is low. Water hardness varies by geographical location.How does water hardness affect dishwashing? Hard water can be detrimental to the performance of your dishwasher. Over time, glassware washed in hard water will become opaque and dishes will become spotted or covered in a white film. Using very hard water can cause dishwasher parts to fail over time. Naturally soft or softened water has no detrimental effects if used with the correct amount of detergent. However, excess detergent combined with hot, soft water may cause irreversible etching on glassware. Etching first appears as a rainbow-coloured film and—if allowed to continue—can make glassware permanently opaque.What can I do to minimise any detrimental effects?Contact your local water company to find out about water hardness in your area.If your home has hard water and your dishwasher has no built-in water softener… Follow the detergent quantity recommendations on the following page. If available, use a detergent with high phosphate content. Phosphate softens the water and this improves wash results. If detergent with phosphate is not available, we recommend using multi-purpose tablets. Use rinse aid. We recommend you turn the rinse aid setting to 5 to help improve wash performance. Use a dishwasher cleaner/descaler regularly, or whenever you notice a build-up of limescale deposits in your dishwasher. Important!We recommend fitting a water softener to the household water supply. If the water hardness in your home is above 250 ppm/14.6 gpg, a water softener has to be fitted to maintain the performance of your dishwasher.If your home has naturally soft or softened water… Avoid using too much detergent. Follow the quantity recommendations on the following page. Ensure the drawer is not overloaded and water can reach all the dishes.
14DD24/DD60 models Find out about water hardness in your home, then use the table below to determine how much detergent to use for each wash program. See also section ‘Water hardness and dishwashing’. The detergent dispenser has markings to help you measure the correct quantities. See following section ‘Adding detergent’.*   If you have a a household water softener installed or your dishwasher has a built-in water softener, use the  quantities recommended for water with a hardness under 100 ppm/6 gpg, irrespective of the water hardness in your area. See also section ‘Water softener’.Wash programs and detergent quantitiesWater hardnessparts per million (ppm)grains per gallon (gpg)Wash programs Detergent quantities (per drawer)US CA NZ AU GB IEdetergent compartment markinggrams grams<100 ppm or < 6 gpg*Heavy 2/3 25 25Normal 2/3 25 25Fast 1/3 10 10Delicate 1/3 10 10Rinse --100 -150 ppm or 6 - 9 gpgHeavy full 30Normal full 30Fast full 25Delicate full 30Rinse -->150 ppm or >9 gpgHeavy full 30Normal full 30Fast full 30Delicate full 30Rinse --SOFTERHARDER
15DD36/DD90 models Find out about water hardness in your home, then use the table below to determine how much detergent to use for each wash program. See also section ‘Water hardness and dishwashing’. The detergent dispenser has markings to help you measure the correct quantities. See following section ‘Using powdered detergent’.*   If you have a a household water softener installed or your dishwasher has a built-in water softener, use the  quantities recommended for water with a hardness under 100 ppm/6 gpg, irrespective of the water hardness in your area. See also section ‘Water softener’.Wash programs and detergent quantitiesWater hardnessparts per million (ppm)grains per gallon (gpg)Wash programs Detergent quantities (per drawer)US CA NZ AU GB IEdetergent compartment markinggrams grams<100 ppm or < 6 gpg*Heavy full 30 30Normal full 25 25Fast 2/3 15 15Delicate 2/3 15 15Rinse --100 -150 ppm or 6 - 9 gpgHeavy full 30Normal full 30Fast 2/3 20Delicate full 30Rinse -->150 ppm or >9 gpgHeavy full 30Normal full 30Fast full 30Delicate full 30Rinse --SOFTERHARDER
16 Suitable detergents and where to place themNote: You may see other, equally suitable types of dishwasher detergent on the shelves ofyour supermarket. Read and follow the detergent manufacturer’s recommendations.Adding detergent     Detergent dispenser Powdered dishwasher detergent pour into detergent dispenserSolid dishwasher tabletsplace on tablet tray in cutlerybasketPouch packs of gel or powderplace in detergent dispenser, but only if pack fits easily around prongs (pack must not be pierced) ORplace on tablet tray in cutlery basketTablet tray LatchIf the cutlery basket is not used for a particular load, place tablet or pouch pack in the bottom of the drawer.Filling the detergent dispenser1  Press the latch down to open the dispenser.2  Check that the dispenser is empty and dry, then add detergent (do not place solid tablets in the dispenser). No detergent is needed for the Rinse program.3  Close the dispenser until it clicks shut. The detergent will automatically be released into the drawer during the wash program.
17Unsuitable detergentsThese types of detergent are not suitable and may damage your dishwasher or lead to a service call that is not covered by warranty.Important! Do not use these in your dishwasher! Liquid detergents Laundry detergents Hand washing liquids Soaps DisinfectantsHow much detergent to useFor powdered detergent, refer to previous section ‘Wash programs and detergent quantities’ and follow the quantities relevant to your location and water hardness level. Use the markings to help you measure the correct quantities. For other types of detergent, follow the manufacturer’s recommendations.Notes on using tablets If you are using tablets, follow manufacturer instructions on the packet. Some tablets may not be suitable for all wash programs.  Using tablets could improve wash performance in hard water areas. Make sure that tablets never get in direct contact with dishes or cutlery. If you are using dishwasher tablets with a built-in rinse aid component, you may need to reduce the rinse aid setting. See your ‘Quick start guide’ for instructions.Important!Dishwasher detergents are strongly alkaline. They can be extremely dangerous if swallowed. Avoid contact with the skin and eyes and keep children and infirm persons away from the dishwasher when it is open. Check that the detergent dispenser is empty after completion of the wash program.1/3 (10 grams)2/3 (20 grams)Full (30 grams) Adding detergent
18 Using rinse aid    We recommend using liquid rinse aid regularly to give the best drying results. Rinse aid gives a streak-free, sparkling clean look to glass and chinaware. It also prevents metal from tarnishing. The rinse aid dispenser is on the inside of the drawer, underneath the detergent dispenser.  It holds approximately 1.7 fl oz / 50 ml of rinse aid. You may hear some unusual, high-pitched beeping when rinse aid is  being dispensed. This is normal. When to refill rinse aid If the indicator glows bright red, refill rinse aid. If the indicator glows dimly or not at all, you do not need to refill:  there is enough rinse aid for the wash. Note: Lighter coloured rinse aids will not dim the  indicator as effectively as darker ones.How to refill rinse aid1  Turn the plug anticlockwise and remove.2  Pour rinse aid into the circular opening, taking care not to spill any   into the drawer.Important!Any accidental spillages of rinse aid must be wiped up. If not wiped up, spilt rinse aid will cause excessive foaming, resulting in a service call that will not be covered by warranty.3  Refit the plug, then turn it clockwise back to its original position.Important!Make sure that the plug is closed tight, with its hand grip pointing straight ahead.How much rinse aid to useYou may need to adjust the amount of rinse aid dispensed in each wash to suit your water conditions or the kind of dishwasher tablet you are using. The lowest setting is ‘1’, the highest is ‘5’. See the ‘Preference options’ section of your ‘Quick start guide’ for instructions on how to change the rinse aid setting. If there is excessive foam at the end of the wash or you are using  dishwasher tablets with built-in rinse aid, reduce the setting. If dishes are wet or streaky after drying, increase the setting. If you live in a hard water area and you have no water softener  installed in your water supply or built into your dishwasher,  we recommend adjusting the rinse aid setting to 5.Indicator lightPlugTurn the plug anticlockwise. Remove the plugPour rinse aid into the circular openingRefit the plug by turning it clockwise. Ensure it is closed tight.
19Setting up the water softenerImportant!Only some models (those with a letter ‘H’ in the model name) have a built-in water softener. Models with water softener are not currently available in New Zealand and Australia.Determine the water hardness in your local area Your local water company will be able to provide you with information. Identify the setting you require for your dishwasher from the water hardness table below. For example, if your water hardness is 500ppm, then the water softener setting on your dishwasher should be 4. Refer to the ‘Preference options’ section of your ‘Quick start guide’ for instructions on adjusting the water softener setting.Dishwasher settingParts per million   (ppm)Grains per gallon (gpg)odH ofH oe / oClark mmol/l0 0 - 100 0 - 6 0 - 5.6 0 - 10 0 - 7 0 - 0.11 100 - 250 6 - 14 5.6 - 14 10 - 25 7 - 17.5 0.1 - 2.52 250 - 350 14 - 20 14 - 19.6 25 - 35 17.5 - 24.5 2.5 - 3.53 350 - 450 20 - 26 19.6 - 25.2 35 - 45 24.5 - 31.5 3.5 - 4.54 450 - 550 26 - 32 25.2 - 30.8 45 - 55 31.5 - 38.5 4.5 - 5.55 550 - 625 32 - 36 30.8 - 35 55 - 62 38.5 - 43.8 5.5 - 6.2 Water softener
20 Water softener    Notes: If your water hardness is above 625ppm/36 gpg, we highly recommend you completely fill the detergent dispenser for all programs except Rinse and the rinse aid setting should be at 5. If your water hardness is above 625ppm/36 gpg, the wash performance of your dishwasher will decline. You may hear some unusual noises when the water softener is in operation, this is normal.How to fill the salt reservoir1  Open the drawer(s).2  Unscrew the salt reservoir cap by turning anticlockwise.3  Place the salt into the salt container and pour the contents into the salt reservoir.   The salt reservoir can hold up to approximately 1 lb/0.5 kg of salt.4  Fit the cap tightly back into its original position.5  If you do not wash your dishes immediately after filling the salt reservoir, run a Rinse program to remove any salt water or spilt granules.Note:When filling the salt reservoir, you may notice water being displaced from the water softener overflow.Salt containerSalt reservoir
21 Water softenerImportant!The water softener must always be filled with granular salt made especially for dishwasher watersoftening systems. We do not recommend the use of cooking salt like table salt, rock salt orpellets as they may contain impurities that will impair or diminish the life of the water softener.The salt reservoirWater softening can only take place when thereis salt in the reservoir. The salt reservoir mustbe filled prior to using the dishwasher andwhenever the salt indicator light is red.Salt indicator light If the salt indicator light is red, the salt reservoir is empty. If the salt indicator light is black, there is enough salt in the reservoir for the wash program that has been selected. Classic models only: The electronic display will also indicate when the salt reservoir is empty by displaying the salt   symbol.Important!Do not pour detergent or rinse aid into the saltreservoir. Detergent and rinse aid will destroythe water softener.aba     Salt indicator lightb     Salt reservoir capSalt onlyNO Detergent NO Rinse Aid
22 User maintenance instructions - DD24/DD60 models    Important!Disconnect the dishwasher from the power supply (unplug or switch off at the circuit breaker) and allow all its parts to cool before any cleaning or maintenance. Holiday time If the dishwasher is not going to be used for some time, we recommend you leave it clean and empty. Leave the drawer(s) ajar to allow air to circulate. Turn off both the power and water supply to the dishwasher. When using your dishwasher for the first time after a long period away, we recommend pouring 3 cups of water into the drawer before loading and starting a wash. This is to lubricate components that may have dried out during non-use.Cleaning the surfaces 1  Wipe with a clean damp cloth. Take care not to wet the control panel.2  Dry with a clean lint-free cloth.Important!We do not recommend the use of the following cleaning aids on your dishwasher as they may damage the surfaces: Plastic or stainless steel scouring pads           Abrasive, solvent, household cleaners Acid or alkaline cleaners            Hand washing liquids or soap Stainless steel cleaners or polishes          Laundry detergents or disinfectantsCleaning the drain filter, spray arm and filter plate We recommend that the drain filter is cleaned whenever there is evidence of food particles.   The spray arm may need cleaning about once a month in normal use or more often should the need arise. The filter plate should not normally need cleaning. Food particles remaining on its surface can be wiped off with a clean, damp cloth.Spray armFilter plate Drain filter
23User maintenance instructions - DD24/DD60 models Important ! If a dishwasher cleaner/descaler is used, you must run a wash program with detergent immediately afterward to prevent any damage to your dishwasher.  The dishwasher must be used with the filter plate, drain filter and spray arm correctly in place.Cleaning the drain filter1  Unplug the dishwasher or turn it off at the power supply.2  To access the drain filter, lift up the plastic grid above it, as shown.3  Lift and remove the drain filter. It is normal to find some water under it.4  Empty, rinse clean under running water and replace back into the allocated space. 5  Ensure the drain filter is flush with the filter plate , then lower the plastic grid back into place.6  Plug the dishwasher back in or turn it on at the power supply.
24 User maintenance instructions - DD24/DD60 models    Cleaning the spray arm and filter plateTo remove and clean the spray arm and filter plate1  Unplug the dishwasher or turn it off at the power  supply.2  Unclip the glass supports (if fitted) from the rack   wires and fold all the adjustable racks away, so   that they are upright and close to the top.3  Remove the base rack carefully. Lift from the back   end first to prevent knocking the detergent and   rinse aid dispenser.4  Lift the spray arm and shake any foreign material out.   Rinse it clean under running water and wipe with a damp cloth.5  Lift and remove the drain filter.6  In the centre of the filter plate there are two rings. Turn the outer ring anticlockwise, about a 1/8 turn. This will release the filter plate.7  Lift the filter plate out. Remove any foreign material, wash in hot soapy water and rinse thoroughly in clean water, then wipe with a damp cloth. Take care handling the sharp outer edge of the filter plate.1245673Turn outer ring 1/8 turn
25To replace the filter plate and spray arm8  Before replacing the filter   plate, ensure the O-ring is correctly   positioned on the base, as shown.9  Orientate the filter plate and lower it into place:   make sure its kidney-shaped hole aligns with  the matching recess in the dishwasher base.10  Ensure the filter plate lies flat in the base, then   lock it into position: turn the outer ring clockwise   until the the marks align with each other and all three pin pairs firmly interlock, as shown.Important!The filter plate must not be able to move about freely.11  Replace the drain filter, ensuring it is flush with the filter plate.12  Replace the spray arm back onto the impeller.13  Replace the base rack, lowering its front edge into position first.14  Plug the dishwasher back in or turn it on at the power supply.Note: Where there is broken crockery or glass in the drawer, it must be carefully removed to prevent damage to the dishwasher.O-ringInter-lockingpinOuter ringAlignment marks9101112User maintenance instructions - DD24/DD60 models
26 User maintenance instructions - DD36/DD90 models    Spray armFilter plate Drain filterWash pump housingImportant!Disconnect the dishwasher from the power supply (unplug or switch off at the circuit breaker) and allow all its parts to cool before any cleaning or maintenance. Holiday time If the dishwasher is not going to be used for some time, we recommend you leave it clean and empty. Leave the drawer(s) ajar to allow air to circulate. Turn off both the power and water supply to the dishwasher. When using your dishwasher for the first time after a long period away, we recommend pouring 3 cups of water into the drawer before loading and starting a wash. This is to lubricate components that may have dried out during non-use.Cleaning the surfaces 1  Wipe with a clean damp cloth. Take care not to wet the control panel.2  Dry with a clean lint-free cloth.Important!We do not recommend the use of the following cleaning aids on your dishwasher as they may damage the surfaces: Plastic or stainless steel scouring pads           Abrasive, solvent, household cleaners Acid or alkaline cleaners            Hand washing liquids or soap Stainless steel cleaners or polishes          Laundry detergents or disinfectantsCleaning the drain filter, spray arm and filter plate We recommend that the drain filter is cleaned whenever there is evidence of food particles.   The spray arm may need cleaning about once a month in normal use or more often should the need arise. The filter plate should not normally need cleaning. Food particles remaining on its surface can be wiped off with a clean, damp cloth.
271012User maintenance instructions - DD36/DD90 models Important ! If a dishwasher cleaner/descaler is used, you must run a wash program with detergent immediately afterward to prevent any damage to your dishwasher.  The dishwasher must be used with the filter plate, drain filter and spray arms correctly in place.Cleaning the drain filter1  Unplug the dishwasher or turn it off at the power supply.2  Ensure the tines above the drain filter are in the upright position.3  Lift and remove the drain filter. It is normal to find some water under it.4  Empty, rinse clean under running water and replace back into the allocated space. 5  Ensure the drain filter is flush with the filter plate.6  Plug the dishwasher back in or turn it on at the power supply.
28 User maintenance instructions - DD36/DD90 models  Cleaning the spray arms and filter plateEnsure the dishwasher is cool before you start cleaning.To remove the base rack and spray arms1  Unplug the dishwasher or turn it off at the power supply. 2  Take out the cutlery basket.3  Unclip the glass supports (if fitted) from the rack wires and fold all the adjustable racks away, so that they are upright and close to the top.4  Fold down all the tines.5  Remove the base rack carefully.  Start lifting from the back first, tilting the rack as needed to clear the adjustable racks and the dispenser in the front.6  Unclip the spray arms off their mounting valves and shake any foreign material out.7  Rinse the spray arm clean under running water and wipe with a damp cloth.8  If necessary, wipe any soiling off the filter plate with a clean, damp cloth.Spray armMounting valveFilter plateWash pump housing
29To replace the spray arms and base rack9  Clip the spray arms back onto their mounting valves. Be careful that you don’t force them too hard and apply too much pressure on the wash pump housing. You should hear them click into place. Rotate them with your hand to check that they are located properly.10  Replace the base rack, lowering its front edge into position first.11  Clip the glass supports back on and arrange the racking back to your preference.12 Plug the dishwasher back in or turn it on at the power supply. Note: Where there is broken crockery or glass in the drawer, it must be carefully removed to prevent damage to the dishwasher. User maintenance instructions - DD36/DD90 models
30 TroubleshootingProblem Possible cause What to doUnclean dishes Wash program unsuitable for the load.See your ‘Quick start guide’ for a suitable wash program, or the soils were too heavily baked on and dishes may need soaking.Spray arm unable to rotate. Ensure no items are obstructing the spray arm path.Drawer overloaded/incorrectly loaded.Refer to the section on loading.Filter plate/drain filter is incorrectly inserted.See section ‘User maintenance instructions’.Detergent put in the wrong compartment of the dispenser.Detergent must be placed in the large compartment. See section ‘Adding detergent’ for information.Excess food not removed from dinnerware prior to loading.Scrape all food scraps off dinnerware prior to loading.Unsuitable detergent. Use detergents suitable for automatic dishwashers. See section ‘Adding detergent’ for examples of suitable and unsuitable detergents.Not enough detergent. See section ‘Wash programs and detergent quantities’  or follow the detergent manufacturer’s instructions.Spray arm holes are blocked. Clean the spray arm.Filter plate/drain filter is blocked.Clean the filter plate and drain filter.Foaming Incorrect amount of detergent.See section ‘Wash programs and detergent quantities’  or follow the detergent manufacturer’s instructions.Too much egg in the wash load.Increase the amount of detergent.Rinse aid setting too high. Decrease the rinse aid setting.Rinse aid dispenser plug not closed properly.Ensure that the rinse aid dispenser plug is closed tight, with its hand grip pointing straight ahead. See section ‘Using rinse aid’.Water leaking Drain hose disconnected from waste pipe.Reconnect the drain hose to the waste pipe.Water inlet hose not properly connected.Ensure the inlet hose is connected securely.Other leaks. Turn water and power supplies to the dishwasher off.  Call Customer Care or your Authorised Service Centre. See your ‘Service and warranty’ booklet for contact details.Rinse aid dispenser plug not closed properly.Ensure that the rinse aid dispenser plug is closed tight, with its hand grip pointing straight ahead. See section ‘Using rinse aid’.
31 Troubleshooting Problem Possible cause What to doDishwasher will not open (no beeping, no wash underway)Childlock feature is on or the ‘Closed drawer autolock’ option is on, or both.Turn the Childlock off.  Hold down the  /button until the  symbol disappears from the display or the light above the /button goes out and/or press the /button to open the dishwasher.Power failure during cyclePower outage in your home or area.Wait until power resumes, cycle will restart in same part of wash program.Continuous beepingA fault has occurred. Refer to section ‘If there is a fault’.Intermittent beepingDishwasher is in pause mode. Close the dishwasher and press the    button to resume the program.High-pitched, subtle beeping during a wash programRinse aid is being dispensed. This is normal and needs no action.Control buttons inside the drawer do not respond to touchWater over control buttons. Wipe the area dry.Dishwasher will not startPower supply is not connected.Connect the power supply.The drawer is not closed properly.Ensure the drawer is firmly closed.Models with three buttons on the front only: Keylock or Childlock feature is on.Turn the Keylock or Childlock off.  Hold down the  /button until the  symbol disappears from the display or the light above the /button goes out. button not pressed. Press the   button.Fan noise coming from the dishwasher after awash program hasfinishedThis is normal. The dryingfan continues to run for aset period of time after aprogram has finished toassist with drying.No action required. The fan will automatically stop after the set time is over, or when the drawer is opened. In some cases, the fan may resume when the drawer is closed again.Fan noise starts up when I close the drawer, even though I didn’t start a new washThis is normal. In somecases, the drying fan willrun whenever the drawer isclosed for a set period oftime after a program hasfinished.No action required. The fan will automatically stop after the set time is over.
32 TroubleshootingProblem Possible Cause What to doThe wash program seems to have finished (thedishwasher is idle), but the end of wash beeps haven’t sounded and thedrawer cannot be openedThe wash program is stillunderway. It is in a ‘quiet’phase that is needed forensuring the best washresults.No action required. The program will transition into a more audible phase after the ‘quiet’ phase is over.Water pooling on inner rim of drawer after a wash.This is normal condensation. If there is any water over the control buttons, wipe dry.Water under the drain filterThis is normal and needs no action.Excess water in the dishwasher Drain hose(s) bent or kinked.Straighten the drain hose(s).Blocked filters. Clean the filter plate/drain filter.  Refer to ’User maintenance instructions’.Water marks on the dishesRinse aid depleted. Refill the rinse aid dispenser.Rinse aid setting too low. Increase the rinse aid setting.Dishwasher overloaded/incorrectly loaded.Refer to the section on loading.Drawer interior is stainedSome foods, like tomato based products, may stain the inside of the drawer.Pre-rinse dishes before placing in the drawer. Alternatively, using the Rinse program after adding the dishes may minimise staining.Dishes did not dry Incorrect loading. Ensure the dishes are not nesting together.Dishes were left in the drawer for several hours after a wash.We recommend unloading the dishes within a few hours after a wash program has finished, as the small amount of vapour left after the wash may -with time- resettle on dishes as condensation.Rinse aid depleted. Refill the rinse aid dispenser.Rinse aid setting too low. Increase the rinse aid setting.Eco wash program used. Choose a standard wash program.No detergent dispensedDetergent dispenser was wet when loaded.Clean the dispenser and ensure it is dry before adding detergent.Excessive motor noiseThe filter plate and/or spray arm is incorrectly placed.Refer to the ‘User maintenance instructions’ section for details on correct placement.No water in the motor area.   This usually occurs on the first use or when the dishwasher has not been used for long periods of time.  Pour 3 cups of water into the drawer before running a wash program.
33 If there is a fault How do I know if there is a fault?Your dishwasher will self‐diagnose and let you know by beeping continuously and showing a fault code on the wash program panel inside the drawer (all models) and in the display (Classic models only) .What should I do if there is a fault?Check what kind of model you have and attend to the fault by following the appropriateflowchart following. You may be able to fix some of the faults yourself – with others, you will need to contact Fisher & Paykel Customer Care to organise a visit by a service technician.Classic modelsGo to Page 34Designer modelsGo to Page 36Integrated models with badgeGo to Page 36Integrated models with remote controlGo to Page 38
34 How to attend to a fault ‐ Classic modelsSTART HEREPress  to stop the beeping.Look up the fault code in the table opposite and note it down.U1: Turn on the water supply, then press  to resume the wash program.Press  . Wait a few seconds, thenpress  again.Press . Another number will briefly appear in the display. Note this number down too. It will help Fisher & Paykel Customer Care identify the fault more precisely.U4: Attend to the fault on the other drawer. The drawer displaying U4 is not faulty.YES NONONOYESYESU6: Open the drawer and check the spray arm.Has the spray arm loosened or come off its mounting?Water pressure is too low. You may need to have a ‘4 litre’ valve installed on your water supply.Refit the spray arm following instructions in section ‘User maintenance instructions’, then close the drawer and press   to resume the wash program.If it’s a ‘U’ codeHas the fault code disappeared? Has the dishwasher resumed normal operation?Has the fault code disappeared?You have corrected the faultand can continue to use yourdishwasher as normal.Disconnect the dishwasher from the power supply (unplug or switch off at circuit breaker), turn off its water supply, then contact Customer Care with the fault code information. See your ‘Service and warranty’ booklet for contact details.The fault hasreset. You cancontinue to useyour dishwasher.If it’s an ‘E’ code
35 How to attend to a fault ‐ Classic models Display Fault Code Possible cause of faultU1 U1 No water – the water supply hasn’t beenturned on.U4 U4 Fault in the other drawer preventing theuse of this drawer.U6 U6 The spray arm has loosened or come off its mounting, or water pressure is too low.Display Fault Code Possible cause of faultE1 E1 Flood detected.E2 E2 Motor fault.E3 E3 Temperature sensor fault. You may needto have a tempering valve installed on your water supply, to ensure that incoming water is less than 65oC (149oF).E4 E4 Heating element failed.E5 E5 Fault with the internal lid of thedishwasher.E6 E6 Fault with the drying fan.E7 E7 Electronics fault—detergent dispensingsystem.E8 E8 Electronics fault—other systems.E9 E9 Electronics fault—controller.EC EC Electronics fault—communicationbetween drawers.
36START HEREPress  /  to stop the beeping.Try to open the drawer (without using excessive force).U1: Turn on the water supply, then press  to resume the wash program.Check which program indicators are lit on the wash program panel. Look up what fault code the indicators correspond to in the table opposite. Note down the code here:Press . The Eco indicator and another set of program indicators will briefly light up on the wash program panel. Mark which ones in the diagram below. This information will help Fisher & Paykel identify the fault more precisely. Which other indicators light up when you press  ?Press/. Wait a few seconds, thenpress/again.Press/. Wait a few seconds, thenpress/again.YESYESNOYESYESNO, IT’S BLUENO, IT’S BLUENOIf it’s a ‘U’ codeIf it’s an ‘E’ codeHas the fault code disappeared? Has the dishwasher resumed normal operation?Can the drawer be opened?Is the light above the button still red?Is the light above the button still red?You have corrected the fault and can continue to use your dishwasher as normal.Disconnect the dishwasher from the power supply (unplug or switch off at circuit breaker), turn off its water supply, then contact Customer Care with the fault code information. See your ‘Service and warranty’ booklet for contact details.The faulthas resetand youshould now be able to open thedrawer. You can continue touse it asnormal.How to attend to a fault ‐ Designer and Integrated models with badge modelsU4: Attend to the fault on the other drawer. The drawer displaying U4 is not faulty.NOYESU6: Open the drawer and check the spray arm.Has the spray arm loosened or come off its mounting?Water pressure is too low. You may need to have a ‘4 litre’ valve installed on your water supply.Refit the spray arm following instructions in section ‘User maintenance instructions’, then close the drawer and press  to resume the wash program.
37Wash program panel Fault Code Possible cause of faultU1 No water – the water supply hasn’t beenturned on.U4 Fault in the other drawer preventing theuse of this drawer.U6 The spray arm has loosened or come off its mounting, or water pressure is too low.Wash program panel Fault Code Possible cause of faultE1 Flood detected.E2 Motor fault.E3 Temperature sensor fault. You may needto have a tempering valve installed on your water supply, to ensure that incoming water is less than 65oC (149oF).E4 Heating element failed.E5 Fault with the internal lid of thedishwasher.E6 Fault with the drying fan.E7 Electronics fault—detergent dispensingsystem.E8 Electronics fault—other systems.E9 Electronics fault—controller.EC Electronics fault—communicationbetween drawers. How to attend to a fault ‐ Designer and Integrated models with badge models
38START HERETry to open the drawer(without using excessive force).Press   on the wash program panel to stop the beeping, then follow the applicable instructions below.Press and hold   until you hear a quick double beep. Do the fault code indicators and beeping come back in a few seconds?Check which program indicators are lit on the wash program panel. Look up what fault code the indicators correspond to in the table opposite. Note down the code here:Press   on the wash program panel. The Eco indicator and another set of program indicators will briefly light up. Mark which ones in the diagram below. This information will help Fisher & Paykel identify the fault more precisely. Which other indicators light up when you press  ?YESNOIf it’s an ‘E’ codeCan the drawer be opened?Disconnect the dishwasher from the power supply to stop the beeping, then contact Customer Care. See your ‘Service and warranty’ booklet for contact details.How to attend to a fault ‐ Integrated models with remote controlDisconnect the dishwasher from the power supply (unplug or switch off at circuit breaker), turn off its water supply, then contact Customer Care with the fault code information. See your ‘Service and warranty’ booklet for contact details.U1: Turn on the water supply, press  , then close the drawer to resume the wash program.YESNOIf it’s a ‘U’ codeHas the fault code disappeared? Has the dishwasher resumed normal operation?You have corrected the fault and can continue to use your dishwasher as normal.You have corrected the fault and can continue to use your dishwasher as normal.U4: Attend to the fault on the other drawer. The drawer displaying U4 is not faulty.NONOYESYESU6: Open the drawer and check the spray arm.Has the spray arm loosened or come off its mounting?Water pressure is too low. You may need to have a ‘4 litre’ valve installed on your water supply.Refit the spray arm following instructions in section ‘User maintenance instructions’, then close the drawer and press  to resume the wash program.
39Wash program panel Fault Code Possible cause of faultU1 No water – the water supply hasn’t beenturned on.U4 Fault in the other drawer preventing theuse of this drawer.U6 The spray arm has loosened or come off its mounting, or water pressure is too low.Wash program panel Fault Code Possible cause of faultE1 Flood detected.E2 Motor fault.E3 Temperature sensor fault. You may needto have a tempering valve installed on your water supply, to ensure that incoming water is less than 65oC (149oF).E4 Heating element failed.E5 Fault with the internal lid of thedishwasher.E6 Fault with the drying fan.E7 Electronics fault—detergent dispensingsystem.E8 Electronics fault—other systems.E9 Electronics fault—controller.EC Electronics fault—communicationbetween drawers. How to attend to a fault ‐ Integrated models with remote control
40 Warranty and serviceBefore you call for service or assistance ...Check the things you can do yourself.  Refer to the ‘Installation instructions’, ‘User guide’ and ‘Quick start guide’ and check that:1  your product is correctly installed2  you are familiar with its normal operation.If after checking these points you still need assistance, please see you ‘Service and warranty’ booklet for warranty information and Customer Care contact details, or contact us through our website listed on the back cover.Fisher & Paykel AppliancesModel no  Serial no.  Copy this from the serial label of your dishwasher.      The label is located inside cabinet, underneath the     (top) drawer.Date of purchaseContact details  Dealer name
42 Wash program data - DD24/DD60 models USA & CANADA - Classic, Designer, and Integrated double modelsHEAVY (~127 mins)NORMAL (~128 mins)FAST (~53 mins)DELICATE (~82 mins)RINSE (~11 mins)pre-wash 120oF pre-washmain wash 150oF main wash 130oF main wash 130oF main wash 120oFpost-rinse x3 post-rinse post-rinse post-rinse x2final rinse 163oF final rinse 130oF final rinse 120oF final rinse 130oFdrying phase drying phase drying phaseHEAVY ECO (~107 mins)NORMAL ECO (~100 mins)FAST ECO (~35 mins)DELICATE ECO (~68 mins)main wash 150oF main wash 120oF main wash 115oF main wash 115oFpost-rinse x3 post-rinse post-rinse post-rinse x2final rinse 150oF final rinse 125oF final rinse 115oF final rinse 120oFdrying phase drying phase drying phaseUSA & CANADA - Integrated single modelsHEAVY (~163 mins)NORMAL (~159 mins)FAST (~84 mins)DELICATE (~118 mins)RINSE (~11 mins)pre-washmain wash 149oF main wash 131oF main wash 131oF main wash 122oFpost-rinse x3 post-rinse post-rinse post-rinse x2final rinse 134oF final rinse 134oF final rinse 122oF final rinse 131oFdrying phase drying phase drying phase drying phaseHEAVY ECO (~153 mins)NORMAL ECO (~131 mins)FAST ECO (~61 mins)DELICATE ECO (~99 mins)main wash 149oF main wash 118oF main wash 113oF main wash 113oFpost-rinse x2 post-rinse post-rinse post-rinse x2final rinse 134oF final rinse 125oF final rinse 113oF final rinse 122oFdrying phase drying phase drying phaseFor information on which program to use for your load, see your ‘Quick start guide’. Wash cycle times indicated are approximate.
43 Wash program data- DD24/DD60 modelsNEW ZEALAND & AUSTRALIA - Classic, Designer, and Integrated double modelsHEAVY (~124 mins)NORMAL (~128 mins)FAST (~49 mins)DELICATE (~92 mins)RINSE (~11 mins)pre-washmain wash 70oC main wash 60oC main wash 55oC main wash 50oCpost-rinse x2  post-rinse post-rinse post-rinse x2final rinse 65oC final rinse 60oC final rinse 55oC final rinse 60oCdrying phase drying phase drying phaseHEAVY ECO (~120 mins)NORMAL ECO* (~134 mins)FAST ECO (~33 mins)DELICATE ECO (~80 mins)main wash 65oC main wash 40oC main wash 45oC main wash 45oCpost-rinse x2  post-rinse post-rinse post-rinse x2final rinse 55oC final rinse 40oC final rinse 45oC final rinse 50oCdrying phase drying phase drying phaseNEW ZEALAND & AUSTRALIA - Integrated single modelsHEAVY (~165 mins)NORMAL (~175 mins)FAST (~75 mins)DELICATE (~128 mins)RINSE (~11 mins)pre-washmain wash 70oC main wash 60oC main wash 55oC main wash 50oCpost-rinse x2  post-rinse post-rinse post-rinse x2final rinse 57oC final rinse 57oC final rinse 55oC final rinse 57oCdrying phase drying phase drying phase drying phaseHEAVY ECO (~166 mins)NORMAL ECO* (~190 mins)FAST ECO (~57 mins)DELICATE ECO (~111 mins)main wash 65oC main wash 40oC main wash 45oC main wash 45oCpost-rinse x2  post-rinse post-rinse post-rinse x2final rinse 55oC final rinse 40oC final rinse 45oC final rinse 50oCdrying phase drying phase drying phase drying phase*Reference program for energy label in compliance with AS/NZS 2007.
44 Wash program data - DD24/DD60 models GREAT BRITAIN AND IRELANDHEAVY (~126 mins)NORMAL (~95 mins)FAST (~53 mins)DELICATE (~92 mins)RINSE (~11 mins)pre-washmain wash 70oC main wash 65oC main wash 55oC main wash 50oCpost-rinse x2  post-rinse x2 post-rinse post-rinse x2final rinse 65oC final rinse 65oC final rinse 50oC final rinse 60oCdrying phase drying phase drying phaseHEAVY ECO (~121 mins)NORMAL ECO (~159 mins)FAST ECO (~39 mins)DELICATE ECO (~87 mins)main wash 60oC main wash 50oC main wash 45oC main wash 45oCpost-rinse x2 post-rinse post-rinse post-rinse x2final rinse 55oC final rinse 60oC final rinse 45oC final rinse 50oCdrying phase drying phase drying phase*Reference program for energy label in compliance with EN50242 Regulations.Note:Wash times can vary depending on the incoming water temperature, ambient conditions, type of dish load and whether the drawer has been opened during the wash. Wash times are only APPROXIMATE on the electronic display and based on 120oF (USA and Canada), 20oC (New Zealand and Australia), or 15oC (Great Britain and Ireland) incoming water.
45
46USA & CANADA - Designer modelsHEAVY (~141 mins)NORMAL (~148 mins)FAST (~58 mins)DELICATE (~85 mins)RINSE (~9 mins)pre-washmain wash 150oF main wash 120oF main wash 130oF main wash 120oFpost-rinse x3 post-rinse x4 post-rinse post-rinse x2final rinse 163oF final rinse 150oF final rinse 140oF final rinse 130oFdrying phase drying phase drying phaseHEAVY ECO (~135 mins)NORMAL ECO (~113 mins)FAST ECO (~39 mins)DELICATE ECO (~60 mins)pre-wash pre-washmain wash 140oF main wash 120oF main wash 115oF main wash 115oFpost-rinse x3 post-rinse post-rinse post-rinse x2final rinse 150oF final rinse 150oF final rinse 115oF final rinse 120oFdrying phase drying phase drying phaseUSA & CANADA - Integrated modelsHEAVY (~172 mins)NORMAL (~179 mins)FAST (~89 mins)DELICATE (~116 mins)RINSE (~9 mins)pre-washmain wash 149oF main wash 122oF main wash 131oF main wash 122oFpost-rinse x3 post-rinse x4 post-rinse post-rinse x2final rinse 134oF final rinse 134oF final rinse 135oF final rinse 131oFdrying phase drying phase drying phase drying phaseHEAVY ECO (~166 mins)NORMAL ECO (~144 mins)FAST ECO (~70 mins)DELICATE ECO (~91 mins)main wash 140oF main wash 122oF main wash 113oF main wash 113oFpost-rinse x2 post-rinse post-rinse post-rinse x2final rinse 134oF final rinse 135oF final rinse 113oF final rinse 122oFdrying phase drying phase drying phase drying phaseFor information on which program to use for your load, see your ‘Quick start guide’. Wash cycle times indicated are approximate.Wash program data - DD36/DD90 models
47NEW ZEALAND & AUSTRALIA - Designer modelsHEAVY (~130 mins)NORMAL (~120 mins)FAST (~55 mins)DELICATE (~98 mins)RINSE (~11 mins)pre-washmain wash 70oC main wash 50oC main wash 55oC main wash 50oCpost-rinse x2  post-rinse post-rinse post-rinse x2final rinse 65oC final rinse 60oC final rinse 60oC final rinse 60oCdrying phase drying phase drying phaseHEAVY ECO (~129 mins)NORMAL ECO* (~146 mins)FAST ECO (~45 mins)DELICATE ECO (~91 mins)main wash 60oC main wash 42oC main wash 45oC main wash 45oCpost-rinse x2  post-rinse post-rinse post-rinse x2final rinse 55oC final rinse 43oC final rinse 45oC final rinse 50oCdrying phase drying phase drying phaseNEW ZEALAND & AUSTRALIA - Integrated modelsHEAVY (~168 mins)NORMAL (~158 mins)FAST (~88 mins)DELICATE (~136 mins)RINSE (~11 mins)pre-washmain wash 70oC main wash 60oC main wash 55oC main wash 50oCpost-rinse x2  post-rinse post-rinse post-rinse x2final rinse 57oC final rinse 57oC final rinse 57oC final rinse 57oCdrying phase drying phase drying phase drying phaseHEAVY ECO (~166 mins)NORMAL ECO* (~173 mins)FAST ECO (~75 mins)DELICATE ECO (~126 mins)main wash 60oC main wash 40oC main wash 45oC main wash 45oCpost-rinse x2  post-rinse post-rinse post-rinse x2final rinse 55oC final rinse 40oC final rinse 45oC final rinse 50oCdrying phase drying phase drying phase drying phase*Reference program for energy label in compliance with AS/NZS 2007. Wash program data- DD36/DD90 models
48GREAT BRITAIN AND IRELANDHEAVY (~126 mins)NORMAL (~95 mins)FAST (~53 mins)DELICATE (~92 mins)RINSE (~11 mins)pre-washmain wash 70oC main wash 65oC main wash 55oC main wash 50oCpost-rinse x2  post-rinse x2 post-rinse post-rinse x2final rinse 65oC final rinse 65oC final rinse 60oC final rinse 60oCdrying phase drying phase drying phaseHEAVY ECO (~121 mins)NORMAL ECO (~179 mins)FAST ECO (~42 mins)DELICATE ECO (~92 mins)main wash 60oC main wash 50oC main wash 45oC main wash 45oCpost-rinse x2 post-rinse post-rinse post-rinse x2final rinse 55oC final rinse 55oC final rinse 45oC final rinse 50oCdrying phase drying phase drying phase*Reference program for energy label in compliance with EN50242 Regulations.Note:Wash times can vary depending on the incoming water temperature, ambient conditions, type of dish load and whether the drawer has been opened during the wash. Wash times are only APPROXIMATE on the electronic display and based on 120oF (USA and Canada), 20oC (New Zealand and Australia), or 15oC (Great Britain and Ireland) incoming water.Wash program data - DD36/DD90 models
49
50The dishwashers are tested to various standards for wash performance using the parameters detailed below.Wash programNormal Rinse agent setting4Maximum place setting10 for double modelsWater softener setting(for DD24-H models only)Adjust the water softener to match the waterhardness. Refer to the ‘Water softener’ section.Height setting of adjustable racksRecommended loading patternTop drawerCutlery basketBottom drawer5½” (140mm)12 3 4 5 6635541111133223322444433333Standards test - DD24 models (USA & CANADA)
51Cutlery basket  Standards test - DD36 models (USA & CANADA)The dishwashers are tested to various standards for wash performance using the parameters detailed below.Wash programmeNormal Rinse agent setting4Maximum place setting9Accessories to be used in the    dishwasher standards testBase rack, folding tines, cutlery basket with cutlery grid, adjustable racks, glass supports, multi-purpose clip. Use the multi-purpose clip to hold the platterRecommended loading pattern16126333333533333333333322222222444444444111111112 3 4 5 63 glasses6 glasses under adjustable racks4 cups under adjustable racks
52The dishwashers are tested to AS/NZS 2007 standards for both wash and dry performance, using the parameters detailed below.Wash programNormal Eco (At the end of the program, open the drawer 50 mm to improve the dry performance.)Detergent quantities23.75g (main wash) per drawerRinse aid setting4Maximum place setting (per drawer)7Accessories to be used in the Dishwasher standards testBase rack, folding tines, spacing-adjustable tines, cutlery basket with cutlery grid, adjustable racks, glass supports.Height setting of adjustable racksCorrect orientation of glass supports   on both sides of drawerRecommended loading pattern140mmTop and Bottom drawerStandards test - DD60 models (NZ & AUSTRALIA)  Cutlery basket123 45333113154 42222222115555115544444333
53  Standards test - DD90 models (NZ & AUSTRALIA)The dishwashers are tested to AS/NZS 2007 standards for both wash and dry performance using the parameters detailed below.Wash programmeNormal Eco (At the end of the programme, open the drawer 50 mm to improve the dry performance.)Detergent quantities26.25g (main wash)Rinse aid setting4Maximum place setting9Accessories to be used in the dishwasher standards testBase rack, folding tines, cutlery basket with cutlery grid, adjustable racks, glass supports, multi-purpose clip.Height setting of adjustable racksCorrect orientation of glass supports      on both sides of drawerRecommended loading pattern12 3 45113325544433333335522222222555554444441111111HH = 125 mm for the back right-hand adjustable rackH = 140 mm for all the other adjustable racks5 glasses under adjustable racks1 saucer 3 cups + 1 glass under adjustable racks3 glasses1 bread-and-butter plateCutlery basket
54The dishwashers are tested to EN50242 standards for both wash and dry performances using the parameters detailed below.Wash programNormal Eco Detergent quantities2.5g (pre-wash) per drawer15.5g (main wash) per drawerRinse aid setting4Water softener settingAdjust the water softener to match the waterhardness. Refer to the ‘Water softener’ and‘Option adjustments’ sections.Maximum place setting (per drawer)6Accessories to be used in the Dishwasher standards testBase rack, folding tines, spacing-adjustable tines, cutlery basket, adjustable racks, glass supports.Height setting of adjustable racksCorrect orientation of glass supports on both sides of drawerRecommended loading pattern140mmStandards test - DD60 models (GREAT BRITAIN & IRELAND) Top and Bottom drawerCutlery basket12 3 456 788833457262222211441114445555513333small bowl between cutlery basket and first plate
55  Standards test - DD90 models (GREAT BRITAIN & IRELAND)The dishwashers are tested to EN50242 standards for both wash and dry performances using the parameters detailed below.Wash programmeNormal Eco Detergent quantities5g (pre-wash)22g (main wash)Rinse aid setting4Water softener settingAdjust the water softener to match the waterhardness. Refer to the ‘Water softener’ and‘Option adjustments’ sections.Maximum place setting9Accessories to be used in the dishwasher standards testBase rack, ‘slide-and-fold’ tines, cutlery basket with cutlery grid, adjustable racks, glass supports, multi-purpose clip.Height setting of adjustable racksCorrect orientation of glass supports   on both sides of drawerRecommended loading patternHH = 125 mm for the back right-hand adjustable rackH = 140 mm for all the other adjustable racks163825544433333385555553517223222222444444111111112 3 456 785 glasses under left-hand adjustable rackcupcupcupsmall serving bowl2 glasses2 glassesCutlery basket
US CA NZ AU GB IE 08.2011F&P PN - 590199 Awww. sherpaykel.comwww. sherpaykel.cawww. sherpaykel.co.nzwww. sherpaykel.com.auwww. sherpaykel.co.ukwww. sherpaykel.ieCopyright © Fisher & Paykel 2011. All rights reserved.The product specifications in this booklet apply to the specific products and models described at the date of issue.  Under our policy of continuous product improvement, these specifications may change at any time.  You should therefore check with your Dealer to ensure this booklet correctly describes the product currently available.

Navigation menu