Furuno USA 9ZWRTR104 Transceiver for Radar Sensor DRS4DL User Manual
Furuno USA Inc Transceiver for Radar Sensor DRS4DL
Contents
- 1. User Manual I
- 2. User Manual II Part 1
- 3. User Manual II Part 2
- 4. User Manual II Part 3
- 5. User Manual II Part 4
- 6. User Manual II Part 5
- 7. User Manual II Part 6
- 8. User Manual II Part 7
- 9. User Manual II Part 8
- 10. User Manual II Part 9
- 11. User Manual II Part 10
- 12. User Manual II Part 11
- 13. User Manual II Part 12
User Manual II Part 1
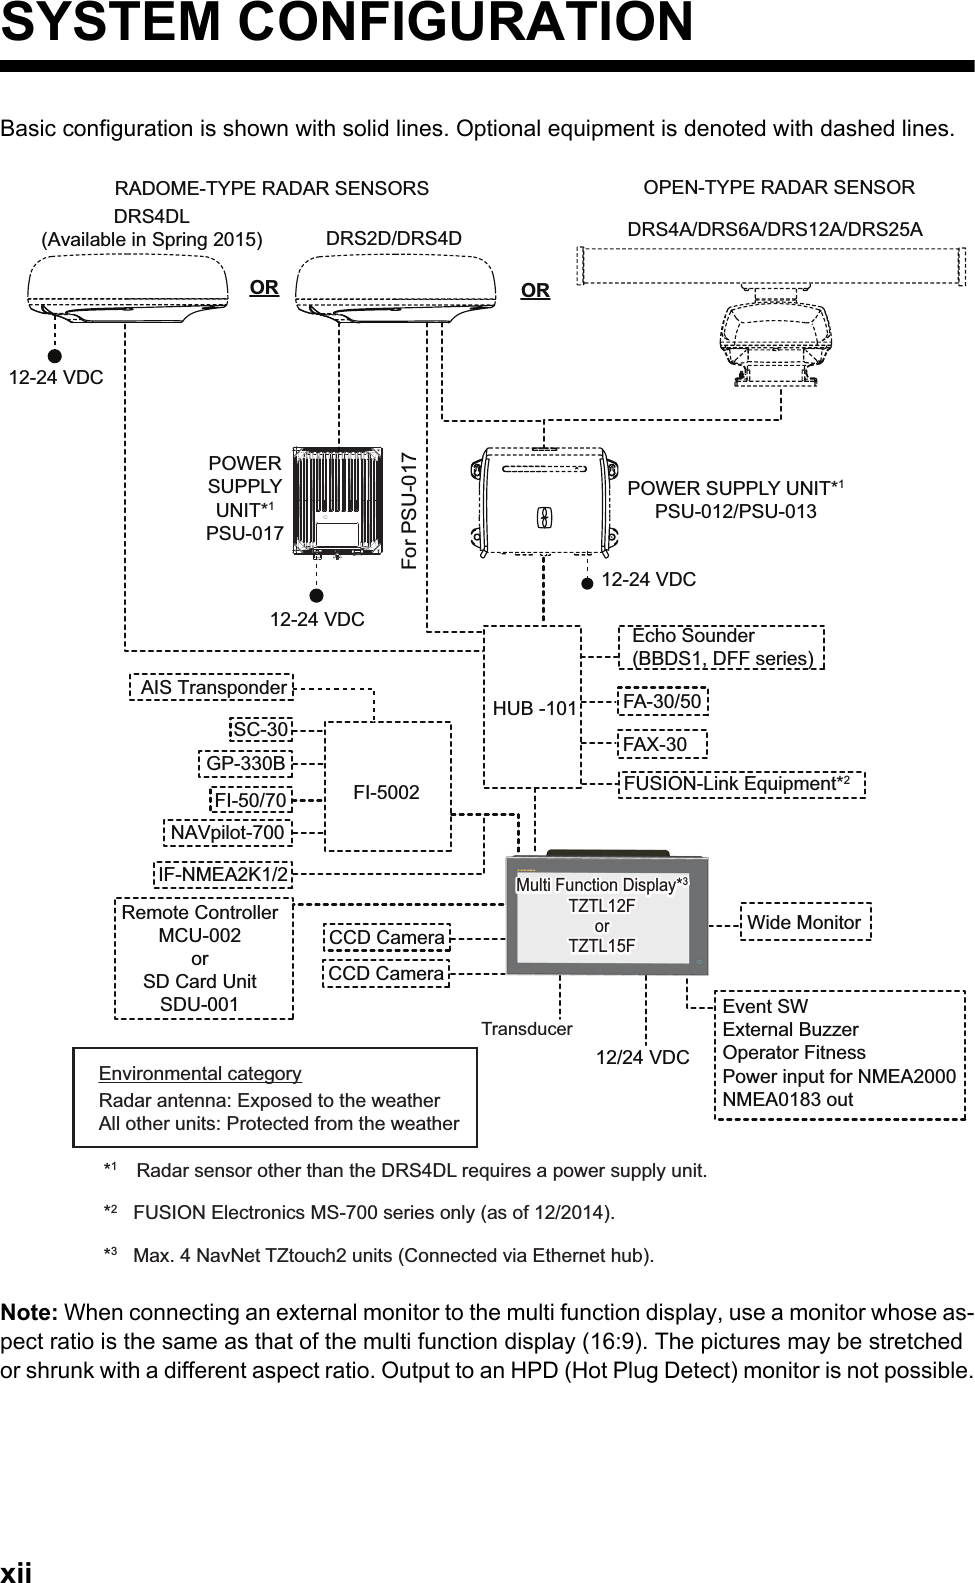
![1-11. SYSTEM INTRODUCTIONThis chapter provides the information necessary to get you started using your system.Standards used in this manual• Key names are shown in boldface type. For example, ENT key (on the MCU-002).• Menu items, on-screen indications and window names are shown in brackets. For example, the [Settings] menu.• On-screen messages are shown in quotations. For example, "No Network Connect-ed".• The [Settings] menu is comprised of several sub menus. When you are asked to se-lect one of its sub menus, “[Settings]” is followed by a hyphen and the sub menu name. For example, "Tap [Settings] - [General]”.• The colors mentioned in this manual are the default colors. Your colors may be dif-ferent.• Most of the screenshots in this manual are from the TZTL12F. The layout is slightly different on the TZTL15F.](https://usermanual.wiki/Furuno-USA/9ZWRTR104.User-Manual-II-Part-1/User-Guide-2522485-Page-14.png)
![1. SYSTEM INTRODUCTION1-3Touchscreen operationsThe tables which follow outline the touchscreen operations.Operation with a fingerOperation with two fingersOperation with a finger FunctionTap Short tap• Select a menu item.• Select an object or posi-tion to display the corre-sponding pop-up menu.Long tap• Edit display icon (on home screen).Drag • Pan the charts.• Scroll the menu.Operation with two fingers FunctionPinch • Zoom in or out the dis-play range in the 2D/3D modes or weather display.• Select radar range on the radar display.Drag Change 3D viewing point.Tap Do the function assigned to [Function Gesture], which is in the ([Settings] - [General] menu. See section 1.15.Zoom in Zoom outor](https://usermanual.wiki/Furuno-USA/9ZWRTR104.User-Manual-II-Part-1/User-Guide-2522485-Page-16.png)
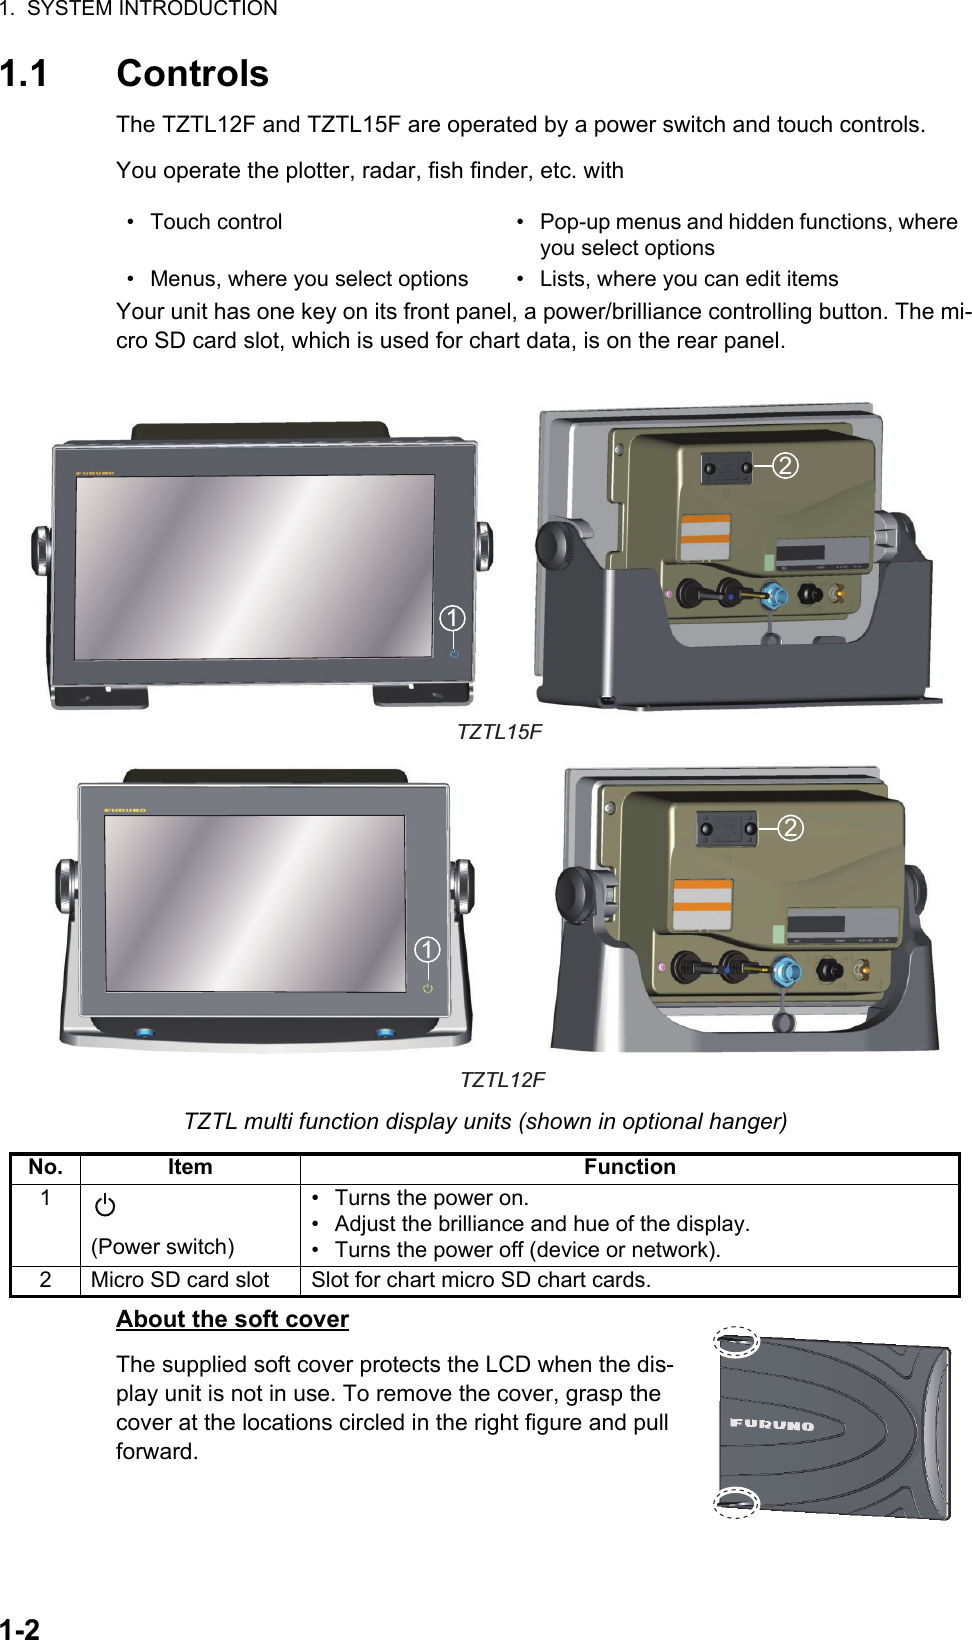
![1. SYSTEM INTRODUCTION1-51.2 Remote Control Unit MCU-002 (Option)The Remote Control Unit MCU-002 lets you operate the system without touching the screen.* When you switch the steering mode with the STBY.AUTO key, a beep sounds and then one of the messages shown below appears. The message does not appear on the home screen.- STBY mode AUTO mode: "NAVpilot is engaged."- AUTO mode STBY mode: "NAVpilot is disengaged."No. Key Function1STBY•AUTO keySwitches the steering mode of the FURUNO NAVpilot-700 series Autopilot between the STBY and AUTO modes*.2CENTER key • Returns own ship to the center of the screen (Plotter/Weather/Radar display).• Cancels the echo history (Fish finder dis-play).3CURS•SCRL keySwitches the joystick gesture between the cur-sor mode and scroll mode.4 Joystick Short press: Works same as tap gesture.• Opens the pop-up menu.• Activates the item selected by the cursor.Long press: Works same as long tap gesture.• Opens the detail pop-up menu.Operate the joystick:Cursor mode operation• Moves the cursor.Scroll mode operation• Pans the display (Plotter/Weather/Radar dis-play).• Shifts the range and scrolls back the picture (Fish finder display).5+, - key • Selects an item from the slide-out/main/pop-up menu.• Zooms in (+) and out (-).• Raises (+) and lowers (-) the brilliance on the [Power & Brilliance] window.6ENT key • Activates a selected item.• Opens the slide-out menu.7CANCEL/MOB keyShort press:• Closes the menu or dialog box.• Stops the aural alarm.• Ends the tool mode (End Route, End Move, etc.).Long press:• Enters the MOB mark (at the own ship’s po-sition).8FUNC key Does the function set at [Function Gesture].9HOME/BRILL keyShort press:• Opens the home screen.Long press:• Opens the [Power & Brilliance] window.1 2 3456789](https://usermanual.wiki/Furuno-USA/9ZWRTR104.User-Manual-II-Part-1/User-Guide-2522485-Page-18.png)
![1. SYSTEM INTRODUCTION1-61.3 How to Turn the Power On or OffThe power switch ( ) on the front panel controls the power.When you turn on the power, the equipment beeps twice and the start-up screen ap-pears. After the startup process is completed, the [NAVIGATION WARNING] screen appears. Read the warning, then tap [OK]. The last-used display appears.The color of the lamp in the power switch changes according to equipment state.Green: Equipment is powered.Orange: Equipment is not powered but power is flowing to the equipment.To turn off the power, tap the power switch to show the [Power & Brilliance] window.Tap [Power Off This Equipment] or [Power Off Network], then tap [OK].15 seconds af-ter the screen goes blank, the power turns off. (The power is on for this 15 seconds.)Note 1: If you cannot turn off the power as shown above or the display freezes, long push the power switch until the screen goes blank.Note 2: Do not turn off the power during the start-up. Wait until the start-up is complet-ed before you turn the power off.Note 3: The screen refreshes slower in low ambient temperature.POWER switchSelect either of the two.](https://usermanual.wiki/Furuno-USA/9ZWRTR104.User-Manual-II-Part-1/User-Guide-2522485-Page-19.png)
![1. SYSTEM INTRODUCTION1-71.4 How to Adjust the Brilliance of the Display, the Power Indicator and the HueWith the power applied, press to show the [Power & Brilliance] window.Drag the slider or tap the slider bar to adjust the brilliance of both the display and the power indicator.The [Day], [Dusk], [Night] and [Auto] options (below the slider bar) set the hue accord-ing to selection. The [Auto] option automatically sets the hue according to time of day. Adjust the display brilliance. Close the window.Hue options](https://usermanual.wiki/Furuno-USA/9ZWRTR104.User-Manual-II-Part-1/User-Guide-2522485-Page-20.png)
![1. SYSTEM INTRODUCTION1-81.5 Home ScreenThe home screen is where you access functions and menus, select displays and check sensor status. Tap the [Home] icon at the top left corner to show the home screen. The home screen is automatically closed, and the previous operation display restored, when no operation is detected for approx. one minute.The sensor icons denote what sensors are connected in the system and their status. The color of an icon changes according to sensor status.White: Sensor normalRed: Sensor errorGray: Sensor inactive (stopped)Plotter Radar SounderCamera Weather InstrumentTimeDateGPSHeadingRadarSounderSiriusFusionWiFiFunctionsFunctionsTapHome screenHome screenTime, dateTime, dateSensor iconsSensor iconsDisplay iconsDisplay iconsHome icon](https://usermanual.wiki/Furuno-USA/9ZWRTR104.User-Manual-II-Part-1/User-Guide-2522485-Page-21.png)
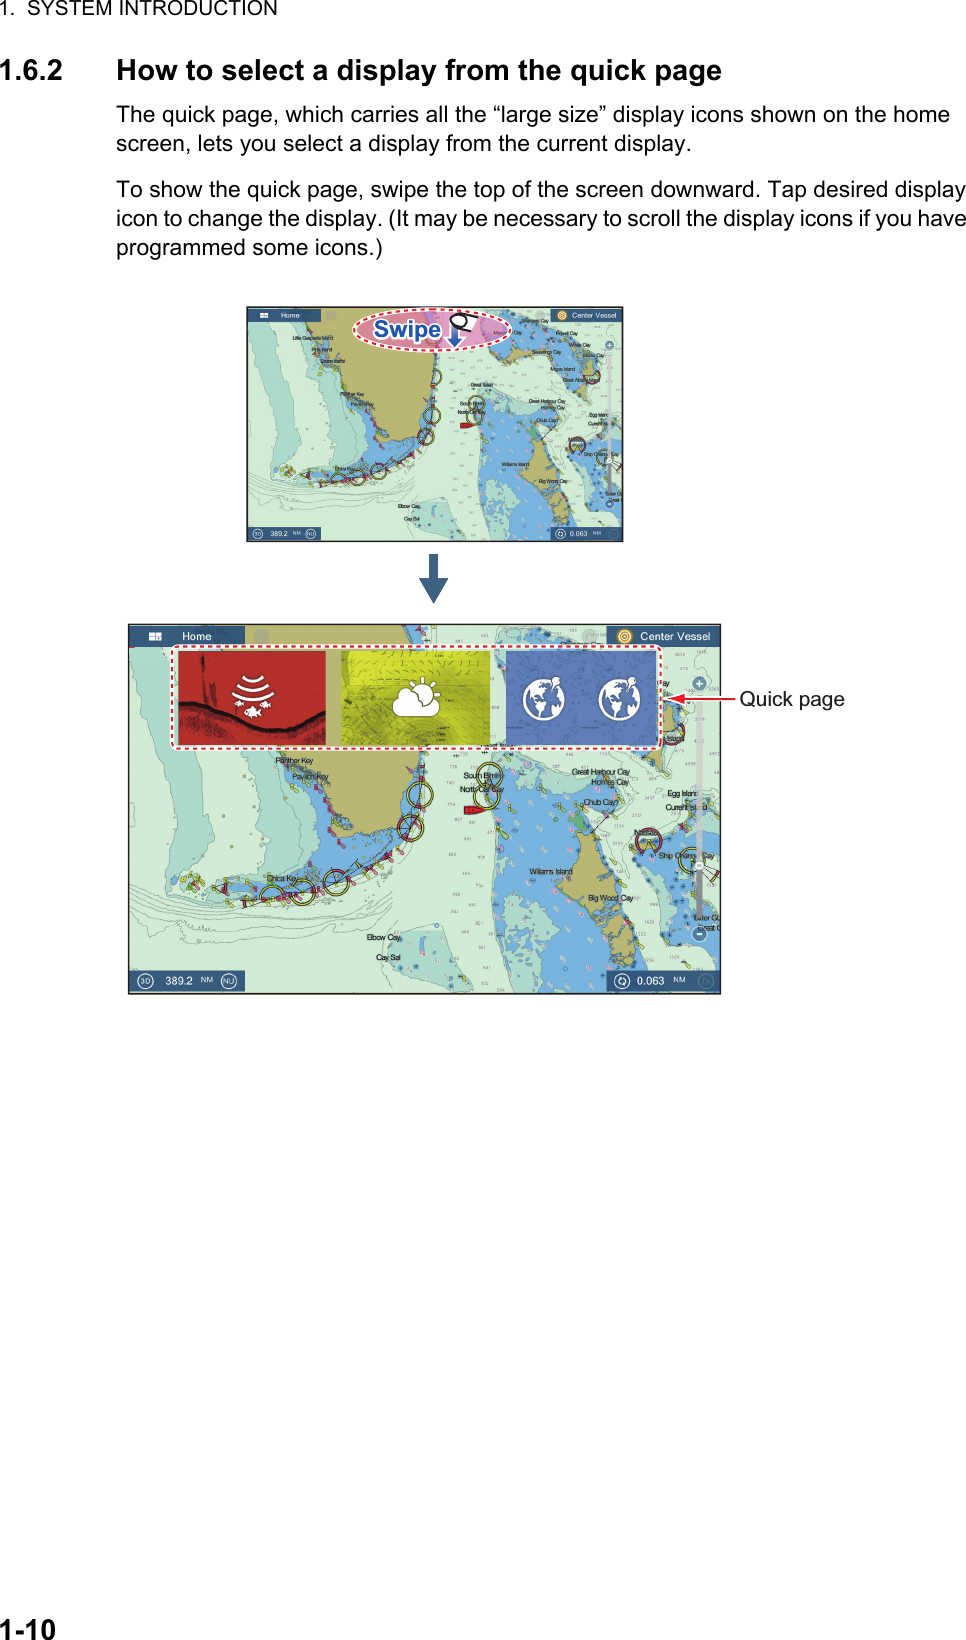
![1. SYSTEM INTRODUCTION1-9The functions section provide the following features:[MOB]: Puts the MOB mark (to mark man overboard location on the plotter and radar displays. See section 1.17.[Settings]: Menus (plotter, radar, sounder, etc.) for customization of the system. See section 1.14.[Tide]: Opens the tide graph.[List]: Opens the routes, points, AIS and DSC lists.[Catalog]: Opens the list of charts installed in your system.[eGuide]: Opens the abbreviated operator’s manual. You can get the latest version of the operator’s manual by accessing the quick response code provided in the introduc-tion section of the guide.The display icons select corresponding displays. See the next section for details.1.6 How to Select a DisplayYou have two methods from which to select a display, the quick page and the home screen.1.6.1 How to select a display from the home screenTap the [Home] icon to show the home screen. Tap the applicable display icon. (It may be necessary to swipe the screen if you have programmed a number of display icons.)Display icons](https://usermanual.wiki/Furuno-USA/9ZWRTR104.User-Manual-II-Part-1/User-Guide-2522485-Page-22.png)