HOSEOTELNET ST3 Pager User Manual 1
Hoseo Telnet Co., Ltd. Pager 1
UserManual.wiki
>
HOSEOTELNET
>
ST3 User Manual
User Manual
Navigation menu
Upload a User Manual
Namespaces
Wiki Guide
HTML
PDF
Info
Views
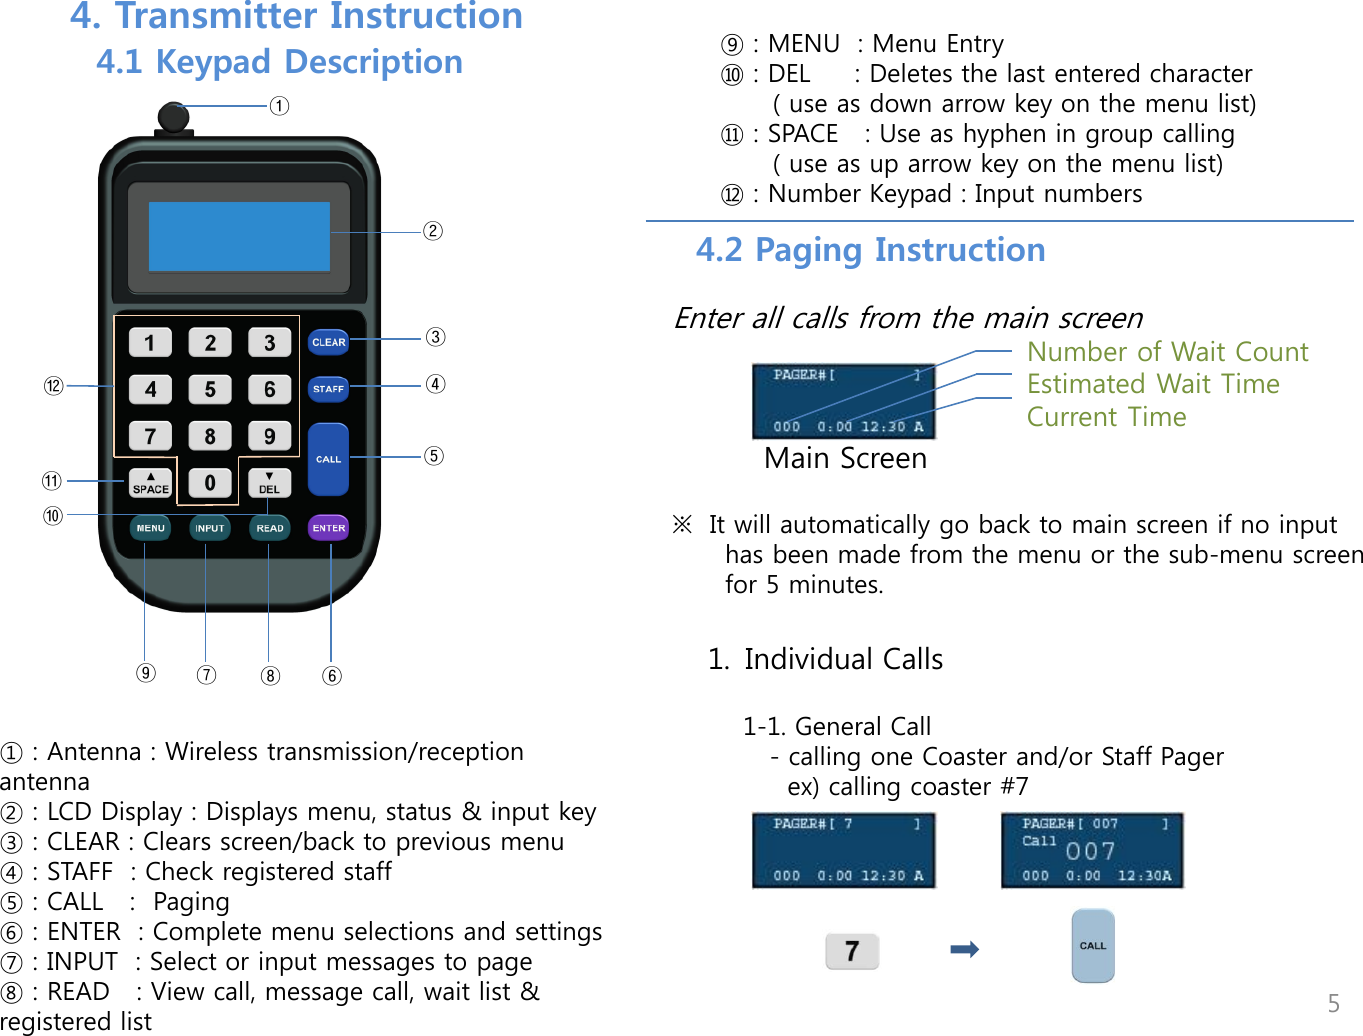
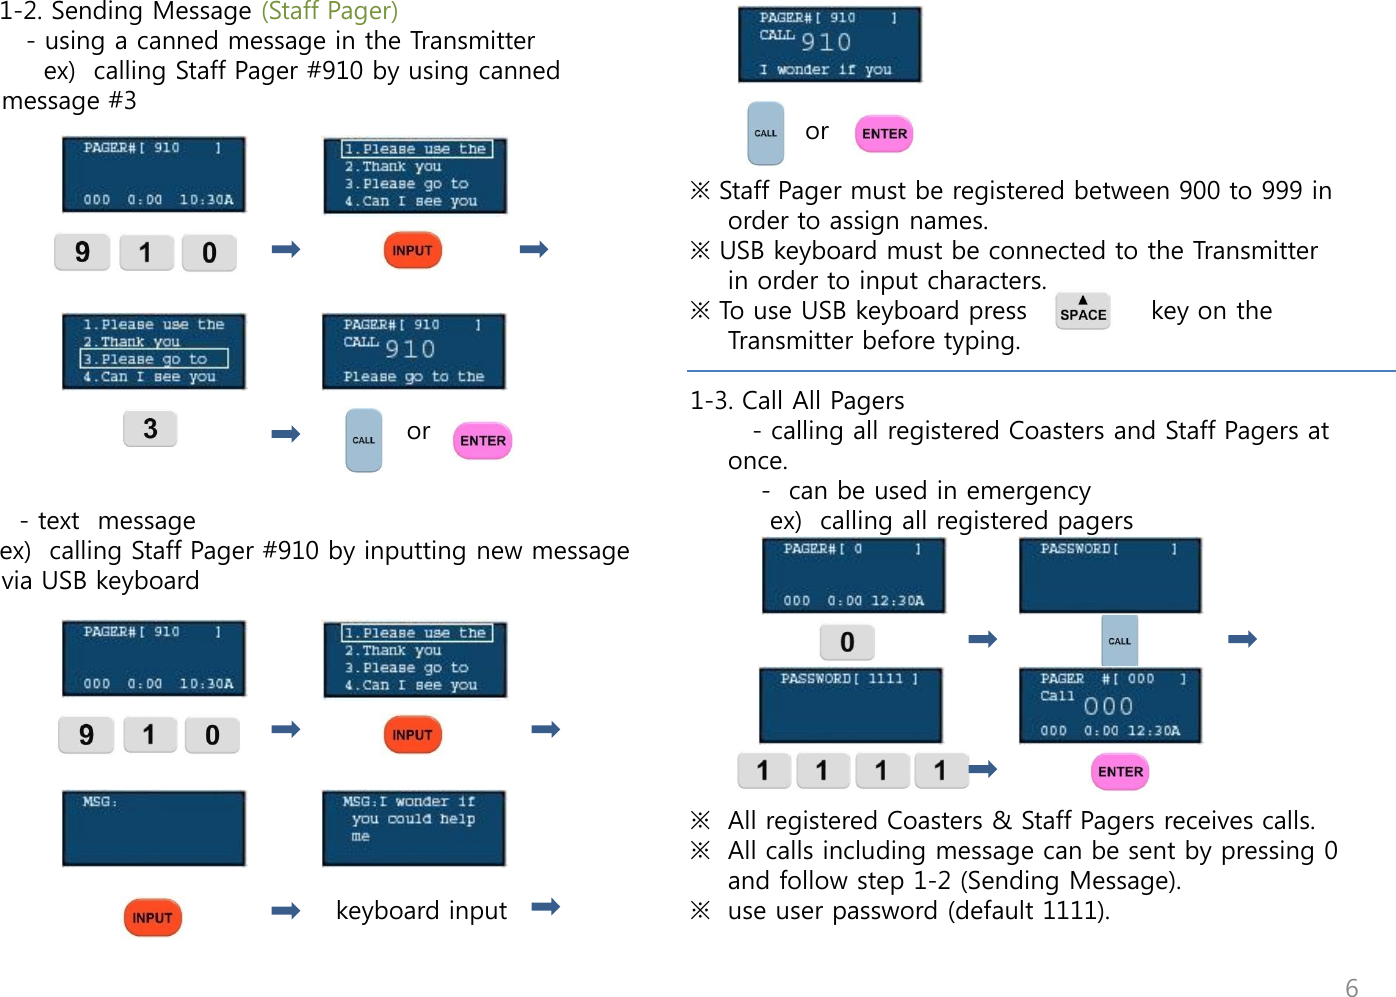
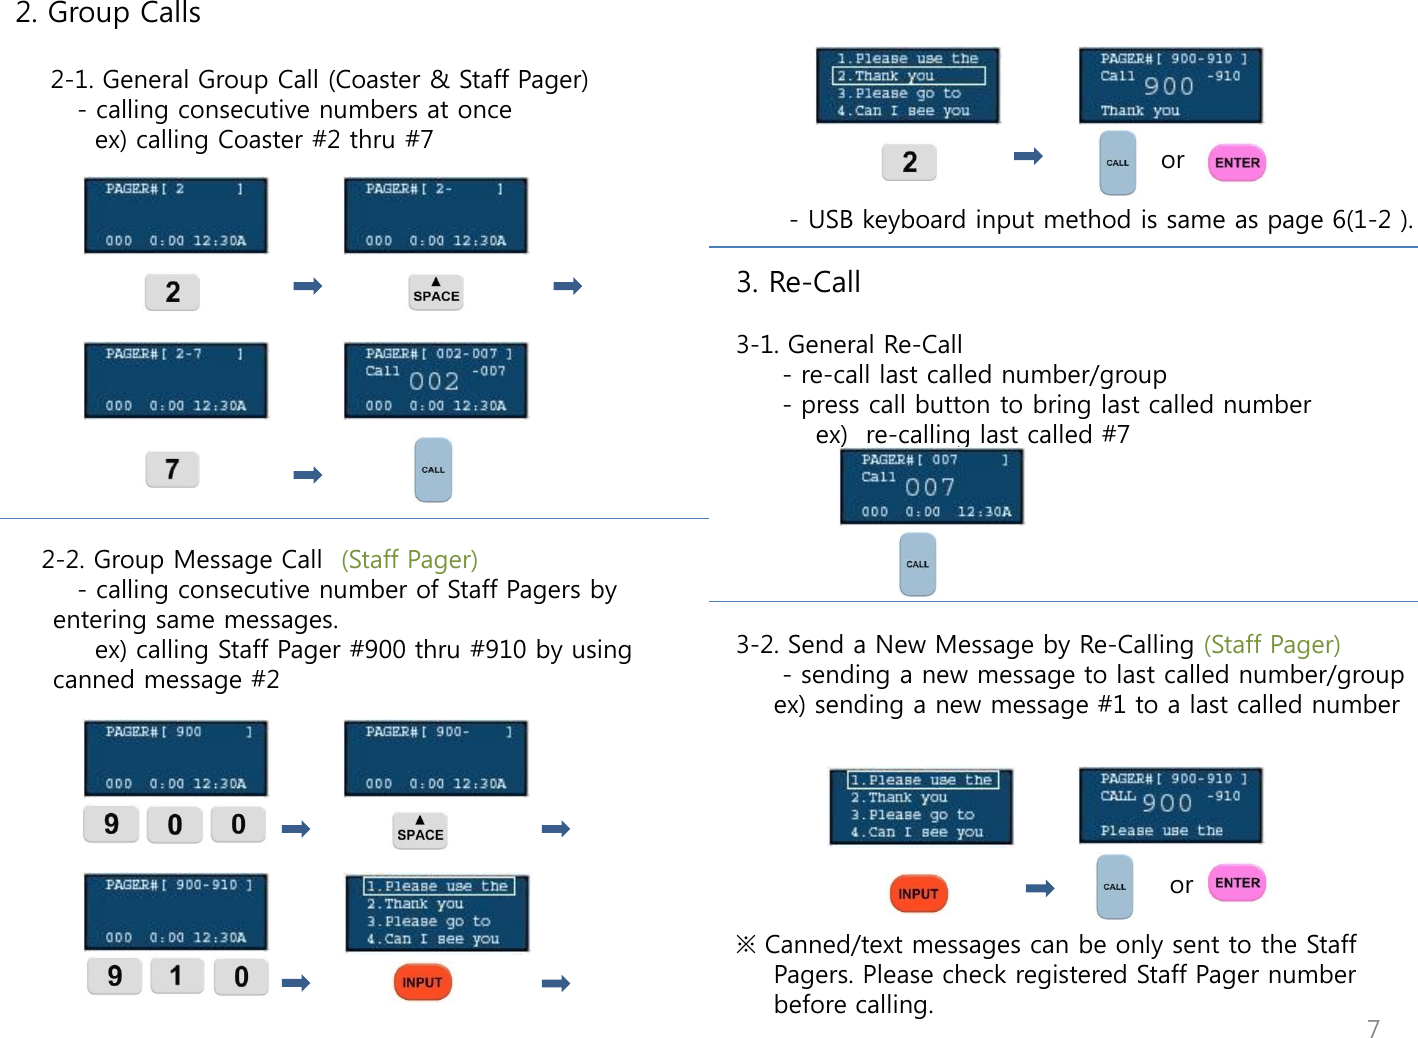
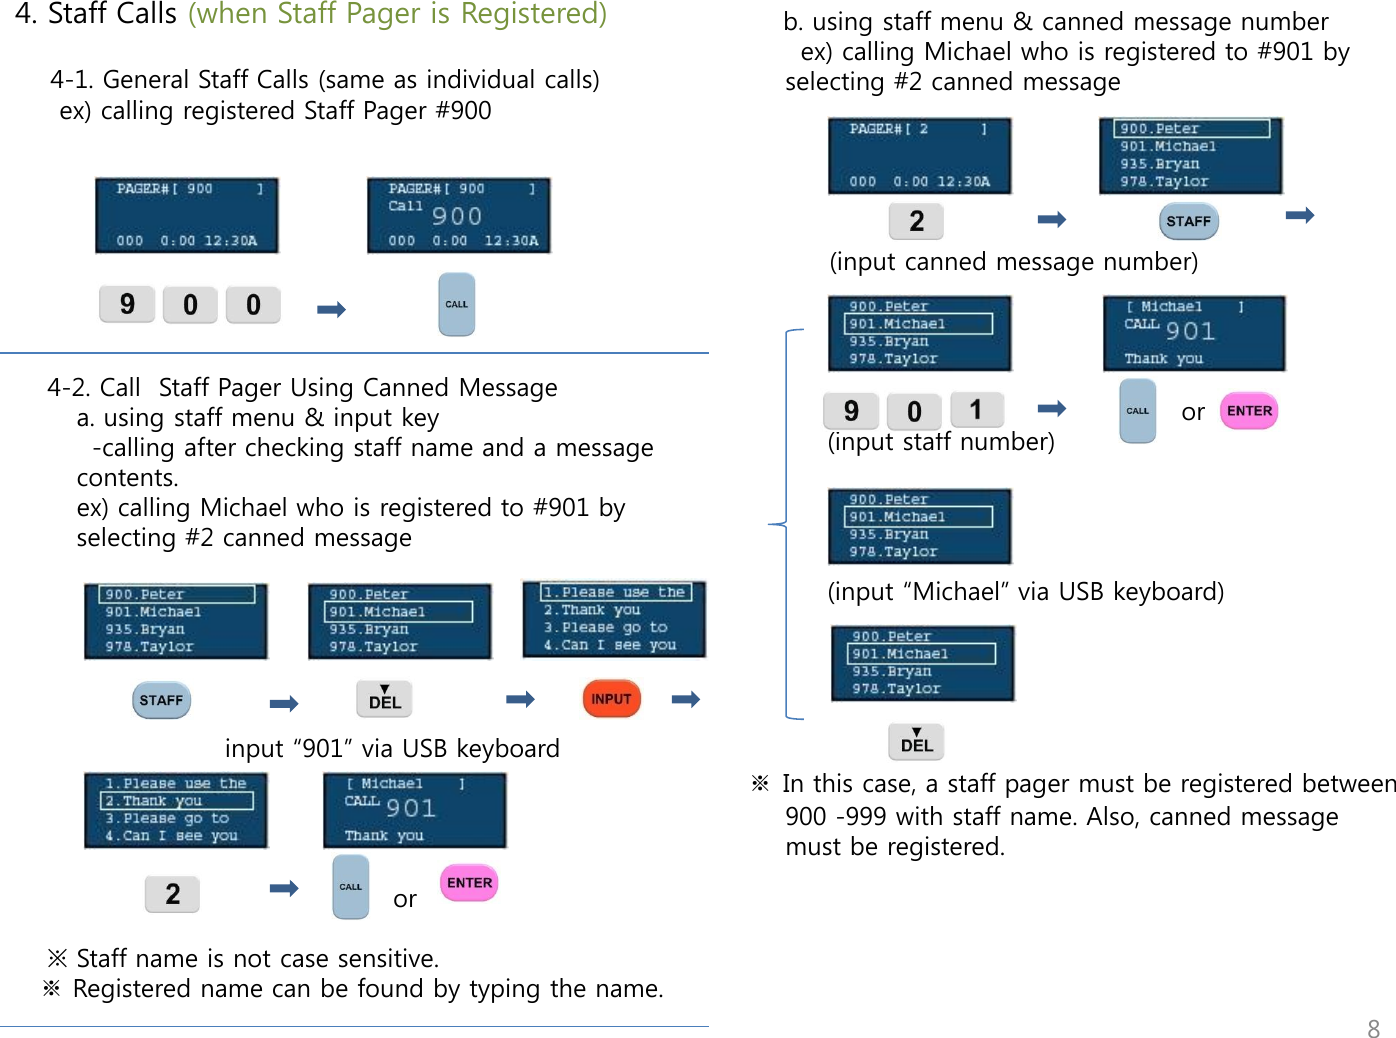
User Manual
Discussion / Help
Navigation


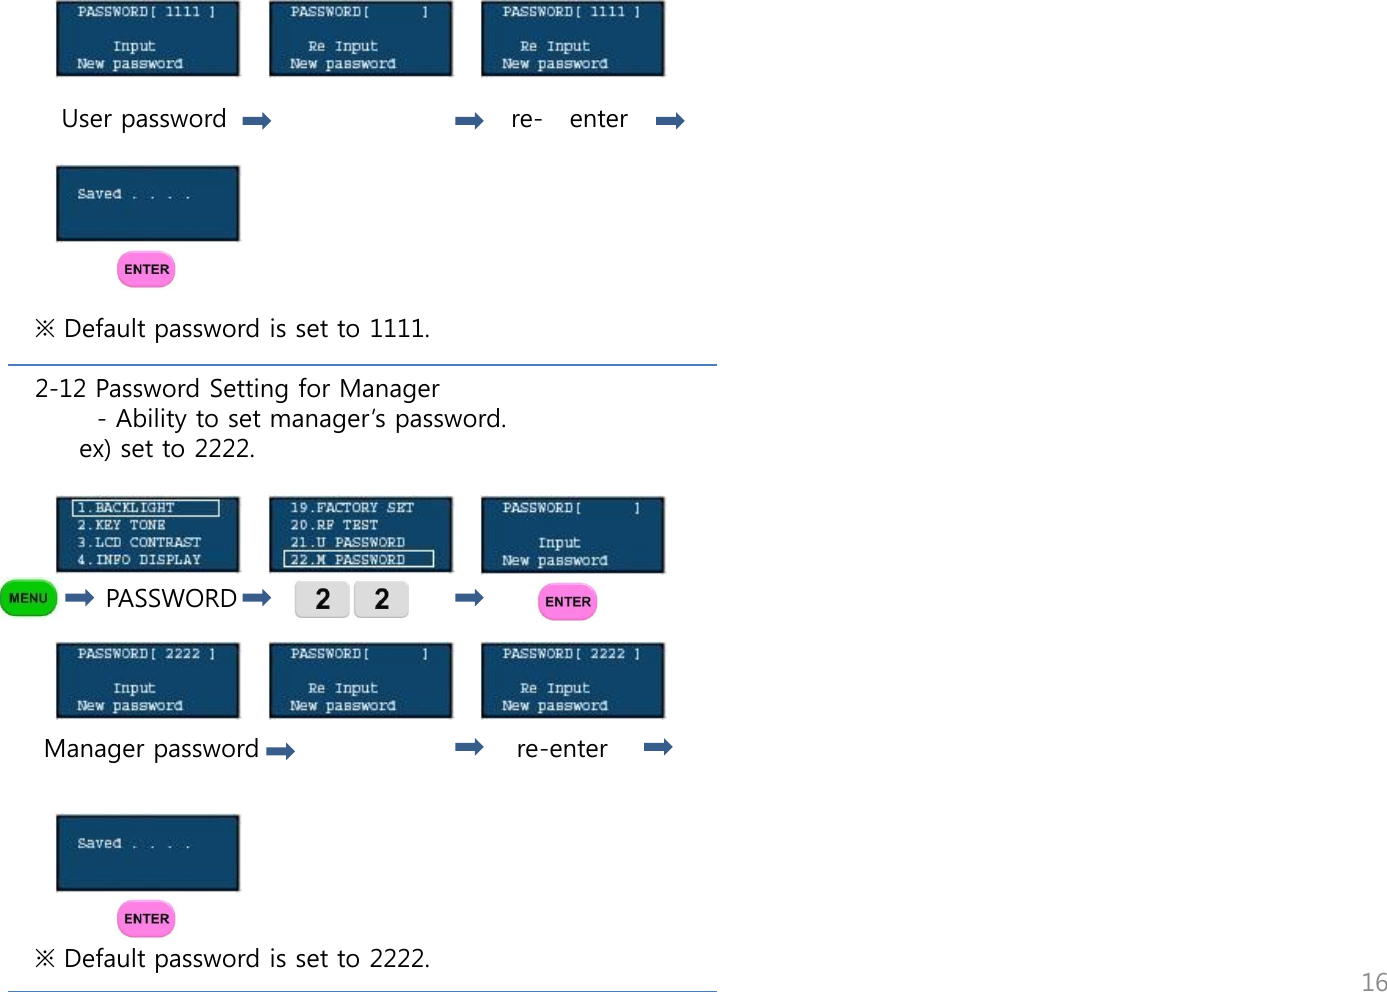
![1-9 Time Setting - To set year, month, day and time PASSWORD input yy/mm/dd toggle12/24H. ※ If time is set on the Transmitter, it will automatically set time on the Staff Pagers. 1-10 Canned Message Setting - To set Canned Messages. ex) setting message #1 as “Thank you” PASSWORD input via USB keyboard ※ Up to 10 different canned messages can be saved. Message #10 will automatically used if no message is selected. (will be used as the frequently used message) 1-8 Staff Name Setting - Assigning staff name on a registered Staff Pager ex) assigning “Peter” to registered staff pager #900 ※ Staff Pager must be registered and [ USED ] will appear if registered correctly. [EMPTY] will appear if not registered. password input name via USB keyboard ※ Staff name will appear on the staff pager LCD screen when registration is complete. (up to 9 characters) ※ Staff name can be assigned between 900 ~ 999 on registered staff pagers. ※ Staff name will be deleted if pager is replace/updated. ※ When duplicate names are used, no combination of numbers and alphabets can be used. ex) Michael 1 (x) Michael H (o) 12](https://usermanual.wiki/HOSEOTELNET/ST3/User-Guide-1683344-Page-12.png)

![6. Description of Staff Pager 6.1. Menu ② 02:57P 01/01/12 ① ③ ④ 1. Main Menu ① [Inbox] : Menu to check received message ② [INFO] : Check PIN & User Name ③ [Config] : Set alert type, date, power down ④ Date : Display time and date ② 02:57P 01/01/12 ① ③ 1. [Call] 1.1 [Inbox] ① Index : The order of message received ② Message : Received message ③ Date : Received date & time User [Steve] ① PIN [900] 1.2 [INFO] ① PIN : Registered number on the Transmitter ② User : Registered staff name on the Transmitter ② 21](https://usermanual.wiki/HOSEOTELNET/ST3/User-Guide-1683344-Page-21.png)
![1.3 [Config] ① Beep : Buzzer Alert ② Vibration : Vibrate Alert ③ Beep+VIbration : Buzzer and Vibrate Alert ④ Set Time : Time setting ⑤ Power Down : Power off ① ② ③ ④ ⑤ 6.2. Button Configuration 2.1 - Use to move left and right - Use to navigate through the menu 2.2 -Use to go back to previous menu 2.3 - Use to adjust time on “Set Time” - Use to check message - Use to complete setting - Press for 5 seconds to put power on from the Power Down mode 22](https://usermanual.wiki/HOSEOTELNET/ST3/User-Guide-1683344-Page-22.png)
![1. Register -Staff Pager must be registered to Transmitter. It will not receive if not registered. (see page11, 1-6 “Coaster/Staff Pager Registration” ) - Displays PIN from the [INFO] menu 2. User Name Setting - User name can be set from the transmitter via USB keyboard (see page 12, 1-8 “Staff Name Setting”) -Displays User from the [INFO] menu 3. Call / Message Receiving - Vibrate and/or Buzzer occurs depends on setting (can be set from the [Config] menu) -Press any button to stop vibrate/beep while during incoming call - Received message can be checked from the [Inbox] -New message icon display on top of the screen. It will disappear if message is read or is pressed while receiving a call 3. Out of range -Occurs when the Staff Pager is out of range of Transmitter (see page 13, 2-3 “Out Of Range Setting”) - Enable the Out of Range Icon on top of the screen ( ) when out of range - Automatically turns off when the pager is back in range - Periodically alerts when out of range 4. Power Down - Function to turn power off when not in use - Power Down setting from the [Config] menu - Back to normal operation when is pressed for 5 seconds 5. Factory Set -Initializing staff pager from the transmitter (see page 15, 2-9 “Factory Set”) 6. RF Test - Check receiving range (see page 15, 2-10 “RF Test”) - Response to the periodically sent message from the Transmitter -Saves as “Test Message” in [Inbox] 7. Low Battery -Low Battery Alarm -Periodically displays “Low Battery” on the screen -Displays icon when Low Battery 6.3. Functional Description 23](https://usermanual.wiki/HOSEOTELNET/ST3/User-Guide-1683344-Page-23.png)