Hisense Communication STARTEL9000X CDMA 1X Fixed Wireless Phone User Manual UserManual Startel 9000X
Hisense Communication Co., Ltd. CDMA 1X Fixed Wireless Phone UserManual Startel 9000X
UserManual.wiki
>
Hisense Communication
>
STARTEL9000X User Manual
Users Manual
Navigation menu
Upload a User Manual
Namespaces
Wiki Guide
HTML
PDF
Info
Views
User Manual
Discussion / Help
Navigation

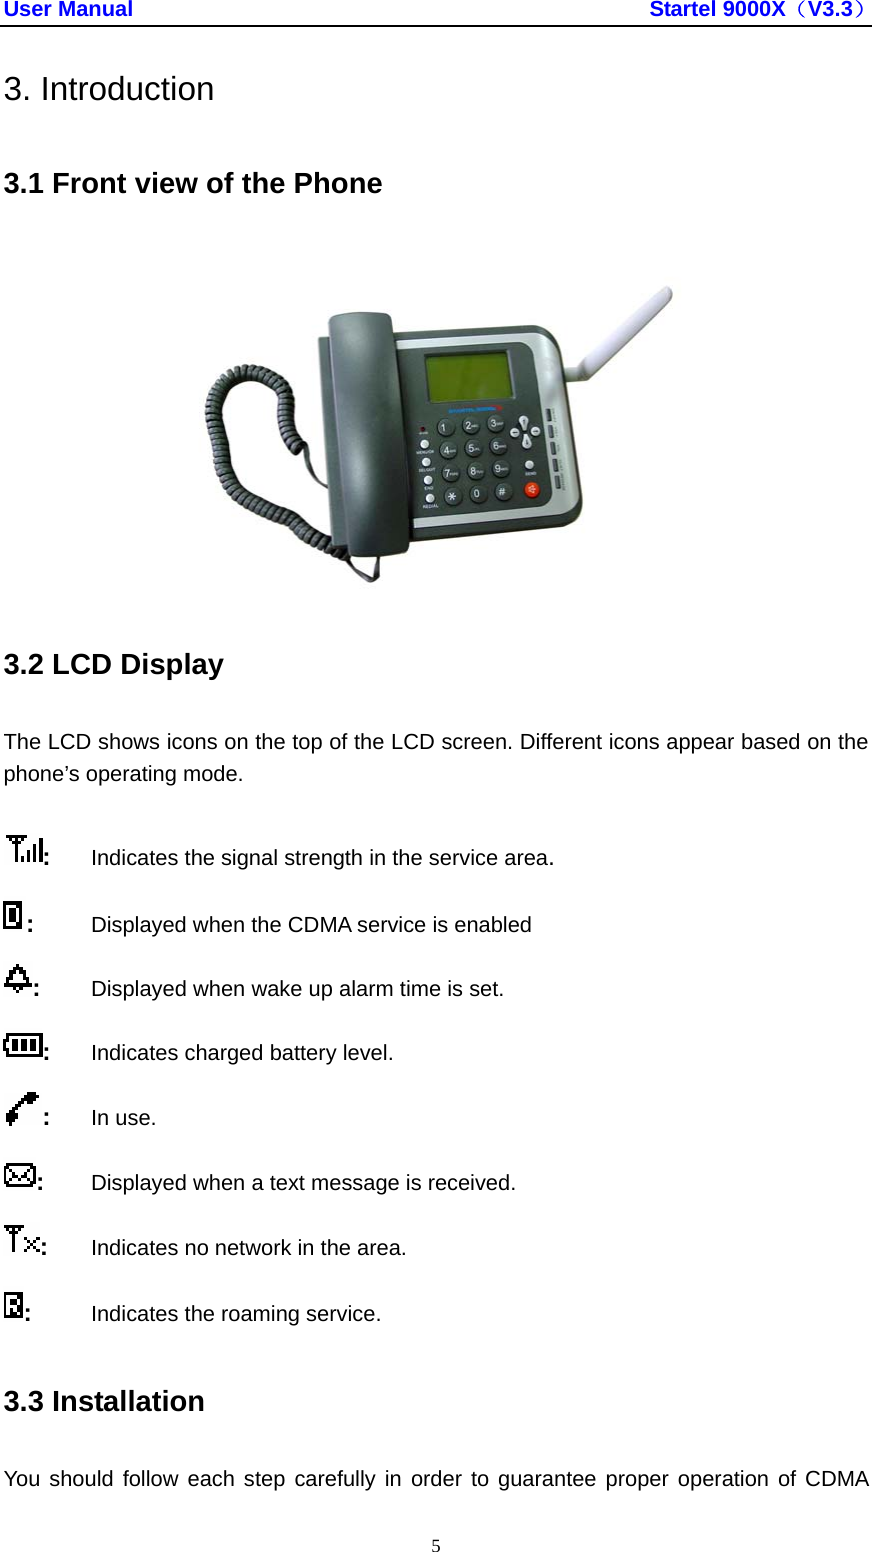
![User Manual Startel 9000X(V3.3) 7 signal as shown in the figure in the next page. STEP4 Check the LCD Display z After you follow the installation instruction STEP3, please check the LCD for normal operation z If you do not see the status of service, please repeat the instruction of STEP3. And confirm Fixed Wireless Phone to get the proper signal strength from service operator system. The adapter type (with power cord) may be different according to different country. 4. Basic Operation 4.1 Making a call The phone offers a variety of ways to make a call, including making a call using the keypad, dial from phonebook or speed dialing. z Making a call using the keypad 1. Pick up the handset or press “hands free” button. 2. Listen for dial tone. 3. Enter the phone number with area code if needed. 4. Wait for the auto time-out or press “Send” button. 5. The call is connected and you can start conversation. 6. To disconnect the call, replace the handset or press “hands free” button. z Making a call from phonebook 1. Pick up the handset or press “hands free” button. 2. Listen for dial tone. 3. Press “Right” button to enter Contacts menu or enter the Contacts menu by press [Menu]->[Contacts], and then select [Find]. 4. Now find by name. Input the first letters, or total letters of the name you are looking for and press [Find], then a list of records beginning with those letters are displayed. You can select the corresponding input method by press [Multitap]. There are four different input methods as Multitap, Numbers, eZiText and Symbols. Or you can choose to search by Business or Personal. Or you can just view all records list and scroll through to find the record you want. 5. Enter the record to see details. Select a phone number and press “Send” to dial it. If one record has more than one phone numbers stored and you dial it directly, the](https://usermanual.wiki/Hisense-Communication/STARTEL9000X/User-Guide-651143-Page-10.png)
![User Manual Startel 9000X(V3.3) 8 first number is selected and dialed out. 6. To disconnect the call, replace the handset or press “hands free” button. z To enter English character. Select [Multitap], and press once a keypad to enter the first letter labeled in the keypad, twice to enter the second letter and 3 times to enter the third letter. EX To enter “c”, Press dial button 2 labeled “ABC” 3 times to enter “c”, After 2 seconds entering a character, the cursor is moved to the next position automatically. Press Volume “Left/Right” button to move the cursor. Press “Clear” button to erase or correct entered character z To enter number character. Select [Numbers], and press the corresponding number button to enter the number. z To enter specific character. Select [Symbols], and press the corresponding number button to enter the specific character. There are 30 symbols corresponding to the number, and you can press “Up/Down” button to change the characters representing by 1-9 number buttons. z Make a call with a speed dial Refer to Speed Dial List in 6.5 Speed Dial List for more details. If you input one less than 2 digits (including 2) number and press “Send”, then the entry stored in this location is selected and dialed out 4.2 Redialing Last Outgoing Number 1. Pick up the handset or press “hands free” button. 2. Listen for dial tone. 3. Press “RDL” button. The last number that you called will be re-dialed.](https://usermanual.wiki/Hisense-Communication/STARTEL9000X/User-Guide-651143-Page-11.png)
![User Manual Startel 9000X(V3.3) 9 z Correcting dialing mistakes 1. Press “Clear” button shortly to erase the most recent digit. 2. Press and hold “Clear” button for at least one second to erase all the entered digits. z If the phone is locked, enter the lock Code. z If the call did not go through, press the hook switch and dial again. z Flashing/Hook Switch 1. While in the middle of a call, pressing the hook switch for less than 1 second will be treated as a flash. After 1 second, the call will be terminated. 2. Very briefly pressing the hook switch will be ignored. 4.3 Answering a Call 1. When the bell rings, pick up the handset or press “hands free” button. 2. Start conversation. 3. To disconnect the call, replace the handset or press “hands free” again. 4.4 Signal Strength The quality of calls depends on the signal strength in your area. The stronger the signal, the better the call quality. The signal strength icon indicates the current strength as a number of bars. You can see bars according to the strength of received signal in the upper-left part of the LCD. 4.5 Missed Call Message If a call is received and not answered, you are informed that you have missed a call. The latest missed call is displayed on LCD, you can press [CALLS] to read the details of this missed call or press [OK] to erase “Missed call” message. 5. Contacts](https://usermanual.wiki/Hisense-Communication/STARTEL9000X/User-Guide-651143-Page-12.png)
![User Manual Startel 9000X(V3.3) 10 5.1 Find 5.1.1 Find by name You can find a phone number by name in the contacts 1. Press [MENU]. 2. Press [Contacts]->[Find] ->[Name]to enter the find menu. 3. Input the name that you want to look for and press [Find]. 4. Enter the corresponding name; there are two options, which are Options and the number 5. You can enter to the Options to add new, edit the name, classify contact and erase the contact, or enter to the number to set the number type, edit it, erase it, add it to speed dial. 6. Press [Save] to save and exit. 5.1.2 View All You can view all of the contacts. 1. Press [MENU]. 2. Press [Contacts] ->[Find]->[View All] to enter the all contacts menu. 3. Press “Up/Down” button to select the corresponding name. 4. Enter this name to check the number and there are two options, which are Options and the number 5. You can enter to the Options to add new, edit the name, classify contact and erase the contact, or enter to the number to set the number type, edit it, erase it, add it to speed dial. 6. Press [Save] to save and exit. 5.1.3 Business and Personal You can find the phone number by groups. 1. Press [MENU]. 2. Press [Contacts] ->[Find]->[Business] or [Personal] to enter the different groups. 3. Press “Up/Down” button to select the corresponding name. 4. Enter to this name to check the number and there are two options, which are Options and the number 5. You can enter to the Options to add new, edit the name, classify contact and erase the contact, or enter to the number to set the number type, edit it, erase it, add it to speed dial. 6. Press [Save] to save and exit.](https://usermanual.wiki/Hisense-Communication/STARTEL9000X/User-Guide-651143-Page-13.png)
![User Manual Startel 9000X(V3.3) 11 5.2 Add Add to Phone You can add the new to the contacts. 1. Press [MENU]. 2. Press [Contacts]->[Add]->[Add to Phone] to enter the add new menu. 3. Press “Up/Down” button to select the contents types that you want to add which include Phone, Email, Address and Web Page. 4. Input the materials, when inputting a phone number, you can save the extension number following “P”. Press [NEXT] and input the name, and then press [NEXT] to save. 5. You can enter to the Options to add new, edit the name, classify contact and erase the contact, or enter to the number to set the number type, edit it, erase it, add it to speed dial. 6. Press [Save] to save and exit. 5.3 Speed Dial List You can check the speed dial list. 1. Press [MENU]. 2. Press [Contacts]->[Speed Dial List] to enter the different groups. 3. Press “Up/Down” button to select the corresponding name. 4. Enter to this name to check the number and there are two options, which are Options and the number 5. You can enter to the Options to add new, edit the name, classify contact and erase the contact, or enter to the number to set the number type, edit it, erase it, add it to speed dial. 6. Press [Save] to save and exit. 5.4 Own Number You can check and set Own phone number. 1. Press [MENU]. 2. Press [Contacts]->[Own Number] enter[ own number ] menu.](https://usermanual.wiki/Hisense-Communication/STARTEL9000X/User-Guide-651143-Page-14.png)
![User Manual Startel 9000X(V3.3) 12 5.5 Memory state You can check memory state of contacts. 1. Press [MENU]. 2. Press [Contacts]->[memory state ] enter memory state menu. 6. Recent Calls 6.1 missed calls, incoming calls and outgoing calls There are three items including missed calls, incoming calls and outgoing calls. The operations under every item are similar. 1. Press [MENU]. 2. Press [Recent Calls]->[Missed calls] or [Incoming Calls] or [Outgoing Calls] to enter the different items. 3. Press “Up/Down” button to select the corresponding name. 4. Enter to this name, and there are 7 operations including call number, time, view number, delete entry, send SMS Message, save new and save to existing. z Call Number: The call number is only valid in the off-hook state. z Time: You can check the time, number by pressing [Time]. z View Number: You can check the time, number by pressing [View Number]. z Delete Entry: If you want to delete this entry, press [Delete Entry], and select [Yes] to delete this entry. z Send SMS Message: If you want to send SMS message to this number, press [Send SMS Message], and edit the message text, then you can select send or save this message by corresponding operation. z Save New: If you want to save this number, press [Save New], the following operations are as same as 5.2 z Save to existing: If you want to save this entry to existing , press [Save to existing], the following operations are similar to 5.2 6.2 Call Timers There are four timers in the menu, which are Previous call time, Outgoing Calls, Incoming Calls and All Calls. 1. Press [MENU].](https://usermanual.wiki/Hisense-Communication/STARTEL9000X/User-Guide-651143-Page-15.png)
![User Manual Startel 9000X(V3.3) 13 2. Press [Recent Calls]->[Call Timers]->[Previous Call Time],[Outgoing Calls], [Incoming Calls] and [All Calls] to enter the corresponding menus. 3. Press “Left/Right” button to select the settings. Press [Reset] to set the timer to zero. 4. Press [OK] to save and exit. 7. SMS (Short Message Service) SMS is available when your phone is turned on. Using Message button allows you to access messages for viewing on the LCD screen or to send a message. While viewing a message, you can call back to the number displayed in the message by picking up handset. Check with your WLL service provider regarding the availability of this feature. The information in a message depends on the mode the WLL is operating in and the service’s capabilities. 7.1 Received or outgoing Messages You can check, forward, edit and erase the received or outgoing messages. 1. Press [Messages]. 2. Press “Up/Down” to select [InBox], [OutBox]. 3. Press “Up/Down” to select the message you want to check. And also there are some other operations in every Box. z In [InBox], there are 6 operations including Next, Erase, Forward, Reply, Sender and Move to phonebook. You can press [Next] to check the following messages one by one. You can press [Erase] to erase this message. You can press [Forward] to forward this message. You can press [Reply] to reply this message. You can press [Sender] to operate the sender’s information. You can press [Move to Phonebook] to save this message to phonebook. z In [OutBox], there are 4 operations including Done, Erase, Send and Forward. You can press [Done] to go back to the outbox list. You can press [Erase] to erase this message. You can press [Send] send this message again. You can press [Forward] to forward this message. z When you send or forward the existing messages, you can edit it with any input method you want. 7.2 Send a new message You can send a new message.](https://usermanual.wiki/Hisense-Communication/STARTEL9000X/User-Guide-651143-Page-16.png)
![User Manual Startel 9000X(V3.3) 14 1. Press [Messages]. 2. Press “Up/Down” to select [Create Message] 3. Input the phone number you want to send or select it from the contacts and press [Continue] to enter the message edit box, and then input the content you want to send and press [Continue]. You can select any input method you want. 4. There are two options as Send and Save, you can select to send or save this message to outbox by press [Send] or [Save]. 5. Also you can send the preformatted messages by entering the [Preformatted Message]. The process is as following: Press [MESSAGE]-> [Preformatted Message], and use “Up/Down” to select the preformatted message that you want. The following process is as same as Create Message. 7.3 Erase message You can erase messages by the following modes. 1. Press [Messages]->[Erase Messages] to enter the erase menu. 2. Press “Up/Down” button to select the erase modes. There are 4 erase modes including [Entire InBox], [Entire OutBox] and [Old Inbox]. You can enter Entire Inbox and press [Yes] to erase the entire inbox messages. Other box erase method is as same as Entire InBox. And if you don’t want to erase, please select [No]. 7.4 Message Setting You can set some features of the messages Voice Mail Number You can set or edit voice mail number. 1. Press [Messages]->[Message Setting]->[Voice Mail Number] to enter the setting menu. 2. Press “Left/ Right” to select go back or edit voice mail number . 7.4.1 Message Alert You can different message alert mode. 1. Press [Messages]->[Message Setting]->[Message Alert] to enter the setting](https://usermanual.wiki/Hisense-Communication/STARTEL9000X/User-Guide-651143-Page-17.png)
![User Manual Startel 9000X(V3.3) 15 menu. 2. Press “Up/Down” to select the alert mode you want. There are three modes including None, Alert Once and Alert &Remind. 3. None means no alert when a new message incoming; Alert Once means only alert once when a new message incoming. Alert &Remind means alert and remind when a new message incoming. 7.4.2 Auto Erase Inbox You can select auto or not-auto erase inbox 1. Press [Messages]->[Message Setting]->[Auto Erase Inbox] to enter the setting menu. 2. Press “Up/Down” to select [Enable] or [Disable] to enable or disable this function. 8. Sound Setting This menu allows you to adjust the various different volumes. 8.1 Volumes 8.1.1 Ringer Volume The ringer volume when a call is incoming can be adjusted. 1. Press [MENU]. 2. Press[SoundSetting]->[Volume]->[Ringer] to enter the Ringer volume-adjusting menu. 3. Press “Up/Down” button to adjust ringer volume. 4. Press “SELECT”. 8.1.2 Voice Volume The voice volume of the other party can be adjusted in on-hook state. 1. Press [MENU]. 2. Press [Sound Setting]->[Volume]->[Voice Volume] to enter the Voice Volume adjusting menu 3. Press “Up/Down” button to adjust voice volume. 4. Press “SELECT”. 8.1.3 Key Beep volume](https://usermanual.wiki/Hisense-Communication/STARTEL9000X/User-Guide-651143-Page-18.png)
![User Manual Startel 9000X(V3.3) 16 The Key Beep volume when you press a key can be adjusted. 1. Press [MENU]. 2. Press [Sound Setting]->[Volume]->[Key Beep] to enter the Key volume adjusting menu 3. Press “Up/Down” button to adjust key beep volume. 4. Press “SELECT”. 8.2 Ringer Type You can select the various ringer types. 1. Press [MENU]. 2. Press[Sound Setting]->[Ringer Type] to enter the Ringer type adjusting menu 3. Press “Up/Down” button to adjust ringer volume. There are 10 different ringer types. 4. Press “SELECT” to save and exit. 8.3 Key Tone Length You can modify the key tone length. 1. Press [MENU]. 2. Press [Sound Setting]->[Key Tone Length] to enter the key tone length adjust menu 3. Press “Up/Down” button to adjust ringer volume. There are two modes as “Normal” and “Long”. 4. Press “SELECT” to save and exit. 8.4 Alert 8.4.1 Missed Call You can enable or disable the missed call alert. 1. Press [MENU]. 2. Press [Sound Setting]->[Alert]->[Missed call] to enter the missed call menu. 3. Press “Up/Down” button to select the modes. There are 2 different modes as Enable and Disable.. 4. Press “SELECT” to save and exit. 8.4.2 Service](https://usermanual.wiki/Hisense-Communication/STARTEL9000X/User-Guide-651143-Page-19.png)
![User Manual Startel 9000X(V3.3) 17 You can enable or disable the service alert. 1. Press [MENU]. 2. Press [Sound Setting]-> [Alert]->[Service] to enter the service menu. 3. Press “Up/Down” button to select the modes. There are 2 different modes as Enable and Disable.. 4. Press “SELECT” to save and exit. 8.4.3 Minute Alert You can enable or disable the minute alert. 1. Press [MENU] in on-hook state. 2. Press [Sound Setting]-> [Alert]->[Minute Alert] to enter the minute alert menu. 3. Press “Up/Down” button to select the modes. There are 2 different modes as Enable and Disable.. 4. Press “SELECT” to save and exit. 9. Display setting 9.1 Backlighting You can enable or disable the backlighting. 1. Press [MENU]. 2. Press [Display Setting]->[Backlighting] to enter the backlighting menu 3. Press “Up/Down” button to select the backlighting modes. There are 4 different backlighting modes as Off, 10s, 20s,30s, 4. Press “SELECT” to save and exit. 9.2 Banner You can edit the banner. 1. Press [MENU]. 2. Press [Display Setting]->[Banner]->[Edit] to enter the Banner edit menu 3. Select the corresponding input method by press [Multitap] and edit the banner. There are four different input methods as Multitap, Numbers,eZiText and Symbols. 4. Press “SELECT” to save and exit.](https://usermanual.wiki/Hisense-Communication/STARTEL9000X/User-Guide-651143-Page-20.png)
![User Manual Startel 9000X(V3.3) 18 9.3 Language You can select the language. 1. Press [MENU]. 2. Press[Display Setting]->[Language] to enter the language menu 3. Press “Up/Down” button to select the language. There are 2 different languages as Spanish and English. 4. Press “OK” to save and exit. 9.4 Contrast You can adjust the contrast 1. Press [MENU]. 2. Press [Display Setting]->[Contrast] to enter the contrast adjust menu 3. Press “Left/Right” button to adjust the contrast. 4. Press “SELECT” to save and exit. 9.5 Menu Format You can change the menu format 1. Press [MENU]. 2. Press [Display Setting]->[Menu Format] to enter the menu format menu 3. Press “Up/Down” button to select the menu format. There are 2 different menu formats as Large Icons and Small Icons. 4. Press “SELECT” to save and exit. 9.6 Time Format You can change the time format. 1. Press [MENU] in on-hook state. 2. Press [Display Setting]->[Time Format] to enter the time format menu 3. Press “Up/Down” button to select the time format. There are 2 different time formats as AM/PM and 24HR.. 4. Press “SELECT” to save and exit.](https://usermanual.wiki/Hisense-Communication/STARTEL9000X/User-Guide-651143-Page-21.png)
![User Manual Startel 9000X(V3.3) 19 9.7 Carrier Info. You can enable or disable Carrier Information. 1. Press [MENU]. 2. Press [Display Setting]->[Carrier Info.] to enter the Carrier Info. menu 10. Security setting 10.1 Forbidden Outgoing Calls You can set the forbidden outgoing calls 1. Press [MENU]. 2. Press [Security Settings]->[Forbidden outgoing calls] to enter the setting menu. 3. Input the password and press “select”. 4. Press “Up/Down” button to select [On] or [Cancel]. 10.2 Phone Reset You can restore the phone set. 1. Press [MENU]. 2. Press [Security Settings]->[Phone Reset] to enter the reset menu. 3. Input the password and press “select”. 4. Press “Left/Right” button to select [OK] or [Cancel]. 5. Press “OK” to save and exit, the phone will restart. 10.3 PIN Setting You can set the PIN check or not and change the PIN number. . 1. Press [MENU]. 2. Press [Security Settings]->[PIN Setting] to enter the PIN Setting menu. 3. Press “Up/Down” button to select [PIN Check] or [PIN Change]. 4. Set the corresponding item according to the steps.](https://usermanual.wiki/Hisense-Communication/STARTEL9000X/User-Guide-651143-Page-22.png)
![User Manual Startel 9000X(V3.3) 20 10.4 Modify Keyboard Unlock You can change the keyboard unlock password. 1. Press [MENU]. 2. Press [Security Settings]->[Modify Keyboard unlock] to enter the keyboard unlock menu. 3. Input the old password and press “select”, and then input new password. 4. Press “SELECT” to save and exit. 10.5 Modify Second Password You can modify the second password. 1. Press [MENU]. 2. Press [Security Settings]->[Modify Second Password] to enter the Modify Second Password menu. 3. Input the old password and press “SELECT”, and then input new password. 4. Press “SELECT” to save and exit. 10.6 Charge Type You can set battery charging type. 1. Press [MENU]. 2. Press [Security Settings]->[Charge Type] to enter the charge type menu. 3. Press “Up/Down” button to select [Fast Charge] or [Slow Charge]. 4. Set the corresponding item according to the steps. 11. Supp. Services 11.1 Call Waiting You can set this function to receive another call when answering a call. 1. Press [MENU] in off-hook or talking state. 2. Press [Supp. Services]->[Call Waiting] to enter the Call Waiting menu 3. Press “Left/Right” button to select the call-waiting mode. There are 3 different call waiting modes as Activate, Deactivate and Cancel. 4. Press “SELECT” to save and exit.](https://usermanual.wiki/Hisense-Communication/STARTEL9000X/User-Guide-651143-Page-23.png)
![User Manual Startel 9000X(V3.3) 21 11.2 Call Forwarding You can set this function to forward the call to the third one when talking. 1. Press [MENU] in off-hook or talking state. 2. Press [Supp. Services]->[Call Forwarding] to enter the Call Forwarding menu 3. Press “Left/Right” button to select the call-forwarding mode. There are 6 different call forwarding modes as All, Busy, No Answer, Default, Cancel all and Number. 4. Press “SELECT” to save and exit. 12. PIM This phone provides some extra functions including Stop Watch, Alarm, Scheduler . 12.1 Stop Watch 1. Press [PIM]->[Stop Watch] to enter the stop watch menu. 2. Press [Start] to start the stopwatch, and then press [Stop] to stop the stopwatch. If you want to continue, press [Start] again, if you want to reset back to zero, press [Reset] 12.2 Alarm 1. Press [PIM]->[Alarm] to enter the alarm menu. 2. Press [Enable] to enable the alarm. You also can set the alarm time by pressing [Set] In Set menu, you can set the alarm time on hour, and minute. Also you can select the alarm-indicating mode as Once, Daily or Weekday. 12.3 Scheduler 1. Press [PIM]->[Scheduler] to enter the Scheduler menu. 2. Press “Up/Down” to select [View Day], [View Month], [Add Event] or [Options] to check or set the schedule.](https://usermanual.wiki/Hisense-Communication/STARTEL9000X/User-Guide-651143-Page-24.png)