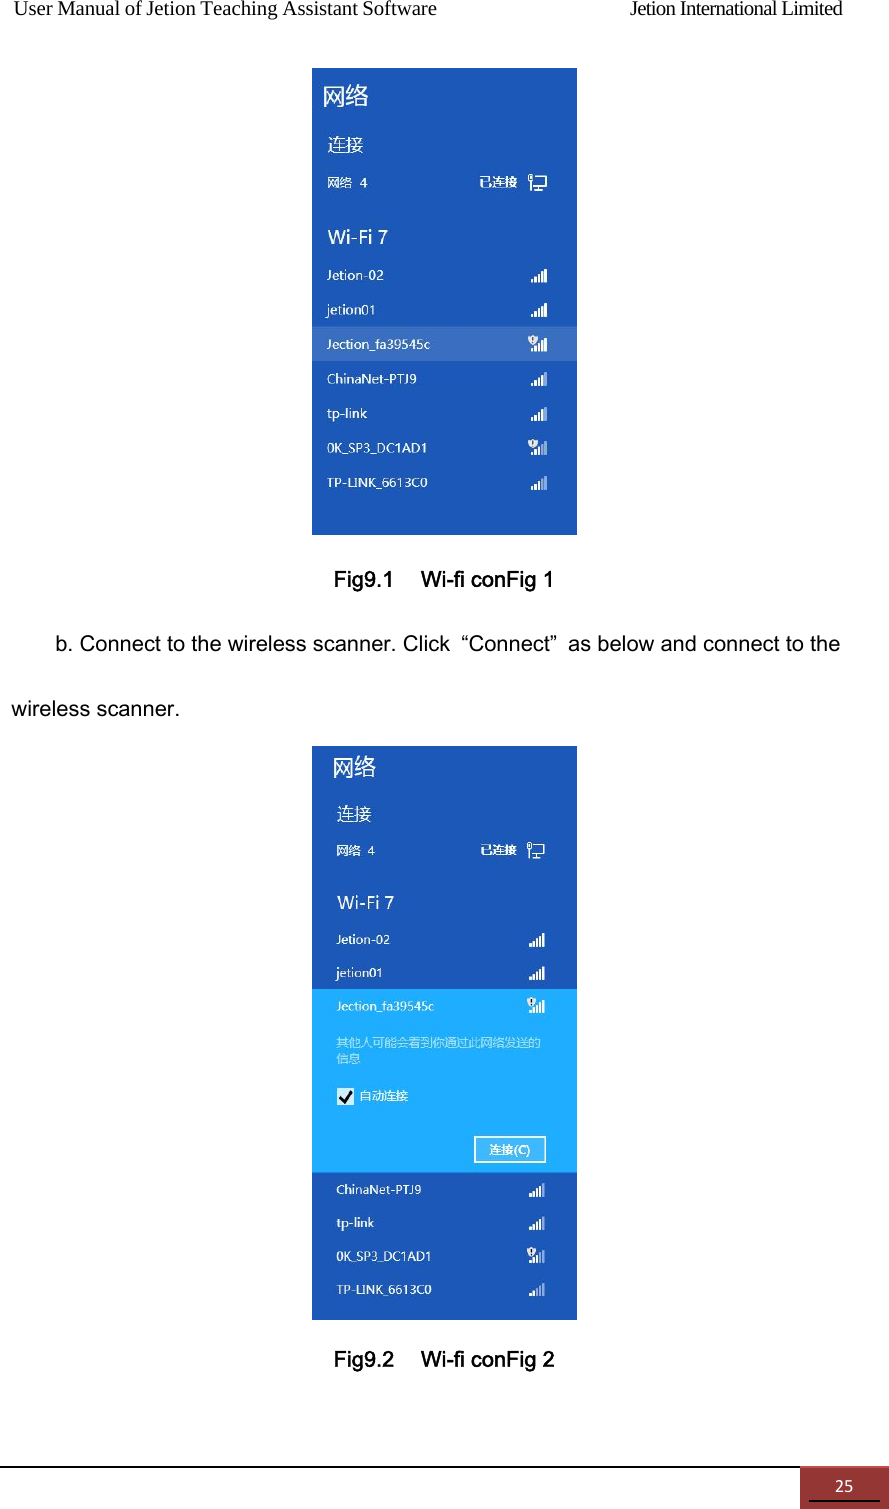
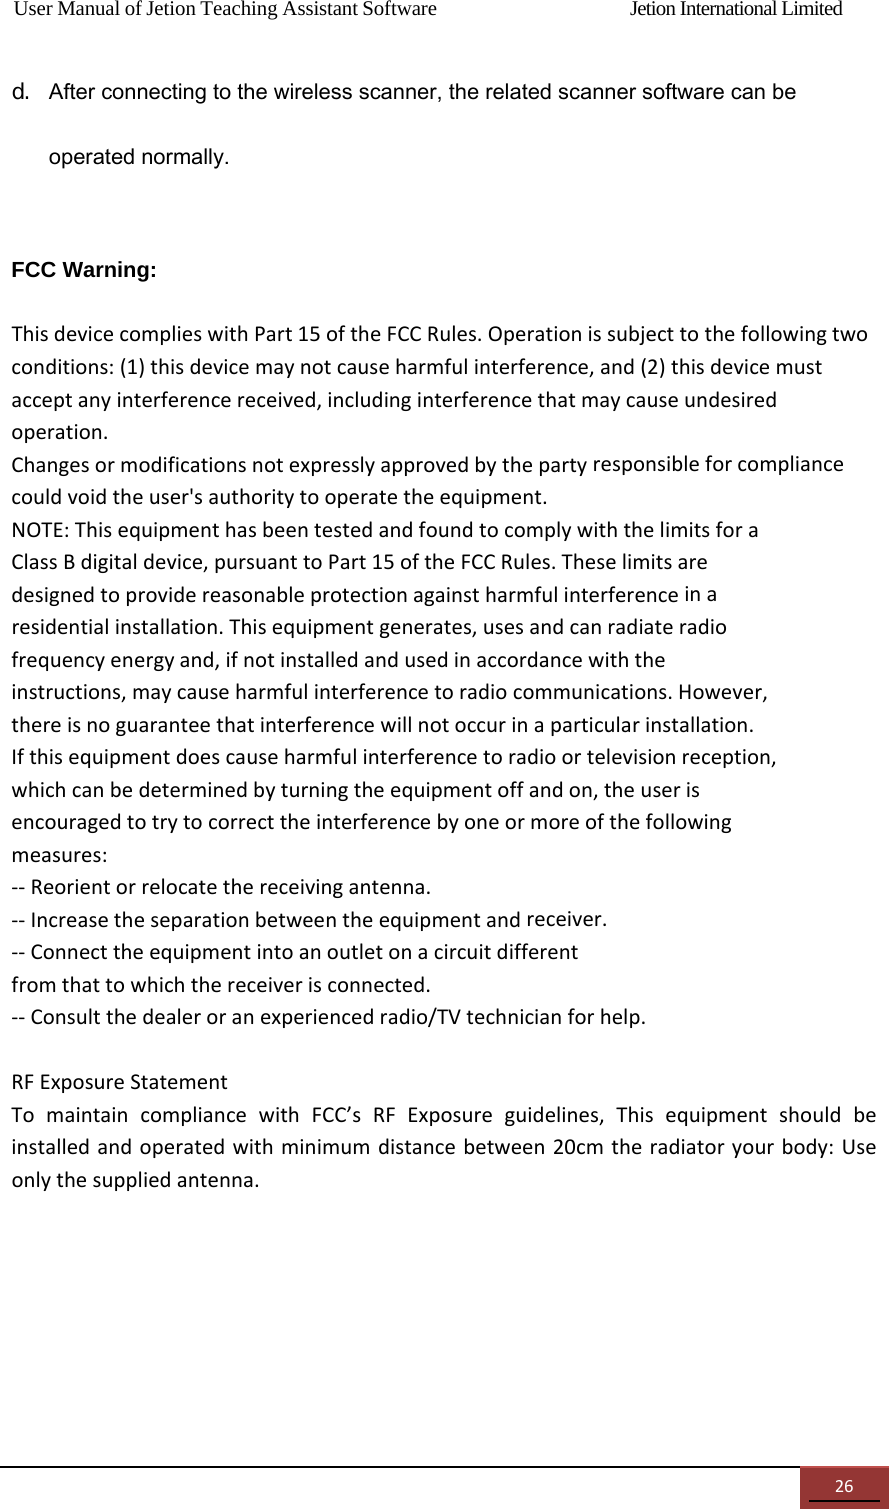
JETION WS-T4W Wireless digital scanner User Manual

JETION INTERNATIONAL LIMITED Wireless digital scanner

User manual

  Jetion International Limited  Wireless Digital Scanner Jetion Wireless Teaching System   --Physical Presenter & Contrast Teaching    User Manual    V1.3
Directory1    Software Installation Instructions...........................................................................................12    Software Functions..................................................................................................................43    Teaching Archive Recording..................................................................................................73.1  Data Archive..............................................................................................................73.2    Photo Viewer.................................................................................................................74 Physical display teaching.........................................................................................................124.1 Physical display model..................................................................................................125    More Screen Contrast Teaching..........................................................................................165.1 Classification..................................................................................................................165.2    Bottom toolbar (from left to right):)...........................................................................186    Screen Operating Recorder..................................................................................................207    Computer Desktop Teaching................................................................................................218    Quick Capture.........................................................................................................................228.1    Copy mode:..................................................................................................................238.2    Save as mode:............................................................................................................249    Hardware installation instructions:.......................................................................................249.1    Installation of wireless network card........................................................................249.2    Connect to w ireless scanner....................................................................................24
User Manual of Jetion Teaching Assistant Software                Jetion International Limited 11    Software Installation Instructions a. Find the executable file of Jetion Teaching Assistant Software (hereinafter referred to as  “Assistant Software”) in the CD attached with the digital HD video presenter. Double click the icon as Fig. 1.1 below to install(The user of Win7 & Win 8; please run as administrator to set up the software.):     Fig. 1.1 Executable file b. The installation wizard will immediately pop up as shown in Fig. 1.2. User is able to install the software according to the wizard step by step. If continue, click  “Next”:   Fig. 1.2 Installation wizard c. Select the folder location to install the software, as shown in Fig. 1.3. If selecting the
User Manual of Jetion Teaching Assistant Software                Jetion International Limited 2default location, just click  “Next”. If user wants to select another path, click  “browse” and select the path in the new popup window (Fig. 1.4). After confirming the selection, the destination folder becomes the installation path. Then, click  “Next”  to continue.  Fig. 1.3 Selection of installation path   Fig. 1.4 Customized installation path d. Here comes to the installation window, as shown in Fig. 1.5. This window shows the
User Manual of Jetion Teaching Assistant Software                Jetion International Limited 3installation information. If user confirms to install, click  “Install”; if not, click  “Back”  to re-edit the installation path.  Fig. 1.5 Installation preparation e. Then, installation progress window appears, as shown in Fig. 1.6. A progress bar shows the installation status. If user wants to stop the installation, click  “Cancel”  to exit the window.
User Manual of Jetion Teaching Assistant Software                Jetion International Limited 4Fig. 1.6 Installation progress f. When the progress bar finishes, the installation completion window comes out, as shown in Fig. 1.7. Click  “Finish”  to close the window.  Fig. 1.7 Installation completion g. A shortcut of the Assistant Software will be automatically created on the desktop, as shown in Fig. 1.8. Double click the shortcut to start the program.    Fig. 1.8 Desktop shortcut  2 Software Functions Start the software and enter the functions window (Fig. 2.1). Five major
User Manual of Jetion Teaching Assistant Software                Jetion International Limited 5functions are available for use.  Fig 2.1 Function Enabled interface Physical display teaching—HD scanning, editing, filing, and control of documents; More Screen Contrast Teaching—contrastive teaching in (double) split screens; easy-to-use white board marking; Computer Desktop Teaching—Clear the desktop; present the prepared documents and videos, etc.; easy- to-use tools for marking on the white board; Screen Operating Recorder—Record any specified area on the screen and save as a video file; Quick Capture—Capture pictures quickly from files to the desktop, or add them to PPT, Word in editing; Teaching Archives Recording--- high resolution scans and edit documents, filing, management and archiving. You can also print and send email, PDF, etc.;
User Manual of Jetion Teaching Assistant Software                Jetion International Limited 6Function Panel—After selecting a function in the Assistant Software, the Function Panel will automatically reduce in size and stay at the bottom right corner (Scan Function is on the top right corner), as shown in Fig. 2.2. User can switch to any function of the Assistant Software at any time in an easy way.  Fig 2.2. Function of plate Menu of Function Panel—Auxiliary options for the Function Panel, as shown in Fig. 2.3. Click  “Menu”  and you’ll have 5 options:    Fig. 2.3 Menu of Function Panel a. Back to the main window: go back to the starting window of the Assistant Software; b. About us: for such information as software edition, company website, email, address, post code, etc.; c. Exit: exit the software and get back to the desktop
User Manual of Jetion Teaching Assistant Software                Jetion International Limited 73    Teaching Archive Recording 3.1    Data Archive Click  “Teaching Archive Record”  in  “Function Window”, and enter the pictures library firstly (Fig. 3.1). User can edit and manage the photos taken before.  Fig. 3.1 Data Archive 3.2    Photo Viewer Double click the photos saved in the picture library or in the photo list after taking the photos, and the photo viewer window comes out (Fig. 3.2). In this window, user can view and edit the saved photos.
User Manual of Jetion Teaching Assistant Software                Jetion International Limited 8 Fig. 3.2 Photo Viewer 3.2.1Leftsidetoolbox(fromtoptobottom):3.2.1.1Basicmodificationfunction: Adjust photo brightness, saturation and contrast up to the demand of user; The maximum value is at the right end;  Auto modification: the left scissor tool automatically cuts the perimeter black frame; the right tool automatically corrects the inclined photos
User Manual of Jetion Teaching Assistant Software                Jetion International Limited 9 Cut: select an area on the photo, as shown in Fig. 3.3; then, a toolbar.   appears and offers several options; from left to right:  “save as”,  “copy”,  “cancel”, and  “confirm”.  “Save as”: you can save the cropped picture as a new picture in the specified path;  “copy”: you can copy the cropped picture to another software, like Word, PPT, QQ, etc.;  “confirm”: after you confirm the cropping operation, you can further adjust the picture;  Fig 3.3 Cutting operation interface  Rotation: you can rotate the whole picture. The left tool rotates the picture anti-clockwise, while the right tool clockwise. The picture will rotate 90 degrees after each click;    Flip vertical/horizontal: you can flip the picture content.
User Manual of Jetion Teaching Assistant Software                Jetion International Limited 10The left tool flip the content vertically, while the right tool horizontally; 3.2.1.2EffectClick  “Effect”  for the advanced auto adjustment functions, including  “grayness”, “Thresholding  ”,  “reversed”,  “Relief”, and  “sharpen”. User is able to select any 5 of them, if necessary.  Fig 3.4 Effect function 3.2.1.3Thepublicbutton   The  “undo”  tool undoes the current adjustment. The right tool restores the previous operation.    The left tool applies all the adjustments made by user and saves the picture. The right tool restores the picture to the initial state without any adjustment.
User Manual of Jetion Teaching Assistant Software                Jetion International Limited 113.2.2  Bottomtoolbar(fromlefttoright)  Fig 3.5 Bottom toolbar    Go back to the pictures library;    Enlarge or reduce the dimension of the video or picture in display. The left end (min.) means 20% of the normal size, while the right end (max.) is 200% of the normal size (note: it’s feasible to roll the mouse wheel to zoom in or out the picture.);    Actual size: 1:1 scale; show the picture or video in 100% dimension;    Proper size: adjust the picture or video to the size suitable for the screen, normally in A4 size;    Full screen mode: show the picture or video in full screen mode;      Photo selection bar: click the arrows at two ends to select the photo. 3.2.3    Photo information area: The right side of the photo viewer is the information area (Fig. 3.6). It shows the photo format, name, size, definition, and creation date. User can rate the picture. Double click the mark and remarks area, you can type and label the picture.
User Manual of Jetion Teaching Assistant Software                Jetion International Limited 12 Fig 3.6, picture file information area 4 Physical Display Teaching   The high resolution video equipment can collect HD photos. The photos can be compressed, processed, and videos can be compressed, too. It offers functions like projection, HD video preview, and any demands of rotation or scaling of the videos. Besides, the software supports white board, multi-point touch, multi-point movement, scaling, rotation, auxiliary camera, simultaneous operation of dual cameras, real-time video recording and saving as video file, etc. The software has 2 modes: visual presenter and contrastive teaching.   4.1 Physical display model   Click the display button inside of the function menu. the user default open the physical display model. And this mainly for the H-D physical video display‘s taking down and taking plain through the below toolbar, whiteboard tools and function plate to showing physical video display function.
User Manual of Jetion Teaching Assistant Software                Jetion International Limited 13  Fig4.1 physical video display 4.1.1    Bottom toolbar (from left to right)     Enlarge or reduce the dimension of the video or picture in display. The left end (min.) means 20% of the normal size, while the right end (max.) is 200% of the normal size (note: it’s feasible to roll the mouse wheel to zoom in or out the picture.);    Actual size: 1:1 scale; show the picture or video in 100% dimension;  Full screen mode: make the display area cover the status bar and in full screen mode;    Proper size: adjust the picture or video to the size suitable for the screen, normally in A4 size;
User Manual of Jetion Teaching Assistant Software                Jetion International Limited 14 Rotate button: you can rotate the whole picture. The left tool rotates the picture anti-clockwise, while the right tool clockwise. The picture will rotate 90 degrees after each click;    Shooting and record the area of the display or image. 4.1.2 Whiteboard tool a.   Switch the mouse and cancel the current whiteboard tool b. Brush          provide 3 custom properties of the paint brush, each pen can automatically memory the user Settings line, color, thickness, and four attributes; c.   Flash line, also name magic pen: within 2 seconds after the user line, marks will disappear automatically, can according to the user demand of custom line, color, thickness and transparency in four properties; d.   Eraser; e.   Clear: clear all the whiteboard tool marks on the screen; f.   Change the brush write line:  click and appear choose box, the user can according their demand to choose suitable color for the brush, and the program will automatically memory this line, and no need to change again for nest time. g. Brush color choice button: click and will appear color choice menu, the user can choose the suitable color
User Manual of Jetion Teaching Assistant Software                Jetion International Limited 15according to their own needs and it will be automatically in memory.; h. The brush thickness choice button: click and will appear choice menu   i. Transparency option: the function is to adjust the transparency of brush handwriting on the screen;  Fig 4.2 Transparency option j. Senior tools options: click unfolds (as shown in fig 4.3) from left to right including input six function: world, triangle, ellipse, circle, rectangle, select;  Fig 4.3 Senior tools options Save function: equal to the screenshot function, click can keep the entire screen contents to save as picture format. Directly save in the gallery of helper applications and show the path of the actual preservation (as shown in fig 4.4).  Fig4.4 Save function
User Manual of Jetion Teaching Assistant Software                Jetion International Limited 165    More Screen Contrast Teaching Through contrast teaching button that between the display interface and scanning interface. Can turn to contrast teaching model, and the main function is to take the digital HD video display shooting picture or the user 's own picture to compare and showing and can through the whiteboard tool to adjust and show.  Fig 5.1 Function plate 5.1 Classification Contrast teaching mainly has three categories: full screen, 2 split screen and 4 split screen, as shown in Fig 4.5 and Fig 4.6 and Fig 4.7:  Fig 5.2 Full screen
User Manual of Jetion Teaching Assistant Software                Jetion International Limited 17 Fig 5.3      2 split screen     Fig 5.4    4 split screen
User Manual of Jetion Teaching Assistant Software                Jetion International Limited 185.2    Bottom toolbar (from left to right)       Pictures library: click and show the picture list, as shown in Fig , among them:           a. Minimize the list: click again to restore;  b. Go back to the previous one;   c. Thumbnails of all the pictures in the library are shown in the list. User can directly drag the picture to the presentation area for contrastive teaching; d. Go to the next one; e. Click    to    select    the    path    for    saving    the    picture;   user  is  able  to “confirm” or  “cancel”  the process to continue;   f. Close the picture list.    Digital HD video display button: use the digital HD video display to shooting and get picture, click and you will get the shooting interface, as show in Fig    5.5. Below is the   toolbar for each function button :
User Manual of Jetion Teaching Assistant Software                Jetion International Limited 19  Fig 5.5 Shooting window of digital HD Visual Presenter a.   Rotate button: rotate the showing picture, the left button is counterclockwise rotation, the right button is clockwise rotation. Each click rotation is 90 degrees; b.   Enlarge or reduce the dimension of the video or picture in display. The left end (min.) means 20% of the normal size, while the right end (max.) is 200% of the normal size (note: it’s feasible to roll the mouse wheel to zoom in or out the picture.); c.   Actual size: 1:1 scale; show the picture or video in 100% dimension; d.   Proper size: adjust the picture or video to the size suitable for the screen, normally in A4 size; e.   Camera: take a photo of the video image in the window, and show it directly on the selected split screen; f.   Local access button: click on the local path, the user can select the local folder image    files in the currently selected split-screen display area; g.   Split screen display area selected button. Due to the different split screen mode, the buttons displayed are different. The whole screen is, 2 split screen is, 4 split screen is, or directly to use mouse to choose one of split screen
User Manual of Jetion Teaching Assistant Software                Jetion International Limited 20h. Visual display, is used to play video files. 6    Screen Operating Recorder a. Click “Screen Operating Recording”in the Function Panel and the recording window will pop out (Fig. 6.1), regardless of the current window in use. The default recording window is 800 * 600. User can enlarge or reduce the window as demand. Four options of definition are available on the window.    Fig 6.1 Recording window b. After setting the recording area, click  “Start”  and start record  .    There will be a recording frame (Fig. 6.1) on the screen. The frame size is based on the recording area set by the user before. (Note: if user selects full screen recording, there will not be any recording frame.) During the recording process, the  “Record”  button in the Function Panel shows  “Stop”. If user needs to finish record, just click  “Stop”  to close the recording window.
User Manual of Jetion Teaching Assistant Software                Jetion International Limited 21Fig 6.2    Recording   c. 3.  After stopping the recording, the software will automatically generate the video file and need you to specify the path to save it (Fig. 6.3) or just save in the default folder.  Fig 6.3    save dialogue d. 4.  AVI video format is only available for the saved video. 7    Computer Desktop Teaching Click function plate button Computer Desktop Teaching, it will automatically minimize helper applications and return to the desktop directly , on the right side there are
User Manual of Jetion Teaching Assistant Software                Jetion International Limited 22whiteboards toolbar and functional plate (as shown in Fig 7.1), User can do any desktop operation, such as broadcast video, PPT, WORD, or on the QQ, etc. Also can use the whiteboard tools, switch back to the assistant directly for other functions of the software , Video recording function can also be used directly.  Fig 7.1 Initial screen desktop function  8    Quick Capture Click function plate button Quick Capture, it can open fast capture function, the assistant software is minimized and then switch to the desktop directly for the operation of the screenshots (as shown in Fig 8.1);
User Manual of Jetion Teaching Assistant Software                Jetion International Limited 23 Fig 8.1    Quick capture function   8.1    Copy mode: Double click the capturing area and directly drag the picture to other programs or documents, like PPT, Word, or other white board software (Fig. 8.2). The drag action only copies the picture instead of saving the picture. After finish the drag action, the capturing area will disappear. You can click again the  “Quick Capture”  button in the Function Panel and show the capturing area.    Fig8.2    Quick copy mode
User Manual of Jetion Teaching Assistant Software                Jetion International Limited 248.2    Save as mode: Double click the screenshots area and drag directly the picture to the desktop or folder, screenshots area image will be directly generated JPG format independent files (as shown in Fig 7.3), Users can copy, paste, move, modify the generate image files; After completion of towing screenshots area will be displayed, You can click again the  “Quick Capture”  button in the Function Panel and show the capturing area. 9    Hardware installation instructions: 9.1    Installation of wireless network card   An external USB wireless network card is necessary if the computer cannot connect to WiFi. Software driver for the network card is also necessary to be installed (as per the specific installation instructions of wireless card). 9.2    Connect to wireless scanner   a. Switch on the WLAN and select the WiFi hotspot of Jetion wireless scanner, as below:
User Manual of Jetion Teaching Assistant Software                Jetion International Limited 25 Fig9.1    Wi-fi conFig 1 b. Connect to the wireless scanner. Click  “Connect”  as below and connect to the wireless scanner.  Fig9.2    Wi-fi conFig 2
User Manual of Jetion Teaching Assistant Software                Jetion International Limited 26d. After connecting to the wireless scanner, the related scanner software can be operated normally.  FCC Warning:    ThisdevicecomplieswithPart15oftheFCCRules.Operationissubjecttothefollowingtwoconditions:(1)thisdevicemaynotcauseharmfulinterference,and(2)thisdevicemustacceptanyinterferencereceived,includinginterferencethatmaycauseundesiredoperation.Changesormodificationsnotexpresslyapprovedbythepartyresponsibleforcompliancecouldvoidtheuser'sauthoritytooperatetheequipment.NOTE:ThisequipmenthasbeentestedandfoundtocomplywiththelimitsforaClassBdigitaldevice,pursuanttoPart15oftheFCCRules.Theselimitsaredesignedtoprovidereasonableprotectionagainstharmfulinterferenceinaresidentialinstallation.Thisequipmentgenerates,usesandcanradiateradiofrequencyenergyand,ifnotinstalledandusedinaccordancewiththeinstructions,maycauseharmfulinterferencetoradiocommunications.However,thereisnoguaranteethatinterferencewillnotoccurinaparticularinstallation.Ifthisequipmentdoescauseharmfulinterferencetoradioortelevisionreception,whichcanbedeterminedbyturningtheequipmentoffandon,theuserisencouragedtotrytocorrecttheinterferencebyoneormoreofthefollowingmeasures:‐‐Reorientorrelocatethereceivingantenna.‐‐Increasetheseparationbetweentheequipmentandreceiver.‐‐Connecttheequipmentintoanoutletonacircuitdifferentfromthattowhichthereceiverisconnected.‐‐Consultthedealeroranexperiencedradio/TVtechnicianforhelp.RFExposureStatementTomaintaincompliancewithFCC’sRFExposureguidelines,Thisequipmentshouldbeinstalledandoperatedwithminimumdistancebetween20cmtheradiatoryourbody:Useonlythesuppliedantenna.

Navigation menu