LRE Medical Esterline 8047000 Laboratory Equipment with RFID User Manual
LRE Medical GmbH Esterline Corporation Laboratory Equipment with RFID
UserManual.wiki
>
LRE Medical Esterline
>
8047000 User Manual
user manual
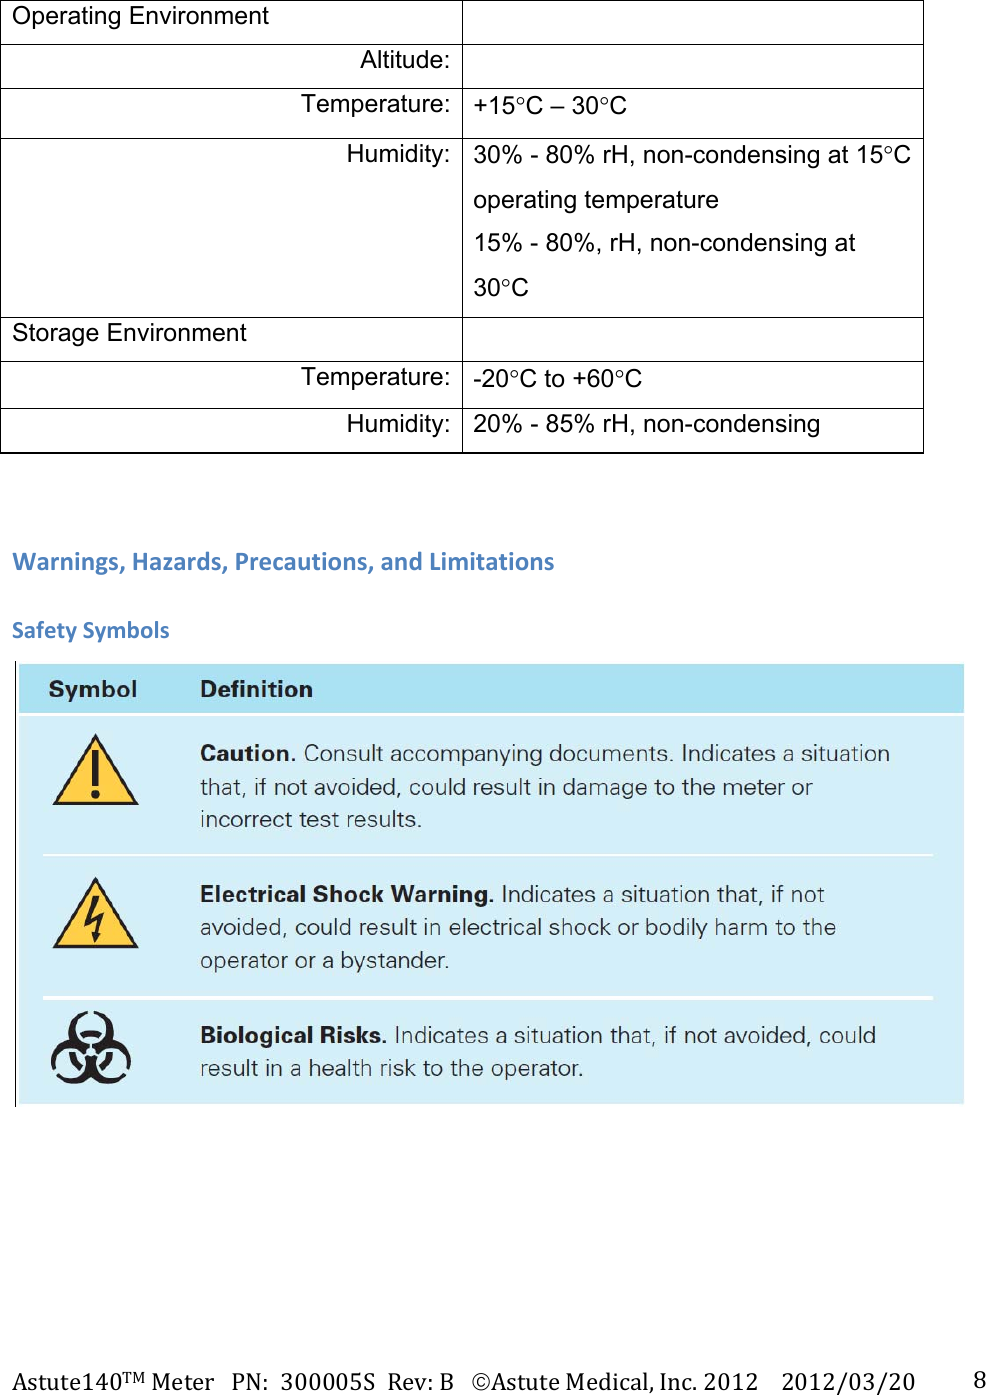
Navigation menu
Upload a User Manual
Namespaces
Wiki Guide
HTML
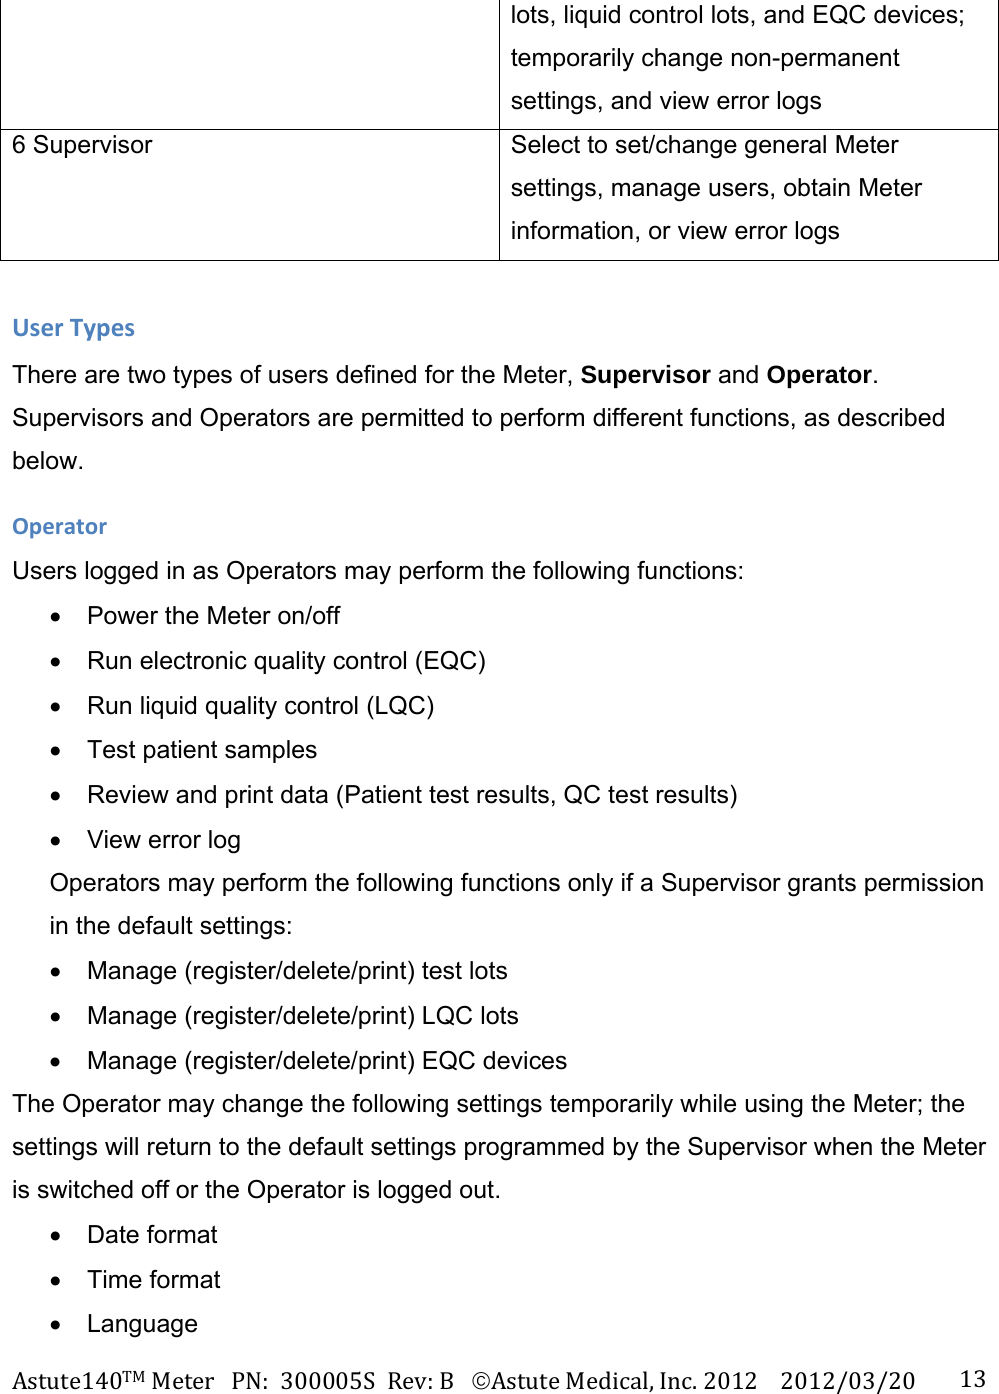
PDF
Info
Views
User Manual
Discussion / Help
Navigation
![Astute140TMMeterPN:300005SRev:B2012AstuteMedical,Inc.2012/03/17 [Company Logo] ASTUTE140TM METER [PHOTO HERE] User Manual](https://usermanual.wiki/LRE-Medical-Esterline/8047000/User-Guide-1706993-Page-1.png)
![Astute140TMMeterPN:300005SRev:BAstuteMedical,Inc.20122012/03/20 2 For performance evaluation only. Manufactured for Astute Medical, Inc. 3550 General Atomics Ct. Building 2 San Diego, CA 92121 USA MDSS GmbH Schiffgraben 41 30175 Hannover, Germany CONTACT INFORMATION: info@astutemedical.com Phone: +1 (858) 792-3544 Fax: +1 (858) 882-0449 [Add 800 number] [Add international number]](https://usermanual.wiki/LRE-Medical-Esterline/8047000/User-Guide-1706993-Page-2.png)


![Astute140TMMeterPN:300005SRev:BAstuteMedical,Inc.20122012/03/20 11MeterFeatures [Photo of front of Meter here with labels] Feature Function 1 Printer Cover Covers the printer 2 LCD Display User interface -- displays screens for navigating, entering data, and reviewing data 3 Paper Feed Key Advances the paper roll 4 Eject Button Opens the drawer 5 Main Menu Key Used to return to the Main Menu 6 Navigation Keys Used to navigate up, down, left, and right within menu screens 7 Left Soft Key Used to select the menu option displayed above the key 8 Right Soft Key Used to select the menu option displayed above the key 9 Numeric Keypad Used to enter numerical values into menus and screens 10 Decimal Point Used to add decimal points to numerical values 11 Backspace Key Deletes the character to the left of the cursor 12 Drawer Used to insert a test cartridge and the electronic quality control cartridge into the Meter 13 Battery cover Covers the battery compartment [Photo of back of Meter here with labels]](https://usermanual.wiki/LRE-Medical-Esterline/8047000/User-Guide-1706993-Page-11.png)
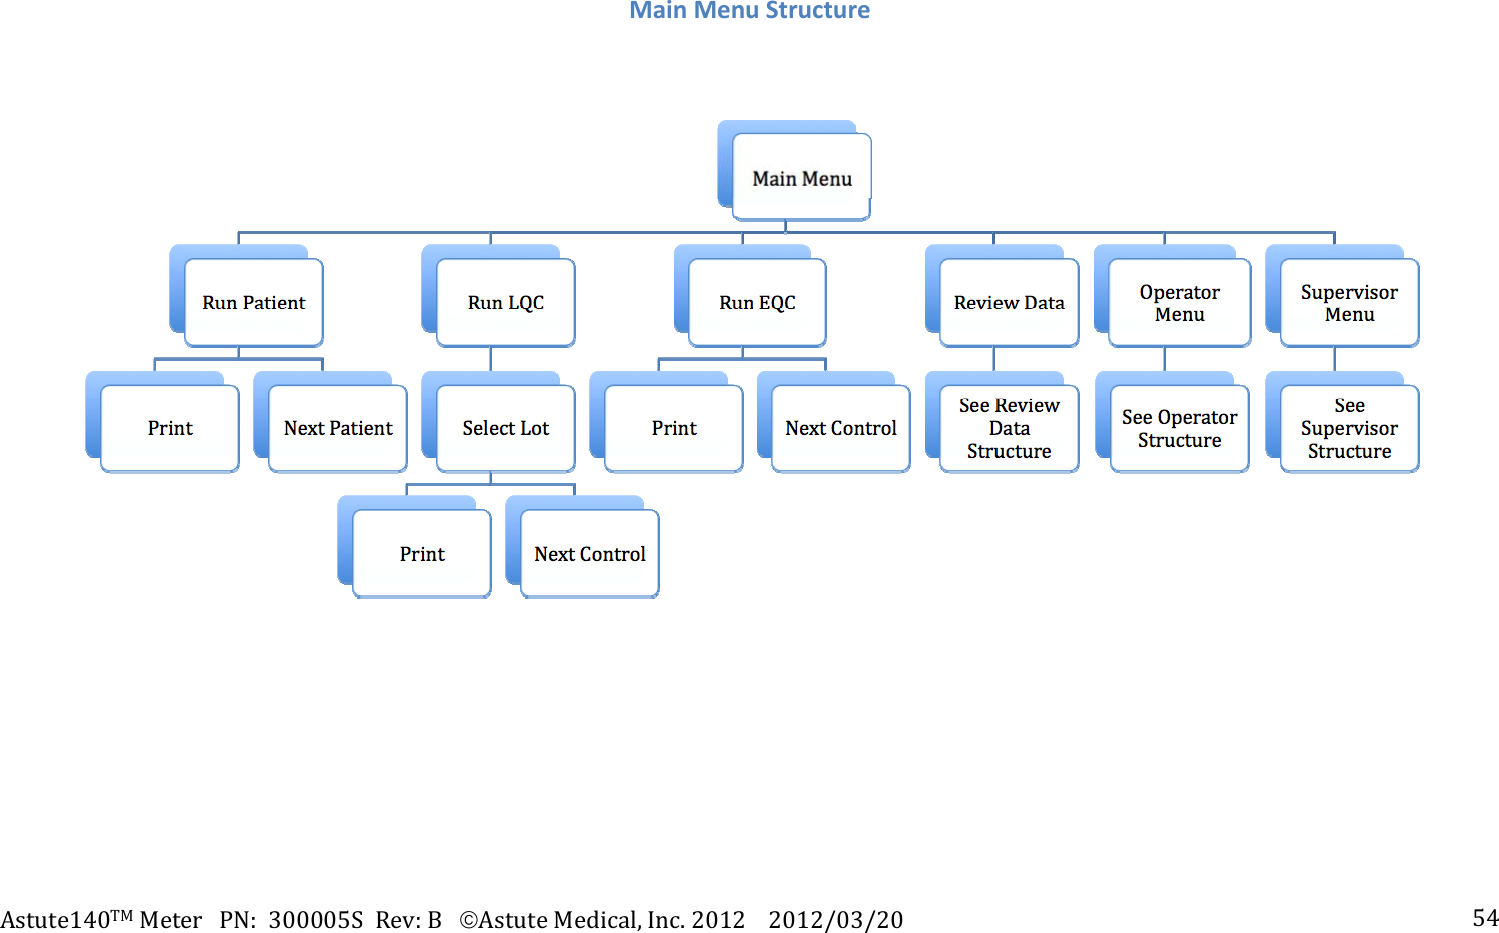
![Astute140TMMeterPN:300005SRev:BAstuteMedical,Inc.20122012/03/20 12 1 PS/2 Port Used to connect the optional external barcode reader and/or keyboard to the Meter 2 Ethernet Port Used to connect the Meter to a LIS or to a computer to download software 3 AC Power Adapter Port Used to connect the AC power adapter to the Meter 4 USB Port Used to connect the Meter to a computer to download new software versions or manage the meter 5 On/Off Switch Used to power the Meter on and off [Photo of bottom of Meter here with labels] 1 Battery Cover Covers the battery compartment 2 Serial Number Unique number used to identify the Meter 3 In-Vitro Diagnostic device labels and symbols Regulatory labels and symbols used to provide information about the Meter and its proper use (See “Labels and Symbols”, p. XX, for definitions) [Photo of Main Menu screen here] All Meter functions are grouped under six icons found on the Main Menu (for menu structures, see the Appendix): 1 Run Patient Select to run patient tests 2 Run LQC Select to run high and low liquid controls 3 Review Data Select to manage patient, LQC and EQC test results 4 Run EQC Select to run EQC 5 Operator Select to manage (register or delete) test](https://usermanual.wiki/LRE-Medical-Esterline/8047000/User-Guide-1706993-Page-12.png)
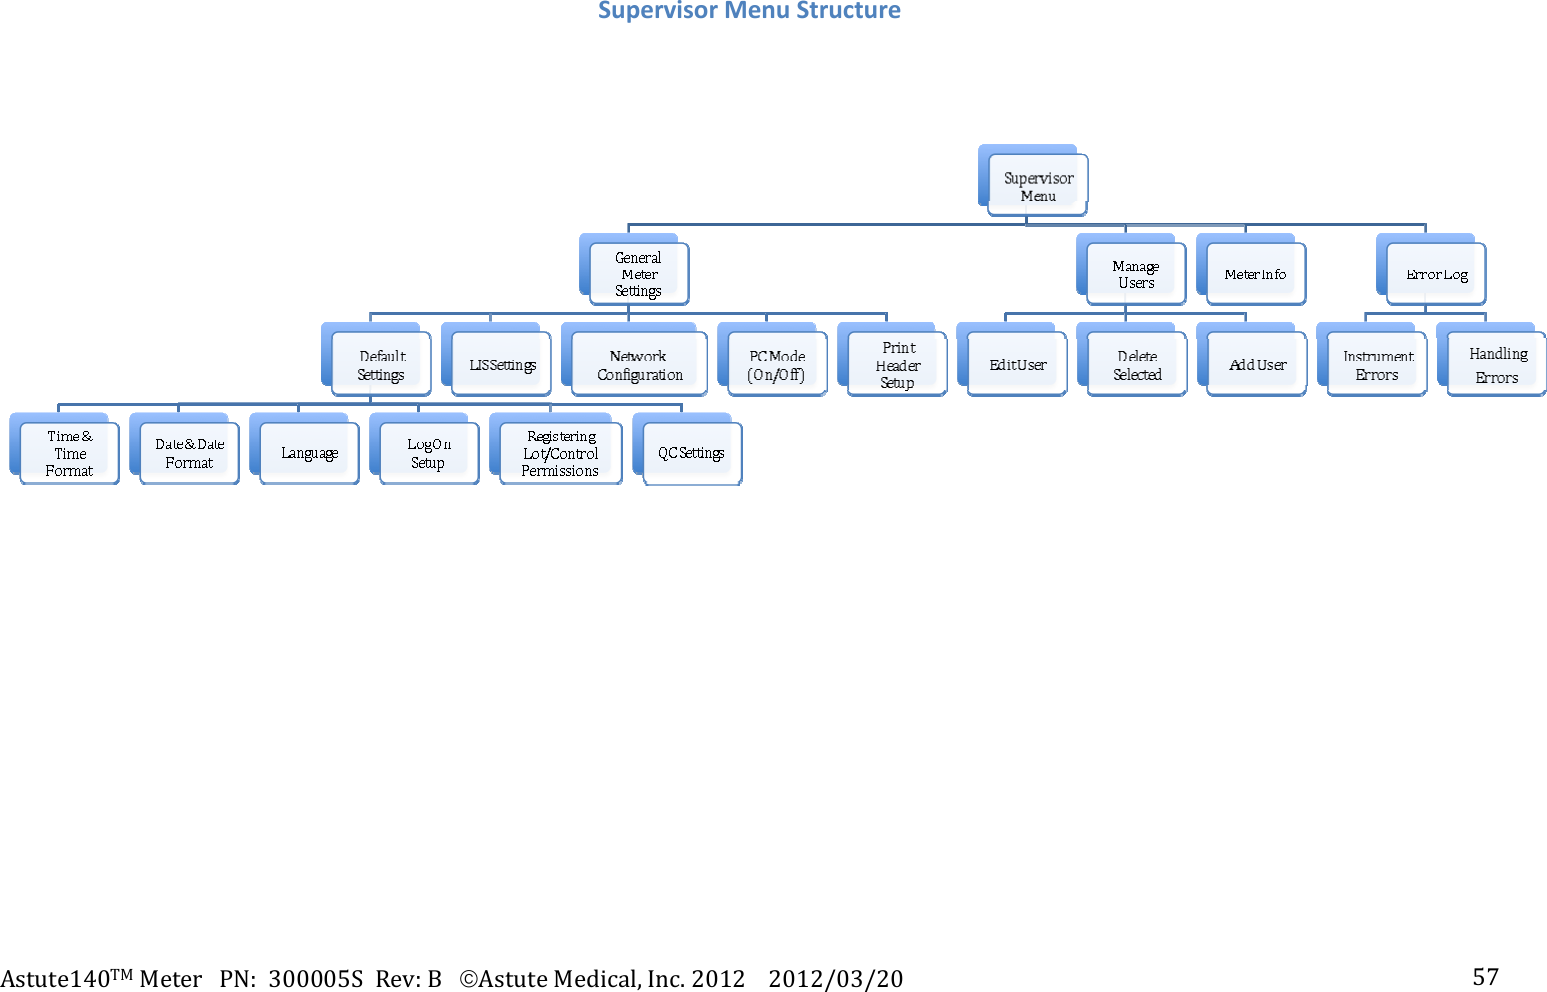
![Astute140TMMeterPN:300005SRev:BAstuteMedical,Inc.20122012/03/20 14 Beeper (On/Off) SupervisorUsers logged in as Supervisors may perform all of the Operator functions and the following additional functions: Set or change all default system settings (Time, Date, Language, Log On Setup, registering lot/control permissions, QC settings) Set or change LIS settings Set PC Mode (on/off) Set or change network settings Set or change print headers Manage Users (change/add/delete) View Meter information (hardware/firmware/bootware/serial number/IP address) InstallationACPowerSupplyThe Meter is generally meant to be powered by plugging the AC power adapter into a power source; however, power may be supplied temporarily by four AA batteries when an electrical power source is unavailable (see “Batteries” on p. X.). To connect the AC power adapter: 1. Locate the AC power adapter pack containing the AC power cord, the switching power supply, and the country specific adapter, and connect them as shown: [Show picture depicting connection of the 3 cords] 2. Insert the end of the country-specific adapter into a power source [Show picture depicting connection of the country-specific adapter into a power source]](https://usermanual.wiki/LRE-Medical-Esterline/8047000/User-Guide-1706993-Page-14.png)
![Astute140TMMeterPN:300005SRev:BAstuteMedical,Inc.20122012/03/20 153. Insert the cylindrical end of the switching power adapter into the AC power adapter port on the back of the Meter. [Show picture depicting insertion of the switching power adapter into the port on the back of the Meter] NOTE: To avoid damage to the Meter from a potential power surge, always plug the AC power adapter into the electrical power source prior to connecting it to the Meter. When removing power, disconnect the AC power adapter from the Meter prior to unplugging it from the electrical power source. InstallationandReplacementofBatteriesThe Meter is generally meant to be powered by plugging the AC power adapter into an electrical power source (see “AC Power Adapter, p. X); however, power may be supplied for a limited period of time by four AA batteries when an electrical power source is unavailable (for example, in the event of a electricity failure or if the Meter must be operated in a location where there is no electric output). When using alkaline or Li batteries under a temperature operating range of 20o to 25o C, the Meter will allow approximately 15 user tests to be performed before requiring battery replacement. The Meter includes a low battery indicator. [Insert picture depicting the low battery indicator unlit] The batteries should be changed when the low battery indicator is lit. [Insert picture depicting the low battery indicator when lit] When the low battery indicator is lit, the Meter can run at least 3 additional tests within 1 hour under the same operating conditions before the batteries will need to be replaced.](https://usermanual.wiki/LRE-Medical-Esterline/8047000/User-Guide-1706993-Page-15.png)
![Astute140TMMeterPN:300005SRev:BAstuteMedical,Inc.20122012/03/20 16To install or replace four AA batteries into the Meter or change the batteries: 1. Press the Eject Button to the left of the LCD display to open the Meter drawer and ensure there is not a cartridge in the Meter. 2. Power off the Meter. 3. Gently turn the Meter over so the bottom is facing up and place it on a flat surface. [Insert image depicting Meter turned upside down, and placed on a flat surface] 4. Open the battery cover by pressing your thumb on the center of the battery cover and sliding it in the direction shown below: [Insert image showing bottom of Meter with thumb pressing on and sliding battery cover to the left] 5. If replacing the batteries, remove the old batteries and properly discard them (see “Disposing of the batteries”, p. XX). 6. Insert 4 AA 1.5 volt batteries, making sure that the ends of the batteries facing up correspond to the + and – signs diagrammed in the battery compartment, [Insert diagram of the battery compartment with symbols visible] 7. Replace the battery cover by sliding it back into position as shown until it snaps firmly in place. 8. Turn the Meter right side up. InstallingorChangingthePaperTo install or change the internal printer paper, perform the following steps: 1. Remove the printer cover by pulling up on the blue handle on top of the cover. 2. If changing the paper, remove the empty spool and any unused paper.](https://usermanual.wiki/LRE-Medical-Esterline/8047000/User-Guide-1706993-Page-16.png)
![Astute140TMMeterPN:300005SRev:BAstuteMedical,Inc.20122012/03/20 173. Place the paper roll into the holder with the end of the paper coming from under the roll toward the Meter display. [INSERT PHOTO DEPICTING STEP 3] 4. Holding the end of the paper, replace the printer cover as shown below until it snaps into place. [insert photo depicting step 4] 5. To feed the paper further out the top of the printer press [paper button]. PoweringOntheMeterTo power on the Meter, locate the power switch on the back of the Meter and toggle it upwards, holding it in position until the self-test screen appears. [Insert screen shot of self-test screen] When all systems pass, the Log In screen will then automatically appear, indicating that the Meter is ready for use. [Insert screen shot of Log In screen] If the self-test fails, an error message will be displayed. Press the right soft key to select OK and close the error message, and then restart the Meter by turning it off and back on again (to power off the Meter, toggle the power switch upwards and it should immediately shut down). If after restarting the Meter the self-test fails again, contact Asute Medical, Inc. Technical Support (See “Contacting Astute Medical, Inc.” on p. X).](https://usermanual.wiki/LRE-Medical-Esterline/8047000/User-Guide-1706993-Page-17.png)
![Astute140TMMeterPN:300005SRev:BAstuteMedical,Inc.20122012/03/20 18SupervisorInstructions:ConfigurationandSettingsAddingtheFirstSupervisorUserThe first Supervisor user must be added to the Meter before any default settings may be set or changed. The Meter comes from the factory with a default Supervisor login ID (1234) that will allow the first Supervisor user to log in and create a user profile. Once the new profile is created, the user must log out of the system and log back in with the new user information before performing any additional functions. Perform the following steps to add the first supervisor user: 1. After powering on the Meter, the Log In screen will be displayed after a brief self test (see “Powering on the Meter” on p. X for details.) [Insert screen shot of Log In screen] 2. When the Log In screen is displayed, User ID is highlighted. Enter 1234 using the numeric keypad or an external keyboard, if connected. 3. After entering your user ID, use the [down arrow navigation key] key to highlight the Password field. 4. Use the numeric keypad or an external keyboard, if connected, to enter 1234. Press the right soft key to accept all entries. 5. After logging in, the Main Menu will be displayed. Use the navigation keys to highlight the Supervisor Menu icon. Press the right soft key to display the Supervisor Menu. [Insert screen shot of Main Menu with Supervisor icon highlighted] 6. When the Supervisor Menu is displayed, General Meter Settings is highlighted. Use the [down arrow navigation key] key to highlight Manage Users and press the right soft key.](https://usermanual.wiki/LRE-Medical-Esterline/8047000/User-Guide-1706993-Page-18.png)
![Astute140TMMeterPN:300005SRev:BAstuteMedical,Inc.20122012/03/20 197. The screen should read Existing User List across the top; however, no users should be listed. Press the right soft key to display the Options pop-up menu. [Insert screen shot of #7] 8. When the Options pop-up menu is displayed, use the [down arrow navigation key] key to highlight Add User and press the right soft key to display the Create New User screen. 9. When the Create New User screen is displayed, Mode will be highlighted. Use the [right and left arrow navigation keys] keys to toggle between operator and Supervisor. Select Supervisor. 10. After selecting Supervisor, use the down arrow navigation key to highlight Name. Use the numeric keypad or an external keyboard, if connected, to enter a user name. 11. Use the down arrow navigation key to highlight ID. Use the numeric keypad or an external keyboard, to enter a numeric ID. 12. Once a numeric ID is entered, use the down arrow navigation key to highlight Password. Use the numeric keypad or an external keyboard, if connected, to enter a password. 13. After entering a password, use the [down arrow navigation key] key to re-enter the password. 14. Confirm that the correct information is displayed. To make changes to the entries, use the [up and down arrow navigation keys] keys to highlight the field to be changed. Use the [backspace key] key to delete the incorrect entry, and then use the numeric keypad or an external keyboard, if connected, to change the entries. To clear all entries on the screen, press the left soft key. Once the correct entries have been made, press the right soft key to accept all entries. 15. After accepting the new user information entered, the Existing User List screen will again be displayed. The user information just created should now appear in the list, including the user ID, Name, and Mode (Supervisor or Operator). 16. Press the left soft key to return to the main Supervisor menu.](https://usermanual.wiki/LRE-Medical-Esterline/8047000/User-Guide-1706993-Page-19.png)
![Astute140TMMeterPN:300005SRev:BAstuteMedical,Inc.20122012/03/20 2017. Press the left soft key to return to the Main Menu. 18. Press the left soft key to log out of the system. 19. After logging out, the Log In screen will appear and User ID will be highlighted. Enter your new user ID using the numeric keypad or an external keyboard, if connected. 20. After entering your user ID, use the [down arrow navigation key] key to highlight the Password field. 21. Use the numeric keypad or an external keyboard, if connected, to enter your new password. 22. Confirm that the correct log in information is displayed. To make changes to the entries, use the [up and down arrow navigation keys] keys to highlight the field to be changed. Use the [backspace key] key to delete the incorrect entry, and then use the numeric keypad or an external keyboard, if connected, to change the entries. Press the right soft key to accept all entries. SetorChangeTimeThe Supervisor can set or change the time by performing the following steps: 1. Press the [picture of menu button] key to display the Main Menu. 2. Use the navigation keys to highlight the Supervisor Menu icon. [Insert screen shot of Main Menu with Supervisor Icon highlighted] 3. Press the right soft key to display the Supervisor Menu. 4. When the Supervisor Menu is displayed, General Meter Settings is highlighted. Press the right soft key to display the General Meter Settings screen. 5. When the General Meter Settings screen is displayed, Default Settings is highlighted. Press the right soft key to display the Default Settings screen. 6. When the Default Settings screen is displayed, Time & Time Format is highlighted. Press the right soft key to display the Time & Time Format screen. 7. When the Time & Time Format screen is displayed, Time Format is highlighted. Use the [left and right arrow navigation keys] to choose either a 12- or 24-hour time format for display on the screen and printouts.](https://usermanual.wiki/LRE-Medical-Esterline/8047000/User-Guide-1706993-Page-20.png)
![Astute140TMMeterPN:300005SRev:BAstuteMedical,Inc.20122012/03/20 218. After the desired time format is selected, use the [down arrow navigation key] key to highlight the Hours field. 9. Use the numeric keypad to enter the correct hour. 10. After the correct hour is entered, use the [down arrow navigation key] to highlight the Minutes field. 11. Use the numeric keypad to enter the correct minutes. 12. After entering the correct minutes, use the [down arrow navigation key] to highlight the AM or PM field. 13. Use the [left and right arrow navigation keys] to select AM or PM. 14. After confirming that the correct time information is displayed, press the right soft key to accept all entries. To make changes to the entries, use the [up and down arrow navigation keys] to highlight the field to be changed and use the [left and right arrow navigation keys] to toggle between options, or use the numeric keypad to change numeric entries. To clear all entries on the screen, press the left soft key. SetorChangeDateThe Supervisor can set or change the date by performing the following steps: 1. Press the [picture of menu button] key to display the Main Menu. 2. Use the navigation keys to highlight the Supervisor Menu icon. [Insert screen shot of Main Menu with Supervisor icon highlighted] 3. Press the right soft key to display the Supervisor Menu. 4. When the Supervisor Menu is displayed, General Meter Settings is highlighted. Press the right soft key to display the General Meter Settings screen. 5. When the General Meter Settings screen is displayed, Default Settings is highlighted. Press the right soft key to display the Default Settings screen. 6. On the Default Settings screen, use the [down arrow navigation key] key to highlight Date & Date Format. 7. Use the [left and right arrow navigation keys] to scroll through the available date formats for display on the screen and printouts.](https://usermanual.wiki/LRE-Medical-Esterline/8047000/User-Guide-1706993-Page-21.png)
![Astute140TMMeterPN:300005SRev:BAstuteMedical,Inc.20122012/03/20 228. After the desired date format is displayed, use the [down arrow navigation key] key to highlight the Day field. 9. Use the numeric keypad to enter the day of the month. 10. After the correct day of the month is entered, use the [down arrow navigation key] to highlight the Month field. 11. Use the numeric keypad to enter the month of the year. 12. After the correct month of the year is entered, use the [down arrow navigation key] to highlight the Year field. 13. Use the numeric keypad to enter to correct year. 14. After confirming that the correct date information is displayed, press the right soft key to accept all entries. To make changes to the entries, use the [up and down arrow navigation keys] to highlight the field to be changed and use the [left and right arrow navigation keys] to toggle between date format options, or use the numeric keypad to change numeric entries. To clear all entries on the screen, press the left soft key. SetorChangetheLanguageThe Supervisor can change the default language by performing the following steps: 1. Press the [picture of menu button] key to display the Main Menu. 2. Use the navigation keys to highlight the Supervisor Menu icon. [Insert screen shot of Main Menu with Supervisor icon highlighted] 3. Press the right soft key to display the Supervisor Menu. 4. When the Supervisor Menu is displayed, General Meter Settings is highlighted. Press the right soft key to display the General Meter Settings screen. 5. When the General Meter Settings screen is displayed, Default Settings is highlighted. Press the right soft key to display the Default Settings screen. 6. On the Default Settings screen, use the [down arrow navigation key] key to highlight Language. 7. Press the right soft key to display the Language Menu](https://usermanual.wiki/LRE-Medical-Esterline/8047000/User-Guide-1706993-Page-22.png)
![Astute140TMMeterPN:300005SRev:BAstuteMedical,Inc.20122012/03/20 238. When the Language menu is displayed, use the [up arrow navigation key] or [down arrow navigation key] keys to highlight the desired default language. 9. Press the right soft key to select the highlighted default language. UpdatingSystemSoftwareSoftware updates for the Meter will be required periodically. When updates are available, Astute Medical, Inc. will send written notifications by email and postal service including a description of the software update and downloading instructions. Supervisors can download software updates through the USB and/or Ethernet port. UpdateMeterLanguagesWhen new languages for the Meter become available, Astute Medical, Inc. will send written notifications by email and postal service of the newly available languages and downloading instructions. Supervisors can update the Meter languages by downloading language updates through the USB and/or Ethernet port. MeterOperationStartupPowerOntheMeterTo power on the Meter, locate the power switch on the back of the Meter and toggle it upwards, holding it in position until the self-test screen appears. [Insert screen shot of self-test screen] When all systems pass, the Log In screen will then automatically appear, indicating that the Meter is ready for use. [Insert screen shot of Log In screen] If the self-test fails, an error message will be displayed. Press the right soft key to select OK and close the error message, and then restart the Meter by turning it off and](https://usermanual.wiki/LRE-Medical-Esterline/8047000/User-Guide-1706993-Page-23.png)
![Astute140TMMeterPN:300005SRev:BAstuteMedical,Inc.20122012/03/20 24back on again (to power off the Meter, toggle the power switch upwards and it should immediately shut down). If after restarting the Meter the self-test fails again, contact Astute Medical, Inc. Technical Support (See “Contacting Astute Medical, Inc.” on p. X). LoginAfter successfully powering on the Meter, the Log In screen will automatically appear. Perform the following steps to log in to the system: 1. When the Log In screen is displayed, User ID is highlighted. Enter your user ID using the numeric keypad or an external keyboard, if connected. 2. After entering your user ID, use the [down arrow navigation key] key to highlight the Password field. 3. Use the numeric keypad or an external keyboard, if connected, to enter your password. 4. Confirm that the correct log in information is displayed. To make changes to the entries, use the [up and down arrow navigation keys] to highlight the field to be changed. Use the [backspace key] key to delete the incorrect entry, and then use the numeric keypad or an external keyboard, if connected, to change the entries. Press the right soft key to accept all entries. RFIDCardsforDeviceandLotRegistrationEach new EQC device, Liquid Control lot, and test lot must be registered prior to first use. Operators may register EQC devices, Liquid Control lots, and test lots only if Supervisors grant registration permission to Operators in the default settings; otherwise, Supervisors must carry out registrations. To register an EQC device, Liquid Control lot or test lot, see “EQC Device Registration” (p. X), “Liquid Control Set Registration” (p. X), and Test Lot Registration” (p. X). EQCDeviceRegistrationThe EQC procedure verifies the calibration of the Meter, including the positioning system, optical system, and other internal systems of the Meter to confirm that the Meter is functioning properly.](https://usermanual.wiki/LRE-Medical-Esterline/8047000/User-Guide-1706993-Page-24.png)
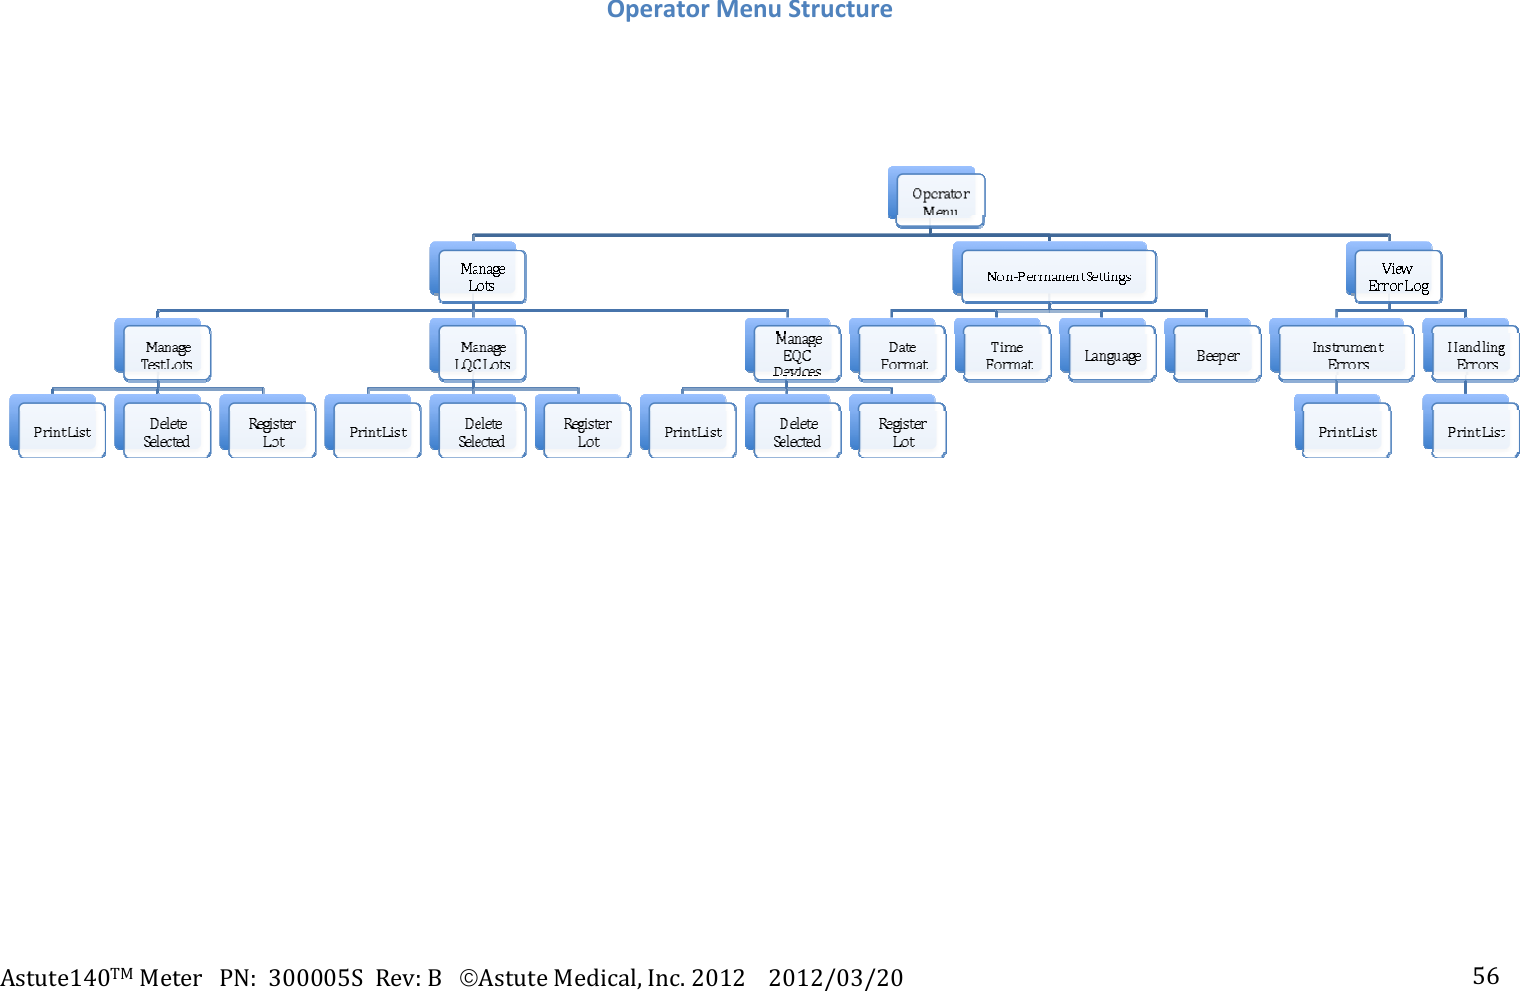
![Astute140TMMeterPN:300005SRev:BAstuteMedical,Inc.20122012/03/20 25 When not in use, the EQC Device should be stored in its original packaging away from light. If lost, a replacement EQC device may be ordered from Astute Medical, Inc. at www.astutemedical.com or by contacting your Astute Medical, Inc. sales representative. The EQC device must be registered prior to first use. Operators may register the EQC device only if the Supervisor granted registration permission in the default settings; otherwise, Supervisors must register the EQC device. To register the EQC device, locate the EQC RFID card included in the Meter Kit and perform the following steps: 1. Press the [picture of menu button] key to display the Main Menu (if registering the EQC device immediately after successful log in, the Main Menu will automatically be displayed). 2. Use the navigation keys to highlight the Operator icon. [Insert screen shot of Main Menu with Operator icon highlighted] 3. Press the right soft key to display the Operator Menu. 4. When the Operator Menu is displayed, Manage Lots is highlighted. Press the right soft key to display the Manage Lots screen. 5. When the Manage Lots screen is displayed, Manage Test Lots is highlighted. Use the [down arrow navigation key] key to highlight Manage EQC Devices and press the right soft key to display the Registered EQC Devices screen. [Insert screen shot of the Registered EQC Devices screen] 6. On the Registered EQC Devices screen, press the right soft key to display the Options pop-up menu. [Insert screen shot of Options pop-up menu]](https://usermanual.wiki/LRE-Medical-Esterline/8047000/User-Guide-1706993-Page-25.png)
![Astute140TMMeterPN:300005SRev:BAstuteMedical,Inc.20122012/03/20 26 7. When the Options pop-up menu is displayed, Print List is highlighted. Use the [down arrow navigation key] key to highlight Register Device and press the right soft key. 8. When prompted, hold the RFID card for the EQC device next to or against the numeric keypad to register the EQC Device information and select “OK” by pressing the right soft key. 9. If registered correctly, a screen indicating that the EQC device number was successfully read from the RFID card will appear. Press the right soft key to select “Accept”. The EQC device that was just registered should now appear in the list of registered EQC devices. 10. If registered incorrectly, an error message will appear. Press the right soft key to select OK and close the error message. Repeat steps 8-9. If registered incorrectly a second time, contact Astute Medical, Inc. Technical Support (for contact information, see “Contacting Astute Medical, Inc.” on p. XX). 11. After use, return the RFID card to it’s sleeve and store it with the EQC device in its original packaging. ElectronicQualityControl(EQC)The EQC procedure verifies the calibration of the Meter, including the positioning system, optical system, and other internal systems of the Meter to confirm that the Meter is functioning properly.It is recommended that the EQC procedure be run at a frequency in accordance with to the best practices of your institution. The required frequency for running EQC may be set by a Supervisor in the general Meter default settings (for instructions on setting the required frequency, see “Quality Control Settings”, p. X). Prior to running the first EQC procedure, the EQC Device must be registered (For instructions on registering the EQC device, see “EQC Device Registration”, p. X). To run the EQC procedure, perform the following steps using the EQC Device provided with the Meter:](https://usermanual.wiki/LRE-Medical-Esterline/8047000/User-Guide-1706993-Page-26.png)
![Astute140TMMeterPN:300005SRev:BAstuteMedical,Inc.20122012/03/20 271. Press the [picture of menu button] key to display the Main Menu if needed. . 2. Use the navigation keys to highlight the Run EQC icon. 3. Press the right soft key to select Run EQC. The Meter drawer will automatically open. 4. When prompted, place the EQC device into the recess inside the Meter drawer in the direction of the arrow marked on the EQC device and gently close the drawer until it clicks. [Insert photo of gloved hand inserting EQC device into the open drawer of the Meter] 5. After closing the drawer, a temporary screen will appear indicating that the Meter is running the EQC procedure and the amount of time remaining until test completion will be displayed. [Insert photo of temporary screen showing EQC procedure countdown here] 6. When the EQC procedure completes, press the eject button to open the drawer. The results will be displayed along with the word “passed” if the Meter passed the EQC procedure or “failed” if it did not. If the EQC procedure failed, run the EQC procedure again following the steps below: a. Press the right soft key to display the Options pop-up menu. b. Use the [down arrow navigation key] key to highlight Next Control and press the right soft key. c. Repeat steps 4-5. When the EQC procedure completes, the the results will be displayed along with the word “passed” if the Meter passed the EQC procedure or “failed” if it did not. If the procedure failed, contact Astute Medical, Inc. Technical Support (for contact information, see “Contacting Astute Medical, Inc.” on p. XX). Press the eject button to open the drawer. 7. To manually print the EQC results if Autoprint is disabled: a. Press the right soft key to display the Options pop-up menu.](https://usermanual.wiki/LRE-Medical-Esterline/8047000/User-Guide-1706993-Page-27.png)
![Astute140TMMeterPN:300005SRev:BAstuteMedical,Inc.20122012/03/20 28b. When the options menu is displayed, Print is highlighted. To print the EQC results, press the right soft key. c. To hide the Options Menu, use the [down arrow navigation key] key to highlight Hide Options and press the right soft key. d. To return to the Main Menu, press the left soft key. 8. After completing the EQC procedure, store the EQC Device in its original packaging away from light. LiquidControlLotRegistrationHigh and low liquid controls must be run to verify the precision and accuracy of the assay procedure, including the performance of the test cartridges and assay-specific reagents. Each assay-specific liquid control set includes a high and a low liquid control. Each liquid control in the set must be registered prior to first use. Operators may register the liquid controls only if the Supervisor granted registration permission in the default settings; otherwise, Supervisors must register the liquid controls. See the assay-specific controls product insert for storage instructions when the liquid control set is not in use. Additional liquid controls may be ordered from Astute Medical, Inc. at www.astutemedical.com or by contacting your Astute Medical, Inc. sales representative. For each liquid control set, the liquid control registration process must be carried out twice: once for the high liquid control and once for the low liquid control. To register each control, perform the following steps: 1. Locate the RFID card for the liquid control lot to be registered (i.e. the high liquid control RFID card if registering the high liquid control, or the low liquid control RFID card if registering the low liquid control).](https://usermanual.wiki/LRE-Medical-Esterline/8047000/User-Guide-1706993-Page-28.png)
![Astute140TMMeterPN:300005SRev:BAstuteMedical,Inc.20122012/03/20 292. Press the [picture of menu button] key to display the Main Menu (if registering the liquid control lot immediately after successful log in, the Main Menu will automatically be displayed). 3. Use the navigation keys to highlight the Operator icon. [Insert photo of Main Menu with Operator icon highlighted] 4. Press the right soft key to display the Operator Menu. 5. When the Operator Menu is displayed, Manage Lots is highlighted. Press the right soft key to display the Manage Lots screen. 6. When the Manage Lots screen is displayed, Manage Test Lots is highlighted. Use the [down arrow navigation key] to highlight Manage LQC Lots and press the right soft key to display the Registered LQC Lots screen. 7. On the Registered LQC Lots screen, press the right soft key to display the Options pop-up menu. 8. When the Options pop-up menu is displayed, Print List is highlighted. Use the [down arrow navigation key] key to highlight Register Lot and press the right soft key. 9. When prompted, hold the RFID card for the liquid control to be registered next to or against the numeric keypad to register the liquid control lot information and press the right soft key to select OK. 10. If registered correctly, a screen indicating that the liquid control lot number was successfully read from the RFID card will appear, and the lot number will be displayed. Press the right soft key to select Accept. The lot that was just registered should now appear in the list of Registered LQC lots. 11. If registered incorrectly, an error message will appear. Press the right soft key to select OK and close the error message. Repeat steps 9-10. If registered incorrectly a second time, contact Astute Medical, Inc. Technical Support (for contact information, see “Contacting Astute Medical, Inc.” on p. XX). 12. After use, return the RFID card to its sleeve and store with the corresponding liquid control.](https://usermanual.wiki/LRE-Medical-Esterline/8047000/User-Guide-1706993-Page-29.png)
![Astute140TMMeterPN:300005SRev:BAstuteMedical,Inc.20122012/03/20 3013. To register the second liquid control in the set, or to register another liquid control set from a different lot, repeat steps 7-12. ExternalLiquidQualityControl(LQC)High and low liquid controls must be run to verify the precision and accuracy of the assay procedure, including the performance of the meter, test cartridges and assay-specific reagents. It is recommended that LQC be performed at the following times: Every 30 days With each new lot number of test cartridges With each new shipment of test kits In accordance with the laboratory’s standard quality control procedures The required frequency for running LQC may be set by a Supervisor in the general Meter default settings (for instructions on setting the required frequency, see “Quality Control Settings”, p. X). Prior to running the first LQC procedure, both the high and low liquid controls in the liquid control set must be registered if they are from a new liquid control lot (for instruction on registering liquid controls, see “Liquid Control Registration”, p. X). The LQC procedure must be run twice: once with the high liquid control and once with the low liquid control. Both high and low liquid controls must have passed for a given lot of test cartridges within the time window set in the default settings before patient samples can be run using test cartridges from that lot. To run the LQC procedure, perform the following steps and repeat for the second control in the liquid control set: 1. Press the [picture of menu button] key to display the Main Menu if needed. 2. Use the navigation keys to highlight the Run LQC icon.](https://usermanual.wiki/LRE-Medical-Esterline/8047000/User-Guide-1706993-Page-30.png)
![Astute140TMMeterPN:300005SRev:BAstuteMedical,Inc.20122012/03/20 31[Insert screen shot of Main Menu with Run LQC icon highlighted] 3. Press the right soft key to select Run LQC. 4. A screen showing all liquid control lots previously registered and their expiration dates will be displayed. Controls displayed as “Control +” correspond to high liquid controls and those displayed as “Control –“ correspond to low liquid controls. [{Insert photo showing screen shot of “Run LQC – Select Lot” screen] 5. Use the [up and down arrow navigation keys] keys to highlight the correct liquid control lot being tested and press the right soft key. If the liquid control lot is not listed, register the liquid control lot to be tested by following the steps outlined in “Liquid Control Lot Registration” on p. XX. After the lot is registered, repeat steps 1-6. 6. After selecting the liquid control lot to be tested, the Meter drawer will automatically open. 7. Prepare the test cartridge with the liquid control (high or low) as instructed in the assay-specific Control Product Insert. 8. When prompted, place the prepared test cartridge into the recess inside the Meter drawer in the direction of the arrow marked on the test cartridge, and gently close the drawer until it clicks. [Insert photo of gloved hand correctly inserting the cartridge into the Meter] 9. After closing the drawer, a temporary screen will appear indicating that the Meter is running the LQC procedure and the amount of time remaining until test completion will be displayed. 10. When the LQC procedure completes, the Meter drawer will automatically open and the results will be displayed along with the word “passed” if the procedure](https://usermanual.wiki/LRE-Medical-Esterline/8047000/User-Guide-1706993-Page-31.png)
![Astute140TMMeterPN:300005SRev:BAstuteMedical,Inc.20122012/03/20 32passed or “failed’ if it did not. If the LQC procedure failed, run the LQC procedure again following the steps below: a. Press the right soft key to display the Options pop-up menu. b. Use the [down arrow navigation key] key to highlight Next Control and press the right soft key. c. Repeat steps 4-9. When the LQC procedure completes, the results will be displayed along with the word “passed” if the Meter passed the LQC procedure or “failed” if it did not. If the procedure failed a second time, contact Astute Medical, Inc. Technical Support (For contact information, see “Contacting Astute Medical, Inc.” on p. X). Press the eject button to open the drawer. 11. Remove the cartridge from the Meter drawer and discard according to the laboratory’s standard practices for the type of biological sample used. 12. To manually print the LQC results if Autoprint is disabled: a. Press the right soft key to display the Options pop-up menu. b. When the options menu is displayed, Print is highlighted. To print the LQC results, press the right soft key. c. To hide the Options Menu, use the [down arrow navigation key to highlight Hide Options and press the right soft key. d. To return to the Main Menu, press the left soft key. 13. To run the next liquid control (high or low) after viewing or printing the LQC results, press the right soft key to display the Options pop-up menu. Use the [down arrow navigation key] key to highlight Next Control and press the right soft key. Repeat steps 4-12. TestLotRegistrationAssay-specific test cartridges that are uniquely compatible with the Astute140 Meter are used to test patient samples. The test cartridges approved for use with the Astute140 Meter should not be used with any other testing device. Similarly, only test cartridges approved for use with the Astute140 Meter can be used with the Meter. For a list of approved tests for use with the Astute140 Meter and to purchase assay-specific test](https://usermanual.wiki/LRE-Medical-Esterline/8047000/User-Guide-1706993-Page-32.png)
![Astute140TMMeterPN:300005SRev:BAstuteMedical,Inc.20122012/03/20 33cartridges, go to www.astutemedical.com or consult your Astute Medical, Inc. sales representative. Each new test lot must be registered prior to use of any test cartridges from that lot. Operators may register the test lot only if the Supervisor granted registration permission in the default settings; otherwise, Supervisors must register the test lot. See the assay-specific product insert for test cartridge storage instructions. To register a test lot, perform the following steps: 1. Locate the RFID card included in the test kit from the test lot to be registered. 2. Press the [picture of menu button] key to display the Main Menu if needed. 3. Use the navigation keys to highlight the Operator icon. [Insert Main Menu screen shot with Operator icon highlighted] 4. Press the right soft key to display the Operator Menu. 5. When the Operator Menu is displayed, Manage Lots is highlighted. Press the right soft key to display the Manage Lots screen. 6. When the Manage Lots screen is displayed, Manage Test Lots is highlighted. Press the right soft key to display the Registered Test Lots screen. 7. On the Registered Test Lots screen, a list of all the previously registered test lots will be displayed. If the lot being registered appears on the list, it has already been registered and need not be registered again. Press the left soft key to return to the Main Menu. If the test lot does not appear on the list, proceed to step 8. 8. On the Registered Test Lots screen, press the right soft key to display the Options pop-up menu. 9. When the Options pop-up menu is displayed, Print List is highlighted. Use the [down arrow navigation key] key to highlight Register Lot and press the right soft key.](https://usermanual.wiki/LRE-Medical-Esterline/8047000/User-Guide-1706993-Page-33.png)
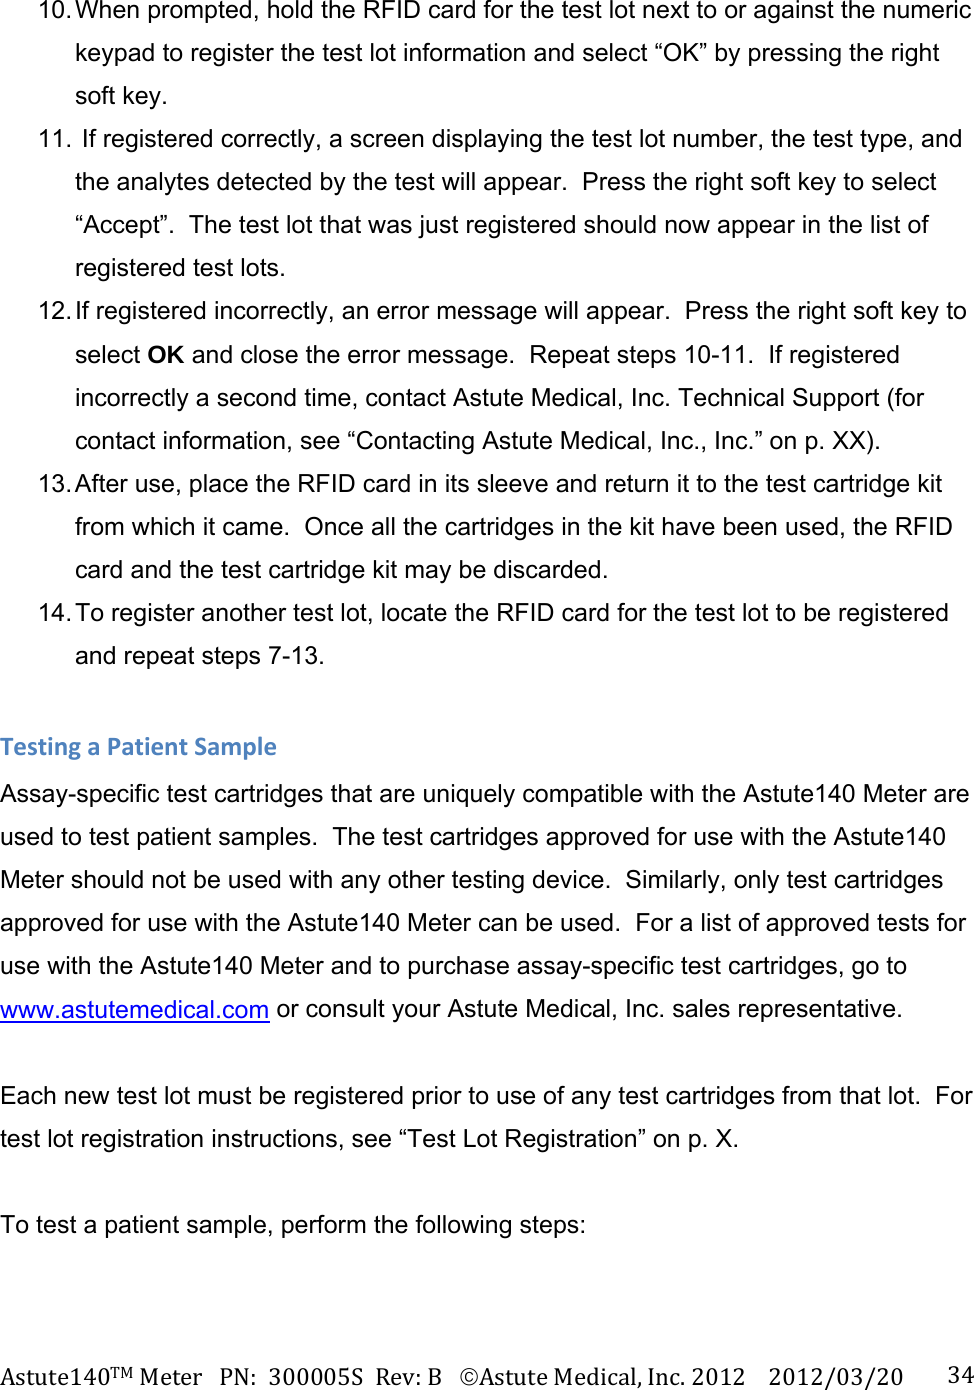
![Astute140TMMeterPN:300005SRev:BAstuteMedical,Inc.20122012/03/20 351. Press the [picture of menu button] key to display the Main Menu (if running patient sample immediately after successful log in, the Main Menu will automatically be displayed). 2. When the Main Menu is displayed, use the navigation keys to highlight the Run Patient icon. Press the right soft key to select Run Patient. [Insert screen shot of Main Menu with Run Patient icon highlighted] 3. When the Run Patient screen is displayed, Patient ID will be highlighted. Enter the Patient ID manually using the numeric keypad or an external keyboard (if connected), or, if applicable, by scanning the barcode on the patient sample with the optional barcode scanner (if connected). 4. If available, a Sample ID may be entered; otherwise, this field may be left blank. To enter a Sample ID, use the [down arrow navigation key] key to highlight Sample ID and enter the Sample ID manually using the numeric keypad or an external keyboard (if connected), or, if applicable, by scanning the barcode on the patient sample with an optional barcode scanner (if connected). NOTE: an external keyboard and barcode scanner are optional devices that are not included with the Astute140 Meter kit. 5. After confirming that the correct Patient ID and/or Sample ID have been entered, press the right soft key to select Run Patient. 6. After selecting Run Patient, the Meter drawer will automatically open. 7. Prepare the test cartridge with the patient specimen according to the assay-specific Product Insert for the test to be run. NOTE: Each test cartridge must be run immediately after inoculation with the patient sample, and the next cartridge should not be prepared until testing on the first has completed. The Meter times the incubation period for the test, and only one test can be run at a time; therefore, inoculating additional samples before testing on the first has completed may result in inaccurate test results due to a time delay in testing after inoculation.](https://usermanual.wiki/LRE-Medical-Esterline/8047000/User-Guide-1706993-Page-35.png)
![Astute140TMMeterPN:300005SRev:BAstuteMedical,Inc.20122012/03/20 368. When prompted, place the prepared test cartridge into the recess inside the Meter drawer in the direction of the arrow marked on the test cartridge, and gently close the drawer until it clicks. [Insert photo of gloved hand correctly inserting the cartridge into the Meter] 9. After closing the drawer, a temporary screen will appear indicating that the Meter is reading the test lot information to determine if the test lot is registered and whether high and low LQC measurements have passed for the test kit lot. [Insert screen shot of temporary screen “Reading Test Lot Info Please Wait”] a. If the lot has not been registered, an error message will appear. Press the right soft key to select OK and close the error message. Register the lot (see “Test Lot Registration”, p. X) before running the test again. b. If the lot has been registered, but high and low LQC measurements have not passed for the test kit lot, the patient test will not be run and a message indicating that passed LQC measurements are required will be displayed. [Insert screen shot of error message showing “Cassette Lot Locked”] If high and low LQC measurements are required, follow these steps: 1. Press the right soft key to select OK and close the error message. 2. Discard the test cartridge prepared with the patient sample 3. Run high and low LQC measurements (for instructions, See “External Liquid Quality Control”, p. X). 4. When high and low LQC measurements have passed, repeat steps 1-9.](https://usermanual.wiki/LRE-Medical-Esterline/8047000/User-Guide-1706993-Page-36.png)
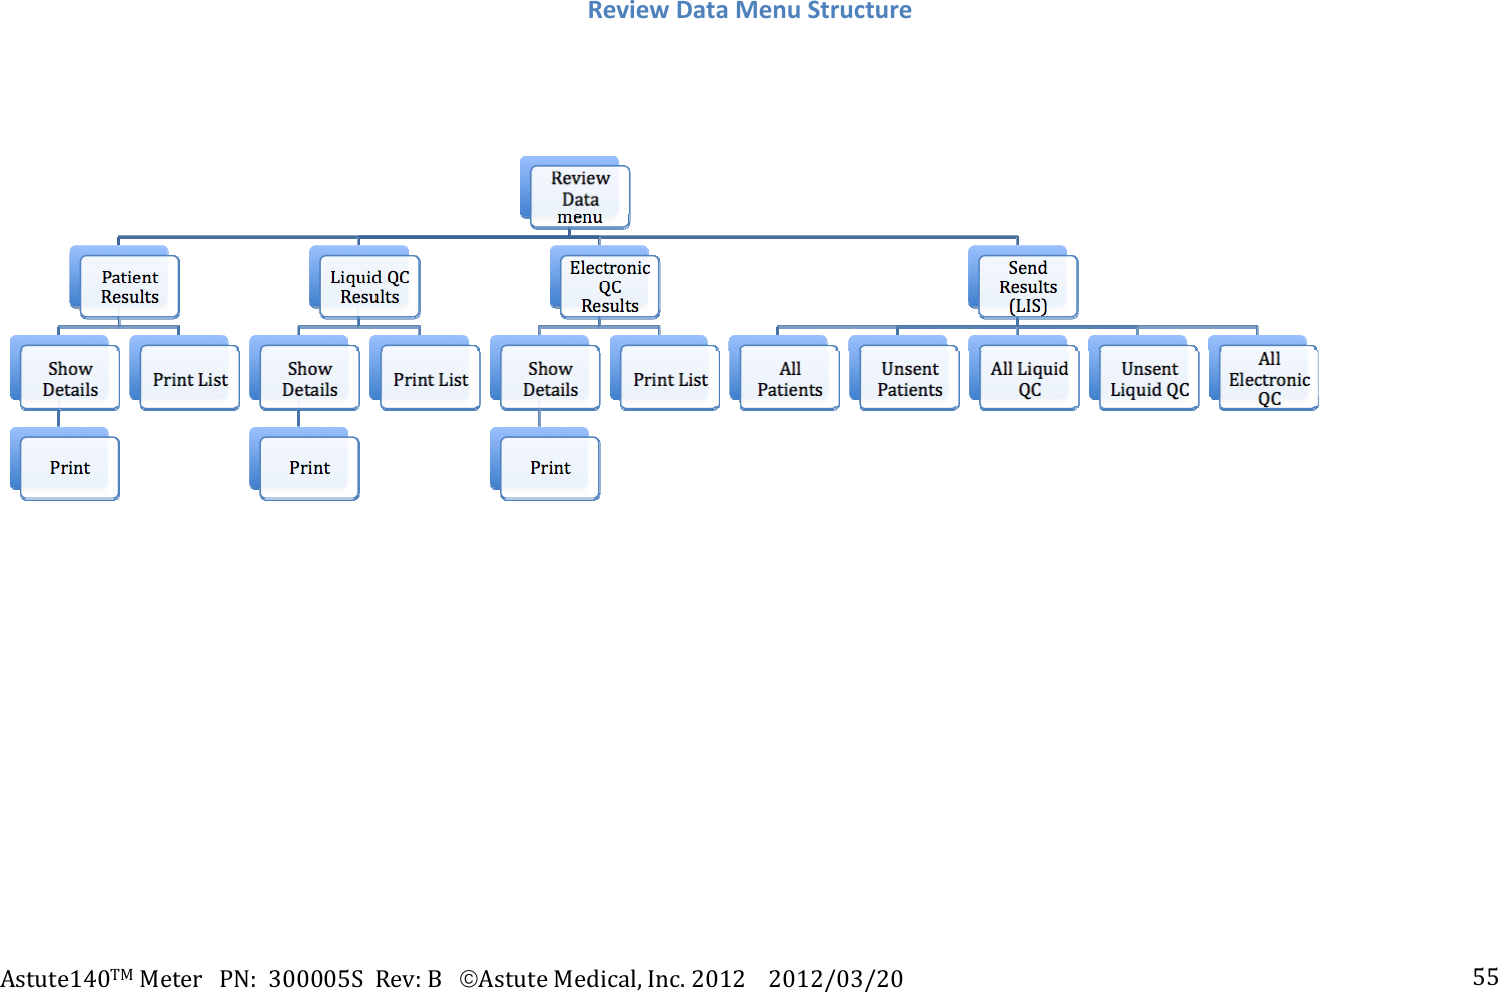
![Astute140TMMeterPN:300005SRev:BAstuteMedical,Inc.20122012/03/20 3710. If LQC measurements for the cartridge test lot have passed, a screen indicating the amount of time remaining until test completion will be displayed. To abort the test for any reason, select Cancel by pressing the left soft key. 11. Once the test is complete, the Meter drawer will automatically open and test results will be displayed. 12. To manually print the patient test results if Autoprint is disabled: a. Press the right soft key to display the Options pop-up menu. b. When the options menu is displayed, Print is highlighted. To print the patient test results, press the right soft key. c. To hide the Options Menu, use the [down arrow navigation key] key to highlight Hide Options and press the right soft key. d. To return to the Main Menu, press the left soft key. 13. Remove the cartridge from the Meter drawer and discard according to the laboratory’s standard practices for the type of biological sample used. 14. To run the next patient sample after viewing or printing the patient test results, press the right soft key to display the Options pop-up menu. Use the [down arrow navigation key] key to highlight Next Patient and press the right soft key. Repeat steps 4-13. ReviewandManageTestResultsPatient, LQC, and EQC test results can be recalled, printed, or sent to the LIS at any time. To perform these functions, follow the instructions below. PatientResults1. Press the [picture of menu button] key to display the Main Menu. 2. Using the navigation keys, highlight the Review Data icon and press the right soft key. [Insert screen shot of Main Menu with Review Data icon highlighted] 3. When the Review Data menu is displayed, Patient Results is highlighted. Press the right soft key to display the Patient Results screen.](https://usermanual.wiki/LRE-Medical-Esterline/8047000/User-Guide-1706993-Page-37.png)
![Astute140TMMeterPN:300005SRev:BAstuteMedical,Inc.20122012/03/20 384. On the Patient Results screen, patient results can be selected by entering a range of dates, a range of test sequence numbers, or by entering a specific patient ID, sample ID, or Operator ID. Use the [up and down arrow navigation keys] keys to select the desired data elements, and enter the data using the numeric keypad or an external keyboard, if connected. (Note: date fields must be entered in the format specified in the default settings) 5. Once the selection criteria are entered, press the right soft key to display a list of the patient results meeting the selection criteria. a. To print the list of patient test results i. Display the Options pop-up menu by pressing the right soft key. ii. Use the [down arrow navigation key] key to highlight Print List. iii. After printing is complete, the list of patient results will again be displayed. b. To display and/or print detailed test results for a particular patient sample i. Use the [up and down navigation keys] to highlight the test of interest. ii. Press the right soft key to display the Options pop-up menu. iii. When the Options pop-up menu is displayed, Show Details will be highlighted. Press the right soft key to select Show Details. iv. Details of the patient test results will be displayed. To print the test results, press the right soft key to select Print. v. After printing is complete, press the left soft key to return to the list of patient results. LQCResults1. Press the [picture of menu button] key to display the Main Menu. 2. Using the navigation keys, highlight the Review Data icon and press the right soft key. [Insert screen shot of main menu with review data icon highlighted]](https://usermanual.wiki/LRE-Medical-Esterline/8047000/User-Guide-1706993-Page-38.png)
![Astute140TMMeterPN:300005SRev:BAstuteMedical,Inc.20122012/03/20 39 3. When the Review Data menu is displayed, Patient Results is highlighted. Use the [down arrow navigation key] key to highlight Liquid QC Results and press the right soft key to display the Review LQC Results screen. 4. On the Review LQC Results screen, LQC results can be selected by entering a range of dates, or by selecting a specific control lot or test lot number. a. To select LQC results using a range of dates i. Start date will be automatically highlighted. Use the numeric keypad or an external keyboard, if connected, to enter a date (Note: date fields must be entered in the format specified in the default settings.) ii. Use the [down arrow navigation key] key to highlight End Date and enter the end date in the same manner and format. b. To select LQC results from a specific control lot i. Use the [down arrow navigation key] key to highlight Control Lot. ii. The default selection is to display LQC results from all control lots. To select a specific control lot, use the [left and right navigation keys] keys to display the desired control lot. c. To select LQC results from a specific test lot i. Use the [down arrow navigation key] key to highlight Test Lot. ii. The default selection is to display LQC results from all test lots. To select a specific test lot, use the [left and right navigation keys] keys to display the desired test lot. 5. Once all selection criteria are entered, press the right soft key to display a list of the LQC results meeting the selection criteria. a. To print the list of LQC test results i. Display the Options pop-up menu by pressing the right soft key. ii. Use the [down arrow navigation key] key to highlight Print List. iii. After printing is complete, the list of LQC results will again be displayed. b. To examine and/or print test results for a particular patient sample](https://usermanual.wiki/LRE-Medical-Esterline/8047000/User-Guide-1706993-Page-39.png)
![Astute140TMMeterPN:300005SRev:BAstuteMedical,Inc.20122012/03/20 40i. Use the [up and down navigation keys] to highlight the LQC result of interest. ii. Press the right soft key to display the Options pop-up menu. iii. When the Options pop-up menu is displayed, Show Details will be highlighted. Press the right soft key to select Show Details. iv. Detailed LQC results for the selected test will be displayed. To print the detailed results, press the right soft key to select Print. v. After printing is complete, press the left soft key to return to the list of patient results. EQCResults1. Press the [picture of menu button] key to display the Main Menu. 2. Using the navigation keys, highlight the Review Data icon and press the right soft key. [[Insert screen shot of Main Menu with Review Data icon highlighted] 3. When the Review Data menu is displayed, Patient Results is highlighted. Use the [down arrow navigation key] key to highlight Electronic QC Results and press the right soft key to display the Review EQC Results screen. 4. On the Review EQC Results screen, all EQC controls can be selected, a specific EQC control can be selected, or multiple results can be displayed by entering a range of dates, as follows. a. The default selection is for all EQC control results to be displayed. To display all EQC control results, press the right soft key. b. To select a specific EQC control device, use the [right and left arrow navigation keys] keys to display the desired control device and press the right soft key. c. To select EQC results falling within a range of dates: i. Use the down arrow navigation key to highlight Start Date. Use the](https://usermanual.wiki/LRE-Medical-Esterline/8047000/User-Guide-1706993-Page-40.png)
![Astute140TMMeterPN:300005SRev:BAstuteMedical,Inc.20122012/03/20 41numeric keypad or an external keyboard, if connected, to enter a start date (Note: date fields must be entered in the format specified in the default settings). ii. Use the [down arrow navigation key] key to highlight End Date and use the numeric keypad or an external keyboard, if connected, to enter an end date (Note: date fields must be entered in the format specified in the default settings). 5. Once all selection criteria are entered, press the right soft key to display a list of the EQC results meeting the selection criteria. a. To print the list of EQC test results i. Display the Options pop-up menu by pressing the right soft key. ii. Use the [down arrow navigation key] key to highlight Print List. iii. After printing is complete, the list of EQC results will again be displayed. b. To examine and/or print test results for a particular EQC result i. Use the [up and down navigation keys] to highlight the EQC result of interest. ii. Press the right soft key to display the Options pop-up menu. iii. When the Options pop-up menu is displayed, Show Details will be highlighted. Press the right soft key to select Show Details. iv. Detailed EQC results for the selected test will be displayed. To print the detailed results, press the right soft key to select Print. v. After printing is complete, press the left soft key to return to the list of patient results. SendResultstoLIS1. Press the [picture of menu button] key to display the Main Menu. 2. Using the navigation keys, highlight the Review Data icon and press the right soft key. [Insert screen shot of Main Menu with Review Data icon highlighted]](https://usermanual.wiki/LRE-Medical-Esterline/8047000/User-Guide-1706993-Page-41.png)
![Astute140TMMeterPN:300005SRev:BAstuteMedical,Inc.20122012/03/20 423. When the Review Data menu is displayed, Patient Results is highlighted. Use the [down arrow navigation key] key to highlight Send Results (LIS) and press the right soft key. 4. On the Send Results to LIS screen, results for all patients, unsent patients, all LQC, unsent LQC, all EQC, and unsent EQC may be sent to the LIS. Results for all patients will be automatically highlighted. To choose any of the other types of results to send to the LIS, use the [down arrow navigation key] key to highlight the desired results and press the right soft key. 5. Once sending to the LIS is complete, the Send Results to LIS screen will again be displayed. Repeat step 4 to send additional results to the LIS. 6. Once all desired results have been sent to the LIS, press the left soft key to return to the Review Data menu. ShutdownTo power off the Meter, toggle the power switch on the back of the Meter upwards, and the Meter should immediately shut down. CareandMaintenanceNo maintenance is required other than routine external cleaning, changing the paper, and changing the batteries. Remove batteries to reduce risk of electrical shock. ClCleaningandDecontamination](https://usermanual.wiki/LRE-Medical-Esterline/8047000/User-Guide-1706993-Page-42.png)
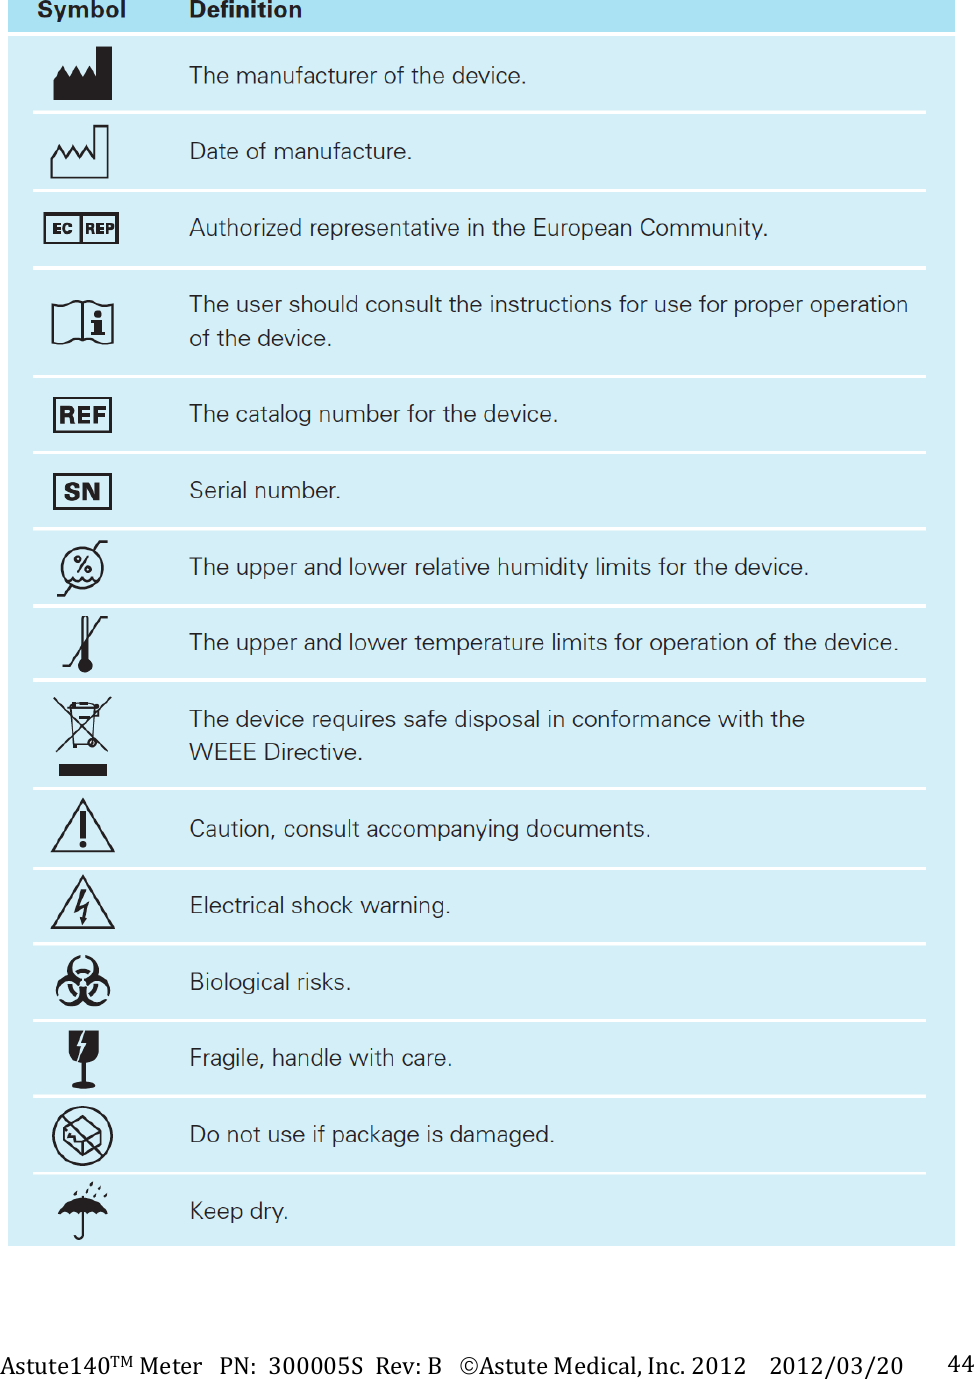
![Astute140TMMeterPN:300005SRev:BAstuteMedical,Inc.20122012/03/20 43Gently wipe only the external surface of the Meter and the inside of the Meter drawer with a soft cloth slightly dampened with disinfectant (70% alcohol or 0.5% bleach solution). Do not clean with soap or other solutions. To open the Meter drawer, press the eject button on the left side of the LCD display. [Insert photo of the eject button with label] ChangingthePaperTo change the paper in the internal printer, see instructions for “Installing and Changing the Paper” on page XX. ChangingtheBatteriesFor information on when and how to change the batteries in the Meter, see “Batteries” on page XX. DisposingoftheBatteriesIn conformance with Directive 2006/66/EC of the European Parliament and of the Council of 6 September 2006 on batteries and accumulators and waste batteries and accumulators, (also known as the EU Battery Directive), batteries are to be removed from the Asute140 Meter and disposed of or recovered separately. Do not dispose of the batteries in municipal waste; please check with your local waste disposal authorities for specific requirements for battery disposal. DisposingoftheMeterIn conformance with the WEEE (Waste Electrical and Electronic Equipment) Directive, the Meter should be considered infectious waste. Dispose of the Meter according to the Laboratory’s best practices for disposal of biohazardous waste. LabelsandSymbolsThe following table defines the symbols located on the bottom of the Meter.](https://usermanual.wiki/LRE-Medical-Esterline/8047000/User-Guide-1706993-Page-43.png)
![Astute140TMMeterPN:300005SRev:BAstuteMedical,Inc.20122012/03/20 45TroubleShootingTipsProblem Action to Take Meter will not power on When AC power is being used: 1. Ensure that the proper AC power adapter is connected correctly and securely to a power source and to the meter. 2. If the problem continues, connect the AC power adapter to a different power source 3. If the problem persists, call Astute Medical, Inc. Technical Support (for contact information, see “Contacting Astute Medical, Inc.” on p. X. When battery power is being used: 1. Disconnect the AC power adapter from the meter. 2. Ensure that the 4 AA batteries are correctly installed, with the ends of the batteries facing up according to the + and – signs diagrammed in the battery compartment (see p. X). 3. If the problem continues, replace the 4 AA batteries 4. If the problem persists, call Astute Medical, Inc. Technical Support (for contact information, see “Contacting Astute Medical, Inc.” on p. X. Test cartridge drawer is jammed Press the Eject button. Do not pull or force the drawer open or closed. Reset the meter by disconnecting the AC power adapter (or removing the AA batteries if the power adapter is not being used). Wait 30 seconds and reconnect the AC power adapter (or reinsert the batteries if the AC power adapter is not being used). If the drawer is still jammed, insert a paper clip into the small hole on the back of the meter to manually open the drawer. [Insert photo of paper clip being inserted into small hole] If the drawer still does not open, call Astute Medical, Inc. Technical Support (for contact information, see “Contacting Astute Medical, Inc.” on p. X.). Keypad and/or Power On/Off button do not respond Reset the meter by disconnecting the AC power adapter (or removing the AA batteries if the power adapter is not being used). Wait 30 seconds and reconnect the AC power adapter (or reinsert the batteries if the AC power adapter is not being used). If the keypad still does not respond, call Astute Medical, Inc. Technical Support (for contact information, see “Contacting Astute Medical, Inc.” on p. X.).](https://usermanual.wiki/LRE-Medical-Esterline/8047000/User-Guide-1706993-Page-45.png)