Light Labs L16 Camera User Manual
Light Labs Inc. Camera Users Manual
UserManual.wiki
>
Light Labs
>
L16 User Manual
Users Manual
Navigation menu
Upload a User Manual
Namespaces
Wiki Guide
HTML
PDF
Info
Views
User Manual
Discussion / Help
Navigation
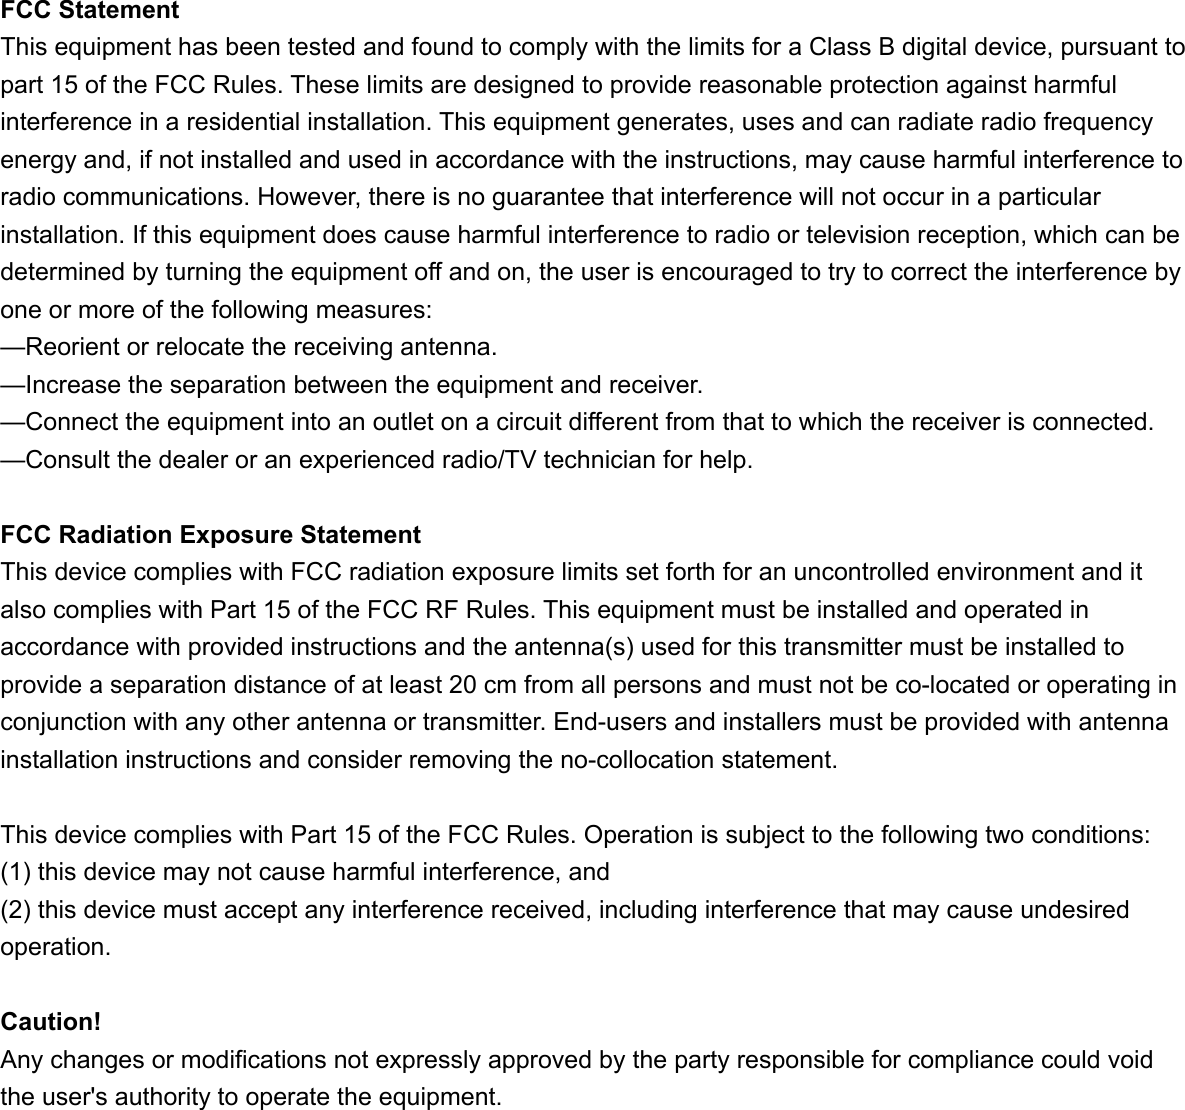
![● Connectivity settings ■Access device settings. ● While using the camera or gallery, swipe down from the top of the screen to access the Control Panel for quick access to common settings. To access the full menu, click the gear icon in the top right corner. ● From the home screen, click the settings icon to open the full device settings menu. ■ Airplane mode. ● Turn Airplane mode on or off. 1. Access the device settings menu (see above). 2. Tap the Airplane mode button [ICON] to toggle airplane mode on or off. ■Bluetooth. ●Turn Bluetooth on, pair a device. 1. Access the device settings menu (see above). 2. Tap the Bluetooth icon [ICON] to toggle Bluetooth on and open the Available Devices menu. 3. Your Light L16 will search for nearby devices. When you see the name of your device, tap it to connect. Your Light L16 will then connect with the device. ●Turn Bluetooth off. 1. Access the device settings menu (see above).](https://usermanual.wiki/Light-Labs/L16/User-Guide-3520782-Page-5.png)
![2. Tap the Bluetooth icon [ICON] to open the Available Devices menu. 3. Tap the activation switch to toggle Bluetooth off. ■Wi-Fi. ●Turn Wi-Fi on, connect to a device. 1. Access the device settings menu (see above). 2. Tap “Wi-Fi” to open the available wireless networks menu. 3. Tap the on/off switch to turn Wi-Fi on. 4. Your Light L16 will search for nearby wireless networks. When you see the name of your wireless network, tap it to connect. If the network is secured and you need a password, you'll see the Wi-Fi lock. 5. Once successfully connected, "Connected" shows under the network name. The Wi-Fi network is now a "Saved network." When in range, your Light L16 automatically connects to it, as long as Wi-Fi is turned on. ●Turn Wi-Fi off. 1. Access the device settings menu (see above). 2. Tap “Wi-Fi” to open the available wireless networks menu. 3. Tap the on/off switch to turn Wi-Fi off.](https://usermanual.wiki/Light-Labs/L16/User-Guide-3520782-Page-6.png)
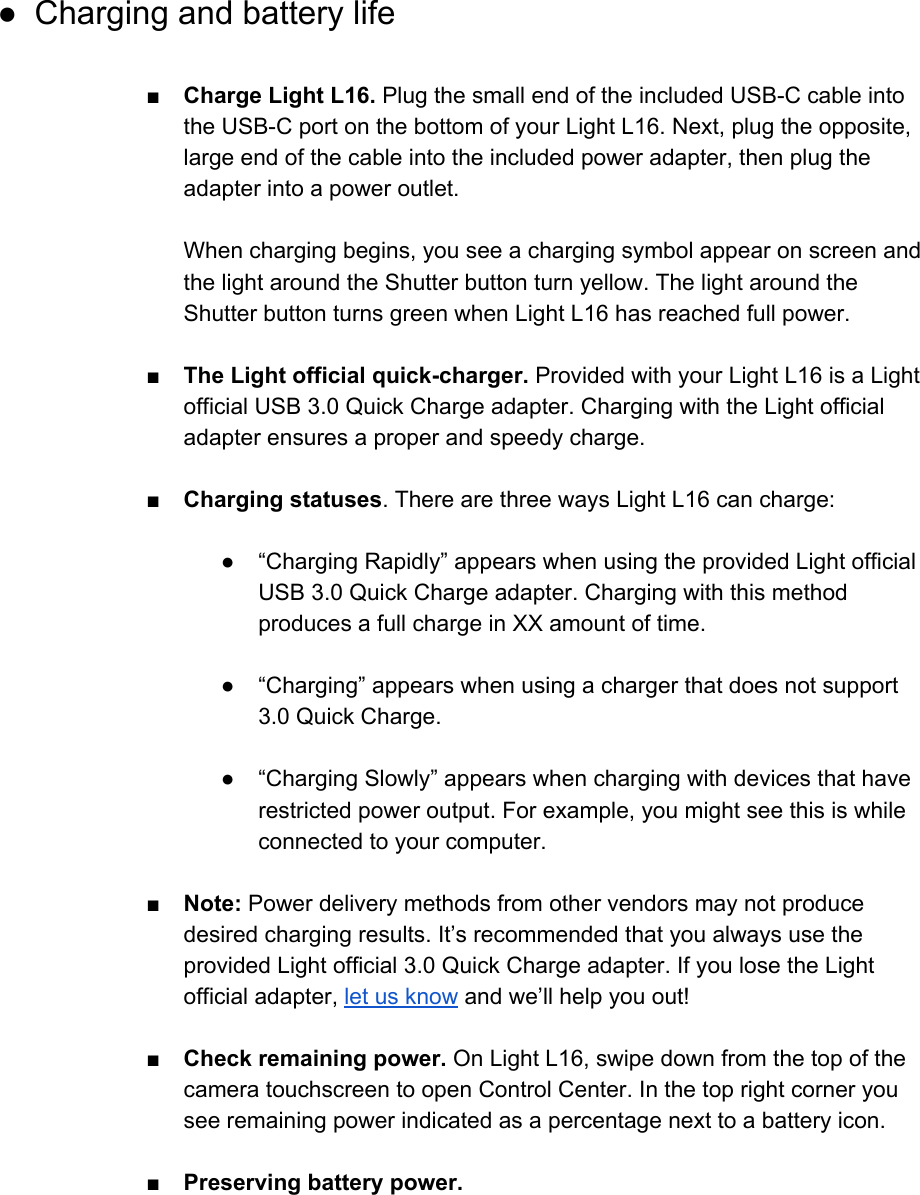
![● When not shooting, it’s best to keep your Light L16 screen off. ● If you know you won’t be using your Light L16 for an extended period of time, fully power down the camera before storing it in your Light soft case. ● Even if you are not using it, Wi-Fi can consume power. You can turn it off in the Control Center by swiping down from the top of your Light L16’s touchscreen. ■Tip: For information on Light L16’s lithium ion battery, see How To Care For Your Lithium Ion Battery [Link to help article]. ■ Low battery notification. When battery charge drops below 10 percent, Light L16 alerts you with a low battery notification.](https://usermanual.wiki/Light-Labs/L16/User-Guide-3520782-Page-8.png)
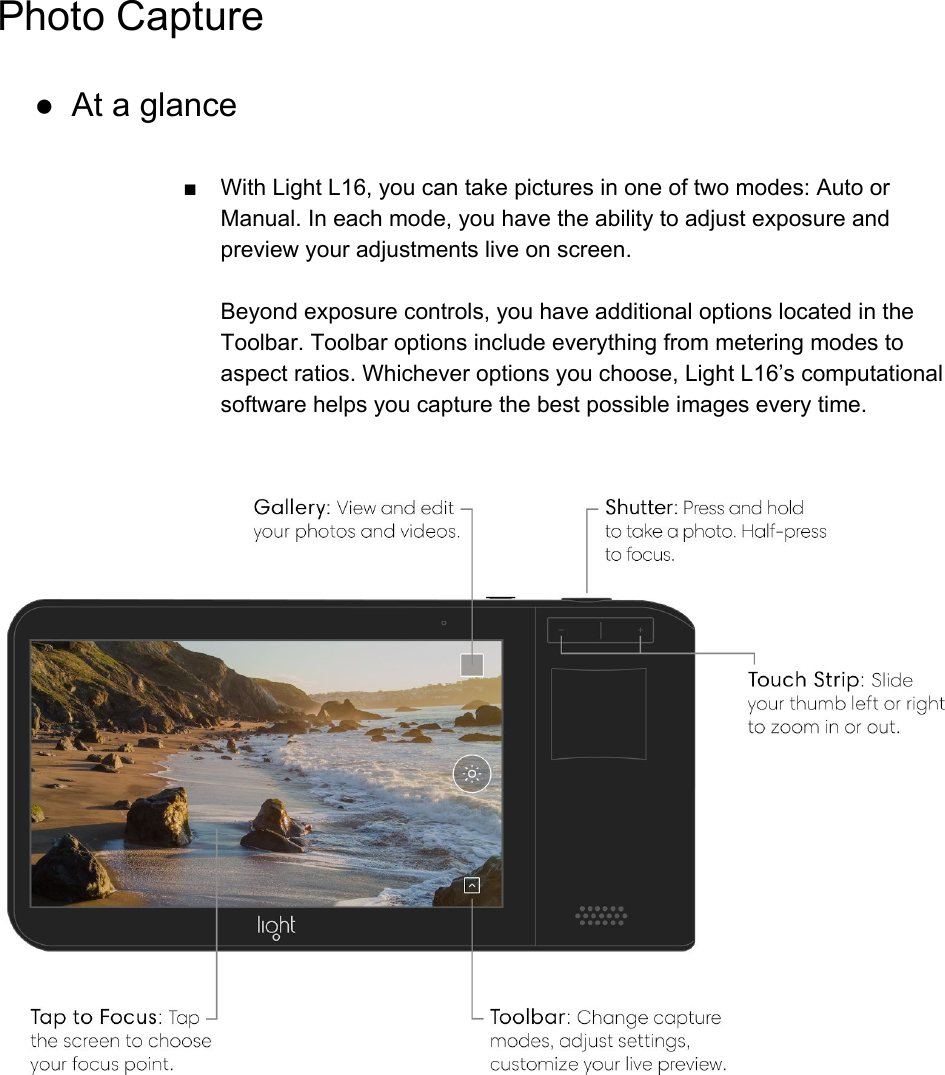
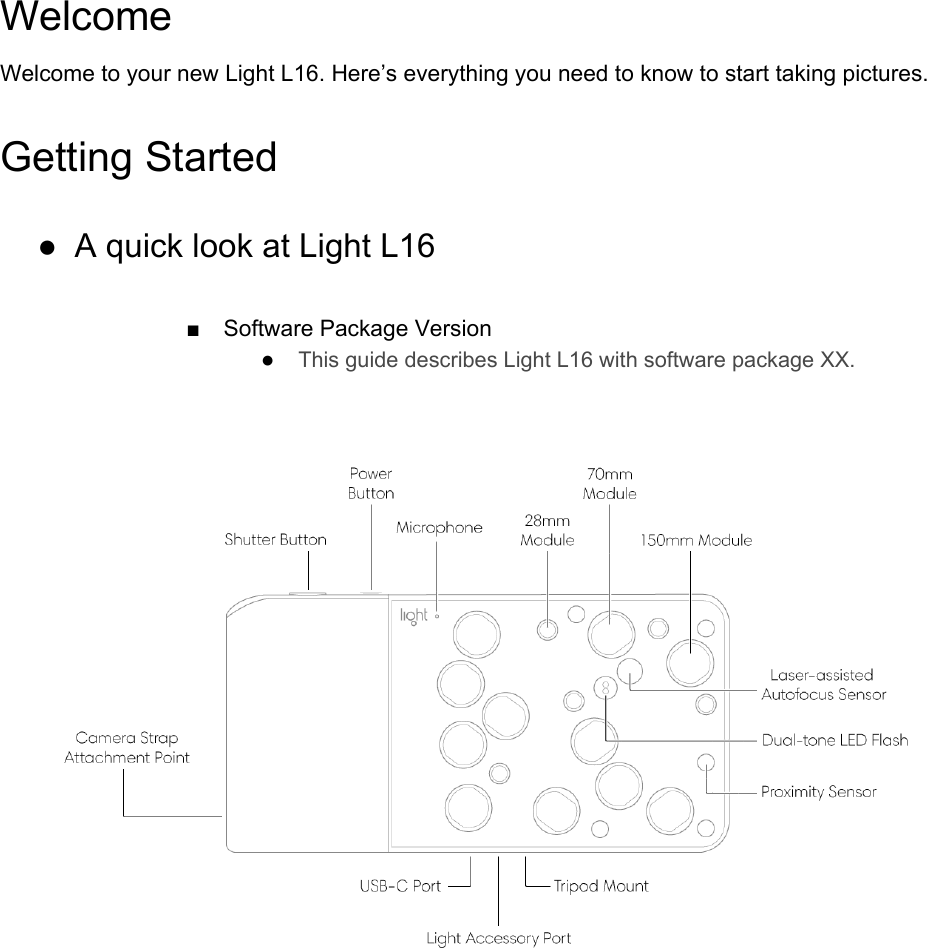
![● Take a photo ■Choose a capture mode. Tap the Toolbar button [Toolbar.png] in the bottom right corner to show the Toolbar. Above the Toolbar you see three capture mode options: Auto, Manual, and Video. Swipe up or down on the screen to highlight your preferred capture mode. When finished, tap the down arrow [Down arrow settings.png] to close the Toolbar. ■ Take a photo. There are multiple ways to take a photo with Light L16: ●Press and hold the Shutter button to take a photo with exposure automatically calculated by Light L16. For more information on exposure, see what is exposure? ● Tap on the screen to focus on your desired subject. After focus is achieved, a camera icon will appear. Tap the icon to take a photo.](https://usermanual.wiki/Light-Labs/L16/User-Guide-3520782-Page-10.png)
![For more information, see Focus. You can also press the Shutter button to take a picture after tapping to focus. ● Auto Exposure mode ■ Auto mode sets exposure (ISO and Shutter Speed) automatically. Depth of field (the amount of blur before and after your subject) for images taken with Light L16 is adjustable after your images are transferred to the Light desktop app. There is no native aperture control on Light L16 – click here to find out why! [Link to help article] ■ Adjust Exposure in Auto mode. Auto mode automatically adjusts exposure based on the scene you are capturing. If you want, you can make adjustments to the calculated exposure before taking a photo. Press and hold the Exposure button [Exposure (black).png] on the right side of the screen to open the Exposure slider. While holding, move your finger up or down to set Exposure to your desired value. As you drag up or down, you will see a live preview of your Exposures changes.](https://usermanual.wiki/Light-Labs/L16/User-Guide-3520782-Page-11.png)

![● Manual Exposure mode ■ Manual mode allows you to adjust exposure through two capture controls: ISO [ISO.png] and Shutter Speed [Shutter Speed.png] . What are ISO and Shutter Speed?. When you open Manual mode, ISO and Shutter Speed will be set to a default value based on what? ■Adjust ISO in Manual mode. Press and hold the ISO button [ISO.png] on the right side of the screen to open the ISO slider. While holding, move your finger up or down to set your desired ISO value. Learn more about ISO.](https://usermanual.wiki/Light-Labs/L16/User-Guide-3520782-Page-13.png)
![■View your current ISO value. Tap the ISO button [ISO.png] to see your last used ISO value. Or press and hold the ISO button [ICON] to open the ISO slider. Your previously used ISO value is indicated by a hollow carrot [Hollow Carrot.png] . With Capture Information turned on, you can see your ISO value in the Info bar on the left of the screen. For more information, see Capture Information. ■Adjust Shutter Speed in Manual mode. Press and hold the Shutter Speed button [Shutter Speed.png] on the right side of the screen to open the Shutter Speed slider. While holding, move your finger up or down to set your desired shutter speed value. Learn more about shutter speed.](https://usermanual.wiki/Light-Labs/L16/User-Guide-3520782-Page-14.png)
![■View your current shutter speed value. Tap the Shutter Speed button [Shutter Speed.png] to see your last used shutter speed. Or tap and hold the Shutter Speed button [Shutter Speed.png] to open the Shutter Speed slider. Your previously used shutter speed value is indicated by a hollow arrow [Hollow Carrot.png] . With Capture Information turned on, you can see your ISO value in the Info bar on the left of the screen. For more information, see Capture Information. ■Tip: If you don’t want to use Manual mode, tap the Toolbar button [Toolbar.png] in the bottom right corner to show the Toolbar. Above the Toolbar you see three capture mode options: Auto, Manual, and Video. Swipe up or down on the screen to indicate your preferred capture mode. When finished, tap the down arrow [Down arrow settings.png] to close the Toolbar.](https://usermanual.wiki/Light-Labs/L16/User-Guide-3520782-Page-15.png)
![■Note: Remember that Light L16 does not have a native aperture control. You can adjust aperture after uploading images to your computer. Click here to read more about why Light L16 doesn’t have native aperture control. [Link to help article] Find out why! ● Focus ■ Tap to focus. In Manual or Auto mode, tap your desired focus object on the touchscreen to focus the camera at that location and distance. An animated circle icon [ICON] indicates the camera is focusing and a final, blue icon [ICON] indicates that focus has been achieved. After you have tapped to focus, you can either press the Shutter button or tap the focus icon again to take a picture. ■Half-shutter press to focus. After indicating your desired focal point, you can half-press the Shutter button to start the focusing sequence again. An animated circle icon [ICON] indicates the camera is focusing and a final, blue circle icon [ICON] indicates that focus has been achieved. ■Note: Half-pressing the Shutter button will always initiate the focus sequence at your pre-selected focal point. If you want to focus outside of that point, tap to focus on your desired object. ● Zoom ■Zoom in or out. There are two ways to zoom on Light L16. ●Pinch to zoom. Place two fingers on the screen and pinch open or closed to zoom in or out. ● Zoom by tapping. Tap and hold anywhere on the screen, then move your finger up and down to zoom in or out.](https://usermanual.wiki/Light-Labs/L16/User-Guide-3520782-Page-16.png)
![● Exposure ■ Adjust Exposure in Auto mode. Auto mode automatically adjusts exposure based on the scene you are capturing. If you want, you can make adjustments to the calculated exposure before taking a photo. Press and hold the Exposure button [Exposure (black).png] on the right side of the screen to open the Exposure slider. While holding, move your finger up or down to set Exposure to your desired value. As you drag up or down, you will see a live preview of your Exposures changes. ■ Note: To adjust exposure in Manual mode, see Manual Exposure mode or ISO and Shutter Speed.](https://usermanual.wiki/Light-Labs/L16/User-Guide-3520782-Page-17.png)
![● ISO ■Adjust ISO in Manual mode. Press and hold the ISO button [ISO.png] on the right side of the screen to open the ISO slider. While holding, move your finger up or down to set your desired ISO value. Learn more about ISO. ■Note: To access ISO, switch to Manual mode. Tap the Toolbar button [Toolbar.png] in the bottom right corner to show the Toolbar. Above the Toolbar you see three capture mode options: Auto, Manual, and Video. Swipe up or down on the screen to indicate your preferred capture mode. When finished, tap the down arrow [Down arrow settings.png] to close the Toolbar. ■View your current ISO value. Tap the ISO button [ICON] to see your last used ISO value. Or press and hold the ISO button [ICON] to](https://usermanual.wiki/Light-Labs/L16/User-Guide-3520782-Page-18.png)
![open the ISO slider. Your previously used ISO value is indicated by a hollow carrot [ICON] . With Capture Information turned on, you can see your ISO value in the Info bar on the left of the screen. For more information, see Capture Information. ● Shutter Speed ■Adjust Shutter Speed (Manual mode). Press and hold the Shutter Speed button [ICON] on the right side of the screen to open the Shutter Speed slider. Move your finger up or down to set your desired shutter speed value. Learn more about shutter speed. [Link to help article] ■Note: To access Shutter Speed, switch to Manual mode. Tap the Toolbar button [Toolbar.png] in the bottom right corner to show the Toolbar. Above the Toolbar you see three capture mode options: Auto, Manual, and Video. Swipe up or down on the screen to indicate your](https://usermanual.wiki/Light-Labs/L16/User-Guide-3520782-Page-19.png)
![preferred capture mode. When finished, tap the down arrow [Down arrow settings.png] to close the Toolbar. ■View your current shutter speed value. Tap the Shutter Speed button [ICON] to see your last used shutter speed. Or tap and hold the Shutter Speed button [ICON] to open the Shutter Speed slider. Your previously used shutter speed value is indicated by a hollow arrow [ICON] . With Capture Information turned on, you can see your ISO value in the Info bar on the left of the screen. For more information, see Capture Information. ● Flash ■Choose a flash mode. Tap the Toolbar button [Toolbar.png] in the bottom right corner to show the Toolbar. Tap the Flash button [ICON] to show the the available flash options [ICON]. When finished, tap the X [ICON] to close the Flash options menu, tap the down arrow [ICON] to close the Toolbar. ●Flash On [ICON] : Fires the flash every time you take a photo. ●Flash Off [ICON] : Flash will not fire. ●Flash Auto [ICON] : Light L16 will determine if flash is necessary to provide a proper exposure.](https://usermanual.wiki/Light-Labs/L16/User-Guide-3520782-Page-20.png)
![● White Balance ■ In tricky lighting situations, you may want to control how Light L16 perceives the color of light in a scene. Light L16 has several white balance options for use in various environments. Changing your White Balance on Light L16 ■Choose a White Balance mode. Tap the Toolbar button [ICON] in the bottom right corner to show the Toolbar. Tap the White Balance button [ICON] to open the White Balance options. When finished, tap the down arrow [ICON] to close the Toolbar. ■ Note: If you have previously changed your white balance, the corresponding icon will appear in the Toolbar. Example: If you previously chose Cloudy [icon] as your white balance mode, your Toolbar will show the Cloudy White Balance icon . ■ White Balance modes. ●Auto White Balance [ICON] By default, Light L16 is set to auto white balance mode. In auto mode, Light L16 chooses a white balance based on the light coming into the camera from the scene. ●Sunny [ICON] Choose the Sunny White Balance option to adjust Light L16 for cloudy conditions.](https://usermanual.wiki/Light-Labs/L16/User-Guide-3520782-Page-21.png)
![● Cloudy [ICON] Choose the Cloudy White Balance option to adjust Light L16 for cloudy conditions. ● Shady [ICON] Choose the Shade White Balance option to adjust Light L16 for shady conditions. ● Fluorescent [ICON] Choose the Flourescent White Balance option to adjust Light L16 for shooting under Fluorescent lighting. ● Self-Timer ■ Turn on the Self-Timer. Tap the Toolbar button [Toolbar.png] in the bottom right corner to show the Toolbar. Tap the Self-Timer button [ICON] to show the the available self-timer options: 3, 5, 10, or 20 seconds. When finished, tap the X [ICON] to close the Self-Timer options menu, tap the down arrow [Down arrow settings.png] to close the Toolbar.](https://usermanual.wiki/Light-Labs/L16/User-Guide-3520782-Page-22.png)
![● Capture information ■ Turning on Light L16’s Capture Information allows you to view important information about your current capture settings including shutter speed, ISO, focal length, and more. ■ Turn on Capture Information. Tap the Toolbar button [Toolbar.png] in the bottom right corner to show the Toolbar. Tap the Capture Information button [ICON] to show toggle the Capture Information bar on and off. When finished, tap the down arrow [Down arrow settings.png] to close the Toolbar](https://usermanual.wiki/Light-Labs/L16/User-Guide-3520782-Page-23.png)
![● Grid ■ To display grid lines over Light L16’s live preview, Tap the Toolbar button [Toolbar.png] in the bottom right corner to show the Toolbar. Tap the Grid button to show the available grid options. ■ Grid options. ●Thirds The Thirds grid [ICON] divides the screen into a 3x3 grid of equal size sections. This grid helps photographers who prefer to follow the Rule of Thirds when composing. ●Golden Ratio The Golden Ratio grid divides the screen into sections based on the golden ratio. This grid helps photographers who prefer to follow the Golden Rule when composing. ● Crosshairs The Crosshairs grid divides the screen into 4 equal sections by intersecting two lines in the very middle. This grid helps photographers trying to frame their subject squarely in the middle.](https://usermanual.wiki/Light-Labs/L16/User-Guide-3520782-Page-24.png)
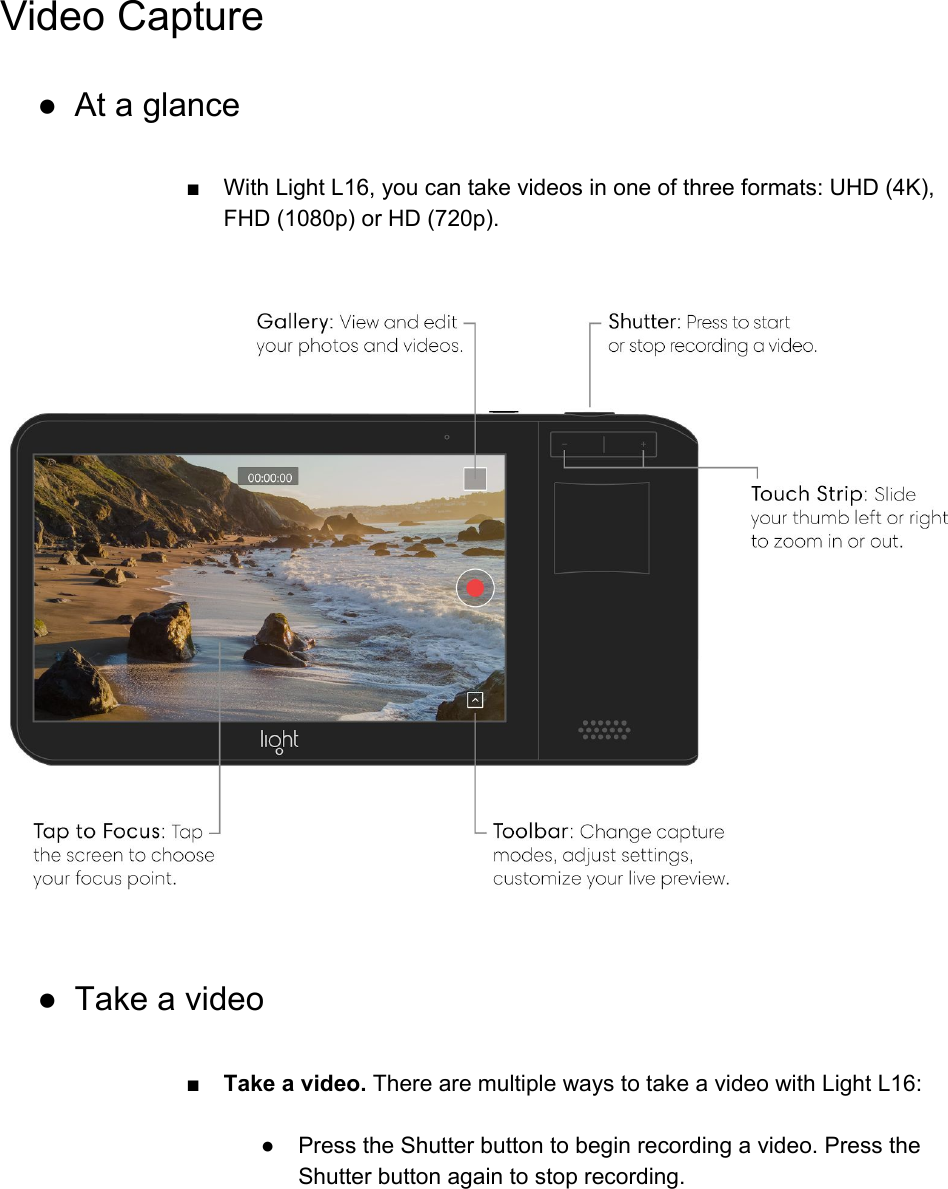
![● Tap the Record button [ICON] to begin recording a video. The button will turn from a red circle to a red square. Tap the End Recording button [ICON] to stop recording. ● Access Video mode ■Switch to video mode. Tap the Toolbar button [Toolbar.png] in the bottom right corner to show the Toolbar. Above the Toolbar you see three capture mode options: Auto, Manual, and Video. Swipe to select Video mode. With “video” highlighted, tap the down arrow [Down arrow settings.png] to close the Toolbar.](https://usermanual.wiki/Light-Labs/L16/User-Guide-3520782-Page-26.png)
![Gallery ● View photos and videos ■View your photos. From the any capture mode, tap the thumbnail icon in the upper-right corner to access the gallery. Swipe right to see your previous photos, or tap the collage icon [ICON] in the upper-left corner to see all of your photos. ■Filter your photos. From the collage view, tap “all” in the upper-left corner to change which images are displayed. There are several filtering options: ● All - View all of your photos and videos. ● Star - View only your starred (favorited) photos and videos. ● Photo - View only photos, no videos. ● Video - View only videos, no photos. ● Deleted - View photos and videos you have recently deleted.](https://usermanual.wiki/Light-Labs/L16/User-Guide-3520782-Page-27.png)
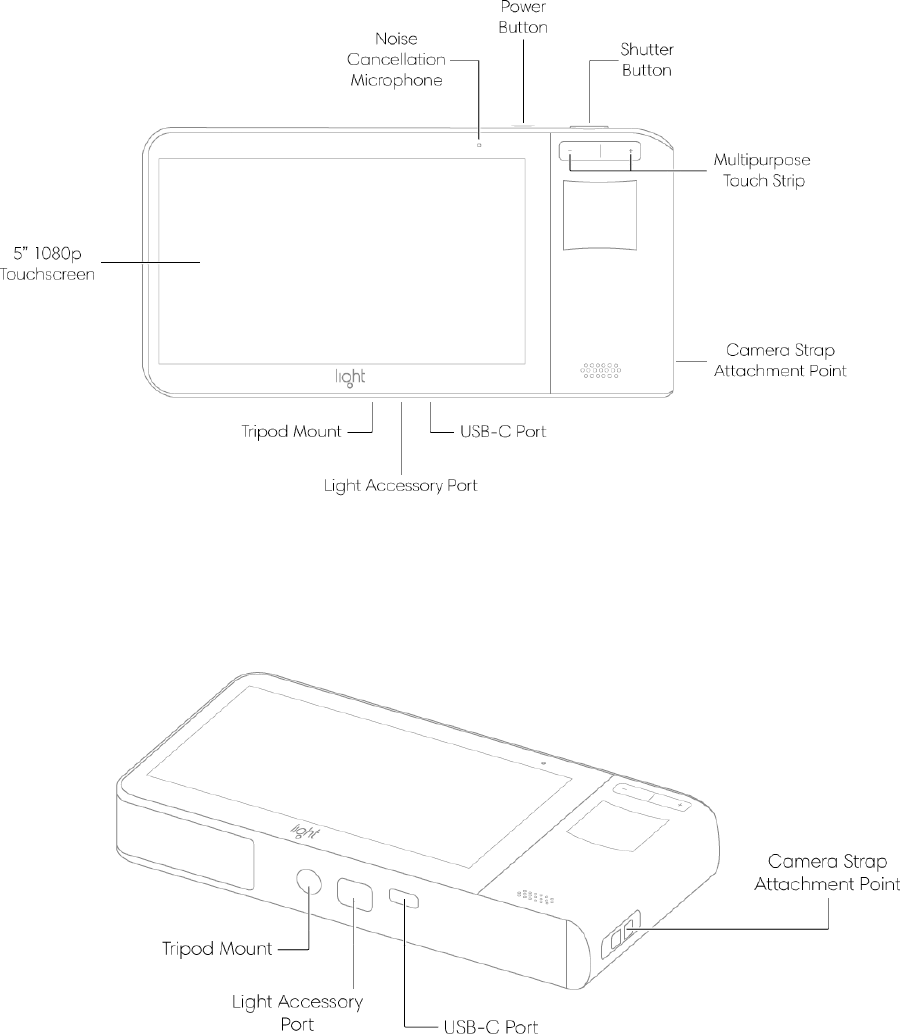
![Safety, Handling and Support ● Care for Light L16 ■ Storing Light L16. Included with your Light L16 is a soft case for storing the camera on the go. The outside of the case is made of durable eco-yarn to protect the camera when being stored in your pocket or bag. The inside of the case is made of microfiber cloth to help clean your Light L16 when putting the camera away and when pulling it out. ■ How to clean Light L16: ●Inside of the Light L16 soft case is an attached microfiber cleaning cloth. To access the cloth, put your finger inside the case and pull straight out. The cloth stays attached to the case while you clean the surface of the camera. ● Light L16’s glass surfaces are are made with Gorilla Glass. To clean the front or back surface of Light L16, wipe in circular motions with a lint-free, nonabrasive cloth. If necessary, you can also lightly dampen the cloth with fresh water. ■ How not to care for Light L16: ●It is best not to clean Light L16 while it’s charging. ●Do not dry Light L16 using any external heat source. ●Do not use cleaning products or compressed air when cleaning your Light L16. ● Customer support ■ For more help, feel free to contact us at hello@light.co, or take a look at our support page [Link to help article].](https://usermanual.wiki/Light-Labs/L16/User-Guide-3520782-Page-28.png)