MARUSYS MOMMYFRAME Digital Picture Frame User Manual
MARUSYS Co., Ltd. Digital Picture Frame
UserManual.wiki
>
MARUSYS
>
MOMMYFRAME User Manual
User Manual
Navigation menu
Upload a User Manual
Namespaces
Wiki Guide
HTML
PDF
Info
Views
User Manual
Discussion / Help
Navigation
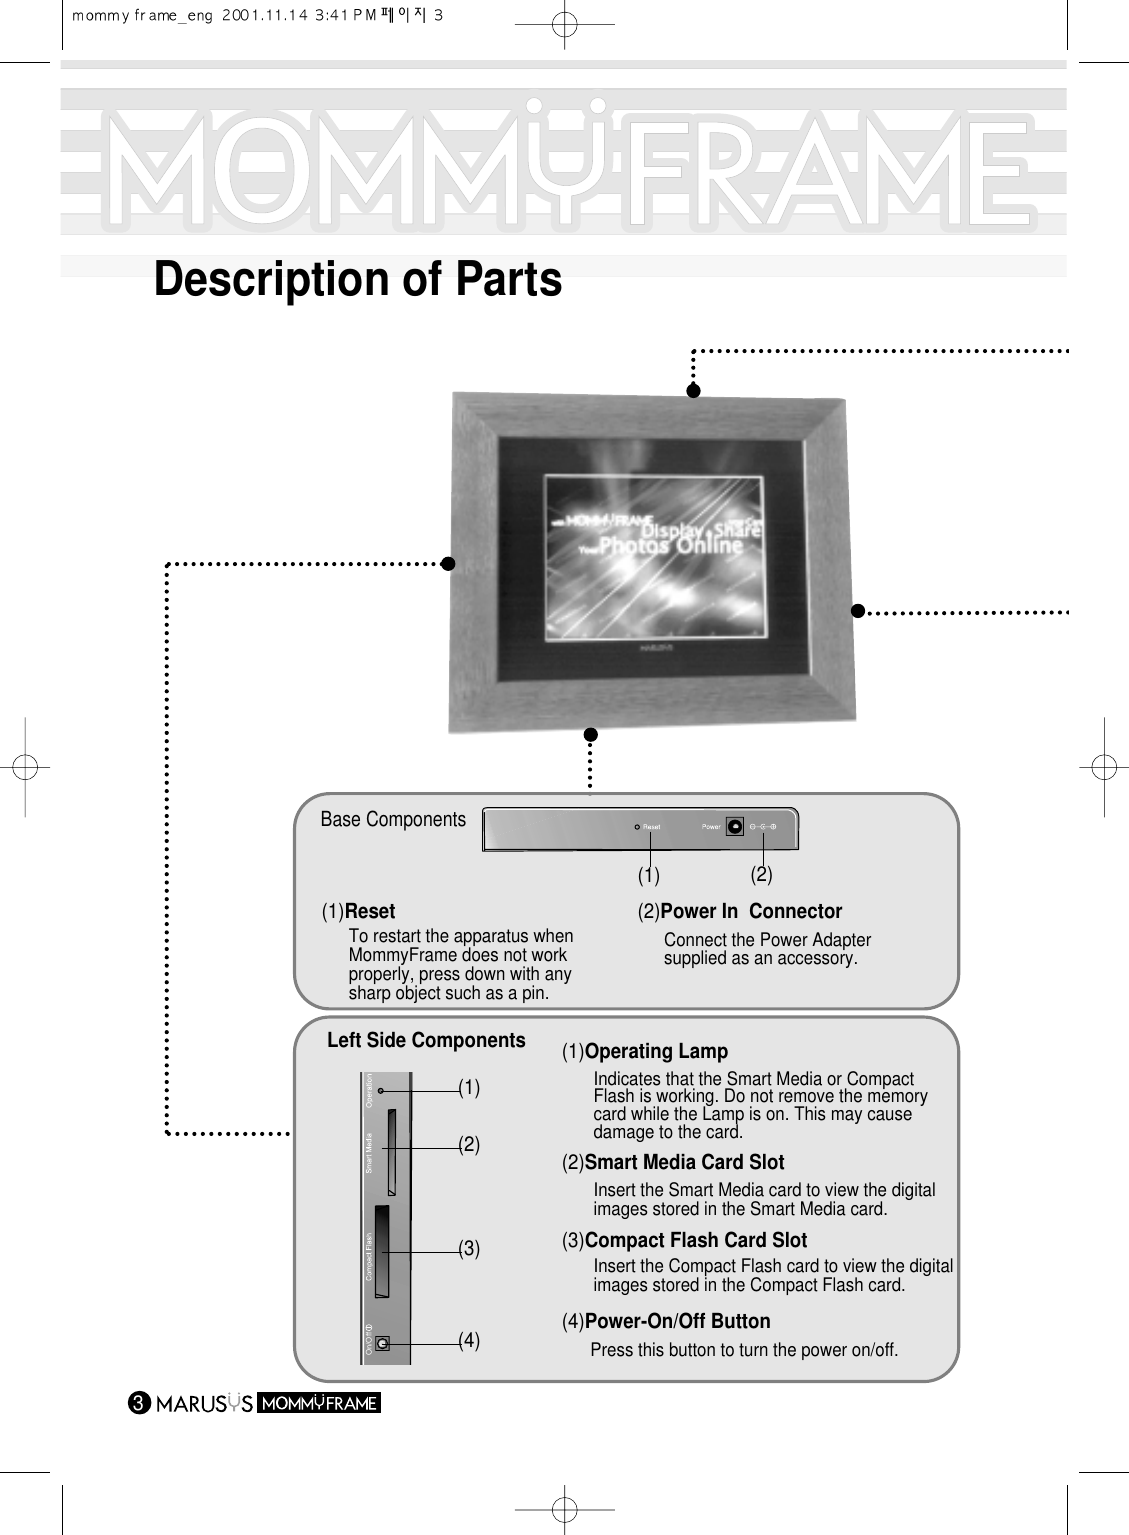
![4Top Components(1) Sleep Button Press this button to put MommyFrame into sleep mode. Restarting from sleep mode won change [MommyFrame]default settings.Press this button for the [MommyFrame] Menu to appear.If you press this button again, the Menu will disappear.(2) Menu Button(3) Move Forward Button Functions as a [Move to Next Image] button in Slideshow.Functions as a [Move between Items] button in the Menuscreen.(4) Stop/Play Button Functions as a [Stop/Play] button in Slideshow.Functions as a [Select] or [Change Numbers] button in theMenu screen.(5) Move BackwardButton Functions as a [Move to Previous Image] button in theSlideshow. Functions as a [Move between Items] button in theMenu screen.(6) Mode Switch Button Pressing this button, switches the Mode between [Slideshow]---> [Channel] and [Clock] in that order.(M10WM, M10WL)For the M8W Model, the Mode switches between [Slideshow]and [Help].(1) (2) (3) (4) (5) (6)Right Side Components(1)(2)(3)(1) USB Connector(2) Ethernet ConnectorConnect an RJ45 jack when you purchase theMommyFrame Ethernet version.Before connecting to your PC using the USB cable,install the MommyFrame USB software.(3) Modem ConnectorConnect a modem-connecting jack when youpurchase the MommyFrame Modem version.](https://usermanual.wiki/MARUSYS/MOMMYFRAME/User-Guide-244157-Page-6.png)

![Making Use of the Menu6The MommyFrame Menu allows you to set up the apparatus according to your requirements.11If you press the Menu Button on the top of the MommyFrame, the menu items will be displayed on the screen. If you press this button again, the items will disappear. Image MenuCopy ImagesDelete ImagesRotate ImagesSelect ImagesImage MenuBack Light ControlAuto On / OffAdvanced SettingsUpadate NowSlide Settings22Press the Move Forward ( )/or Backward ( ) buttons on the top of the MommyFrame to move for each Menu item.33Press the Select ( )button on the top of the MommyFrame to select an item.Image Settings MenuThis menu allows you to set images in[MommyFrame].Frame Settings MenuThis menu allows you to set [MommyFrame]and the connections to external devices.-.The M8W Model does not support theAuto On/Off, Advanced Settings, andUpdate Now features.](https://usermanual.wiki/MARUSYS/MOMMYFRAME/User-Guide-244157-Page-8.png)
![Setting up the Current Time711Press the Menu button.-.The Menu will appear.Image MenuCopy ImagesDelete ImagesRotate ImagesSelect ImagesImage MenuBack Light ControlAuto On / OffAdvanced SettingsUpadate NowSlide SettingsSetting timeSet the regular update timeSet the network optionsCancelAdvanced Settings33Press the Move Forward ( ) button to move to the [Set the time] item.Press the Select ( ) button.-.The "Set the time" screen will appear.-.MommyFrame for Modems' does not support the Network Setting Item.-.MommyFrame for Ethernet' does not support the Dial-Up Number Setting Item.22Press the Move Forward ( ) button to move to the [Advanced Settings] item.Press the Select ( ) button.Do you want to set the time automatically? YesNoCancelOKSet the time1 Press the Move Forward ( )button to move to the [Yes] item.Press the Select ( ) button.-.MommyFrame will automatically connect to theserver to retrieve the current "Mean Time".-.To set up the current time automatically, be sure to connect MommyFrame to the network.Setting up the Current Time AutomaticallyM10WL/M10WM](https://usermanual.wiki/MARUSYS/MOMMYFRAME/User-Guide-244157-Page-9.png)
![81 Press the Move Forward ( ) button to move to the [No] item.Press the Select ( ) button.-.The "Set the time manually" message will appear.Do you want to set the time automatically? YesSet the time manually. (YYYY MM DD)No2001 . 01 . 0109 : 30 AMCancelOKSet the timeDo you want to set the time automatically? YesSet the time manually. (YYYY MM DD)No2001 . 09 . 1710 : 30 AMCancelOKSet the time2 Press the Select and Move buttons to set up the [Year, Month, Day, Hour, Minute].-.Press the Select button to increase the number.-.Press the Move button to move between the items.[Year]-->[Month]-->[Day]-->[Hour]-->[Minute]-->[AM/PM]Setting up the Current Time Manually44 Press the Move Forward ( ) button to move to the [OK] item. Press the Select ( ) button.The current time setting has been completed.Checking the Current TimePress the Mode button on the top of theMommyFrame until the [Clock] mode screenappears.Press the Mode button to switch between[Slideshow] -->[Channel]-->[Clock].M10WL/M10WM](https://usermanual.wiki/MARUSYS/MOMMYFRAME/User-Guide-244157-Page-10.png)
![Setting up the Automatic On/Off Time911Press the Menu button.In the following example, we will set up the On/Off Time to 6:30 AM and 12:00 PM, respectively.Image MenuCopy ImagesDelete ImagesRotate ImagesSelect ImagesImage MenuBack Light ControlAuto On / OffAdvanced SettingsUpadate NowSlide SettingsThe ’Auto On / Off ’ is running.Do you want to run ’Auto On / Off ’ ?Set the ’Frame-Auto-On Time’ 09 : 00 AM11 : 30 PMSet the ’Frame-Auto-Off Time’YesNoCancelOKAuto On / Off33Press the Move Forward ( ) button to move to the [Yes] item.Press the Select ( ) button.22Press the Move Forward ( ) button to move to the [Auto On/Off]item.Press the Select ( ) button.-.The ["Auto On/Off"] screen will appear.44Press the Move Forward ( ) button to move to the [Hour] item.Press the Select ( ) button to adjust the hour to [06].-.Pressing the Select button increases thehour.Set the ’Frame-Auto-On Time’ 06 : 00 AM01 : 00 AMSet the ’Frame-Auto-Off Time’M10WL/M10WM](https://usermanual.wiki/MARUSYS/MOMMYFRAME/User-Guide-244157-Page-11.png)
![10The ’Auto On / Off ’ is running.Do you want to run ’Auto On / Off ’ ?Set the ’Frame-Auto-On Time’ 06 : 30 AM12 : 00 PMSet the ’Frame-Auto-Off Time’YesNoCancelOKAuto On / OffSet the ’Frame-Auto-On Time’ 06 : 30 AM01 : 00 AMSet the ’Frame-Auto-Off Time’66Press the Move Forward ( ) button to move to the [AM, PM] item.Press the Select ( ) button to select [AM].55Press the Move Forward ( ) button to move to the [Minute] item.Press the Select ( ) button to adjust the minutes to [30].Follow the steps in "Setting up the Automatic On Time".77Press the Move Forward ( ) button to move to the [OK] item.If you press the Select ( ) button, the set time will be automatically saved.If you select the Cancel item, you will return to the first menu.Set the ’Frame-Auto-On Time’ 06 : 30 AM01 : 00 AMSet the ’Frame-Auto-Off Time’Setting up the Automatic Off Time](https://usermanual.wiki/MARUSYS/MOMMYFRAME/User-Guide-244157-Page-12.png)
![Setting up the Dial-Up Number1111Press the Menu button.-.The Menu will appear.Image MenuCopy ImagesDelete ImagesRotate ImagesSelect ImagesImage MenuBack Light ControlAuto On / OffAdvanced SettingsUpadate NowSlide SettingsSetting timeSet the regular update timeSet Dialing OptionsCancelAdvanced Settings33Press the Move Forward ( ) button to move to the [Set Dialing Options] item.Press the Select ( ) button.-.The "Set Dialing Options" screen will appear.22Press the Move Forward ( ) button to move to the [Advanced Settings] item.Press the Select ( ) button.-.The Advanced Settings screen will appear.M10WM](https://usermanual.wiki/MARUSYS/MOMMYFRAME/User-Guide-244157-Page-13.png)
![1255Press the Move Forward ( ) button to move to the [OK] item.Press the Select ( ) button.-.Now, the Dial-Up number setting has been completed.If you select Cancel, you will return to the first menu.44Setting up your extension number.Press the Select ( ) button to select one from No Ext. # -->Ext. # 9 -->Ext. # 0.Press the Move Forward ( ) button and [OK] to save the settings-.The extension number refers to having to press the number 9 or 0 before making an external phone call for example from within a switchboard environment. For a normal phone, select the No Ext. # item.](https://usermanual.wiki/MARUSYS/MOMMYFRAME/User-Guide-244157-Page-14.png)
![Setting up the Network1311 Press the Menu button.-.The Menu will appear.Image MenuCopy ImagesDelete ImagesRotate ImagesSelect ImagesImage MenuBack Light ControlAuto On / OffAdvanced SettingsUpadate NowSlide SettingsSetting timeSet the regular update timeSet Dialing OptionsCancelAdvanced Settings33Press the Move Forward ( ) button move to the [Set the networkoptions] item.Press the Select ( ) button.-.The "Set the network options" screen will appear.22Press the Move Forward ( ) button to move to [Advanced Settings].Press the Select ( ) button.-.The "Advanced Settings" screen will appear.M10WL](https://usermanual.wiki/MARUSYS/MOMMYFRAME/User-Guide-244157-Page-15.png)
![1444Press the Select and the Movebuttons to set up the [IP Address, Subnet Mask, Gateway, DNS].-.Press the Select button to increase the value for each item.-.Press the Move button to move to each item.Set the network optionsOK CancelNetwork Settings55Press the Move Forward ( ) button to move to the [OK] item.Press the Select ( ) button.-.Now, the network setting has been completed.-.Select the [Cancel] to move to the first menu.-.Please contact your network administrator for the IP Address.](https://usermanual.wiki/MARUSYS/MOMMYFRAME/User-Guide-244157-Page-16.png)
![15Connecting to the SeverConnecting to the Server Automatically11Press the Menu button.-.The Menu items will appear.Image MenuCopy ImagesDelete ImagesRotate ImagesSelect ImagesImage MenuBack Light ControlAuto On / OffAdvanced SettingsUpadate NowSlide SettingsSetting timeSet the regular update timeSet the network optionsCancelAdvanced Settings33Press the Move Forward ( ) button to move to the [Set the regular update time] item.Press the Select ( ) button.-.The "Set the regular update time" screenwill appear.22Press the Move Forward ( ) button to move to the [Advanced Settings] item.Press the Select ( ) button.-.The "Advanced Settings" screen will appear.You can enable MommyFrame to connect to the server automatically at a time set in the [Set theregular update time] menu.M10WL/M10WM](https://usermanual.wiki/MARUSYS/MOMMYFRAME/User-Guide-244157-Page-17.png)
![1644Press the Select ( ) button to select the Server Connecting Time: [Disable/Everyday/Every Two days/Every Three days]-.Whenever you press the Select button, it switches between Disable --->Everyday -->Every Two days -->Everyday Three days, in that order.Set the regular update time.Disable 06 : 00 AMCancelOKSet the regular update time55Press the Move Forward ( ) button to move to the [Hour] item.Press the Select ( ) button to select your server connecting [Hour].77Press the Move Forward ( ) button to move to the [AM/PM] item.Press the Select ( ) button to select your preference.Set the regular update time.Everyday 10 : 30 AMCancelOKSet the regular update time66Press the Move Forward ( ) button to move to the [Minute] item.Press the Select ( ) button to select your server connecting [Minute].88Press the Move Forward ( ) button to move to [OK].Press the Select ( ) button to complete the setup.-.Select Cancel to return to the first menu.](https://usermanual.wiki/MARUSYS/MOMMYFRAME/User-Guide-244157-Page-18.png)
![Connecting to the Server17Connecting to the Server Manually11Press the Menu button.-.The Menu items will appear.Image MenuCopy ImagesDelete ImagesRotate ImagesSelect ImagesImage MenuBack Light ControlAuto On / OffAdvanced SettingsUpadate NowSlide SettingsDo you want to update now?CancelOKUpdate Now33Press the Move Forward ( ) button to move to [OK].Press the Select ( ) button.-.The "Getting 13 Images...." message will appear at the center of the screen.A new image will appear after connecting to the server.-.For more information about the server connection, see Page 34 in which related messages are listed.If you press the Select button while connecting to the server, the connection is canceled.22Press the Move Forward ( ) button to select the [Update Now] item.Press the Select ( ) button.-.The "Update Now" screen will appear.M10WL/M10WM](https://usermanual.wiki/MARUSYS/MOMMYFRAME/User-Guide-244157-Page-19.png)
![Selecting ImagesYou can select images to be displayed in MommyFrame.1811Press the Menu button.-.The Menu items will appear.Image MenuCopy ImagesDelete ImagesRotate ImagesSelect ImagesImage MenuBack Light ControlAuto On / OffAdvanced SettingsUpadate NowSlide SettingsSelect Images to display.The ’O’ marked Images will be displayed.Select ImagesOKPrevious PageNext Page Cancel33Press the Move Forward ( )/Move Backward ( ) buttons to move to the image that you want todisplay.Press the Select ( ) button.-.The selected image will be marked with an "O".You can continue to select another image.22Press the Move Forward ( ) button to the [Select Images] item.Press the Select ( ) button.-.The "Select Images" screen will appear.44Press the Move Forward ( ) button to move to [OK]. Then, press the Select ( ) button to display the image in MommyFrame.-.Select [Cancel] to return to the previous menu.](https://usermanual.wiki/MARUSYS/MOMMYFRAME/User-Guide-244157-Page-20.png)
![Copying ImagesYou can copy the images stored in a Smart Media or Compact Flash card to MommyFrame.Before copying the images, first insert the Smart Media or Compact Flash card into the appropriateslot in the MommyFrame.1911Press the Menu button.-.The Menu items will appear.Image MenuDelete ImagesRotate ImagesSelect ImagesImage MenuBack Light ControlAuto On / OffAdvanced SettingsUpadate NowSlide SettingsCopy ImagesCopy ImagesSelect Images to copy.The ’ ’ marked Images will be copied.OKPrevious PageNext PageCancel22Press the Move Forward ( ) button to move to the [Copy Images] item.Press the Select ( ) button.-.The "Copy Images" screen will appear.33Press the Move Forward ( )/ Move Backward ( ) buttons to move to the image that you want tocopy.Press the Select ( ) button.-.The images stored in Smart Media are indicated with an "S", and the ones in Compact Flash with a "C".-.The images that are to be displayed in MommyFrame will be copied.You can continue to select other images to copy.44Press the Move Forward ( ) button to move to [OK]. Then, pressthe Select ( ) button to select an image to be displayed in MommyFrame.-.Select [Cancel] to return to the previous menu.-.Do not remove the cards while the Operating lamp is on. This may cause damage to the cards. -.When MommyFrame does not have enough disk space, you can not copy images. In this case, remove existing images and try again.](https://usermanual.wiki/MARUSYS/MOMMYFRAME/User-Guide-244157-Page-21.png)
![Deleting ImagesYou can delete images from MommyFrame.It is impossible to retrieve deleted images after they have been deleted.2011Press the Menu button.-.The Menu items will appear.Image MenuDelete ImagesRotate ImagesSelect ImagesImage MenuBack Light ControlAuto On / OffAdvanced SettingsUpadate NowSlide SettingsCopy ImagesDelect ImagesSelect Images to Delete.The ’X’ marked Images will be deleted.OKPrevious PageNext Page Cancel22Press the Move Forward ( ) button to move to [Delete Images] item.Press the Select ( ) button.-.The "Delete Images" screen will appear.33Press the Move Forward ( )/Move Backward ( ) buttons to move to the image that you want to delete.Press the Select ( ) button.-.The selected image will be marked with an "X".You can continue to select another image to delete.44Press the Move Forward ( ) button to move to [OK]. Then, press the Select ( ) button to delete the image from MommyFrame.-.Select [Cancel] to return to the previous menu.](https://usermanual.wiki/MARUSYS/MOMMYFRAME/User-Guide-244157-Page-22.png)
![Rotating ImagesYou can rotate images to be displayed in MommyFrame.2111Press the Menu button.-.The Menu items will appear.Image MenuDelete ImagesRotate ImagesSelect ImagesImage MenuBack Light ControlAuto On / OffAdvanced SettingsUpadate NowSlide SettingsCopy ImagesRotate ImagesSelect Images to Rotate.The Image will be rotated an angle of 90 degrees clockwise.OKPrevious PageNext PageCancel22Press the Move Forward ( ) button to move to the [Rotate Images] item.Press the Select ( ) button.-.The "Rotate Images" screen will appear.33 Press the Move Forward( )/Move Backward ( ) buttons to move to the image that you want to rotate.44 Press the Select ( ) button.-.Pressing the Select button, will cause the image to rotate 90 clockwise.Continue pressing the Select button until the image is in the desired position.Repeat steps 3 and 4 to rotate another image.55Press the Move Forward ( ) button to move to [OK]. Then, press the Select ( ) button to rotate the image in MommyFrame.-.Select [Cancel] to return to the previous menu.](https://usermanual.wiki/MARUSYS/MOMMYFRAME/User-Guide-244157-Page-23.png)
![Setting up the Slide IntervalYou can set the interval at which MommyFrame displays images.2211 Press the Menu button.-.The Menu items will appear.Image MenuDelete ImagesRotate ImagesSelect ImagesImage MenuBack Light ControlAuto On / OffAdvanced SettingsUpadate NowSlide SettingsCopy ImagesSlide Interval SettingSlide Transition Effect SettingCancelSlide SettingsStop5 Sec.10 Sec.20 Sec.1 Min.10 Min.1 Hour1 DaySelect an Interval of Each SlideCancelSlide Interval22Press the Move Forward ( ) button to move to the [Slide Settings] item.Press the Select ( ) button.-.The "Slide Settings" screen will appear.33Press the Move Forward ( ) button to move to the [Slide Interval Setting] item.Press the Select ( ) button.-.The "Slide Interval Setting" screen will appear.44Press the Move Forward ( ) button to move to the desired time setting.Press the Select ( ) button.-.The Slide interval setting has been completed.Select [Cancel] to return to the first menu.](https://usermanual.wiki/MARUSYS/MOMMYFRAME/User-Guide-244157-Page-24.png)
![Setting up the Slide Transition Effect2311Press the Menu button.-.The Menu items will appear.Image MenuDelete ImagesRotate ImagesSelect ImagesImage MenuBack Light ControlAuto On / OffAdvanced SettingsUpadate NowSlide SettingsCopy ImagesSlide Interval SettingSlide Transition Effect SettingCancelSlide SettingsSelect a Transition of Slide ShowNoneTop to Bottom Bottom to Top Dot DissolveCenter Out Center InCancelRandomLeft to Right Right to LeftSlide Effect22Press the Move Forward ( ) button to move to the [Slide Settings] item.Press the Select ( ) button.-.The "Slide Settings" screen will appear.33Press the Move Forward ( ) button to move to the [Slide Transition Effect Settings] item.Press the Select ( ) button.-.The "Slide Transition Effect Settings" screen will appear.44Press the Move Forward ( ) button to move to the [Slide Effect] item that you wish to select.Press the Select ( ) button.-.The Slide Transition Effect setting has been completed.Select [Cancel] to return to the first menu.](https://usermanual.wiki/MARUSYS/MOMMYFRAME/User-Guide-244157-Page-25.png)
![Adjusting Back Light ControlYou can adjust the LCD brightness.2411Press the Menu button.-.The Menu items will appear.Image MenuDelete ImagesRotate ImagesSelect ImagesImage MenuBack Light ControlAuto On / OffAdvanced SettingsUpadate NowSlide SettingsCopy ImagesBack Light ControlSelect the Back Light Brightness BrightestBrighterBrightNormalDarkDarkerDarkestCancel22Press the Move Forward ( ) button to move to the [Back Light Control] item.Press the Select ( ) button.-.The "Back Light Control" screen will appear.33Press the Move Forward ( )/Move Backward ( ) buttons to move to the desired Screen Brightness setting.Press the Select ( ) button.-.The Back Light Control Setting has been completed.Select [Cancel] to return to the first menu.](https://usermanual.wiki/MARUSYS/MOMMYFRAME/User-Guide-244157-Page-26.png)
![Connecting MommyFrame Server andRegistering Your ProductRegistration and access is available for all models of MommyFrame, but some online services, such as imagetransmission to MommyFrame and channel services, are only available for the M10WM and the M10WL.2511Visit MommyFrame website at http://www.mommyframe.com-. MommyFrame website at http://www.mommyframe.com22 Click on the Signup button and fill out the form.-.For the frame ID, enter the serial number on the back of your product.The MommyFrame server will identify your frame with this number.33Click the [Register] button to complete your registration.](https://usermanual.wiki/MARUSYS/MOMMYFRAME/User-Guide-244157-Page-27.png)
![Guide on Server Uses2611Enter your ID and password and click the Login button.-.The MommyFrame main page will appear.22Click the desired menu item to enter the appropriate menu.[My Albums]View your photo albums.You can upload, edit and delete your imagesas well as insert text into them. In addition,you can exchange images between yourfriends.[Channel]Enjoy various channel services, such asNews, Entertainment, Education and Arts.These are updated daily.MommyFrame will automatically connect tothe Homepage and download your chosenchannel images.[Personal Information Update] Update your personal information in this section.[Album Management] Create, delete and manage your photo album.[Manage Friend Lists] Find and make friends. You can also authorizethem as online friends.[Bulletin Board] This is for customer support. For any questionsand comments to Marusys, please use thisBulletin Board.](https://usermanual.wiki/MARUSYS/MOMMYFRAME/User-Guide-244157-Page-28.png)
![Uploading Photos to the Server2711Enter your ID and password and click the Login button.-.The MommyFrame main page will appear.33Select Main Album.-. Allocated spaces for your photos will appear for you to upload up to 20 photos.-.If you select the Album Management menu on the top of the page, the (Managing Albums)screen will appear for you to create a new album or delete the existing one.-.To create a new album, enter an album title(e.g., Car, Wedding, etc.) and click [Create] from the Album Management menu.44 Click the [Add Images] button.-. A new window will popup for you to upload your photos.55Click the [Browse] button to select an image file on your computer and click the [Upload Image] button.-. The image screen will appear and the [Edit], [Delete], and [Send To MommyFrame] buttons will be created below the uploaded image.22Select [My Albums].-.The [Main Album],[MommyFrame], and [Friend Album] items will be created.You cannot upload photos to the [MommyFrame] and [Friend Album] items.ClickClickClickClick](https://usermanual.wiki/MARUSYS/MOMMYFRAME/User-Guide-244157-Page-29.png)
![2866If you click the [Send To MommyFrame] button, a "Transfer Finished Successfully" message will appear. 77If you set up the [Server Connecting Time] in the MommyFrame menu, photos will be transferred at that time.-.To send photos to MommyFrame, be sure to connect to a phone line or a LAN.If you want to download photos immediately, select [Connect the Server Now](see page 17) in the MommyFrame menu.-.When free disk space in MommyFrame is insufficient, you will not be able to download photos from the server.In this case, remove some existing photos and try again.Click](https://usermanual.wiki/MARUSYS/MOMMYFRAME/User-Guide-244157-Page-30.png)
![Editing Photos on the Server2911Press the [Edit] button below the photo.-. The Edit screen will appear.22Edit the images.-. You can rotate the photo, change the size, adjust the contrast, and change it toblack-and-white.Click the appropriate buttons below the photo to edit.Rotate :Rotate a photo.Reverse :Reverse a photo right/left and up/down.Brightness :Adjust a photo brightness.Contrast :Adjust a photo contrast between bright and shade.Black-and-White:Make a photo black-and-white.Size :Adjust a photo size.Trim :Trim a photo to a desired size.](https://usermanual.wiki/MARUSYS/MOMMYFRAME/User-Guide-244157-Page-31.png)
![Inserting Text into a Photo3011Press the [Edit] and [Insert Text] buttons.-. The Insert Text screen will appear.22Select the text location, content, font color, text transparency, font, font style, and/or font size.33Press the [Apply Text Edits] button to insert the text.44Press the [Save Image] button. (2) (3)(1)(4)Restore : Restore the original image when you are unhappy with the edited photo.Cancel : Cancel the image edit and return to the image selection screen, Album state.](https://usermanual.wiki/MARUSYS/MOMMYFRAME/User-Guide-244157-Page-32.png)
![Finding Friends on the Server3111Press the [Manage Friend Lists] inthe Login state.-. The Manage Friend Lists screen will appear.22Enter the ID of a friend and press the [Propose] button.-. If you do not know the ID of your friend, you can find your friend in the Find Friends section.33When you have been accepted by your friend, the ID of your friend willbe registered in the "My Friends" list.-. You will be able to sent photos to the [Friend Album] of your friend.(2)My Friends : This section is the list of your friends who have been accepted to send photos to [My Albums].Friends Waiting for Acceptance :This section is the list of your friends for Acceptancewho are waiting for your acceptance. If accepted, he/she will move to the "My Friends" list.Click](https://usermanual.wiki/MARUSYS/MOMMYFRAME/User-Guide-244157-Page-33.png)
![Sending Photos to your Friends3211Upload a photo to your Main Album or another album created from the Album Management.-. The photo will be transferred and registered to My Albums.33Select a friend ID from the [Select Friend ID] menu.22Click the photo in the Album state.44Click [Send to Friend].-. The photo will be transferred to the [Friend Album] of your friend.(2)(3) (4)Click](https://usermanual.wiki/MARUSYS/MOMMYFRAME/User-Guide-244157-Page-34.png)
![33What is MommyFrame's Channel Services?MommyFrame's Channel Services refer to other information besides photos providedby MommyFrame's [Channel].11Click the [Channel] menu in Login state. -. You may select the Channel menu from the MY SPACE screen.22Select a channel from the categories.-. You can designate up to 4 channels, and the channel content will be updated on a regular basis.33If you click the [OK] button, the channels in your [MommyFrame] will be automatically updated.-. If you click the [Cancel] button, it will revert to the previous settings. (2) (3)Channels may contain advertisements from Mommyframe.com.Of free/pay channels, only channels you have selected will be transmitted to your MommyFrame.For more information, select [See Details].Channel services may be rescheduled according to situations.ClickClick44Press the [Mode] button on the top of [MommyFrame] to select the channel mode.-. If you press the [Mode] button, the mode switches between [Photo Mode]-[ChannelMode]-[Time/Calendar], in that order.The channels are categorized into [News & Info], [Lifestyle], and [Arts/Entertainment] sections.](https://usermanual.wiki/MARUSYS/MOMMYFRAME/User-Guide-244157-Page-35.png)
![34About Screen MessagesThis message indicates that the line connected to MommyFrame is busy whentrying to "Update Now" or "Auto On/Off".This message indicates that the line is not connected to MommyFrame whentrying to "CUpdate Now" or "Auto On/Off".This message indicates that "Update Now" has been successfullycompleted.This message occurs after downloading images or retrieving the current timehas completed.This message occurs when trying to "Update Now" or selecting "Auto On/Off".If the connection was successful, the "Successfully Connected" message willappear.This message occurs if the connection attempts (up to 3 times) either with"Update Now" or "Auto On/Off" have failed.This message occurs while downloading images from the server.The number of images being downloaded is shownThis message indicates that attempts to "Update Now" or "Auto On/Off"have failed.This message indicates that the server is already connected when trying to"Update Now" or selecting "Auto On/Off".This message indicates that the connection has been canceled when pressingthe Select ( ) button while downloading images or setting up the current timeautomatically.This message occurs when setting up the current time automatically.This message indicates that MommyFrame is receiving images from the server.This message indicates that MommyFrame is trying to connect to the serverautomatically. If you press the [Menu] button while this message is displayed,the auto connection is canceled.This message indicates that the USB connector is connected to your PC.](https://usermanual.wiki/MARUSYS/MOMMYFRAME/User-Guide-244157-Page-36.png)