NDS RSC600I CONTROLLER User Manual Layout 1
NDS, Inc. CONTROLLER Layout 1
UserManual.wiki
>
NDS
>
RSC600I User Manual
Users Manual
Navigation menu
Upload a User Manual
Namespaces
Wiki Guide
HTML
PDF
Info
Views
User Manual
Discussion / Help
Navigation
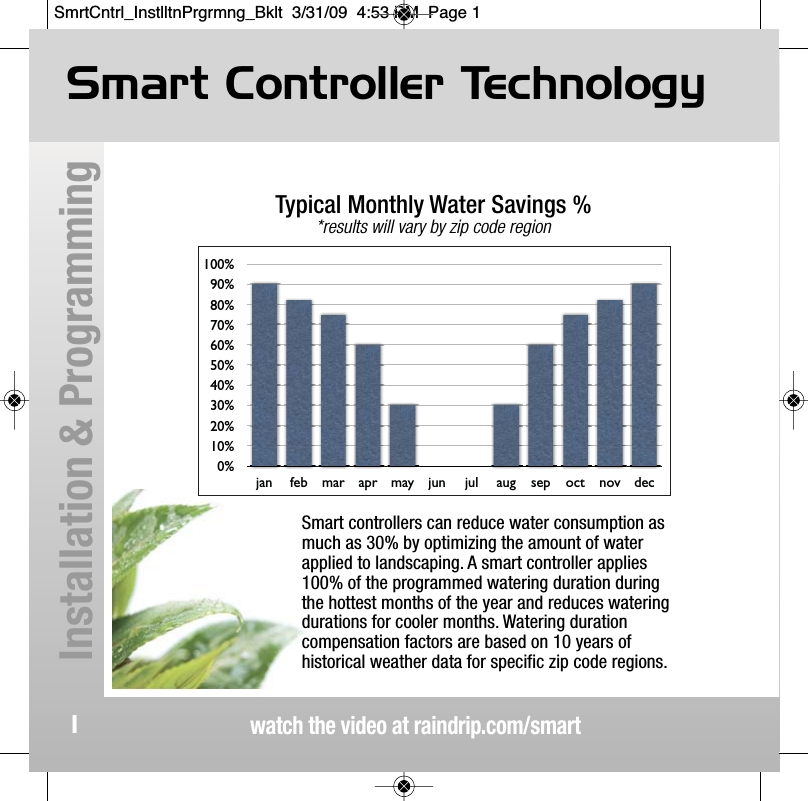

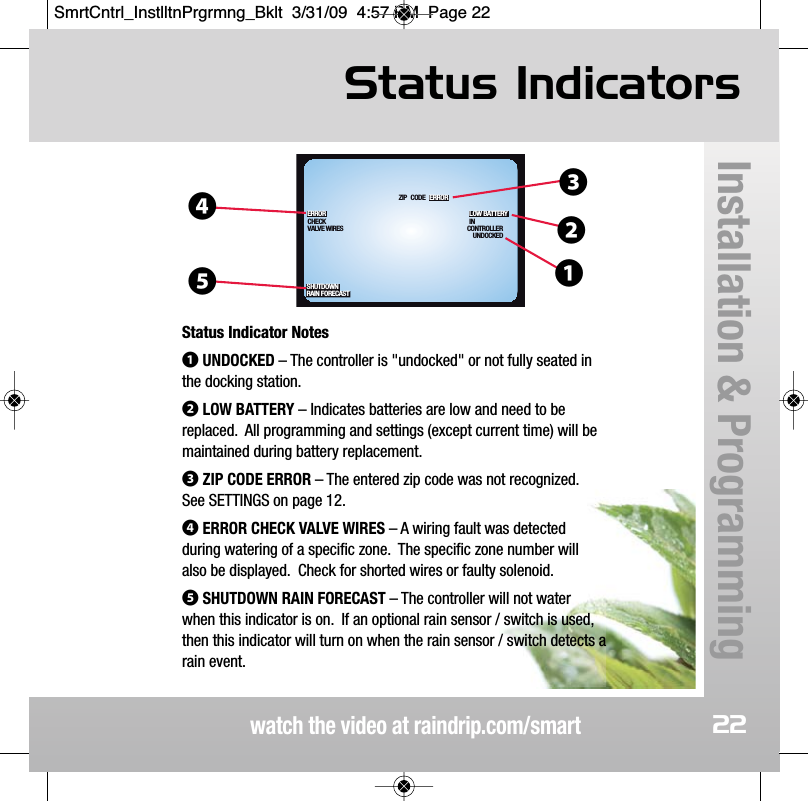

![WarrantyRaindrip Smart Controller - Limited Warrantywatch the video at raindrip.com/smartwww.raindrip.comRaindrip warrants to the original product or service purchaser ('the Customer') that the Raindrip product, for which the Customerreceived this warranty, was designed, developed and/or fabricated using all due reasonable commercial care and goodmanufacturing practices. Raindrip's product shall be free from defects in material and workmanship for one year, from the originaldate of purchase. Raindrip's sole and exclusive obligation under this warranty is to provide for the free repair or replacement of theproduct or of defective part in the product, at Raindrip's option.Warranty Limitations. The duration of any implied warranty or condition, of merchantability, fitness for a particular purpose, orotherwise, on this product shall be limited to the duration of the express warranty set forth above. In no event shall Raindrip beliable for any loss, inconvenience or damage, whether direct, incidental, consequential or otherwise, resulting from breach of anyexpress or implied warranty or condition, of merchantability, fitness for a particular purpose or otherwise with respect to thisproduct, except as set forth herein. Some states or countries do not allow limitation on how long an implied warranty lasts andsome do not allow exclusions or limitations of incidental or consequential damages, so the above limitations or exclusions may notapply to you. This warranty will be interpreted pursuant to the laws of the United States and the State of California. The originalEnglish language version (meaning) of this warranty controls over all translations.Warranty Service Options. For service under this warranty you must return the product to the store where you purchased [the units] it.Warranty Exclusions.This warranty does not cover the following:• Products that have been modified, neglected or poorly maintained, misused, abused or involved in accidents or natural disasters.• Damage to the product resulting from improper maintenance or repair, the use or installation of parts and/or accessories that arenot compatible with the original intended use of the product, or the failure to follow the product warnings and usage instructions. • Damage or deterioration to the surface finish, aesthetics or appearance of the product. • The labor costs required to remove and/or refit and readjust the product covered by this warranty.• Normal wear and tear to the product.• Product installed outdoors or in a manner not recommended by Raindrip.• Or, any products for which the Customer does not follow the warranty procedures outlined [above] in this Limited Warranty.877.502.7952techservice@ndspro.comraindrip.com/smart32SmrtCntrl_InstlltnPrgrmng_Bklt 3/31/09 4:57 PM Page 32](https://usermanual.wiki/NDS/RSC600I/User-Guide-1200778-Page-35.png)