User Manual
Exhibit K: User Manual
FCC ID: QYUELITEHRM

Contents
Triax Elite features . . . . . . . . . . . . . . . . . . . . . . . . . . . . . . . . . . . . . . . . . . . . . . . . . . . . . . . . . . . . . . . . . . . 4
Setup . . . . . . . . . . . . . . . . . . . . . . . . . . . . . . . . . . . . . . . . . . . . . . . . . . . . . . . . . . . . . . . . . . . . . . . . . . . . . . 6
Installing Application, USB Dock and Drivers . . . . . . . . . . . . . . . . . . . . . . . . . . . . . . . . . . . . . . . . . . . . . . 8
PC mode
Link the Watch to the Computer . . . . . . . . . . . . . . . . . . . . . . . . . . . . . . . . . . . . . . . . . . . . . . . . . . . . . . . . . 9
Features of the Application . . . . . . . . . . . . . . . . . . . . . . . . . . . . . . . . . . . . . . . . . . . . . . . . . . . . . . . . . . . . . 10
Using SET WATCH Feature . . . . . . . . . . . . . . . . . . . . . . . . . . . . . . . . . . . . . . . . . . . . . . . . . . . . . . . . . . . . . 11
Schedule and Upload Workouts . . . . . . . . . . . . . . . . . . . . . . . . . . . . . . . . . . . . . . . . . . . . . . . . . . . . . . . . . 12
TIME mode
Set Time . . . . . . . . . . . . . . . . . . . . . . . . . . . . . . . . . . . . . . . . . . . . . . . . . . . . . . . . . . . . . . . . . . . . . . . . . . . . 14
Set Alarm . . . . . . . . . . . . . . . . . . . . . . . . . . . . . . . . . . . . . . . . . . . . . . . . . . . . . . . . . . . . . . . . . . . . . . . . . . . 15
WORKOUT mode
Select Workouts and Review Segments . . . . . . . . . . . . . . . . . . . . . . . . . . . . . . . . . . . . . . . . . . . . . . . . . . . 16
Begin a Workout . . . . . . . . . . . . . . . . . . . . . . . . . . . . . . . . . . . . . . . . . . . . . . . . . . . . . . . . . . . . . . . . . . . . . 17
Auto-Calibrate the SDM Pod . . . . . . . . . . . . . . . . . . . . . . . . . . . . . . . . . . . . . . . . . . . . . . . . . . . . . . . . . . . . 18
Manually Calibrate the SDM Pod . . . . . . . . . . . . . . . . . . . . . . . . . . . . . . . . . . . . . . . . . . . . . . . . . . . . . . . . 19
CHRONOGRAPH mode
Using the Chronograph . . . . . . . . . . . . . . . . . . . . . . . . . . . . . . . . . . . . . . . . . . . . . . . . . . . . . . . . . . . . . . . . 20
Set the Auto-Lap Feature . . . . . . . . . . . . . . . . . . . . . . . . . . . . . . . . . . . . . . . . . . . . . . . . . . . . . . . . . . . . . . 22
STATS mode
Review Saved Runs or Workouts . . . . . . . . . . . . . . . . . . . . . . . . . . . . . . . . . . . . . . . . . . . . . . . . . . . . . . . . . 23
Heart-Rate Chart . . . . . . . . . . . . . . . . . . . . . . . . . . . . . . . . . . . . . . . . . . . . . . . . . . . . . . . . . . . . . . . . . . . . . 24
Running Pace Chart . . . . . . . . . . . . . . . . . . . . . . . . . . . . . . . . . . . . . . . . . . . . . . . . . . . . . . . . . . . . . . . . . . 25
Linking Digital Components to Watch . . . . . . . . . . . . . . . . . . . . . . . . . . . . . . . . . . . . . . . . . . . . . . . . . . . . . 26
Troubleshooting . . . . . . . . . . . . . . . . . . . . . . . . . . . . . . . . . . . . . . . . . . . . . . . . . . . . . . . . . . . . . . . . . . . . . . 27
Specifications . . . . . . . . . . . . . . . . . . . . . . . . . . . . . . . . . . . . . . . . . . . . . . . . . . . . . . . . . . . . . . . . . . . . . . . 29
FCC and RSS-210 Compliance . . . . . . . . . . . . . . . . . . . . . . . . . . . . . . . . . . . . . . . . . . . . . . . . . . . . . . . . . . 29
Battery . . . . . . . . . . . . . . . . . . . . . . . . . . . . . . . . . . . . . . . . . . . . . . . . . . . . . . . . . . . . . . . . . . . . . . . . . . . . . 30
Warranty . . . . . . . . . . . . . . . . . . . . . . . . . . . . . . . . . . . . . . . . . . . . . . . . . . . . . . . . . . . . . . . . . . . . . . . . . . . 31
Service Centers . . . . . . . . . . . . . . . . . . . . . . . . . . . . . . . . . . . . . . . . . . . . . . . . . . . . . . . . . . . . . . . . . . . . . . 31
Index . . . . . . . . . . . . . . . . . . . . . . . . . . . . . . . . . . . . . . . . . . . . . . . . . . . . . . . . . . . . . . . . . . . . . . . . . . . . . . 33
Document updates are available online at www.nike.com /timing
Printed on Wood-Free Paper
4
Triax Elite features
HRM/SDM training system
This manual describes the functions of the
Triax Elite HRM/SDM training system
and the Triax Elite HRM training system.
NOTE: Any information pertaining to the SDM pod
will not apply to the Triax Elite HRM system.
• Digital Heart-Rate Monitor
• Digital Speed and Distance Monitor
• Two-way Digital Radio Technology
Virtually eliminates radio cross-talk
• Comprehensive PC/Macintosh
Training Application
• Complete Stopwatch Functionality
• Extra Large LCD Display
• View Button
Display on-the-fly heart rate, pace,
distance or time
• Easy-Access Battery Hatch
• Time/Day /Date/Alarm
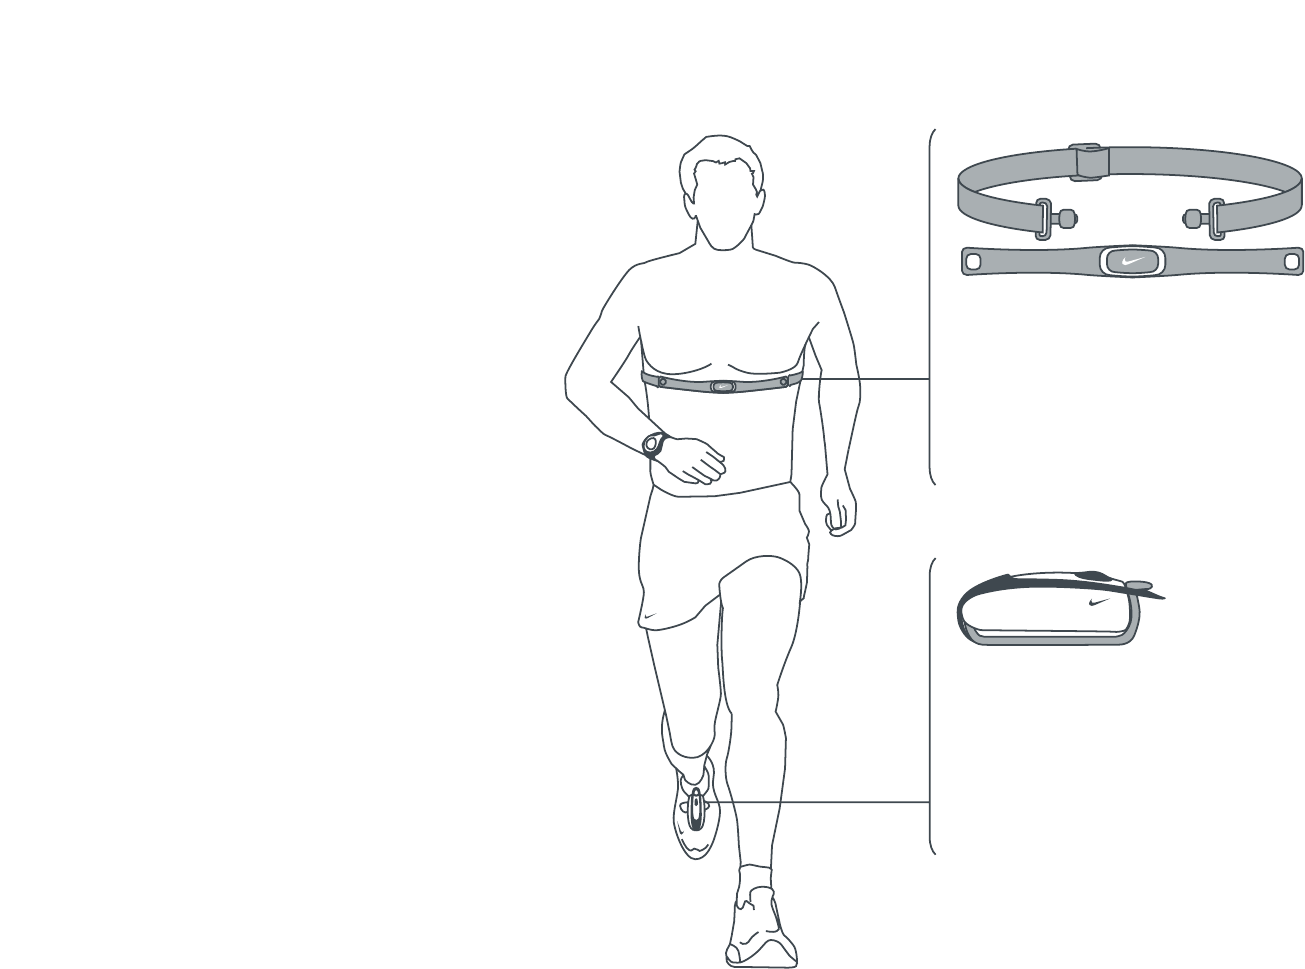
HRM transmitter
The HRM (Heart-Rate Monitor) transmitter
reads heart-rate information when worn
directly against the skin and within a few
meters of the watch. The transmitter is
ergonomically designed to fit comfortably
during all types of exercise.
SDM pod
The SDM (Speed Distance Monitor) pod
measures foot acceleration/deceleration
100 times per second. When properly
calibrated, the pod accurately calculates
speed and distance even if stride length
and running pace changes.
ATTENTION: Anyone beginning an exercise
regimen for the first time (especially users of
pacemakers or other implanted devices) should
consult a physician or health professional before
using the Triax Elite HRM/SDM training system.

5
Triax Elite Introduction
The Triax Elite training system will help you intelligently gauge
how hard and how long you are working out.
Why?
Managing the Intensity and Duration of exercise provides
the ability to:
• Train the correct or desired body systems
• Avoid overtraining
• Achieve peak performance
By training smart, you can reach a variety of fitness goals,
whether it’s weight loss, long-term health or competitive
performance.
The Triax Elite application provides the ability to create,
schedule and upload personalized workouts to the watch.
Upon completion, detailed training data can be downloaded
from the watch to be viewed in the application. It’s all possible
with the USB dock and the Triax Elite training system.
Minimum System Requirements
Windows
Pentium 266
Windows 98, ME, NT or XP
800 x 600 Minimum Screen Resolution
32MB RAM
256 VGA Color (32-BIT Supported)
20MB Available Hard-Disk Space
USB Port
Internet Connection (Optional)
Macintosh
PowerPC
MacOS 8.6 - 10
800 x 600 Minimum Screen Resolution
32MB RAM
20MB Available Hard-Disk Space
USB Port
Internet Connection (Optional)
USB dock
The USB dock links the watch to
the computer via a 916mHz digital
radio transmission. DO NOT plug
the USB dock into a USB port on
your computer before installing
the Triax Elite application.

6
VERY IMPORTANT Setup of the Triax Elite Training System VERY IMPORTANT
It is crucial that you follow the steps below in sequential order to ensure
trouble-free installation and full functionality of your Triax Elite training system.
WARNING! You must install the Triax Elite application before plugging the USB dock into the computer.
1. Open package and remove all contents.
Package Contents
(1) Triax Elite watch
(1) HRM transmitter
(1) SDM pod (not included with Triax Elite HRM training system)
(1) AAA battery (see page 30, Battery to install the SDM pod battery)
(1) USB dock
(1) Triax Elite CD-rom
(1) Triax Elite manual
(1) Bicycle watch mount
2. Insert the CD-rom into your computer.
3. Install the Triax Elite application. See page 8, Installing Application, USB Dock and Drivers.
DO NOT open the Triax Elite application until step 4 is complete.
4. Plug USB dock into an open USB port on your computer.
5. Open the Triax Elite application.
6. Scroll to PC mode on the watch to establish a link with the computer. See page 9, Link the Watch to the Computer.
Success! Enjoy your Triax Elite training system.
7
3
124
3
124
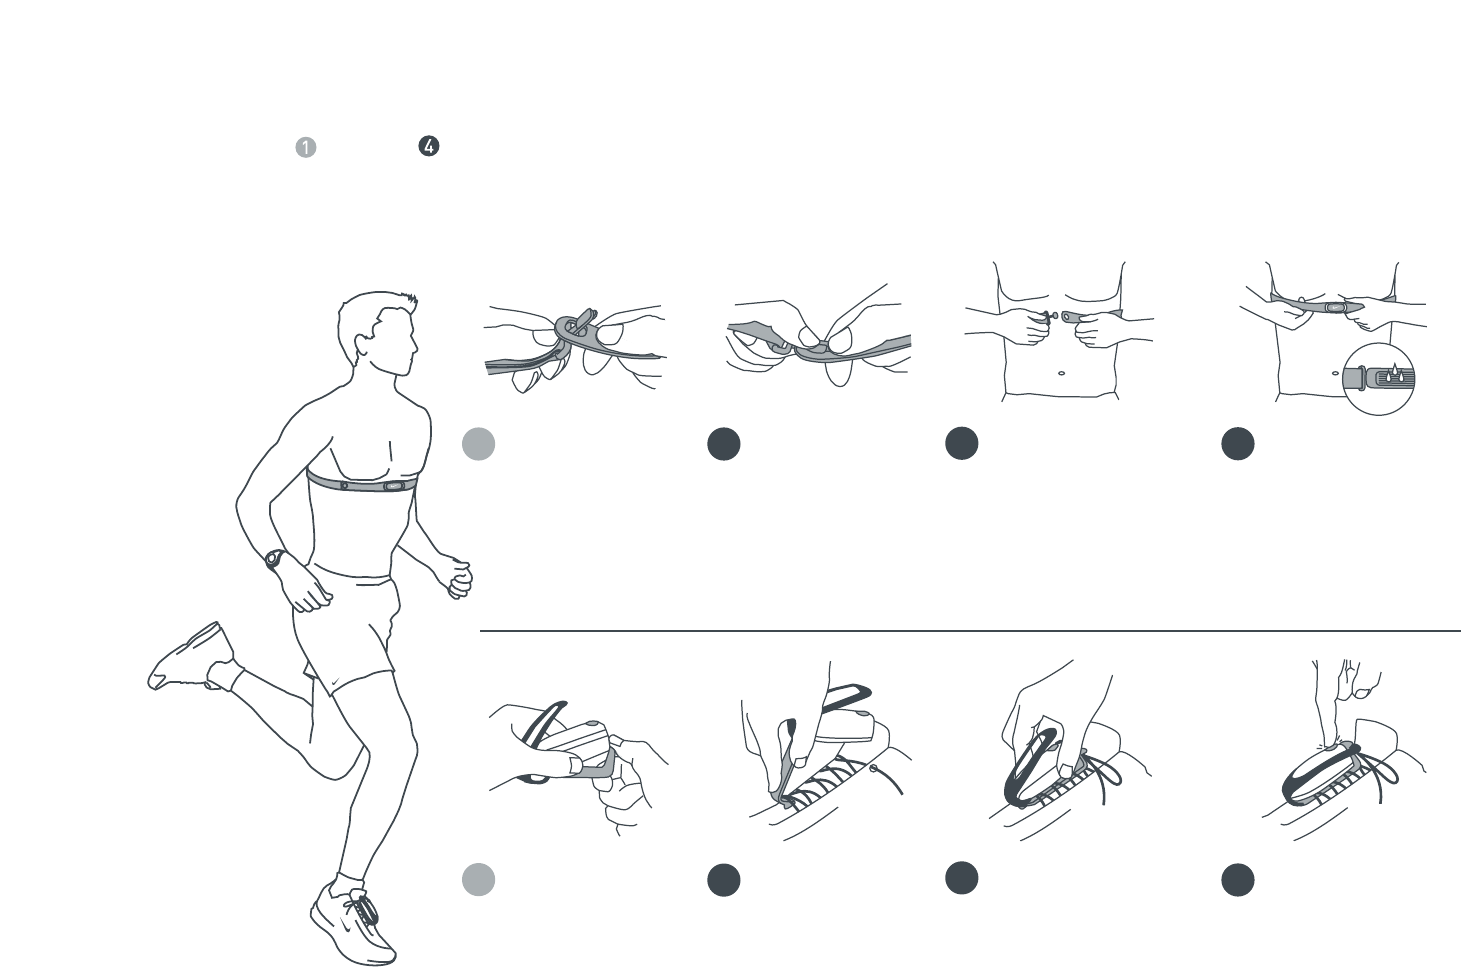
Setup Positioning the HRM Transmitter and SDM Pod for Use
Follow steps through to position the HRM transmitter and SDM pod before a run or workout.
Push tab up
through slot in
HRM transmitter.
Press down tab
until flush.
Attach other side of HRM
transmitter around chest.
Position on rib cage just
below the breast plate.
The transmitter should be
worn directly against skin
and snug enough to stay
in place during workout.
Generously wet both
sensors on the back
of the HRM transmitter
to ensure strong
connection between
your pulse and the
transmitter.
Remove the top
strap and unseat
the SDM pod from
the bottom clip.
Loosen shoe laces
and slide pod clip
under laces.
Secure the SDM pod
with black strap.
The pod should rest
just below where
laces tie and be
secure enough to
stay in place
during workout.
Turn SDM pod ON.
Press and hold power
button until LED light
begins to blink.
NOTE: Press and hold
power button again to
turn pod OFF.

8
Installing Application, USB Dock and Drivers
The CD included contains the Triax Elite application and drivers for the USB dock. Use the instructions below
to install the application, USB drivers and USB dock.
NOTE: You must install the Triax Elite application before plugging the USB dock into the computer.
NOTE: USB drivers are automatically installed with the Triax Elite application.
Windows 98, ME, NT or XP
1. Insert Triax Elite CD into CD-ROM drive.
2. The Setup Wizard will launch. If the program does not
begin automatically, locate Setup.exe in the root folder
of the Triax Elite CD and double-click the icon to begin.
3. Click Next to continue through the Welcome window.
4. Read the license agreement carefully. If you agree
to the conditions, select the Yes check box and
click Next to accept.
5. Select a destination folder for the application.
The default is C:\ Program Files \ NIKE \ TRIAX ELITE.
6. Click Next to begin the installation.
NOTE: When USB driver installation begins, some users
will receive a "Window Logo testing compatibility" warning.
Simply ignore this message and press CONTINUE.
7. Click OK at the Installation Complete window.
NOTE: Some systems may ask you to reboot after installation.
Make sure to complete step 8 before rebooting your system.
NOTE: You must install the USB dock before opening
the Triax Elite application for the first time.
USB Dock Installation
8. Plug the USB dock into an open USB port on the computer.
9. The computer will take a moment to recognize the USB dock.
10. Proceed to page 9, Link the Watch to the Computer,
to attempt for the first time.
NOTE: To uninstall the Triax Elite application, see page 27.
Macintosh OS 8.5 - 10
1. Insert Triax Elite CD into CD-ROM drive.
2. Double-click the Triax Elite CD icon on your desktop.
3. Double-click the Install Triax Elite icon in the
popup window.
4. Click Next to continue through the Welcome window.
5. Read the license agreement carefully. If you agree
to the conditions, click YES to accept.
6. Select a location to install the Triax Elite application.
After highlighting a desired location, click Choose.
The installation program will install the files in
Your Location \ NIKE \ TRIAX ELITE.
7. Click OK at the Installation Complete Window.
8. The Installation Wizard will ask you to restart the computer.
Once the computer has successfully rebooted, the Triax
Elite application and USB drivers are now successfully installed.
NOTE: You must install the USB dock before opening
the Triax Elite application for the first time.
USB Dock Installation
9. Plug the USB dock into an open USB port on the computer.
10. Proceed to page 9, Link the Watch to the Computer,
to attempt for the first time.
9
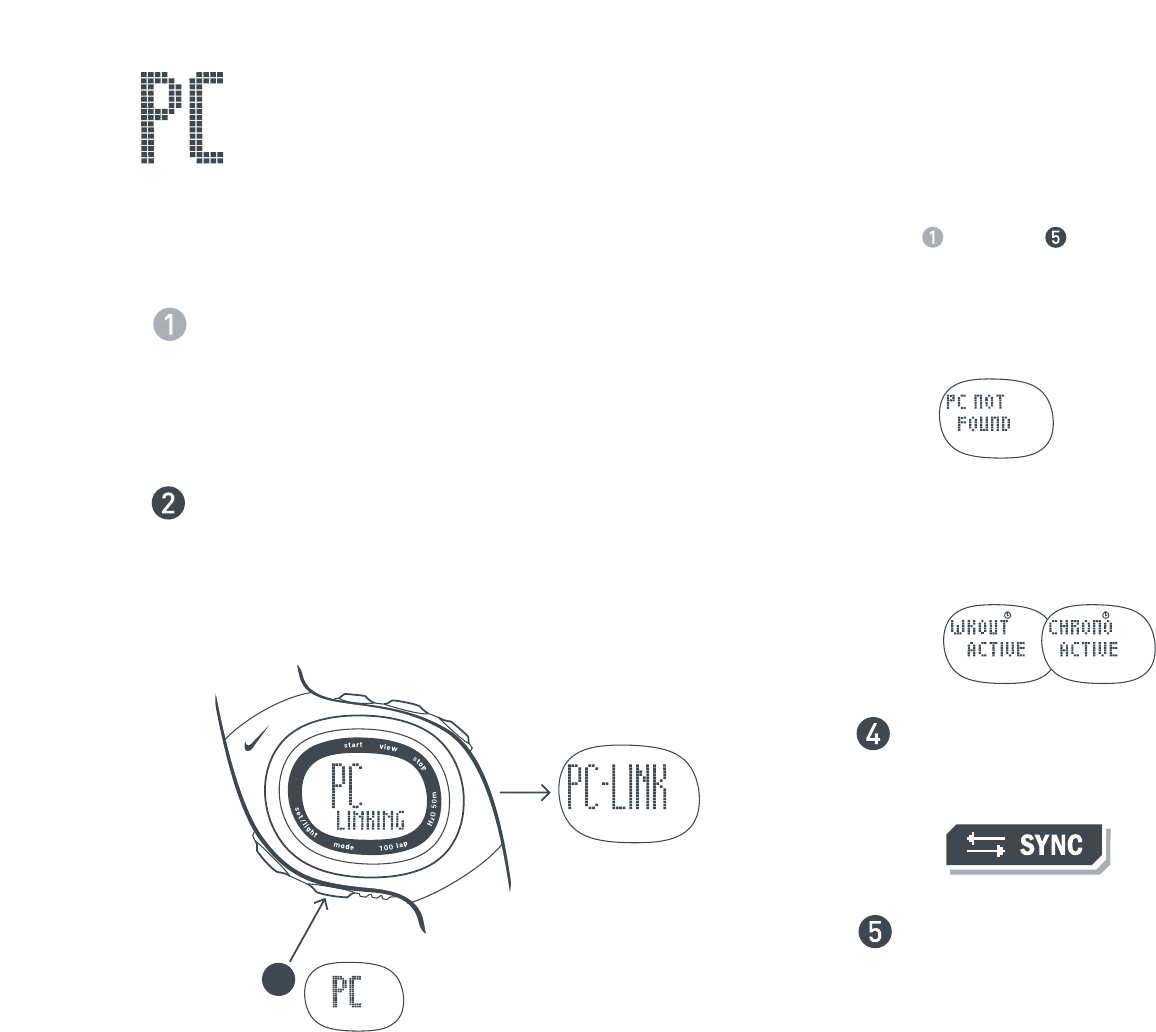
NOTE: The link has failed if the display reads PC NOT FOUND.
Press START to retry.
NOTE: The WKOUT ACTIVE or CHRONO ACTIVE display
means you must save a workout or run data before
linking to the computer. See page 17, Begin a Workout,
or page 21, Save Run Data.
Once you have established a successful link with your
computer, click the SYNC button at the bottom of the
Calendar window in the application.
The TRANSFER DATA window will open. Run and workout
data is downloaded to the application. Scheduled workouts
are uploaded to the watch.
3
Link the Watch to the Computer
Use PC mode to connect the Triax Elite watch to the computer through the USB dock. The watch communicates with the
USB dock as long as they are within 6 feet of each other. Follow steps through to link the watch to the computer.
The USB dock MUST be connected to the computer before
opening the Triax Elite application. If you have opened the
application before installing the USB dock, shut down the
application and see page 8, Installing Application, USB Dock
and Drivers, to ensure the USB dock is properly attached
to the computer.
Open the Triax Elite application. You will be asked to provide
USER PROFILE information the first time you open the
application. Once you have created a USER PROFILE,
be sure to select the correct profile before linking
the watch to the computer.
Scroll to PC mode.
Watch will begin
linking
Successful Link

10
Features of the Application
Below is an outline of the advanced training features found in the Triax Elite application. Detailed descriptions of all
features listed here are also located in the application Help files. The Help files can be accessed by clicking the HELP
button at the top of any application window.
• Set up multiple USER PROFILES to allow friends, family, teammates or colleagues
to store personal training data.
• Easily set all watch functions (time, alarms, user preferences) from within the application
by clicking the SET WATCH button.
• Design custom training workouts and long-term programs using the WORKOUT BUILDER and PLAN BUILDER.
• Design workouts based on personal pace or heart-rate zones.
• Design monthly or weekly training schedules with the simple drag-and-drop calendar.
• Use the SYNC button to upload ten-day training schedules and FAVORITE workouts to the watch.
• Use the SYNC button to download detailed heart rate, distance, pace, lap and total-time data of completed
and saved runs or workouts.
• Log and track exercise programs and fitness progress.
• Automatically CALCULATE maximum heart rate based on your USER PROFILE information.
•GRAPH and PRINT heart rate, speed data and calendar information.
•ZOOM IN to view detailed point-to-point run or workout data.
• Share custom workouts, long-term plans and training logs with friends, between computers
and across multiple operating systems platforms.
• Includes sample workouts and training programs for running and walking.
11
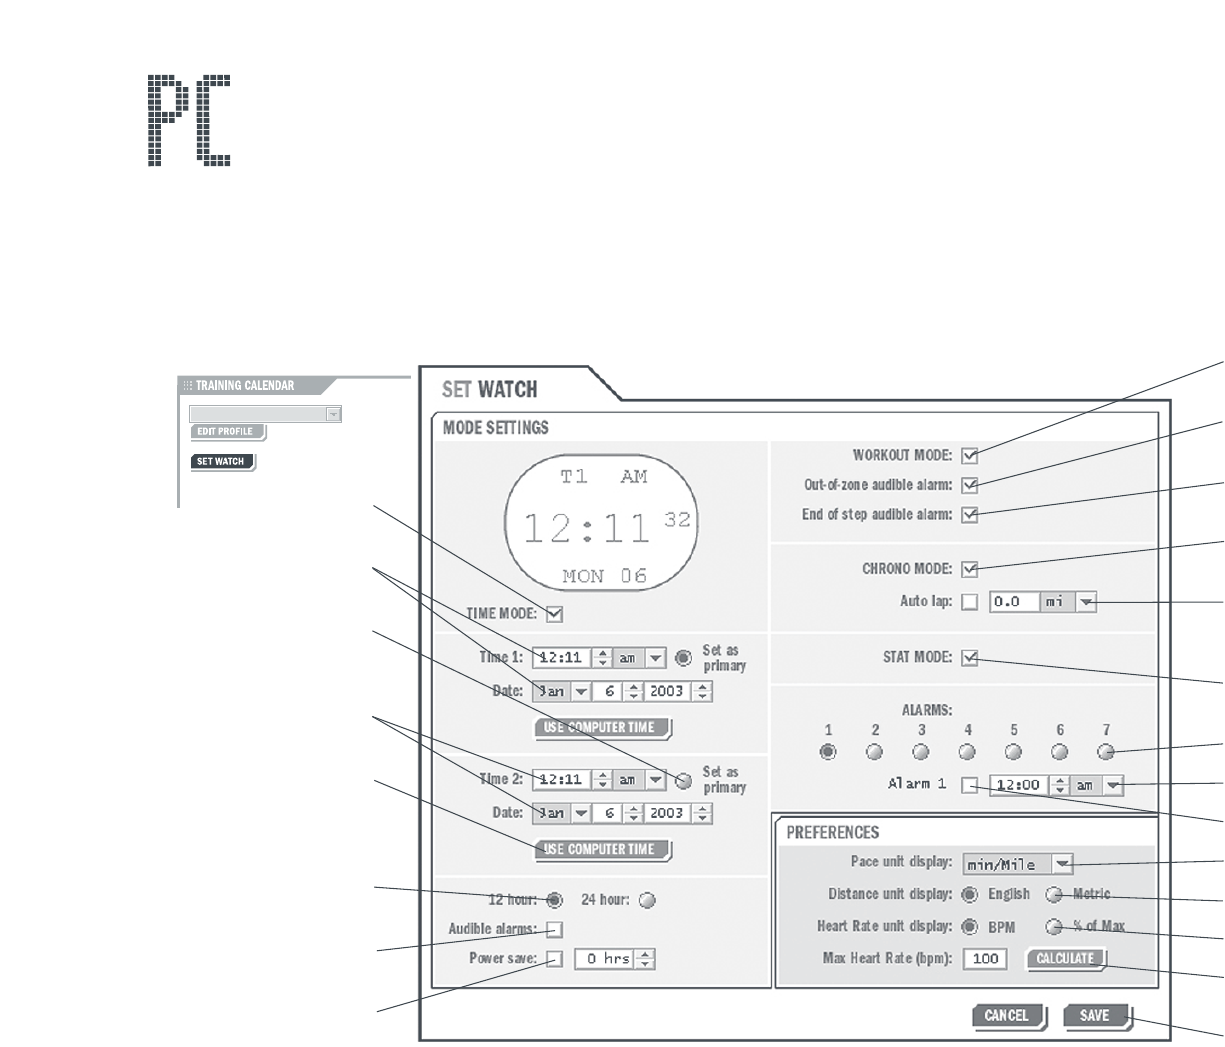
Using SET WATCH Feature
Numerous watch settings can be controlled using the Triax Elite application. Below is a screenshot of the SET WATCH
window with a brief description of each function. You can enter this window by clicking the SET WATCH button in the
upper left corner of the Calendar Screen. If the USB dock is not connected to your computer, the SET WATCH button
will not appear on screen. If you have a current successful link between the watch and USB dock, the application
will load any new settings to the watch when you save the SET WATCH window.
Enable / Disable
TIME mode
Set time and date for
Time Zone 1
Click SET AS PRIMARY
to show TZ1 or TZ2 in
display
Set time and date for
Time Zone 2
Click USE COMPUTER
TIME to set watch
to computer’s time
and date
Use 12- or
24-hour clock
Enable / Disable
audible alarms
Enable / Disable
POWER SAVE and
set POWER SAVE
time frame
Enable / Disable
WORKOUT mode
Enable / DIsable
out-of-zone alarms
Enable / Disable
end-of-step alarms
Enable / Disable
CHRONOGRAPH mode
Enable / Disable
Auto-Lap and
set Auto-Lap distance
Enable / Disable
STATS mode
Select alarm
Set alarm time
Turn alarm ON/OFF
Set pace units
Set distance units
Set heart-rate unit
CALCULATE maximum
heart rate
Save to watch
NOTE: If you disable any modes in this window by unchecking the
mode box, the unchecked modes will not appear on the watch.

12
Schedule and Upload Workouts
Follow steps through on the next two pages to use the Triax Elite application to enter workouts in the calendar
and upload any scheduled or favorite workouts to the Triax Elite watch.
Open the Triax Elite application. If this is the first time the application has been opened,
you will be prompted to enter USER PROFILE information. Once you have created a
USER PROFILE be sure to select the correct profile before scheduling workouts.
The application opens to the current day in the monthly Calendar. The Calendar can be
viewed by the month or by each week. The MONTH and WEEK tabs are located in the
top center of the Calendar window. Click either tab to switch to desired view.
Locate the WORKOUTS menu in the left center of the Calendar window. The Triax Elite
application includes sample workouts listed in the WORKOUTS window. Any of these
workouts can be deleted by dragging them to the TRASH icon in the lower right corner
of the Calendar window.
Click on the WORKOUT BUILDER button at the bottom of the WORKOUTS menu.
Use the SELECT pulldown menu in the upper left corner to choose a sample workout
and view the steps involved.
NOTE: See the application Help files for complete information about customizing any of
the sample workouts, building new workouts or developing long-term plans. The Help files
can be accessed by clicking the HELP button at the top any application window.
Close the WORKOUT BUILDER window by clicking the CLOSE button
at the bottom of the screen.
13
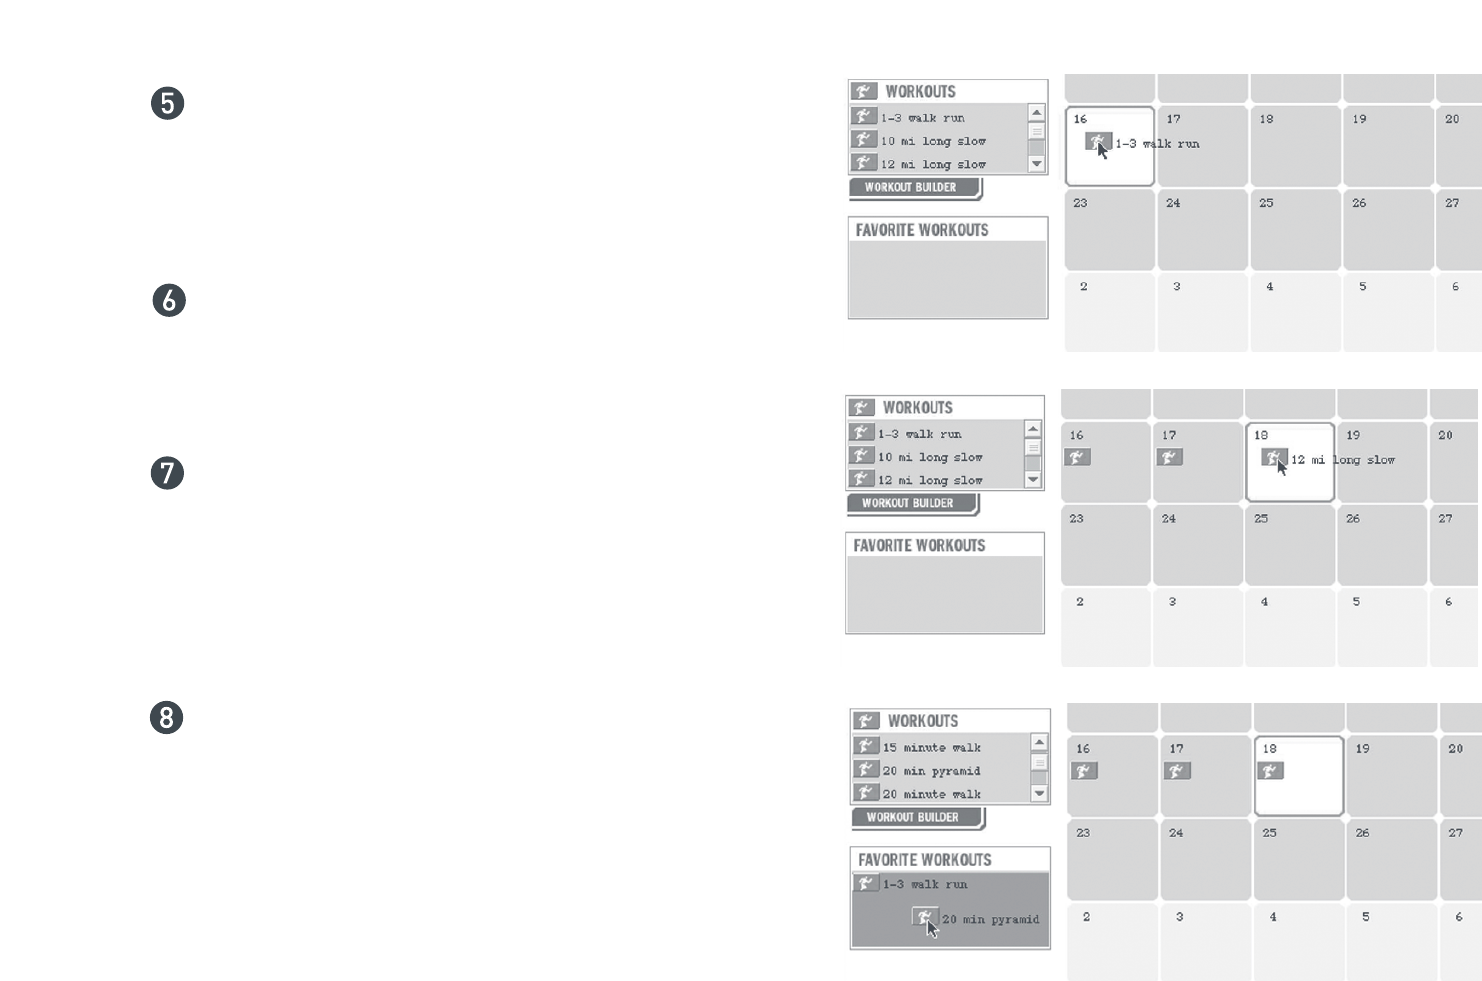
Click and drag any workout in the WORKOUTS menu to the
current day on the calendar.
Click and drag a few more workouts to future Calendar dates.
Locate the FAVORITE WORKOUTS menu on the lower left side
of the Calendar window. Click and drag a few workouts from
the WORKOUTS menu to the FAVORITE WORKOUTS menu.
These workouts will not be scheduled on specific dates,
but will be available on the watch to complete at anytime.
Follow steps 3-6 on page 9, Link the Watch to the Computer.
During TRANSFER DATA, the application will scan the
Calendar and upload 10 days of scheduled workouts.
The application will also load any workouts contained in
the FAVORITE WORKOUTS menu.
14
4
4 SEC
2 SEC
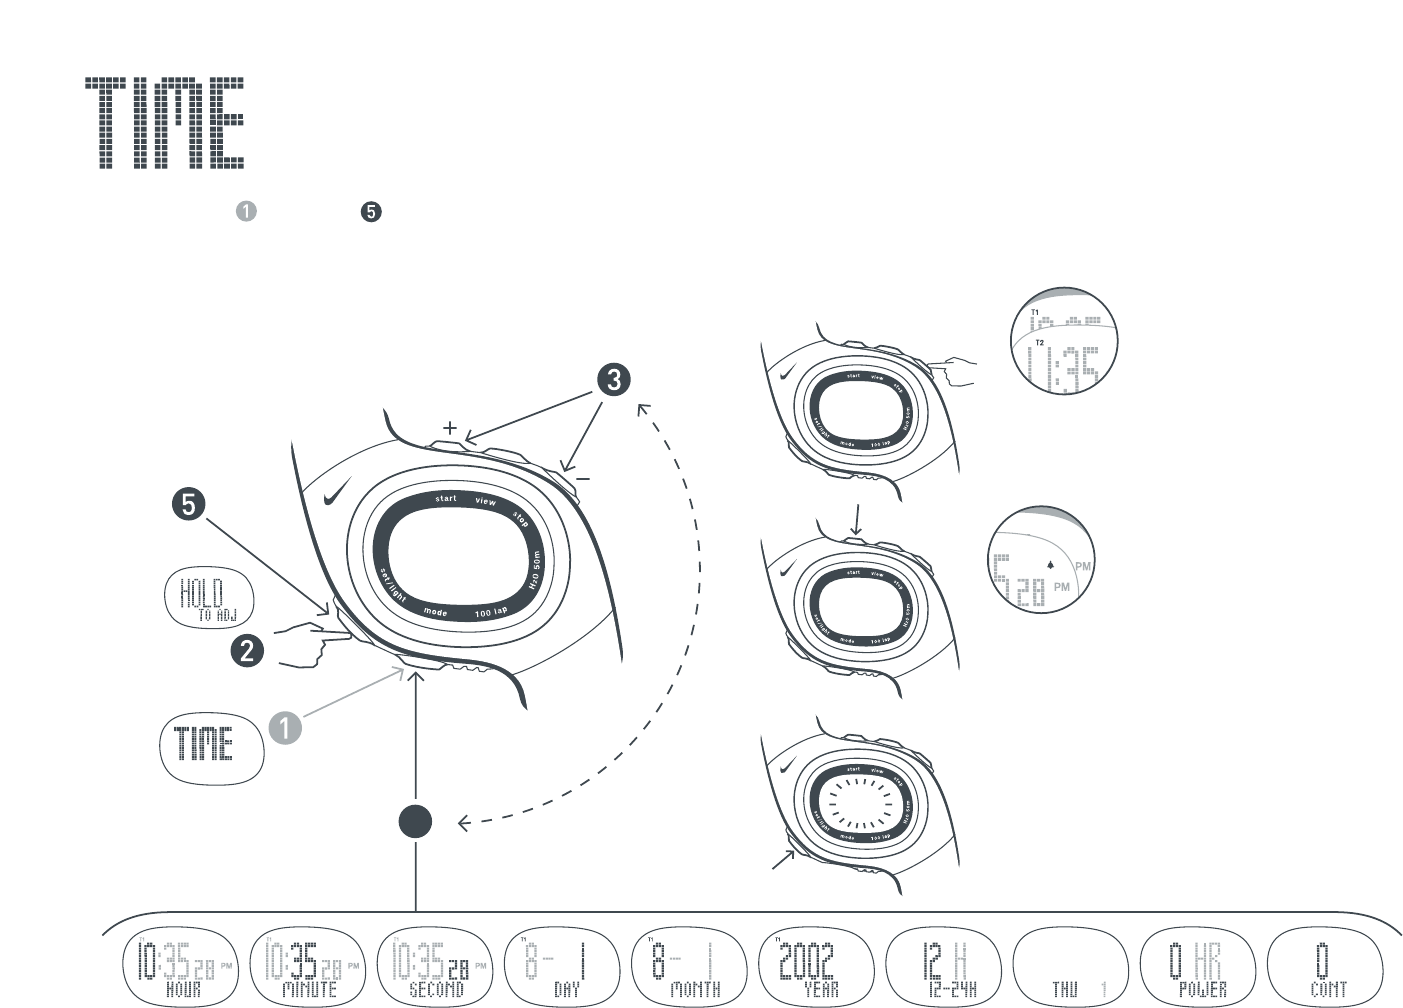
Set Time
Follow steps through to set the time and date. All settings shown below may also be set using
the Triax Elite application. See page 11, Using SET WATCH Feature.
Scroll to
TIME mode.
Press to select
adjustable element.
EXIT
Switch Time Zones
Press to view.
Hold two seconds to switch.
Chime ON/ OFF
Chime sounds at the press of
any button.
Electrolight
ON/OFF
Power Save (0-23 hrs.)
The watch goes to sleep after
set hours with no activity.
Push any button to wake.
Set Hour Set Minutes Set Seconds Set Day Set Month Set Year Choose 12-
or 24-hour
Clock
Show Day
or Month in
Display
Power Save Set Contrast
Press to change
element.

15
5
6
4
4
4 SEC
2 SEC
Set Alarm
In TIME mode you can set up to seven alarms. The alarm will sound intermittently for 55 seconds. Press any button to
stop the audible alarm. Follow steps through to set an alarm. All settings shown below may also be set using the
Triax Elite application. See page 11, Using SET WATCH Feature.
Scroll to
TIME mode.
Set Hour Set Minutes
Press to select
adjustable element.
EXIT
Alarm is ON
after exiting
adjust mode.
Press VIEW button
to select alarm.
etc...
Turn Alarm ON/ OFF
The alarm icon will
show in the display of
any mode when an
alarm is turned ON.
Press to change
element.
Time Warp
Within any mode,
press and hold the
MODE button for 2
seconds to enter
TIME mode.
16
3
3 SEC
4
3
2
1
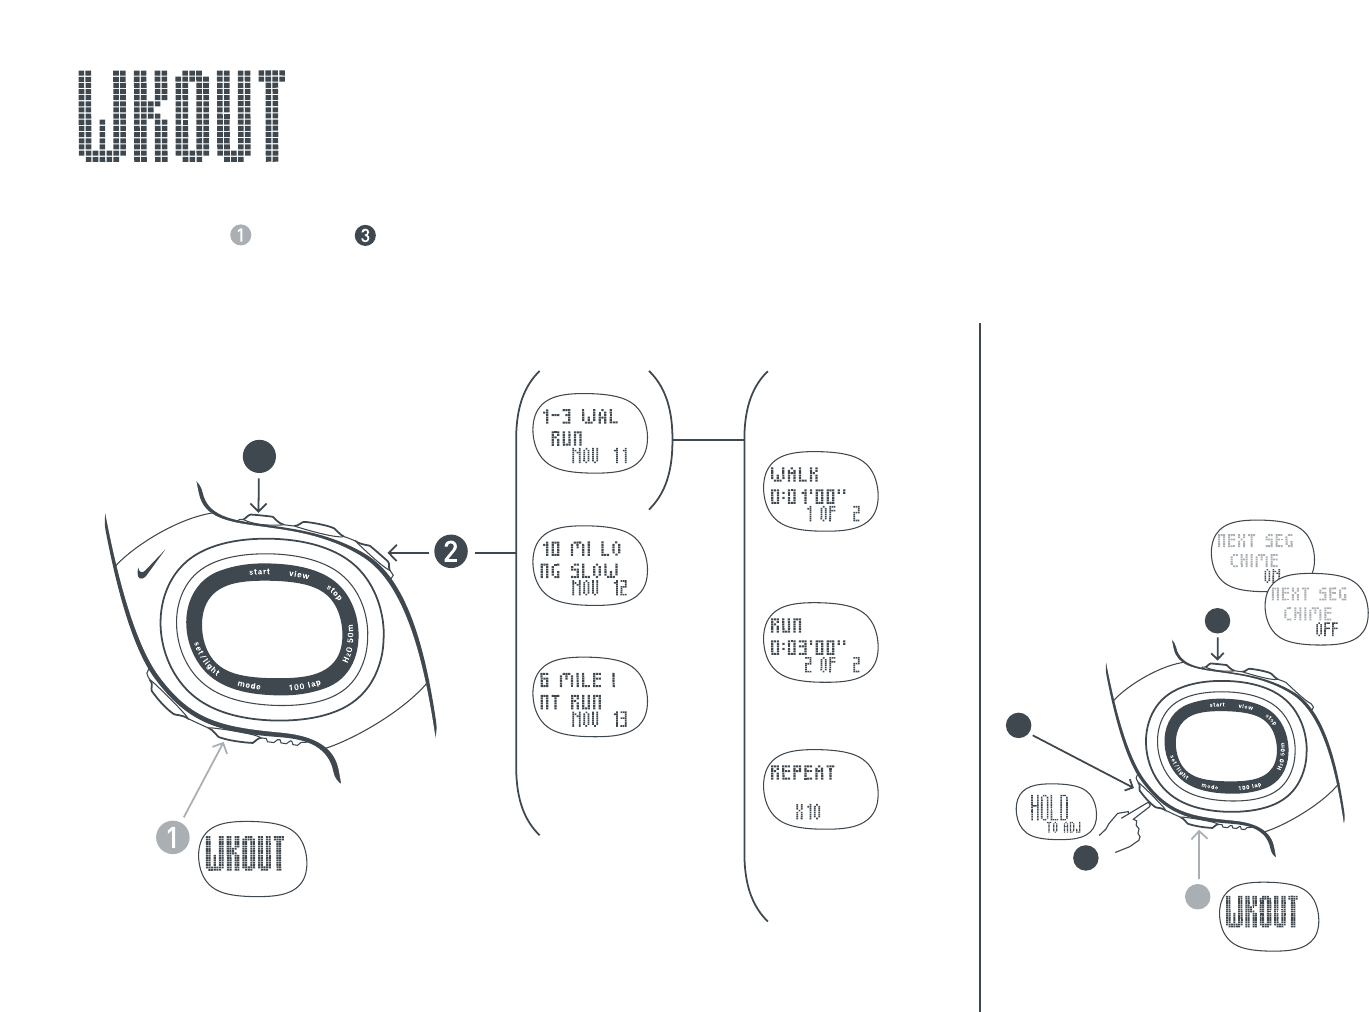
Select Workouts and Review Segments
In WORKOUT mode you can select and review the steps of workouts loaded to the watch.
Follow steps through to select and review a desired workout.
Scroll to
WKOUT mode.
Begin Workout.
Workout 1
Workout 2
Workout 3
etc...
Workout segments
begin to auto-scroll.
Segment 1
2 sec
Segment 2
2 sec
Segment 3
etc...
2 sec
Turn segment chime ON/ OFF
A chime will sound between
segments if they are not
ended manually.
Follow steps 1-4 below to turn the
segment chime ON/OFF.
Scroll to
WKOUTmode.
EXIT
17
1
2
3
3 SEC
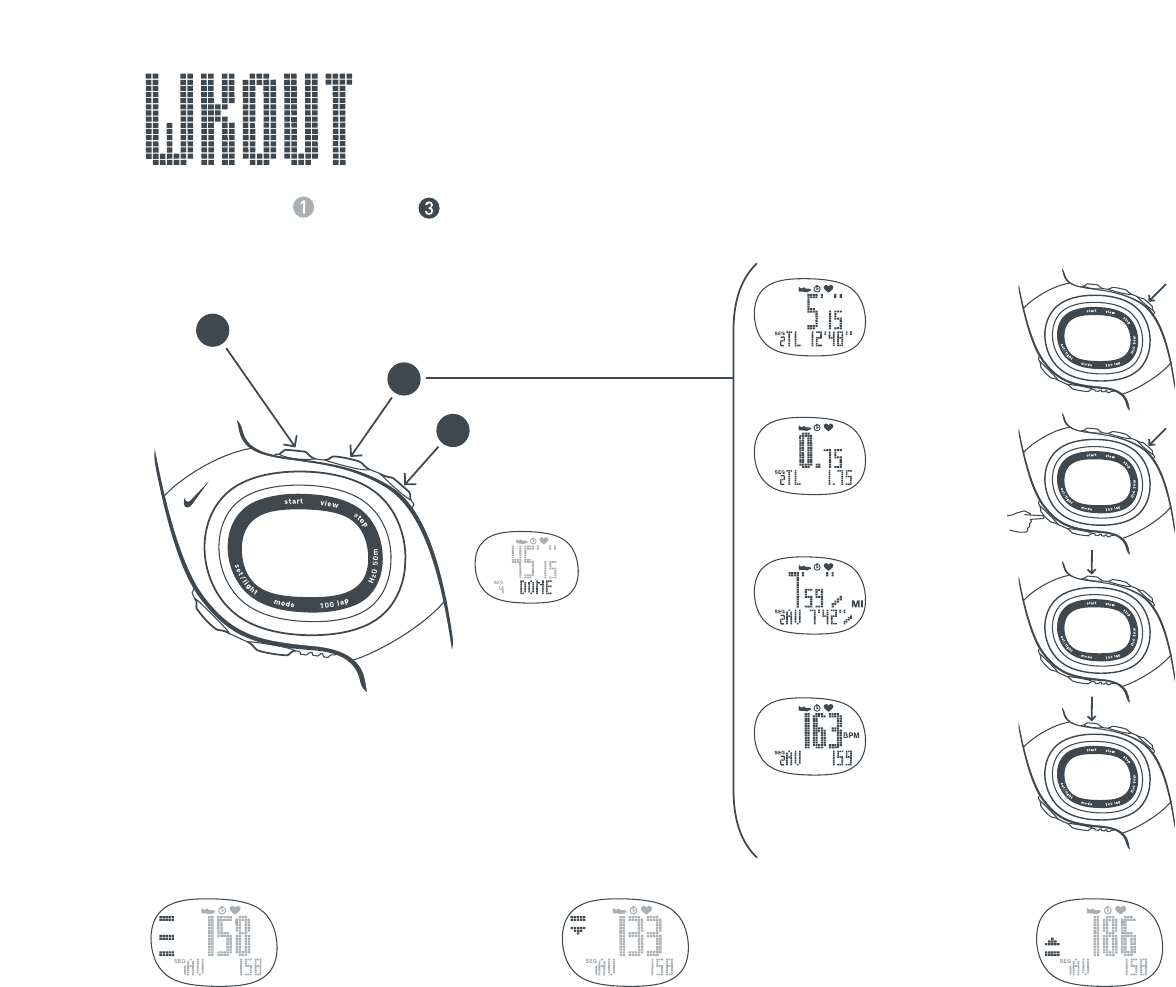
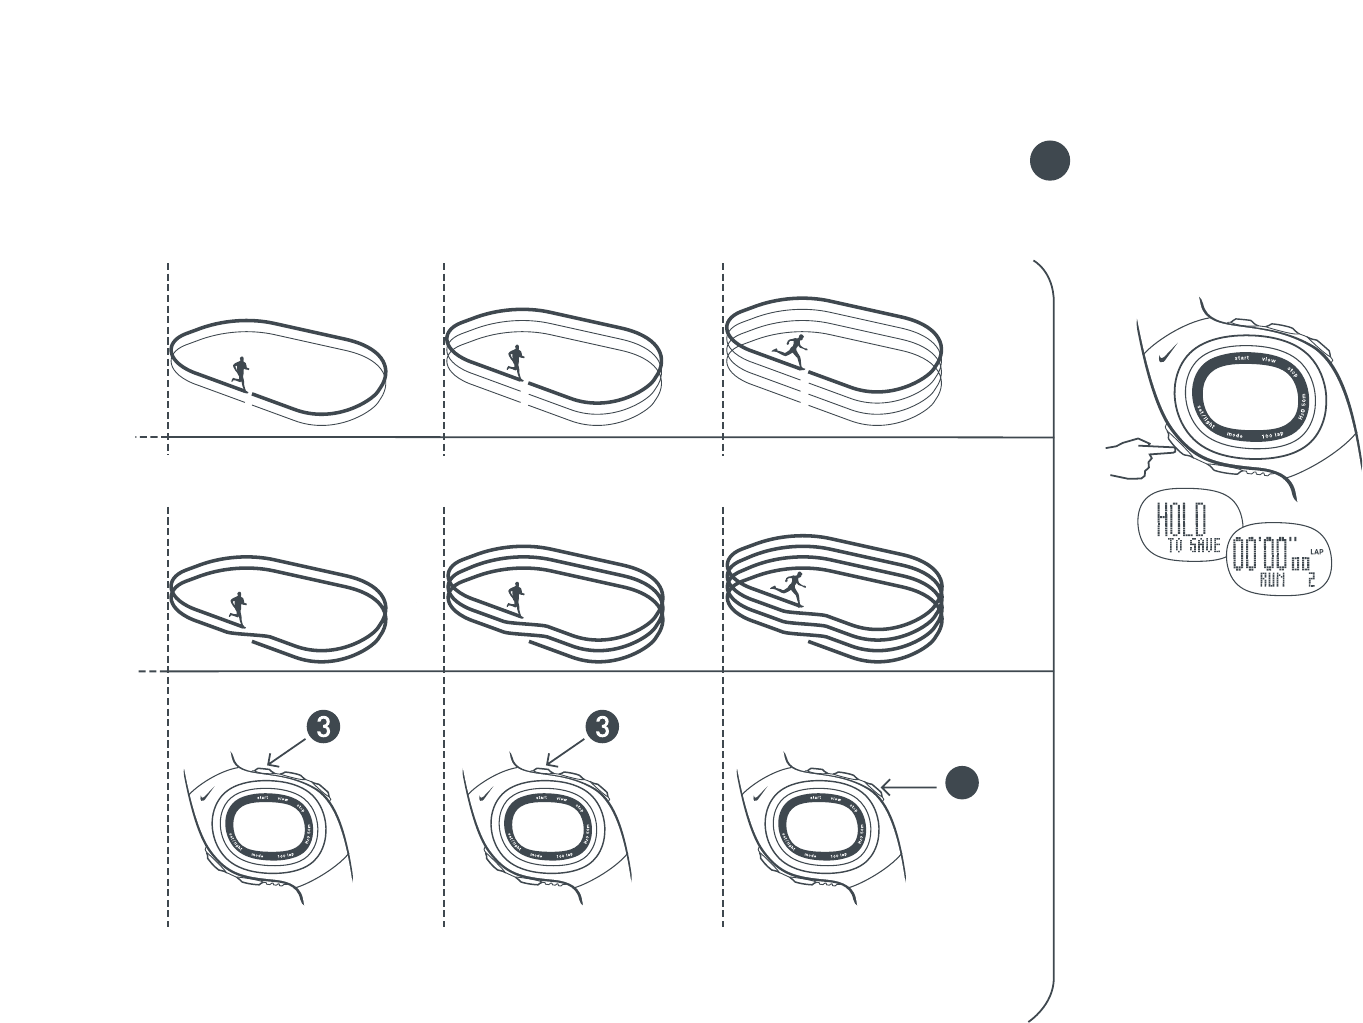
Begin a Workout
Follow steps through to begin and complete a desired workout.
Begin Workout.
Press VIEW button during
workout to access on-the-fly
statistics.
Save Workout
To save data, press
when entire workout
is DONE.
NOTE: All workouts
must be saved
before they can
be downloaded
to the application.
Segment Time
Total Time
Segment Distance
Total Distance
Segment Pace
Average Pace
Segment HR
Average HR
Press STOP once to
manually PAUSE segment.
While Paused, press STOP
again to SKIP segment
or
Press and hold SET/LIGHT
to end and save entire
workout.
Press START to begin
PAUSED segment.
AUTO-START
If a segment is not
set to AUTO-START,
press START to begin.
Zone Indicators and Alarms
If the workout is set up for a pace or heart-rate
intensity zone, the zone indicator bars display
the user’s current position within the zone.
Zones can only be set by the application
WORKOUT BUILDER.
Within Target Zone
Find the three bars
in the display:
Top Bar: upper zone limit
Bottom Bar: lower zone limit
Middle Bar: location within zone
Out-of-Zone: Below Target Zone
An arrow will be displayed under
a bar. You will hear a double-beep
to indicate you are below the
target zone.
Out-of-Zone: Above Target Zone
An arrow will be displayed above
a bar. You will hear a triple-beep
to indicate you are below the
target zone.
NOTE: Out-0f-Zone alarms can be disabled
in the SET WATCH window of the application.
18
5
6
3 SEC
3
4
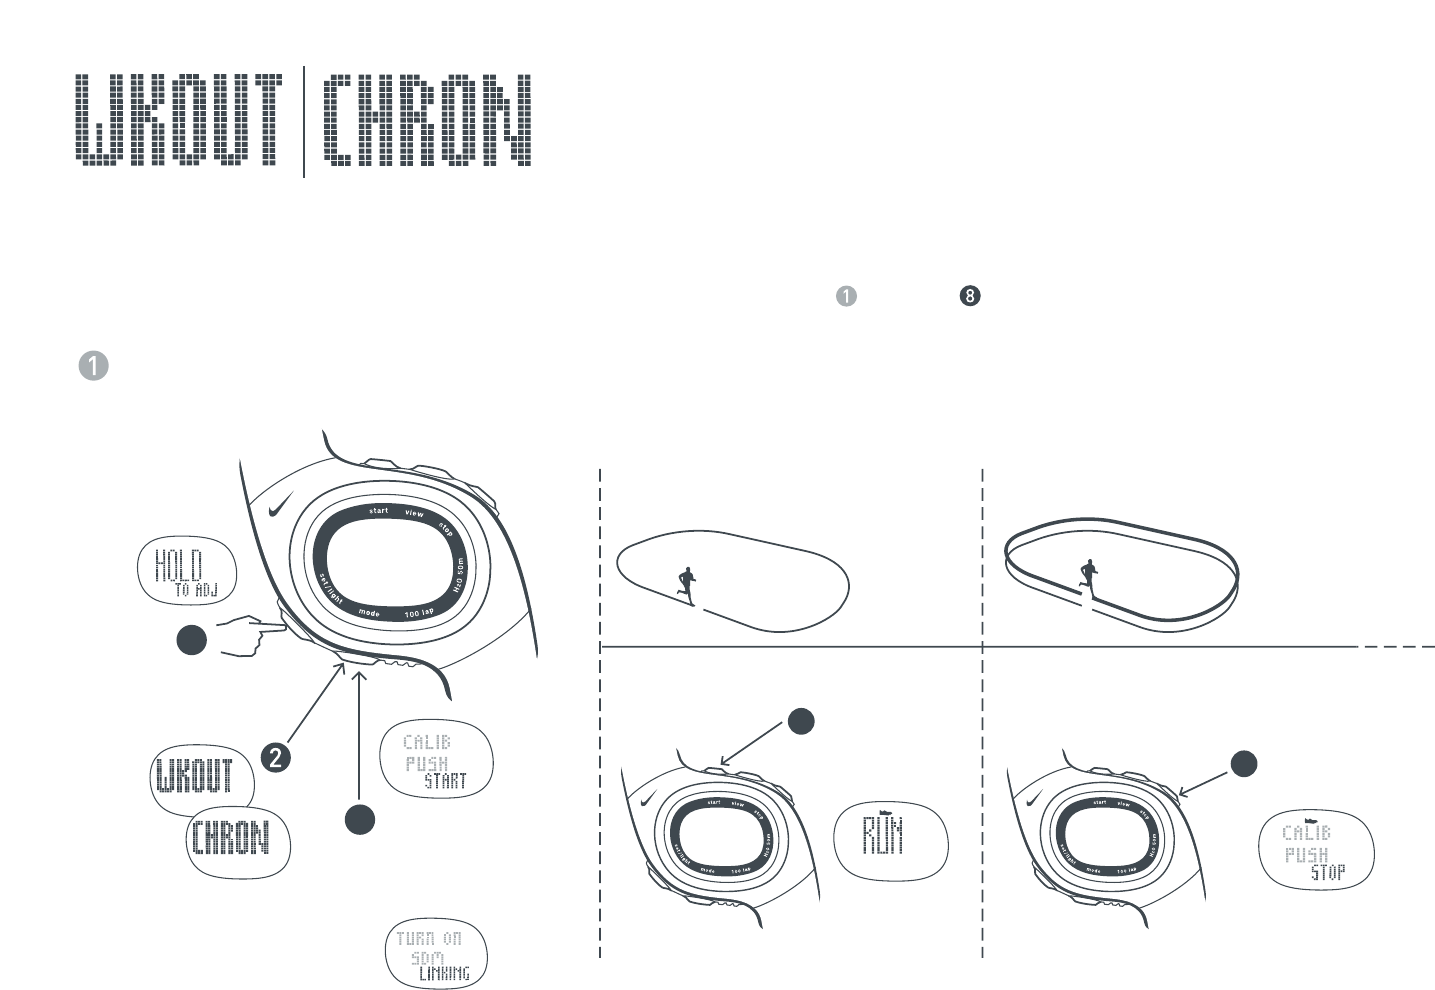
Auto-Calibrate the SDM Pod
Once calibrated, the Speed Distance Monitor (SDM) pod is more than 97% accurate for most runners. To calibrate the
SDM pod, use either WORKOUT or CHRONOGRAPH mode. Calibrate the SDM pod by running 400-800 meters on a
marked track, then adjust the watch to exact distance. The SDM pod will need to be calibrated each time you replace
the watch battery. Go to a 400-meter marked track and follow steps through to automatically calibrate the SDM pod.
Turn SDM pod ON by pressing the power button
until LED begins to blink.
Scroll to
WKOUT or
CHRON mode.
Press several
times to scroll to
CALIB PUSH START.
400 meters
Run at your usual pace on the inside
edge of the track. Complete 1-2 laps
(400-800 meters).
Push START
and begin
running. Push STOP
when finished.
NOTE: If you see the screen
displayed above while scrolling
during step 4, the SDM pod is
not turned ON. See step 1.
19
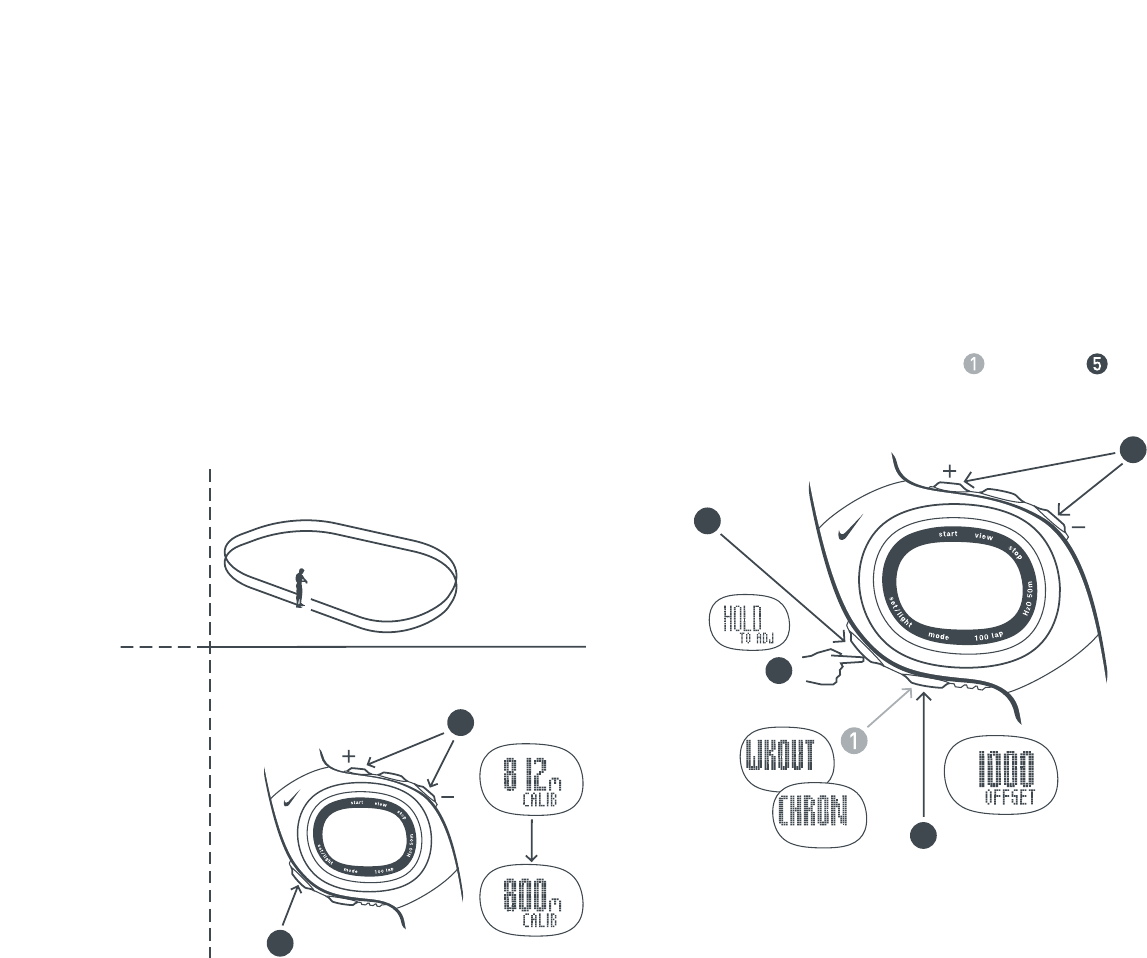
Manually Calibrate the SDM Pod
After calibration, the SDM pod automatically
calculates an offset value. The default value is 1000.
Change the offset value to make small adjustments to
the calibration. If the SDM pod is slightly under measuring
a known distance, increase the offset value. Different shoe
models may affect the pod calibration. Adjust the offset value
accordingly if you notice differences between shoes.
Follow steps through to fine-tune the offset value.
7
8
3 SEC
2
5
3
4
If you ran 800 meters, adjust displayed
distance to read 800m.
Press several
times to scroll
to OFFSET.
EXIT
Scroll to
WKOUT or
CHRON mode.
EXAMPLES
1000 = factory setting
990 = 99% of factory setting
1010 = 101% of factory setting
The offset value is 1000. You run
400m. The SDM pod returns a
reading of 392m (5% under)
The offset value should be
adjusted to 1050 (5% above).
NOTE: Write down and save your
offset value. It will come in handy
if you let friends or family borrow the
Triax Elite system and they change the
calibration setting.
Press to change value.
EXIT

Using the Chronograph
CHRONOGRAPH mode will record heart-rate, distance,
pace, lap and total-time data during a run if the components
are in the correct operating position. See page 7, Setup.
Both lap times and total-time are captured simultaneously
when you press the lap button.Follow steps through
to use the chronograph.
2
20
Press VIEW button at any
time during run to switch
information in main display.
Scroll to
CHRON mode.
Lap View
Total-Time View
Heart-Rate View
Distance View
Pace View
Mark Laps
Lap time is the time required
to go once around a track or
complete a segment of a run.
LAP 1
and
Mark Total-Time
Total time is the time from
the beginning of run up to
the point of mark.
TOTAL 1
Start
Run
Mark Lap/Total
You will have 7
seconds to read
lap and total
time before
chronograph
continues.
Auto-Lap ON
You cannot manually mark laps if the
Auto-Lap feature is ON. See page 22,
Set the Auto-Lap Feature, to turn
the feature ON/OFF.
21
4
3 SEC
LAP 3 LAP 4
Mark
Lap/
Total
Mark
Lap/
Total
Stop RUN
Save Run Data
and Reset
the Chronograph
The information for this run
is saved and viewable in STATS
mode. The chronograph is reset
to the next run.
Any heart-rate, distance, pace,
lap and total-time data is stored in
memory and will be automatically
downloaded from the watch the next
time the SYNC button is pressed in
the application.
NOTE: Be sure to select the correct
USER PROFILE in the upper left corner
of the application Calendar window before
pressing the SYNC button. Once run or
workout data is downloaded it cannot be
moved to another profile.
LAP 2
TOTAL 3 TOTAL 4
TOTAL 2
5
22
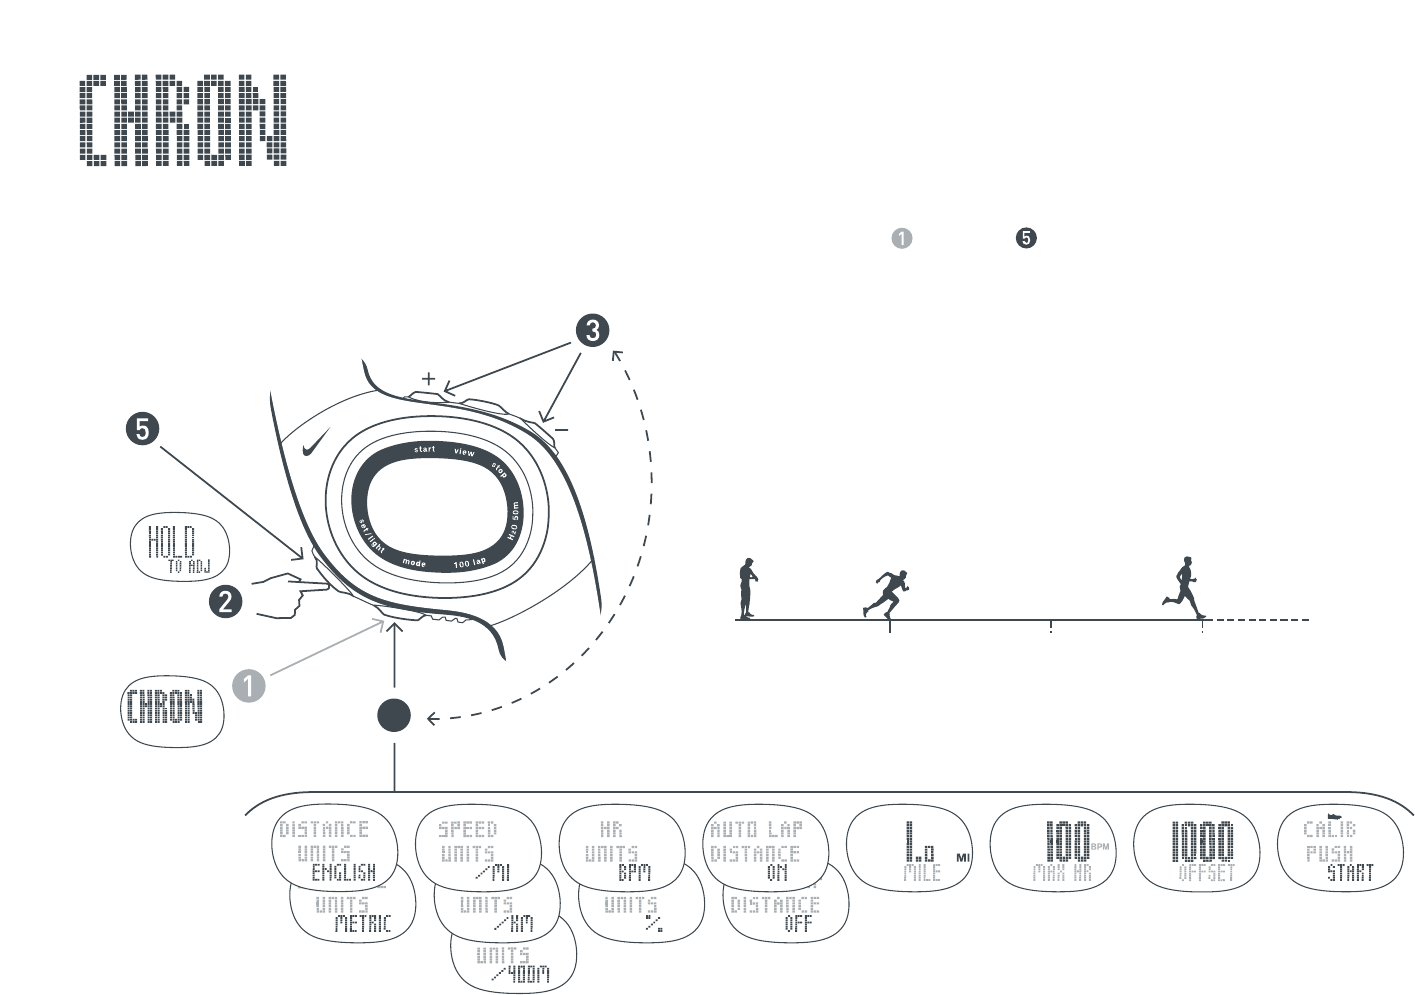
Set the Auto-Lap Feature
The chronograph contains an Auto-Lap feature which will automatically mark a lap after a determined distance.
You cannot manually mark laps when Auto-Lap is activated. Follow steps through to set up the Auto-Lap feature.
4
4 SEC
Scroll to
CHRON
mode.
Press to select
adjustable element.
EXIT
Set Distance
Unit
Set Speed
Unit
Set
Heart-Rate
Unit
Auto-Lap
ON/OFF
Set Auto-Lap
Set lap distance
(example: 1 mile)
Start Run
Press START
button
Auto-Lap
Marked
(2 miles)
LAP 1 LAP 2
Auto-Lap
Distance
Set Maximum
Heart-Rate
Max HR can
be calculated
in SET WATCH
window.
SDM Manual
Calibration
(See page 19
Manually
Calibrate the
SDM Pod.)
SDM Auto
Calibration
(See page 18
Calibrate the
SDM Pod.)
Press to change.
Auto-Lap
Marked
(1 mile)
23
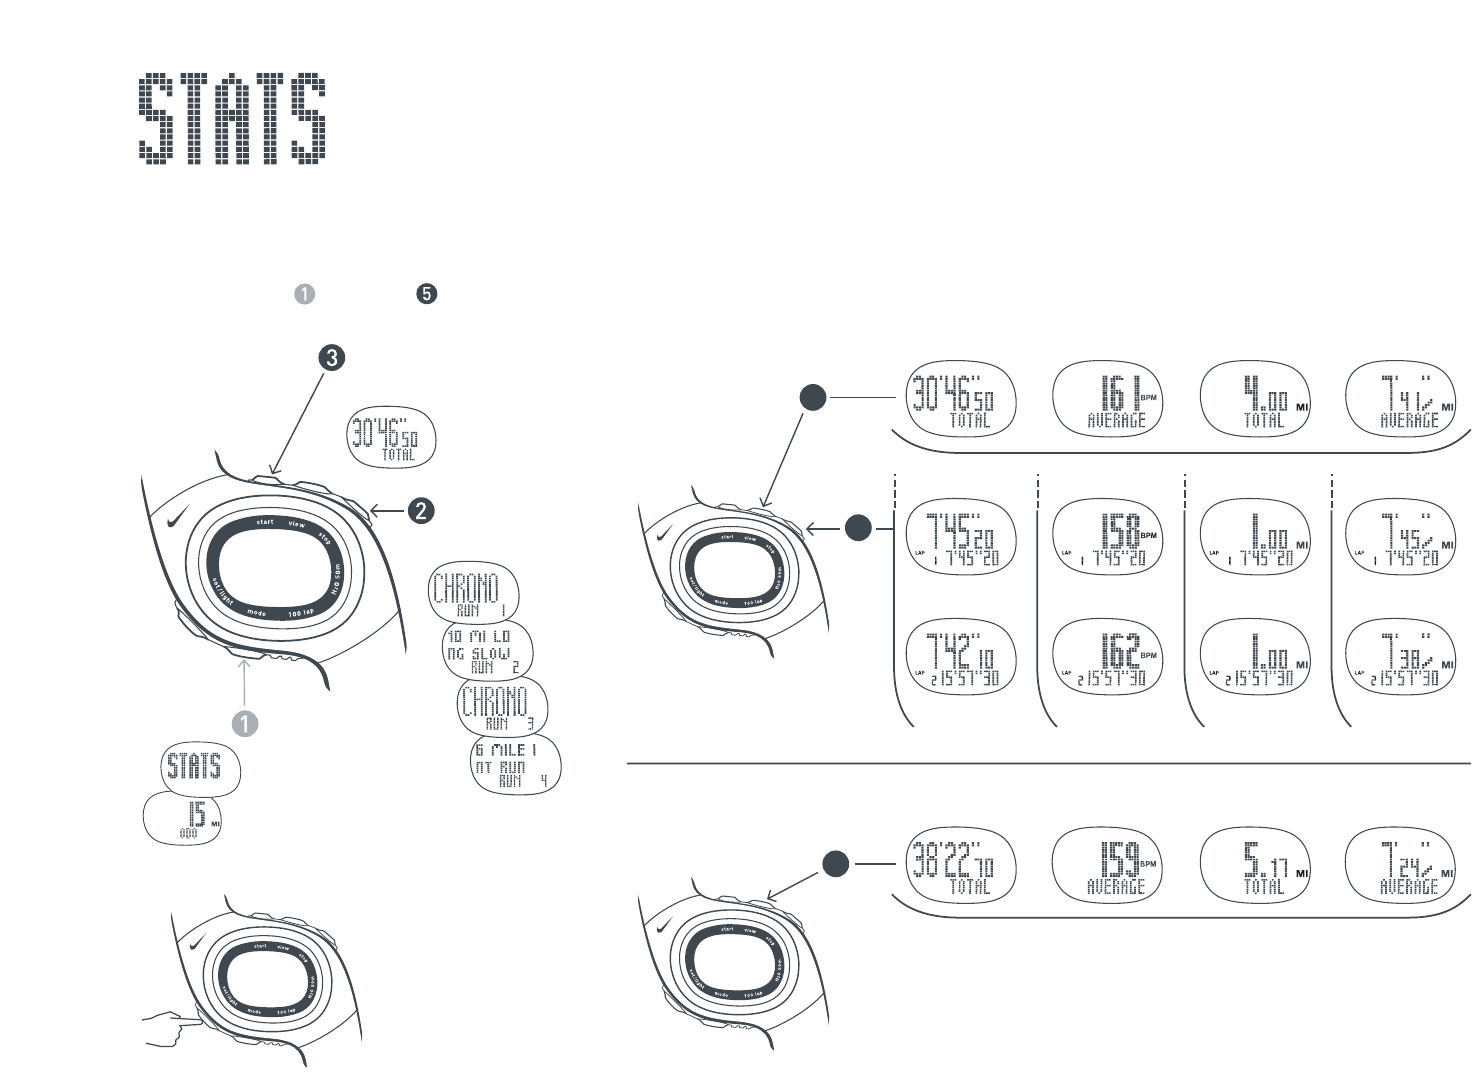
Review Saved Runs or Workouts
Use STATS mode to review saved information including total time, average heart rate, total distance, average pace
and detailed lap information. Up to 100 laps and multiple runs or workouts can be stored. Detailed statistics will be
available for the most recent run. Summary statistics will be available on all other runs.
Follow steps through to view saved run or workout data.
4
4
5
4 SEC
Scroll to
STATS mode.
Odometer will
appear in display.
Enter the Selected
Run or Workout
Scroll to a Run
or Workout.
Clear STATS
Hold for 4 seconds
to clear ALL RUNS.
Hold for 7 seconds
to clear odometer.
Follow these steps
to view detailed
STATS on most
recent run.
Follow these steps to
view summary STATS
on all other runs.
Total Time Average HR Total Distance Average Pace
Lap 1 Time Lap 1 Avg. HR Lap 1 Distance Lap 1 Avg. Pace
Lap 2 Time... Lap 2 Avg. HR... Lap 2 Distance... Lap 2 Avg. Pace...
Total Time Average HR Total Distance Average Pace
NOTE: Detailed data will not show on past runs
but it is still available to download.
NOTE: Saved runs or workouts will no longer be
viewable in STATS mode once they have been
downloaded from the watch.

24
Determine your Target Heart Rate Zones (Intensities)
Max Heart Rate
205 bpm
200
195
190
185
180
175
170
165
160
155
150
123 - 143 bpm
120 - 139
117 - 136
114 - 132
111 - 129
108 - 125
105 - 122
102 - 118
99 - 115
96 - 111
93 - 108
90 - 104
144 - 163 bpm
140 - 159
137 - 155
133 - 151
130 - 147
126 - 143
123 - 139
119 - 135
116 - 131
112 - 127
109 - 123
105 - 119
164 - 184 bpm
160 - 179
156 - 175
152 - 170
148 - 166
144 - 161
140 - 157
136 - 152
132 - 148
128 - 143
124 - 139
120 - 134
184 - 205 bpm
180 - 200
176 - 195
171 - 190
167 - 185
162 - 180
158 - 175
153 - 170
149 - 165
144 - 160
125 - 155
121 - 150
Light Intensity
(60-70% of Max HR)
Exercise in this range at the
start of a workout or to recover
from a tough workout or race.
You should be able to easily
maintain a conversation while
exercising at this intensity.
Find your
Max Heart Rate Moderate Intensity
(70-80% of Max HR)
Exercise in this range to develop
endurance and prepare your
muscles to make the transition
from aerobic to anaerobic. You
should be able to maintain this
for a while. You should not be
completely breathless and this
should not hurt.
Heavy Intensity
(80-90% of Max HR)
Exercise in this range
to increase muscle strength
and improve your anaerobic
threshold. This is uncomfortable.
You should be breathing very
heavily. You should be able to
sustain this for a brief time.
Maximum Intensity
(90-100% of Max HR)
Exercise in this range to increase
mental toughness, Max V02 and
tolerance to lactic acid. This is
very uncomfortable. You can
barely sustain it. You should be
completely breathless. Do not
exercise at this intensity except
on the advice of a trained
medical professional.
Heart-Rate Intensity Chart
Starting with your Maximum Heart-Rate (MHR), use this chart to help calculate your heart-rate zones depending on
the workout intensity desired. To determine your MHR, enter your age into the equation below or click the CALCULATE
button in the SET WATCH window of the Triax Elite application. Your MHR is dependent on your personal fitness level
so the formula below may not work for everyone.
25
Running Pace Chart
Use this chart to determine your pace (time per distance) for common races and finishing times.
2 mi 3.2 km
3 mi 4.8 km
3.1 mi 5 km
3.5 mi 5.6 km
5 mi 8.1 km
6 mi 9.7 km
6.2 mi 10 km
9.3 mi 15 km
10 mi 16.1 km
12.4 mi 20 km
1/2-Marathon
13.1 mi 21.1 km
15 mi 24.1km
15.5 mi 25 km
18.6 mi 30 km
20 mi 32.2 km
Marathon*
26.2 mi 42.2 km
*Example: If your goal is to finish a marathon in 3:43:00 you would need a pace
of 8:30/mi. If this is your goal, you might want to train with the pace zone at 8:40/mi
for the slow threshold and 8:20/mi for the fast threshold.
Common Races and Finishing Times
12:00/mi
7:28/km
24:00
36:00
37:17
42:00
1:00:00
1:12:00
1:14:34
1:51:51
2:00:00
2:29:08
2:37:19
3:00:00
3:06:25
3:43:42
4:00:00
5:14:37
11:30/mi
7:09/km
23:00
34:30
35:44
40:15
57:30
1:09:00
1:11:27
1:47:11
1:55:00
2:22:55
2:30:45
2:52:30
2:58:39
3:34:22
3:50:00
5:01:31
11:00/mi
6:50/km
22:00
33:00
34:11
38:30
55:00
1:06:00
1:08:21
1:42:32
1:50:00
2:16:42
2:24:12
2:45:00
2:50:53
3:25:03
3:40:00
4:48:24
10:30/mi
6:31/km
21:00
31:30
32:37
36:45
52:30
1:03:00
1:05:15
1:37:52
1:45:00
2:10:29
2:17:39
2:37:30
2:43:07
3:15:44
3:30:00
4:35:18
10:00/mi
6:13/km
20:00
30:00
31:04
35:00
50:00
1:00:00
1:02:08
1:33:12
1:40:00
2:04:16
2:11:06
2:30:00
2:35:21
3:06:25
3:20:00
4:22:11
9:30/mi
5:54/km
19:00
28:30
29:31
33:15
47:30
57:00
59:02
1:28:33
1:35:00
1:58:04
2:04:32
2:22:30
2:27:35
2:57:05
3:10:00
4:09:05
9:00/mi
5:35/km
18:00
27:00
27:58
31:30
45:00
54:00
55:55
1:23:53
1:30:00
1:51:51
1:57:59
2:15:00
2:19:49
2:47:46
3:00:00
3:55:58
8:30/mi*
5:17/km
17:00
25:30
26:24
29:45
42:30
51:00
52:49
1:19:13
1:25:00
1:45:38
1:51:26
2:07:30
2:12:02
2:38:27
2:50:00
3:42:52*
8:00/mi
4:58/km
16:00
24:00
24:51
28:00
40:00
48:00
49:43
1:14:34
1:20:00
1:39:25
1:44:53
2:00:00
204:16
2:29:08
2:40:00
3:29:45
7:30/mi
4:40/km
15:00
22:30
23:18
26:15
37:30
45:00
46:36
1:09:54
1:15:00
1:33:12
1:38:19
1:52:30
1:56:30
2:19:49
2:30:00
3:16:38
7:00/mi
4:21/km
14:00
21:00
21:45
24:30
35:00
42:00
43:30
1:05:15
1:10:00
1:27:00
1:31:46
1:45:00
1:48:44
2:10:29
2:20:00
3:03:32
6:30/mi
4:02/km
13:00
19:30
20:12
22:45
32:30
39:00
40:23
1:00:35
1:05:00
1:20:47
1:25:13
1:37:30
1:40:58
2:01:10
2:10:00
2:50:25
6:00/mi
3:44/km
12:00
18:00
18:38
21:00
30:00
36:00
37:17
55:55
1:00:00
1:14:34
1:18:39
1:30:00
1:33:12
1:51:51
2:00:00
2:37:19
5:30/mi
3:25/km
11:00
16:30
17:05
19:15
27:30
33:00
34:11
51:16
55:00
1:08:21
1:12:06
1:22:30
1:25:26
1:42:32
1:50:00
2:24:12
5:00/mi
3:06/km
10:00
15:00
15:32
17:30
25:00
30:00
31:04
46:36
50:00
1:02:08
1:05:33
1:15:00
1:17:40
1:33:12
1:40:00
2:11:06
Pace (minutes per mile)
Pace (minutes per kilometer)

26
1
2
7
3 SEC
Linking Digital Components to the Watch
All componetns in your system share a unique digital ID to avoid crosstalk with other Triax Elite systems. Before the
components communicate properly, the watch must be linked to the HRM transmitter and SDM pod to establish this
shared ID. The original components which came with the watch were linked at the factory. Follow steps through
to re-link the original components or link any replacement components to the Triax Elite watch.
NOTE: These directions describe how to link both components. If you are replacing /re-linking only one component, you can ignore the steps
for the other component. Exit ID SENSOR LINKING once you establish a successful link with the new component.
Scroll to
PC mode.
NOTE: After steps 1 and 2 below, the watch will
begin to search for the components.
If the watch displays NO HRM or NO SDM
before you are finished with all 6 steps,
you will need to exit PC mode and re-enter
ID SENSOR LINKING.
Firmly grasp the HRM transmitter with both
hands, one on each end, making sure to touch
the sensors on the back side of the transmitter.
There is no ON/OFF switch for the transmitter.
It sends a digital signal during the first 10
seconds of connection with the sensors.
NOTE: If you are unable to enter ID SENSOR LINKING
before the 10 seconds expires, wait two minutes
for the HRM transmitter to automatically turn off
and try again.
After a few seconds the watch should display
NEW HRM. This means the watch has located
the digital ID of the HRM transmitter for the
first time.
NOTE: Once you have linked the HRM transmitter for
the first time, the watch will remember the digital ID
until you switch to a different transmitter.
If you would now exit PC mode and re-enter
ID SENSOR LINKING, the display would read
HRM instead of NEW HRM.
Using a coin, turn the SDM pod
battery hatch 90 degrees clockwise.
Insert a AAA battery with the
negative node facing you.
Press and hold the power button on
the SDM pod for five seconds until
the LED light begins a fast triple-
flash. The pod is now in ID mode,
ready to link with the watch. After
10 seconds the pod will revert to
normal operation.
After a few seconds, the watch
should display NEW SDM under
NEW HRM. This indicates the
watch has successfully located
the digital ID of both components.
NOTE: Once you have linked the SDM
pod for the first time, the watch will
remember the digital ID until you switch
to a different pod. If you would now exit
PC mode and re-enter ID SENSOR
LINKING, the display would read SDM
instead of NEW SDM.
SENSORS
EXIT

27
Troubleshooting
Watch does not link with the USB dock:
Reposition the USB dock away from your monitor or
other electronic devices.
Move the watch closer to the USB dock.
Turn OFF any nearby devices possibly using the same 916MHz
radio frequency (cordless phones, baby monitors, etc).
Re-enter PC mode and try linking again.
Exit and re-start the Triax Elite application.
USB dock blue LED is not flashing:
Make sure the USB dock is plugged into a working USB port
on the computer.
Make sure you have installed the Triax Elite application
and drivers.
Uninstalling the USB dock (Windows only):
In order to uninstall the USB drivers, you have to perform an
additional step beyond uninstalling the Triax Elite application
from Add/Remove programs.
1. Open the Control Panel.
2. Double-Click the Add/Remove Programs icon
3. Highlight the TRIAX ELITE icon, click Change/Remove
and follow the on-screen directions.
4. After successful uninstall, Plug-in the USB dock
and select System from within Control Panel.
5. Expand the Universal Serial Bus controller menu.
6. Click on the Nike Triax Elite USB Link controller.
7. Click the Driver tab and then click Remove.
8. Unplug the USB dock.
SDM pod does not link with watch:
Make sure the watch has assigned a digital ID
to the SDM pod. See page 26.
Be sure the unit is ON by pressing the power switch
on the top of the unit until the LED begins to blink.
Try replacing the battery. See page 30.
Check battery placement for correct orientation. See page 30.
Re-enter CHRON or WKOUT mode on watch.
LED light on SDM pod flashes rapidly:
This indicates low battery power.
Replace the AAA battery in the SDM pod.
Cross-talk:
If you receive “cross-talk” from another electronic device,
press the button on the speed sensor. The watch and speed
sensor will begin linking on another channel.
SDM pod attachment to shoe:
Make sure the SDM pod is attached to the laces securely
enough so there is no wobble when running. The pod should
be aligned with the foot and secured well enough that the
alignment does not change during run.
Orthotics:
People who wear orthotics or have extreme pronation or
supination in their stride may experience reduced accuracy.
Re-calibrate for improved accuracy.
Varying paces:
People who run at varying paces within a run
may experience reduced accuracy.
Calibrate at the speed you usually run for improved accuracy.

28
Troubleshooting (continued)
HRM transmitter does not link with the watch:
Make sure the watch has assigned a digital ID
to the HRM transmitter. See page 26.
Make sure the HRM transmitter is ON by placing it on the body.
The unit turns ON when it detects the two electrodes on the
body. It is recommended to wear the transmitter directly
against the skin.
Reposition the HRM transmitter slightly.
Try replacing the battery. See page 30.
Check battery placement for correct orientation. See page 30.
Moisten the electrodes with water or gel to make better contact
with the body. If you are wearing the HRM transmitter over
clothing, try wetting the clothing.
Re-enter CHRON or WKOUT mode to the watch.
The watch will not ID the HRM transmitter in PC adjust mode:
There is a limited time that the HRM transmitter will attempt to
syncronize with the watch.
Set the HRM transmitter aside for several minutes and try again.
Watch display is frozen:
The display of your watch may “freeze” due to static electricity
or recent battery replacement. If this occurs, press and hold all
five buttons at the same time. This will erase the data in the
memory and reset the watch to the factory settings.
Press and hold all five buttons
at the same time to reset the
watch to the factory settings
The SET WATCH and SYNC buttons are not present in the Triax
Elite application:
Exit the application. Exit PC mode. Plug-in the USB PC dock
to a working USB port on the computer. Open the application
again and then enter PC mode.
If you unplug the USB dock while the application is open,
you will need to reboot the computer before SYNC and SET
WATCH buttons will appear in Calendar window.
WKOUT ACTIVE or CHRONO ACTIVE shown in watch display:
The WKOUT ACTIVE or CHRONO ACTIVE display
means you must save a workout or run data before
linking to the computer. See page 17, Begin a Workout,
or page 21, Save Run Data.
Run or Workout data downloaded to wrong USER PROFILE:
Once run or workout data is uploaded to the computer,
it is permanently erased from the watch. It is also embedded
into the USER PROFILE that was active at the time of the upload.
There is no way to move it to another profile.
Make sure the current USER PROFILE is set to the desired
profile before downloading run or workout data from the watch.
Where can I locate my WORKOUTS, PLANS and USERS files:
PC:
C:\ Documents and Settings \ All Users \ Documents \ Nike \
TRIAX ELITE
Macintosh:
Main Hard-drive \ Applications \ Nike \ TRIAX ELITE
These files will be found at the path listed above unless you
chose a custom location during installation.

29
Specifications
IP code: IPX8
Applied Part: Type CF
Storage: Standard Conditions (within operating temperature)
Watch
Water-Resistant up to 50 Meters:
Designed for underwater performance
to a depth of 165 feet (50 m).
ATTENTION: Water damage may occur if
watch buttons are pressed while underwater.
Operating Temperature: -5˚ to 50˚ Celsius
Material Specifications:
Battery Door: Stainless Steel
Bezel: Stainless Steel
Buckle: Stainless Steel
Case: Polycarbonate
Caseback: Polycarbonate
Crystal: Mineral Glass
Strap: Urethane
Mode Limits:
Chronograph: 99:59’59”
Heart Rate: 30 - 240 bpm
HRM Transmitter
Water-Resistant up to 30 Meters:
Wipe dry after use. Do not use around conductive material.
Operating Temperature: -5˚ to 50˚ Celsius
Accuracy: +-1% or +-1% bpm (steady state)
Material Specifications:
Case: Polycarbonate
Strap: Urethane
Band: Elastic
SDM Pod
Water-Resistant up to 10 Meters:
Wipe dry after use. Not intended for underwater use.
Operating Temperature: 0˚ to 40˚ Celsius
Accuracy: +-3% (most runners)
Material Specifications:
Case: ABS
Strap: Urethane
Clip: Nylon
FCC and RSS-210 Compliance
This device complies with part 15 of the FCC and
RSS-210 of the IC rules.
Operation is subject to the following two conditions:
(1) This device may not cause harmful interference.
(2) This device must accept any interference that
may cause undesired operation of the device.
Tested to comply with FCC standards.
For home or office use.
FCC WARNING: Changes or modifications not expressly
approved by Nike could void your authority to operate
this device under FCC regulations.

30
Battery
WARNING! Keep watch batteries away from children. If swallowed, contact a doctor immediately.
WARNING! Batteries contain chemical substances. They should be disposed of properly according to local regulations.
Watch
Battery Type: CR2025 3V Lithium
Battery Life:
The battery is estimated to last 1-1.5 years depending on frequency and use of certain features.
Utilizing the Power Save function will help conserve battery life.
Battery Replacement:
Follow steps below to replace your watch battery. For best results, you can have Nike’s authorized
service center change the watch battery.
HRM Transmitter
Battery Type: CR2032 3V Lithium
Battery Replacement: Follow steps below to replace your HRM transmitter battery.
SDM Pod
Battery Type: AAA battery
Battery Replacement: Follow steps below to replace your SDM pod battery.
Using a coin, unscrew
the battery hatch by
turning it counter-
clockwise.
Replace old battery
with CR2025 3V lithium
battery. Positive writing
facing you. Do not touch
the two contacts.
Replace the battery hatch
with care not to damage
the rubber “O” ring.
Using a coin, unscrew the battery
hatch by turning it counter-clockwise.
Replace old battery with CR2025 3V
lithium battery. Positive writing facing
you. Do not touch the two contacts.
Replace the battery hatch.
Using a coin, turn the
battery hatch 90
degrees clockwise.
Insert a AAA battery
with the negative node
facing you.
Replace the battery
hatch with care not
to damage the
rubber “O” ring.

31
Two-Year Limited Warranty
Your NIKE watch is warranted to be free of defects in materials
or workmanship, under normal use, for a period of two years from
the date of delivery. This limited warranty excludes the battery, crystal, strap,
or damage resulting from improper care or handling, accidents,
modification, unauthorized repairs or normal wear.
Return the defective watch and the store receipt to the place of purchase.
If there is a covered defect, you have the option to have the defective parts
or watch repaired or replaced with the same product (if available) or
a similar product of equal price. However, NIKE reserves the right
to refuse either repair or replacement (but not both) if the cost of
doing so would be disproportionate to the defect.
This limited warranty is in place of all other express warranties,
and excludes refund of the purchase price. Any implied warranties,
including merchantability and fitness for a particular purpose, are limited
to the duration of this limited warranty. In no event shall NIKE be liable
for direct, indirect, incidental or consequential damages arising out of
the use of the watch, and any recovery is limited to the purchase price.
No other person or company is authorized to change this limited warranty,
and your dealer is solely responsible for any other warranties.
For U.S. Purchasers: Some states do not allow limitations on how long
an implied warranty lasts, or exclusions of incidental or consequential
damages, so the above limitations may not apply to you. This warranty gives
you specific legal rights, and you may also have other rights which vary
from state to state.
The foregoing is without prejudice to other legal rights that may arise
under applicable national legislation.
For non-warranty service like battery or strap replacement, contact one of
the listed service centers.
Technical Support
and Product Questions
www.nike.com/timing
NIKE CONSUMER AFFAIRS: 1-888-350-6453
Service Centers
USA: 800-359-2508
Parsec Enterprises, Inc.
7501 N. Harker Dr.
Peoria, IL 61650