Nikko Co MR2D2TX Radio Controlled Toy(Transmitter) User Manual R2D2 EN Latest indd
Nikko Co Ltd Radio Controlled Toy(Transmitter) R2D2 EN Latest indd
Nikko Co >
Contents
- 1. User Manual 1
- 2. User Manual 2
- 3. User Manual 3
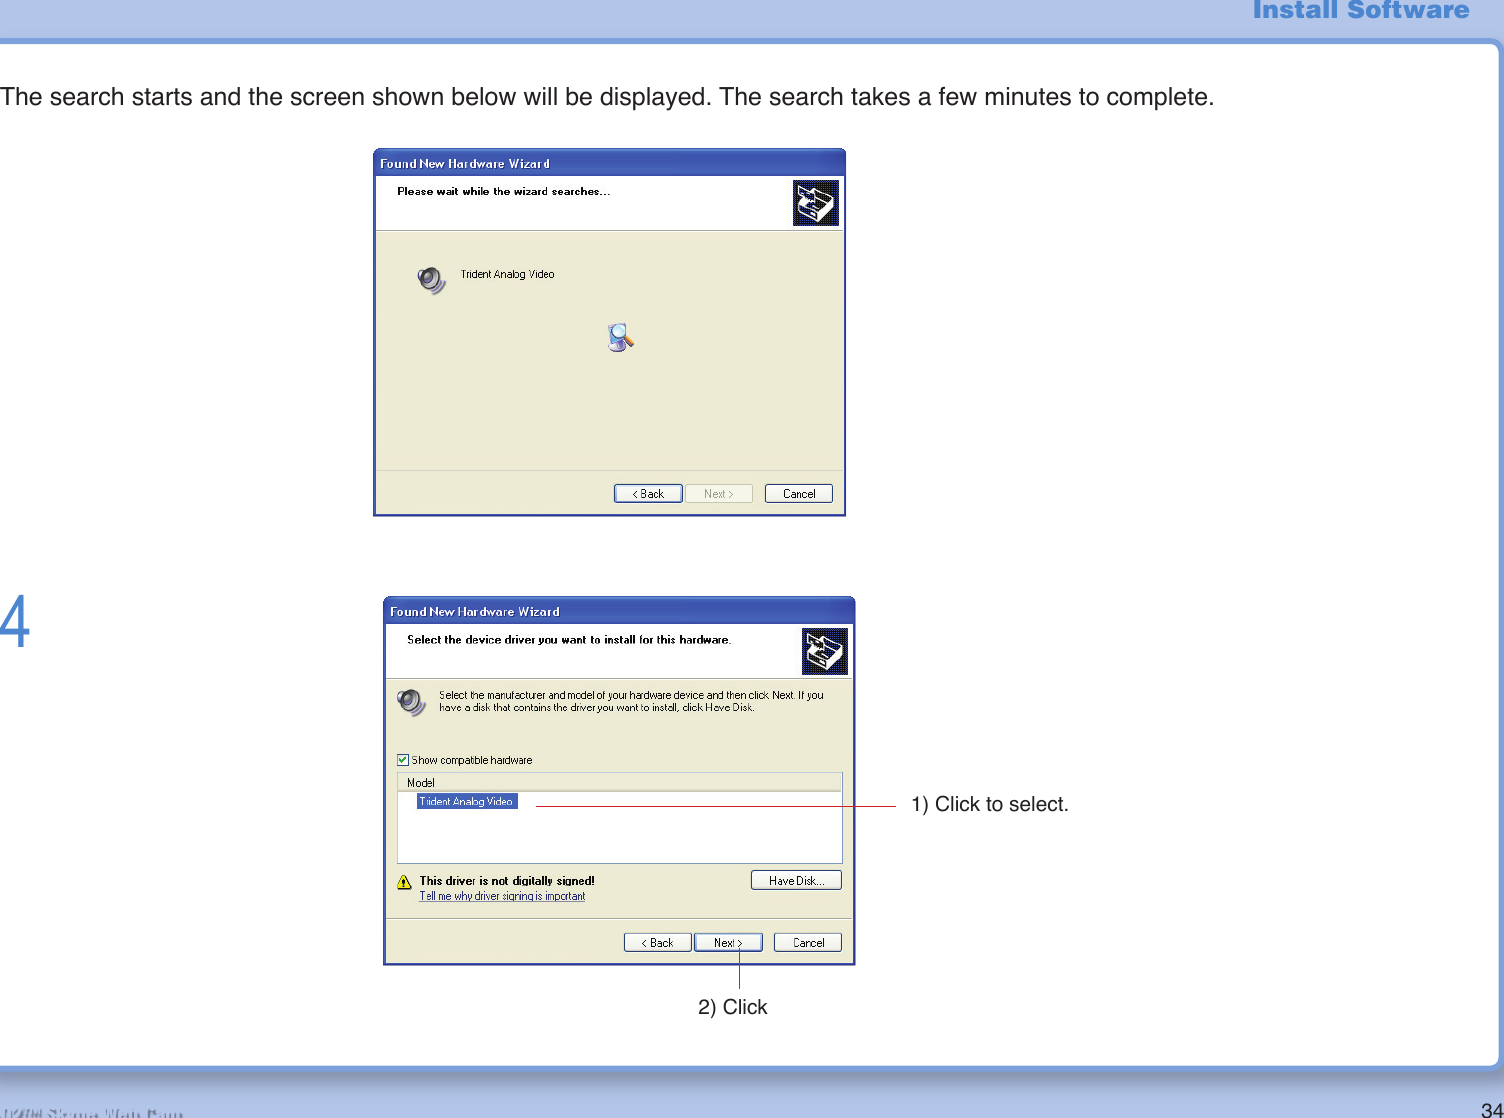
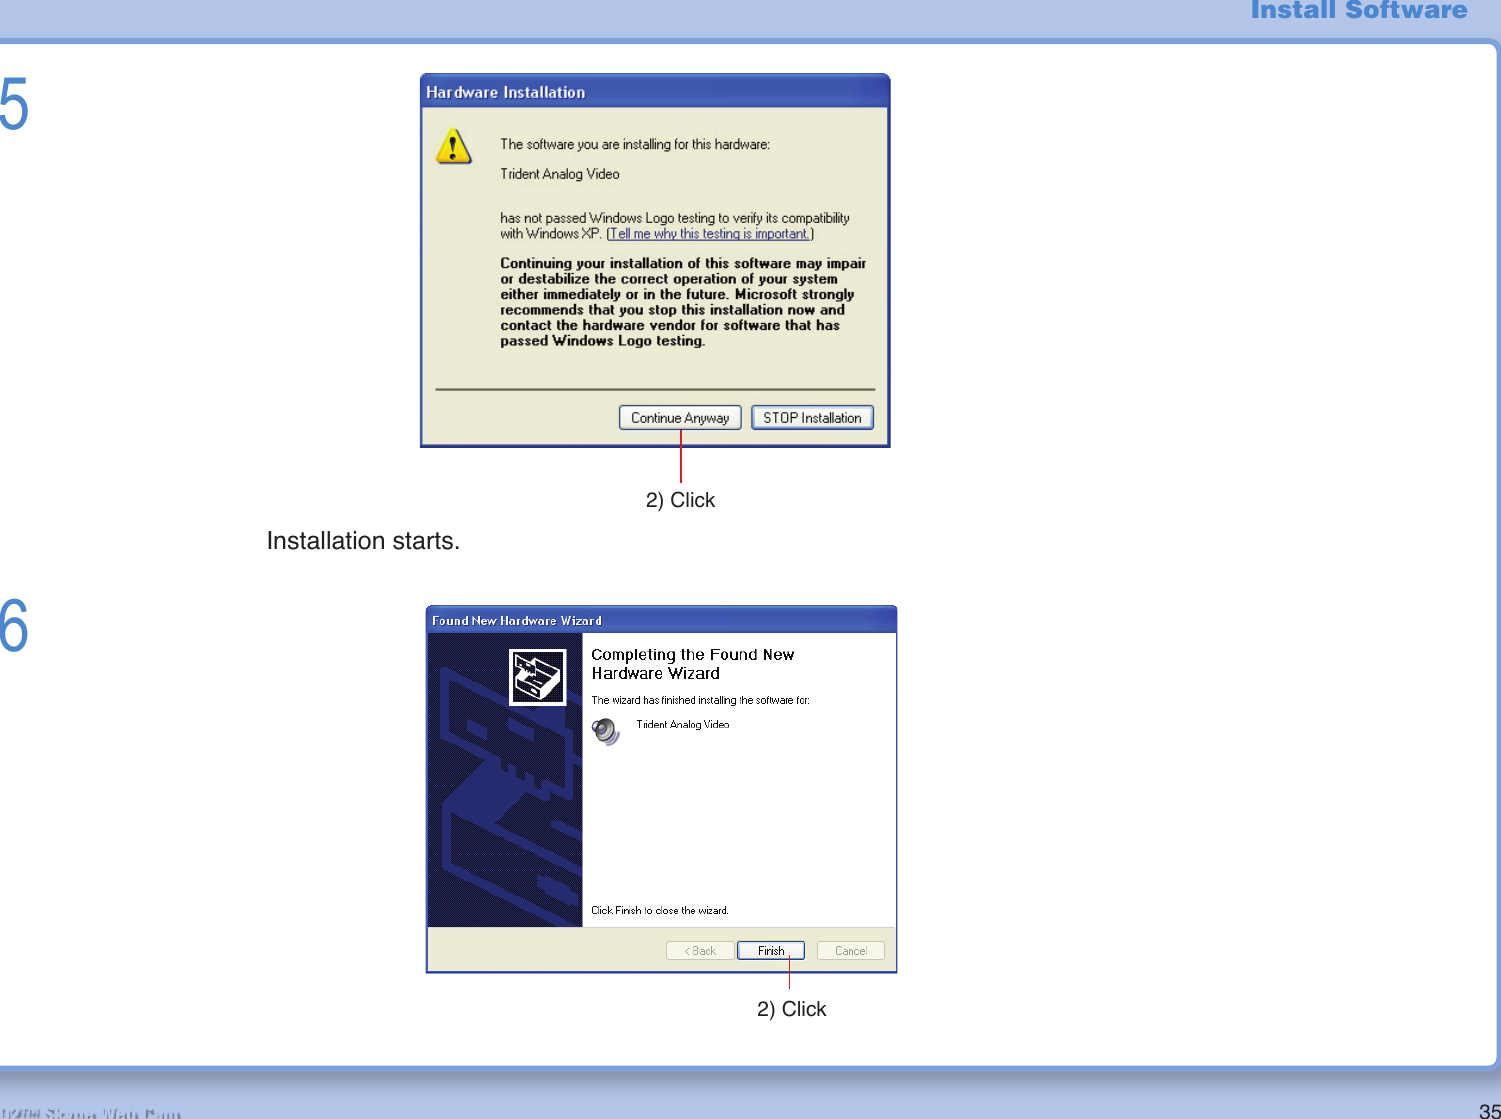
User Manual 2
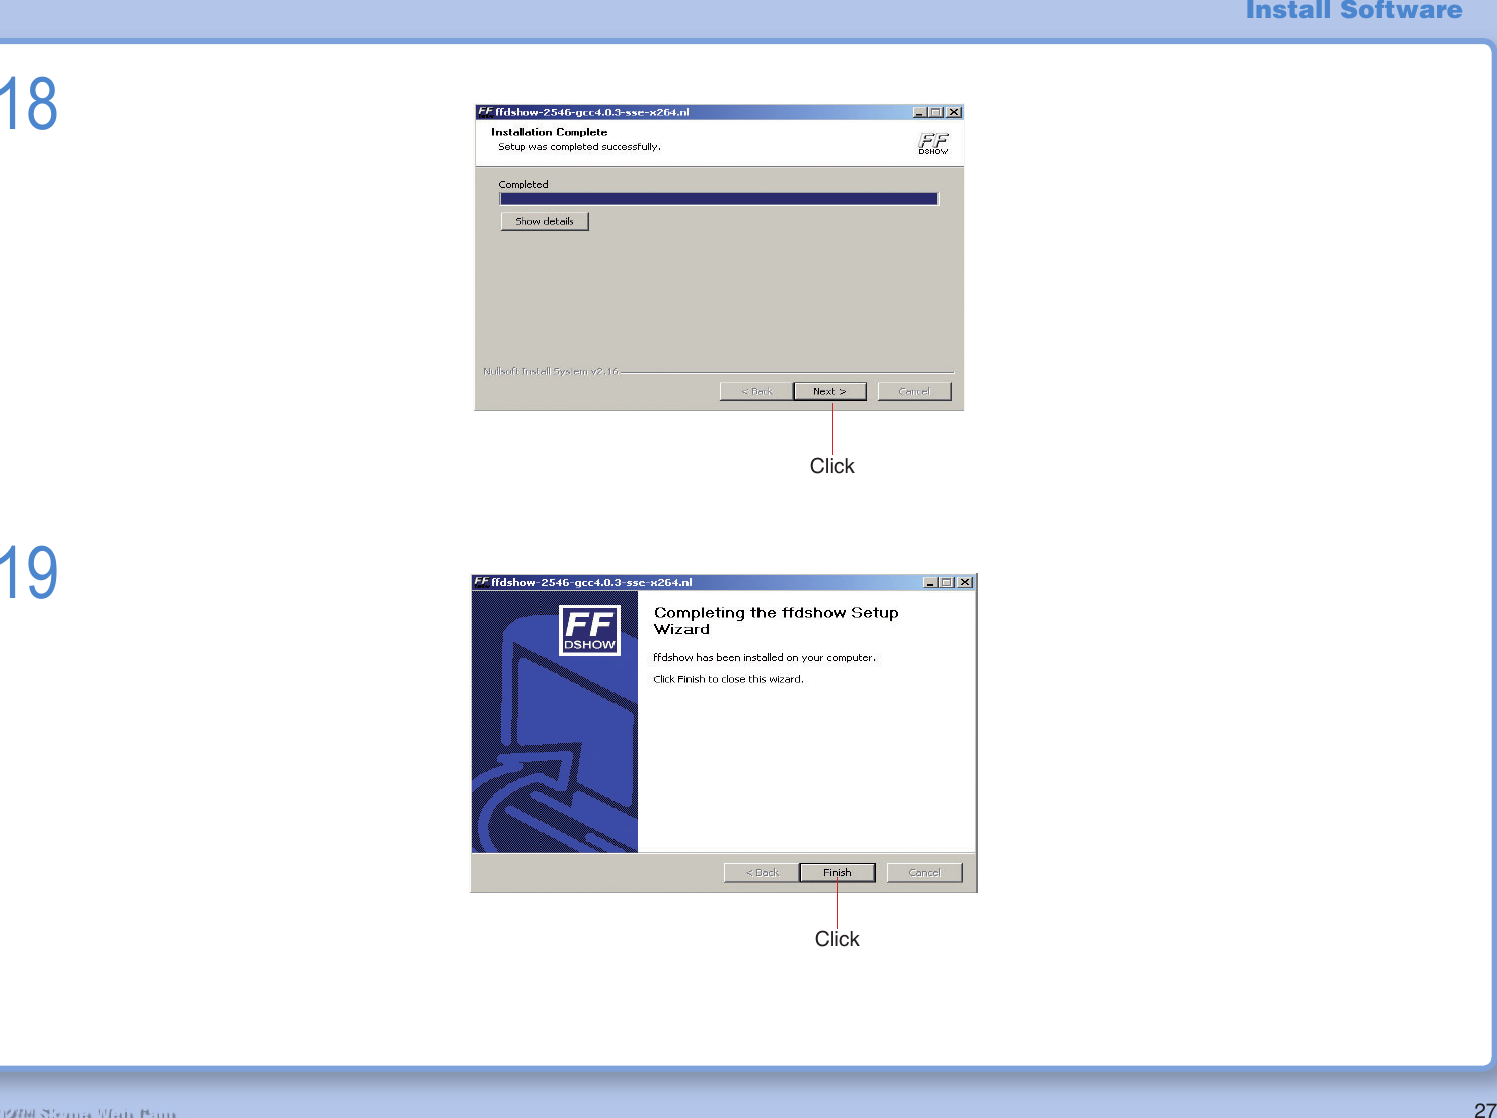
![29R2-D2™ Skype Web Cam22If you wish to change installation folder, click on the [Browser] button and specify the desired location.MemoFile will be copied onto the computer.23ClickInstall SoftwareClickClick](https://usermanual.wiki/Nikko-Co/MR2D2TX.User-Manual-2/User-Guide-809341-Page-3.png)
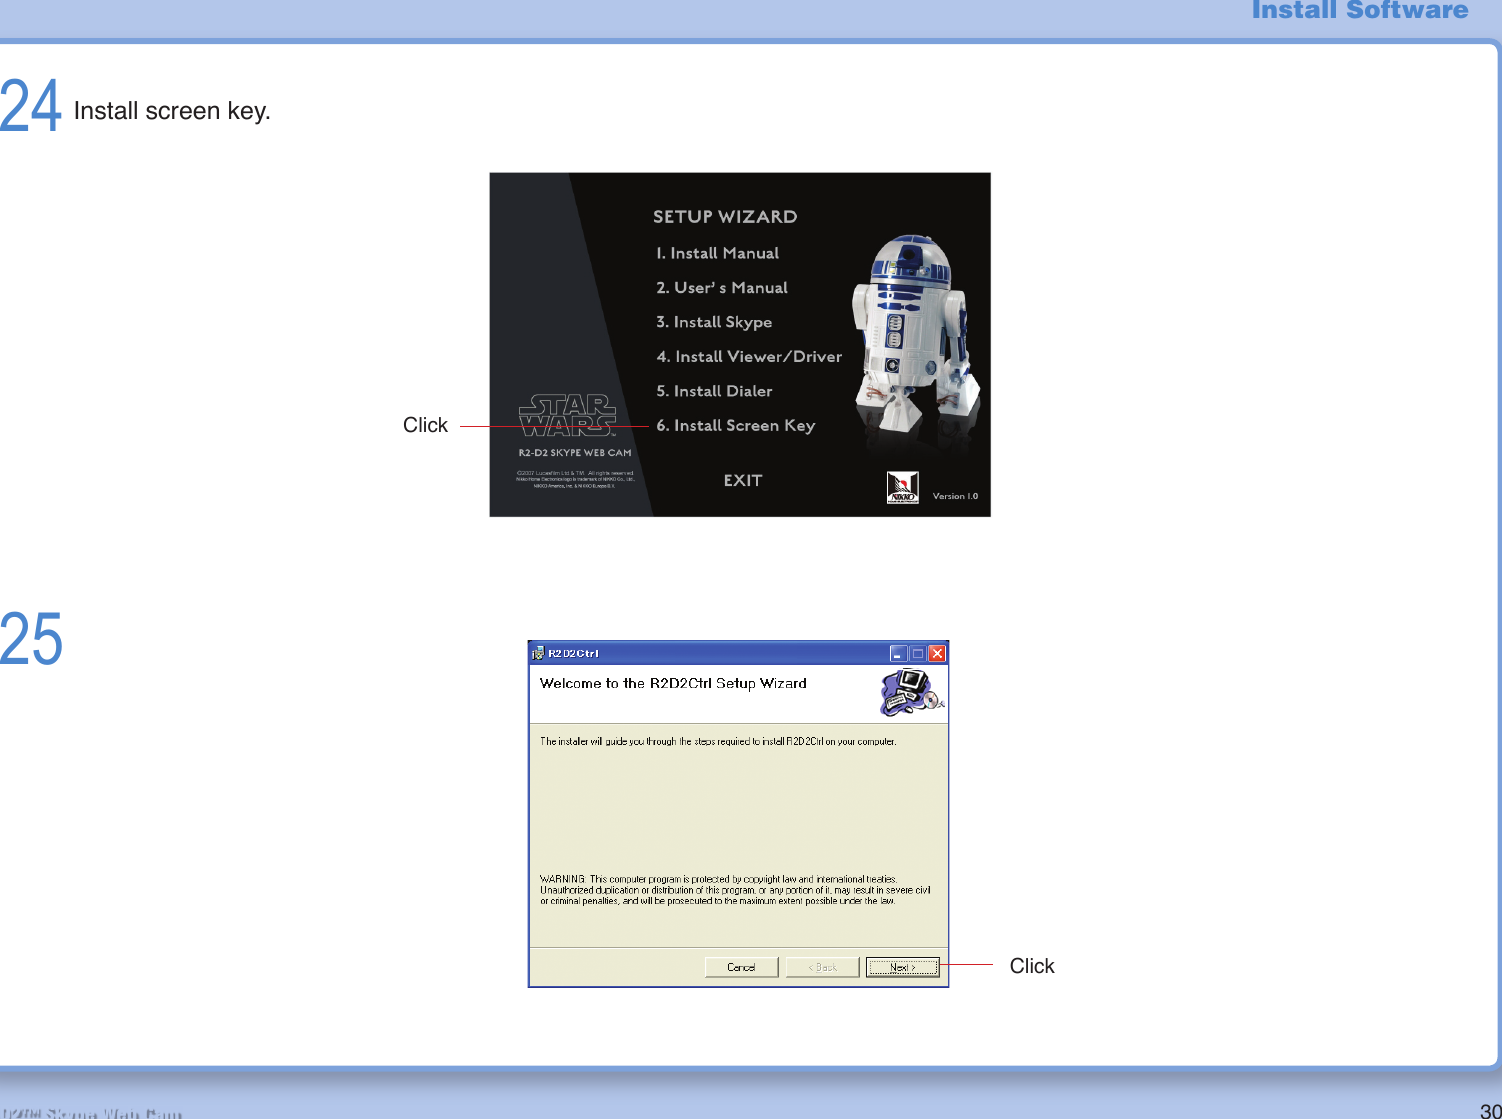
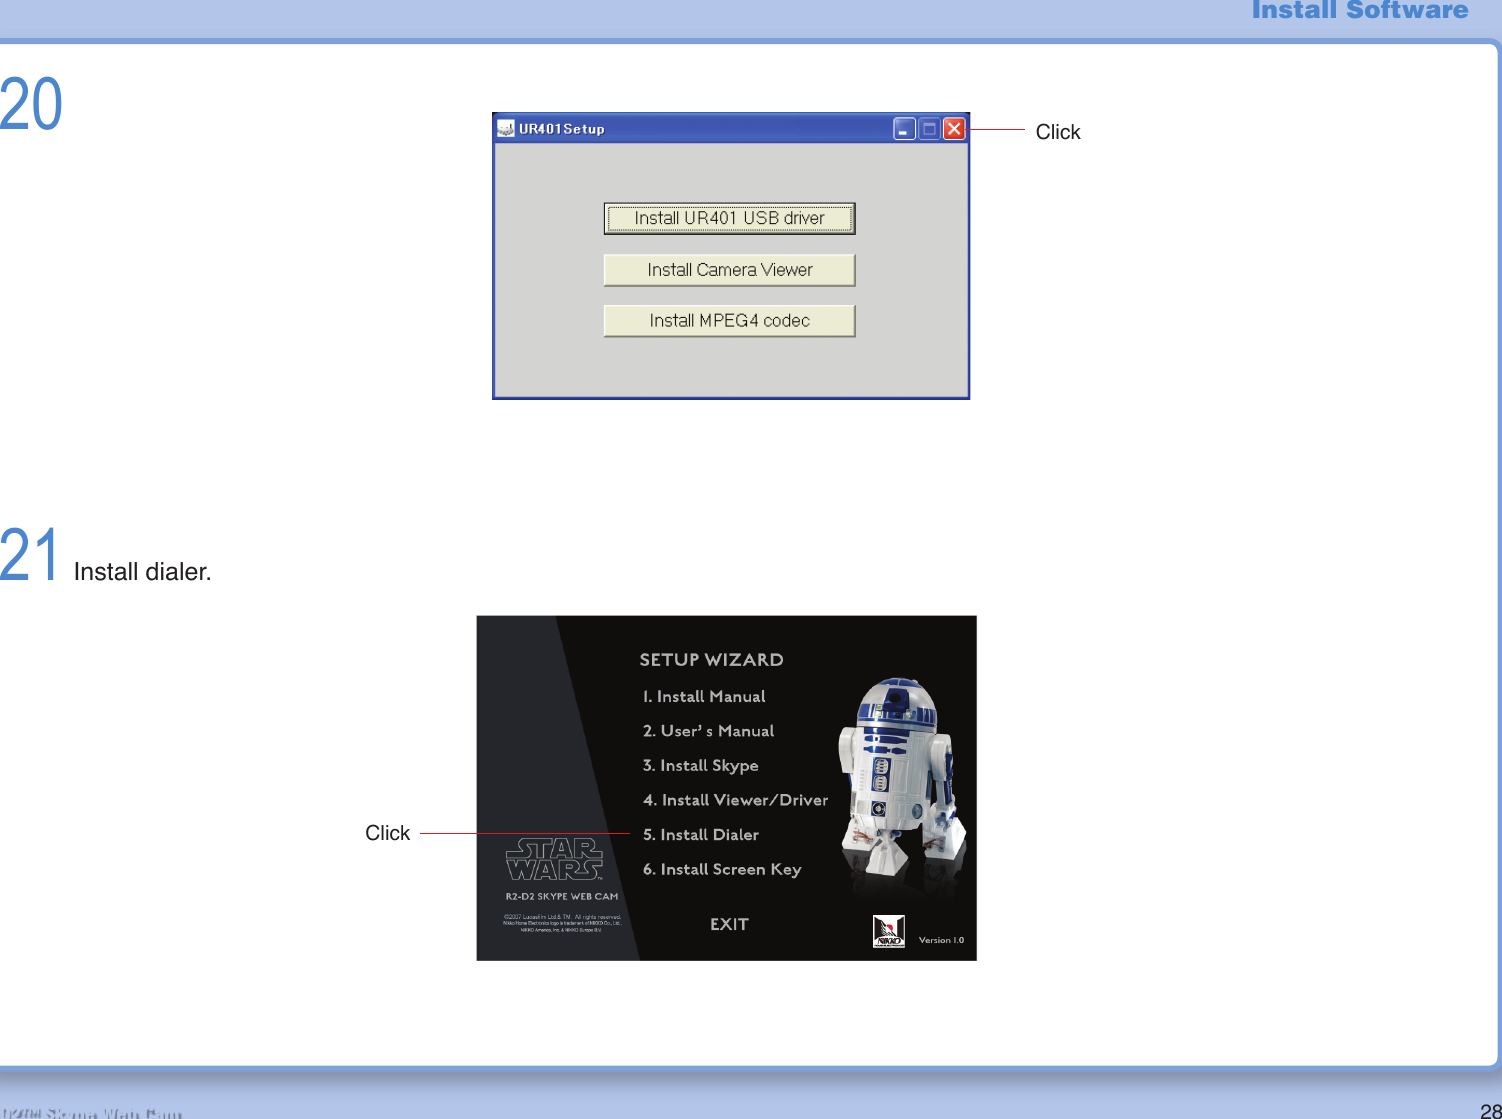
![31R2-D2™ Skype Web Cam2627ClickIf you wish to change installation folder, click on the [Browse] button and specify the desired location.MemoClickInstall Software](https://usermanual.wiki/Nikko-Co/MR2D2TX.User-Manual-2/User-Guide-809341-Page-5.png)

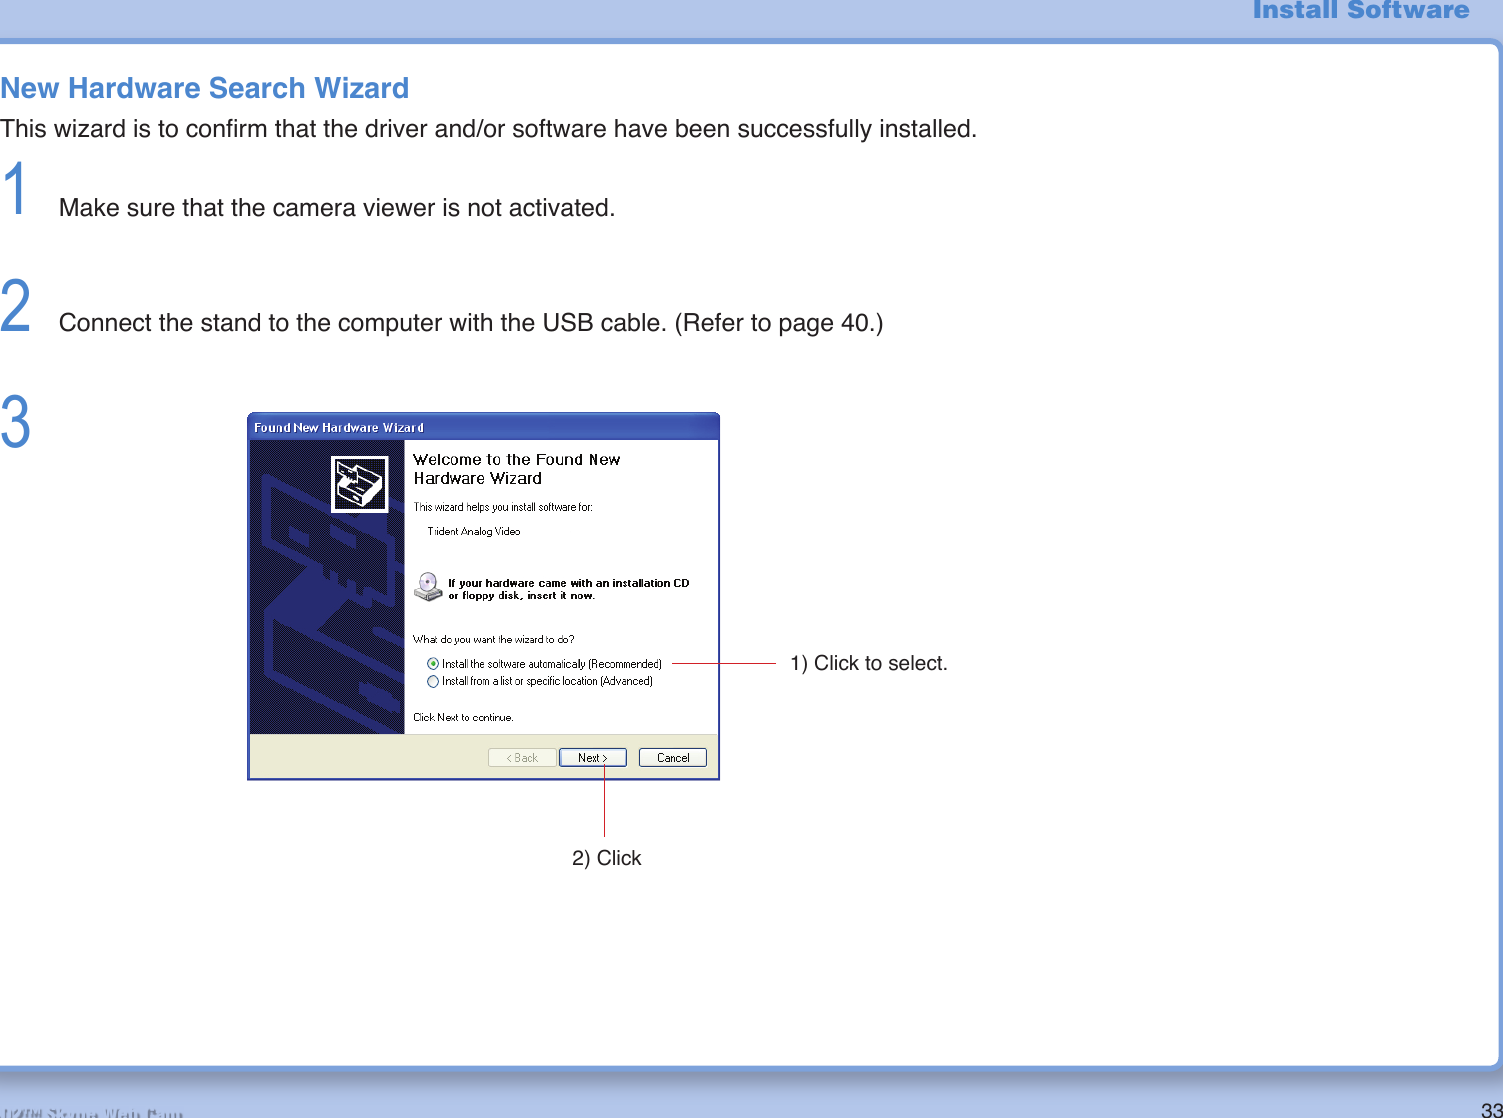
![36R2-D2™ Skype Web CamConfi rm the Installation ResultConfi rm if driver and software have been installed successfully.Confi rm driver installation1 Connect computer, stand and lightsaber with USB cable. (Refer to “USB Cable Connection” on page 14)2 Click [Start] – [Settings] – [Control Panel].3 Double-click the “System” icon.4 Click the [Hardware] tab and [Device Manager] button.5If “!” mark is attached to Trident Analog Video, disconnect the USB cable from computer and reconnect it.MemoMake sure that this has been addedInstall Software](https://usermanual.wiki/Nikko-Co/MR2D2TX.User-Manual-2/User-Guide-809341-Page-10.png)
![37R2-D2™ Skype Web CamConfi rm audio device installation1 Connect computer, stand and lightsaber with USB cable. (Refer to “USB Cable Connection” on page 40)2 Click [Start] – [Settings] – [Control Panel].3 Double-click the [Sound and Audio] icon.4If “NIKKO R/C” has not been selected, display the list and select “NIKKO R/C”.Memo1) ClickMake sure that “NIKKO R/C” has been selected3) ClickInstall Software](https://usermanual.wiki/Nikko-Co/MR2D2TX.User-Manual-2/User-Guide-809341-Page-11.png)


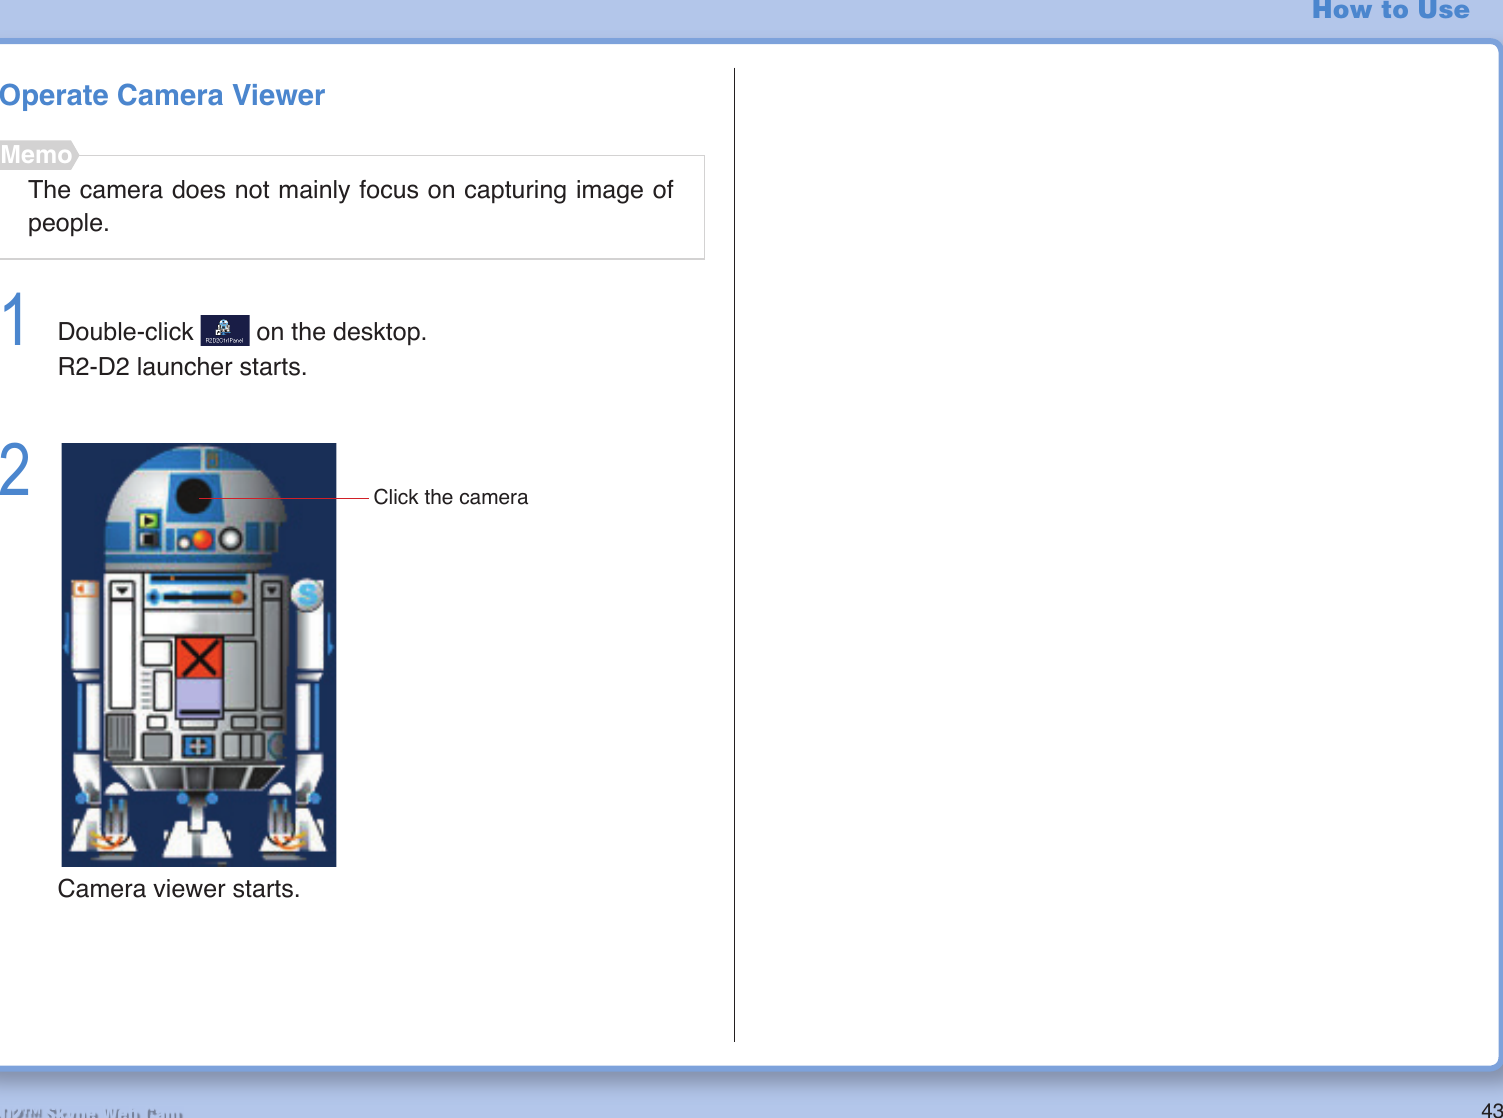
![42R2-D2™ Skype Web CamHow To UseStart SoftwareSoftware can be started from R2-D2 launcher.1 Turn on R2-D2 power. (Refer to “Turn on R2-D2 Power” on page 41)2 Double-click on the desktop. R2-D2 launcher starts.3 Click the desired parts of R2-D2 launcher.When put a cursor on the point that can click, the cursor changes to lightsavorʼs fi gure . MemoNote: Do not disconnect the USB cable from you computer and connect again during R2-D2 operation. This will caused your computer to auto-restart.MemoIf the screen shown below is displayed, select [Allow this program to use Skype].Activates camera viewer. (Refer to page 43)Activates screen key. (Refer to page 47)Starts Skype. (Refer to page 52)Ends R2-D2 launcher.Minimizes R2-D2 launcher window.](https://usermanual.wiki/Nikko-Co/MR2D2TX.User-Manual-2/User-Guide-809341-Page-16.png)
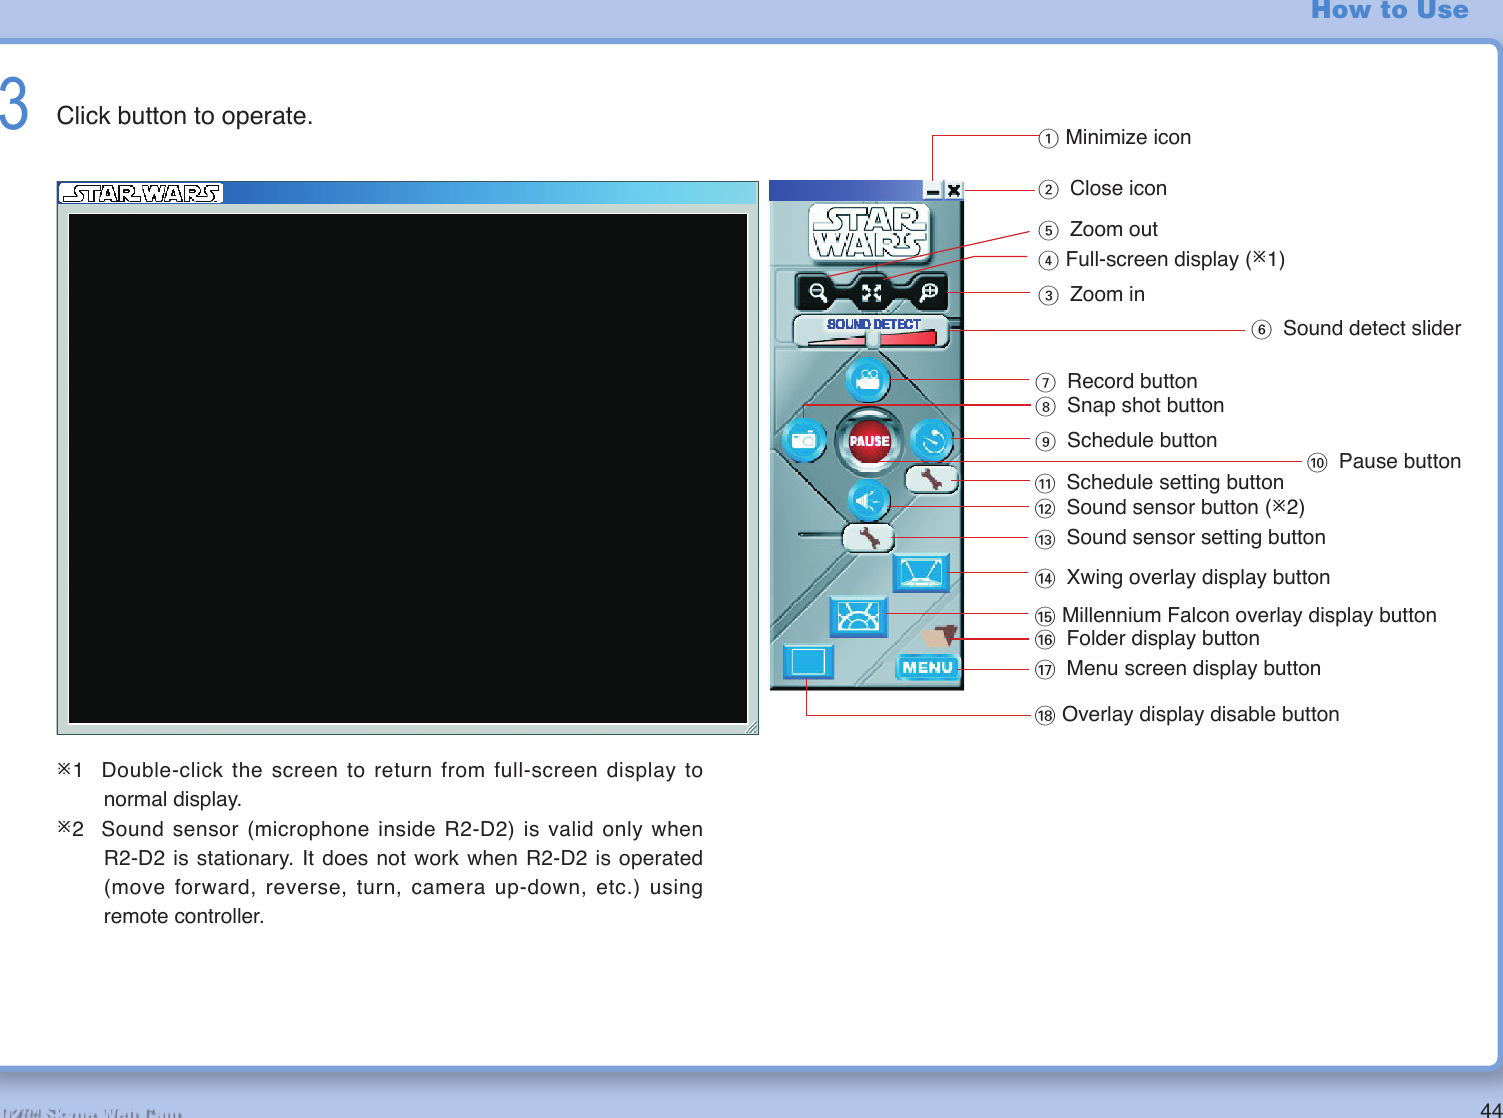
![45R2-D2™ Skype Web CamHow to UseNo. Name Function1. Minimize icon Minimizes camera viewer window.2. Close icon Closes camera viewer.3. Zoom in For digital zoom in. Displays close shot.4. Full screen display Displays full-screen camera viewer window.5. Zoom out For digital zoom out. Displays far shot.6. Sound detect sliderAdjusts the sensitivity of the sound sensor. Sliding to the left makes the sensor react to a softer sound while sliding to the right makes the sensor react to a louder sound. The sensor reacts to a sound at approximately 50dB when the slider is moved to near the center.¯ Reaction of the sensor varies depending on the surrounding circumstances and/or battery level. Please note that the sensor does not always works.7. Record button Records the image captured by R2-D2 as a moving picture.Reclicking this button pauses recording.8. Snap shot button Records the image captured by R2-D2 as a still image.9. Schedule button Performs actions designated according to the schedule settings if this button is clicked to activate schedule.10. Pause button Pauses reception from the camera. Display on the screen is paused.Click again to cancel pause.11. Schedule setting button Sets the items to be registered on the schedule and executed automatically. (Refer to “[Plan Task] Screen” on page 65.)12. Sound sensor button Performs monitoring using sound sensor if this button is clicked to activate sound sensor. Able to record or take pictures when sound sensor responds to any sound.13. Sound sensor setting button Sets the action when sound sensor responds to any sound. Alarm setting screen will be displayed. (Refer to “[Alarm] Screen” on page 63.)14. Xwing overlay display button Displays Xwing cockpit picture overlaid on your screen.15. Millennium Falcon overlay display button Displays Millennium Falcon cockpit picture overlaid on your screen.16. Folder display button Display the folder(s) in which recorded data are stored.17. Menu screen display button Displays menu (setting) screen.(Refer to “Camera Viewer Setting” on page 62.)18. Overlay display disable button Disables overlay display and returns to normal screen display.](https://usermanual.wiki/Nikko-Co/MR2D2TX.User-Manual-2/User-Guide-809341-Page-19.png)
![46R2-D2™ Skype Web CamHow to Use4 Close camera viewer when operation is complete.5 Turn off R2-D2 power. (Refer to “Turn on R2-D2 Power” on page 41)ClickThe image might not be clear due to poor signal reception condition. The condition may improve if you change the orientation of R2-D2 or move it to a different location.MemoPress the menu screen display button and make the set-tings for [Sound] and [Channel].MemoUse this product while the Sound is set to OFF. If it is set to ON, change it to OFF.Select either CH1 or CH4 referring to the package of this product.• [Channel]• [Sound]](https://usermanual.wiki/Nikko-Co/MR2D2TX.User-Manual-2/User-Guide-809341-Page-20.png)

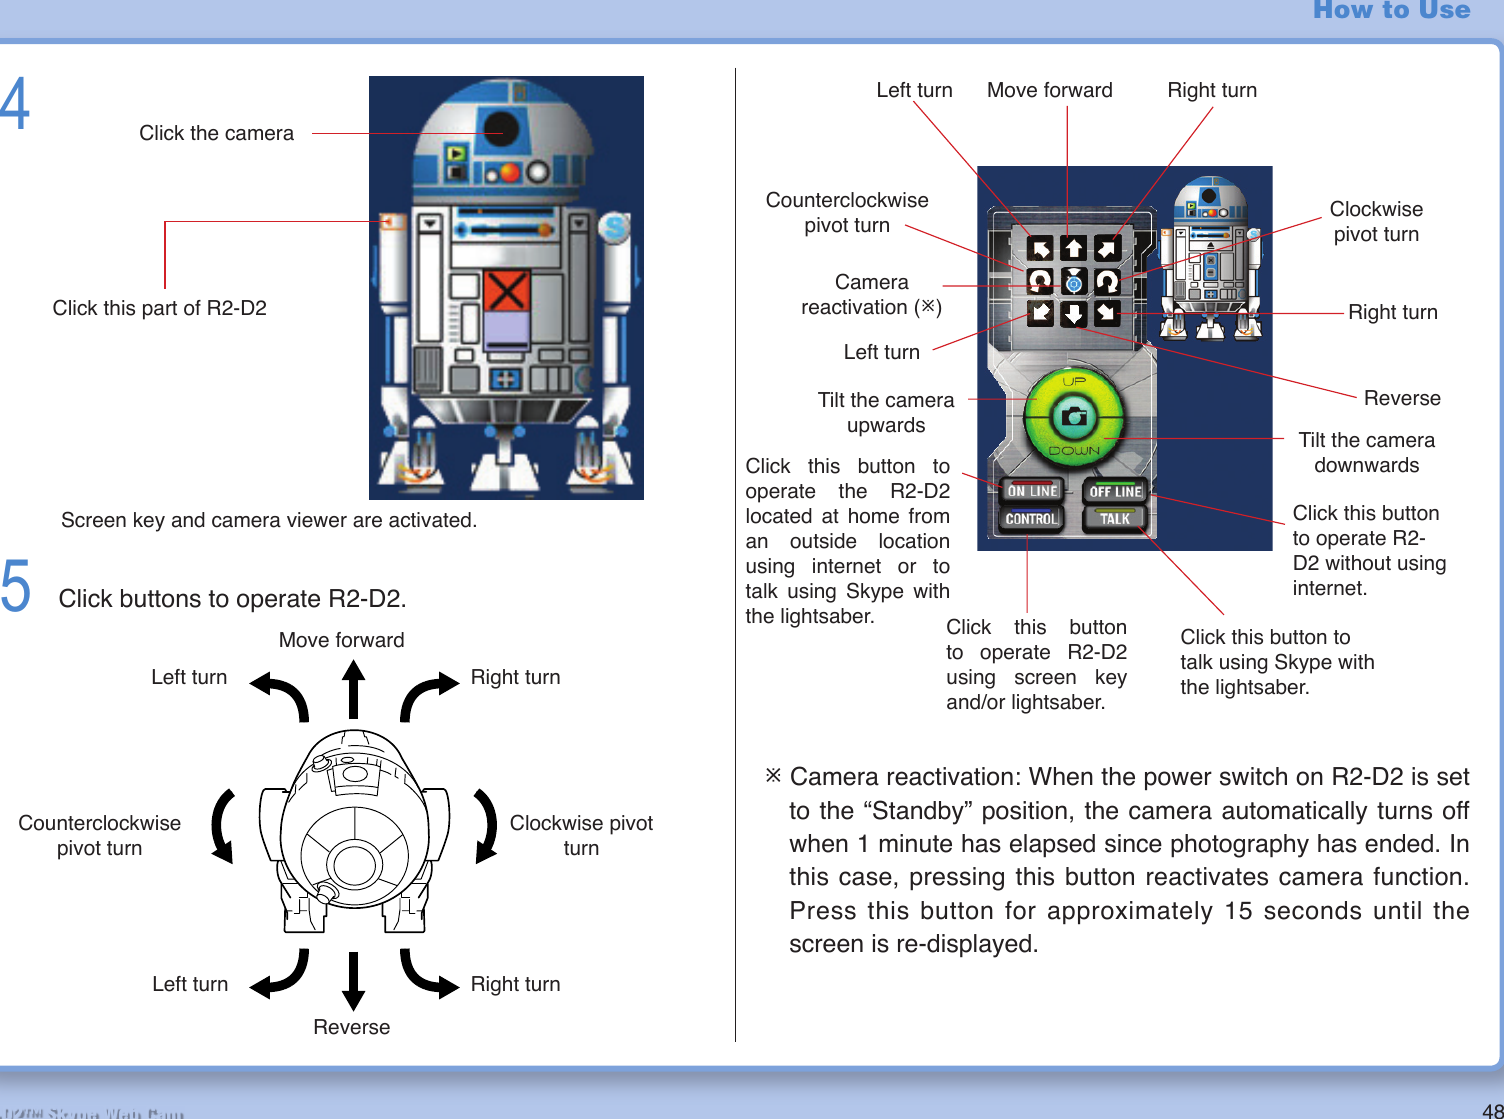
![50R2-D2™ Skype Web CamHow to UseOperate with lightsaberMake sure that USB cable is properly connected to lightsaber.Memo1 Double-click on the desktop. R2-D2 launcher starts.2 Turn on R2-D2 power. (Refer to “Turn on R2-D2 Power” on page 41.)3Screen key and camera viewer are activated.4When [TALK] is pressed, lightsaber functions as an IP phone and R2-D2 cannot thus be operated with lightsaber.MemoIf [OFFLINE] is selected, the mode is set to [CONTROL] automatically.MemoClick this part of R2-D2Click the camera.Click](https://usermanual.wiki/Nikko-Co/MR2D2TX.User-Manual-2/User-Guide-809341-Page-24.png)
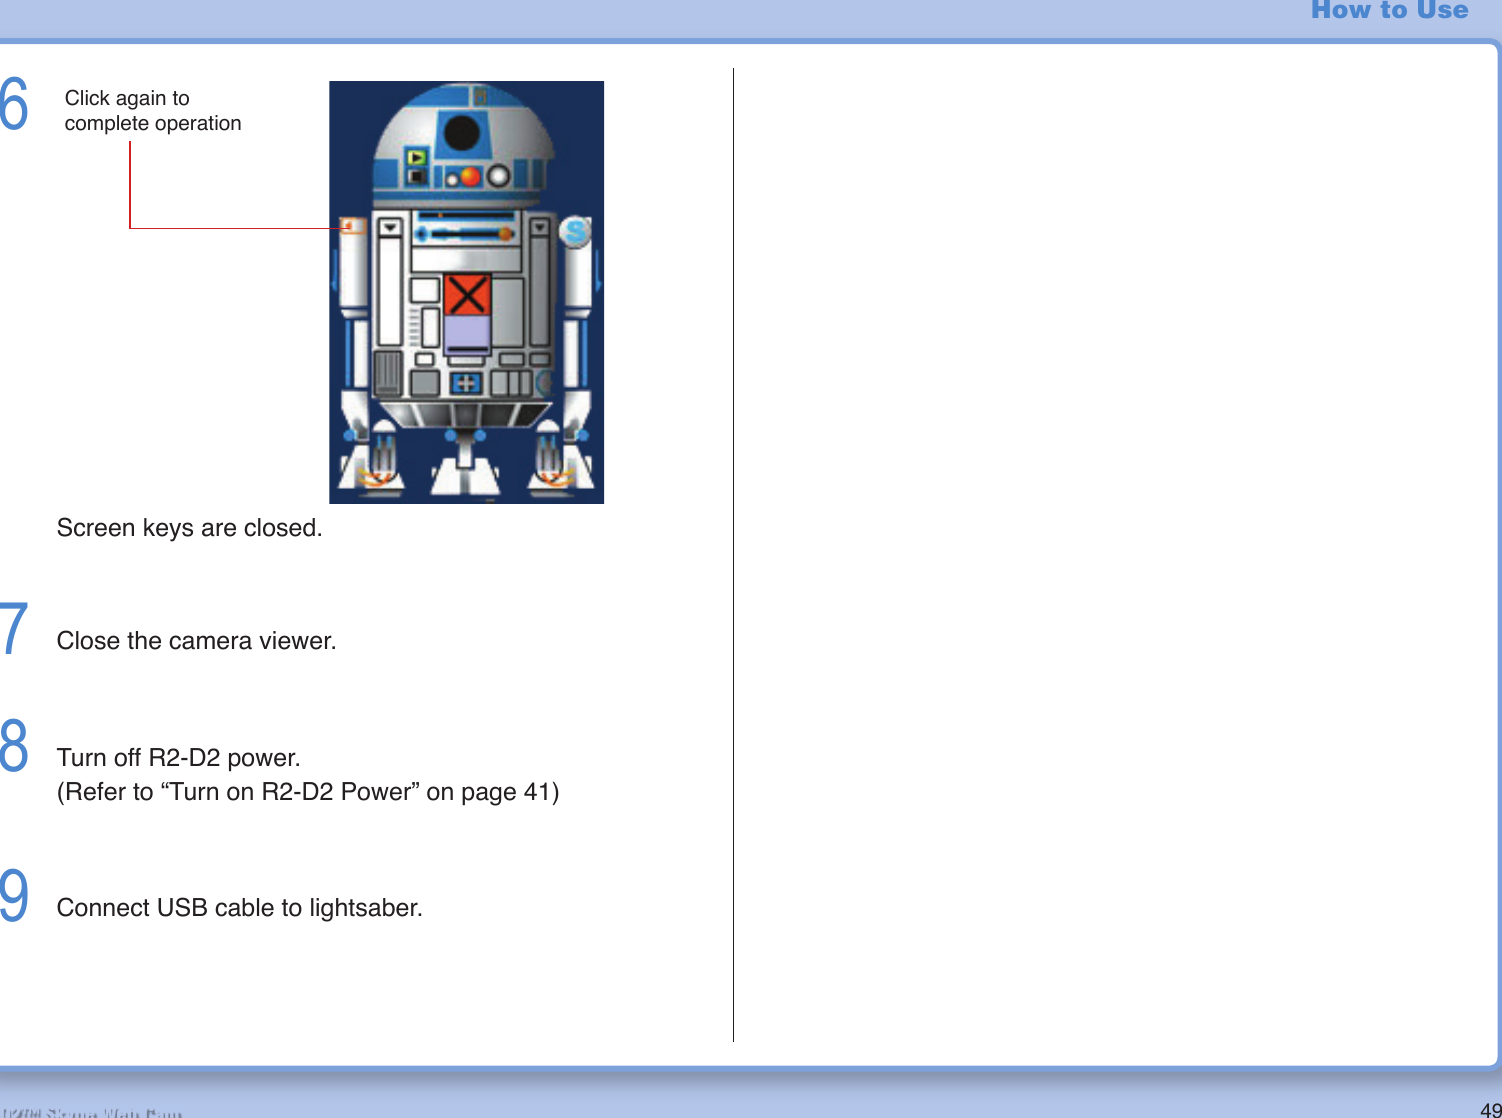
![51R2-D2™ Skype Web Cam5 Open the cover of lightsaber.6 Press buttons to operate R2-D2.How to Use¯ Skype starts when R2-D2 is operated with the lightsaber. Make sure to press the [Off button] on the lightsaber or click the Off button on the Skype screen when ending R2-D2 operation.¯ Camera reactivation: When the power switch on R2-D2 is set to the “Standby” position, the camera automatically turns off when 1 minute has elapsed since photography has ended. In this case, pressing this button reactivates camera function. Press this button for approximately 15 seconds until the screen is re-displayed.8 Turn off the power of R2-D2 when the operation is mplete. (Refer to “Turn on R2-D2 Power” on page 41)Move forwardReverseLeft turnCounterclockwise pivot turnClockwise pivot turnRight turnLeft turn Right turn1) Press2) Turn Move forwardLeft turnCounterclockwise pivot turnRight turnCamera reactivation (¯)Clockwise pivot turnLeft turnTilt the camera downwardsUnusedRight turnReverseTilt the camera upwards7 Close the screen key and camera viewer.1) While pressing the button on the grip, 2) turn the grip clockwise to open the cover. The grip turns only in a single direction. Please note that the grip may get damaged if you attempt to turn the grip in the reverse direction. Just as opening the cover, turn the grip clockwise to close the cover. When closing the cover, stop turning the grip when you hear a click sound and the button on the grip pops up.](https://usermanual.wiki/Nikko-Co/MR2D2TX.User-Manual-2/User-Guide-809341-Page-25.png)
![52R2-D2™ Skype Web Cam How to UseTalk on Skype1 Double-click on the desktop. R2-D2 controller is activated.23When [CONTROL] is pressed, lightsaber functions as an R2-D2 controller and it cannot thus be used as an USB phone.MemoSkype starts and screen key is activated.Click this part of R2-D2.Click the Skype button on R2-D2.2) Click1) Click](https://usermanual.wiki/Nikko-Co/MR2D2TX.User-Manual-2/User-Guide-809341-Page-26.png)