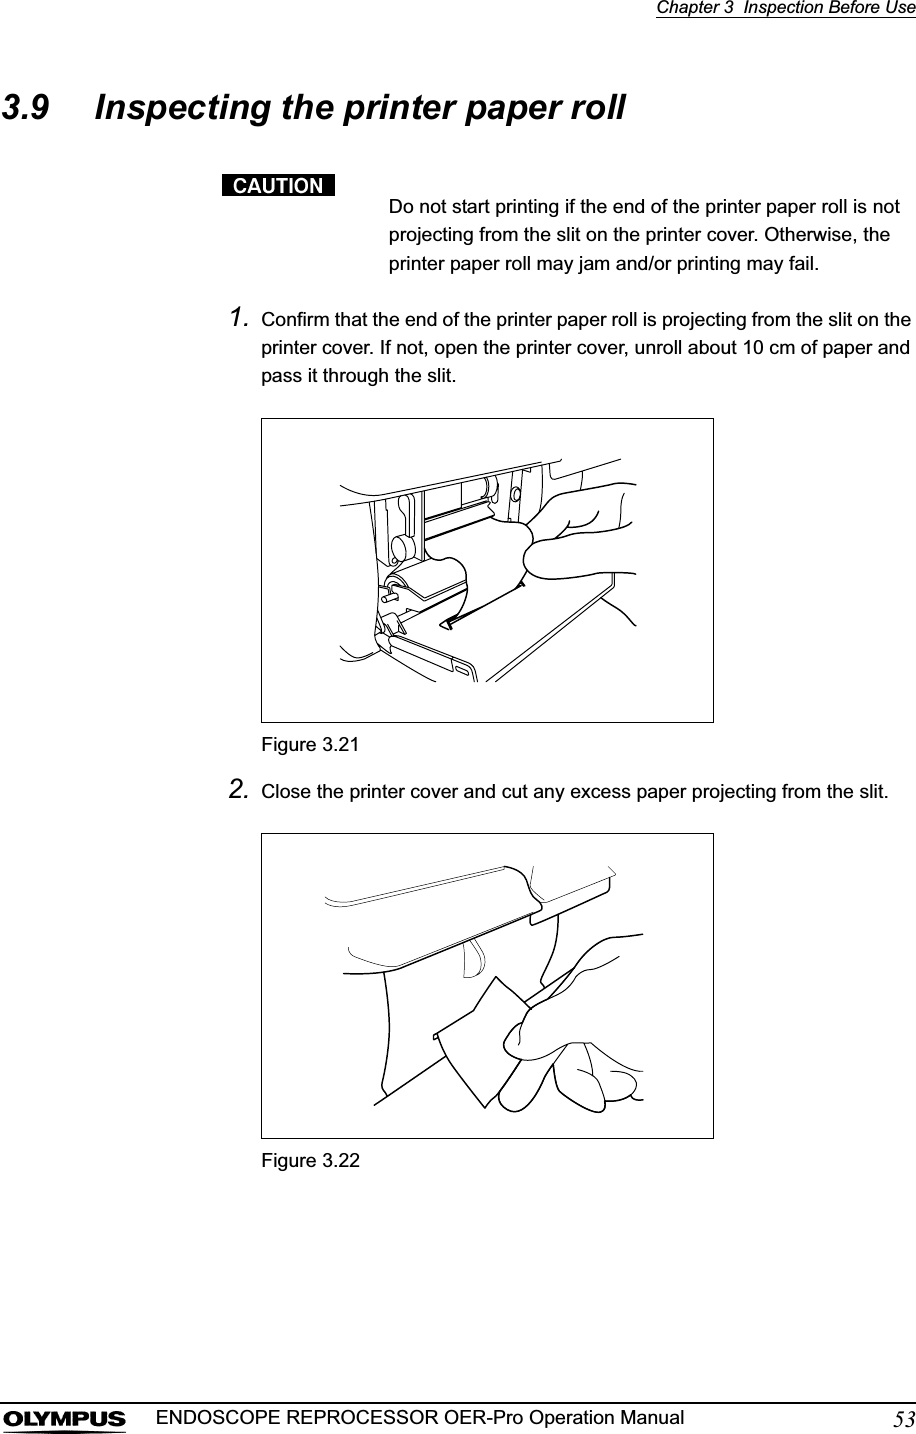
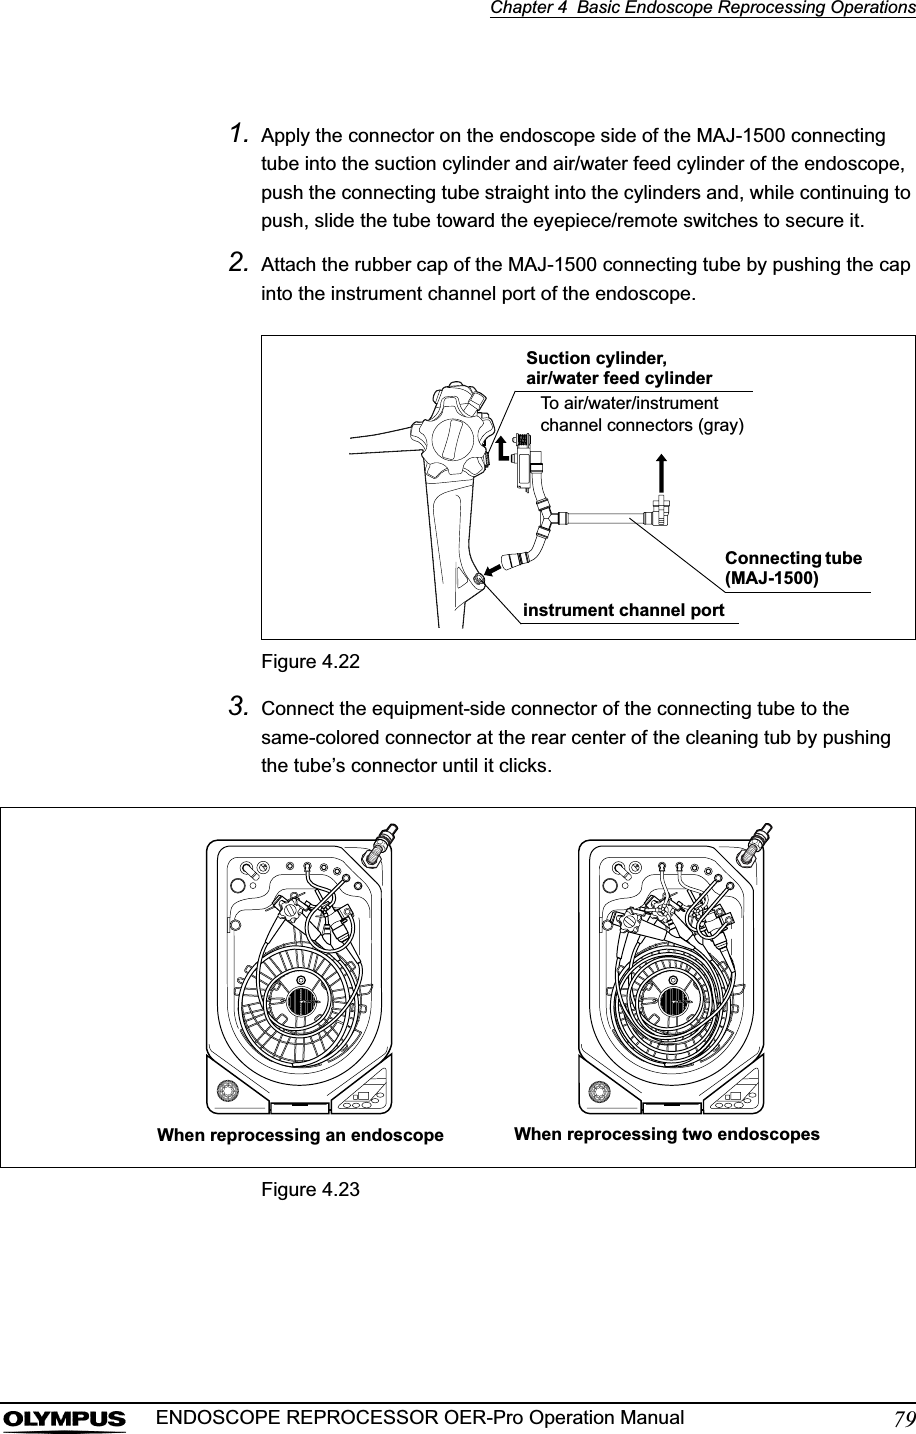
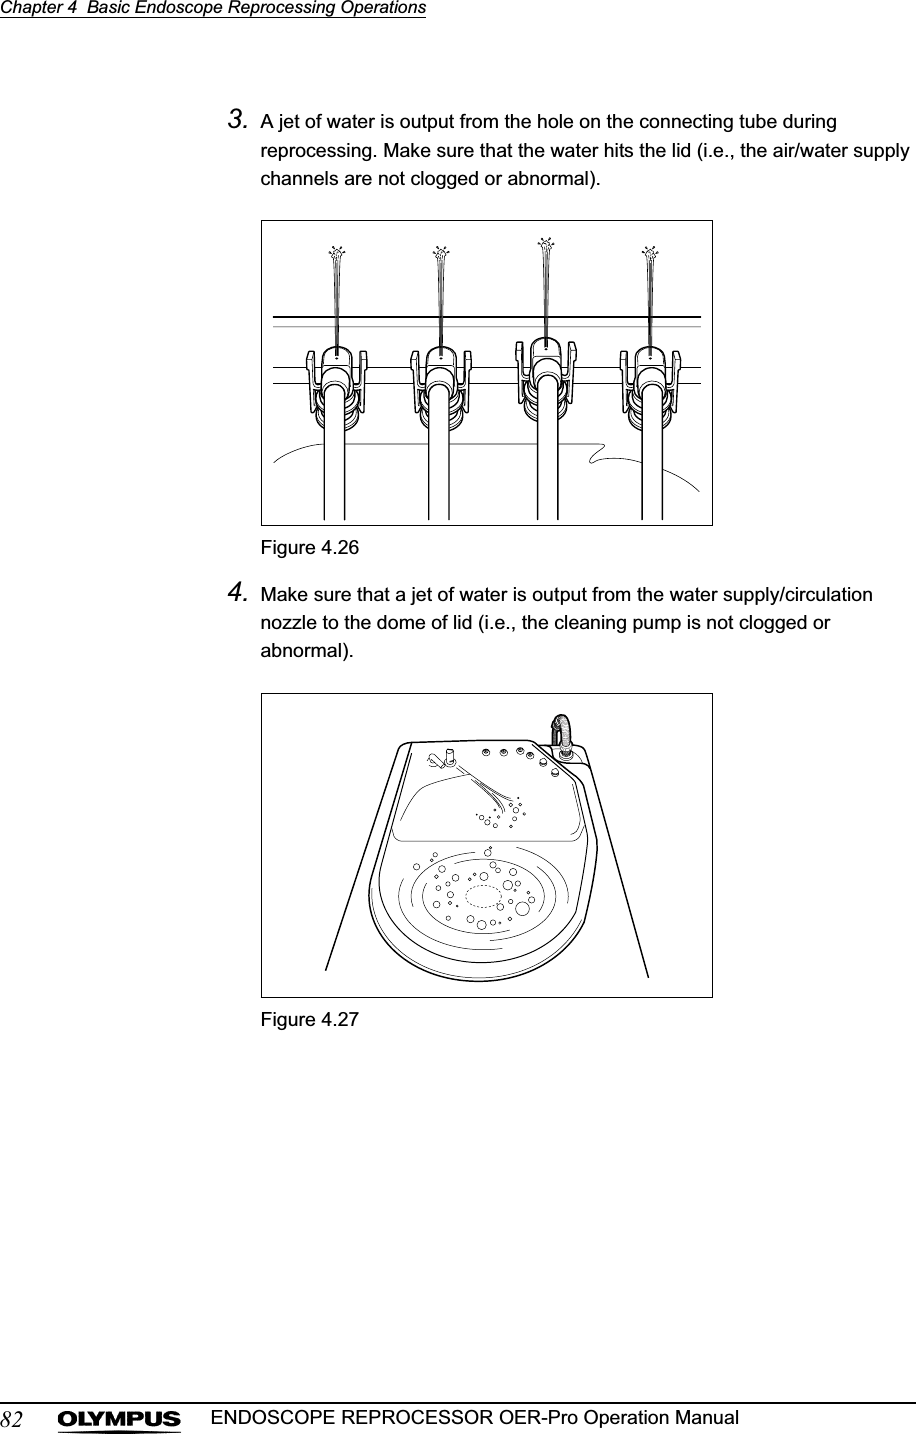
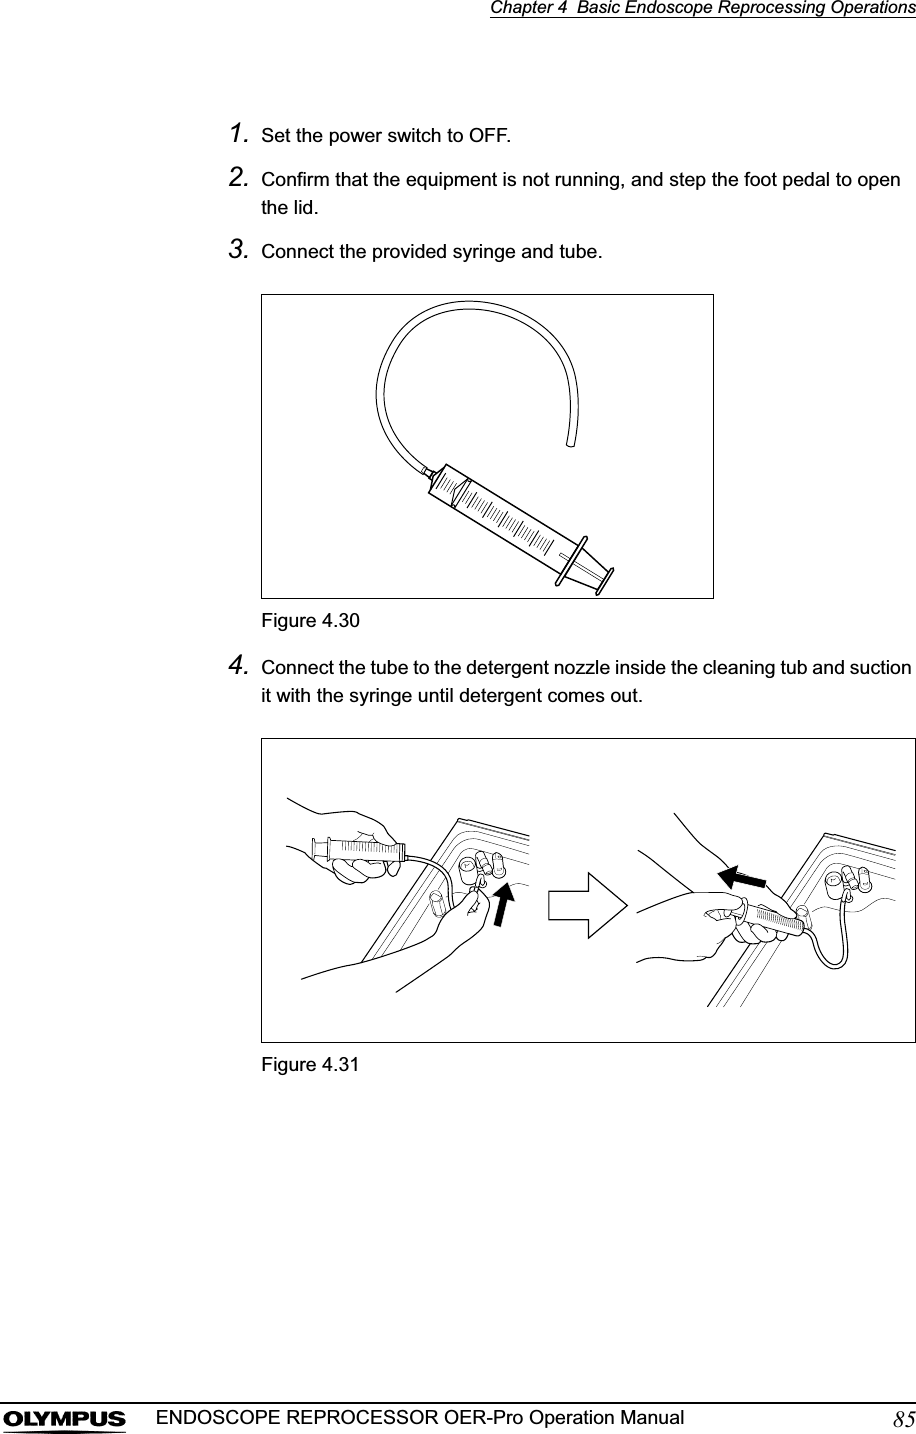
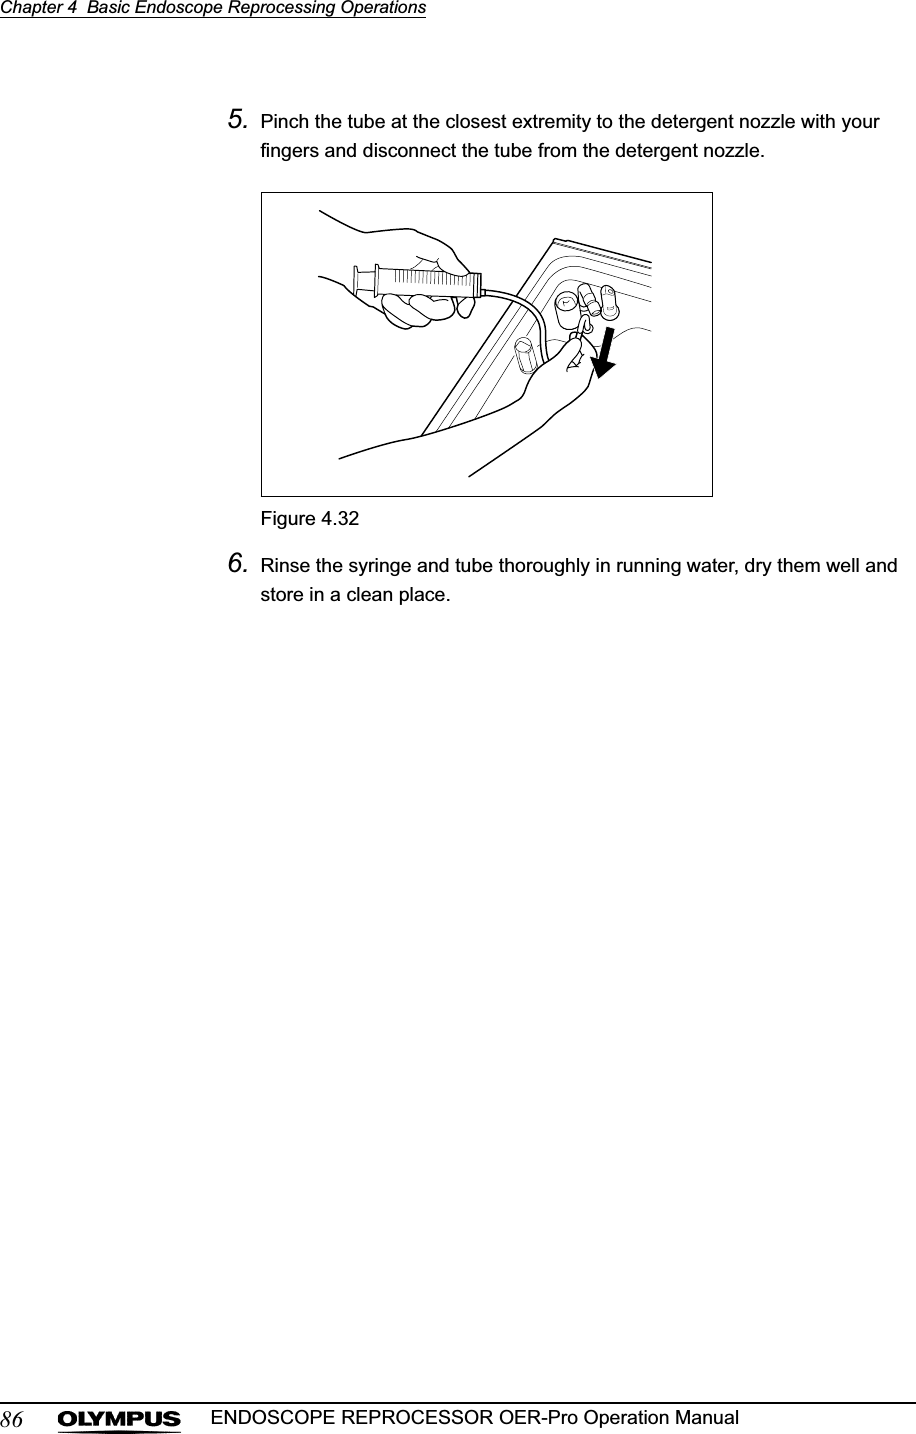
Olympus Medical Systems GN4215 Endoscope Reprocessor with RFID User Manual Manual P1 P114
Olympus Medical Systems Corp. Endoscope Reprocessor with RFID Manual P1 P114
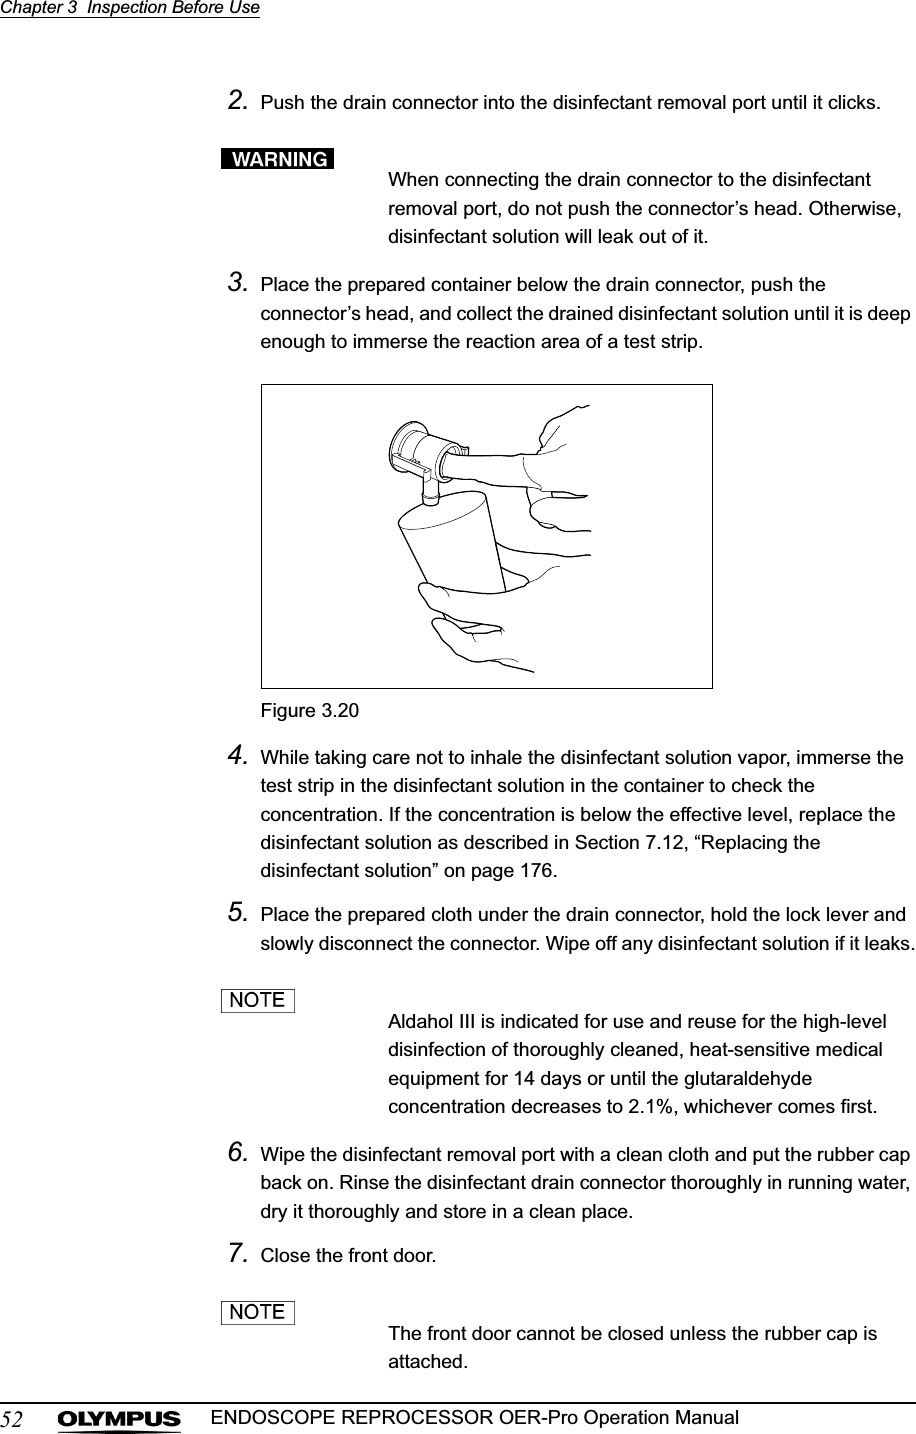
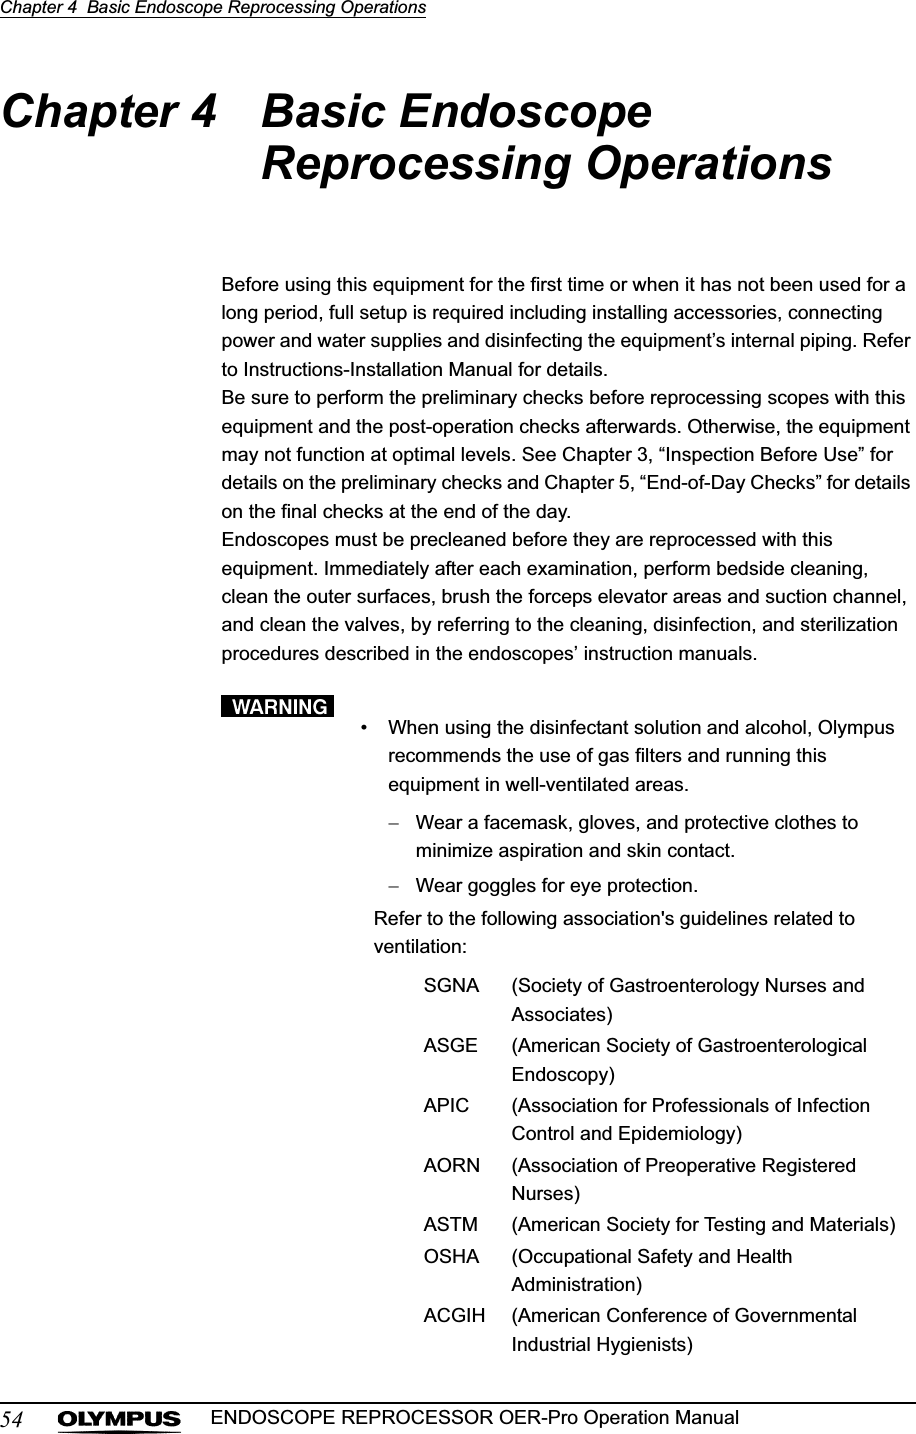
Contents
- 1. Users Manual 1
- 2. Users Manual 2
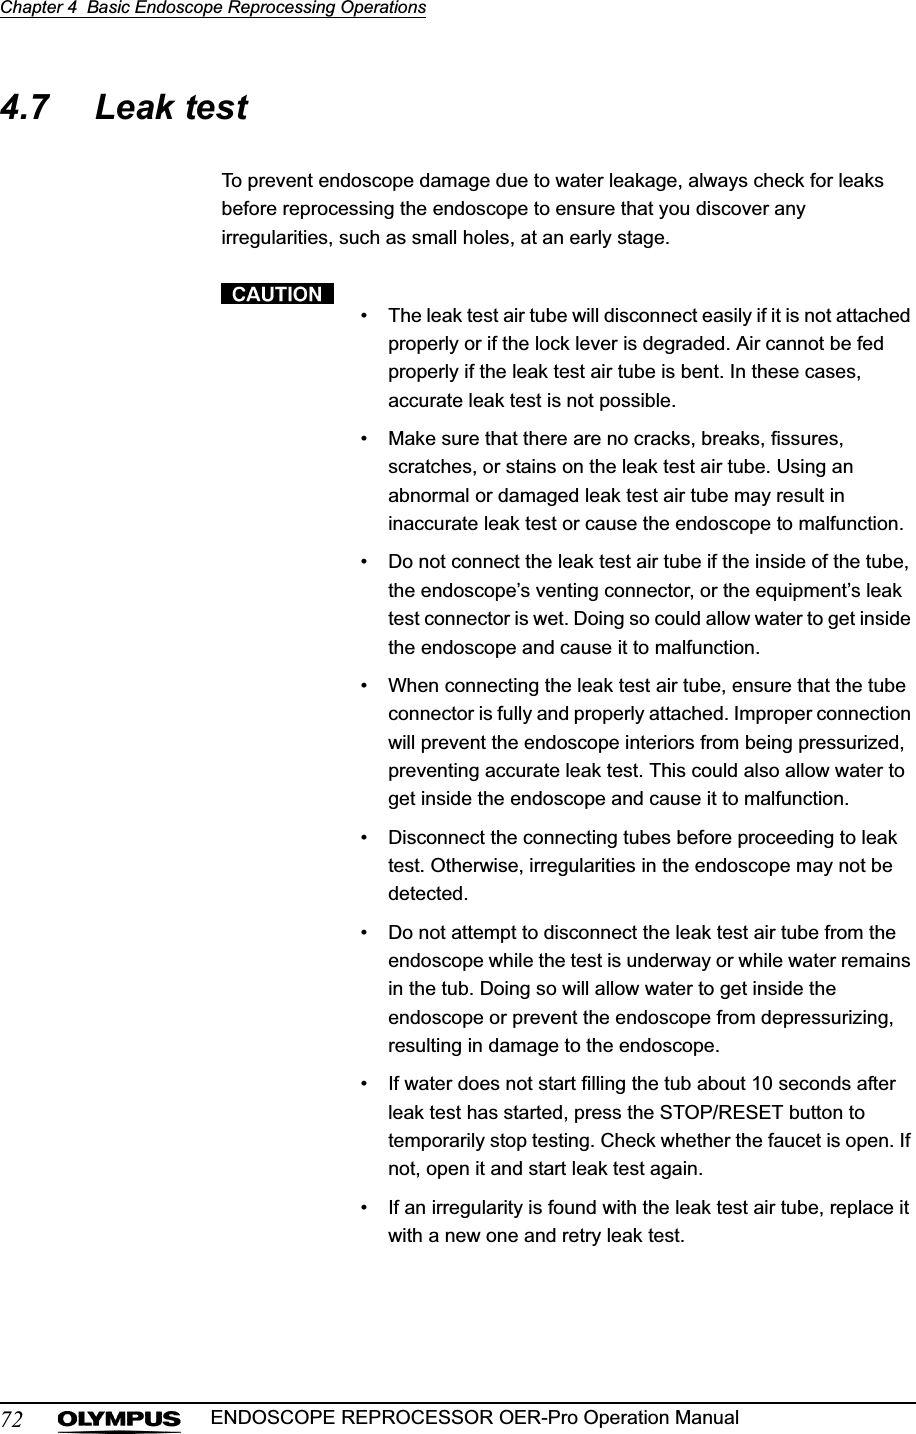
- 3. Users Manual 3
- 4. Users Manual 4
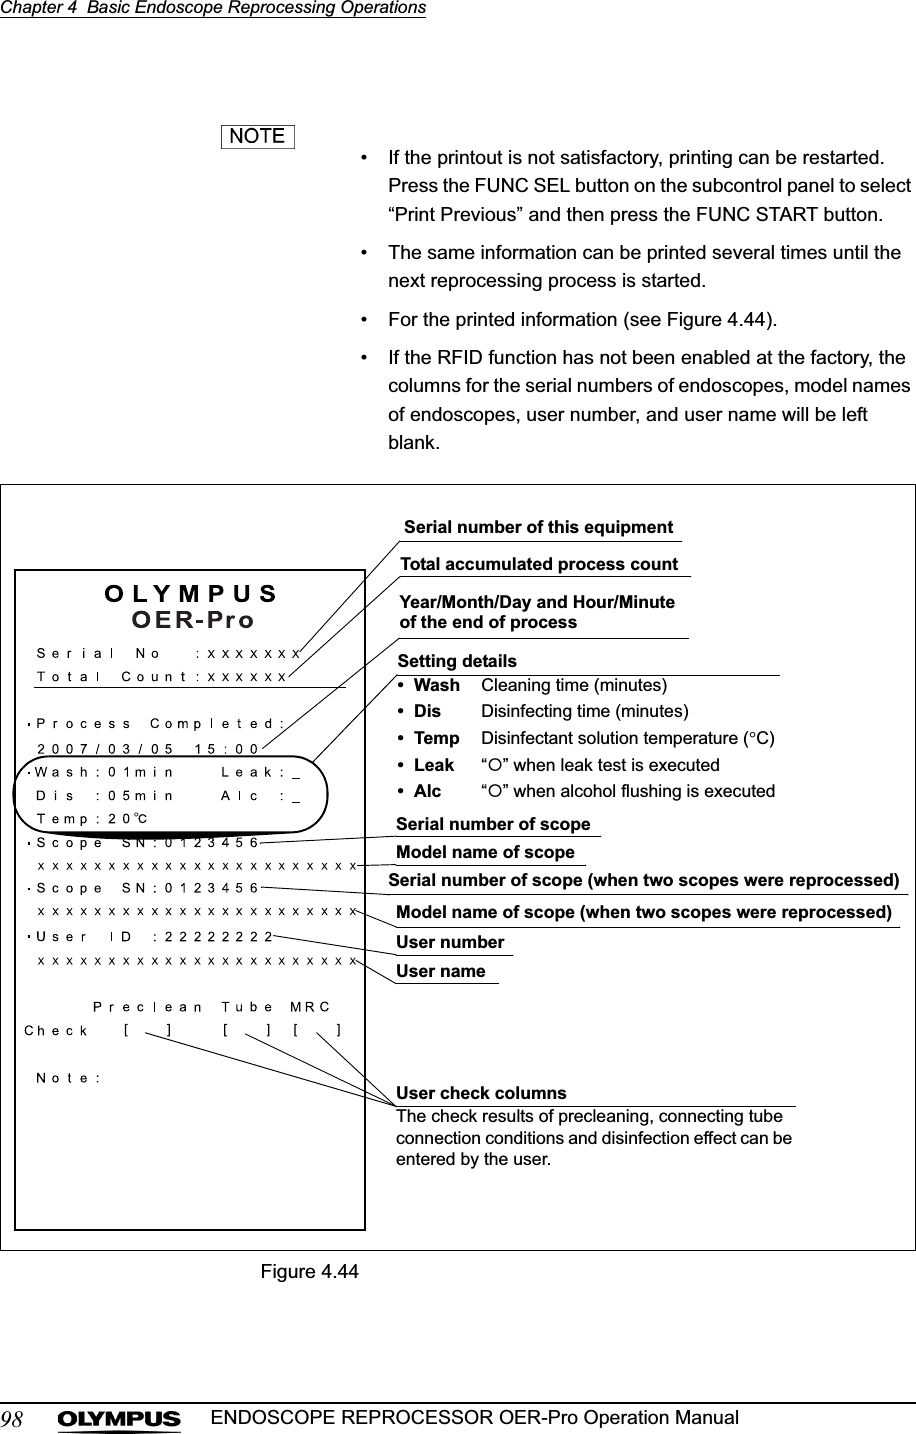
Users Manual 2
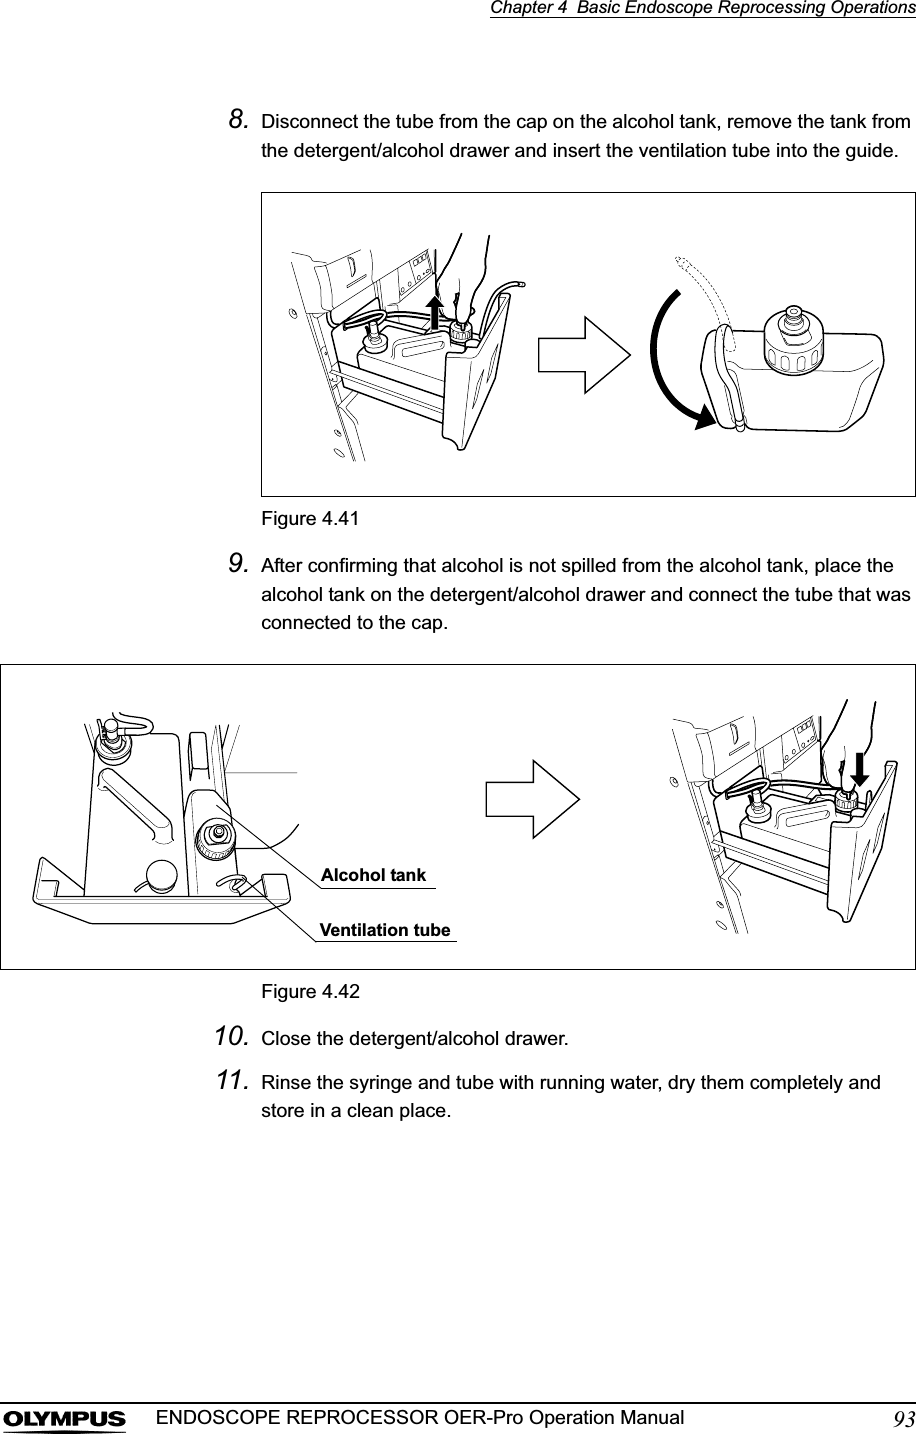
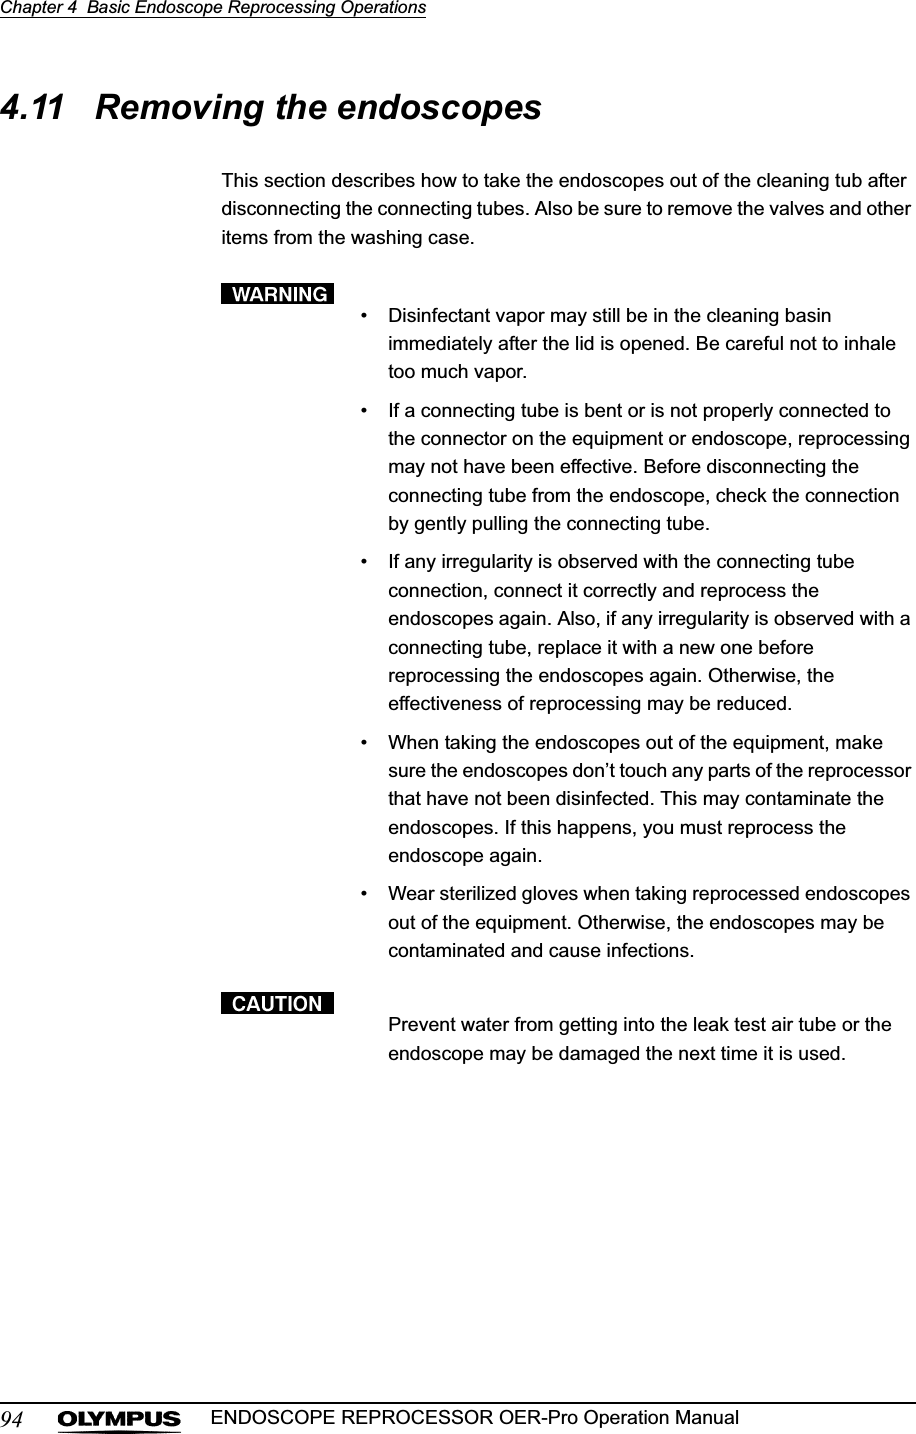
![56Chapter 4 Basic Endoscope Reprocessing OperationsENDOSCOPE REPROCESSOR OER-Pro Operation ManualFigure 4.14.1 Power activation and opening the faucet4.2 Inspection before useInspection at the start of workInspection before every operation• Inspection of pump function and piping• Check of disinfectant solution concentrationRequired items • Test strip• Drain connector• 200 ml cup-shape container• Clean cloth4.3 Endoscope precleaning(Follow the cleaning, disinfection, and sterilization procedures described in the endoscopes’ instruction manual.)4.4 Recognition of the Scope ID (When using the RFID function)14.5 User ID detection (When using the RFID function)14.7 Leak testConnection of leak test air tubeRequired leak test time: Approximately 5 minutesRequired items• Leak test air tube (MAJ-821)• 70% ethyl alcohol or isopropyl alcohol• Clean cloth4.8 Connecting tube installation Required items• Connecting tubes(See “List of Compatible Endoscopes/Connecting Tubes <OER-Pro>”.)4.9 Reprocessing4.10 Alcohol flushing4.11 Removing the endoscopes Required items• Sterilized cloth such as gauzeDisconnection of leak test air tube and connecting tubes, removal of endoscopes4.12 Printing of the reprocessing results4.6 Endoscope setup: Optional operations: Indispensable operationsChapter 5 End-of-Day ChecksReprocess next scopes.: Automatically performed operationsRequired time: Approximately 3 minutesAlcohol flushingoAir purgeProgram [1] (can be selected from three reprocessing programs)Required time: Approximately 23 minutes at the shortestWater supply oUltrasonic cleaning oAlkali detergent cleaning oRinsing oAir purge oDisinfectant solution heating oDisinfection using disinfectant solution o Rinsing oAir purge1 This function is disabled when the equipment is shipped.If you want to use this function, please contact Olympus.](https://usermanual.wiki/Olympus-Medical-Systems/GN4215.Users-Manual-2/User-Guide-870328-Page-5.png)

![Chapter 4 Basic Endoscope Reprocessing Operations63ENDOSCOPE REPROCESSOR OER-Pro Operation Manual3. When reprocessing two endoscopes, ensure that the second scope ID is detected by repeating Steps 1 and 2 with the second endoscope.Figure 4.7• The lower Scope ID Detection indicator lights when the first scope ID has been detected, and the upper Scope ID Detection indicator lights when the second scope ID has been detected.• Up to two scope IDs can be recognized at a time. Error code [E91] is displayed if you attempt to have the equipment detect a third scope ID. If this error code is displayed, press the STOP/RESET button to clear it and restart the scope ID detection procedure from the first endoscope.PMDETLCGRFIDWDR](https://usermanual.wiki/Olympus-Medical-Systems/GN4215.Users-Manual-2/User-Guide-870328-Page-12.png)
![Chapter 4 Basic Endoscope Reprocessing Operations65ENDOSCOPE REPROCESSOR OER-Pro Operation Manual1. Hold the reprocessing operator’s user ID card parallel to the ID reader and scan the card with the reader until the equipment generates a short beep.Figure 4.82. Make sure that the User ID Detection indicator on the main control panel lights up.Figure 4.9• If the User ID Detection indicator on the main control panel does not light up, the equipment has not recognized the user ID card. Try scanning the user ID card with the ID reader section again.• Only one user ID can be recognized at a time. Error code [E91] is displayed if you attempt to have the equipment recognize a second user ID. If this error code is displayed, press the STOP/RESET button to clear it and restart the user ID recognition procedure.PMDETLCGRFIDWDR](https://usermanual.wiki/Olympus-Medical-Systems/GN4215.Users-Manual-2/User-Guide-870328-Page-14.png)
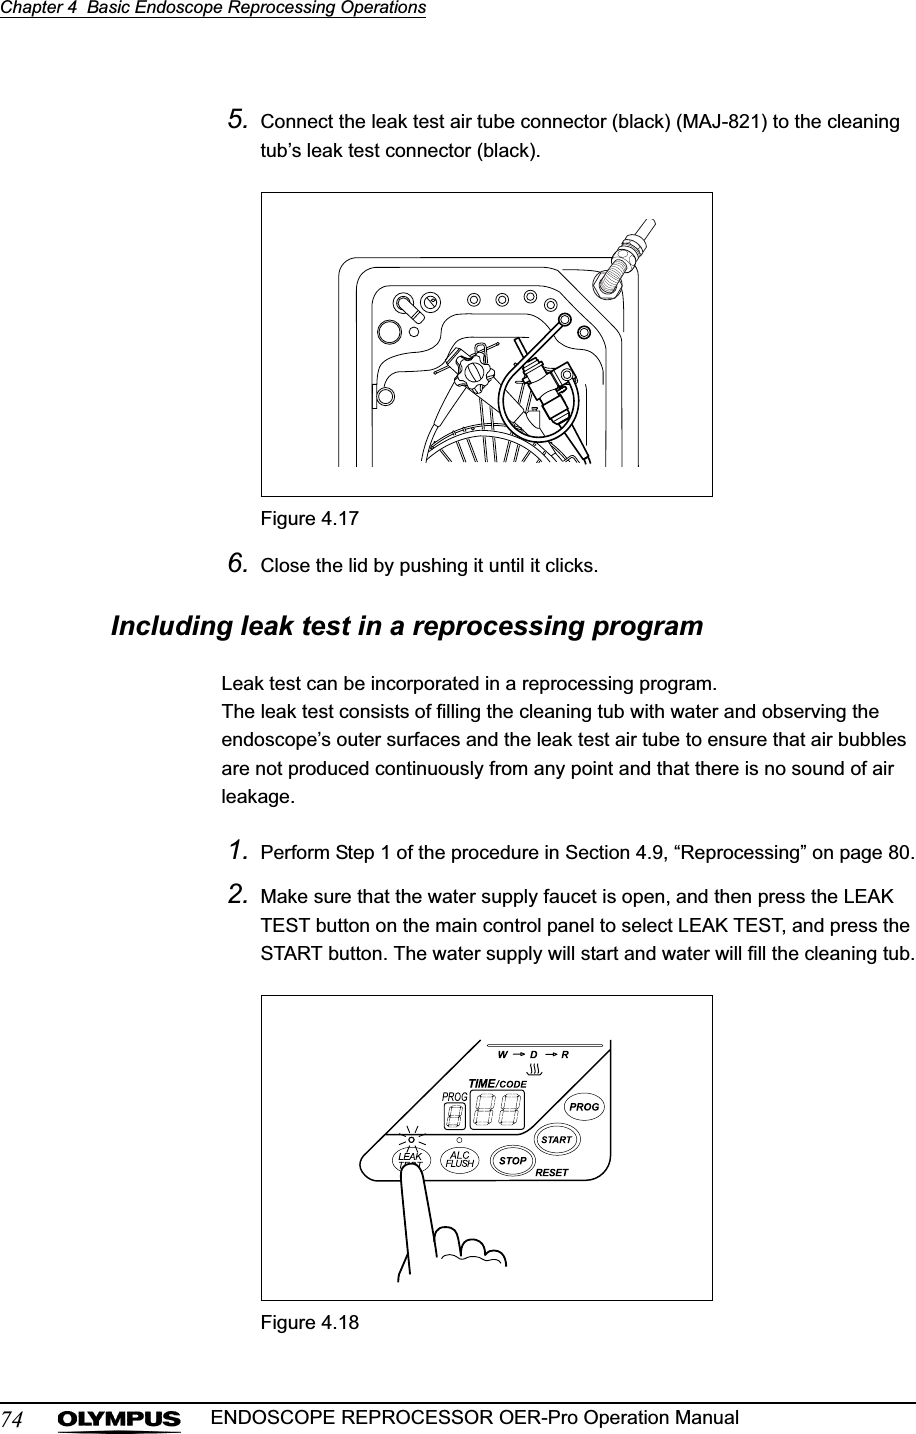
![Chapter 4 Basic Endoscope Reprocessing Operations75ENDOSCOPE REPROCESSOR OER-Pro Operation Manual3. When the cleaning tub is filled with water, the buzzer beeps three times and the lid is unlocked.4. Make sure that the supply of water has stopped and then step the foot pedal to open the lid.5. Bend the angulating section of the endoscope and make sure that air bubbles are not produced continuously from the outer surfaces of the endoscope and leak test air tube.6. With the lid open and cleaning fluid in the tub, perform the procedure in Section 4.8, “Connecting tube installation” on page 78 and close the lid. The reprocessing process will start.Even when leak test is performed without closing the lid, the water will drain and the testing will finish automatically in about 10 minutes. At this time, the main control panel displays the error code [E92].Performing leak test independently1. Press the FUNC SEL button on the subcontrol panel to select “LEAK TEST”.Figure 4.19](https://usermanual.wiki/Olympus-Medical-Systems/GN4215.Users-Manual-2/User-Guide-870328-Page-24.png)
![76Chapter 4 Basic Endoscope Reprocessing OperationsENDOSCOPE REPROCESSOR OER-Pro Operation Manual2. Press the FUNC START button on the subcontrol panel to start the water supply. When water supply starts, the TIME/CODE display on the main control panel shows a [ ] mark spinning as shown below.Figure 4.203. When the water supply completes, the buzzer beeps three times and the TIME/CODE display shows [10], which indicates 10 minutes. The time displayed on the main control panel counts down every minute.4. When the lid is unlocked, make sure that the supply of water has stopped, and then step the foot pedal to open the lid.When the lid is opened, the TIME/CODE display on the main control panel is reset to [10] and the countdown restarts.5. Bend the angulating section of the endoscope and make sure that air bubbles are not produced continuously from the outer surfaces of the endoscope and leak test air tube.](https://usermanual.wiki/Olympus-Medical-Systems/GN4215.Users-Manual-2/User-Guide-870328-Page-25.png)
![Chapter 4 Basic Endoscope Reprocessing Operations77ENDOSCOPE REPROCESSOR OER-Pro Operation Manual6. Close the lid to drain the cleaning fluid and finish leak test. At this time, the buzzer beeps and the main control panel displays [- -] to indicate the end of testing.Figure 4.21Once the air leak test tube has been connected to a non-reprocessed endoscope, the outer surfaces of the tube should be disinfected. Put the tube through the reprocessing process without removing it from the endoscope.Even when testing is finished without closing the lid, the water will drain and the testing will end automatically in about 10 minutes. At this time, the main control panel displays error code [E92].](https://usermanual.wiki/Olympus-Medical-Systems/GN4215.Users-Manual-2/User-Guide-870328-Page-26.png)
![80Chapter 4 Basic Endoscope Reprocessing OperationsENDOSCOPE REPROCESSOR OER-Pro Operation Manual4. Check the following.The endoscopes should not touch the lid.The endoscopes should be located below the pin that marks the disinfecting liquid level.The scope ID tags should be located in the specified positions.The cover of the washing case should be closed and the washing case should be located in the specified position.5. Close the lid by pushing it until it clicks.4.9 ReprocessingThis section explains how to clean and disinfect endoscopes. Select from three different reprocessing programs [1] to [3]. If the selected reprocessing program incorporates the disinfectant solution heating process, the disinfectant solution is heated during reprocessing. For details on how to set the reprocessing programs, see Section 6.3, “Setting the reprocessing programs” on page 122.• When using one of the user-set programs [2] or [3], be sure to thoroughly check the cleaning/disinfection effects of the selected program beforehand.• There is no data guaranteeing the sterilization effect of this equipment. Therefore, after cleaning/disinfecting an endoscope that requires sterilization, always be sure to sterilize the endoscope as instructed in its instruction manual.• Make sure that the endoscopes are not touching the lid. If they are touching the lid, reprocessing may not be effective. Adjust the positions of the endoscopes whenever they are touching the lid.• If the pipes in the equipment are clogged or suffered other problem, it will not be possible to properly feed fluids into the endoscope channels and the endoscope may not be effectively reprocessed. Be sure to confirm that the jets from the connecting tube connectors and the jet on the lid dome are functioning during reprocessing.](https://usermanual.wiki/Olympus-Medical-Systems/GN4215.Users-Manual-2/User-Guide-870328-Page-29.png)
![Chapter 4 Basic Endoscope Reprocessing Operations81ENDOSCOPE REPROCESSOR OER-Pro Operation Manual• Before starting the reprocessing process, always confirm the Program No. display of the main control panel and the INFO display (WASH/CYCLE, DIS/DAY, TEMPqC) of the subcontrol panel. Press the INFO SEL on the subcontrol panel to select PROGRAM INFO and check the cleaning time, disinfecting time, and disinfectant temperature. Then, press the INFO SEL again to select LCG USAGE and check the disinfection operation count and elapsed day count. If the cleaning time, disinfecting time and disinfection operation count are inappropriate, endoscope reprocessing may not have been effective.1. Press the PROG button on the main control panel to select a program [1] to [3].Figure 4.242. Press the START button on the main panel. In about 10 seconds, the water supply starts and the TIME/CODE display shows the remaining reprocessing time.Figure 4.25](https://usermanual.wiki/Olympus-Medical-Systems/GN4215.Users-Manual-2/User-Guide-870328-Page-30.png)
![Chapter 4 Basic Endoscope Reprocessing Operations83ENDOSCOPE REPROCESSOR OER-Pro Operation Manual5. When reprocessing is finished, the buzzer beeps and the TIME/CODE display shows [- -] indicating that the process has ended.Figure 4.28• When the process is started, the standard time required to complete the process will blink on the display.• The minimum required time for program [1] is about 23 minutes. This varies depending on the models and number of endoscopes, outside temperature, and water supply quantity.• To display the correct time information, the equipment measures the water supply time of the first process, calculates the required process time automatically, and corrects the displayed value automatically at the beginning of cleaning (or end of water supply) during the reprocessing process.• The equipment may also update the displayed time information during the rinsing process.](https://usermanual.wiki/Olympus-Medical-Systems/GN4215.Users-Manual-2/User-Guide-870328-Page-32.png)
![84Chapter 4 Basic Endoscope Reprocessing OperationsENDOSCOPE REPROCESSOR OER-Pro Operation Manual• The PRINT LAST lamp on the subcontrol panel lights up at the end of reprocessing. Press the FUNC START button if you want to print the reprocessing data.Figure 4.29When the error code [E95] is displayed even though there is enough detergent in the tankWhen the error code [E95] is displayed and the equipment has stopped even when detergent is left in the detergent tank, manually fill the detergent pipe with detergent as described below.Before handling the detergent, read the precautions carefully and use it as instructed. Be sure that you fully understand what measures need to be taken if you get any detergent on your skin.When handling the detergent, always wear appropriate personal protective equipment, such as eye wear, face mask, moisture-resistant clothing, and chemical-resistant gloves that fit properly and are long enough so that your skin is not exposed. All personal protective equipment should be inspected before use and replaced periodically before it is damaged.Check Required itemsSyringeTubeTable 4.1](https://usermanual.wiki/Olympus-Medical-Systems/GN4215.Users-Manual-2/User-Guide-870328-Page-33.png)
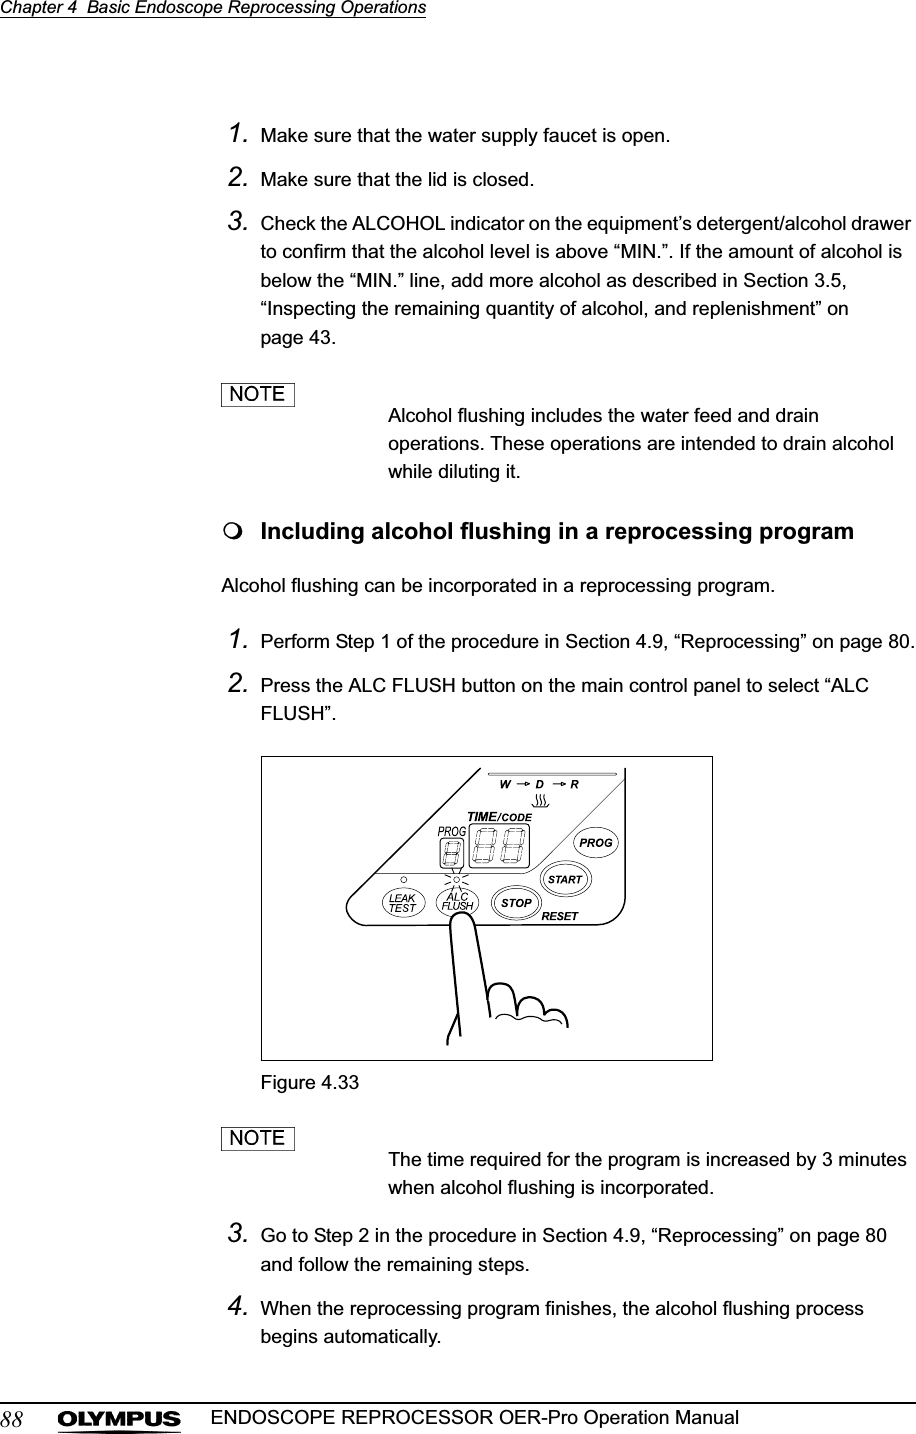
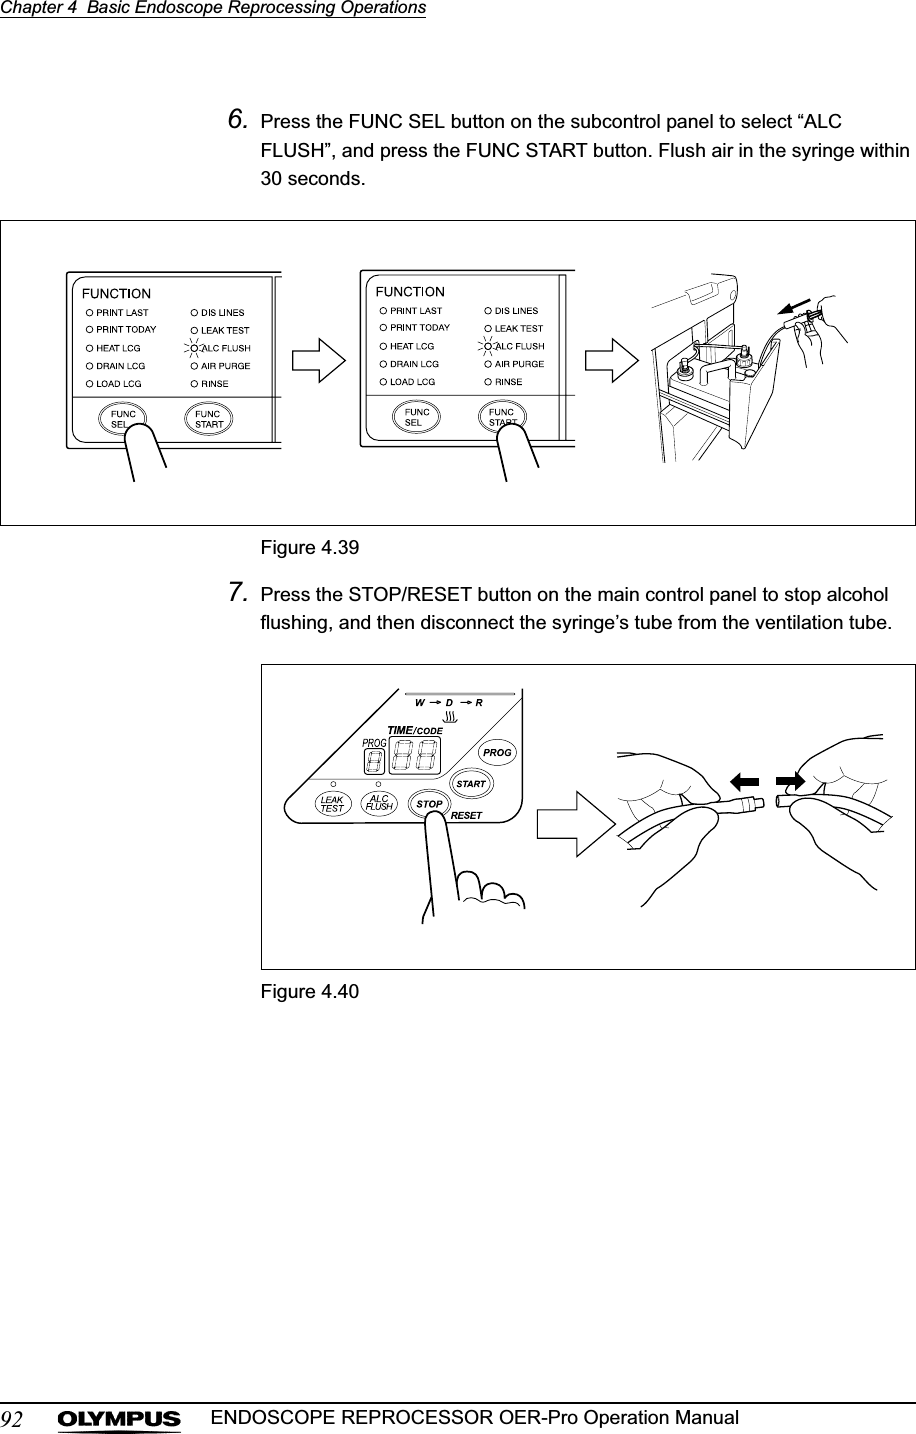
![Chapter 4 Basic Endoscope Reprocessing Operations89ENDOSCOPE REPROCESSOR OER-Pro Operation Manual5. When the alcohol flushing process finishes, the buzzer beeps and the TIME/CODE display shows [- -].Figure 4.34Performing alcohol flushing independently1. Press the FUNC SEL button on the subcontrol panel to select “ALC FLUSH”.2. Press the FUNC START button on the subcontrol panel. The TIME/CODE display of the main control panel shows [03], which indicates 3 minutes. The time displayed on the main control panel counts down every minute.3. When the alcohol flushing process finishes, the buzzer beeps and the TIME/CODE display shows [- -].Figure 4.35](https://usermanual.wiki/Olympus-Medical-Systems/GN4215.Users-Manual-2/User-Guide-870328-Page-38.png)
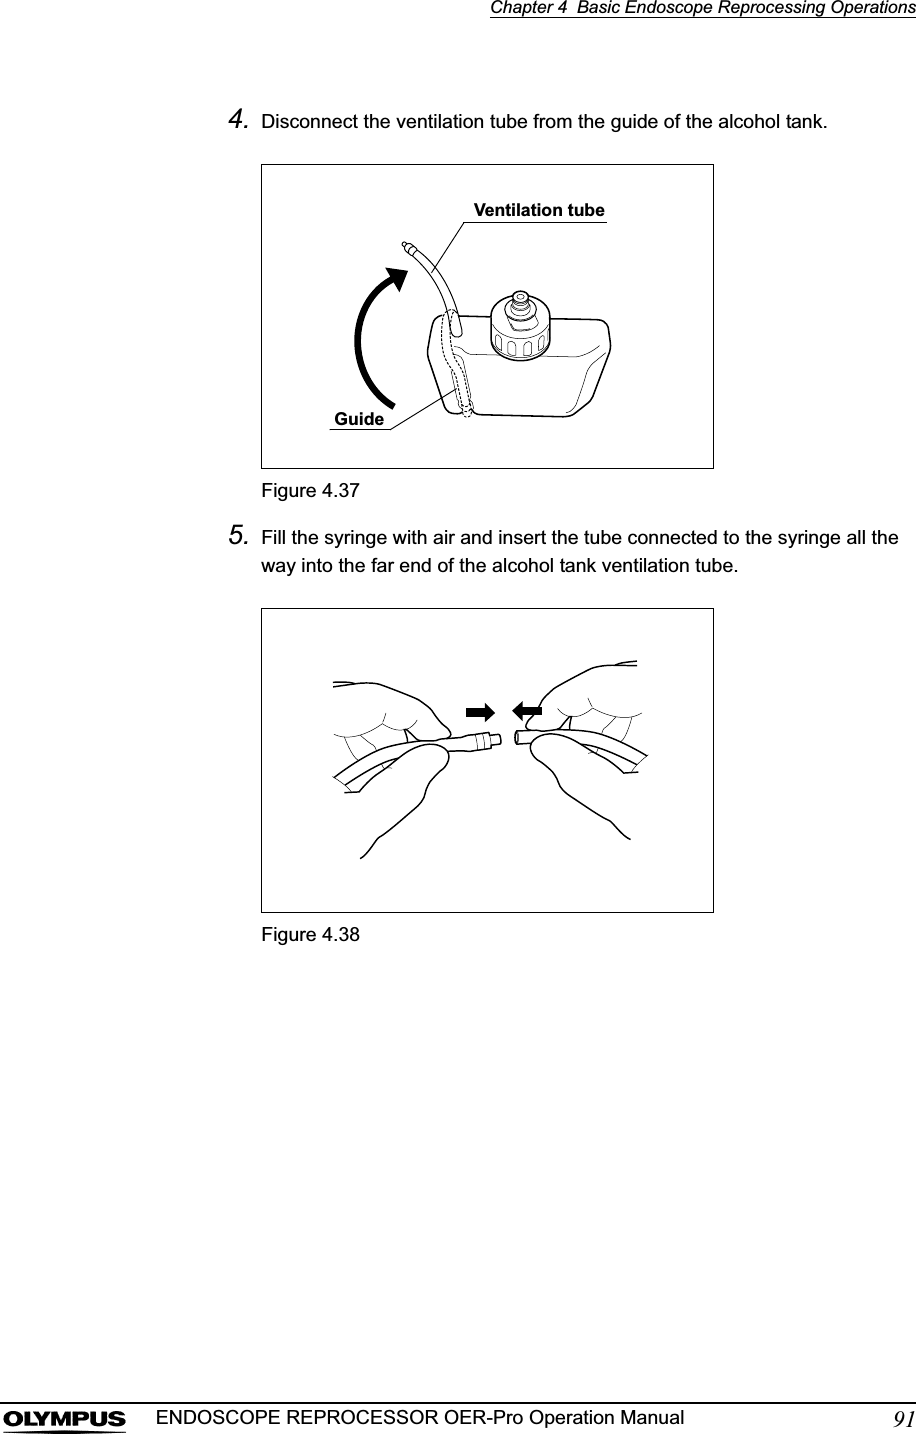
![90Chapter 4 Basic Endoscope Reprocessing OperationsENDOSCOPE REPROCESSOR OER-Pro Operation ManualIf error code [E93] is displayed while alcohol is still present in the alcohol tank:If error code [E93] is displayed and the equipment is stopped while alcohol is still present in the alcohol tank, perform the following steps.• The alcohol used with the equipment should be 70% ethyl alcohol or isopropyl alcohol. Using any other kind of alcohol may result in malfunction of the equipment or the endoscope, difficulty drying the endoscope, or a hazard due to toxic vapor emitted from the alcohol.• Alcohol is flammable and should be handled with extra care. At the end of the working day, be sure to drain the alcohol from the tank or to remove the tank from the equipment and store it at a safe distance from the equipment. For more information on draining the alcohol or removing the alcohol tank, refer to Section 5.3, “Removal or storage of alcohol” on page 113. Leaving alcohol in the tank could pose a fire hazard.• Remove the alcohol in the alcohol tank and replace it with new alcohol at least once a week. Otherwise, the alcohol in the alcohol tank may degrade.• Before handling the alcohol, read the precautions carefully and use it as instructed.1. Connect the connecting tube to the connector at the rear center of the cleaning tub by pushing the tube’s connector until it clicks.2. Close the lid and make sure that the power switch is ON.3. Connect the provided syringe and tube.Figure 4.36](https://usermanual.wiki/Olympus-Medical-Systems/GN4215.Users-Manual-2/User-Guide-870328-Page-39.png)
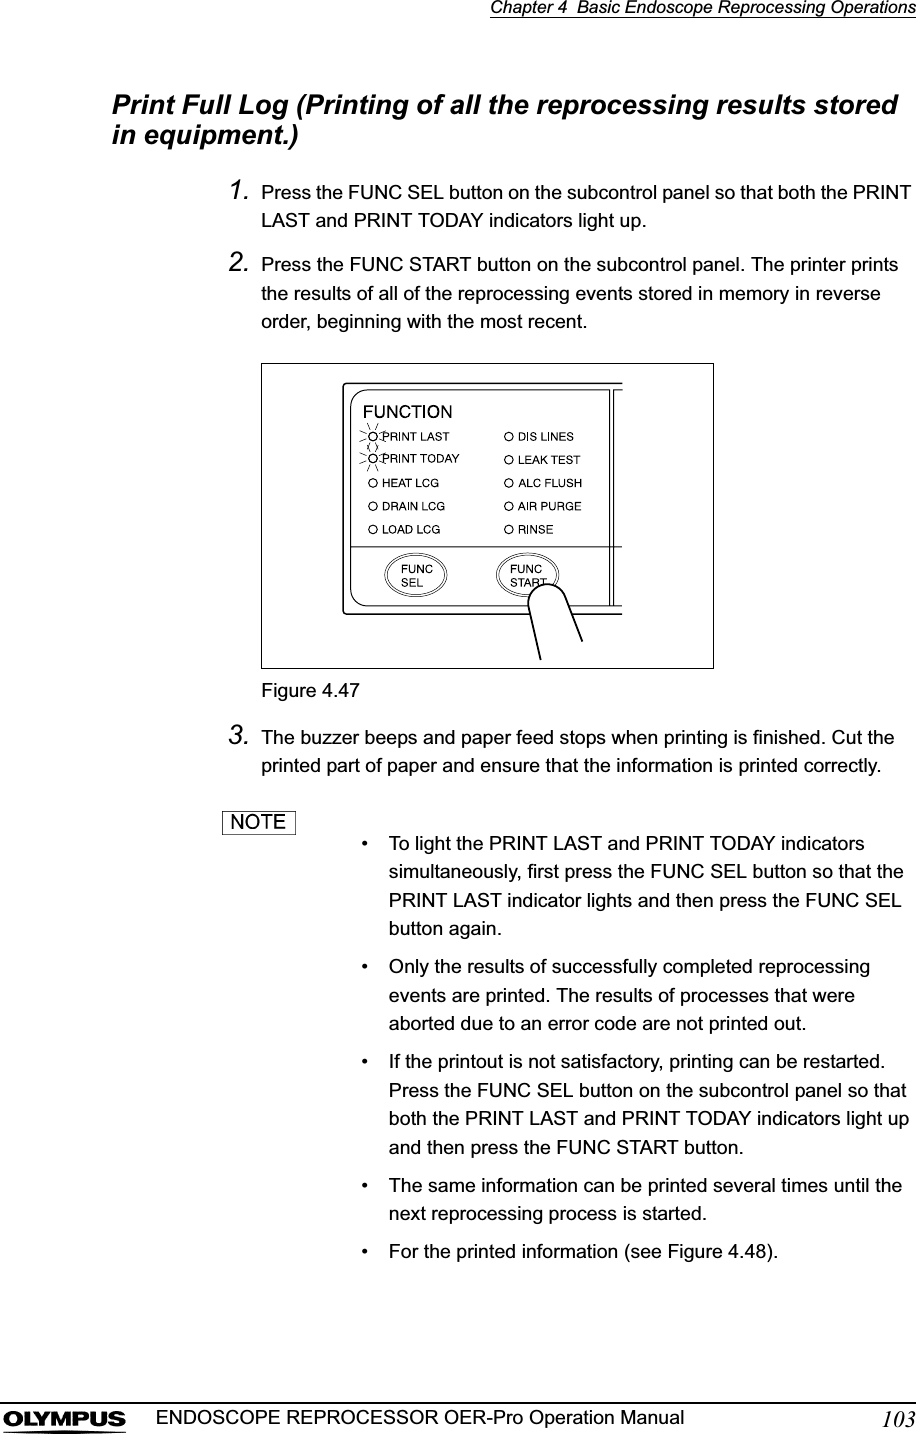
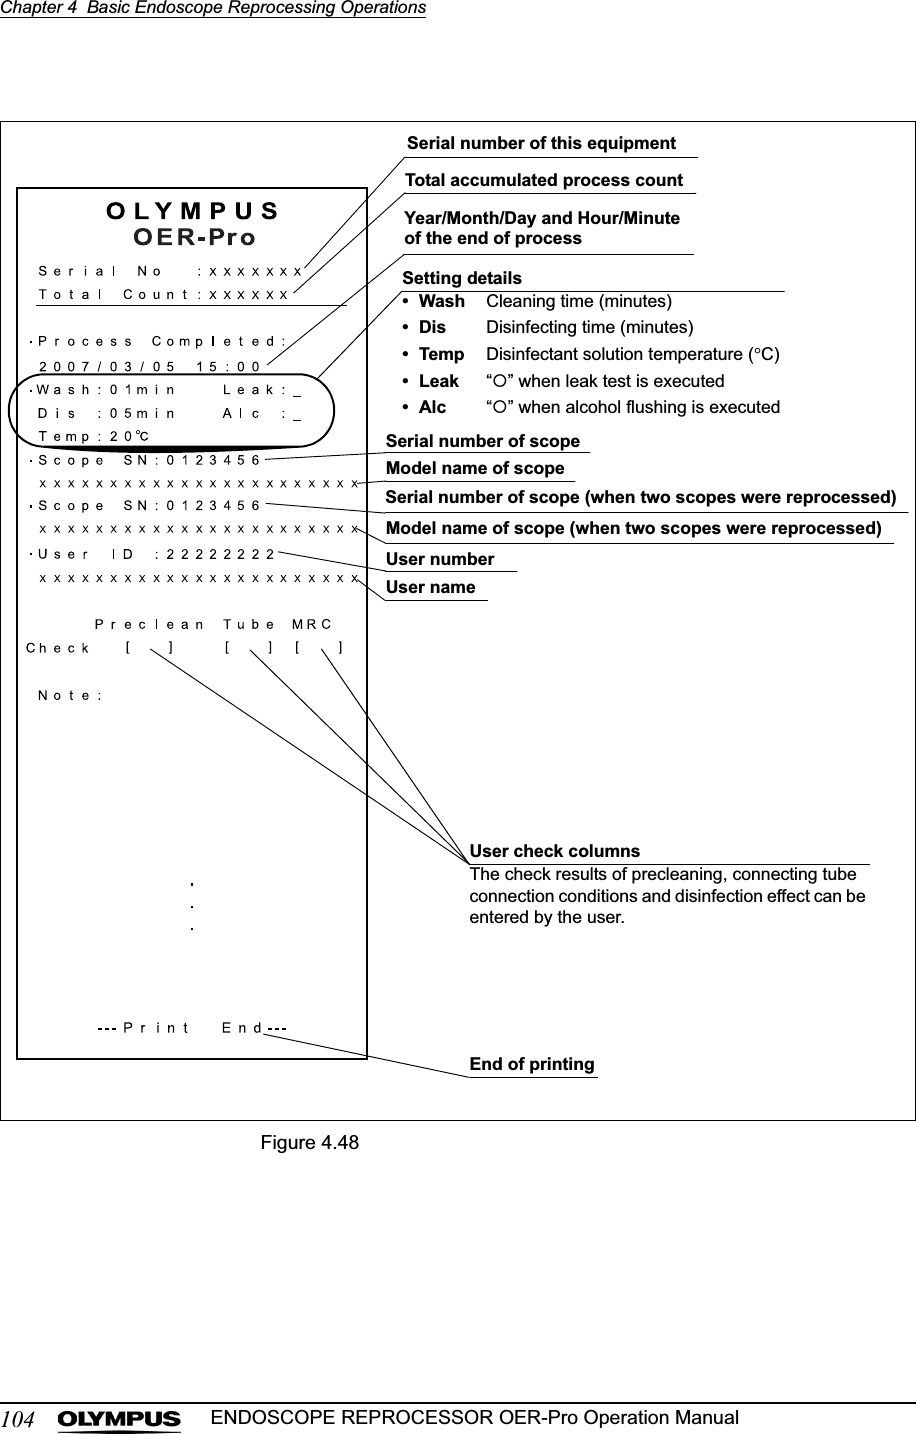
![Chapter 4 Basic Endoscope Reprocessing Operations95ENDOSCOPE REPROCESSOR OER-Pro Operation Manual1. Make sure that the program number on the main control panel shows the selected program number and the TIME/CODE display shows [- -] that the reprocessing process is completed.2. Step the foot pedal to open the lid.3. Check the condition of the connecting tubes.The connecting tubes should not be bent.The connecting tubes should be connected firmly to the connectors.The connecting tubes should be free of abnormalities including such as cracks, scratches, etc.4. Disconnect the connecting tubes and leak test air tube from each endoscope.5. Take the endoscopes and valves out of the cleaning tub. Wipe off any water using a piece of sterilized gauze. Attach the auxiliary water inlet cap to the auxiliary water inlet.6. Store the endoscopes and valves in a clean place.7. Take the connecting tubes and leak test air tubes out of the cleaning tub, wipe off any water using a piece of sterilized gauze, and store them in a clean place.4.12 Printing of the reprocessing resultsYou can print the reprocessing results and the details of any error codes. The printed data can be selected from “PRINT PREVIOUS”, “PRINT ONE DAY” and “PRINT FULL LOG”.Print Option Subcontrol panel lamps DescriptionPRINT PREVIOUS“PRINT LAST” Prints the results of the last reprocessing process or the latest error code output.PRINT ONE DAY“PRINT TODAY” Prints the results of all of the reprocessing process performed that day.PRINT FULL LOG“PRINT LAST” and“PRINT TODAY”Prints up to 60 of all the last reprocessing process stored in the equipment.Table 4.2](https://usermanual.wiki/Olympus-Medical-Systems/GN4215.Users-Manual-2/User-Guide-870328-Page-44.png)
![Chapter 4 Basic Endoscope Reprocessing Operations99ENDOSCOPE REPROCESSOR OER-Pro Operation ManualIf error code [E94] is displayed during printing1. If the paper runs out while printing, the main control panel displays error code [E94]. Press the STOP/RESET button on the main control panel to clear the error code.2. Replace the printer paper roll.3. After the roll has been replaced, press the FUNC SEL button on the subcontrol panel to select “PRINT LAST”.4. Press the FUNC START button on the subcontrol panel. The printer starts printing the reprocessing results again from the beginning.5. If you want to print only the information after the point where printing was stopped with error code [E94], do not clear the error code and simply replace the printer paper roll.If the printer paper roll is jammed• If the end of the already-printed printer paper roll is jammed in the printer, do not pull the paper by force. Doing so could damage the printer.• When the printer paper roll is replaced without clearing error code [E94], printing restarts at the moment the printer paper roll is inserted in the printer so there is a risk of jamming the end of the printer paper roll in the printer. When replacing the printer paper roll without clearing error code [E94], be sure to hold the end of the printer paper roll.1. Press the STOP/RESET button to stop printing.2. Raise the release lever, rotate the paper feed roller toward the inner part of the printer and take the printer paper roll out of the printer.3. Install the printer paper roll again as described in Section 7.17, “Installing the printer paper roll” on page 211.](https://usermanual.wiki/Olympus-Medical-Systems/GN4215.Users-Manual-2/User-Guide-870328-Page-48.png)
![102Chapter 4 Basic Endoscope Reprocessing OperationsENDOSCOPE REPROCESSOR OER-Pro Operation ManualIf error code [E94] is displayed during printing1. If the paper runs out while printing, the main control panel displays error code [E94]. Press the STOP/RESET button on the main control panel to clear the error code.2. Replace the printer paper roll.3. After replacing the printer paper roll, press the FUNC SEL button on the subcontrol panel to select “PRINT TODAY”.4. Press the FUNC START button on the subcontrol panel. The printer starts printing the reprocessing results again from the beginning.5. If you want to print only the information after the point where printing was stopped with error code [E94], do not clear the error code and simply replace the printer paper roll.If the printer paper roll is jammed• If the end of the already-printed printer paper roll is jammed in the printer, do not pull the paper by force. Doing so could damage the printer.• When the printer paper roll is replaced without clearing error code [E94], printing restarts at the moment the printer paper roll is inserted in the printer so there is a risk of jamming the end of the printer paper roll in the printer. When replacing the printer paper roll without clearing error code [E94], be sure to hold the end of the printer paper roll.1. Press the STOP/RESET button to stop printing.2. Raise the release lever, rotate the paper feed roller toward the inner part of the printer and take the printer paper roll out of the printer.3. Install the printer paper roll again as described in Section 7.17, “Installing the printer paper roll” on page 211.](https://usermanual.wiki/Olympus-Medical-Systems/GN4215.Users-Manual-2/User-Guide-870328-Page-51.png)
![Chapter 4 Basic Endoscope Reprocessing Operations105ENDOSCOPE REPROCESSOR OER-Pro Operation ManualIf error code [E94] is displayed during printing1. If the paper runs out while printing, the main control panel displays error code [E94]. Press the STOP/RESET button on the main control panel to clear the error code.2. Replace the printer paper roll.3. After replacement, press the FUNC SEL button on the subcontrol panel so that both the PRINT LAST and PRINT TODAY indicators light up.4. Press the FUNC START button on the subcontrol panel. The printer starts printing all of the stored reprocessing results again from the beginning.5. If you want to print only the information after the point where printing was stopped with error code [E94], do not clear the error code and simply replace the printer paper roll.If the printer paper roll is jammed• If the end of the already-printed printer paper roll is jammed in the printer, do not pull the paper by force. Doing so could damage the printer.• When the printer paper roll is replaced without clearing error code [E94], printing restarts at the moment the printer paper roll is inserted in the printer so there is a risk of jamming the end of the printer paper roll in the printer. When replacing the printer paper roll without clearing error code [E94], be sure to hold the end of the printer paper roll.1. Press the STOP/RESET button to stop printing.2. Raise the release lever, rotate the paper feed roller toward the inner part of the printer and take the printer paper roll out of the printer.3. Install the printer paper roll again as described in Section 7.17, “Installing the printer paper roll” on page 211.](https://usermanual.wiki/Olympus-Medical-Systems/GN4215.Users-Manual-2/User-Guide-870328-Page-54.png)
![108Chapter 4 Basic Endoscope Reprocessing OperationsENDOSCOPE REPROCESSOR OER-Pro Operation ManualIf error code [E94] is displayed during printing1. If the paper runs out while printing, the main control panel displays error code [E94]. Press the STOP/RESET button on the main control panel to clear the error code.2. Replace the printer paper roll.3. After the roll has been replaced, press the FUNC SEL button on the subcontrol panel to select “PRINT LAST”.4. Press the FUNC START button on the subcontrol panel. The printer starts printing the reprocessing results again from the beginning.5. If you want to print only the information after the point where printing was stopped with error code [E94], do not clear the error code and simply replace the printer paper roll.If the printer paper roll is jammed• If the end of the already-printed printer paper roll is jammed in the printer, do not pull the paper by force, as this could damage the printer.• When the printer paper roll is replaced without clearing error code [E94], printing restarts at the moment the printer paper roll is inserted in the printer so there is a risk of jamming the end of the printer paper roll in the printer. When replacing the printer paper roll without clearing error code [E94], be sure to hold the end of the printer paper roll.1. Press the STOP/RESET button to stop printing.2. Raise the release lever, rotate the paper feed roller toward the inner part of the printer and take the printer paper roll out of the printer.3. Install the printer paper roll again as described in Section 7.17, “Installing the printer paper roll” on page 211.](https://usermanual.wiki/Olympus-Medical-Systems/GN4215.Users-Manual-2/User-Guide-870328-Page-57.png)