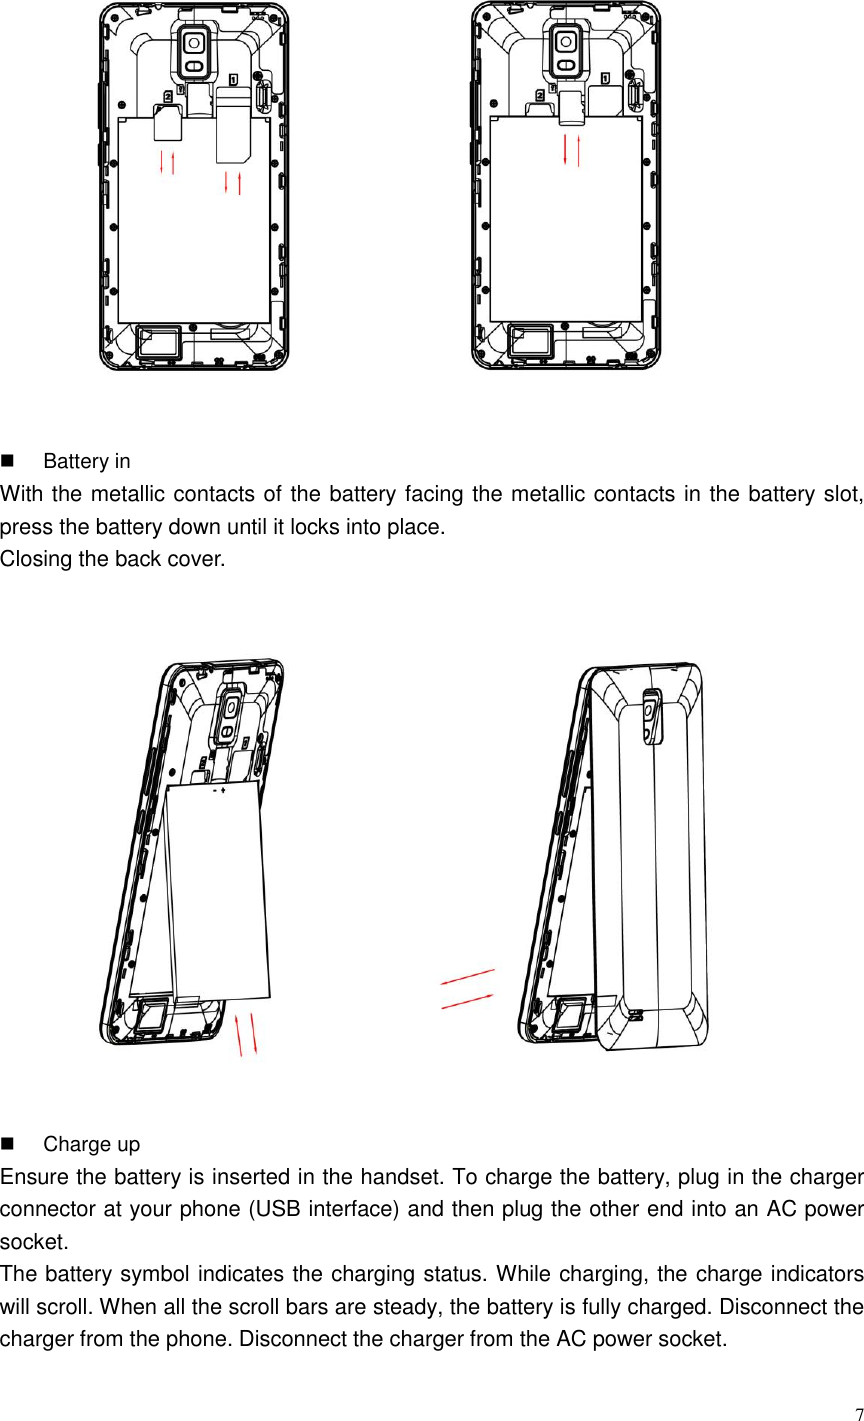
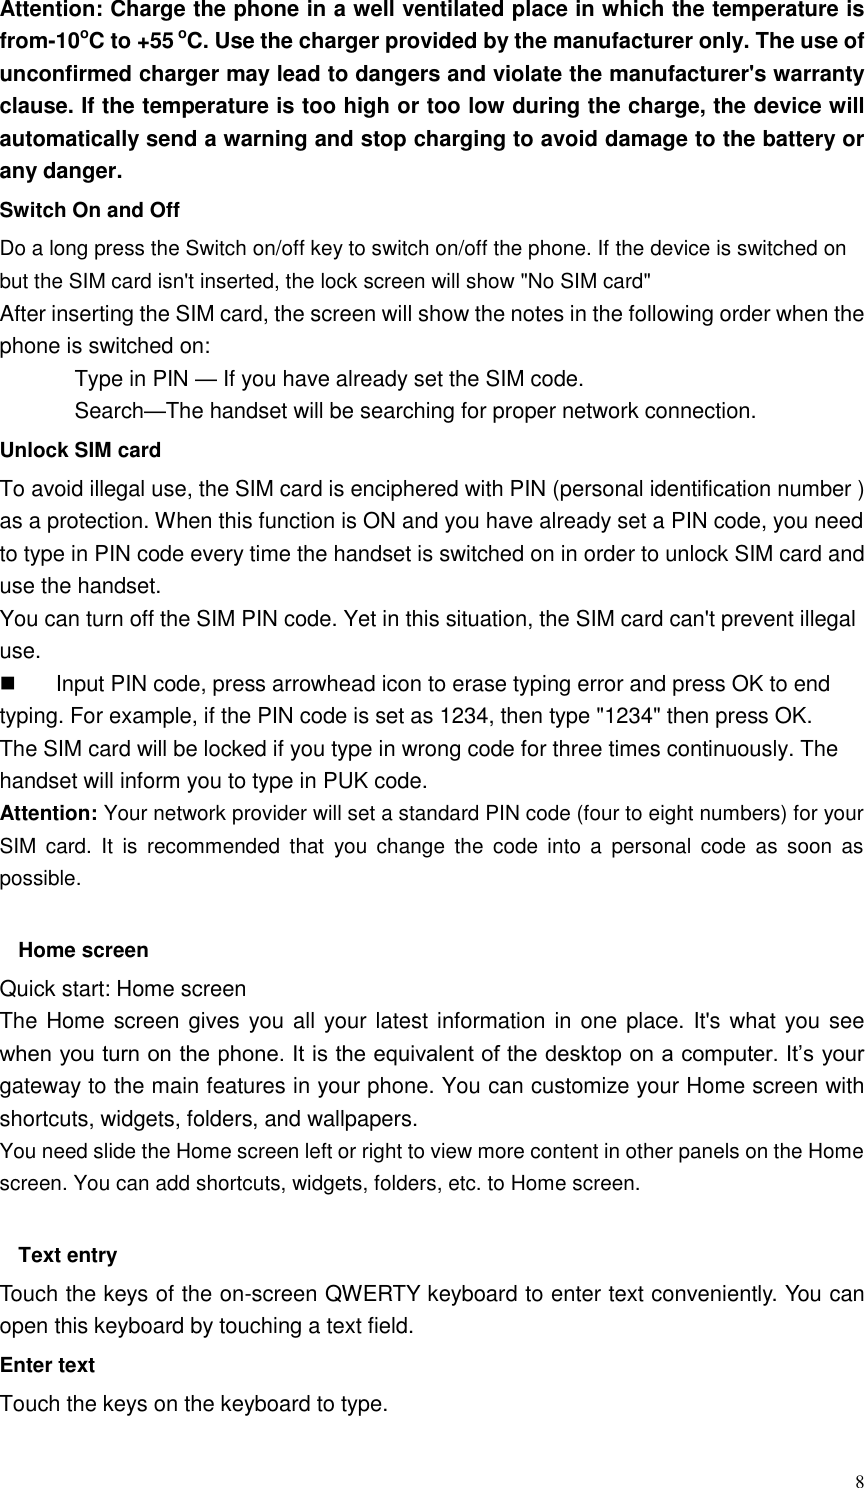
POSH Mobile E600 Titan Max HD User Manual POSH Orion Max X550

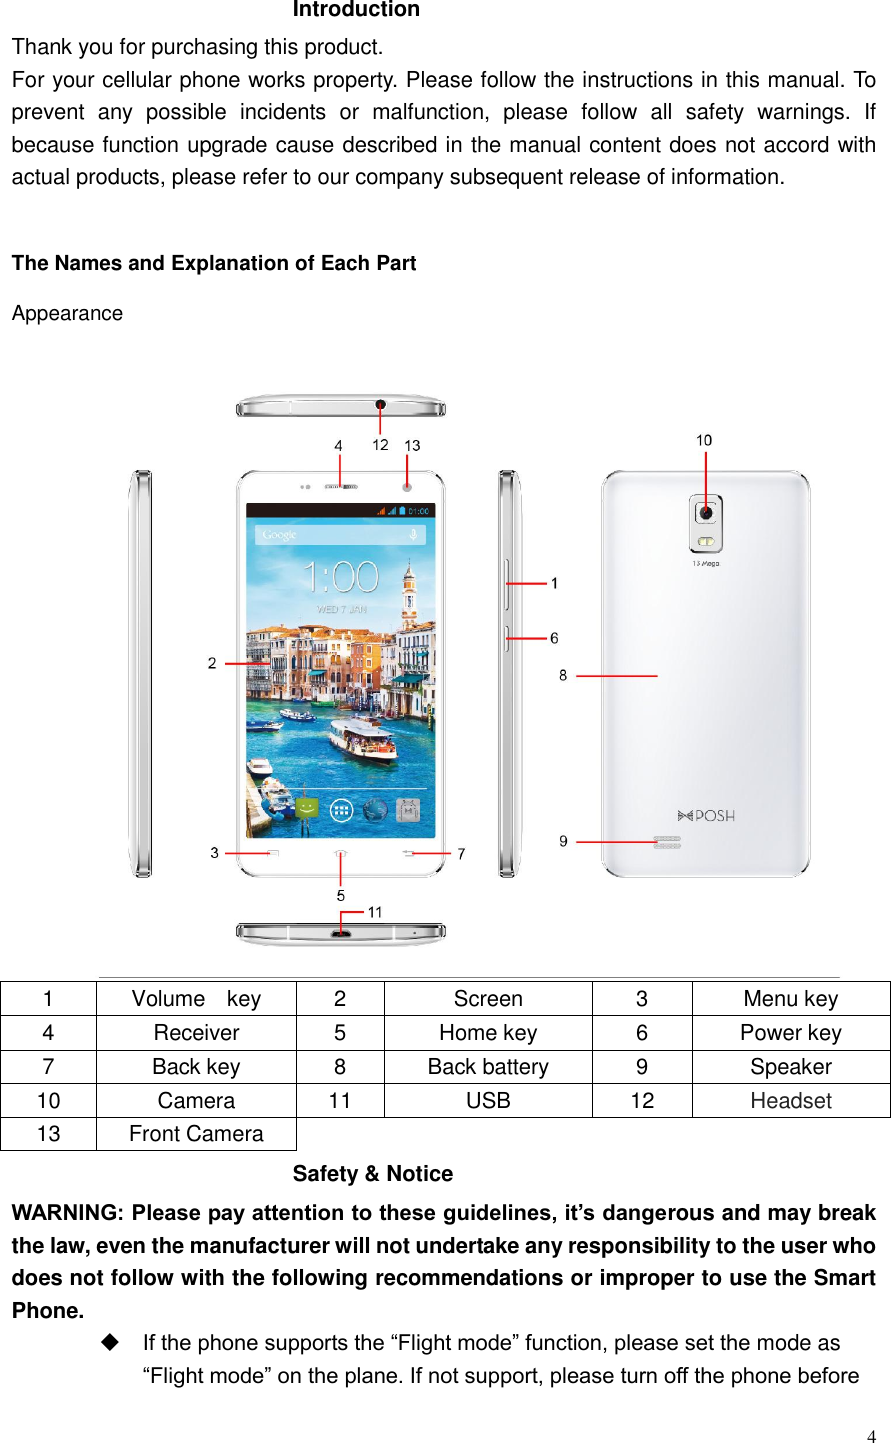
Posh Mobile Limited Titan Max HD POSH Orion Max X550

E600A_Users Manual

 1         POSH Titan Max HD   E600  Users Manual
 2 Table of Contents POSH Titan Max HD ........................................................................................................... 1 E600 ...................................................................................................... 错误!未定义书签。 Introduction ........................................................................................................................ 4 The Names and Explanation of Each Part ................................................................... 4 Appearance ..................................................................................................................... 4 Safety & Notice................................................................................................................... 4 Start to use ......................................................................................................................... 6 Touch & type ................................................................................................................. 6 Assemble & charge ...................................................................................................... 6 Switch On and Off .......................................................................................................... 8 Unlock SIM card ............................................................................................................. 8 Home screen ................................................................................................................ 8 Quick start: Home screen ............................................................................................. 8 Text entry ...................................................................................................................... 8 Enter text ......................................................................................................................... 8 Enter Various Characters ............................................................................................. 9 Edit Text ........................................................................................................................... 9 Select Text ....................................................................................................................... 9 Shortcut ........................................................................................................................ 9 Bluetooth ....................................................................................................................... 9 Global Positioning System ........................................................................................... 9 Phone ................................................................................................................................ 10 Make a call.................................................................................................................. 10 During a call ................................................................................................................ 10 Emergency calls ......................................................................................................... 10 Make International Calls ............................................................................................. 10 Answer Calls ............................................................................................................... 11 Call History ................................................................................................................. 11 Contact .............................................................................................................................. 11 Add a contact .............................................................................................................. 11 Search contacts .......................................................................................................... 11 Additional options ....................................................................................................... 11 Contact groups ........................................................................................................... 12 Favorites ..................................................................................................................... 12 Messages .......................................................................................................................... 12 New message ............................................................................................................. 13 Delete message threads ............................................................................................ 13 Forward a message .................................................................................................... 13 Web application ............................................................................................................... 13 Wireless Connection Networks .................................................................................. 13 Browser ....................................................................................................................... 14 Multimedia ........................................................................................................................ 14
 3 Camera ....................................................................................................................... 14 Music Player ............................................................................................................... 14 Videos ......................................................................................................................... 15 FM Radio .................................................................................................................... 15 Gallery ........................................................................................................................ 15 Sound Recorder ......................................................................................................... 15 Other application ............................................................................................................. 15 Clockie ........................................................................................................................ 15 Calculator .................................................................................................................... 15 File manager ............................................................................................................... 15 Connect to a computer via USB ................................................................................. 15 Troubleshooting .................................................................................. 错误!未定义书签。
 4  Introduction Thank you for purchasing this product. For your cellular phone works property. Please follow the instructions in this manual. To prevent  any  possible  incidents  or  malfunction,  please  follow  all  safety  warnings.  If because function upgrade cause described in the manual content does not accord with actual products, please refer to our company subsequent release of information.  The Names and Explanation of Each Part Appearance      1 Volume    key 2 Screen 3 Menu key 4 Receiver 5 Home key 6 Power key 7 Back key 8 Back battery 9 Speaker 10 Camera 11 USB 12 Headset 13 Front Camera Safety & Notice WARNING: Please pay attention to these guidelines, it’s dangerous and may break the law, even the manufacturer will not undertake any responsibility to the user who does not follow with the following recommendations or improper to use the Smart Phone.  If the phone supports the “Flight mode” function, please set the mode as “Flight mode” on the plane. If not support, please turn off the phone before
 5 boarding, because the phone may cause interference in aircraft. Please follow any restrictions on the airplane.   Switch the device off near the fuel, chemicals, or blasting areas. Keep the device away from the children.     While driving please obey local laws and regulations with regard to Smart Phone use. When talking on the phone while driving, please obey the following rules: Concentrate on driving and be aware of traffic conditions; if your Smart Phone has a hands-free function, please use it in this mode. Under poor driving conditions, please stop the car before you dial or pick up the phone.   Switch off the Smart Phones in the hospital or other forbidden using Smart Phone place. The Smart Phones will affect the normal work of electronic equipment and medical devices, such as pacemakers, hearing aids and other medical electronics equipment.     Non-original accessories and components are not provided with repair warranty qualification.     Please do not disassemble your phone by yourself, if your phone is out of order, please contact your supplier.   Please do not charge the Smart Phone before battery is installed. Do not short-circuit the battery.     Smart Phone must be charged in the good ventilated and cooling environment, and away from flammable and explosive materials.   In order to demagnetization, please keep Smart Phone away from the magnetic material, such as disks, credit card etc.     Keep the device dry. Precipitation, humidity, and all types of liquids or moisture can contain minerals that will corrode electronic circuits. If your device does get wet, remove the battery, and contact with the supplier.     Do not use the Smart Phone in too high or too low temperature environment, and do not expose the Smart Phone to strong sunlight or high humidity.     Do not use liquid or wet cloth with strong detergent to clean the device.   This Smart Phone is provided photograph, video recording and sound recording functions; please follow the relevant laws and regulations to use those functions. Photograph, video recording and sound recording without authorization may violate laws and regulations.     While using the network functions, please do not download the files which have virus, do not install any photos and ring tones which have been damaged. If it results the phone abnormally, our company will not undertake any responsibility.   Please dispose of batteries according to local regulations, please recycle when possible. Please do not dispose as household waste.   STATEMENT: Our Company reserves the right  to  revise this manual content  without prior notice.
 6  Start to use Touch & type   Use your fingers to manipulate icons, buttons, menus, the onscreen keyboard, and other items on the touch screen. You can also change the screen's orientation. To select or activate something, touch it.   To type something, such as a name, password, or search terms, just touch where you want to type. A keyboard pops up that lets you type into the field. Other common gestures include:  Touch & hold: Touch & hold an item on the screen by touching it and not lifting your finger until an action occurs.    Drag: Touch & hold an item for a moment and then, without lifting your finger, move your finger on the screen until you reach the target position. For example, you can drag to reposition shortcuts on the Home screen.  Swipe or slide: Quickly move your finger across the surface of the screen, without pausing when you first touch (so you don't drag something instead). For example, you can slide a Home screen left or right to view the other Home screens.    Double-tap: Tap  quickly twice  on a  webpage, map, or  other  screen to  zoom. For example, double-tap a webpage in Browser to zoom in, and double-tap again to zoom out.    Pinch: In some apps (such as Maps, Browser, and Gallery), you can zoom in and out by placing two fingers on the screen at once and pinching them together (to zoom out) or spreading them apart (to zoom in).    Rotate the screen: On most screens, the orientation of the screen rotates with your device as you turn it. You can change this Display setting.    Assemble & charge   SIM card in Please according to the label on the phone. Make sure that the clipped corner of the SIM card is facing the correct direction and the metallic contacts are facing the correct direction. Slide the SIM card into the card slot until it stops.   SD card in Slide the SD card into the SD card slot with the metallic pins facing downwards. Push the card until it locks into place. Warning:Use  only  compatible  memory  cards  for use  with  this device.  Incompatible memory cards may damage the card or the device and corrupt the data stored in the card.
 7    Battery in With the metallic contacts of the battery facing the metallic contacts in the battery slot, press the battery down until it locks into place.   Closing the back cover.    Charge up Ensure the battery is inserted in the handset. To charge the battery, plug in the charger connector at your phone (USB interface) and then plug the other end into an AC power socket. The battery symbol indicates the charging status. While charging, the charge indicators will scroll. When all the scroll bars are steady, the battery is fully charged. Disconnect the charger from the phone. Disconnect the charger from the AC power socket.
 8 Attention: Charge the phone in a well ventilated place in which the temperature is from-10oC to +55 oC. Use the charger provided by the manufacturer only. The use of unconfirmed charger may lead to dangers and violate the manufacturer's warranty clause. If the temperature is too high or too low during the charge, the device will automatically send a warning and stop charging to avoid damage to the battery or any danger. Switch On and Off Do a long press the Switch on/off key to switch on/off the phone. If the device is switched on but the SIM card isn't inserted, the lock screen will show "No SIM card" After inserting the SIM card, the screen will show the notes in the following order when the phone is switched on:   Type in PIN — If you have already set the SIM code. Search—The handset will be searching for proper network connection. Unlock SIM card To avoid illegal use, the SIM card is enciphered with PIN (personal identification number ) as a protection. When this function is ON and you have already set a PIN code, you need to type in PIN code every time the handset is switched on in order to unlock SIM card and use the handset.   You can turn off the SIM PIN code. Yet in this situation, the SIM card can't prevent illegal use.   Input PIN code, press arrowhead icon to erase typing error and press OK to end typing. For example, if the PIN code is set as 1234, then type "1234" then press OK. The SIM card will be locked if you type in wrong code for three times continuously. The handset will inform you to type in PUK code. Attention: Your network provider will set a standard PIN code (four to eight numbers) for your SIM  card.  It  is  recommended  that  you  change  the  code  into  a  personal  code  as  soon  as possible.  Home screen Quick start: Home screen The Home screen gives you all your latest information in one place. It's what you see when you turn on the phone. It is the equivalent of the desktop on a computer. It’s your gateway to the main features in your phone. You can customize your Home screen with shortcuts, widgets, folders, and wallpapers.   You need slide the Home screen left or right to view more content in other panels on the Home screen. You can add shortcuts, widgets, folders, etc. to Home screen.  Text entry Touch the keys of the on-screen QWERTY keyboard to enter text conveniently. You can open this keyboard by touching a text field. Enter text Touch the keys on the keyboard to type.
 9   Use the Delete key    to erase characters to the left of the cursor.   When you finished typing, Press Back key to close the keyboard. Enter Various Characters   Touch the Symbols key    to switch to the numbers and symbols keyboard.   Touch    on the symbols keyboard to view additional symbols. Edit Text You can edit the text you enter in text fields and use menu commands to cut, copy, and paste text, within or across applications. Some applications do not support editing some or all of the text they display. Others may offer their own way to select text you want to work with.   Touch and hold the text field that contains the text to select the word.   Cut or copy the text. Select Text You can select text for cutting or copying. The selected text is highlighted in blue.   Touch and hold the portion that contains text. Some options open with icons.   Move the cursor to select the text.  Shortcut     To add a shortcut to Home screen 1. From Home screen, touch Launcher icon. 2. From APPS tab, you will see application menu. 3. Touch and hold an application icon until it vibrates, then back to the Home screen, and drag it to the desired location.     To remove a shortcut on Home screen If you want to remove the shortcut, you can touch and hold the shortcut icon on Home screen until it vibrates, and then drag it to Remove tab.  Bluetooth Bluetooth  is  a  short-range  wireless  communications  technology  that  devices  can  use  to exchange information over a distance of about 10 meters. Turn Bluetooth on or off, search for available Bluetooth devices, and make your phone visible or invisible to other Bluetooth devices. 1.    Rename phone: check and rename device name. 2.    Visibility timeout: set the time of others can find your Device. 3.    Show received files: show the files download and upload.  Global Positioning System From  Settings  into  the  location  access,  open  the  Global  Positioning  System  satellites, connection on the GPRS or Wireless Connection, can navigation and positioning.
 10 Phone   Make a call Touch phone icon on the Home screen. In dialing screen, input number and touch Dial icon to dial the inputted number.  During a call During a call, there are some call options available to you. These call options can be seen only during a  call. When a  call  is in  progress, you  can  put it  on hold, initiate a  phone conference, mute your microphone etc. Touch   Go to the key pad Touch   To turn on/off the speaker. Touch   Mute your voice so that the other party cannot hear you. Touch   To place a call on hold. Touch   Open dial pad to dial the second call.    Conference* In Conference call mode, you answer the incoming call and add it to the conference in accordance with the instructions; Hold multiparty conference; Have a private conversation with one party and hold other parties' call; Connect one party to the other and end the conference call; Put one party on hold; End current call and all hold on calls. Attention: Menu items market by happen only under certain situations. Users need to apply for opening the conference call functions to relevant service provider.    Emergency calls You can call for emergency service as long as you are in the network coverage (check the signal  strength  indication  bar  on  the  upper  right  side  of  the  handset  screen). If  your network provider doesn't provide roaming service in this area, there will be "Emergency Calls " on the lock screen.   If you are in the network coverage, you can have emergency calls even without a SIM card.  Make International Calls If you need to make an international call, do a long press on the 0 key on the virtual keyboard until there appears the sign "+" for international call prefix, which helps you call from any country (For example, in USA +”1”) even if you don't know the international call prefix of that country. You can make an international call according to the following typing order: + ›  country code › complete phone number › dialing icon (type in the prefix code, and then continue to enter  the  country  code  and  complete  phone  number).  Country  code  usually  follows
 11 conventional practice: German is 49, Britain 44, Sweden 46 and so on.    Answer Calls Drag the icon to answer to answer an incoming call. If your headphone is connected to the handset, you can use the headphone key on the headphone answer calls. Attention: A short press of the headphone key will answer the call while a long one will refused to answer the phone.  Call History This handset not only can list all calls in reverse chronological order, but also list a floating menu with all, answered, dialed, missed calls for checking call history of different kinds.   Contact     The Contacts application offers you to store and manage all your contacts.   Add a contact 1. From your Home screen, touch Contact icon or find it: Application menu > contact.   2. Touch  . 3. Select a location to save. 4. Enter the information for the contact. 5. After you finish, touch DONE.  Search contacts 1. From your Home screen, touch Contact icon or find it: Application menu >Contact.   2. Touch  . 3. Input to keyword search contacts. 4. The matched contacts listed phone automatically.  Additional options From contacts list screen, Press Menu key 错误!未找到引用源。, some additional options will be available to you. For example, import/export, and share visible contacts.   Delete contact: You can mark much more than one contact, and then delete these marked contacts.   Contacts to display: To select which contacts to display in the contacts list.   Import/export: Copy contacts to which you want import.   Accounts:  You  can  synchronize  your  phone  contacts  with  a  synchronization account.   Settings: You can set Sort list by and View contact names
 12   Share visible contacts: You can share contacts via Bluetooth, Email, MMS, and so on.  Contact groups You  can  assign  contacts  to  groups  to  get  quicker  access  to  them  from  the  Contacts application. It allows you to create a new group such as VIP, schoolmate, friends, family or co-worker.   To create a new group 1. From your Home screen, touch Contacts icon or find it: Application menu >Contacts.   2. Touch Groups tab. 3. Touch  . 4. Input the information of group, then touch DONE.   To assign a contact to a group 1. From your Home screen, touch Contacts icon or find it: Application menu >Contacts.   2. Touch Groups tab. 3. Touch a group to which you want to assign contacts. 4. Press Menu key, touch Edit in the menu that opens. 5. Touch Type person’s name to input the contact’s name, then the corresponding contact entry will pop up, select the desired contact entry. 6. After you finish editing, touch DONE  Favorites You can set contacts as favorites so that you can get access to them from the Contacts application. Only the contacts stored in phone memory can be set as favorites.   To set a contact as favorite 1.  From  your  Home  screen,  touch  Contacts  icon  or  find  it:  Application  menu  > Contacts.   2. From contacts list, touch a contact which you want to set as favorite. 3. Touch . If you want to cancel the favorite, touch .    Messages   You can compose, send and receive text messages from your phone, and also can compose, send and receive multimedia messages, which contain media files such as pictures, videos and audios.  When  you  view  your  messages,  they  appear  as  conversations,  which  means  that  all messages to and from a particular person are grouped together.
 13 New message     1.  From  your  Home  screen,  touch  Messages  icon  or  find  it:  Application  menu  > Messages. 2. Touch . 3. To add recipient(s), touch , then find and mark the contact name. To add more than one contact, mark the contact name for the desired recipients. You can also enter the recipient’s phone number manually. 5. Touch Type text message to enter your message text. 6. If you want to insert a media file, touch , and select an attachment. 7. To send the message, touch   When editing message, press Menu key 错误!未找到引用源。, some additional options will be available to you. For example, add subject, and insert smiley. You can touch the options to do actions.  Delete message threads 1.  From  your  Home  screen,  touch  Messages icon  or  find  it:  Application  menu  > Messages. 2. Touch and hold the message thread. 3. Select the conversations you want to delete. 4. Touch . You can also press Menu key and touch Delete all threads to delete all message threads from the window.  Forward a message 1.  From  your  Home  screen,  touch  Messages  icon  or  find  it:  Application  menu  > Messages. 2. Touch the conversation containing the message you want to forward. 3. Touch and hold the message you want to forward. 4. Touch forward in the menu that opens. 5. Add recipient(s), touch , Then find and mark the contact name. To add more than one contact, mark the contact name for the desired recipients. You can also enter the recipient’s phone number manually. 6. Touch    to send the message.  Web application   Wireless Connection Networks Wireless Connection is a wireless networking technology that can provide internet access at distance of up to 100 meters. To use Wireless Connection on your phone, you access a wireless access point, or “hotspot”. Some hotspots are open and you can simply connect to them. Others are hidden or implement other security features, so you must configure your phone so it can connect to them.
 14 TIP: Turn off Wireless Connection when you are not using it, to extend the life of your battery.  Connect to Wireless Connection Network 1. Touch Launcher icon, and from Application menu, touch Settings. 2. Touch Wireless Connection. 3. Check Wireless Connection to turn it on. The phone scans for available Wireless Connection networks and displays the names of those it finds. Secured networks are indicated with a Lock icon. 4. Touch a network to connect to it If the network is secured, you are prompted to enter a password or other credentials (Ask your network administrator for details)  Browser Use your web browser to view and navigate web pages, add pages as bookmarks, and save pages for offline reading. You can open several windows at the same time and switch among them easily. You can also request the desktop version of a web page if you don’t want to view the mobile version.  Open the web browser From your Home screen, touch Browser icon or find it: Application menu > Browser.    Search and address bar           Multimedia   Camera Take  a  photo or  record a  video  with  the camera in  your  phone. You can  hold  the  camera horizontally or vertically. Share a photo or a video with your friends, or upload your photos and videos to a web service.  Music Player The phone comes with a Music player that plays songs, listen to audio book and podcasts you have stored. It gives you a host of setting options to make your listening experience interesting.
 15 Videos Play video. Enter the video list, scroll the screen to browse and choose the file you want to play.  FM Radio The phone comes with an in-built FM Radio. You can listen to FM radio stations, and add them to channel list. You have to plug in an earphone, as the antenna of the FM radio. You can listen to the radio either through an earphone, or through the speaker in the phone. Gallery   You  can  view  the  captured  images,  recorded  video  clips,  and  downloaded  images  in  the Gallery. Sound Recorder You can use the sound recorder to record sounds and also select to save the recordings in your phone.  Other application   Clock Function   The clock错误!未找到引用源。  allows you to view time and date. You can also add an alarm, set the alarm and turn it on. Then, the alarm错误!未找到引用源。  can ring at a specific time you set.   • Add an alarm 1.  From  your  Home  screen,  touch  Launcher  icon,  then  find  it:  Application  menu  > Clock.   2. Touch  . 3. You need set time, ringtone, repeat, vibrate, etc. Then, turn it on.   4. After you finish setting, touch Done. Then the alarm错误!未找到引用源。  can ring at a specific time you set.  Calculator Keep your calculations on your finger tips with the calculator. Using this application allows you to  make  calculations. The  calculator  provides  the  basic  arithmetic  functions;  addition, subtraction, multiplication, and division. You can also use an advanced panel. File manager You can manage files, including Download, Music, and Received File. Press Add folder icon to create a new folder or select folders to copy, move and delete.  Connect to a computer via USB You can connect your phone to a computer with a USB cable to transfer music, pictures, and other files between your phone’s SD card and the computer. You cannot share your phone’s data connection and SD card via USB cable at the same
 16 time. If you are using USB tethering, you must turn that off first.   FCC RF Exposure Information and Statement The SAR limit of USA (FCC) is 1.6 W/kg averaged over on one gram of tissue. Device types: E600A (FCCID: 2ABN6E600) has also been tested against this SAR limit. The highest SAR value reported under this standard during product certification for use at the ear is 0.645 W/kg and when properly worn on the body is 0.699 W/kg. This device was tested for typical body-worn operations with the back of the handset kept 1.0 cm from the body. To maintain compliance with FCC RF exposure requirements, use accessories that maintain a 1.0 cm separation distance between the user's body and the back of the handset. The use of belt clips, holsters and similar accessories should not contain metallic components in its assembly. The use of accessories that do not satisfy these requirements may not comply with FCC RF exposure requirements, and should be avoided. This device complies with part 15 of the FCC rules. Operation is subject to the following two conditions: (1) this device may not cause harmful interference, and (2) this device must accept any interference received, including interference that may cause undesired operation. NOTE: The manufacturer is not responsible for any radio or TV interference caused by unauthorized modifications to this equipment. Such modifications could void the user’s authority to operate the equipment .This equipment has been tested and found to comply with the limits for a Class B digital device, pursuant to part 15 of the FCC Rules. These limits are designed to provide reasonable protection against harmful interference in a residential installation. This equipment generates uses and can radiate radio frequency energy and, if not installed and used in accordance with the instructions, may cause harmful interference to radio communications. However, there is no guarantee that interference will not occur in a particular installation. If this equipment does cause harmful interference to radio or television reception, which can be determined by turning the equipment off and on, the user is encouraged to try to correct the interference by one or more of the following measures: - Reorient or relocate the receiving antenna. - Increase the separation between the equipment and receiver. - Connect the equipment into an outlet on a circuit different from that to which the receiver is connected. - Consult the dealer or an experienced radio/TV technician for help. The user’s manual or instruction manual for an intentional or unintentional radiator shall caution the user that changes or modifications not expressly approved by the party responsible for compliance could void the user's authority to operate the equipment. In cases where the manual is provided only in a form other than paper, such as on a computer disk or over the Internet, the information required by this section may be included in the manual in that
 17 alternative form, provided the user can reasonably be expected to have the capability to access information in that form. §  15.19 Labelling requirements. §  15.21 Changes or modification warning Any Changes or modifications not expressly approved by the party responsible for compliance could void the user's authority to operate the equipment. §  15.105 Information to the user.

Navigation menu