Panasonic Connect 208006A UMTS/ GSM Cellular Mobile with Bluetooth® and RFID User Manual 000 P906i
Panasonic Mobile Communications Development of Europe Ltd UMTS/ GSM Cellular Mobile with Bluetooth® and RFID 000 P906i
Contents
- 1. User Manual Part 1
- 2. User Manual Part 2
- 3. User Manual Part 3
User Manual Part 2
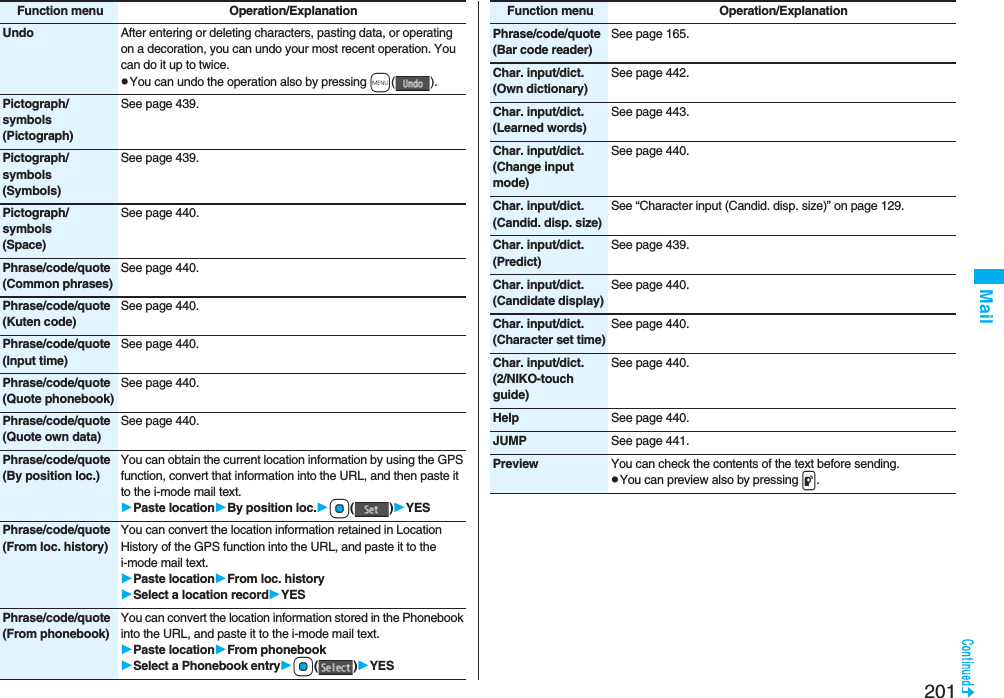
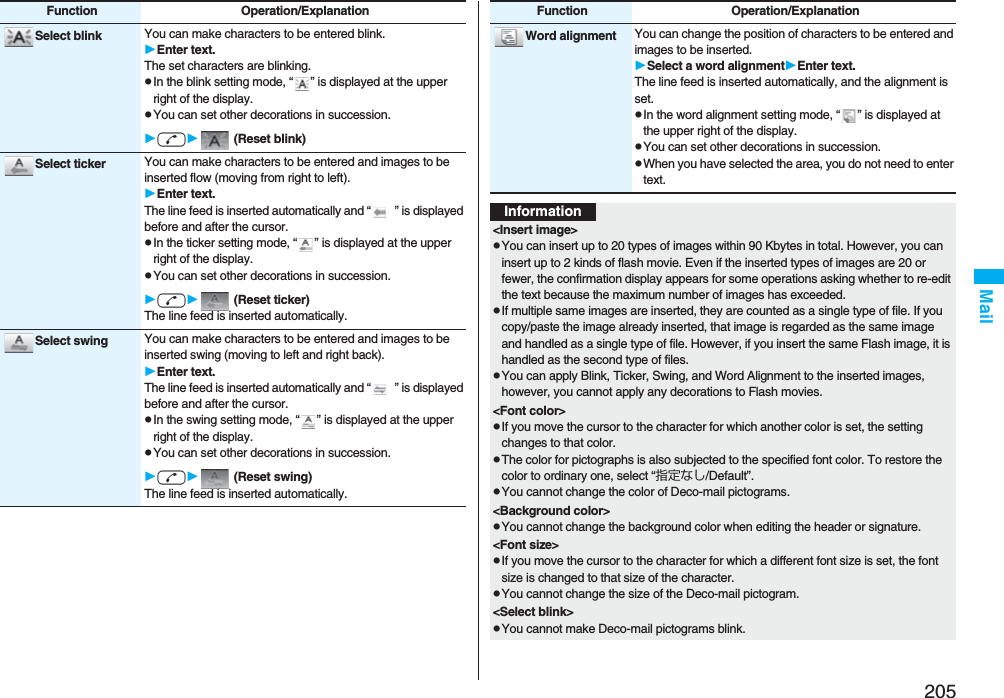

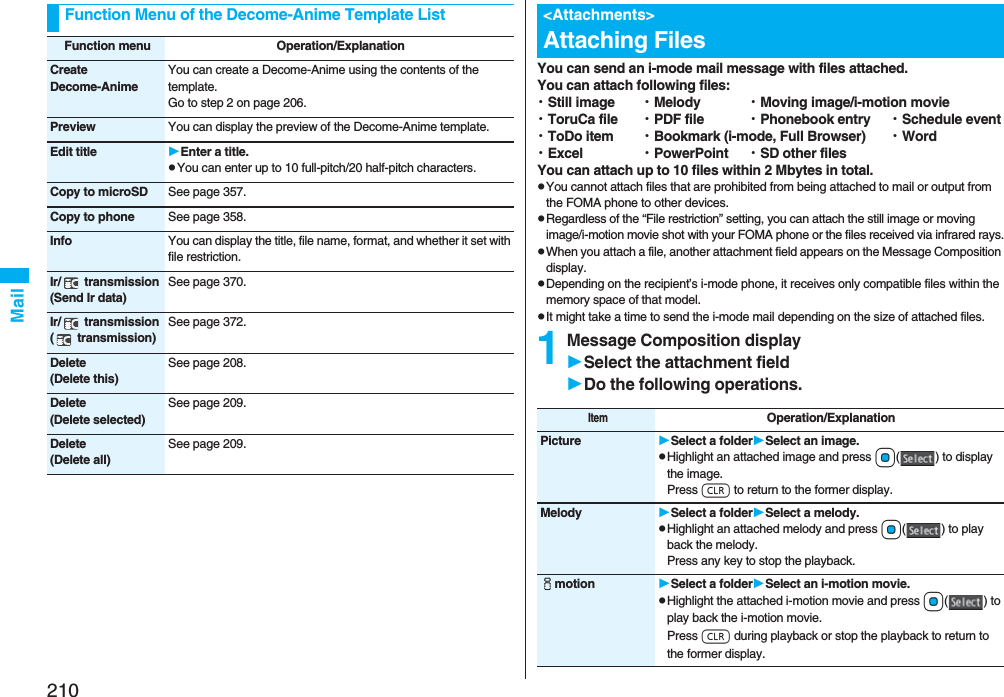
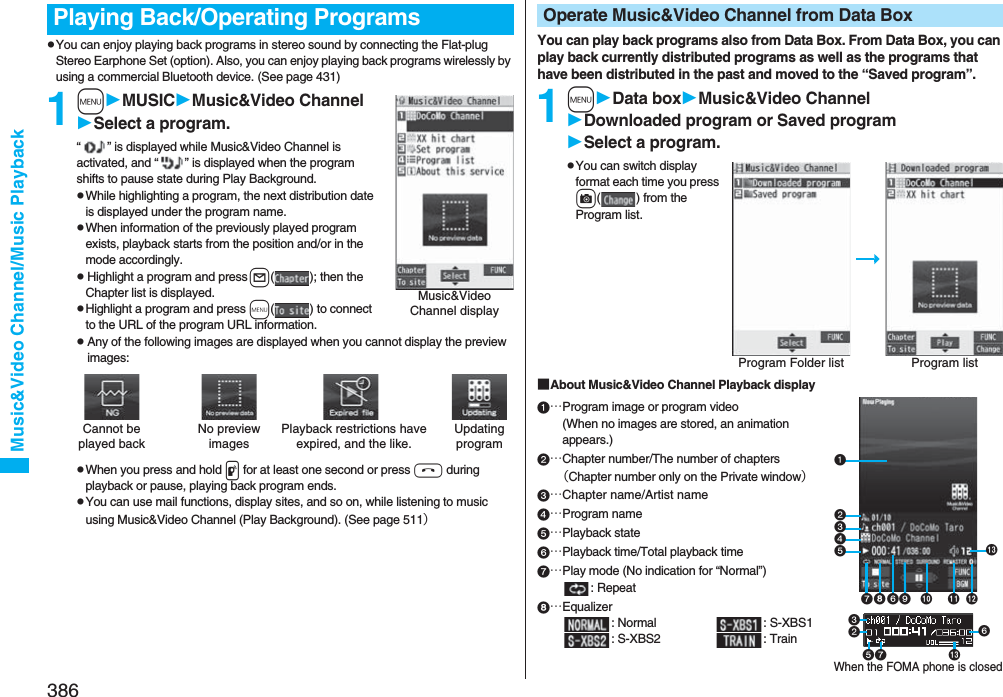
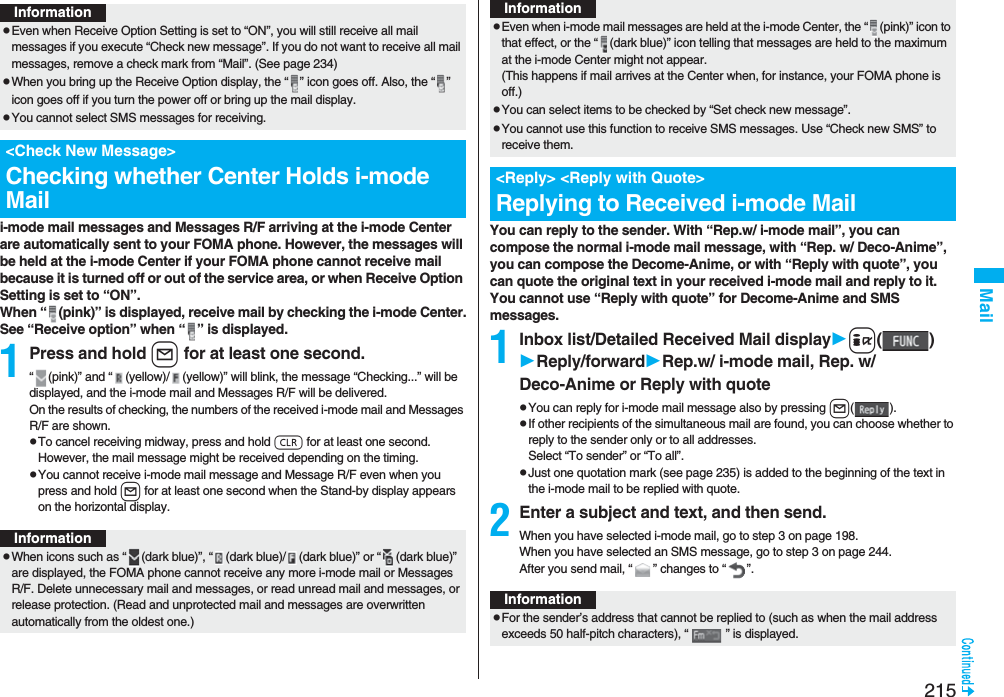
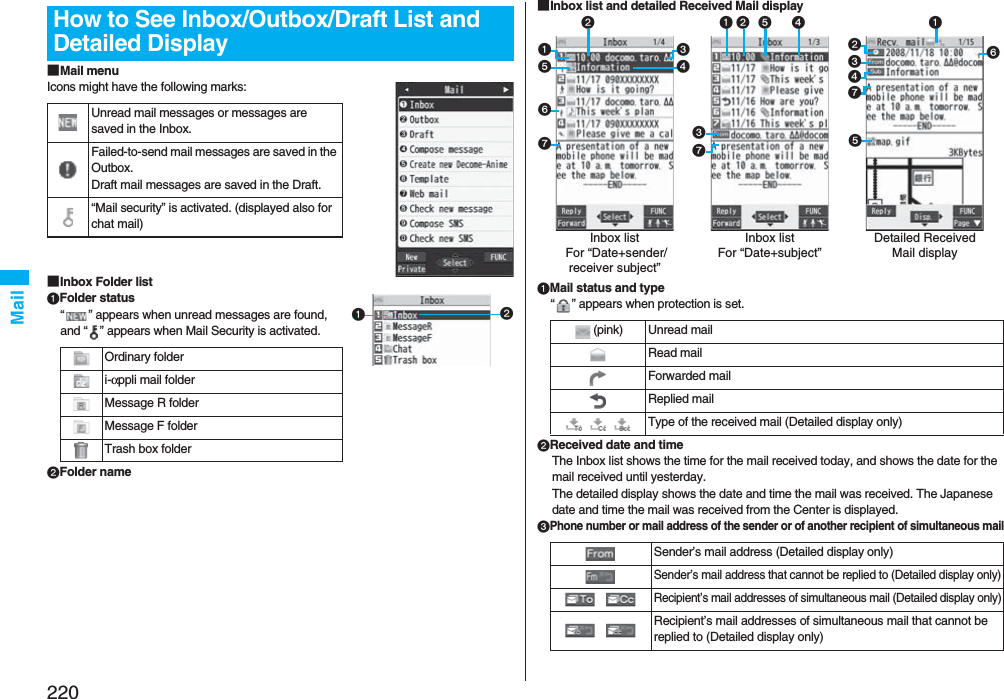
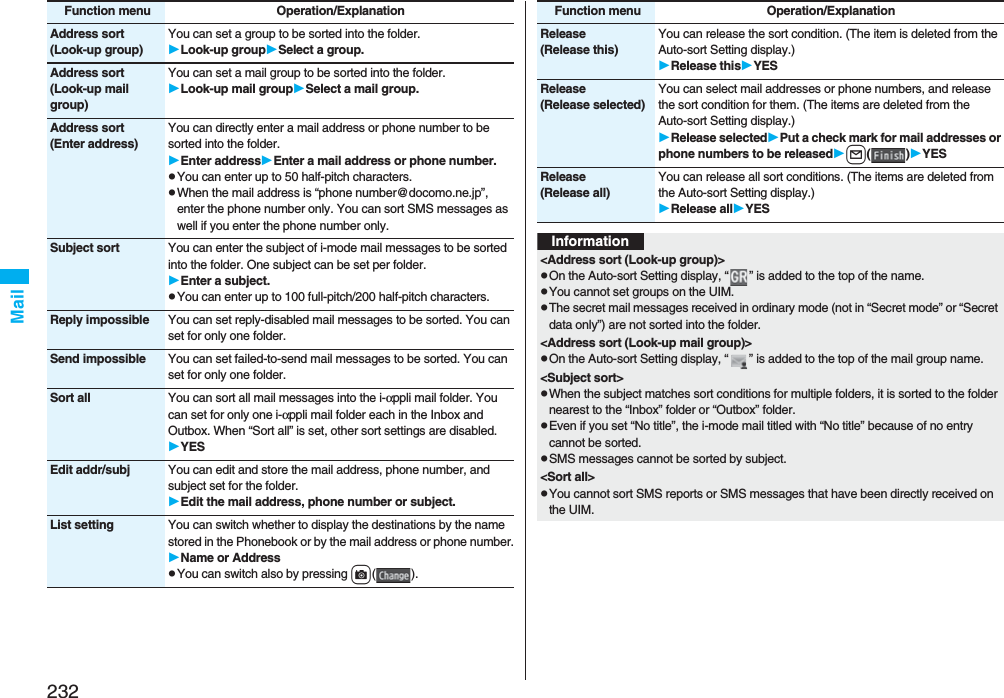
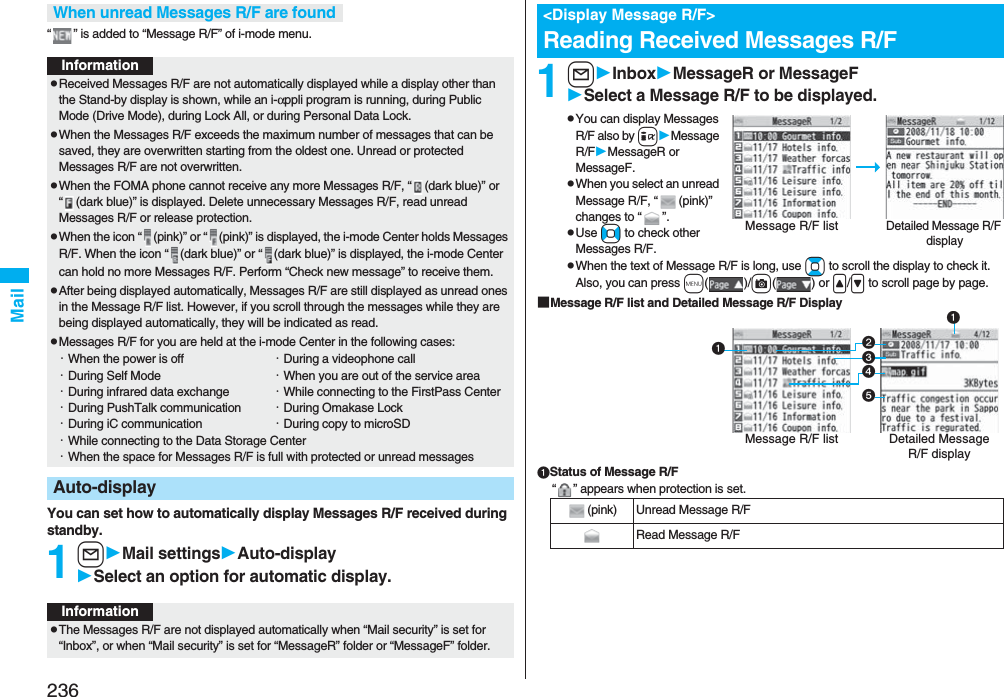
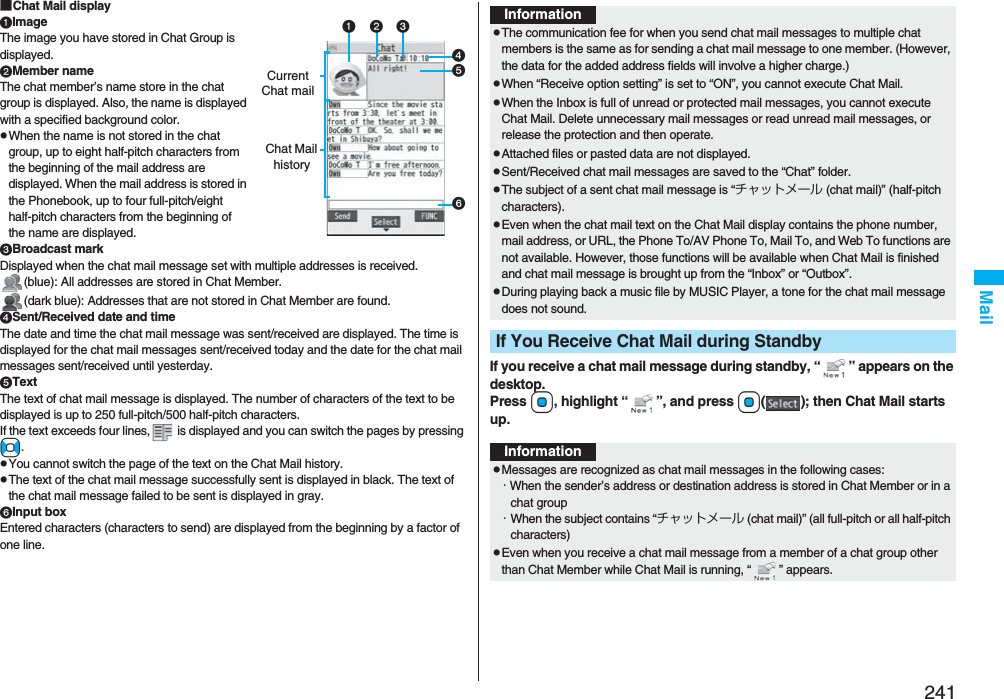
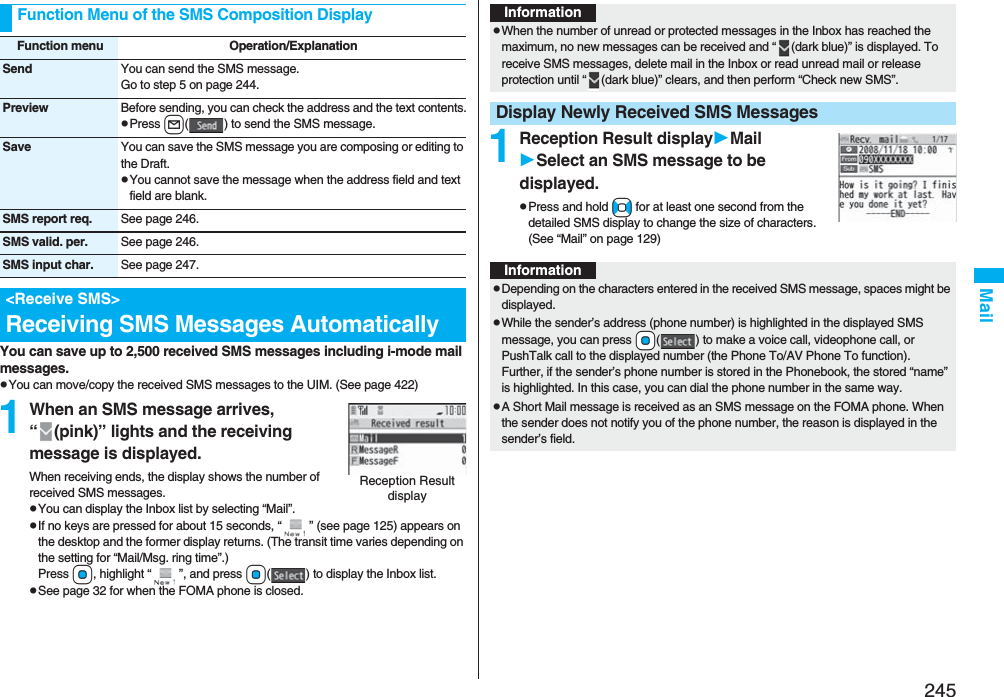
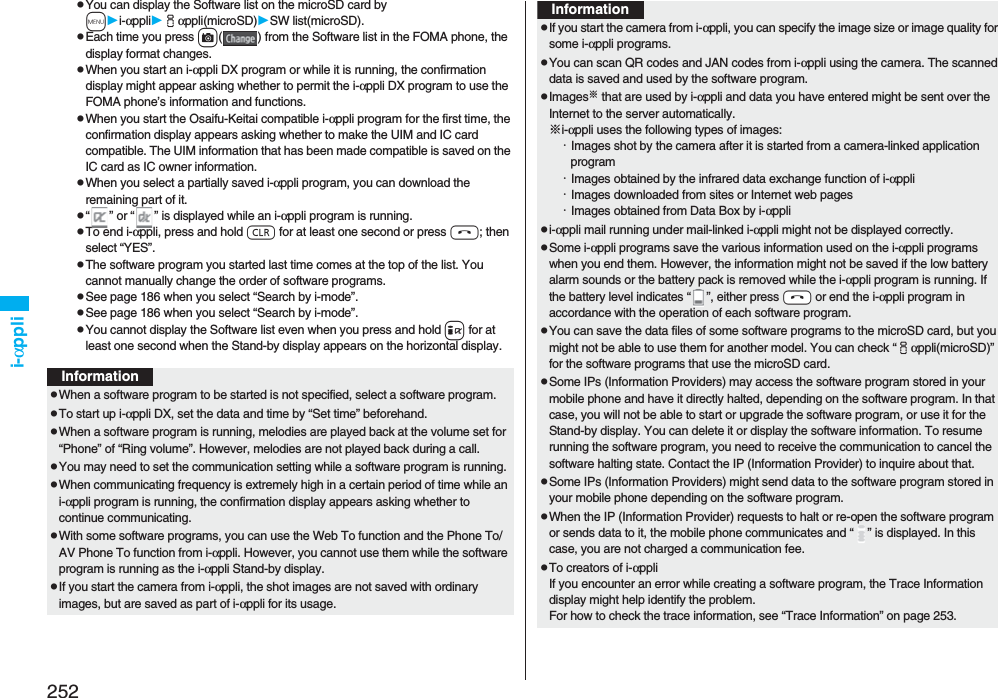
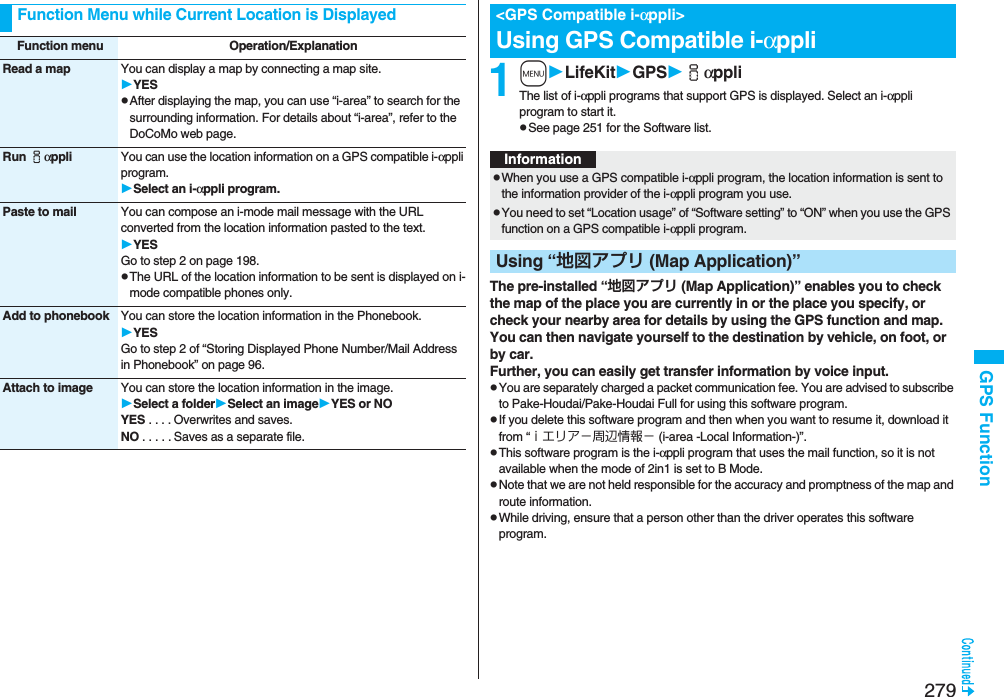
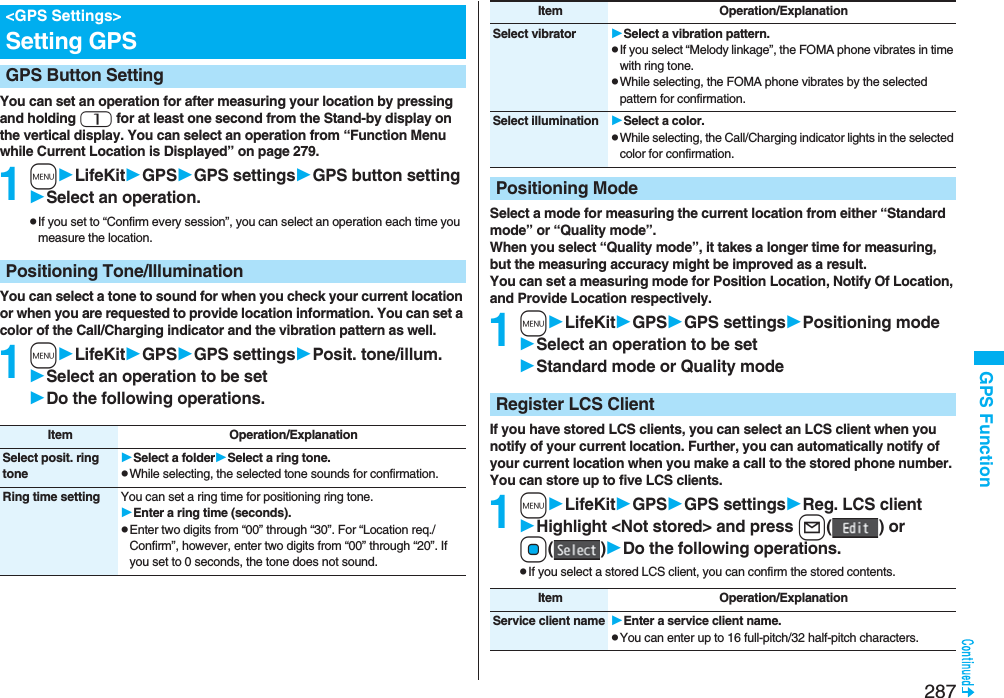
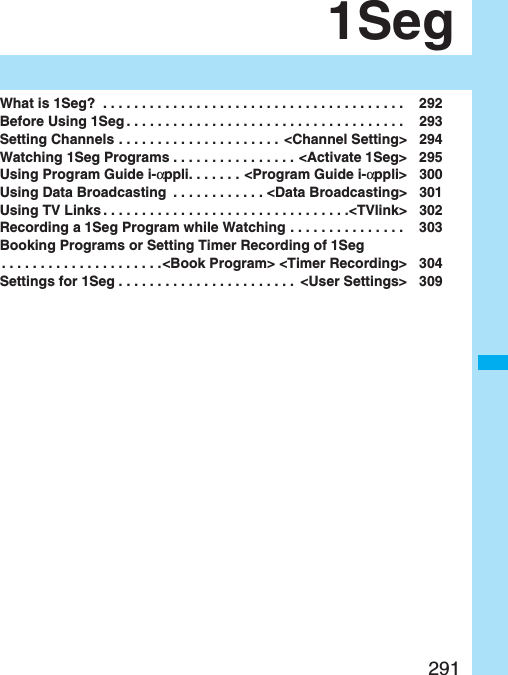
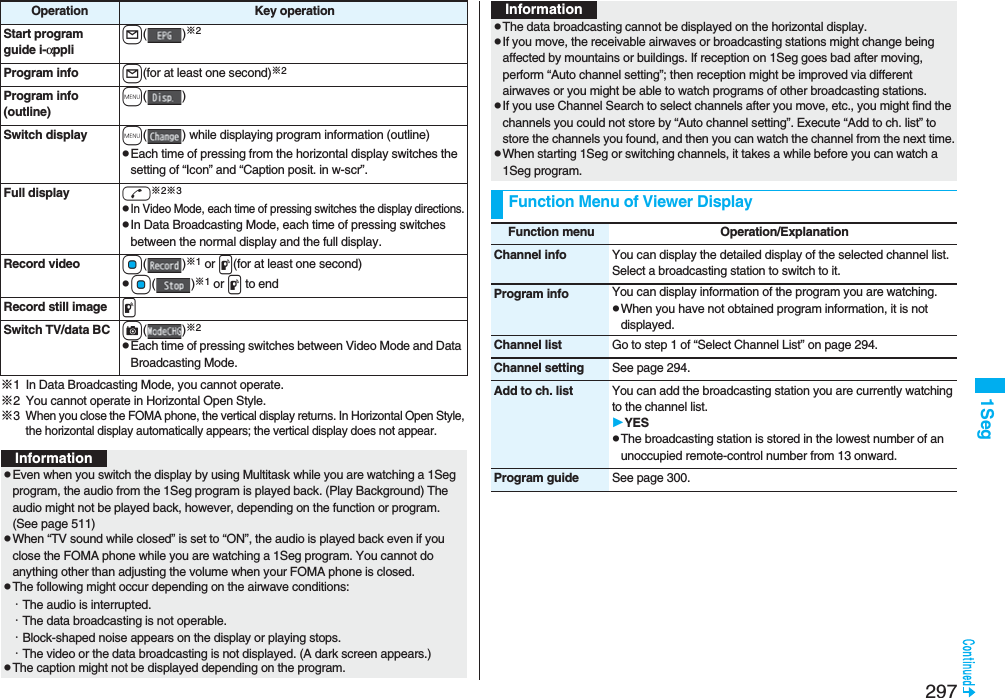
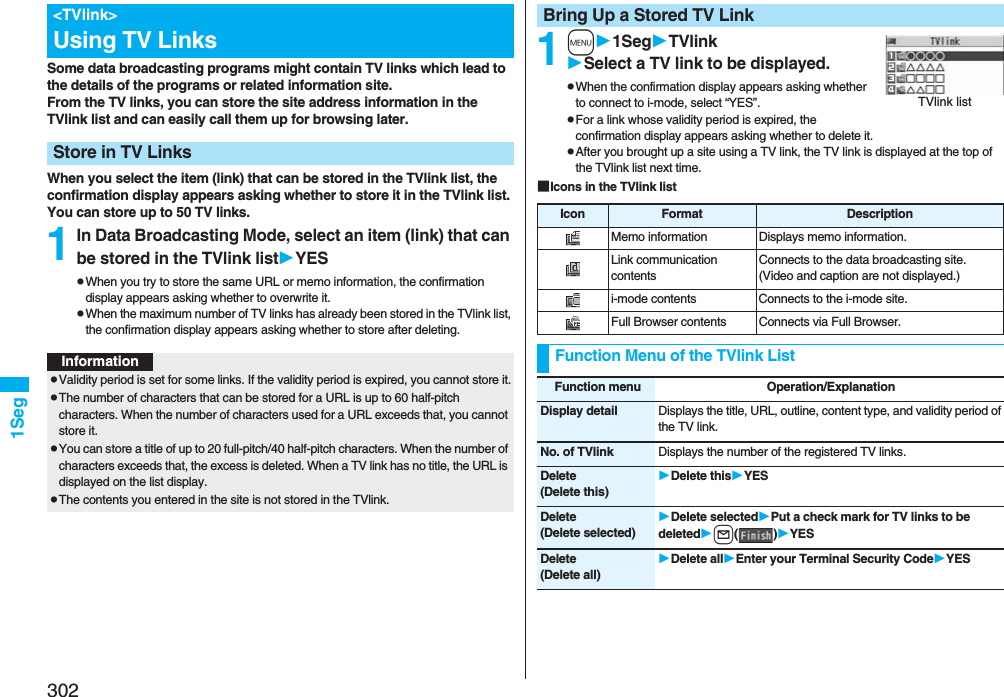
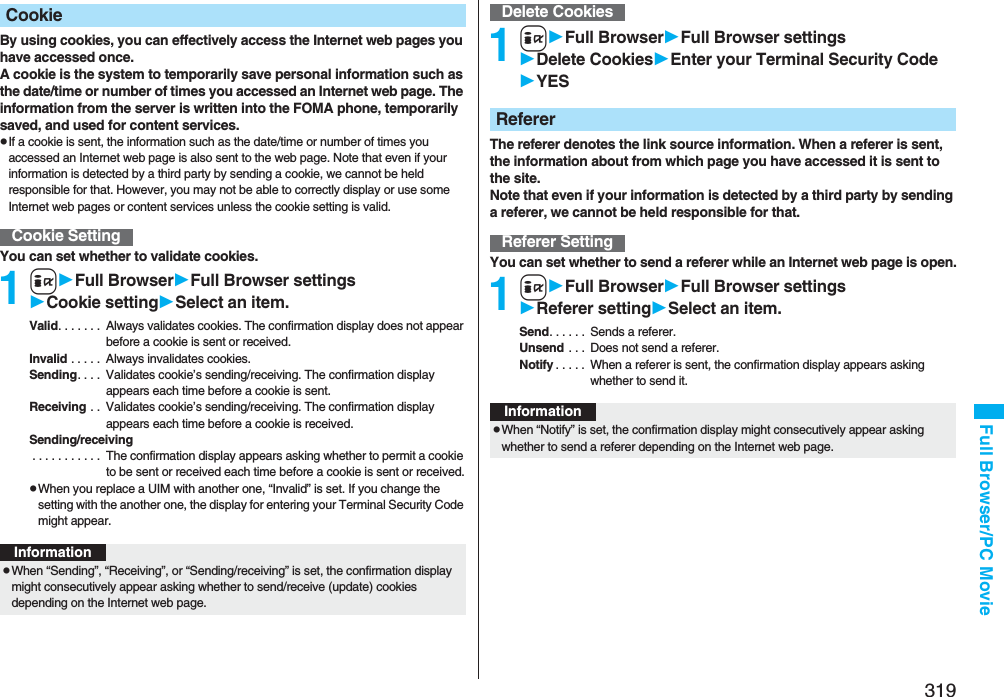
![214Mail1Reception Result displayMailSelect an i-mode mail message to be displayed.pFor Decome-Anime, the playback display of Decome-Anime appears. Press i( ) to display the detailed display.pPress and hold No for at least one second from the detailed i-mode mail display to change the size of characters. (See “Mail” on page 129.)pWhen the total number of unread or protected mail messages in the Inbox has reached the maximum, no new mail can be received and “ (dark blue)” is displayed. To receive i-mode mail, delete received mail or read unread mail or release protection of mail until “ (dark blue)” clears, and then perform “Check new message”.pYou can receive i-mode mail with melodies, still images, or other files attached. You can receive incompatible attached files but you cannot display them.pWhen you receive mail from a device that can set To, Cc and Bcc, you can check whether the message was sent to you as To, Cc or Bcc.pMail Messages for you are held at the i-mode Center in the following cases:・When the power is off ・During a videophone call・During Self Mode ・During infrared data exchange・During Omakase Lock ・During iC communication・When you are out of the service area・While connecting to the FirstPass center・During PushTalk communication・While copying to the microSD card・While connecting to the Data Storage Center・When the space of the Inbox is full with protected or unread messagespWhen i-mode mail messages are held at the i-mode Center, “ (pink)” appears, and when they are held to the maximum, “ (dark blue)”, appears.Display Newly Received i-mode MailInformationInformationpUndisplayable characters are replaced by spaces, etc.You can check the titles of i-mode mail messages held at the i-mode Center and select them to receive, or delete them at the Center before receiving.To use this function, set “Receive option setting” to “ON” beforehand.When “Receive option setting” is set to “ON”, you cannot receive i-mode mail messages automatically. When a mail message comes in the i-mode Center, “ ” is displayed.You can set whether to select and receive necessary i-mode mail only.1lMail settingsReceive option settingON or OFF1lReceive optionOperate following the procedure described in “Mobile Phone User’s Guide [i-mode] FOMA version”.pWhen “Receive option setting” is set to “OFF”, the display to the effect that it will be set to “ON” appears.Press Oo( ) to set “Receive option setting”.pYou can bring up the Receive Option display also by iiMenuメニュー/検索 (Menu/Search)メール選択受信 (Receive Option).pWhen the number of characters in the text of received i-mode mail exceeds the maximum, “/” or “//” is inserted at the end of the text and the excess part is deleted automatically.pThe still image automatically displayed at opening might not be correctly displayed. When the image is larger than the screen size, it is displayed shrunk with a proportional ratio retained.pSome decorations inserted into the decorated mail (HTML mail) sent from a personal computer might not be displayed correctly.<Receive Option>Receiving Selected i-mode MailReceive Option SettingInformationSelect and Receive Mail Messages](https://usermanual.wiki/Panasonic-Connect/208006A.User-Manual-Part-2/User-Guide-920755-Page-15.png)
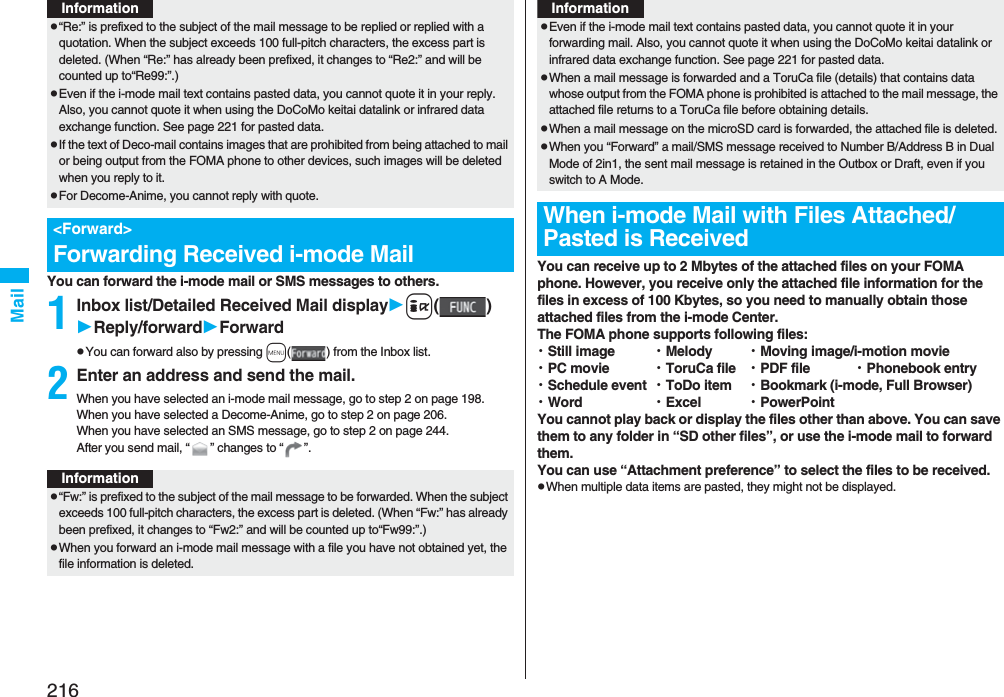


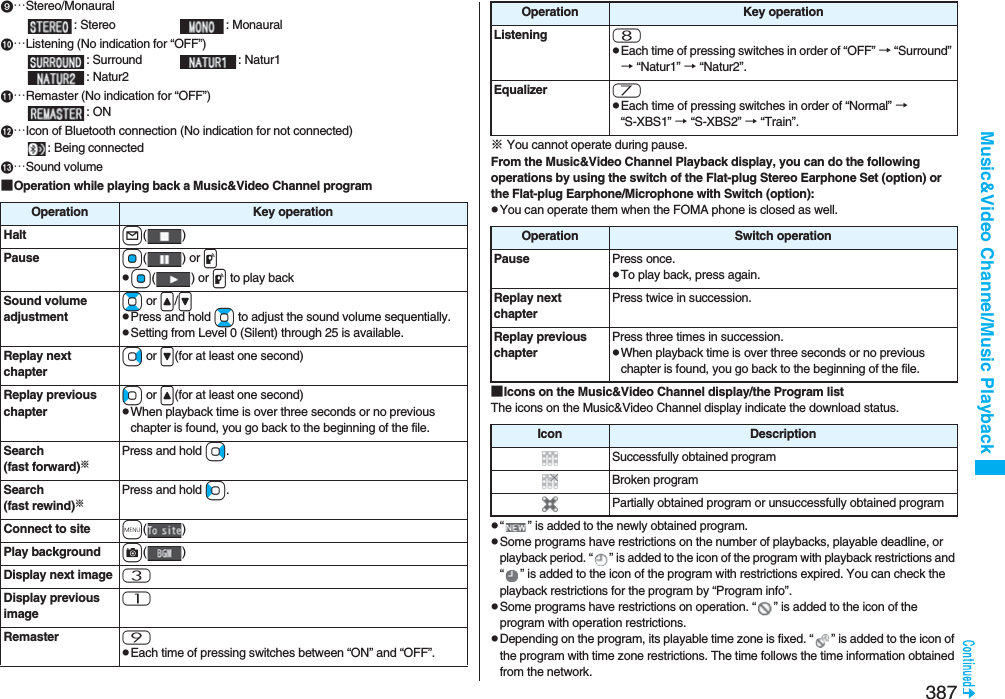
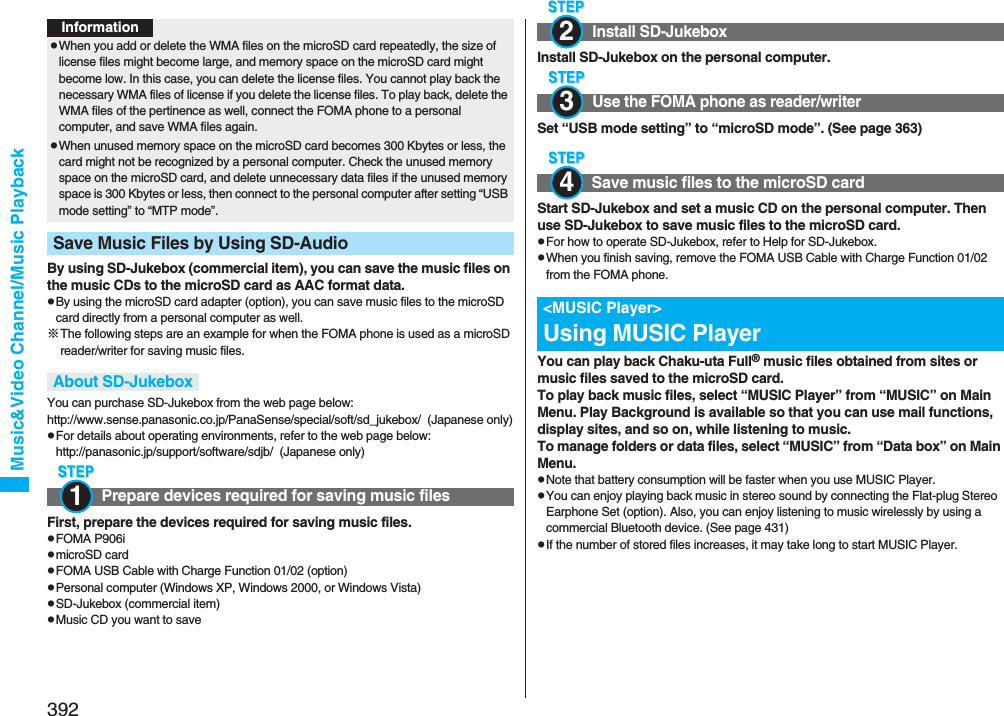
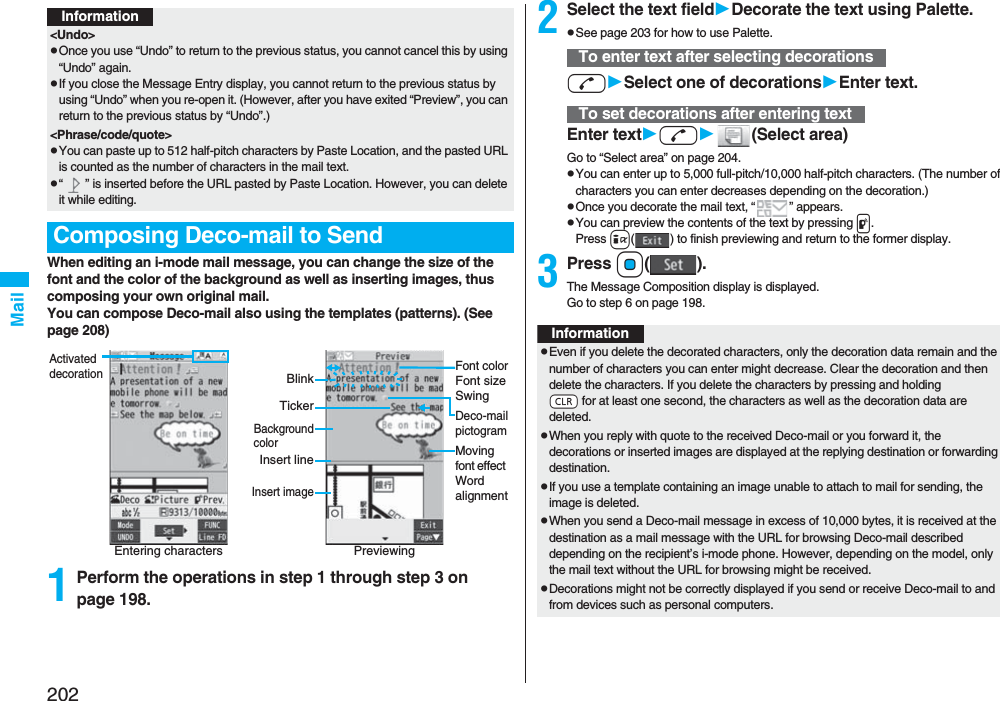
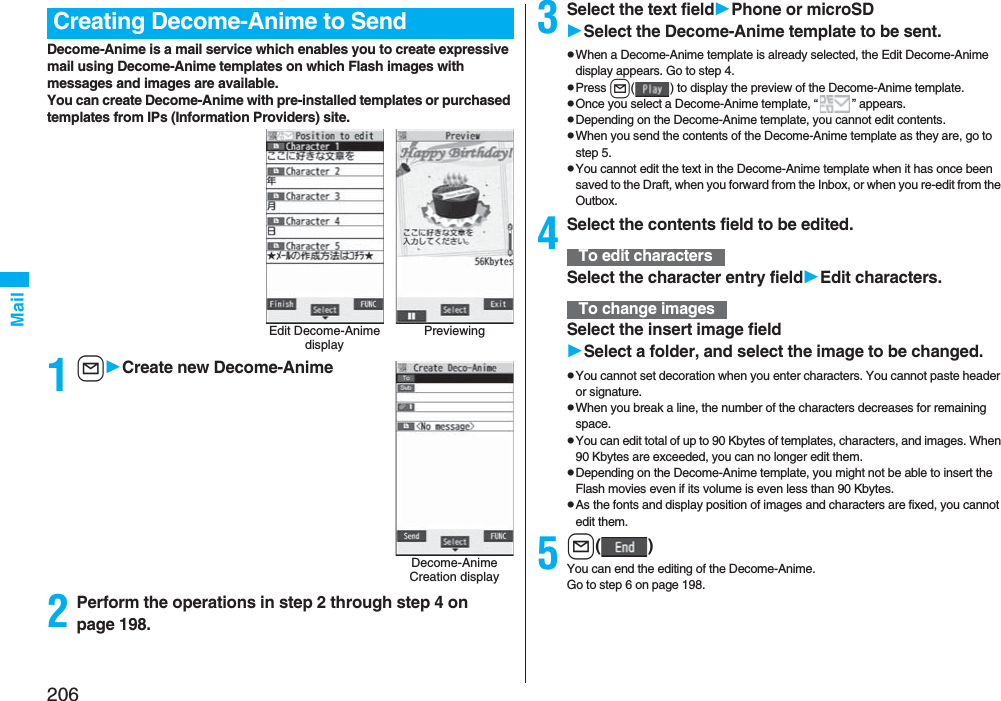
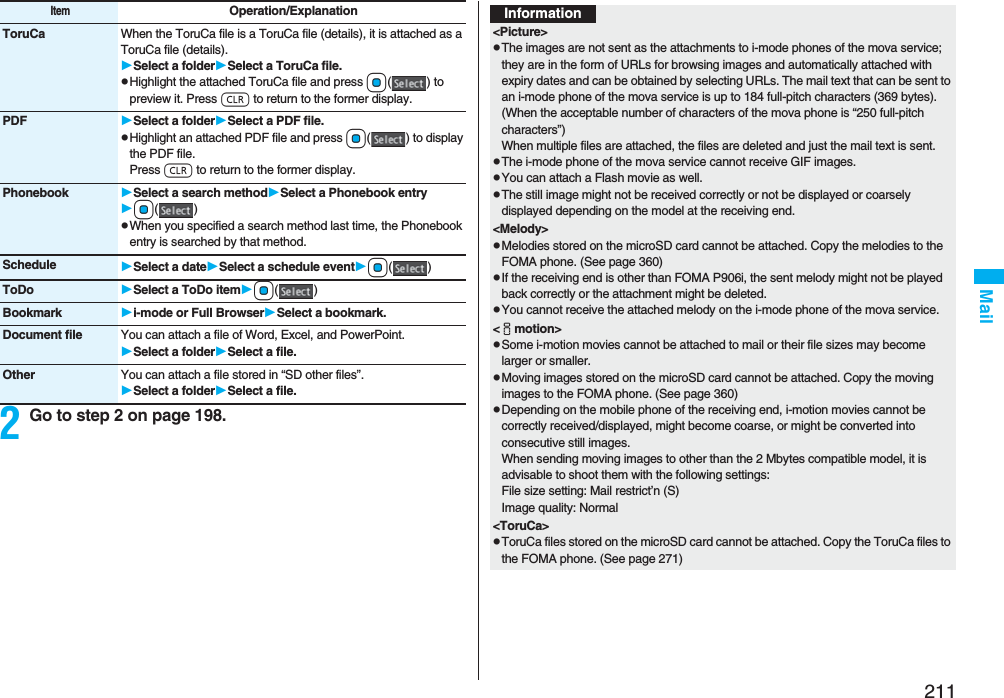
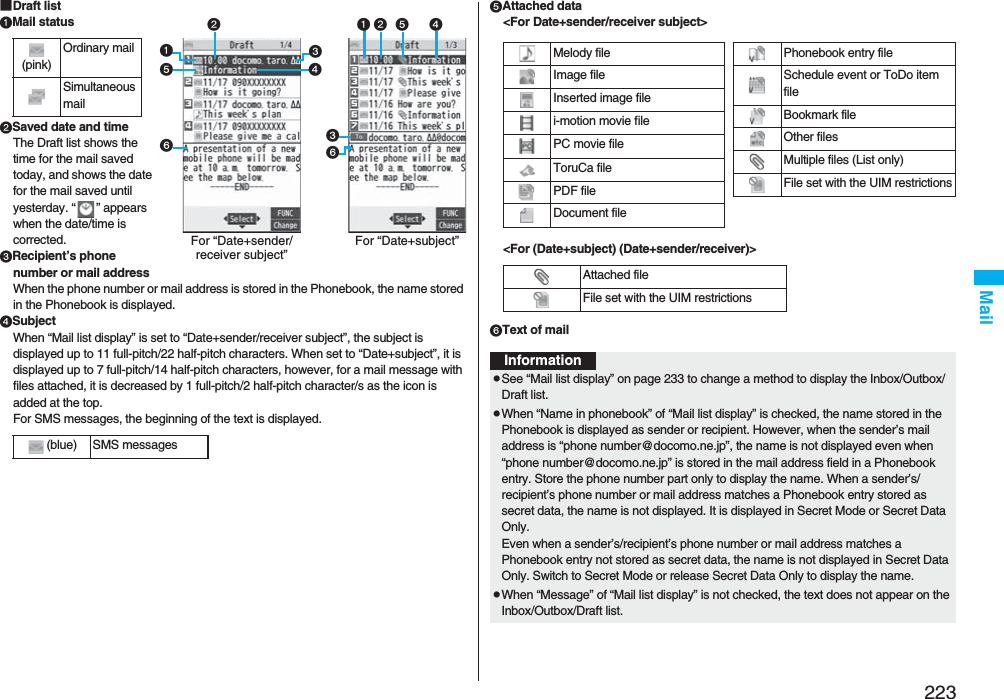
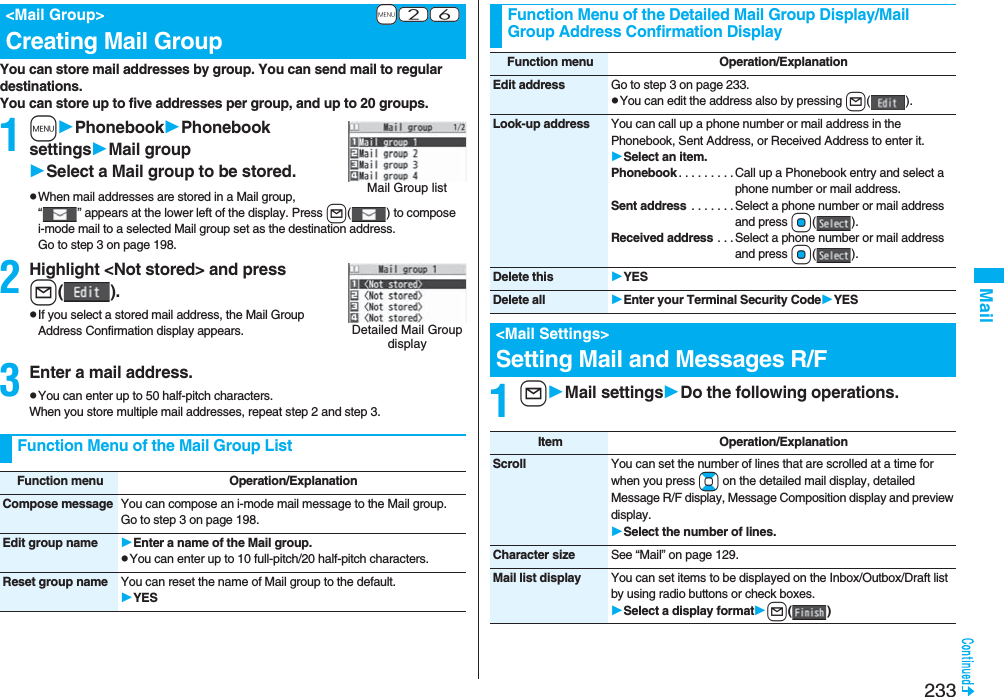
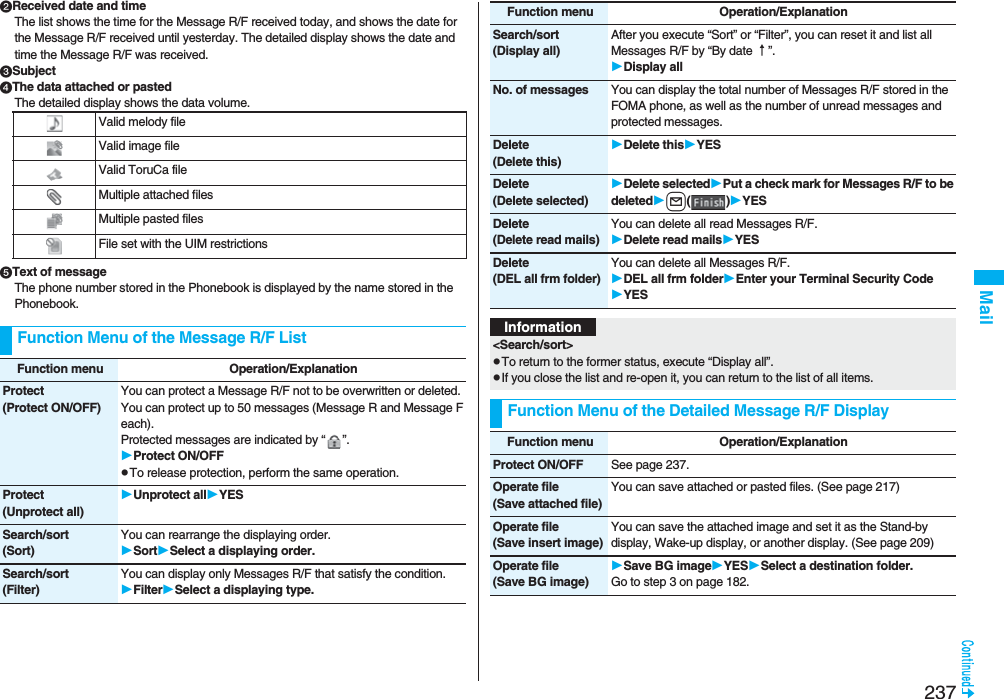
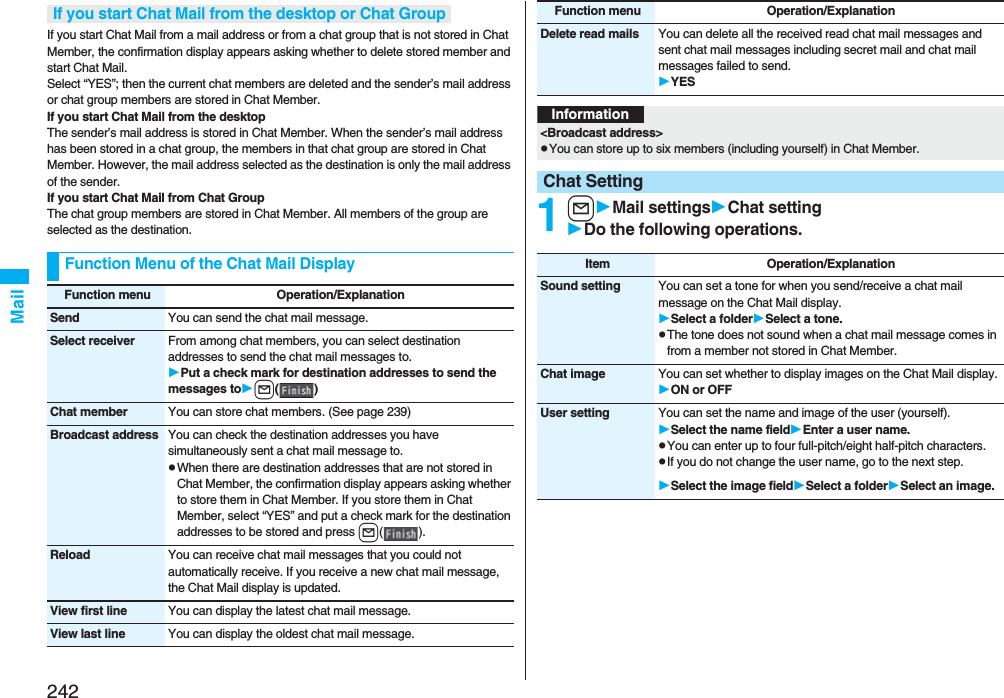
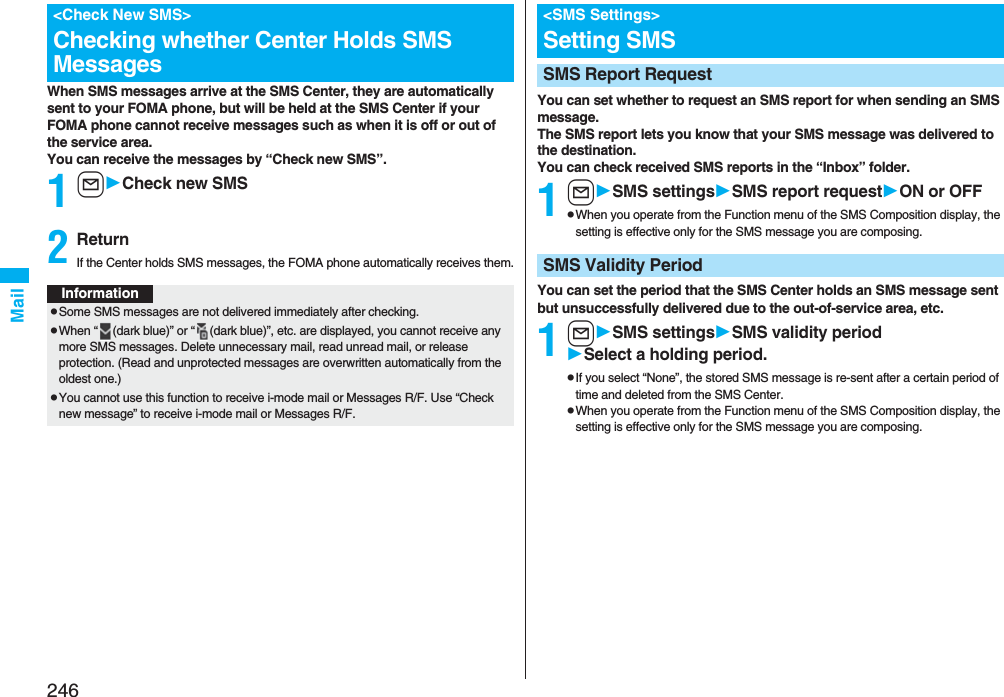
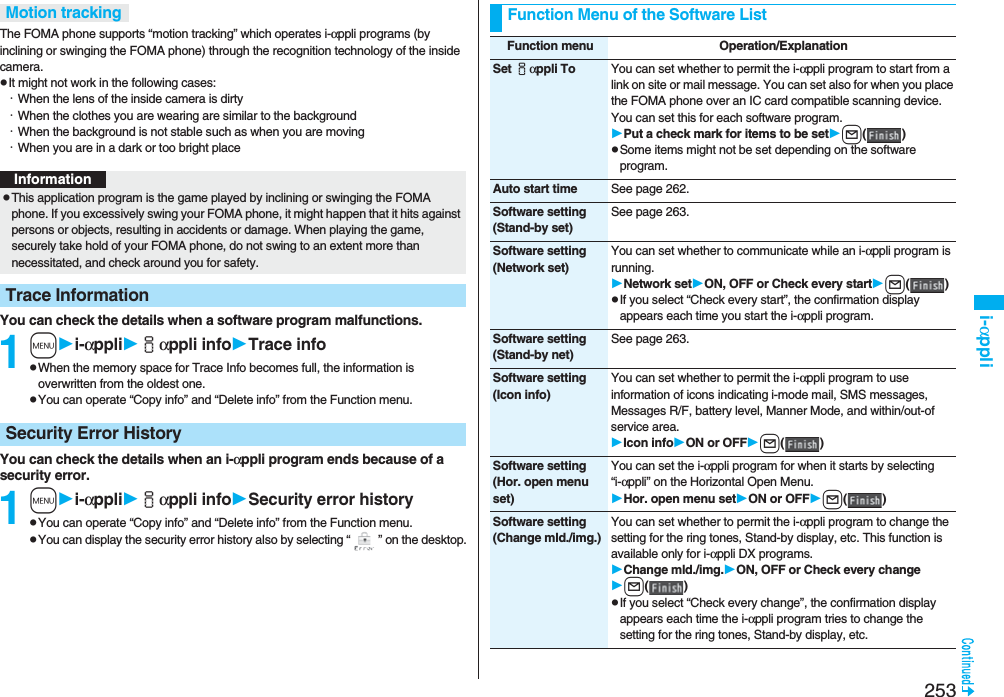
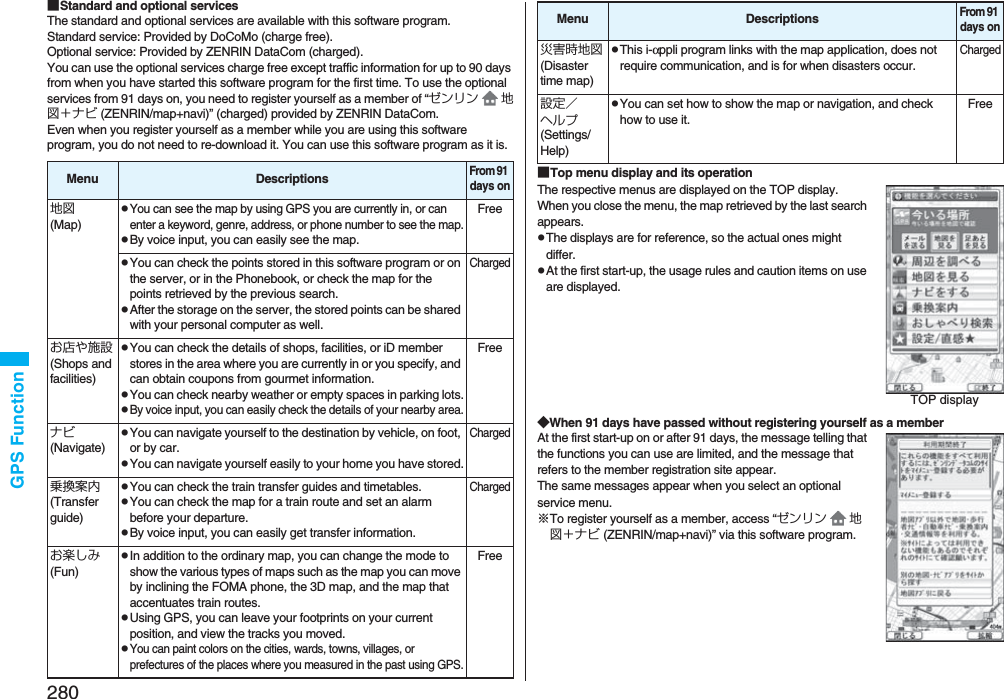
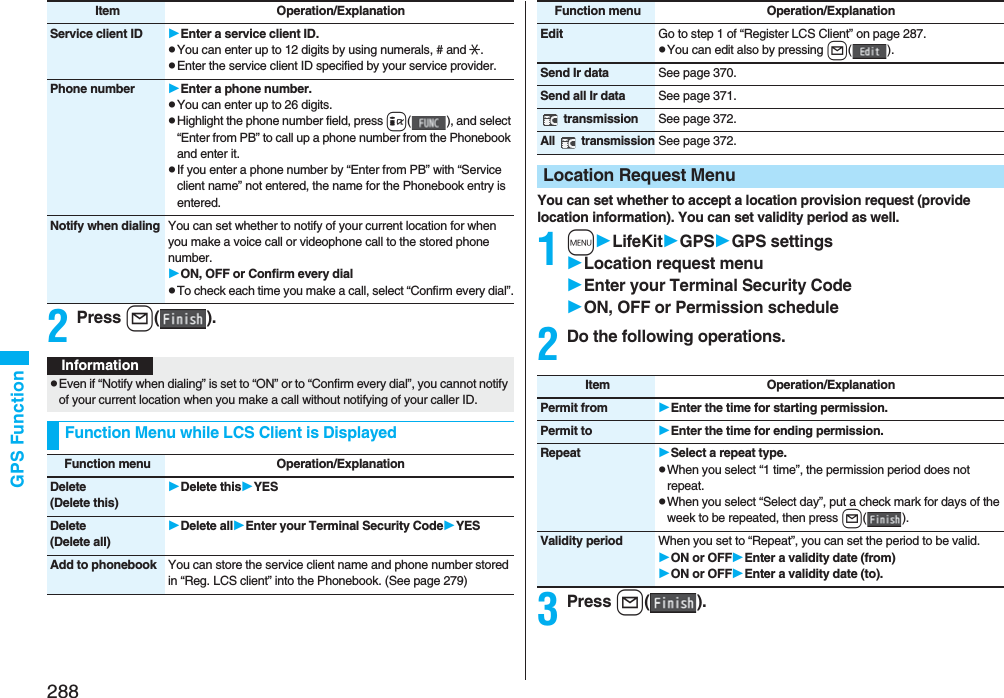
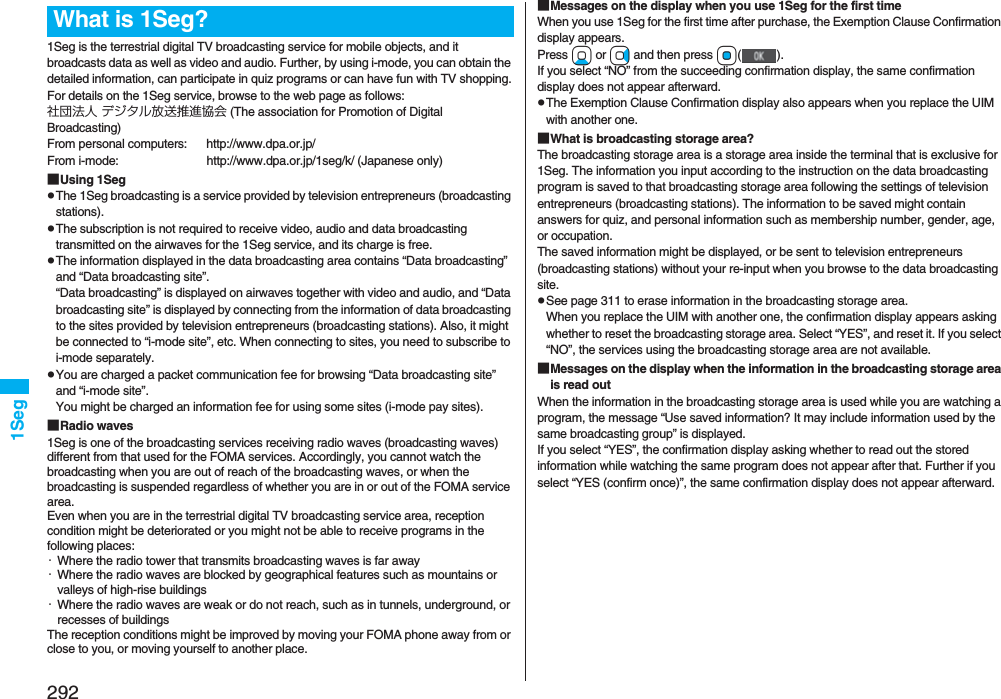
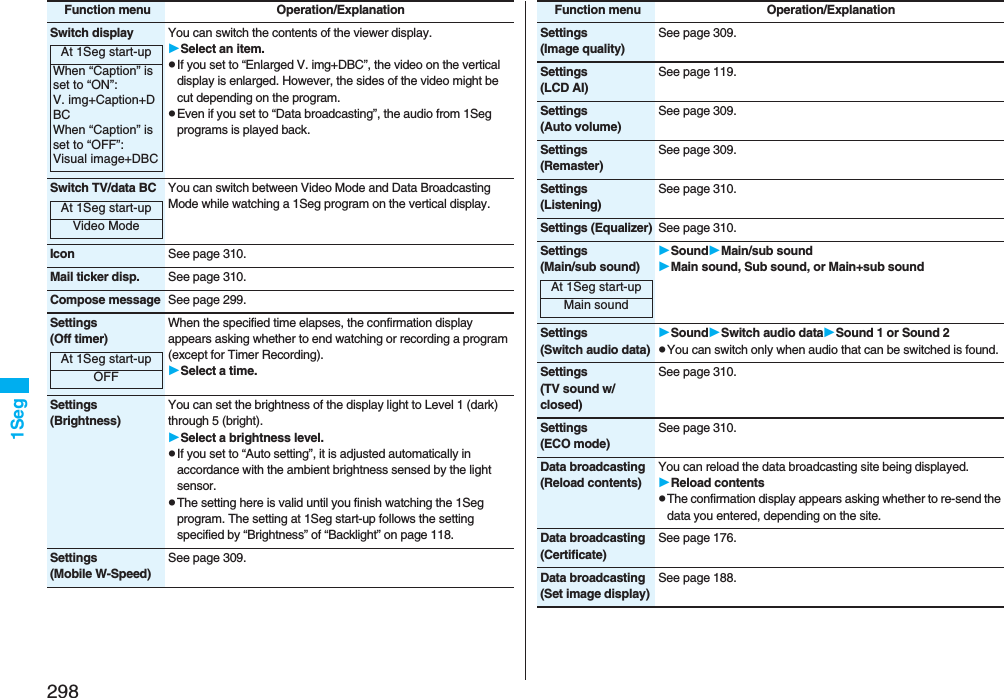
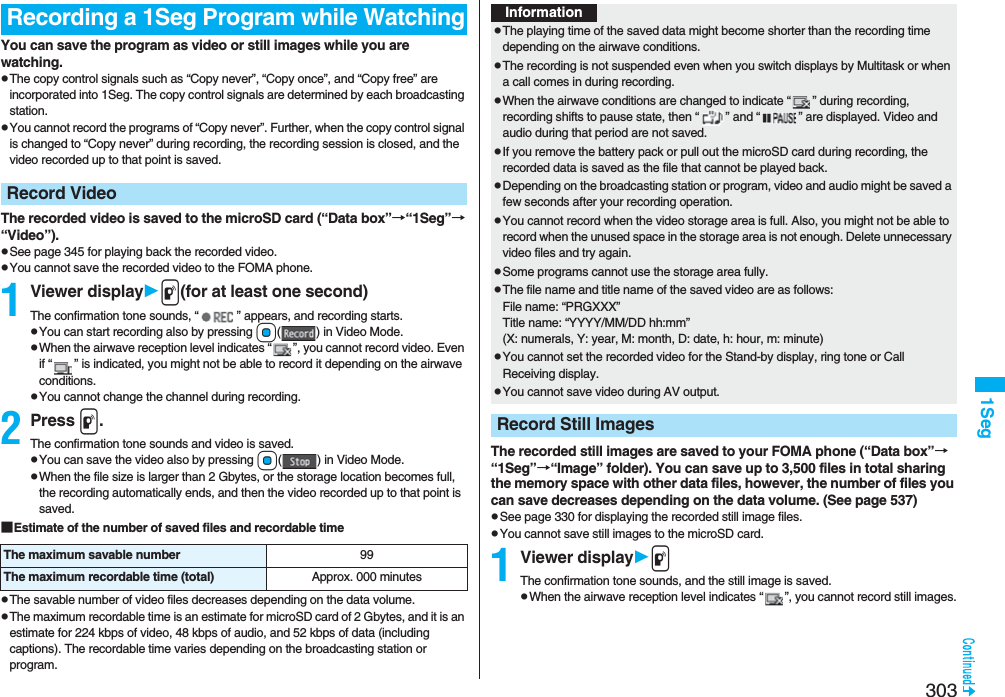
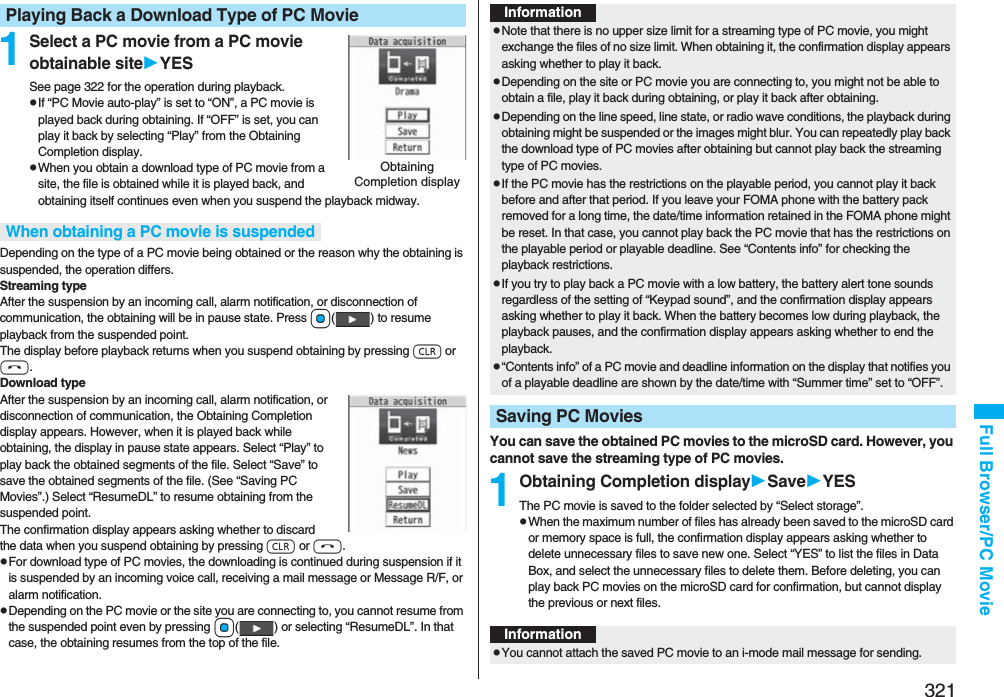
![222Mail■Outbox list and detailed Sent Mail displayMail status“ ” appears when protection is set.Sent date and timeThe Outbox list shows the time for the mail sent today, and shows the date for the mail sent until yesterday. The detailed display shows the date and time the mail was sent. “ ” appears when the date/time is corrected.Recipient’s phone number or mail address(pink) Mail successfully sentMail failed to be sentSimultaneous mail successfully sent to all addresses(gray) Simultaneous mail sent to some addresses(pink) Simultaneous mail failed to be sent to all addresses Mail address successfully sent (Detailed display only) Mail address failed to be sent (Detailed display only)Outbox listFor “Date+sender/receiver subject” Outbox listFor “Date+subject”Detailed Sent Mail displaySubjectWhen “Mail list display” is set to “Date+sender/receiver subject”, the subject is displayed up to 11 full-pitch/22 half-pitch characters. When set to “Date+subject”, it is displayed up to 7 full-pitch/14 half-pitch characters, however, for a mail message with files attached, it is decreased by 1 full-pitch/2 half-pitch character/s as the icon is added at the top.For SMS messages, the beginning of the text is displayed. (“SMS” is displayed on the detailed display.)Attached dataThe detailed display shows the data volume as well.<For Outbox list (Date+sender/receiver subject) and detailed Sent Mail display>“ ” is added to each icon when you execute “Delete att. file” (Detailed display only).<For Outbox list (Date+subject) (Date+sender/receiver)>Text of mail(blue) SMS messages in the FOMA phoneSMS messages on the UIMSMS report received [List (Date+sender/receiver subject) and detailed display only]Melody fileImage fileInserted image file (List only)i-motion movie filePC movie fileToruCa filePDF fileDocument filePhonebook entry fileSchedule event or ToDo item fileBookmark fileOther filesi-αppli mail (List only)Multiple files (List only)File set with the UIM restrictionsAttached filei-αppli mailFile set with the UIM restrictions](https://usermanual.wiki/Panasonic-Connect/208006A.User-Manual-Part-2/User-Guide-920755-Page-23.png)
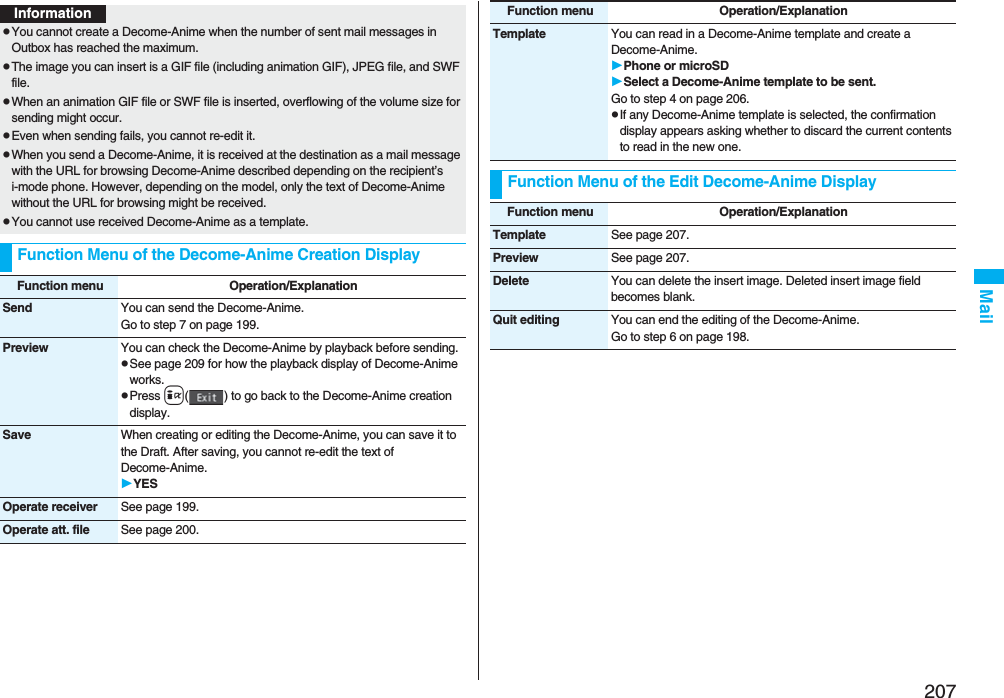
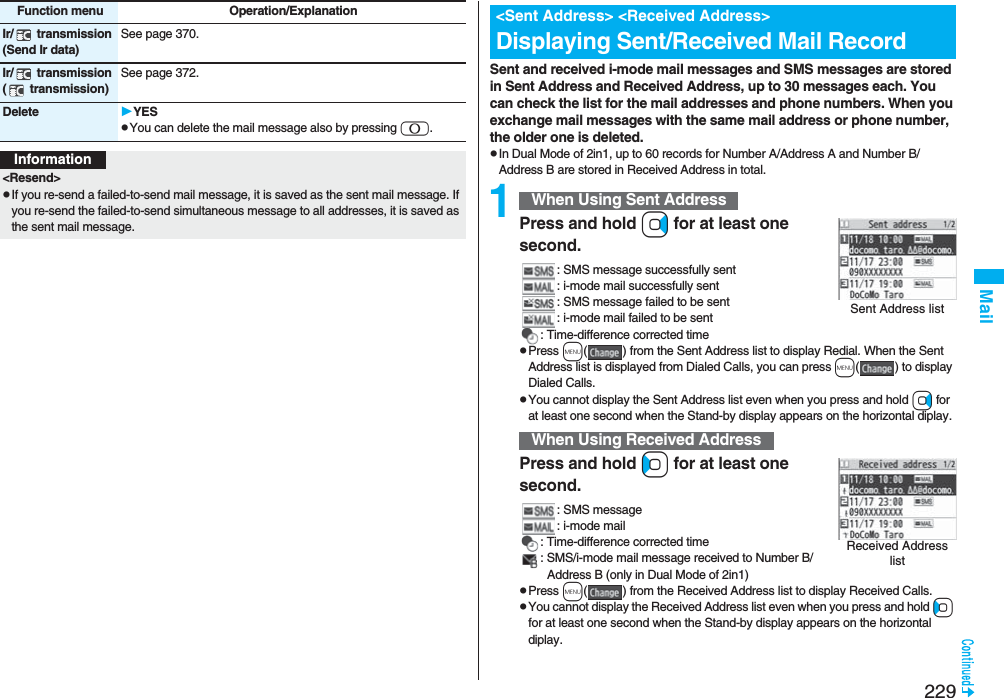
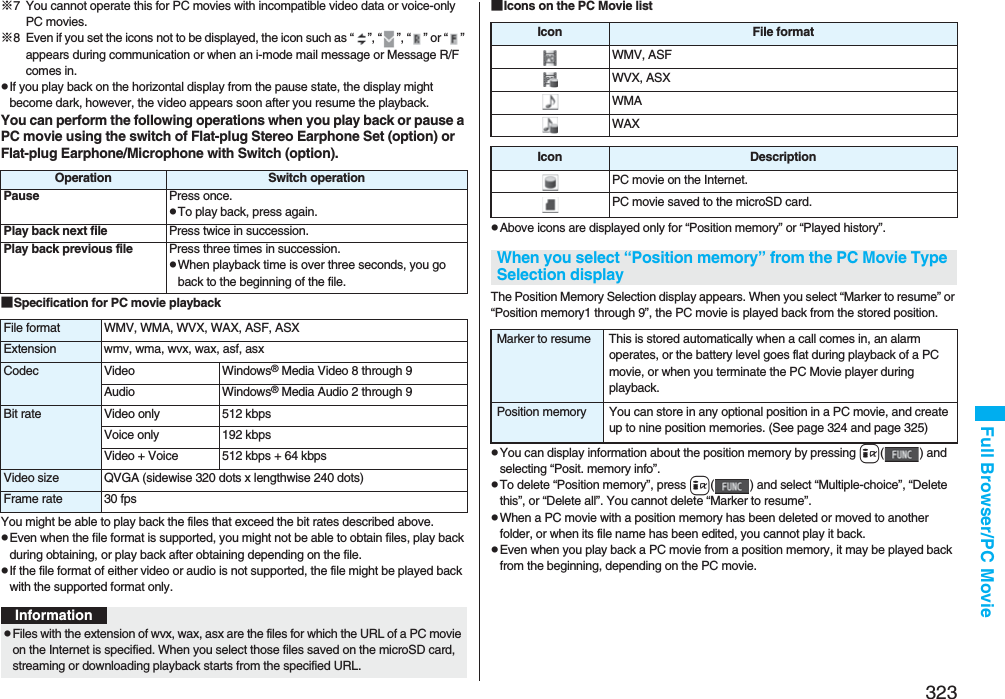
![224MailManaging Mail MessagesFunction Menu of the Inbox Folder List/Outbox Folder ListFunction menu Operation/ExplanationOperate folder(Add folder)You can add a new folder. You can add up to 22 folders to each of “Inbox” and “Outbox”.Add folderEnter a folder name.pYou can enter up to 10 full-pitch/20 half-pitch characters.Operate folder(Edit folder name)You can edit the names of the added folders only.Edit folder nameEdit the folder name.pYou can enter up to 10 full-pitch/20 half-pitch characters.Operate folder(Sort folder)You can sort folders. You can sort the added folders, Message R/F folder, and the i-αppli mail folders.Sort folderUse Bo to sort the orderOo()Operate folder(Delete folder)All the mail messages including secret mail in the folder will be deleted as well.Delete folderEnter your Terminal Security CodeYESOpen folder You can display the mail messages in the i-αppli mail folder without running mail-linked i-αppli.Read all[Inbox Folder only]You can change unread mail in the folder to read mail.YESSort(Auto-sort)See page 231.Sort(Re-sort)You can resort mail messages following the sorting conditions specified by “Auto-sort”.Re-sortYESpWhen the folder applied with Mail security (see page 224) is found, you need to enter your Terminal Security Code.Mail security You can set the folder to open only when you enter your Terminal Security Code.Enter your Terminal Security CodeYESpTo release it, perform the same operation.Ir/ transmission(Send all Ir data)See page 371.Ir/ transmission(All transmission)See page 372.No. of messages You can display the number of stored received mail messages, Messages R/F, and sent mail messages.Delete(DEL all read mails)[Inbox Folder only]You can delete all the read mail messages including secret mail in all Inbox folders. All the read SMS messages on the UIM are deleted as well.DEL all read mailsYESDelete(DEL all recv. mails)[Inbox Folder only]You can delete all the mail messages including secret mail in all Inbox folders. All the received SMS messages on the UIM are deleted as well.DEL all recv. mailsEnter your Terminal Security CodeYESDEL all sent mails[Outbox Folder only]You can delete all the mail messages including secret mail in all Outbox folders. All sent SMS messages on the UIM are deleted as well.Enter your Terminal Security CodeYESFunction menu Operation/ExplanationInformation<Operate folder (Delete folder)>pYou cannot delete an i-αppli mail folder if corresponding mail-linked i-αppli exists.If the software program does not exist, you can delete the i-αppli mail folder, but this will delete both folders created in the Outbox Folder list and Inbox Folder list.<Sort (Re-sort)>pYou cannot re-sort the mail messages in the “Chat” folder and “Trash box” folder.pMail messages which are not applied with “Auto-sort” are sorted into the “Inbox” folder.](https://usermanual.wiki/Panasonic-Connect/208006A.User-Manual-Part-2/User-Guide-920755-Page-25.png)
![225Mail<Mail security>pYou can neither delete the Mail-Security-activated folder nor edit its name.Function Menu of the Inbox List/Outbox List/Draft ListInformationFunction menu Operation/ExplanationReply/forward(Reply)[Inbox only]See page 215.Reply/forward(Reply with quote)[Inbox only]See page 215.Reply/forward(Forward)[Inbox only]See page 216.Edit[Outbox only]You can re-edit the sent mail message and send it again.When you have selected an i-mode mail message, go to step 2 on page 198.When you have selected a Decome-Anime, go to step 2 on page 206.When you have selected an SMS message, go to step 2 on page 244.Protect(Protect ON/OFF)[Inbox/Outbox]You can protect the mail message so that it is not overwritten and deleted. You can protect all the received and sent messages. (2,500 received messages, 1,000 sent messages)The protected one is indicated by “ ”.Protect ON/OFFpTo release protection, perform the same operation.pYou can switch between protected and unprotected also by pressing 1 from the detailed Received Mail display or detailed Sent Mail display.Protect(ProtectSLCT. ON/OFF)[Inbox/Outbox]ProtectSLCT. ON/OFFPut/Remove a check mark for mail messages to be protected/unprotectedl()pA check mark is placed to the mail already protected.Move/copy(Move)[Inbox/Outbox]MoveSelect a destination folderPut a check mark for mail messages to be movedl()YESMove/copy(Move to trash) [Inbox only]You can move mail messages to the “Trash box” folder. The mail messages moved to the “Trash box” folder are preferentially overwritten (deleted).Move to trashPut a check mark for mail messages to be moved to the trash boxl()YESMove/copy(UIM operation)[Inbox/Outbox]You can copy or move the mail message to the UIM or FOMA phone. (See page 422)Move/copy(Copy to microSD)See page 357.Move/copy(Store in Center)You can save mail messages stored in FOMA phone to the Data Storage Center. Data Security Service is a pay service that is available on a subscription basis.Store in CenterEnter your Terminal Security CodePut a check mark for mail messages to be savedl()YESpYou can select up to 10 mail messages.pYou do not need to put a check mark for the mail messages on the detailed Received Mail display and detailed Sent Mail display.Function menu Operation/Explanation](https://usermanual.wiki/Panasonic-Connect/208006A.User-Manual-Part-2/User-Guide-920755-Page-26.png)
![226MailSearch/sort(Search sender/Search receiver)[Inbox/Outbox]You can retrieve mail messages with a mail address or phone number of a sender or recipient.“Search sender” for received mail and “Search receiver” for sent mail are displayed respectively.Search mailSearch sender or Search receiverSelect an item.Phonebook . . . . . . . . Call up a Phonebook entry and select a phone number or mail address.Received address. . . Select a phone number or mail address and press Oo().Sent address . . . . . . . Select a phone number or mail address and press Oo().Enter address . . . . . . Enter the mail address or phone number.pYou can enter up to 50 half-pitch characters.Search/sort(Search subject)[Inbox/Outbox]You can retrieve mail messages with a subject.Search mailSearch subjectEnter a subject.pYou can enter up to 100 full-pitch/200 half-pitch characters.Search/sort(Search subject+msg)[Inbox/Outbox]You can retrieve mail messages with a subject or text.Search mailSearch subject+msgEnter a part of a subject or text.pYou can enter up to 100 full-pitch/200 half-pitch characters.Search/sort(Sort)[Inbox/Outbox]You can change the order of displayed mail messages.SortSelect an order.Search/sort(Filter)[Inbox/Outbox]You can display the mail messages only that satisfy the condition.FilterSelect a type.Search/sort(Display all)[Inbox/Outbox]You can re-display all mail messages in “By date↑” order after using Search Mail, or the Sort or Filter function.Display allFunction menu Operation/ExplanationMail history[Inbox/Outbox]You can display the history of sent/received mail from the sender or to the recipient being selected or displayed. Up to 1,000 histories are displayed in the chronological order from the most recent one.Select a sender’s or destination address.The target sent/received mail histories are displayed. . . . . Sent mail . . . . Received mailpSelect a history; then you can bring up the detailed Received Mail display or detailed Sent Mail display. Press r to return to the former display.pYou can display also by pressing 7 on the detailed Received Mail display or detailed Sent Mail display.Color label[Inbox/Outbox]You can color the characters on the Inbox list and Outbox list for classifying mail. Select “Default” to set ordinary character color.Select a color.List setting You can select the item to be displayed on the list. You can also switch between the name stored in the Phonebook and the mail address/phone number for the display in the sender’s/destination address field.You can set to list the mail messages by subject depending on the setting of “Mail list display”.Select an item to be displayed.pYou can switch each time you press c( ) from the Outbox list and Draft list.Ir/ transmission(Send Ir data)See page 370.Ir/ transmission(Send all Ir data)[Draft only]See page 371.Ir/ transmission( transmission)See page 372.Ir/ transmission(All transmission)[Draft only]See page 372.Function menu Operation/Explanation](https://usermanual.wiki/Panasonic-Connect/208006A.User-Manual-Part-2/User-Guide-920755-Page-27.png)
![227MailNo. of messages You can display the number of stored received mail messages, sent mail messages and draft mail messages.Delete(Delete this)Delete thisYESDelete(Delete selected)Delete selectedPut a check mark for mail messages to be deletedl()YESDelete(Delete read mails)[Inbox only]You can delete all the read mail messages in the folder.Delete read mailsYESDelete(Delete all SMS-R)[Inbox only]You can delete all the SMS reports. While displaying SMS reports using the Search Mail function or Filter function, only the displayed SMS reports are deleted.Delete all SMS-REnter your Terminal Security CodeYESDelete(DEL all frm folder)[Inbox/Outbox]You can delete all mail messages in the folder.DEL all frm folderEnter your Terminal Security CodeYESDelete(Delete all)[Draft only]You can delete all the mail messages in Draft.Delete allEnter your Terminal Security CodeYESFunction menu Operation/ExplanationInformation<Edit>pTo use “Mail group” for destination addresses, delete all the entered addresses, press +l( ) to complete the deletion, and then re-select the address field. <Protect>pYou cannot protect mail messages in the “Trash box” folder.pIf you protect all the sent messages which are stored to the maximum, you can no longer compose i-mode mail messages.<Move/copy (Move to trash)>pIf you move unread mail to the Trash box, it changes to read mail.<Move/copy (Store in Center)>pYou cannot save the SMS messages stored on the UIM.pYou cannot save the files attached to mail.pYou cannot use Data Security Service when you are out of the service area.pWhen you have not signed up for Data Security Service, the message to that effect appears.pYou can download the mail messages saved to the Data Security Center from its site to your FOMA phone. For details, refer to “Mobile Phone User’s Guide [i-mode] FOMA version”.<Search/sort> pEven if you set “No title” for “Search subject” of “Search mail”, you cannot search for the i-mode mail whose subject is not entered and displayed as “No title”.<Color label>pColor Label applied to the mail messages is released when they are copied to the microSD card, copied/moved to the UIM, copied/moved from the UIM or sent via infrared rays or iC transmission.pColor Label applied to the SMS messages on the UIM is released when the UIM is dismounted and then mounted.Function Menu of the Detailed Received Mail Display/Detailed Sent Mail DisplayInformationFunction menu Operation/ExplanationReply/forward(Reply)[Received Mail only]See page 215.Reply/forward(Reply with quote)[Received Mail only]See page 215.Reply/forward(Forward)[Received Mail only]See page 216.Edit[Sent Mail only]See page 225.](https://usermanual.wiki/Panasonic-Connect/208006A.User-Manual-Part-2/User-Guide-920755-Page-28.png)
![228MailResend[Sent Mail only]You can re-send the sent mail message.YESProtect ON/OFF See page 225.Move/copy(Copy)CopySelect an item to be copied.pSee page 442 for how to copy.pWhen the addresses of the sender and another recipient of simultaneous mail are found or the multiple destination addresses are found, select a mail address or phone number to be copied.Move/copy(Move)MoveSelect a destination folder.Move/copy(Move to trash)[Received Mail only]You can move the mail to the “Trash box” folder. The mail messages moved to the “Trash box” folder are preferentially overwritten (deleted).Move to trashYESMove/copy(UIM operation)You can copy or move the mail to the UIM or FOMA phone. (See page 422)Move/copy(Copy to microSD)See page 357.Move/copy(Store in Center)See page 225.Operate file(Save attached file)See page 217.Operate file(Save insert image)See page 209.Operate file(Save D-pictograph)[Received Mail only]You can save Deco-mail pictograms in the mail text at once. You can save up to 20 of them.Save D-pictographYESpSee page 186 for when the Deco-mail pictograms are stored to the maximum.pSee page 330 for how to check the stored Deco-mail pictograms.Function menu Operation/ExplanationOperate file(Save as template)You can save the sent/received Deco-mail as a template.Save as templateYESpSee page 186 for when the templates are stored to the maximum.pSee page 208 for how to check the stored template.Operate file(Property)You can display the file name and file size of the image inserted into the text.PropertySelect an image.Operate file(Delete att. file)Delete att. fileYESStore(Store address)See page 96.Store(Add to phonebook)See page 96.Store(Auto-sort)You can store a sender or subject as a sort condition. (See page 231)Store(Add desktop icon)See page 127.Mail history See page 226.Color label See page 226.Display(Name/address)You can display the sender’s/destination address by the name stored in the Phonebook or by the mail address/phone number.Name/addresspYou can switch also by pressing 5.Display(Scroll)See page 233.Display(Character size)See “Mail” on page 129.Display SMS report[Sent Mail only]You can check the result of the SMS message you sent, or the date and time it arrived at the destination. To receive the SMS report, set “SMS report request” to “ON”.Function menu Operation/Explanation](https://usermanual.wiki/Panasonic-Connect/208006A.User-Manual-Part-2/User-Guide-920755-Page-29.png)
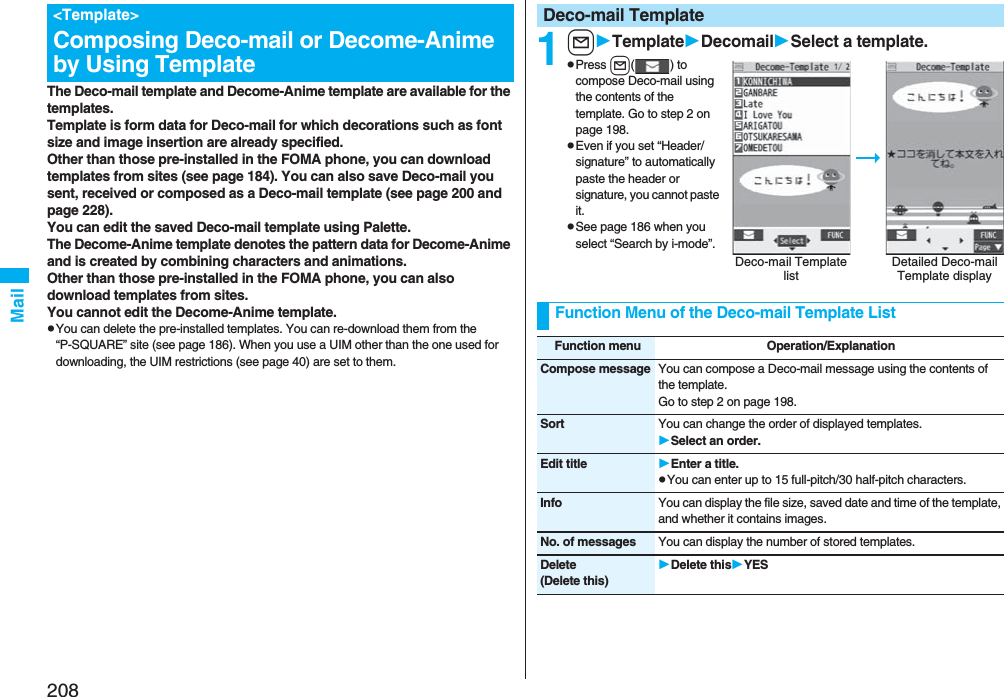
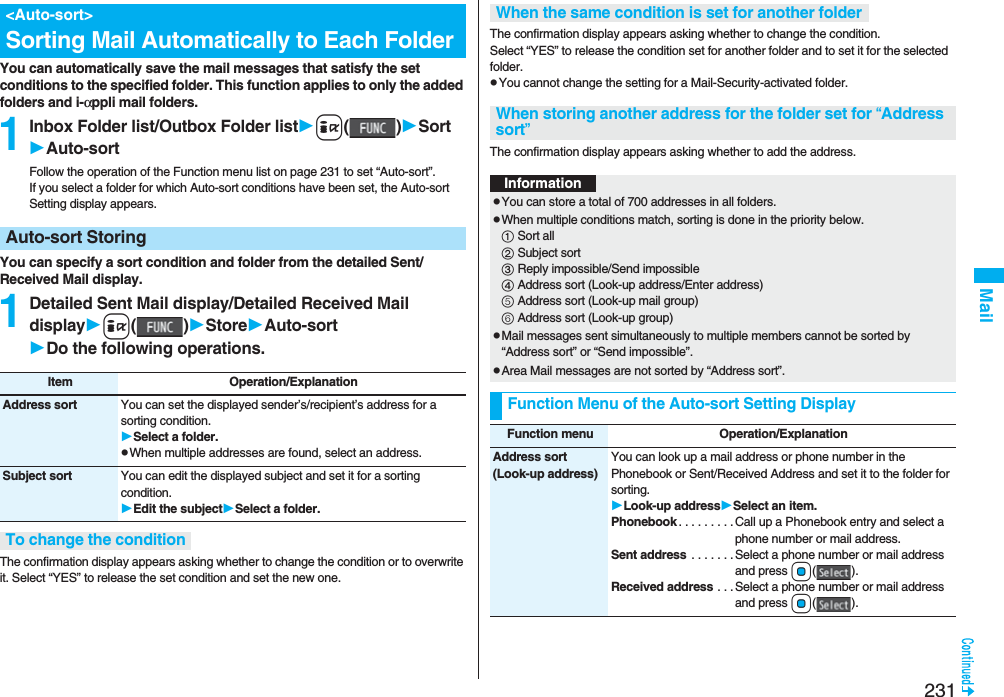
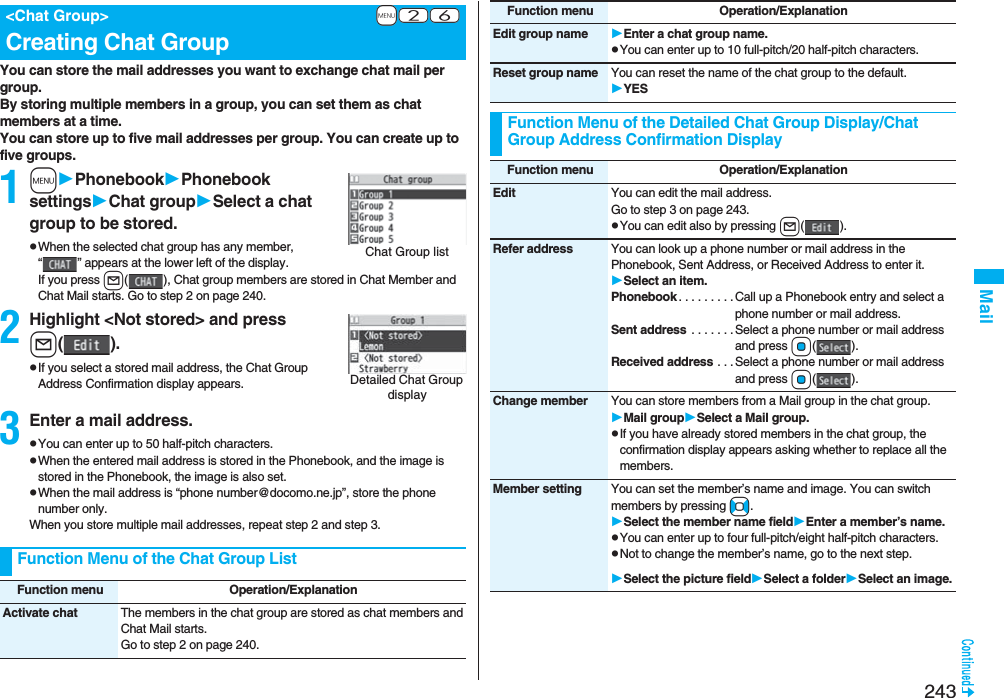
![230Mail2Select a record to be displayed.The detailed display of the Address list is displayed.pWith an SMS message for which the other party’s phone number is not notified, the reason for no caller ID is displayed.pTo send i-mode mail to the displayed address, press Oo( ) and go to step 3 on page 198. To send an SMS message to the displayed phone number, press Oo( ) and go to step 3 on page 244.pTo store in the Phonebook, press m( ). Go to step 2 of “Storing Displayed Phone Number/Mail Address in Phonebook” on page 96.Function Menu while Sent/Received Address is DisplayedFunction menu Operation/ExplanationCharacter size You can switch the character size for the list. (See “Dialed/recv. calls” on page 129)Feel*Mail[Received Address only]The Feel*Mail image is played back. See page 122 for Feel*Mail.pYou can play back the Feel*mail image also by pressing c().Add to phonebook See page 96.Add desktop icon See page 127.Compose message You can compose an i-mode mail message. The mail address is entered in the address field.Go to step 3 on page 198.Compose SMS You can compose an SMS message. The phone number is entered into the address field.Go to step 3 on page 244.Dialing If the mail address has been stored in a Phonebook entry, you can make a voice call, videophone call or PushTalk call to the phone number stored in the Phonebook.Select a dialing type.pWhen you select “Select image”, select an image to be sent to the other party during a videophone call. To cancel the setting, select “Release”.pWhen multiple phone numbers are stored in a Phonebook entry, you can dial the first phone number.DialpTo make an international call, select “Int’l dial assist”, select an international call access code, and follow the procedure above after selecting “Dialing” from the Function menu. (See page 61)pTo set Caller ID Notification, select “Notify caller ID”. (See step 2 on page 48)Redial/Dialed calls[Sent Address only]You can display the Redial list or the Dialed Call list.Received calls[Received Address only]You can display the Received Call list. All received calls (all calls) are displayed.Delete this YESDelete selected Put a check mark for records to be deletedl()YESDelete all Enter your Terminal Security CodeYESFunction menu Operation/Explanation](https://usermanual.wiki/Panasonic-Connect/208006A.User-Manual-Part-2/User-Guide-920755-Page-31.png)

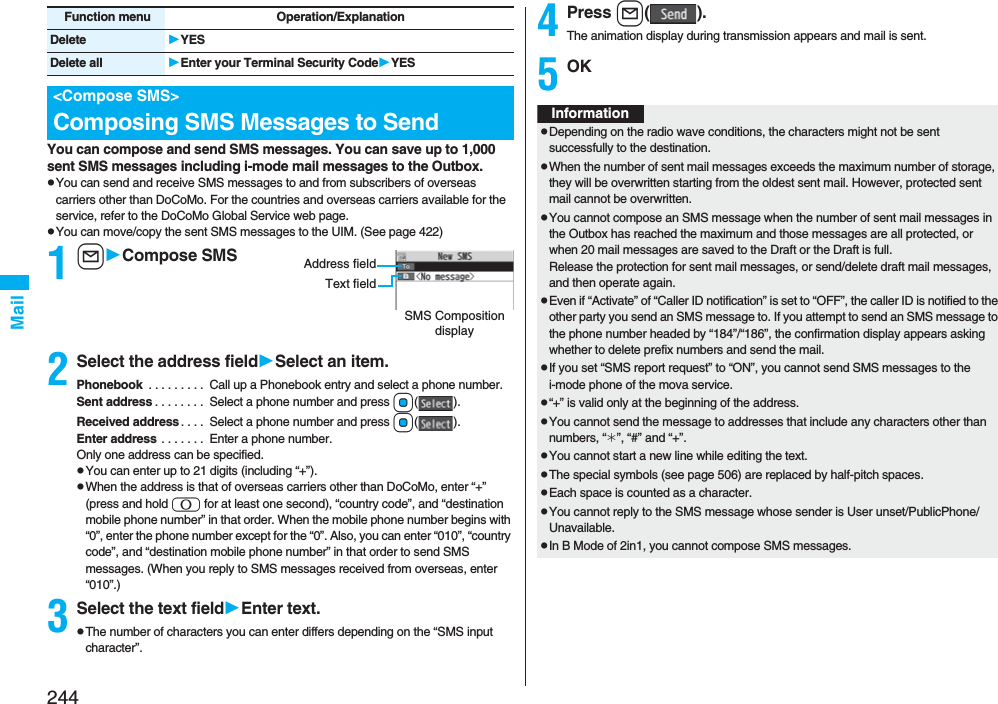
![247MailYou can set the characters you can enter into the text of SMS messages. You can set to enter only half-pitch alphanumeric characters and half-pitch symbols.1lSMS settingsSMS input characterSelect an item.Japanese (70char.) . . .You can enter full-pitch and half-pitch characters. You cannot enter pictographs except “ ” and “ ” (see page 502). You can enter up to 70 characters for the text.English (160char.) . . . .You can enter only half-pitch alphanumeric characters and half-pitch symbols. You can enter up to 160 characters for the text.pWhen you operate from the Function menu of the SMS Composition display, the setting is effective only for the SMS message you are composing.You can set the address and “Type of number” for the SMS Center. This setting is for getting any service other than SMS Service you currently use.1lSMS settingsSMS center selectionUser settingEnter an addressInternational or UnknownpYou can enter up to 20 half-pitch characters for the address. However, if “:” or “#” is included, you cannot set it for “International”.pYou can reset User Setting to “DoCoMo” by ResetEnter your Terminal Security CodeYES.You can send mail messages or browse received mail messages on the i-mode site.pYou can use only in B Mode or Dual Mode of 2in1.pFor details on Web mail, refer to “Mobile Phone User’s Guide [2in1]”.1lWeb mailOperate following the instructions on the display.SMS Input CharacterSMS Center Selection※Normally, you do not need to change this setting.<Web Mail>Using Web Mail](https://usermanual.wiki/Panasonic-Connect/208006A.User-Manual-Part-2/User-Guide-920755-Page-48.png)

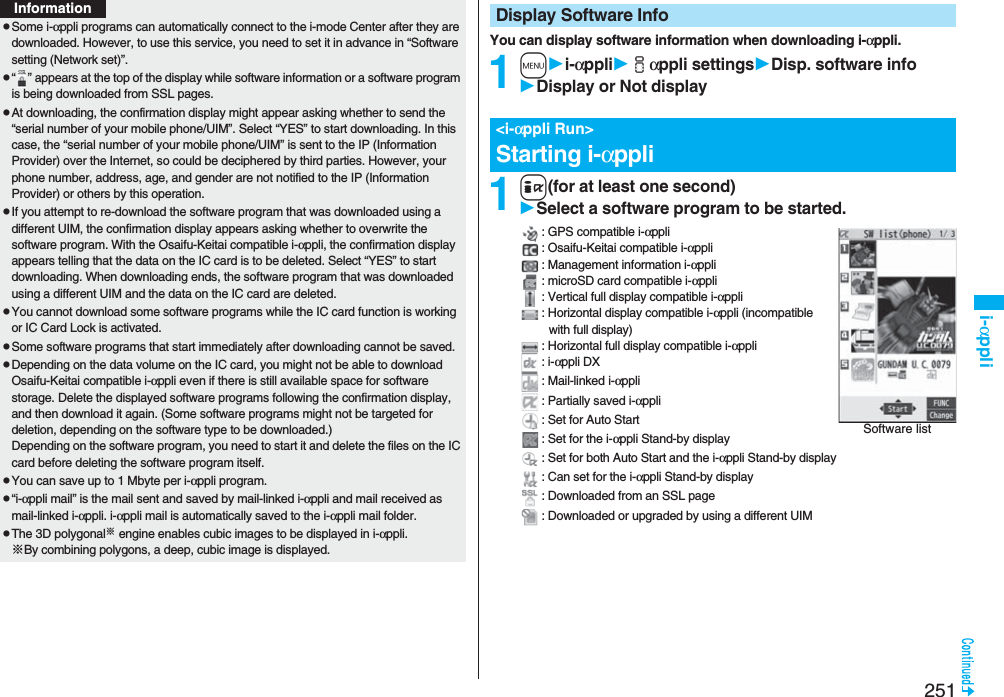
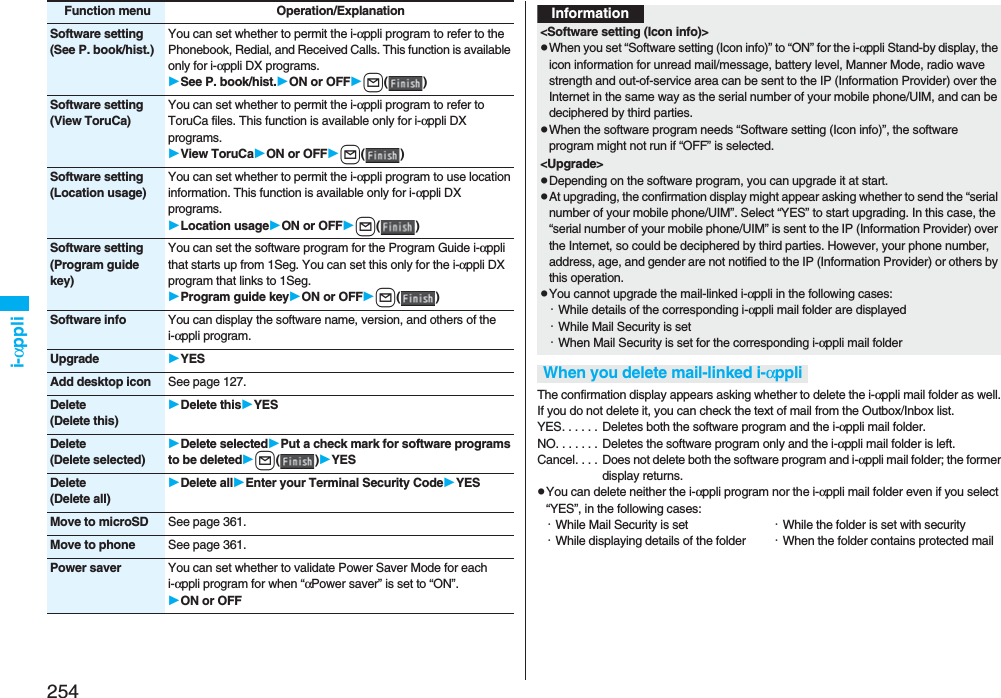
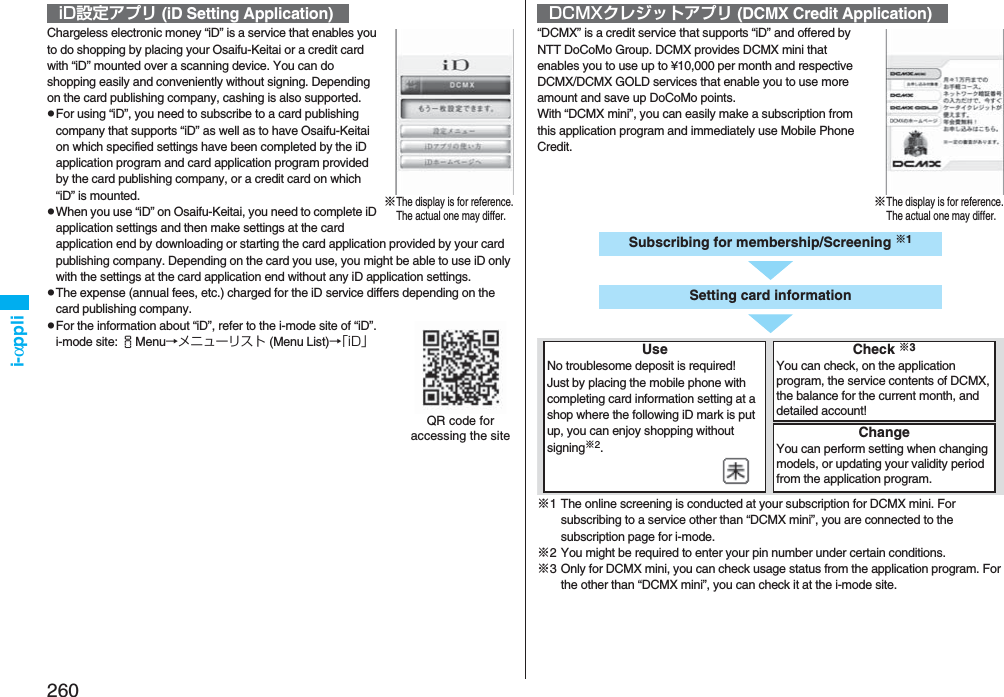
![250i-αppliBy downloading i-αppli from i-mode sites, you can use the FOMA phone more convenient. You can use the i-αppli which enables you to directly store the data into the Phonebook or Schedule, or the i-αppli which links to Data Box, enabling you to save or obtain images.Also, as the large capacity mega i-αppli is supported, you can enjoy playing high-resolution 3D games and full-length role playing game.pFor details on i-αppli, refer to the “Mobile Phone User’s Guide [i-mode] FOMA version”.You can download software programs from sites to the FOMA phone. You can save up to 100 files, however, the number of files you can save decreases depending on the data volume because the memory space is shared with other data files. (See page 537)1Bring up an i-αppli downloadable siteSelect a software program.2Select “OK” when downloading ends.pSee page 186 when i-αppli programs are stored to the maximum.pWhen downloading ends, the display for Software Setting (Network Set, Stand-by Set, Location Usage, or Program Guide Key) might appear. These settings can be done also from the Software list.3YES or NOYES . . . . Starts i-αppli.NO . . . . . Returns to the site display.What is i-αppli?<i-αppli Download>Downloading i-αppli from SitesWhen you press r or h to suspend downloading an i-αppli program of 100 Kbytes or more, or when downloading is suspended by the radio wave conditions, the confirmation display appears asking whether to resume downloading. Select “YES” to resume downloading the remaining part. Select “NO” to show the confirmation display asking whether to save the file downloaded halfway. Select “YES” to partially save the file.You can re-download the rest of the partially saved i-αppli program from the Software list.An i-αppli mail folder is created automatically each in the Inbox/Outbox Folder list, and the title of the downloaded mail-linked i-αppli becomes the name of the folder.pYou can save up to five mail-linked i-αppli programs.pYou cannot download the software program if the mail-linked i-αppli using the same folder is already in the Software list.pYou cannot download mail-linked i-αppli while Mail Security is set.pYou cannot download mail-linked i-αppli if the Inbox/Outbox Folder list contains five i-αppli mail folders.pWhen re-downloading mail-linked i-αppli whose folder only remains, the confirmation display appears asking whether to use the existing i-αppli mail folder. If you select “YES”, the existing folder is used. If you select “NO” because you do not use it, the confirmation display appears asking whether to delete an existing folder and create a new one. You cannot download mail-linked i-αppli without creating a new folder.When downloading is suspendedWhen you downloaded mail-linked i-αppliInformationpYou can download pre-installed i-αppli programs from the “P-SQUARE” site (Japanese only).iMenu→メニュー/検索 (Menu/Search)→ケータイ電話メーカー (Mobile Phone Maker)→P-SQUAREpDownloading is not available from some accessed sites.QR code for accessing the site](https://usermanual.wiki/Panasonic-Connect/208006A.User-Manual-Part-2/User-Guide-920755-Page-51.png)
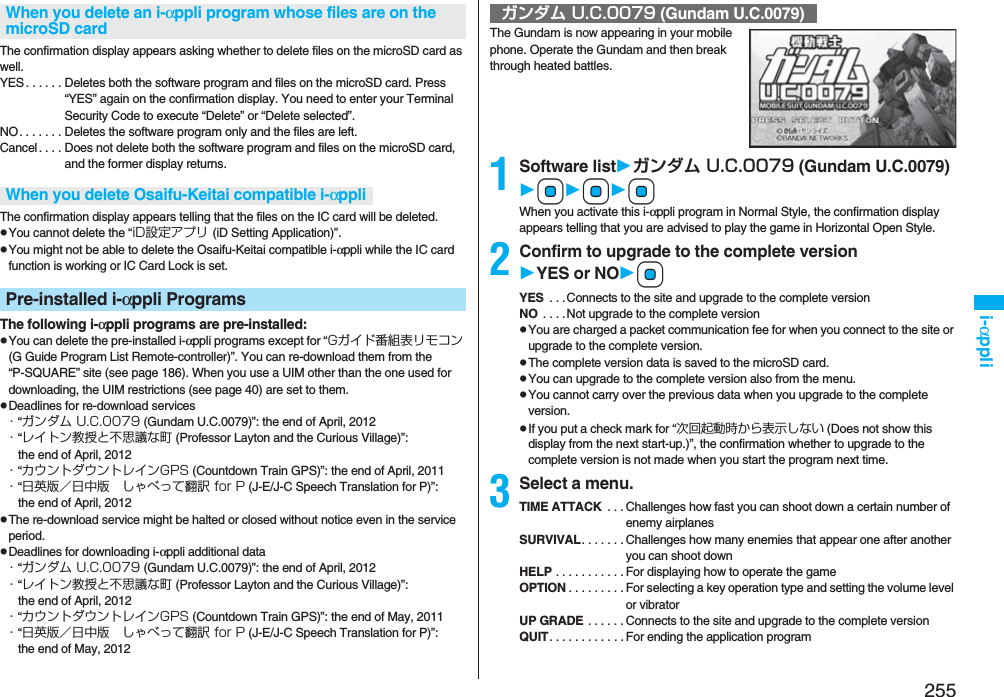
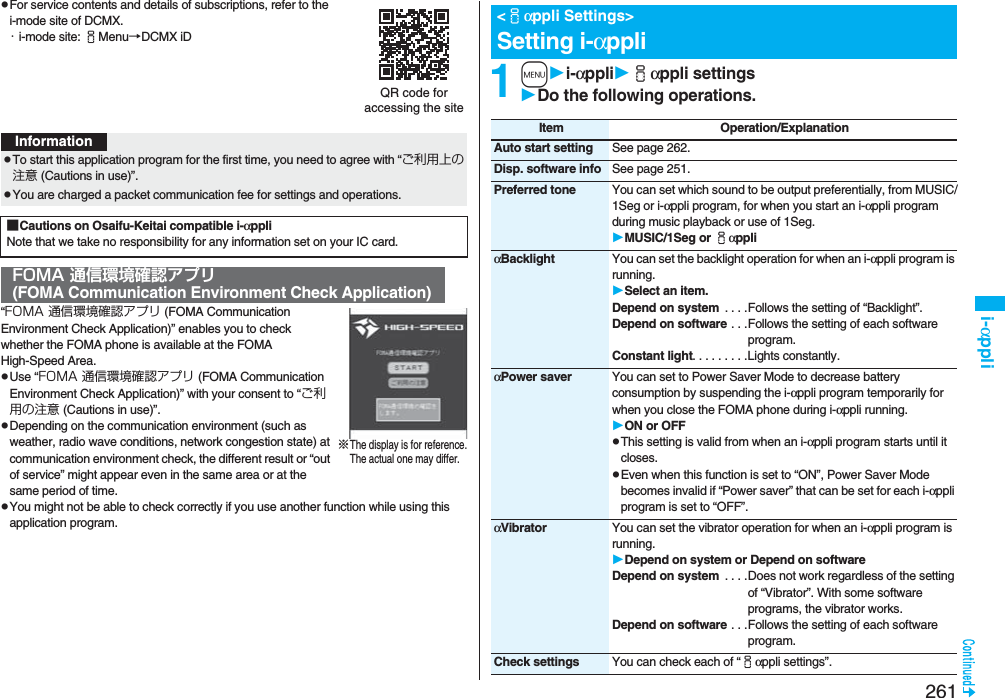
![256i-αppliThis is the transplanted version of an adventure puzzle game, which was a huge hit for game consoles.© LEVEL-5 INC.1Software listレイトン教授と不思議な町 (Professor Layton and the Curious Village)0When you activate this i-αppli program in Normal Style, the confirmation display appears telling that you are advised to play the game in Horizontal Open Style.2Select a menu.はじめから (From the beginning) . . .Start the game from the beginningオプション (Option) . . . . . . . . . . . . . .For setting the volume level or vibratorアップグレード (Upgrade) . . . . . . . . .Upgrade to the complete versionpYou are charged a packet communication fee for when you upgrade to the complete version.pThe complete version data is saved to the microSD card.“Mobile Google Map” is the convenient i-αppli program that enables you to get town information visually. You can easily search for information about areas or shops using the map. You can switch to the aerial photos as well.pYou need to agree with “利用規約 (Usage rules)” for the first time.pYou are separately charged a packet communication free.レイトン教授と不思議な町(Professor Layton and the Curious Village)Mobile Google MapYou can download the time schedule of trains, and can count down the departure time of the train you want to catch on a minute/second basis. The alarm function is also provided to notify you of 5 to 30 minutes before the departure. You can update the time schedule from the menu so the latest one is always available. Further, you can search for the nearest station using the GPS function.pYou are separately charged a packet communication fee for using.pFor details, refer to “ヘルプ (Help)” in the menu.Powered by JR Travel Navigator1Software listカウントダウントレイン-P (Countdown Train-P)2Read “免責事項 (Exemption clause)” thoroughlyi()はい (YES)3l()最寄駅検索(GPS) [Search the nearest station (GPS)] or 駅名入力検索 (Search by entering station name)最寄駅検索(GPS) [Search the nearest station (GPS)]. . . . Measures your current location and searches the surroundings for a station.駅名入力検索 (Search by entering station name). . . . Enter a station name, and press i(). You do not need to enter the whole station name.4Select a station nameSelect a line and directioni()はい (YES)カウントダウントレインGPS (Countdown Train GPS)](https://usermanual.wiki/Panasonic-Connect/208006A.User-Manual-Part-2/User-Guide-920755-Page-57.png)
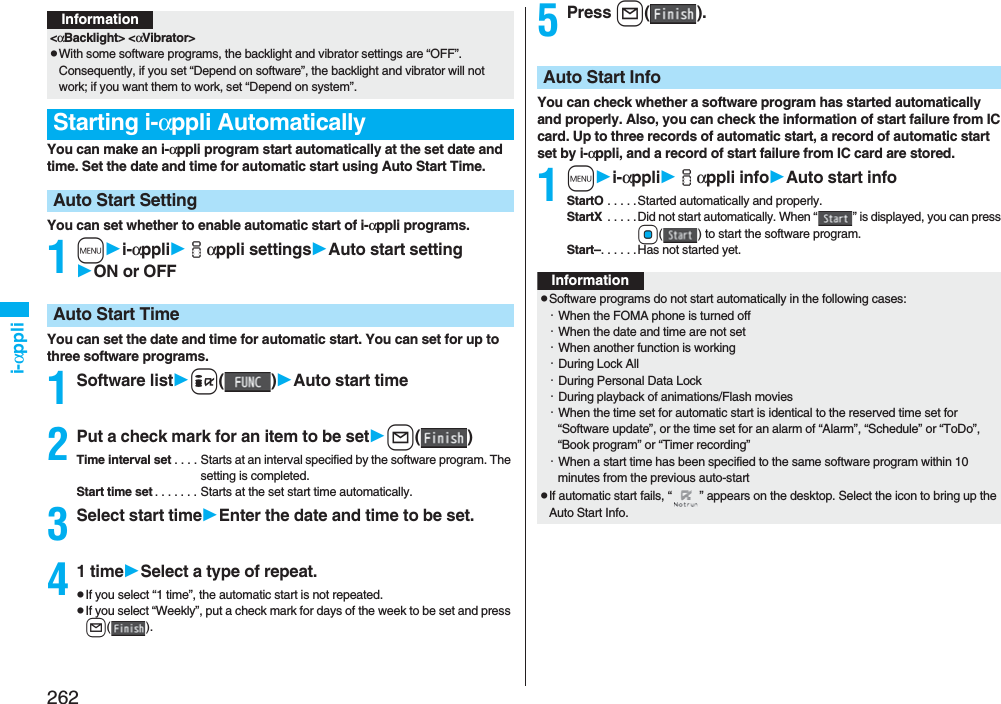
![257i-αppliJust by speaking a phrase to be translated into your FOMA phone, this application program translates it from Japanese to English or Chinese and vice versa.pYou can use all the functions charge free for 60 days from when you start using this application program. The phrases available for translation are restricted from the 61st day after. To use all the services, you need to register My Menu (charged) from the “しゃべって翻訳 (Speech Translation)” site by ATR-Trek Co., Ltd. [(How to access: iMenu→メニュー/検索 (Menu/Search)→辞書/便利ツール (Dictionary/Convenient Tool)→便利ツール (Convenient Tool)→しゃべって翻訳 (Speech Translation)]pYou are separately charged a packet communication fee for using.© ATR-Trek1Software list日英 しゃべって翻訳_P (J-E Speech Translation_P) or 日中 しゃべって翻訳_P (J-C Speech Translation_P)SKIPpSelect “日英 しゃべって翻訳_P (J-E Speech Translation_P)” for using English version, or select “日中 しゃべって翻訳_P (J-C Speech Translation_P)” for using Chinese version.2Read “しゃべって翻訳とは (What is Speech Translation?)” and “ご利用規約 (Usage rules)” thoroughly同意する (Agree)pYou need to agree with “ご利用規約 (Usage rules)” for the first time.3Read “ご利用注意事項 (Cautions in use)” thoroughlyOKはい (YES)pIf you select “いいえ (NO)”, “しゃべって翻訳とは (What is Speech Translation?)”, “ご利用規約 (Usage rules)”, and “ご利用注意事項 (Cautions in use)” do not appear when you start the program next time.4はい (YES)OKp“iアプリの使い方 (How to use i-αppli)” appears at the first startup.日英版/日中版 しゃべって翻訳 for P(J-E/J-C Speech Translation for P)The display is for English version.5Select a menu item.日→英 翻訳 (Translate Japanese to English) . . .Start to translate Japanese to English.英→日 翻訳 (Translate English to Japanese) . . .Start to translate English to Japanese.日→中 翻訳 (Translate Japanese to Chinese) . . .Start to translate Japanese to Chinese.中→日 翻訳 (Translate Chinese to Japanese) . . .Start to translate Chinese to Japanese.シーンを変更 (Change scene) . . .You can select the scene to translate.pPress i to switch between Japanese and English or Chinese.By using the GPS function and map, you can check the map for where you are currently in or for the place you specify, or check your nearby area for details. You can then navigate yourself to the destination by vehicle, on foot, or by car. Further, you can easily get train information by voice input. pYou are separately charged a packet communication fee. You are advised to use Pake-Houdai/Pake-Houdai Full for using this software program.pIf you delete this software program and then when you want to resume it, download it from “iエリアー周辺情報ー (i-area -Local Information-)”.pThis software program is the i-αppli program that uses the mail function, so it is not available when the mode of 2in1 is set to B Mode.pNote that we are not held responsible for the accuracy and promptness of the map and route information.pWhile driving, ensure that a person other than the driver operates this application program.pSee page 279 for details on operations.地図アプリ (Map Application)](https://usermanual.wiki/Panasonic-Connect/208006A.User-Manual-Part-2/User-Guide-920755-Page-58.png)
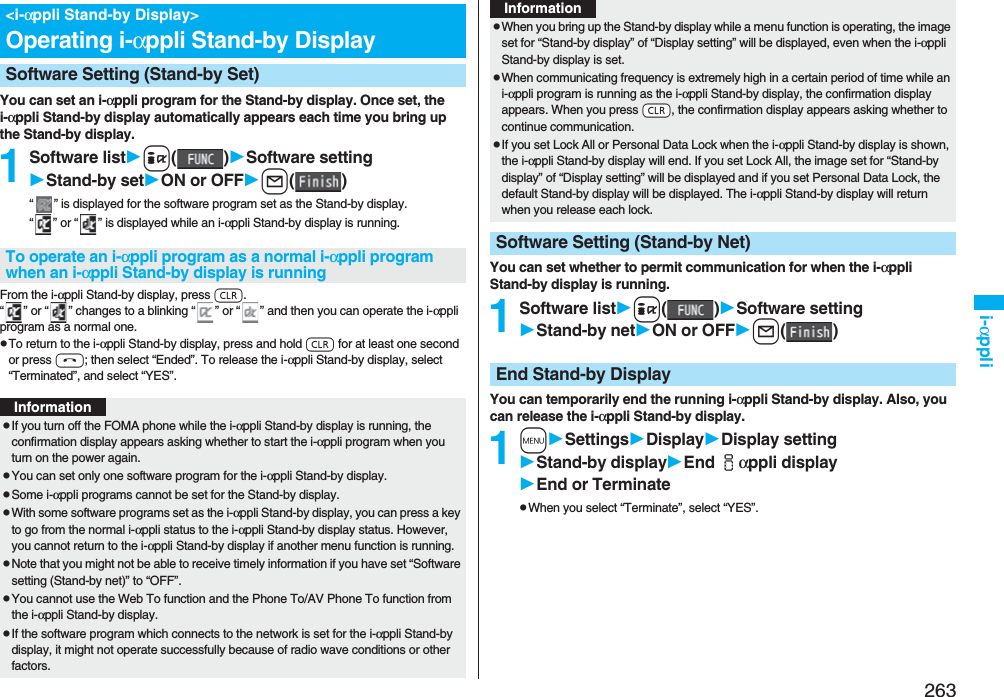
![258i-αppli“楽オク出品アプリ2 (Rakuoku Exhibition Application 2)” enables you to easily exhibit your goods on Rakuoku whenever you want wherever you are. Even if you are a beginner, an instruction guides you through exhibition procedures, so you can use it easily. The convenient functions such as shooting/editing photos and saving records are available so that you can exhibit your goods in a shorter time than you do on sites.pYou need to agree with “利用規約 (Usage rules)” for the first time.pYou are separately charged a packet communication fee.pFor details on Rakuoku, refer to “Mobile Phone User’s Guide [i-mode] FOMA version”.pTo exhibit on Rakuoku, you need to register with the Rakuten membership and exhibitor membership.pFor the information about Rakuoku, refer to i-mode site.i-mode site: iMenu→楽オク -オークション- (Rakuoku -Auction-)楽オク出品アプリ2 (Rakuoku Exhibition Application 2)※The display is for reference.The actual one may differ.QR code for accessing the siteThis is an i-αppli program that enables you to conveniently use mobile banking. Mobile banking enables you to use your FOMA phone to check the account balance, check the deposits/withdrawals, and transfer/shift money whenever you want and wherever you are. By entering your specified password at the start of this application program, you can use the mobile banking services for up to two banks. pTo use mobile banking, you need to have the bank account and subscribe to the mobile banking service of each bank.pYou are separately charged a packet communication fee.pFor details on i-αppli Banking, refer to “Mobile Phone User’s Guide [i-mode] FOMA version”.pFor the information about i-αppli Banking, refer to i-mode site.i-mode site: iMenu→メニュー/検索 (Menu/Search)→モバイルバンキング (Mobile Banking)→iアプリバンキング (i-αppli Banking)iアプリバンキング (i-αppli Banking)※The display is for reference.The actual one may differ.QR code for accessing the site](https://usermanual.wiki/Panasonic-Connect/208006A.User-Manual-Part-2/User-Guide-920755-Page-59.png)
![259i-αppliThis is an i-αppli program that bundles the TV program list and AV remote-controller function and the monthly charge is free.Anytime and anywhere you are, you can easily obtain the terrestrial digital, terrestrial analog or BS digital TV program information for the desired time zone. You can know about titles, contents, and start/end times of TV programs. Further, you can start a 1Seg program from the program list and vice versa.If there is any program you want to watch, you can set timer recordings of the program on a DVD recorder, etc. over the Internet. (You need to have a DVD recorder, etc. that supports the remote timer recording function. And you need to perform initial settings of this application program.) Further, you can search for the program information by keywords such as program genres or celebrities you like, or pickup keywords on the top of the display. You can also remote-control a TV, video recorder, and DVD player. (Some models are not supported.)pSee “Using Infrared Remote-controller Function” on page 371 for details on the infrared remote-controller.pYou need to make the initial settings and to agree with the usage rules for the first time.pYou are separately charged a packet communication fee.pTo use this application program overseas, set the time for the FOMA phone to Japan time.pFor details, refer to “Mobile Phone User’s Guide [i-mode] FOMA version”.pYou cannot delete “Gガイド番組表リモコン (G Guide Program List Remote-controller)”.pThis software program is the i-αppli program that uses the mail function, so it is not available when the mode of 2in1 is set to B Mode.You can select and book a program you want to watch from the program list of this application program.How to book a program1. Software listGガイド番組表リモコン (G Guide Program List Remote-controller)Highlight a program to be booked and press i()視聴予約 (Book program)予約実行 (Execute booking)Operate following the instructions on the display.Gガイド番組表リモコン (G Guide Program List Remote-controller)About program booking function※The display is for reference.The actual one differs.Local programs according to your region appear on your display.You can select a program you want to record and set a timer recording from the program list of this application program.How to set a timer recording1. Software listGガイド番組表リモコン (G Guide Program List Remote-controller)Highlight a program to be set for a timer recording and press i()♯ワンセグ録画予約 (1Seg timer recording)予約実行 (Execute booking)Operate following the instructions on the display.(You can set a timer recording also by highlighting a program and pressing s.)If you have a DVD recorder, etc. that supports the remote timer recording function, you can set timer recordings from the program list of this application program over the Internet even if you are away. For remote timer recording, you need to make initial settings of this application program.How to make initial settings1. Set the Internet connection for the DVD recorder, etc.(Refer to the instruction manual of the DVD recorder, etc. you use.)2. Software listGガイド番組表リモコン (G Guide Program List Remote-controller)i()リモート録画予約 (Remote timer recording)Operate following the guidance.How to set timer recordingsAfter the initial settings, specify your desired program and select “リモート録画予約 (Remote timer recording)”. Then, the DVD recorder, etc. specified on this application program is connected via the Internet, and you can set timer recordings.pYou are separately charged a packet communication fee.About timer recording functionAbout remote timer recording function](https://usermanual.wiki/Panasonic-Connect/208006A.User-Manual-Part-2/User-Guide-920755-Page-60.png)


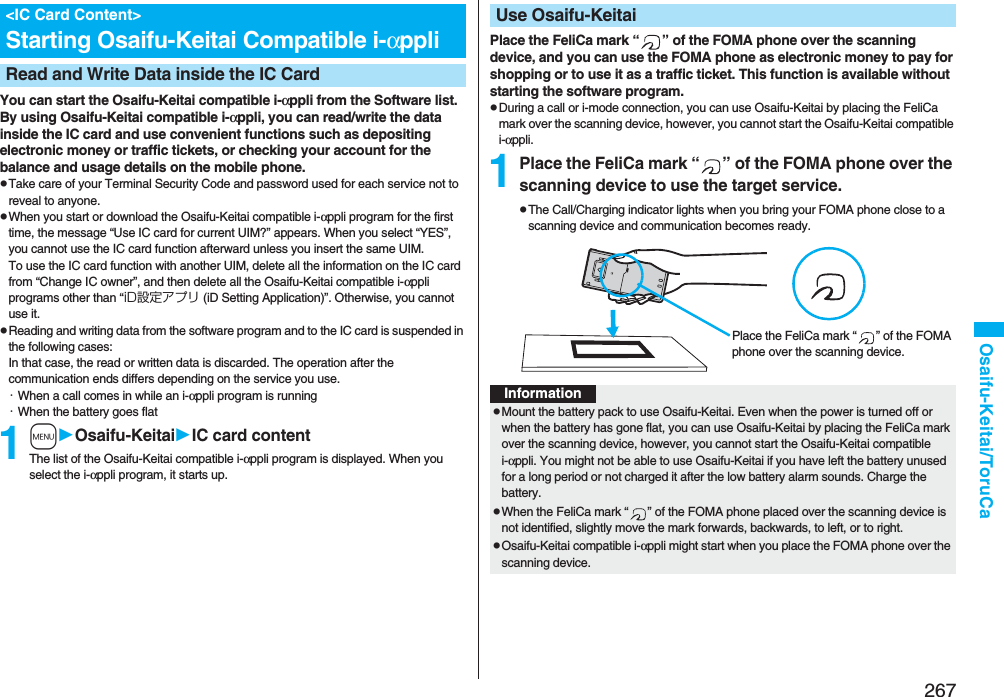
![266Osaifu-Keitai/ToruCaThe convenient i-mode function which uses the IC card function of the i-mode phone (i-mode FeliCa), or the i-mode phone with the IC card mounted is called “Osaifu-Keitai”.FeliCa is one of the non-contact IC technologies that enables you to read and write data just by placing it over a scanning device.Just by placing Osaifu-Keitai over the scanning device in a shop, you can pay by electronic cash or use it as an air ticket or reward card. Mobile phones have become one of easy-to-use tools.Further, different from the existing FeliCa compatible non-contact IC card, the new one enables you to deposit electronic money by using the communication into the IC card inside the Osaifu-Keitai or to check your account for balance or usage details.※To use Osaifu-Keitai compatible service, you need to make the settings from i-αppli (IC application) program which supports the IC card function [for details, inquire of IP (Information Provider)].※For cautions on using each Osaifu-Keitai compatible service, refer to “Mobile Phone User’s Guide [i-mode] FOMA version”.pData on the IC card might be lost or deformed owing to the malfunction of Osaifu-Keitai. (When we keep your Osaifu-Keitai for repair, we cannot keep it with data files left, so the data files shall be deleted beforehand by yourself as a rule.) Use the backup service of the IP (Information Provider) for supports such as reissue, restoration, temporary storage or transfer of data files, except for the data transfer by iC transfer service. The availability of backup services and their usage conditions (necessary applications, charges, etc.) and the support availability of iC transfer service differ depending on the service. Contact the IP (Information Provider) beforehand. For your important data files, be sure to use the service with backup support.pIn any case including malfunction or model change, we cannot be held responsible for the loss or deformation of data on the IC card or other losses caused regarding Osaifu-Keitai compatible services.pIf your Osaifu-Keitai has been stolen or lost, inquire of the provider for Osaifu-Keitai compatible service you use about ways of dealing with the trouble, immediately. With this FOMA phone, you can use Omakase Lock or IC Card Lock. (See page 135, and page 275)What is Osaifu-Keitai?iC transfer service※1 is the service for transferring the data files on the IC card at a time※2 to your new Osaifu-Keitai mobile phone※3 when you replace your Osaifu-Keitai mobile phone such as at the time of model change or malfunction. After completing the transfer of data files on the IC card, just download an Osaifu-Keitai compatible i-αppli program, and then you can easily use the Osaifu-Keitai services.iC transfer service is available at the service counters such as a DoCoMo shop nearby.For details, refer to “Mobile Phone User’s Guide [i-mode] FOMA version”.※1 You are charged a handling fee for using iC transfer service. (You might not be charged at times.)In addition, you are charged a packet communication fee for downloading iC application programs and respective settings.※2 Some Osaifu-Keitai services are not supported. The services that are not supported are deleted when you use iC transfer service, so ensure that you use a back-up service for the Osaifu-Keitai services or delete them in advance.※3 iC transfer service is available when new Osaifu-Keitai mobile phone is iC transfer service compatible model.What is iC Transfer Service?](https://usermanual.wiki/Panasonic-Connect/208006A.User-Manual-Part-2/User-Guide-920755-Page-67.png)
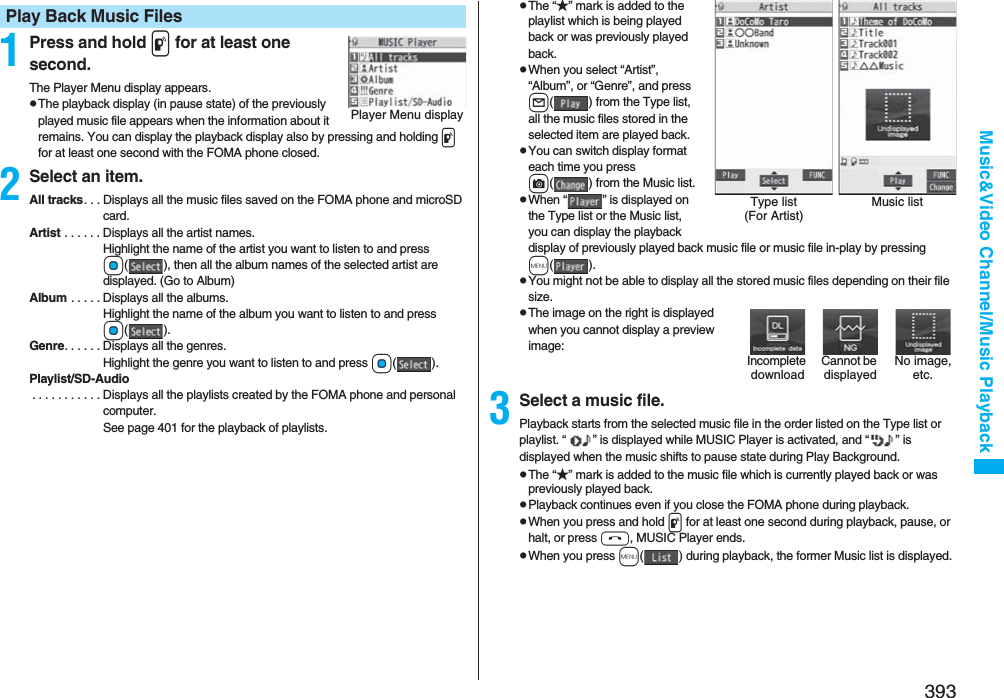
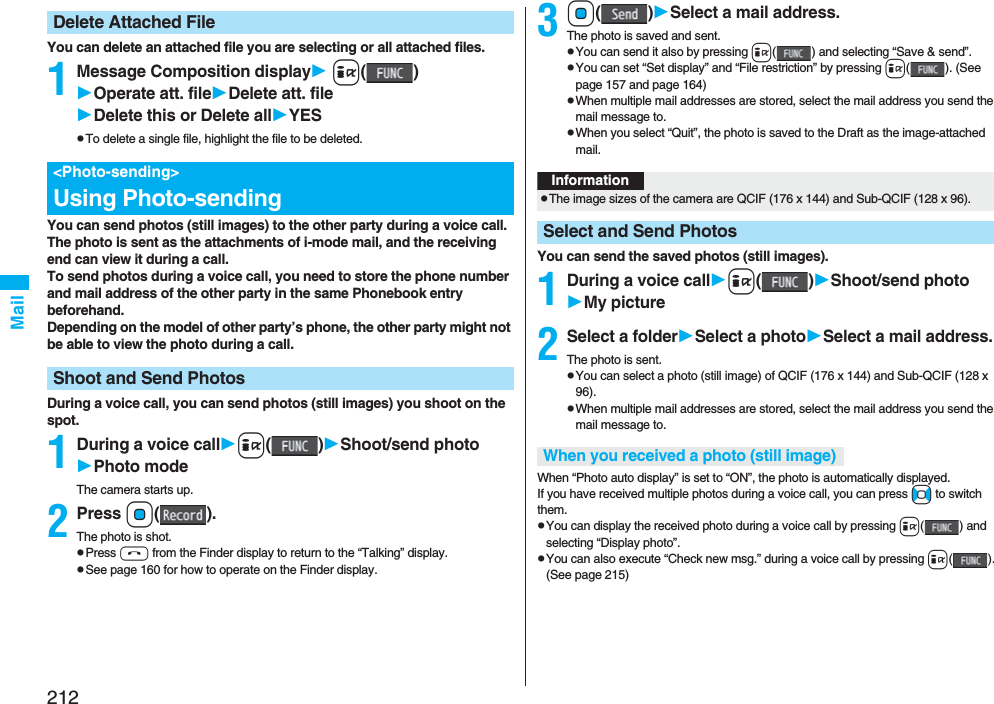
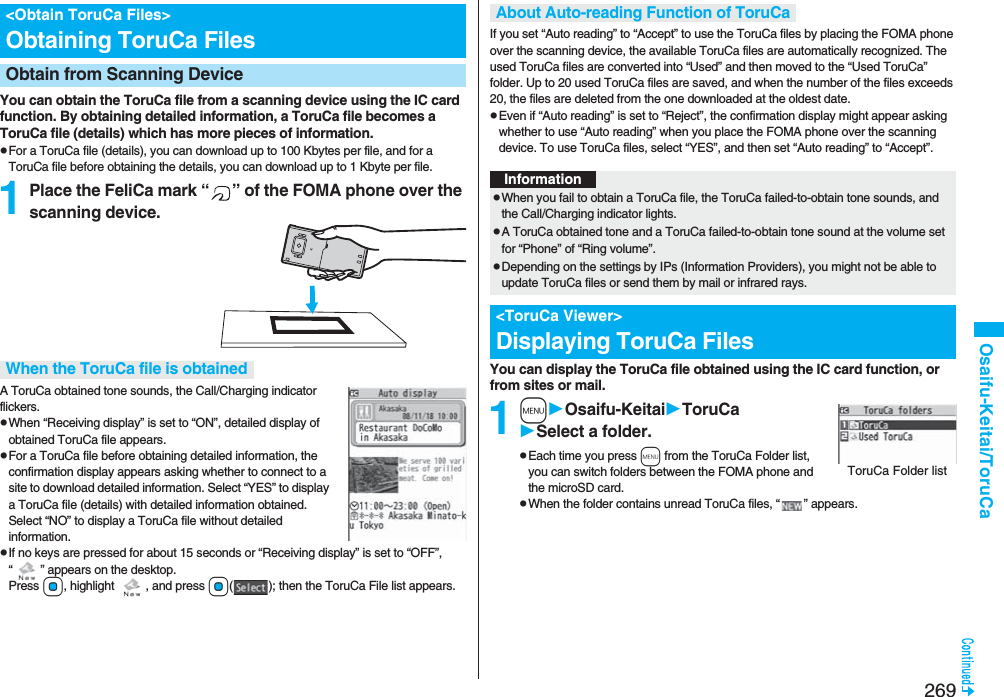
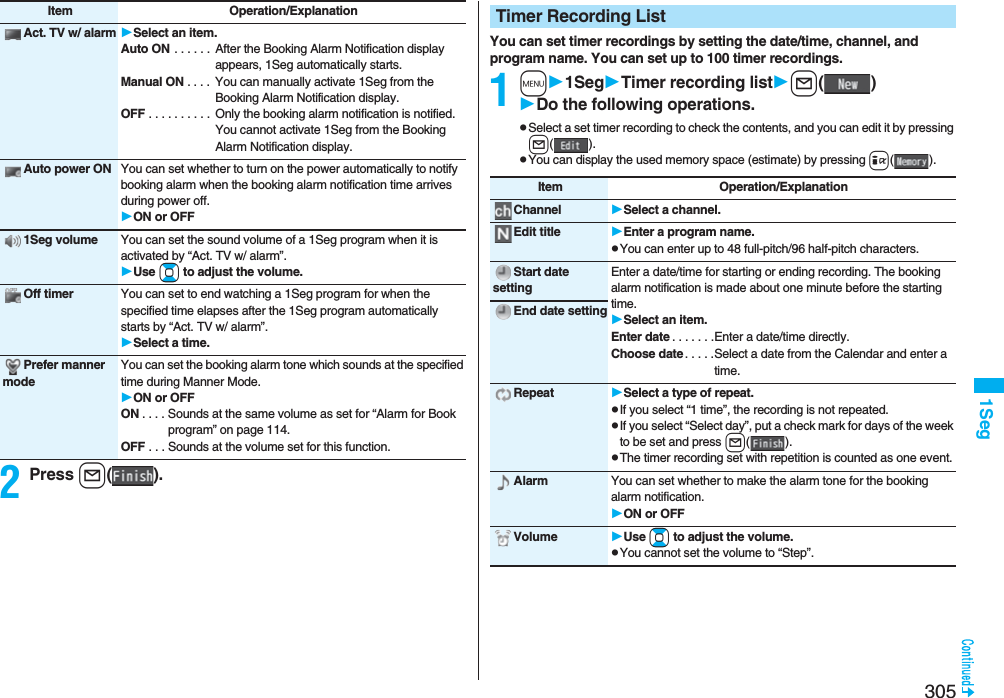
![268Osaifu-Keitai/ToruCaYou can check whether IC owner information for using the IC card is consistent with the information of the currently inserted UIM.1mOsaifu-KeitaiCheck IC ownerpWhen the UIM differs from the one for stored information, select “変更” and reset the data inside the IC card, and then you can store the UIM information. You can delete the data in IC card, and reset the IC owner data. After resetting, you can re-register by currently inserted UIM.pDelete all the Osaifu-Keitai compatible i-αppli programs other than “iD設定アプリ (iD Setting Application)” to delete the IC owner information. However, the i-αppli program with its data file on the IC card is not initialized, so you need to delete it separately.1mOsaifu-KeitaiChange IC ownerResetYESEnter your Terminal Security CodeYESToruCa is an electronic card that you can obtain with Osaifu-Keitai for use as fliers, restaurant cards, and coupon tickets. You can obtain ToruCa files from scanning devices or sites and can easily exchange them using mail, infrared ray, or a microSD card.The obtained ToruCa files are saved to “ToruCa” of “Osaifu-Keitai”.pAvailable on the ToruCa compatible model. For details, refer to “Mobile Phone User’s Guide [i-mode] FOMA version”.<Check IC Owner>Checking IC Owner Data in IC CardChange IC Owner<ToruCa>What is ToruCa?■Flow for using ToruCa■Sources of ToruCa filesPlace your Osaifu-Keitai over a scanning device to obtain a ToruCa file.You can view more detailed information by using “詳細 (Details)” key.Scanning deviceSitei-αppliExchanges ToruCa files between i-mode phones.Mail, infrared data exchange, iC communicationQR codemicroSD card](https://usermanual.wiki/Panasonic-Connect/208006A.User-Manual-Part-2/User-Guide-920755-Page-69.png)
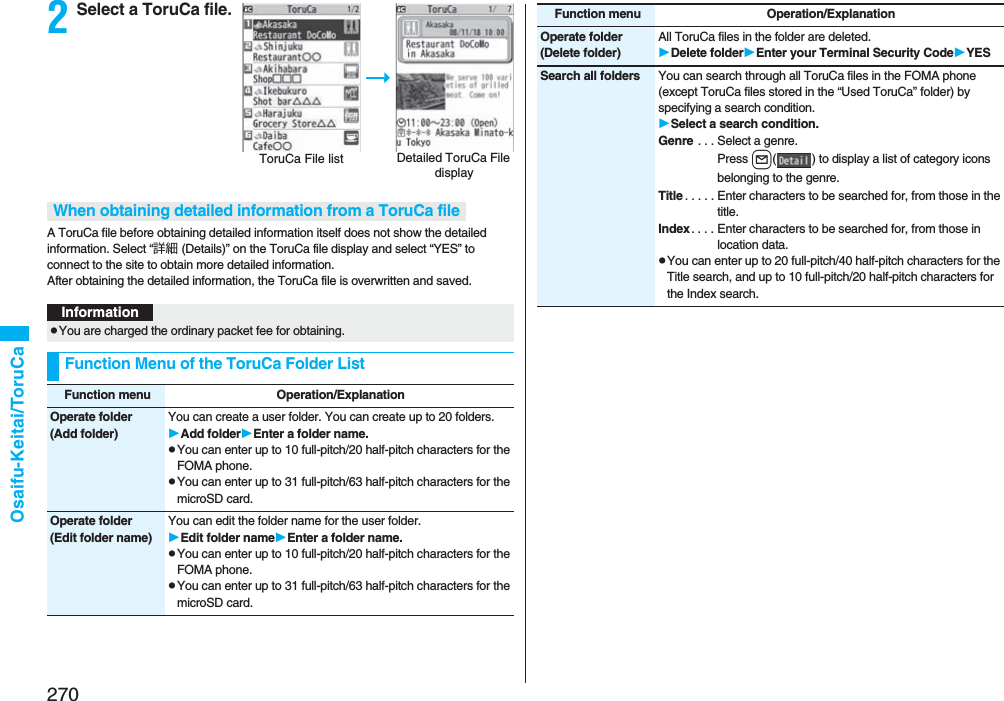
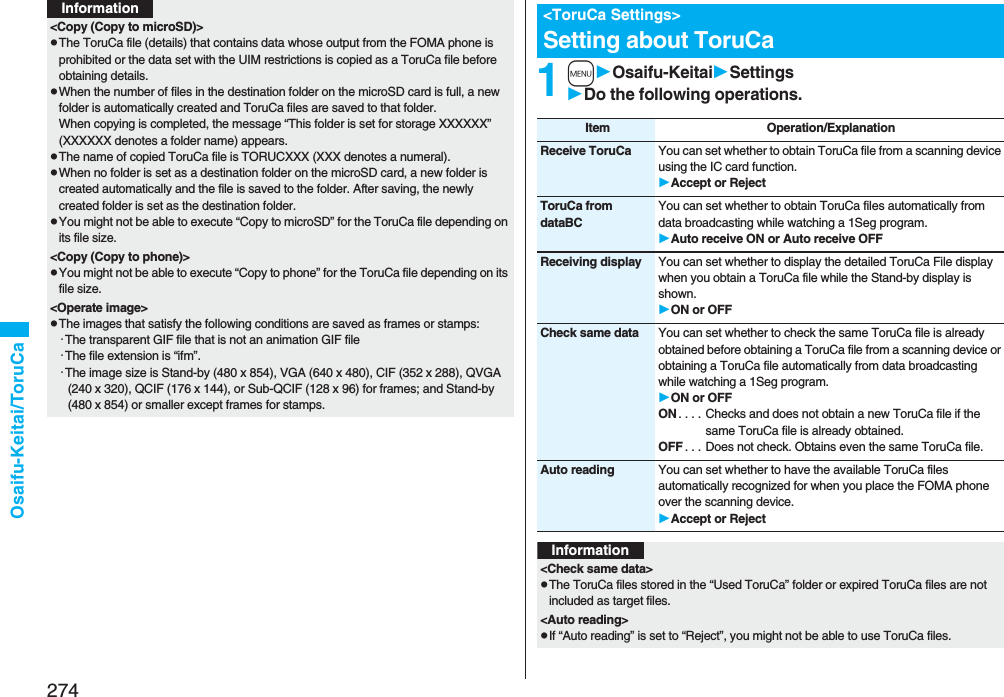
![272Osaifu-Keitai/ToruCaIndicates the state of ToruCa file※1 Does not apply to the ToruCa file downloaded from a site.※2 Appears for only the ToruCa file on the microSD card.p“ ” is add to the expired ToruCa file.p“ ” is add to the ToruCa file whose output from the FOMA phone is prohibited.Indicates the categoryDisplays a category icon that matches the contents of the ToruCa file.Indicates the Index fileDisplays the location data of the publisher that publishes the information about the ToruCa file.Indicates the titleIndicates the date and time the ToruCa file was obtainedIndicates the ToruCa informationSimple explanation and the “詳細 (Details)” key are displayed for a ToruCa file. Information about the publisher is displayed for a ToruCa file (details).How to See ToruCa File List/Detailed ToruCa File DisplayToruCa File listDetailed ToruCa File display(for ToruCa file)Detailed ToruCa File display[for ToruCa file (details)] ※1Unread ToruCa fileRead ToruCa file※2FOMA phone incompatible ToruCa fileFunction Menu of the ToruCa File List/Detailed ToruCa File DisplayFunction menu Operation/ExplanationAttach to mail You can compose an i-mode mail message with the ToruCa file attached.Go to step 2 on page 198.pYou can compose it also by pressing l().Move Select a destination folder.pYou cannot select the “Used ToruCa” folder.Search/sort(Search)[List only]You can search through ToruCa file in the folder by specifying a search condition.SearchSelect a search condition.Genre . . . Select a genre.Press l( ) to display a list of category icons belonging to the genre.Title . . . . . Enter characters to be searched for, from those in the title.Index. . . . Enter characters to be searched for, from those in location data.pYou can enter up to 20 full-pitch/40 half-pitch characters for the Title search, and up to 10 full-pitch/20 half-pitch characters for the Index search.Search/sort(Sort)[List only]You can change the order of displayed files.SortSelect an order.Copy(Copy)You can copy the displayed or highlighted ToruCa file to another folder.CopySelect a destination folder.pYou cannot select the “Used ToruCa” folder.Copy(Copy to microSD)The files are copied to the folder as specified by “Select storage” on page 271.Copy to microSDCopy(Copy to phone)You can copy the ToruCa file from the microSD card to the ToruCa folder in the FOMA phone.Copy to phone](https://usermanual.wiki/Panasonic-Connect/208006A.User-Manual-Part-2/User-Guide-920755-Page-73.png)
![273Osaifu-Keitai/ToruCaMultiple-choice[List only]You can select multiple ToruCa files and operate.Put a check mark for ToruCa files to be selectedi()Select an item.Move . . . . . . . . . . . . . . See page 272.Copy . . . . . . . . . . . . . . See page 272.Copy to microSD. . . . See page 272.Copy to phone . . . . . . See page 272.Send Ir data . . . . . . . . See page 370.Select all . . . . . . . . . . . Selects all files.Release all . . . . . . . . . Releases all selections.Update ToruCa[Detailed display only]You can re-obtain the information about the ToruCa file. The re-obtained ToruCa file (details) is automatically overwritten and then saved.YESpYou cannot update some ToruCa files.pSee page 186 for when ToruCa files are stored to the maximum.Operate image(Save image)[Detailed display only]You can save the image displayed on the ToruCa file and set it for the Stand-by display or Wake-up display.Save imageSelect an imageYESSelect a destination folder.Go to step 3 on page 182.pSee page 186 for when images are stored to the maximum.Operate image(Save BG image)[Detailed display only]You can save the background image of the ToruCa file and set it for the Stand-by display or Wake-up display.Save BG imageYESSelect a destination folder.Go to step 3 on page 182.pSee page 186 for when images are stored to the maximum.Operate image(Retry)[Detailed display only]You can play back an animation image or Flash movie in the ToruCa file from the beginning.RetrypWhen a part of the Flash movie is outside the display area, the Flash movie might not be played back.Add to phonebook[Detailed display only]See page 96.Add desktop icon See page 127.Function menu Operation/ExplanationIr/ transmission(Send Ir data)See page 370.Ir/ transmission( transmission)See page 372.Memory info[List only]You can display the used memory space (estimate)/the number of saved files.Delete(Delete this)Delete thisYESDelete(Delete selected)[List only]Delete selectedPut a check mark for ToruCa files to be deletedl()YESDelete(Delete all)[List only]You can delete all ToruCa files in the folder.Delete allEnter your Terminal Security CodeYESFunction menu Operation/ExplanationInformation<Attach to mail>pThe ToruCa file (details) that contains data whose output from the FOMA phone is prohibited is attached as a ToruCa file before obtaining details.pYou might not be able to attach the ToruCa file to i-mode mail depending on its file size.<Copy (Copy)>pYou cannot copy ToruCa files whose output from the FOMA phone is prohibited.](https://usermanual.wiki/Panasonic-Connect/208006A.User-Manual-Part-2/User-Guide-920755-Page-74.png)

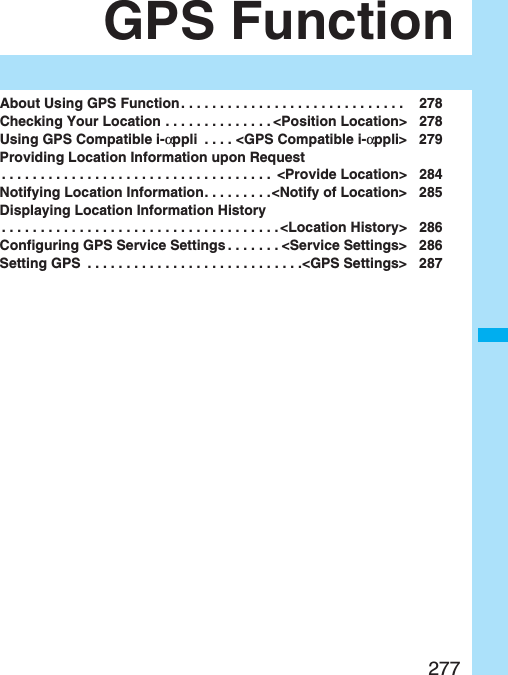
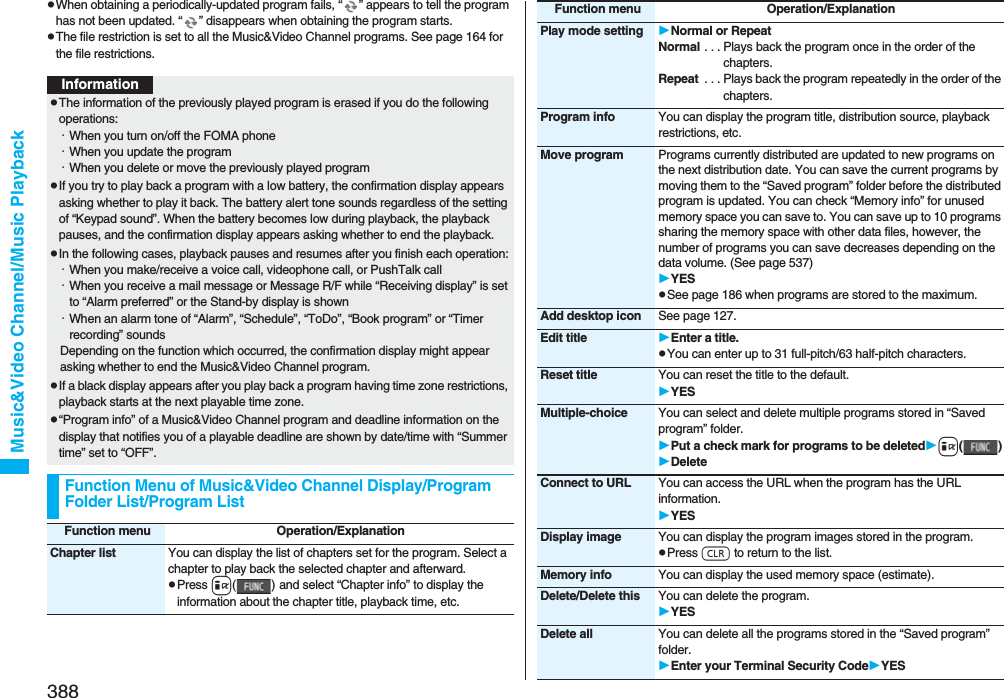
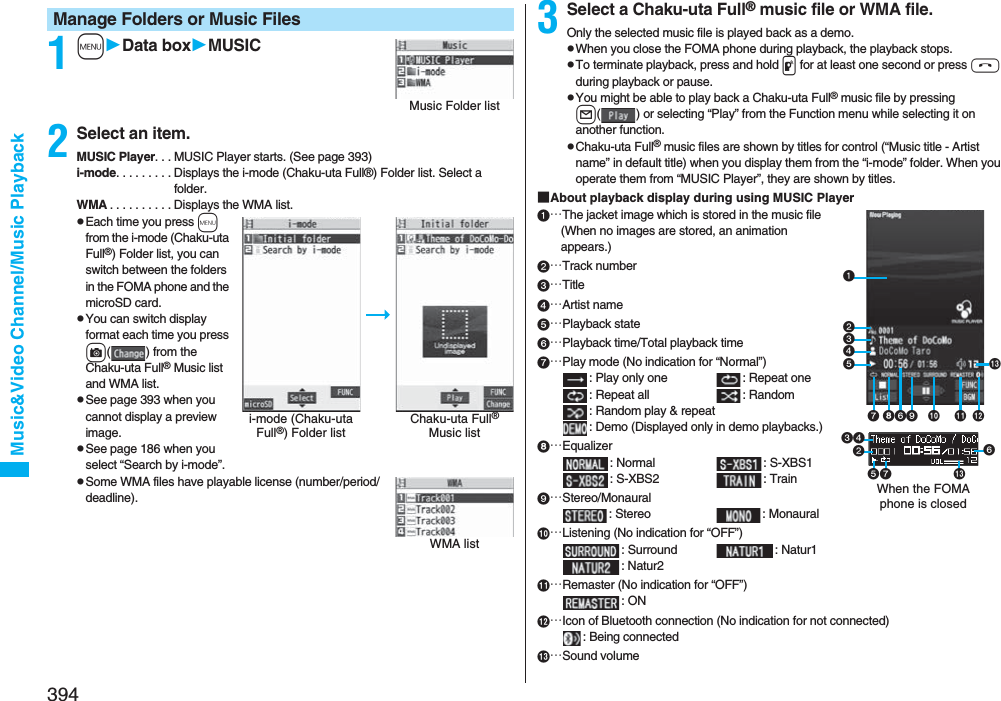
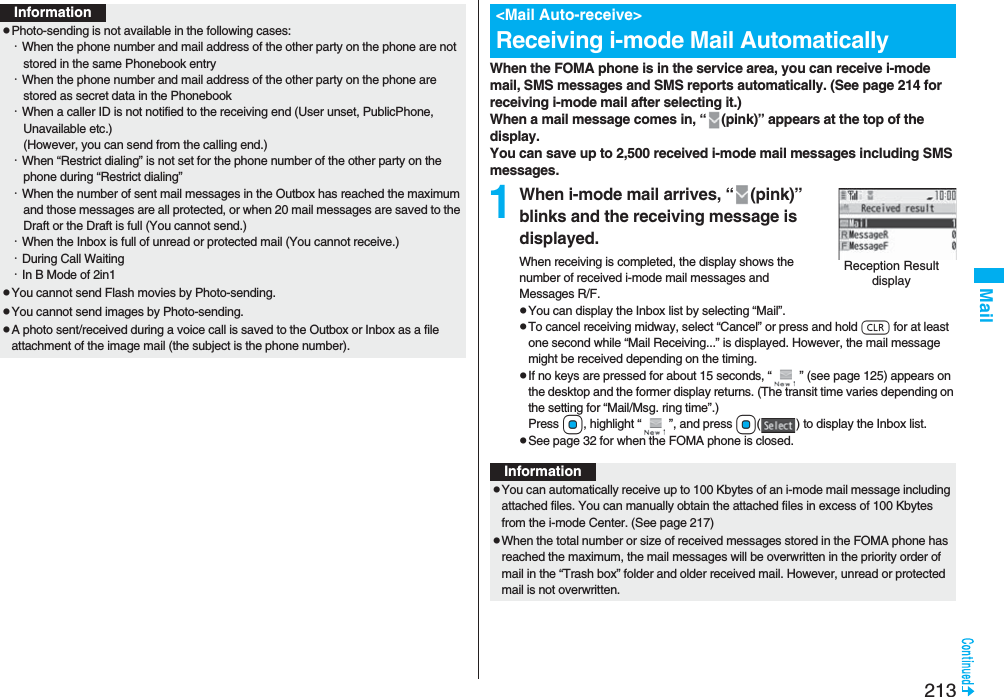
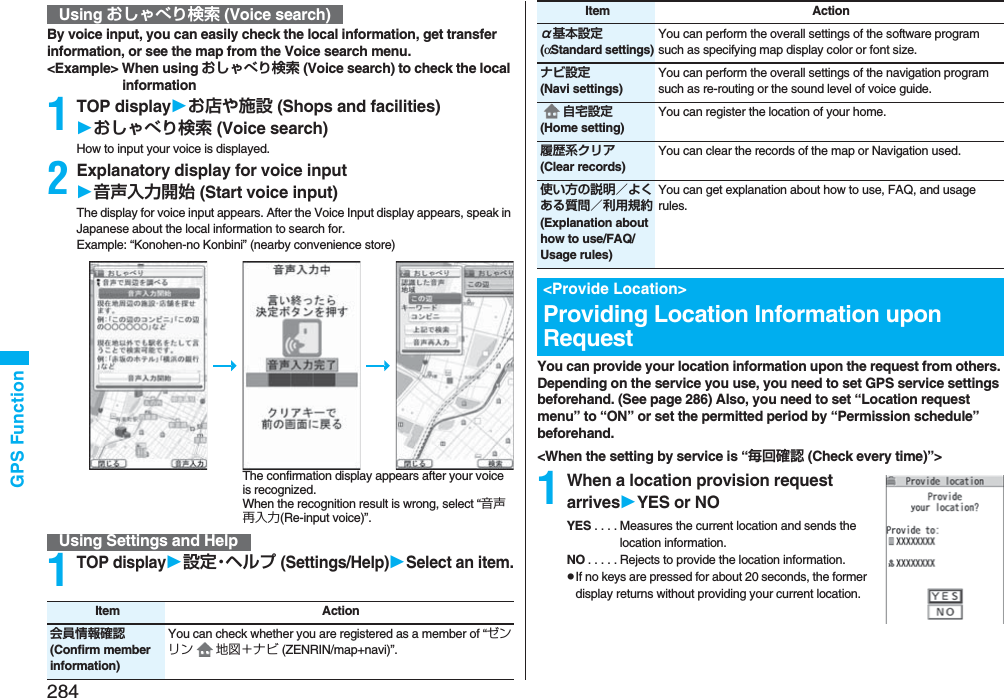
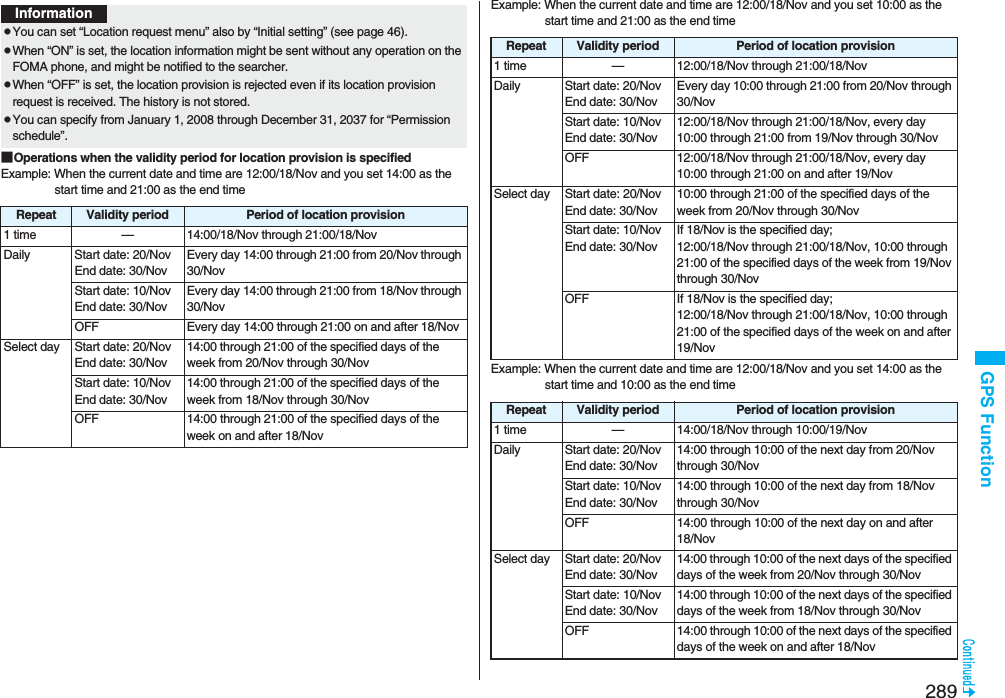
![281GPS Function■Map display and its operation◆Key operation when the map is shown◆Key operation when the quick access menu is shown© 2008 ZENRIN DataComMap View displayKey operation Actionl[メニュー (Menu)] Can show the menu.OoCan show the quick access menu.i[拡縮(Enlarge/Reduce)]Can show the scale bar. To display a large area, press Zo, and to display the details, press Xo. Press i[閉じる (close)] to fix the reduced scale, and then to clear the bar.MoCan move the map up, down, left, and right.rCan close the menu, or returns to the point retrieved by the first search.aCan turn the map counterclockwise.0Can turn the map northward.sCan turn the map clockwise.Key operation ActionZo[周辺を調べる(Check local information)]Can check the local information centering around the area on the map.Xo[ココへナビ(Navi to)]Can set the start point and search for a route to the center of the map.■The Search Result display for the local information and its operationpThe display is for reference, so the actual one might differ.pThe display and operation are for when you show the search result on the map, not for when you select it from the list.◆The Search Result display for the local information◆Key operation when the Search Result display for the local information is shown※When the cursor is not placed over the shop, etc. retrieved by the search, the quick menu appears.Co[ココを送信(Send here)]Can send the URL for the displayed map by i-mode mail.Vo[ココを登録(Store here)]Can store the location information of the center of the map in this software program, on the server, or in the Phonebook. When you store it on the server, the stored point can be shared with your personal computer as well.Oo[地図へ (To map)] Can close the quick access menu.1[3D/パノラマ(3D/Panorama)]Can show the point from where a three-dimensional intersection or panoramic image can be viewed. Select the point to display the three-dimensional intersection or panoramic image.2[ビル/テナント(Building/Tenant)]Can show the buildings around and can click to check the tenants in the buildings if any.Key operation Action© 2008 ZENRIN DataComKey operation ActionOoCan confirm detailed information about search results.](https://usermanual.wiki/Panasonic-Connect/208006A.User-Manual-Part-2/User-Guide-920755-Page-82.png)
![282GPS FunctionYou can set a start point and destination, and search for a route. The route you can go through on foot, by public transportation, or by car are displayed. After you search for the route, the voice and display navigate you to your destination.1TOP displayナビ (Navigate)出発地/目的地を選ぶ (Select a start point/destination)2出発地 (Start point)Select a setting method.現在地(GPS) [Current location (GPS)]. . . .Measures and sets the current location.フリーワード検索 (Keyword search). . . .Set a start point searching by keywords.地図上で指定 (Specify on map). . . .Set a start point on the map.TEL/〒検索 (TEL/ZIP code search). . . .Set a start point searching by the phone number or zip code.住所一覧から (From address list). . . .Set a start point selecting an address.ジャンルから (From genre). . . .Set a start point selecting a genre.履歴から (From record). . . .Set a start point on the map previously displayed.登録地点から (From stored point). . . .Set a start point from the location information stored in this software program, on the server, or in the Phonebook.自宅 (Home). . . .Set a start point from the location information of your home.出発地の確認 (Confirm start point). . . .Confirm information about the start point.MoCan move the map up, down, left, and right.5Can re-search the center area of the displayed map.4Can show the previous search results.6Can show the next search results.l[メニュー (Menu)] Can show the menu.i[拡縮(Enlarge/Reduce)]Can show the scale bar. To display a large area, press Zo, and to display the details, press Xo. Press i[閉じる (close)] to fix the reduced scale, and then to clear the bar. Searching for a Route and Navigating Yourself to Destination by Voice and on DisplayKey operation Action 3目的地 (Destination)Select a setting method.フリーワード検索 (Keyword search). . . Set a destination searching by keywords.地図上で指定 (Specify on map). . . Set a destination on the map.TEL/〒検索 (TEL/ZIP code search). . . Set a destination searching by the phone number or zip code.住所一覧から (From address list). . . Set a destination selecting an address.ジャンルから (From genre). . . Set a destination selecting a genre.履歴から (From record). . . Set a destination on the map previously displayed.登録地点から (From stored point). . . Set a destination from the location information stored in this software program, on the server, or in the Phonebook.自宅 (Home). . . Set a destination from the location information of your home.目的地の確認 (Confirm destination). . . Confirm information about the destination.4時間指定 (Specify time)Select an item.現時刻で指定 (Specify by current time). . . Search for a route by the current time.出発時刻指定 (Specify start time). . . Search for a route specifying the start time.到着時刻指定 (Specify arrival time). . . Search for a route specifying the arrival time.終電を利用 (Use last train). . . Search for a route by the last train of the day.5条件設定 (Set conditions)Select a condition.乗換条件 (Transfer conditions). . . Select a transfer condition from “早い (Fast)”, “安い (Cheap)”, and “楽々 (Easy)”.徒歩ルート (Foot route). . . Select a route condition from “おまかせ (Free)”, “屋根多い (Many roofs)”, and “階段少ない (Less stairs)”.特急利用 (Use special express). . . Select whether to use special expresses for even when the total distance is less than 100 km.通常利用車種 (Ordinary type of vehicles). . . Select a type of vehicle.6上記で設定 (Fix as specified above)](https://usermanual.wiki/Panasonic-Connect/208006A.User-Manual-Part-2/User-Guide-920755-Page-83.png)
![283GPS Function7ルートを検索 (Search for a route)You can search for a route by “ で検索 (Search by )” that searches all types of routes, or “ のみで検索 (Search by only )” that searches for routes only by car. Up to six routes are displayed as search results. When the routes using different transportation are found, the characteristics of the routes are displayed by the icons shown below: 早 (Fast): Arrival time is early.安 (Cheap): Fare is cheap.楽 (Easy): Transfer is less.オススメ (Recommendable): Route provided with three conditions, “早 (Fast)”, “安 (Cheap)”, and “楽 (Easy)”.有料 (Charged): Route by car using toll roads一般 (Ordinary): Route by car using ordinary roadspTo store the route, select “ルートを登録 (Store route)”.8ルートを選択 (Select a route)ナビ・ルート確認 (Navi/Confirm route)ナビ (Navi) or ナビ(省電力) [Navi (power saver)]Navigation to the destination starts. pTo confirm the route, select “ルート確認 (Confirm route)”.pTo check the timetable, select “時刻表 (Timetable)”.■Route (Car)/Navigation (Car) View display and its operationpThe displays are for reference, so the actual ones might differ. © 2008 ZENRIN DataComThe route to the destination is displayed.Navigation (Car) View displayThe current location and proceeding direction is displayed.◆Key operation when using Navigation◆Key operation when the quick access menu appearsKey operation Actionl[メニュー (Menu)] Can end the Navigation program and shows the TOP menu.OoCan show the quick access menu. i[拡縮(Enlarge/Reduce)]Can show the scale bar. To display a large area, press Zo, and to display the details, press Xo. Press i[閉じる (Close)] to fix the reduced scale, and then to clear the bar.MoCan move the map up, down, left, and right.rCan return to the current location.2Can switch to the intersection mode. 5Can pause or start the Navigation program.aCan turn the map counterclockwise.0Can turn the map northward.sCan turn the map clockwise.Key operation ActionXo[結果&設定(Result&Settings)]Can show search results of routes (time, fare, and others), or sets the navigation.Co[経由地を設定(Point setting)]Can search for a route by adding up to three points you go through to the destination.Vo[リルート(Re-route)]Can re-search for a route from the current point to the destination.1[ルート消去(Clear route)]Can clear the displayed route.2[モード切替(Switch mode)]Can switch to the intersection mode.](https://usermanual.wiki/Panasonic-Connect/208006A.User-Manual-Part-2/User-Guide-920755-Page-84.png)
![285GPS Function<When the setting by service is “許可 (Accept)”>1When a location provision request arrivesOKpWhen you select “OK” or about three seconds elapse, the current location provision starts.pThe information of the service provider might not be displayed.pPress r to stop providing information. However, your location information might be sent depending on the timing.InformationpIf no keys are pressed for about 15 seconds from the Position Location Result display or the Failure display, the former display returns.pTo use “imadoco-search”, you need to set “位置情報利用設定(イマドコサーチ設定) [Location Information Usage Setting (imadoco-search Setting)] of “オプション設定 (Options)” of “料金&お申込・設定 (Bill & Subscription/Setting)” on iMenu.pTo use Provide Location, you might need to subscribe to a service provider which supports the Provider Location function or to pay the service fee.pEven when you send your location information, it might not be delivered to the service provider depending on the radio wave conditions.pWhen “Location request menu” is set to “OFF”, the location information is not displayed, and the request is rejected.pWhen you set, by GPS service settings, the location request to be checked every time, the location information is not provided on the location provision request during Public Mode (Drive Mode).pWhen you set, by GPS service settings, the location request to be accepted, the location information is provided with a display during Public Mode (Drive Mode) but the positioning tone, vibrator, and illumination do not work.pWhen you are requested to provide your location information from the other party using “imadocokantan search”, the confirmation display appears asking whether to send the current location information each time you receive a request. Select “YES” to immediately send the rough position location result. After selecting “YES”, the GPS Measuring display appears and the precise position location result is notified after GPS measuring. The rough position location result is notified even if you suspend the location providing during GPS measuring. In this case, it is stored in Location History but the location information is not displayed.You can notify a service provider of your current location.1mLifeKitGPSNotify of locationDirect inputEnter a party to be notifiedYESpYou can enter up to 12 digits by using numerals, # and :.pIf you have stored LCS clients by “Reg. LCS client” beforehand, you can select an LCS client from “View service clients”.pYou can press l() to stop measuring, but your current location might be notified depending on the timing.2OKpRegardless of the mode of 2in1, the location information can be searched for Number A only.When the other party searches you by your Number B, your current location is not provided and the searcher is notified that the search has failed. pA fee is not charged for using the Provide Location function.pFor using the service, refer to the information on your service provider or the DoCoMo web page.<Notify of Location>Notifying Location InformationInformationInformationpEven when you send your location information, it might not be delivered to the service provider depending on the radio wave conditions.pYou are charged a fee for using the function to notify your current location.](https://usermanual.wiki/Panasonic-Connect/208006A.User-Manual-Part-2/User-Guide-920755-Page-86.png)
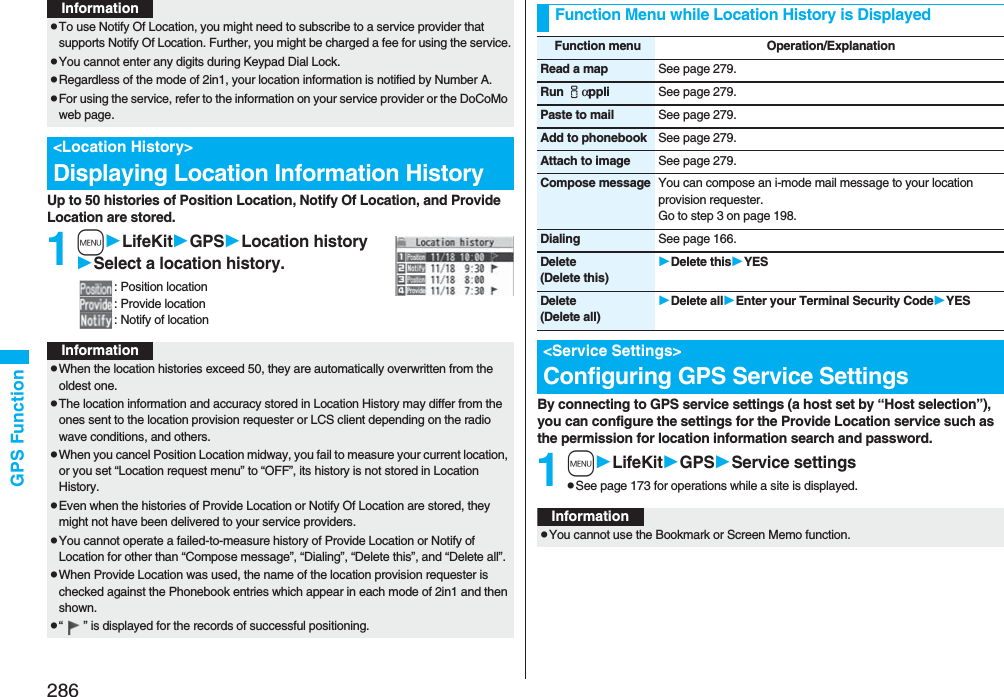


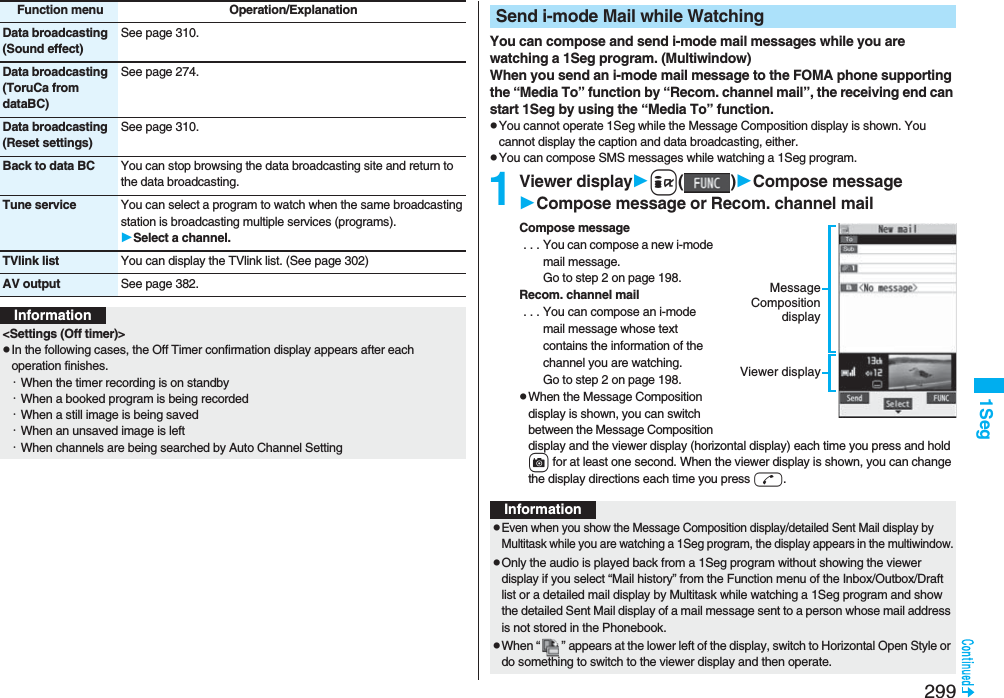
![3001SegThe ticker notifies you of the receiving of the i-mode mail message, SMS message, and Messages R/F. You can open the detailed Received Mail display while you are watching a 1Seg program. (Multiwindow)pYou cannot use this function when “Mail ticker display” is set to “OFF”.pYou cannot operate 1Seg while the detailed Received Mail display is shown. You cannot display the caption and data broadcasting, either.pYou can display SMS messages while watching a 1Seg program.1Receive i-mode mail while viewer display is shownPress l( ) while the ticker is displayed.pWhen the Detailed Received Mail display is shown, you can switch between the Detailed Mail display and the viewer display (horizontal display) each time you press and hold c for at least one second. When the viewer display is shown, you can change the display directions each time you press d.pIn B Mode of 2in1, you cannot compose/send i-mode mail message. (See page 456)Receive i-mode Mail while WatchingInformationDetailedReceivedMail displayViewerdisplayInformationpEven if “Mail ticker display” is set to “Sender+subject”, the titles are not displayed for Messages R/F, i-mode mail messages, and SMS messages received from the parties not stored in the Phonebook.pEven when you show the detailed Received Mail display by Multitask while you are watching a 1Seg program, the display appears in the multiwindow. However, you cannot show the viewer display and only the audio from a 1Seg program is played back when you display a mail message from a person whose mail address is not stored in the Phonebook.By using the Program Guide i-αppli, you can start 1Seg by selecting a program from the program guide, book programs, and set timer recordings. (See page 259)1m1SegProgram guide“Gガイド番組表リモコン (G Guide Program List Remote-controller)” starts.pPress l( ) from the display of “Gガイド番組表リモコン (G Guide Program List Remote-controller)” to watch the program currently broadcast on the selected channel.pFor details, refer to “Mobile Phone User’s Guide [i-mode] FOMA version”.pWhen the display is shown in the multiwindow, or when only audio from a 1Seg program is played back with the detailed Received Mail display shown, you cannot press +No to show other messages. However, you can press +No to show other messages when you select “Mail history” from the Function menu of the Inbox/Outbox/Draft list or the detailed mail display by Multitask while watching a 1Seg program.pWhen “ ” appears at the lower left of the display, switch to Horizontal Open Style or do something to switch to viewer display and then operate.<Program Guide i-αppli>Using Program Guide i-αppliInformationInformationpYou can set the Program Guide i-αppli by “Program guide key” of “Software setting”.pWhen you use “Gガイド番組表リモコン (G Guide Program List Remote-controller)” for the first time, you need to do initial settings.pThis software program is the i-αppli program that uses the mail function, so it is not available when the mode of 2in1 is set to B Mode.](https://usermanual.wiki/Panasonic-Connect/208006A.User-Manual-Part-2/User-Guide-920755-Page-101.png)

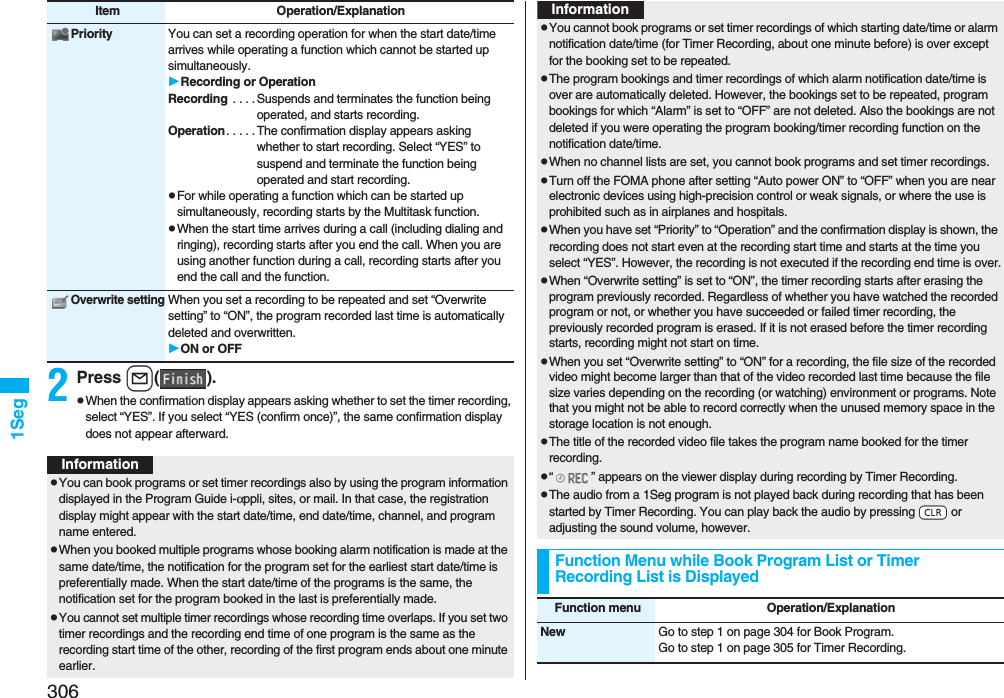
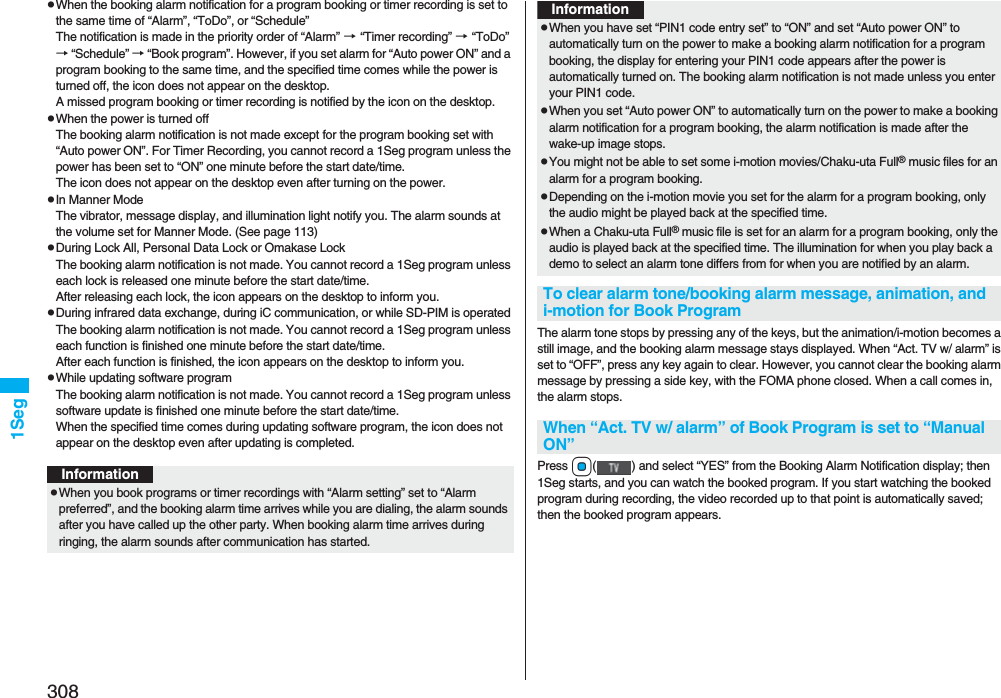
![3071SegThe icon appears on the desktop.“ ” . . . . Displayed when an alarm is set for today (except the setting for past time).“ ” . . . . Displayed when an alarm is set for tomorrow or onward only.pIf you set “Display setting”→“Clock”→“Clock display” to “OFF”, or set “Alarm” to “OFF” for a program booking, the icons are not displayed.Edit Go to step 1 on page 304 for Book Program.Go to step 1 on page 305 for Timer Recording.Sort You can change the display order.Select an order.Delete this YESDelete past You can delete the program bookings and timer recordings whose start date/time or end date/time is set for the past date/time.YESDelete selected Put a check mark for program bookings or timer recordings to be deletedl()YESDelete all Enter your Terminal Security CodeYESMemory info[Timer Recording list only]You can display the used memory space (estimate).When you set an alarm for “Book program” or “Timer recording”Function menu Operation/Explanation<Book Program>If you set “Act. TV w/ alarm” to other than “Auto ON”, the alarm sounds for about five minutes, and illumination lights. The vibrator works as the same setting for “Phone” of “Vibrator”. The set start date/time, channel, program name and an animation appear on the display.If you set “Alarm” to “ON” and “Act. TV w/ alarm” to “Auto ON”, 1Seg automatically starts when the specified time comes. The alarm does not sound.To end watching, press h and select “YES”.If you set “Off timer”, the confirmation display appears asking whether to continue watching when the specified time elapses. If you select “NO” or do nothing for about 15 seconds, 1Seg automatically terminates.<Timer Recording>About one minute before starting time, the alarm sounds for about two seconds, and illumination lights. The vibrator works as the same setting for “Phone” of “Vibrator”. The set start date/time, end date/time, channel, program name and an animation appear on the display, then the viewer display appears. If you do nothing for about one minute after the recording starts, the Stand-by display appears. If the timer recording has started with the FOMA phone closed, you can show the viewer display by opening the FOMA phone. If the FOMA phone is opened, you can show the viewer display by re-opening the FOMA phone or by pressing x and selecting “Activate 1Seg”.To end video recording by Timer Recording and save video, press p on the viewer display. In Video Mode, you can end the video recording and save video also by pressing Oo ( ) and selecting “YES”.pDuring a callThe alarm sounds from the earpiece.pDuring operations<Book Program>When “Alarm setting” is set to “Operation preferred”, the booking alarm notification is made only when the Stand-by display is shown. When it is set to “Alarm preferred”, the booking alarm notification is made even while you are operating another function or during a call. (See page 416)<Timer Recording>Timer Recording works according to the setting of “Priority” (see page 306). However, Timer Recording might not work when you are reading to/writing from the microSD card, or accessing the Data Storage Center.When the time specified for “Book program” or “Timer recording” comes](https://usermanual.wiki/Panasonic-Connect/208006A.User-Manual-Part-2/User-Guide-920755-Page-108.png)
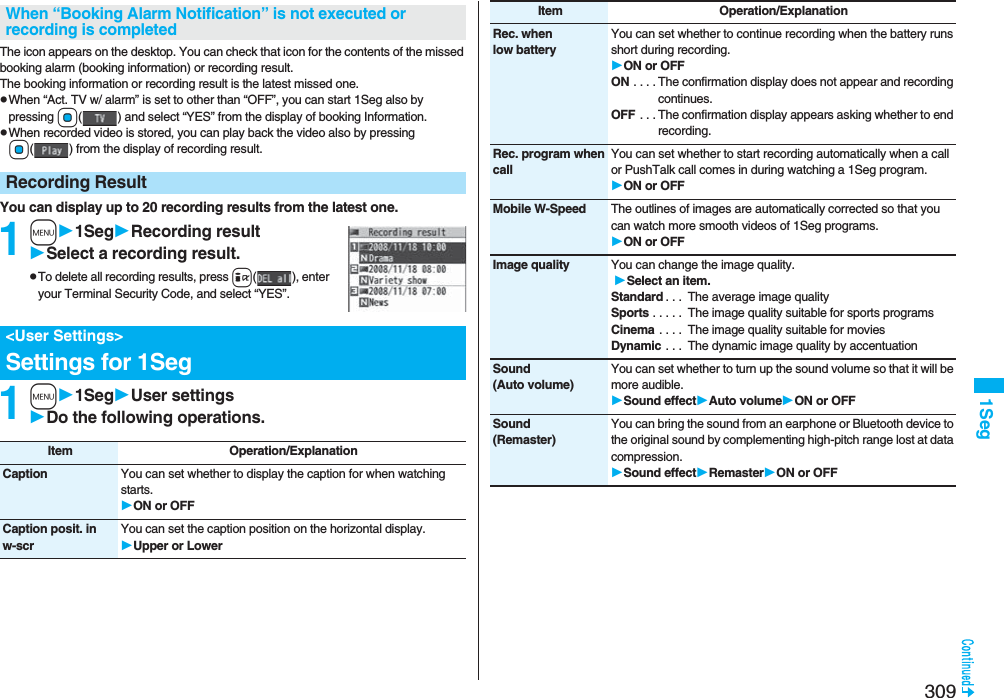


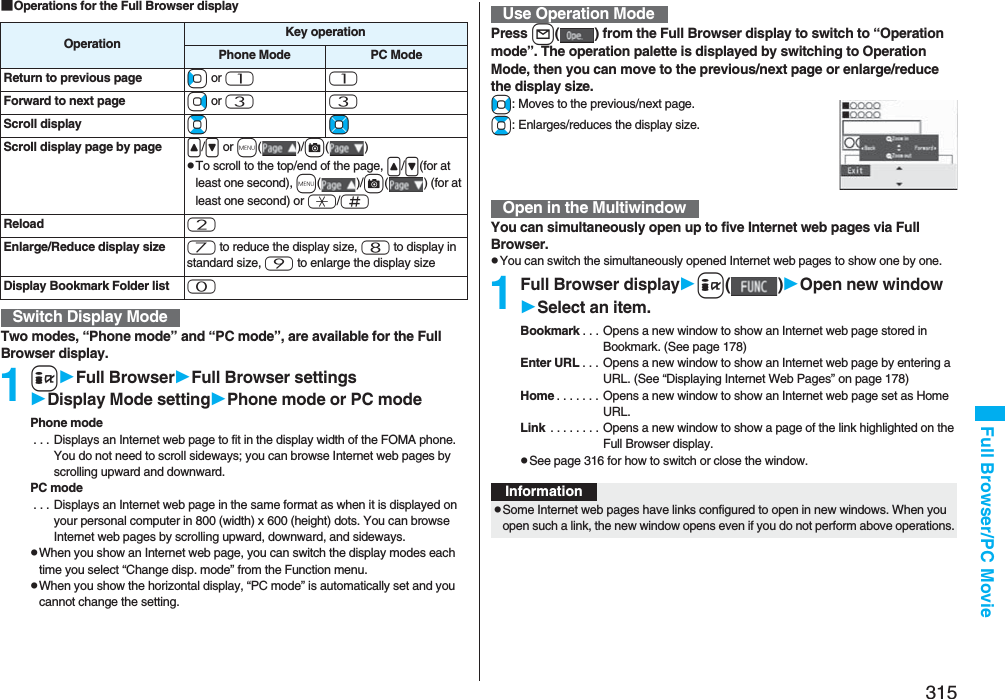
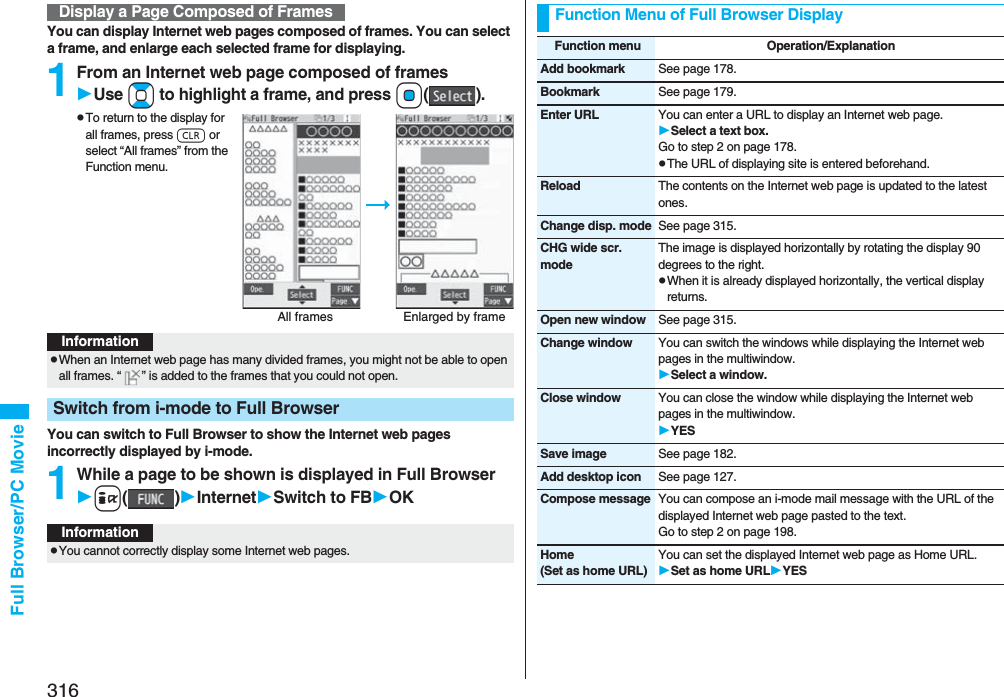
![314Full Browser/PC Movie You can browse Internet web pages designed for PCs using the Full Browser function. You can display even the Internet web pages that cannot be correctly displayed by i-mode. However, you cannot display or correctly display some Internet web pages.If you change the style while running Full Browser, the display automatically switches between the vertical display and the horizontal display. However, the display might not switch automatically during data communication or while a message is shown. When you switch it manually, select “CHG wide scr. mode” from the Function menu.pThe data such as Home URL or Bookmarks registered via Full Browser cannot be used via i-mode. The contents set by Full Browser are invalid for i-mode, either.pNote that you are charged a high communication fee for the massive data communication such as browsing Internet web pages having many images or downloading data files. For details on the packet communication fee, refer to “Mobile Phone User’s Guide [i-mode] FOMA version”.pYou can browse Internet web pages composed of frames. You can select a frame to display it as well. (See page 316)pYou can display SSL/TLS※-compatible pages via Full Browser.※SSL and TLS are the methods of safer data communication using authentication/encryption technology to protect your privacy. SSL/TLS pages prevent eavesdropping and information alteration during communication by exchanging encrypted data files. Further, server authentication prevents web spoofing, thus making your personal information such as credit card number or postal address exchanged safer.<Full Browser>Displaying Web Pages Designed for PC1iFull BrowserSelect an item.Home. . . . . . . . . . . . Displays an Internet web page set as Home URL.Bookmark. . . . . . . . Displays an Internet web page stored in Bookmark. (See page 178)Last URL. . . . . . . . . Displays an Internet web page you viewed last time.Go to location . . . . Displays an Internet web page by entering a URL. (See “Displaying Internet Web Pages” on page 178)Full Browser settings. . . . . . . . . . . . . . . . . Configures Full Browser settings. (See page 317)pWhen “Access setting” is set to “No”, the confirmation display appears asking whether to start Full Browser. Highlight “Yes” and select “OK” to switch setting of “Access setting”, then Full Browser starts up.pTo end Full Browser, press h with an Internet web page displayed and select “YES”.…: Displaying in the multiwindow…Window number/Number of windows…: During communication in another window: During communication in another frame…: Phone Mode: PC Mode…: Displaying an enlarged frameInformationpIt may take long to display some Internet web pages.pYou cannot use the following functions on Full Browser:・Phone To function ・Screen memos・Flash movies ・PDF filesFull Browser DisplayFull Browser Display](https://usermanual.wiki/Panasonic-Connect/208006A.User-Manual-Part-2/User-Guide-920755-Page-115.png)
![320Full Browser/PC Movie By using high speed communication, you can play back smooth and high-quality PC movies provided by portal sites, movie specialty sites and other sites on the Internet.pPC Movie Player supports playback of Windows Media® Video.pWhen downloading or streaming a PC movie, you might receive a bulky size of file. Note that you are charged a high packet communication fee for a bulky sent/received file such as a streaming type file whose size is not limited. For the details of the packet communication fee and billing plan, refer to “Mobile Phone User’s Guide [i-mode] FOMA version”.pThe distribution server for streaming type supports Windows Media Services 4.1 and Windows Media Services 9. You cannot play back a streaming type of PC movie distributed from other than Windows Media Services 4.1 and Windows Media Services 9.pSome sites check the operating environment (browser type, OS type, etc.) are checked and you might not be able to play back PC movies.pSee page 323 for the supported file format of PC movies.What is PC Movie?Categories DescriptionType Playback typeStreaming type(cannot be saved)Plays back while obtainingYou can play back a PC movie while obtaining it. A long time playback is available.Download type(can be saved)Plays back while obtainingWhen “PC Movie auto-play” is set to “ON”, you can play back a PC movie while obtaining it. You can save it to the microSD card after download and play it back without re-connection. Up to 10 Mbytes of a file can be downloaded.Plays back a file saved to the microSD cardTo the microSD card, you can save not only data files obtained by the FOMA phone but also PC movies obtained or created on a personal computer, and then play them back. You can save a bulky file of up to the space size of microSD card.1Select a PC movie from a PC movie obtainable siteYESSee page 322 for the operation during playback.pAmong the PC movies protected by the license, you can play back the streaming type of PC movies only. You cannot play back the download type of PC movies protected by the license.pYou might not be able to play back PC movies depending on the license setting of the PC movies.pIf files are stored to the maximum when you try to obtain a license to save it to the FOMA phone, the confirmation display appears asking whether to delete currently stored licenses to save a new one. Select “YES” to delete all the stored licenses to save it. You need to obtain a license again to play back a PC movie whose license is deleted.Downloading PC MoviesPlaying Back a Streaming Type of PC MovieAbout license (Windows Media DRM)](https://usermanual.wiki/Panasonic-Connect/208006A.User-Manual-Part-2/User-Guide-920755-Page-121.png)
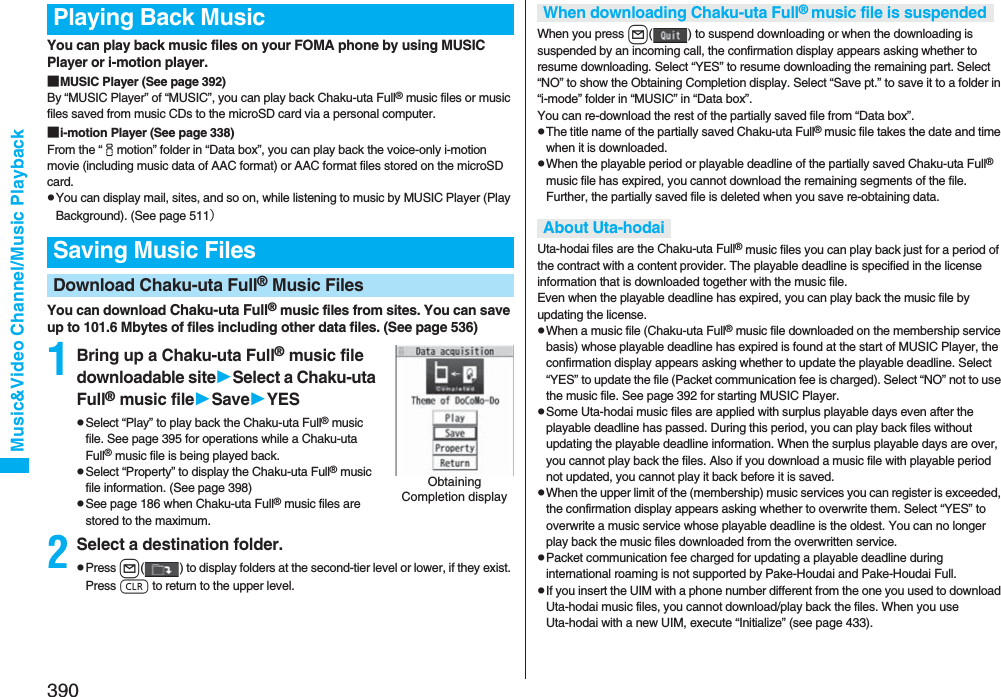
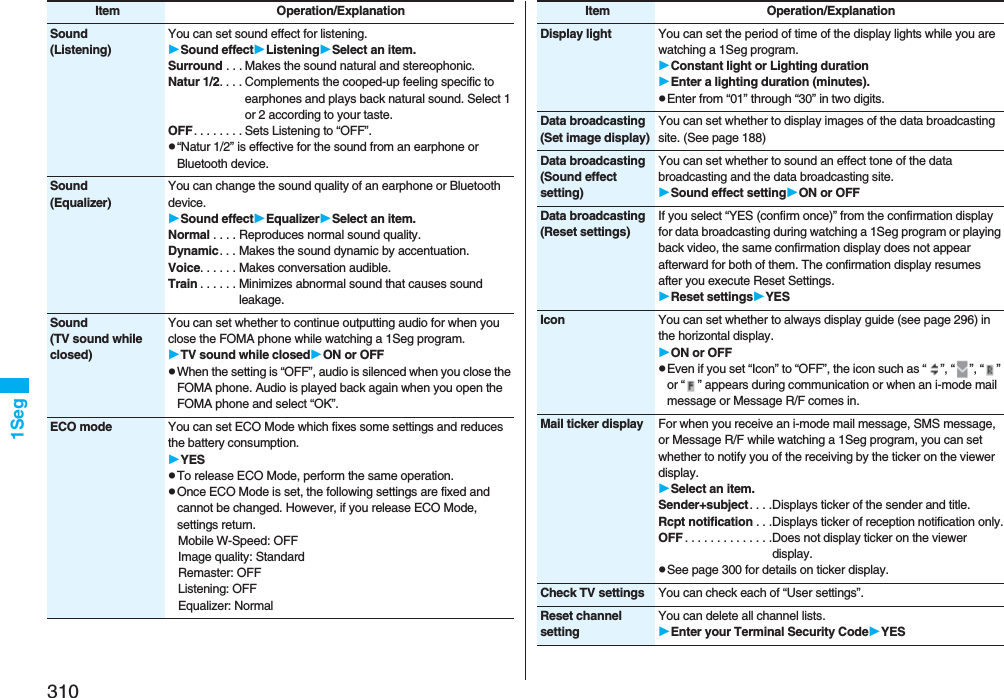
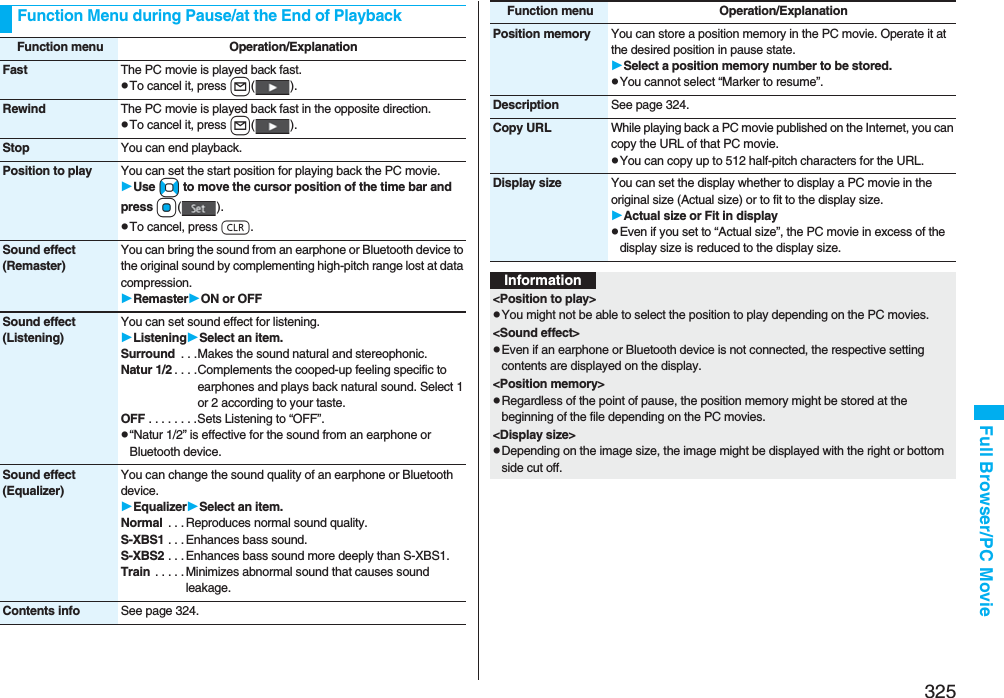
![322Full Browser/PC MovieYou can play back moving images published on the Internet for personal computers or PC movies saved to the microSD card via a personal computer, etc.PC movie is played back in the horizontal display in Horizontal Open Style. You can switch the style during playback.pYou can play back the sound of moving images from a commercial Bluetooth device. (See page 431)1mData boxPC Movie2microSDSelect a folderSelect a file.pWhen you press and hold p for at least one second during playback, pause, or halt, or press h, PC Movie Player ends. It ends even when you play back during obtaining.■Operations while playing back a PC moviepSee page 325 for when you operate from the Function menu.<PC Movie Player>Playing Back PC Movies from Data BoxPC Movie Type Selection displayPC Movie Folder list PC Movie listOperation Key operationPause※1Oo() or ppOo() or p to play backFast forward※1l()pl( ) to play backDisplay next file※2※3VoDisplay previous file※2※3Co※4※1 You might not be able to operate this for some PC movies.※2 You cannot operate this for a streaming type of PC movie, or when you are playing back a PC movie while obtaining it. You cannot operate this when you play back an obtained but unsaved PC movie from the Obtaining Completion display, either.※3 The files are displayed in the order on the PC Movie list. You can operate this when you play back from the PC Movie list. However, PC movies in WVX, ASX, and WAX formats are skipped.※4 When three seconds have elapsed after starting playback, this operation returns the position to the beginning of the file. However, you might not be able to operate this for a streaming type of PC movie or when you are playing back a PC movie while obtaining it.※5 You cannot operate this during fast-rewinding.※6 The horizontal display is valid only for the current display of playback display. When you close the playback display, the vertical display returns.Select position to play※1※5Press and hold No.Sound volume adjustment Bo or </>pPress and hold to adjust the sound volume sequentially.pSetting from Level 0 (Silent) through 25 is available.Mute i()pi( ) or adjust the sound volume to play back soundSwitch vertical display/horizontal display※6※7[Normal Style only]c()pEach time of pressing switches display direction.Icon[Horizontal Open Style only]m※8pEach time of pressing switches whether to display icons and navigations.Remaster 9pEach time of pressing switches between “ON” and “OFF”.Listening 8Each time of pressing switches in order of “OFF” → “Surround” → “Natur1” → “Natur2”.Equalizer 7pEach time of pressing switches in order of “Normal” → “S-XBS1” → “S-XBS2” → “Train”.Operation Key operation](https://usermanual.wiki/Panasonic-Connect/208006A.User-Manual-Part-2/User-Guide-920755-Page-123.png)


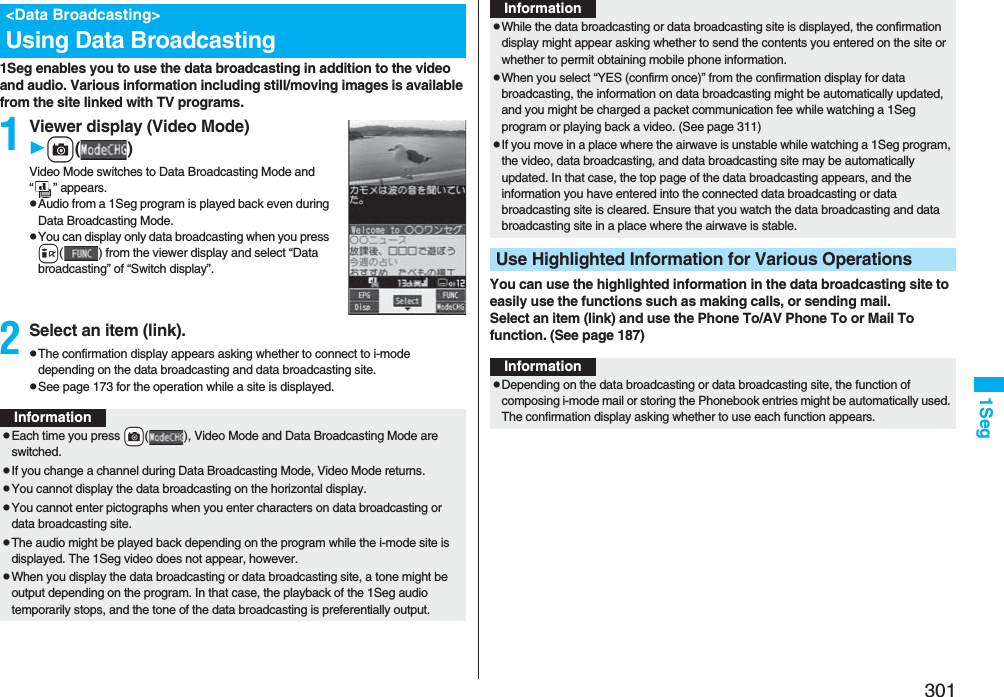
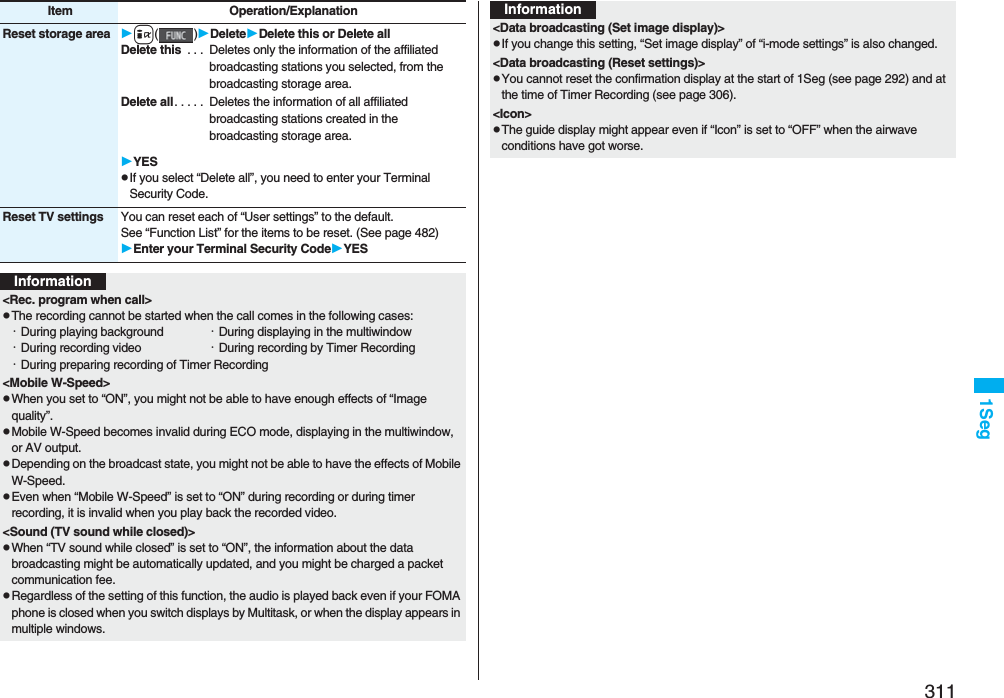
![329Data Display/Edit/Management※1 The folder names can be changed by “Edit folder name”. Deco-mail pictograms are directly saved to these folders, and files other than Deco-mail pictograms cannot be saved to them.※2 The folder names you have entered for “Add folder” are displayed.※3 Includes the music files in AAC format.Playlist Playback of playlistSearch by i-mode Connects to the data site.microSD Melody Melodies copied from the FOMA phoneMovable contents Copyrighted melodies moved from the FOMA phoneMy documentsi-mode Downloaded PDF files, etc.microSD PDF files downloaded or copied from the FOMA phoneKisekae ToolSearch by i-mode Connects to the data site.microSD Kisekae Tool files downloaded, or moved from the FOMA phoneChara-denPre-installed or downloaded Chara-den imagesPC MoviemicroSD PC movies downloaded, or saved by personal computerPosition memory Playback of marker positionPlayed history Playback histories of PC movies1SegImage Still images recorded by 1SegVideo Video recorded by 1Seg, and copyright-protected and 1Seg compatible moving images made with other AV devicesPosition memory Playback of marker positionDocument viewerDocument files saved from mail (attached files)SD other filesSD others Incompatible files saved from mail (attached files), or files in BMP or PNG format obtained by Full Browser■Icons in the File listFile TypeTitle namePictureIcon Type File formatStill image JPEGStill image with location information JPEGStill image/Animation image GIFFrame GIFMarker stamp GIFCushy mark GIFFlash movie SWFi-motion movie MP4(AMR)i-motion movie MP4(AAC)i-motion movie MP4(AAC+[HE-AAC])i-motion movie MP4(Enhanced aacPlus)i-motion movie ASFVideo MPEG2-TSVideo already viewed MPEG2-TS※Video not viewed yet MPEG2-TSPartially saved i-motion movie —Melody SMFMelody MFiComplete PDF file PDFPartial PDF file PDFIncomplete PDF file PDFDamaged PDF file PDF](https://usermanual.wiki/Panasonic-Connect/208006A.User-Manual-Part-2/User-Guide-920755-Page-130.png)
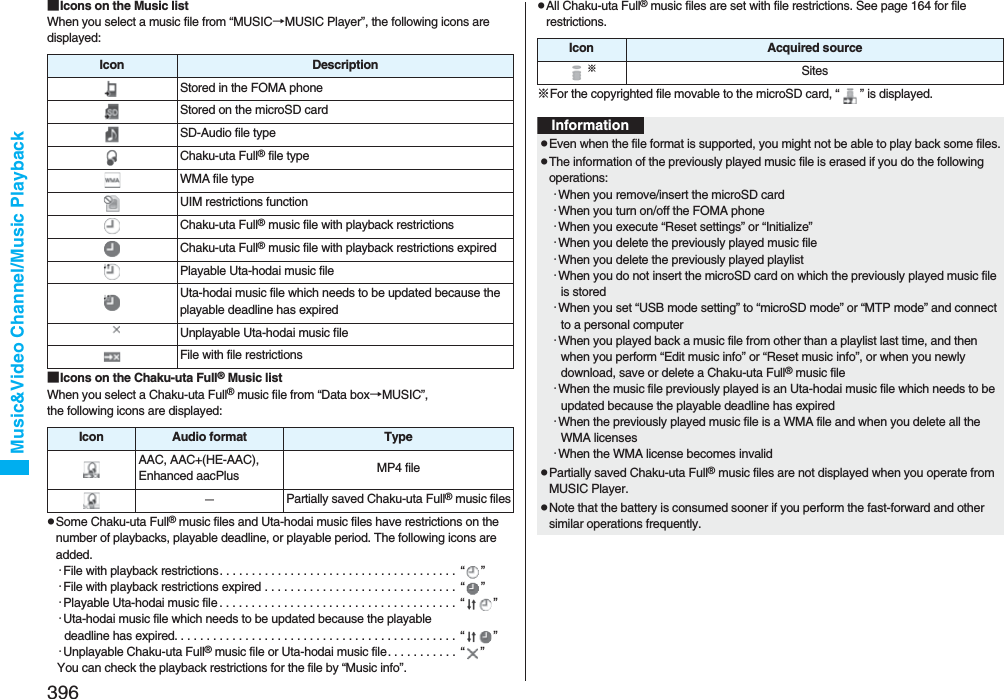
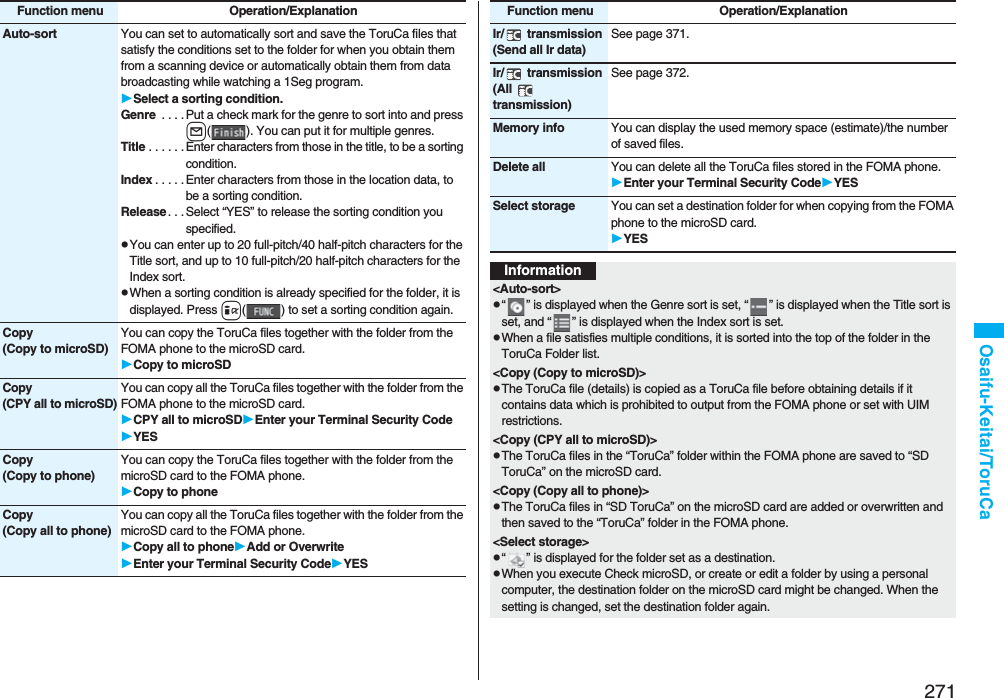
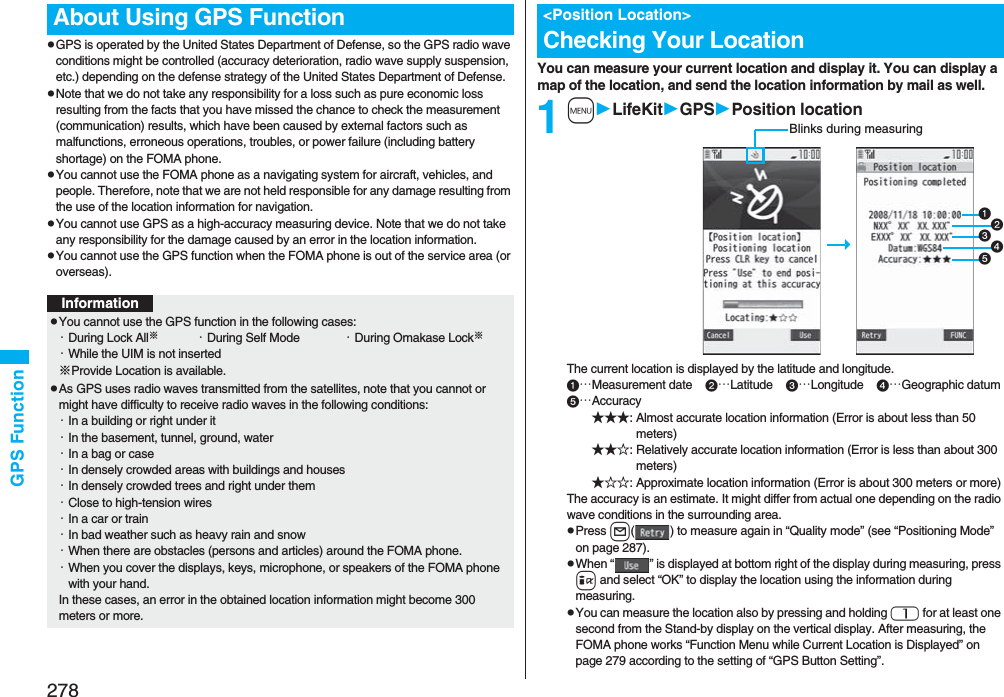
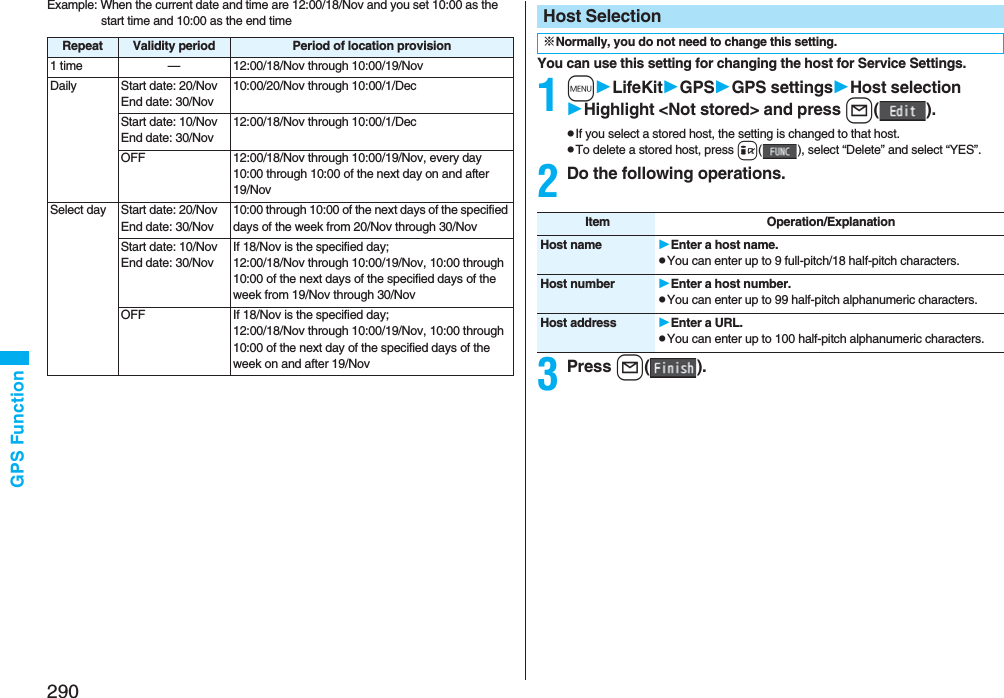
![331Data Display/Edit/Management■Operations when playing back still imagespSee page 334 for when you operate from the Function menu.※1 Files are displayed in the order on the Still Image list.※2 You cannot operate depending on the image size or file format.※3 Even if you set the icons not to be displayed, the icon such as “ ”, “ ”, “ ” or “ ” appears during communication or when an i-mode mail message or Message R/F comes in.■Specifications for playing back still image files※1 The types of JPEG file you can play back are Baseline and Progressive of the Exif/CIFF/JFIF format.※2 For the file in the progressive format, you can display the file of VGA (640 x 480) size or smaller.pYou cannot display some files even if their file formats are supported.Operation Key operationDisplay the next file※1VoDisplay the previous file※1CoZoom (Enlarge/Reduce)※2Oo()pi() or l( ) to display enlarge/reduce during zoomingpOo( ) to return to the former fileIcon[Horizontal Open Style only]m※3pEach time of pressing switches whether to display icons and navigations.File format JPEG※1, GIF, FlashExtension jpg, gif, swf, ifmPixels Files of 5M (2592 x 1944) size or smaller※2File size Still images of 2 Mbytes or lessFunction Menu of the Still Image ListFunction menu Operation/ExplanationEdit picture See page 335.Edit title Enter a title.pFor a file in the FOMA phone, you can enter up to 9 full-pitch/18 half-pitch characters.pFor a file on the microSD card, you can enter up to 18 full-pitch/36 half-pitch characters.Display picture You can display the image.Set displayYou can paste the image to the Stand-by display and other displays for displaying.See “Positioning” for the position to which you paste the still image.Select the display you paste it to.p“★” is displayed for the pasted items but not for the videophone related items other than “Videophone dial” or “V.phone incoming” even if already pasted.pIf you select the videophone related items other than “Videophone dial” or “V.phone incoming”, an appropriate message is displayed at the center of the still image.Picture info You can display the still image title, file name and others.pThe item of “Set display” only is displayed for “Picture info” of original animations.Location info(Attach location)Attach locationSelect an item.By position loc.. . . Measures the current location and store the location information. After checking the location information, press Oo().From loc. history. . . Select a piece of location information from Location History and store it.From phonebook. . . Select a Phonebook entry which contains the location information for storing.pTo delete the stored location information, select “Delete loc. info”.pWhen you press i( ) during measuring the current location, the confirmation display appears asking whether to display the result obtained so far from the location information.pTo cancel measuring the current location, press r or l().pPress l( ) from the confirmation display for the location information to restart measuring in “Quality mode”.Function menu Operation/Explanation](https://usermanual.wiki/Panasonic-Connect/208006A.User-Manual-Part-2/User-Guide-920755-Page-132.png)
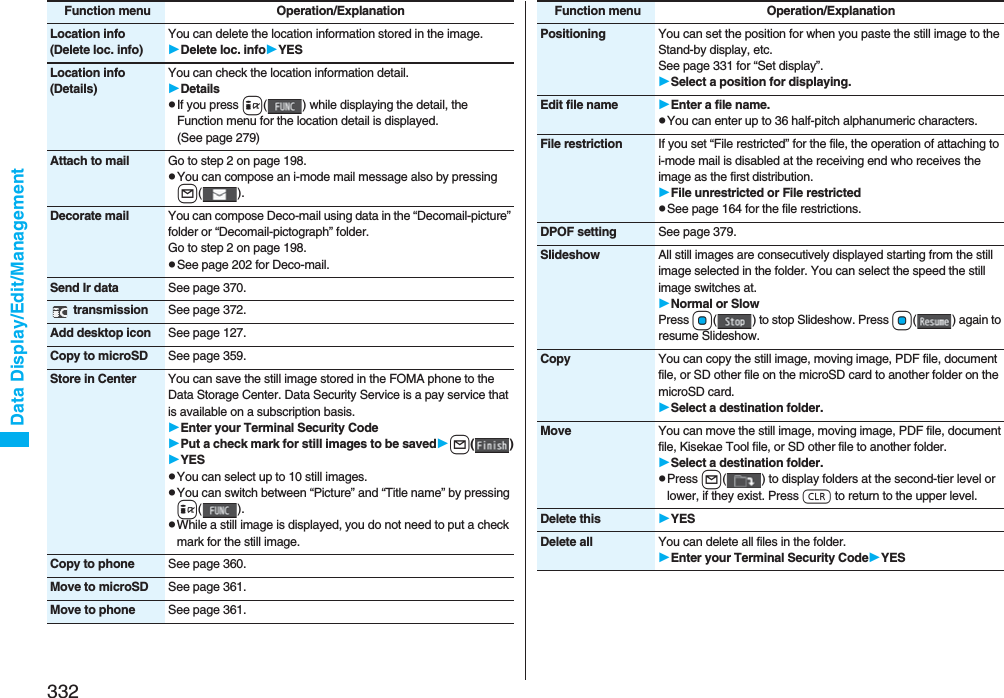
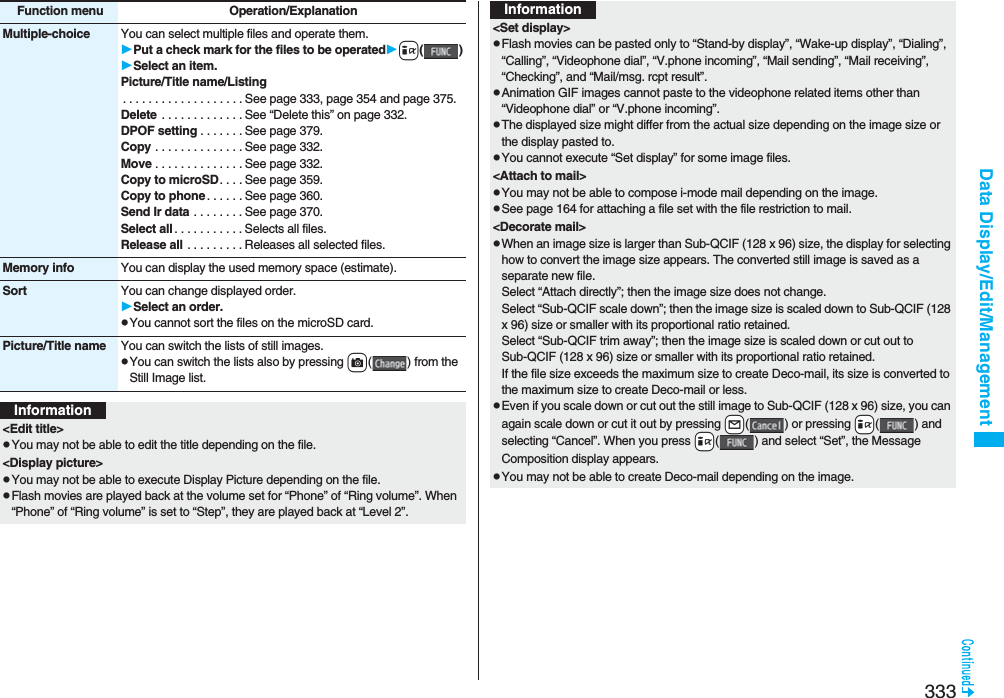
![334Data Display/Edit/Management<Store in Center>pYou cannot save the following still images:・Images whose sizes exceed 100 Kbytes・Images whose output from the FOMA phone is prohibited・Images other than in JPEG or GIF formatpYou cannot use Data Security Service when you are out of the service area.pWhen you have not signed up for Data Security Service, the message to that effect appears.pYou can download the saved still images from the Data Storage Center site to your FOMA phone. For details, refer to “Mobile Phone User’s Guide [i-mode] FOMA version”.<Edit file name>pYou may not be able to edit the file name depending on the file.pYou cannot use half-pitch space for the file name.<File restriction>pYou may not be able to set the file restrictions depending on the file.<Slideshow>pFlash movies are not displayed.pThe time interval to show the images might differ depending on the image.<Copy> <Move>pIf a call comes in while copying/moving multiple files, copying/moving is canceled even midway.<Delete this> <Delete all>pIf a call comes in while deleting multiple files, deleting is canceled.<Multiple-choice>pYou can select up to 3,500 still images, moving images, melodies, PDF files and Kisekae Tool files, and up to 100 videos, document files and SD other files.<Picture/Title name>pWhen you use “Picture” to display still images, some images may appear different.InformationFunction Menu while Playing Back Still ImageFunction menu Operation/ExplanationEdit picture See page 335.Set display See page 331.Picture info See page 331.Location info(Attach location)See page 331.Location info(Delete loc. info)See page 332.Location info(Details)See page 332.Attach to mail See page 332Decorate mail See page 332.Send Ir data See page 370. transmission See page 372.Display size You can set whether to display the still image in original size (normal size) or to fit to the display size.Normal or Fit in displaypEven if you set to “Normal”, the still image in excess of the display size is reduced to the display size. Also, when the still image is QCIF (176 x 144) size or smaller, it is doubled at both lengthwise and sidewise to be displayed.Add desktop icon See page 127.Copy to microSD See page 359.Store in Center See page 332.Copy to phone See page 360.Positioning See page 332.DPOF setting See page 379.Delete See “Delete this” on page 332.](https://usermanual.wiki/Panasonic-Connect/208006A.User-Manual-Part-2/User-Guide-920755-Page-135.png)
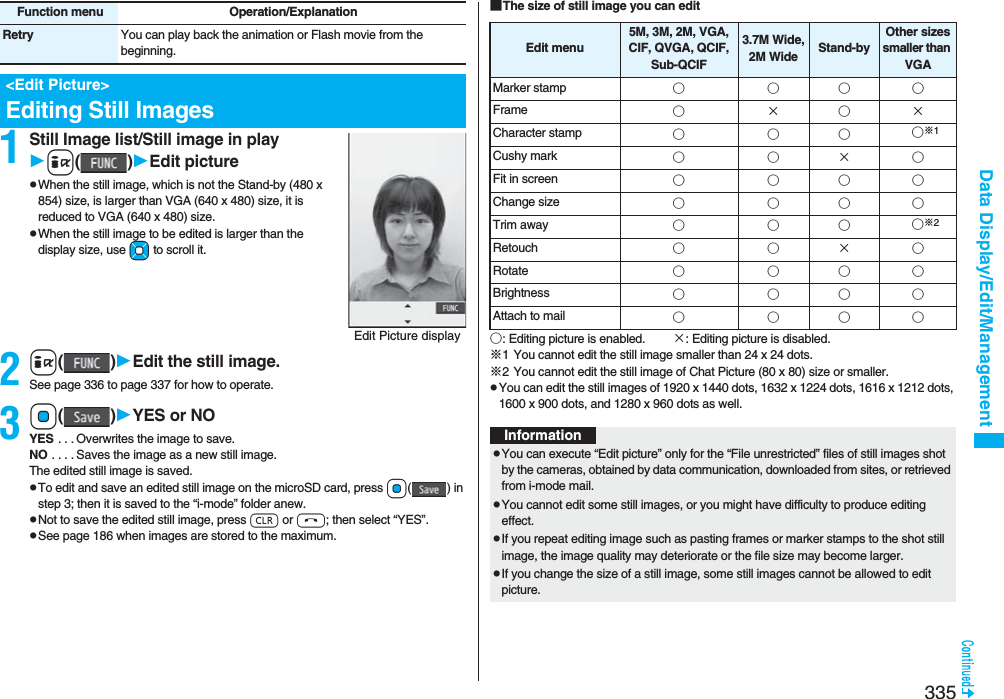

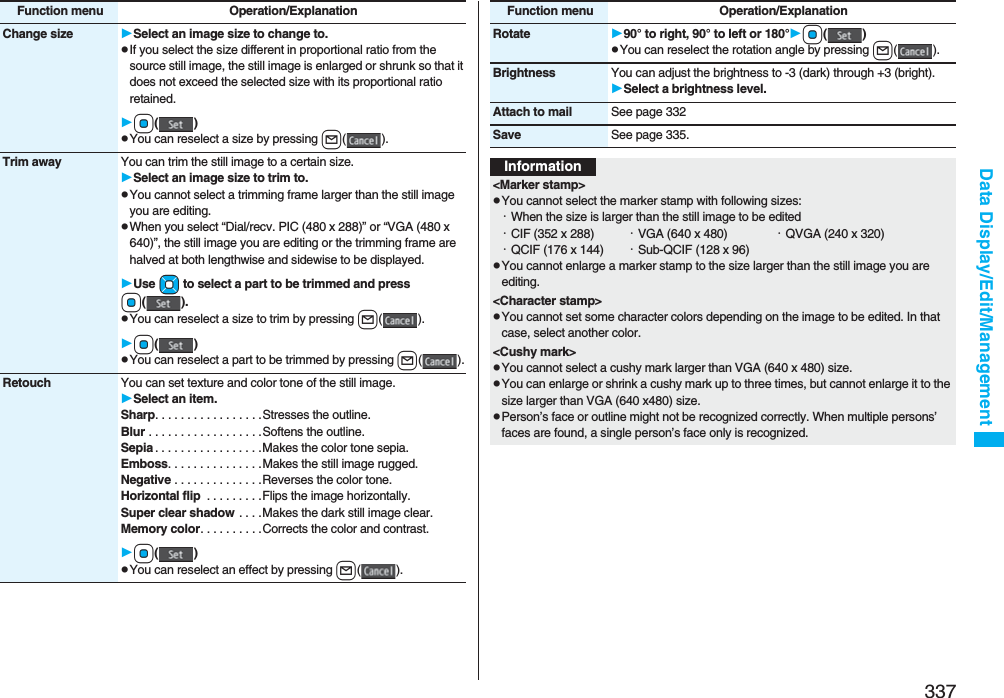
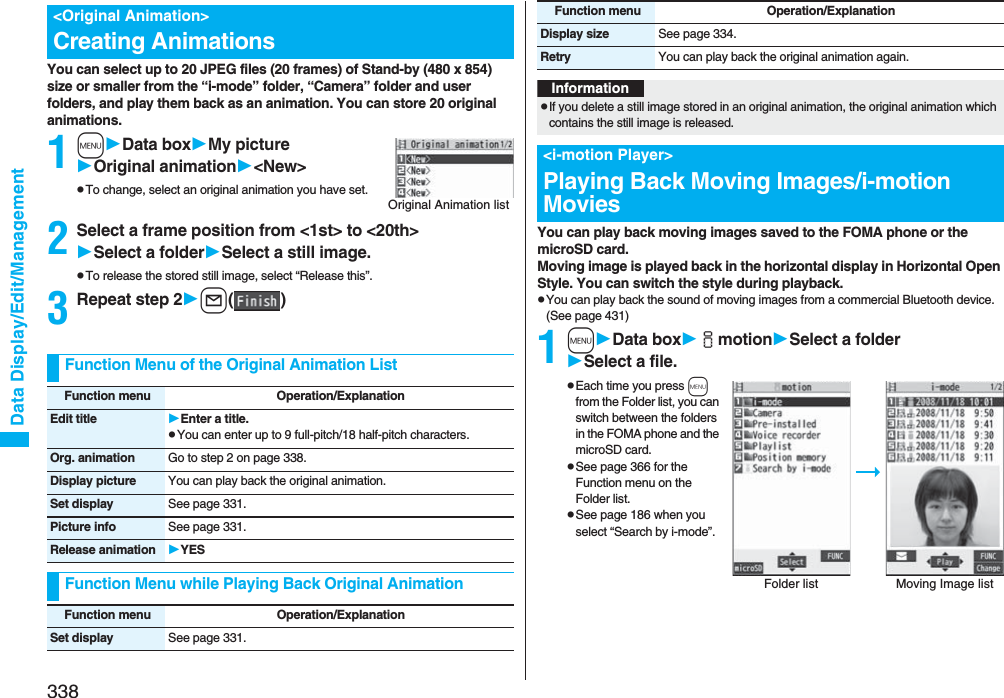
![339Data Display/Edit/ManagementpThe following images are displayed when you cannot display the preview images:pWhen you select a folder or i-motion movie from another function, some folders or i-motion movies may not be displayed depending on the function. You may be able to confirm the i-motion movie by pressing l( ) while selecting an i-motion movie.pDepending on the i-motion movie, you can play back by selecting a chapter set for the i-motion movie. (See page 341)■Operations when playing back moving imagepSee page 341 for when you operate from the Function menu.Cannot be played backPlayback restrictions have expired, and the like.No preview imagesIncompletedownloadOperation Key operationQuick View l( ) (See page 341)Mute i()pi( ) or adjust the sound volume to play back soundPause※1Oo()pOo( ) to resumePlay back frame by frame※2l( ) during pausepEach time of pressing proceeds frame by frame.Sound volume adjustmentBo or </>pPress and hold to adjust the sound volume sequentially.pSetting from Level 0 (Silent) through 6 is available.Display next file or chapter※3VoDisplay previous file or chapter※3CopWhen playback time is over three seconds, you go back to the beginning of the file. (You go back to the top of the chapter for the file with chapters.)Search (fast forward)※2Press and hold Vo.Search (fast rewind)※2Press and hold Co.Change vertical disp./horizontal disp./full disp.[Normal Style only]c()pEach time of pressing switches display format.※1 You cannot operate this for a streaming type of i-motion movie.※2 You cannot operate this for a streaming type of i-motion movie, or when you are playing back an i-motion movie while obtaining it. Further, you might not be able to operate this depending on the i-motion movie.※3 Moving images having no chapters are switched in the order on the Moving Image list. This operation is available when you play back from the Moving Image list. Moving images having chapters are switched in the order that the chapters are stored.※4 Even if you set the icons not to be displayed, the icon such as “ ”, “ ”, “ ” or “ ” appears during communication or when an i-mode mail message or Message R/F comes in.■Specifications for moving image playbackpEven when the file format is supported, you might not be able to play back some files.Icon[Horizontal Open Style only]m※4pEach time of pressing switches in order of “Display icons and navigations” → “Nondisplay icons and navigations” → “Full display”.Remaster 9pEach time of pressing switches between “ON” and “OFF”.Listening 8pEach time of pressing switches in order of “OFF” → “Surround” → “Natur1” → “Natur2”.Equalizer 7pEach time of pressing switches in order of “Normal” → “S-XBS1” → “S-XBS2” → “Train”.Operation Key operationFile format MP4, ASFCoding system MP4 file Image: MPEG4, H.263, H.264Audio: AMR, AAC, AAC+ (HE-AAC), Enhanced aacPlusASF file Image: MPEG4Audio: G.726Pixels MPEG4: Files of VGA (640 x 480) size or smallerH.263: Files of Sub-QCIF (128 x 96) or QCIF (176 x 144) size onlyH.264: Files of QVGA (240 x 320) size or smallerExtension sdv, 3gp, mp4, asf](https://usermanual.wiki/Panasonic-Connect/208006A.User-Manual-Part-2/User-Guide-920755-Page-140.png)
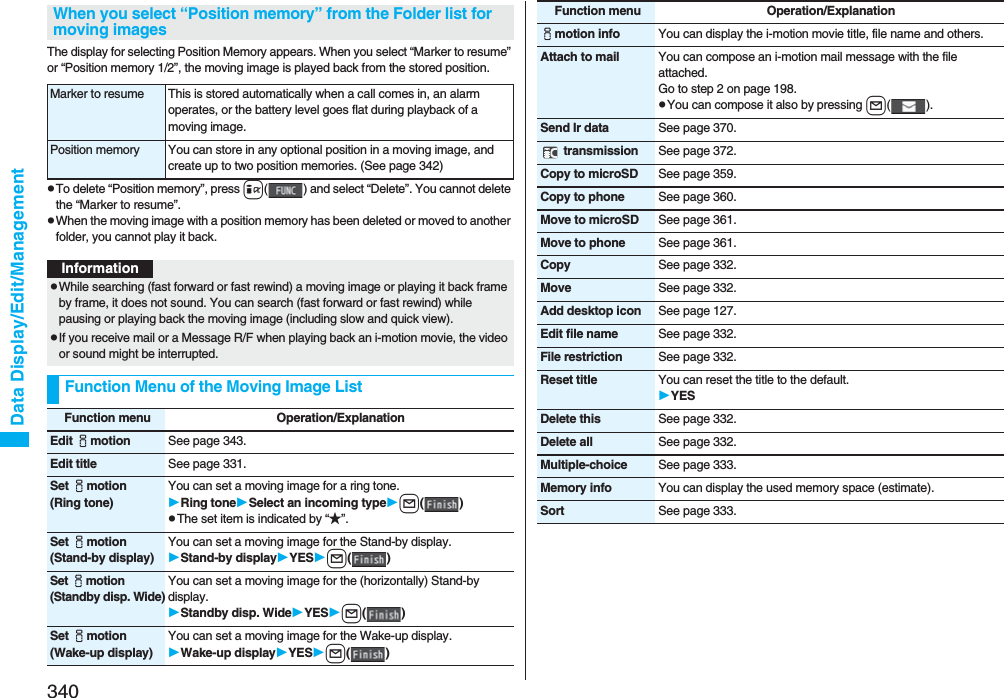
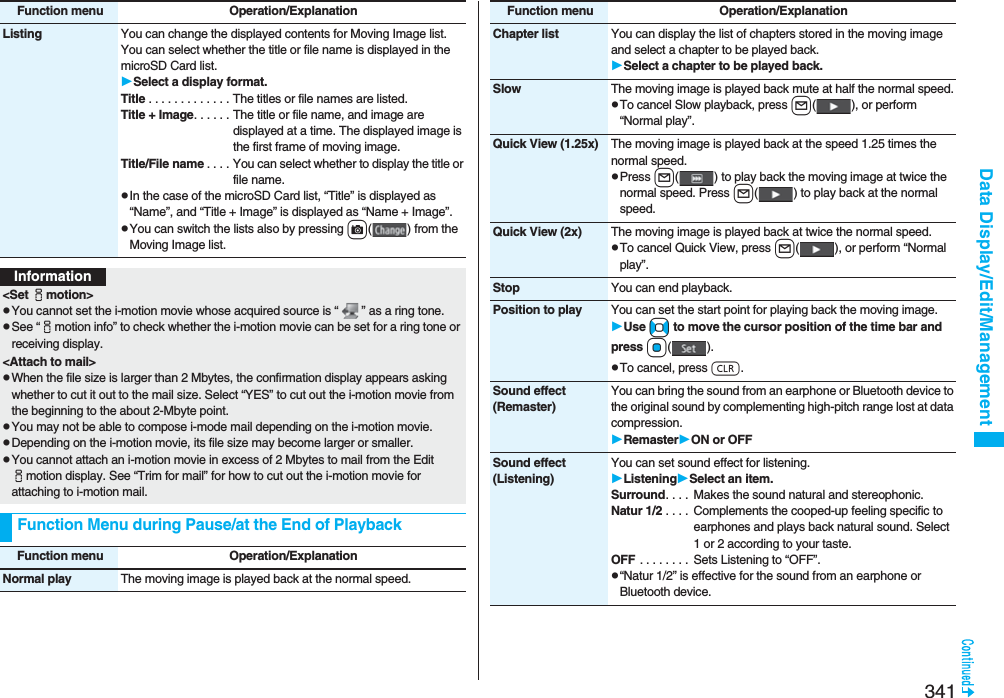
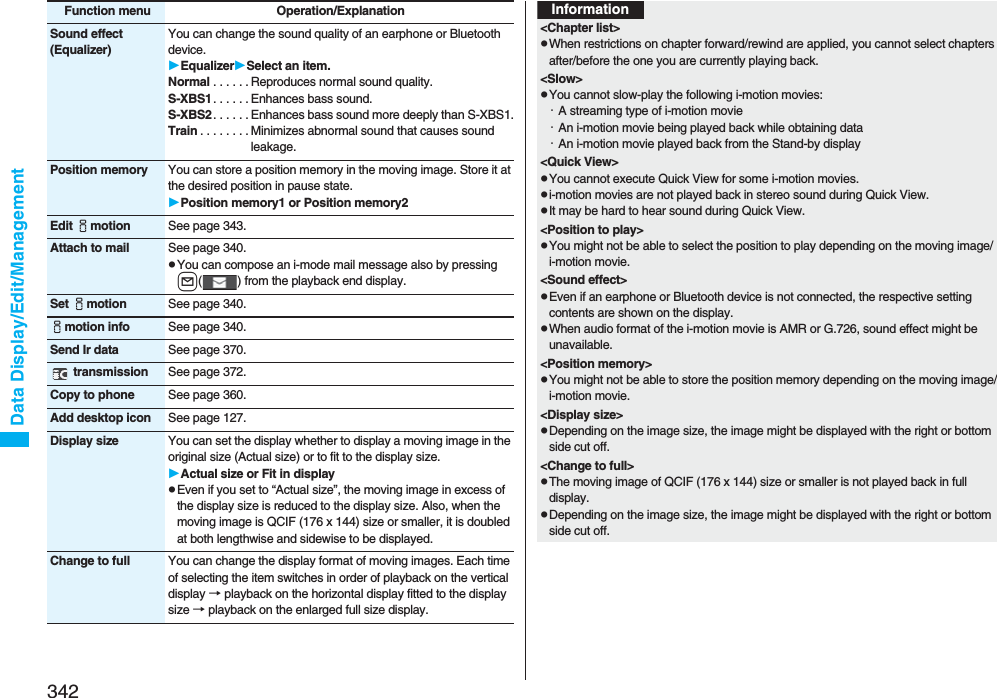
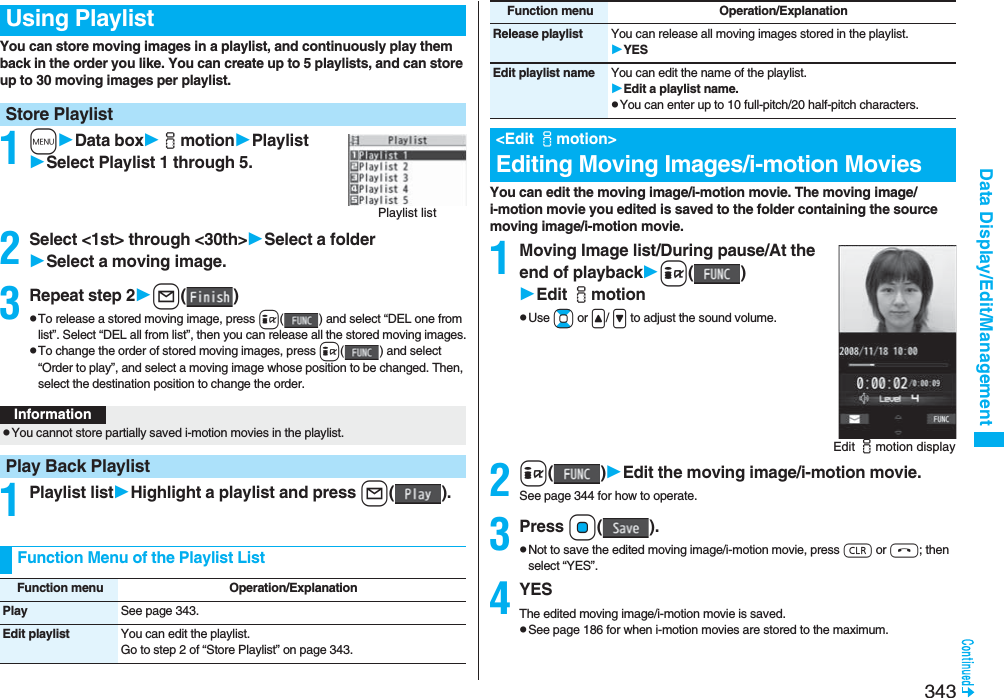
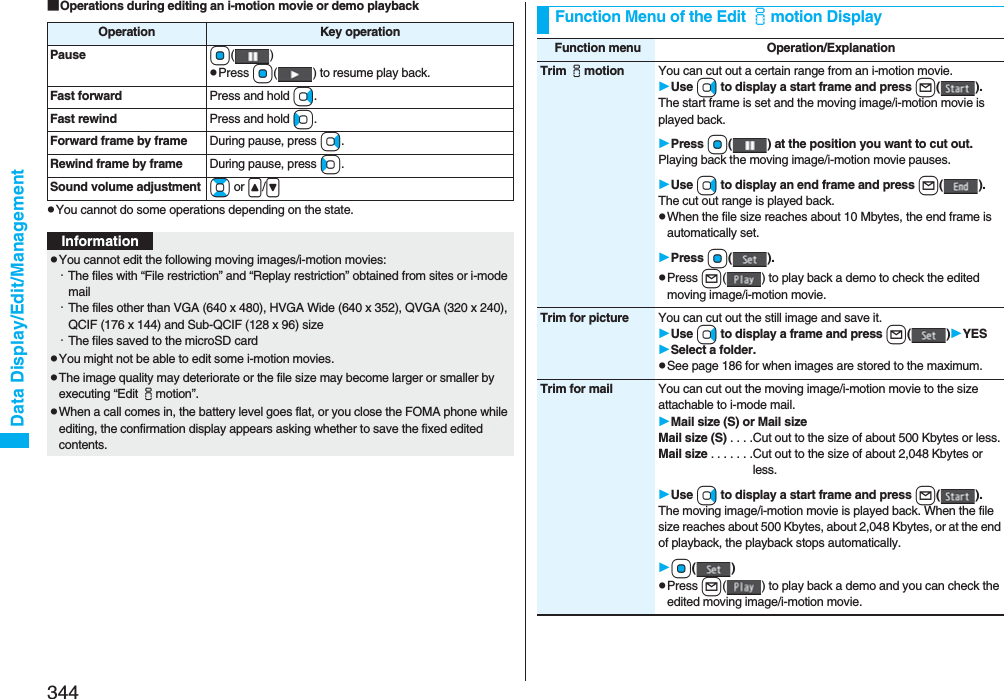
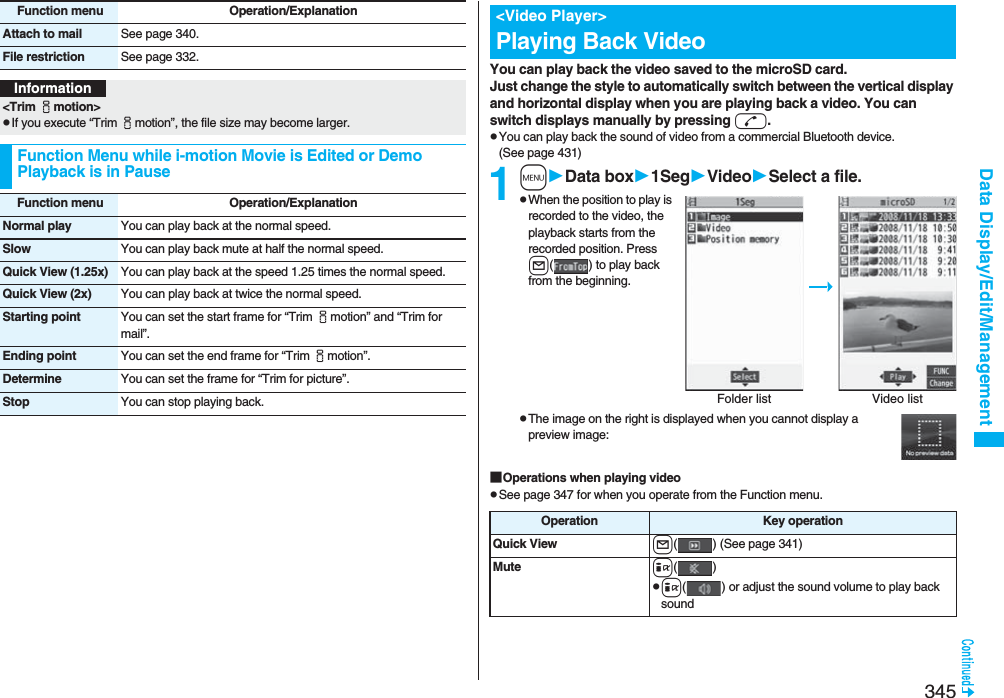

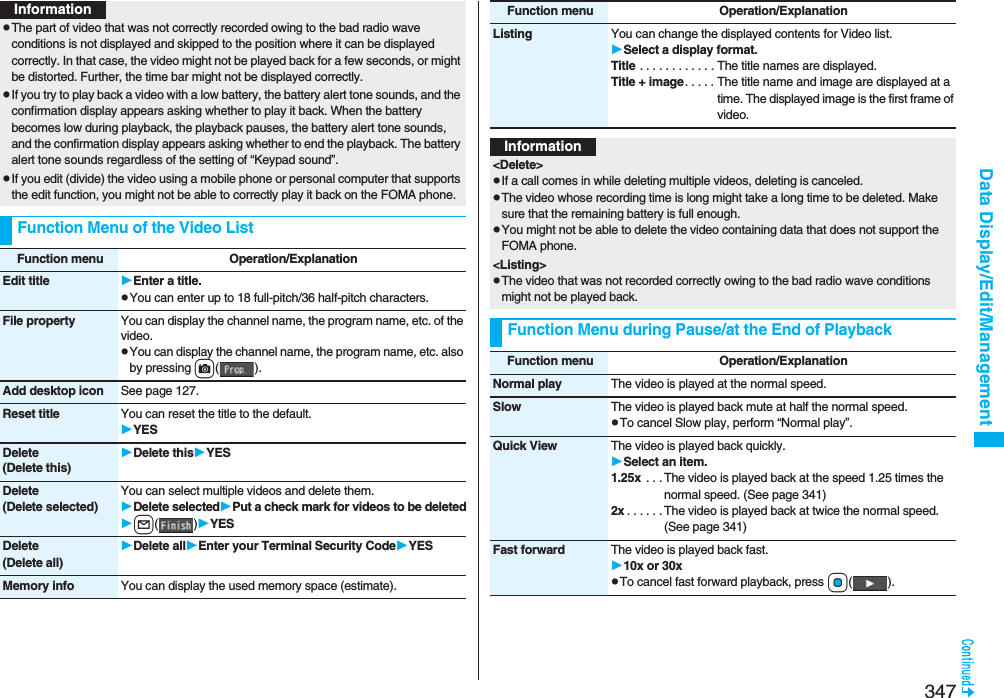
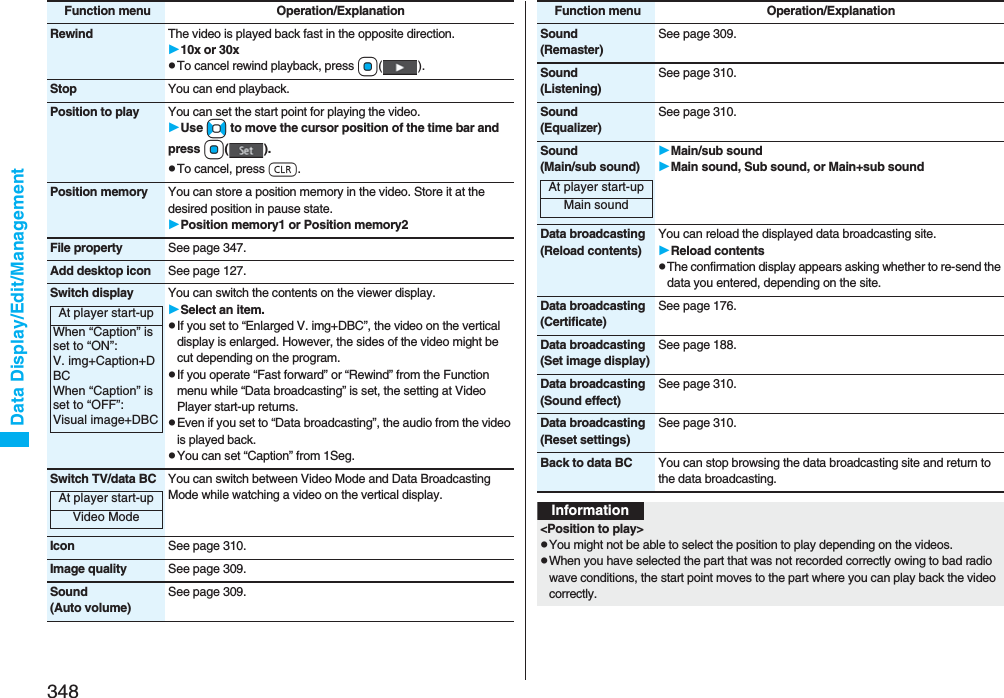
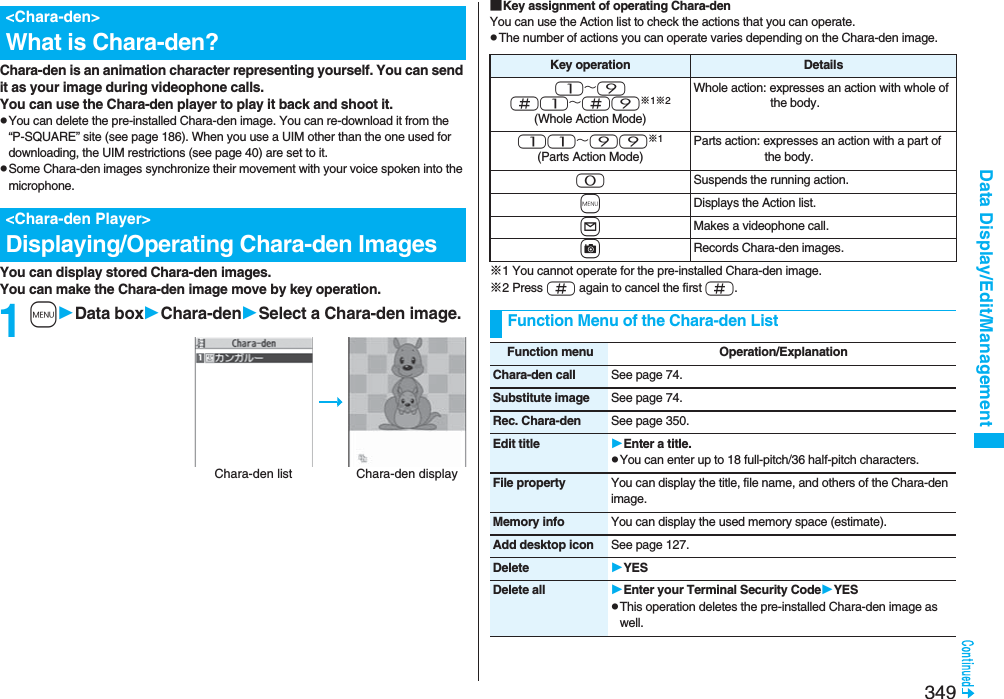
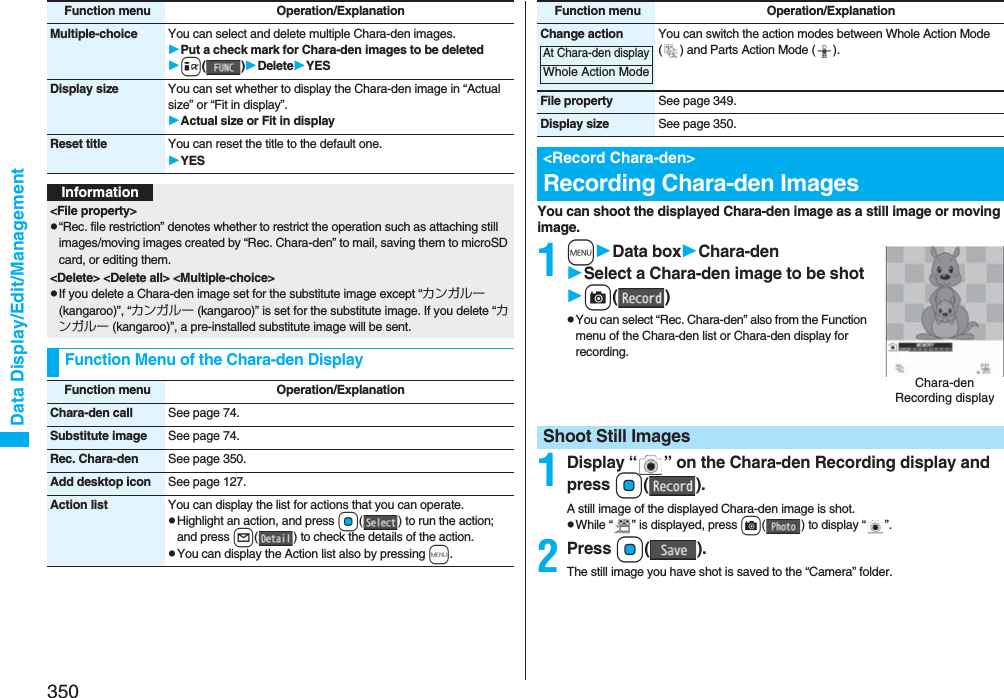
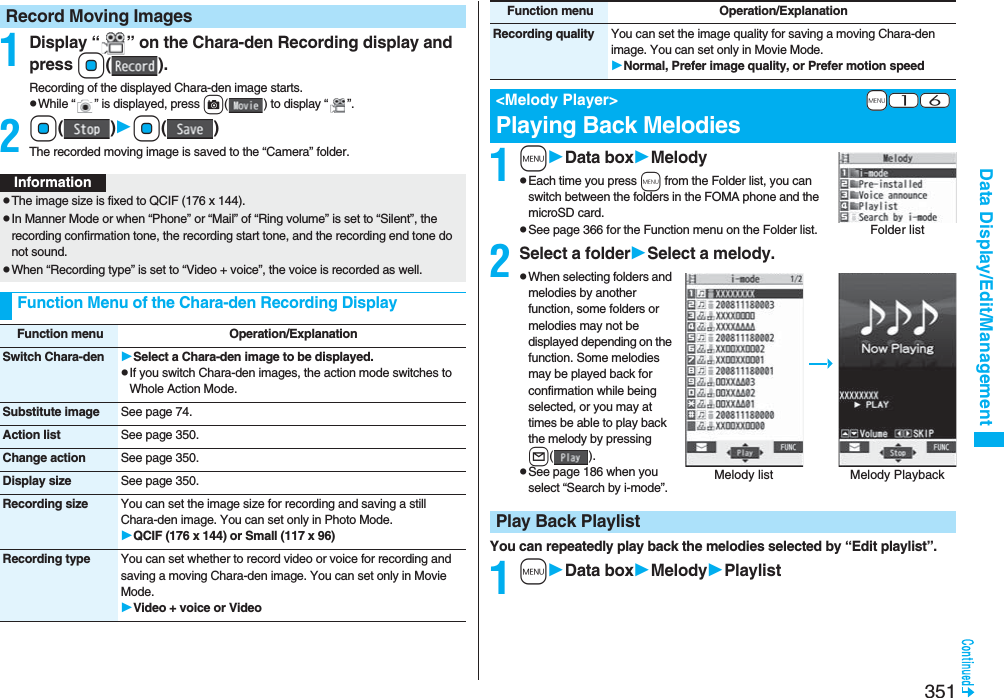

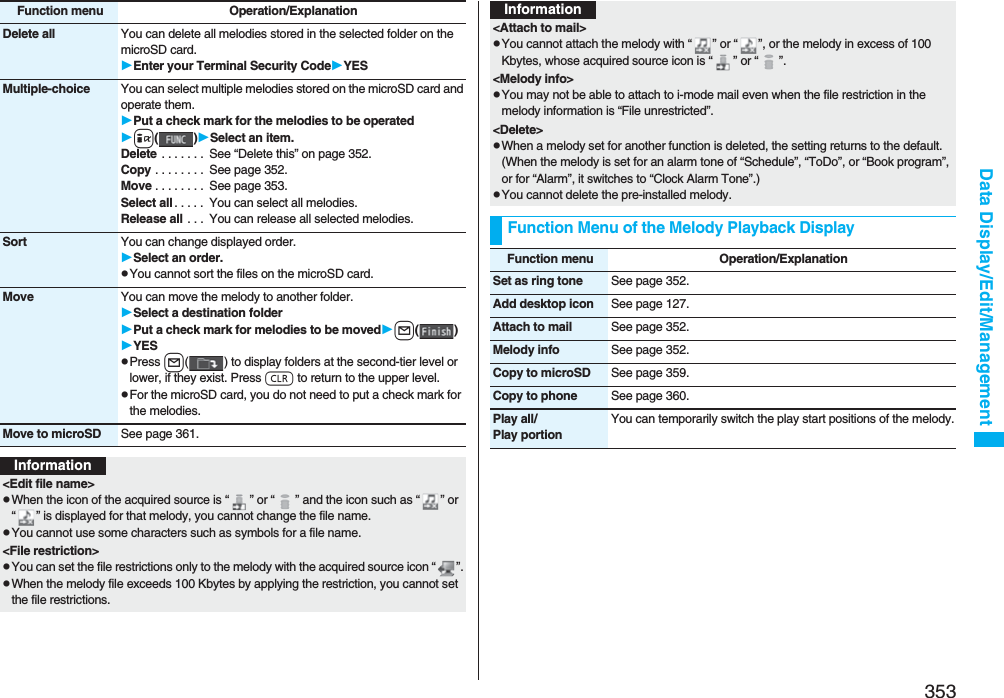

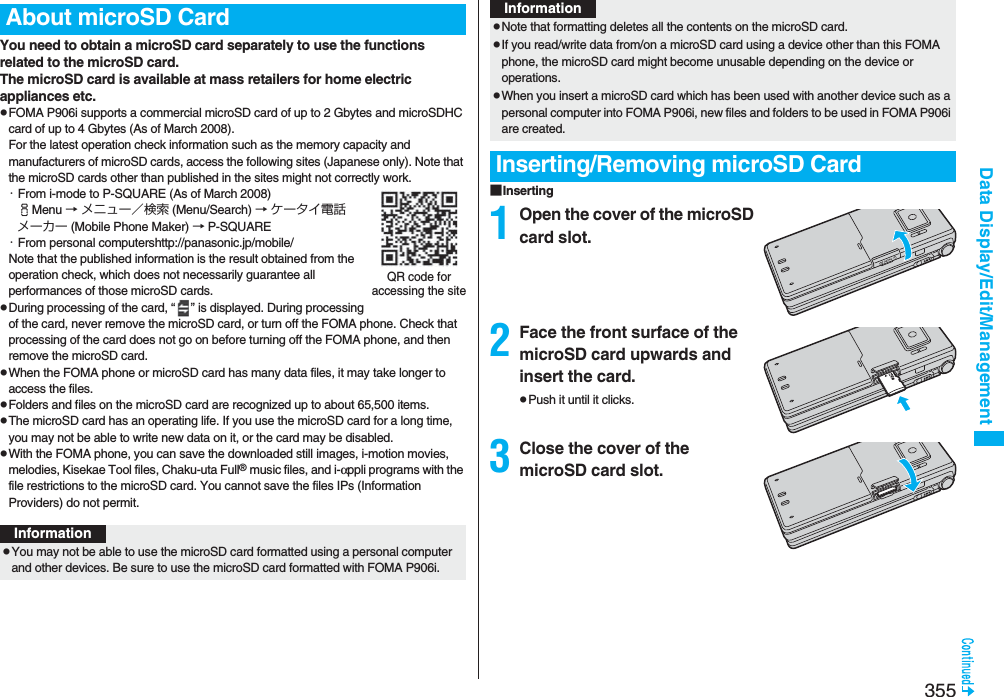
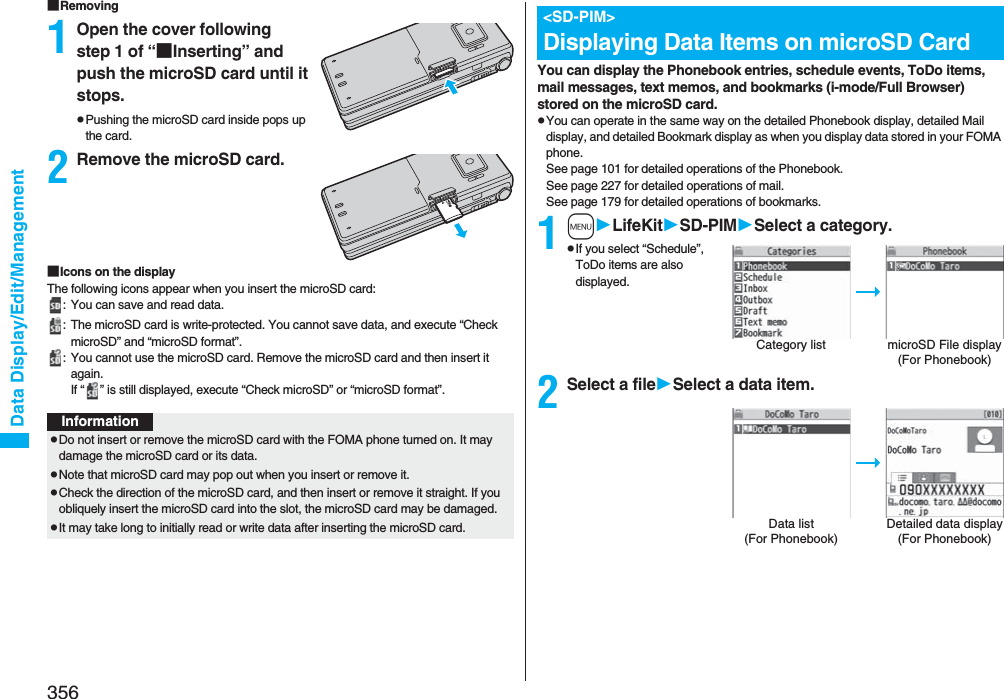
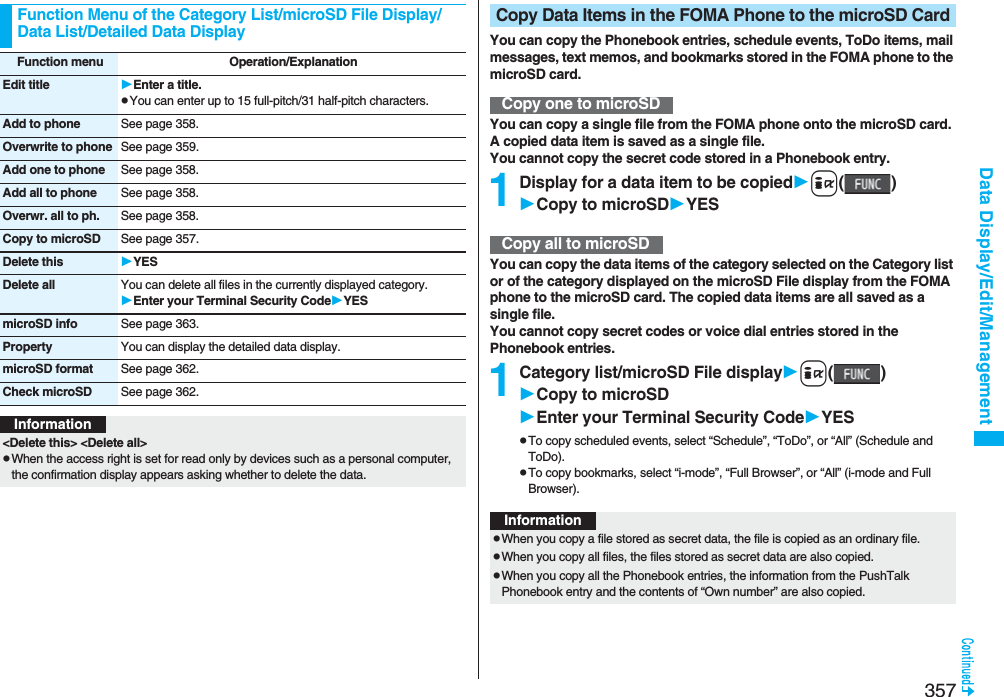
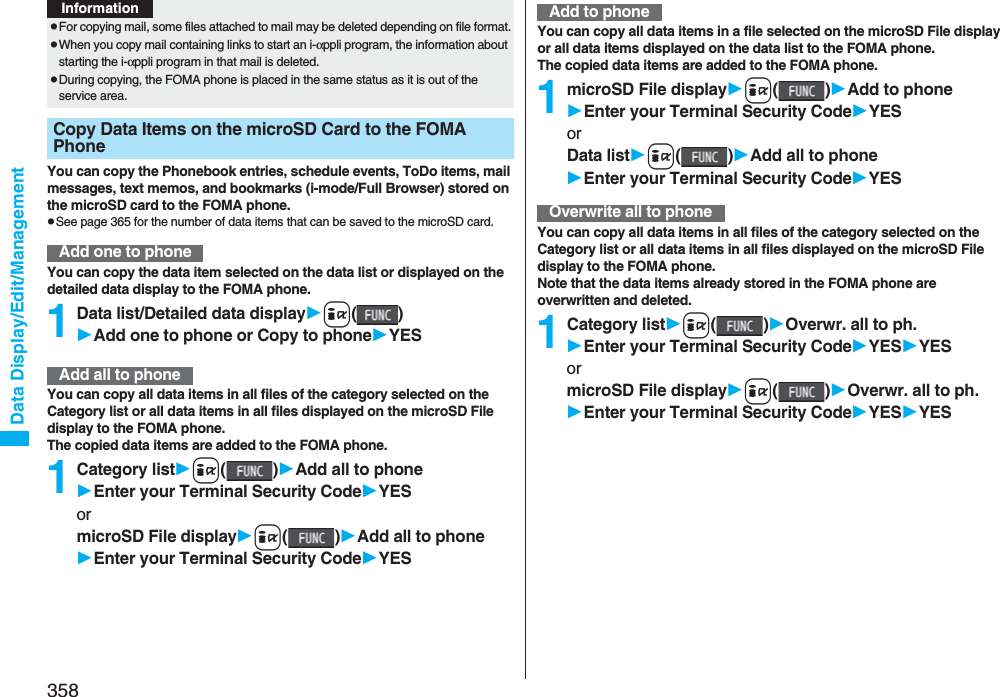
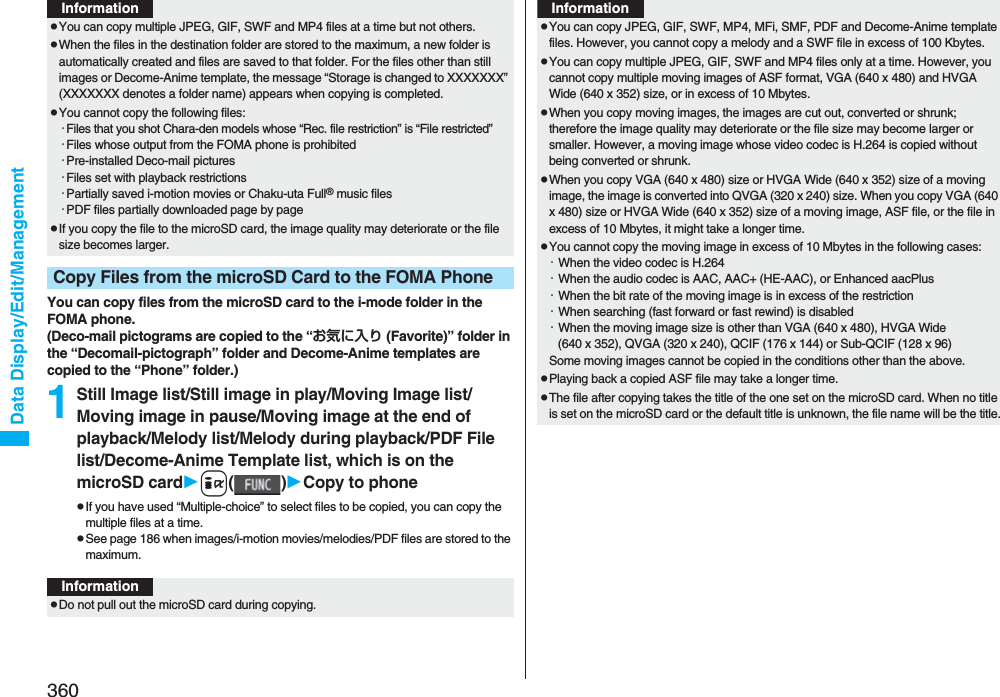
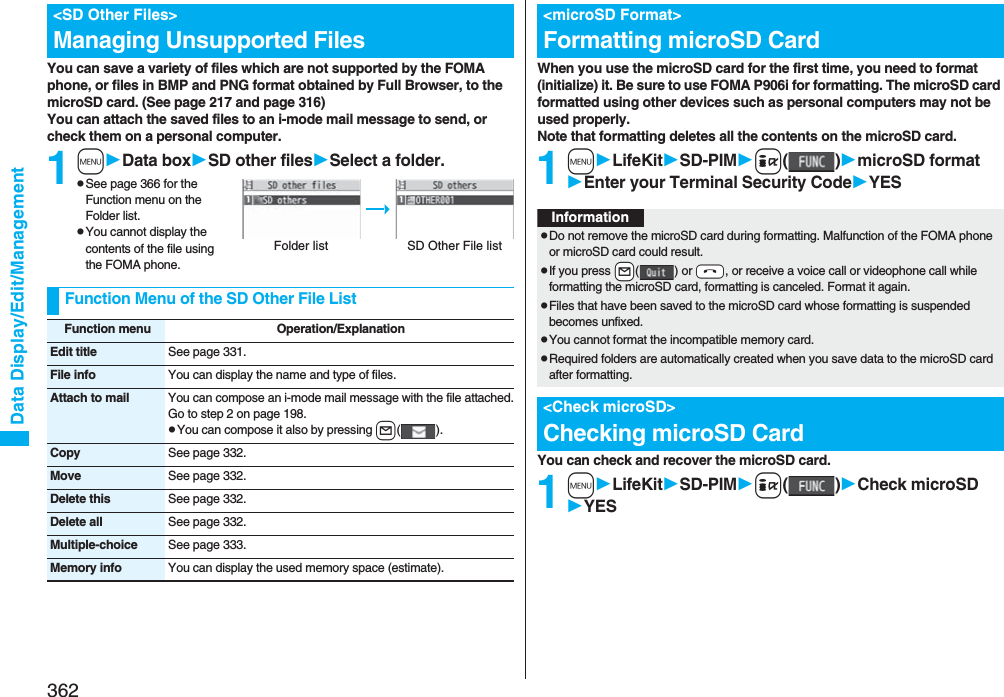
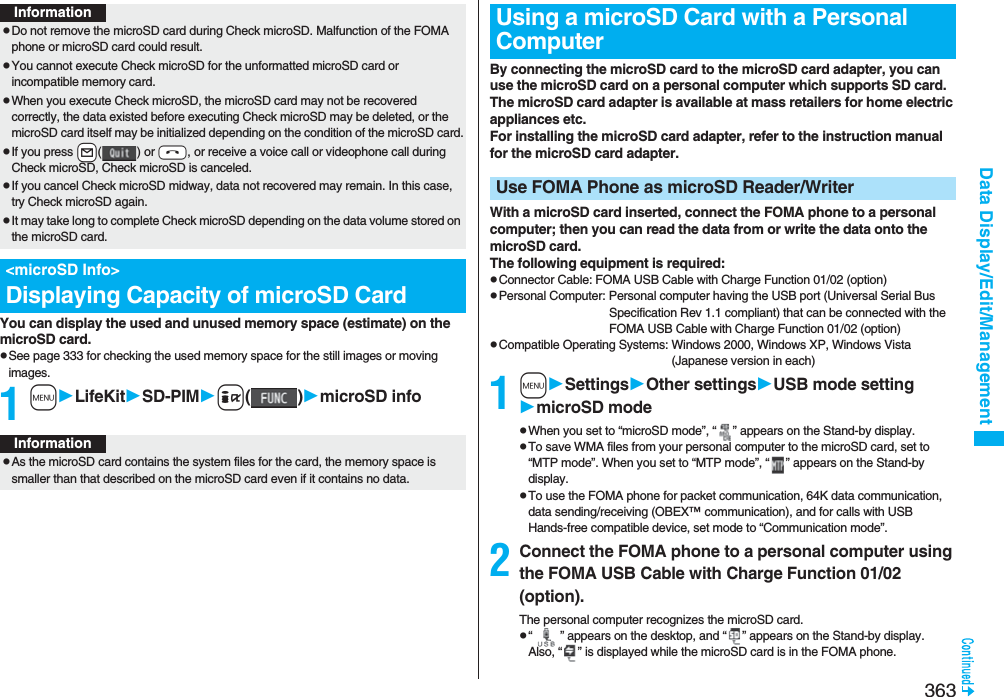
![364Data Display/Edit/ManagementThe FOMA phone creates the following folders on the microSD card to save data files. To write files to the microSD card from a personal computer, you need to write the following configuration and file names.DCIM (Folder for DCF standard still images)△△△_PANAP△△△zzzz.### (Extension is JPG, or GIF.)MISC [DPOF folder (This folder is created automatically when “DPOF setting” on page 379 is set.)]SD_VIDEO (Folder for moving images)PRL◇◇◇ (Folder for movies)MOL◇◇◇.### (Extension is 3GP, SDV, ASF, or MP4.)MGR_INFO (Folder for video management information)PRG◇◇◇ (Folder for videos)InformationpIf the FOMA phone and personal computer are not correctly connected, or the remaining battery level of the FOMA phone shows very low or goes flat, you cannot send or receive data. In addition, you may lose data.pWhile data is being read or written, do not pull the FOMA USB Cable with Charge Function 01/02 off. Not only you cannot send or receive data, but also you may lose the data.pWhile data is being read or written, you cannot set this function. Further, make sure that you do not “Reset settings” or “Initialize” during reading/writing. Malfunction of the microSD card could result.pYou cannot read from/write to a personal computer while reading from/writing to the FOMA phone, and vice versa.pTo use the DoCoMo keitai datalink, set it to “Communication mode”.Folder Configuration on microSD CardPRIVATEDOCOMOSTILL (Folder for non-DCF standard still images)SUD□□□STILzzzz.### (Extension is JPG, GIF, or SWF.)DOCUMENT (Folder for PDF files)PUD□□□PDFDC□□□.PDFRINGER (Folder for melodies)RUD□□□RINGzzzz.### (Extension is MLD, or SMF.)TORUCA (Folder for ToruCa files)TRC□□□TORUC□□□.TRCMMFILE [Folder for non-SD-VIDEO standard moving images (include music data of AAC format)]MUD□□□MMFzzzz.### (Extension is 3GP, SDV, ASF, or MP4.)WM_SYSTEMWMDECOIMG (Folder for Deco-mail pictograms)DUD□□□DIMGzzzz.### (Extension is JPG, or GIF.)OTHER (Folder for SD other files)OUD□□□OTHER□□□.### (Extension is up to three-digit half-pitch alphabets that the FOMA phone cannot recognize.)MOVIE (Folder for PC movie files)MVUD□□□MOVIE□□□.### (Extension is WMV, WMA, WVX, WAX, ASF, or ASX.)DECO_A_T (Folder for Decome-Anime template)DTUD□□□DEATZZZZ.VGTTABLE (Folder for additional information)MEIGROUPPMCDOCUMENT (Folder for Word, Excel, or PowerPoint files)DOC□□□DOCDC□□□.### (Extension is XLS, DOC, or PPT.)TABLEDOCUMENT](https://usermanual.wiki/Panasonic-Connect/208006A.User-Manual-Part-2/User-Guide-920755-Page-165.png)
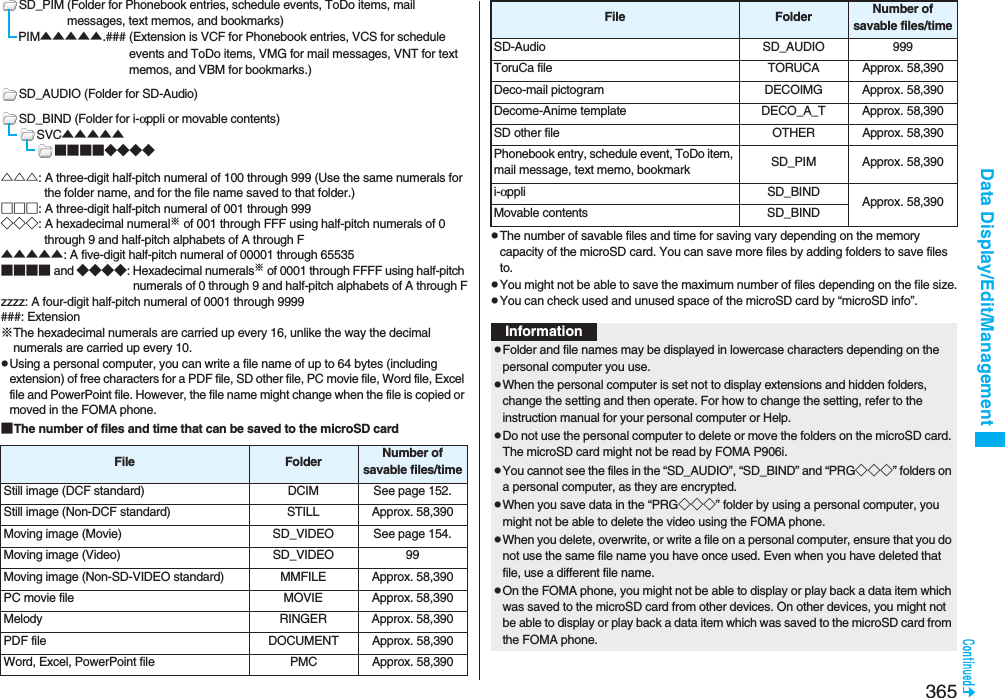
![366Data Display/Edit/ManagementMy picture, MUSIC, imotion, Melody, My documents, Kisekae Tool (SD), PC Movie, Document viewer, and SD other files in Data Box manage files in the respective folders.pSee page 397 for folder operations of MUSIC.pEven when the files in the “Movable contents” folder are listed, the Function menu in the Folder list is displayed.pTo procure a microSD reader/writer or PC card read adapter, inquire respective manufacturers for the operation of microSD card beforehand.Managing FoldersFunction Menu of the Folder ListInformationFunction menu Operation/ExplanationAdd folder You can create a user folder.Enter a folder name.pYou can enter up to 10 full-pitch/20 half-pitch characters in the FOMA phone.pYou can enter up to 31 full-pitch/63 half-pitch characters on the microSD card. You can enter up to 10 full-pitch/20 half-pitch characters for a folder in the “Movable contents” folder.Edit folder name You can edit the name of a user folder, or a folder in the “Decomail-pictograph” folder in the FOMA phone.Enter a folder name.pYou can enter up to 10 full-pitch/20 half-pitch characters in the FOMA phone.pYou can enter up to 31 full-pitch/63 half-pitch characters on the microSD card. You can enter up to 10 full-pitch/20 half-pitch characters for a folder in the “Movable contents” folder.Delete folder You can delete a user folder and all files in the folder.Enter your Terminal Security CodeYESFolder security[My picture/imotion]You can set the folder to open only when you enter your Terminal Security Code.Enter your Terminal Security CodeYESThe folder changes to “ ”.pTo release it, perform the same operation.DEL all frm folder[My picture only]You can delete all the files in the folder selected in “i-mode”, “Camera”, “Decomail-picture”, “Decomail-pictograph”, and user folder in “My picture”.Enter your Terminal Security CodeYESEdit playlist[Melody only]You can select up to 10 melodies and program them in order as you like. This is displayed while you are selecting “Playlist”.Select a playing order from <1st> through <10th>Select a folderSelect a melody.pTo release a programmed melody, select “Release this”.Repeat the operations and complete the playlist editingl()Release playlist[Melody only]You can release all the programmed melodies from the playlist. This is displayed while you are selecting “Playlist”.YESSelect storage You can set the destination folder for when you save the shot still/moving images or the melodies and PDF files obtained by downloading or data communication to the microSD card.YESFunction menu Operation/ExplanationInformation<Add folder>pYou can add up to 20 folders in the FOMA phone.pYou cannot add folders on the microSD card in the following cases:・When the “Picture” folder contains 900 folders・When the “Movie” folder contains 4,095 folders・When 999 folders are contained in the “Image Box”, “Decomail-pictograph”, “Melody”, “Other contents”, “My documents”, “Document viewer”, or “SD other files”.](https://usermanual.wiki/Panasonic-Connect/208006A.User-Manual-Part-2/User-Guide-920755-Page-167.png)
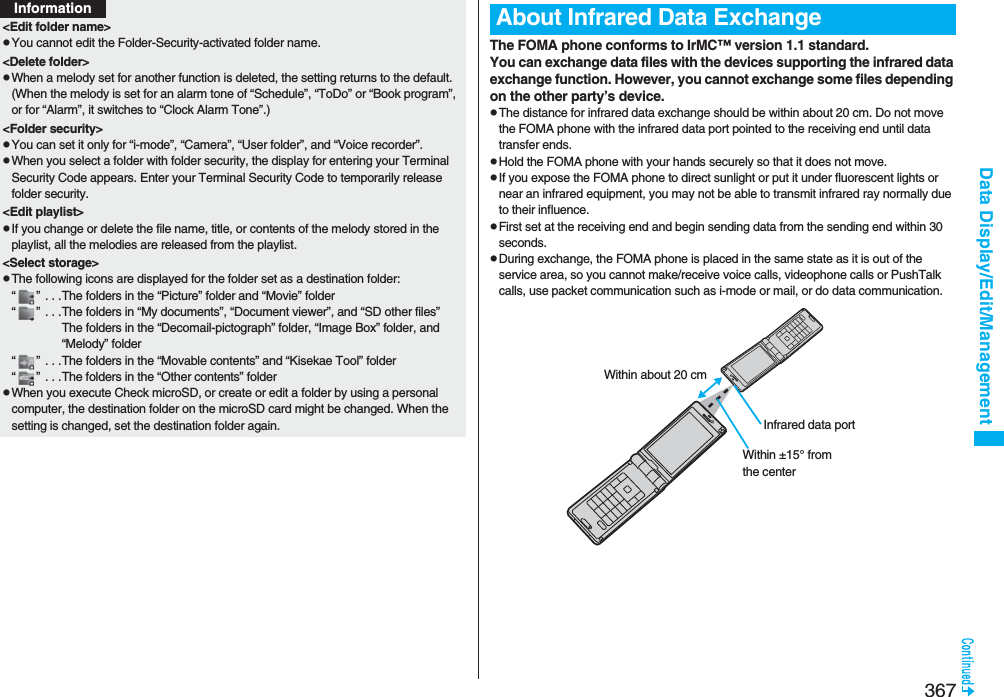
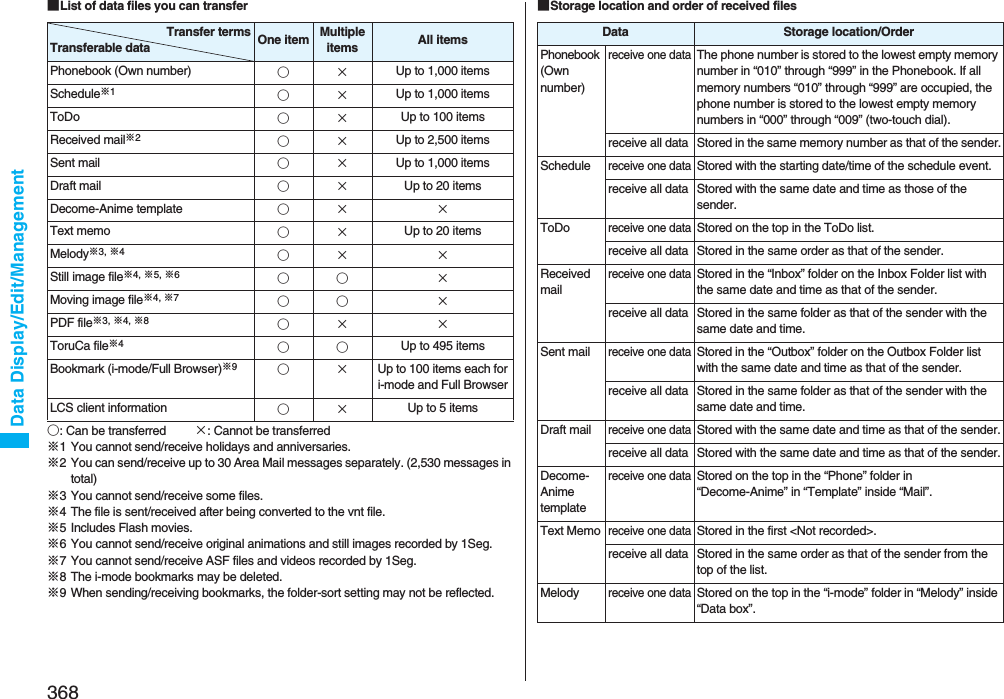
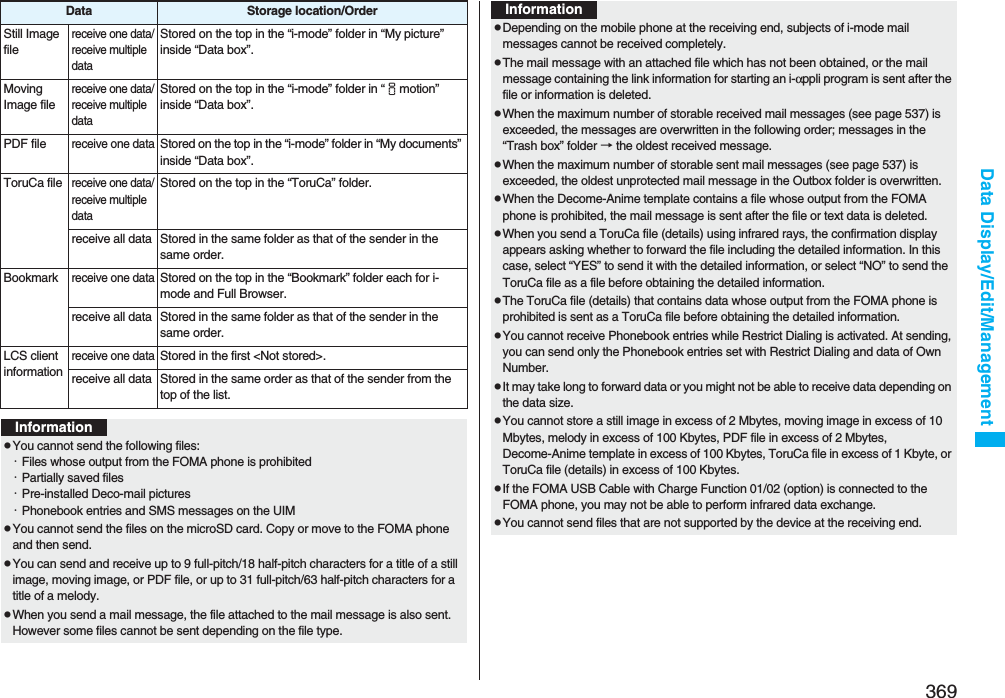
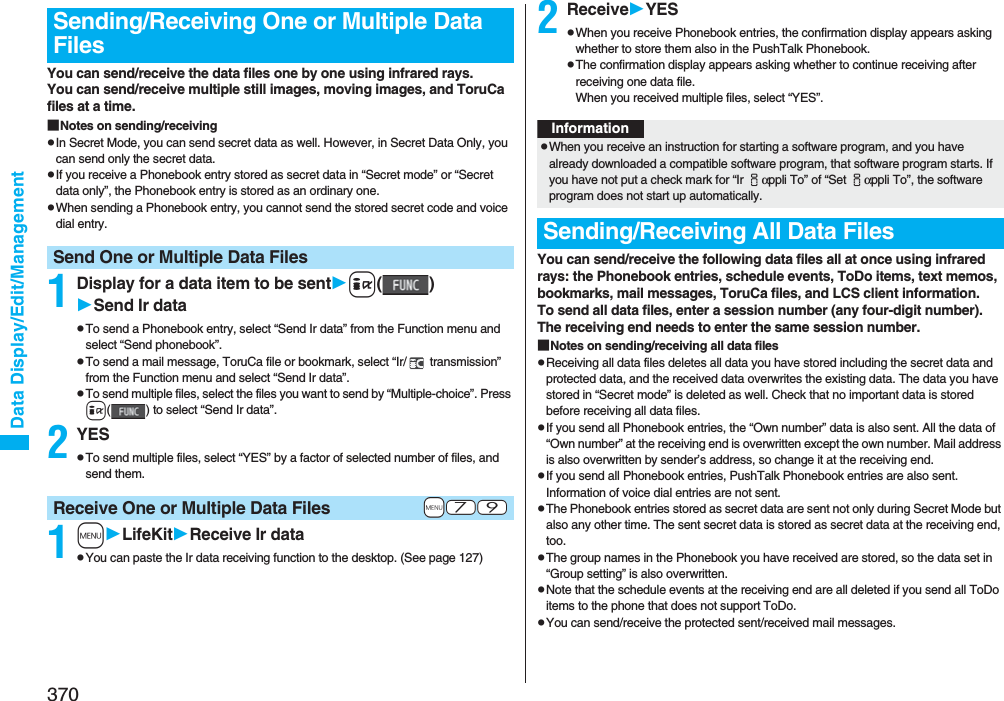
![371Data Display/Edit/Management1Display for a data item to be senti()Send all Ir dataEnter your Terminal Security Code.pTo send the Phonebook entries, select “Send Ir data” from the Function menu and select “Send all phonebook”.pTo send mail messages, ToruCa files or bookmarks, select “Ir/ transmission” from the Function menu and select “Send all Ir data”.2Enter the session numberYESpEnter any four-digit number as the session number.1mLifeKitReceive Ir datapYou can paste the Ir data receiving function to the desktop. (See page 127)2Receive allEnter your Terminal Security CodeEnter the same session number as that entered at the sending endYESYESThe stored data is deleted, then receiving starts.Send All Data Files+m-7-9Receive All Data FilesInformationpWhen you receive Phonebook entries in which still images are stored or mail to which files are attached, and the multiple same still images or files are found, only one image or file is stored.You can use the FOMA phone as a TV remote-controller by starting the i-αppli program.pTo use remote-control devices, you may need to download the software program for those devices. [The pre-installed “Gガイド番組表リモコン (G Guide Program List Remote-controller)” supports the infrared remote-controller function.] The key operation for the remote-controller differs depending on the software program.pThis function does not work with some devices.pCommunication might be affected by compatible devices and the ambient light.pYou cannot use the infrared remote-controller during Self Mode.pTurn the FOMA phone’s Infrared data port to the front of a device to be operated. You can operate within about 4 meters away from the device.pThe radiation angle of the infrared rays is within ±15° from the center.For when you forward Phonebook entries using infrared rays, iC communication, SD-PIM, or DoCoMo keitai datalink, you can specify whether to forward the stored still images together.1mPhonebookPhonebook settingsForwarding imageON or OFFUsing Infrared Remote-controller FunctionInfrared Remote-controller+m-2-6<Forwarding Image>Communication SettingWithin about 4 metersInfrared data portWithin ±15° from the center](https://usermanual.wiki/Panasonic-Connect/208006A.User-Manual-Part-2/User-Guide-920755-Page-172.png)
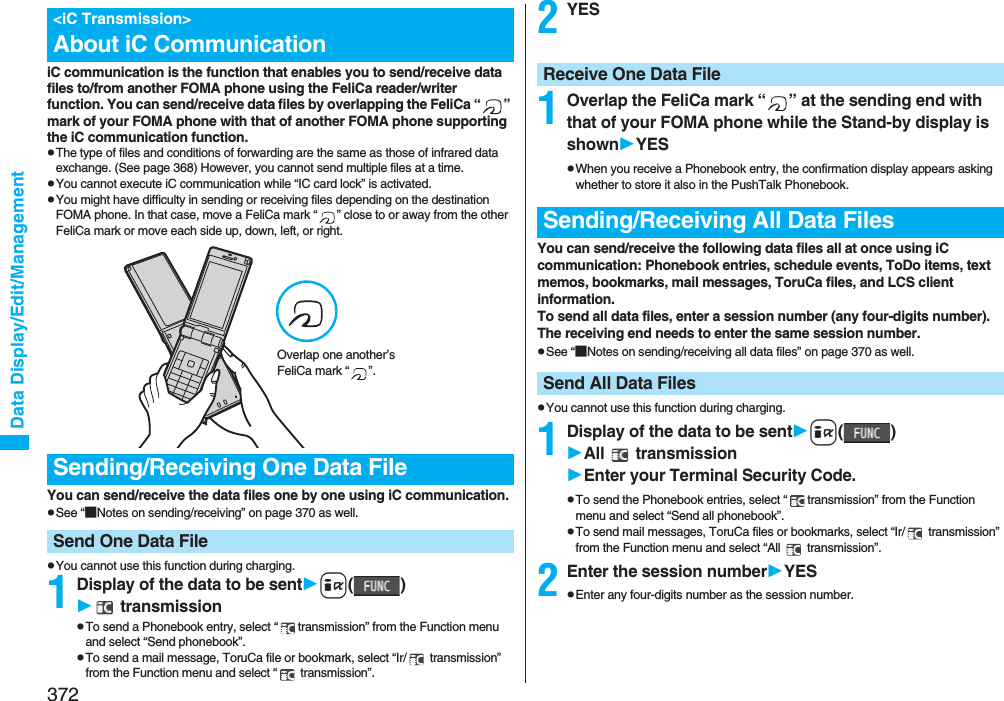
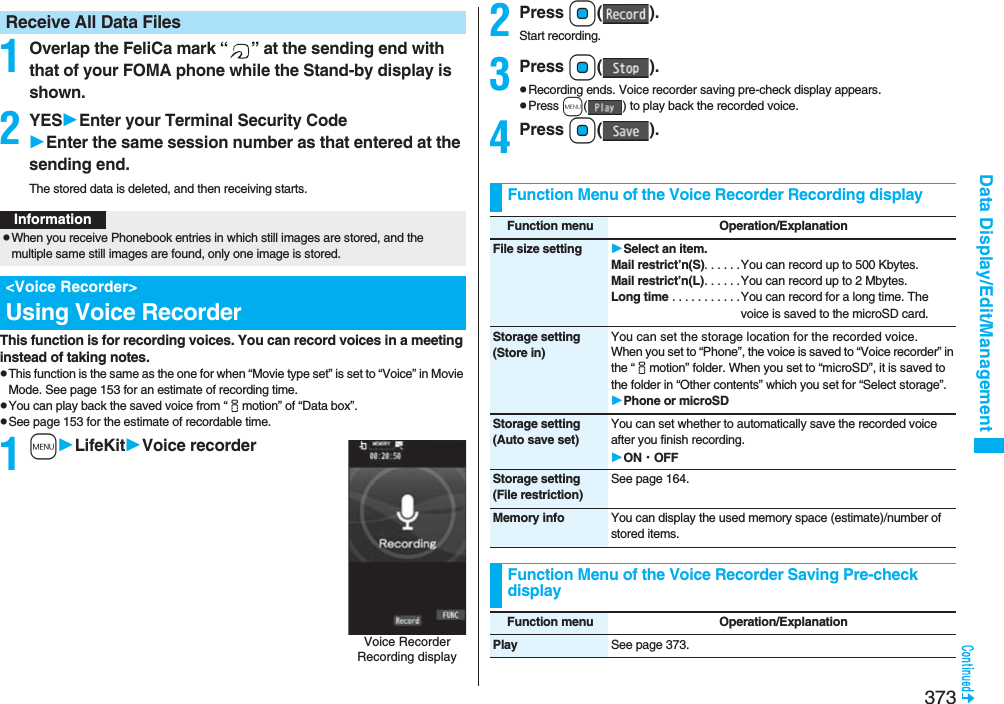
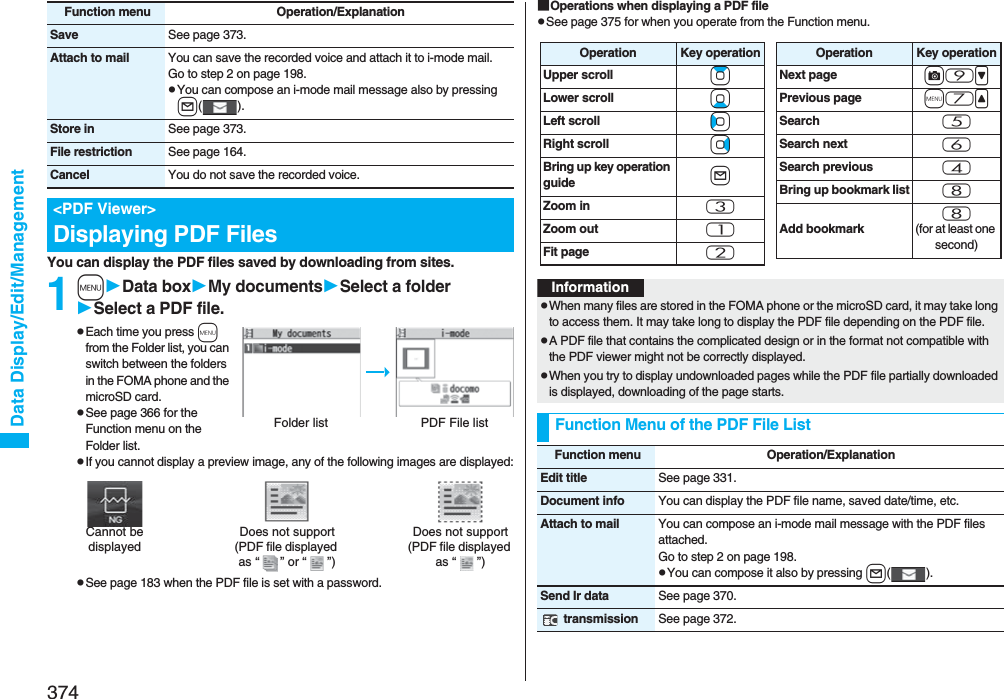
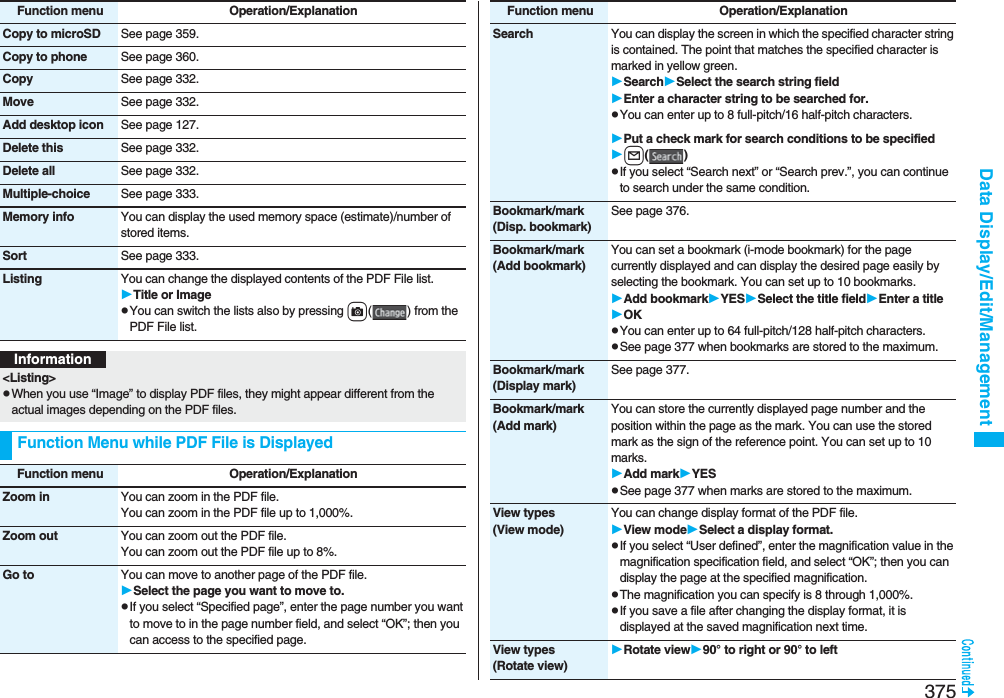
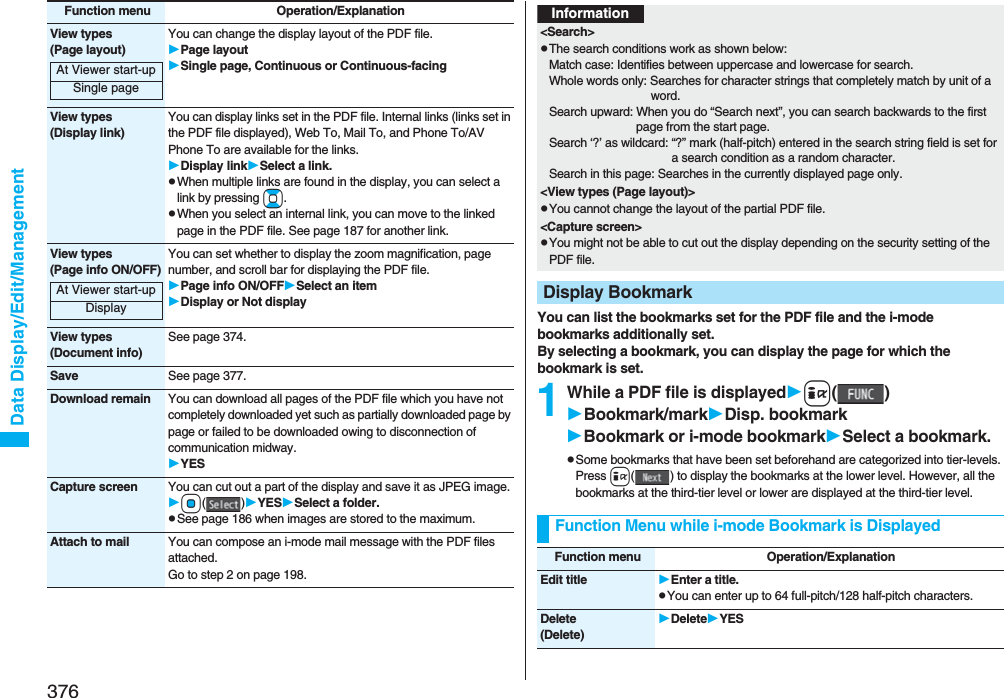

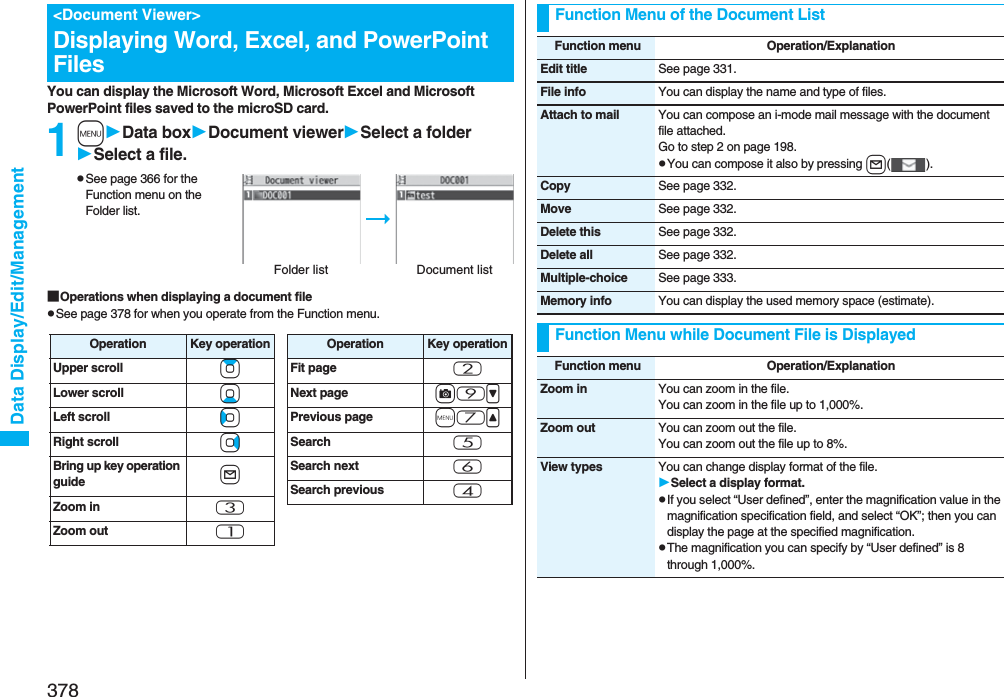
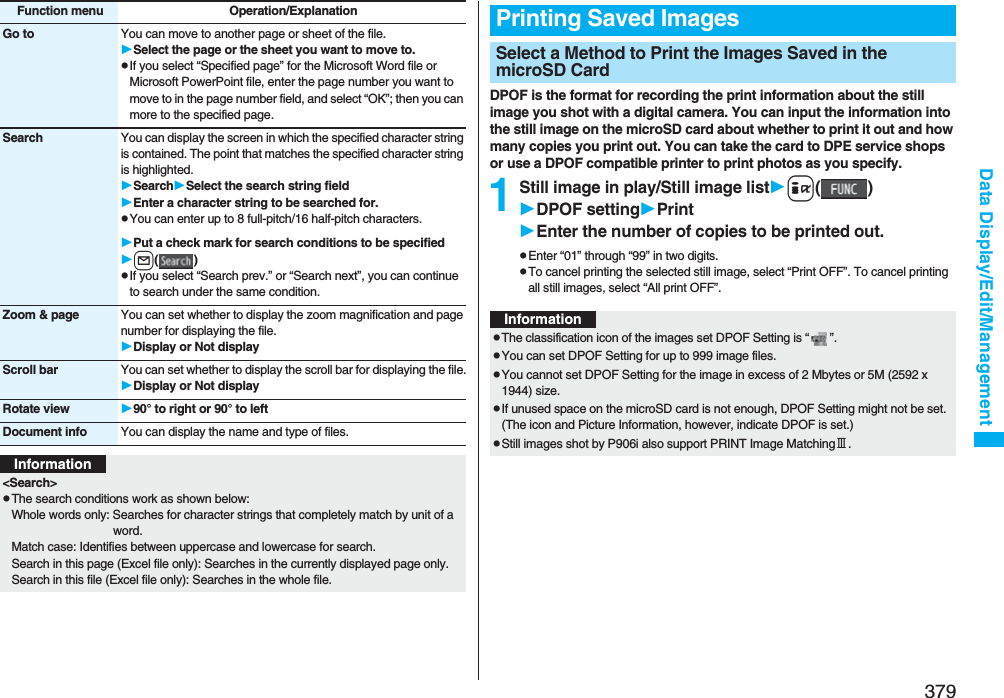
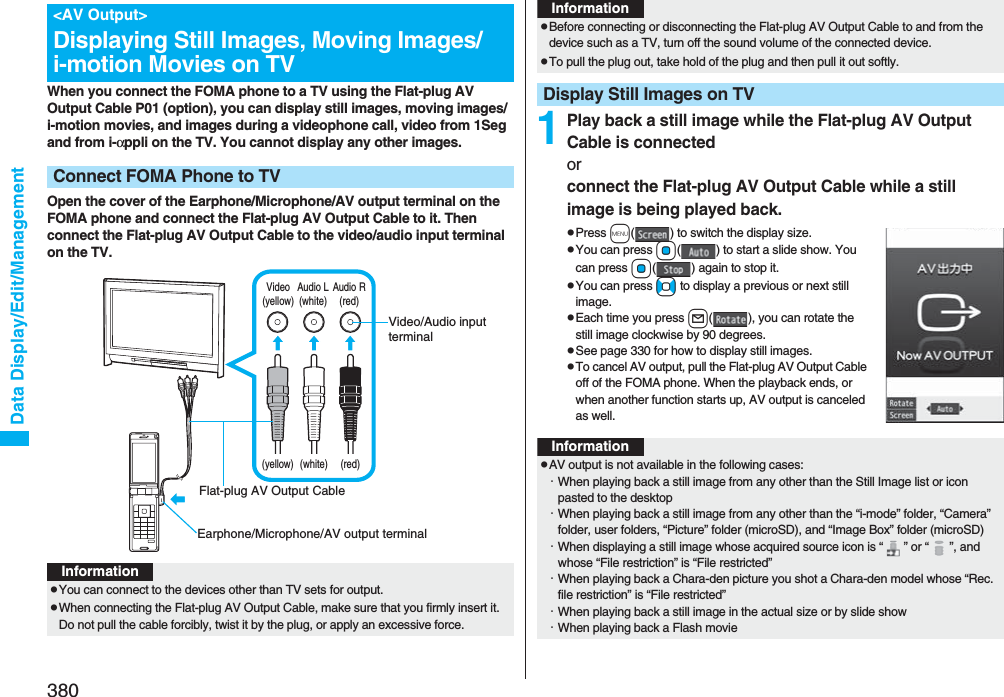
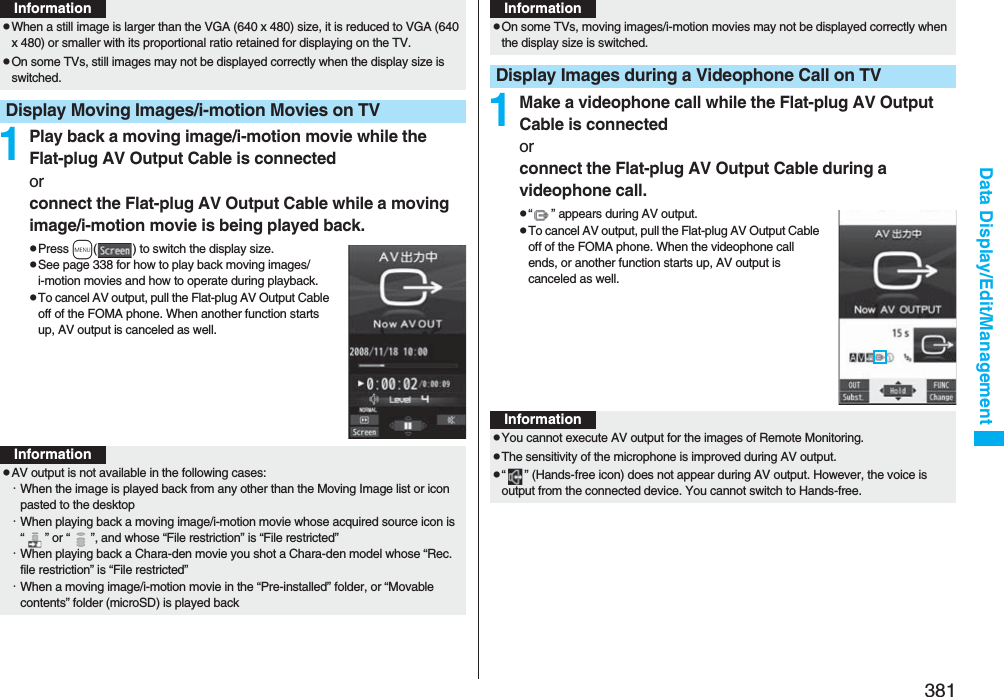
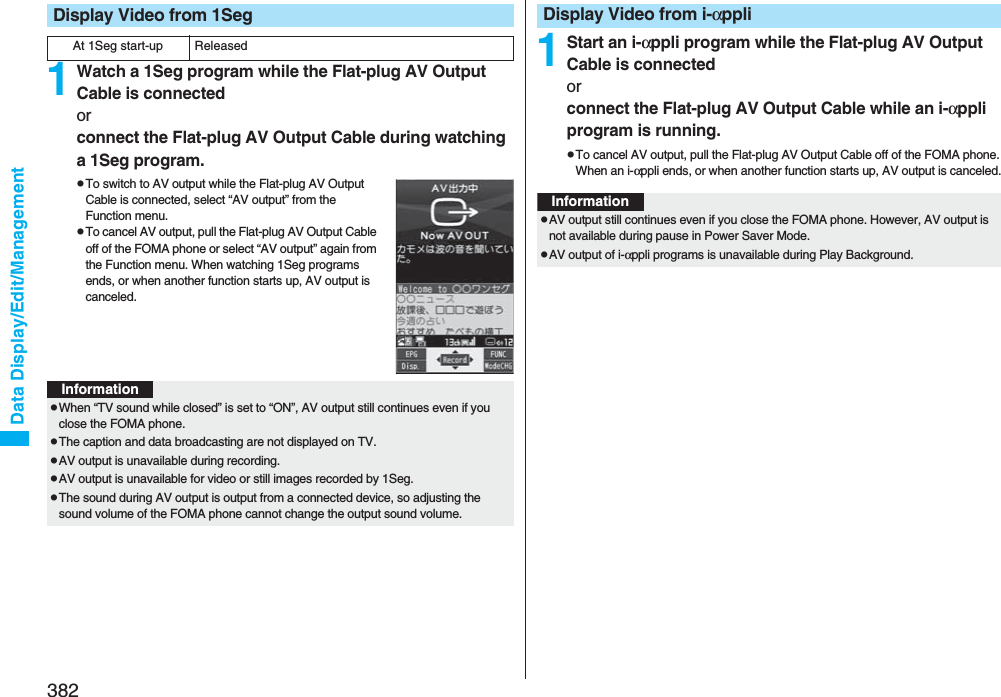
![384Music&Video Channel/Music PlaybackMusic&Video Channel is a service which automatically delivers up to about one-hour programs at night by just setting your favorite music programs in advance. Further, you can enjoy high-quality moving image program of up to about 30 minutes. Programs are updated periodically and you can enjoy the delivered programs at your convenient time such as on commuting.■Before using Music&Video ChannelpMusic&Video Channel is a pay service which is available on a subscription basis. (You need to subscribe to i-mode and Pake-Houdai/Pake-Houdai Full to apply for it.)pOther than the service fee for using Music&Video Channel, you might be separately charged an information fee depending on the program.pFor the details on Music&Video Channel, refer to “Mobile Phone User's Guide [i-mode]”.pIf you insert the UIM to the Music&Video Channel incompatible FOMA phone after you subscribe to Music&Video Channel, you cannot use Music&Video Channel Service. Note that the service fee applies unless you cancel the Music&Video Channel subscription.pYou cannot obtain or set programs during international roaming. When you try to obtain or set programs, note that you are charged a packet communication fee for the i-mode communication. Take procedures to halt the distribution of programs before departure to overseas. Then, after homecoming, resume receiving distribution.What is Music&Video Channel?If you previously set a program that you want to watch, the FOMA phone automatically downloads the program data at night.1mMUSICMusic&Video Channel2Set programFollow the instructions on the display to set a program.For details, refer to “Mobile Phone User’s Guide [i-mode] FOMA version”.pSee page 186 when data files are stored to the maximum.“ ” appears on the Stand-by display 12 hours before the time the program obtaining starts. However, it does not appear if you have inserted a UIM which is different from the one you used to set the program.Programs are automatically obtained at night. The display for obtaining programs does not appear but “ ” appears on the desktop when they are successfully obtained. Press Oo, highlight “ ”, and press Oo( ) to display the Music&Video Channel display. When obtaining fails, “ ” appears.Setting ProgramsMusic&Video Channel displayWhen a program is set](https://usermanual.wiki/Panasonic-Connect/208006A.User-Manual-Part-2/User-Guide-920755-Page-185.png)
![385Music&Video Channel/Music PlaybackInformationpWhen the communication is disconnected during obtaining a program, re-obtaining is automatically tried up to five times by an interval of about three minutes. When a display for obtaining a program is shown, however, the confirmation display appears asking whether to re-obtain the program.pThe ring tone does not sound and the vibrator does not work to notify that obtaining programs starts or is completed. When you set “Music&Video ch illum.” of “Illumination” to “ON”, the Call/Charging indicator flickers when obtaining programs is completed. (See page 122)pYou can set up to two programs at once.pNote that a newly obtained program overwrites a saved program and you can no longer play back that saved program afterward. To avoid overwriting, perform “Move program” to move the program to the “Saved program” folder.pYou cannot save the obtained program to the microSD card.pTo set programs, you need to register the site which offers Music&Video Channel programs to your My Menu. (See page 177)pIf you have not subscribed to Music&Video Channel, select “About this service” to see the Music&Video Channel introduction page.pWhen the programs could not be obtained due to “power off” or “low battery” at the start time of program obtaining, re-obtaining is performed at night of the following day.pIt may take a time to obtain programs, so fully charge the battery and operate in the good radio wave conditions.pYou cannot perform the setting operation and automatic obtaining of the program selected on the Music&Video Channel display or the program in use.pWhen you cancel Music&Video Channel, the programs other than those moved by “Move program” are deleted.pIf you insert a UIM which is different from the one you used to set programs, programs cannot be automatically obtained. Set the programs again from the Music&Video Channel display.pWhen you select a service menu for Music&Video Channel and the message “Confirm set up information?” appears, select “YES” to delete the programs that have already been distributed. However, they may not be deleted while the distribution of programs is halted.pIf you insert the UIM of the FOMA phone that you have already set programs into another Music&Video Channel compatible FOMA phone, the programs cannot be obtained automatically. Select “Set program” again from the Music&Video Channel display to automatically update the program setting on the FOMA phone, then the programs can be obtained automatically.1Music&Video Channel displaySet programFollow the instructions on the display.You can check or cancel the set program. For details, refer to “Mobile Phone User’s Guide [i-mode] FOMA version”. “ ” appears on the Stand-by display when the automatic program obtaining fails or the program is not updated even after the program distribution date. When the automatic obtaining fails, you can manually obtain the program.1Music&Video Channel displaySelect a programYESpFor a partially obtained program, select “Play” to play it back.pFor a program which has not been updated, select “Play” to play it back.Check/Cancel the Set ProgramInformationpEven if the setting of a program is canceled, My Menu is not deleted.Obtain a Program ManuallyInformationpWhen obtaining of a program is suspended, the part of the program obtained up to that point is saved. To obtain remaining part, you can manually obtain it except in some time zones. When a program has been updated or switched to another program, obtaining starts not from the suspended point but from the beginning.pYou cannot re-obtain the program whose playable deadline has expired. Such a program cannot be updated until the next distribution date.pYou may not be able to manually obtain programs depending on the time zone.](https://usermanual.wiki/Panasonic-Connect/208006A.User-Manual-Part-2/User-Guide-920755-Page-186.png)