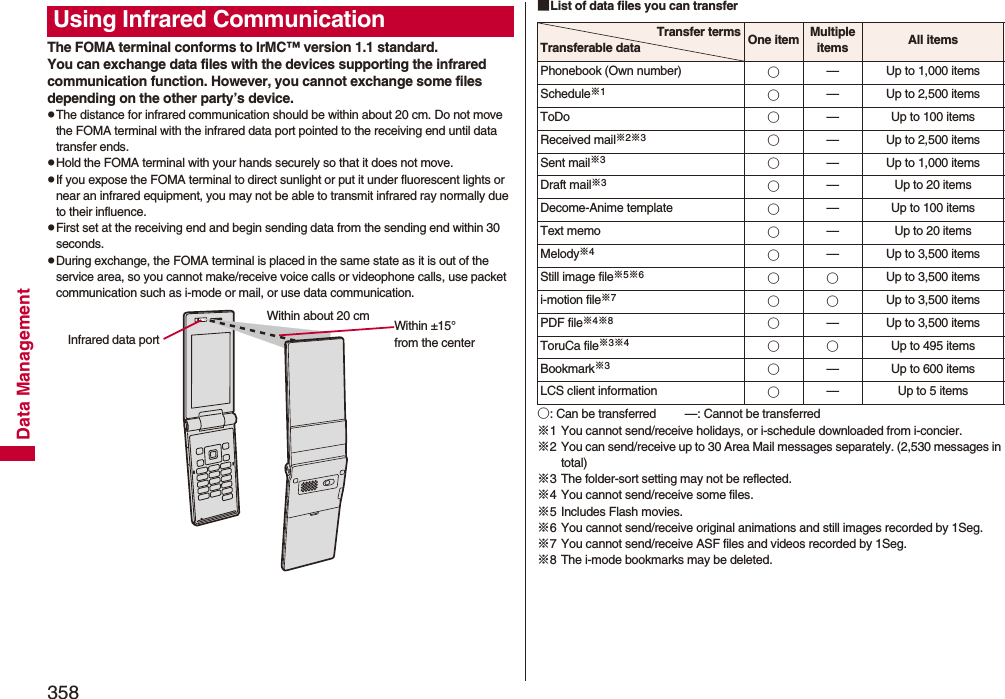
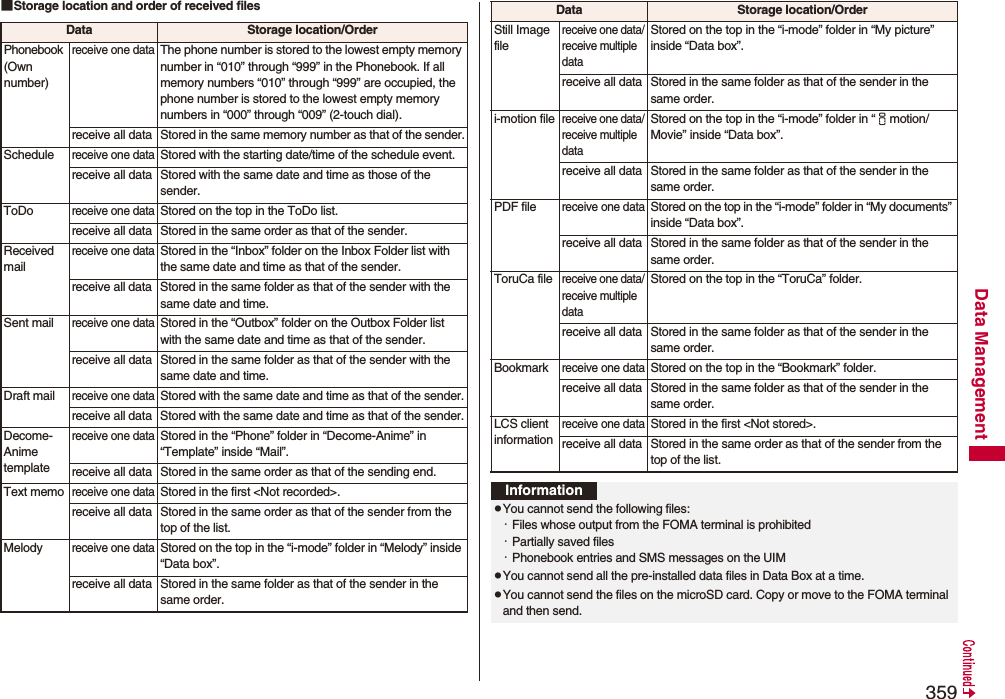
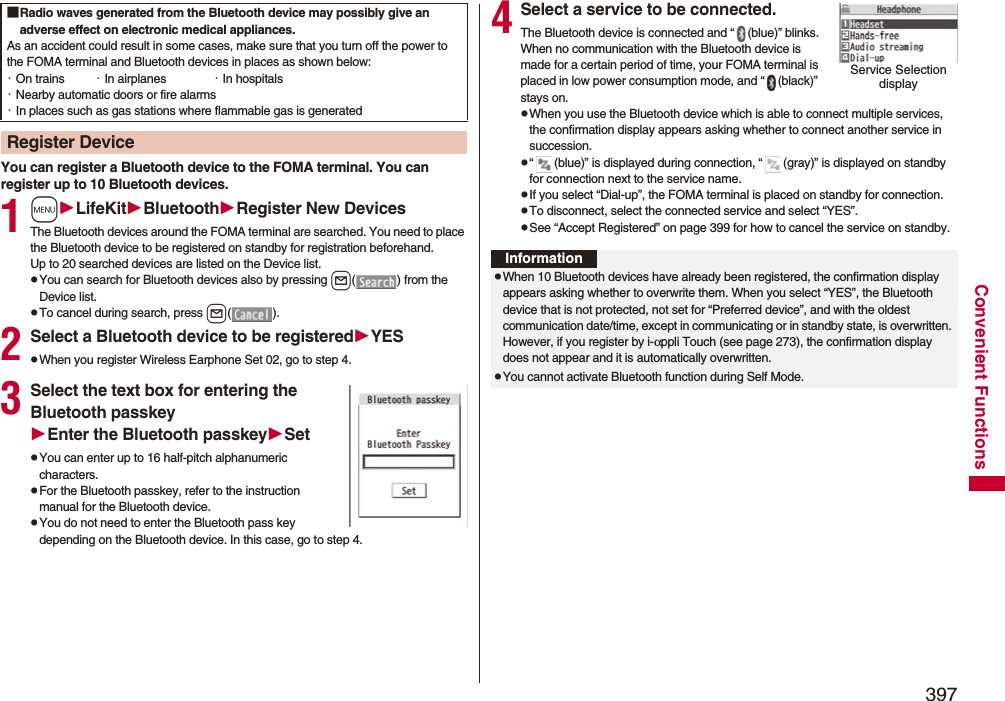
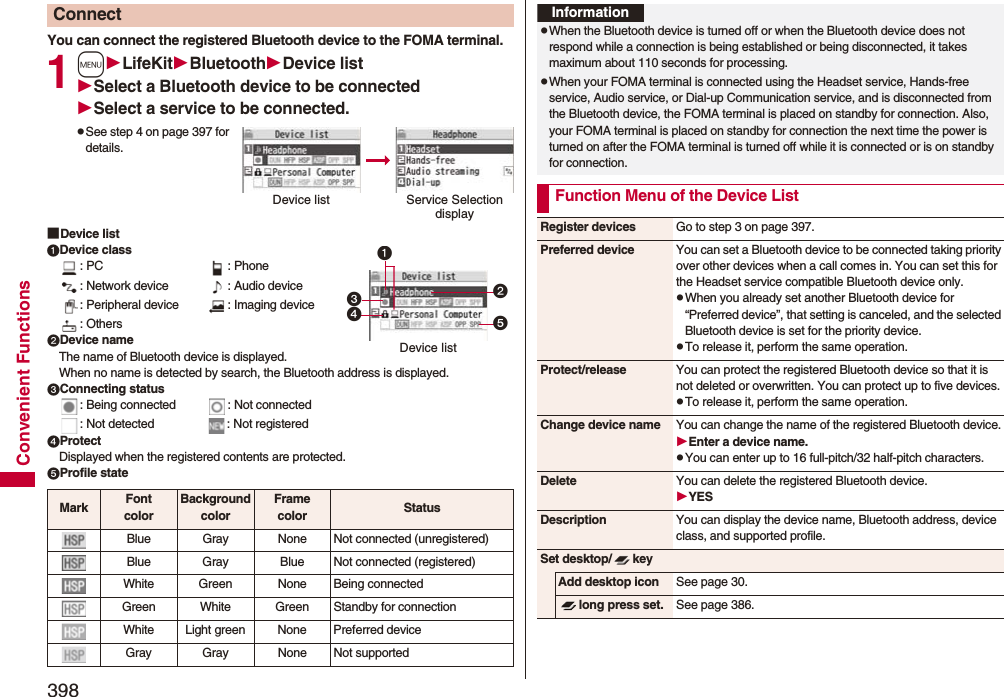
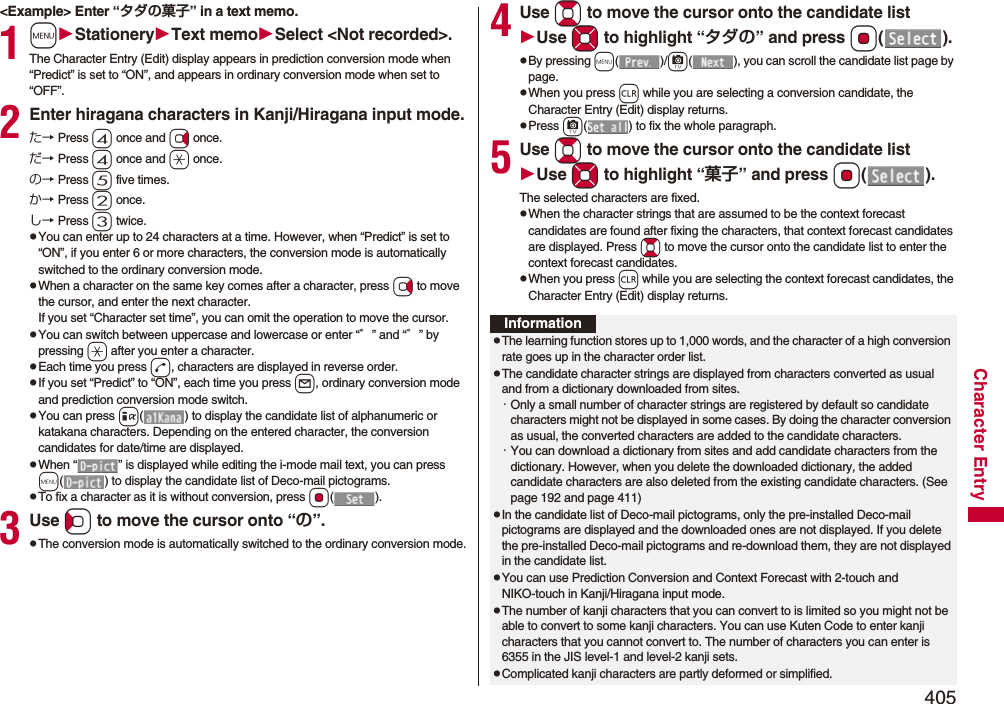
Panasonic Connect 209018A UMTS/ GSM Cellular Mobile with Bluetooth® and RFID User Manual 000 P 09A
Panasonic Mobile Communications Development of Europe Ltd UMTS/ GSM Cellular Mobile with Bluetooth® and RFID 000 P 09A
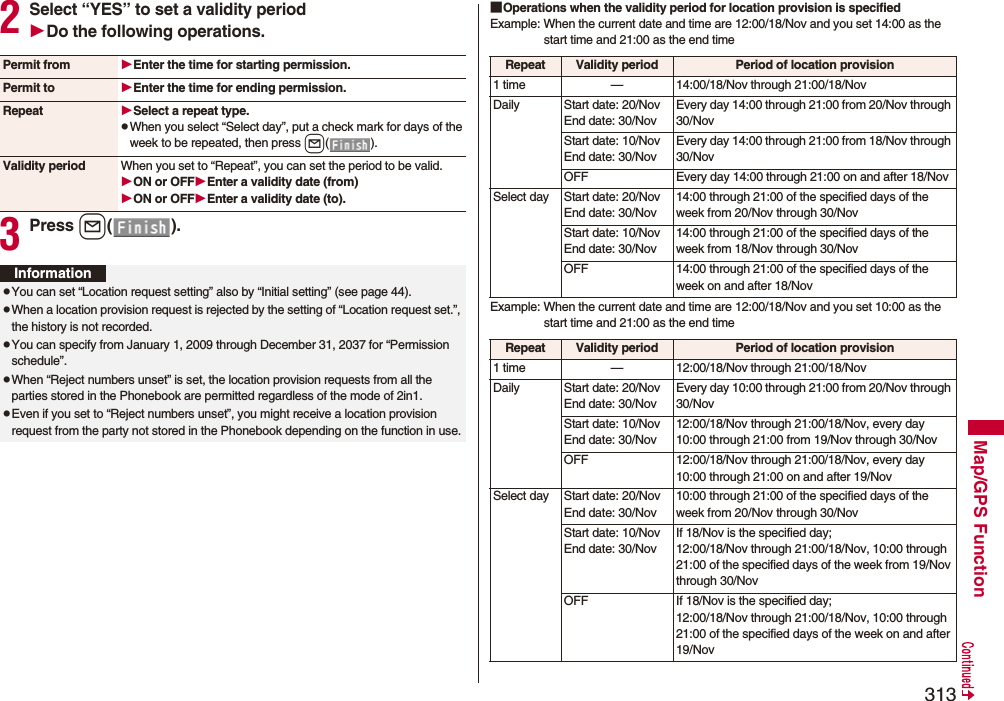
Contents
- 1. User Manual Part 1 of 2
- 2. User Manual Part 2 of 2
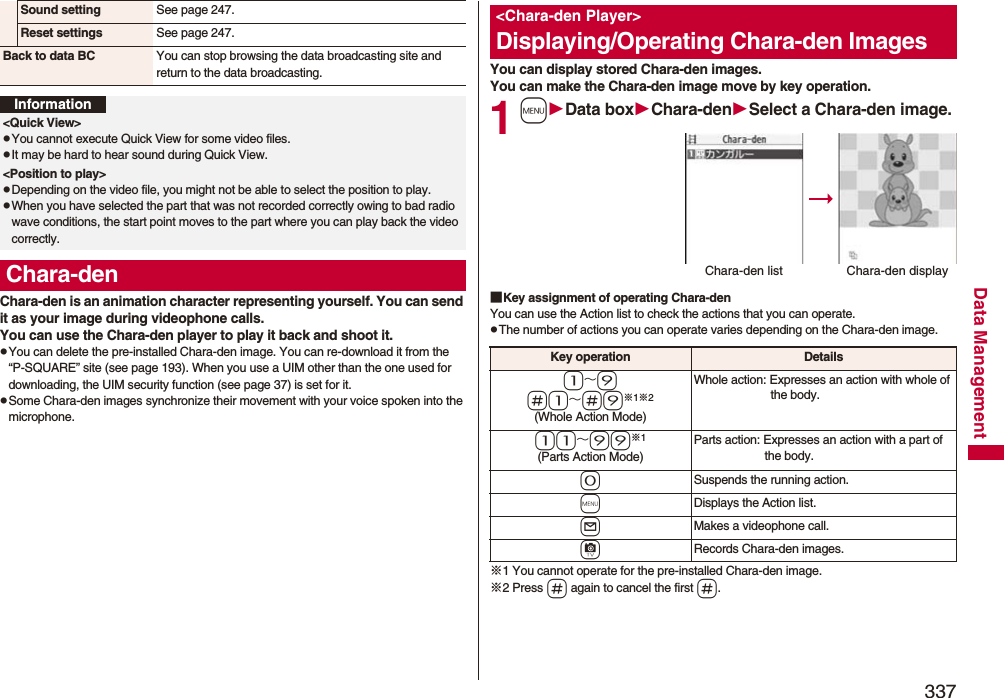
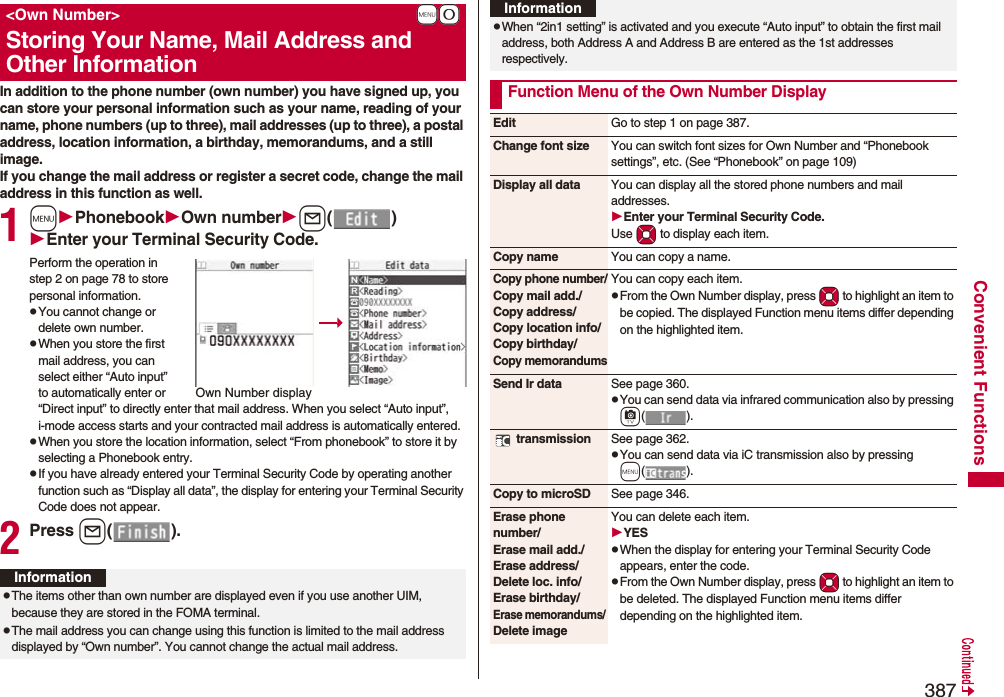
User Manual Part 2 of 2
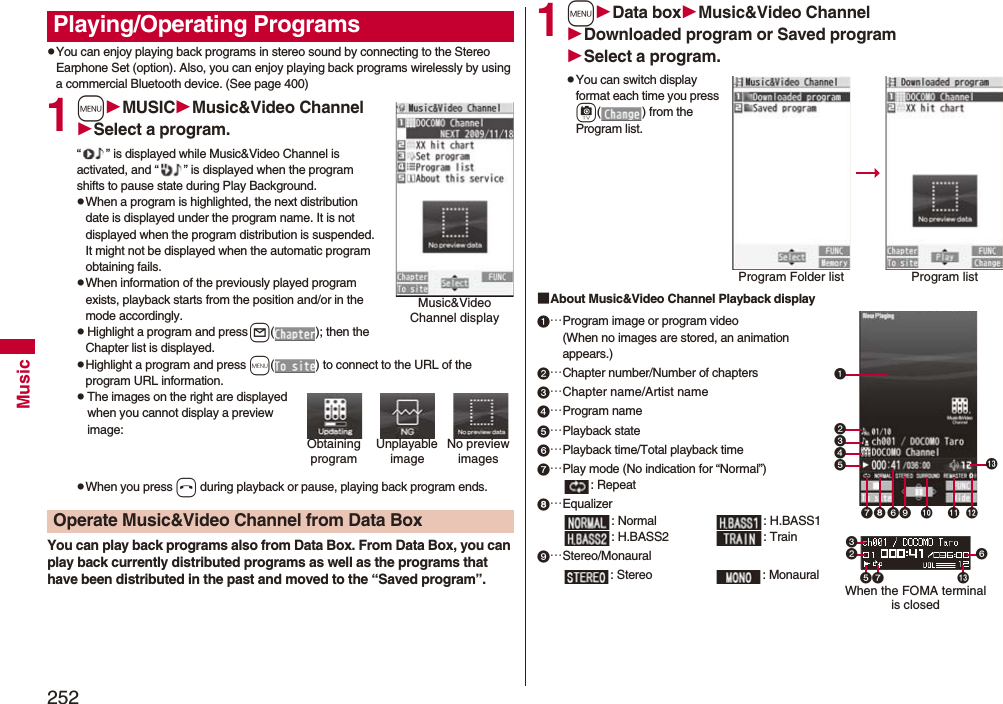
![251MusicpTo set programs, you need to register the site which offers Music&Video Channel programs to your My Menu. (See page 179)pIf you have not subscribed to Music&Video Channel, select “About this service” to see the Music&Video Channel introduction page.pWhen the programs could not be obtained due to “power off” or “low battery” at the start time of program obtaining, re-obtaining is performed at night of the following day.pIt may take a time to obtain programs, so fully charge the battery and operate in the good radio wave conditions.pYou cannot perform the setting operation and automatic obtaining of the program selected on the Music&Video Channel display or the program in use.pWhen you cancel Music&Video Channel, the programs other than those moved by “Move program” are deleted.pIf you insert a UIM which is different from the one you used to set programs, programs cannot be automatically obtained. Set the programs again from the Music&Video Channel display.pWhen you select a service menu for Music&Video Channel, the message “Confirm set up information?” appears. If you select “YES”, the programs that have been distributed might be deleted. However, they will not be deleted while the distribution is set to be halted.pIf you insert the UIM of the FOMA terminal that you have been set for programs into another Music&Video Channel compatible FOMA terminal, the programs cannot be obtained automatically. Select “Set program” again from the Music&Video Channel display to automatically update the program setting on the FOMA terminal, then the programs can be obtained automatically.Information1Music&Video Channel displaySet programFollow the instructions on the display.You can check or cancel the set program. For details, refer to “Mobile Phone User’s Guide [i-mode] FOMA version”. “ ” appears on the desktop when the automatic program acquisition fails or the program is not updated even after the program distribution date. When the automatic acquisition fails, you can manually obtain the program.1Music&Video Channel displaySelect a programYESpFor a partially obtained program, select “Play” to play it back.pFor a program which has not been updated, select “Play” to play it back.pSee page 194 when data files are stored to the maximum.Check/Cancel the Set ProgramInformationpEven if the setting of a program is canceled, My Menu is not deleted.Obtain a Program ManuallyInformationpWhen obtaining of a program is suspended, the part of the program obtained up to that point is saved. To obtain remaining part, you can manually obtain it except in some time zones. When a program has been updated or switched to another program, obtaining starts not from the suspended point but from the beginning.pYou cannot re-obtain the program whose playable deadline has expired. Such a program cannot be updated until the next distribution date.pYou may not be able to manually obtain programs depending on the time zone.](https://usermanual.wiki/Panasonic-Connect/209018A.User-Manual-Part-2-of-2/User-Guide-1106379-Page-1.png)

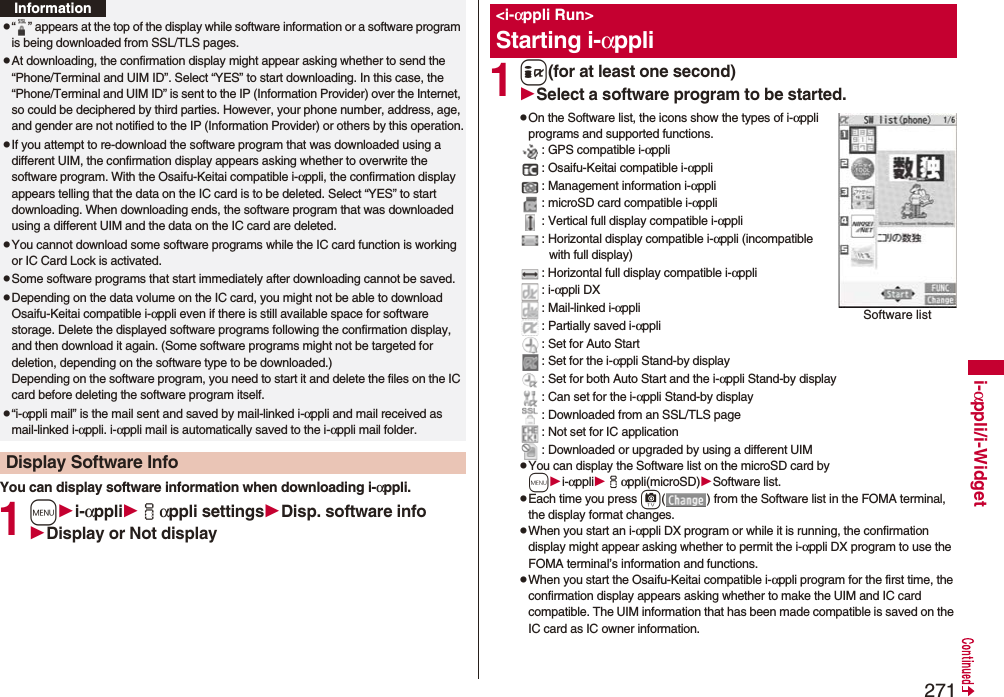
![270i-αppli/i-Widget“i-αppli” is a software program for i-mode mobile phones. You can use your FOMA terminal more conveniently by downloading※ various software programs from the i-mode site. For example, you can automatically update the stock price information or weather information, and enjoy games without accessing network.It also supports i-αppli online which enables the online communication among multiple parties using real time communication and i-αppli call (see page 287), so you can enjoy versus games and chat applications.Also, some i-αppli programs are compatible with i-Widget (see page 290).※You are separately charged a packet communication fee.pThe packet communication fee for the overseas use differs from the one for the domestic use. For details, refer to “Mobile Phone User’s Guide [International Services]” or the DOCOMO Global Service website.pFor details on i-αppli, refer to “Mobile Phone User’s Guide [i-mode] FOMA version”.You can download software programs from sites to the FOMA terminal. You can save up to 100 files (up to about 2 Mbytes per file), however, the number of files you can save decreases depending on the data volume because the memory space is shared with other data files. (See page 508)1Call up an i-αppli downloadable siteSelect a software program.2Select “OK” when downloading ends.pSee page 194 when i-αppli programs are stored to the maximum.pWhen downloading ends, the display for Software Setting (Network Set, Stand-by Set, Location Usage, Program Guide Key, or iαppli call) might appear. These settings can be done also from the Software list.3YES or NOYES . . . . Starts i-αppli.NO . . . . . Returns to the site display.i-αppli<i-αppli Download>Downloading i-αppli from SitesWhen you press r or h to suspend downloading an i-αppli program of 100 Kbytes or more, or when downloading is suspended by the radio wave conditions, the confirmation display appears asking whether to resume downloading. Select “YES” to resume downloading the remaining part. Select “NO” to show the confirmation display asking whether to save the file downloaded halfway. Select “YES” to partially save the file.You can re-download the rest of the partially saved i-αppli program from the Software list.An i-αppli mail folder is created automatically each in the Inbox/Outbox Folder list, and the title of the downloaded mail-linked i-αppli becomes the name of the folder.pYou can save up to five mail-linked i-αppli programs.pYou cannot download the software program if the mail-linked i-αppli using the same folder is already in the Software list.pYou cannot download mail-linked i-αppli while Mail Security is set.pYou cannot download mail-linked i-αppli if the Inbox/Outbox Folder list contains five i-αppli mail folders.pWhen re-downloading mail-linked i-αppli whose folder only remains, the confirmation display appears asking whether to use the existing i-αppli mail folder. If you select “YES”, the existing folder is used. If you select “NO” because you do not use it, the confirmation display appears asking whether to delete an existing folder and create a new one. You cannot download mail-linked i-αppli without creating a new folder.When downloading is suspendedWhen you downloaded mail-linked i-αppliInformationpYou can download pre-installed i-αppli programs from the “P-SQUARE” site (in Japanese only).iMenu→メニューリスト (Menu List)→ケータイ電話メーカー (Mobile Phone Maker)→P-SQUAREpDownloading is not available from some accessed sites.pSome i-αppli programs can automatically connect to the i-mode Center after they are downloaded. However, to use this service, you need to set it in advance in “Network set” of “Software setting”.QR code for accessing the site](https://usermanual.wiki/Panasonic-Connect/209018A.User-Manual-Part-2-of-2/User-Guide-1106379-Page-20.png)


![277i-αppli/i-WidgetFamily Message Board is an application program that enables you to share memos and schedule events among your family or friends. After registering to join a group, you can share the memos and schedule events with other members of the group. Further, you can check the memos and schedule events by using compatible TV.pYou are separately charged a packet communication fee.pFor details, press m[説明(Explanation)] from each display to show them.pFor the compatible TV sets and how to access on the TVs, refer to the information of the Function menu.© Panasonic Mobile Communications Co.,Ltd.1Software listファミリー伝言板 (Family Message Board)Read “利用規約 (Usage rules)” thoroughly“同意のうえ利用する (Agree with Exemption Clause)”pIf you put a check mark for “次回から表示しない (Does not show from the next time)”, “利用規約 (Usage rules)” does not appear when you start the program next time.2Register yourself.You need to register yourself at the first startup. Select “ユーザーの登録 (User's registration)” and register yourself following the instructions on the display.3Set your group.You need to set a group you join at the first startup.新しいグループを作る (Make a new group) . . . . You can make a new group as a manager. Make a new group following the instructions on the display.グループに参加 (Join a group) . . . . You can join a group already created. Join the group following the instructions on the display.pEvery user can join only one group.ファミリー伝言板 (Family Message Board)This is a Widget application program that enables you to check News New or Nikkei Average.You might not be able to browse some news depending on the period you are using this service.Check the Widget application program for details when you start it.pYou are separately charged fees for when you use this service.© 2009 Nikkei Inc. All rights reserved.Sticky is a Widget Appli program that enables you to easily create, edit, and browse sticky notes. You can store up to 300 characters, up to 50 items. You can change colors and display positions of sticky notes.“P-SQUARE INFO” is a Widget Appli program that periodically distributes the updated information and recommendable content of maker’s site P-SQUARE.If you select displayed information, the i-mode browser starts and then P-SQUARE opens.pYou are separately charged a packet communication fee.NIKKEI NET付箋 (Sticky)P-SQUARE INFO© Millmo Inc.](https://usermanual.wiki/Panasonic-Connect/209018A.User-Manual-Part-2-of-2/User-Guide-1106379-Page-27.png)
![278i-αppli/i-WidgetWith this Widget Appli program, you can download the timetable and check the countdown of minutes/seconds until the train’s departure. The schedule registration function is also provided to notify you of the departure time by sounding an alarm. You can update the timetable from the menu, and search for the nearest station using the GPS function.pYou are separately charged a packet communication fee.pFor details, refer to “ヘルプ (Help)” in the menu.Powered by JR Travel Navigator1Software list時刻表ウィジェット (Timetable Widget)2Read “免責事項 (Exemption clause)” thoroughlyi()3Select an item.駅名入力/時刻表登録 (Enter station name/Store timetable). . . .Stores the timetable of the station you want to use.全体設定/ヘルプ/免責事項 (Whole setting/Help/Exemption clause). . . .Sets a font size, and displays “ヘルプ (Help)” and “免責事項 (Exemption clause)”.アプリ終了 (End application). . . .Ends this application.時刻表ウィジェット (Timetable Widget)Just by speaking a phrase to be translated into your FOMA terminal, this application program translates it from Japanese to English or Chinese and vice versa.pYou can use all the functions charge free for 60 days from when you start using this application program. Some phrases available for translation are restricted on and after the 61st day. To use all the services, you need to register in My Menu (charged) from the “しゃべって翻訳 (Speech Translation)” site by ATR-Trek Co., Ltd. (in Japanese only)[How to access: iMenu→メニューリスト (Menu List)→辞書/学習/便利ツール (Dictionary/Study/Convenient Tool)→辞書/翻訳 (Dictionary/Translation)→しゃべって翻訳 (Speech Translation)]pYou are separately charged a packet communication fee.1Software list日英しゃべって翻訳_P (J-E Speech Translation_P) or 日中しゃべって翻訳_P (J-C Speech Translation_P)SKIPpSelect “日英しゃべって翻訳_P (J-E Speech Translation_P)” for using J-E version, or select “日中しゃべって翻訳_P (J-C Speech Translation_P)” for using J-C version.2Read “しゃべって翻訳とは (What is Speech Translation?)” and “ご利用規約 (Usage rules)” thoroughly同意する (Agree)pYou need to agree with “ご利用規約 (Usage rules)” when you use the program for the first time.3Read “ご利用注意事項 (Cautions in use)” thoroughlyOKはい (YES)pIf you select “いいえ (NO)”, “しゃべって翻訳とは (What is Speech Translation?)”, “ご利用規約 (Usage rules)”, and “ご利用注意事項 (Cautions in use)” do not appear when you start the program next time.4はい (YES)OKp“アプリの使い方 (How to use application)” appears at the first startup.日英版/日中版 しゃべって翻訳 for P(J-E/J-C Speech Translation for P)The display is for J-E version.© ATR-Trek](https://usermanual.wiki/Panasonic-Connect/209018A.User-Manual-Part-2-of-2/User-Guide-1106379-Page-28.png)
![279i-αppli/i-Widget5Select a menu item.日→英 翻訳 (Translate Japanese to English) . . .Starts translation from Japanese to English.英→日 翻訳 (Translate English to Japanese) . . .Starts translation from English to Japanese.日→中 翻訳 (Translate Japanese to Chinese) . . .Starts translation from Japanese to Chinese.中→日 翻訳 (Translate Chinese to Japanese) . . .Starts translation from Chinese to Japanese.シーンを変更 (Change scene) . . .Select a scene suitable for words to be translated.pPress i to switch between Japanese and English or Chinese.This is a convenient i-αppli program that bundles the TV program list and AV remote control function and the monthly charge is free.Anytime and anywhere you are, you can easily obtain the terrestrial digital, terrestrial analog or BS digital TV program information for the desired time zone. You can know about titles, contents, and start/end times of TV programs. Further, you can start a 1Seg program from the program list and vice versa.If there is any program you want to watch, you can set timer recordings of the program on a DVD recorder, etc. over the Internet. (You need to have a DVD recorder, etc. that supports the remote timer recording function. And you need to perform initial settings of this application program.) Further, you can search for the program information by keywords such as program genres or celebrities you like, or pickup keywords on the top of the display. You can also remote-control a TV, video recorder, and DVD player. (Some models are not supported.)pSee page 362 for details on the infrared remote control.pYou need to make the initial settings and to agree with the usage rules for the first time.pYou are separately charged a packet communication fee.pTo use this application program overseas, set the FOMA terminal’s clock to Japan time.pFor details, refer to “Mobile Phone User’s Guide [i-mode] FOMA version”.Gガイド番組表リモコン (G Guide Program List Remote Control)※The display is for reference. The actual one may differ. Local programs according to your region appear on your display.You can set 1Seg TV Timer for programs you want to watch by selecting from the program list of this application program.How to set TV Timer1. Software listGガイド番組表リモコン (G Guide Program List Remote Control)Highlight a program you want set TV Timer for and press i()視聴予約 (TV Timer)予約実行 (Execute booking)Operate following the instructions on the display.You can select a program you want to record and set a timer recording from the program list of this application program.How to set a timer recording1. Software listGガイド番組表リモコン (G Guide Program List Remote Control)Highlight a program to be set for a timer recording and press i()♯ワンセグ録画予約 (1Seg timer recording)予約実行 (Execute booking)Operate following the instructions on the display.(You can set a timer recording also by highlighting a program and pressing s.)If you have a DVD recorder, etc. that supports the remote timer recording function, you can set timer recordings from the program list of this application program over the Internet even if you are away. For remote timer recording, you need to make initial settings of this application program.How to make initial settings1. Set the Internet connection for the DVD recorder, etc.(Refer to the instruction manual of the DVD recorder, etc. you use.)2. Software listGガイド番組表リモコン (G Guide Program List Remote Control)i()リモート録画予約 (Remote timer recording)Operate following the guidance.How to set timer recordingsAfter the initial settings, specify your desired program and select “リモート録画予約 (Remote timer recording)”. Then, the DVD recorder, etc. specified on this application program is connected via the Internet, and you can set timer recordings.pYou are separately charged a packet communication fee.About TV timer functionAbout timer recording functionAbout remote timer recording function](https://usermanual.wiki/Panasonic-Connect/209018A.User-Manual-Part-2-of-2/User-Guide-1106379-Page-29.png)
![281i-αppli/i-WidgetpFor service contents and details of subscriptions, refer to the i-mode site of DCMX (in Japanese only).・i-mode site: iMenu→DCMX iDQR code for accessing the siteInformationp“未設定 (Unset)” or “ ” is displayed on the Software list until the card information setting is completed.pTo start this application program for the first time, you need to agree with “ご利用上の注意 (Cautions in use)”.pYou are charged a packet communication fee for settings and operations. ■Cautions on Osaifu-Keitai compatible i-αppliNote that we take no responsibility for any information set on your IC card.On the map, you can easily find out area information, shop information, and the contents created by users. You can switch to the aerial photo mode or view the map by Street View. You can also check the transportation to the destination by the line search and navigate yourself to the destination.© 2009 Google - Map data © 2009 ZENRIN■About the Map displayl: Displays the menu.i: Searches. (Searches shops in the area, service information, and other places to show on the map.)Mo: Moves the cursor.Oo: Context menu [現在地の住所 (Postal address of current location), ここまでの経路 (Route up to here), ここからの経路 (Route from here), ストリートビュー (Street view), お気に入りに保存 (Bookmark), 付近を検索 (Search the vicinity)]1: Zoom out2: Switches map/aerial photo.3: Zoom in0: Shows the current location.a: Saves to/Displays from bookmark.pYou need to agree to the usage rules when you use it for the first time.pYou are separately charged a packet communication fee. You are advised to subscribe to Pake-hodai, Pake-hodai full or Pake-hodai double for using this software program.pFor details, refer to “ヘルプ (Help)” in the menu.モバイルGoogleマップ (Google Map for Mobile)](https://usermanual.wiki/Panasonic-Connect/209018A.User-Manual-Part-2-of-2/User-Guide-1106379-Page-31.png)
![282i-αppli/i-Widget“モバイルSuica登録用iアプリ (Mobile Suica Setup i-αppli)” is the i-αppli program NTT DOCOMO provides for making initial settings required before you use the Osaifu-Keitai compatible service, “Mobile Suica”, offered by JR East. Make the initial settings on this application program, and follow the online instructions to download the Suica application from the JR East site and subscribe to it.pYou need to agree with “ご注意事項(必読) [Cautions (Must read)]” when you use this program for the first time.pYou are separately charged a packet communication fee.pYou can delete this application program after completing initial settings, but the area within the IC card you set remains occupied. To use the occupied area for other services, you need to initialize all the data in the IC card (full format, hereafter).pYou need to visit a docomo shop to perform a full format.pAll the data files on the IC card are deleted by the full format.pWhen you use Mobile Suica Service after a full format, you need to make initial settings again using this i-αppli program.pFor the information about Mobile Suica, refer to the i-mode site (in Japanese only).i-mode site:iMenu →メニューリスト (Menu List) → おサイフケータイ (Osaifu-Keitai) → 対応サービス (Compatible services) → モバイルSuica (Mobile Suica)p“Mobile Suica” is a registered trademark of East Japan Railway Company.モバイルSuica登録用iアプリ (Mobile Suica Setup i-αppli)※The display is for reference.The actual one may differ.What you can do with i-Avatar Maker■Create avatarsYou can easily create avatars by using various parts prepared by i-Avatar Maker. You can create avatars viewing the images shot by the camera or stored in Data Box, or can create avatars based on the prepared samples.■Use avatarsYou can use the created avatars by converting to the materials for Deco-mail, Deco-mail pictograms, Decome-Anime, or the Machi-chara images which support i-concier.By registering the created avatars on the i-avatar site, you can change their clothes and publicize them on the competition site.pYou are separately charged a packet communication fee for converting avatars to Decome-Anime templates or Machi-chara images.pYou are separately charged a packet communication fee for registering avatars on the i-avatar sites.pYou might need to purchase items for changing their clothes on the i-avatar site.pi-avatar is a trademark of D2 COMMUNICATIONS.p“Avatar Maker” is a trademark of ACRODEA, Inc.iアバターメーカー (i-Avatar Maker)※The display is for reference.The actual one may differ.© 2009 Acrodea, Inc./© eitarosoft](https://usermanual.wiki/Panasonic-Connect/209018A.User-Manual-Part-2-of-2/User-Guide-1106379-Page-32.png)
![283i-αppli/i-Widget“楽オク☆アプリ (Rakuoku ☆ Application)” enables you to easily exhibit your goods on Rakuoku whenever you want wherever you are. The instruction guides you through exhibition procedures, and you can make “体験出品 (trial entries)”, so you can use it easily even if you are a beginner. As the “かんたん入力 (Easy entering)” function and the convenient functions such as shooting/editing photos and saving records are available, you can exhibit your goods in a shorter time than you do on sites.pYou need to agree with “利用規約 (Usage rules)” when you use this program for the first time.pYou are separately charged a packet communication fee.pFor details on Rakuoku, refer to “Mobile Phone User’s Guide [i-mode] FOMA version”.pTo exhibit on Rakuoku, you need to subscribe to the Rakuten membership and register on My menu.pFor the information about Rakuoku, refer to i-mode site (in Japanese only).i-mode site: iMenu→オークション (Auction)■Widget Appli Supported (see page 290)The information of the goods recommended by Rakuoku or the goods you exhibit/bid for is displayed, so you can easily check the auction state.楽オク☆アプリ (Rakuoku ☆ Application)※The display is for reference.The actual one may differ.QR code for accessing the siteThis is a convenient i-αppli program that enables you to read the map of the place you are currently in or you specify, check area information, or navigate yourself to the destination by using the location information. You can search for information of facilities which are useful in a time of disaster. Further, using Chizu Talk function, you can exchange messages with your friends on the map.pSee page 307 for details on operations.i-αppli Banking is an i-αppli program that enables you to conveniently use mobile banking (check your account balance and deposit/withdrawal details, and transfer/shift money, etc.) from your FOMA terminal. You can use up to two financial institutions by entering your specified password at the startup of the i-αppli program. You can pay bills/payment notices also by Pay-easy.pTo use mobile banking on i-αppli Banking, you need to have the bank account and subscribe to the Internet banking service of each bank.pYou are separately charged a packet communication fee.pFor details on i-αppli Banking, refer to “Mobile Phone User’s Guide [i-mode] FOMA version”.pFor the information about i-αppli Banking, refer to i-mode site (in Japanese only).i-mode site: iMenu→メニューリスト (Menu List)→モバイルバンキング (Mobile Banking)→ iアプリバンキング (i-αppli Banking)■Widget Appli Supported (see page 290)With i-αppli Banking Widget, you can easily start i-αppli Banking by entering your password on the Widget display, and can use your registered financial institutions and optional functions more conveniently.地図アプリ (Map Application)iアプリバンキング (i-αppli Banking)※The display is for reference.The actual one may differ.QR code for accessing the site](https://usermanual.wiki/Panasonic-Connect/209018A.User-Manual-Part-2-of-2/User-Guide-1106379-Page-33.png)
![287i-αppli/i-WidgetYou can check whether a software program has started automatically and properly. Also, you can check the information of start failure from IC card. Up to three records of automatic start, a record of automatic start set by i-αppli, and a record of start failure from IC card are stored.1mi-αppliiαppli infoAuto start infoStartO . . . . .Started automatically and properly.StartX. . . . . .Did not start automatically. When “ ” is displayed, you can press Oo( ) to start the software program.Start–. . . . . .Has not started yet.With the i-αppli call function, you can call up your friends on the i-αppli program to have online matches and to share the information with them.pWith i-αppli calls, you are called up in two ways; directly by your friend or by the IP (Information Service Providers).pRejecting all i-αppli calls is also available.For details, refer to “Mobile Phone User’s Guide [i-mode] FOMA version”.Auto Start InfoInformationpSoftware programs do not start automatically in the following cases:・When the FOMA terminal is turned off・When the date and time are not set・When another function is working・During Lock All・During Personal Data Lock・During playback of animations/Flash movies・When the time set for automatic start is identical to the reserved time set for “Software update”, or the time set for an alarm of “Alarm”, “Schedule”, “ToDo”, “TV timer”, or “Timer recording”・When a start time has been specified to the same software program within 10 minutes from the previous auto-startpIf automatic start fails, “ ” appears on the desktop. Select the icon to show the Auto Start Info.Using i-αppli Call1While an i-αppli program which supports i-αppli call is runningMake an i-αppli callYESpThe operation differs depending on the i-αppli program.When an i-αppli call comes in, the i-αppli call ring tone sounds and the confirmation display appears asking whether to answer it.1The i-αppli call confirmation display appearsSelect an item.Accept . . . . . . . Answers the i-αppli call. The target i-αppli program starts.Reject. . . . . . . . Rejects the i-αppli call.Hold . . . . . . . . . Holds the i-αppli call. “ ” appears at the top of the display, and “ ” appears on the desktop. Press Oo, highlight “ ” and press Oo to show the i-αppli call logs.pSome i-αppli calls activate the i-αppli program without showing the confirmation display.pWhen you answer an i-αppli call, you might be charged a packet communication fee.pWhile a display other than the Stand-by display is shown, only “ ” tells you the arrival of i-αppli calls.pWhen the target i-αppli program is already running, the operation varies depending on the i-αppli program.The confirmation display might appear asking whether to download the target i-αppli program or to access a site. Select “YES” to download it or to access the site. Select “NO” to return to the Stand-by display. In this case, “Accept” is recorded on the i-αppli call log.Send i-αppli Calls to Call up MembersReceive i-αppli CallsWhen the target i-αppli program is not found on the FOMA terminal when you select “Accept”](https://usermanual.wiki/Panasonic-Connect/209018A.User-Manual-Part-2-of-2/User-Guide-1106379-Page-37.png)
![290i-αppli/i-WidgetWhen the i-αppli Stand-by display does not end successfully, you can check the date/time and its reason.1mi-αppliiαppli infoEnd stand-by infopWhen “ ” is displayed on the End Stand-by Info display, press i( ), and select “Copy info” to copy the information. Select “Delete info”, and select “YES” to delete the information.Depending on the i-αppli program, you can save its data files on the microSD card. You can display the i-αppli data files saved on the microSD card.1mi-αppliiαppli(microSD)iαppli dataEnd Stand-by Info<iαppli Data>Displaying i-αppli Data Files on the microSD CardFunction Menu while i-αppli Data File is DisplayedFolder info You can display the information of the software program that uses the selected folder, available/unavailable for folder usage, and the reason if unavailable.Delete folder You can delete the selected folder and files in the folder.Enter your Terminal Security CodeYESi-Widget is a useful function that enables you to access the frequently-used contents such as the calculator, clock, and stock price information (Widget Appli) by pressing the i-Widget key (r).You can add Widget Appli programs by downloading from sites offered by IPs (Information Providers). (See page 270)Also, you can paste multiple (up to eight) Widget Appli programs to the i-Widget display to customize it to your taste.pMultiple Widget Appli programs might communicate when you show the i-Widget display.pYou are separately charged a packet communication fee for downloading Widget Appli programs or showing the i-Widget display.pAs for overseas use, you are charged a packet communication fee each time a Widget Appli program communicates. Further, the packet communication fee for the overseas use differs from the one for the domestic fee. For details, refer to “Mobile Phone User’s Guide [International Services]” or the DOCOMO Global Service website.pFor details on i-Widget, refer to “Mobile Phone User’s Guide [i-mode] FOMA version”.■Widget Appli listi-Widgetニコリの数独 (SUDOKU of NIKOLI) See page 276NIKKEI NET See page 277ファミリー伝言板 (Family Message Board) See page 277時刻表ウィジェット (Timetable Widget) See page 278楽オク☆アプリ (Rakuoku ☆ Application) See page 283地図アプリ (Map Application) See page 283iアプリバンキング (i-αppli Banking) See page 283Start! iウィジェット (Start! i-Widget) See page 284マクドナルド トクするアプリ(McDonald’s TOKUSURU KEITAI application)See page 284iWウォッチ (iW Watch) See page 284P-SQUARE INFO See page 277付箋 (Sticky) See page 277株価アプリ (Stock Prices Application) See page 285Googleモバイル (Google Mobile) See page 285](https://usermanual.wiki/Panasonic-Connect/209018A.User-Manual-Part-2-of-2/User-Guide-1106379-Page-40.png)
![291i-αppli/i-WidgetAfter starting i-Widget, you can simultaneously start multiple Widget Appli programs. You can show the multiple running Widget Appli programs on the i-Widget display.1Press r.i-Widget starts.When any Widget Appli program is running, the i-Widget display is displayed. When no Widget Appli program is running, the Widget Appli list is displayed.pYou can start i-Widget also by selecting a Widget Appli program from the Software list.Using i-WidgetStart i-Widgeti-Widget displayInformationpWith i-Widget, you can simultaneously start and show up to eight Widget Appli programs. When you switch Widget Appli programs to be displayed while eight Widget Appli programs are running, end an unwanted Widget Appli program and then start another one from the Widget Appli list. See page 292 for ending a Widget Appli program. pIf you have not operated for three minutes from the Widget Appli list or i-Widget display, the Stand-by display automatically returns. The Stand-by display does not automatically return from the Widget Appli operation display.pEven if you end i-Widget while a pre-installed Widget Appli program is running and change the UIM or initialize the FOMA terminal, the Widget Appli program does not end and remains running as launched from i-Widget.■About i-Widget displayWidget Appli displayOn the Widget Appli list, all Widget Appli programs are displayed and “ACTIVE” is displayed for the running Widget Appli program. On the i-Widget display/Widget Appli operation display, each application program is shown in running state.: Widget Appli:i-αppli DX compatible Widget Appli: Widget Appli for communication: GPS compatible Widget Appli: Osaifu-Keitai compatible Widget Appli: Downloaded from an SSL/TLS pageNavigation displayNavigation that corresponds to the key operation is displayed.You can change the position of Widget Appli programs on the i-Widget display. You cannot specify each position as it is automatically changed.1i-Widget displayi[シャッフル (Shuffle)]Shuffle i-WidgetWidget Appli list i-Widget display Widget Appli operation display](https://usermanual.wiki/Panasonic-Connect/209018A.User-Manual-Part-2-of-2/User-Guide-1106379-Page-41.png)
![292i-αppli/i-WidgetYou can end i-Widget to return to the Stand-by display.1Widget Appli list/i-Widget display/Widget Appli operation displayhpYou can return to the Stand-by display also by pressing r or m[戻る (Return)] from the i-Widget display.pFor the Widget Appli operation display, the confirmation display appears asking whether to finish it.You can set whether to communicate via i-Widget overseas.1mi-αppliiαppli settingsi-Widget roaming set.ON or OFFYou can set whether to sound an effect tone at the start of i-Widget.1mi-αppliiαppli settingsi-Widget sound effectON or OFFEnd i-WidgetSetting i-Widgeti-Widget Roaming SettingInformationpWhen you arrive at a destination overseas, the setting changes to “OFF” and the confirmation display appears when you start i-Widget.i-Widget Sound EffectInformationpThe effect tone at the start of i-Widget sounds at the volume set for “Phone” of “Ring volume”. It sounds at Level 2 when “Step” is set.1Widget Appli listSelect a Widget Appli program to be started.You can show the Widget Appli operation display.pYou can start a Widget Appli program also by selecting it from the Software list.pYou can show the Widget Appli operation display also by selecting a running Widget Appli program.pYou can show the i-Widget display by pressing r or m[戻る (Return)] from the Widget Appli operation display.1i-Widget display/Widget Appli operation displayHighlight a Widget Appli program to be ended and press c[アプリ終了 (END Widget Appli)]YESWhen a Widget Appli program does not end successfully, you can check the date/time and its reason.1mi-αppliiαppli infoEnd Widget appli infpWhen “ ” is displayed on the End Widget Appli Inf display, press i( ), and select “Copy info” to copy the information. Select “Delete info”, and select “YES” to delete the information.<Start Widget Appli>Starting Widget AppliEnd Widget AppliEnd Widget Appli Inf](https://usermanual.wiki/Panasonic-Connect/209018A.User-Manual-Part-2-of-2/User-Guide-1106379-Page-42.png)
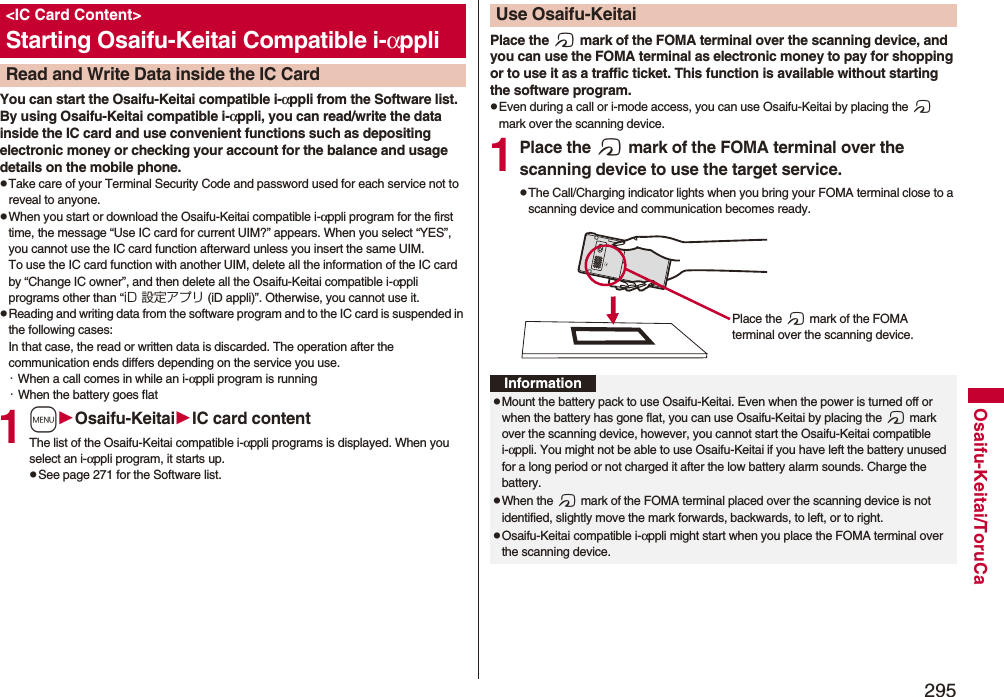
![294Osaifu-Keitai/ToruCaOsaifu-Keitai mounts the IC card, so you can make payment and others just by placing the FOMA terminal over the scanning device in a shop.Further, you can use communications to deposit electronic money or to check your account for balance or usage histories. Security is fully secure※1 so that you can make use with a sense of security.For details on Osaifu-Keitai, refer to “Mobile Phone User’s Guide [i-mode] FOMA version”.pTo use the Osaifu-Keitai compatible service, you need to download the Osaifu-Keitai compatible i-αppli program from the Osaifu-Keitai compatible site※2 (in Japanese only) to make the settings.※1 You can use Omakase Lock and IC Card Lock. (See page 115 and page 296)※2iMenu→メニューリスト (Menu List)→おサイフケータイ (Osaifu-Keitai)pData on the IC card (including electronic money, reward points, etc.) might be lost or deformed owing to the malfunction of the FOMA terminal. (When we keep your FOMA terminal for repair, we cannot keep it with data files left, so the data files shall be deleted beforehand by yourself as a rule.) For supports such as reissue, restoration, temporary storage, or transfer of data files, consult the service provider which supports Osaifu-Keitai, except for the data transfer by iC transfer service. For your important data files, be sure to use the service with backup support.pIn any case including malfunction or model change, we cannot be held responsible for the loss or deformation of data on the IC card or other losses caused regarding Osaifu-Keitai compatible services.pIf your FOMA terminal is stolen or lost, inquire of the provider for Osaifu-Keitai compatible service you use about ways of dealing with the trouble, immediately.Osaifu-KeitaiiC transfer service※1 is the service for moving※2 a package of data files※3 on the IC card of your Osaifu-Keitai to your new Osaifu-Keitai when you replace your Osaifu-Keitai such as at the time of phone model change or malfunction. After moving data files on the IC card, just download※4 an Osaifu-Keitai compatible i-αppli program, and then you can use the Osaifu-Keitai services continuously. iC transfer service is available at the service counters such as a nearby docomo shop.For details on iC transfer service, refer to “Mobile Phone User’s Guide [i-mode] FOMA version”.※1 Both the transferring end and transferred end have to be the FOMA terminal that supports iC transfer service. Visit a nearby counter such as a docomo shop to use iC transfer service.※2 This service is not for “copying” but for “moving” data files, so no data files on the IC card remain in the FOMA terminal at the transferring end. iC transfer services is not available for some cases, so use backup services for Osaifu-Keitai compatible services.※3 Some Osaifu-Keitai compatible services do not cover iC transfer service, and you can move only the files on the IC card of the Osaifu-Keitai compatible service that covers iC transfer service.※4 You are charged a packet communication fee for downloading i-αppli programs and respective settings.iC Transfer Service](https://usermanual.wiki/Panasonic-Connect/209018A.User-Manual-Part-2-of-2/User-Guide-1106379-Page-44.png)
![296Osaifu-Keitai/ToruCaTo prevent the IC card function from being used by others, you can set the Osaifu-Keitai, received ToruCa, or iC communication disabled.pIf the battery runs out while IC Card Lock is set, the IC card stays locked.1Press and hold m for at least one second.“ ” appears and IC Card Lock is set.pTo release IC Card Lock, perform the same operation and enter your Terminal Security Code. When Timer Lock ON At Close is set and “Lock OFF at open” is set to “ON”, the display for releasing IC Card Lock appears also by opening the FOMA terminal.You can set whether to lock the IC card function while the power is turned off.1mSet./ServiceLock/SecurityLock settingormOsaifu-KeitaiIC card lock set.2IC lock (power-off)Enter your Terminal Security CodeSelect an item.Setting before OFF . . . . Follows the setting just before turning off the power.Lock . . . . . . . . . . . . . . . . Sets IC Card Lock.<IC Card Lock>Locking IC Card FunctionIC Lock (Power-off)You can check whether IC owner information required for using the IC card is consistent with the information of the currently inserted UIM.1mOsaifu-KeitaiCheck IC ownerpWhen the UIM differs from the stored one, select “Change” and reset the data on the IC card, and then you can newly store the UIM information. You can reset the IC owner information by deleting data on the IC card. After resetting, you can newly register information of currently inserted UIM.pWhen you initialize the IC owner information, the Osaifu-Keitai compatible i-αppli programs except “iD 設定アプリ (iD appli)” are deleted. However, they might not be deleted depending on your usage state, so you need to delete them separately.1mOsaifu-KeitaiChange IC ownerResetYESEnter your Terminal Security CodeYESToruCa is an electronic card that you can receive with Osaifu-Keitai for use as fliers, restaurant cards, and coupon tickets. You can receive ToruCa files from scanning devices or sites and can easily exchange them using mail, infrared ray, or a microSD card.The received ToruCa files are saved to “ToruCa” of “Osaifu-Keitai”.pFor details on ToruCa, refer to “Mobile Phone User’s Guide [i-mode] FOMA version”.<Check IC Owner>Checking Owner Information of IC CardChange IC Owner<ToruCa>ToruCa](https://usermanual.wiki/Panasonic-Connect/209018A.User-Manual-Part-2-of-2/User-Guide-1106379-Page-46.png)

![300Osaifu-Keitai/ToruCaInformation<Auto-sort>p“ ” is displayed when the Genre sort is set, “ ” is displayed when the Title sort is set, and “ ” is displayed when the Index sort is set.pWhen a file satisfies multiple conditions, it is sorted into the top of the folder in the ToruCa Folder list.<Copy to microSD>pThe ToruCa file (details) is copied as a ToruCa file before receiving details if it contains the data file with the UIM security or whose output from the FOMA terminal is prohibited.<CPY all to microSD>pThe ToruCa files in the “ToruCa” folder within the FOMA terminal are saved to “SD ToruCa” on the microSD card.<Copy all to phone>pThe ToruCa files in “SD ToruCa” on the microSD card are added or overwritten and then saved to the “ToruCa” folder in the FOMA terminal.<Select storage>p“ ” is displayed for the folder set as a destination.pWhen you execute Check microSD, or create or edit a folder by using a personal computer, the destination folder on the microSD card might be changed. When the setting is changed, set the destination folder again.State of ToruCa file※1 Does not apply to the ToruCa file downloaded from a site.※2 Appears for only the ToruCa file on the microSD card.p“ ” is added to the expired ToruCa file.p“ ” is added to the ToruCa file whose output from the FOMA terminal is prohibited.CategoryDisplays a category icon that matches the contents of the ToruCa file.Index fileDisplays the location data of the publisher of the ToruCa file information.TitleDate and time the ToruCa file was receivedToruCa informationSummary and the “詳細 (Details)” key are displayed for a ToruCa file. Publisher information is displayed for a ToruCa file (details).How to See ToruCa File List/Detailed ToruCa File DisplayToruCa File listDetailed ToruCa File display(for ToruCa file)Detailed ToruCa File display[for ToruCa file (details)] ※1Unread ToruCa fileRead ToruCa fileUsed ToruCa file※2FOMA terminal incompatible ToruCa file](https://usermanual.wiki/Panasonic-Connect/209018A.User-Manual-Part-2-of-2/User-Guide-1106379-Page-50.png)
![301Osaifu-Keitai/ToruCaFunction Menu of the ToruCa File List/Detailed ToruCa File DisplayAttach to mail You can compose an i-mode mail message with the ToruCa file attached.Go to step 2 on page 130.pYou can compose it also by pressing l().Move Select a destination folder.pYou cannot select the “Used ToruCa” folder.Search/sortSearch[List only]You can search through ToruCa file in the folder by specifying a search condition.Select a search condition.Genre. . . .Select a genre.Press l( ) to display a list of category icons belonging to the genre.Title . . . . .Enter characters to be searched for, from those in the title.Index . . . .Enter characters to be searched for, from those in location data.pYou can enter up to 20 full-pitch/40 half-pitch characters for the Title search, and up to 10 full-pitch/20 half-pitch characters for the Index search.Sort[List only]You can change the order of displayed files.Select an order.CopyCopy You can copy the displayed or highlighted ToruCa file to another folder.Select a destination folder.pYou cannot select the “Used ToruCa” folder.Copy to microSD The files are copied to the folder as specified by “Select storage” on page 299.Copy to phone You can copy the ToruCa file from the microSD card to the ToruCa folder in the FOMA terminal.Connect to Center[List only]See page 124.ToruCa folders[List only]You can display the ToruCa folder list.pYou can display it also by pressing c().Multiple-choice[List only]You can select multiple ToruCa files and operate them.Put a check mark for ToruCa files to be selectedi()Select an item.Move . . . . . . . . . . . . . See page 301.Copy. . . . . . . . . . . . . . See page 301.Copy to microSD . . . See page 301.Copy to phone . . . . . See page 301.Send Ir data. . . . . . . . See page 360.Select all . . . . . . . . . . Selects all files.Release all. . . . . . . . . Releases all selections.Update ToruCa[Detailed display only]You can re-receive the information about the ToruCa file. The re-received ToruCa file (details) is automatically overwritten and then saved.YESpYou cannot update some ToruCa files.pSee page 194 when ToruCa files are stored to the maximum.Operate imageSave one image[Detailed display only]You can save an image displayed on the ToruCa file.Select an imageGo to step 2 on page 192.Save some images[Detailed display only]You can save multiple images displayed on the ToruCa file.Put a check mark for images to be savedl()Go to step 2 on page 192.Save all images[Detailed display only]Among the images displayed on the ToruCa file, you can save all the images that can be saved at one time.Go to step 2 on page 192.Save BG image[Detailed display only]You can save the background image of the ToruCa file and set it for the Stand-by display or Wake-up display.Go to step 2 on page 192.](https://usermanual.wiki/Panasonic-Connect/209018A.User-Manual-Part-2-of-2/User-Guide-1106379-Page-51.png)
![302Osaifu-Keitai/ToruCaRetry[Detailed display only]You can play back an animation image or Flash movie in the ToruCa file from the beginning.pWhen a part of the Flash movie is outside the display area, the Flash movie might not be played back.Add to phonebook[Detailed display only]See page 82.Add desktop icon See page 30.Ir/ transmissionSend Ir data See page 360. transmission See page 362.Memory info[List only]You can display the used memory space (estimate)/the number of saved files.DeleteDelete this[List only]YESDelete selected[List only]Put a check mark for ToruCa files to be deletedl()YESDelete all[List only]You can delete all ToruCa files in the folder.Enter your Terminal Security CodeYESDelete[Detailed display only]YESInformation<Attach to mail>pThe ToruCa file (details) that contains data whose output from the FOMA terminal is prohibited is attached as a ToruCa file before receiving details.pYou might not be able to attach the ToruCa file to i-mode mail depending on its file size.<Copy>pYou cannot copy ToruCa files whose output from the FOMA terminal is prohibited.<Copy to microSD>pThe ToruCa file (details) is copied as a ToruCa file before receiving details if it contains the data file with the UIM security or whose output from the FOMA terminal is prohibited.pWhen the number of files in the destination folder on the microSD card is full, a new folder is automatically created and ToruCa files are saved to that folder.When copying is completed, the message “Storage is changed to XXXXXXXX” (XXXXXXXX denotes a folder name) appears.pThe name of copied ToruCa file is TORUCXXX (XXX denotes a numeral).pWhen no folder is set as a destination folder on the microSD card, a new folder is created automatically and the file is saved to the folder. After saving, the newly created folder is set as the destination folder.pYou might not be able to execute “Copy to microSD” for the ToruCa file depending on its file size.<Copy to phone>pYou might not be able to execute “Copy to phone” for the ToruCa file depending on its file size.<Operate image>pTransparent GIF file (except animation GIF file) whose file extension is “ifm” is saved as a frame or stamp.Information](https://usermanual.wiki/Panasonic-Connect/209018A.User-Manual-Part-2-of-2/User-Guide-1106379-Page-52.png)


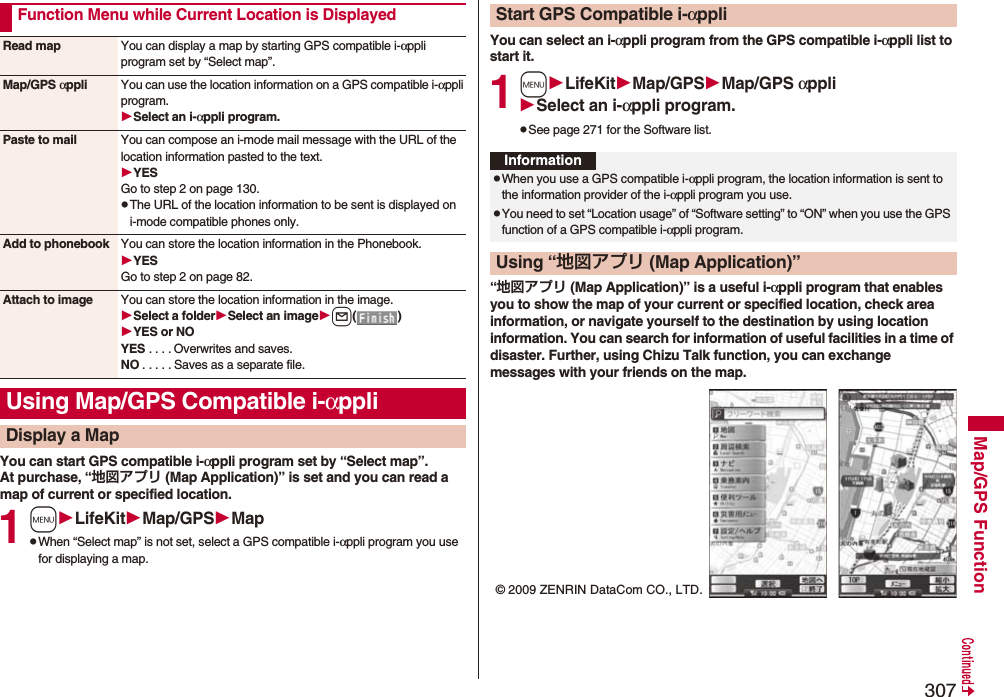
![308Map/GPS Function■About Service ChargeThe services provided by this application are classified as follows:Charge-free functionspMap viewing and area information search are available. Gourmet-coupon search is also available.pOn the map, you can color the places for which you previously measured by using GPS, by the unit of city, ward, town, village, or prefecture. This function shows the visited places at a glance.pIn addition to the ordinary map, you can change the mode to show the various types of maps such as the 3D map, train-route accentuated map, and day/night mode map, etc.Charged functionsYou can use these functions charge free except traffic information for up to 60 days from when you start Map Application for the first time. After this charge-free period, you need to register yourself to My Menu at “ゼンリン 地図+ナビ (ZENRIN map+navi)” (charged) provided by ZENRIN DataCom CO., LTD.pYou can navigate yourself to the destination by the comprehensive search including cars, trains, and on foot. Root search considering traffic snarls is also available.pYou can show the train transfer information and timetables.pYou can show the locations of your friends on the map and exchange messages with them.pYou can search for facilities which are useful in a time of disaster. You can also use the disaster map application, the i-αppli program which does not require communications. If you previously download the disaster map of your neighborhood, you will be helped in case of emergency.InformationpYou are separately charged a packet communication fee. You are advised to subscribe to Pake-hodai, Pake-hodai full or Pake-hodai double for using this software program.pIf you delete this software program, download it from “iエリア−周辺情報− (i-area -Area Information-)”.pNote that we are not held responsible for the accuracy and promptness of the map and route information.pWhile driving, ensure that a person other than the driver operates this software program.pThe displays are for reference, so the actual ones might differ.You can provide your location information on the request from others. Depending on the service you use, you need to set GPS service settings beforehand. (See page 311) Also, you need to set “Location request set.” to the setting to permit the location provision beforehand.<When the setting by service is “毎回確認 (Check every time)”>1When a location provision request arrivesYES or NOYES . . . . Measures the current location and sends the location information.NO . . . . . Rejects to provide the location information.pIf no keys are pressed for about 20 seconds, the former display returns without providing your current location.<When the setting by service is “許可 (Accept)”>1When a location provision request arrivesOKpWhen you select “OK” or about three seconds elapse, the current location provision starts.pThe information about where to provide might not be displayed.pPress r to stop providing information. However, your location information might be sent depending on the timing.<Provide Location>Providing Location Information on RequestInformationpIf no keys are pressed for about 15 seconds from the Position Location Result display or the Failure display, the former display returns.pTo use “imadoco search”, you need to trace from iMenu → “お客様サポート (User Support)” → “各種設定( 確 認・変 更・利 用 ) [Respective settings (Confirmation/Change/Use)]” → “その他サービス設定・確認 (Other Service Settings/Confirmation)” → to set “位置情報利用設定(イマドコサーチ設定) [Location Information Usage Setting (imadoco search Setting)]”.pWhen “Location request set.” is set to other than “OFF”, your location information might be sent and known to the searchers, even if you do not operate the FOMA terminal.](https://usermanual.wiki/Panasonic-Connect/209018A.User-Manual-Part-2-of-2/User-Guide-1106379-Page-58.png)
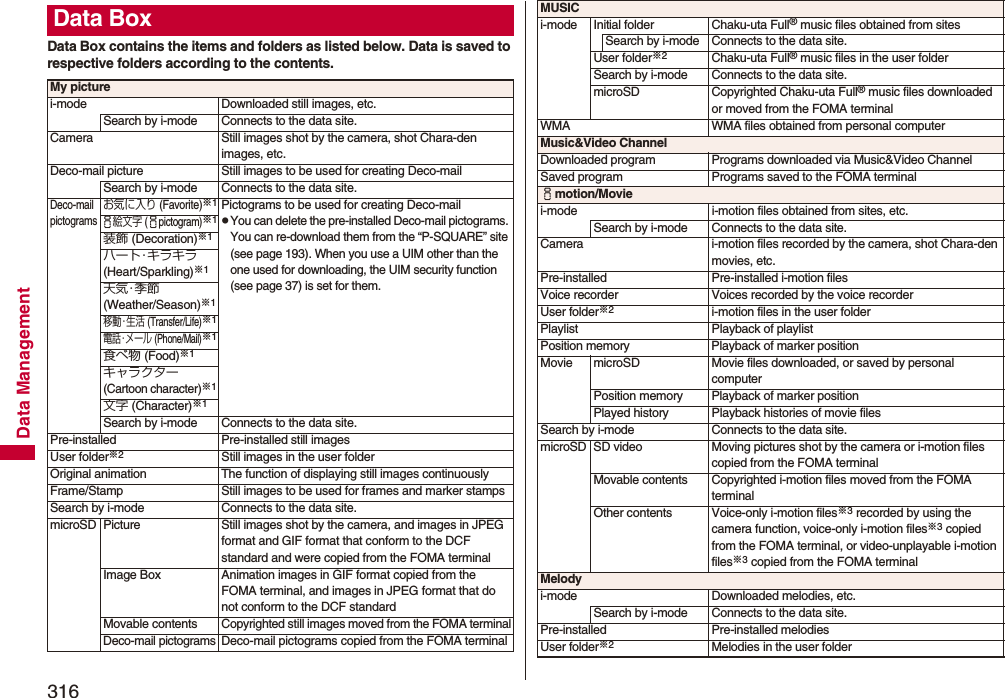
![317Data Management※1 The folder names can be changed by “Edit folder name”. Deco-mail pictograms are directly saved to these folders, and files other than Deco-mail pictograms cannot be saved to them.※2 The folder names you have entered for “Add folder” are displayed.※3 Includes the music files in AAC format.Voice announce Data files recorded by using “Voice announce”Playlist Playback of playlistSearch by i-mode Connects to the data site.microSD Melody Melodies copied from the FOMA terminalMovable contents Copyrighted melodies moved from the FOMA terminalMy documentsi-mode Pre-installed or downloaded PDF filesmicroSD My documents PDF files downloaded or copied from the FOMA terminalMovable contents Copyrighted PDF files moved from the FOMA terminalKisekae ToolPre-installed or downloaded Kisekae Tool filesSearch by i-mode Connects to the data site.microSD Kisekae Tool files downloaded, or moved from the FOMA terminalMachi-charaPre-installed or downloaded Machi-chara imagesSearch by i-mode Connects to the data site.microSD Machi-chara images downloaded, or moved from the FOMA terminalChara-denPre-installed or downloaded Chara-den images1SegImage Still images recorded by 1SegVideo Video recorded by 1Seg, and copyright-protected and 1Seg-compatible moving pictures created with other AV devicesPosition memory Playback of marker positionDocument viewerDocument files saved from mail (attached files)SD other filesSD others Incompatible files saved from mail (attached files), or downloaded files in BMP or PNG format■Icons on the File listFile TypeTitle namePictureIcon Type File formatStill image JPEGStill image with location information JPEGStill image/Animation image GIFFrame GIFMarker stamp GIFFlash movie SWFi-motion file MP4 (AMR)i-motion file MP4 (AAC)i-motion file MP4 (AAC+[HE-AAC])i-motion file MP4 (Enhanced aacPlus)i-motion file ASFMovie file WMV, ASFMovie file on the Internet WVX, ASXMovie file WMAMovie file on the Internet WAXVideo MPEG2-TSVideo already viewed MPEG2-TS※Video not viewed yet MPEG2-TSPartially saved i-motion file —Melody SMFMelody MFiComplete PDF file PDFPartial PDF file PDF](https://usermanual.wiki/Panasonic-Connect/209018A.User-Manual-Part-2-of-2/User-Guide-1106379-Page-67.png)
![326Data ManagementYou can play back the i-motion files stored in the FOMA terminal or microSD card, or the moving pictures published on the Internet for personal computers (movie files). pYou can play back the sound of i-motion/movie files in stereo sound by connecting to the Stereo Earphone Set (option). Also, you can play back programs wirelessly by using a commercial Bluetooth device. (See page 400)1mData boximotion/MovieSelect a folderSelect a file.pEach time you press m from the Folder list, you can switch between the folders in the FOMA terminal and the microSD card.pSee page 356 for the Function menu of the Folder list.pWhen you select a folder or i-motion file from another function, some folders or i-motion files may not be displayed depending on the function. You may be able to confirm the i-motion file by pressing l( ) while selecting an i-motion file.pDepending on the i-motion file, you can play back by selecting a chapter set for the i-motion file. (See page 330)pSee page 193 when you select “Search by i-mode”.pWhen you press h during playback, pause, or halt, movie player ends. It ends even during playback with obtaining.<i-motion Player> <Movie Player>Playing i-motion/MovieFolder list i-motion listMovie listpThe following images are displayed when you cannot display a preview image.※1 For the Movie list, the “NG” image is displayed.※2 For the Movie list, the preview image is displayed.■Operations when playing back i-motion/movie filepSee page 330 for when you operate from the Function menu.Unplayable imagePlayback restrictions have expired, and the like.※1No preview imagesIncompletedownload※2Operation Key operationQuick View[i-motion only]l( ) (See page 330)Fast forward[Movie only]l()pl( ) to play backMute/Release mute iPause Oo()pOo( ) to play backPlay back frame by frame[i-motion only]l( ) during pausepEach time of pressing proceeds frame by frame.Sound volume adjustmentBo or </>Display next file or chapter※1VoDisplay previous file or chapter※1CopWhen playback time is over three seconds, you go back to the beginning of the file. (You go back to the top of the chapter for the file with chapters.)Search (fast forward)[i-motion only]Press and hold Vo.Search (fast rewind)[i-motion only]Press and hold Co.Select position to play※2[Movie only]Press and hold No.](https://usermanual.wiki/Panasonic-Connect/209018A.User-Manual-Part-2-of-2/User-Guide-1106379-Page-76.png)


![354Data ManagementThe FOMA terminal creates the following folders on the microSD card to save data files. When you write files to the microSD card from a personal computer, you need to write in the specified folder configuration and file names.aaa: A three-digit half-pitch numeral of 100 through 999 (Use the same numerals for the folder name, and for the file name saved to that folder.)bbb: A three-digit half-pitch numeral of 001 through 999ccc: A three-digit half-pitch alpha-numeral (hexadecimal numeral※)ddddd: A five-digit half-pitch numeral of 00001 through 65535eeee and ffff: A four-digit half-pitch alpha-numeral (hexadecimal numerals※)gggg: A four-digit half-pitch numeral of 0001 through 9999###: Extension※The hexadecimal numerals are carried up every 16, unlike the way the decimal numerals are carried up every 10. They are indicated by half-pitch numerals of 0 through 9 and half-pitch alphabets of A through F.pUsing a personal computer, you can write a file name of up to 64 bytes (including extension) of free characters for a PDF file, SD other file, movie file, Word file, Excel file and PowerPoint file. However, you cannot use following characters:¥ / , : ; * ? “ < > |InformationpIf the FOMA terminal and personal computer are not correctly connected, or the remaining battery level of the FOMA terminal shows very low or goes flat, you cannot send or receive data. In addition, you may lose data.pWhile data is being read or written, do not pull the FOMA USB Cable with Charge Function 01/02 off. Not only you cannot send or receive data, but also you may lose the data.pWhile data is being read or written, you cannot set this function. Further, make sure that you do not “Reset settings” or “Initialize” during reading/writing. Malfunction of the microSD card could result.pWhen “MTP mode” is set, you cannot reset functions by “Reset settings”. When you turn on the power after removing the battery, the mode is set to “Communication mode”.pYou cannot read from/write to a personal computer while reading from/writing to the FOMA terminal, and vice versa.pTo use the DOCOMO keitai datalink, set it to “Communication mode”.Folder Configuration on microSD CardDCIM (Folder for DCF standard still images)aaa_PANAPaaagggg.### (Extension is JPG, or GIF.)MISC [DPOF folder (This folder is created automatically when “DPOF setting” on page 369 is set.)]SD_VIDEO (Folder for moving pictures)PRLccc (Folder for i-motion files)MOLccc.### (Extension is 3GP, SDV, ASF, or MP4.)MGR_INFO (Folder for video management information)PRGccc (Folder for videos)PRIVATEDOCOMOSTILL (Folder for non-DCF standard still images)SUDbbbSTILgggg.### (Extension is JPG, GIF, or SWF.)DOCUMENT (Folder for PDF files)PUDbbbPDFDCbbb.PDFRINGER (Folder for melodies)RUDbbbRINGgggg.### (Extension is MLD, or SMF.)TORUCA (Folder for ToruCa files)TRCbbbTORUCbbb.TRCMMFILE [Folder for non-SD-VIDEO standard motion pictures (include music data of AAC format)]MUDbbbMMFgggg.### (Extension is 3GP, SDV, ASF, or MP4.)WM_SYSTEMWMDECOIMG (Folder for Deco-mail pictograms)DUDbbbDIMGgggg.### (Extension is JPG, or GIF.)OTHER (Folder for SD other files)OUDbbbOTHERbbb.### (Extension is up to three-digit half-pitch alphabets that the FOMA terminal cannot recognize.)](https://usermanual.wiki/Panasonic-Connect/209018A.User-Manual-Part-2-of-2/User-Guide-1106379-Page-104.png)

![356Data ManagementFiles in My picture, MUSIC, imotion/Movie, Melody, My documents (SD), Kisekae Tool (SD), Machi-chara (SD), Document viewer, and SD other files in Data Box are managed in the respective folders.pSee page 263 for folder operations of MUSIC.pEven when the files in the “Movable contents” folder are listed, the Function menu in the Folder list is displayed.InformationpFolder and file names may be displayed in lowercase characters depending on the personal computer you use.pWhen the personal computer is set not to display extensions and hidden folders, change the setting and then operate. For how to change the setting, refer to the instruction manual for your personal computer or Help.pDo not use the personal computer to delete or move the folders on the microSD card. The microSD card might not be read by P-09A.pYou cannot see the files in the “SD_AUDIO”, “SD_BIND” and “PRGccc” folders on a personal computer, as they are encrypted.pWhen you save data in the “PRGccc” folder by using a personal computer, you might not be able to delete the video using the FOMA terminal.pWhen you delete, overwrite, or write a file on a personal computer, ensure that you do not use the same file name you have once used. Even when you have deleted that file, use a different file name.pEach time you perform “Backup to microSD”, all folders and files in the “BACKUP” folder are deleted and new ones are created. When you perform “Delete backup data”, all folders and files in the “BACKUP” folder are deleted.pOn the FOMA terminal, you might not be able to display or play back a data item which was saved to the microSD card from other devices. On other devices, you might not be able to display or play back a data item which was saved to the microSD card from the FOMA terminal.pTo procure a microSD reader/writer or PC card read adapter, inquire respective manufacturers for the operation of microSD card beforehand.Managing FoldersFunction Menu of the Folder ListAdd folder You can create a user folder.Enter a folder name.pYou can enter up to 10 full-pitch/20 half-pitch characters in the FOMA terminal.pYou can enter up to 31 full-pitch/63 half-pitch characters on the microSD card. You can enter up to 10 full-pitch/20 half-pitch characters for a folder in the “Movable contents” folder.Edit folder name You can edit the name of a user folder, or a folder in the “Deco-mail pictograms” folder in the FOMA terminal.Enter a folder name.pYou can enter up to 10 full-pitch/20 half-pitch characters in the FOMA terminal.pYou can enter up to 31 full-pitch/63 half-pitch characters on the microSD card. You can enter up to 10 full-pitch/20 half-pitch characters for a folder in the “Movable contents” folder.Delete folderDelete this You can delete the highlighted user folder.Enter your Terminal Security CodeYESDelete selected Put a check mark for user folders to be deletedl()Enter your Terminal Security CodeYESDelete all You can delete all user folders.Enter your Terminal Security CodeYESFolder security[My picture/imotion/Movie]You can set the folder to open only when you enter your Terminal Security Code.Enter your Terminal Security CodeYESThe folder changes to “ ”.pTo release it, perform the same operation.Send all Ir data[My picture/imotion/Movie/Melody]See page 361.](https://usermanual.wiki/Panasonic-Connect/209018A.User-Manual-Part-2-of-2/User-Guide-1106379-Page-106.png)
![357Data ManagementDEL all frm folder[My picture only]You can delete all the files in the folder selected in “i-mode”, “Camera”, “Deco-mail picture”, “Deco-mail pictograms”, and user folder in “My picture”.Enter your Terminal Security CodeYESEdit playlist[Melody only]You can select up to 10 melodies and program them in order as you like. This is displayed while you are selecting “Playlist”.Select a playing order from <1st> through <10th>Select a folderSelect a melody.pTo release a programmed melody, select “Release this”.Repeat the operations and complete the playlist editingl()Release playlist[Melody only]You can release all the programmed melodies from the playlist. This is displayed while you are selecting “Playlist”.YESSelect storage You can set the destination folder for when you save to the microSD card.YESMemory info You can display the used memory space (estimate)/number of stored items.pYou can display them also by pressing c().Information<Add folder>pYou can add up to 20 folders in the FOMA terminal. However, you can add up to 19 folders in “imotion/Movie”.pYou cannot add folders on the microSD card in the following cases:・When 900 folders are contained in “Picture”・When 4,095 folders are contained in “SD video”・When 999 folders are contained in “Image Box”, “Deco-mail pictograms”, “Melody”, “Other contents”, “My documents”, “Document viewer”, or “SD other files”<Edit folder name>pYou cannot edit the Folder-Security-activated folder name.<Delete folder>pAll data files in the user folder are deleted.pWhen you select this function on the microSD card, “Delete this” is performed.pWhen a melody set for another function is deleted, the setting returns to the default. (When the melody is set for an alarm tone of “Schedule”, “ToDo” or “TV timer”, or for “Alarm”, it switches to “Clock Alarm Tone”.)<Folder security>pYou can set it only for “i-mode”, “Camera”, user folder, and “Voice recorder”.pWhen you select a folder with folder security, the display for entering your Terminal Security Code appears. Enter your Terminal Security Code to temporarily release folder security.<Edit playlist>pIf you change or delete the file name, title, or contents of the melody stored in the playlist, all the melodies are released from the playlist.<Select storage>pThe following icons are displayed for the folder set as a destination folder:“ ” . . . Folders in the “Picture” folder and “SD video” folder“ ” . . . Folders in “Document viewer”, and “SD other files”Folders in the “Deco-mail pictograms” folder, “Image Box” folder, “Movie” folder, “Melody” folder, and “My documents” folder“ ” . . . Folders in the “Kisekae Tool” and “Machi-Chara”Folders in the “Movable contents” folder“ ” . . . Folders in the “Other contents” folderpWhen you execute Check microSD, or create or edit a folder by using a personal computer, the destination folder on the microSD card might be changed. When the setting is changed, set the destination folder again.Information](https://usermanual.wiki/Panasonic-Connect/209018A.User-Manual-Part-2-of-2/User-Guide-1106379-Page-107.png)

![362Data ManagementYou can use the FOMA terminal as a TV remote control by starting the i-αppli program.pTo use remote control devices, you may need to download the software program for those devices. [The pre-installed “Gガイド番組表リモコン (G Guide Program List Remote control)” supports the infrared remote control function.] The key operation for the remote control differs depending on the software program.pThis function does not work with some devices.pCommunication might be affected by compatible devices and the ambient light.pYou cannot use the infrared remote control during Self Mode.pTurn the FOMA terminal’s Infrared data port to the front of a device to be operated. You can operate within about 4 meters away from the device.pThe radiation angle of the infrared rays is within ±15° from the center.For when you forward Phonebook entries using infrared rays, iC communication, microSD card, or DOCOMO keitai datalink, you can specify whether to forward the stored still images together.1mPhonebookPhonebook settingsForwarding imageON or OFFUsing Infrared Remote Control FunctionInfrared Remote Control+m-2-6<Forwarding Image>Communication SettingWithin about 4 metersInfrared data portWithin±15° fromthe centeriC communication is the function that enables you to send/receive data files to/from another FOMA terminal using the FeliCa reader/writer function. You can send/receive data files by facing the f mark of your FOMA terminal toward that of another FOMA terminal supporting the iC communication function. However, you cannot exchange some files depending on the other party’s FOMA terminal.pThe type of files you can forward and forwarding conditions are the same as those for infrared communication. (See page 358) However, you cannot send multiple files, all Decome-Anime templates and all data files in Data Box at a time.pYou cannot execute iC communication while “IC card lock” is activated.pYou might have difficulty in sending or receiving files depending on the destination FOMA terminal. In that case, move a f mark close to or away from the other f mark or move each side up, down, left, or right.pDuring communication, the FOMA terminal is placed in the same state as it is out of the service area, so you cannot make/receive voice calls or videophone calls, use packet communication such as i-mode or mail, or use data communication.You can send/receive the data files one by one using iC communication.pSee “■Notes on sending/receiving” on page 360 as well.pYou cannot use this function during charging.1Display of the data file to be senti() transmissionpTo send a Phonebook entry, select “Send Ir/ trans/BT” → “ transmission” from the Function menu and then select “Send phonebook”.pTo send a schedule event, select “Ir/ transmission” → “ transmission” from the Function menu and then select “Send”.pTo send a mail message, Decome-Anime template, ToruCa file or bookmark, select “Ir/ transmission” from the Function menu and then select “ transmission”.<iC Transmission>iC Communication FunctionSending/Receiving One DataSend One DatafFace one another’s f marks.](https://usermanual.wiki/Panasonic-Connect/209018A.User-Manual-Part-2-of-2/User-Guide-1106379-Page-112.png)


![380Convenient FunctionsYou can store up to 100 holidays. However, you cannot store multiple holidays for the same date.1mStationerySchedulei()SettingsSet holidayNewDo the following operations.2Press l().Store HolidaysDate setting Select an item.Yearly [fixed date]. . . . . Enter the date.Yearly [- - - - - -, - - -] . . . Enter the month, week, and day of the week.Holiday name Enter a holiday name.pYou can enter up to 10 full-pitch/20 half-pitch characters.InformationpHolidays stored at purchase on the calendar are conformance with “Law on National Holidays and the partially amended version of the Elder Law” (up to No.43, 2005). Spring Equinox Day and Autumn Equinox Day are announced on the official gazette of February 1 in the previous year, therefore, they may differ from the days on the calendar. (As of April 2009)You can check the details of schedule events and holidays. You can check birthdays stored in the Phonebook as well.1mStationeryScheduleThe Calendar display is shown.pIf you press m() or c( ), the calendar for the pervious or next month is displayed.pIf you receive a weather forecast for a week from i-concier, its information is also displayed.2Select a date.The list of schedule events and birthdays for the selected date is displayed.pFor the schedule events set to be repeated, up to 30 schedule events are displayed backward from the current day.Check Schedule EventsCalendar displaySchedule list](https://usermanual.wiki/Panasonic-Connect/209018A.User-Manual-Part-2-of-2/User-Guide-1106379-Page-130.png)

![383Convenient FunctionsYou can display contents of the schedule downloaded by i-concier.1Calendar display/Schedule listl()The i-schedule list is displayed.pSee “Search by i-mode” on page 193 when you select “To i-schedule list”.2Select an i-schedule item.Set secret/Release secretYou can set/release secret for/from the schedule event.YESpWhen you select “Set secret” in ordinary mode (not in “Secret mode” or “Secret data only”), enter your Terminal Security Code. Information<Delete>pThe schedule events downloaded from i-concier are not deleted.Displaying i-schedulei-schedule listDetailed i-schedule displayFunction Menu of the i-schedule List/Detailed i-schedule DisplaySchedule list You can display the schedule list stored in the i-schedule event. (See page 380)pYou can display the schedule list also by pressing l( ), or by selecting “To this i-schedule details” from the detailed i-schedule display.DeleteDelete this[i-schedule list only]YESDelete select[i-schedule list only]Put a check mark for i-schedule events to be deletedl()YESDelete all[i-schedule list only]Enter your Terminal Security CodeYES](https://usermanual.wiki/Panasonic-Connect/209018A.User-Manual-Part-2-of-2/User-Guide-1106379-Page-133.png)

![389Convenient FunctionsYou can confirm the last and accumulated call duration and cost for voice calls and videophone calls.pDisplayed call duration and cost are for reference and might differ from the actual ones. In addition, the consumption tax is not included in the call cost.pBoth the voice call duration and digital communications duration (videophone call duration + 64K data communication duration) are displayed and both incoming and outgoing calls are included in the duration.pThe call cost is for the outgoing calls only. However, “¥0” or “¥**” is displayed for toll free calls such as Free Dial or for Directory Assistance Service (104), etc.pThe call cost is accumulated on the UIM. Therefore, when you replace the UIM, the charge accumulated on the UIM in use is displayed. (accumulation from December 2004)pYou can reset the displayed call duration and call cost.1mSet./ServiceCall time/costCall dataLast call durationTalk: Displays the call duration of the latest voice call.Digital Videophone: Displays the call duration of the latest videophone call.Non-limiting digital: Displays the call duration of the latest 64K data communication.Last call costTalk: Displays the call cost for the latest voice call.Digital Videophone: Displays the call cost for the latest videophone call.Non-limiting digital: Displays the call cost for the latest 64K data communication.Total calls durationTalk: Displays the call duration of voice calls from the time Reset Total Duration was executed to the current time.Digital: Displays the call duration of videophone calls and 64K data communication from the time Reset Total Duration was executed to the current time.Total callsDisplays the call cost from the time Reset Total Cost was executed to the current call.+m-6-1<Call Data>Checking Call Duration/ChargeCalls resetDisplays the date and time when Reset Total Duration was executed last time.Cost resetDisplays the date and time when Reset Total Cost was executed last time.1mSet./ServiceCall time/costReset total cost&dura.Enter your Terminal Security CodeDo the following operations.InformationpWhen Last Call Duration exceeds “19 hours 59 minutes 59 seconds”, or Total Calls Duration exceeds “199 hours 59 minutes 59 seconds”, “0 s” returns to re-count the time.pIf you switch between the voice call and videophone call during a call, the call duration and call cost are counted respectively for the calls. You are not charged while “Changing” (see page 51) is displayed.pThe duration/charge for i-mode communication and packet communication are not counted. For how to check the i-mode fee, refer to “Mobile Phone User’s Guide [i-mode] FOMA version” which is supplied on your i-mode contract.pThe charge for Chaku-moji is not counted.pThe international call fee for using WORLD CALL is counted. The fees for using other international call services are not counted.pThe duration for ringing and calling is not counted as call duration.pIf you turn off the power or remove the UIM, Last Call Duration is reset to “0 s”; and Last Call Cost is reset to “¥**”.+m-6-0<Reset Total Cost&Duration>Resetting Total Duration/Total CostReset total duration You can reset Last Call Duration and Total Calls Duration to “0 s”.YESReset total cost You can reset Last Call Cost and Total Calls to “¥0”.YESEnter the PIN2 code.pSee page 112 for PIN2 code.](https://usermanual.wiki/Panasonic-Connect/209018A.User-Manual-Part-2-of-2/User-Guide-1106379-Page-139.png)

![406Character Entry1Move the cursor to the left of the character you want to correctrThe character at the right of the cursor is deleted. Press and hold r for at least one second to delete all characters on and after the cursor.pWhen no character is found to the right side of the cursor, the character to the left side of the cursor is deleted. Press and hold r for at least one second to delete all characters.2Enter a correct character.The character is entered in the position of the cursor.Other Entry FunctionsItem Operation/ExplanationKatakana input Press l( ) a few times to switch to Katakana input modePress keys to enter characters.Alphabet input Press l( ) a few times to switch to Alphabet input modePress keys to enter characters.pWhen you press c( ) in half-pitch Alphabet input mode, you can show the list of phrases frequently used for entering URLs and others.Numeral input Press l( ) a few times to switch to Numeral input mode Press keys to enter numerals.pYou can enter “+” by pressing and holding 0 for at least one second in Numeral input mode.Line feed Press a.pWhen the cursor is at the end of text and characters are fixed, you can press Xo to break a line. Information<Line feed>pA line feed is counted as one full-pitch character.pYou cannot break a line depending on the function such as editing in the text box for i-mode.pYou can enter “*” by pressing -a in Numeral input mode.Correct CharactersWhen the battery alarm soundsThe data you have been editing is automatically fixed and saved. Charge the battery or replace it with a new charged battery to resume editing. However, you cannot save the unfixed data being converted.When you press hThe confirmation display appears asking whether to discard the data you are editing.When a call or mail comes inThe Multitask function works, so the data you are editing is retained, and you can answer the call or receive the mail.You can return to the data edit display by switching menu, by pressing and holding x for at least one second. You can return to the data edit display also by ending the call or mail function.You can set whether to display the prediction conversion/context forecast candidates in the candidate list.1mSet./ServiceOther settingsCharacter input methodPredictON or OFFYou can set whether to store the characters converted in Secret Mode or Secret Data Only as learned words.1mSet./ServiceOther settingsCharacter input methodInt.with secretEnter your Terminal Security CodeON or OFFData you are editing+m-3-5Predict+m-3-5Intelligent with SecretFunction Menu while Entering (Editing) CharactersDecorate mail[Message Entry display only]See page 134.Template](https://usermanual.wiki/Panasonic-Connect/209018A.User-Manual-Part-2-of-2/User-Guide-1106379-Page-156.png)
![407Character EntryLoad template[Message Entry display only]See page 132.Save template[Message Entry display only]See page 132.Full pitch/Half pitch You can switch between full pitch and half pitch.Copy See page 410.Cut See page 410.Paste See page 410.Undo You can undo the fixed, deleted, or pasted text, etc.pYou can undo the operation also by pressing and holding d for at least one second.pYou can undo the operations up to 10 times, except on the Message Entry display. However, you can undo fixing characters only once.pOn the Message Entry display, you can undo the operations up to twice. You can also undo the decoration as well.Pictograms/symbolsPictogramsYou can enter pictograms while showing them on the display.Select a pictogram.The selected pictogram is entered and the Character Entry (Edit) display returns.pHighlight a pictogram and press l( ), then you can enter a pictogram in succession. Press r to return to the Character Entry (Edit) display.pYou can display the Pictogram list also by pressing m().pPress c to switch the Pictogram lists in order of “Pictograms 1” → “Pictograms 2” → “Deco-mail pictograms” [お気に入り (Favorite) through 文字 (Characters)]. However, you can enter “Deco-mail pictograms” [お気に入り (Favorite) through 文字 (Characters)] only while editing the i-mode mail text. Press m to switch them in the reverse order.pPress i( ) to display the Symbol list.pPress d to switch between the full display of Pictogram list and ordinary input display.Symbols You can enter symbols while showing them on the display.Select a symbol.The selected symbol is entered and the Character Entry (Edit) display returns.pHighlight a symbol and press l(), you can enter a symbol in succession. Press r to return to the Character Entry (Edit) display.pYou can display the Symbol list also by pressing and holding s for at least one second.pPress c to switch the symbol lists in order of Half-pitch symbols → Full-pitch symbols. Press m to switch them in the reverse order.pPress i( ) to display the Pictogram list.pPress d to switch between the list of all symbols and ordinary input display.Smiley Select a smiley.pYou can select smiley also by pressing c() or entering “かお” and converting it.Space You can enter a full-pitch space in full-pitch input mode, and a half-pitch space in half-pitch input mode.pWhen the cursor is at the end of text, you can enter a space also by pressing Vo.Phrase/quoteCommon phrases Select a folderSelect a common phrase.pIn mode other than numeral input mode, you can show the folder list for common phrases also by pressing and holding a for at least one second.Kuten code You can enter characters, numerals, and symbols on the Kuten Code list (see the PDF version of “Kuten Code List” on the provided CD-ROM).You can operate in Kanji/Hiragana input mode.Enter a four-digit Kuten code.A character that matches the entered Kuten code is displayed, and the former input mode returns.pWhen a character that matches the entered Kuten code is not found, a space is inserted.](https://usermanual.wiki/Panasonic-Connect/209018A.User-Manual-Part-2-of-2/User-Guide-1106379-Page-157.png)
![408Character EntryInput time Select a format for entering the date/timeEnter the date/time.pYou can enter the date/time using the numeric keys.pYou can enter years 1800 through 2099.Quote phonebook You can access and quote Phonebook entries. The following are the items you can quote:<Inside FOMA terminal>Name, reading, phone number, mail address, postal address, birthday, memorandumsPostal address, URL, memorandums obtained from i-concier<Inside UIM>Name, reading, phone number, mail addressSearch the PhonebookSelect a Phonebook entryPut a check mark for items to be quotedl()Quote own data You can access and quote your personal information. The following are the items you can quote: Name, reading, phone number, mail address, postal address, birthday, memorandumsEnter your Terminal Security CodePut a check mark for items to be quotedl()Paste loc. infoBy position loc.[Message Entry display only]You can obtain the location information by measuring the current location (see page 306), convert that information into the URL, and then paste it to the i-mode mail text.Oo()YESFrom loc. history[Message Entry display only]You can convert the location information from Location History (see page 310) into the URL, and paste it to the i-mode mail text.Select a location recordOo()YESFrom phonebook[Message Entry display only]You can convert the location information stored in the Phonebook into the URL, and paste it to the i-mode mail text.Select a Phonebook entryOo()YESFrom own number[Message Entry display only]You can convert the location information stored in “Own number” into the URL, and paste it to the i-mode mail text.Enter your Terminal Security CodeOo()YESBar code reader You can start Bar Code Reader. (See page 226)Character inputOwn dictionary See page 410.Learned words See page 411.Change input mode You can switch the character input methods.Select an input mode.pYou cannot select the input mode that is not selected in “Input mode” of “Character input method” (see page 404).Predict See page 406.Candidate displayYou can set whether to display context forecast candidates.ON or OFFCharacter set time You can select whether to automatically fix the entered characters while you are entering characters in Mode 1 (5-touch). In addition, you can specify the time until characters are fixed. You can omit the operation of pressing Vo to move the cursor for the entry of characters on the same key.Fast, Normal, Slow, or OFF2/NIKO-touch guide You can select whether to list input candidates at the lower part of the display when you press the first-digit key while you are entering characters in Mode 2 (2-touch) or Mode 3 (NIKO-touch).ON or OFFHelp You can check the operating procedures for entering characters.Select an item.JUMP You can move the cursor to the top or end of text.To beginning or To endpWhen the Character Entry (Edit) display ranges over multiple pages, the cursor moves to the beginning or end of the page.Preview[Message Entry display only]You can check the contents of the text before sending.Information<Full pitch/Half pitch>pWhen you switch to half-pitch mode in Kanji/Hiragana input mode of NIKO-touch, the input mode switches to half-pitch Katakana input mode.](https://usermanual.wiki/Panasonic-Connect/209018A.User-Manual-Part-2-of-2/User-Guide-1106379-Page-158.png)
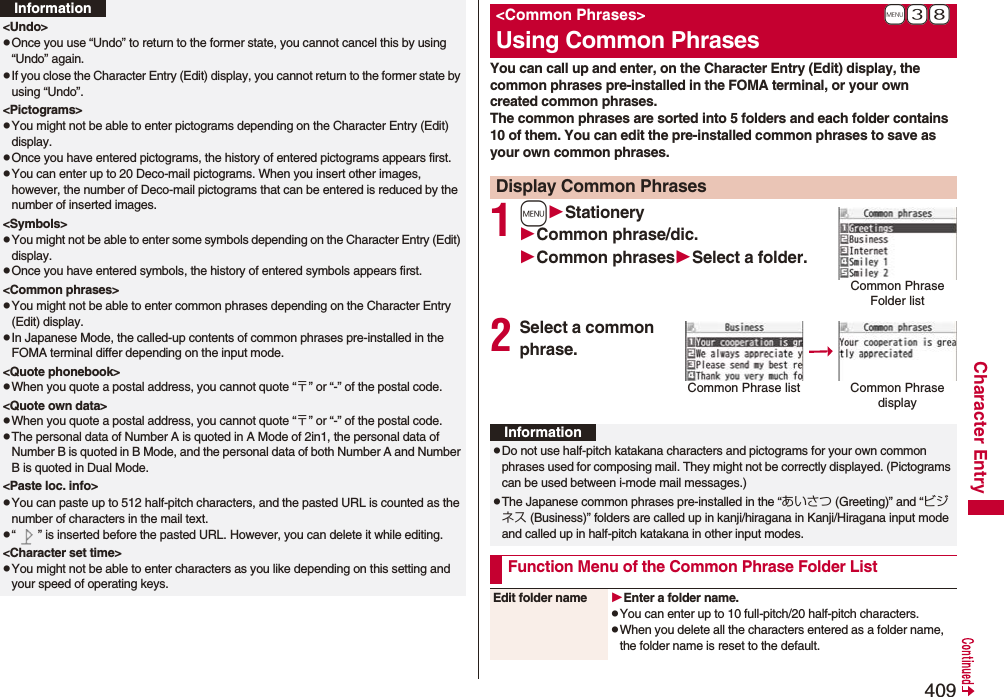
![413Network ServicesChecking New Voice Mail Messages . . . . . . . . . . . . . . . . . . . . . . . . . . . . . . . <Check New Messages> 414Using Voice Mail Service . . . . . . . . . . . . . . . . . . . . <Voice Mail> 414Using Call Waiting Service . . . . . . . . . . . . . . . . <Call Waiting> 416Using Call Forwarding Service . . . . . . . . . . <Call Forwarding> 418Using Nuisance Call Blocking Service . . . . . . . . . . . . . . . . . . . . . . . . . . . . . .<Nuisance Call Blocking> 419Using Caller ID Display Request Service . . . . . . . . . . . . . . . . . . . . . . . . . . . . . . . . . . .<Caller ID Request> 420Using Dual Network Service . . . . . . . . . . . . . . <Dual Network> 420Switching Guidance Language between Japanese and English. . . . . . . . . . . . . . . . . . . . . . . . . . . . . . . . . . . <English Guidance> 421Using Service Numbers. . . . . . . . . . . . . . . <Service Numbers> 421Selecting Actions for an Incoming Call during a Call. . . . . . . . . . . . . . . . . . . . . . . . . . . . . . . . . . . . . <Arrival Call Act> 421Setting Remote Control. . . . . . . . . . . . . . . . <Remote Control> 422Setting Additional Number . . . . . . . . . . . . . . . <Multi Number> 422Using 2in1. . . . . . . . . . . . . . . . . . . . . . . . . . . . . . . . . . . . . <2in1> 424Using OFFICEED . . . . . . . . . . . . . . . . . . . . . . . . . . <OFFICEED> 429Saving and Using Services . . . . . . . . . . . <Additional Service> 430■ Available Network ServicesThe following are the DOCOMO network services available from the FOMA terminal.For the outline and usage method of each service, see the reference page in the table below.pThe network services are not available when you are out of the service area or out of reach of radio waves.pFor details, refer to “Mobile Phone User’s Guide [Network Services]”.pFor subscriptions and inquiries, contact “docomo Information Center” on the back page of this manual.p“OFFICEED” is a pay service which is available on a subscription basis. For details, visit the DOCOMO-enterprise-oriented website (in Japanese only). http://www.docomo.biz/d/212/p“Deactivate” does not mean that the contract for Voice Mail Service, Call Forwarding Service or other services is canceled.pYou can store new network services in the menu when they are provided by DOCOMO. (See page 430)pIn this manual, a brief outline for each network service is described following the procedure using the menus of the FOMA terminal.Service Application Monthly fee ReferenceVoice Mail Service Required Charged 414Call Waiting Service Required Charged 416Call Forwarding Service Required Free 418Nuisance Call Blocking Service Not required Free 419Caller ID Notification Service Not required Free 46Caller ID Display Request Service Not required Free 420Dual Network Service Required Charged 420English Guidance Not required Free 421Multi Number Required Charged 4222in1 Required Charged 424Public mode (Drive mode) Not required Free 67Public mode (Power off) Not required Free 67OFFICEED Required Charged 429Melody Call Required Charged 94Service Application Monthly fee Reference](https://usermanual.wiki/Panasonic-Connect/209018A.User-Manual-Part-2-of-2/User-Guide-1106379-Page-163.png)


![419Network Services11429dOperate following the voice guidance.You can forward an incoming call to the phone number you specified as a “Forwarding number” by a simple key operation. Even if you do not set Call Forwarding Service to “Activate”, the service will be available using this function.1During ringingi()Call forwardingYou can automatically forward the calls from the specified phone numbers stored in the Phonebook after the ring tone sounds for about one second, regardless of the Activate/Deactivate setting for Call Forwarding Service.You can specify up to 20 phone numbers.This setting is valid only when the caller notifies his/her phone number. It is advisable to activate “Caller ID request” at the same time.1Detailed Phonebook displayi()RestrictionsEnter your Terminal Security CodeCall forwarding“Call forwarding” is indicated by “★”.pTo release “Call forwarding”, perform the same operation.Set On/Off of Forwarding GuidanceForward an Incoming Call during RingingForward Specified Calls to Specified DestinationInformationpEven if you set this function, all incoming calls are not forwarded when you set “Personal data lock” while Call Forwarding Service is deactivated.However, when you set “Phonebook available” to “Accept” for “Customize” of Personal Data Lock, calls from the specified phone numbers are forwarded even during Personal Data Lock.pIf you have not signed up for Call Forwarding Service or have not set the forwarding destination, the call will be a missed call.You can register so as not to receive “nuisance calls” such as crank calls. Once you register a phone number for rejection, calls from that phone number is automatically rejected and the guidance answers the caller.pWhen a call comes in from the phone number stored for rejection, the ring tone does not sound. The call is not recorded in Received Calls, either.■Relation between each Service and incoming calls while Nuisance Call Blocking Service is activated1mSet./ServiceNW servicesNuis. call blockingDo the following operations.<Nuisance Call Blocking>Using Nuisance Call Blocking ServiceServiceHandling of incoming calls from the caller rejected as Register CallerVoice Mail Service Call Rejection guidance is played back. (Message is not held.)Call Forwarding ServiceCall Rejection guidance is played back. (Not forwarded to forwarding destination.)Call Waiting ServiceCall Rejection guidance is played back.Caller ID Display Request ServiceCall Rejection guidance is played back.Public mode (Drive mode)Call Rejection guidance is played back. [Public mode (Drive mode) guidance is not played back.]Register caller You can register the phone number of the call that arrived last for rejection.YESOKRegister selected No.You can register the specified phone number for rejection so that the call from that phone number does not come in.Enter a phone numberYESpPress Bo to select the phone number from the Search Phonebook display, and press Vo to select from the Dialed Call list, and press Co to select from the Received Call list.](https://usermanual.wiki/Panasonic-Connect/209018A.User-Manual-Part-2-of-2/User-Guide-1106379-Page-169.png)
![420Network ServicesThis service provides the guidance asking the caller ID notification against incoming voice calls/videophone calls without caller IDs, and then automatically disconnects the call.pThe call rejected by Caller ID Display Request Service is not stored in “Received calls”, and the “Missed call” desktop icon does not appear.■Relation between each Service and incoming calls while Caller ID Display Request Service is activated1mSet./ServiceNW servicesCaller ID requestDo the following operations.Delete last entry You can delete the phone number registered last. Repeat the same procedures to delete phone numbers one by one from the one registered last.YESOKDelete all entries YESOKCheck No. of entries You can check the number of phone numbers registered for rejection.<Caller ID Request>Using Caller ID Display Request ServiceServiceHandling incoming call from the caller who does not notify a caller IDVoice Mail Service Caller ID Request guidance is played back. (Message is not held.)Call Forwarding ServiceCaller ID Request guidance is played back. (Not forwarded to the forwarding destination.)Call Waiting ServiceCaller ID Request guidance is played back.Nuisance Call Blocking ServiceFor the call from the number registered to be rejected, the Call Rejection guidance is played back.Public mode (Drive mode)Caller ID Request guidance is played back. [Public mode (Drive mode) guidance is not played back.]Activate YESOKDeactivate YESOKCheck setting You can check the setting contents of Caller ID Display Request Service.You can use a mova terminal with the phone number for your FOMA terminal. You can use either your FOMA terminal or mova terminal depending on the service area.pYou cannot use your FOMA terminal and mova terminal at the same time.pYou need to operate Dual Network Switching from the phone which is not using the service.1mSet./ServiceNW servicesDual networkDo the following operations.InformationpIf you activate this service while “Call setting w/o ID” is set to “Reject”, this service has priority.pYou can set and confirm this setting from the FOMA terminal with your own UIM inserted. You cannot remote-control the setting from land-line phones, public phones, and other mobile phones.<Dual Network>Using Dual Network ServiceDual network switchingYou can switch to the FOMA terminal so that you can use it. Operate when the FOMA is in the FOMA service area.YESEnter your Network Security Code.pSee page 112 for the Network Security Code.Check setting You can check the setting contents of Dual Network Service.](https://usermanual.wiki/Panasonic-Connect/209018A.User-Manual-Part-2-of-2/User-Guide-1106379-Page-170.png)
![424Network ServicesYou can use two phone numbers/mail addresses on your single FOMA terminal. By using respective modes, you can operate your FOMA terminal as if you are using two sets of them. The following three modes are available with 2in1:A ModeYou can use your phone number (Number A) to make calls and your i-mode mail address (Address A) to send/receive mail messages, and can browse their related data.B ModeYou can use your 2in1 phone number (Number B) to make calls and your i-mode mail address (Address B) to send/receive mail messages, and can browse their related data.Dual ModeThis mode has the functions of both A Mode and B Mode.pFor details on 2in1, refer to “Mobile Phone User’s Guide [2in1]”.pYou can use packet communication even in B Mode if you subscribe to i-mode.pYou can subscribe to either 2in1 or Multi Number.pWhen you replace a UIM with another one while using 2in1, 2in1 Setting is deactivated. For using 2in1, activate 2in1 Setting.pSee page 427 for how this service works for each mode.1mSet./ServiceNW services2in1 settingEnter your Terminal Security CodeYESWhen you activate 2in1, the 2in1 Setting Menu display appears.pThis display appears also by pressing and holding < for at least one second from the Stand-by display and entering your Terminal Security Code.<2in1>Using 2in1Activate 2in12in1 Setting Menu display12in1 Setting Menu displayDo the following operations.Configure 2in1 SettingMode switching You can switch to the mode you use.Select a mode.pWhen 2in1 is activated, the display for selecting a mode appears also by pressing and holding < for at least one second from the Stand-by display, and entering your Terminal Security Code.pWhen “Mode link setting” is activated, the confirmation display appears telling that the setting for “Receive avoidance set.” is also changed.Phonebook 2in1 settingYou can change Phonebook 2in1 Setting for the Phonebook entry stored in the FOMA terminal.Select an item.Set to A . . . . . . . . . . Sets as the Phonebook entry for A. You can use it in A Mode and Dual Mode.Set to B . . . . . . . . . . Sets as the Phonebook entry for B. You can use it in B Mode and Dual Mode.Set to Common . . . Sets as the common Phonebook entry for A and B. You can use it in all modes.Select a setting method.Set one . . . . . Sets a Phonebook entry you call up.Set some. . . . Select multiple Phonebook entries from the Phonebook list you call up, then press l().Set group . . . Sets a Phonebook group you call up.](https://usermanual.wiki/Panasonic-Connect/209018A.User-Manual-Part-2-of-2/User-Guide-1106379-Page-174.png)

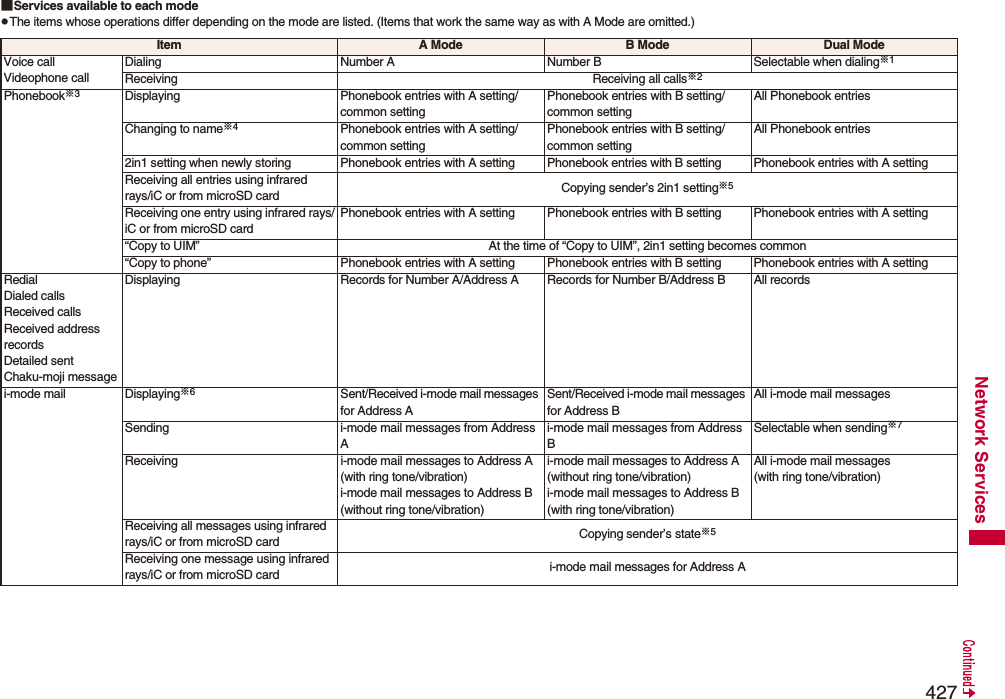
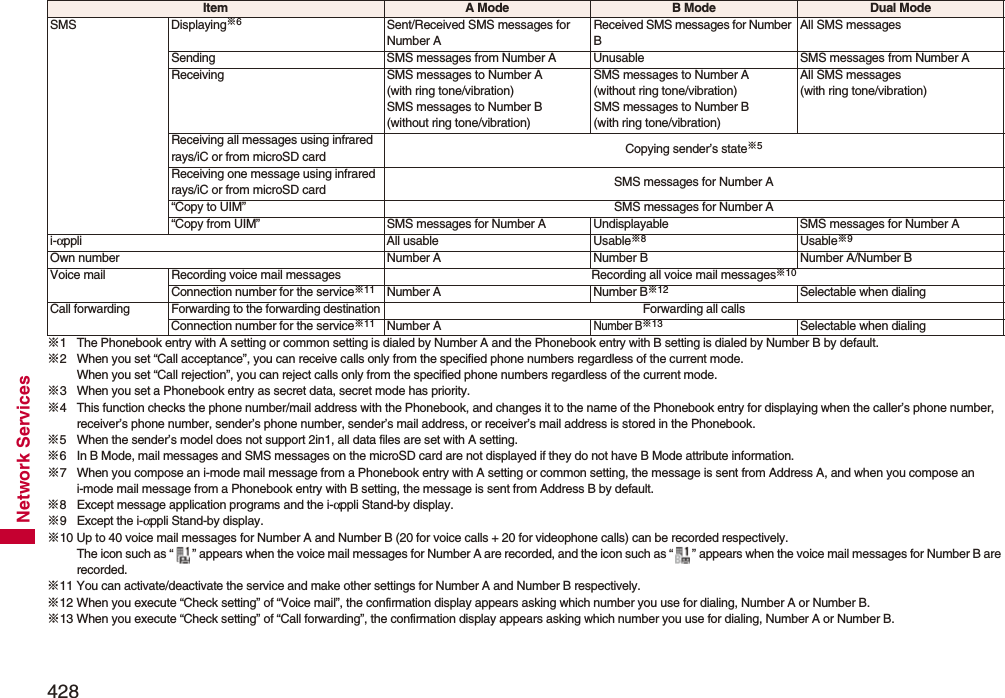

![432Overseas UseInternational Roaming (WORLD WING) is a service that enables you, using local carrier’s networks, to make calls or to communicate even in the foreign countries which are out of the service area of the FOMA network. pThere are following three major communication systems for network services overseas:3G NetworkThird generation mobile communications system that conforms to the world standard specifications, 3GPP (Third Generation Partnership Project※).※This is the regional standards organization for developing common technical specifications for third-generation mobile telecommunication systems (IMT-2000).GSM (Global System for Mobile Communications) NetworkThe most widespread 2G digital mobile standard system available worldwide.GPRS (General Packet Radio Service) NetworkA 2.5G mobile standard system enabling high-speed packet communications by GPRS using GSM communication system.pAt the time of purchase, the FOMA terminal is set to automatically switch networks in foreign countries. (See page 437)pRefer to the following before you use your FOMA terminal overseas:・“Mobile Phone User’s Guide [International Services]”・“Mobile Phone User’s Guide [Network Services]”・DOCOMO Global Service website・PDF file “海外ご利用ガイド (Guide for Overseas Use)” pre-installed in “My documents” in Data BoxOutline of International Roaming (WORLD WING)InformationpQuick Manual “For Overseas Use” is attached to the end of this manual. Refer to it when you use the FOMA terminal overseas.pFor the country/area codes, international call access codes, and international prefix numbers for the universal number, see page 434 and page 435.pOverseas use fee is added to your monthly bill. You might be requested, however, to pay the fee with the bill for the following month or later depending on the overseas carrier. Note that the usage amount to be paid for a month might not be charged in the same month.○: Available —: Not available※1 In B Mode or Dual Mode of 2in1, you cannot make calls from Number B.※2 You need to make overseas usage settings. (See page 433)※3 You need to make i-Channel settings. You are charged a packet communication fee each time you receive i-Channel messages (including the basic channel).※4 You need to make overseas usage settings for i-concier (see page 212). You are charged a packet communication fee each time you receive information.※5 You need to make i-Widget roaming settings (see page 292). When you show an i-Widget display, multiple Widget Appli programs might start. In this case, you are charged a packet communication fee for each communication.Available Services OverseasCommunication Service 3G GSM GPRSVoice call※1○○○Videophone call※1○——SMS ○○○i-mode※2○—○i-mode mail ○—○i-Channel※2※3○—○i-concier※4○—○i-Widget※5○—○Packet communication by connecting with a personal computer ○—○InformationpThe GPS functions and 64K data communication are not available overseas.pYou cannot dial from an additional number even if you are the user of Multi Number.pSome services are not available depending on the carrier or network. For connectable countries, regions, and carriers, refer to “Mobile Phone User’s Guide [International Services]” or the DOCOMO Global Service website.pThe packet communication fee for the overseas use differs from the one for the use in Japan.](https://usermanual.wiki/Panasonic-Connect/209018A.User-Manual-Part-2-of-2/User-Guide-1106379-Page-182.png)

![434Overseas Use■Country/Area codes for major countriesUse the following country/area codes when you make international calls or when you set Int’l Dial Assist.pFor the code for other countries or for details, refer to “Mobile Phone User’s Guide [International Services]” or the DOCOMO Global Service website.Service area Code Service area CodeAustralia 61 Monaco 377Belgium 32 Netherlands 31Brazil 55 New Zealand 64Canada 1 Norway 47China 86 Philippines 63Czech Republic 420 Poland 48Denmark 45 Portugal 351Finland 358 Russia 7France 33 Singapore 65Germany 49 South Korea 82Greece 30 Spain 34Hong Kong 852 Sweden 46Hungary 36 Switzerland 41India 91 Taiwan 886Indonesia 62 Thailand 66Ireland 353 Turkey 90Italy 39 United Arab Emirates 971Luxembourg 352 United Kingdom 44Macau 853 United States of America 1Malaysia 60 Vietnam 84■International call access codes for major countries (Table 1)The international call access codes for major countries are listed below.Service area Access code Service area Access codeAustralia 0011 Monaco 00Belgium 00 Netherlands 00Brazil 0021/0014 New Zealand 00Canada 011 Norway 00China 00 Philippines 00Czech Republic 00 Poland 00Denmark 00 Portugal 00Finland 00 Russia 810France 00 Singapore 001Germany 00 South Korea 001Greece 00 Spain 00Hong Kong 001 Sweden 00Hungary 00 Switzerland 00India 00 Taiwan 002Indonesia 001 Thailand 001Ireland 00 Turkey 00Italy 00 United Arab Emirates 00Luxembourg 00 United Kingdom 00Macau 00 United States of America 011Malaysia 00 Vietnam 00](https://usermanual.wiki/Panasonic-Connect/209018A.User-Manual-Part-2-of-2/User-Guide-1106379-Page-184.png)
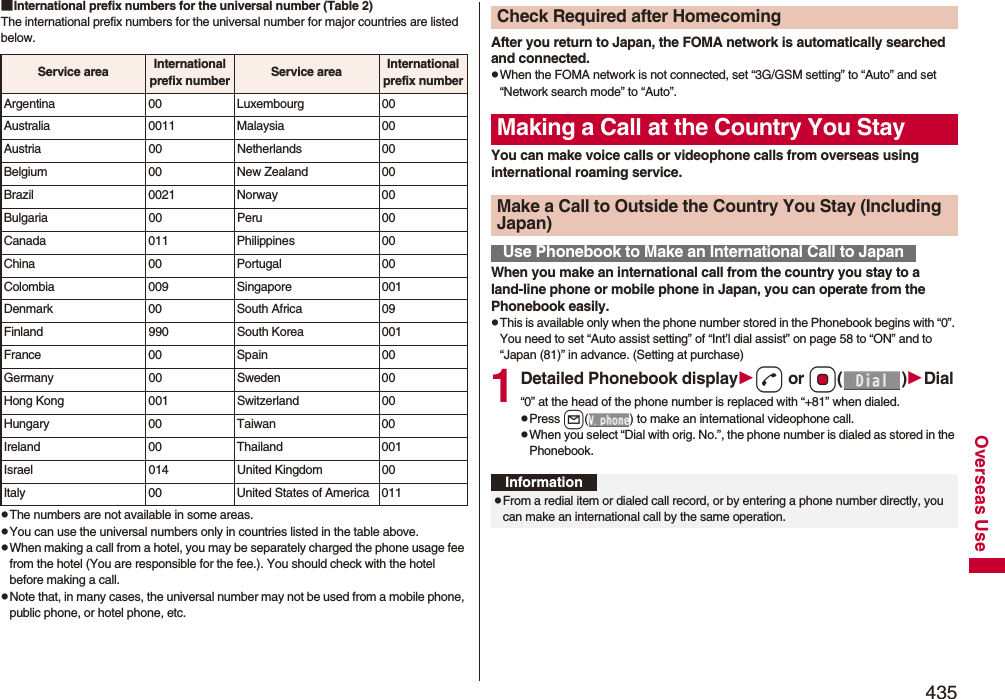


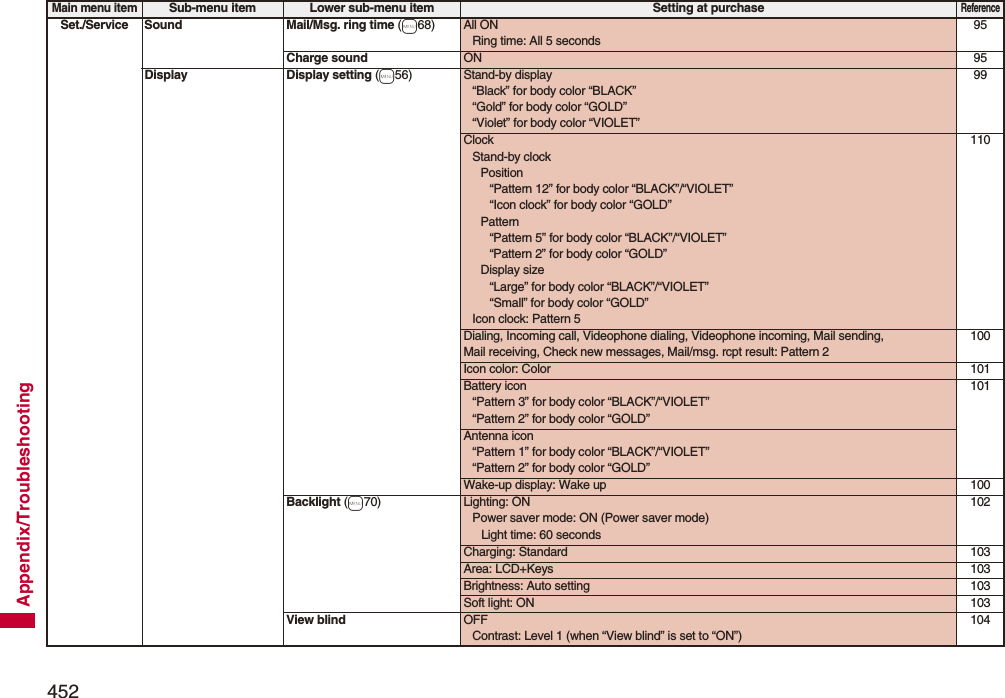
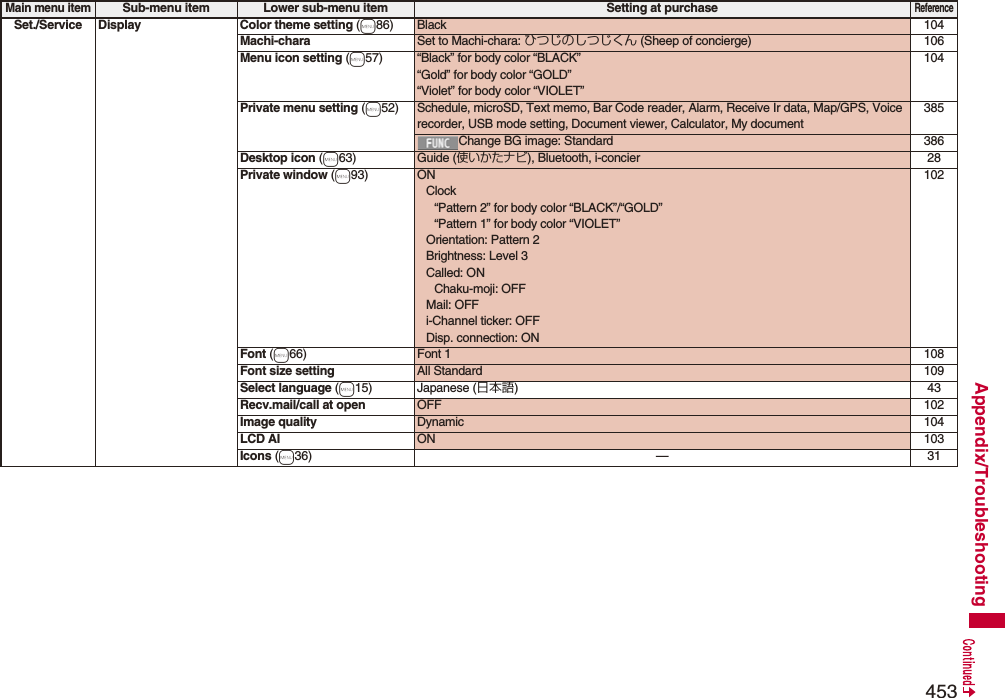
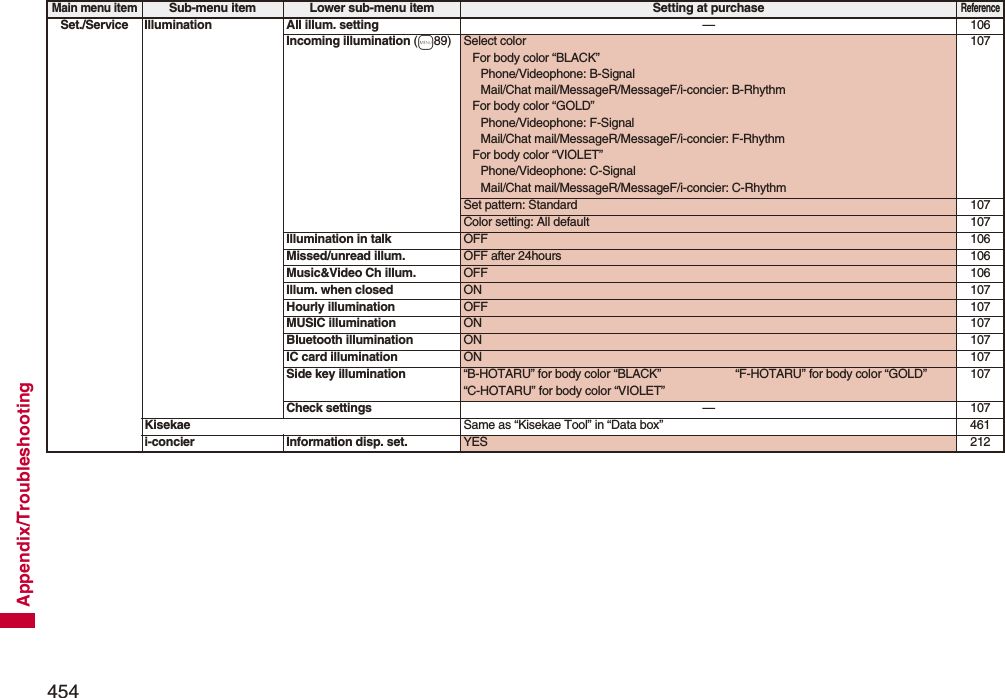
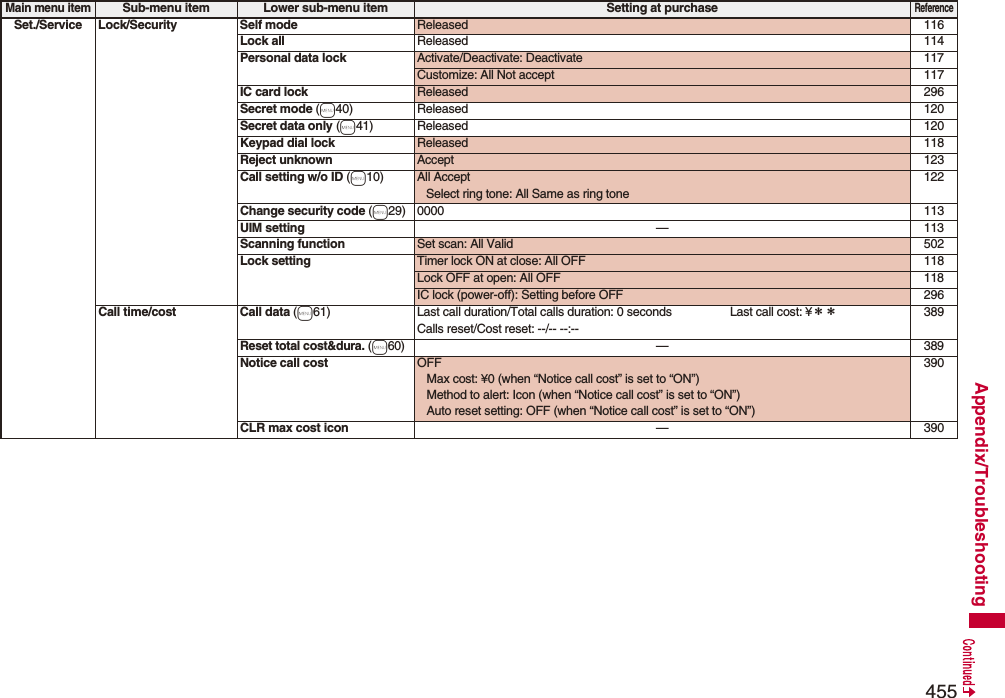
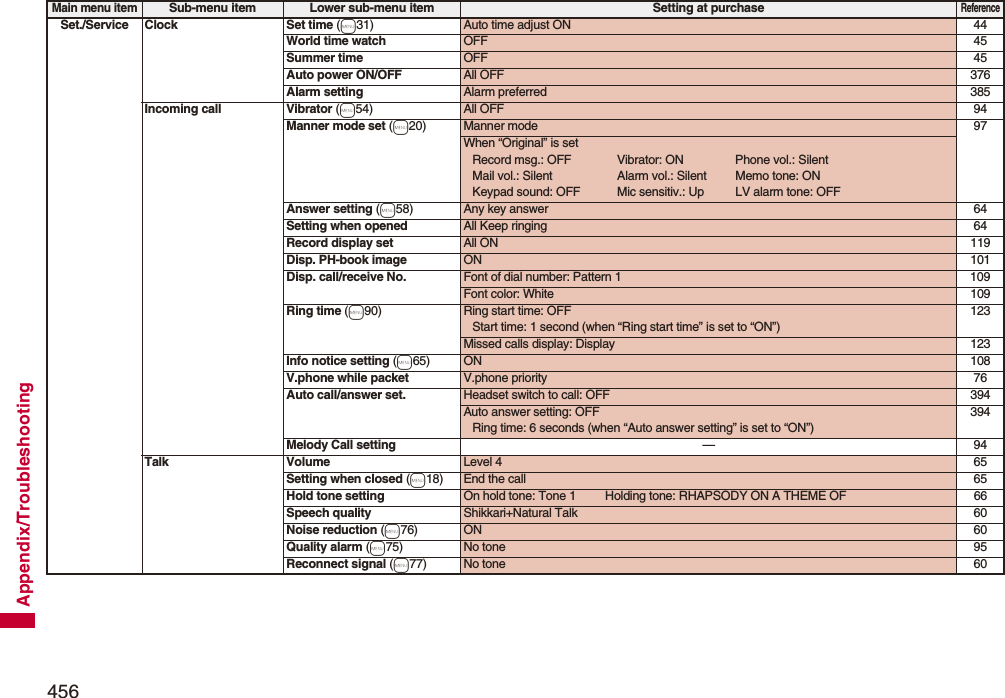
![457Appendix/TroubleshootingSet./Service Videophone Visual preference Normal 74Select image On hold: Pre-installed Holding: Pre-installedSubstitute image: Chara-den [カンガルー (Kangaroo)]Record message: Pre-installed Preparing: Pre-installedMovie memo: Pre-installed74Hands-free w/ V. phone ON 74Voice call auto redial OFF 75Notify switchable mode —75Reject videophone OFF 124Network setting Prefix setting WORLD CALL (009130010) 59Int’l roaming Network search mode: Auto 437Display operator name: Display ON 4383G/GSM setting: Auto 437Int’l dial assist Auto assist setting: ON 58Country/Area Code: Japan (81) 59IDD prefix setting: WORLD CALL (009130010) 59Status in the area —438NW services Caller ID notification (m17) — 45Voice mail Message notification: YES 415Call waiting —416Call forwarding —418Nuis. call blocking —419Caller ID request —4202in1 setting Deactivated 424Mode switching: Dual mode 424Stand-by displayDual mode: Chairs and tableB mode“Elevators” for body color “BLACK”“Chicago.jpg” for body color “GOLD”“Lighthouse” for body color “VIOLET”425Main menu itemSub-menu item Lower sub-menu item Setting at purchaseReference](https://usermanual.wiki/Panasonic-Connect/209018A.User-Manual-Part-2-of-2/User-Guide-1106379-Page-207.png)
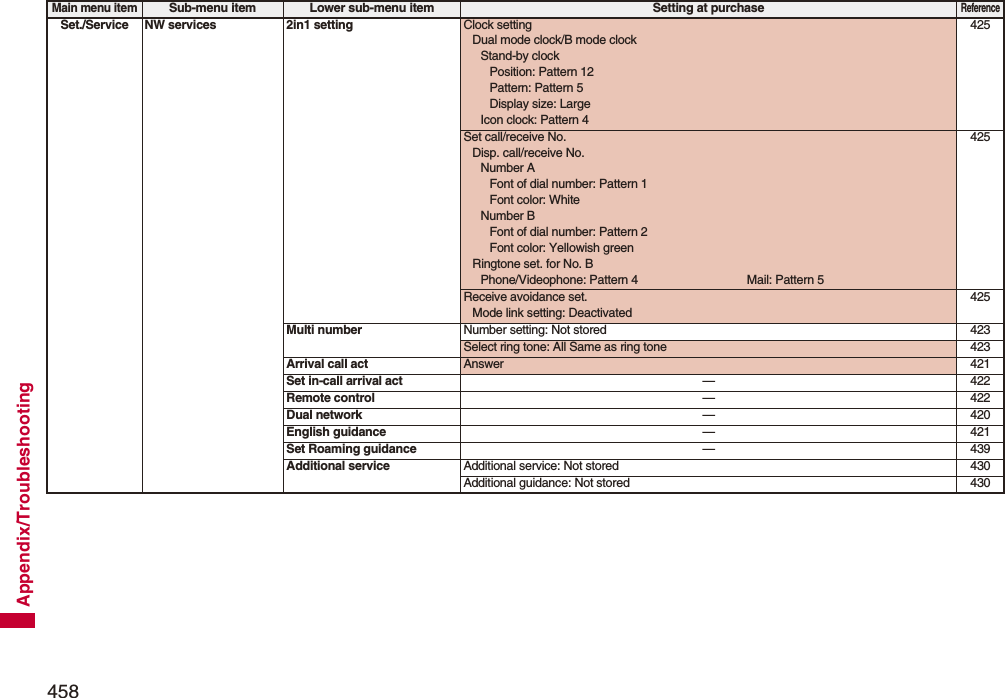

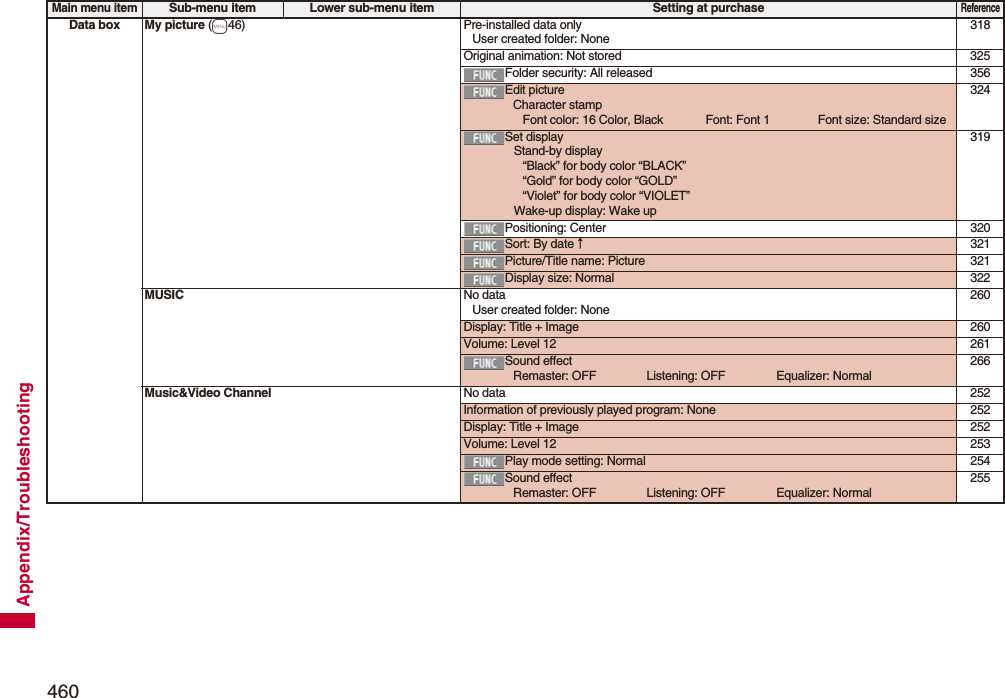

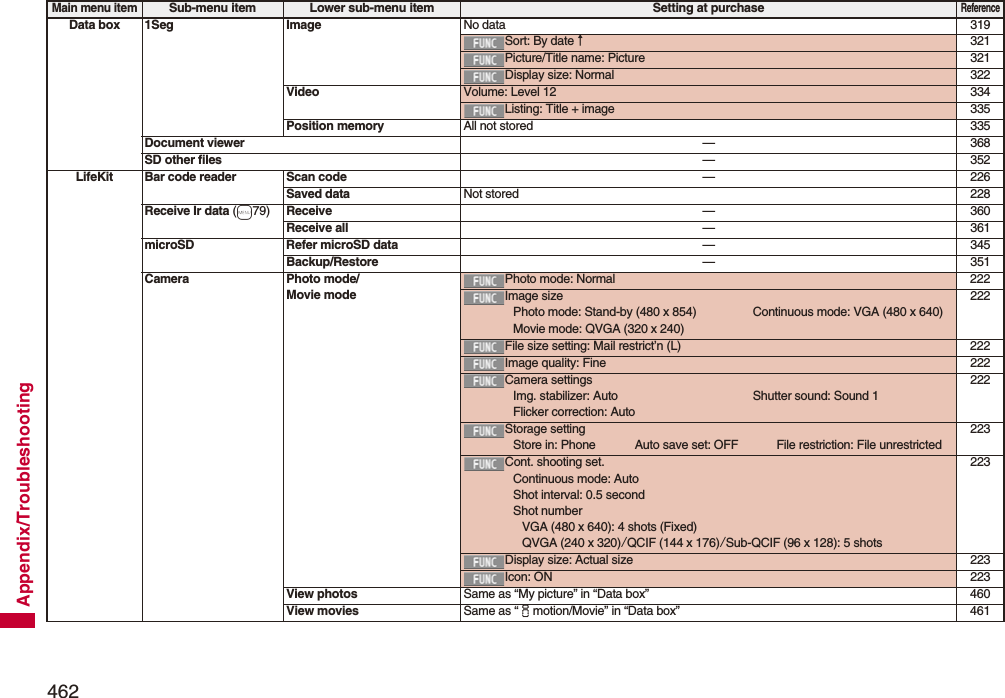
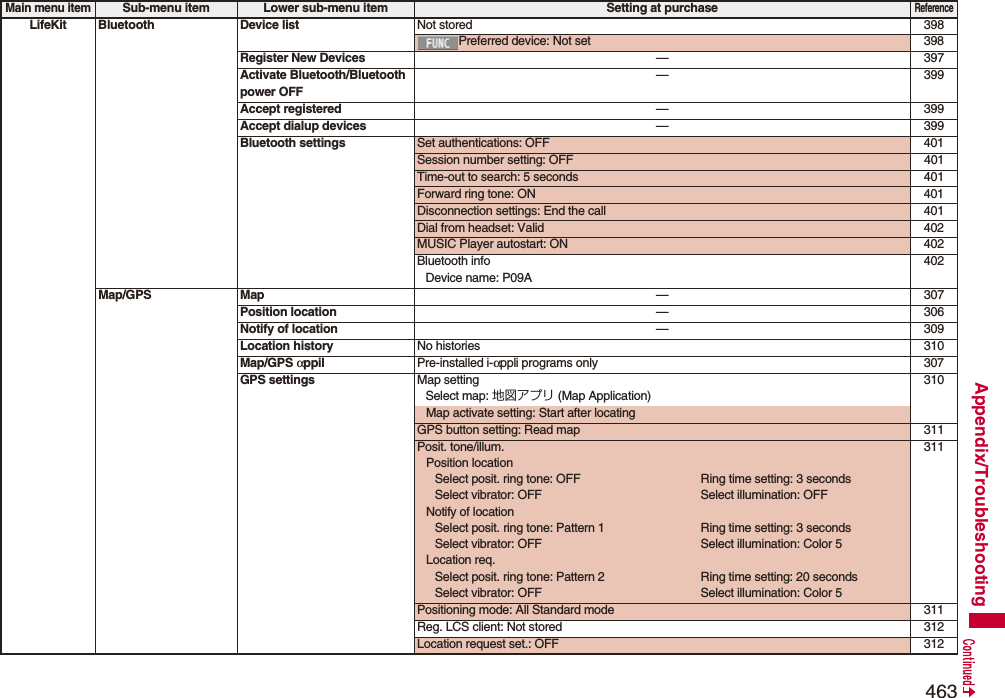
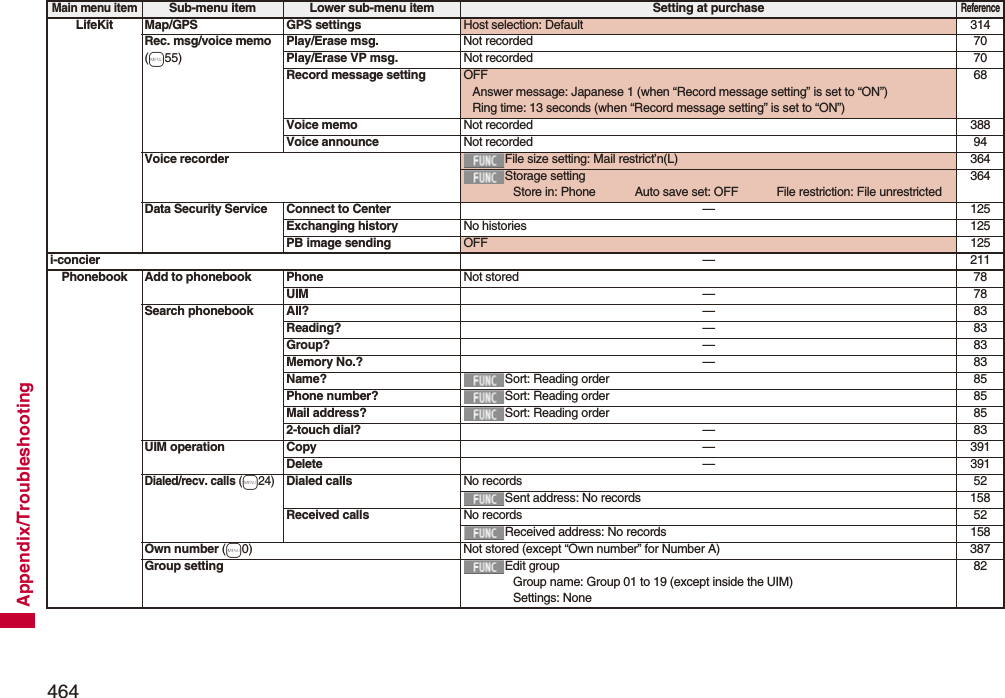
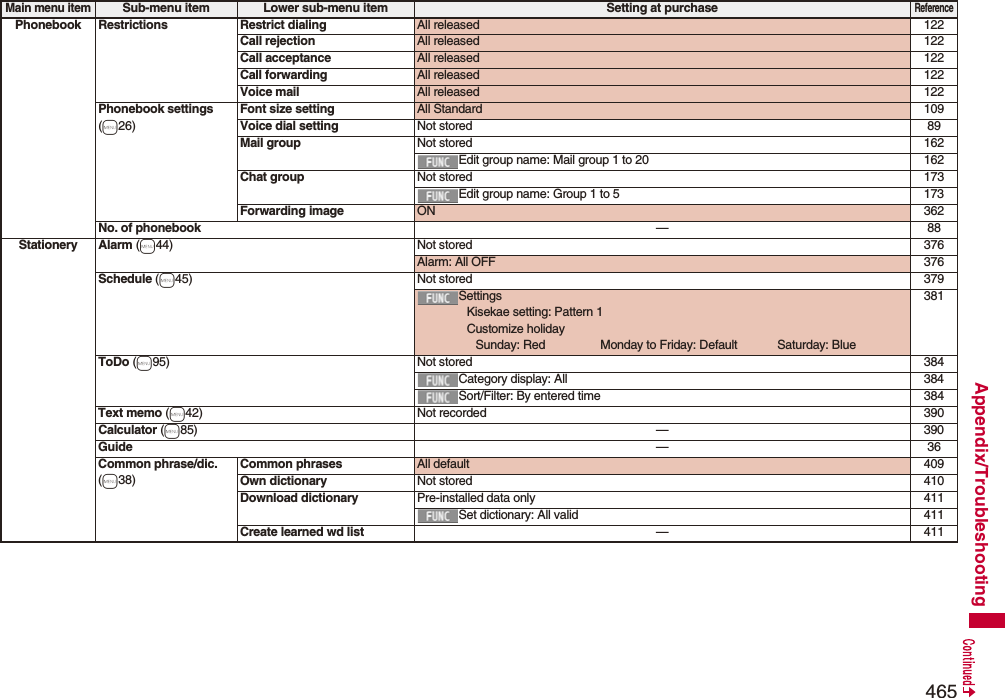
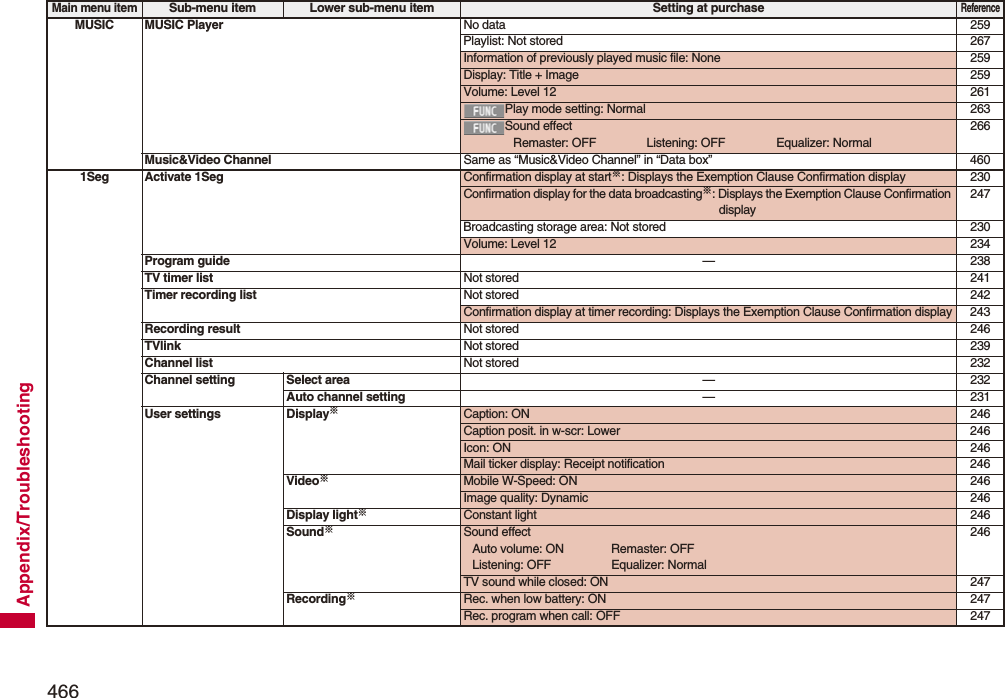
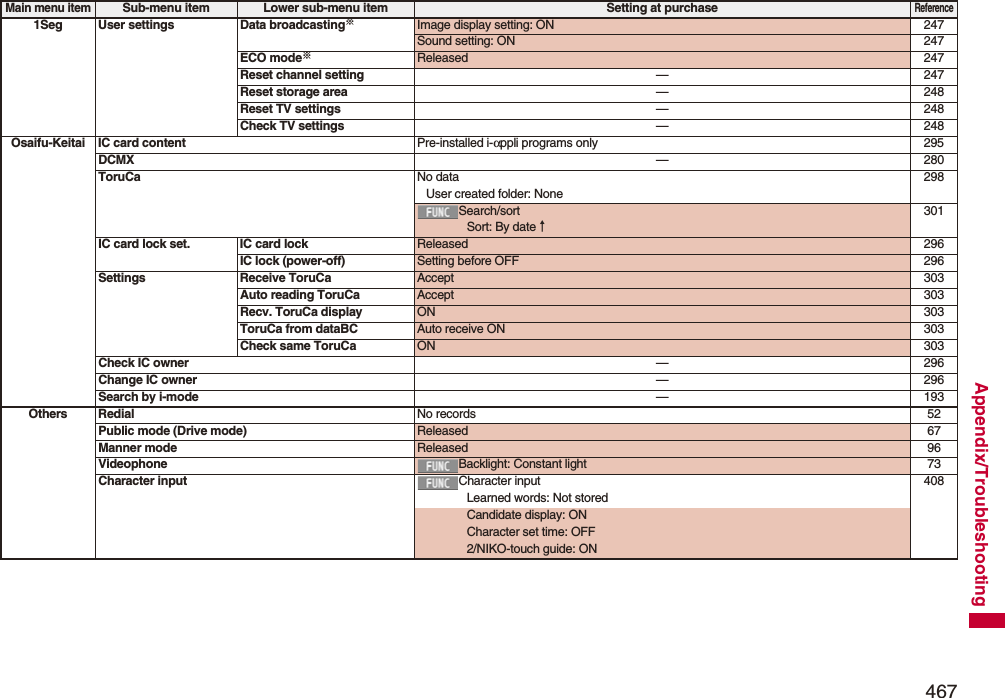

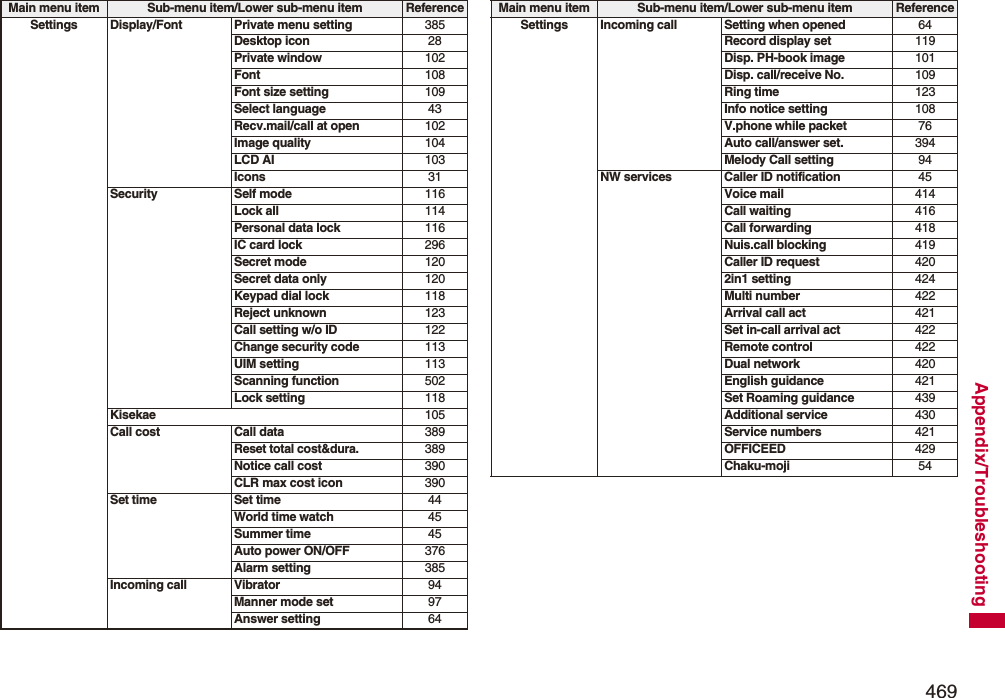

![471Appendix/TroubleshootingList of Characters Assigned to Keys (2-touch Input Method)Kanji/Hiragana input mode <Uppercase input mode>Second digit12345678901あいうえおABCDE2かきくけこFGHIJ3さしすせそKLMNO4たちつてとPQRST5なにぬねのUVWXY6はひふへほZ?! /7まみむめも¥&8や( ゆ )よ*#9らりるれろ123450わをん゛゜67890First digit<Lowercase input mode>Second digit12345678901ぁぃぅぇぉ abcde2fghij3klmno4っpq r s t5uvwxy6z78ゃゅょ90ゎ、。First digitKatakana input mode <Uppercase input mode>Second digit12345678901アイウエオABCDE2カキクケコFGHIJ3サシスセソKLMNO4タチツテトPQRST5ナニヌネノUVWXY6ハヒフヘホZ?!−/7マミムメモ¥&8ヤ(ユ)ヨ*#9ラリルレロ123450ワヲン゙゚67890First digit<Lowercase input mode>Second digit12345678901ァィゥェォabcde2fghij3klmno4ッ pqrst5uvwxy6z78ャュョ90ヮ※1,.First digitAlphabet input mode Second digit1 2 3 45678901"$ % ’+abcde2,. : ;<fghij3=> @ [ ]klmno4^_‘※1`※2{ |pqrst5}∼※1~※2uvwxy6z?!−/7¥&8()*#912345067890First digit: Switches between uppercase input mode and lowercase input mode.※1: Displayed when entering characters in full pitch.※2: Displayed when entering characters in half pitch.InformationpA space is entered if you press keys that correspond to a blank where no character is assigned.pYou can switch between uppercase and lowercase or enter “゛” or “゜” by pressing -a after you enter a character.pYou can enter “+” by pressing and holding -0 for at least one second in Numeral input mode.](https://usermanual.wiki/Panasonic-Connect/209018A.User-Manual-Part-2-of-2/User-Guide-1106379-Page-221.png)
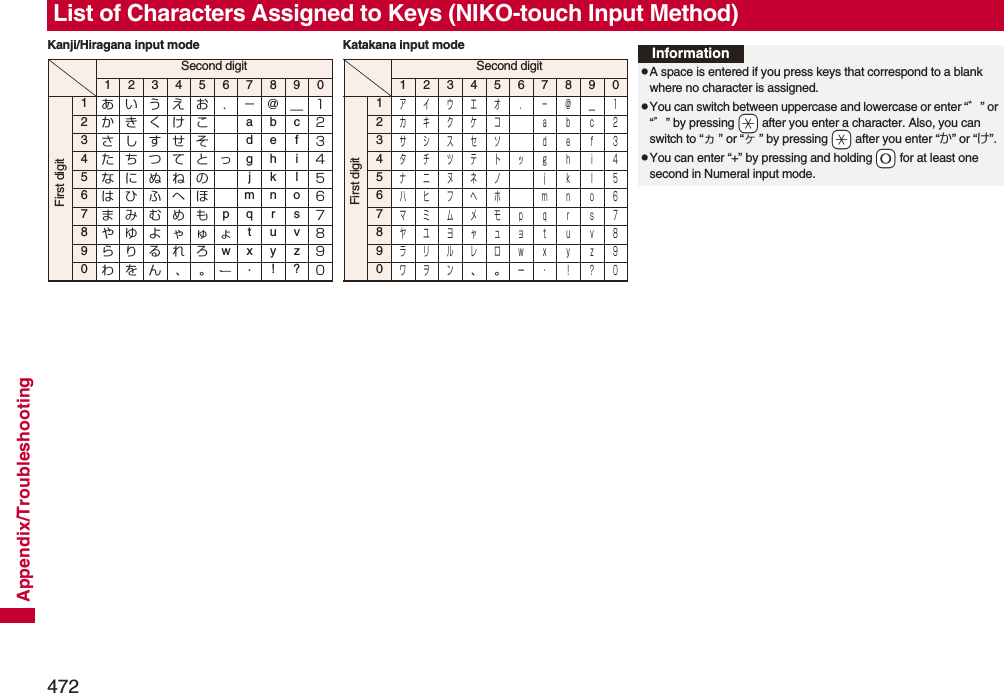
![473Appendix/TroubleshootingWhen “Read aloud settings” is set to “ON”, symbols are read aloud. Symbol ListSymbolVoice guidance、—。—,コンマ※1.ドット※1・テン:コロン; セミコロン?ギモンフ※1! カンタンフ※1゛ダクテン゜ ハンダクテン´—`—¨ ウムラウト^ ヤマガタキゴウ※1 ̄ オーバーライン_ アンダーラインヽ—ヾ—⇅—⇆—〃—仝ドウ々—⅞シメ〇ゼロチョーオン※2―ダッシュ‐ハイフン/ スラッシュ\ バックスラッシュ∼カラ※3‖—| タテセン※1… テンテンテン‥ テンテン‘—’ アポストロフィ※1“—” インヨウフ※1(カッコ) トジカッコ〔カッコ〕 トジカッコ[カッコ] トジカッコ{カッコ} トジカッコ〈カッコ〉 トジカッコ《カッコ》 トジカッコ「 カギカッコ」 トジカギカッコ『 カギカッコ』 トジカギカッコ【カッコ】 トジカッコ+プラス− マイナス※4± プラスマイナス×カケル÷ワル= イコールSymbolVoice guidance≠ ノットイコール< ショーナリ>ダイナリ≦ ショーナリイコール≧ ダイナリイコール∞ ムゲンダイ∴ユエニ♂オス♀メス°ド′フン″ビョー℃ドシー¥エン$ドル¢セント£ポンド% パーセント#イゲタ&アンド* アスタリスク@ アットマーク§ セクション☆ホシ★クロホシ○マル●クロマル◎ ニジューマル◇ヒシガタ◆ クロヒシガタ□シカク■ クロシカクSymbolVoice guidance△サンカク▲ クロサンカク▽ ギャクサンカク▼ クロギャクサンカク※ コメジルシ〒 ユービンバンゴー→ ミギヤジルシ← ヒダリヤジルシ↑ ウエヤジルシ↓ シタヤジルシ〓ゲタキゴー∈ゾクスル∋フクム⊆ ブブンシューゴー⊇ ブブンシューゴーフクム⊂ シンブブンシューゴー⊃ シンブブンシューゴーフクム∪ガッペー∩ キョーツー∧オヨビ∨マタワ¬ヒテー⇒ナラバ⇔ドーチ∀スベテノ∃アル∠カク⊥ スイチョク͡コ∂ラウンドディーSymbolVoice guidance∇ナブラ≡ゴードー≒ ニアリーイコール≪ ショーナリショーナリ≫ ダイナリダイナリ√ルート∽ソージ∝ヒレー∵ ナゼナラバ∫ インテグラル∬ ダブルインテグラルÅ オングストローム‰パーミル♯シャープ♭フラット♪オンプ†ダガー‡ ダブルダガー¶ ダンラクキゴー⃝マルゐイゑエヰイヱエヴヴヵカヶケΑアルファΒベータΓガンマΔデルタΕ イプシロンSymbolVoice guidance](https://usermanual.wiki/Panasonic-Connect/209018A.User-Manual-Part-2-of-2/User-Guide-1106379-Page-223.png)
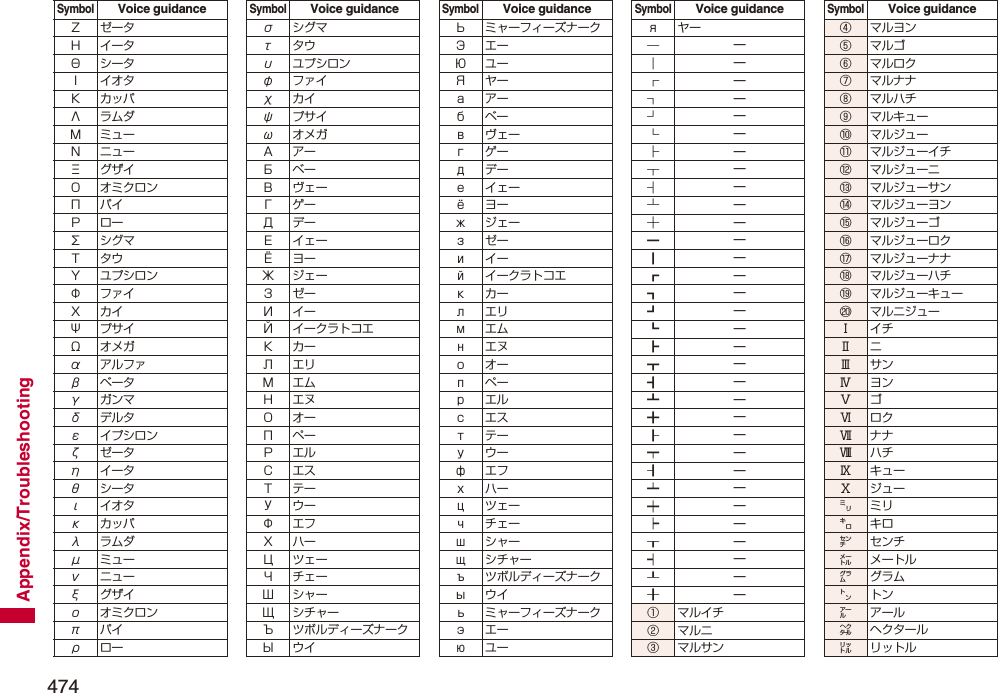
![475Appendix/Troubleshooting※1 Does not read aloud if it is not for a URL or mail address.※2 When it follows a hiragana, katakana, or kanji character, the ending of the character immediately before it is read aloud as a long vowel.※3 When it follows a hiragana or katakana character, the ending of the character immediately before it is read aloud as a long vowel.※4 Reads it aloud “ハイフン (hyphen)” if it is for a URL or mail address.On the Character Entry (Edit) display, enter “きごう” to convert it to show symbol candidates. Further, you can enter characters listed below to convert them into respective symbols.SymbolVoice guidance㍗ワット㌍カロリー㌦ドル㌣セント㌫ パーセント㍊ ミリバール㌻ページ㎜ ミリメートル㎝ センチメートル㎞ キロメートル㎎ ミリグラム㎏ キログラム㏄ シーシー㎡ ヘーホーメートル㍻ ヘーセー〝—〟—№ ナンバーSymbolVoice guidance㏍ケーケー℡デンワ㊤マルウエ㊥マルナカ㊦マルシタ㊧ マルヒダリ㊨マルミギ㈱ カッコカブ㈲ カッコユーSymbolVoice guidance㈹カッコダイ㍾メージ㍽ タイショー㍼ショーワ≒ ニアリーイコール≡ゴードー∫インテグラル∮ファイ∑シグマSymbolVoice guidance√ルート⊥ スイチョク∠カク∟ チョッカク⊿ サンカッケー∵ ナゼナラバ∩ キョーツー∪ガッペーSymbolVoice guidanceInformationpSpecial symbols “①” through “∪” might not be correctly displayed if they are sent to mobile phones which do not support i-mode or personal computers. Further, you cannot enter special symbols of into the text of SMS messages, and they are replaced by half-pitch spaces.Symbol Candidate ListInput Conversionおなじ 〃 々から ∼かんま ,こんま ,たてせん ‖|てんてん … ‥りーだ …しめ ⅞かっこ ‘’ “”()〔〕[]{}〈〉《》「」『』【】たす +ひく −ぷらすまいなす±かける ×わる ÷いこーる =ふとうごう <>≦≧しょうなり <だいなり >しょうなりいこーる ≦だいなりいこーる ≧むげんだい ∞おす ♂Input Conversionめす ♀ならば ⇒どうち ⇔にありいこーる≒ちいさい ≪おおきい ≫るーと √ど°℃ふん ′びょう ″どる $せんと ¢ぽんど £Input Conversionせつ §ほし *☆★あっと @まる 。○●◎〇しかく ◇◆□■さんかく △▲▽▼こめ ※ゆうびん 〒やじるし →←↑↓うえ ↑した ↓みぎ →Input Conversionひだり ←あすたりすく *おんぐすとろーむ Åしゃーぷ #ふらっと ♭おんぷ ♪だがー †だぶるだがー ‡だんらく ¶おーむ Ωでんわ ℡Input Conversion](https://usermanual.wiki/Panasonic-Connect/209018A.User-Manual-Part-2-of-2/User-Guide-1106379-Page-225.png)
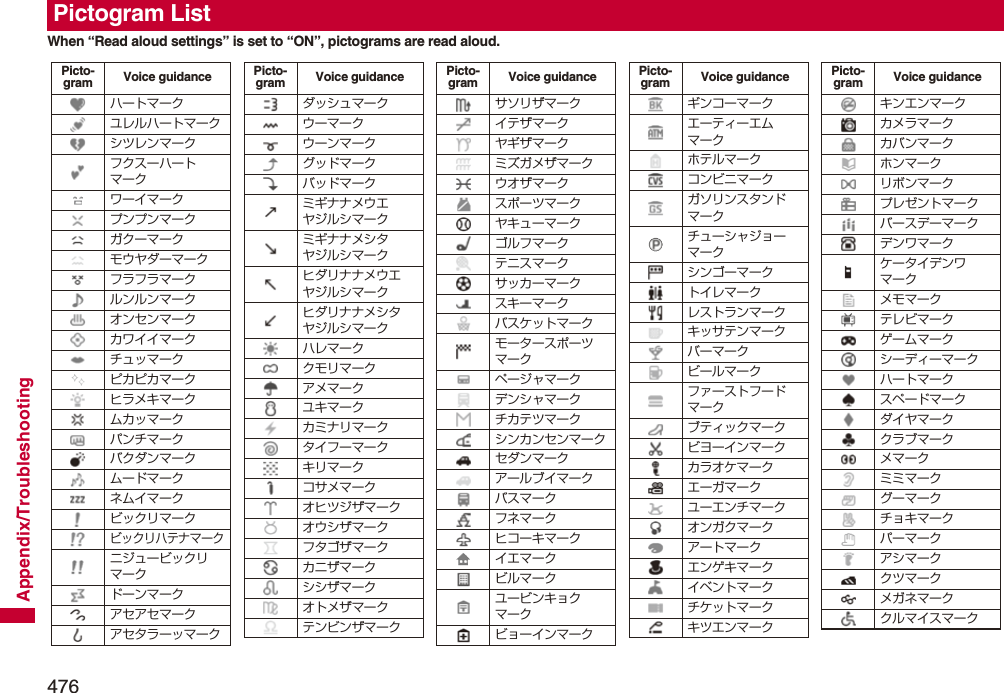


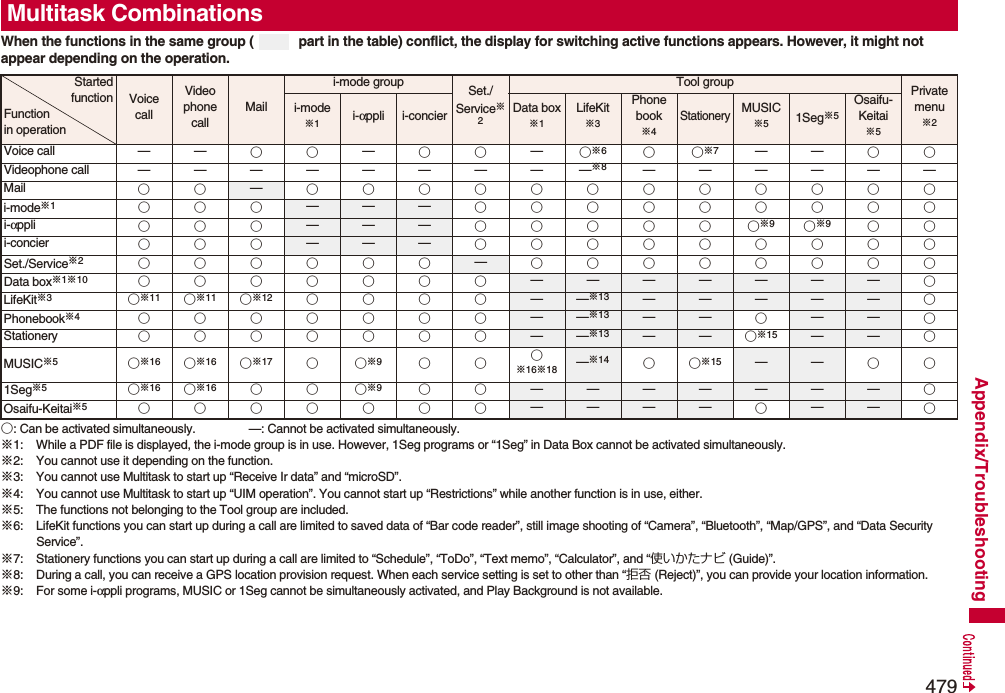


![485Appendix/Troubleshooting“ ” is displayed, and the international roaming service is not available.pYou may be out of the international roaming service area or weak radio waves are being received.pRefer to the international service guides such as “Mobile Phone User’s Guide [International Services]” to check if the area or carrier is available.pSearch for an available carrier by Network Search Mode.pSwitch 3G/GSM Setting to “Auto” or any available network after moving from Japan to overseas. If you have set to “Auto” in Japan, turn off and on the FOMA terminal.——43743437Cannot receive voice calls or videophone calls during overseas use.pMake sure Call Barring is not set to “Activate”.pMake sure Videophone while Packet is set to “V.phone priority”.pYou cannot use videophone calls while using the GSM/GPRS network.43976432Cannot make or receive calls unexpectedly during overseas use.pConfirm your accumulated charges at the docomo Information Center. An approximate limit for service suspension is previously set for “International Roaming Service (WORLD WING)”. When this limit is exceeded, all services are deactivated. If your limit for service suspension is exceeded, pay your accumulated charges to restart the services.pConfirm the setting of 3G/GSM Setting. When “Auto” is set, you may not be able to use the services because some particular network is connected. Switch the setting to the network (3G or GSM/GPRS) available for the country/area you stay.—437Problem CountermeasuresReferenceThe other party’s phone number is not notified./A number different from the other party’s phone number is notified./Functions using caller ID notification or contents in the Phonebook do not work.pEven if the other party makes a call with the setting to notify you of his/her caller ID, the caller ID might not be notified depending on the overseas carrier. Also, a number different from the other party’s caller ID might be notified depending on the caller’s network.—Cannot perform data transfer.pMake sure you do not use a USB hub. If you use a USB hub, the devices may not work correctly.—Cannot display data files saved to the microSD card.pExecute Check microSD. 353“×” appears on a preview image.p“×” may appear when the image file is broken. —Attached files are deleted, so the images cannot be displayed.pConfirm the setting of Attachment Preference.pConfirm the setting of Limit Mail Size. For details, refer to “Mobile Phone User’s Guide [i-mode] FOMA version”.163—Cannot connect with the Bluetooth communication compatible devices./Cannot find them even if you search for.pYou need to register a Bluetooth communication compatible device (commercial item) from the FOMA terminal after you put the device on standby for registration. When you delete a registered device to register it again, you need to delete it from both the Bluetooth communication compatible device and FOMA terminal before re-registration.398Cannot make calls from the FOMA terminal with an external device such as a car navigation system or Hands-free device connected.pIf you make several calls when the other party does not answer or is out of the service area, dialing to that phone number might become unavailable. In this case, turn off and on the FOMA terminal.—Problem CountermeasuresReference](https://usermanual.wiki/Panasonic-Connect/209018A.User-Manual-Part-2-of-2/User-Guide-1106379-Page-235.png)


![495Appendix/TroubleshootingpMake sure that you have received a warranty card provided at purchase. After checking the contents of the warranty card as well as “Shop name and date of purchase”, keep the warranty card in a safe place. If you notice that necessary items of the warranty card are not filled in, immediately contact the shop where you purchased the FOMA terminal. The term of the warranty is one year from the date of purchase.pAll or part of this product including the accessories may be modified for improvement without notice.pData stored in the Phonebook and others might be changed or lost owing to a malfunction, repairs, or other mishandling of your FOMA terminal. You are advised to take a note of Phonebook entries and other files in preparation for such incidents. After we repair your FOMA terminal, we cannot move, with some exceptions, the information downloaded by using i-mode or i-αppli to your repaired FOMA terminal because of the copyright law.※The FOMA terminal enables you to save Phonebook entries, i-motion files, or data files used for i-αppli to the microSD card.※You can use Data Security Service (pay service that is available on a subscription basis) to save the data files such as Phonebook entries from the FOMA terminal to the Data Storage Center. ※If you have a personal computer, you can transfer and save the data files from the Phonebook to your personal computer by using the DOCOMO keitai datalink (see page 445) via the FOMA USB Cable with Charge Function 01/02 (option) or FOMA USB Cable (option).Warranty and After-sales ServicesWarranty ◎When there is a problem with the FOMA terminalBefore asking repairs, check “Troubleshooting” in this manual.If the problem remains unsolved, contact the “Repairs” counter listed on the back page of this manual for malfunction and consult them.◎When repairs are necessitated as a result of consultation:Bring your FOMA terminal to a repair counter specified by DOCOMO. Note that your FOMA terminal is accepted for repair during the repair counter’s business hours. Also, make sure that you will bring the warranty card with you to the counter. Further, note that you may need to wait for fixing depending on the malfunction state.■In warranty period・Your FOMA terminal is repaired charge free in accordance with the terms of warranty.・Make sure that you bring the warranty card to the counter for the repair. If you do not show the warranty card, or when troubles or malfunctions are regarded to be caused by your mishandling, the repair cost is charged even within the warranty period.・The cost for troubles caused by the use of devices and consumables other than those specified by DOCOMO is charged even within the warranty period.・For the damages of liquid crystal display, connector, etc. after purchase, the repair cost is charged.■Repairs may not be performed in the following cases:・When exposure to water is found at our repair counter (Example: When the waterproof sticker reacts)・When, as a result of inspection at our repair center, corrosion is found due to exposure to water, dew condensation, or sweat, or when damage or deformation is found in the circuit board [Repairs might not be carried out when damage to the connector terminal (earphone/microphone terminal) or LCD, or cracks in the body are found.]※Even if repair is feasible, it is not covered by the warranty, so that repair cost is charged.■After the warranty periodWe will repair your FOMA terminal on request (charges will apply).■Spare parts availability periodThe minimum storage period of the performance spare parts (parts required for maintaining performance) for the FOMA terminal is basically six years after the closure of its production. Note, however, that your FOMA terminal might not be repaired depending on the troubled portions because of shortage of the spare parts. Even after the storage period, some FOMA terminals can be repaired depending on the troubled portions. Contact the “Repairs” counter listed on the back page of this manual.After-sales Services](https://usermanual.wiki/Panasonic-Connect/209018A.User-Manual-Part-2-of-2/User-Guide-1106379-Page-245.png)
![496Appendix/Troubleshooting◎Other points to notepMake sure not to modify the FOMA terminal or its accessories.・Catching fire, giving injury, or causing malfunctions may result.・For the repair of devices that the modification is applied to, we accept it if you agree to have the modification reset. Further, we might reject to repair depending on the conditions of the modification. The following might be regarded as modifications: ・To put stickers, etc. onto the liquid crystal display or keys・To decorate the FOMA terminal using adhesives・To replace the coverings etc. with those of other than DOCOMO genuine products・Repairs of troubles or malfunctions resulting from the modifications are charged even within the warranty period.pDo not peel the nameplate off the FOMA terminal. The nameplate is a certificate for ensuring the technological standard. If someone intentionally peel off the nameplate or replace it, the contents described in the nameplate cannot be checked, as we cannot verify the conformity of the product to the technical standard. Note that we may refuse repair for some malfunctions in this case.pThe information such as function settings and Total Calls Duration, etc. might be reset depending on troubles or repairs, or the way you handle the FOMA terminal. Set the settings again.pThe parts generating magnetism are used in the following portions of the FOMA terminal. Note that if you place a magnetism-sensitive object such as a cash card near the FOMA terminal, the card might become unusable.Portions: speaker, earpiecepIf the FOMA terminal gets wet or becomes moist, immediately turn off the power and remove the battery pack; then visit a repair counter. The FOMA terminal may not be repaired depending on its condition.◎Memory dial (Phonebook function) and downloaded information・It is recommended to take a note of the information you have stored in the FOMA terminal and keep it in a safe place. We are not responsible for any change in or loss of information.・When replacing or repairing your FOMA terminal, the data you created, obtained from external devices, or downloaded may be changed or lost. We do not take any responsibility for the loss or change incurred to the data. We may replace your FOMA terminal with a fungible one instead of repairing, for our convenience sake. Only at the time of repair, we move the files from your FOMA terminal including the images and ring melodies downloaded to your FOMA terminal or the files you created. (We cannot move some files. Also, some files might not be movable depending on the degree of malfunction.)※It may take a while to move files, or it might occur that moving files is not possible depending on the memory size of the files stored in the FOMA terminal. You can check on your FOMA terminal whether sending/receiving mail messages, downloading images/melodies, and others are normally working.pTo connect to “iモード故障診断サイト (i-mode Fault Diagnosis Site)” [in Japanese only]i-mode site: iMenu→お知らせ (News)→サービス・機能 (Services & Functions)→iモード (i-mode)→iモード故障診断 (i-mode Fault Diagnosis)pA packet communication fee for connecting to the i-mode Fault Diagnosis Site is free. (When you access it from overseas, you are charged the fee.)pThe test items differ by model of FOMA terminals. Further the test items might be changed.pWhen you check operations of your FOMA terminal according to each test item, read the cautions on the site thoroughly and then perform the test.pWhen you connect to the i-mode Fault Diagnosis Site and test on sending mail messages, the proper information about your FOMA terminal (model name, mail address, etc.) is automatically sent to the server (i-mode Fault Diagnosis Server). We never use the sent information for other purposes than for the i-mode fault diagnosis.pWhen you think your FOMA terminal is in trouble as a result of your check, contact the “Repairs” counter listed on the back page of this manual.i-mode Fault Diagnosis SiteTop display Test Menu listQR code for accessing the site](https://usermanual.wiki/Panasonic-Connect/209018A.User-Manual-Part-2-of-2/User-Guide-1106379-Page-246.png)

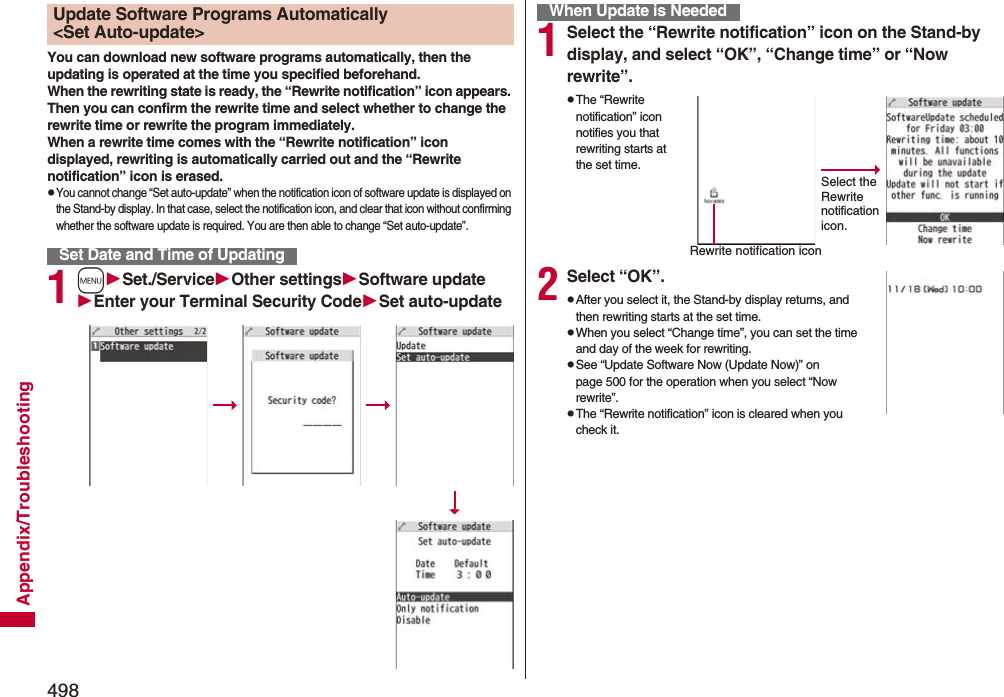
![499Appendix/TroubleshootingIf you select “Only notification” of “Set auto-update”, “Update notification icon” notifies you when software update is necessary.You can start Software Update by selecting “Update notification icon”, or from the Menu display.1Select “Update notification icon” on the Stand-by display.pIf you select “No”, the confirmation display appears asking whether to delete the notification icon.p“Update notification icon” appears in the following cases:・When notification is provided by DOCOMO・When “Update is needed” is displayed in step 3・When you fail to update software programs during updating in Reserve Update・When you cancel the reservation for the software update2Check whether the software programs need to be updated.pYou can answer voice calls during check.Start Software UpdateStart Software Update by Selecting “Update notification icon”3When updating is not necessary, “No update is needed” is displayed. Use the FOMA terminal as it is. When updating is necessary, “Update is needed” is displayed. You can select either “Now update” or “Reserve”.1mSet./ServiceOther settingsSoftware updateEnter your TerminalSecurity CodeUpdate2Go to step 2 of [Start Software Update by Selecting “Update notification icon”] on page 499.Software Update display※When updating is not necessary※The display for when the software update is unavailable because of the server congestion. (Wait for a while and then start the software update again.)Start Software Update from Menu](https://usermanual.wiki/Panasonic-Connect/209018A.User-Manual-Part-2-of-2/User-Guide-1106379-Page-249.png)
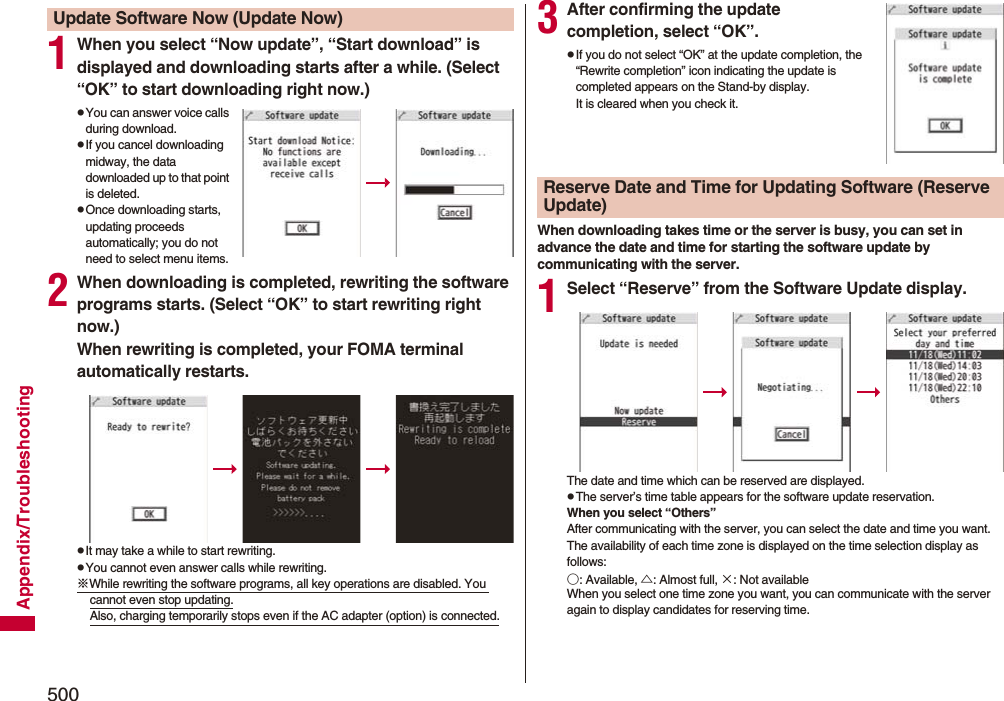
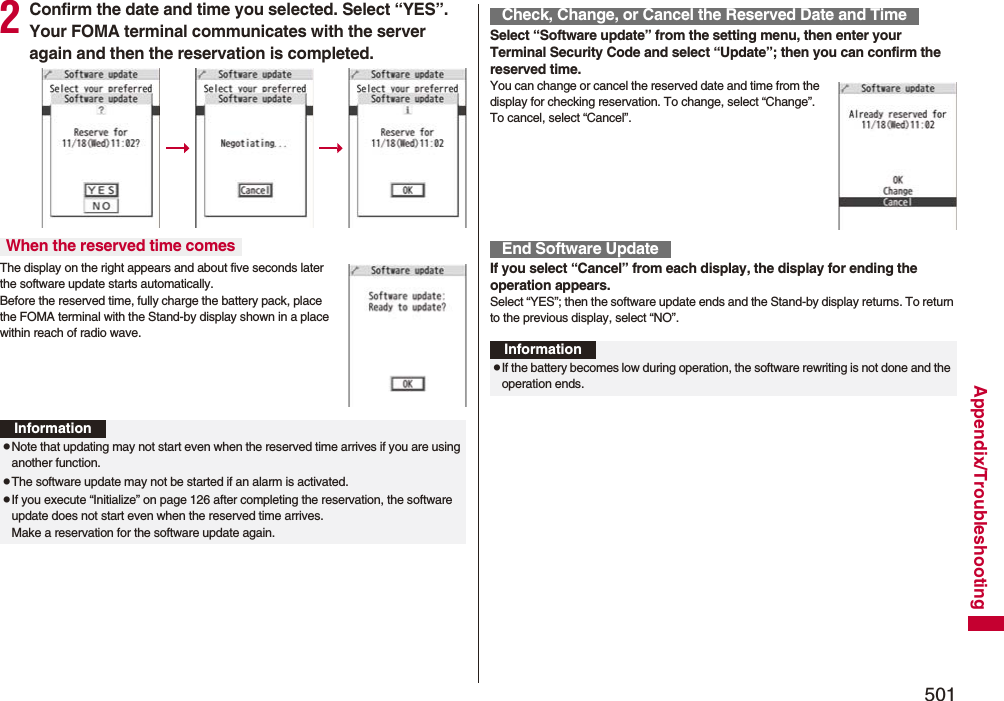
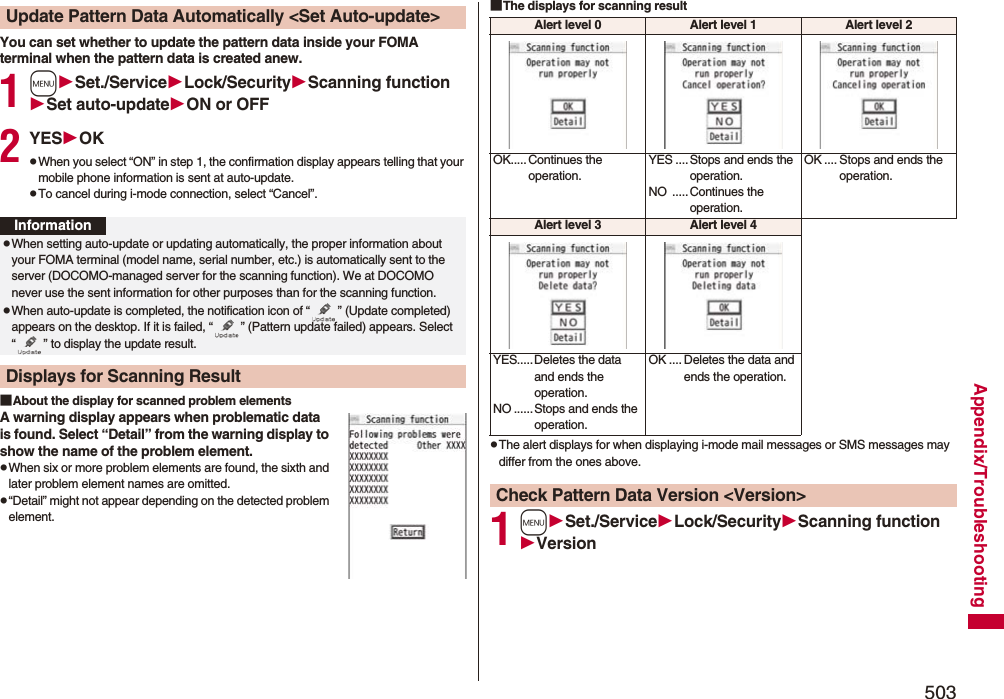
![504Appendix/Troubleshooting■HandsetMain SpecificationsModel P-09ADimensions (when closed)Height: Approx. 110 mmWidth: Approx. 50 mmDepth: Approx. 12.5 mm (at thickest point: Approx. 16.5 mm)Weight (with the battery pack attached)Approx. 110 gContinuous standby timeFOMA/3G3G/GSM setting [3G]In motion: Approx. 400 hours3G/GSM setting [Auto]Standstill: Approx. 610 hoursIn motion: Approx. 380 hoursGSM3G/GSM setting [Auto]Standstill: Approx. 260 hoursContinuous talk timeFOMA/3G Voice call: Approx. 190 minutesVideophone call: Approx. 140 minutesGSM Voice call: Approx. 230 minutes1Seg watching timeApprox. 290 minutes(when Mobile W-Speed is OFF: Approx. 320 minutes)(in ECO Mode: Approx. 410 minutes)Charging time AC adapter: Approx. 120 minutesDC adapter: Approx. 120 minutesLCD Type Display: TFT 262,144 colorsPrivate window: Organic EL one colorSize Display: Approx. 3.0 inchesPrivate window: Approx. 0.9 inchesNumber of pixels Display: 409,920 pixels (480 dots x 854 dots)Private window: 4,608 pixels (128 dots x 36 dots)Image pickupdeviceType CMOSSize 1/4.0 inchesCamera Number of effective pixelsApprox. 3,200,000 pixelsNumber of recording pixels (maximum)Approx. 3,200,000 pixels※1: Image size: Sub-QCIF (128 x 96), Image quality: Normal, File size: 10 Kbytes※2: The continuous playback time is the estimated duration that you can play back using the Stereo Earphone Set 01 (option) with the FOMA terminal closed.※3: File format: AAC※4: Shares with still images, i-motion files, melodies, PDF files, Music&Video Channel programs, Kisekae Tool files, Machi-chara images, ToruCa files, and i-αppli programs.■Battery packRecordingNumber of recordable still images※1Approx. 2,400 max. (default)Approx. 3,500 max. (when the deletable pre-installed data files are deleted)Number of still images for continuous shootingVGA: 4 QVGA: 5 through 10QCIF: 5 through 20 Sub-QCIF: 5 through 20Music playbackContinuous playback time※2SD-Audio file (supports Play Background): Approx. 6,500 minutes※3Chaku-uta Full® music file (supports Play Background): Approx. 6,000 minutes※3i-motion file (including Chaku-uta® music file): Approx. 1,260 minutes※3WMA file (supports Play Background): Approx. 4,800 minutesMusic&Video Channel program (supports Play Background)Sound: Approx. 6,000 minutesMoving picture: Approx. 240 minutesMemory capacityChaku-uta®Approx. 250 Mbytes※4Chaku-uta Full®Name of product Battery Pack P19Battery type Li-ion (lithium ion) batteryVoltage 3.7 VCapacity 800 mAh](https://usermanual.wiki/Panasonic-Connect/209018A.User-Manual-Part-2-of-2/User-Guide-1106379-Page-254.png)

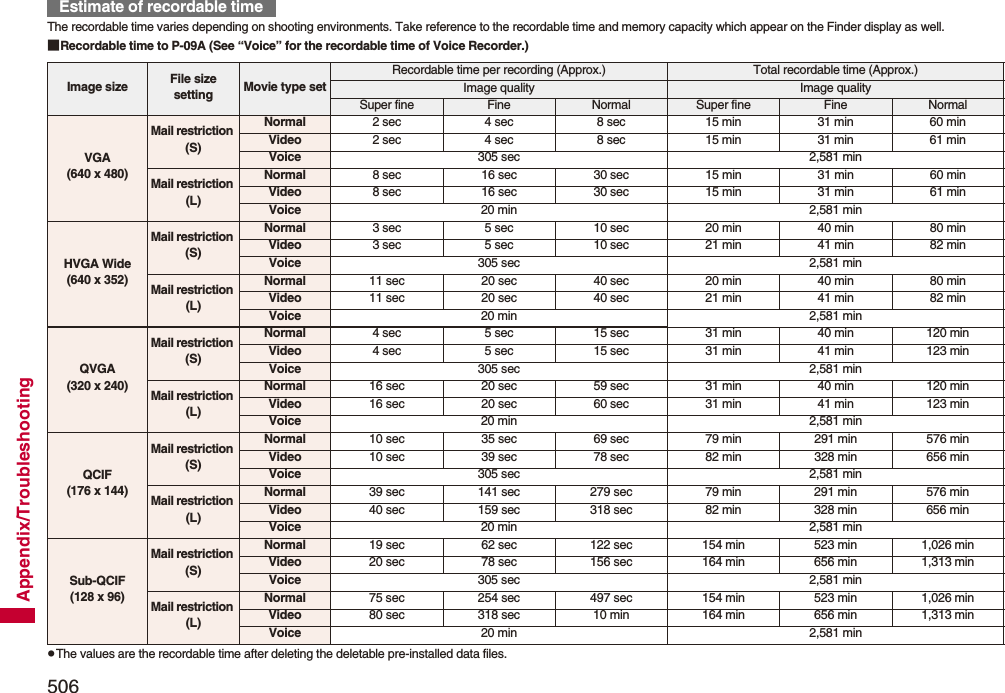
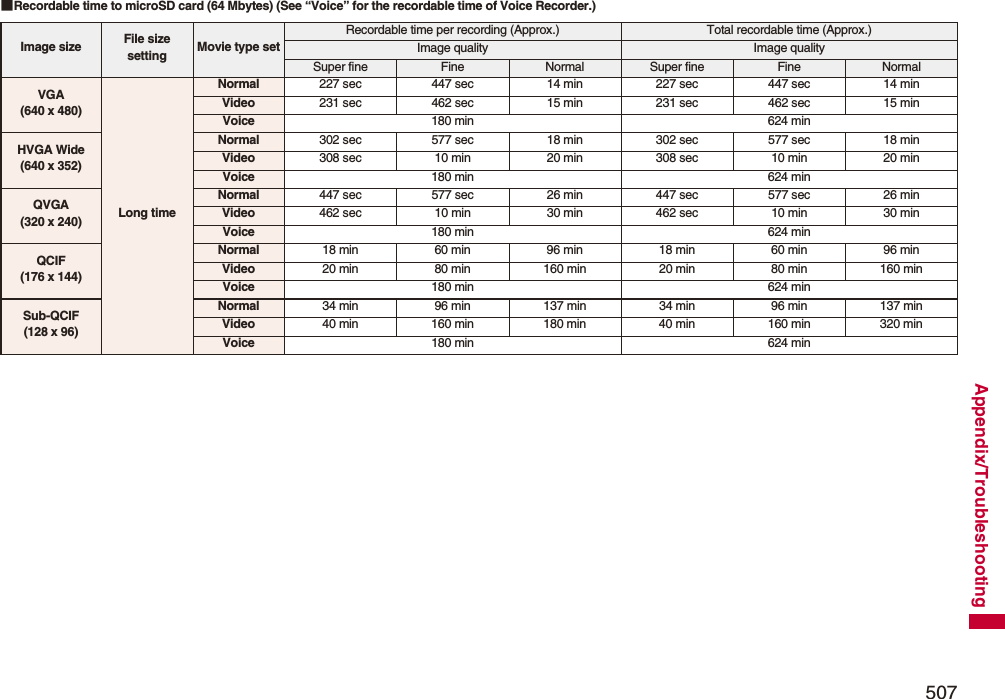
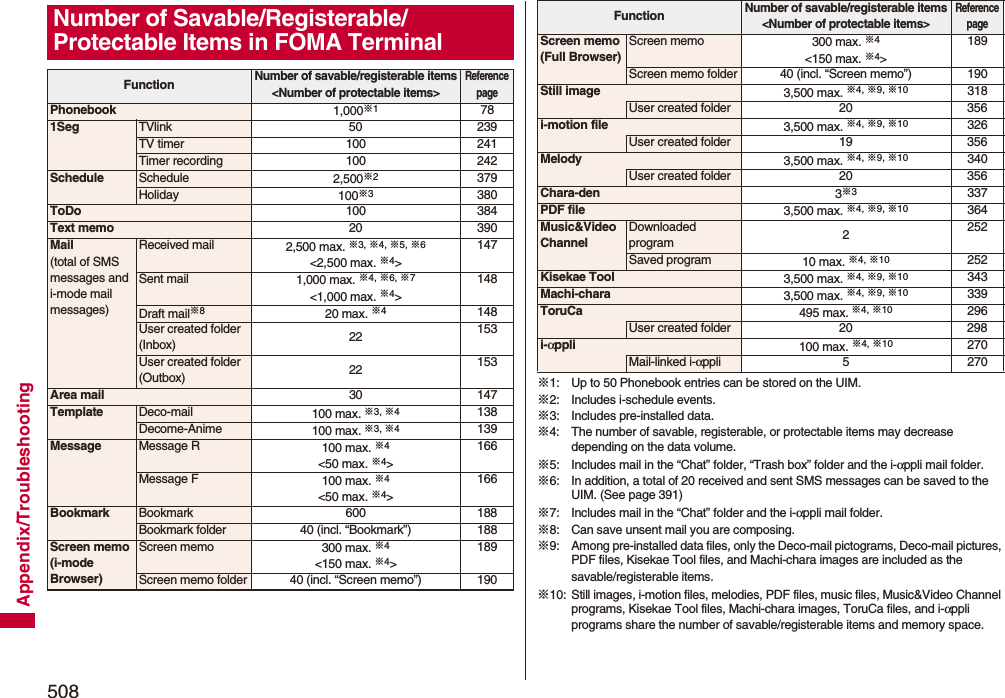


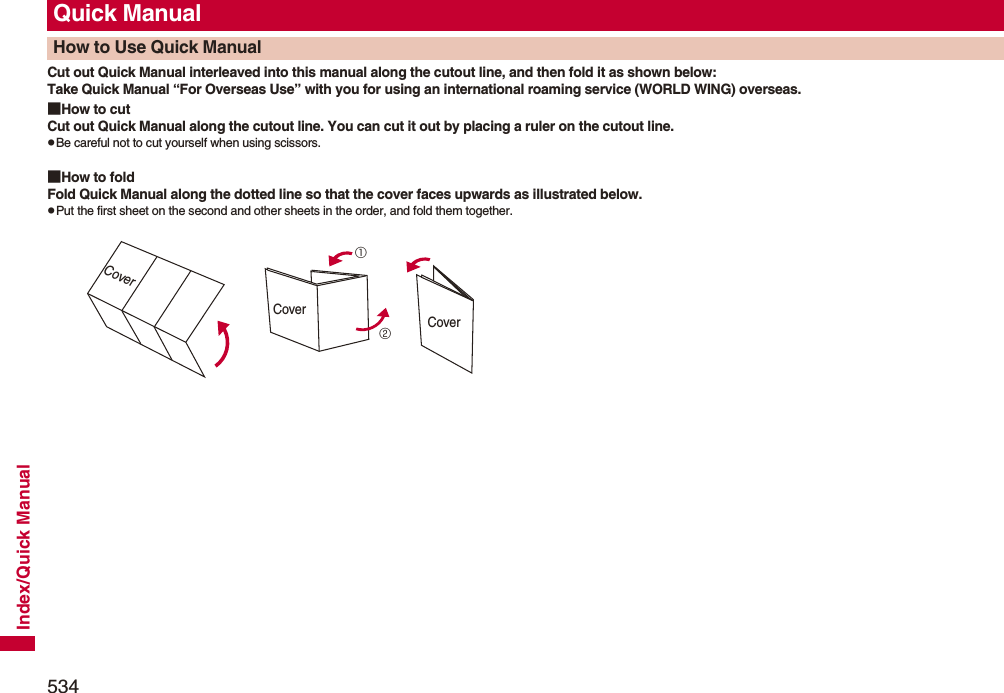


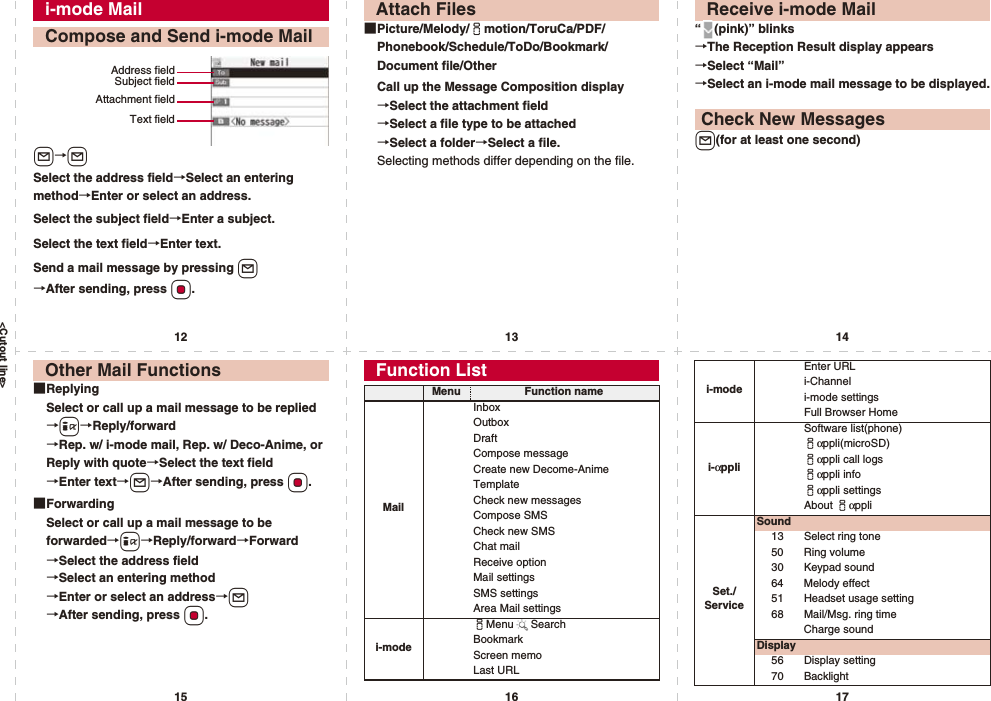
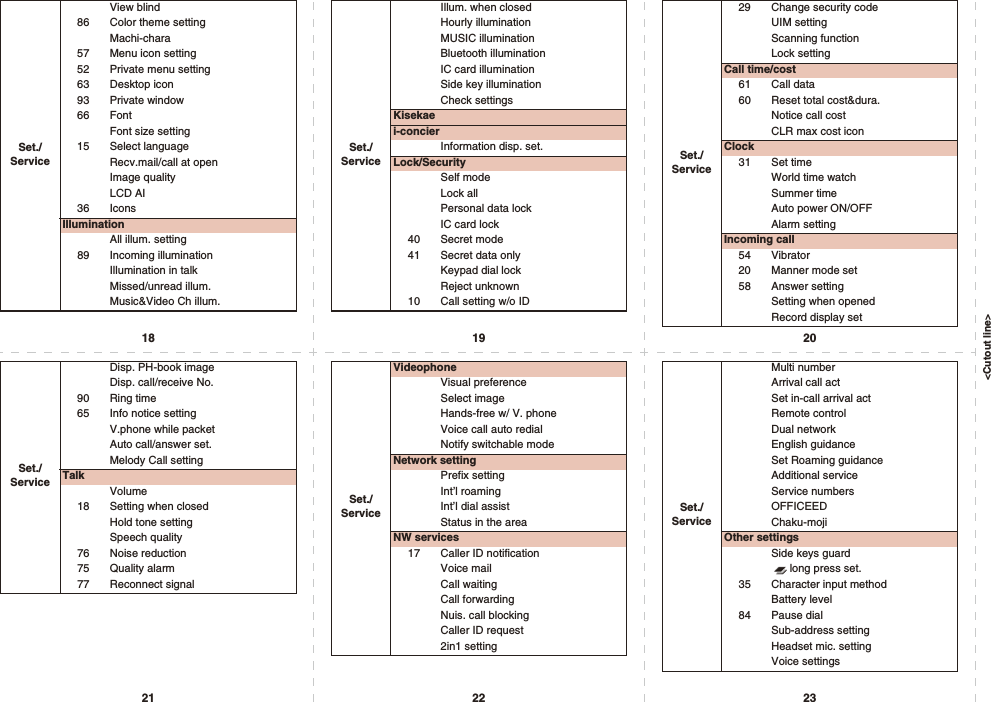
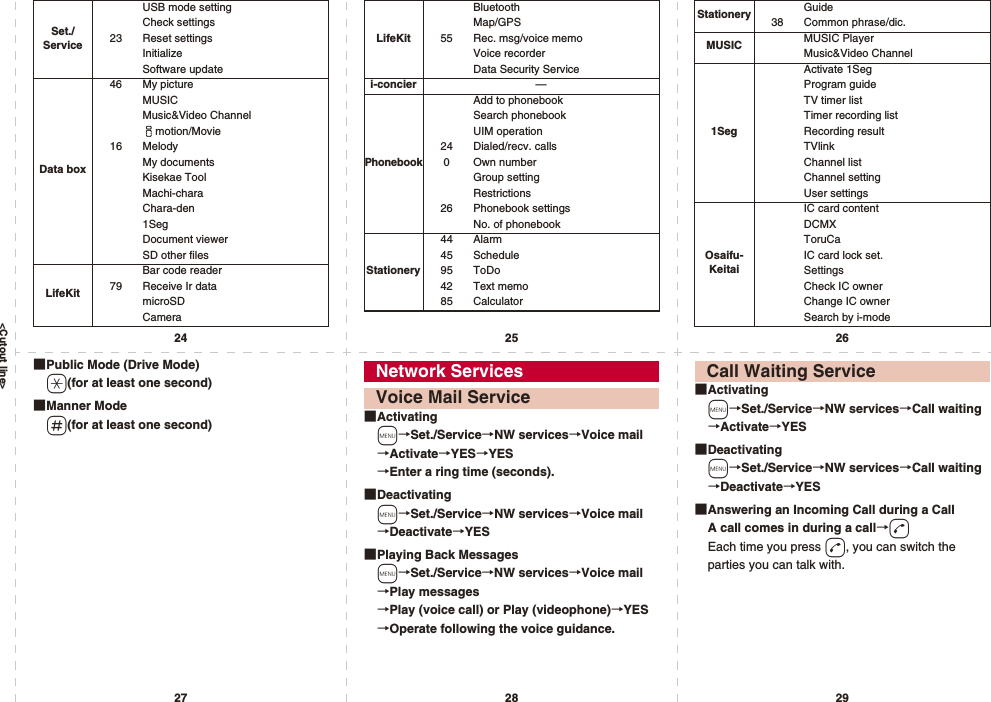

![<Cutout line>12345P-09AQuick Manual “For Overseas Use”<docomo Information Center> (available 24 hours a day)pFrom DOCOMO mobile phones※If you use P-09A, you should dial the number +81-3-5366-3114 (to enter “+”, press and hold the “0” key for at least one second).pFrom land-line phones <Universal number>※See page 16 and page 20 for international call access codes for major countries (Table 1) and international prefix numbers for the universal number (Table 2).pIf you lose your FOMA terminal or have it stolen, immediately take the steps necessary for suspending the use of the FOMA terminal.Loss or theft of FOMA terminal or payment of cumulative cost overseasInternational call access code for the country you stay (Table 1)-81-3-5366-3114* (toll free)*You are charged a call fee to Japan when calling from a land-line phone, etc.International prefix number for the universal number (Table 2) -800-0120-0151**You might be charged a domestic call fee according to the call rate for the country you stay.<Network Technical Operation Center> (available 24 hours a day)pFrom DOCOMO mobile phones※If you use P-09A, you should dial the number +81-3-6718-1414 (to enter “+”, press and hold the “0” key for at least one second).pFrom land-line phones <Universal number>※See page 16 and page 20 for international call access codes for major countries (Table 1) and international prefix numbers for the universal number (Table 2).pIf the FOMA terminal you purchased is damaged, bring your FOMA terminal to a repair counter specified by DOCOMO after you return to Japan.Failures encountered overseasInternational call access code for the country you stay (Table 1)-81-3-6718-1414*(toll free)* You are charged a call fee to Japan when calling from a land-line phone, etc.International prefix number for the universal number (Table 2) -800-5931-8600** You might be charged a domestic call fee according to the call rate for the country you stay.pRefer to the following before you use your FOMA terminal overseas:・“Mobile Phone User’s Guide [International Services]”・“Mobile Phone User’s Guide [Network Services]”・DOCOMO Global Service website・PDF file “海外ご利用ガイド (Guide for Overseas Use)” pre-installed in “My documents” in Data Box■Setting in Japani→English→Options→International Settings→i-mode services Settings→Select “Yes”→Enter your i-mode password→Select■Setting Overseasi→iMenu Search→English→Options→International Settings→i-mode services Settings→Select “Yes”→Enter your i-mode password→SelectPreparing for Overseas UseSetting of i-mode■Setting in Japanm→Set./Service→NW services→Remote control→Activate→YES■Setting Overseasm→Set./Service→Network setting→Int’l roaming→Remote control (Int.)→YES→Operate following the voice guidance.m→Set./Service→Clock→Set time→Auto time adjust ONRemote ControlSet Time○: Available —: Not availablepThe GPS functions and 64K data communication are not available overseas.Communication Systems and Available ServicesCommunication Service 3G GSMGPRSVoice call ○○○Videophone call ○——SMS ○○○i-mode ○—○i-mode mail ○—○i-Channel ○—○i-concier ○—○i-Widget ○—○Packet communication by connecting with a personal computer○—○m→Set./Service→Network setting→Int’l roaming→Network search mode→Select an item.Auto . . . . . . Automatically re-connects to another carrier. The setting is completed.Manual. . . . Connect manually to a carrier on the list.Network re-search. . . . . . . . . . When set to “Auto”, automatically switches to an available carrier. The setting is completed. When set to “Manual”, displays the list of carriers.→Select a carrier.Setting a Search Method of Telecommunication Carrier](https://usermanual.wiki/Panasonic-Connect/209018A.User-Manual-Part-2-of-2/User-Guide-1106379-Page-291.png)
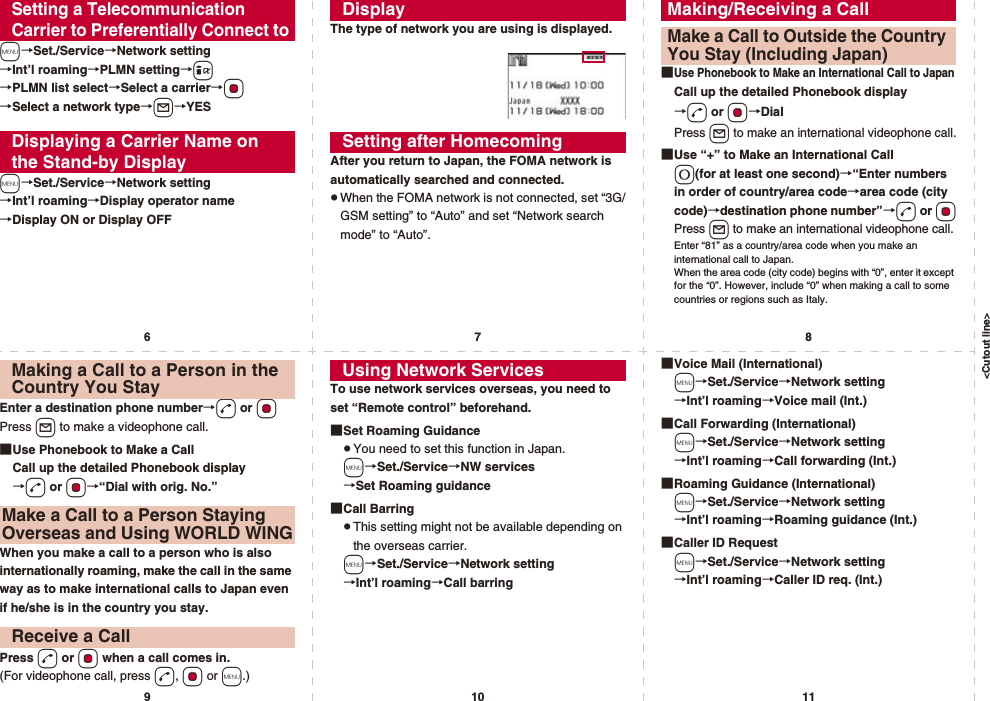
![<Cutout line>12 13 1415 16 17Use the following country/area codes when you make international calls or when you set Int’l Dial Assist.Country/Area Codes for Major CountriesService area CodeAustralia 61Belgium 32Brazil 55Canada 1China 86Czech Republic 420Denmark 45Finland 358France 33Germany 49Greece 30Hong Kong 852Hungary 36India 91Indonesia 62Ireland 353Italy 39Luxembourg 352Macau 853Malaysia 60Monaco 377Netherlands 31Service area CodeNew Zealand 64Norway 47Philippines 63Poland 48Portugal 351Russia 7Singapore 65South Korea 82Spain 34Sweden 46Switzerland 41Taiwan 886Thailand 66Service area CodepFor the code for other countries or for details, refer to “Mobile Phone User’s Guide [International Services]” or the DOCOMO Global Service website.Turkey 90United Arab Emirates 971United Kingdom 44United States of America 1Vietnam 84Service area Code International Call Access Codes for Major Countries (Table 1)Service area Access codeAustralia 0011Belgium 00Brazil 0021/0014Canada 011China 00Czech Republic 00Denmark 00Finland 00France 00Germany 00Greece 00Hong Kong 001Hungary 00India 00Indonesia 001Ireland 00Italy 00Luxembourg 00Macau 00Malaysia 00Monaco 00Netherlands 00New Zealand 00Norway 00Service area Access code](https://usermanual.wiki/Panasonic-Connect/209018A.User-Manual-Part-2-of-2/User-Guide-1106379-Page-293.png)