Panasonic Connect 209019A UMTS/ GSM Cellular Mobile Radio User Manual 2
Panasonic Mobile Communications Development of Europe Ltd UMTS/ GSM Cellular Mobile Radio 2
Contents
- 1. User Manual 1
- 2. User Manual 2
- 3. User Manual 3
- 4. User Manual 4
User Manual 2
![13-3Internet13SSL/TLSSSL (Secure Socket Layer) and TLS (Transport Layer Security) are encryption protocols for secure Internet transmissions of important/sensitive information such as credit card numbers.Server certificates are saved on handset (ZP.17-14).NotesWhen a security notice appears, subscribers must decide for themselves whether or not to open the page. SOFTBANK MOBILE Corp., VeriSign Japan K.K., Cybertrust Japan Co., Ltd., Entrust Japan Co.,Ltd., GlobalSign K.K., RSA Security Inc. and SECOM Trust.net Co., Ltd. cannot be held liable for any damages associated with the use of SSL and TLS.TipSettings #Security Settings (ZP.17-14)Using Yahoo! KeitaiOpening Yahoo! Keitai Main MenuSelect Yahoo! Keitai Main Menu items to access websites.Main Menu 4 Yahoo! Keitai1 Yahoo! KeitaiHandset connects to the Network.2 Select a menu item Repeat Step 2 as required. Basic Operations: ZP.14-6Note Shortcut: In Standby, press S [ ]](https://usermanual.wiki/Panasonic-Connect/209019A.User-Manual-2/User-Guide-1191108-Page-3.png)
![13-4Internet13Entering URLEnter URLs (addresses beginning with "http://" or "https://") directly to access websites, or open previously viewed pages using URL histories. Up to 20 URL histories are stored.Main Menu 4 Yahoo! Keitai 4 Enter URL1 Enter URL DirectlyDirect Entry 7 Enter URL Use URL HistoryURL History List 7 Select a URL ■Edit URL Histories >In Step 1, URL History List 7 Highlight URL 7 A[Menu] 7 Edit 7 Edit URL ■Delete URL Histories >In Step 1, URL History List 7 (Highlight URL 7 ) A[Menu] 7 Delete 7 One or All 7 A[YES]URL History List WindowUsing Access HistoriesOpen previously viewed pages using access histories. Up to 100 access histories are stored. (The number of savable histories varies depending on data amount.)Main Menu 4 Yahoo! Keitai 4 History1 Select a history ■Delete Access Histories >In Step 1, (Highlight URL 7 ) A[Menu] 7 Delete 7 One or All 7 A[YES] ( 7 For All, enter Phone Password)Exiting Mobile Internet1 L 7 Note Closing handset does not affect active browser.Access History Window](https://usermanual.wiki/Panasonic-Connect/209019A.User-Manual-2/User-Guide-1191108-Page-4.png)
![13-5Internet13Using PC Site BrowserOpening MenuView PC websites using PC Site Browser. When PC Site Browser is active, appears. Some pages may not be viewable. Viewing PC websites may incur high charges.Main Menu 4 Yahoo! Keitai 4 PC Site Browser1 HomepageConfirmation appears. Press A[OK]. To show confirmation each time: Show Every Time2 Select a menu itemRepeat Step 2 as required.TipSettings #Hide Warning Messages when Activating PC Site Browser or Switching to Yahoo! Keitai (ZP.17-13)Entering URLFollow same operation accessed from Yahoo! Keitai. Main Menu 4 Yahoo! Keitai 4 PC Site Browser 4 Enter URL Follow Step 1 of same operation accessed from Yahoo! Keitai. (ZP.14-4)Using Access HistoriesFollow same operation accessed from Yahoo! Keitai. Main Menu 4 Yahoo! Keitai 4 PC Site Browser 4 History Follow Step 1 of same operation accessed from Yahoo! Keitai. (ZP.14-4)Exiting Internet1 L 7 Note Closing handset does not affect active browser.](https://usermanual.wiki/Panasonic-Connect/209019A.User-Manual-2/User-Guide-1191108-Page-5.png)
![13-6Internet13Basic OperationsUsing CursorMove CursorUse cursor to select underlined menu items. t o move right t o move left t o move to previous line t o move to next lineScroll PagesScroll bar appears on right side or at bottom of Display when page content continues beyond view. scroll up/down scroll left/rightD scroll page up by a screenfulF scroll page down by a screenful To scroll continuously, press and hold above keys.Move toprevious page/next pagePreviously viewed pages are temporarily saved in Cache Memory (ZP.14-2).S[Back]: Return to previous pageA[Menu] 7 Forward: View next page Some web pages may not appear after performing the steps above.Web Page Sound Volume When Manner Mode is active or Voice Call Ringer Volume set to Silent, web page sounds are muted. Sound volume cannot be adjusted while viewing web pages. Adjust Voice Call Ringer Volume beforehand (ZP.XX-2). If activated, Media Player sound volume is adjustable. Incoming message and S! Quick News ringtones do not sound while Yahoo! Keitai is active regardless of mode or message ringtone settings. indicates and handset vibrates for Incoming messages, and handset vibrates for S! Quick News.When Authentication is RequiredSome pages require user authentication for access.If required, enter user ID or password.TipSettings #Change Font Size #Scroll Unit #Images Off #Sounds Off (ZP.17-13) #Delete User ID or Password Entered when Authentication is Required (ZP.17-14)](https://usermanual.wiki/Panasonic-Connect/209019A.User-Manual-2/User-Guide-1191108-Page-6.png)
![13-7Internet13Text Entry & Item SelectionEnter text or select items to send information.Example: Actual web pages may differ in appearance.Text Entry FieldCheck BoxRadio ButtonMenu ListCommand ButtonText Entry FieldHighlight field 7 7 Enter text 7 Enter previously entered text (input memory).A[Menu] 7 Insert 7 Input Memory 7 Select input memoryMenu ListHighlight field 7 Menu list appears.Highlight an item 7 Selected items are highlighted.Radio Button Highlight 7 When selected, appears.Check Box Highlight 7 When selected, appears.Command Button Highlight the button 7 Corresponding command is executed.TipSettings #Delete Input Memory (ZP.XX-18)](https://usermanual.wiki/Panasonic-Connect/209019A.User-Manual-2/User-Guide-1191108-Page-7.png)
![13-8Internet13Using InformationBookmarks & Saved PagesBookmark websites or save page content to Saved Pages. Some copy protected materials cannot be saved.BookmarksSave links to websites. Handset connects to the Network to open the link. Create folders to organize Bookmarks.Saved Pages Save page content. Handset opens saved pages without connecting to the Network.Saving Web Pages1 Open a web page 7 A[Menu] 7 Bookmarks or Saved Pages2 Add3 Save BookmarksSelect title 7 Edit title 7 A[Save] To save to folders: Select Folder 7 Select a folder (Not selectable when no folders exist in Bookmarks.) Save Saved PagesEdit titleViewing Bookmarks & Saved PagesMain Menu 4 Yahoo! Keitai (4 PC Site Browser)1 Bookmarks or Saved PagesExample: Yahoo! Keitai Browser2 Select an itemTip#Save URLs to Bookmarks #Open Bookmarks & Saved Pages List while Online (ZP.XX-10)Saved Pages List WindowBookmarks List Window](https://usermanual.wiki/Panasonic-Connect/209019A.User-Manual-2/User-Guide-1191108-Page-8.png)
![13-9Internet13Managing Bookmarks & Saved PagesFollow the steps below to open Bookmarks or Saved pages list: ■Yahoo! KeitaiMain Menu 4 Yahoo! Keitai 4 Bookmarks or Saved Pages ■PC Site BrowserMain Menu 4 Yahoo! Keitai 4 PC Site Browser 4 Bookmarks or Saved PagesNote Panasonic site bookmark cannot be edited/deleted. When a different USIM Card is inserted, Saved Pages do not appear or title name cannot be changed.Creating New Bookmark Folders Folders cannot be created within existing folders.1 In Bookmarks list window, A[Menu] 7 Create2 Folder 7 Enter title ■Move Bookmarks to Folder >In Bookmark list window, highlight a bookmark 7 A[Menu] 7 Move to 7 Select a folder ■Edit Folder Title >In Bookmark list window, highlight a folder 7 A[Menu] 7 Edit 7 Edit folder titleEditing Bookmark Titles/URLs1 In Bookmark list window, highlight a bookmark 7 A[Menu] 7 Edit2 Select a title/URL3 Edit Bookmark title/URL 7 A[Save]Renaming Saved Pages1 In Saved Pages list window, highlight an item 7 A[Menu] 7 Rename2 Edit title](https://usermanual.wiki/Panasonic-Connect/209019A.User-Manual-2/User-Guide-1191108-Page-9.png)
![13-10Internet13Bookmarks/Saved Pages FunctionsFrom Main Menu 4 Yahoo! Keitai ( 4 PC Site Browser) 4 Bookmarks or Saved Pages ■Save URLs to Bookmarks >A[Create]* 7 Bookmark 7 <Title> 7 Enter Title 7 <URL> 7 Enter URL 7 When saving to a folder, select Folder 7 Select a folder 7 A[Save]* When saved items exist: A[Menu] 7 Create ■Open Bookmarks & Saved Pages List while Online >On a wave page, A[Menu] 7 Bookmarks or Saved Pages 7 List ■Delete Bookmarks/Folders >Follow the steps belowItem Operation/DescriptionDelete >Highlight a bookmark/folder 7 A[Menu] 7 Delete 7 One 7 Delete Selected Items >A[Menu] 7 Delete 7 Selected Files 7 (Repeat: Select a bookmark/folder)* 7 A[Delete] 7 * To cancel selection, press again.Delete All Items >A[Menu] 7 Delete 7 All 7 A[YES] 7 Enter Phone Password ■Delete Saved Pages >Follow the steps belowItem Operation/DescriptionDelete >Highlight a saved page 7 A[Menu] 7 Delete 7 One 7 Delete Selected Saved Pages >A[Menu] 7 Delete 7 Selected Files 7 (Repeat: Select a saved page)* 7 A[Delete] 7 * To cancel selection, press again.Delete All Saved Pages >A[Menu] 7 Delete 7 All 7 A[YES] 7 Enter Phone Password ■Reorder Bookmarks/Folders >Highlight a bookmark/folder 7 A[Menu] 7 Reordering 7 to select new order ■Send Bookmark URLs >Highlight a bookmark 7 A[Menu] 7 Send Bookmark 7 S! Mail or SMS ■Send Bookmarks via Infrared >Highlight a bookmark 7 A[Menu] 7 Send via Infrared](https://usermanual.wiki/Panasonic-Connect/209019A.User-Manual-2/User-Guide-1191108-Page-10.png)
![13-11Internet13Downloading Image/Sound FilesSave images, sounds, etc. to Data Folder or Memory Card. For PC Site Browser, only still images can be saved.1 Open a web page 7 A[Menu] 7 Select item2 Select a fileFile details appear.3 A[Save]4 Phone or Memory CardAvailable menu items vary by saved content.Note 840P does not support Progressive JPEG files. Do not remove/install Memory Card while saving files to it. Do not turn handset power off while downloading or saving files. Files may be damaged. Some copy protected files may not be saved.Using Number, Address or URLUse linked numbers, addresses or URLs to make calls, send messages, access websites, or save them directly to Phone Book.1 Open a web page containing phone numbers, mail addresses or URLs2 Phone NumberSelect a phone number 7 Select an item (See below)Item Operation/DescriptionVoice Call Make a Voice Call >Video Call Make a Video Call >Phone Book Save a number to Phone Book (ZP.4-3) E-mail AddressSelect an address 7 Select an item (See below)Item Operation/DescriptionS! Mail Create S! Mail (ZFrom Step 4 on ZP.XX-4)SMS Create SMS (ZFrom Step 4 on ZP.XX-8)Phone Book Save mail address to Phone Book (ZP.4-3) URLSelect URLHandset connects to the Network.](https://usermanual.wiki/Panasonic-Connect/209019A.User-Manual-2/User-Guide-1191108-Page-11.png)
![13-12Internet13Streaming Supported by compatible files on Yahoo! Keitai sites only. Streaming files cannot be saved.Main Menu 4 Yahoo! Keitai 4 Yahoo! Keitai1 Open a web page 7 Select a fileMedia Player activates and streaming starts. To pause: 7 to resume Playback Window Operations: ZP.7-9(Replay Track, Play Previous and Play Next are unavailable)2 L or S[Back] to exitNote Streaming requires a continuous Network connection. Network remains connected even during a pause (Transmission fees apply). Streaming indicator appears (ZP.1-8). Paused streams may stop after three minutes of inactivity. When roaming abroad, streaming may be unavailable or not be performed properly.Incoming Voice Calls while StreamingIncoming call pauses an active stream. Video Calls cannot be received while streaming.](https://usermanual.wiki/Panasonic-Connect/209019A.User-Manual-2/User-Guide-1191108-Page-12.png)
![13-13Internet13Option Menu ItemsIn Yahoo! Keitai, press A[Menu] for these options: Some functions may not be available depending on web pages.Item Operation/DescriptionForward Go to next pageBookmarks View Bookmarks list, add bookmarks, or access web pagesSaved Pages View Saved Pages list or save page content to Saved PagesText Copy Copy page textReload Page Refresh page informationSmall Screen/PC Screen1Toggle display sizePage OperationFrame In/Frame Out : Select full screen frameJump to Top : Jump to top of pageJump to Bottom : Jump to end of pageZoom In/Out1: Zoom page in/outSelect Item View, play or save file to Data Folder (Downloading Images/Sounds: ZFrom Step 2 on P.XX-11)MoreSearch in Internet : Search text in InternetSearch in this page : Search text within pageHistory : Open previously viewed pagesSend Bookmark : Send URL via S! Mail/SMSEnter URL : Enter URL directly or select URL from URL History list to open siteProperty : View page details or electronic certificates for secure pagesFlash(R) Menu : Playback/pause Flash® filesItem Operation/DescriptionTo PC Site Browser2/Change Browser1Toggle Yahoo! Keitai/PC siteYahoo! Keitai2/Homepage1View top menuSettings2/PC Site Browser Settings1Font Size : Change character sizeEncoding : Change encoding type1 PC Site Browser only2 Yahoo! Keitai only](https://usermanual.wiki/Panasonic-Connect/209019A.User-Manual-2/User-Guide-1191108-Page-13.png)
![14-2S! Appli14Before Using S! AppliS! Appli are Java™-based applications designed to run on SoftBank handsets. Download games and other real-time applications for use on handset. Separate subscription required to use downloaded applications (not required for pre-installed S! Appli). For usage on pre-installed applications, see Help menu for each S! Appli.Note For more information, visit SOFTBANK MOBILE Corp. Website (http://www.softbank.jp).Network S! AppliNetwork S! Appli requires Network connections. Transmission fees apply. ■License Information >Main Menu 4 S! Appli 4 InformationDownloading S! AppliDownload up to 100 S! Appli file to handset/Memory Card.Main Menu 4 S! Appli 4 S! Appli List1 Download S! AppliHandset connects to the Network, and download site appears.2 Select an S! AppliProperties appear.3 Follow onscreen instructions4 Phone or Memory CardDownloaded S! Appli is saved to Data Folder automatically. Download may take some time.5 A[YES] to activateDownloaded S! Appli starts. To exit: S[NO]](https://usermanual.wiki/Panasonic-Connect/209019A.User-Manual-2/User-Guide-1191108-Page-16.png)
![14-4S! Appli14Managing ApplicationsMoving S! Appli between Handset and Memory Card Main Menu 4 S! Appli 4 S! Appli List1 Highlight an S! Appli 7 A[Menu] 7 Move Some S! Appli may not be moved to Memory Card.Deleting S! Appli Main Menu 4 S! Appli 4 S! Appli List1 Highlight an S! Appli 7 A[Menu] 7 Delete 7 Some pre-installed S! Appli may not be deleted.Viewing S! Appli Properties Main Menu 4 S! Appli 4 S! Appli List1 Highlight an S! Appli 7 A[Menu] 7 PropertySet Security Level while Running S! Appli Security Level cannot be set for some S! Appli. Main Menu 4 S! Appli 4 S! Appli List 1 Highlight an S! Appli 7 A[Menu] 7 Permission2 Select an item (See below)Item Operation/DescriptionNetwork AccessConnect to the NetworkAuto InvocationActivate S! AppliMultimedia RecordingActivate CameraData Reading AccessRead Phone Book, schedule events, etc.Data Rewriting AccessWrite/delete Phone Book, schedule events, etc.Location Access Retrieve Location information3 Always Allowed, Ask First Time, Ask Every Time or Not Allowed For Ask First Time, confirmation appears the first time application is activated.](https://usermanual.wiki/Panasonic-Connect/209019A.User-Manual-2/User-Guide-1191108-Page-18.png)
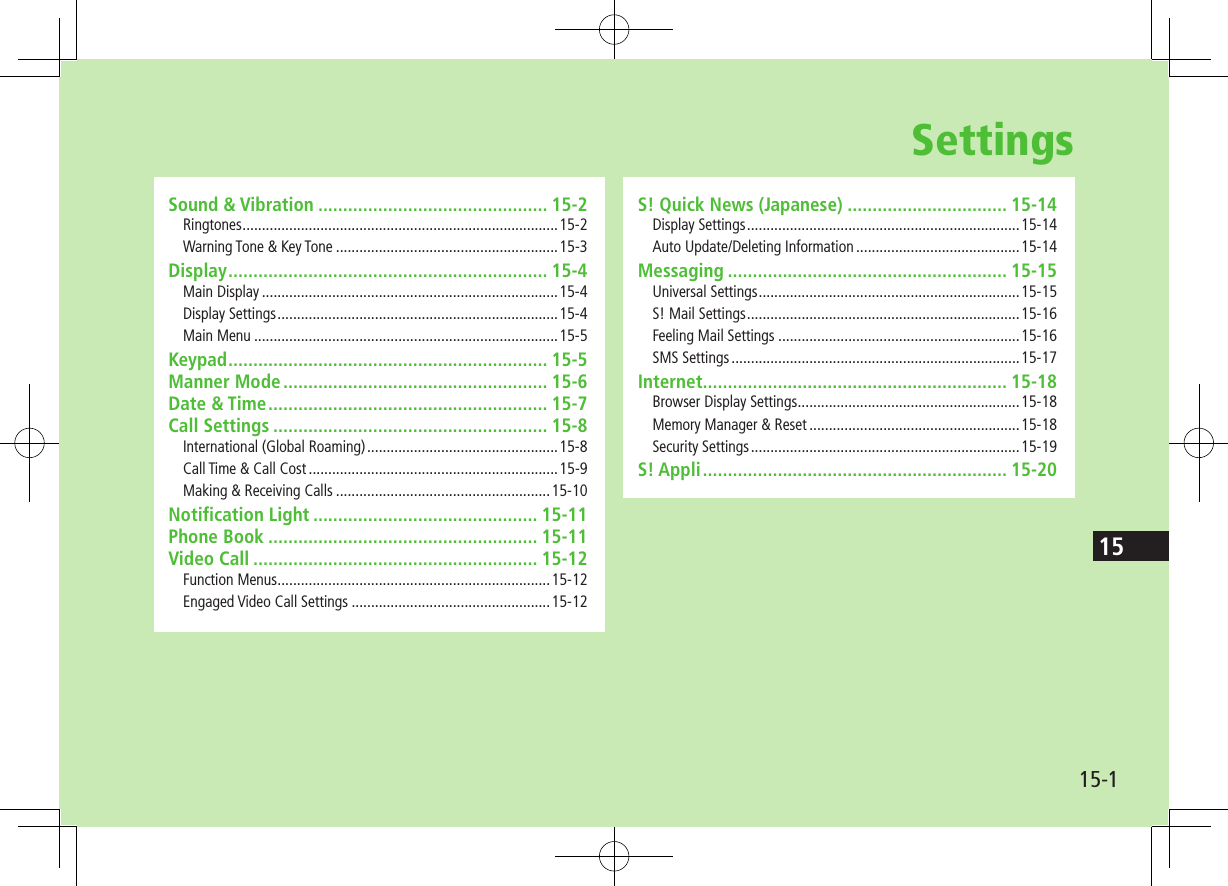
![Settings15-215SettingsSound & VibrationRingtonesFrom Main Menu 4 Settings 4 Sound SettingsSetting/Operation Default ■Change Ringtone (Voice Call or Video Call)1 2 3 >Assign Ringtone 7 Voice Call or Video Call 7 Select a folder in Data Folder 7 Highlight a tone 7 A[Set]ブザー.mmf ■Change Ringtone (Message or S! Quick News)1 2 >Assign Ringtone 7 Message or S! Quick News 7 Select a folder in Data Folder 7 Highlight a tone 7 A[Set]効果音(キラキラ).mmf ■Change Ringer Volume (Voice Call, Video Call or Message)4 >Ringer Volume 7 Voice Call, Video Call or Message 7 Adjust volumeVolume 3 ■Change Ringer Volume (S! Quick News) >Ringer Volume 7 S! Quick News 7 Adjust volume Silent ■Change Ringtone Duration (Message or S! Quick News) >Ringtone Duration 7 Message or S! Quick News 7 Enter ring time5 seconds ■Set Vibration Alert (Voice Call, Video Call, Message or S! Quick News)5 >Vibration Alert 7 Voice Call, Video Call, Message or S! Quick News 7 Select a vibration patternOFF1 Files recorded by Voice Recorder cannot be set for ringtones. Some music files cannot be set as Ringtone. (Copy protected files: ZP.XX-4)2 When unique tones for each Phone Book entry or Group are set (ZP.4-4, P.4-5), Phone Book settings take priority.3 If a Voice Call is received while streaming/downloading, default ringtone may sound.4 Same setting applies to sound effects from: Web pages, messages and S! Information Channel. When Escalating Tone is set, volume sounds at Volume 6 (setting may not apply to some content).5 Avoid placing handset on unstable surface when Vibration Alert is active/while charging battery; cancel Vibration Alert before charging battery.](https://usermanual.wiki/Panasonic-Connect/209019A.User-Manual-2/User-Guide-1191108-Page-20.png)
![Settings15-415SettingsDisplayMain DisplayFrom Main Menu 4 Settings 4 Display SettingsSetting/Operation Default ■Change Wallpaper* >Main Display 7 Select a folder in Data Folder 7 Highlight an image 7 A[Set]リング.jpg ■Change Backlight Duration >Backlight Time 7 Select a time 15 seconds ■Change Display Color Scheme >Themes 7 Select a color White ■Change Display Brightness >Brightness 7 Select a level Level 3* Some images may not be set or appear properly. (Copy protected files: ZP.XX-4)Display SettingsFrom Main Menu 4 SettingsSetting/Operation Default ■Set Interface Language >Phone Settings 7 言語選択 7 English or 日本語Automatic1 ■Change Clock/Calendar Style >Display Settings 7 Standby Display 7 Clock/Calendar Display 7 Select a clock/calendar typeLarge Clock (Upper Center) ■Show Operator Name in Standby >Display Settings 7 Standby Display 7 Operator Name 7 ONOFF (hide) ■Set Standby Window On/Off2 >Display Settings 7 Standby Display 7 Standby Window 7 ON (Always) or OFFON (Manually)1 Automatic applies USIM Card language.2 S! Quick News Display Settings (ZP.XX-14)](https://usermanual.wiki/Panasonic-Connect/209019A.User-Manual-2/User-Guide-1191108-Page-22.png)
![Settings15-515Main MenuFrom Main Menu 4 Settings 4 Display SettingsSetting/Operation Default ■Change Main Menu Theme1 >Change Menu Theme 7 Original Menu 7 Select a menu 7 – ■Use Other Handset Interface2 >Change Menu Theme 7 S! Familiar Usability 7 Highlight a menu theme 7 A[Set] 7 – ■Change Main Menu Background >Main Menu Icons 7 Change Full Image 7 Highlight an image 7 A[Set]– ■Change Main Menu Icons >Main Menu Icons 7 Change Image 7 (Repeat: Select an icon 7 Highlight an image 7 A[Set])– ■Reset Main Menu Icons >Main Menu Icons 7 Reset Defaults 7 –1 While changing theme, other functions are unavailable. For approximately 30 seconds after process is complete, calls/messages may be blocked.2 Download S! Familiar Usability applications beforehand (ZP.1-21).SettingsKeypadFrom Main Menu 4 Settings 4 Phone Settings 4 Key SettingsSetting/Operation Default ■Set Keypad Backlight Duration >Keypad Backlight 7 Select a time or OFF15 seconds ■Change Keypad Function >One Touch Key 7 Speed DialQuick Phone Book Search ■Hide Confirmation when Pressing One Touch Site Button >One Touch Site Button 7 Access Confirm 7 OFFON (show)](https://usermanual.wiki/Panasonic-Connect/209019A.User-Manual-2/User-Guide-1191108-Page-23.png)
![Settings15-615SettingsManner ModeFrom Main Menu 4 Settings 4 Manner Mode SettingsSetting/Operation Default ■Set Manner Mode Type* >Select a mode When Manner, Drive or Original Manner is set, an indicator appears in Standby (ZP.1-8, P.1-10).Normal ■Personalize Individual Mode Settings >Highlight a mode 7 A[Menu] 7 Edit 7 Select an item 7 Edit–* Manner Mode and Drive Mode can be activated/deactivated in Standby (ZP.1-16, P.1-17). ■Default Settings by ModeNormal Manner Drive Original Manner ModeAssign Ringtone (Voice Call/Video Call)ブザー.mmf – – ブザー.mmfAssign Ringtone (Message/S! Quick News)効果音(キラキラ).mmf– – 効果音(キラキラ).mmfRinger Volume (Voice Call/Video Call/Message)Volume 3 – – Volume 3Ringer Volume (S! Quick News)Silent – – SilentRingtone Duration (Message/S! Quick News)5 sec 5 sec 5 sec 5 secKey Tone (Tone Type)Tone 1 – Tone 1 Tone 1Key Tone (Tone Volume)Silent – Silent Silent Warning ToneON – OFF ONVibration Alert (Voice Call/Video Call/Message)OFF Pattern 1 OFF OFFVibration Alert (S! Quick News)OFF OFF OFF OFFAnswer PhoneOFF ON * OFF* When activating Drive Mode, Answer Phone activates automatically, and cannot be set to OFF.](https://usermanual.wiki/Panasonic-Connect/209019A.User-Manual-2/User-Guide-1191108-Page-24.png)
![Settings15-815SettingsCall SettingsInternational (Global Roaming)From Main Menu 4 Settings 4 Call Settings 4 Optional Services 4 International SettingSetting/Operation Default ■Change International Code1 >International Code 7 Enter Phone Password 7 Enter International Code0046010 ■Edit Country/Region Code >Country/Area Number List 7 Select a country/region 7 Edit country/region name 7 Edit country/region code– ■Add Country/Region Code >Country/Area Number List 7 A[Menu] 7 Add 7 Enter country/region name 7 Enter country/region code– ■Delete Country/Region Code >Country/Area Number List 7 Highlight a country/region 7 A[Menu] 7 Delete 7 A[YES]– ■Select Operator >Select Operator 7 Select Auto/Manual 7 Manual 7 Select an operatorAutomatic ■Set Operator Priority for Automatic Search2 >Select Operator 7 Set Priority 7 A[Menu] 7 Add, Insert, Edit or Delete Add : new network appears at the end of the list; place cursor at the end of the list beforehand. Insert : new network appears above selected one.–1 In Standby, press J 7 Press and hold P (+ appears) to enter International Code automatically. (+ indicates International Code.)2 Available operators vary by network conditions.](https://usermanual.wiki/Panasonic-Connect/209019A.User-Manual-2/User-Guide-1191108-Page-26.png)
![Settings15-915Call Time & Call CostFrom Main Menu 4 Settings 4 Call Settings 4 Call Time & CostSetting/Operation Default ■View Total Call Charge for Outgoing Calls >All Calls ( 7 To reset, 7 7 Enter PIN2) – ■View Total Call Time for Outgoing Calls1 >Total Call Time ( 7 To reset, 7 ) – ■Display Call Charge2 >Display Cost 7 ONOFF (hide) ■Set Charge Limit3 4 >Set Cost Limit 7 A[Menu] 7 Edit 7 Enter PIN2 7 Enter charge limit– ■View Remaining Cost >Remaining– ■Enter Currency Denomination and Price per Unit of Call Time >Currency Setting 7 7 Enter PIN2 7 Enter three letter abbreviation for the designated currency 7 Enter value–1 For Group Calling, total length of all calls made from handset remains.2 Call Cost may not appear depending on subscription.3 If charge limit is set below the value set in All Calls, outgoing calls are blocked. Reset All Calls or change charge limit to a higher value.4 Emergency numbers (110, 119, 118) are dialable even when the limit is reached.](https://usermanual.wiki/Panasonic-Connect/209019A.User-Manual-2/User-Guide-1191108-Page-27.png)
![Settings15-1215SettingsVideo CallFunction MenusFrom Main Menu 4 Settings 4 Call Settings 4 Video CallSetting/Operation Default ■Change Outgoing Image and Sound Settings1 >Video & Voice Setting 7 Select an itemAlternative Picture ■Change Display Backlight Brightness1 >Display Backlight 7 Brightness 7 Select a level Level 3 ■Change Display Backlight Duration1 >Display Backlight 7 Backlight Time 7 Follow General Setting2 or Always OFFAlways ON ■Change Incoming Video Image Quality1 >Incoming Video Quality 7 Motion Prioritized or Quality PrioritizedStandard ■Change Alternative Picture >Alternative Picture 7 Highlight a file 7 A[Set]TVコール代替画像1.bmp ■Switch Speaker ON1 >Loud Speaker 7 OFFON(speaker on)1 To change settings during a call: ZP.2-9, Right2 Display Backlight Time setting (ZP.XX-4) applies.Engaged Video Call SettingsFrom During a Video Call, A[Menu] 7 SettingsSetting/Operation Default ■Change Brightness >Display Backlight 7 Brightness 7 Select a level Level 3 ■Change Backlight Duration >Display Backlight 7 Backlight Time 7 Select an item Selecting Follow General Setting applies Display Backlight Time setting.Always ON ■Change Incoming Image Quality >Incoming Video Quality 7 Motion Prioritized or Quality PrioritizedStandard ■Adjust Color Tone to Lighting Conditions >White balance 7 Select an environment Automatic](https://usermanual.wiki/Panasonic-Connect/209019A.User-Manual-2/User-Guide-1191108-Page-30.png)
![Settings15-1315SettingsDigital TVFrom Main Menu 4 TV 4 User SettingsSetting/Operation Default ■Hide Caption >Caption 7 OFFON ■Change Default View >First View 7 Normal ScreenWide Screen ■Change Brightness >Display Backlight 7 Brightness 7 Select a level Level 2 ■Set Backlight Duration while Watching TV >Display Backlight 7 Backlight Time 7 Select an itemAlways ON ■Turn Off Sounds from Data Broadcast/Sites >Data Broadcasting 7 Sound Effect 7 OFFON ■Show Confirmation on Data Broadcast >Data Broadcasting 7 Reset Confirmation Display 7 – ■Hide Guide in Wide Screen >Icon Always Display 7 OFF ON ■Reset Channel List >Reset Channel Settings 7 7 Enter Phone Password– ■Delete Information Saved in Broadcast Storage Area >Reset Storage Area 7 Select an item 7 – ■Delete All Information Saved in Broadcast Storage Area >Reset Storage Area 7 A[All] 7 7 Enter Phone Password– ■Reset TV Settings >Reset TV Settings 7 7 Enter Phone Password –-](https://usermanual.wiki/Panasonic-Connect/209019A.User-Manual-2/User-Guide-1191108-Page-31.png)
![Settings15-1415SettingsS! Quick News (Japanese)Display SettingsFrom Main Menu 4 Settings 4 Display Settings 4 S! Quick News SettingsSetting/Operation Default ■Show Only Unread Items in Standby >Unread/Read Setting 7 UnreadUnread + Read ■Change Marquee Speed >Marquee Speed 7 Fast or Slow Medium ■Show Image Data >Image Display 7 ONOFF (hide)Auto Update/Deleting InformationFrom Main Menu 4 Entertainment 4 S! Quick News 4 SettingsSetting/Operation Default ■Automatically Update News Flash in S! Quick News List1 2 >Auto Refresh 7 News Flash 7 Set update frequencyOFF (not automatically update) ■Automatically Update General News (Once a day)1 2 >Auto Refresh 7 General 7 7 ONOFF (not automatically update) ■Cancel Automatic Updates for Special News1 2 >Auto Refresh 7 Special 7 OFFON (Automaticallyupdate every fowr hours)1 2 ■Delete S! Quick News Information >Del S! Quick News List 7 A[YES] 7 Enter Phone Password–1 If calls are in progress at update time, auto update does not occur until next update.2 Video Calls are rejected during auto update.](https://usermanual.wiki/Panasonic-Connect/209019A.User-Manual-2/User-Guide-1191108-Page-32.png)
![Settings15-1515SettingsMessagingUniversal SettingsFrom Main Menu 4 Messaging 4 Settings 4 Universal SettingsSetting/Operation Default ■Open Incoming Mail Folder Automatically by Opening Handset for New Messages1 >Clamshell Control 7 ONOFF ■Change Font Size2 >Font Size 7 Large or SmallNormal ■Confirm Message Delivery (Available when Messaging to SoftBank Handset Numbers) >Delivery Report 7 ONOFF (not confirm) ■Filter Messages into Folders >Mail Delivery Rule 7 Select a folder 7 A[Menu] 7 Add Address 7 Select a search/entry method 7 Select/enter address– ■Filter Messages by Subject >Mail Delivery Rule 7 Select a folder 7 A[Menu] 7 Add Subject 7 Enter subject– ■Change Word Prediction Priority >Learning from Received Message 7 OFFON (prioritize) ■Require Phone Password Entry when Opening Messaging Folders/Retrieving Server Mail >Mail Security Setting 7 Enter Phone Password 7 (Repeat: Select an item)3 7 A[OK]OFF (not set) ■Enable 3D Pictograms when Opening Messages >3D Pictograms 7 3D Picto Auto Play 7 Always Display or Display only UnreadOFF ■Change Font/Background Color >3D Pictograms 7 Color Settings 7 Select a color White ■Set Auto Delete Off (For Drafts or Sent/Unsent Messages) >Auto Delete Sent Messages 7 OFFON ■Set Auto Delete Off (For Incoming Mail) >Auto Delete Incoming Messages 7 OFFON1 Available only when the first information received on handset is Message.2 In the following cases, font size does not change. Open preview window to view created messages in selected font size. ・In Subject field・In S! Mail Composition window when Font Size is set to Small3 To cancel selection, press again.](https://usermanual.wiki/Panasonic-Connect/209019A.User-Manual-2/User-Guide-1191108-Page-33.png)
![Settings15-1615S! Mail SettingsFrom Main Menu 4 Messaging 4 Settings 4 S! Mail SettingsSetting/Operation Default ■Set S! Mail Download Condition (within Japan) >Incoming Options 7 Home Auto Settings 7 From Numbers Only or Manual RetrievalAuto Download All ■Retrieve S! Mail Manually while Abroad >Incoming Options 7 Roaming Auto Settings 7 Manual RetrievalAuto Download ■Set Not to Quote Message Text when Replying >Quote Message 7 OFFON (quote) ■Open Image Files Manually >Attachment Auto-play 7 Images 7 OFFON (open) ■Play Music Files Automatically* >Attachment Auto-play 7 Sounds 7 ONOFF(not play back)* When multiple sound files are attached, the first file plays.Feeling Mail SettingsFrom Main Menu 4 Messaging 4 Settings 4 S! Mail Settings 4 Feeling ExpressionSetting/Operation Default ■Hide Information >Information Display Settings 7 OFFON (show) ■Deactivate Notification Light >Notification Light Patterns 7 Settings ON/OFF 7 OFFON (activate) ■Change Notification Light Color >Notification Light Patterns 7 Select feeling 7 Select a color*– ■Deactivate Vibration >Vibration Patterns 7 Settings ON/OFF 7 OFFON (activate) ■Change Vibration Pattern >Vibration Patterns 7 Select feeling 7 Select a pattern– ■Set Message Ringtone >Message Ringtone 7 Settings ON/OFF 7 ONOFF ■Change Message Ringtone >Message Ringtone 7 Select feeling 7 Select a folder in Data Folder 7 Highlight a tone 7 A[Set]–* When highlighting a color, Notification Light illuminates.](https://usermanual.wiki/Panasonic-Connect/209019A.User-Manual-2/User-Guide-1191108-Page-34.png)
![Settings15-1815SettingsInternetBrowser Display SettingsYahoo! KeitaiFrom Main Menu 4 Yahoo! Keitai 4 SettingsPC Site BrowserFrom Main Menu 4 Yahoo! Keitai 4 PC Site Browser 4 PC Site Browser SettingsSetting/Operation Default ■Change Font Size >Font Size 7 Large or SmallNormal ■Scroll Unit >Scroll Unit 7 Whole Screen or Half ScreenSingle Line ■Images Off >Downloads 7 Display Images 7 OFFON (Show) ■Sounds Off >Downloads 7 Play Sounds 7 OFFON (Retrieve) ■Hide Warning Messages when Activating PC Site Browser or Switching to Yahoo! Keitai* >Warning Messages 7 PC Site Browser (when activating) or Yahoo! Keitai (when switching) 7 OFFON (Show)* PC Site Browser onlyMemory Manager & ResetYahoo! KeitaiFrom Main Menu 4 Yahoo! Keitai 4 SettingsPC Site BrowserFrom Main Menu 4 Yahoo! Keitai 4 PC Site Browser 4 PC Site Browser SettingsSetting/Operation Default ■Clear Cache >Memory Manager 7 Clear Cache 7 – ■Delete Cookies >Memory Manager 7 Delete Cookies 7 – ■Delete User ID or Password Entered when Authentication is Required >Memory Manager 7 Delete Certificates 7 – ■Delete Input Memory >Memory Manager 7 Delete Input Memory 7 – ■Initialize Browser >Initialized Browser 7 7 Enter Phone Password– ■Reset Browser Settings >Reset Defaults 7 A[YES] 7 Enter Phone Password–](https://usermanual.wiki/Panasonic-Connect/209019A.User-Manual-2/User-Guide-1191108-Page-36.png)

![16-13Appendix16Key AssignmentsMultiple characters are assigned to each key. For input modes and character types: ZP.3-2 Press and hold numeric keys (P to O) to enter single-byte numbers assigned to each key, regardless of input mode.To enter +, press and hold P in single-byte number mode.Key Input Modes Kanji (Hiragana) [Double-byte] Katakana [Double-/Single-byte] Alphanumerics [Double-/Single-byte] Numbers [Double-/Single-byte] Qあいうえおぁぃぅぇぉ1 アイウエオァィゥェォ1 . / @ - : 1 |2 _ 1 1 Wかきくけこ2 カキクケコ2 a b c A B C 2 2 Eさしすせそ3 サシスセソ3 d e f D E F 3 3 Rたちつてとっ4 タチツテトッ4 g h i G H I 4 4 Tなにぬねの5 ナニヌネノ5 j k l J K L 5 5 Yはひふへほ6 ハヒフヘホ6 m n o M N O 6 6 Uまみむめも7 マミムメモ7 p q r s P Q R S 7 7 Iやゆよゃゅょ8 ヤユヨャュョ8 t u v T U V 8 8 Oらりるれろ9 ラリルレロ9 w x y z W X Y Z 9 9 Pわをんゎー0 ワヲンヮ2ー0 0 0 [Press and hold] + 1 1 Appears when entering single-byte character.2 Appears when entering double-byte character.](https://usermanual.wiki/Panasonic-Connect/209019A.User-Manual-2/User-Guide-1191108-Page-51.png)
![16-14Appendix16Key Input Modes Kanji (Hiragana) [Double-byte] Katakana [Double-/Single-byte] Alphanumerics[Double-/Single-byte]Numbers[Double-/Single-byte]G゛゜Pictograph List/Symbol List Pictograph List/Symbol List3 "[Press and hold] Notepad List [Press and hold] P (pause) 4H、。 ?!・ (Single-byte Space) , . ? ! ’ - & ( ) ¥ (Space) #[Press and hold] Symbol List DToggle input modes [Press and hold] Toggle double-byte and single-byte characters FLine Break/Scroll Backward5 Line Break JToggle upper and lower case characters6KDelete one character after cursor (Delete one character before cursor when cursor is at the end of a sentence) [Press and hold] Delete all characters after cursor (Delete all characters before cursor when cursor is at the end of a sentence) 0Emoticons String Templates73 In single-byte alphanumerics mode, single-byte symbol list appears first.4 Pause can be entered only when entering phone numbers in Phone Book, etc.5 Toggle characters in reverse order (When cursor is at c : c 7 b 7 a 7 2 …)6 Toggle upper and lower case characters at cursor.7 Parts of URLs appear.](https://usermanual.wiki/Panasonic-Connect/209019A.User-Manual-2/User-Guide-1191108-Page-52.png)