Panasonic of North America 96NKX-MB2061 Multi-Function Laser Printer with Facsimile and 1.9 GHz DECT Base User Manual
Panasonic Corporation of North America Multi-Function Laser Printer with Facsimile and 1.9 GHz DECT Base
Contents
- 1. user manual
- 2. user manual information guide
user manual
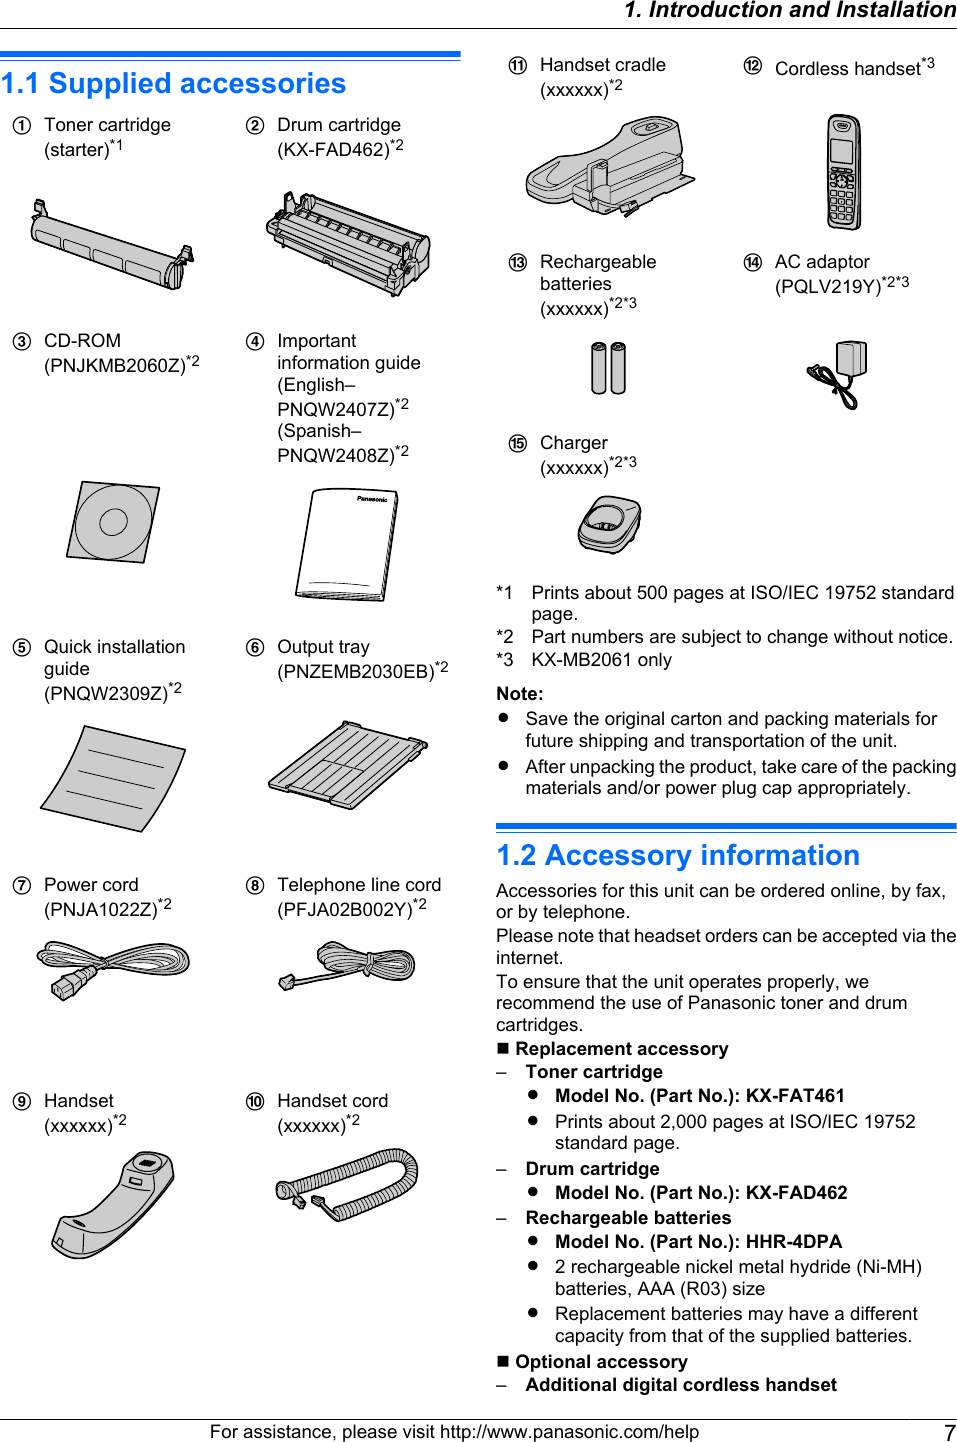


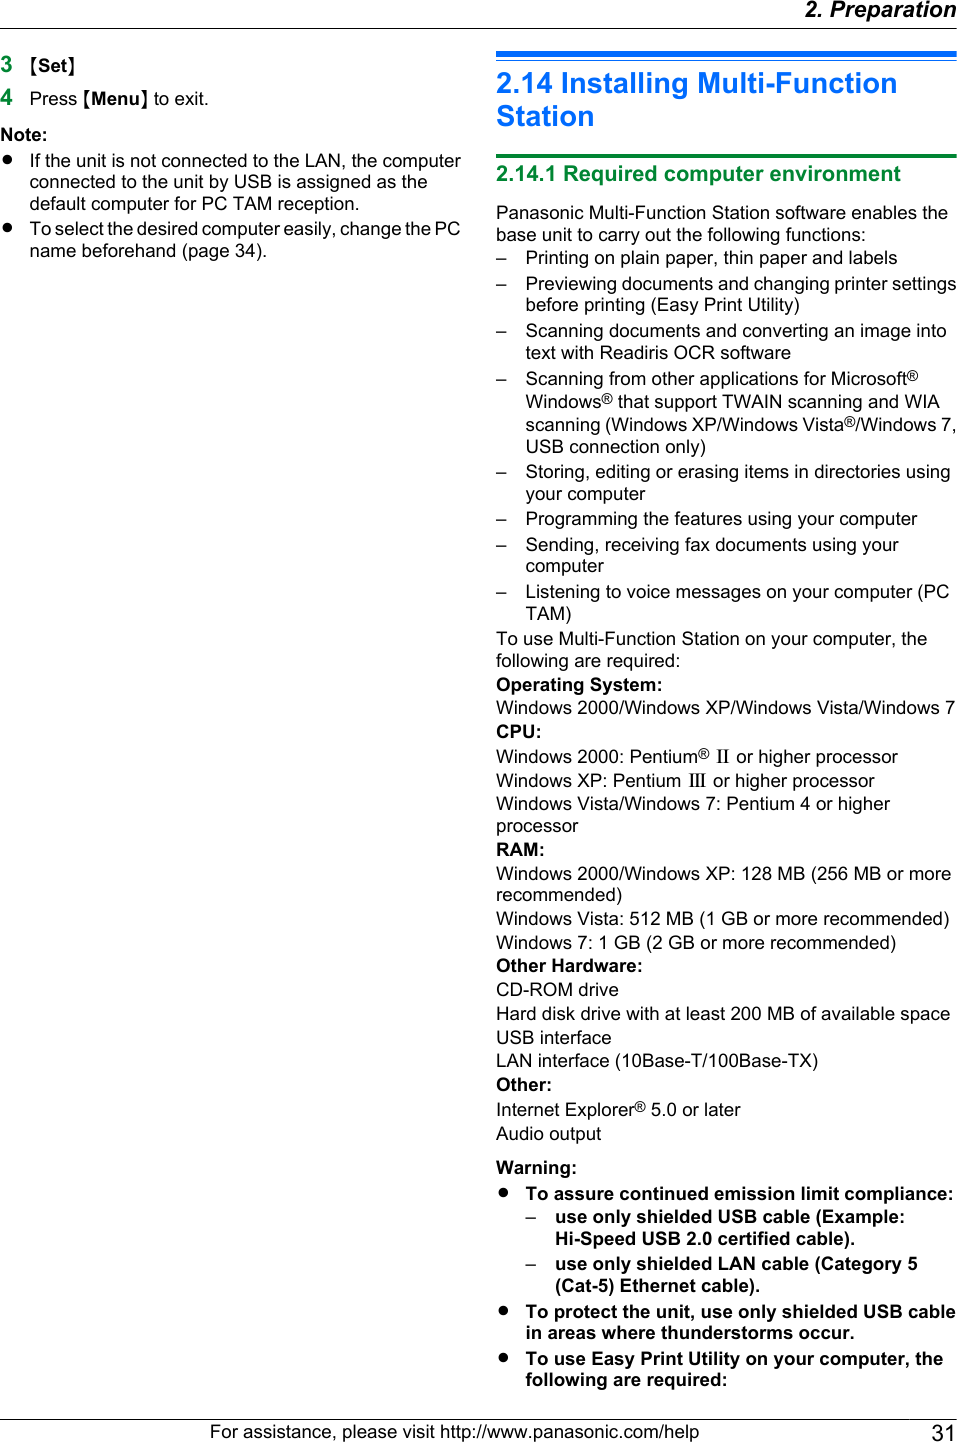
![–Windows 2000 Service Pack 4 and Securityupdate for Windows 2000 (KB835732).Install KB835732 from Microsoft downloadsite before installing Easy Print Utility.–Windows XP Service Pack 2 or later.Note:RA USB cable is not supplied. Please purchase ashielded Type-A male/Type-B male USB cable.2.14.2 Installing Multi-Function Station on acomputerRInstall Multi-Function Station (CD-ROM) beforeconnecting the unit to a computer with the USBcable. If the unit is connected to a computer withthe USB cable before installing Multi-FunctionStation, the [Found New Hardware Wizard] dialogbox will appear. Click [Cancel] to close it.RThe screenshots shown in these instructions arefor Windows XP and are included for referenceonly.RThe screenshots shown in these instructionsmay differ slightly from those of the actualproduct.RSoftware features and appearance are subject tochange without notice.RIf you are also using KX-MB200/KX-MB700/KX-FLB880 series, see page 125.1Start Windows and exit all other applications.RYou must be logged in as an administrator inorder to install Multi-Function Station.2Insert the supplied CD-ROM into your CD-ROMdrive.RIf the [Select Language] dialog box appears,select the language that you want to use with thissoftware. Click [OK].RIf the installation does not start automatically:Click [Start]. Choose [Run...]. Type “D:\Install”(where “D” is the drive letter of your CD-ROMdrive). Click [OK].(If you are not sure what the drive letter is for yourCD-ROM drive, use Windows Explorer and lookfor the CD-ROM drive.)3[Easy Installation]RThe installation will start automatically.4When the setup program starts, follow the on-screeninstructions.REasy Print Utility (page 36), Readiris OCRsoftware (page 38) and Device Monitor(page 108) will also be installed.5The [Connection Type] dialog box appears.For USB connection:1. [Connect directly with a USB cable.] A [Next]RThe [Connect Device] dialog box will appear.2. Connect the unit to a computer with the USB cable(A), then click [Next].ARIf the unit is connected to your computer, themodel name will be automatically detected.RYou can change the name of the unit if necessary.3. Click [Install], then follow the on-screen instructions.RThe files will be copied to your computer.For LAN connection:1. [Connect via the Network.] A [Next]RThe [Select a Network Device] dialog box willappear.2. Check [Select from the search list] and select theunit from the list.RIf the name of the desired unit is not displayed onthe list, and the IP address for the unit has beenassigned, check [Direct input] and enter the IPaddress.3. [Next]RYou can change the name of the unit if necessary.4. Click [Install], then follow the on-screen instructions.RThe files will be copied to your computer.Important noticeIf you are using Windows XP, Windows Vista orWindows 7, a message may appear after connectingthe unit with the USB cable. This is normal and thesoftware will not cause any difficulties with youroperating system. You can continue the installationwith no problem. This kind of message is displayed:RFor Windows XP users“The software you are installing for this hardwarehas not passed Windows Logo testing to verify itscompatibility with Windows XP.”RFor Windows Vista/Windows 7 users“Would you like to install this device software?”To view or install the operating instructions data1. Start Windows and insert the supplied CD-ROM intoyour CD-ROM drive.2. Click [Operating Instructions], then follow theon-screen instructions to view or install the operatinginstructions in PDF format.RAdobe® Reader® is required to view the operatinginstructions.32 For assistance, please visit http://www.panasonic.com/help2. Preparation](https://usermanual.wiki/Panasonic-of-North-America/96NKX-MB2061.user-manual/User-Guide-1342881-Page-32.png)
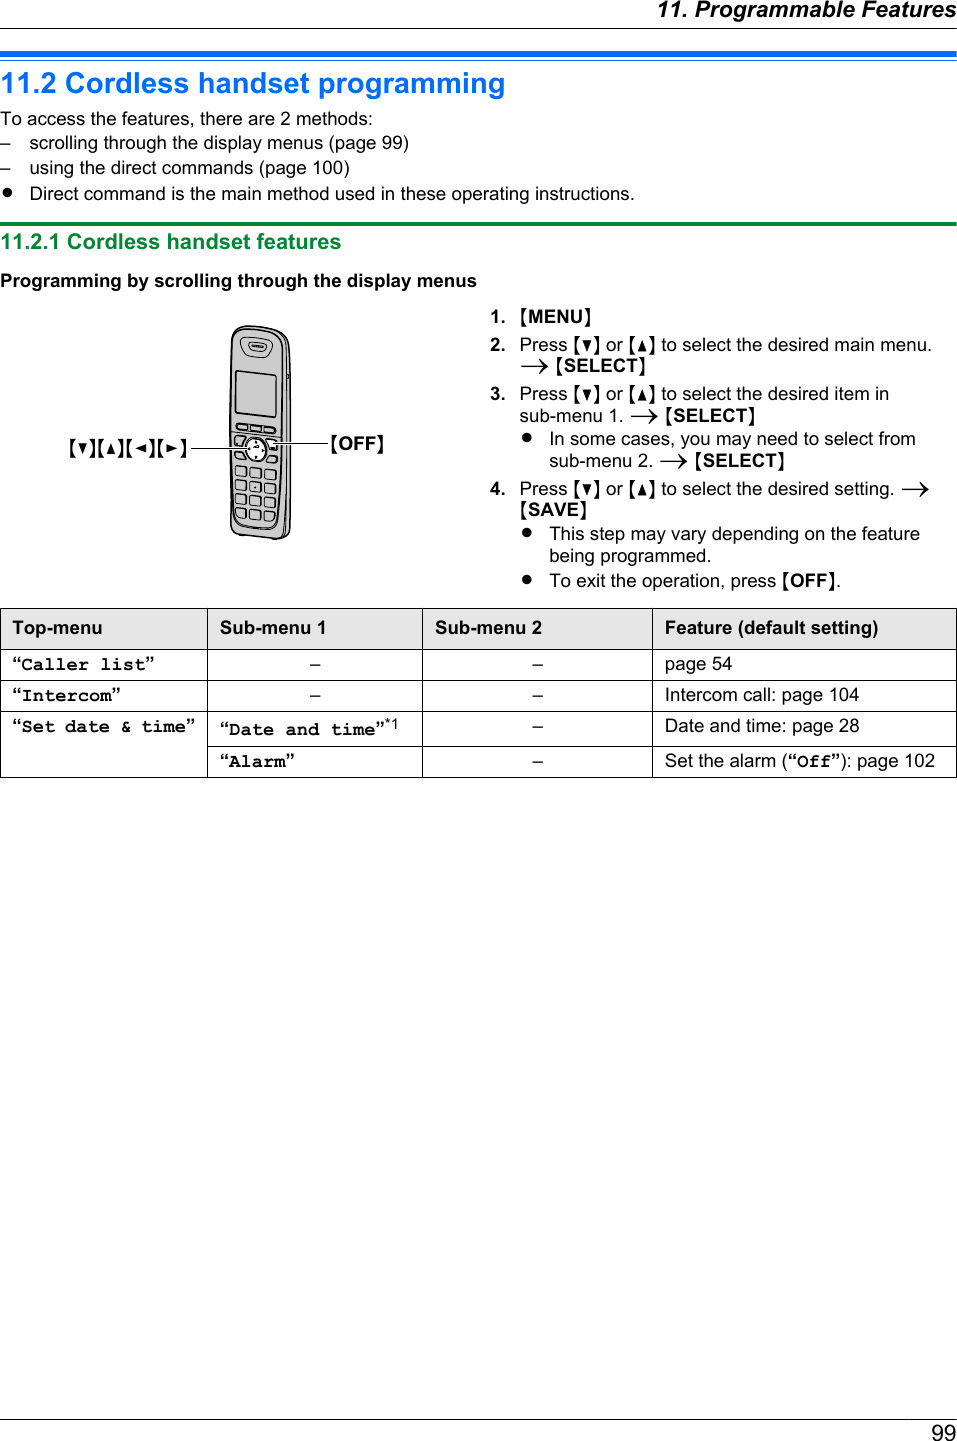
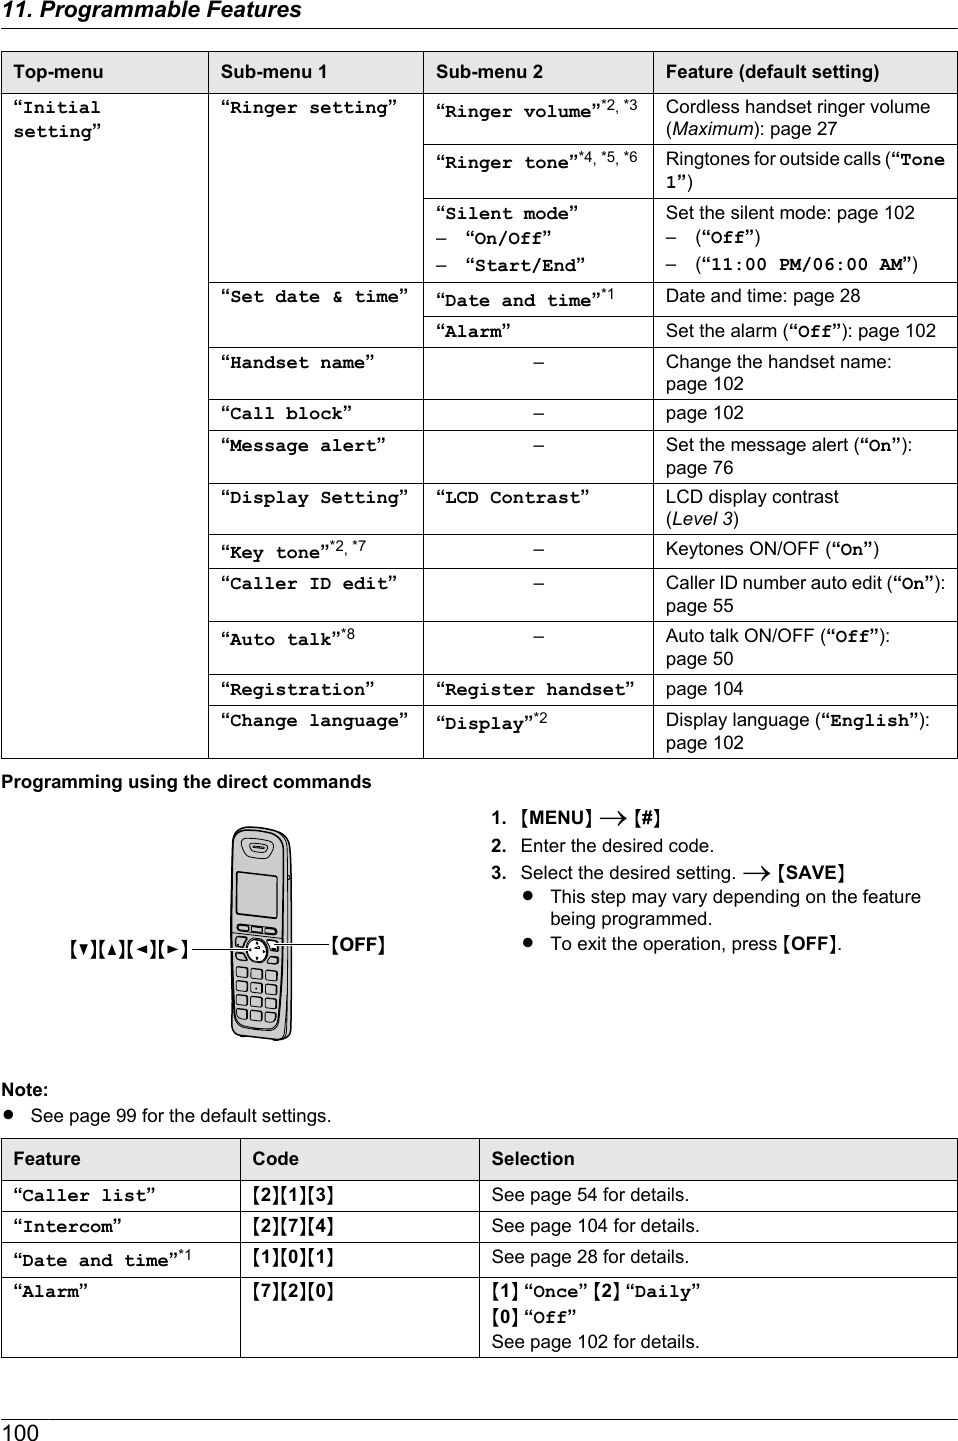
![Note:RIf the screen prompts you to insert the CD-ROM forthe operating system when installing Multi-FunctionStation, insert it into your CD-ROM drive.RIf you install the operating instructions, you can viewit anytime by clicking [ ] on the Multi-FunctionStation launcher.To use another unit with the computerYou need to add the printer driver for each unit, asfollows.1. Start Windows and insert the supplied CD-ROM intoyour CD-ROM drive.2. [Modify] A [Add Multi-Function Station Driver].Then follow the on-screen instructions.Note:RYou cannot connect more than one unit to the samecomputer at the same time (USB connection only).To modify the software (To add or uninstall eachcomponent)You can select the components to install or uninstallanytime after the installation.You must be logged in as an administrator in order tomodify Multi-Function Station.1. Start Windows and insert the supplied CD-ROM intoyour CD-ROM drive.2. [Modify] A [Modify Utilities]. Then follow theon-screen instructions.To uninstall the softwareYou must be logged in as an administrator in order touninstall Multi-Function Station.[Start] A [All Programs] or [Programs] A[Panasonic] A the unit’s name A [Uninstall]. Thenfollow the on-screen instructions.2.15 Starting Multi-FunctionStation[Start] A [All Programs] or [Programs] A[Panasonic] A the unit’s name A [Multi-FunctionStation]RMulti-Function Station will appear.[Scan] (page 40)RTo scan and display the scanned images.RTo scan and create an image file.RTo scan and send by email.RTo scan and convert an image into editable text data.[PC FAX]RTo send a document created on the computer as afax message (page 61).RTo display a fax document received on the computer(page 66).[Remote Control] (page 108)RTo program the features.RTo store, edit or erase items in base unit’s directories.RTo view items in the journal report or Caller ID list.RTo store caller information into base unit’s directories.RTo store or erase items for broadcast transmission.[Utilities]RTo start the Multi-Function Viewer (page 40).RTo start the PC TAM application (page 72).RTo start the Device Monitor (page 108).RTo start the OCR application (page 38).RTo start the configuration web page (page 77,108) (LAN connection only).[Settings] (page 34)RTo change the general settings.RTo change the settings for scanning.[]RFor detailed instructions on Multi-Function Station.RTo view operating instructions.For assistance, please visit http://www.panasonic.com/help 332. Preparation](https://usermanual.wiki/Panasonic-of-North-America/96NKX-MB2061.user-manual/User-Guide-1342881-Page-33.png)
![[ ]RTo display usage tips.[]RTo display information about Multi-Function Station.Note:RYou can confirm if the unit is connected to yourcomputer by using Device Monitor (page 108).RComputer features (printing, scanning, etc.) may notfunction properly in the following situations:– When the unit is connected to a computer thatwas custom-built by the user.– When the unit is connected to the computer via aPCI card or other expansion card.– When the unit is connected to another piece ofhardware (such as a USB hub or interfaceadapter) and not connected directly to thecomputer.To change the settingsYou can change the settings for Multi-Function Stationbeforehand.1. Select [Settings] from Multi-Function Station.2. Click the desired tab and change the settings. A[OK][General]–[Launcher display setting]: To select the displaytype of the launcher.–[OCR Path]: To select the OCR software.–[PC name list up on device] (LAN connection only):To select whether or not your computer name isdisplayed on the base unit.–[PC name] (LAN connection only): The computername that will be displayed on the base unit.[Scan]–[Save to]: To select the folder where the scannedimage will be saved.–[Viewer][File][Email][OCR][Custom]: To changescanning settings for Multi-Function scan application.Note:RAssign a unique name for the [PC name] to avoiderrors, or the scanned image may be sent to theincorrect computer.To select the default Email softwareThe default Email software is used when using“4.1.3 Scan to Email”, page 38.You can select the default Email software as follows.For Windows 2000:1. [Start] A [Settings] A [Control Panel] A[Internet Options] A [Programs] A [E-mail]2. Select the desired MAPI-compliant Email softwaresuch as [Outlook Express], etc. A [OK]For Windows XP:1. [Start] A [Control Panel] A [Internet Options]A [Programs] A [E-mail]2. Select the desired MAPI-compliant Email softwaresuch as [Outlook Express], etc. A [OK]For Windows Vista:1. [Start] A [Control Panel] A [Internet Options]A [Programs] A [Set programs] A [Setprogram access and computer defaults]RIf the [User Account Control] dialog boxappears, click [Continue].2. [Custom]3. Select the desired MAPI-compliant Email softwaresuch as [Windows Mail], etc. from [Choose adefault e-mail program]. A [OK]For Windows 7:1. [Start] A [Control Panel] A [Network andInternet] A [Internet Options] A [Programs]A [Set programs] A [Set program access andcomputer defaults]2. [Custom]3. Select the desired MAPI-compliant Email softwarefrom [Choose a default e-mail program]. A [OK]34 For assistance, please visit http://www.panasonic.com/help2. Preparation](https://usermanual.wiki/Panasonic-of-North-America/96NKX-MB2061.user-manual/User-Guide-1342881-Page-34.png)
![3.1 Printing from WindowsapplicationsYou can print a file created in a Windows application. Forexample, to print from WordPad, proceed as follows:1Open the document you want to print.2Select [Print...] from the [File] menu.RThe [Print] dialog box will appear.For details about the [Print] dialog box, click [?],then click the desired item.Note:RFor Microsoft PowerPoint®, select [Color] orremove the check next to [Grayscale] in the printdialog so that colored or gray objects will beprinted in grayscale properly.3Select the unit’s name as the active printer.RIf you have changed the name of the unit wheninstalling, select that name from the list.RTo change the printer settings, proceed asfollows.For Windows 2000:Click the desired tab and change the printersettings.For Windows XP/Windows Vista/Windows 7:Click [Preferences], then click the desired tab.Change the printer settings, then click [OK].4Click [Print].RThe unit will start printing.Note:RTo stop printing from the base unit, see page 109.RTo load paper, see page 16, 18.RFor details about the paper specifications, seepage 139.RIf a printing error occurs, the Device Monitor(page 108) will start automatically and display theerror information.Setting the printer propertiesYou can change the printer setting in step 3. Werecommend that you test paper (especially special sizesand types of paper) on the unit before purchasing largequantities.You can change or display the settings on the followingtabs.[Basic]: Paper size, media type, pages per sheet, etc.[Output]: Number of prints, collate, etc.[Quality]: Quality, contrast, toner save feature, etc.[Effects]: Watermark, overlay.[Profile]: Saving the desired settings, selecting thesaved settings, etc.[Support]: Version information.Note:RSelect the desired media type on the [Basic] tabaccording to the recording paper.Recording paper type Media typePlain paper75 g/m2 to 90 g/m2(20 lb to 24 lb)[Plain Paper]Thin paper64 g/m2 to 75 g/m2(17 lb to 20 lb)[Thin Paper]Label [Label]RWhen printing from a computer, the printer propertiessetting overrides the following unit’s programmingfeatures:– Media type setting (feature #383 and feature#384 on page 81)– Toner save setting (feature #482 on page 81)To print on labelsYou can print not only on plain paper but also on specialmedia (labels).RPlease refer to page 139 for information on recordingpaper.RTo load paper, see page 18.Use labels designed for laser printing. We recommendthe following:Avery®5160/5161/5162/5163/5164/5165/5167/5168XEROX®LWH100/LWH110/LWH120/LWH130/LWH140RUse the manual input tray to print labels.RLoad label sheets one page at a time for printing,print-side down.RRemove each label after printing.RDo not use the following types of labels:– Labels that are wrinkled, damaged or separatedfrom the backing sheet.– Any sheet of labels that has spaces in it wheresome of the labels have been removed.353. . Printer3. Printer](https://usermanual.wiki/Panasonic-of-North-America/96NKX-MB2061.user-manual/User-Guide-1342881-Page-35.png)
![– Labels that do not completely cover the backingsheet as follows:3.2 Easy Print UtilityBy printing using the Panasonic Easy Print Utility insteadof the printer driver, you can use useful printing featuresfor your convenience.– Preventing unnecessary prints by checking thepreview on PC screen– Combining multiple documents– Saving a file in PDF formatFor example, to print from WordPad, proceed as follows:1Open the document you want to print.2Select [Print...] from the [File] menu.3Select [Panasonic Easy Print Driver] as the activeprinter.4Click [Print].RThe [Panasonic Easy Print Utility] dialog will bedisplayed. For details about the Easy Print Utility,click [], then click the desired item.5View the print image by clicking the desired page inthe print page window (left column list).RTo change the printer settings, see page 36.RTo combine multiple documents created invarious applications, see page 36.RTo save the file in PDF format, see page 36.REven if you set the number of prints on the originalapplication beforehand, you may have to re-set itfor the Easy Print Utility.6Click [Print] icon on the print toolbar.RThe unit will start printing.3.2.1 Ecology printing featuresYou can use various printing features and preview theprint image without test print.Printer settingsYou can change or display the settings on the followingtabs in step 5.[Basic]: Paper size, layout printing[Output]: Number of prints, paper source, media type[Quality]: Color mode, toner save[Effects]: Header, watermark, footerCombining multiple documentsYou can display multiple pages created in variousapplications and handle it as a single document.1. Perform step 1 to 4 on “3.2 Easy Print Utility”.2. Open another document you want to add to EasyPrint Utility.3. Select [Print...] from the [File] menu.RThe [Print] dialog box will appear.4. Select [Panasonic Easy Print Driver] as the activeprinter.5. Click [Print].RThe document will be added after the last page ofthe previous document in the print previewwindow.6. Repeat step 2 to 5.7. If necessary, change the printer settings (page 36).8. Click [Print] icon on the print toolbar.Note:RThe maximum number of documents that can bedisplayed in the [Print Page Operation] window is999 pages.Saving a file as PDF fileYou can save the previewed files in PDF format insteadof printing it.1. Perform step 1 to 4 on “3.2 Easy Print Utility”.2. Click the [Save PDF file] icon on the print toolbar.RThe [Save As] dialog box appears.3. Specify the folder to save, enter the file name, andthen click [Save]. The [Save PDF file] dialogappears while PDF files are being created and saved.Note:RThe PDF file created with Easy Print Utility is animage type.363. Printer](https://usermanual.wiki/Panasonic-of-North-America/96NKX-MB2061.user-manual/User-Guide-1342881-Page-36.png)
![4.1 Scanning from the base unit(Push Scan)You can easily scan the document by using the operationpanel on the base unit. You can select one of thefollowing scanning modes depending on how you intendto use the scanned image.– Viewing using Multi-Function Viewer (Viewer)– Saving as a file to your computer (File)– Sending as an attached file to an email destinationfrom your computer (Email)– Using OCR software (OCR)– Sending as an attached file to an email destinationdirectly from this unit (Email address)– Sending to an FTP server (FTP)– Sending to an SMB folder (SMB)Note:RYou can set the desired scan mode for push scanbeforehand (feature #493 on page 92).RWhen scanning a document, we recommend usingthe scanner glass rather than the automaticdocument feeder for better results.RDo not open the document cover when scanning adocument with the automatic document feeder.MLowerNMStopNMScanNMStartNMSetNMCNMDNMENStation keys4.1.1 Scan to Multi-Function Viewer1Set the original (page 25).2MScanN3Press MCN or MDN repeatedly to select “VIEWER”.A MSetN4For USB connection:Press MCN or MDN repeatedly to select “USB HOST”.A MSetNFor LAN connection:Press MCN or MDN repeatedly to select the computer towhich you want to send the scanned image. AMSetN5If necessary, change the scanning settings. PressMEN, press MCN or MDN repeatedly to select the desiredsetting. A MSetNRIf you want to scan several pages and save as asingle file, select TIFF or PDF as the file format.6When using the scanner glass:MStartN A The unit will scan 1 page. Place the nextdocument on the scanner glass and press MSetN.Repeat this until all the documents are scanned, thenpress MStartN.When using the automatic document feeder:MStartNRThe scanned image will be displayed in the[Multi-Function Viewer] window after scanning.However, when you select PDF as a file format,the software that is associated to open PDF fileswill start.7After you finish scanning, press MStopN to reset thesettings you set in step 5.Note:RTo stop scanning, see page 109.RYou can save the images in TIFF, JPEG, BMP orPDF formats.RThe scanned image will be automatically saved in thefolder selected in the [Settings] window (page 34).4.1.2 Scan to save as a file1Set the original (page 25).2MScanN3Press MCN or MDN repeatedly to select “FILE”. AMSetN4For USB connection:Press MCN or MDN repeatedly to select “USB HOST”.A MSetNFor LAN connection:Press MCN or MDN repeatedly to select the computer towhich you want to send the scanned image. AMSetN5If necessary, change the scanning settings. PressMEN, press MCN or MDN repeatedly to select the desiredsetting. A MSetNRIf you want to scan several pages and save as asingle file, select TIFF or PDF as the file format.6When using the scanner glass:MStartN A The unit will scan 1 page. Place the nextdocument on the scanner glass and press MSetN.Repeat this until all the documents are scanned, thenpress MStartN.374. . Scanner4. Scanner](https://usermanual.wiki/Panasonic-of-North-America/96NKX-MB2061.user-manual/User-Guide-1342881-Page-37.png)
![When using the automatic document feeder:MStartNRThe scanned image will be automatically savedin the folder selected in the [Settings] window.To change the folder, see page 34.7After you finish scanning, press MStopN to reset thesettings you set in step 5.Note:RTo stop scanning, see page 109.RYou can save the images in TIFF, JPEG, BMP orPDF formats.4.1.3 Scan to EmailYou can send the scanned image as an email attachmentusing email software on your computer.1Set the original (page 25).2MScanN3Press MCN or MDN repeatedly to select “EMAIL”. AMSetN4For USB connection:Press MCN or MDN repeatedly to select “USB HOST”.A MSetNFor LAN connection:Press MCN or MDN repeatedly to select the computer towhich you want to send the scanned image. AMSetN5If necessary, change the scanning settings. PressMEN, press MCN or MDN repeatedly to select the desiredsetting. A MSetNRIf you want to scan several pages and save as asingle file, select TIFF or PDF as the file format.6When using the scanner glass:MStartN A The unit will scan 1 page. Place the nextdocument on the scanner glass and press MSetN.Repeat this until all the documents are scanned, thenpress MStartN.When using the automatic document feeder:MStartNRThe email software will automatically start and thescanned image will be attached to a new emailmessage.7After you finish scanning, press MStopN to reset thesettings you set in step 5.Note:RTo select the default email software, see page 34.RTo stop scanning, see page 109.RYou can save the images in TIFF, JPEG or PDFformats.RThe scanned image will be automatically saved in thefolder selected in the [Settings] window (page 34).4.1.4 Scan to OCRWith OCR software, you can convert an image into textdata that can be edited with word processing software.Readiris OCR software can be installed when installingMulti-Function Station.1Set the original (page 25).2MScanN3Press MCN or MDN repeatedly to select “OCR”. AMSetN4For USB connection:Press MCN or MDN repeatedly to select “USB HOST”.A MSetNFor LAN connection:Press MCN or MDN repeatedly to select the computer towhich you want to send the scanned image. AMSetN5If necessary, change the scanning settings. PressMEN, press MCN or MDN repeatedly to select the desiredsetting. A MSetNRIf you want to scan several pages and save as asingle file, select TIFF as the file format.6When using the scanner glass:MStartN A The unit will scan 1 page. Place the nextdocument on the scanner glass and press MSetN.Repeat this until all the documents are scanned, thenpress MStartN.When using the automatic document feeder:MStartNRThe scanned image will be displayed in the OCRwindow after scanning.7After you finish scanning, press MStopN to reset thesettings you set in step 5.Note:RTo stop scanning, see page 109.RYou can save the images in TIFF, JPEG or BMPformats.RFor detailed instructions about OCR, select [Help].RThe scanned image will be automatically saved in thefolder selected in the [Settings] window (page 34).4.1.5 Scan to email address (LAN connectiononly)You can send the scanned image as an attachmentwithout using email software.Important:RProgram the email server settings (page 97) andthe email destinations (page 98) beforehand.1Set the original (page 25).2MScanN384. Scanner](https://usermanual.wiki/Panasonic-of-North-America/96NKX-MB2061.user-manual/User-Guide-1342881-Page-38.png)
![4.1.7 Scan to SMB folder (LAN connectiononly)You can send the scanned image to a folder on thenetwork.Important:RProgram the SMB folder settings beforehand(page 93).1Set the original (page 25).2MScanN3Press MCN or MDN repeatedly to select “SMBFOLDER”. A MSetN4Press MCN or MDN repeatedly to select the folder towhich you want to send the scanned image. AMSetN5If necessary, change the scanning settings. PressMEN, press MCN or MDN repeatedly to select the desiredsetting. A MSetNRIf you want to scan several pages and save as asingle file, select PDF as the file format.6When using the scanner glass:MStartN A The unit will scan 1 page. Place the nextdocument on the scanner glass and press MSetN.Repeat this until all the documents are scanned, thenpress MStartN.When using the automatic document feeder:MStartNRThe scanned image will be automatically savedin the selected folder on the network.7After you finish scanning, press MStopN to reset thesettings you set in step 5.Note:RTo stop scanning, see page 109.RYou can save the images in TIFF, JPEG or PDFformats.RIf this function does not perform properly, consultyour network administrator. This unit’s SMB functiondoes not support NTMLv2 and SMB signatures.4.2 Scanning from a computer(Pull Scan)Note:RWhen scanning a document, we recommend usingthe scanner glass rather than the automaticdocument feeder for better results.RDo not open the document cover when scanning adocument with the automatic document feeder.4.2.1 Using Multi-Function scan applicationBy clicking an application icon, the selected applicationstarts automatically after scanning.1Set the original (page 25).2Start Multi-Function Station. A [Scan]3Click the desired application icon.RWhen you click [Custom], the pre-programmedapplication starts.RTo cancel scanning while the documents arebeing scanned, click [Cancel].Note:RYou can change the scanning settings beforehand foreach application (page 34).RWhen you point to an application icon, the scanningsettings for that application are displayed as a tooltip.RThe scanned image will be automatically saved in thefolder selected in the [Settings] window (page 34).4.2.2 Using Multi-Function Viewer1Set the original (page 25).2Start Multi-Function Station.3[Utilities] A [Viewer]R[Multi-Function Viewer] will appear.4Click the [Scan] icon in the [Multi-FunctionViewer] window.RThe unit’s name dialog box will appear.5If necessary, change the scanning settings on yourcomputer.RTo preview the scanned image, click [Preview].You can drag the frame to specify the scanningarea. If you change the scan settings, click[Preview] to refresh the scanned image.If you use the automatic document feeder, onlythe first page will be previewed. When you needto refresh the scanned image, set the documentto preview again.6[Scan]RIf you preview the scanned image using theautomatic document feeder in step 5, set thedocument again and click [Scan].RThe scanned image will be displayed in the[Multi-Function Viewer] window after scanning.404. Scanner](https://usermanual.wiki/Panasonic-of-North-America/96NKX-MB2061.user-manual/User-Guide-1342881-Page-40.png)
![RTo save the scanned image, select [Save As ...]from the [File] menu.RTo cancel scanning while the documents arebeing scanned, click [Cancel].Note:RYou can display images in applications that supportTIFF, JPEG, PCX, DCX and BMP formats.RYou can save images in TIFF, JPEG, PCX, DCX,BMP or PDF formats.RIf the [Select...] button is displayed in [TargetDevice], click [Select...] to select the unit from thelist, and then click [OK].The [Select...] button will not be displayed whenthere is only one printer driver installed.RYou can move, copy and delete a file or page.4.2.3 Using other applicationsMulti-Function Station includes a TWAIN and WIAcompliant scanner driver. You can also scan using otherapplications that support TWAIN or WIA scanning. Forscanning example, proceed as follows:1Set the original (page 25).2Start an application that supports TWAIN or WIAscanning.3For TWAIN scanning:Select [Acquire Image...] from the [File] menu.For WIA scanning:Select [From Scanner or Camera...] from the[File] menu.RThe unit’s name dialog box will appear.4If necessary, change the scanning settings on yourcomputer. A [Scan]RThe scanned image will be displayed in theapplication window after scanning.RTo cancel scanning while the documents arebeing scanned, click [Cancel].Note:RScanning from WIA compliant applications is onlyavailable for Windows XP, Windows Vista andWindows 7, and only via a USB connection.RDepending on the application used, the appearancemay differ slightly.RIf the [Select...] button is displayed in [TargetDevice] when performing TWAIN scanning, click[Select...] to select the unit from the list, and thenclick [OK].The [Select...] button will not be displayed whenthere is only one printer driver installed.414. Scanner](https://usermanual.wiki/Panasonic-of-North-America/96NKX-MB2061.user-manual/User-Guide-1342881-Page-41.png)

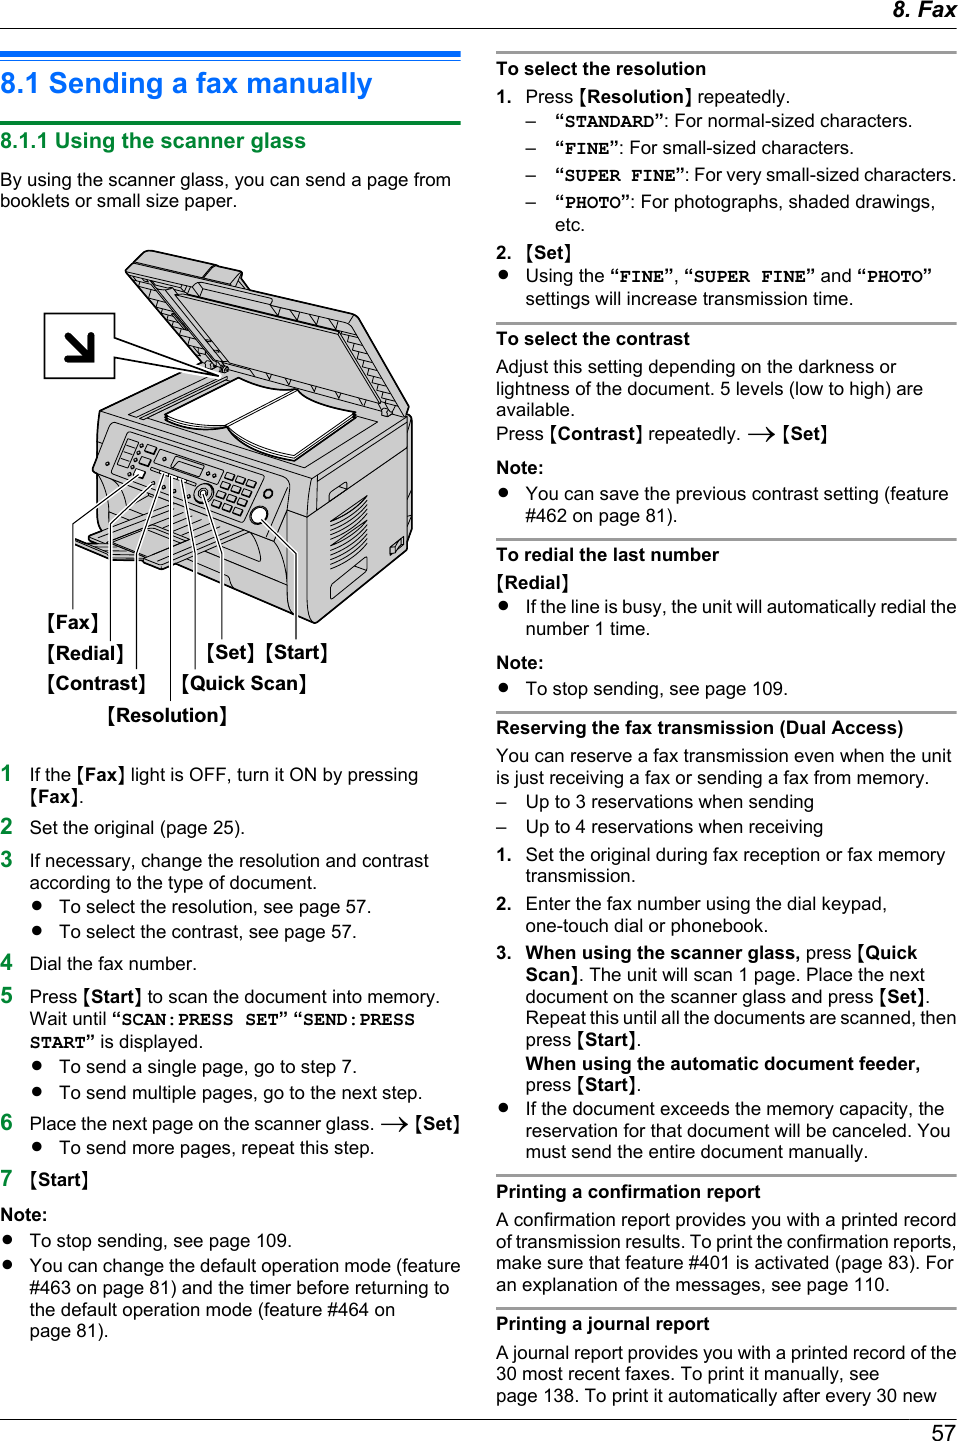

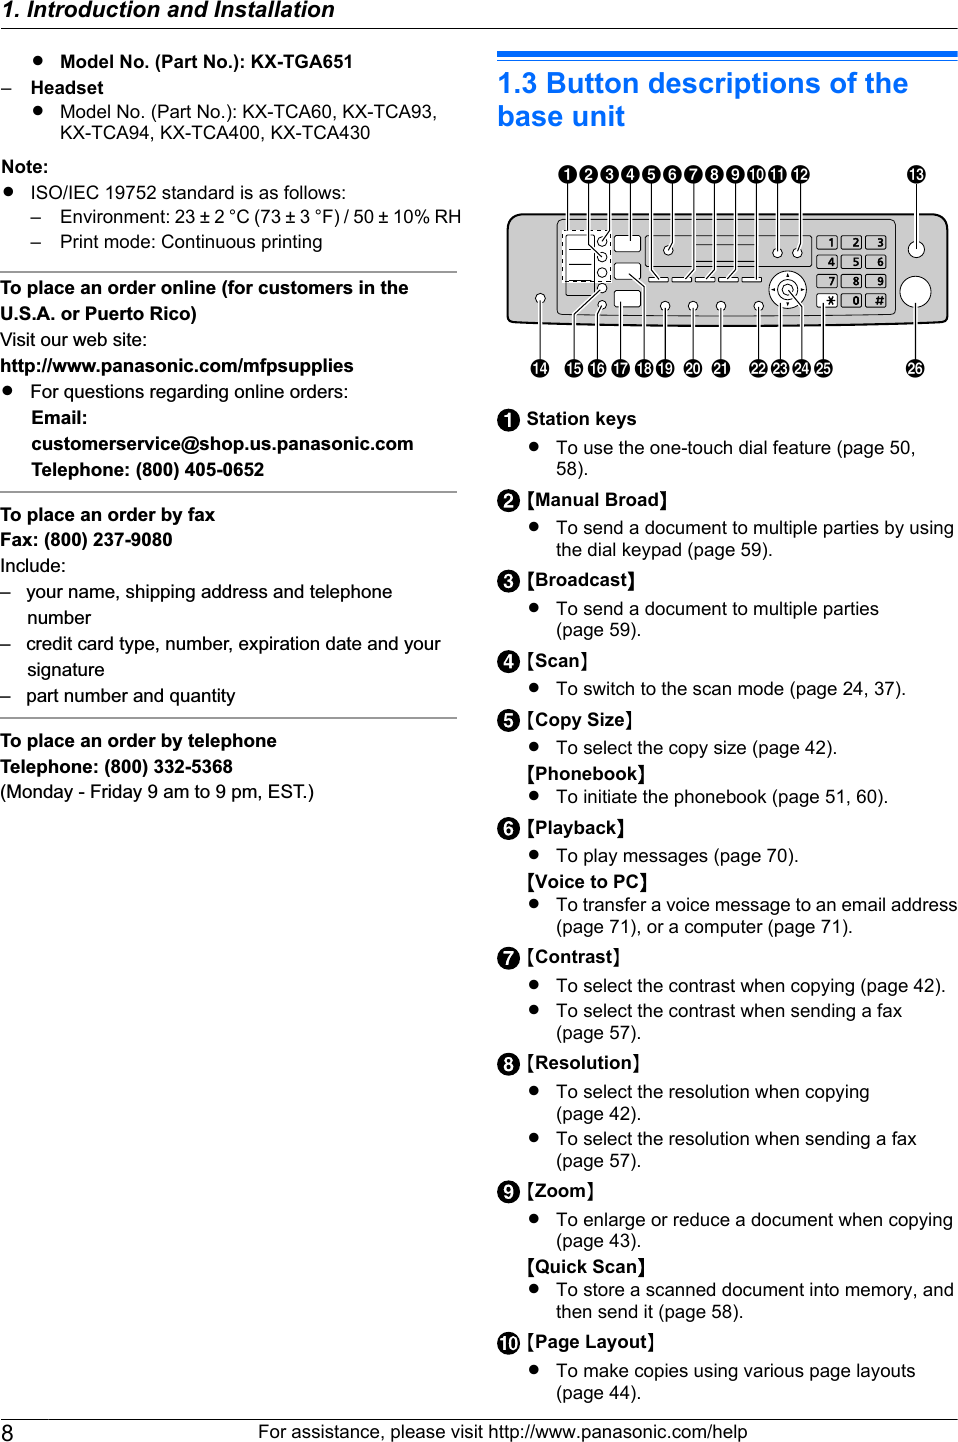
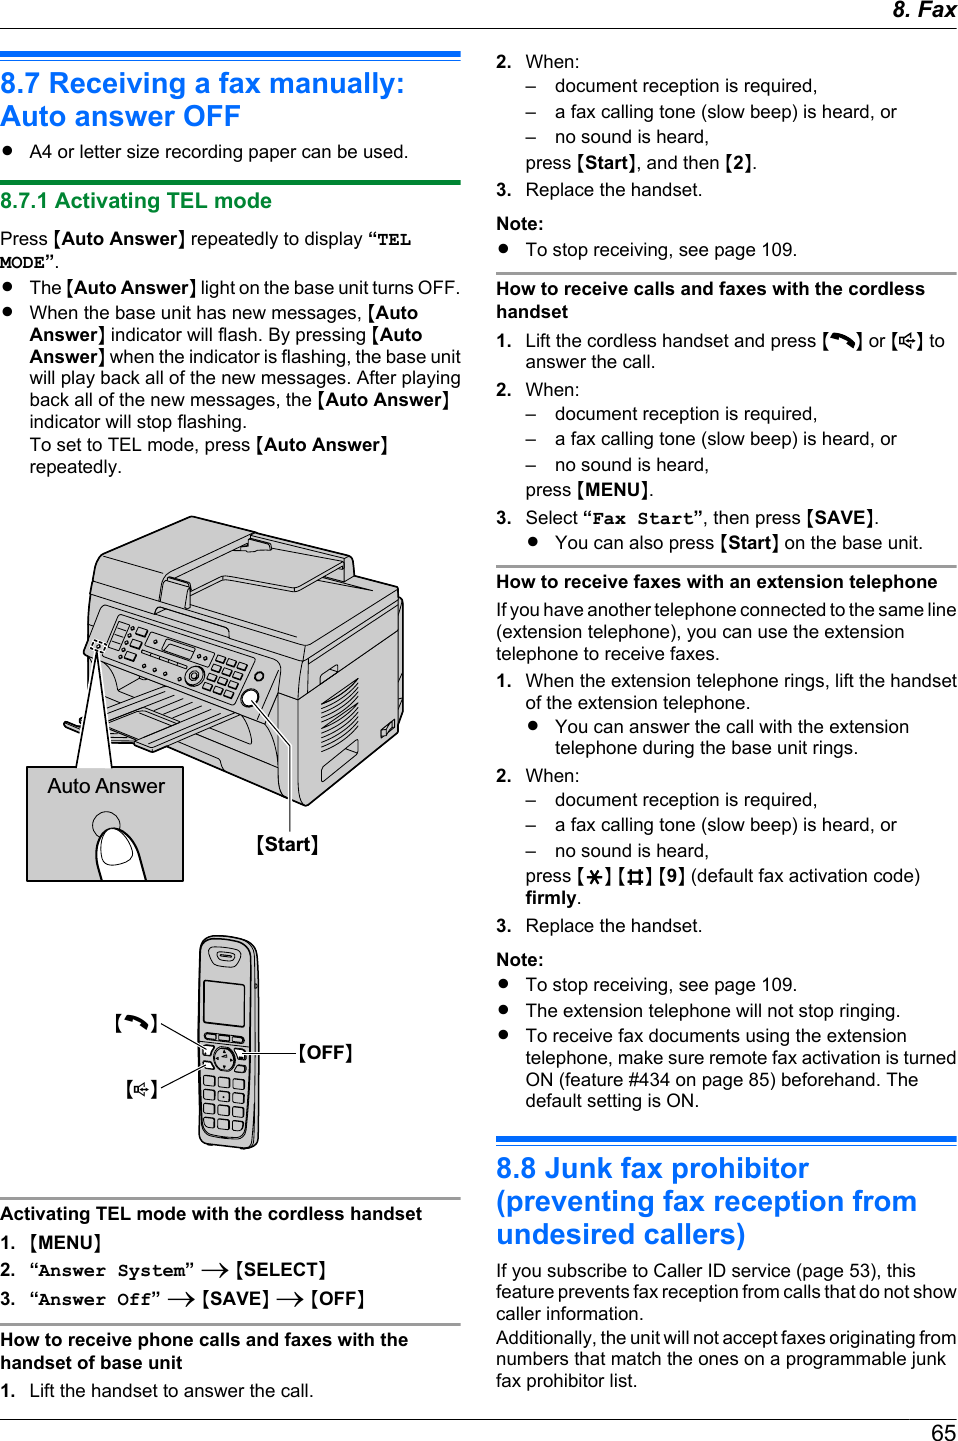
![8.4 Sending an electronicdocument as a fax message fromyour computerYou can access the fax function from a Windowsapplication using Multi-Function Station.For example, to send a document created fromWordPad, proceed as follows.1Open the document you want to send.2Select [Print...] from the [File] menu.RThe [Print] dialog box will appear.3Select the PCFAX unit’s name as the active printer.4Click [Print].RThe [Send a Fax] dialog box will appear.5Enter the fax number using the keypad display or thebase unit’s directory.RTo stop the operation, click [Cancel].6[Send]RThe document will be sent through the unit fromyour computer.Note:RTo stop sending, see page 109.RIf the document exceeds the memory capacity of theunit, sending will be canceled.RFor details, see the help file by selecting [] fromMulti-Function Station.RClick [Select...] to change the active unit.8.5 Selecting the way to use yourunitDepending on your situation, select the way you preferto use your unit.– Use as a telephone answering machine and/or fax(TAM/FAX mode)– Use only as a fax (FAX ONLY mode)– Use mostly as a telephone (TEL mode)8.5.1 Use as a telephone answering machineand/or fax (TAM/FAX mode)Your situationYou want to answer phone calls using the telephoneanswering machine and receive faxes automatically.SetupSet the unit to TAM/FAX mode (page 62) by pressingMAuto AnswerN repeatedly.RThe MAuto AnswerN light on the base unit turns ON.Auto AnswerNote:RMake sure feature #400 is set to “TAM/FAX”beforehand (page 81).RReceived fax document and voice message can betransferred automatically to desired email address.To use the email transfer feature, set the emaildestination beforehand (page 87, 89).RDo not connect an answering machine to the sametelephone line. If connected, set the automaticanswer feature to OFF by pressing MAuto AnswerNrepeatedly.RIt is not recommended to subscribe to voice mailservice as it may disturb fax reception. If you dosubscribe to a voice mail service, set the ring countof your voice mail service to 5 rings or greater.618. Fax](https://usermanual.wiki/Panasonic-of-North-America/96NKX-MB2061.user-manual/User-Guide-1342881-Page-61.png)
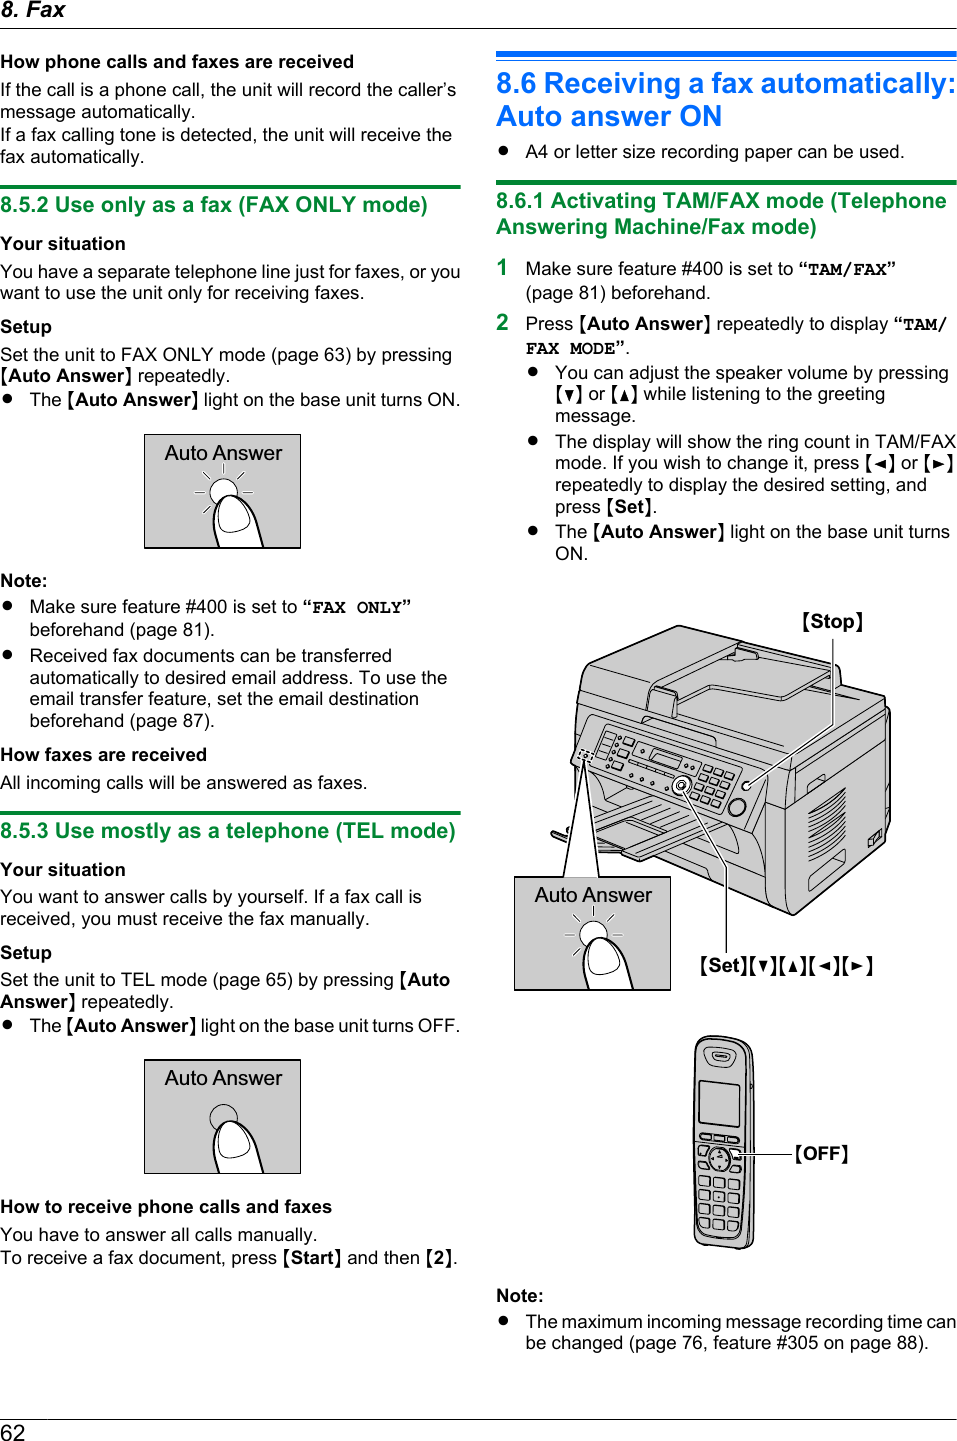
![Activating TAM/FAX mode with the cordless handset1. MMENUN2. “Answer System” A MSELECTN3. “Answer On” A MSAVEN A MOFFNNote:RMake sure feature #400 is set to “TAM/FAX”beforehand (page 81).How phone calls and faxes are receivedWhen receiving calls, the unit works as an answeringmachine and/or fax.Note:RIf you answer a call with an extension telephone (ifconnected to the same line), and the answeringmachine is answering the call, you can pressMGNM0N (default auto disconnection code) to speak tothe caller.RThe auto disconnection code can be changed infeature #435 on page 85.REven when you answer a call with the extensiontelephone, the answering machine may continueanswering the call depending on the type of anextension telephone. Press MStopN on the base unitto talk with the calling party.Receiving a voice message and fax document in onecallThe caller can leave a voice message and send a faxdocument during the same call. Inform the caller of thefollowing procedure beforehand.1. The caller calls your unit.RThe answering machine will answer the call.2. The caller can leave a message after the greetingmessage.3. The caller presses MGNM9N.RThe unit will activate the fax function.4. The caller presses the start button to send a fax.Changing the ring count in TAM/FAX modeYou can select from “2” (default), “3”, “4”, “5”, “6”,“7”, or “AUTO”. This setting can be changed by feature#211 on page 80, or using the cordless handset(page 76).–“AUTO”: The unit answers after 2 or 3 rings when newmessages have been recorded, and after 5 or 6 ringswhen there are no new messages. If you call your unitfrom a remote location to listen to new messages(page 73), you will know that there are no newmessages when the unit rings for the 4th time. Youcan then hang up without being charged for the call.Transferring received fax document/voice messageautomatically to email addressYou can transfer the received fax document (fax to emailfeature) and/or voice message (TAM to email feature) todesired email address automatically. Transferredmessages will not be deleted from the unit.To activate these features, set the following:– Activate the TAM to email address (feature #369 onpage 88)Activate the fax to email address (feature #452 onpage 86)– Program the email server settings (page 97) andthe email destinations (page 98)– Set the TAM to email destinations (page 89)Set the fax to email destinations (page 87)Note:RTo check the status of the transfer, see page 87,89.Useful information:If you are out for a long period of time, we recommendthe following.1. Set this feature.2. Also activate PC FAX (page 66) and/or PC TAM(page 72), and keep your computer turned ON.RFor PC FAX, start Multi-Function station, thenactivate [PC FAX].In this case, data will be transferred to your computerusing PC FAX and/or PC TAM feature, then thetransferred data will be deleted from your unitautomatically. The same data will also be sent to youremail address, so you can check your messages daily,preventing the unit to run out of paper/memory etc.8.6.2 Activating FAX ONLY mode1Make sure feature #400 is set to “FAX ONLY”(page 81) beforehand.2Press MAuto AnswerN repeatedly to display “FAXONLY MODE”.RThe display will show the ring count in FAX ONLYmode. If you wish to change it, press MFN or MENrepeatedly to display the desired setting, andpress MSetN.638. Fax](https://usermanual.wiki/Panasonic-of-North-America/96NKX-MB2061.user-manual/User-Guide-1342881-Page-63.png)

![Important:RThis feature does not work if you receive faxesmanually.8.8.1 Activating the junk fax prohibitor1Press MMenuN repeatedly to display “JUNK FAXPROH.”. A MEN2Press MCN or MDN repeatedly to select “ON”. AMSetN3Press MStopN to exit.8.8.2 Storing undesired callersYou can register up to 20 undesired numbers from theCaller ID list (page 53) if you do not wish to receive faxesfrom them.1Press MMenuN repeatedly to display “JUNK FAXPROH.”.2Press MEN repeatedly to display “JUNK LISTSET”. A MSetN3Press MCN or MDN repeatedly to display the party youdo not want to receive faxes from. A MSetN4Press MStopN 2 times to exit.To display the junk fax prohibitor list1. Press MMenuN repeatedly to display “JUNK FAXPROH.”.2. Press MEN repeatedly to display “JUNK LISTDISP.”. A MSetN3. Press MCN or MDN to display the items on the list.4. Press MStopN to exit.To print the junk fax prohibitor list1. Press MMenuN repeatedly to display “JUNK FAXPROH.”.2. Press MEN repeatedly to display “JUNK LISTPRINT”. A MSetN3. Press MStopN to exit.To erase an item from the junk fax prohibitor list1. Press MMenuN repeatedly to display “JUNK FAXPROH.”.2. Press MEN repeatedly to display “JUNK LISTDISP.”. A MSetN3. Press MCN or MDN repeatedly to display the desireditem. A MEraseNRTo cancel erasing, press MStopN, then pressMMenuN.4. MSetN A MMenuN8.9 Receiving a fax on yourcomputerYou can receive a fax document on your computer. Thereceived fax document is saved as an image file(TIFF-G4 format).Important:RMake sure the PC fax setting is set to “ALWAYS”or “CONNECTED” beforehand (feature #442 onpage 86).RMake sure the computer setting for the PC faxreception is set beforehand (feature #443 onpage 30).RMake sure the fax preview mode is turned OFFbeforehand (feature #448 on page 67) (LANconnection only).1Press MAuto AnswerN repeatedly to turn the autoanswer setting ON (page 62).2Start Multi-Function Station. A [PC FAX]3When a fax call is received, your computer willreceive a document through the unit.Note:RYou can view, print or transfer the received documentusing your computer.RMessages transferred to your computer will bedeleted from the unit.Viewing a received document1. Select [PC FAX] from Multi-Function Station.2. Select [Received Log] in [Communication Log].3. Click the item you want to view.4. Click [File] in the menu bar, then select [View], orclick the [View] icon in the toolbar.RThe received fax will be displayed.If a received fax document is stored in the unit’smemoryYou can load the document into your computer.1. Select [PC FAX] from Multi-Function Station.2. Select [Received Log] in [Communication Log].3. Click [File] in the menu bar. A [Receive a Fax]RIf the PC fax setting (feature #442 on page 86)is activated, the received fax document will beautomatically transferred to the computer.668. Fax](https://usermanual.wiki/Panasonic-of-North-America/96NKX-MB2061.user-manual/User-Guide-1342881-Page-66.png)
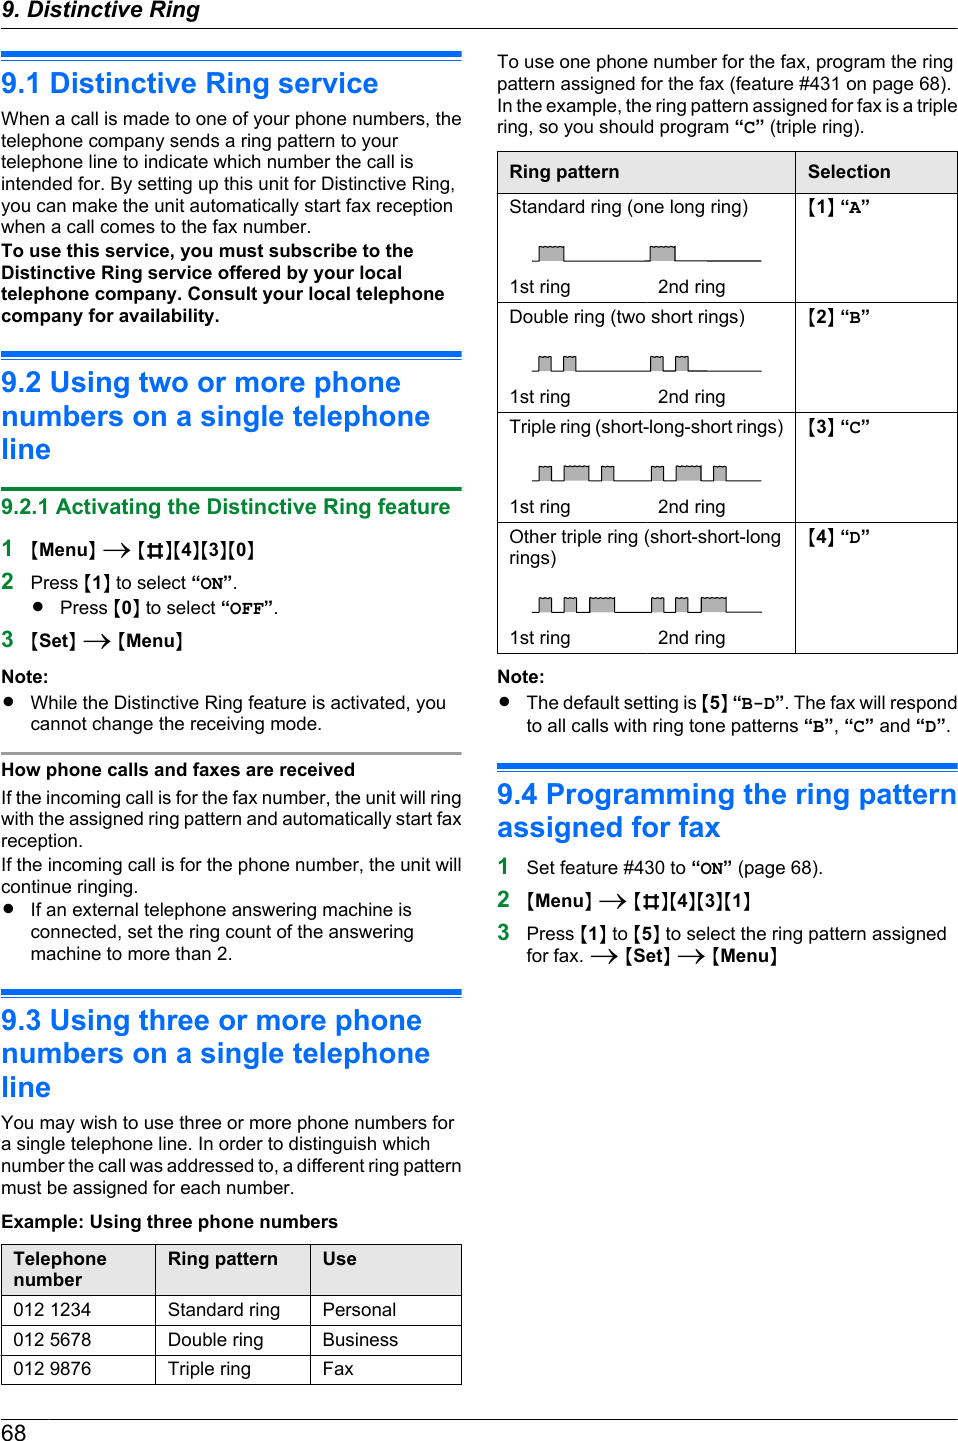
![8.10 Web fax preview (LANconnection only)You can display a received fax document in your webbrowser, and print or save the necessary document afteryou confirm the image.Important:RWeb fax preview will not be activated when usingthe unit for the first time. To activate this feature,set the following:–“8.10.1 Activating the fax preview mode”,page 67.–“8.10.2 Programming the web fax previewaccess code”, page 67.8.10.1 Activating the fax preview mode1MMenuN A MBNM4NM4NM8N2Press M1N to select “ON”.RPress M0N to select “OFF”.3MSetN A MMenuNNote:RIf you select “ON”, the PC fax setting (feature #442on page 86) will be deactivated.RWe recommend you to activate the notification of faxreception (feature #451 on page 86). The selectedcomputer will receive the notification when thememory becomes full of received documents.8.10.2 Programming the web fax previewaccess code1MMenuN A MBNM4NM5NM0N A MSetN2Enter the password (feature #155 on page 79).A MSetN3Enter the web fax preview access code, up to 8characters, using the English alphabet and numbers(see page 107 for character entry).RThe following symbols can also be entered usingM0N or M1N.! @ # $ % ^ & ’ ) ( . – _ { }4MSetN A MMenuNNote:RIf the web fax preview access code is notprogrammed (blank), the web fax preview feature willnot be activated.8.10.3 Displaying a received fax document onthe web browserImportant:RMake sure that the unit is idle.1Start Multi-Function Station.2[Utilities] A [Configuration Web Page] A[Device Configuration]3Type “root” as the user name, then enter thepassword (feature #155 on page 79). A [OK]4Select the [WEB FAX PREVIEW] tab.5Enter the web fax preview access code (feature #450on page 67). A [Submit]RA list of the received fax documents will bedisplayed.6Click the desired icon to preview, print or save a faxdocument.RWhile previewing the document, you canmanipulate the fax document (Example: enlarge,rotate etc.).7Close the web browser.Note:RThe display speed depends on the contents and sizeof the document.RThe received fax document is saved as an image file(PDF format). Adobe Reader is required to view it.What “ ” means“ ” on the display means the image has already beenviewed, printed or saved.RTo delete a document after viewing a fax documentin step 6, click [Back] to go back to the list. You candelete images showing “ ”.RTo delete a document after printing or saving a faxdocument in step 6, click [Reload] to update the list.You can delete images showing “ ”.678. Fax](https://usermanual.wiki/Panasonic-of-North-America/96NKX-MB2061.user-manual/User-Guide-1342881-Page-67.png)
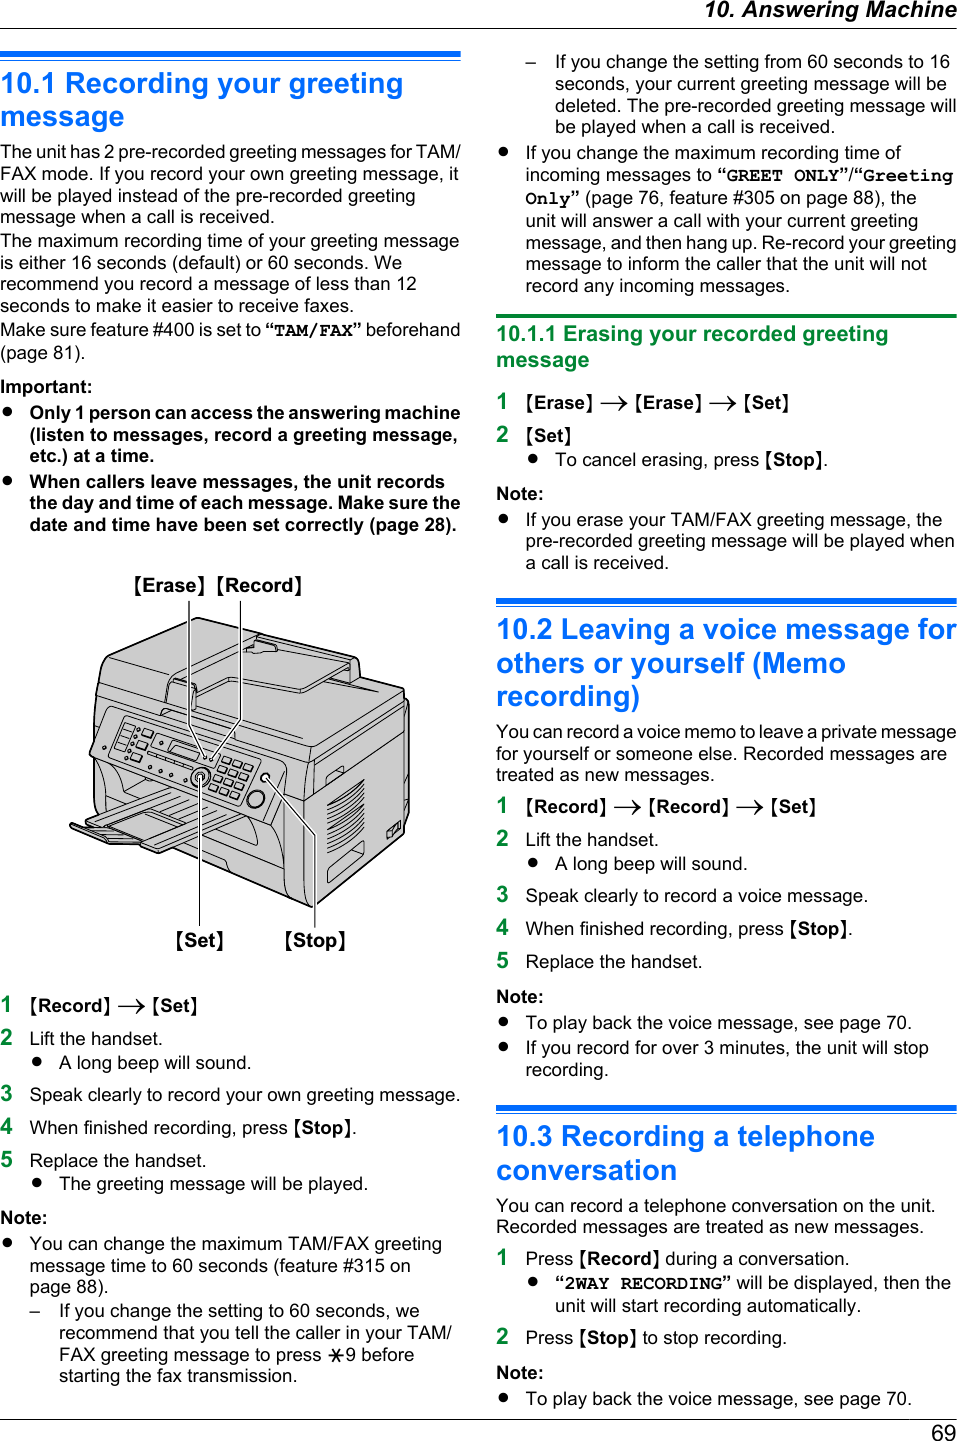
![10.7 Receiving all incoming voicemessages on your computerYou can receive all incoming voice messages on yourcomputer automatically. The received voice message issaved as an audio file in WAVE (µ-Law) format.Important:RTo use this feature, check the following settingsbeforehand:–PC TAM setting is set to “ALWAYS” (feature#365 on page 88).–PC TAM reception is set (feature #366 onpage 30).–The receiving mode is set to TAM/FAX mode(page 62).Note:RMemo recording (page 69) and conversationrecording (page 69) will not be transferred.How voice messages are receivedWhen a voice message is recorded on the unit, yourcomputer will receive the voice message through theunit.Note:R[Multi-Function PC TAM] window appearsautomatically after the voice message is received onyour computer. To listen to the voice message, seestep 3 on “10.7.1 Listening to voice messages”,page 72.RMessages transferred to your computer will bedeleted from the unit.10.7.1 Listening to voice messages1Start Multi-Function Station.2[Utilities] A [PC TAM]R[Multi-Function PC TAM] will appear.3Select the desired message type in [Voice MessageLog].4Select the item you want to listen to, then click theplayback icon (A) to start playing back the voicemessage.ANote:RFor details about the [Multi-Function PC TAM], click[ ], then click the desired item.7210. Answering Machine](https://usermanual.wiki/Panasonic-of-North-America/96NKX-MB2061.user-manual/User-Guide-1342881-Page-72.png)
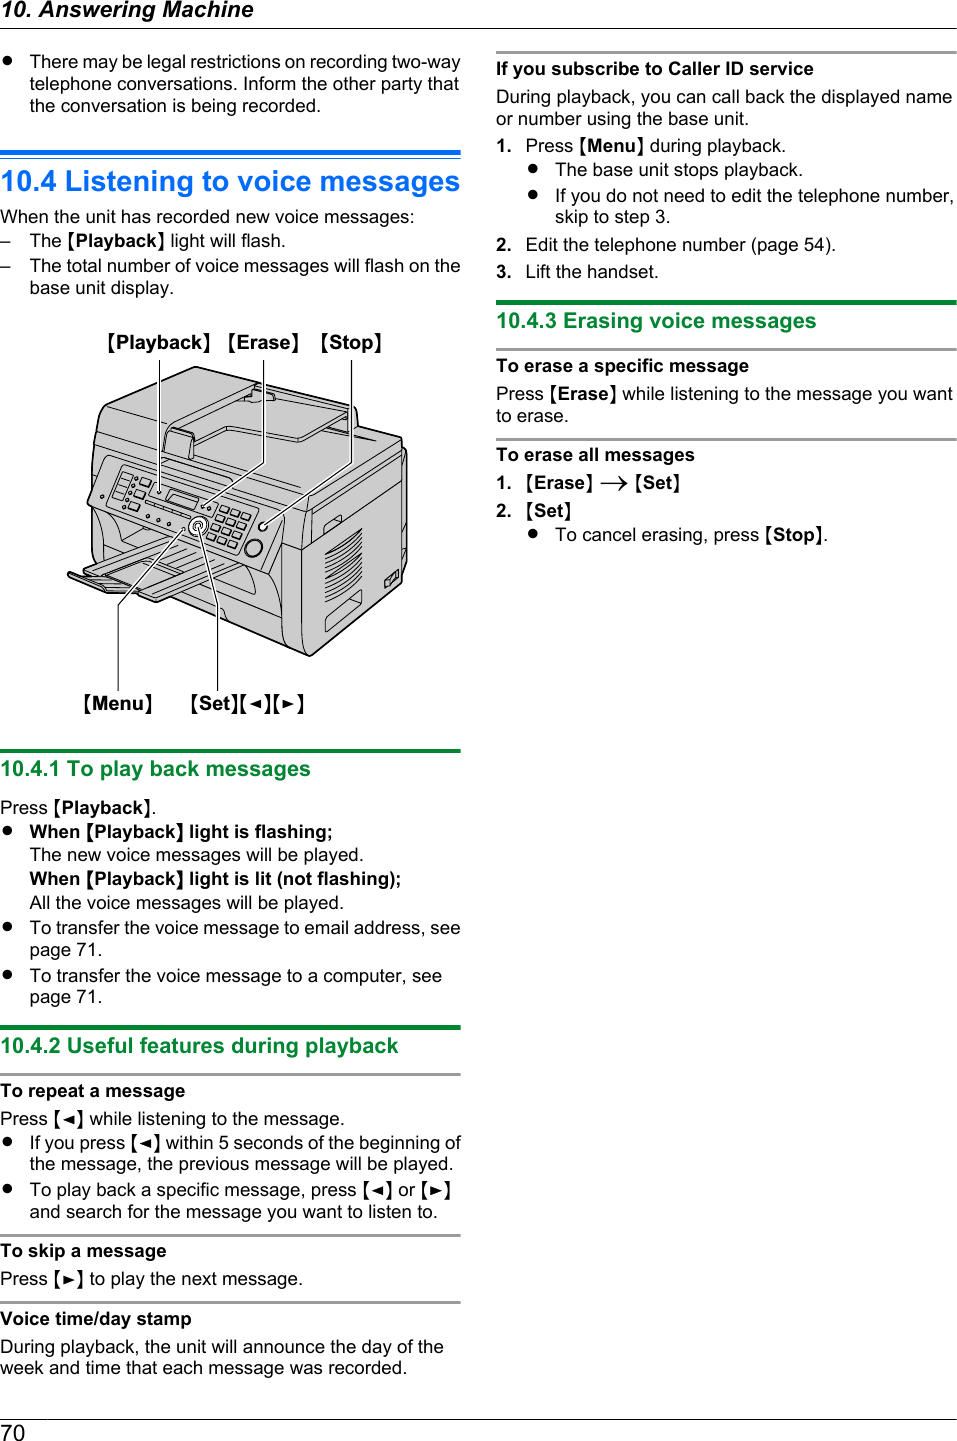
![10.8 Listening to voice messagesvia a web browser (web voiceplayback) (LAN connection only)You can play back a received voice message in your webbrowser, and save the necessary message as an audiofile in WAVE (µ-Law) format.Important:RWeb voice playback will not be activated whenusing the unit for the first time. To activate thisfeature, set the following:–“10.8.1 Activating the web voice playbackmode”, page 73.–“10.8.2 Programming the web voice playbackcode”, page 73.10.8.1 Activating the web voice playbackmode1MMenuN A MBNM3NM6NM7N2Press M1N to select “ON”.RPress M0N to select “OFF”.3MSetN A MMenuN10.8.2 Programming the web voice playbackcode1MMenuN A MBNM3NM6NM8N A MSetN2Enter the password (feature #155 on page 79).A MSetN3Enter the web voice playback code, up to 8characters, using the English alphabet and numbers(see page 107 for character entry).RThe following symbols can also be entered usingM0N or M1N.! @ # $ % ^ & ’ ) ( . – _ { }4MSetN A MMenuNNote:RIf the web voice playback code is not programmed(blank), the web voice playback feature will not beactivated.10.8.3 Listening to voice messagesImportant:RMake sure that the unit is idle.1Start Multi-Function Station.2[Utilities] A [Configuration Web Page] A[Device Configuration]3Type “root” as the user name, then enter thepassword (feature #155 on page 79). A [OK]4Select the [WEB VOICE PLAYBACK] tab.5Enter the web voice playback code (feature #368 onpage 73). A [Submit]RA list of the received voice messages will bedisplayed.6Click the desired icon to play back, save or delete avoice message.RWhile playing back the voice message, you canmanipulate it. (Example: stop, volume controletc.)RIf the playback icon is not displayed or does notactivate properly, save as a file, then play it. (Thisdepends on your computer environment.)7Close the web browser.Note:RThe voice messages can be saved as an audio file(WAV format).10.9 Operating from a remotelocationUsing a touch-tone telephone, you can call yourtelephone number from outside and access the unit tolisten to messages or change auto answer settings. Theunit’s voice guidance prompts you to press certain dialkeys to perform different operations.Important:RTo use this feature:–Program the remote operation ID beforehand(page 75, or feature #306 on page 88).–Set the unit to TAM/FAX mode before goingout (page 62).–Make sure PC TAM setting is set to “OFF”(feature #365 on page 88).–Use a touch tone telephone for remoteoperations.10.9.1 Summary of remote operation1Call your unit.2Enter the remote operation ID during or after theTAM/FAX greeting message.3When there are new voice messages1. A long beep will sound.2. Short beep(s) will sound up to 8 times.RThis indicates the number of new messages.3. New messages will be played back.When there are no new messages1. A long beep will sound (short beep will not sound).2. Press M5N.3. All the voice messages will be played back.4To end remote operation press M9N, then hang up.7310. Answering Machine](https://usermanual.wiki/Panasonic-of-North-America/96NKX-MB2061.user-manual/User-Guide-1342881-Page-73.png)
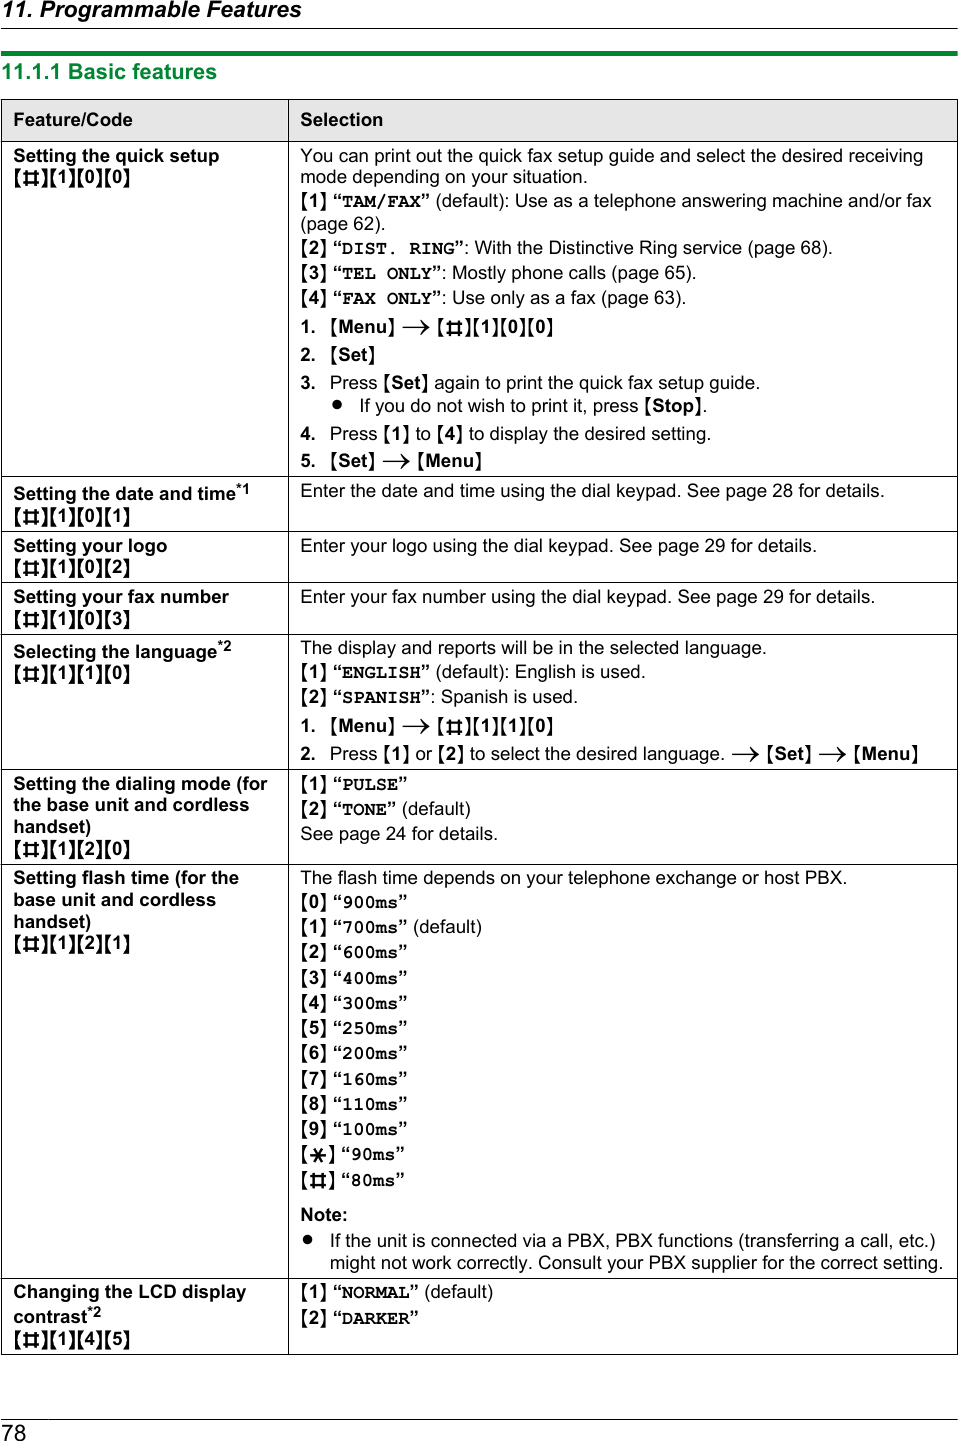
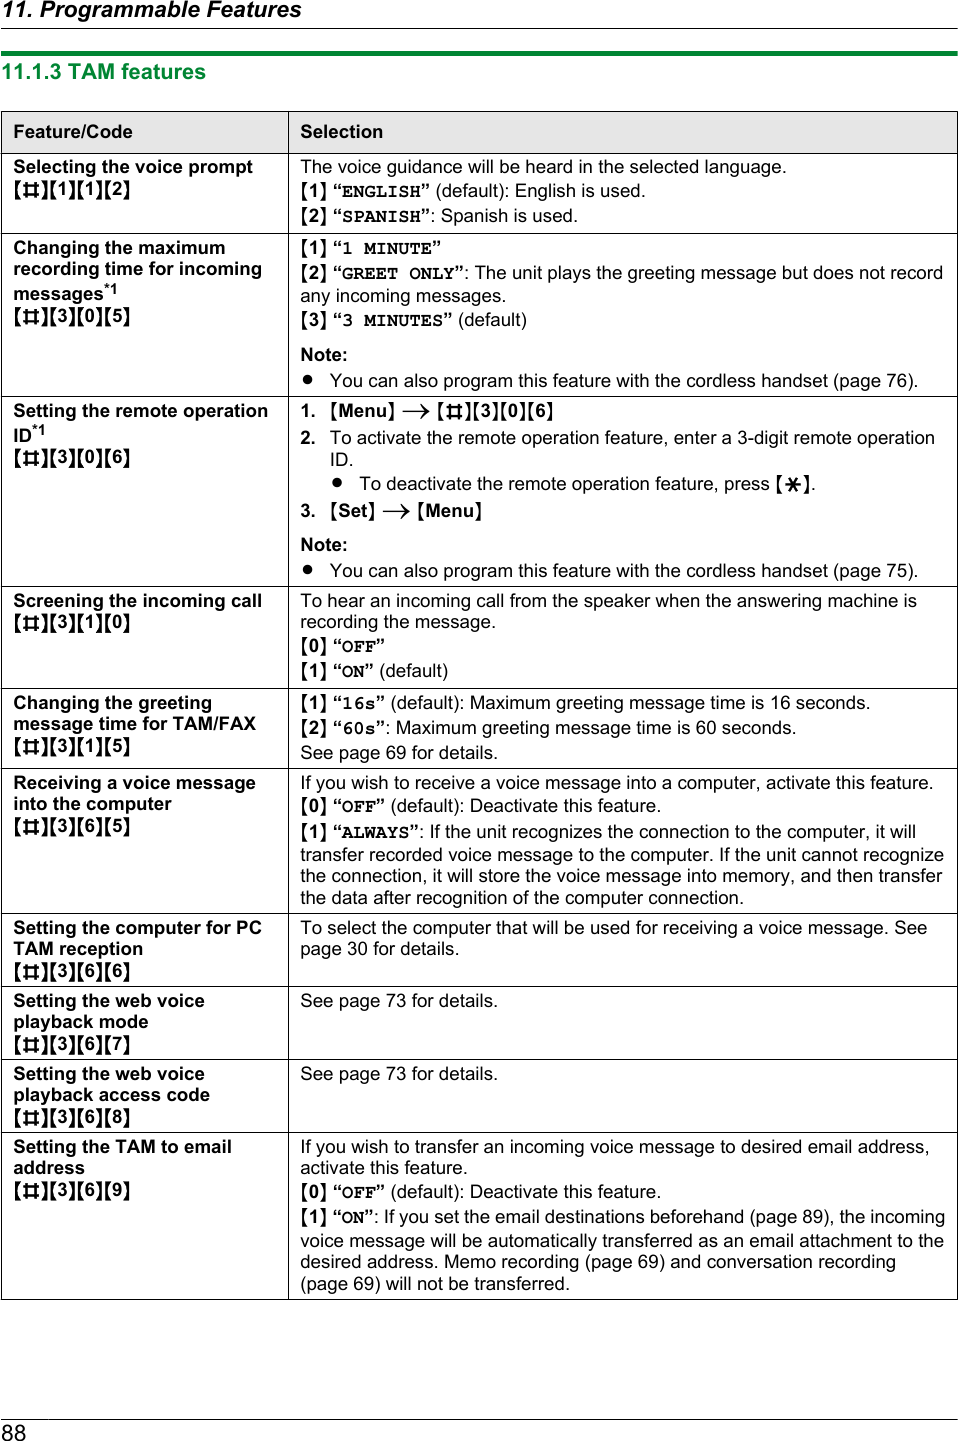
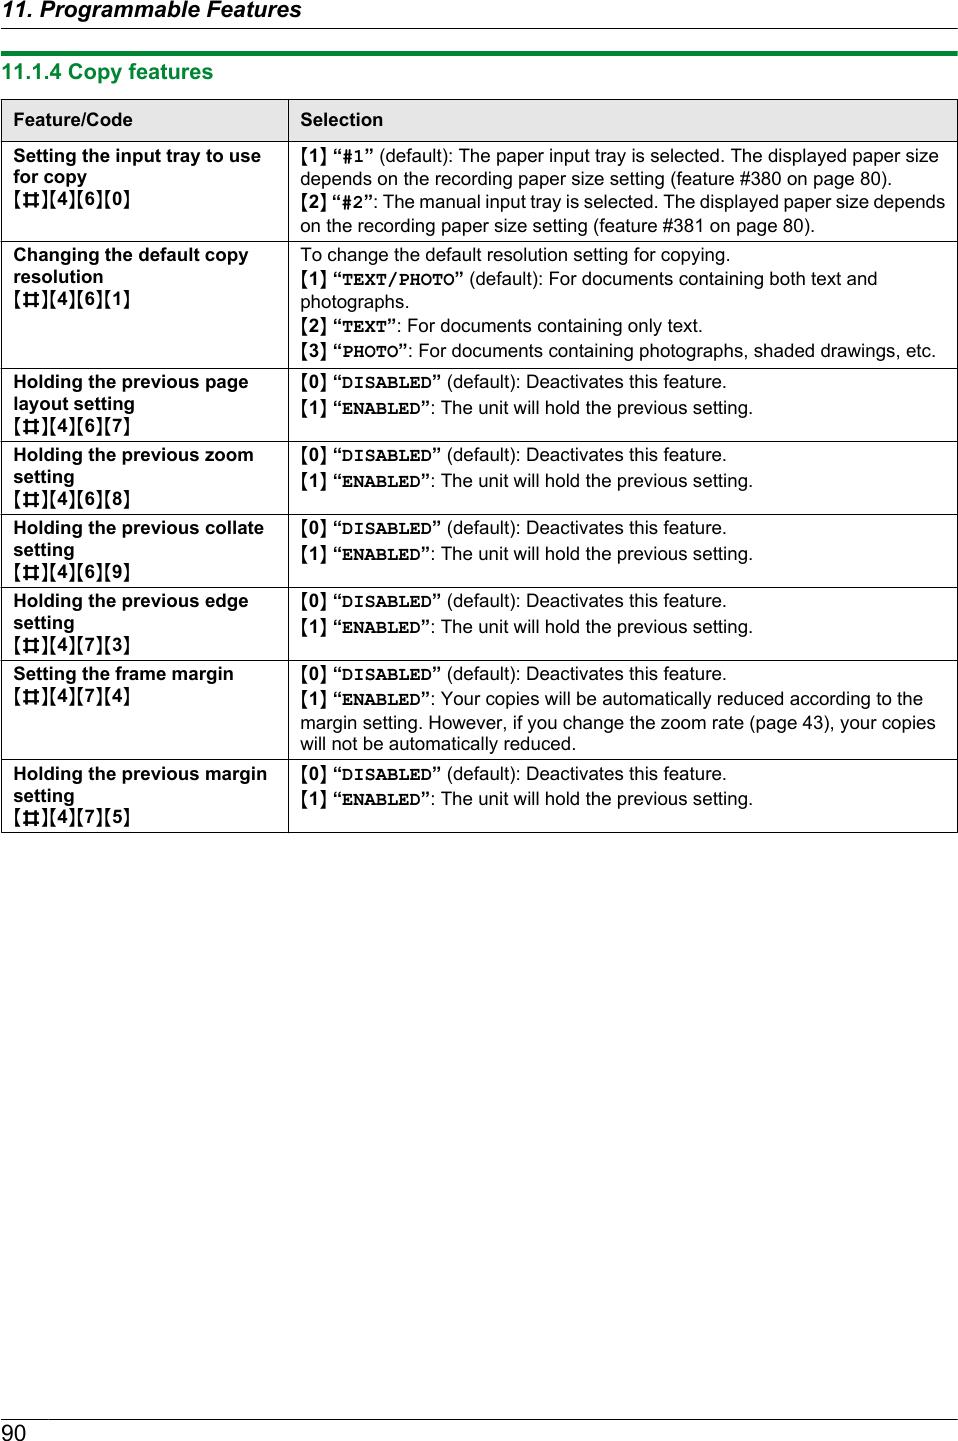
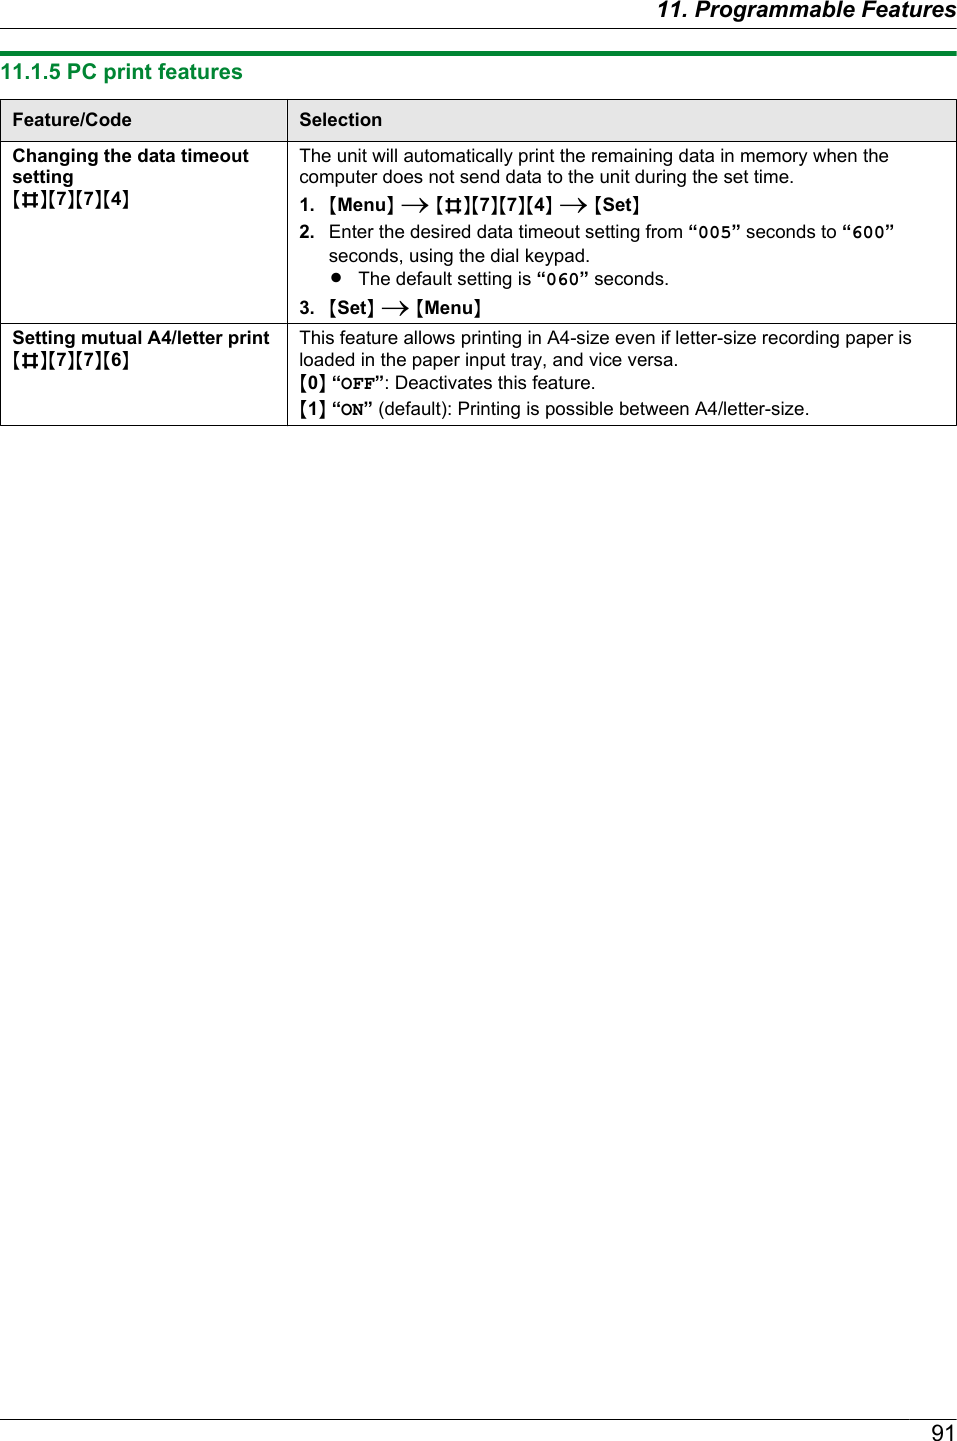
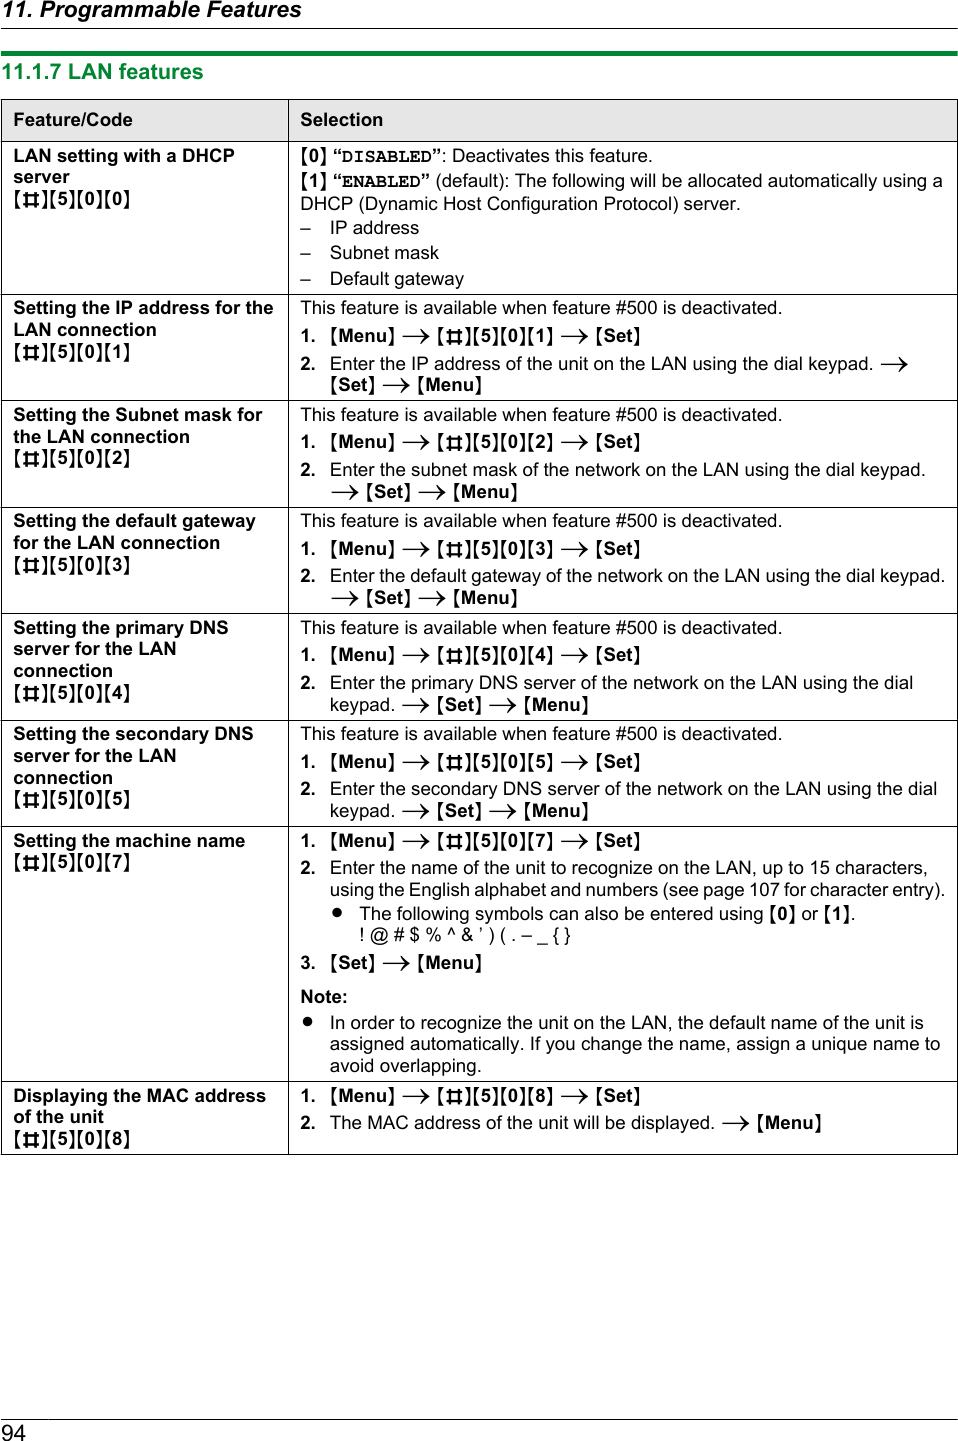
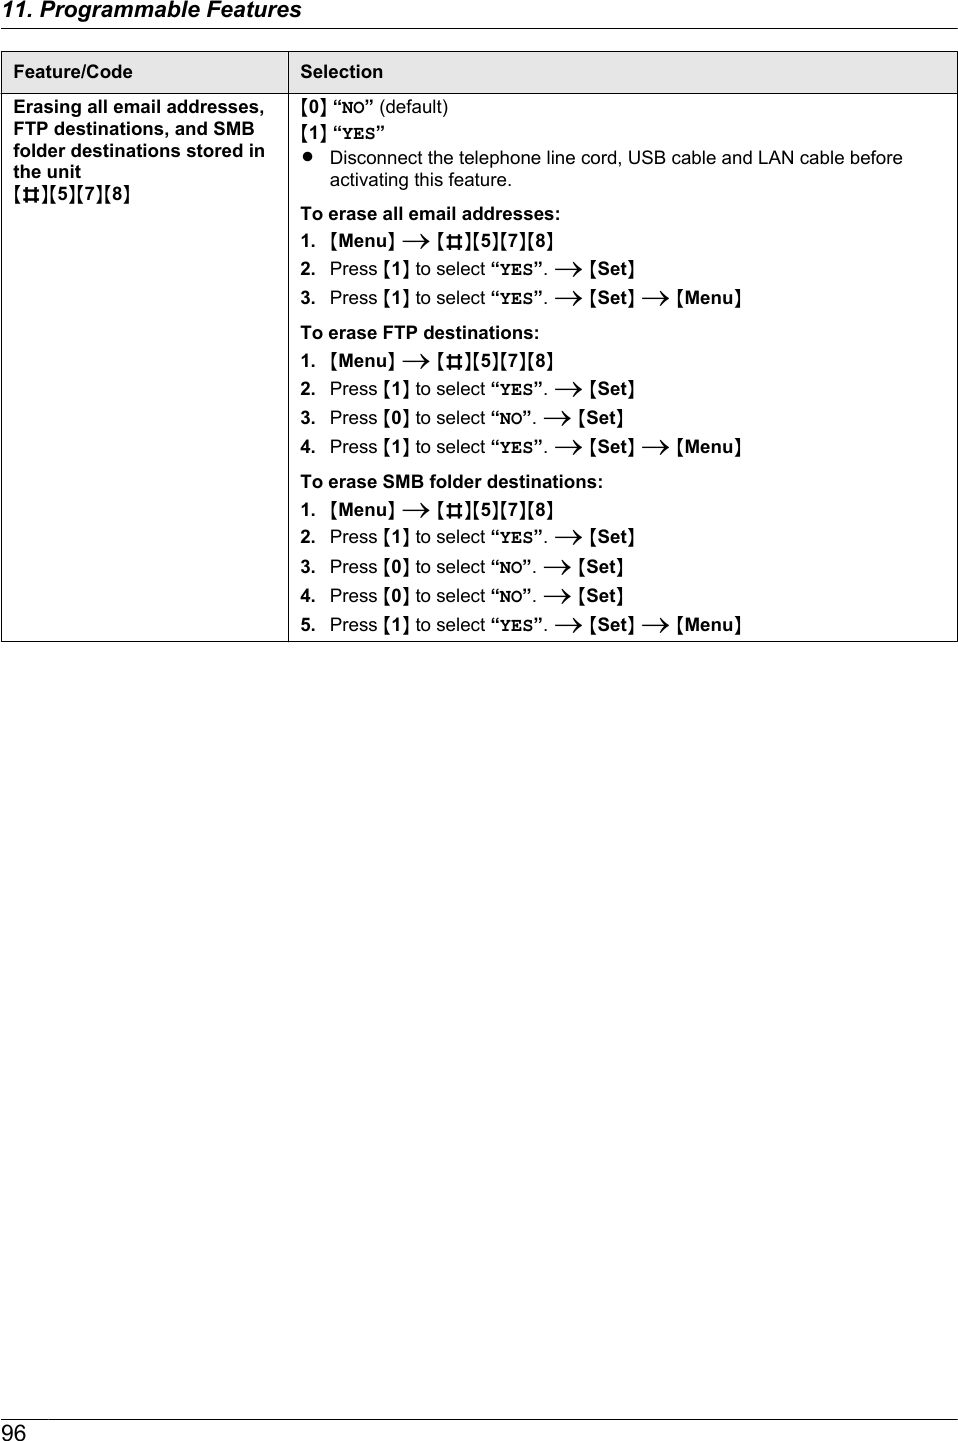
![11.1 Base unit programmingMSetNMMenuN1MMenuN2Press MBN and the 3-digit code (page 78 topage 96).3Press the appropriate selection to display the desiredsetting.RThis step will vary depending on the feature.4MSetN5Press MMenuN to exit.To select features through the web browser interface(LAN connection only)You can change features through the web browserinterface instead of the base unit.1. Start Multi-Function Station. A [Utilities] A[Configuration Web Page]RYou can also access the unit by entering its IPaddress on the web browser.2. Select the desired category from the menu bar.[Device Configuration]: features of the unit[Network Configuration]: network features3. Type “root” as the user name, then enter thepassword (feature #155 on page 79). A [OK]4. Select the desired feature tab at the top of the rightframe.5. Change the settings or edit the information.RThis step will vary depending on the feature.6. [Submit]RThe new setting will be transferred to the unit.7. Close the web browser.Note:RThe settings displayed in the web browser will beupdated by clicking [Reload].7711. . Programmable Features11. Programmable Features](https://usermanual.wiki/Panasonic-of-North-America/96NKX-MB2061.user-manual/User-Guide-1342881-Page-77.png)
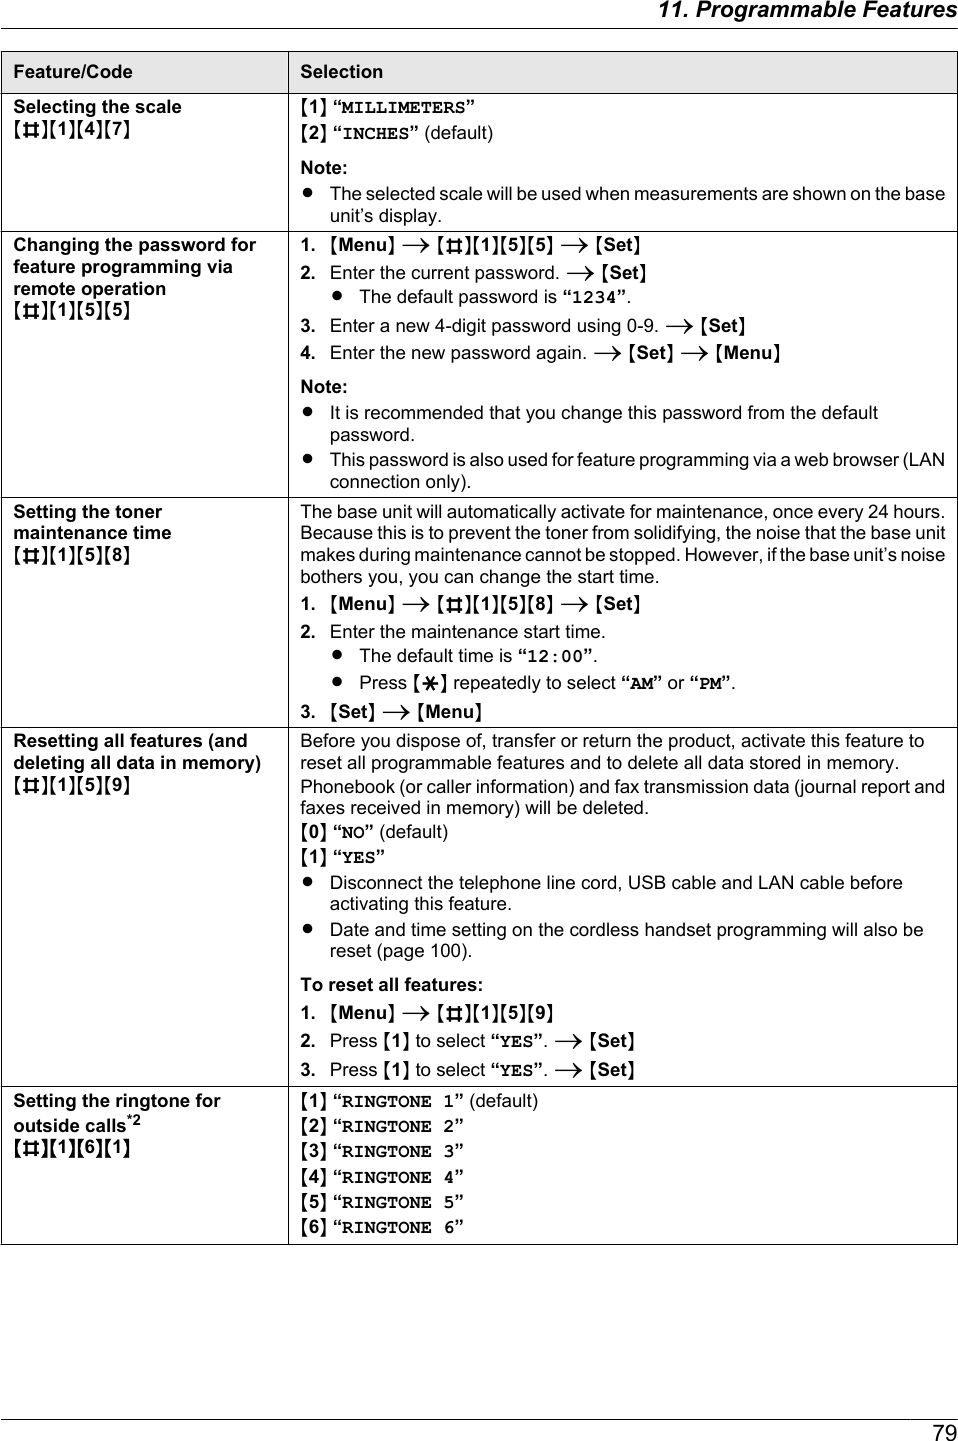
![Feature/Code SelectionSetting friendly receptionMBNM4NM3NM8NTo receive a fax automatically when you answer a call and hear a fax callingtone (slow beep).M0N “OFF”: You have to press MStartN, and then M2N for fax reception using thebase unit. You have to press , select “Fax Start”, and then for faxreception using the cordless handset.M1N “ON” (default): You do not have to press MStartN, and then M2N for faxreception using the base unit. You do not have to press , select “FaxStart”, and then for fax reception using the cordless handset.Receiving a fax into thecomputerMBNM4NM4NM2NIf you wish to receive a fax into a computer, activate this feature and run [PCFAX] from Multi-Function Station.This feature is available when the fax preview mode is turned OFF (feature #448on page 67).M0N “OFF” (default): Deactivates this feature.M1N “ALWAYS”: If the unit recognizes the connection to the computer, it willtransfer received documents to the computer. If the unit cannot recognize theconnection, it will store received documents into memory, and then transfer thedata after recognition of the computer connection.M2N “CONNECTED”: If the unit recognizes the connection to the computer, it willtransfer received documents to the computer. If the unit cannot recognize theconnection, it will print the data.Setting the computer for PCfax receptionMBNM4NM4NM3NTo select the computer that will be used for receiving a fax. See page 30 fordetails.Setting the fax preview modeMBNM4NM4NM8NSee page 67 for details.Setting the web fax previewaccess codeMBNM4NM5NM0NSee page 67 for details.Setting notification of faxreceptionMBNM4NM5NM1NM0N “OFF” (default): Deactivates this feature.M1N “ON”: The computer connected to your unit using USB/LAN will receive anotification when a fax document is received.Note:RFor LAN connection: Register computers to which fax receptionnotifications will be sent through the web browser interface (page 87).Setting the fax to emailaddressMBNM4NM5NM2NIf you wish to transfer a received fax document to desired email address,activate this feature.M0N “OFF” (default): Deactivate this feature.M1N “ON”: If you set the email destinations beforehand (page 87), the receivedfax document will be automatically transferred as an email attachment to thedesired address.Resetting fax features/deleting faxes in memoryMBNM4NM5NM9NM0N “NO” (default)M1N “YES”1. MMenuN A MBNM4NM5NM9N2. To reset the fax features to their default settings, press M1N to select“YES”. A MSetN A MSetNRIf you do not want to reset the fax features to their default settings, pressM0N to select “NO”. A MSetN3. To delete faxes in memory, press M1N to select “YES”. A MSetN AMSetN A MMenuNRIf you do not want to delete faxes in memory, press M0N to select “NO”.A MSetN A MMenuN8611. Programmable Features](https://usermanual.wiki/Panasonic-of-North-America/96NKX-MB2061.user-manual/User-Guide-1342881-Page-86.png)
![Feature/Code SelectionSetting the PC information fornotification of fax reception(LAN connection only)RThis feature can beprogrammed only throughthe web browser interface.Select the PC to send fax reception notification message to (up to 6destinations).1. Start Multi-Function Station.2. [Utilities] A [Configuration Web Page] A [Device Configuration]3. Type “root” as the user name, then enter the password (feature #155 onpage 79). A [OK]4. Select the [FAX FEATURE] tab.5. Click [Edit] next to [RECEIVE PC LIST].6. Click [List] next to the desired destination.7. Click the desired PC from the list. A [Submit]8. Close the web browser.Setting the fax to emaildestinations (LAN connectiononly)RThis feature can beprogrammed only throughthe web browser interface.Select email destinations where you want to send received fax documentautomatically (up to 6 destinations).Important:RProgram the email server settings (page 97), and the emaildestinations (page 98) beforehand.1. Start Multi-Function Station.2. [Utilities] A [Configuration Web Page] A [Device Configuration]3. Type “root” as the user name, then enter the password (feature #155 onpage 79). A [OK]4. Select the [FAX FEATURE] tab.5. Click [Edit] next to [DESTINATION].6. Click [Address Book] next to the desired destination.7. Click the desired name you want to send the received fax documents to.8. [Submit]9. Close the web browser.Note:RTo check the status of the last 15 transfers, click [List] next to [RESULT] instep 5.8711. Programmable Features](https://usermanual.wiki/Panasonic-of-North-America/96NKX-MB2061.user-manual/User-Guide-1342881-Page-87.png)
![Feature/Code SelectionSetting the TAM to emaildestinations (LAN connectiononly)RThis feature can beprogrammed only throughthe web browser interface.Select email destinations where you want to send incoming voice messagesautomatically (up to 6 destinations).Important:RProgram the email server settings (page 97), and the emaildestinations (page 98) beforehand.1. Start Multi-Function Station.2. [Utilities] A [Configuration Web Page] A [Device Configuration]3. Type “root” as the user name, then enter the password (feature #155 onpage 79). A [OK]4. Select the [TAM FEATURE] tab.5. Click [Edit] next to [DESTINATION].6. Click [Address Book] next to the desired destination.7. Click the desired name you want to send the incoming voice messages to.8. [Submit]9. Close the web browser.Note:RTo check the status of the last 15 transfers, click [List] next to [RESULT] instep 5.*1 When this setting is changed using the base unit, the setting for the cordless handset will also be changed, andvice versa.8911. Programmable Features](https://usermanual.wiki/Panasonic-of-North-America/96NKX-MB2061.user-manual/User-Guide-1342881-Page-89.png)
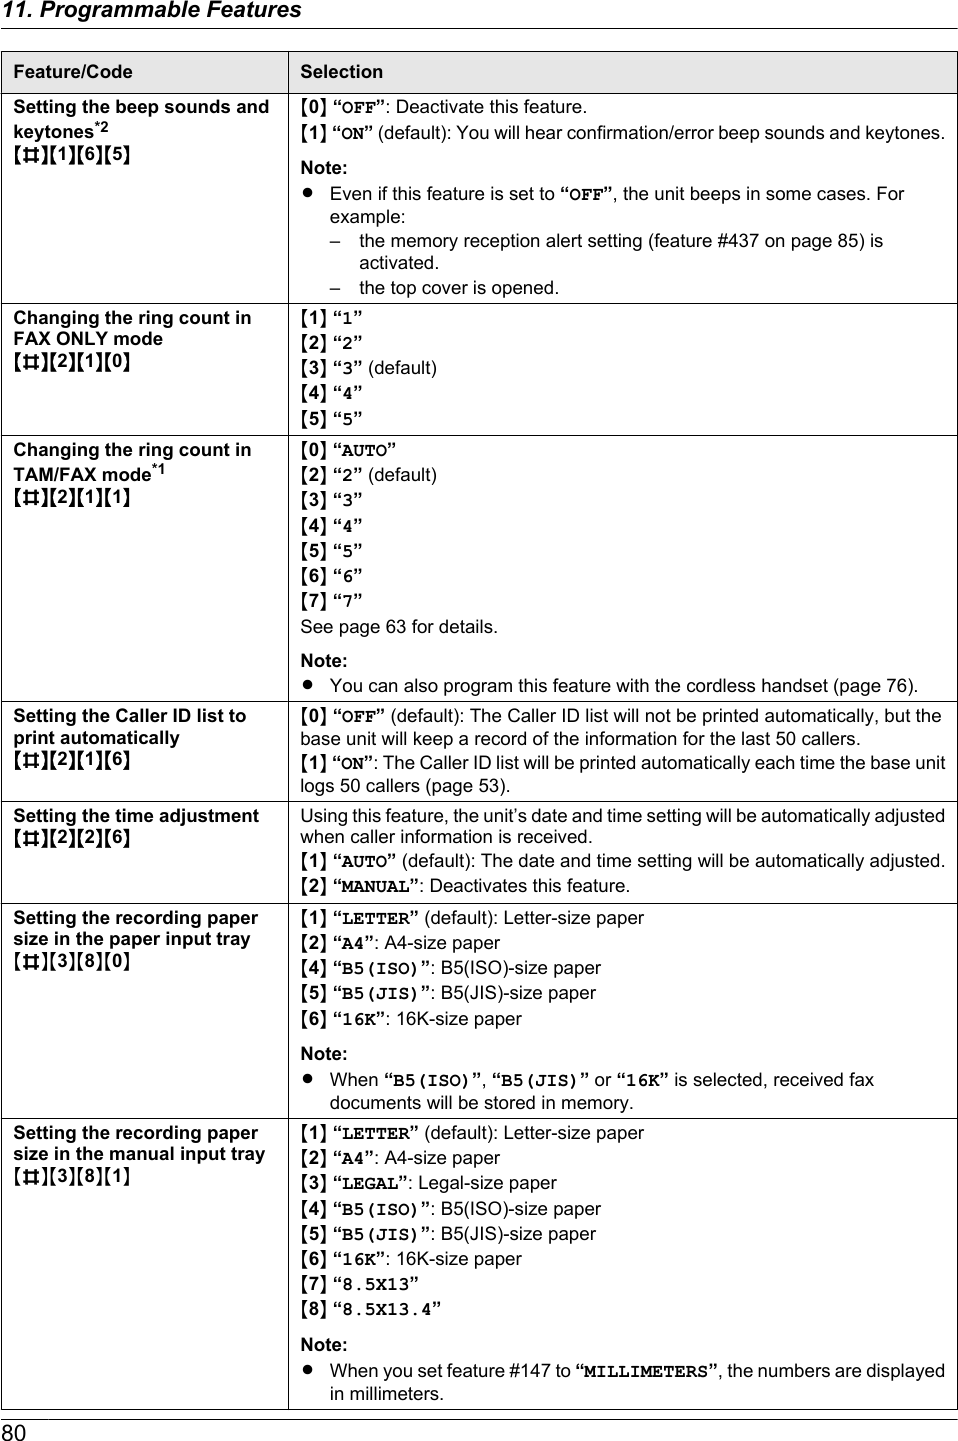
![11.1.6 Scan featuresFeature/Code SelectionSetting the scan mode forPush ScanMBNM4NM9NM3NM1N “VIEWER” (default): The scanned image will be displayed in the[Multi-Function Viewer] window.M2N “FILE”: The scanned image will be saved as a file.M3N “EMAIL”: The scanned image will be saved for email attachment.M4N “OCR”: The scanned image will be displayed in the OCR window.M5N “EMAIL ADDRESS”: The scanned image will be sent as an attachmentwithout using email software.M6N “FTP SERVER”: The scanned image will be sent to the pre-programmedfolder on the FTP server.M7N “SMB FOLDER”: The scanned image will be sent to the pre-programmedSMB folder.Note:RFollowing selections will be displayed only when the server setting isprogrammed through the web browser interface in advance.–“EMAIL ADDRESS” will be displayed when the email server setting isprogrammed (page 97).–“FTP SERVER” will be displayed when the FTP server setting isprogrammed (page 92).–“SMB FOLDER” will be displayed when the SMB folder setting isprogrammed (page 93).Holding the previousscanning parameter for PushScanMBNM4NM9NM4NM0N “DISABLED” (default): Deactivates this feature.M1N “ENABLED”: The unit will hold the previous scan settings for each mode ofpush scan.Setting the information forscan to FTP (LAN connectiononly)RThis feature can beprogrammed only throughthe web browser interface.When you send scanned files to an FTP server, you can register the FTPdestinations (up to 6 destinations) to the unit through the web browser interface.1. Start Multi-Function Station.2. [Utilities] A [Configuration Web Page] A [Device Configuration]3. Type “root” as the user name, then enter the password (feature #155 onpage 79). A [OK]4. Select the [SCAN FEATURE] tab.5. Click [Edit] next to [FTP SERVER].6. Click [Edit] next to the desired FTP server.7. Enter the server name, IP address, folder directory, etc. A [Submit]8. Close the web browser.Note:RIf you do not enter a folder directory in step 7, the scanned image will besaved in the root folder.9211. Programmable Features](https://usermanual.wiki/Panasonic-of-North-America/96NKX-MB2061.user-manual/User-Guide-1342881-Page-92.png)
![Feature/Code SelectionSetting the information forscan to SMB folder (LANconnection only)RThis feature can beprogrammed only throughthe web browser interface.When you send scanned files to an SMB folder, you can register the SMB folderdestinations (up to 6 destinations) to the unit through the web browser interface.1. Start Multi-Function Station.2. [Utilities] A [Configuration Web Page] A [Device Configuration]3. Type “root” as the user name, then enter the password (feature #155 onpage 79). A [OK]4. Select the [SCAN FEATURE] tab.5. Click [Edit] next to [SMB FOLDER].6. Click [Edit] next to the desired SMB folder.7. Enter the folder name and account information.8. Click [Browse], and select a desired computer and/or folder directory fromthe list. A [OK]RYou can also enter the folder directory manually.9. [Submit]10. Close the web browser.9311. Programmable Features](https://usermanual.wiki/Panasonic-of-North-America/96NKX-MB2061.user-manual/User-Guide-1342881-Page-93.png)
![Feature/Code SelectionApproving users for the LANconnectionMBNM5NM3NM2NM0N “DISABLED” (default): Deactivates this feature.M1N “ENABLED”: The unit will deny/approve access from the pre-programmedIP patterns. You can program whether to deny or approve IP addresses. Up to4 patterns each for IPv4 and IPv6 can be programmed through the web browserinterface.1. Start Multi-Function Station.2. [Utilities] A [Configuration Web Page] A [Network Configuration]3. Type “root” as the user name, then enter the password (feature #155 onpage 79). A [OK]4. Select the [LAN FEATURE] tab.5. Click [Edit] next to [APPROVED USERS].6. Click [Edit] next to [FILTER (IPv4)]/[FILTER (IPv6)].7. Change the mode and edit IP filtering information. A [Submit]8. Close the web browser.Setting the IP addressautomatically for the LANconnectionMBNM5NM3NM3NThis feature will be displayed only when feature #500 is activated.M0N “DISABLED” (default): Deactivates this feature.M1N “ENABLED”: IP address will be allocated automatically without using aDHCP (Dynamic Host Configuration Protocol) server.Setting HTTPD for the LANconnectionMBNM5NM3NM4NM0N “DISABLED”: Denies access to the web browser.M1N “ENABLED” (default): Allows access to the web browser.IPv6 protocolMBNM5NM3NM5NM0N “DISABLED” (default): Deactivates this feature.M1N “ENABLED”: IPv6 protocol can be used. After installing the printer driver,be sure to change the port to IPv6 protocol. You can check the IPv6 protocoladdress by printing the “SETUP LIST” (page 138).Note:RTo activate this feature, you need to turn the power switch of the base unitOFF, then ON.Setting the primary WINSserver for the LANconnectionMBNM5NM3NM8NThis feature is available when feature #500 is deactivated.1. MMenuN A MBNM5NM3NM8N A MSetN2. Enter the primary WINS server of the network on the LAN using the dialkeypad. A MSetN A MMenuNSetting the secondary WINSserver for the LANconnectionMBNM5NM3NM9NThis feature is available when feature #500 is deactivated.1. MMenuN A MBNM5NM3NM9N A MSetN2. Enter the secondary WINS server of the network on the LAN using the dialkeypad. A MSetN A MMenuN9511. Programmable Features](https://usermanual.wiki/Panasonic-of-North-America/96NKX-MB2061.user-manual/User-Guide-1342881-Page-95.png)
![11.1.8 Network features (LAN connection only)These features can be programmed through the web browser interface.Feature Tab SelectionSetting the LAN features [LAN FEATURE] Enter the LAN feature settings. See page 94 for details.Setting the communityname for SNMP[SNMP] Enter the SNMP community name. Consult your serviceprovider or network administrator for details.Setting the locationwhere you use this unit[SNMP] Enter the location information of the unit.Displaying the link localaddress for IPv6[IPv6] The link local address will be displayed.Displaying the IPv6address for autoconfiguration[IPv6] The IP address for auto configuration will be displayed.Setting the IP addressfor IPv6[IPv6] Enter the IP address for IPv6. Consult your serviceprovider or network administrator for details.Setting the defaultrouter for IPv6[IPv6] Enter the default router address for IPv6. Consult yourservice provider or network administrator for details.Setting the informationfor scan to FTP[FTP FEATURE] Enter the FTP server information to send scannedimages from the unit to an FTP server. See page 92 fordetails.Setting the informationfor scan to SMB[SMB FEATURE] Enter the SMB folder information to send scannedimages from the unit to an SMB folder. See page 93 fordetails.Setting the informationfor scan to emailaddress, voice to emailaddress, fax to emailaddress and TAM toemail address[EMAIL FEATURE] Enter the email server information to send scannedimage, fax message and/or voice message from the unitvia an email.1. Start Multi-Function Station.2. [Utilities] A [Configuration Web Page] A[Network Configuration]3. Type “root” as the user name, then enter thepassword (feature #155 on page 79). A [OK]4. Select the [EMAIL FEATURE] tab.5. Click [Edit] next to [EMAIL SERVER].6. Enter email address (from), email serverinformation, and time zone.7. [Submit]8. Close the web browser.9711. Programmable Features](https://usermanual.wiki/Panasonic-of-North-America/96NKX-MB2061.user-manual/User-Guide-1342881-Page-97.png)
![Feature Tab SelectionRegistering the emailaddress destinations[EMAIL FEATURE] Register email destinations (up to 30 destinations).These addresses can be used as destinations for thefollowing features.– Scan to email address (page 38)– TAM to email address (page 63)– Fax to email address (page 63, 64)– Voice to email address (page 71)1. Start Multi-Function Station.2. [Utilities] A [Configuration Web Page] A[Network Configuration]3. Type “root” as the user name, then enter thepassword (feature #155 on page 79). A [OK]4. Select the [EMAIL FEATURE] tab.5. Click [Edit] next to [ADDRESS BOOK].6. Click [Edit] next to the desired item you want toregister.7. Enter the name and email address.RSelect the station key number from the dropdown list if necessary.8. [Submit]9. Close the web browser.Setting the error notifyfeature[ERROR NOTIFY] [ENABLED]: The unit will send an email to registereddestinations when a problem occurs.[DISABLED] (default): Deactivates this feature.Setting the email serverinformation for the errornotify feature[ERROR NOTIFY] Enter email address (from), email server information,and time zone to send error notification emails.Registeringdestinations for theerror notify feature[ERROR NOTIFY] Enter the email address to which error notifications willbe sent and select the types of problems.[LIFE WARNING]: A warning indicating that the tonercartridge or drum cartridge needs to be replaced soon.[MEDIA PATH ERROR]: An error indicating that thereis a problem with the paper input tray/manual input tray.[LIFE ERROR]: An error indicating that the tonercartridge or drum cartridge needs to be replaced.9811. Programmable Features](https://usermanual.wiki/Panasonic-of-North-America/96NKX-MB2061.user-manual/User-Guide-1342881-Page-98.png)

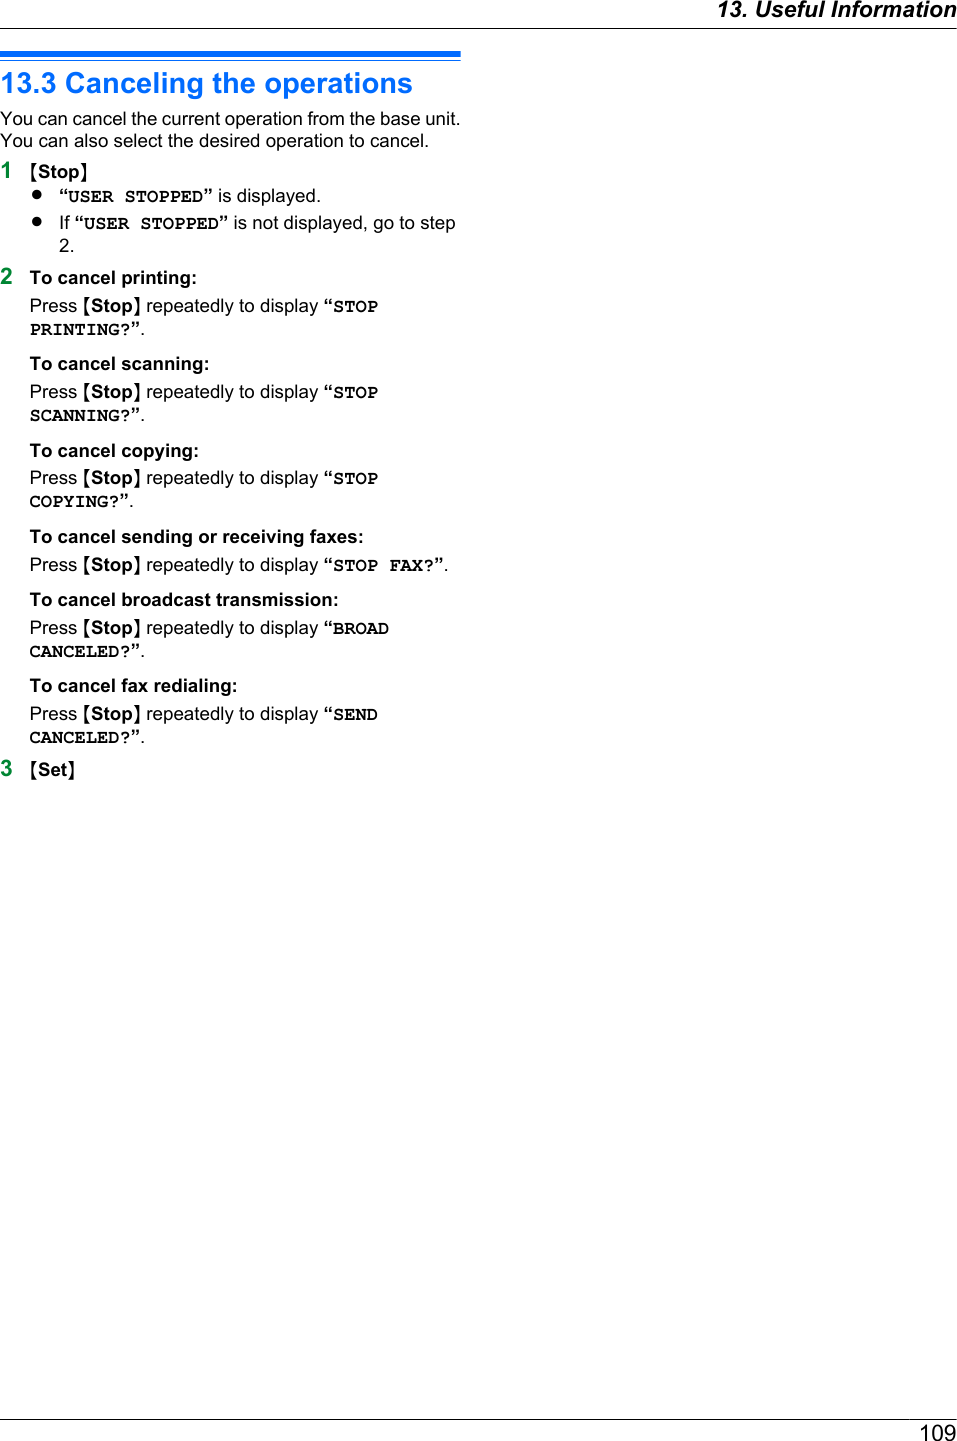
![13.1 Character entryThe dial keypad is used to enter characters andnumbers.– Press MFN or MEN to move the cursor.– Press the dial keys to enter characters and numbers.– Press MStopN on the base unit or MCLEARN on thecordless handset to erase the character or numberhighlighted by the cursor. Press and hold MStopN/MCLEARN to erase all characters or numbers.– To enter another character located on the same dialkey, press MEN to move the cursor to the next space,then press the appropriate dial key.Base unit:Keypad CharactersM1N1 . _ – [ ] { } +/ = , ` : ; ? |M2NA B C a b c 2M3ND E F d e f 3M4NG H I g h i 4M5NJ K L j k l 5M6NM N O m n o 6M7NP Q R S p q r s 7M8NT U V t u v 8M9NW X Y Z w x y z 9M0N0 @ ( ) < > ! " #$ % & ¥ I^ ’ ®MBNTo switch between uppercaseor lowercase letters.MFlashNHyphenMZoomNTo insert a space.MStopNTo delete a character.To select characters using MCN or MDNInstead of pressing the dial keys, you can selectcharacters using MCN or MDN.1. Press MCN repeatedly to display the desiredcharacter. Characters will be displayed in thefollowing order:A Uppercase lettersB NumbersC SymbolsD Lowercase letters*1*1 When you enter email address (i.e. scan to emailaddress feature on page 39), lowercase letterswill be displayed first (LAN connection only).RIf you press MDN, the order will be reversed.2. Press MEN to insert the displayed character.3. Return to step 1 to enter the next character.Cordless handset:Keypad CharactersM1NSpace & ’ ( ) H,– . / 1M2NA B C 2 a b c 2M3ND E F 3 d e f 3M4NG H I 4 g h i 4M5NJ K L 5 j k l 5M6NM N O 6 m n o 6M7NP Q R S 7 p q r s 7M8NT U V 8 t u v 8M9NW X Y Z 9 w x y z 9M0NSpace 0MGNTo switch between uppercase orlowercase letters.M#N#RIf you do not press any dial key within 5 seconds afterentering a character, the character is fixed and thecursor moves to the next space.10713. . Useful Information13. Useful Information](https://usermanual.wiki/Panasonic-of-North-America/96NKX-MB2061.user-manual/User-Guide-1342881-Page-107.png)
![13.2 Status of the base unit13.2.1 Using Remote ControlYou can easily operate the following functions from yourcomputer.– Programming the features (page 78)– Storing, editing or erasing items in the base unit’sdirectories (page 50)– Storing or erasing items for broadcast transmission(page 59)– Viewing items in the journal report (page 57)– Saving the journal report on your computer– Viewing items in the Caller ID list (page 53)– Storing caller information into the base unit’sdirectories (page 55)– Saving the Caller ID list on your computer1Start Multi-Function Station. A [Remote Control]RThe [Multi-Function Remote Control] windowwill appear.2Select the desired tab.RThe latest data in the base unit will be displayed.3Perform the desired operation.RFor details about each function, click [Help].RTo stop the operation, click [Cancel].4[OK]RYou can also click [Apply] to continue the nextoperation without closing the window.5Enter the password (feature #155 on page 79). A[OK]RThe new data will be transferred to the base unitand the window will close.Note:RSome of the features cannot be programmed fromyour computer.RFor details, see the help file by selecting [] fromMulti-Function Station.RWhen another person is adjusting stored data in thebase unit, it may be overwritten. Make sure the baseunit is not currently being used for the same function.RSome characters that have been entered on the unit(page 107) may not be displayed correctly due to thelanguage setting of your computer.13.2.2 Using Device MonitorYou can confirm the setting information and currentstatus of the base unit from your computer.1Start Multi-Function Station.2[Utilities] A [Device Monitor]RThe [Device Monitor] window will appear.3Confirm the status of the base unit.[Status]: Current status of the base unitNote:RAdditional information (toner and recording paperstatus, base unit information, etc.) will be displayedin [Status] tab by clicking [Advanced Information].RYou can update the status of the base unit by clicking[Refresh].RIf a printing error occurs, the Device Monitor will startautomatically and display the error information.RFor details, see the help file by selecting [] fromMulti-Function Station.13.2.3 Using the web browser (LANconnection only)You can confirm the setting information and status of thebase unit from the web browser.1Start Multi-Function Station. A [Utilities] A[Configuration Web Page]RYou can also access the unit by entering its IPaddress in a web browser.2Select a category from the menu bar.[Status]: Toner and paper information, etc.[Device]: Current status of the base unit, etc.[Network]: Network information, etc.RWhen you select [Device] or [Network], you canchange which features are displayed by clickingthe feature tabs at the top of the right frame.3Confirm the status of the base unit.Note:RYou can update the status of the base unit by clicking[Reload].10813. Useful Information](https://usermanual.wiki/Panasonic-of-North-America/96NKX-MB2061.user-manual/User-Guide-1342881-Page-108.png)
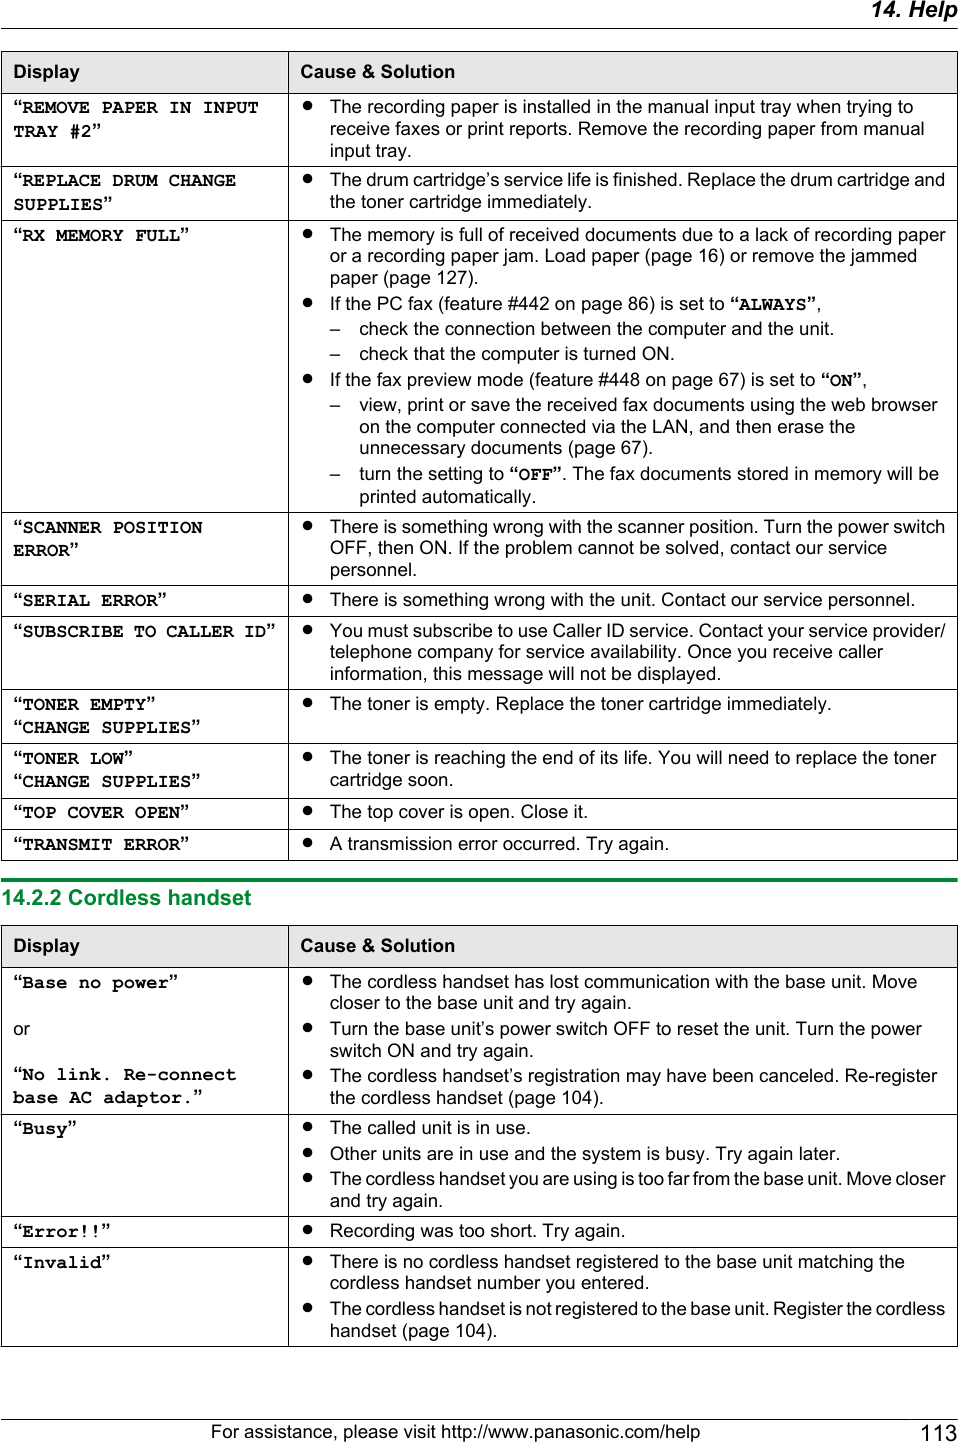
![14.3 When a function does not workIf you still have difficulties after following the instructions in this section, reset the unit. Turn the power OFF both ofthe base unit and the cordless handset. Then turn the power ON of the base unit and the cordless handset.14.3.1 GeneralProblem Cause & SolutionThe unit does not work. RCheck the connections (page 21, 32).RMake sure that the cordless handset’s battery is installed correctly(page 19) and fully charge it (page 22).The output tray becomes fullquickly or the recording paperdoes not stack properly onthe output tray.RHigh humidity may cause the recording paper to curl. Try turning the paperover and re-inserting it. If the curl on the paper is heavy, please remove itfrom the output tray. If you still have this problem, contact our servicepersonnel.From the base unit I cannotadjust the volume, displayitems stored in the one-touchdial and phonebook, ordisplay Caller ID information.RThe unit is set to scan mode or copy mode. Press MFaxN to switch modes.If you still have this problem, contact our service personnel.A printing error is displayedwhile using PC FAX andRemote Control.RThe printer driver is used for PC FAX and Remote Control. Transmissionerrors will be displayed as printing errors.Multi-Function Station doesnot work properly.RIf the USB cable is connected to a USB hub, connect the cable directly tothe USB port on your computer.RMake sure you have installed the latest Service Pack available for theversion of Windows installed on your computer. See the Microsoft web sitefor details.RIf you have any other multifunction software installed on your computer,uninstall it.RCheck that your computer has enough memory and hard disk space. If yourcomputer warns that there is insufficient memory, close other applications.If there is not enough space on the hard disk, delete unnecessary files.RUninstall Multi-Function Station once, and re-install it.I cannot install or uninstallMulti-Function Station.RSome of the files needed to install or uninstall Multi-Function Station maybe corrupted. Use the MfsCleaner utility (found on the supplied CD-ROM)to solve the problem.1. Insert the supplied CD-ROM into your CD-ROM drive.RThe setup program will start automatically.2. [Tools] A [Cleanup Tool]RThe [MfsCleaner] window will appear.3. Click [Clean], and then click [Yes] to restart the computer.Note:RTo install Multi-Function Station again, see page 31.I cannot view the operatinginstructions usingMulti-Function Station.RInstall the operating instructions on your computer beforehand (page 32).For assistance, please visit http://www.panasonic.com/help 11514. Help](https://usermanual.wiki/Panasonic-of-North-America/96NKX-MB2061.user-manual/User-Guide-1342881-Page-115.png)
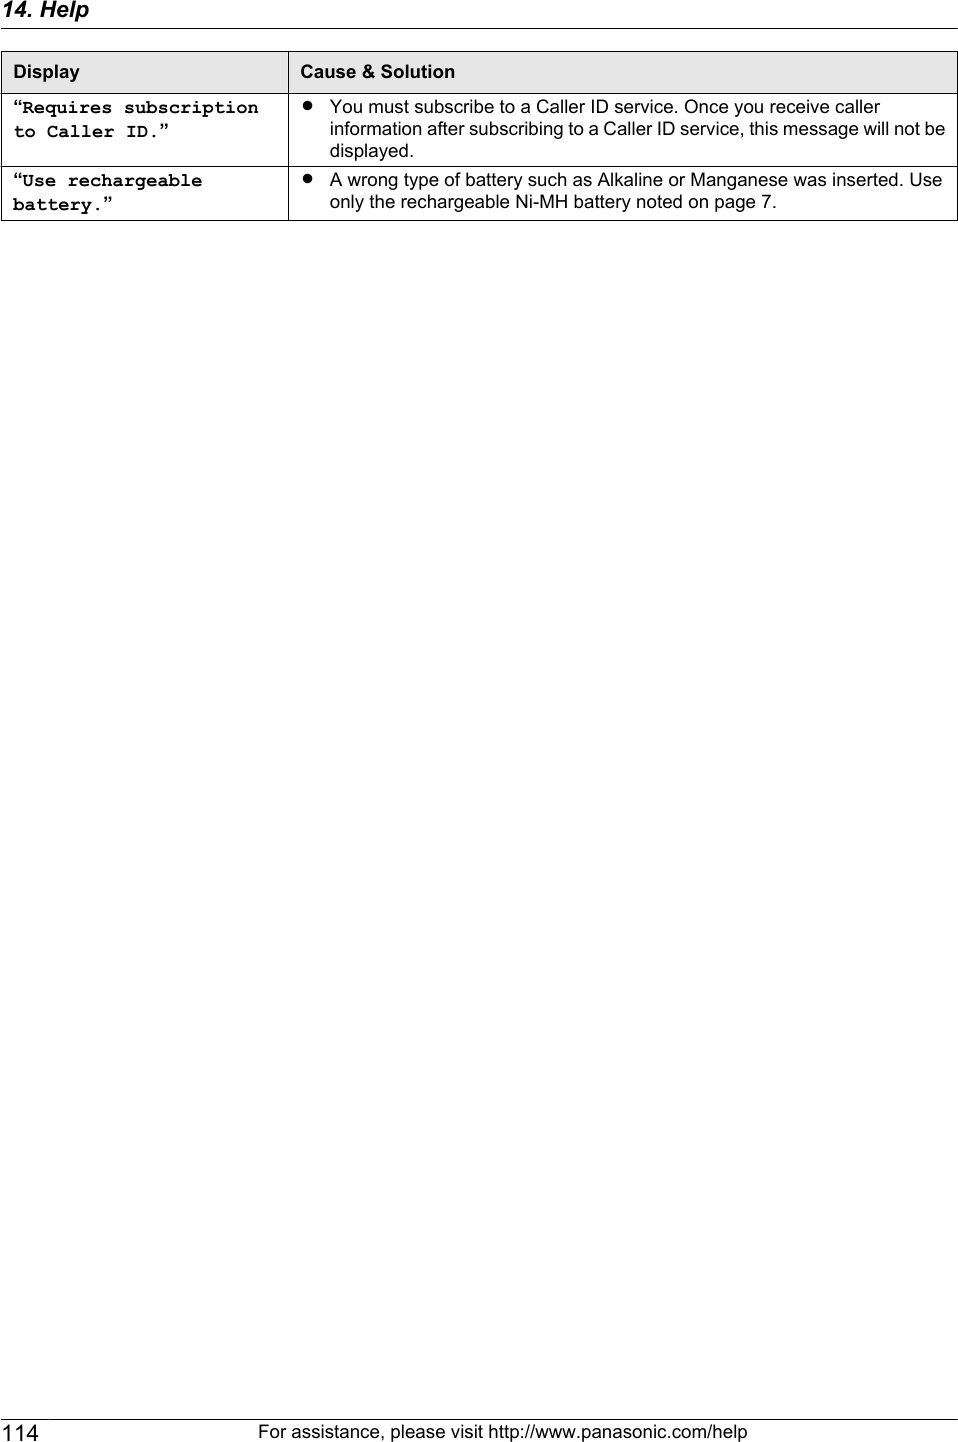
![Problem Cause & SolutionI cannot find the unit in the[Target Device] or [DeviceSelect] dialog box whenoperating the followingfunctions.–Scanning–Remote Control–PC FAX–Device MonitorRThe printer driver has not been installed. Install it on your computer(page 31).I forgot the password forfeature programming viaremote operation.RYou may have changed the feature programming password. If you do notremember it, assign a new password using feature #155 (page 79). Whenrequired to enter the current password, enter “0101” instead.During programming, Icannot enter the code or IDnumber.RAll or part of the number is the same as another code or ID. Change thenumber:– remote operation ID (code): page 75, or feature #306 on page 88.– fax activation code: feature #434 on page 85.– auto disconnection code: feature #435 on page 85.14.3.2 Printing problemsProblem Cause & SolutionRecording paper is wrinkledor folded when printed.RMake sure that the recording paper is loaded properly (page 16).RTry turning the recording paper over or rotating it 180 degrees.The printing quality is poor(e.g. has smudges, blurredpoints or lines).ABCRSome paper has instructions recommending which side to print on. Tryturning the recording paper over.RYou may have used paper with a cotton and/or fiber content that is over20 %, such as letterhead or resume paper.RThe recording paper is too damp. Use new paper.I changed the recordingpaper, but the printing qualityis still poor.RThe glass or rollers are dirty with correction fluid, etc. Clean them(page 134, 137). Please do not insert a document before correction fluidhas dried completely.RThe toner save mode of feature #482 is ON (page 81).RThe remaining toner is low. Replace the toner cartridge.RTo check the drum life and quality, please print the printer test list(page 138). If printing quality is still poor, replace the toner cartridge anddrum cartridge.A blank sheet is ejected. RYou placed the document facing the wrong way when using the copier.RThe other party placed the document in their fax machine the wrong way.Check with the other party.Colored and gray objects areprinted in black instead ofgrayscale when printing fromMicrosoft PowerPoint orother applications.RSelect [Color] or remove the check next to [Grayscale] in the print dialogso that colored or gray objects will be printed in grayscale properly.116 For assistance, please visit http://www.panasonic.com/help14. Help](https://usermanual.wiki/Panasonic-of-North-America/96NKX-MB2061.user-manual/User-Guide-1342881-Page-116.png)
![Problem Cause & SolutionWhen using the unit as aprinter, the printing result isdistorted.RYour unit is connected to the computer by USB. After canceling printingusing your computer, you must wait for 60 seconds before re-printing toavoid distorted printing.14.3.3 ScannerProblem Cause & SolutionI cannot scan. RWhen scanning at a high resolution, a large amount of available memory isrequired. If your computer warns that there is insufficient memory, closeother applications and try again.RThe unit is in use. Try again later.RThere is not enough space on the hard disk. Delete unnecessary files andtry again.RCheck the connection between the computer and the unit (page 21, 32).RRestart the computer, and try again.RYou attempted to scan a document longer than the paper size which youset. Change the setting or divide the document into the appropriate papersize, and try again.The document is not fed intothe unit when using the unitas a scanner.RRemove the document in the automatic document feeder and re-insert it.Even after clicking [Cancel],scanning continues.RPlease wait. It may take a while for the cancel request to be accepted.The name of the desiredcomputer is not displayed onthe base unit when scanningdocuments from the base unit(LAN connection only).RThe printer driver has not been installed. Install it on your computer(page 31).RThe PC name list up feature has been set to [Off]. Set [PC name list upon device] to [On] (page 34).RThe maximum number of computers on the LAN is connected to the unit (upto 30 computers). Set [PC name list up on device] to [Off] on the othercomputers (page 34).RThe IP address of the unit may have changed. To detect the IP address,proceed as follows.[Start] A [All Programs] or [Programs] A [Panasonic] A the unit’sname A [IP Address Checker]RThe IP address for the unit will be detected.14.3.4 CopierProblem Cause & SolutionThe unit will not make a copy. RYou cannot make a copy during programming. Make the copy afterprogramming.RThe document was not fed into the unit properly. Re-insert the document.RRecording paper is not loaded or the unit has run out of paper. Load paper(page 16).Letters on the copieddocuments are not clear.RThe original document is too dark or too light. Change the contrast(page 42) and try again.The copied documents aretoo dark and cannot be read.RYou used a colored paper as a document. Change the contrast (page 42)and make a lighter copy of the document, using “TEXT” resolution(page 42).For assistance, please visit http://www.panasonic.com/help 11714. Help](https://usermanual.wiki/Panasonic-of-North-America/96NKX-MB2061.user-manual/User-Guide-1342881-Page-117.png)
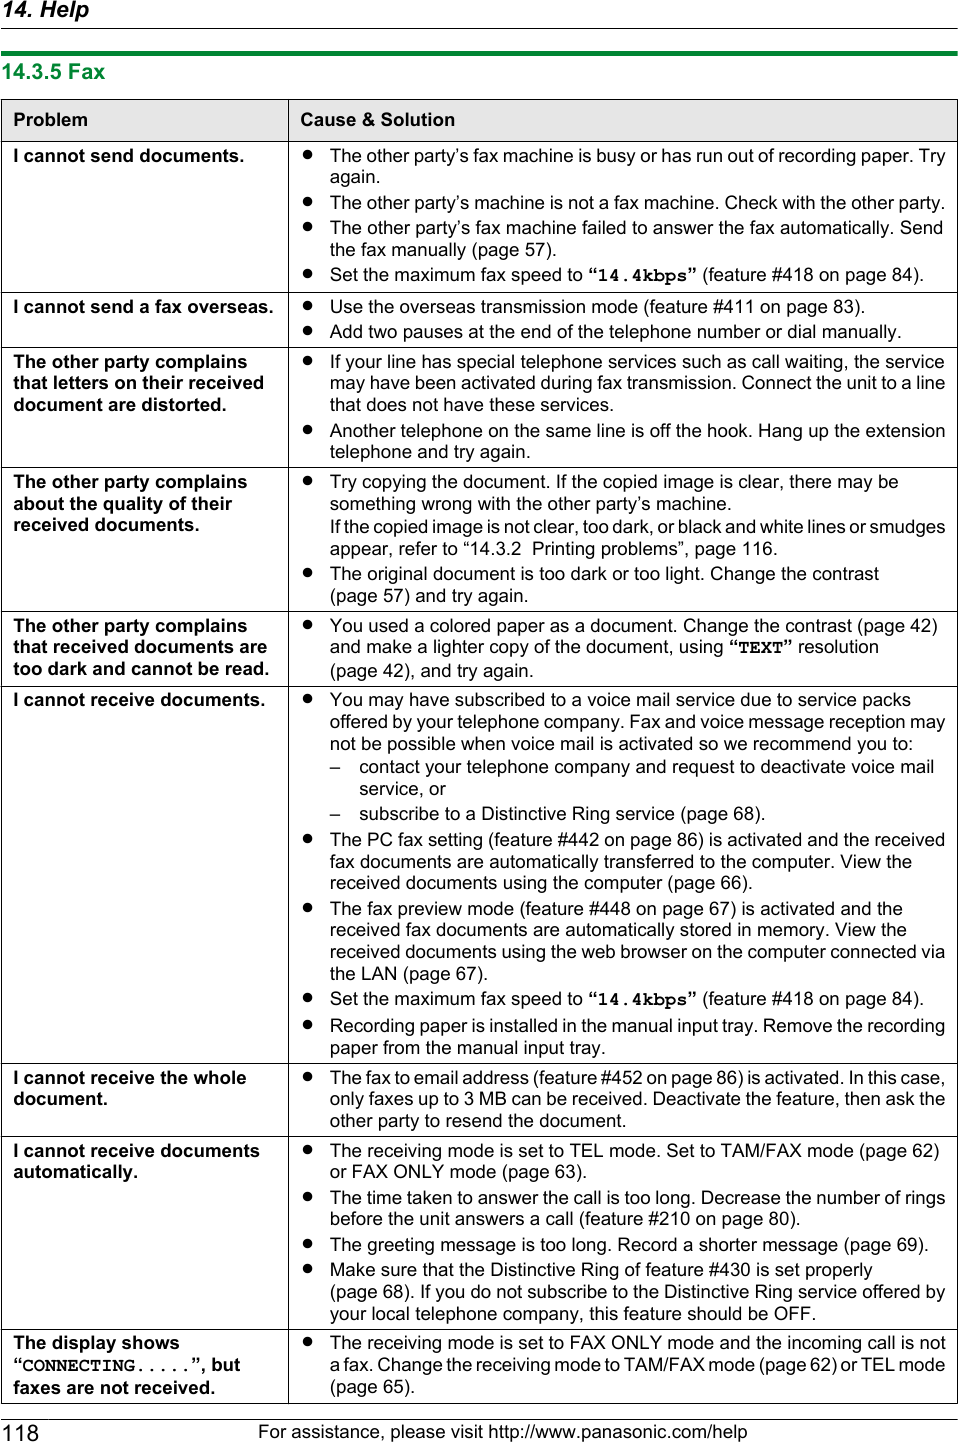

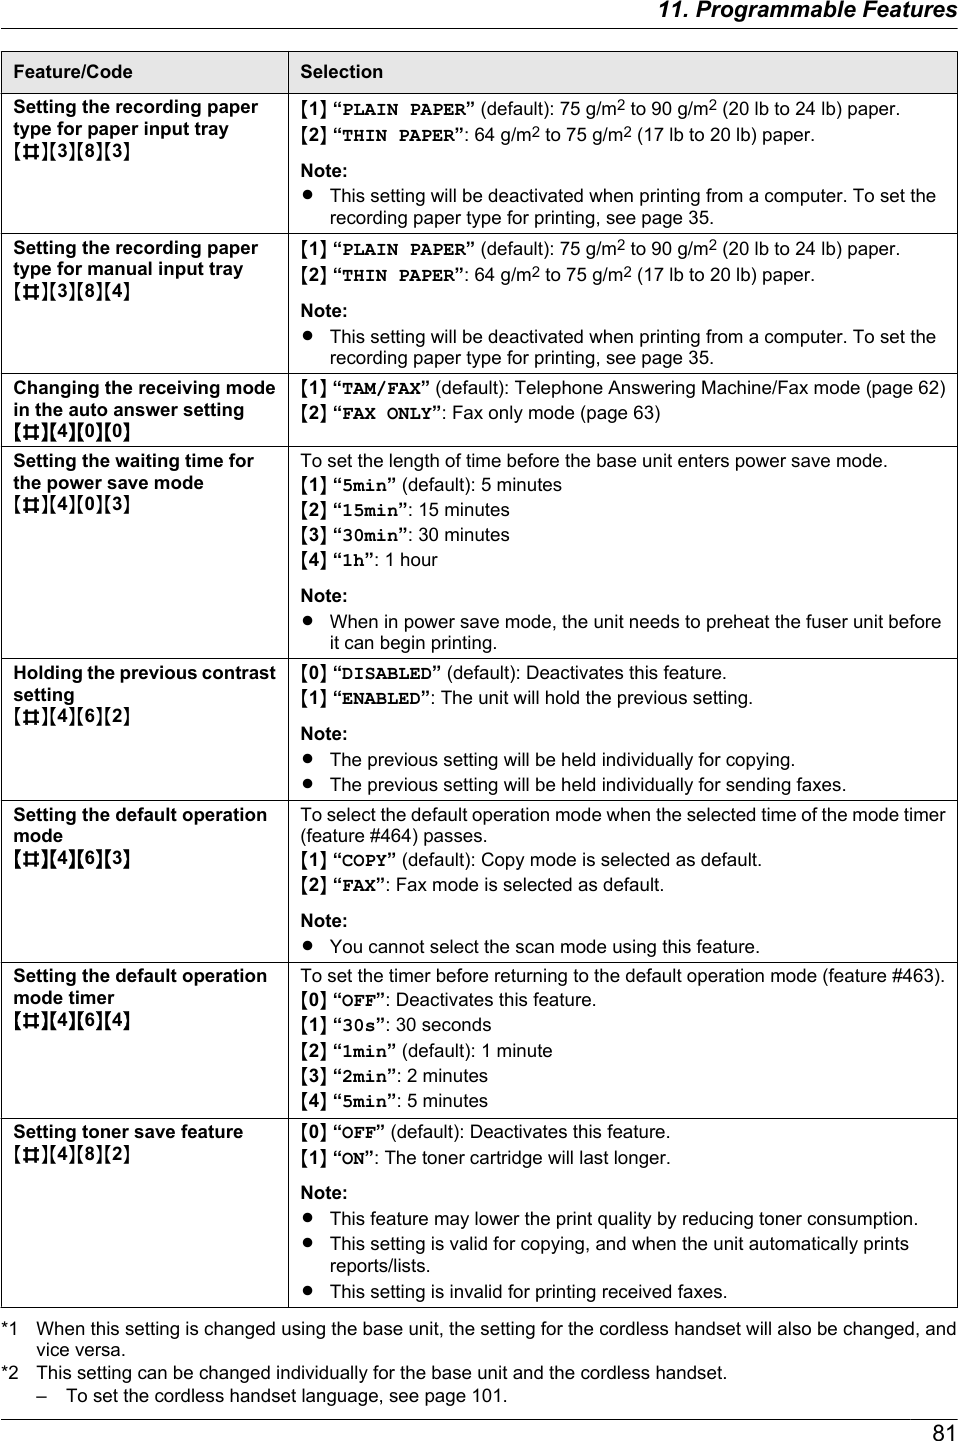
![14.3.8 Network (LAN connection only)Problem Cause & SolutionI cannot operate the followingfunctions.–PC printing–Scanning–Remote Control–PC FAX–Device MonitorRConfirm the LED via the LAN port of the main board. If the LED is glowingor blinking, network access is working correctly.If the LED is not glowing or blinking, confirm the LAN cable (category 5straight cable) is connected to the LAN port of the main board correctly.RIf the LED is blinking and you cannot perform the desired operation, the IPaddress of the unit may have changed.To detect the IP address, proceed as follows.[Start] A [All Programs] or [Programs] A [Panasonic] A the unit’sname A [IP Address Checker]RThe IP address for the unit will be detected.Note:RIf the IP address cannot be detected, enter it manually (feature #501 onpage 94). The IP address of the computer and the unit must be in thesame local IP address class as shown below. Set the IP address in therange of the number specified in the class corresponding to your localnetwork scale.Class Subnet mask IP addressClass A 255.0.0.0 10.0.0.1 -10.255.255.254Class B 255.255.0.0 172.xx.0.1 -172.xx.255.254*1Class C 255.255.255.0 192.168.xx.1 -192.168.xx.254*2*1 “xx” should be the same value for the unit and for the computer,as shown in the following example.Example: 172.16.0.1 - 172.16.255.254(The available range of “xx” is 16 - 31)*2 “xx” should be the same value for the unit and for the computer,as shown in the following example.Example: 192.168.0.1 - 192.168.0.254(The available range of “xx” is 0 - 255)RYour firewall software is blocking the connection. Disable the firewallsoftware or change the firewall settings to make the Multi-Function Stationwork properly.RLAN features can be used when the unit and the computer are connectedin same network segment only. Make sure the network is configuredcorrectly. Consult your network administrator.The unit does not appear inthe [Select a Network Device]dialog box when installingMulti-Function Station.RYour firewall software is blocking the connection and the setup program maynot list any units. Consult your network administrator and temporarily disablethe firewall software.RThe unit is connected to another network segment and the setup programmay not list any units. Make sure the network is configured correctly. Consultyour network administrator.For assistance, please visit http://www.panasonic.com/help 12314. Help](https://usermanual.wiki/Panasonic-of-North-America/96NKX-MB2061.user-manual/User-Guide-1342881-Page-123.png)
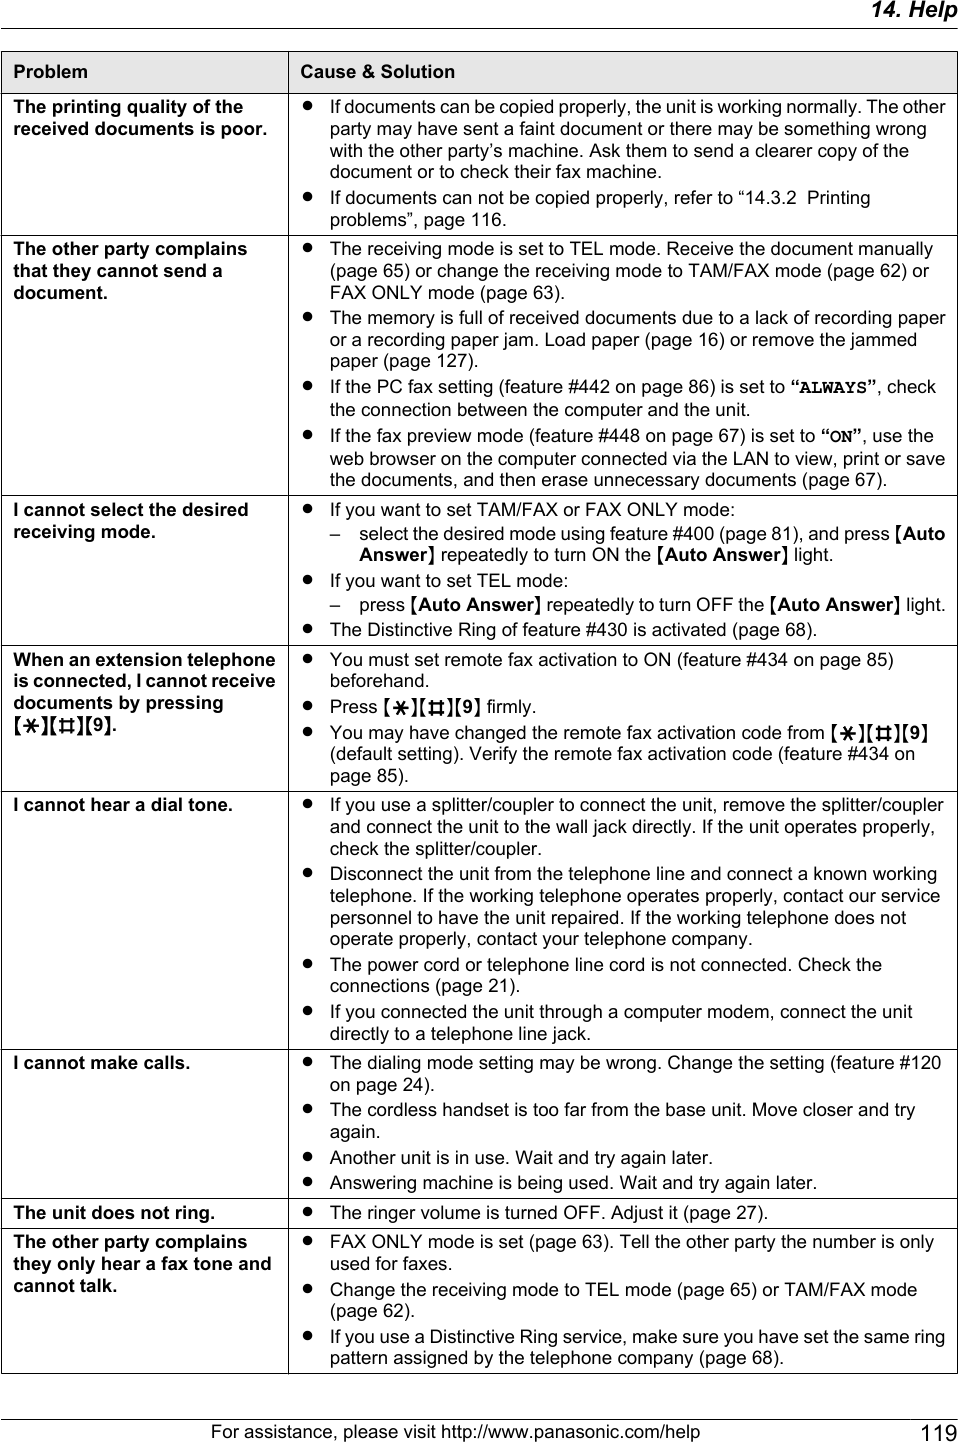
![Problem Cause & SolutionThe [Windows Security Alert]dialog box appears and asksif I want to block[PCCMFLPD] and I cannotoperate the followingfunctions after installing theMicrosoft Windows XPService Pack 2 or later.–PC printing–Scanning–Remote Control–PC FAX–Device MonitorRClick [Keep Blocking] and run the Windows Firewall Setting Tool to allowthe data transmission for Multi-Function Station (page 125).14.3.9 Answering machineProblem Cause & SolutionI cannot receive a voicemessage on the computer.RMake sure the following features are set beforehand.– Receiving a voice message into the computer (feature #365 onpage 88)– Setting the computer for PC TAM reception (feature #366 on page 30)I cannot play back the voicemessage on the computer.RA sound card and speaker are required to play back the voice message onthe computer. Make sure that a sound card is installed correctly and checkthe speaker volume.I cannot listen to messagesfrom a remote location.RActivate the remote operation feature by setting the remote operation IDbeforehand (page 75, feature #306 on page 88). Press the remote operationID correctly and firmly.RThe unit is not in TAM/FAX mode. Change to TAM/FAX mode (page 62).The other party complainsthat they cannot leave a voicemessage.RYou may have subscribed to a voice mail service due to service packsoffered by your telephone company. Fax and voice message reception maynot be possible when voice mail is activated so we recommend you to:– contact your telephone company and request to deactivate voice mailservice, or– subscribe to a Distinctive Ring service (page 68).RThe recording time is set to “GREET ONLY”/“Greeting Only”. Select “1MINUTE”/“1 Minute” or “3 MINUTES”/“3 Minutes” (page 76, feature#305 on page 88).RThe memory is full. Erase unnecessary messages (page 70, 75).RMake sure there is no other answering machine connected on the same line.I cannot operate theanswering machine with thecordless handset.RSomeone is operating the answering machine.RYou are too far from the base unit. Move closer to the base unit.The MPlaybackN light flashesslowly.RThis is normal. New messages have been recorded. Listen to the newmessages (page 70, 75).Caller ID information does notdisplay during messageplayback.RThe caller information will not be displayed if the message is memorecording (page 69) or conversation (page 69).14.3.10 If a power failure occursRThe unit will not function.RIf any documents are stored in the memory (i.e. during copying, PC printing), they will be lost.RThe unit is not designed for making emergency telephone calls when the power fails. Alternative arrangementsshould be made for access to emergency services.124 For assistance, please visit http://www.panasonic.com/help14. Help](https://usermanual.wiki/Panasonic-of-North-America/96NKX-MB2061.user-manual/User-Guide-1342881-Page-124.png)
![RFax transmission and reception will be interrupted.RDocuments during fax transmission or fax reception will be lost.RWhen power is restored, a power down report will be printed out stating which fax items in the memory have beenerased.14.3.11 Firewall setting tool for Microsoft Windows XP Service Pack 2 or later/Windows Vista/Windows 7 users (LAN connection only)After installing Microsoft Windows XP Service Pack 2 or later/Windows Vista/Windows 7, you will not be able to usethe following functions because the Windows Firewall feature will be activated and block the connection.– Device Monitor– LPD Manager (Network communication tool)The Windows Firewall Setting Tool enables you to change the Windows Firewall security settings and to use theabove functions properly.1Insert the CD-ROM that is supplied with the unit into your CD-ROM drive.RIf the [Select Language] dialog box appears, select the desired language that you want to use with thissoftware. Click [OK].2[Tools] A [Windows Firewall Setting]RThe [Windows Firewall Setting Tool] window will appear.3[Add to the exceptions list] A [OK] A [OK]To confirm the security settings (For Windows XP users)1. [Start] A [Control Panel] A [Security Center]RThe [Windows Security Center] window will appear.2. [Windows Firewall]RThe [Windows Firewall] dialog box will appear.3. Click the [Exceptions] tab.4. Confirm that [Panasonic Trap Monitor Service] and [Panasonic LPD] are displayed and checked on the[Programs and Services] list.To confirm the security settings (For Windows Vista users)1. [Start] A [Control Panel] A [Security Center]RThe [Windows Security Center] window will appear.2. [Windows Firewall]RThe [Windows Firewall] dialog box will appear.3. [Change settings]RThe [User Account Control] dialog box will appear.4. [Continue]5. Click the [Exceptions] tab.6. Confirm that [Panasonic Trap Monitor Service], [Panasonic LPD Manager] and [Panasonic LPD] aredisplayed and checked on the [Program or port] list.To confirm the security settings (For Windows 7 users)1. [Start] A [Control Panel] A [System and Security] A [Windows Firewall] A [Advanced settings]RThe [Windows Firewall with Advanced Security] window will appear.2. [Inbound Rules]3. Confirm that [Panasonic Trap Monitor Service], [Panasonic LPD Manager] and [Panasonic LPD] aredisplayed and checked on the [Inbound Rules] list.14.3.12 Notice for KX-MB200/KX-MB700/KX-FLB880 series usersIf you have already installed KX-MB200/KX-MB700/KX-FLB880 series Multi-Function Station on your computer, usethe following instructions to modify or add the printer driver, which changes after installing the KX-MB2000 seriesMulti-Function Station.You can modify or add a printer driver, as follows:For assistance, please visit http://www.panasonic.com/help 12514. Help](https://usermanual.wiki/Panasonic-of-North-America/96NKX-MB2061.user-manual/User-Guide-1342881-Page-125.png)
![1Start Windows and insert the KX-MB200/KX-MB700/KX-FLB880 series CD-ROM into your CD-ROM drive.RIf the [Select Language] dialog box appears, select the desired language that you want to use with thissoftware. Click [OK].2[Easy installation]3[Modify] A [Next]4Select [Modify Utility] or [Add Printer Driver]. A [Next]. Then follow the on-screen instructions.Important:RFor users of versions prior to 1.12, download the latest software as follows, then activate it.[Start] A [All Programs] or [Programs] A [Panasonic] A the unit’s name A [Support Web Page].Then follow the on-screen instructions.126 For assistance, please visit http://www.panasonic.com/help14. Help](https://usermanual.wiki/Panasonic-of-North-America/96NKX-MB2061.user-manual/User-Guide-1342881-Page-126.png)
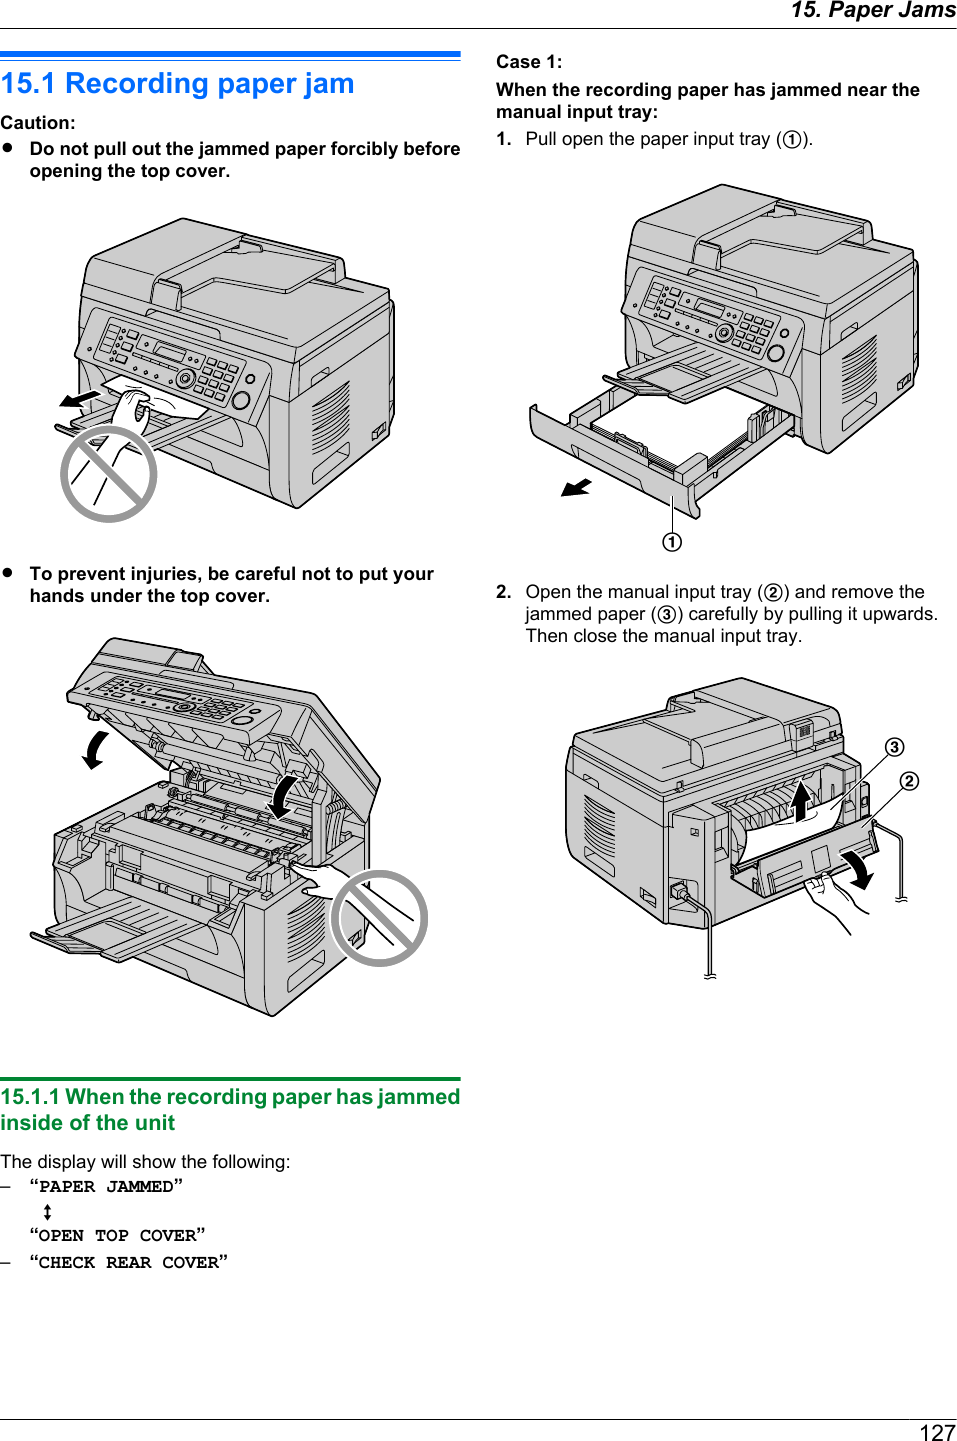
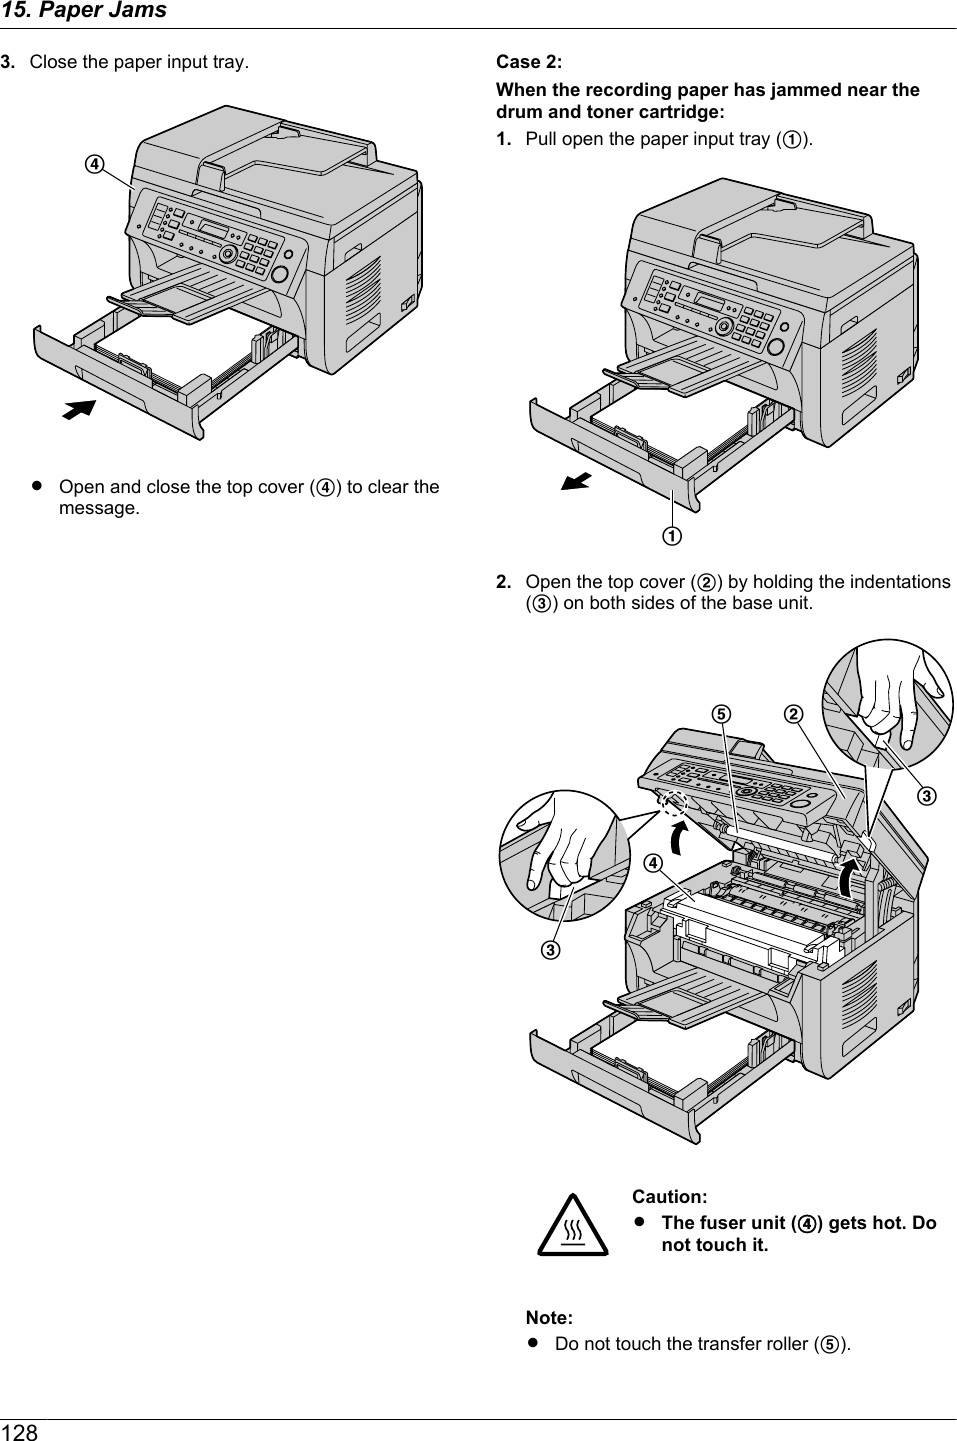
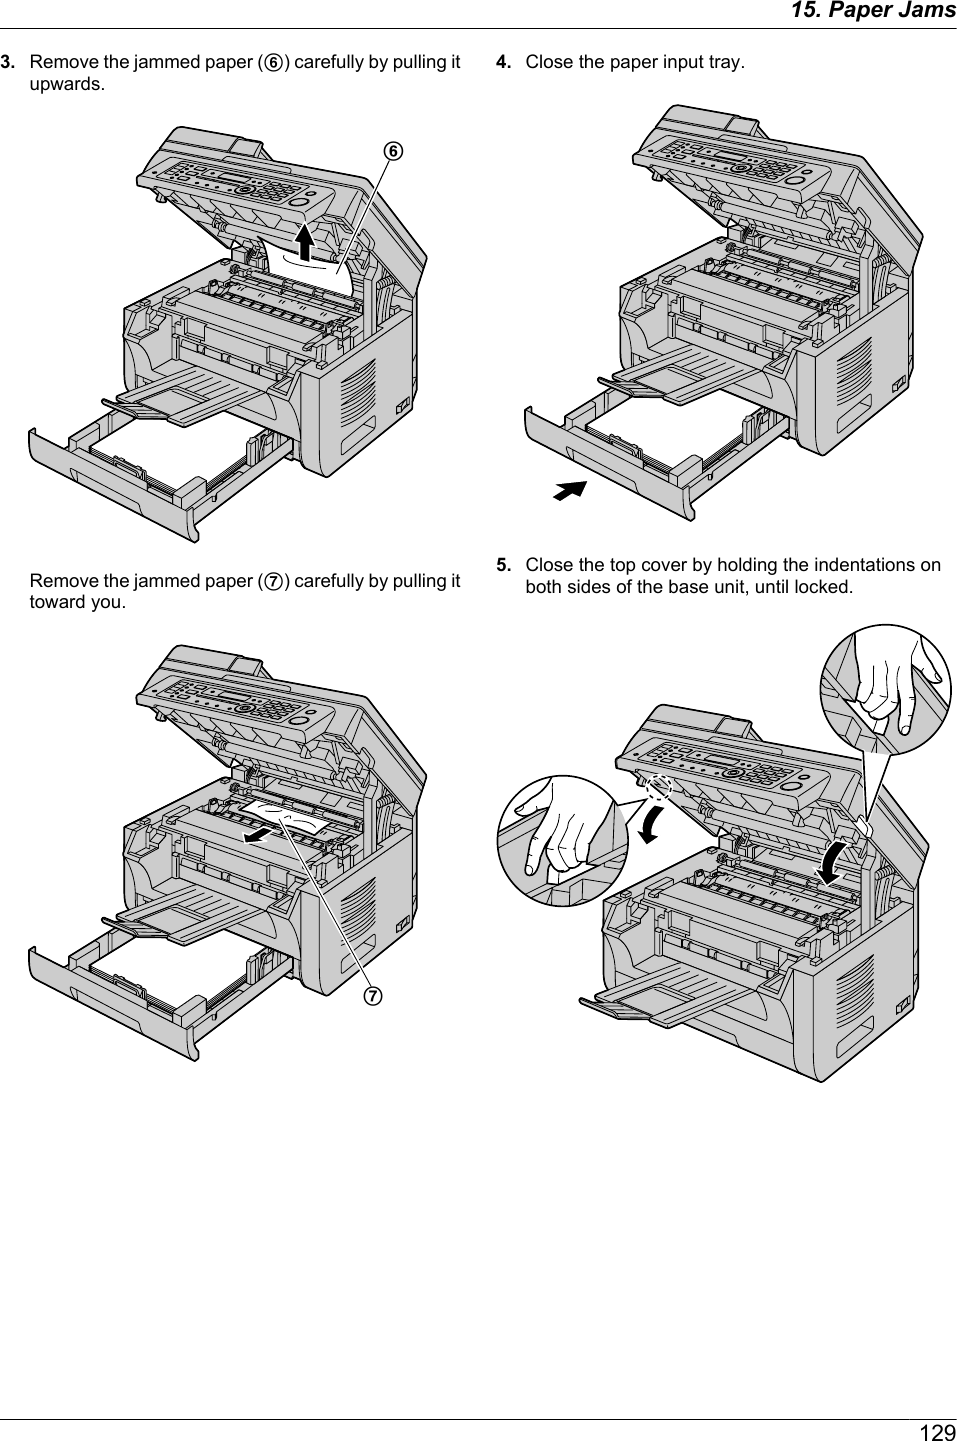
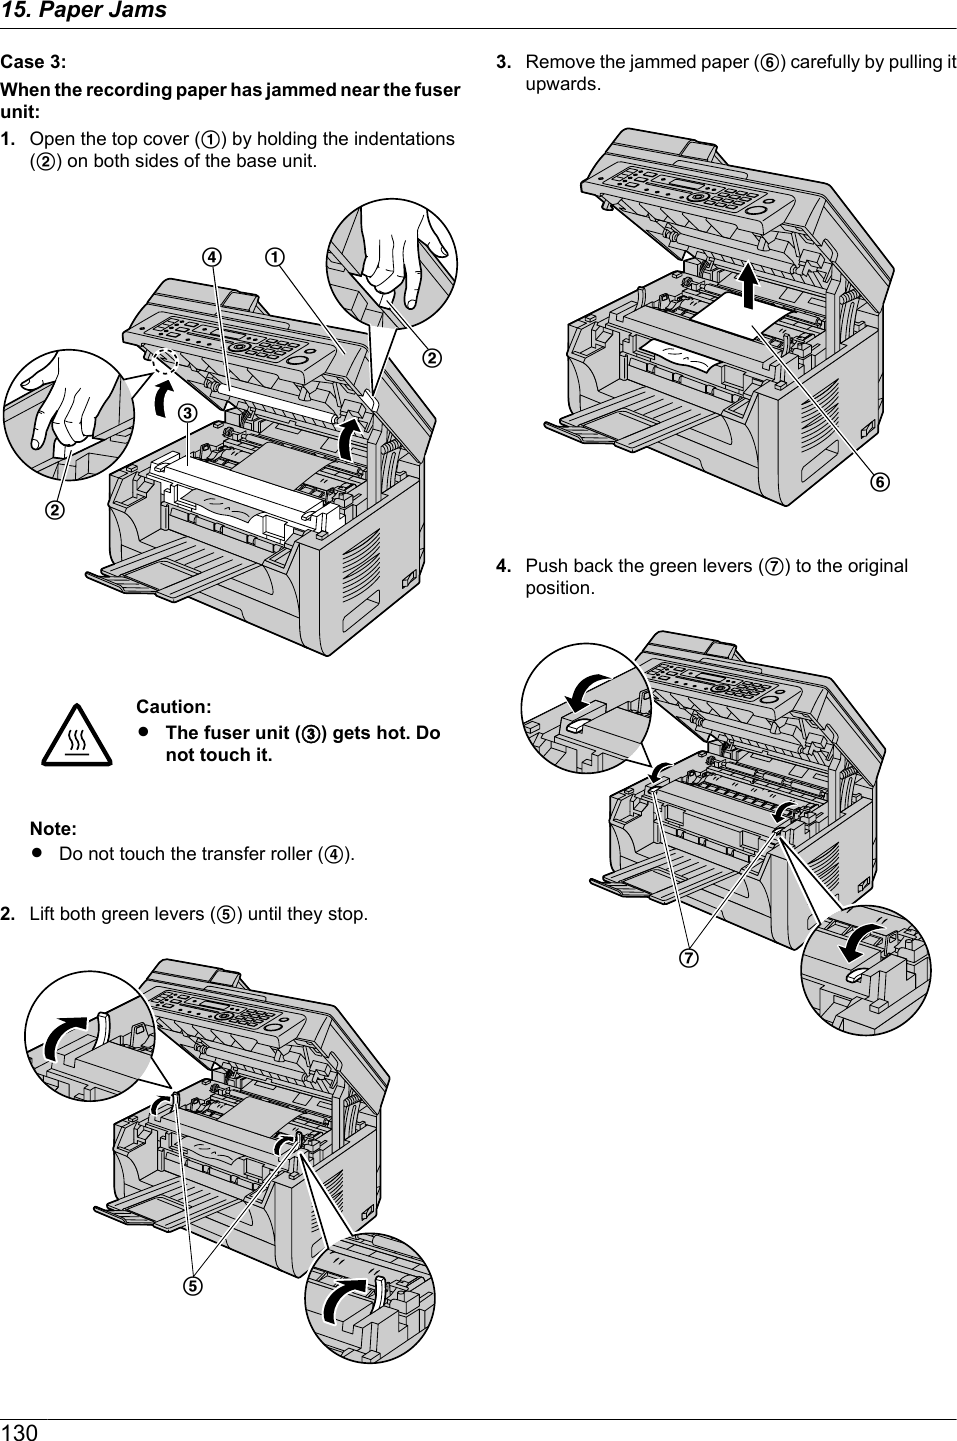
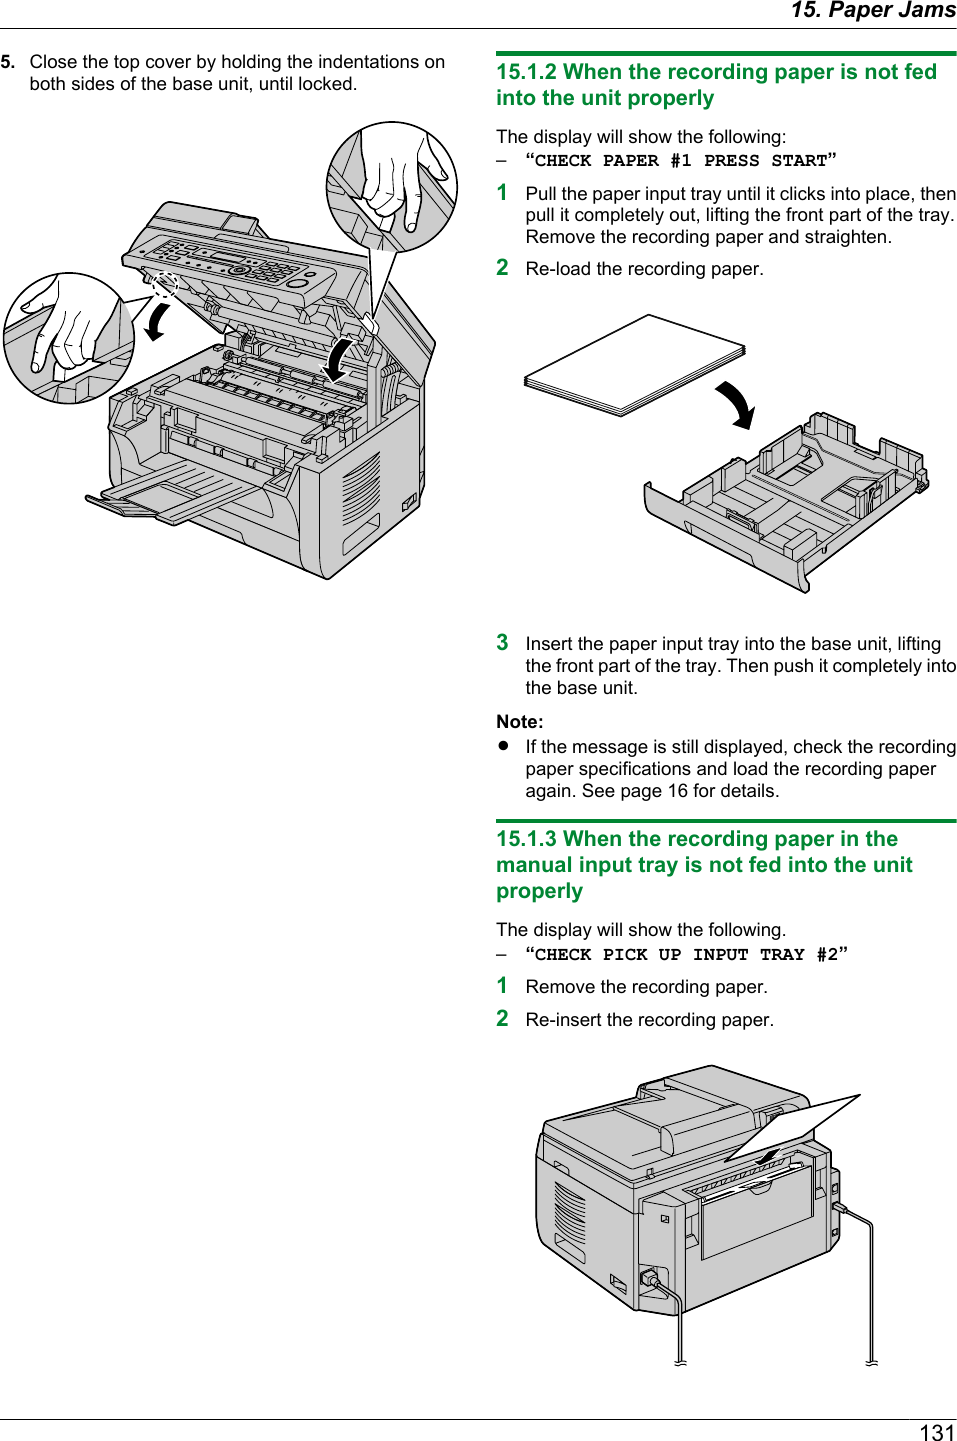
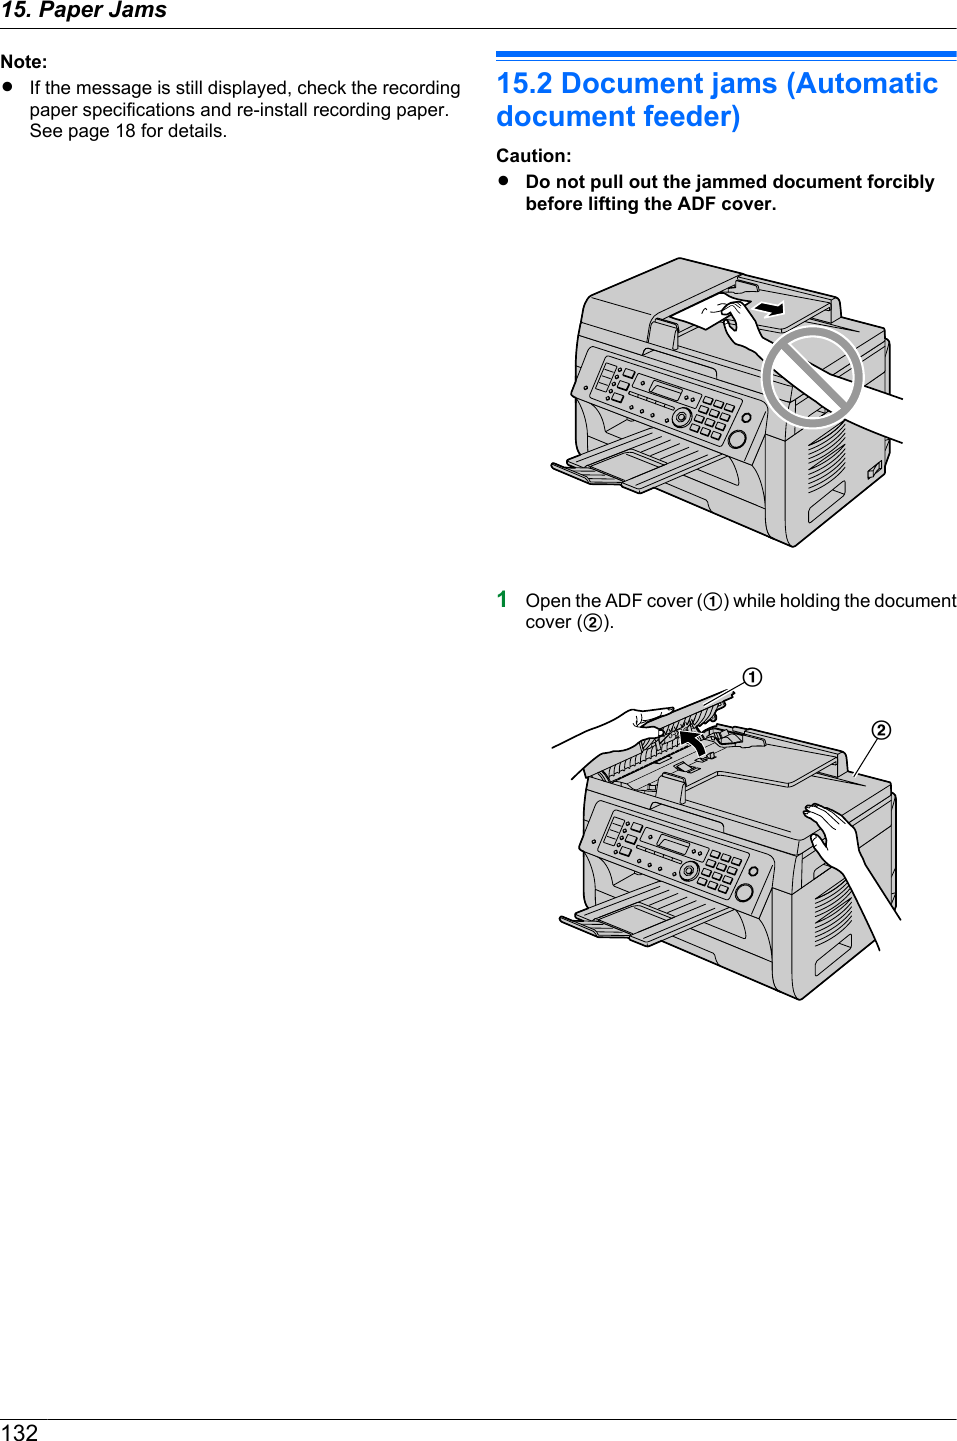

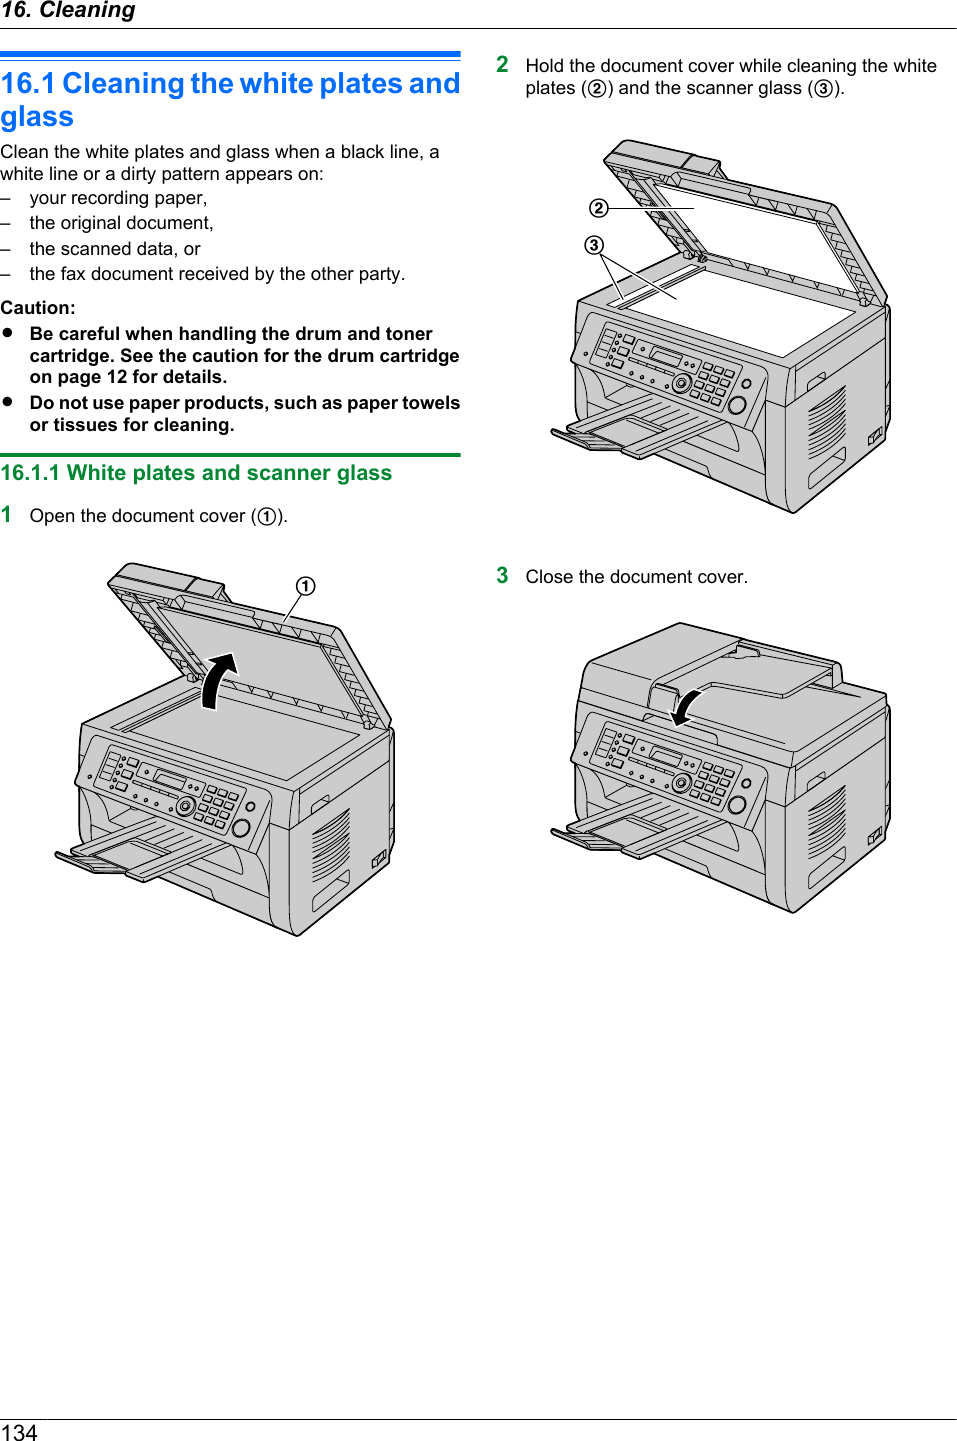
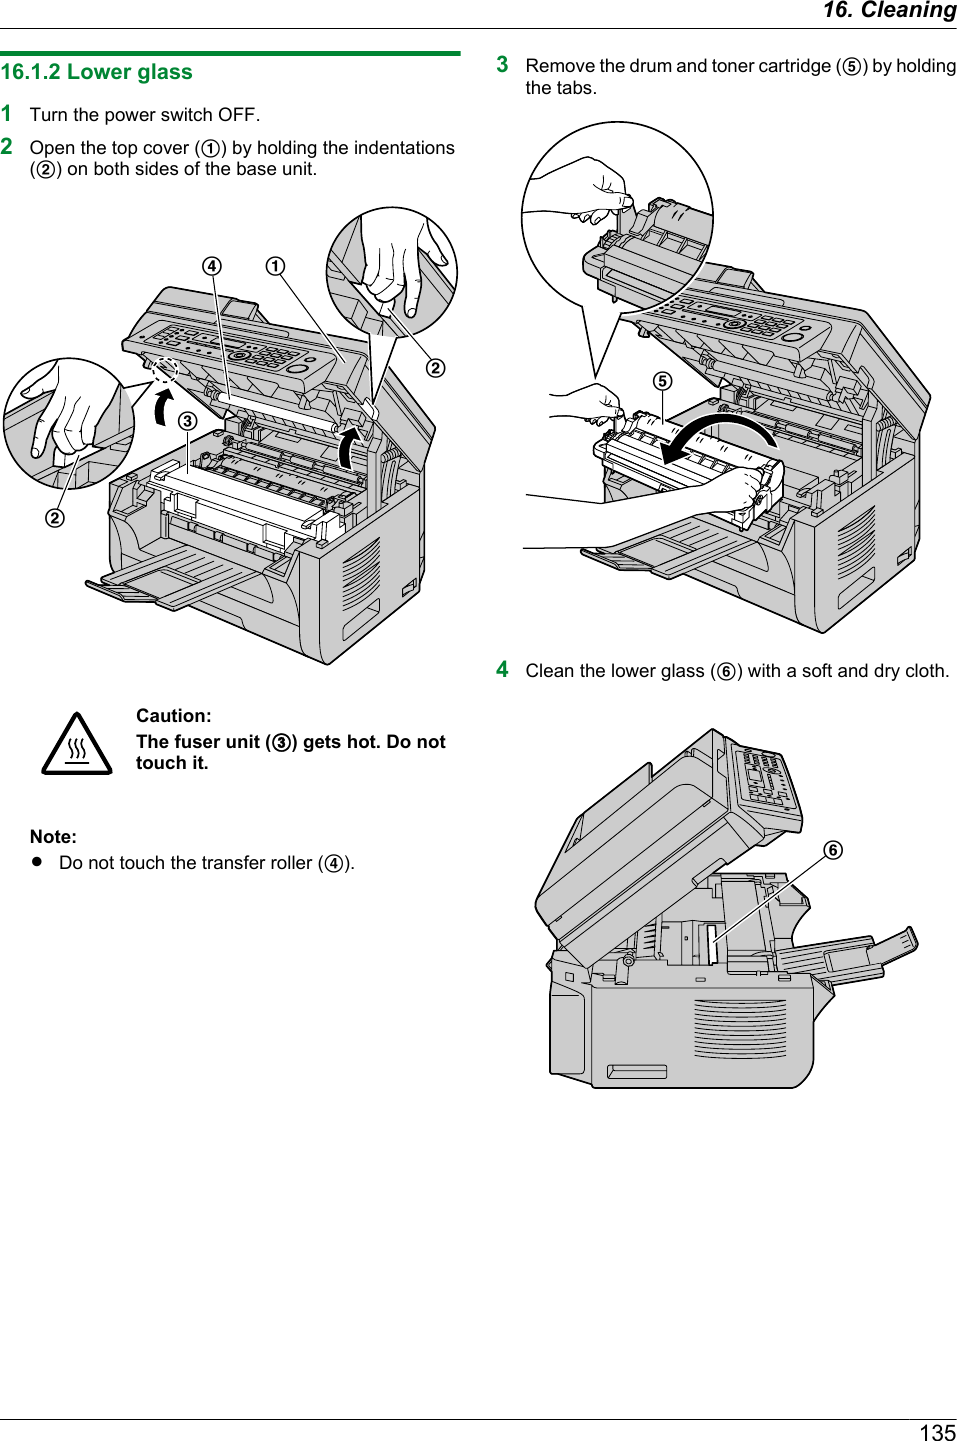
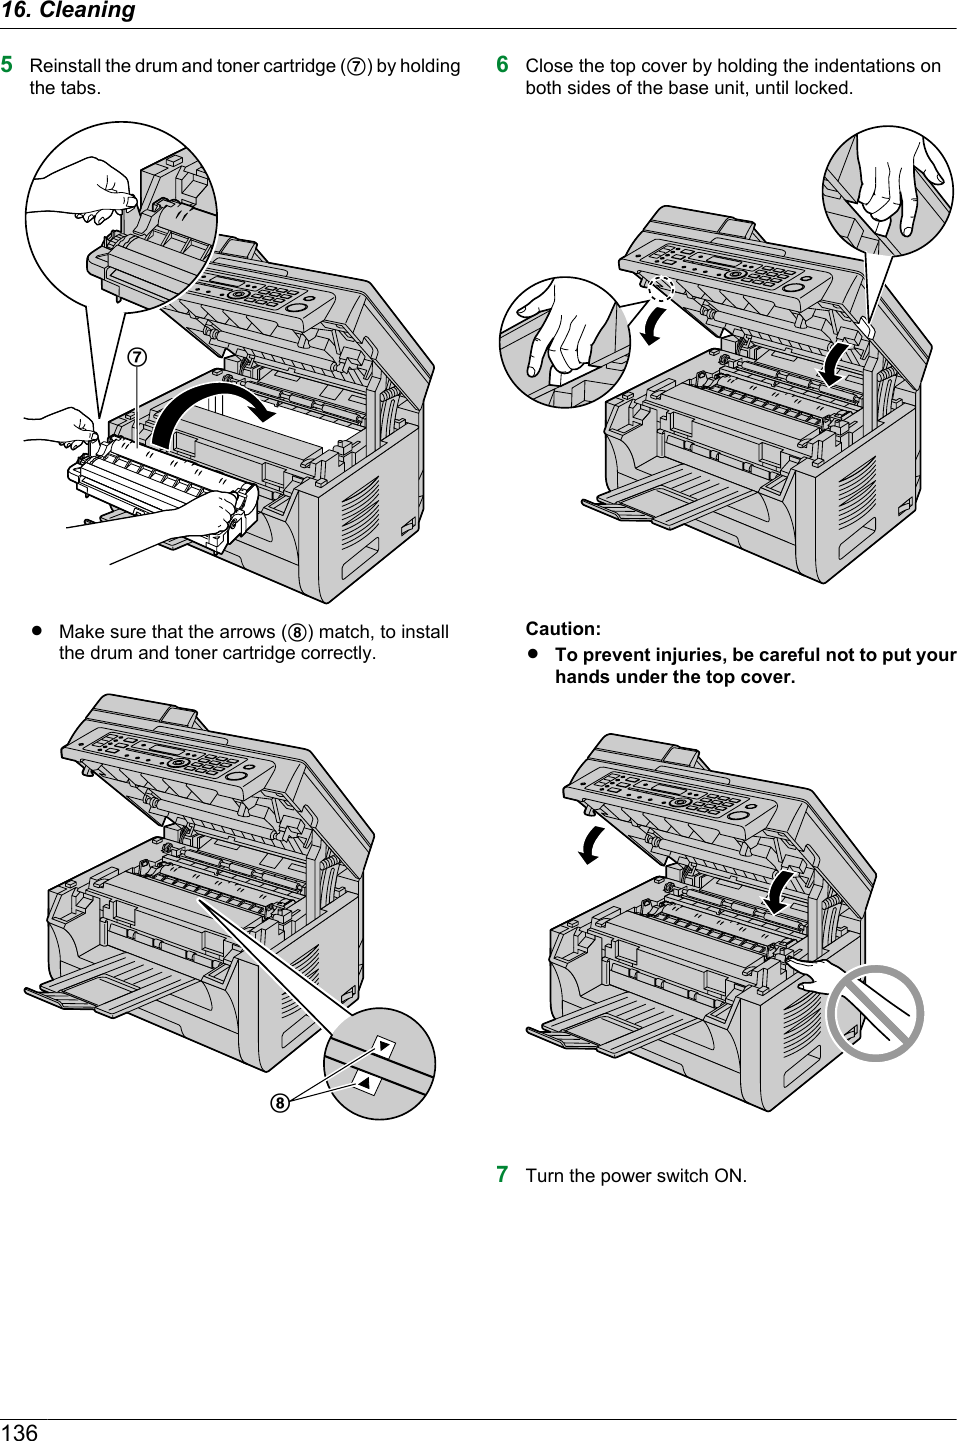
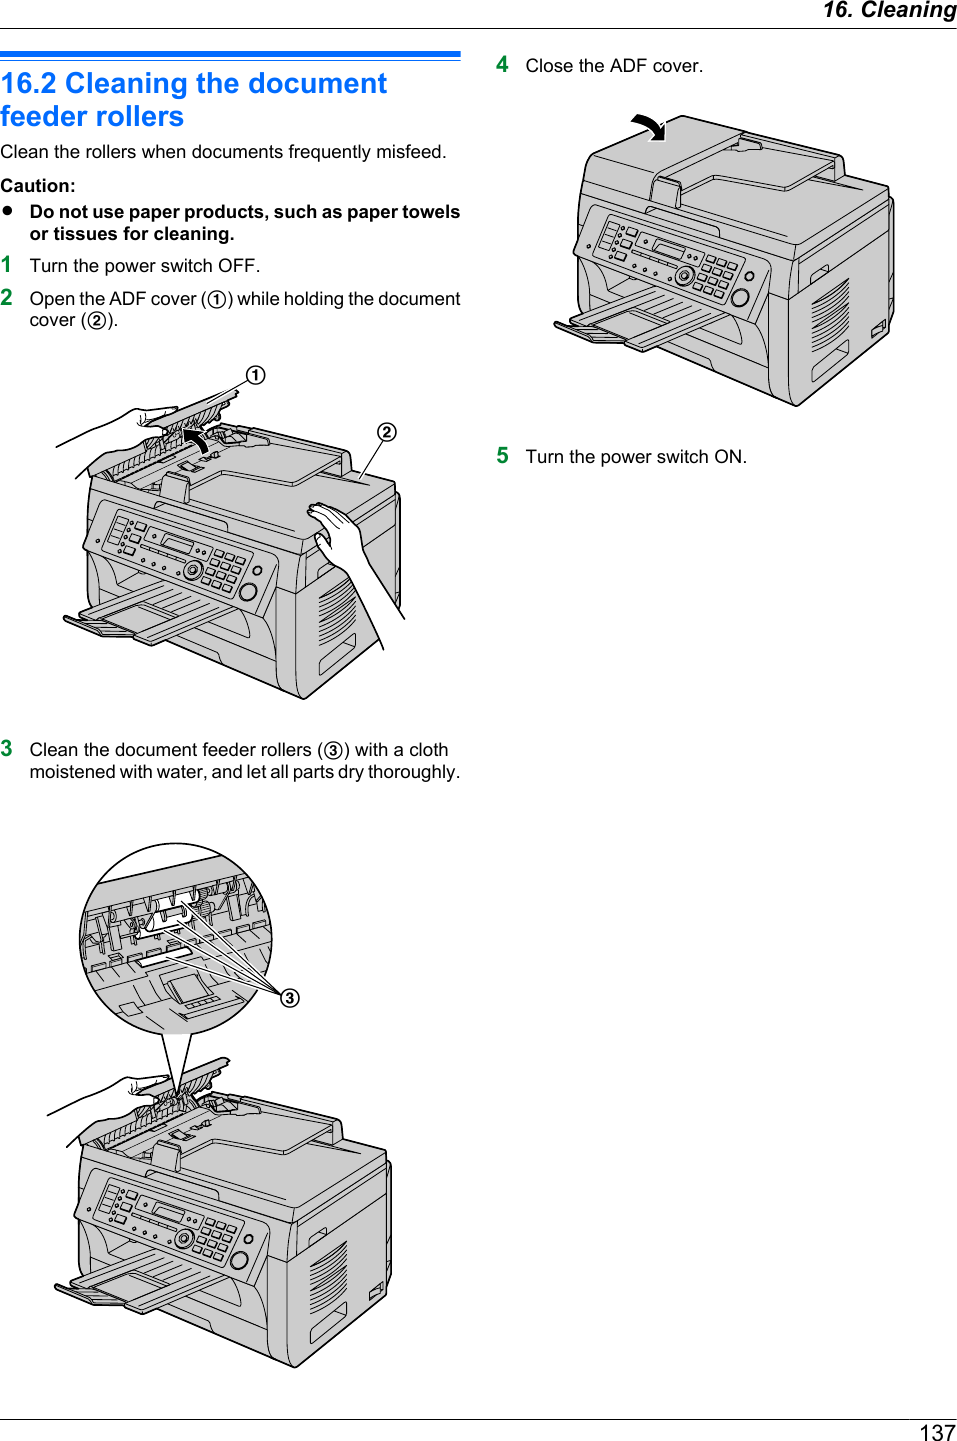
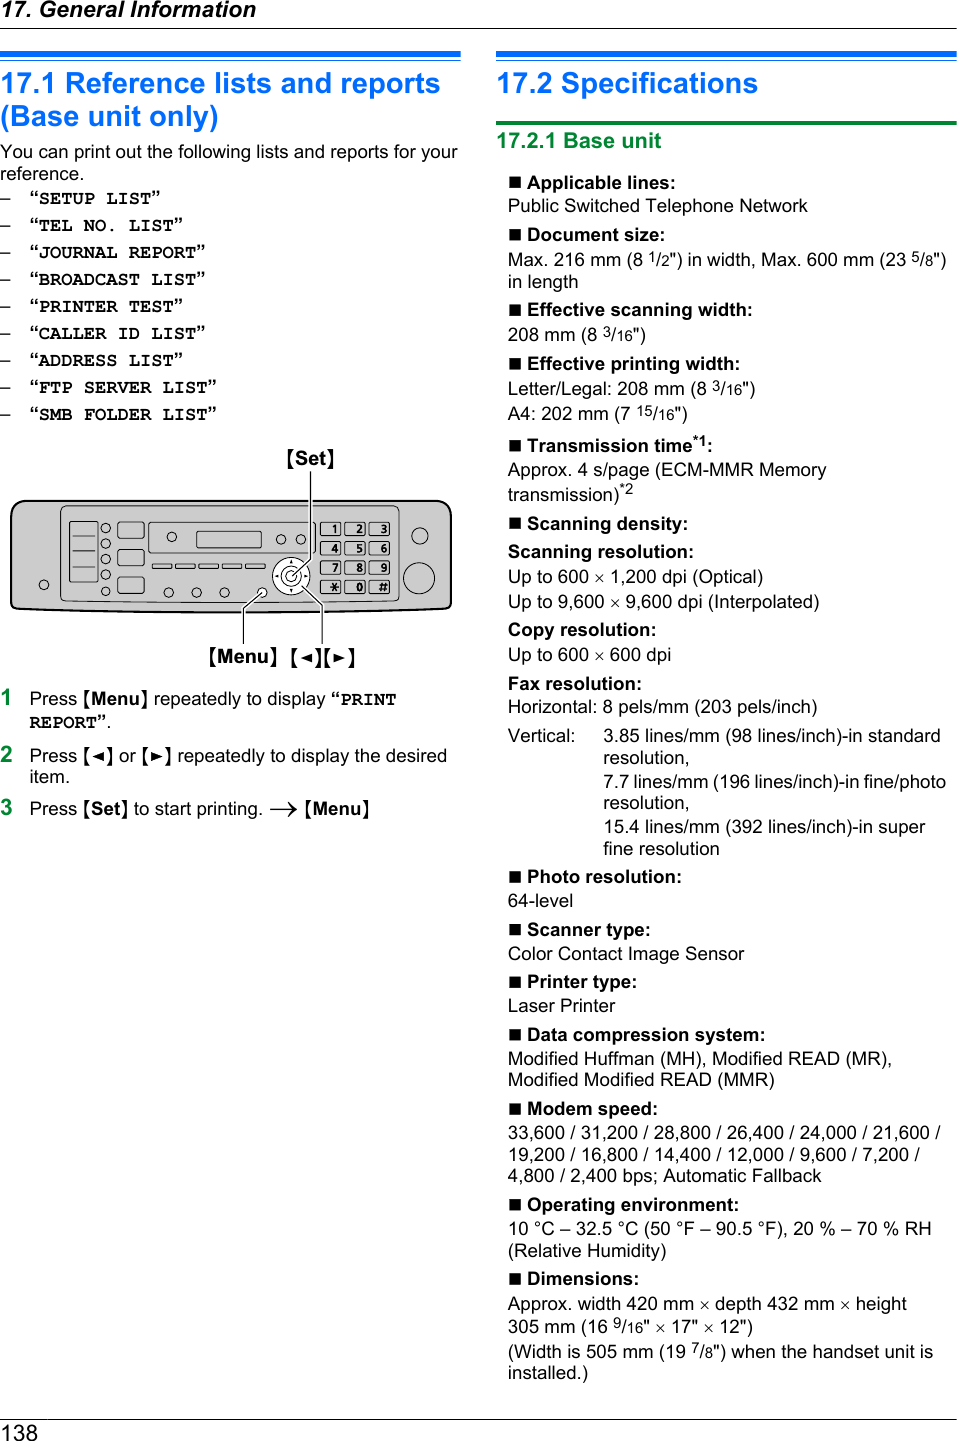
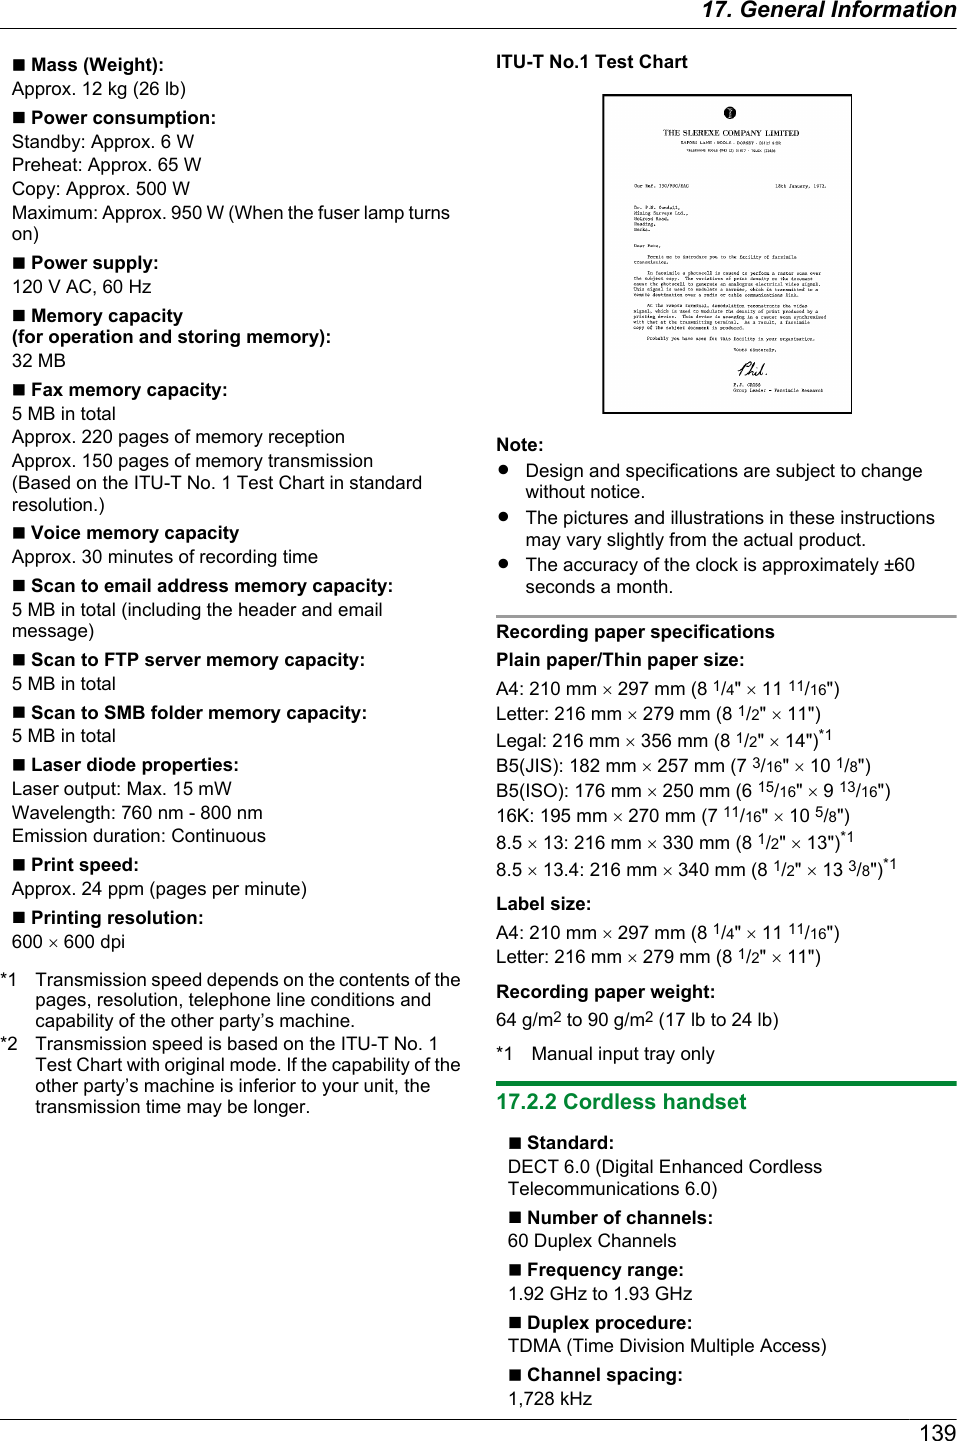


![* This library is free for commercial and non-commercial use as long as * the following conditions are aheared to. The following conditions * apply to all code found in this distribution, be it the RC4, RSA, * lhash, DES, etc., code; not just the SSL code. The SSL documentation * included with this distribution is covered by the same copyright terms * except that the holder is Tim Hudson (tjh@cryptsoft.com). * * Copyright remains Eric Young's, and as such any Copyright notices in * the code are not to be removed. * If this package is used in a product, Eric Young should be given attribution * as the author of the parts of the library used. * This can be in the form of a textual message at program startup or * in documentation (online or textual) provided with the package. * * Redistribution and use in source and binary forms, with or without * modification, are permitted provided that the following conditions * are met: * 1. Redistributions of source code must retain the copyright * notice, this list of conditions and the following disclaimer. * 2. Redistributions in binary form must reproduce the above copyright * notice, this list of conditions and the following disclaimer in the * documentation and/or other materials provided with the distribution. * 3. All advertising materials mentioning features or use of this software * must display the following acknowledgement: * "This product includes cryptographic software written by * Eric Young (eay@cryptsoft.com)" * The word 'cryptographic' can be left out if the rouines from the library * being used are not cryptographic related :-). * 4. If you include any Windows specific code (or a derivative thereof) from * the apps directory (application code) you must include an acknowledgement: * "This product includes software written by Tim Hudson (tjh@cryptsoft.com)" * * THIS SOFTWARE IS PROVIDED BY ERIC YOUNG ``AS IS'' AND * ANY EXPRESS OR IMPLIED WARRANTIES, INCLUDING, BUT NOT LIMITED TO, THE * IMPLIED WARRANTIES OF MERCHANTABILITY AND FITNESS FOR A PARTICULAR PURPOSE * ARE DISCLAIMED. IN NO EVENT SHALL THE AUTHOR OR CONTRIBUTORS BE LIABLE * FOR ANY DIRECT, INDIRECT, INCIDENTAL, SPECIAL, EXEMPLARY, OR CONSEQUENTIAL * DAMAGES (INCLUDING, BUT NOT LIMITED TO, PROCUREMENT OF SUBSTITUTE GOODS * OR SERVICES; LOSS OF USE, DATA, OR PROFITS; OR BUSINESS INTERRUPTION) * HOWEVER CAUSED AND ON ANY THEORY OF LIABILITY, WHETHER IN CONTRACT, STRICT * LIABILITY, OR TORT (INCLUDING NEGLIGENCE OR OTHERWISE) ARISING IN ANY WAY * OUT OF THE USE OF THIS SOFTWARE, EVEN IF ADVISED OF THE POSSIBILITY OF * SUCH DAMAGE. * * The licence and distribution terms for any publically available version or * derivative of this code cannot be changed. i.e. this code cannot simply be * copied and put under another distribution licence * [including the GNU Public Licence.] */RJPEGThis software is based in part on the work of the Independent JPEG Group.15317. General Information](https://usermanual.wiki/Panasonic-of-North-America/96NKX-MB2061.user-manual/User-Guide-1342881-Page-153.png)