Pantech TX-130C Dual-Mode CDMA Cellular Phone User Manual TX 130 manual0227 TX 130
Pantech Co., Ltd. Dual-Mode CDMA Cellular Phone TX 130 manual0227 TX 130
Pantech >
Contents
- 1. User Manual
- 2. CRN 11897 Question 3 revised user manual
User Manual
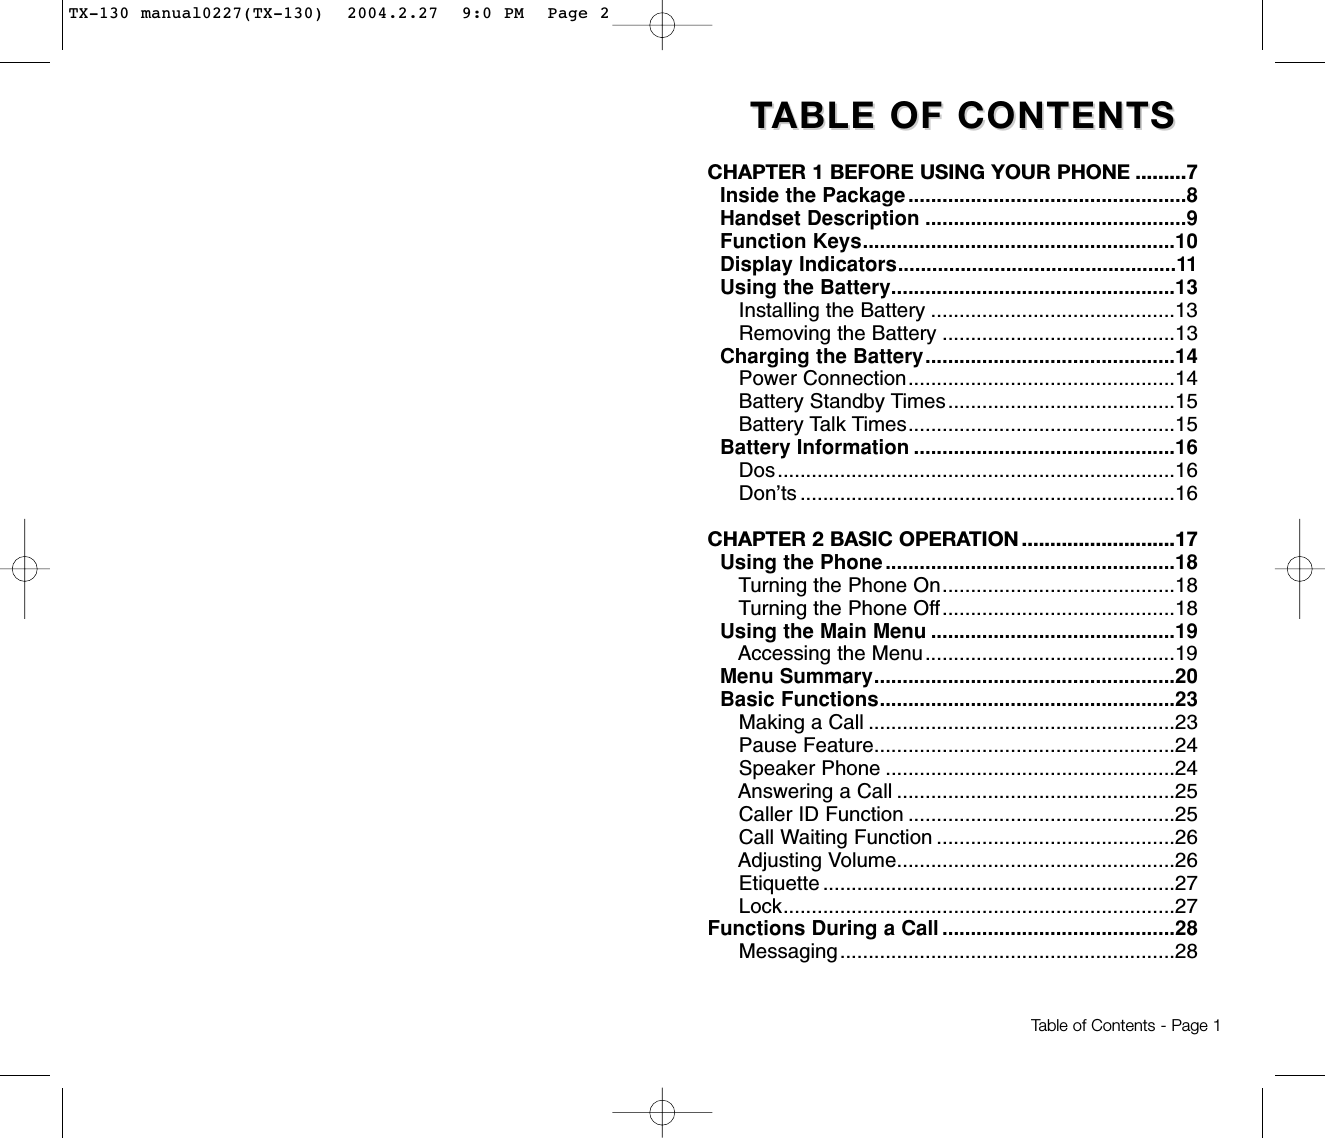
![TTABLE OF CONTENTS ABLE OF CONTENTS TTABLE OF CONTENTS ABLE OF CONTENTS CHAPTER 4 SETTINGS ..........................................55Settings .................................................................56Sounds................................................................56Display ................................................................61Data SVC............................................................64Security ...............................................................65Others .................................................................71System ................................................................75 Phone Info. .........................................................77Media Gallery........................................................79Images ................................................................78Photos.................................................................79Tones ..................................................................79Tools ......................................................................80Name ..................................................................80Voice Memo ........................................................81Voice Dial............................................................82Train Words.........................................................83Voice Setting.......................................................85CHAPTER 5 SUPPLEMENTARY FUNCTIONS ......87Event......................................................................88Add Plan .............................................................88View Event List ...................................................89Alarm .....................................................................90Memo Pad.............................................................92Calculator..............................................................94World Clock ..........................................................95Stopwatch.............................................................96Camera (Take a Photo) ........................................97To Take a Picture From the Menu.......................97To Take a Picture In Idle Mode ...........................97Camera (Camera) .................................................98Camera (Video).....................................................99Camera (My Pix) .................................................100Camera (My Video).............................................101Camera (Help).....................................................102Mute (Unmute) ....................................................28Scratchpad ..........................................................28Send My Phone # ...............................................29My Profile ............................................................29Voice Privacy.......................................................29Location...............................................................30Phone Info...........................................................30Making an Emergency Call....................................31911 in Lock Mode................................................31911 Using Any Available System ........................31CHAPTER 3 MEMORY FUNCTION .......................33Storing Phone Numbers ......................................34Text Input Methods ..............................................35Entering Characters............................................35Alpha Mode [ABC] ..............................................35T9TM Predictive Text Mode [T9TMABC] .................36Numeric Mode [NUM] .........................................38Symbol Mode [SYM] ...........................................38Speed Dialing .......................................................39Speed Dial ..........................................................39One-Touch/Two-Touch Dialing............................39Phone Book ..........................................................40Find.....................................................................40Add New .............................................................41Group..................................................................42Speed Dial ..........................................................43Msg. Group .........................................................44My Phone #.........................................................46Recent Calls .........................................................47All Calls ...............................................................47Missed Calls .......................................................48Received Calls....................................................49Dialed Calls.........................................................50Call Timers..........................................................51Page 2 - Table of Contents Table of Contents - Page 3TX-130 manual0227(TX-130) 2004.2.27 9:0 PM Page 4](https://usermanual.wiki/Pantech/TX-130C.User-Manual/User-Guide-404948-Page-3.png)
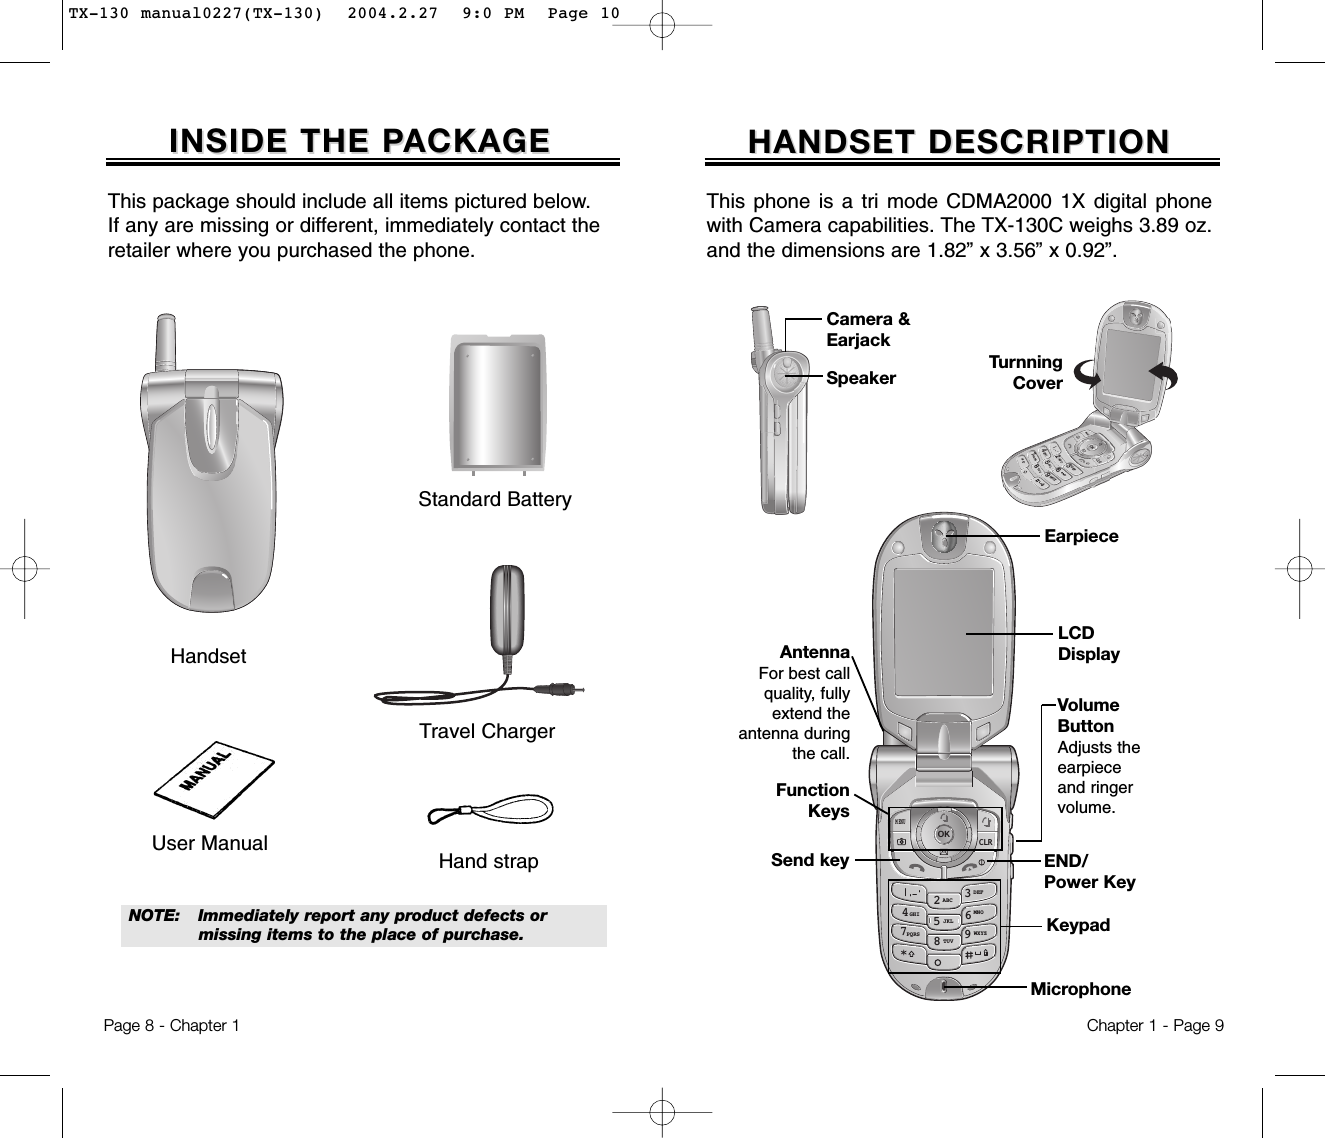
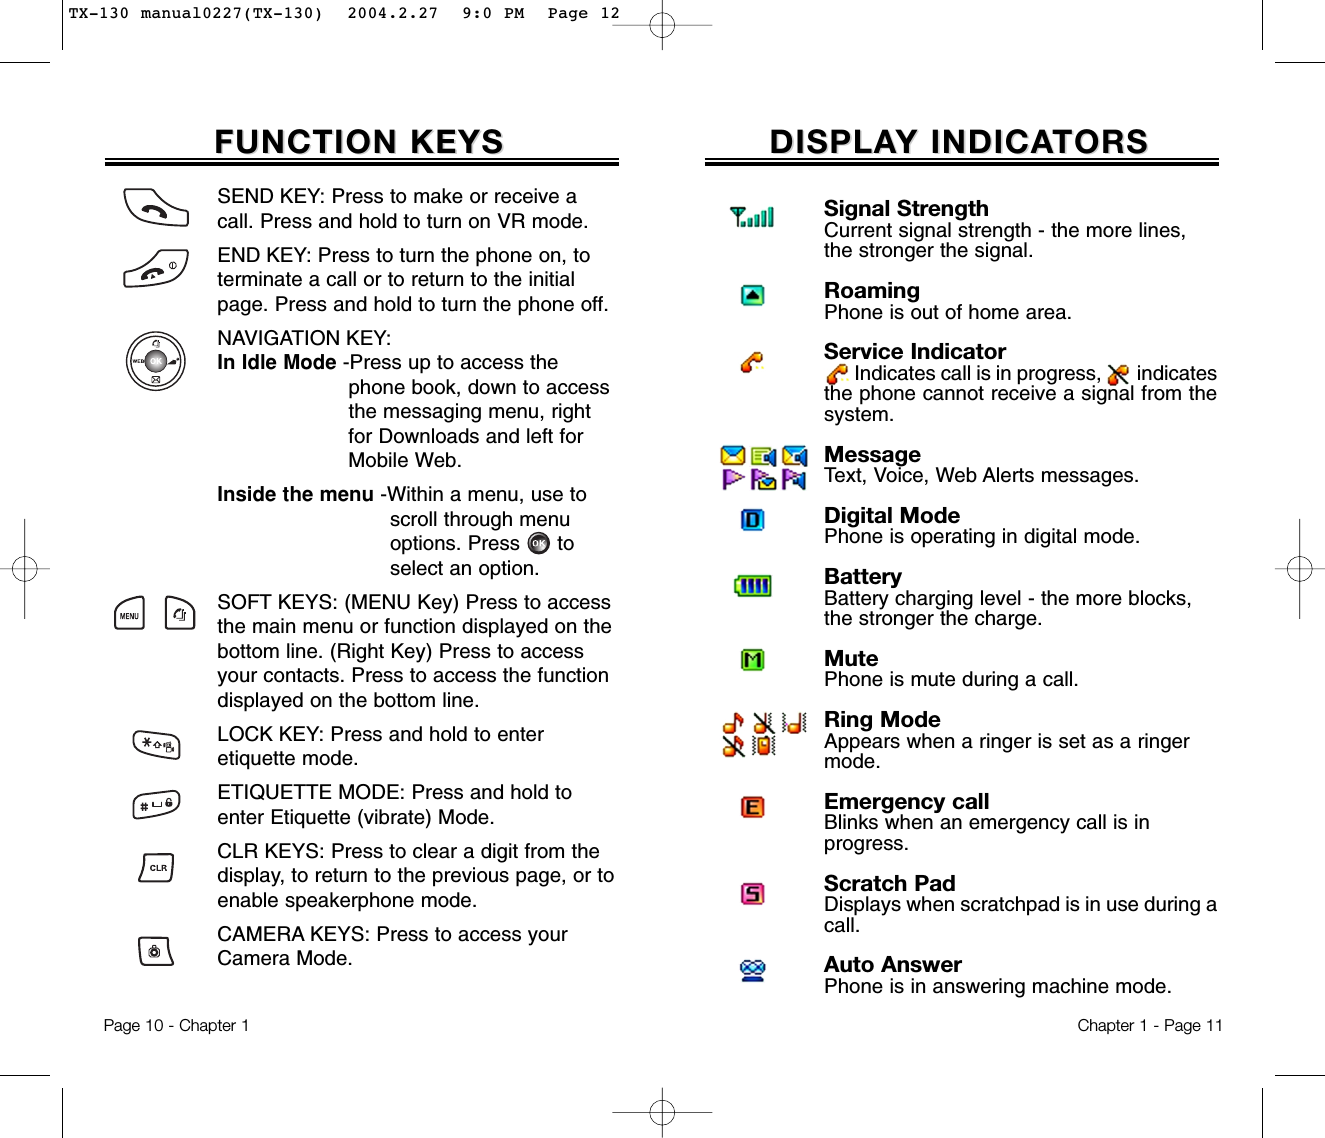
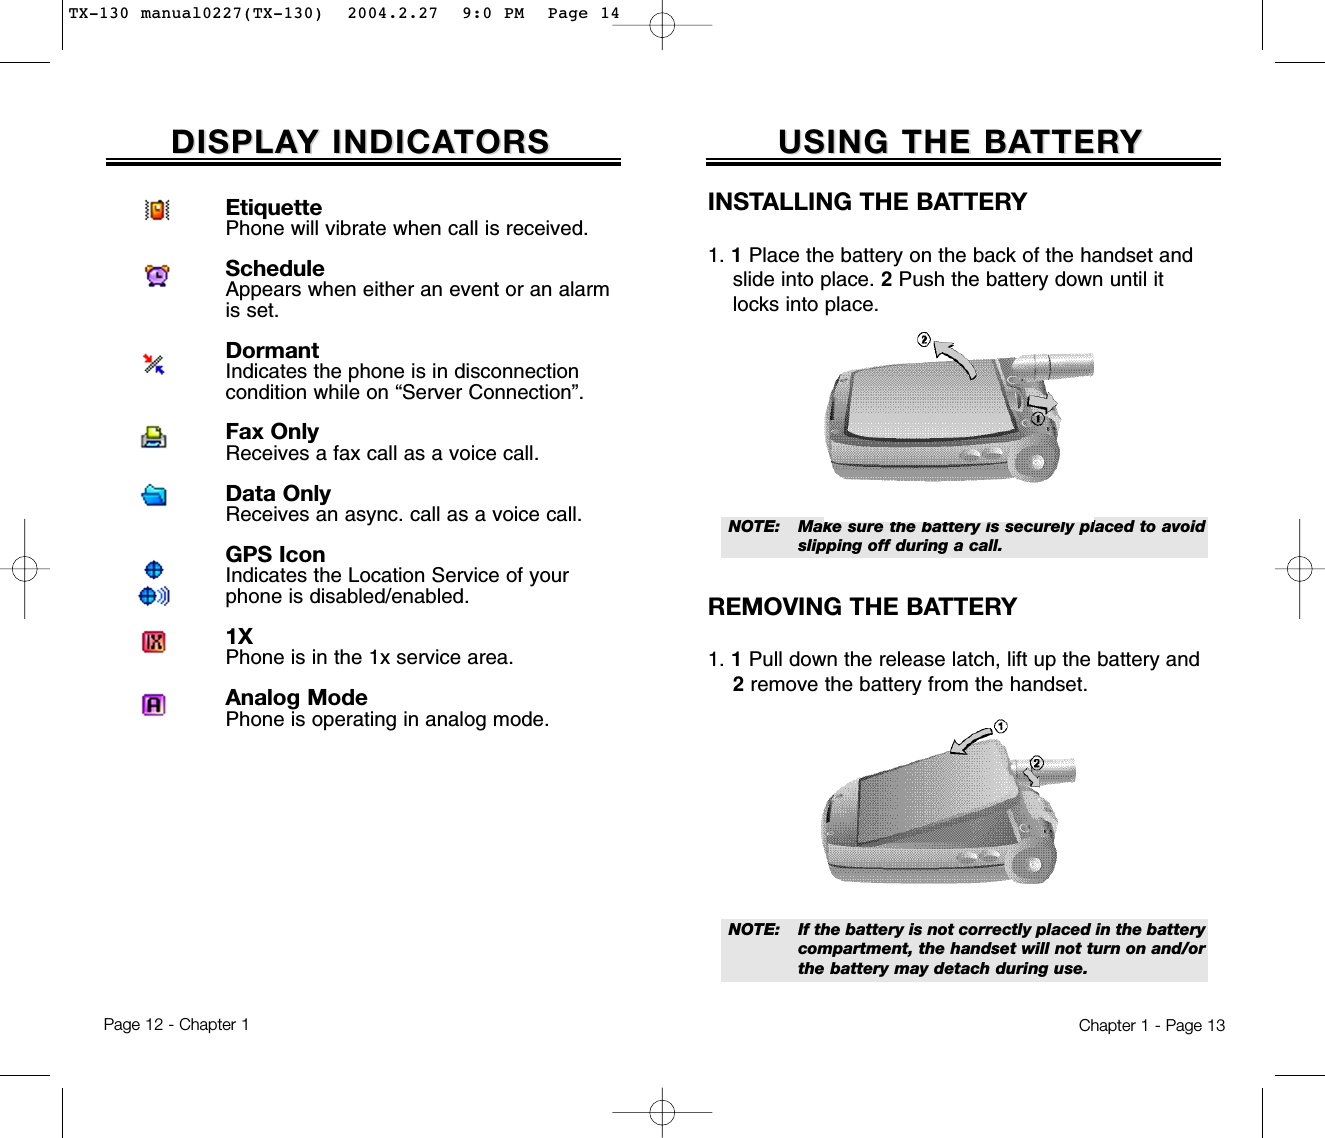
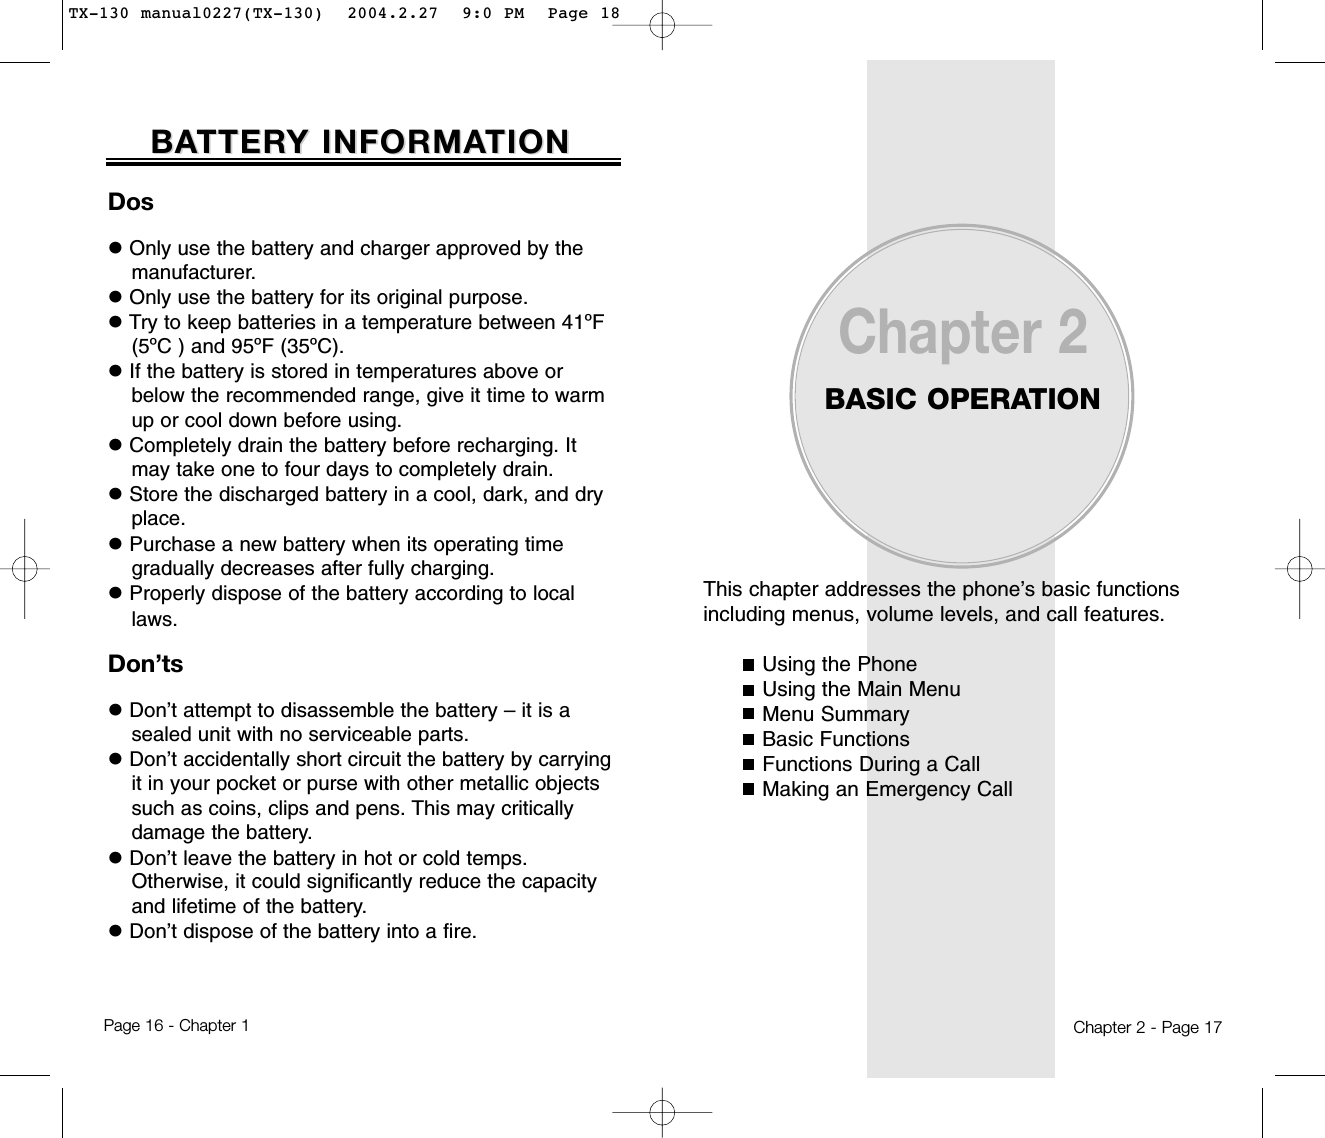
![USING THE MAIN MENUUSING THE MAIN MENUACCESSING THE MENUYour phone can be customized via the menu. Each func-tion can be accessed by scrolling with the NavigationKey or by pressing the number that corresponds with themenu item.1. To access the menu from the idle screen, press [MENU].2. Press the Navigation Key up and down to scrollthrough the menu.3. To return to the previous page, press [CLR].To exit the current menu and return to the idlemode, press . 4. Press [OK] to enter a function when its mainpage is displayed.Chapter 2 - Page 19USING THE PHONEUSING THE PHONETURNING THE PHONE ON1. Press and hold , until your “Power On” logo appears and the melody begins to play.NOTE: 1. Immediately change or recharge the battery when “Low Battery Warning Power Off” appears on the display. Memory may possibly be damaged if the phone turns off due to the battery completely draining. 2. Turn the phone off before removing or replacing the battery.If the phone is on, unsaved data may be lost.● If “Password” appears on the display enter your4-digit password to unlock your phone. ● The default password is the last 4 digits of yourphone number.● HotkeyIn idle mode, move the Navigation Key as follows to accessthese functions:• Upward movement: Phone Book• Downward movement: Messaging• Rightward movement: Downloads• Leftward movement: Mobile WebIf you are in a second-level menu, you may also navigate to the next or previous second-level menu by pressing the navigation key right or left.TURNING THE PHONE OFF1. Press and hold , until “Power Off” animation appears.Page 18 - Chapter 2TX-130 manual0227(TX-130) 2004.2.27 9:0 PM Page 20](https://usermanual.wiki/Pantech/TX-130C.User-Manual/User-Guide-404948-Page-11.png)
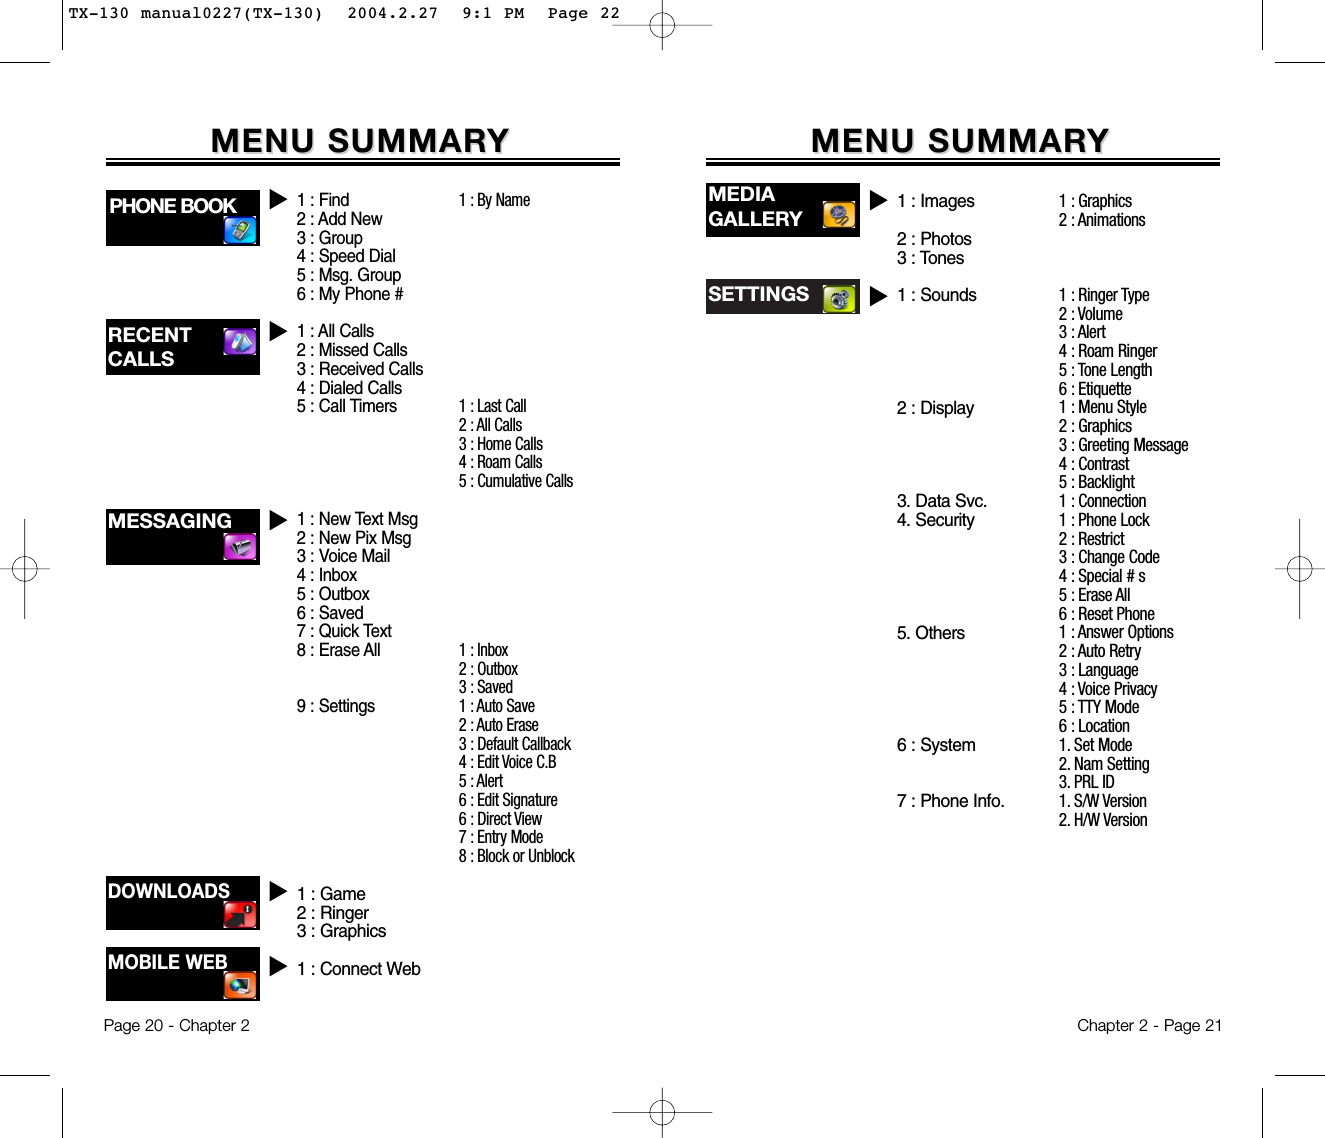
![Chapter 2 - Page 23BASIC FUNCTIONSBASIC FUNCTIONSMAKING A CALL1. Enter a phone number. 2. Press . The indicator , appears on the display.3. To end a call, press . Page 22 - Chapter 2MENU SUMMARMENU SUMMARYYCAMERAu1:Record2 : Play3 : Play Speaker4 : Erase All1 : Record2 : Play3 : Play Speaker4 : Erase All1 : Yes2 : No3 : Wake-Up4 : Undo Train AllSet ActiveHFK Mode1 : Add Plan2 : View Event List1 : Item 12 : Item 23 : Item 31 : Add Memo2 : View Memo3 : Settings1 : Voice Memo2 : Voice Dial3 : Train Words4 : Voice Setting1 : Event2 : Alarm3 : Memo Pad4 : Calculator5 : World Clock6 : Stop Watch1 : Camera2 : Video3 : My Pix4 : My Video5 : Help● If “CALL FAILED” appears on the display or the line isbusy, press or . ● If you activate the “AUTO RETRY” function, the phone willautomatically retry for the number of times you haveselected. (refer to page 72)● If the number you’re calling is stored in the phone book,the name and number will appear when the call is placed.● There is another way to make a call through the VRmode, which is called “VAD (Voice Activated Dialing)”.Please refer to page 82 (Voice Service) for details on mak-ing calls using VAD.● To modify the phone number you have entered:• To erase one digit at a time, press [CLR].• To erase the entire number, press and hold [CLR].NOTE: Please refer to page 34 for more details about storing a phone number.UTILITIES uTOOLS uTX-130 manual0227(TX-130) 2004.2.27 9:1 PM Page 24](https://usermanual.wiki/Pantech/TX-130C.User-Manual/User-Guide-404948-Page-13.png)
![Chapter 2 - Page 25BASIC FUNCTIONSBASIC FUNCTIONSPage 24 - Chapter 2ANSWERING A CALL1. To answer a call, press any key except , ,or .To able a call, press .2. To end the call, press .● In the Settings menu, you can select either “Any Key” or“Send Key” to answer a call. lf “Send Key” is selected,the phone can only be answered by pressing . See page 71 for more information.NOTE: In Auto Answer Mode, a call is automatically answered after a preset time of ring tones. See page 72 for more details.NOTE: The caller ID is stored in the call history.CALLER ID FUNCTIONIdentifies caller by displaying their phone number. Ifthe caller’s name and number are already stored inyour phone book, they both will appear. This featureis system dependent. Please contact your serviceprovider for details.BASIC FUNCTIONSBASIC FUNCTIONSPAUSE FEATUREYou can dial or save a phone number with pauses foruse in the automated systems where you need to entera credit card number, a social security number, and soon. This feature will be convenient when you are linkedto ARS (Advanced Record System).1. To insert a pause, enter a phone number then press[MENU]. Select either a Hard Pause (“P” appears)or a Timed Pause (“T” appears).2. Press to dial or [SAVE] to store.SPEAKER PHONE1. To activate the speaker phone when the phone is in idle mode, answering mode, and calling mode press and hold . 2. The phone returns to normal (Speaker phone off)after ending or call or when the phone is turnedoff and back on.● Hard Pause: When connecting to the ARS, it enables togo to the next number, by either pressing or .● Time Pause: When connecting to the ARS, it allows togo to the next number after 3 seconds.TX-130 manual0227(TX-130) 2004.2.27 9:1 PM Page 26](https://usermanual.wiki/Pantech/TX-130C.User-Manual/User-Guide-404948-Page-14.png)
![ETIQUETTEMutes key tones and activates the vibration mode toalert you of an incoming call or message.1. To turn etiquette mode on/off, press and hold .Chapter 2 - Page 27BASIC FUNCTIONSBASIC FUNCTIONSPage 26 - Chapter 2BASIC FUNCTIONSBASIC FUNCTIONSCALL WAITING FUNCTIONNotifies you of an incoming call when you are on thephone by sounding a beep and displaying the caller’sphone number on the screen.1. To answer another call while on the phone, press . This places the first call on hold. 2. To switch back to the first caller, press again.ADJUSTING VOLUMEAdjusts the volume in two ways: by using the volumecontrol keys on the side of the handset, or by using themenu.1. Press [MENU] and select one of the following. To increase the volume press the Navigation Key upwards or to the right. To lower the volume, press it downwards or to the left.2. Adjust volume and press [OK] to save it.● Ringer: Controls the ringer volume.● Key Tone: Controls the keypad tone volume.● Voice Call: Controls the earpiece volume.● Speaker Phone: Controls the speaker volume in speaker Phone mode.Since Call Waiting is system dependant, the displayedCaller ID may be different from real communicator.LOCKLocks your phone and prevents unauthorized use.Phone can only be used after inputting the password.1. To lock the phone, press and hold .2. To unlock the phone, press then input thepassword.● Lock feature will deactivate when the phone is poweredoff. Upon next powered up, you will need to press to lock phone again.NOTE: The default password is the last 4 digits of your phone number.NOTE: Press the volume keys on the side of the phone ornavigation key(left or right) to adjusts volume of microphone during a call.TX-130 manual0227(TX-130) 2004.2.27 9:1 PM Page 28](https://usermanual.wiki/Pantech/TX-130C.User-Manual/User-Guide-404948-Page-15.png)
![Chapter 2 - Page 29FUNCTIONS DURING A CALLFUNCTIONS DURING A CALLSEND MY PHONE #Automatically transmits your phone number to a pagerduring a call without manually entering the number.1. To transmit your phone number during a call, press [MENU] .MUTE (UNMUTE)Mutes the microphone while you are on a call so theother party cannot hear you if you speak.1. Press [MENU] .To display menu options during a call, press [MENU].These menu items are available while you are on a call.Page 28 - Chapter 2SCRATCHPAD Allows you to enter a phone number during a call so itcan be dialed later. The other party cannot hear thekey presses.1. Press [MENU] .FUNCTIONS DURING A CALLFUNCTIONS DURING A CALLMESSAGINGEnables you to send a message (SMS) during a call.1. Press [MENU] .MY PHONE #Enables you to see your phone number while on a call.Please see page 46 for more details.1. Press [MENU] .VOICE PRIVACYEnhances voice privacy during a call.1. Press [MENU] .2. Select “Enhance” or “Standard” and press [OK] to save it.● To deactivate, press [MENU] .● The phone will automatically un-mute in Emergency Callor Callback mode.NOTE: Enhanced voice privacy is a network dependent feature. Standard voice privacy is the default setting.● To deactivate it, press [MENU] .TX-130 manual0227(TX-130) 2004.2.27 9:1 PM Page 30](https://usermanual.wiki/Pantech/TX-130C.User-Manual/User-Guide-404948-Page-16.png)
![Page 30 - Chapter 2FUNCTIONS DURING A CALLFUNCTIONS DURING A CALLPHONE INFO.Enables you to view handset information while on acall. Please see page 77 for more details.1. Press [MENU] .LOCATIONEnables the network to locate your current locationthrough Global Positioning System (GPS).1. Press [MENU] .2. Select “911 Only” or “Location On” and press [OK] to save it.● 911 Only: Your location will be hidden from network & applications except 911.● Location On: Your location is now available to the network.Chapter 2 - Page 31MAKING AN EMERGENCY CALLMAKING AN EMERGENCY CALL911 IN LOCK MODEThe “911” call service is available even in the lock mode.1. Enter “911” and press .2. The call connects.3. The phone exits the Lock Mode for 5 minutes.4. To end a emergency mode, press .● When the call ends, the phone returns to the Lock Mode.911 USING ANY AVAILABLE SYSTEM1. Enter “911” and press .2. The call connects.3. The phone maintains the Emergency Mode for 5 minutes.4. To end a emergency mode, press .● The phone continuously attempts to receive service from any available system.This 911 feature puts your phone in the EmergencyCall Mode when you dial the preprogrammed emer-gency number, 911. It also operates in the lock modeand out of the service area.NOTE: The 911call is not recorded in the Call History.TX-130 manual0227(TX-130) 2004.2.27 9:1 PM Page 32](https://usermanual.wiki/Pantech/TX-130C.User-Manual/User-Guide-404948-Page-17.png)
![TEXT INPUT METHODSTEXT INPUT METHODSENTERING CHARACTERS For convenient entry of memory location names and textmessages, your phone offers several text input methods:Abc mode: Enters words by repeatedly tapping the corresponding key until the desired character is displayed.T9WORD: Tap each corresponding key only once and the phone predicts the word you are entering.Numeric mode: Only enters numbers.Symbol mode: Enters symbols like @, #, %.Chapter 3 - Page 35STORING PHONE NUMBERSSTORING PHONE NUMBERSPage 34 - Chapter 3The phone book stores up to 300 entries.1. Enter phone # and press [SAVE].2. Choose “New Contact” or “Existing Contact”.Press [OK] to select.3. The Phone # will appear above a list of icons.The name of the icon is displayed below the list.Use the Navigation key to choose the type of #you’re adding, as indicated by the icon.Press [OK] to select.4. Enter a name and press [OK].Follow instructions for entering text on page 35.To change the input mode, press [Abc].5. Use the Navigation key to scroll through moreoptions for the entry (group, other numbers, ringer).6. To store the entry, press [SAVE].“New contact added!” or “Contact edited!” willbe displayed.Group: Personal, Business, Etc.MobileHomeOfficePagerFAXE-Mail: Enter E-Mail address.Wireless Addr.: Enter Wireless address.Ringer: Select Ringer Type.Msg. Ringer: Select Msg. Ringer Type.Graphic: Select take a picture Image.Memo: Enter memo.Set Secret: Lock, Unlock.ALPHA MODE [ABC]Use the digit keys to enter letters, numbers and characters.Enter letters using the keypad as follows:● To enter a space, press . The cursor will automaticallymove to the next column.● Repeat until letters are entered. There is a 16-letter limit.● To delete one digit, press [CLR]. To delete the entire entry, press and hold [CLR].● To change from lowercase to uppercase, press located on the side of the phone.Key Pad 1 Repetition1ADGJMPTW12ABC3DEF4GHI5JKL6MNO7PQRS8TUV9WXYZ.BEHKNQUX@CFILORVY-23456S8Z’...............7...92 Repetitions 3 Repetitions 4 Repetitions 5 RepetitionsTo change the input mode, press [Abc].TX-130 manual0227(TX-130) 2004.2.27 9:1 PM Page 36](https://usermanual.wiki/Pantech/TX-130C.User-Manual/User-Guide-404948-Page-19.png)
![1. Press each key once for each letter of the word you are writing.●To write John with the English dictionary selected:1. Press 5 once - (for - k)2. Press 6 once - (for - km)3. Press 4 once - (for - log)4. Press 6 once - (for - john)2. Press until the correct word is displayed.3. To select the correct word, press .If the T9 mode does not recognize or suggest the word you want to enter, re-enter the name in the Alpha ABC mode.TEXT INPUT METHODSTEXT INPUT METHODSNOTE:The display shows for each keypressed.Chapter 3 - Page 37TEXT INPUT METHODSTEXT INPUT METHODSModePress to change mode.[T9Word][Abc][123][Symbol mode].Press to view the next matchingword if the highlighted word is notthe word you intended.Press to accept a word and add aspace.Press to select a letter case of thestandard text input or T9 textinput mode. [Abc], [ABC], and[abc] indicate the standard textinput. [T9word], [T9Word], and[T9WORD] indicate the predictivetext input.Press to delete a character to theleft of the cursor.Store the letters and numbers youenter.KEY FUNCTIONT9TM PREDICTIVE TEXT MODE [T9TMABC]To choose T9TM mode from the Editor screen press[Abc], then choose [T9WORD]. This mode predicts thewords you are entering using a built-in dictionary. WithT9TM predictive text input, you press each key only oncefor each letter. The chart below outlines how to useT9TM text input.Page 36 - Chapter 3NextSpaceShiftClearSaveNOTE:In case of inputing sentence at once in T9WORDMode, press to move the cursor to the rightafter inputing a word then input next word youwant.TX-130 manual0227(TX-130) 2004.2.27 9:1 PM Page 38](https://usermanual.wiki/Pantech/TX-130C.User-Manual/User-Guide-404948-Page-20.png)
![SPEED DIALINGSPEED DIALINGONE-TOUCH/TWO-TOUCH DIALINGIdeal for frequently dialed numbers, this feature allowsphone book entries to be dialed via the keypad with onlyone or two key presses.ONE-TOUCH DIALING:1-9 : Press the corresponding memory number and hold for more than 1 second.TWO-TOUCH DIALING:10-20 : Press the first digit and second digits of the memory number short and long respectively.Chapter 3 - Page 39NUMERIC MODE [NUM]Numeric mode allows you to add a number to yourentry/message. To select numeric mode from the Editorscreen press [Abc], then select [NUM].TEXT INPUT METHODSTEXT INPUT METHODSSYMBOL MODE [SYM]Symbol mode allows you to add various symbols toyour entry. Whether you are adding an e-mail addressto your phone book or sending an expressive message,symbols make these entries easier. To select symbol mode from the Editor screen press[MODE] then choose [Symbols]. The symbols will appear on the display. The corresponding key number for that symbol willappear as well. You can press the key to select the symbol . To move to the next screen of symbols press .Page 38 - Chapter 3SPEED DIALDials a number simply by pressing and holding its SpeedDial location number. For a 2-digit location number,press the first number then press and hold the secondnumber. To store a number in Speed Dial:1. Press [MENU] .2. To assign a phone number to a location, selectthe location and press [OK].3. The phone book list will be displayedalphabetically. Select a name and press [OK].4. “Speed dial # X edited!” will be displayed.● If a phone number is already assigned to the location,press [ERASE] and the navigation key to delete.● If no phone number is stored in the location entered,“There is no number” will appear on the screen.● If a phone number is stored in secret, you must enterthe password to make a call.NOTE:• A phone number that is set as secret will ask a password.• Possible to phone with press & hold the last digit of speed dial #.TX-130 manual0227(TX-130) 2004.2.27 9:1 PM Page 40](https://usermanual.wiki/Pantech/TX-130C.User-Manual/User-Guide-404948-Page-21.png)
![Chapter 3 - Page 41Page 40 - Chapter 3PHONE BOOKPHONE BOOKFINDRetrieves an entry by name or number, and calls the num-ber by simply pressing . On Standby Screen, you maypress as well. If there’s no data on phonebook, it movesto “Add New” screen.BY NAME1. Press [MENU] .2. The list of names in your phone book is displayed alphabetically. Use navigation key to select the name.3. Enter a name or its character string or scroll through the list with the Navigation Key. Please refer to page 29 for instructions on entering letters, numbers and symbols.4. Matching entries will be displayed. Highlight an entry. Press [OK] to edit the entry. Press [MENU] to 1. delete the entry or 2. add a prefix.5. To call the selected number, press .PHONE BOOKPHONE BOOKStores up to 300 entries, each of which can be assignedto a group. Entries can be retrieved by name, phonenumber or group.● If the entry is set to secret, you will be asked for yourpassword.ADD NEWAdds a new entry to the phone book. Please refer topage 34 for alternate way to add an entry to the phonebook.1. To add a new entry to the phone book, press [MENU] .2. The first field highlighted is Name. Enter the name for the entry, then press [OK].3. Press the Navigation Key down to enter all the other information (group, phone number, etc.).4. When all information for the entry is entered,press [SAVE] to save the entry.● PHONE BOOK FIELD: Name/Group/Mobile/Home/Office/Pager/Fax/E-mail/Wireless Addr./Ringer/Msg.Ringer/Graphic/Memo/Set Secret.TX-130 manual0227(TX-130) 2004.2.27 9:1 PM Page 42](https://usermanual.wiki/Pantech/TX-130C.User-Manual/User-Guide-404948-Page-22.png)
![Chapter 3 - Page 43Page 42 - Chapter 3PHONE BOOKPHONE BOOKGROUPAllows you to classify phone entries into groups. Existinggroups include Personal, Business, Etc. and All.ADD NEW GROUP1. To add a new group, press [MENU] .A maximum of seven groups is allowed.2. Press [MENU] then select “Add Group”.3. Input a new group name.4. Press [OK] to save it.CHANGE GROUP NAME1. Press [MENU] .Select an existing group name.2. Press [MENU] then select “Rename”.3. Input a new group name.4. Press [OK] to save it.PHONE BOOKPHONE BOOKNOTE:Default group name(All, Personal, Business, Etc.) cannot be changed.ERASE GROUP1. Press [MENU] .Select an existing group name.2. Press [ERASE] to delete it.“Erase this group?” will be displayed.4. Press [OK] again to confirm it.SPEED DIALCalls can be placed to numbers stored in speed dial bypressing & holding the last digit of speed dial # on thekeypad.1. Press [MENU] .2. To assign a phone number to a location, select the location and press [Set].3. The phone book list will be displayed alphabetically. Select a name and press [OK].4. “Speed dial # X edited!” will be displayed.● If a phone number is already assigned to the location,press [ERASE] and [OK] to delete.TX-130 manual0227(TX-130) 2004.2.27 9:1 PM Page 44](https://usermanual.wiki/Pantech/TX-130C.User-Manual/User-Guide-404948-Page-23.png)
![Chapter 3 - Page 45Page 44 - Chapter 3PHONE BOOKPHONE BOOKMSG. GROUPAllows the user to group up to 10 phone number. The user can add, change, and delete Msg.Group.ADD NEW MSG. GROUP1. To add a new group, press [MENU] .A maximum of seven groups is allowed.2. Press [MENU] then select “Add Group”.3. Input a new group name.4. Press [OK] to save it.CHANGE MSG. GROUP NAME1. Press [MENU] .Select an existing group name.2. Press [MENU] then select “Rename”.3. Input a new group name.4. Press [OK] to save it.PHONE BOOKPHONE BOOKSEND TEXT MSG.1. Press [MENU] .Select an existing group name.2. Press [MENU] then select “Send Text Msg.”.3. Input a messages, Default CB#, Priority, and Insert Signature.4. Press [MENU] then select “Send” or “Save Msg”. Press .SEND PIX MSG.1. Press [MENU] .Select an existing group name.2. Press [MENU] then select “Send Pix Msg.”.3. Phone goes into camera mode automatically.Take a picture and press [SEND].4. Input a messages, Subject, CC, and BCC.5. Press [MENU] then select “Send” or “Save Msg”. Press .TX-130 manual0227(TX-130) 2004.2.27 9:1 PM Page 46](https://usermanual.wiki/Pantech/TX-130C.User-Manual/User-Guide-404948-Page-24.png)
![Chapter 3 - Page 47Page 46 - Chapter 3RECENT CALLSRECENT CALLSERASE GROUP1. Press [MENU] .Select the group name to be deleted.2. Press [ERASE] to delete it.“Erase this message group?” will be displayed.3. Press [OK]. “This message group erased”will be displayed.PHONE BOOKPHONE BOOKMY PHONE #To display your phone number and service provider:1. Press [MENU] .2. To display your phone number and service provider.To return to the previous page, press [OK].ALL CALLSDisplays information about the 20 most recent numbersdialed, missed and received. Places a call to a selectednumber by simply pressing .1. To see a list of the 20 most recent numbers, press [MENU] . If the number is already stored in your phone book, only the name appears. If the number is not stored, only the phone number appears.2. To view call details, press [OK].3. Press [MENU], [SAVE] to save the numberor press [ERASE] to delete it.To access Recent Calls from the idle mode, press [MENU] .● Save: To store the phone number in your phone book.● Prefix: The user may add the desired number before the number. It is useful when you add “1” during long distance call. You may save it in the phone book after Prefix.● Send Text Msg: To send a message the phone number.● Send Pix Msg: To send a photo message the phone number.● Erase all: To erase recent calls list.NOTE: • Call details include date, time, and phone number.• When the Phone# is in contact and the entry is set insecret, the name is not displayed.NOTE: After 20 incoming, outgoing or missed calls, the oldest call will automatically be erased from the history.TX-130 manual0227(TX-130) 2004.2.27 9:1 PM Page 48](https://usermanual.wiki/Pantech/TX-130C.User-Manual/User-Guide-404948-Page-25.png)
![MISSED CALLSDisplays information of the 20 most recently missedcalls. Place a call to a missed call number by simplypressing .1. To see a list of the 20 most recently missed calls, press [MENU] . If the number is already stored in your phone book, only the name appears. If the number is not stored, only the phone number appears.2. To view missed call details, press [OK].3. Press [MENU], [SAVE] to save the numberor press [ERASE] to delete it.RECENT CALLSRECENT CALLSChapter 3 - Page 49RECENT CALLSRECENT CALLSPage 48 - Chapter 3NOTE: Call details include date, time and phone number.NOTE: After the 20thmissed call, the oldest call will automatically be erased from the history.RECEIVED CALLSDisplays information of the 20 most recently answeredcalls. Place a call to a received number by simply pressing .1. To see a list of the 20 most recently received calls, press [MENU] . If the number is already stored in your phone book, only the name appears. If the number is not stored, only the phone number appears.2. To view received call details, press [OK].3. Press [MENU], [SAVE] to save the numberor press [ERASE] to delete it.NOTE: Call details include date, time and phone number.NOTE: After the 20th received call, the oldest call will automatically be erased from the history.TX-130 manual0227(TX-130) 2004.2.27 9:1 PM Page 50](https://usermanual.wiki/Pantech/TX-130C.User-Manual/User-Guide-404948-Page-26.png)
![Chapter 3 - Page 51Page 50 - Chapter 3RECENT CALLSRECENT CALLS RECENT CALLSRECENT CALLSDIALED CALLSDisplays information of the 20 most recently dialed calls. Place a call to a received number by simply pressing .1. To see a list of the 20 most recently dialed calls, press [MENU] . If the number is already stored in your phone book, only the name appears. If the number is not stored, only the phone number appears.2. To view dialed call details, press [OK].3. Press [MENU], [SAVE] to save the numberor press [ERASE] to delete it.NOTE: Call details include date, time and phone number.NOTE: After the 20th dialed call, the oldest call will automatically be erased from the history.CALL TIMERSChecks the talk time and manages your calls within thelimit you set. The five timers include:LAST CALLDisplays talk time of last call.1. Press [MENU] .2. To return to the previous page, press [OK].ALL CALLSDisplays talk time of all incoming and outgoing calls,excluding web access calls.1. Press [MENU] .2. The time of the following items is displayed:3. To return to the previous page, press [OK].● Voice, Data/FaxNOTE: You cannot reset this timer.NOTE: You may also navigate to the next or previous second-level menu (Last Calls, All Calls, Home Calls, Roam Calls, Cumulative Calls) by pressing the navigation key right or left.TX-130 manual0227(TX-130) 2004.2.27 9:1 PM Page 52](https://usermanual.wiki/Pantech/TX-130C.User-Manual/User-Guide-404948-Page-27.png)
![Chapter 3 - Page 53Page 52 - Chapter 3RECENT CALLSRECENT CALLS RECENT CALLSRECENT CALLSNOTE: You may also navigate to the next or previous second-level menu (Last Calls, All Calls, Home Calls, Roam Calls, Cumulative Calls) by pressing the navigation key right or left.HOME CALLSDisplays talk time of all calls made within Home area.1. Press [MENU] .2. The time of the following items is displayed:3. To reset the timer, press [RESET]. To return to the previous page, press [OK].ROAM CALLSDisplays talk time of roaming calls.1. Press [MENU] .2. The time of the following items is displayed:3. To reset the timer, press [RESET]. To return to the previous page, press [OK].● Voice, Data/Fax● Voice, Data/FaxCUMULATIVE CALLSDisplays talk time of all incoming and outgoing calls,excluding web access calls.1. Press [MENU] .2. The time of the following items is displayed:3. To reset the timer, press [RESET]. To return to the previous page, press [OK].● Voice, Data/FaxNOTE: You may also navigate to the next or previous second-level menu (Last Calls, All Calls, Home Calls, Roam Calls, Cumulative Calls) by pressing the navigation key right or left.TX-130 manual0227(TX-130) 2004.2.27 9:1 PM Page 54](https://usermanual.wiki/Pantech/TX-130C.User-Manual/User-Guide-404948-Page-28.png)
![Chapter 4 - Page 57Page 56 - Chapter 4SOUNDSSets Ringer Type, Volume, Alert, Roam Ringer, ToneLength and Etiquette Mode.RINGER TYPETo select a ringer type for incoming calls:RINGER1. Press [MENU] .2. Select one of the pre-installed 7 music bells and 3 ring tones.3. To confirm, press [OK].MESSAGESTo select a ringer type for receiving messages:1. Press [MENU] .2. Select a tone (1-5).3. To confirm, press [OK].VOICE MAILTo select a ringer type for receiving voice mail:1. Press [MENU] .2. Select a tone (1-5).3. To confirm, press [OK].SETTINGSSETTINGSVOLUMEControls the Ringer, Key and Voice Call volume andalerts you to incoming calls in a variety of modes.RINGERControls the Ringer volume and alerts you to incomingcalls in the following modes.1. Press [MENU] .2. Select one of the following options:3. To confirm, press [OK].KEY TONETo adjust keypad tone:1. Press [MENU] .2. Adjust the keypad tone.3. To save, press [OK].SETTINGSSETTINGS● Silent: Mute the ringer, press [Min].● Ringer Off● Vibrate On● Ringer Mode: Volume Levels 1-5.● High & Vib: The ringer sounds after vibration, press [Max].NOTE: To stop playing a ringer, press [PAUSE].● Off/Level1-5 (Min- , Max- )TX-130 manual0227(TX-130) 2004.2.27 9:1 PM Page 58](https://usermanual.wiki/Pantech/TX-130C.User-Manual/User-Guide-404948-Page-30.png)
![Page 58 - Chapter 4 Chapter 4 - Page 59SETTINGSSETTINGSVOICE CALLTo adjust earpiece volume:1. Press [MENU] .2. Adjust the earpiece volume.3. To save, press [OK].SPEAKER PHONETo adjust speaker volume:1. Press [MENU] .2. Adjust the speaker phone volume.3. To save, press [OK].ALERTAllows you to set an alert that sounds when the follow-ing handset changes occur.MINUTESounds an alert every minute of a phone call.1. Press [MENU] .2. Select “Off” or “On” then press [OK] to save it.SETTINGSSETTINGSROAMSounds an alert when leaving a service area and entering a roaming service area.1. Press [MENU] .2. Select “Off” or “On” then press [OK] to save it.CONNECTNotifies you that a call has been successfully placed.1. Press [MENU] .2. Select “Off” or “On” then press [OK] to save it.FADESounds an alert every minute of a phone call.1. Press [MENU] .2. Select “Off” or “On” then press [OK] to save it.ROAM RINGERSounds a different ringer when you are in a roamingservice area.1. Press [MENU] .2. Select “Distinctive” or “Normal” then press [OK] to save it.● Level1-5 (Min- , Max- )● Level1-5 (Min- , Max- )● Distinctive: Sounds a different ringer type.● Normal: Sounds the same ringer type as used in Home area.TX-130 manual0227(TX-130) 2004.2.27 9:1 PM Page 60](https://usermanual.wiki/Pantech/TX-130C.User-Manual/User-Guide-404948-Page-31.png)
![SETTINGSSETTINGSTONE LENGTHTo adjust key tone length:1. Press [MENU] .2. Select “Normal” or “Long” then press [OK] to save it.ETIQUETTETo place phone in Etiquette Mode so all phone soundsare muted:1. Press [MENU] .2. Select “On” or “Off”.3. To save, press [OK]. Chapter 4 - Page 61Page 60 - Chapter 4SETTINGSSETTINGSDISPLAYThis feature allows you to customize and personalizeyour phone display.MENU STYLETo select an display menu style:1. Press [MENU] .2. Select “Fold”, “Grid” or “List” and press [OK] to save it.GRAPHICSTo select an LCD display:WALLPAPER1. Press [MENU] .2. Select “Flower”, “Digital Clock1,2”, “Analog Clock 1,2” or Downloaded picture through Network or receivedpicture by Picture Msg.3. To save it, press [OK].POWER ON1. Press [MENU] .2. Select “Verizon Wireless” with the Navigation key.● On: Etiquette Mode on.● Off: Etiquette Mode off.Shortcut: Press and hold to activate/deactivate thisfeature.TX-130 manual0227(TX-130) 2004.2.27 9:1 PM Page 62](https://usermanual.wiki/Pantech/TX-130C.User-Manual/User-Guide-404948-Page-32.png)
![SETTINGSSETTINGSPOWER OFF1. Press [MENU] .2. Select “Verizon Wireless” with the Navigation key.RECEIVED1. Press [MENU] .2. Select “Default” or “Pix #” with the Navigation key.3. To save it, press [OK].DIALED1. Press [MENU] .2. Select “Default” with the Navigation key.3. To save it, press [OK].SCREEN SAVERSet the time of Screen Saver and select Image, then theImage will be displayed on LCD. Input Key to repeatImage disappearing.1. Press [MENU] .2. Select “Time Setting” to set the amount of time the screensaver is displayed (Off, 5 sec, 10 sec, 20 sec, 30 sec).3. Select a screensaver from the list.4. Press [OK] to save it.Chapter 4 - Page 63Page 62 - Chapter 4SETTINGSSETTINGSGREETING MESSAGETo input a personal greeting:1. Press [MENU] .2. Select “MSG”, “Font Color”, “Bg” or “Entry Message” to personalize your greeting.Press [OK].3. To save, press [OK].CONTRASTTo adjust the display contrast:1. Press [MENU] .2. Adjust the LCD contrast.3. To save, press [OK].● MSG: On/Off.● Font Color: White, Blue, Dark Blue, Magenta, Gray,Black.● Bg: Transparent, White, Blue, Yellow, Gray, Black.● Entry Message: Enter message (Default-Verizon Wireless).● Level1-5TX-130 manual0227(TX-130) 2004.2.27 9:1 PM Page 64](https://usermanual.wiki/Pantech/TX-130C.User-Manual/User-Guide-404948-Page-33.png)
![BACKLIGHTBacklights the display and keypad for easy viewing indark places.1. Press [MENU] .2. Select “LCD” or “Keypad” and select one of the following options.3. To save, press [OK].DATA SVC.Allows you to transfer data when your phone is connected to a PC.CONNECTIONSelect a connection mode based on the handsetusage.1. Press [MENU] .2. Select one of the following connection modes:3. To save, press [OK].SETTINGSSETTINGSChapter 4 - Page 65Page 64 - Chapter 4SETTINGSSETTINGSSECURITYPrevents others from using the phone without permission and allows access to security features only after inputting a password.PHONE LOCKPrevents others from using your phone without permission. When locked, calls cannot be made andthe menu cannot be accessed without a password.1. Press [MENU] and enter “Password”.2. Press and select “Lock Now”, “Lock On Power Up” or “Unlock”.3. To save, press [OK].● LCD: 5s/15s/30s/60s/Always On.● Keypad: 5s/15s/30s/60s/Always On/Always Off.● Voice Call: To receive a voice call.● Data Only: To receive data when connected to PC.● Fax Only: To function as a fax when connected to PC.● Lock Now: Lock the phone now.● Lock On Power Up: Not lock the phone now, but it isautomatically locked when powerrecycled.● Unlock: Do not lock the phone.NOTE: The default password is the last 4 digits of yourphone number.TX-130 manual0227(TX-130) 2004.2.27 9:1 PM Page 66](https://usermanual.wiki/Pantech/TX-130C.User-Manual/User-Guide-404948-Page-34.png)
![RESTRICTWhen you attempt to make a restricted call, “Thisphone is restricted” appears on the screen.DIALEDBlocks all dialed calls – except emergency calls – but allows incoming calls to be answered.1. Press [MENU] and enter “Password”.2. Press and select “Allow” or “Restrict”.3. To save, press [OK].RECENT CALLSBlocks access to Recent Call List.1. Press [MENU] and enter “Password”.2. Press and select “Allow” or “Restrict”.3. To save, press [OK].SETTINGSSETTINGSChapter 4 - Page 67Page 66 - Chapter 4SETTINGSSETTINGSPHONE BOOKBlocks access to, and protects data in your phone book.1. Press [MENU] and enter “Password”.2. Press and select “Allow” or “Restrict”.3. To save, press [OK].CAMERARestricts access to camera mode.1. Press [MENU] and enter “Password”.2. Press and select “Allow” or “Restrict”.3. To save, press [OK].DATA CALLRestricts data calls from being placed.1. Press [MENU] and enter “Password”.2. Press and select “Allow” or “Restrict”.3. To save, press [OK].● Allow: Allows dialed calls.● Restrict: Restricts dialed calls.● Allow: Allows access to the recent calls menu.● Restrict: Restricts access to the recent calls menu.● Allow: Allows access to the phone book.● Restrict: Restricts access to the phone book.● Allow: Allows access to the camera.● Restrict: Restricts access to the camera.● Allow: Allows data calls.● Restrict: Restricts data calls.NOTE: You may not know the number exists in the phonebook in setting.The name of caller ID (in incoming) is not displayed.TX-130 manual0227(TX-130) 2004.2.27 9:1 PM Page 68](https://usermanual.wiki/Pantech/TX-130C.User-Manual/User-Guide-404948-Page-35.png)
![SETTINGSSETTINGS900 #’SRestricts calling 900 dial service numbers.1. Press [MENU] and enter “Password”.2. Press and select “Allow” or “Restrict”.3. To save, press [OK].LONG DISTANCERestricts calling long distance numbers – the phone islimited to calling numbers within the area.1. Press [MENU] and enter “Password”.2. Press and select “Allow” or “Restrict”.3. To save, press [OK].CHANGE CODEChanges your 4-digit password.1. Press [MENU] and enter “Password”.2. Press .3. Enter a new password and press [OK].4. Enter the new password again and press [OK].Chapter 4 - Page 69Page 68 - Chapter 4SETTINGSSETTINGSSPECIAL #’SStores 3 phone numbers that can be called even in thelock mode.1. Press [MENU] and enter “Password”.2. Press and select a location.3. Press ~ then input a phone number,press [OK] again to save.ERASE ALLClears all phone book, downloads, and photo galleryentries.1. Press [MENU] and enter “Password”.2. Press .3. Select “Phone Book”, “Downloads”, “Photo Gallery” with the [CHECK] and press [OK]to erase all the items in those categories.● Allow: Allows calls to 900-dial services.● Restrict: Restricts calls to 900-dial services.● Allow: Allows a long distance call.● Restrict: Restricts a long distance call.NOTE: The default password is the last 4 digits of yourphone number.NOTE: The default password is the last 4 digits of yourphone number.NOTE: The default password is the last 4 digits of yourphone number.NOTE: As the data cannot be retrieved, the warning shall be marked.NOTE: You can delete a special number by selecting it,pressing [Erase], then [Ok].TX-130 manual0227(TX-130) 2004.2.27 9:1 PM Page 70](https://usermanual.wiki/Pantech/TX-130C.User-Manual/User-Guide-404948-Page-36.png)
![SETTINGSSETTINGSChapter 4 - Page 71Page 70 - Chapter 4SETTINGSSETTINGSRESET PHONEResets phone to default settings.1. Press [MENU] and enter “Password”.2. Press .3. Select “Yes” or “No”, then press [OK].● When you select “yes” you will see “Phone will restoredefault settings and power cycle” appear on the display.Press to begin Reset process.NOTE: The default password is the last 4 digits of yourphone number.NOTE: As the data cannot be retrieved, the warning shall be marked.OTHERSANSWER OPTIONSCALL ANSWERTo select an answer mode:1. Press [MENU] .2. Select “Any Key” or “Send Key”.3. To save, press [OK].ACTIVE FLIPSelects an Active Flip Answer mode as follows.1. Press [MENU] .2. Select “On” or “Off”.3. To save, press [OK].● Any Key: Press any key to answer an incoming call except , , and .● Send Key: Press only to answer a call.● When Active Flip On is selected, an incoming phonecall can be answered simply by opening the phone.● When Active Flip Off is selected, you will need to openthe phone and follow the Answer mode you haveselected.TX-130 manual0227(TX-130) 2004.2.27 9:1 PM Page 72](https://usermanual.wiki/Pantech/TX-130C.User-Manual/User-Guide-404948-Page-37.png)
![Chapter 4 - Page 73Page 72 - Chapter 4SETTINGSSETTINGS SETTINGSSETTINGSAUTO ANSWERAutomatically answers a call after a preset number ofrings. An ideal setting for the hands-free car kit. Auto Answer only works when the Headset, Car kit isconnected the phone.1. Press [MENU] .2. Select one of the following options:3. To save, press [OK].AUTO RETRYAutomatically redial a call up to 5 times after a set timeinterval. Available where signal is weak or where phonehardly comes on.1. Press [MENU] .2. Under Retry Time, select a time interval option(Off, 3, 5, 7, 10 seconds). The Repeat Categorywill appear when a time frame is chosen.3. Under Repeat, select a time interval option(1 time, 3 times, 5 times).4. To save, press [OK].● Off/5/10/18seconds.NOTE: This function will not be active when you selectVibrate, Silent, Etiquette or Ringer after Vib as a ringer mode.LANGUAGESelects the language in which letters are displayed onscreen.1. Press [MENU] .2. Select either “English” or “Spanish”.3. To save, press [OK].VOICE PRIVACYEnhances voice privacy and avoids tapping during acall.1. Press [MENU] .2. Select “Standard” or “Enhanced”.3. To save, press [OK].● “Enhanced”: Makes it more difficult to wire tap.TX-130 manual0227(TX-130) 2004.2.27 9:1 PM Page 74](https://usermanual.wiki/Pantech/TX-130C.User-Manual/User-Guide-404948-Page-38.png)
![Chapter 4 - Page 75SETTINGSSETTINGSTTY MODEYour phone is able to operate with a TTY(Teletypewriter) device in both analog and digitalmodes. This feature is system dependent and may notbe available in all areas.1. Press [MENU] .2. Select one of the following options.3. To save, press [OK].LOCATIONTo determine whether or not the network system candetect your position:1. Press [MENU] .2. Select “Location On” or “911 Only”.3. To save, press [OK].Page 74 - Chapter 4SETTINGSSETTINGS● TTY Off/TTY+TALK/TTY+HEAR/TTY Full ● 911 Only: Your location will be hidden from network& application except 911.● Location On: Your location is now available to the network.SYSTEMSET MODESelects the Preferred System.1. Press [MENU] .2. Select one of the following options:Automatic B, Automatic A, Home only.3. To save, press [OK].NAM SETTINGEnables Auto NAM (Number Assignment Modules) ormanually selects a NAM.AUTO NAMAutomatically switches phone to proper NAM when youhave multiple NAM registrations.1. Press [MENU] .2. Select “Yes” or “No”.3. To save, press [OK].● Automatic B: Scan the radio channels based on theAutomatic B setting.● Automatic A: Scan the radio channels based on theAutomatic A setting.● Home Only: Only within your home area or home affiliated area.TX-130 manual0227(TX-130) 2004.2.27 9:1 PM Page 76](https://usermanual.wiki/Pantech/TX-130C.User-Manual/User-Guide-404948-Page-39.png)
![Chapter 4 - Page 77SETTINGSSETTINGSCHANGE NAMChanges the NAM used by the phone when you havemultiple registrations.1. Press [MENU] .2. Select “NAM1-VERIZON” or “NAM2-VERIZON”.3. To save, press [OK].PRL IDDisplays the phone’s PRL (Preferred Roaming List).1. Press [MENU] .2. To return to the previous page, press [OK].Page 76 - Chapter 4SETTINGSSETTINGSPHONE INFO.To display the version of your phone:S/W VERSION1. Press [MENU] .2. The software version appears.3. Press [OK].H/W VERSION1. Press [MENU] .2. The hardware version appears.3. Press [OK].TX-130 manual0227(TX-130) 2004.2.27 9:1 PM Page 78](https://usermanual.wiki/Pantech/TX-130C.User-Manual/User-Guide-404948-Page-40.png)
![Chapter 4 - Page 79MEDIA GALLERMEDIA GALLERYYIMAGESGRAPHICSThis menu shows the list of download still image.1. Press [MENU] .2. Scroll through the captured pictures to display thepicture you want to send and press [SEND].3. To send text message, press [SEND].To save text message, press [MENU]then select “Save to Outbox” and press [OK].ANIMATIONSThis menu shows the list of download animation image.1. Press [MENU] .2. Scroll through the captured pictures to display thepicture you want to send and press [SEND].3. To send text message, press [SEND].To save text message, press [MENU]then select “Save to Outbox” and press [OK].Page 78 - Chapter 4MEDIA GALLERMEDIA GALLERYY● Press [MENU] to select 1.Erase, 2.Erase All,3.Change Title.● Press [MENU] to select 1.Erase, 2.Erase All,3.Change Title.PHOTOSThis menu shows the list of photo which takes withCamera.1. Press [MENU] .2. Scroll through the captured video to display thepicture you want to send and press [SEND].3. To send text message, press [SEND].To save text message, press [MENU]then select “Save to Outbox” and press [OK].TONESThis menu shows the list of download ringtones.1. Press [MENU] .2. Scroll to the saved voice memo you want to sendthen press [SEND].3. To send text message, press [SEND].To save text message, press [MENU]then select “Save to Outbox” and press [OK].● Press [MENU] to select 1.Erase, 2.Erase All,3.Change Title.● Press [MENU] to select 1.Erase, 2.Erase All,3.Change Title.TX-130 manual0227(TX-130) 2004.2.27 9:1 PM Page 80](https://usermanual.wiki/Pantech/TX-130C.User-Manual/User-Guide-404948-Page-41.png)
![Chapter 4 - Page 81TOOLSTOOLSVOICE MEMOVoice Memo allows you to record a reminder messagethat can be up to 60 seconds. To record a memo:1. Press [MENU] to start Tools menu.2. To enter a voice memo, press .3. 1.1.To record a voice memo, press .Instuctions will be displayed and you will hear“Please record at the tone”.1.2.To stop recording a memo, press [STOP]or [PAUSE/RESUME].1.3.Press [MENU] after recording a voice memoto “Re-record” or “Review”.1.4.Press [SAVE] and input a “Voice Memo” title, then press [OK].2.To play voice memo, press . Select the message you want to play then press [PLAY] or press [EDIT TITLE/SEND],press [ERASE].3.To play speaker mode, press . Select the message you want to play then press [PLAY] or press [EDIT TITLE/SEND],press [ERASE].4.To erase all voice memos, press . “Erase all voice memos?” will be displayed.press [OK] to erase all voice memos.TOOLSTOOLSPage 80 - Chapter 4Voice Recognition (VR) enables you to place callsusing your voice and to record voice memos.1. Press and hold until your phone turns to VoiceRecognition mode.2. “Please say the name after the prompt tone” willbe displayed and you will hear “Name please”.NAME1. Press and hold until your phone turns to VoiceRecognition mode.2. Say a name or tag that is It’s saved without anyrelationship with Phone Book. The saved items on Voice Dial System may be possible to send.The number and name will appear on the displayand you will hear “Calling (name)”.TX-130 manual0227(TX-130) 2004.2.27 9:1 PM Page 82](https://usermanual.wiki/Pantech/TX-130C.User-Manual/User-Guide-404948-Page-42.png)
![Chapter 4 - Page 83TOOLSTOOLSTRAIN WORDSTrain allows you to use Control words to make a callwithout using the keypad.YESUse to train or untrain the Voice Recognition with thecontrol words, “Yes”.1. Press [MENU] .2. “Please listen closely to hear instructions” will bedisplayed and you will hear “Now training controlwords. Please say the word yes”.3. Say “Yes”. You will hear “Again”. Say “Yes” again.You will hear “Training word successful”.NOUse to train or untrain the Voice Recognition with thecontrol words, “No”.1. Press [MENU] .2. “Please listen closely to hear instructions” will be displayed and you will hear “Now training control words. Please say the word no”.3. Say “No”. You will hear “Again”. Say “No” again. You will hear “Training word successful”.Page 82 - Chapter 4TOOLSTOOLSVOICE DIALVoice Dial allows you to call a person by simply sayingtheir name. To access Voice Dial:1. Press [MENU] to start Tools menu.2. To enter a voice dial, press .3. 1.1.To record a voice dial, press .Instuctions will be displayed and you will hear“Name Please”.1.2.Say the name for the voice tag and repeat thename when prompted. You will hear “Added”.1.3.Enter the phone number for the voice tagthen [OK].Press [PAUSE] to insert “Hard Pause” or“Timed Pause”.2.To play voice dial, press . Select the message you want to play then press [PLAY] or press [ERASE].3.To play speaker mode, press . Select the message you want to play then press [PLAY] or press [ERASE].4.To erase all voice dials, press . “Removing all voice tags Proceed?” will bedisplayed.Press [OK] to erase all voice dials.TX-130 manual0227(TX-130) 2004.2.27 9:1 PM Page 84](https://usermanual.wiki/Pantech/TX-130C.User-Manual/User-Guide-404948-Page-43.png)
![Page 84 - Chapter 4TOOLSTOOLSWAKE-UPUse to train or untrain the Voice Recognition with thecontrol words, “Wake-Up”.1. Press [MENU] .2. “Please listen closely to hear instructions” will be displayed and you will hear “Now training control words. Please say the word wake-up”.3. Say “Wake-up”. You will hear “Again”. Say “Wake-up” again. You will hear “Training wordsuccessful”.UNDO TRAIN ALLUndo Train All erases all “trained” words.1. Press [MENU] .2. “Undo voice recognition for all procedures?” will be displayed. Press [OK] to undo all trained words.Chapter 4 - Page 85TOOLSTOOLSVOICE SETTINGSET ACTIVEAfter turning on Set Active, open the flip to go on to VRmode.1. Press [MENU] .2. Select “Active Flip” or “Send Key” by pressing the Navigation Key left or right.3. To save, press [OK].HFK MODEAfter turning on HFK mode, put Hands-free kit and say“wake up” to go on to VR mode.1. Press [MENU] .2. Scroll to HFK Mode. Select “On” or “Off” by pressing the Navigation Key left or right.3. To save, press [OK].TX-130 manual0227(TX-130) 2004.2.27 9:1 PM Page 86](https://usermanual.wiki/Pantech/TX-130C.User-Manual/User-Guide-404948-Page-44.png)
![EVENTEVENTChapter 5 - Page 894. Press [SAVE] to save it or [BACK] to return to the calendar.5. The date of the event will be marked on your calendar.VIEW EVENT LIST1. Press [MENU] .2. Move the Navigation Key to choose an event and press [OK] or [ERASE].Press [MENU], then select “Erase Passed” or“Erase All” using the Navigation Key.EVENTEVENTPage 88 - Chapter 5Sets an event and reminds you of that event.ADD PLAN1. Press [MENU] .2. Move the Navigation Key left, right, up or down tochoose a date in the calendar and press [OK]3. To select alarm options press the Navigation keydownwards.DATE SETTINGUse the keypad to change or enter the date then press [OK].TIME SETTINGUse the keypad to set a time and to select AM or PMthen press [OK].PLAN SETTINGUse the keypad to input a plan message then press [OK].SETTINGSelect an alert time interval option (On Time, 10 MinBefore, 30 Min Before, 1 Hour Before, No Alarm) usingthe Navigation Key, then press [OK].RINGER SETTINGTo set a Ringer, press [MENU], then select “Default”or “Change” using the Navigation key. To save it press[SELECT].● Default: To set default ringer type.● Change: To set custom ringer type.TX-130 manual0227(TX-130) 2004.2.27 9:1 PM Page 90](https://usermanual.wiki/Pantech/TX-130C.User-Manual/User-Guide-404948-Page-46.png)
![ALARMALARMChapter 5 - Page 91RINGER SETTINGTo set a “Ringer” press [MENU], then select “Default”or “Change” using the Navigation key. To save it press[SELECT].PLAN SETTINGUsing the keypad input an alarm message then press [OK].4. To save an alarm setting press [SAVE].ALARMALARMPage 90 - Chapter 5You can set up to 3 alarms.1. To display alarm entries, press [MENU] .2. Select one of the entries using the Navigation Key.To set a new alarm, choose alarm 1, 2 or 3.To edit an existing alarm, select that alarm.Press [OK].3. Press the Navigation Key down to select alarm options.DATE SETTINGUse the keypad to change or enter the date for the alarmthen press [OK].TIME SETTINGUse the keypad to set a time for the event and the toselect AM or PM then press [OK].SETTINGUse the Navigation key to select a setting for the alarm(Once, Daily, Weekly, Monthly, Off) then press [OK].SNOOZE SETTINGUse the Navigation key to select a Snooze setting (No Use, 1 time after 5 min, 1 time after 10 min, 3 times by 5 min) then press [OK].● Default: To set default ringer type.● Change: To set custom ringer type.TX-130 manual0227(TX-130) 2004.2.27 9:1 PM Page 92](https://usermanual.wiki/Pantech/TX-130C.User-Manual/User-Guide-404948-Page-47.png)
![MEMO PMEMO PADADChapter 5 - Page 93SETTINGSTo select memo pad background image:1. Press [MENU] .2. Select “Paper”, “Pattern”, “Sea”, “Sky”, or “Flower”, then press [OK].Your phone includes an internal memo pad that can beused to compose and store reminders and notes.ADD MEMOTo compose a memo (there is an 80-letter limit):1. Press [MENU] .2. Input a new text memo and press [OK].(Please refer to page 35 for more details on entering letters, numbers and symbols.)3. To save, press [SAVE].VIEW MEMOTo view a saved memo:1. 1.1. Press [MENU] .1.2. To erase a memo, press [ERASE].1.3. To add a new memo, press [MENU] “Add New”.1.4. To erase all memo, press [MENU] “Erase All”.2. The list of all memos, in saved order, is displayed.Select a memo and press [OK].3. The selected memo will appear. To edit it, press[MENU], select “Edit” and input a new text memo.MEMO PMEMO PADADPage 92 - Chapter 5TX-130 manual0227(TX-130) 2004.2.27 9:1 PM Page 94](https://usermanual.wiki/Pantech/TX-130C.User-Manual/User-Guide-404948-Page-48.png)
![WORLD CLOCKWORLD CLOCKChapter 5 - Page 95To display the time and date in pre-programmed cities:1. Press [MENU] .2. Select a city.3. The world map appears with the city, its date and time.To access the calculator:1. Press [MENU] .2. Follow the instructions below to calculate (8*6)/4-2.53. To reset, press [RESET].CALCULACALCULATORTORPage 94 - Chapter 5Input 8.Move the Navigation key to the right.Input 6 and press the Navigation key to the left.Input 4 and press the Navigation key down.Input 2 and press the to input (.).Press 5, .NOTE: : i, : ȕ, : Ȗ, : e, : ȵ,: Reset, : q.● Use the Navigation key to select another city.NOTE: As the daylight saving time is not applied, it maybe different from the actual time during DST.TX-130 manual0227(TX-130) 2004.2.27 9:1 PM Page 96](https://usermanual.wiki/Pantech/TX-130C.User-Manual/User-Guide-404948-Page-49.png)
![Simultaneously times up to six different events. To operatethe stopwatch:1. Press [MENU] .2. To measure a time period.1. To start the stopwatch, press [START].2. To pause it, press [STOP].3. To resume it or [RESET] to return to the previous page, press [EXIT].3. To time up to six events at once:1. To start, press [START].2. To stop a time period and continue measuring another one, press [CONT].3. To stop the second and continue measuring a third one, press [CONT].4. To measure up to six time periods, repeat the above steps.5. To review the results, press [VIEW].6. To return to the stopwatch, press [OK].7. To reset it, press [RESET].STOPWSTOPWAATCHTCHPage 96 - Chapter 5CAMERA (TCAMERA (TAKE A PHOTO)AKE A PHOTO)Chapter 5 - Page 97Taking pictures with your phone’s built-in camera is assimple as choosing a subject, pointing the lens, andpressing a button. You can activate the Camera Modeand take pictures when the phone is open.TO TAKE A PICTURE FROM THE MENU1. Press [MENU] .2. Point the camera lens at your subject. You can check the picture framing through the main display screen.3. Press [OK] or the Side Camera button to take the picture.4. To save the picture, press [SAVE]. To go back to idle mode without saving the picture, press . To send the picture to someone, press [SEND].TO TAKE A PICTURE IN IDLE MODE1. Press .2. Point the camera lens at your subject. You can check the picture framing through the main display screen.3. Press [OK] or the Side Camera button to take the picture.4. To save the picture, press [SAVE]. To go back to idle mode without saving the picture, press . To send the picture to someone, press [SEND].● You may receive a call anytime. If an inbound call is com-ing into, View finder mode is quitted and takes the call.However, SMS or Picture Msg may not inform you thereceiving status of a call before the camera mode quits.TX-130 manual0227(TX-130) 2004.2.27 9:1 PM Page 98](https://usermanual.wiki/Pantech/TX-130C.User-Manual/User-Guide-404948-Page-50.png)
![1. Press [MENU] .2. Point the camera lens at your subject. You can check the picture framing through the main display screen.3. Press [OK] or the Side Camera button to take the picture.GO TO NEXT STEPPress [NEXT] to access the next step.CAMERA MODE OPTIONSPress [OPTION] to access the camera mode options.CAMERA (CAMERA (CAMERA)CAMERA)Page 98 - Chapter 5CAMERA (VIDEO)CAMERA (VIDEO)Chapter 5 - Page 991. Press [MENU] .2. Using the phone ’s main LCD as a viewfinder, aim the camera lens at your subject.3. Press [OK] or the Side Camera button to start recording.4. Press [OK] or the Side Camera button to stop recording.GO TO NEXT STEPPress [NEXT] to access the next step.VIDEO MODE OPTIONSPress [OPTION] to access the video mode options.● Playback: To play back the video you just took.● Take New Video: To return to Video mode to take another video.● Go to My Video: To go to the My Video folder to check your saved video file.● Delete: To erase the video you just took.● Self Timer: To activate the video’s timer function.● Movie Light: To select a Video Light setting. Select On to lightthe Video Light while taking video. To deactivate this feature, select Off.● Send Picture: To send the picture.● Upload: To upload the picture you just took to the Picture MailWebsite.Depending on your settings,you may be prompted to accept a PCS Vision connection.● Assign Caller ID: To assign the picture as a Caller ID.● Assign Screensaver: To assign the picture as a Screensaver.● Take New Picture: To return to Camera mode to take another picture.● Go to My Pictures: To go to the My Pictures menu to check your saved pictures.● Self Portrait: To switch the viewfinder to the Sub LCD. Take apicture of yourself by checking the view on the Sub LCD.● Frash: To activate the flash function.● Self Timer: To activate the camera’s timer function.● Fun Tools: To switch the viewfinder to the Sub LCD. Take a picture of yourself by checking the view on the Sub LCD. (Fun Frames / Multiple Shots / Matrix Shots / Color Tone)● Image Controls: To select an option from the following. (Brightness / White Balance / Resolution / Quality)● Settings: With following camera settings,you can enjoy various ways of taking pictures. (Shutter Sound / Status Bar / Auto Delete / LED)● Go to My Pictures: To go to your phone ’s picture storage folder.TX-130 manual0227(TX-130) 2004.2.27 9:1 PM Page 100](https://usermanual.wiki/Pantech/TX-130C.User-Manual/User-Guide-404948-Page-51.png)
![1. Press [MENU] .2. Select an option from the following and press [OK].3. Press [OK] or the Side Camera button to stop recording.GO TO IN CAMERA OPTIONSPress [OPTION] to access the in camera options.GO TO DOWNLOADED/ASSIGNDPress [OPTION] to access the in camera options.CAMERA (CAMERA (MY PIX)MY PIX)Page 100 - Chapter 5CAMERA (MY VIDEO)CAMERA (MY VIDEO)Chapter 5 - Page 1011. Press [MENU] .2. Using the phone ’s main LCD as a viewfinder, aim the camera lens at your subject.3. Press [PLAY/PAUSE] to play or pause the video you just took.4. Press [THUMB/EXPAND] to switch the display from full-screen to thumbnail view.MY VIDEO OPTIONSPress [OPTION] to access the My Video options.● Edit Caption: To enter or edit a caption for the video.● Take New Video: To return to Video mode to take another video.● Delete: To erase selected video files.Select an option from thefollowing,and press .● Video Info: To display video information such as caption,time/date, size, etc.● In Camera: To select the folder storing pictures you havecaptured with your camera.● Downloaded/Assignd: To select the folder storing picturesyou have downloaded or assignd.● Upload: To select an option from the following to upload pictures saved in your phone to the Picture Mail Website. Depending on your settings, you may be prompted to accept a PCS Vision connection.● Assign: To assign the selected picture to display for specific tasks: (Assign Picture ID / Assign Screensaver / Assign Incoming Calls)● Take New Picture: To return to Camera mode to take another picture.● Delete: To erase selected pictures.Select an option from thefollowing,and press .● Edit Caption: To enter or edit a caption for the picture.● Fun Tools: To select an option from the following. (Fun Frames / Color Tone / Picture Info)● Assign Picture ID: To display the picture for incoming calls from a specific Contacts list entry.● Assign Screensaver: To display the picture as an LCD screensaver.● Assign Incoming Calls: To display the selected picture for allincoming calls.● Delete: To erase selected pictures.Select an option from thefollowing,and press .● Edit Caption: To enter or edit a caption for the picture.TX-130 manual0227(TX-130) 2004.2.27 9:1 PM Page 102](https://usermanual.wiki/Pantech/TX-130C.User-Manual/User-Guide-404948-Page-52.png)
![1. Press [MENU] .This chapter addresses checking voice mail messages,as well as sending and receiving text, pix messages.When a New Message ArrivesNew Text MSGNew Pix MSGInboxOutboxWeb AlertsSavedQuick TextErase AllSettingsChapter 6VOICE MAIL ANDTEXT, PIX MESSAGESChapter 6 - Page 103CAMERA (CAMERA (HELP)HELP)Page 102 - Chapter 5TX-130 manual0227(TX-130) 2004.2.27 9:1 PM Page 104](https://usermanual.wiki/Pantech/TX-130C.User-Manual/User-Guide-404948-Page-53.png)
![Chapter 6 - Page 105To send a new message:1. Press [MENU] or press . 2. Under Send To, input the phone number andpress [OK].3. Under Message, input a new text message andpress [OK].(Please refer to page 35 for more details on entering letters, numbers and symbols.)4. The default call back number is automatically inputted into the Default CB# field. You can scroll to the number and edit it or simply press [OK].NEW TEXT MSGNEW TEXT MSGPage 104 - Chapter 6TEXT, PIX MESSAGE1. The following display appears when a new message arrives.2. To display the message, press [READ].VOICE MAILDisplays the number of voice mails and accesses themby pressing .1. To access your voice mail,press [MENU] .or press .WHEN A NEW MESSAGE ARRIVESWHEN A NEW MESSAGE ARRIVES● By pressing [MENU], the user can choose from thefollowing:1. Find: Allows the user to search the phone number which isstored in the phone book.2. Save: Stores the phone number the message was sent to.3. Msg. Group: Allows to select all the phone numbers in a group.● By pressing [MENU], the user can choose from thefollowing:1. Insert Quick Text: Insert Quick Text function brings the saved-already-sentences.2. Insert sound: Insert Sound function inserts sound in Text Msg.3. Insert Picture: Insert Picture function inserts picture in TextMsg.4. Insert Animation: Insert Animation function inserts Animation in Text Msg.5. Save to Quick Text: Save to Quick Text function saves thewritten sentences on Quick Text.TX-130 manual0227(TX-130) 2004.2.27 9:1 PM Page 106](https://usermanual.wiki/Pantech/TX-130C.User-Manual/User-Guide-404948-Page-54.png)
![NEW PIX MSGNEW PIX MSGTo send a new picture message:1. Press [MENU] or press . 2. Phone goes into camera mode automatically.Take a picture and press [SEND].(Please refer to page 97 for more details on taking a photo.)3. Under Send To, input the phone number andpress [OK].4. Under Message, input a new text message andpress [OK].(Please refer to page 35 for more details on entering letters, numbers and symbols.)5. Under Subject, input a message subject andpress [OK].(Please refer to page 35 for more details on entering letters, numbers and symbols.)6. To send a message to another person, select the “CC” or “BCC” and input the phone numbers, then press [OK].7. To send the text message, press [SEND].8. To save the text message, press [MENU] andselect “Save to Outbox” then press [OK].Chapter 6 - Page 107Page 106 - Chapter 6NEW TEXT MSGNEW TEXT MSG5. Press the Navigation Key down for more fields. Under Priority, select Normal or Urgent.6. Under Insert Signature, select On or Off.7. To send the text message, press [SEND].8. To save the text message, press [MENU] andselect the “Save to Outbox” then press [OK].● You can look it up from the phone book by pressing [MENU].TX-130 manual0227(TX-130) 2004.2.27 9:1 PM Page 108](https://usermanual.wiki/Pantech/TX-130C.User-Manual/User-Guide-404948-Page-55.png)
![INBOXINBOXFORWARD1. To forward the text message, press .2. Input the phone number of the person you aresending the message, then press [OK].3. Input any text message to go along with theforwarded message, then press [OK].SAVE TO CONTACT1. To save number to contact, press .SAVE TO SAVED1. To save the text message in your phone,press . And press .SAVE TO QUICK TEXT1. To save received text msg to “Quick text”,press .Chapter 6 - Page 109Page 108 - Chapter 6INBOXINBOXThe Inbox manages received text messages. To access:1. Press [MENU] or press . 2. Select a message and press [OK]. The messageis displayed. To delete a message, press[ERASE].3. Press [MENU].REPLY1. To reply to the text message, press .2. Type your reply message and press [OK].(Please refer to page 35 for more details on entering letters, numbers and symbols.)REPLY WITH COPY1. To reply to a received message and include thereceived message into the message, press .2. The default call back number is automaticallyinputted into the Default CB# field. You can scroll to the number and edit it or simply press [OK].3. Under Insert Signature, select On or Off.4. To send the text message, press [SEND].5. To save the text message, press [MENU] andselect the “Save to Outbox” then press [OK].TX-130 manual0227(TX-130) 2004.2.27 9:1 PM Page 110](https://usermanual.wiki/Pantech/TX-130C.User-Manual/User-Guide-404948-Page-56.png)
![OUTBOXOUTBOXManages sent text messages or messages waiting to besent.1. Press [MENU] or press . 2.1. Select a message, then press [OK].The text message is displayed.2.2. To Erase Message, press [ERASE].3. Press [MENU].RESEND1. To resend a text message, press .EDIT MESSAGE1. To send a message to another person, press .2. Input the phone number and press .3. Input a text message and press .SAVE TO CONTACTS1. To save number to contact, press .SAVE TO SAVED1. To save the text message in your phone, press .2. Press .Chapter 6 - Page 111Page 110 - Chapter 6INBOXINBOXBLOCK SENDERTo register the phone number or e-mail that needs tobe blocked or unblocked enter either the phone num-ber or e-mail then pressing .1. To block all incoming messages from addresseson block list, press .LOCK & UNLOCK1. To lock or unlock the text message, press .2. Select “Lock” to lock the message or “Unlock”to unlock the message, then press .● BLOCK: Enter the address to block.● UNBLOCK: Enter the address to remove from block.● VIEW LIST OF BLOCKED ADDRESS: Displays the blockedlist on LCD.TX-130 manual0227(TX-130) 2004.2.27 9:1 PM Page 112](https://usermanual.wiki/Pantech/TX-130C.User-Manual/User-Guide-404948-Page-57.png)
![SASAVEDVEDChapter 6 - Page 113Page 112 - Chapter 6OUTBOXOUTBOXLOCK & UNLOCK1. To lock or unlock the text message, press .2. Select “Lock” to lock the message or “Unlock” to unlock the message, then press .STATE1. To display the status of an outbox message, press .SAVEDManages saved messages from the Inbox/Outbox.1. Press [MENU] or press . 2.1. Select a text message then press [OK].The text message is displayed.2.2. To erase message, press [ERASE].3. Press [MENU].4. If the text message is saved from the “Inbox” menu, this screen will be displayed.If the text message is saved from the “Outbox” menu, this screen will be displayed.5. Select one by pressing [OK].● To select inbox menu: Reply, Reply With Copy, Forward,Save Media, Save to Quick Text,Save to Contact, Block Sender,Lock & Unlock● To select outbox menu: Resend, Edit Message, Save to Contact, Lock & Unlock, StateTX-130 manual0227(TX-130) 2004.2.27 9:1 PM Page 114](https://usermanual.wiki/Pantech/TX-130C.User-Manual/User-Guide-404948-Page-58.png)
![ERASE ALLERASE ALLQUICK TEXTTo view/edit the quick text messages:1. Press [MENU] or press . 2.1. Select a message from the list.Press [MENU].2.2. To add a new quick text message, press[ADD NEW]. To edit the quick text message you have selected, press [EDIT].3. To erase the saved quick text message,press [ERASE].Chapter 6 - Page 115Page 114 - Chapter 6QUICK TEXTQUICK TEXTERASE MESSAGES1. Press [MENU] or press . 2.1. To erase all the inbox messages, press .2.2. To erase all the outbox messages, press .2.3. To erase the saved messages, press .3. Select “Ok” or “Cancel” with [OK] or [CANCEL].● Entire inbox: To erase all messages.● Old inbox: To erase all messages already read.● Old: Deletes read Message(s).● Entire: Deletes all the message(s) in the Inbox (However,the locked Message(s) will not be deleted).TX-130 manual0227(TX-130) 2004.2.27 9:1 PM Page 116](https://usermanual.wiki/Pantech/TX-130C.User-Manual/User-Guide-404948-Page-59.png)
![SETTINGSSETTINGSManages messaging features through various features.AUTO SAVESAVE SENT MSG1. Press [MENU] or press . Then press for “Auto Save”.2. Press . Select “Off”, “On”, or “Prompt” with the Navigation key.3. Press [OK].PIX RECEIVE MODE1. Press [MENU] or press . Then press for “Auto Save”.2. Press . Select “Automatic” or “Prompt” with the Navigation key.3. Press [OK].Chapter 6 - Page 117Page 116 - Chapter 6SETTINGSSETTINGSAUTO ERASEAutomatically erases inbox/outbox messages when newmessages arrive.AUTO ERASE INBOX1. Press [MENU] or press . Then press for “Auto Erase”.2. Press . Select “Disable” or “Enable” with the Navigation key.3. Press [OK].AUTO ERASE OUTBOX1. Press [MENU] or press . Then press for “Auto Erase”.2. Press . Select “Disable” or “Enable” with the Navigation key.3. Press [OK].TX-130 manual0227(TX-130) 2004.2.27 9:1 PM Page 118](https://usermanual.wiki/Pantech/TX-130C.User-Manual/User-Guide-404948-Page-60.png)
![SETTINGSSETTINGSChapter 6 - Page 119Page 118 - Chapter 6SETTINGSSETTINGSDEFAULT CALLBACKEdits a default call back number so that the recipient cancall back or reply.1. Press [MENU] or press . Then press for “Default Callback”.2. Input a call back number, then press [OK].EDIT VOICE C.B1. Press [MENU] or press . Then press for “Edit Voice C.B”.2. Input a voice call back number, then press [OK].ALERTEnables phone to alert you of an incoming message.1. Press [MENU] or press . Then press for “Alert”.2. Select Voice Mail, Messages or Remind. For Voice Mail and Messages, select tone 1-5. For Remind, select “On” or “Off” with the Navigation key.3. Press [OK].● Press [FIND] to find a number from the phone book.EDIT SIGNATURECreate a signature that can be automatically inserted atthe end of a message.1. Press [MENU] or press . Then press for “Edit Signature”.2. To input Signature, put the cursor on Edit Signature and enter Signature Edit window by using right or left direction keys.3. To activate Signature function, put the cursor on Insert Signature and select On by using right or left direction keys. To inactivate Signature function, select Off.4. Press [OK].DIRECT VIEWIf the Direct View is set to on, the user will be able toview the message by pressing the read key. If the DirectView is set to off, the user can view the message byentering SMS Menu-> Inbox.1. Press [MENU] or press . Then press for “Direct View”.2. Select “On” or “Off” with the Navigation key.3. Press [OK].● ON: Set to read msg without entering inbox in SMS menu.● OFF: Set to read msg after entering inbox in SMS menu.TX-130 manual0227(TX-130) 2004.2.27 9:1 PM Page 120](https://usermanual.wiki/Pantech/TX-130C.User-Manual/User-Guide-404948-Page-61.png)
![This chapter addresses using your handset to accessthe Wireless Internet.DownloadsStart Internet BrowserBrowser MenuChapter 7DOWNLOADS &INTERNETChapter 7 - Page 121Page 120 - Chapter 6SETTINGSSETTINGSENTRY MODESets an Entry Mode as a default. The T9 mode indicatorwill appear whenever the input mode is activated if theT9 mode is the default.1. Press [MENU] or press . Then press for “Entry Mode”.2. Select “T9 Mode” or “Alpha Mode” with theNavigation key.3. Press [OK].BLOCK OR UNBLOCK1. Press [MENU] or press . Then press for “Block or Unblock”.2. Select “Block”, “Unblock”, or “View List of Blocked Addresses” with the Navigation key.3. Press [OK].TX-130 manual0227(TX-130) 2004.2.27 9:1 PM Page 122](https://usermanual.wiki/Pantech/TX-130C.User-Manual/User-Guide-404948-Page-62.png)
![Chapter 7 - Page 123Page 122 - Chapter 7DOWNLOADSDOWNLOADSRINGERS1. Press [MENU] .2. Select “Get New” and press [OK].The browser will launch and take you to the “Ringers” download menu.3. Use the Navigation Key to select a ringer you wish to download.4. From the item information page, select “Buy”.If you have not previously purchased an item, you will be prompted to enter your account password and create your purchasing profile.5. A confirmation page will notify you that the ringer has been purchased and is stored in the “My Vault” folder. To download the ringer, select “Download”.GAMESYou can play a variety of entertaining and graphically-rich games on your phone. New games are easy todownload and play.1. Press [MENU] .2. Select “Get New” and press [OK].The browser will launch and take you to the “Game” download menu.3. Use the Navigation Key to select the game youwish to download.4. From the item information page, select “Buy”.If you have not previously purchased an item, you will be prompted to enter your account password and create your purchasing profile.5. A confirmation page will notify you that the game has been purchased and is stored in the “My Vault” folder. To download the game, select “Download”.DOWNLOADSDOWNLOADSWith your CDM-8450, you have access to a wide varietyof downloadable ringers and screen savers. While eachtype of download involves a different file type, the basicmethod for accessing and downloading files is the same.TX-130 manual0227(TX-130) 2004.2.27 9:1 PM Page 124](https://usermanual.wiki/Pantech/TX-130C.User-Manual/User-Guide-404948-Page-63.png)
![Chapter 7 - Page 125Page 124 - Chapter 7STSTARART INTERNET BROWSERT INTERNET BROWSERDOWNLOADSDOWNLOADSGRAPHICS1. Press [MENU] .2. Select “Get New” and press [OK].The browser will launch and take you to the “Graphics” download menu.3. Use the Navigation Key to select the game youwish to download.4. From the item information page, select “Buy”.If you have not previously purchased an item, you will be prompted to enter your account password and create your purchasing profile.5. A confirmation page will notify you that the game has been purchased and is stored in the “My Vault” folder. To download the game, select “Download”.ACCESS THE INTERNETYour TX-130C allows you to browse various Internetwebsites directly from your phone. This provides youwith access to up-to-date information such as news,sports, weather and stock quotes when you subscribeto Internet service with your service provider. Pleasecontact your service provider for a list of available websites and service details. 1. To start your Internet browser and access websites through your wireless handset press [MENU] or press . TX-130 manual0227(TX-130) 2004.2.27 9:1 PM Page 126](https://usermanual.wiki/Pantech/TX-130C.User-Manual/User-Guide-404948-Page-64.png)
![Chapter 7 - Page 127Page 126 - Chapter 7BROWSER MENUBROWSER MENUBROWSER MENUThe browser menu lists the actions necessary to operate the browser.Press [MENU] or press to access the browser menu.BACK◆ To return previous page, press [MENU] or press , then press .HOME◆ To display the homepage, press [MENU] or press , then press .EXIT◆ To exit the browser, press [MENU] or press , then press .MARK SITE◆ To add the current page to your bookmark list,press [MENU] or press , then press .● “No bookmark service site” is displayed when the Internet site cannot support the bookmark service.BROWSER MENUBROWSER MENUBOOKMARKS◆ To view your bookmark list, press [MENU] or press , then press .This provides easy website access without entering its URL.INBOX◆ Display inbox list.To select Inbox, press [MENU] or press , then press .RELOADReloads current page.◆ To select Reload, press [MENU] or press , then press .SETTINGS◆ Displays Browser Menu Settings.◆ To select Settings, press [MENU] or press , then press .●HOMEPAGE◆ Enables you to change the homepage.Menu settings include:To select Homepage, press .TX-130 manual0227(TX-130) 2004.2.27 9:1 PM Page 128](https://usermanual.wiki/Pantech/TX-130C.User-Manual/User-Guide-404948-Page-65.png)
