Pro Nets Technology WPE81RL WIRELESS PCI Express Adapter User Manual Usser manual 2of 3
Pro-Nets Technology Corporation WIRELESS PCI Express Adapter Usser manual 2of 3
Contents
- 1. User manual 1of 3
- 2. Usser manual 2of 3
- 3. User manual 3 of 3
Usser manual 2of 3
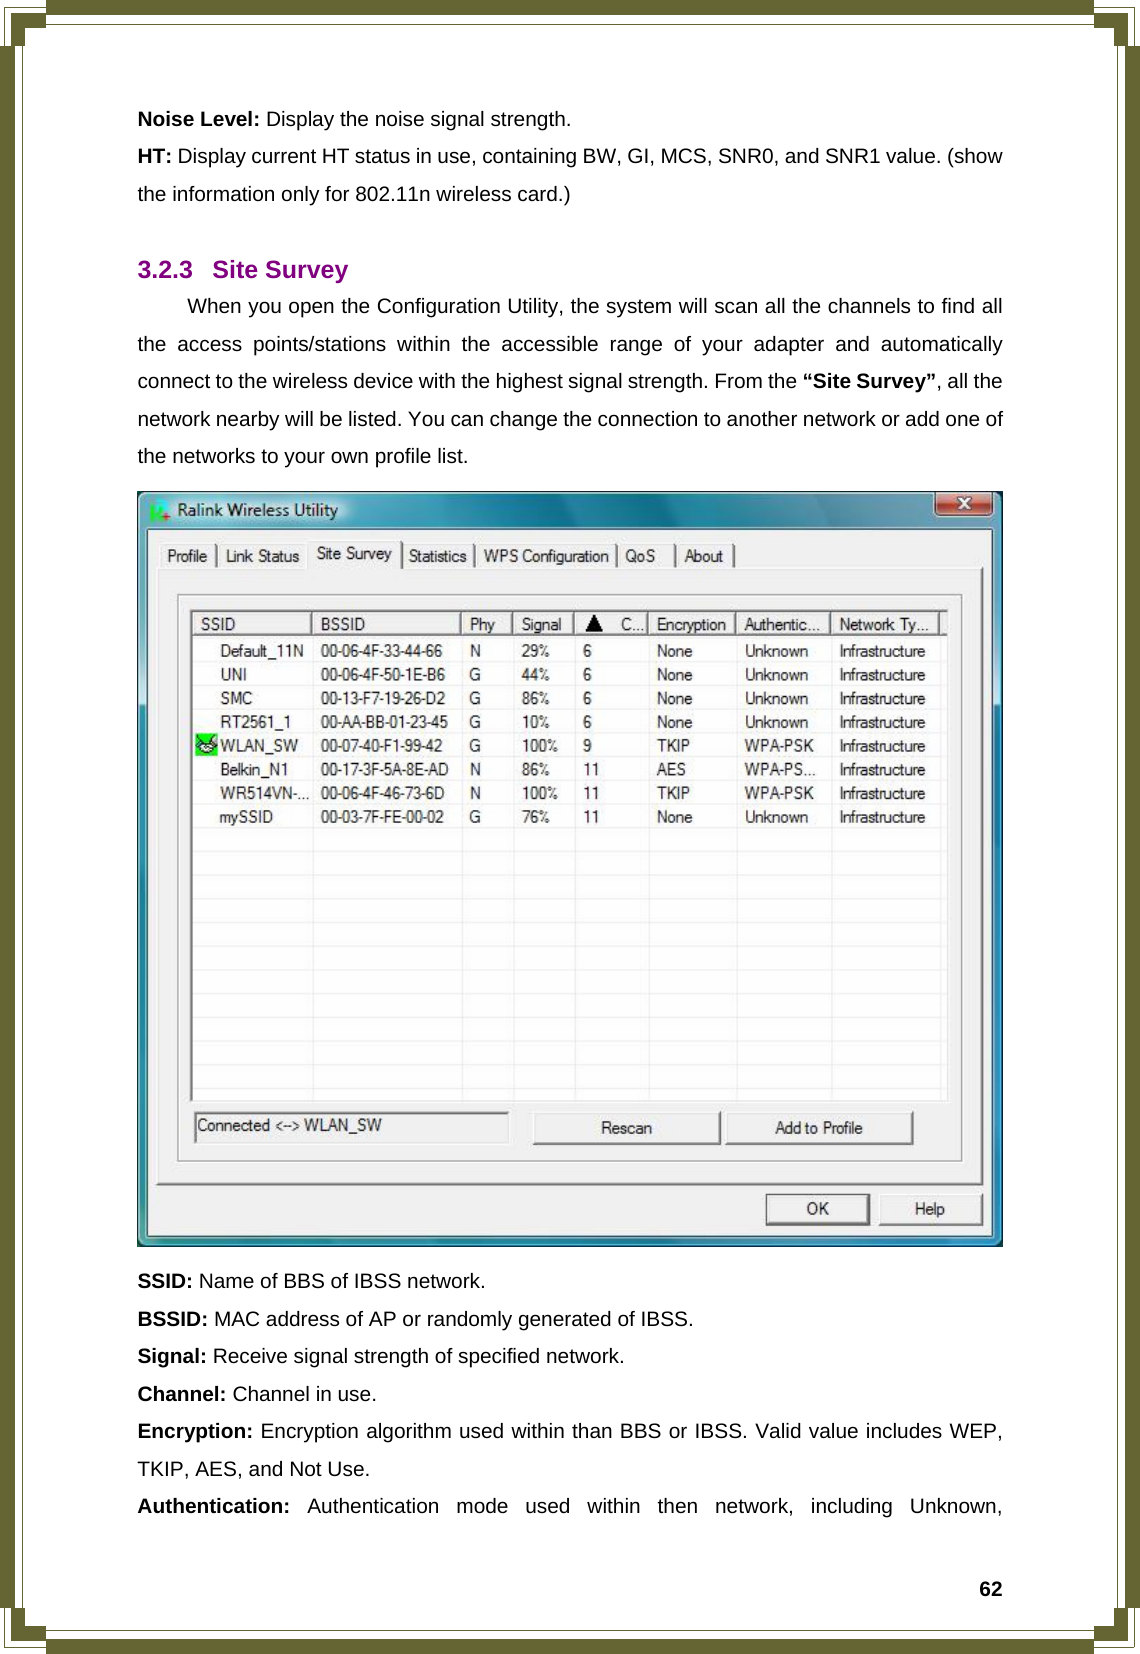
![343.1.3 Network Under the Network function, system will display the information of surrounding APs from last scan result. List information includes SSID, BSSID, Signal, Channel, Encryption algorithm, Authentication and Network type as below: [Definition of each field] SSID: Name of BSS or IBSS network Network Type: Network type in use, infrastructure for BBS, Ad-Hoc for IBSS network Channel: Channel in use. Wireless Mode: AP support wireless mode. IT may support 802.11b, 802.11g or 802.11n wireless mode. Security-Enable: Whether AP provides security-enabled wireless network Signal: Receive signal strength of specified network [Icons & Buttons] Î Indicate connection is successful. Î Indicate network type is infrastructure mode. Î Indicate network type is Ad-Hoc mode. Î Indicate security-enabled wireless network. Î Indicate 802.11b wireless mode. Î Indicate 802.11g wireless mode. Î Indicate 802.11n wireless mode. Î Indicate the AP lists are sorted by SSID, Channel, or Signal. Î Command to connect to the selected network.](https://usermanual.wiki/Pro-Nets-Technology/WPE81RL.Usser-manual-2of-3/User-Guide-891939-Page-2.png)
![35 Î Issue a rescan command to wireless NIC to update information on surrounding wireless network. Î Add the selected AP to Profile setting. It will bring up profile page and save user’s setting to a new profile. [Connected Network] (1) When RaUI first ran, it will select the best AP to connect automatically. (2) If user wants to connect to other AP, He can click “Connect: button for the intended AP to make connection. (3) If the intended network has encryption other than “Not Use”, RaUI will bring up the security page appropriate information to make the connection. (4) When you double-click on the intended AP, you can see AP’s detail information. 3.1.4 Advanced Wireless Mode: Select wireless mode. 802.11B only, 802.11B/G mix, and 802.11B/G/N mix, modes are supported. (802.11 B/G mix selection item only exists for B/G adapter; 802.11B/G/N mix selection item only exists for B/G/N adapter; 802.11 B/G/N mix selection item only exists for A/B/G/N adapter.) Wireless Protection: User can choose from Auto, On, and Off (Only 802.11n adapter don’t support) Î Auto: STA will dynamically change as AP announcement Î ON: Always send frame with protection. Î Off: Always send frame without protection. TX Rate: Manually force the Transmit using selected rate. Default is auto. (802.11n wireless card doesn’t support.)](https://usermanual.wiki/Pro-Nets-Technology/WPE81RL.Usser-manual-2of-3/User-Guide-891939-Page-3.png)
![36Enable Tx Burst: Ralink’s proprietary frame burst mode. Enable TCP Windows Size: Enhance throughout. Fast Roaming at: Fast to roaming, setup by transmit power. Select your Country Region Code: 8 countries to choose. Show Authentication Status Dialog: When you connect AP with authentication, choose whether show “Authentication Status Dialog” or not. Authentication Status Dialog display the process about 802.11x Authentication. Enable CCX (Cisco Compatible eXtensions): support Cisco Compatible Extensions function. Î LEAP turn on CCKM Î Enable Radio Measurement: can channel measurement every 0~2000 milliseconds. Apply: Save the save changes Î Show the information of Status Section Î Hide the information of Status Section 3.1.5 Statistics Statistics page displays the detail counter information based on 802.11 MIB counters. This page translates the MIB counters into a format easier for user to understand. [Transmit Statistics] Frames Transmitted Successfully: Frames successfully sent. Frames Fail To Receive ACK After All Retries: Frames failed transmit after hitting retry limit. RTS Frames Successfully Receive CTS: Successfully receive CTS after sending RTS frame. RTS Frames Fail to Receive CTS: Fail to receive CTS after sending RTS frame. Frames Retransmitted Successfully: Successfully retransmitted frames numbers Reset Counter: Reset counters to zero](https://usermanual.wiki/Pro-Nets-Technology/WPE81RL.Usser-manual-2of-3/User-Guide-891939-Page-4.png)
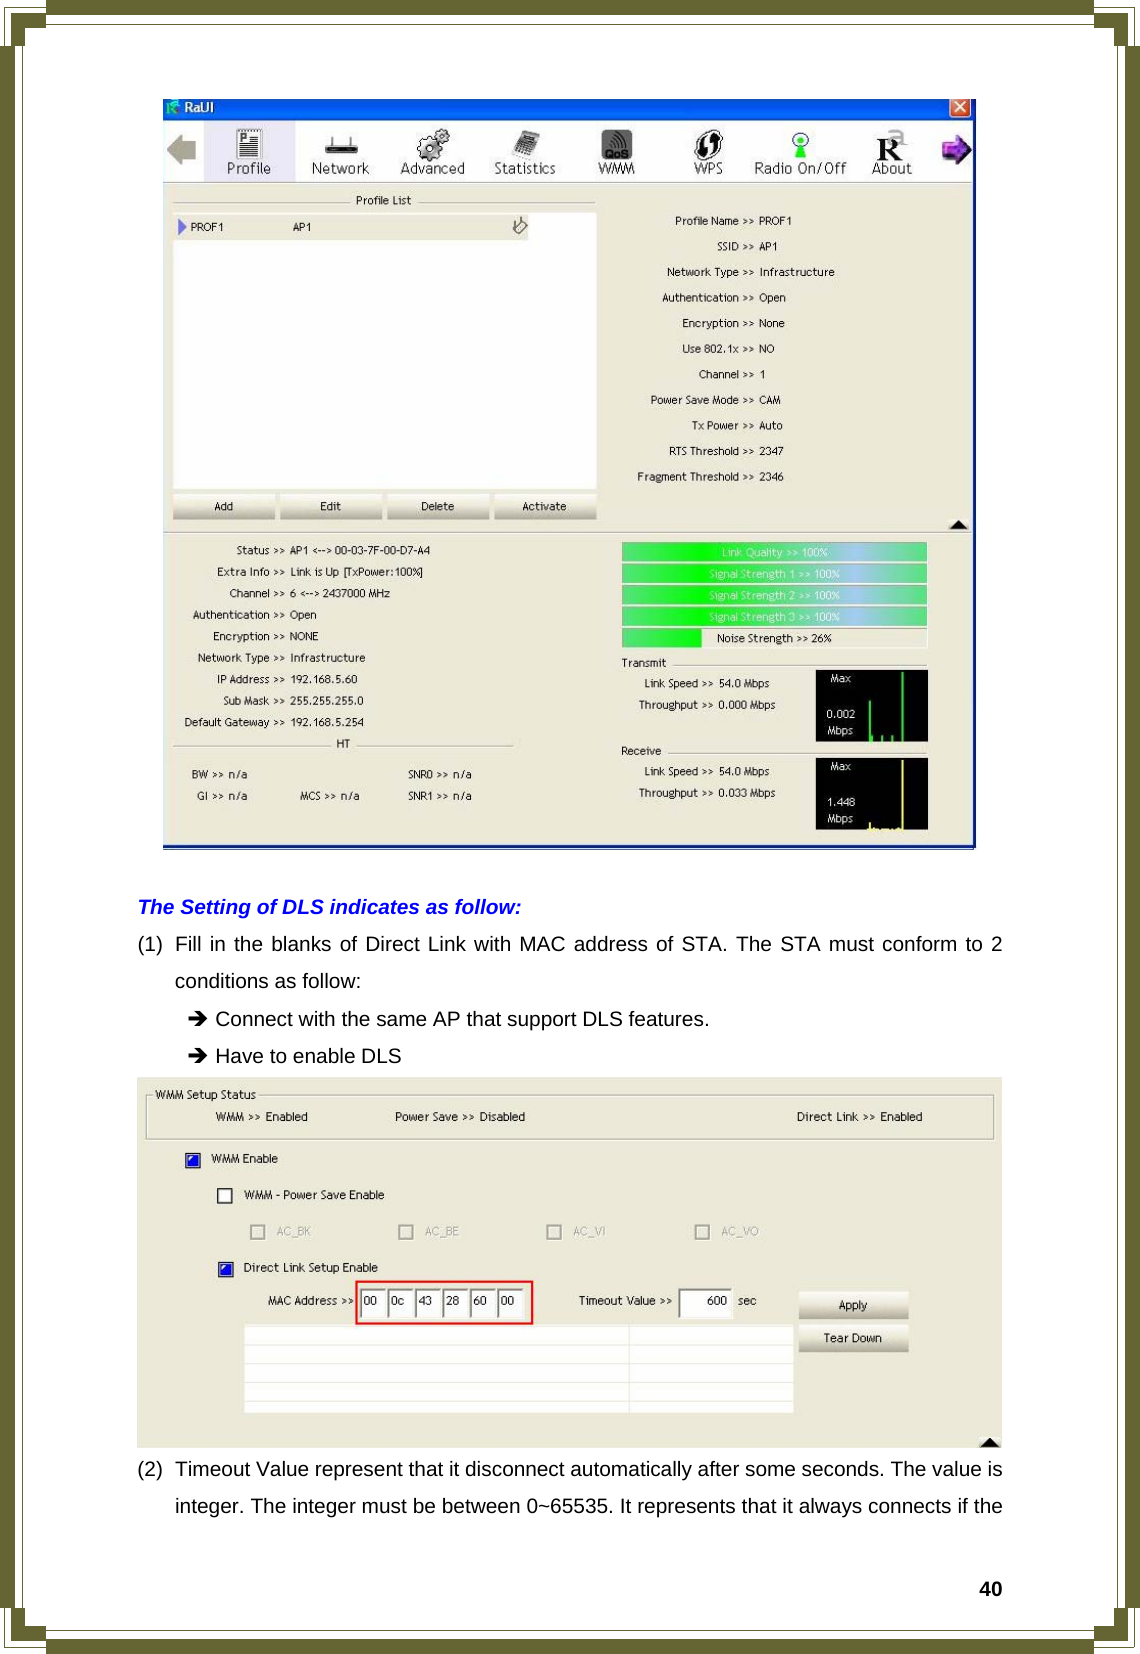
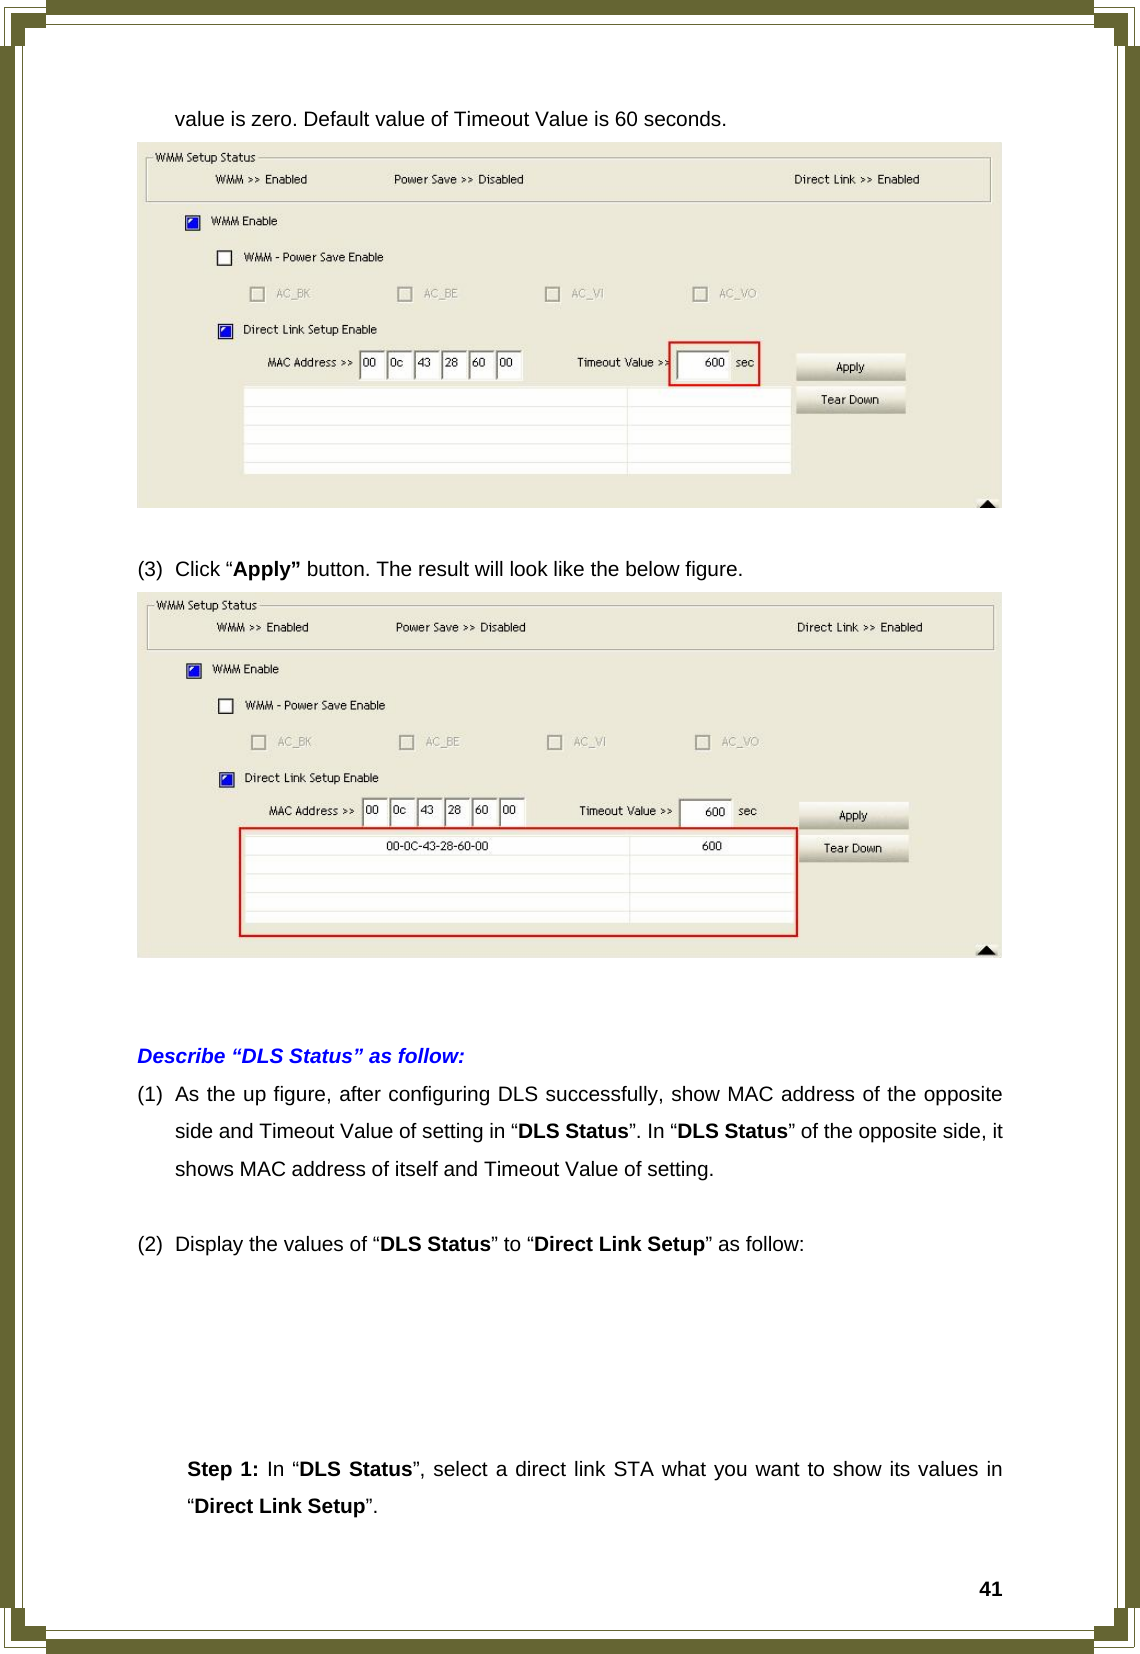
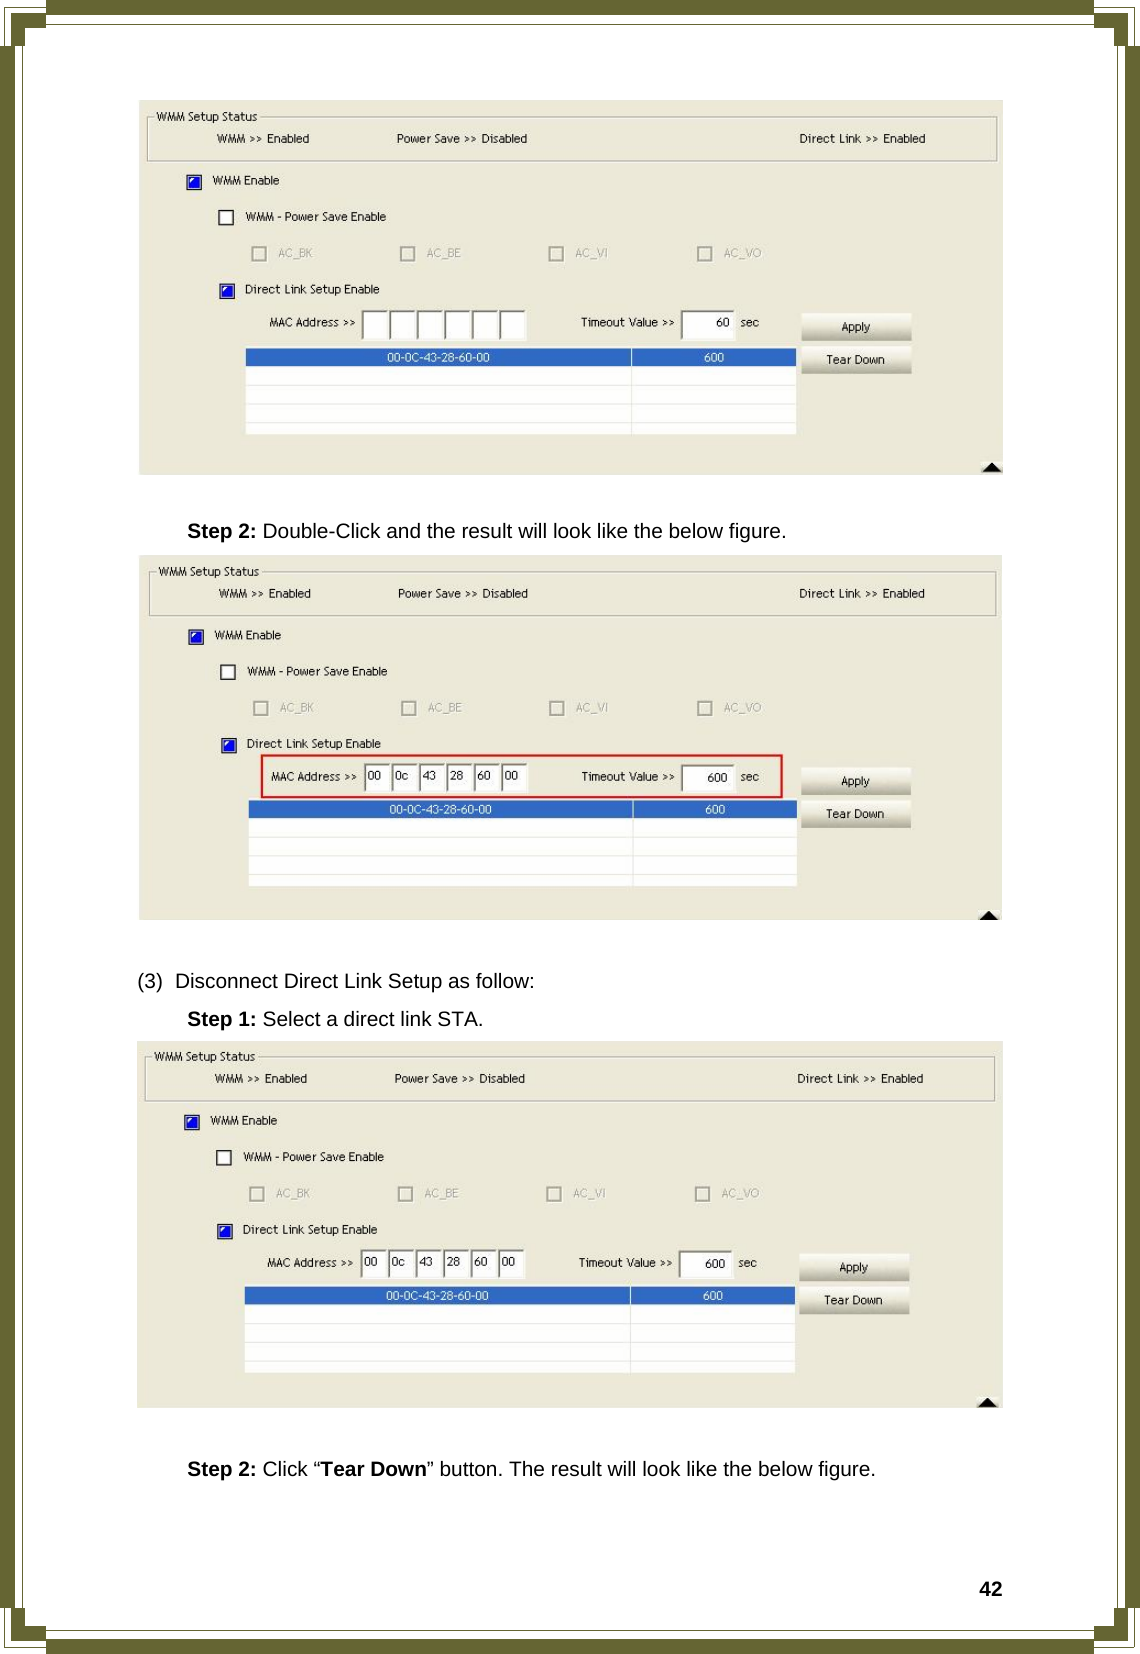
![37[Receive Statistics] Frames Received Successfully: Frames received successfully. Frames Received With CRC Error: Frames receive with CRC error. Frames Dropped Due To Out-Of-Resource: Frames dropped due to resource issue. Duplicate Frames Received: Duplicate received frames. Reset Counter: Reset counters to zero Î Show the information of Status Section Î Hide the information of Status Section 3.1.6 WMM WMM function involves “WMM Enable”, “WMM-Power Save Enable” and “DSL Setup”. WMM Enable: Enabe Wi-Fi Multi-Media. WMM-Power Save Enable: Enable WMM Power Save. Direct Link Setup Enable: Enable DLS (direct Link Setup). [WMM Enable – Enable Wi-Fi Multi-Media] If you want to use “WMM-Power Save” or “Direct Link Setup” you must enable WMM. The](https://usermanual.wiki/Pro-Nets-Technology/WPE81RL.Usser-manual-2of-3/User-Guide-891939-Page-5.png)
![38setting methods of enabling WMM indicating as follow: Step 1: Click “WMM Enable” Step 2: Change to “Network” function. And add an AP that supports WMM features to a Profile. The result will look like the below figure in Profile page. [WMM-Power Save Enable – Enable WMM Power Save] Step 1: Click “WMM-Power Save Enable”](https://usermanual.wiki/Pro-Nets-Technology/WPE81RL.Usser-manual-2of-3/User-Guide-891939-Page-6.png)
![39 Step 2: Please select which ACs you want to enable. The setting of enabling WMM-Power Save is successfully. [Direct Link Setup Enable – Enable DLS (Direct Link Setup)] Step 1: Click “Direct Link Setup Enable” Step 2: Change to “Network” function. And add an AP that supports DLS features to a Profile. The result will look like the below figure in Profile page.](https://usermanual.wiki/Pro-Nets-Technology/WPE81RL.Usser-manual-2of-3/User-Guide-891939-Page-7.png)
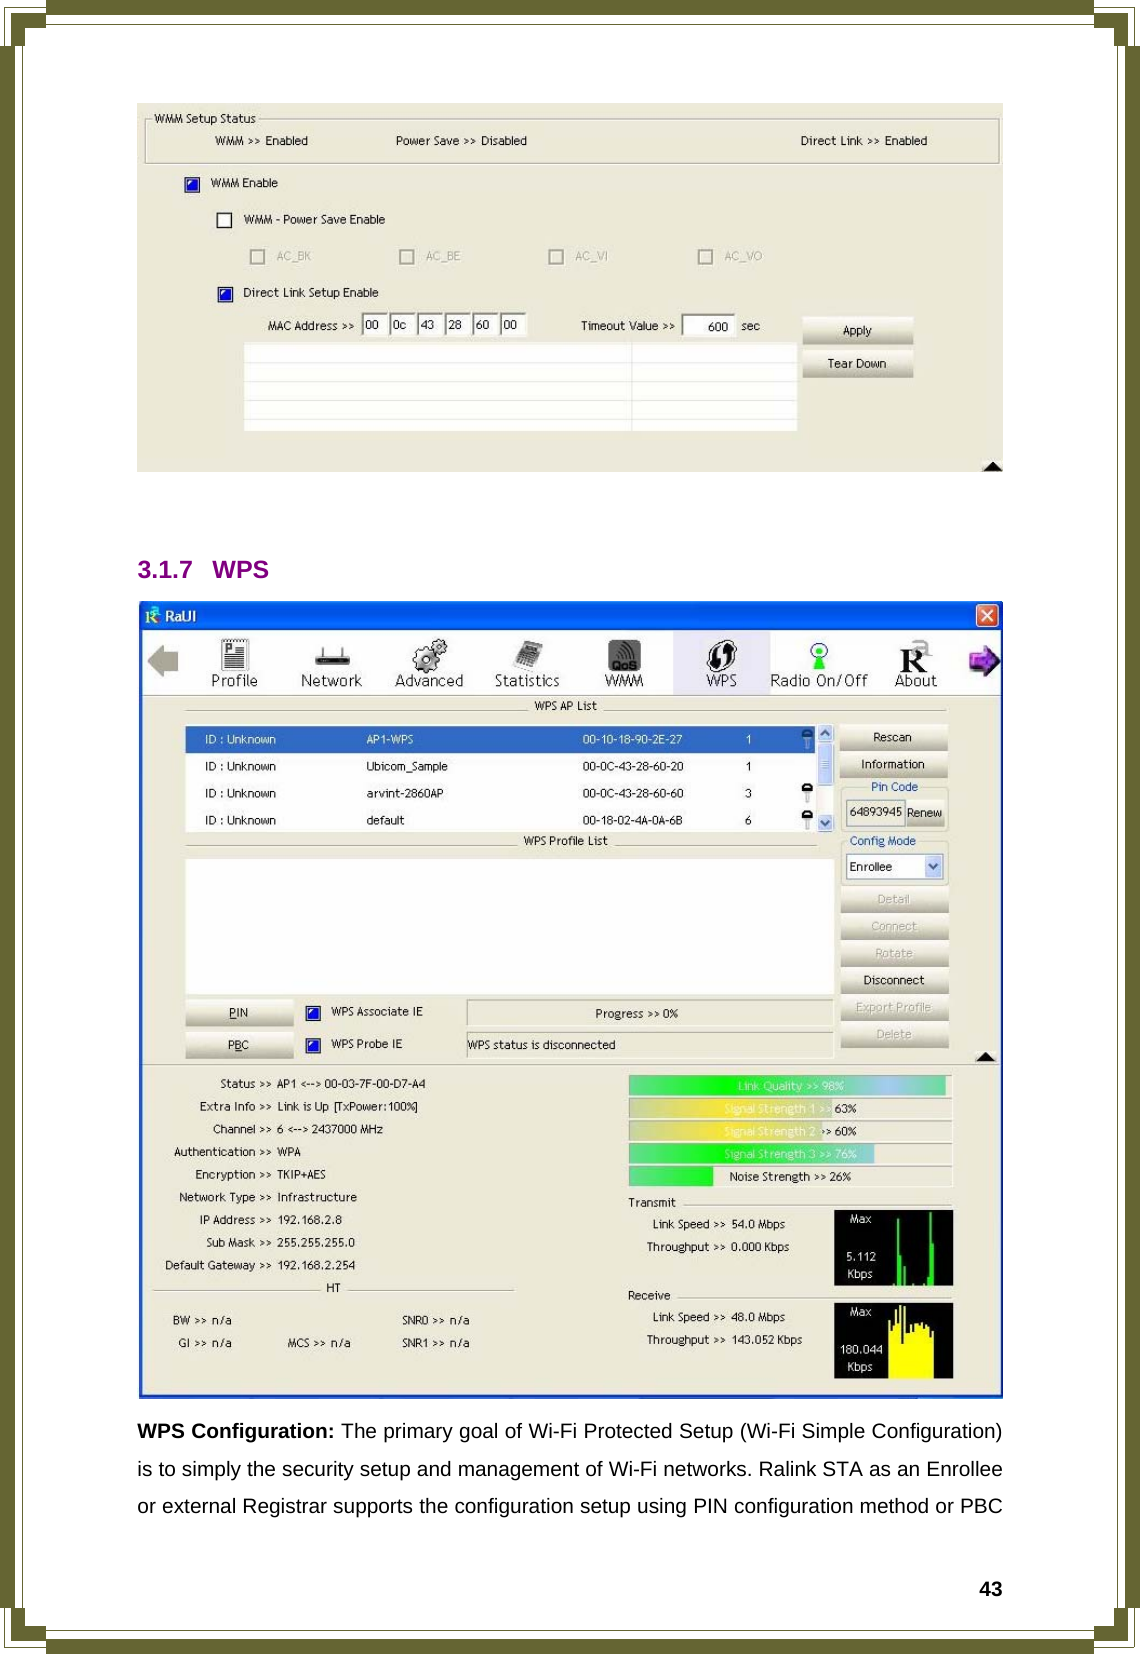
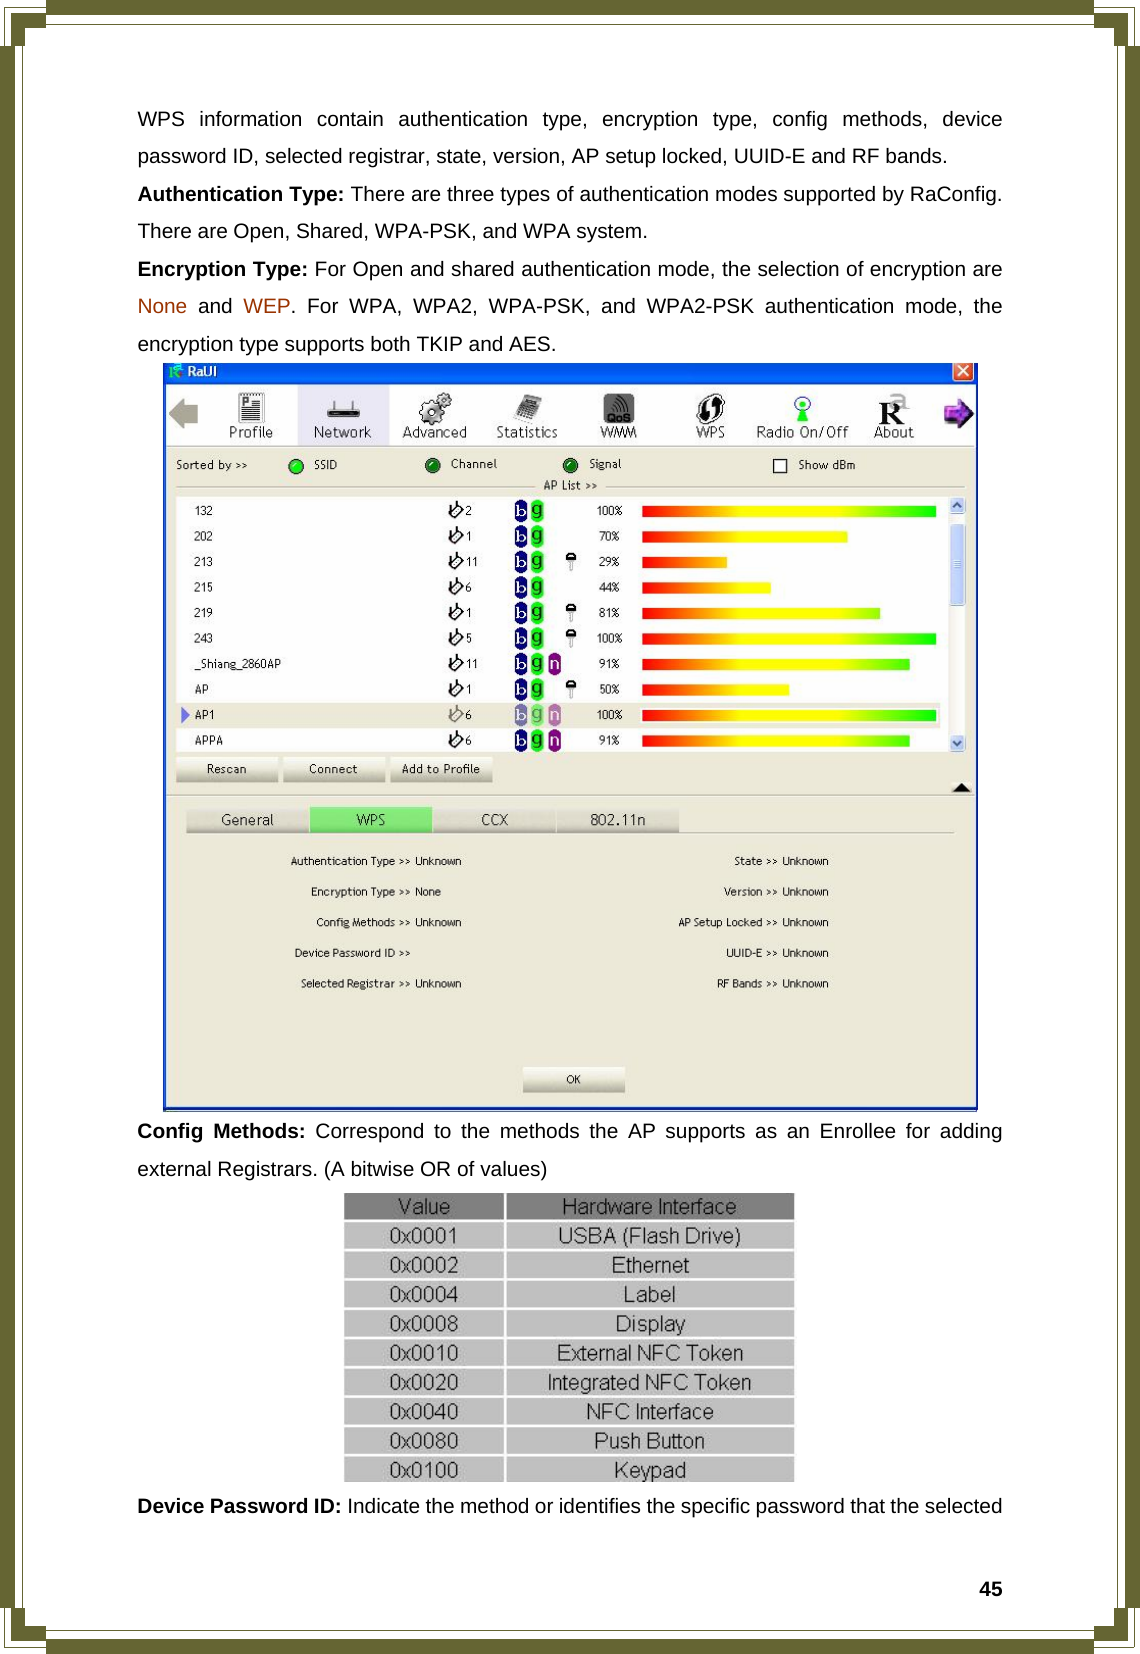
![44configuration setup using PIN configuration method or PBC configuration method through an internal or external Registrar. WPS AP List: Display the information of surrounding APs with WPS IE from last scan result. List information includes SSID, BSSID, Channel, ID (Device Password ID), Security-Enabled. Rescan: Issue a rescan command to wireless NIC to update information on surrounding wireless network. Information: Display the information about WPS IE on the selected network. List Information includes Authentication Type, Encryption Type, Config Methods, Device Password ID, Selected Registrar, State, Version, AP Setup Locked, UUID-E and RF Bands. PIN Code: 8-digit numbers. It is required to enter PIN Code into Registrar using PIN method. Each NIC Wireless has only one PIN Code of Enrollee. Config Mode: Our station role-playing as an Enrollee or an external Registrar. WPS Profile List: Display all of credentials got from the Registrar. List information includes SSID, MAC address, Authentication and Encryption Type. If STA Enrollee, credentials are created as soon as each WPS success. If STA Registrar, RaUI creates a new credential with WPA2-PSK/AES/64Hex-Key and doesn’t change until next switching to STA Registrar. Control items on WPS Profile List: Î Detail: Information about Security and Key in the credential Î Connect: Command to connect to the selected network inside credentials. The active selected credential is as like as the active selected Profile. Î Rotate: Command to rotate to connect to the next inside credentials Î Disconnect: Stop WPS action and disconnect this active link. And then select the last profile at the Profile Page of RaUI if exist. If there is an empty profile page, the driver will select any non-security AP. Î Delete: Delete an existing credential. And then select the next credential if exist. If there is an empty credential, the driver will select any non-security AP. PIN: Start to add to Registrar using PIN configuration method. IF STA Registrar, remember that enter PIN Code read from you Enrollee before starting PIN. PBC: Start to add to AP using PBC configuration method. ★ When you click PIN or PBC, please don’t do any rescan within two-minute connection. If you want to abort this setup within the interval, restart PIN/PBC or press Disconnect to stop WPS connection. WPS associate IE: Send the association request with WPS IE during WPS setup. It is optional for STA. WPS probe IE: Send the probe request with WPS IE during WPS setup. IT is optional for STA. Progress Bar: Display rate of progress from Start to Connected status. Status Bar: Display currently WPS Status. [WPS Information on AP]](https://usermanual.wiki/Pro-Nets-Technology/WPE81RL.Usser-manual-2of-3/User-Guide-891939-Page-12.png)
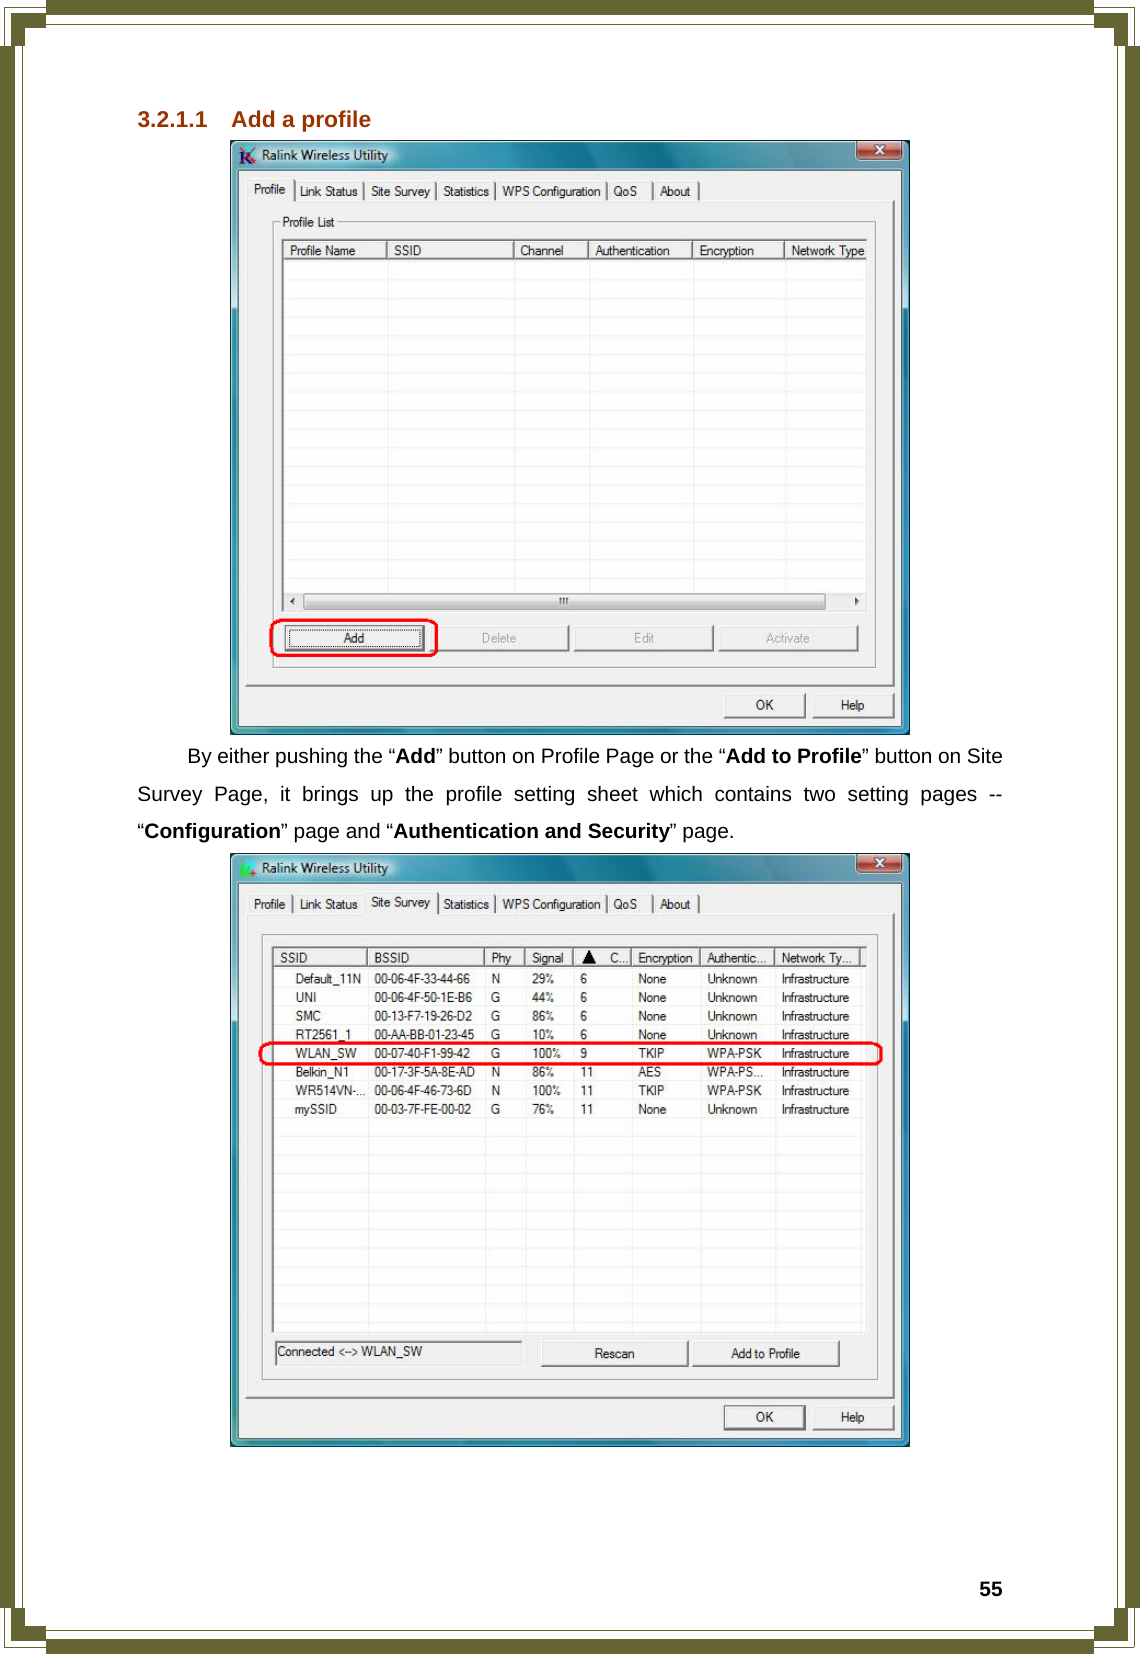
![56 [Configuration page] Profile Name: Name of the profile SSID: Name of the desire network Network Type: Netowork of the desired network, either infrastructure or Ad-Hoc. Infrastructure – This operation mode requires the presence of a wireless Access Point. All communication is done via the Access Point or Router. Ad-Hoc – Select this mode if you want to connect to another wireless station in the Wireless LAN network without through an Access Point or Router. Tx-Power: The desired TX power level; the available options are 100%, 75%, 50% and Auto. If you want to lower the transmit power of the adapter for saving the power of the system, you can select the lower percentages from the list. The lower power will cause the lower signal strength and the coverage range.](https://usermanual.wiki/Pro-Nets-Technology/WPE81RL.Usser-manual-2of-3/User-Guide-891939-Page-24.png)
![57 [Authentication and Security page] Authentication Type: The authentication of the desired network. For infrastructure network, the available modes are Open, Shared, WPA, WPA-PSK, WPA2, and WPA2-PSK. Open: No authentication is needed among the wireless devices. Shared: Only Wireless device using a shared key (WEP Key identified) is allowed to connecting each other. Setup the same key as the wireless device that the adapter intends to connect. WPA: WPA provides a scheme of mutual authentication using either IEEE 802.1x/Extensible Authentication Protocol (EAP) authentication or pre-shared key (PSK) technology. It provides a high level of assurance to enterprise, small business and home users that data will remain protected and that only authorized users may access their networks. For enterprises that have already deployed IEEE 802.1x authentication, WPA offers the advantage of leveraging existing authentication databases and infrastructure. WPA-PSK – It is a special mode designed for home and small business users who do not have access to network authentication servers. In this mode, known as Pre-Shared Key, the user manually enters the starting password in their access point or gateway, as well as in each wireless station in the network. WPA-PSK takes over automatically from that point, keeping unauthorized users that don’t have the matching password from joining the network, while encrypting the data traveling between authorized devices.](https://usermanual.wiki/Pro-Nets-Technology/WPE81RL.Usser-manual-2of-3/User-Guide-891939-Page-25.png)