Renaissance Learning REC-1001 Classroom Response System User Manual AccelTest SW man
Renaissance Learning, Inc Classroom Response System AccelTest SW man
Contents
- 1. Users Manual Part 0
- 2. Users Manual Part 1
- 3. Users Manual Part 2
Users Manual Part 1
![Installing AccelTest5Installing AccelTestHow to use this Manual and Online HelpThis manual will help you become familiar with your AccelTest software. You can get help while using AccelTest by clicking on Help. AccelTest operates much the same on both Windows and Macintosh computers. When differences occur, we provide information for both operating systems. Note that in Windows computers, Wizards are used, and Macintosh computers use Assistants. Both Windows and Macintosh screens are shown in this manual. If you have additional questions or need more information about AccelTest or other Renaissance Learning software, you can email us at answers@renlearn.com.For technical support, email questions to us at support@renlearn.com.In this manual, we use different symbols and type styles to identify buttons, menus, and dialog boxes or screens on your computer screen. We also identify computer keys on your keyboard.When you need to type information in a field, we use a different font to identify what you need to type. For example, “Type admin in the ‘Enter your password’ field,” in the AccelTest Password dialog box. Item How we identify it in the manual ExampleButton Square brackets appear around button names.Click the [Assignment Bank] button.Dialog Boxes Dialog box names appear in bold. Sections of the dialog box and field names appear with initial capital letters.Options within the dialog box are enclosed in quotation marks.In the New Section dialog box, type your section name in the Name field.In the Import Students Wizard (Assistant) dialog box, select “Import from a Renaissance Learning LIS product.”Keys Angle brackets appear around key names Press the <Enter> key.Menus Menu names and menu items appear in bold type.From the Gradebook menu, select New Student.Screen names Screen names appear in bold type. Specified areas in the screen appear with initial capital letters. In the Gradebook screen, in the Students column, click on the name of the student you are selecting.Shortcuts Menu shortcuts are shown as “Reports menu > Student Grade.”From the Student Grade screen, (Reports menu > Student Grade) click on Print.](https://usermanual.wiki/Renaissance-Learning/REC-1001.Users-Manual-Part-1/User-Guide-588177-Page-5.png)
![Installing AccelTest7Installing AccelTestFollow these steps to start AccelTest, if it is not already open.1. Windows computers: Click the [Start] button and select Programs, AccelTest, and AccelTest.Macintosh computers: If it is not already open on your desktop, open the AccelTest folder on your hard drive. Then, double-click the AccelTest icon to start the program.When the Registration dialog box opens, go directly to step 2 on the next page.If one of two messages appear, you will need to either a. upgrade or b. install QuickTime.If the message states you need to install Authoring and Still images support, you have a partial QuickTime installation. See a. Upgrade QuickTime.If the message states that you need to install QuickTime, see b. Install QuickTime.a. Upgrade QuickTimeTo add the missing components in Windows:• Click Start and Programs. Select QuickTime.• Click on the QuickTime updater. Select Custom.• Go to the QuickTime folder and click on the boxes next to “QuickTime Still Images” and “QuickTime Authoring.” Click [Update Now].To add the missing components in Macintosh:• Navigate to your QuickTime folder. It probably is in your Applications folder.• Launch the QuickTime updater. Select Custom.• Go to the QuickTime folder and click on the boxes next to “QuickTime Still Images” and “QuickTime Authoring.” Click [Update Now].b. Install QuickTimeTo install in Windows and Macintosh:• Insert the AccelTest CD-ROM in your CD drive.• Navigate to the Extras folder and open the QUICKTIME folder. Double-click the QUICKTIME file for the installer. Select default settings and click [Next], and [Agree] at the license agreement. You will not need to enter anything on the registration screen. Click [Finish] when done.Starting AccelTest](https://usermanual.wiki/Renaissance-Learning/REC-1001.Users-Manual-Part-1/User-Guide-588177-Page-7.png)
![Installing AccelTest8Installing AccelTestIf a window opens with a message indicating you do not have a default printer, you will not be able to create AccelTest Assignments or print or preview reports until you get access to a printer and set it as your default printer. After reading the message, click the [OK] button.2. The AccelTest Registration dialog box opens. Type the Serial Number in the boxes. The serial number may be found on the sticker located below the CDROM package on the inside front cover of this manual, or on the one- page instruction sheet you received with the software. As you type the serial number, be careful not to confuse “Z” and “2,” “I” and “1,” “S“ and “5,” or “O” and “0.” Type in the school name and your name in the boxes provided. Then click the [OK] button.3. When the AccelTest Password dialog box appears, type admin in the text box. Click [OK].You will be asked if you would like to set up your school year. Click [Setup School Year Now] to set up your school year. The School Year Wizard (Assistant in Mac) will start. See “Setting up Your School Year” on page 10. If you click [Setup School Year Later], AccelTest’s Getting Started screen appears.Before you start using AccelTest, you should read and follow the suggestions in the “To-Do List for Teachers Starting AccelTest” on page 9.To learn more about how students can use the program, see “Student Instructions for Using AccelScan” on page 19.](https://usermanual.wiki/Renaissance-Learning/REC-1001.Users-Manual-Part-1/User-Guide-588177-Page-8.png)
![Starting Acceltest10StartingAccelTestSetting up Your School Year1. Click on the Preferences drop-down menu, and click on School Year.The School Year Wizard (Assistant on Macintosh computers) starts.In the Welcome screen click [Next].2. In the School Year dialog box, type in your Start Date and End Date. (Hint: If you want to see a calendar, click on the calendar icons next to the Start and End date boxes. Use the arrows to select the year, and click on the month, then click on the day to enter the Start Date and End Dates.) Click [Next] after you enter your dates.3. Select the number of terms in the Terms drop-down menu in the Number of Terms dialog box. 4. In AccelTest, you will use Term to define blocks of time in the school year. You can select up to six terms. If you select two or more terms, you can choose to group them into a semester.Type in each Term start date or click the calendar icons to enter the term start and end dates in the Term Dates dialog box.Click [Next] after you enter your dates.5. Review the information you have entered in the Summary dialog box. Click [Back] if you need to correct any errors; then, click [Done].](https://usermanual.wiki/Renaissance-Learning/REC-1001.Users-Manual-Part-1/User-Guide-588177-Page-10.png)
![Starting AccelTest11StartingAccelTestEditing the Subjects List1. Click on the Preferences drop-down menu, and click on Subjects.2. In the Subjects dialog box, click on [Add] to add a subject. In the Add Subject dialog box, type the name of your subject. Click [OK].3. If you need to edit the name of a subject, click on the subject and then click [Edit]. Make your change and click [OK].If you want to keep your subject list short as you add more subjects, click on the unused subjects and then click [delete].When you finish adding, editing or deleting, click [OK].](https://usermanual.wiki/Renaissance-Learning/REC-1001.Users-Manual-Part-1/User-Guide-588177-Page-11.png)
![Starting Acceltest12StartingAccelTestSetting Category Values1. Click on the Preferences drop-down menu, and click on Categories.2. The Categories dialog box opens.If you need to edit an existing category, click in the box, and type your changes.You can type in a new category in a blank field, if needed.Click on the Drop Worst Score box, where applicable. In the Calculate Grades Using section, select Category Weights or leave Total Points Earned selected.Edit or type in a Weight value (if using category weights). Don’t forget Extra Credit, if used.Note: For more information on category weights, extra credit and grade calculation, see “Appendix: AccelTest’s Grade Calculations” on page 89.3. When you have finished adding or changing your category preferences, click the [OK] button.Setting Grading Scales1. Click on the Preferences drop-down menu, and click on Grading Scale.](https://usermanual.wiki/Renaissance-Learning/REC-1001.Users-Manual-Part-1/User-Guide-588177-Page-12.png)
![Starting AccelTest13StartingAccelTest2. The Grading Scale dialog box opens showing the Standard grading scale. If you are not using a standard grading scale, choose another option from the Grading Scale drop-down list.If you are using a standard grading scale, you can determine the minimum percentage needed for each letter grade by clicking the box and changing the number. Note: The number you type is the minimum percent necessary to obtain that letter grade.For example, if your grading scale does not use the A+ as a letter grade you can leave the box next to A+ blank. This can be done for any letters not used in your grading system.If you selected Pass/Fail, in the dialog box, you can change the percentage delineating pass/fail. Click in the box next to Pass to enter the new number.For the Outstanding/Satisfactory/Unsatisfactory option, you can change the percentage delineating Outstanding and Satisfactory in the boxes next to each. The 1 to 10 grading scale is used internationally and automatically assigns a number grade of 1 - 10 depending upon the percentage earned. 3. When you have finished changing your grading scale preference, click the [OK] button.Setting Exams Preference1. Click on the Preferences drop-down menu, and click on Exams.2. In the Exams dialog box, you can edit the percent that exams count toward either a Term Grade, Semester Grade, or Final Grade. The Term and Semester selections available will vary according to School Year preference settings. Click [OK] when you are finished.](https://usermanual.wiki/Renaissance-Learning/REC-1001.Users-Manual-Part-1/User-Guide-588177-Page-13.png)
![Starting Acceltest16StartingAccelTestScoreBefore you can score any scan cards in AccelTest, you must install and connect the AccelScan scanner. See the AccelTest and Renaissance Classroom Response System Installation Guide. You must create an assignment or create a score key for an existing assignment. To create an assignment, see “Creating Questions for a New Assignment” on page 64. To create a score key, see “Creating New Score Key for Existing Assignment” on page 66.The Score button in the Getting Started screen permits students to use of the AccelScan card reader to score the assignments. See “Student Instructions for Using AccelScan” on page 19. Teachers can score the scan cards. See “Teacher Instructions for Scoring Student Assignments” on page 30. In both cases, AccelTest records student grades.Preparing AccelTest for Students to Score Scan CardsTo prepare AccelTest for student scoring of their scan cards, simply click [Score] in the Getting Started screen. (Do not start scoring from the Gradebook to prevent unauthorized access to AccelTest.) Instructions that you can copy for students to use for scoring are found in“Student Instructions for Using AccelScan” on page 19. Note: Once you click on [Score], the application locks, and the students will not be able to access any other part of the program. Password to Unlock AccelTest To return to AccelTest from student scoring, you must enter the AccelTest password in the “Enter your password to unlock AccelTest” box in the Unlock AccelTest screen. Then click [OK]. Your default password is admin.To change the password, use the Password Preference; see page 52.Replace with 4 tabs panel](https://usermanual.wiki/Renaissance-Learning/REC-1001.Users-Manual-Part-1/User-Guide-588177-Page-16.png)
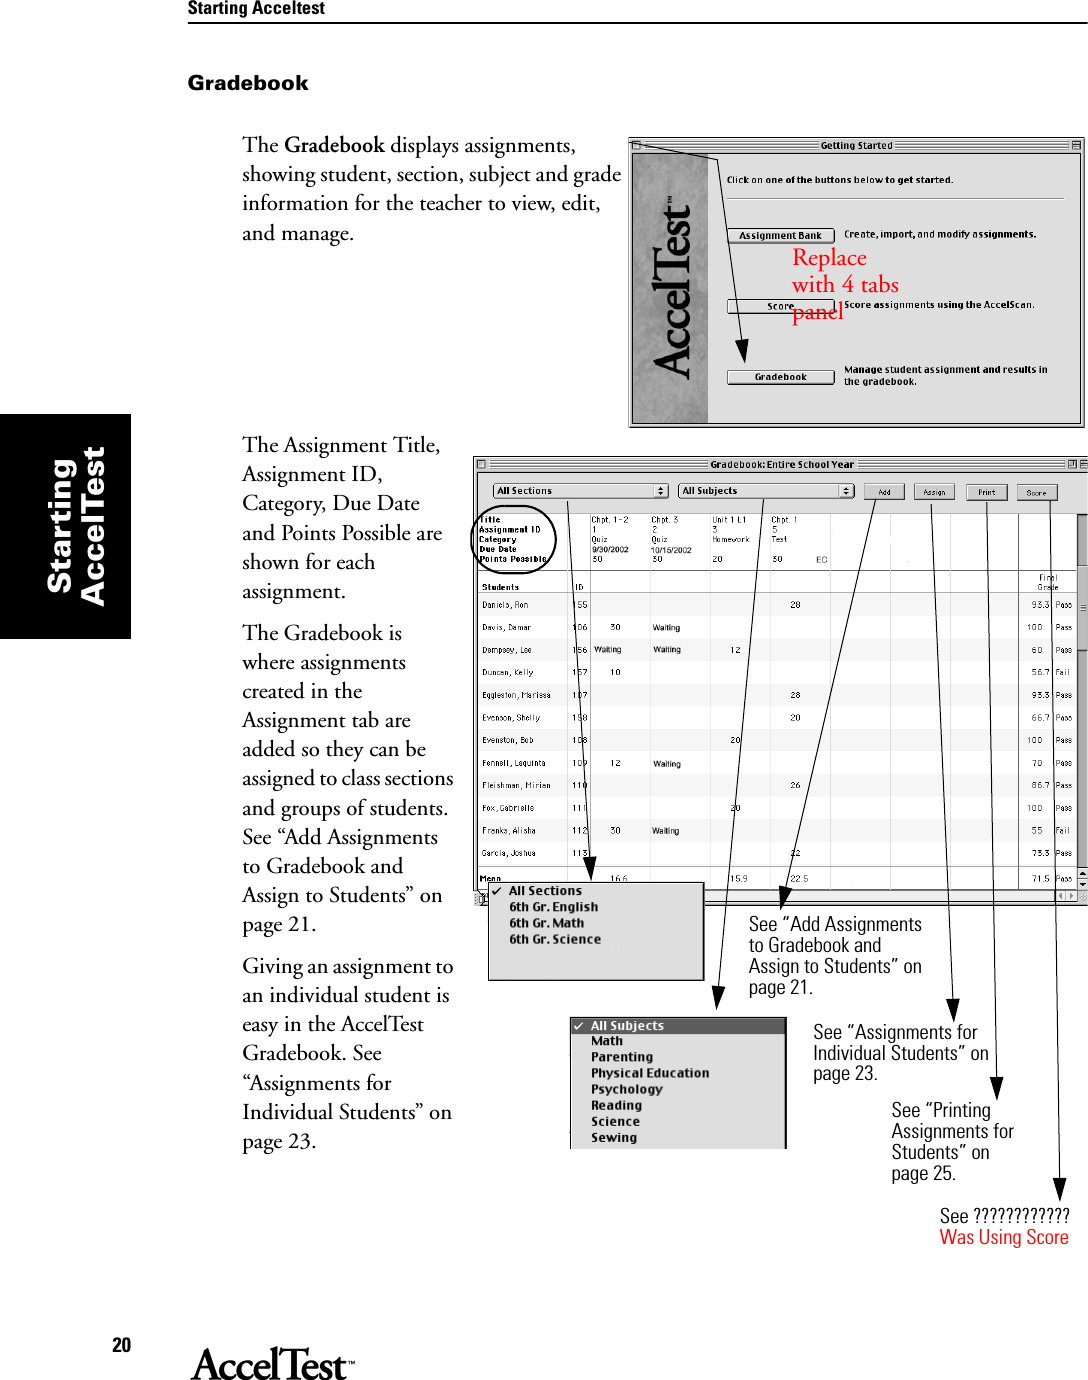
![Starting AccelTest21StartingAccelTestFrequently used Gradebook FeaturesClicking on the [Gradebook] button opens the Gradebook.The teacher can add (or import) students in Gradebook.The Gradebook allows the teacher to use drop-down menus to switch between different sections of students or different subjects. The Gradebook contains information on assignment title, id, category, due date, and points possible. The teacher uses Gradebook to give assignments to sections, groups of students or individual students.Add Assignments to Gradebook and Assign to StudentsThe Add Assignment Wizard or Assistant helps you add to the Gradebook, assignments that you have created in the Assignment tab. Once they are recorded in the Gradebook, the Add Wizard/Assistant helps designate assignments for sections, groups of students and individual students.1. Start AccelTest and click on the [Gradebook] button in the Getting Started screen. If you want to select a Section, click on the Sections drop-down menu and click on the section.To start the Add Assignment Wizard/Assistant, in the Gradebook screen, click on the [Add] button.Note: Extra Credit assignments have EC after Points Possible in the column head. Using GradebookReplace with 4 tabs panel](https://usermanual.wiki/Renaissance-Learning/REC-1001.Users-Manual-Part-1/User-Guide-588177-Page-21.png)
![Assignment22Assignment2. In the Select Assignment screen, click on the Select Assignment drop-down menu and select your subject if you want to limit the list of assignment titles by subject. Click on the assignment title you are adding/assigning. Click [Next].In the Enter Gradebook Details dialog box, enter a short title for your assignment in the Short Title box.Click on the term that applies in the Term drop-down list, and the category in the Category drop-down list. Category choices are Homework, Test, Quiz, or Extra Credit. If you want to make an assignment extra credit, click on the box next to Assignment is extra credit. (EC will appear next to Points Possible in the Gradebook column. See Note on preceding page.) Do not click on Assignment is Extra Credit for an Extra Credit category assignment. Note: For an explanation of when to use Extra Credit Category and when to check Assignment is extra credit, see “Grade Calculations” on page 90. If it is an exam, click on the box next to “Assignment is an exam.” Click [Next] to continue.3. In the Enter Due Date dialog box, click on Yes if your assignment needs a due date. Type in the date or click on the calendar icon and click to select the year, month and day the assignment is due. Click on No if there is no due date. Note: If you do not enter a due date for an assignment, AccelTest will not track it as a required Assignment. Click [Next] to continue.](https://usermanual.wiki/Renaissance-Learning/REC-1001.Users-Manual-Part-1/User-Guide-588177-Page-22.png)
![Assignment23Assignment4. In the Assign to Students dialog box, click on “All Students” if all students are required to do the assignment.To assign to the students in a section, click on “Students in a section.” Then click on the section name in the drop-down list.To assign to individual students, click on “Select specific students.” 5. In the Select Students dialog box, look in “Students to choose from” to find your student(s).Since you only want to add some of the students, first hold down the <Ctrl> key (Windows) or the <z> key (Macintosh) and then click on the students you want to add. You can also select a group of students by clicking on the first student name, holding down the <Shift> key, and clicking on the last student name. Click on the [Add] button, then the [Next] button.To add all of the students, click on the [Add All] button, and then the [Next] button.Check the information in the Summary screen. Click [Back] to go back and make corrections.If the information is correct, click [Done].Your assignment will appear at the top of the Gradebook screen, to the right of previously added assignments. Students you have assigned this assignment to, should show “Waiting” in the column under your new assignment.Assignments for Individual StudentsThe Assign button allows you to quickly assign one or more assignments to individual or multiple students. It is helpful when a new student joins a class in progress. 1. If the student is not in your school database, add or import the student. See“New Students” on page 34.](https://usermanual.wiki/Renaissance-Learning/REC-1001.Users-Manual-Part-1/User-Guide-588177-Page-23.png)
![Assignment24Assignment2. Next, from the Gradebook screen, click on the Sections drop-down menu and then click on the section the new student is in.3. In the Subject drop-down menu, click on the subject.4. Under Students, find the name of the student you are adding. In the assignment column, under your assignment, click once in the row with the name of the new student you are giving the assignment to. Then click on [Assign]. If you have more than one assignment to give to a student, click on the students name and all will be assigned.You can give the assignment to all the students in the students column, by clicking on the assignment name.Removing/Clearing Assignments in the GradebookTo completely remove an assignment from the Gradebook, see Removing Assignments. To clear an assignment from a student see Clearing Assignments.Removing Assignments: If you want to remove an assignment that has been given to students, you can do so by clicking on the column heading for the assignment, then, in the Gradebook drop-down menu clicking on Remove. This will remove all student records for this assignment. If this is OK, click [Yes] in the dialog box. Clearing Assignments: You can clear assignments from individual students by clicking on the cell in the assignment column after the students name and clicking on the Edit drop-down menu and then clicking on Clear. This will remove student score data on this assignment for the student. If this is OK, click [Yes] in the dialog box to clear the assignment.](https://usermanual.wiki/Renaissance-Learning/REC-1001.Users-Manual-Part-1/User-Guide-588177-Page-24.png)
![Assignment25AssignmentPrinting Assignments for StudentsFrom the Gradebook, you can print a master for each assignment variation, or print individual assignments for each of your students. From the Gradebook, click on the top of the assignment column, then click on [Print]. In the Print Assignment dialog box:• click on [Master Copies] to print a master of each test variation. Use this option if you would like to duplicate your own copies of the assignment to distribute.• click on [Individual Copies] to print a single assignment for each student. Use this option to print out all copies for distribution.Viewing Assignment Item Scores in the GradebookNote: Only assignments that have been added to the Gradebook will appear in the Gradebook screen. To edit and view more assignments (not yet in Gradebook), see “How to Use the Assignment Editor” on page 74.You can view assignment points per item and see how your students scored on items (in completed and scored assignments) in the Gradebook. 1. From the Gradebook screen, find the assignment you want item information on. Double click in the column heading for the assignment.](https://usermanual.wiki/Renaissance-Learning/REC-1001.Users-Manual-Part-1/User-Guide-588177-Page-25.png)
![Assignment26Assignment2. An expanded screen will open for the selected assignment.3. Notice that there is a column for each item on your assignment. The points per item and an abbreviation for the item type are at the top of each column. For an explanation of the item abbreviations see “Creating Questions for a New Assignment” on page 64.4. The assignment Variation for each student (whose card has been scanned) is shown. You can select the Variation view in the Variation drop-down menu.5. For assignments that have been (scored), the points earned per item for each student appears in the columns. The points total for the assignment per student is shown in the Score column.At the bottom, click on Mean or Median to switch the view. The mean points per item and mean total score are shown at the bottom, in this example.6. To return to the Gradebook screen, click [Done] or click on the File menu and click Close.](https://usermanual.wiki/Renaissance-Learning/REC-1001.Users-Manual-Part-1/User-Guide-588177-Page-26.png)
![Assignment27AssignmentScoring Assignment Items in the GradebookYou can score and edit individual item points (for an assignment) in the Gradebook. Note: Normally the easiest way to score student’s assignments is to scan the cards with the AccelScan. If your students have not used AccelScan to score their own scan cards, you can scan your students cards yourself. See “Using AccelScan from the Gradebook” on page 32.The steps below, “Entering Scores at the Keyboard” describe how to enter student scores for assisted response items from your computer keyboard. For information on how to edit student scores that have been already been entered, see “Editing Scores at the Keyboard” on page 28. Note: If your assignment contains free response items, complete work on the assisted response items as described below. Then you should refer to “Scoring Free Response Items” on page 30. Entering Scores at the Keyboard1. From the Gradebook screen, find the assignment you want to score. Double click in the column heading for the assignment. 2. An expanded screen will open for the selected assignment. 3. There is a column for each item on the assignment. Double click in the first space in the first column (first item).If the default variation of 1 was changed to 2 or higher, the Select Assignment Variation dialog box opens. (See “Variations” on page 59.) Find the assignment variation on the student assignment or scan card where the student recorded the answers. In the Variation drop-down menu, click on the variation letter. Click [OK].](https://usermanual.wiki/Renaissance-Learning/REC-1001.Users-Manual-Part-1/User-Guide-588177-Page-27.png)
![Assignment28Assignment4. The Score Items dialog box will open. Look at the Item entry, “1 (8) of 10.” In the example shown, this describes the variation; your original item (8) was shuffled and is currently item 1 for William Abbot and other students who received the A variation.The correct answer for item 1, is “D” as shown at Correct Answer.Look at the answer marked by William for item 1 on this assignment, and then click on the corresponding letter next to Student Answer. Click [Next].Repeat, entering William’s answer for each item. When you reach the last item, Click [Done].Correct and incorrect points for William’s answers will be entered in the row to the right of his name. The Score (%) column will show William’s total assignment score.5. Repeat step 3 and 4 for each student.6. After you have entered the items for each student, you are finished. To return to the Gradebook screen, click on the File menu and click Close.Editing Scores at the Keyboard1. From the Gradebook screen, find the assignment where you want to edit item score(s). Double click in the column heading for the assignment.](https://usermanual.wiki/Renaissance-Learning/REC-1001.Users-Manual-Part-1/User-Guide-588177-Page-28.png)
![Assignment29Assignment2. An expanded screen will open for the selected assignment. 3. Find the student whose score you want to edit. Find the variation under the Variations column for that student. 4. Click on the student’s variation in the Variation drop-down menu.5. The window that opens lists the students with the selected variation. Find your student and then double-click on the item you want to edit.6. The Score Items dialog box will open. Look at the Item entry, “4 (5) of 10.” In the example shown, this describes the variation; your original item (5) was shuffled and is currently item 4 for Jane Douglas and other students who received the E variation.The correct answer for item 4, is “D” as shown at Correct Answer. If you are correcting an item incorrectly scored, you need to deselect the incorrect answer at B by clicking on the checked box next to it. Then enter the correct answer by clicking the check box next to D to select it. If you have other items that need correcting for Jane, Click [Next]. If not click [Done].Edited item points for Jane’s answers will be entered in the row to the right of her name. The Score (%) column will show Jane’s total assignment score.7. Repeat steps 4, 5, and 6 for each student with items to edit for this variation.8. Go back to step 3 and select the next variation and repeat steps 4, 5, and 6 for that variation for each student.9. After you have edited the items for each student in each variation, you are finished. To return to the Gradebook screen, click on the File menu and click Close.](https://usermanual.wiki/Renaissance-Learning/REC-1001.Users-Manual-Part-1/User-Guide-588177-Page-29.png)
![Assignment30AssignmentTeacher Instructions for Scoring Student AssignmentsScoring Free Response ItemsFor assignments with only assisted response items, students can score their own assignments using AccelScan. AccelTest will record the grades in the Gradebook. See “Student Instructions for Using AccelScan” on page 19. The teacher can use also AccelScan to score student scan cards.If assignments contain one or more free response items, only the assisted response items are scored and recorded. The Gradebook assumes that all students earn all of the points on free response items.Free response items have to be graded by the teacher. To assist the teacher, AccelTest includes a report called the Free Response Grading Worksheet. The worksheet provides a place for teachers to record reduced point scores for free response items. The teacher must then update the Gradebook.The Free Response Grading Worksheet should be printed after the students scan cards have been scored. This shows the points earned for the assisted response items that were scanned, and aids the teacher in grading the free response items. Follow these instructions to score and record assignments with assisted response items and free response items.1. When your students complete their assignment, have them score their assignments. See “Student Instructions for Using AccelScan” on page 19. 2. After all students have completed and scored the assignment, go to the Gradebook. Click in the top of the assignment column. Print a Free Response Grading Worksheet report for the assignment. To print the Free Response Grading Worksheet Report:• Click on the Reports drop down menu, • Click in the top of column for the assignment, and• Click on Free Response Grading Worksheet.• Click [Preview] or [Print] if asked.](https://usermanual.wiki/Renaissance-Learning/REC-1001.Users-Manual-Part-1/User-Guide-588177-Page-30.png)
![Assignment31Assignment3. Record your scores for the students in the Free Response Grading Worksheet. If your assignment has variations, you will have a separate worksheet for each variation.4. Return to your assignment in the Gradebook. For assignments that have been assigned, completed and scored, the points scored per item for each student appears in the columns.Note: Free response items will show the full point value until you evaluate each student’s free response items and decrease the items point value as needed.To adjust the free response point value, double click in a free response item column (item/column 10 here). Then enter the point value you determined for each students free response item. In this case the item was a short answer (S.A.) item.In the first row, John missed item 10, so item 10 has been scored at 0.Next, to adjust Ron’s score, double-click in the item 10 row for Ron. Enter the corrected point value in the Points Earned box. Click [Done] and go on to the next free response student item you need to adjust. 5. When you have completed entering Free Response Item data, click on the File menu and click Close.](https://usermanual.wiki/Renaissance-Learning/REC-1001.Users-Manual-Part-1/User-Guide-588177-Page-31.png)
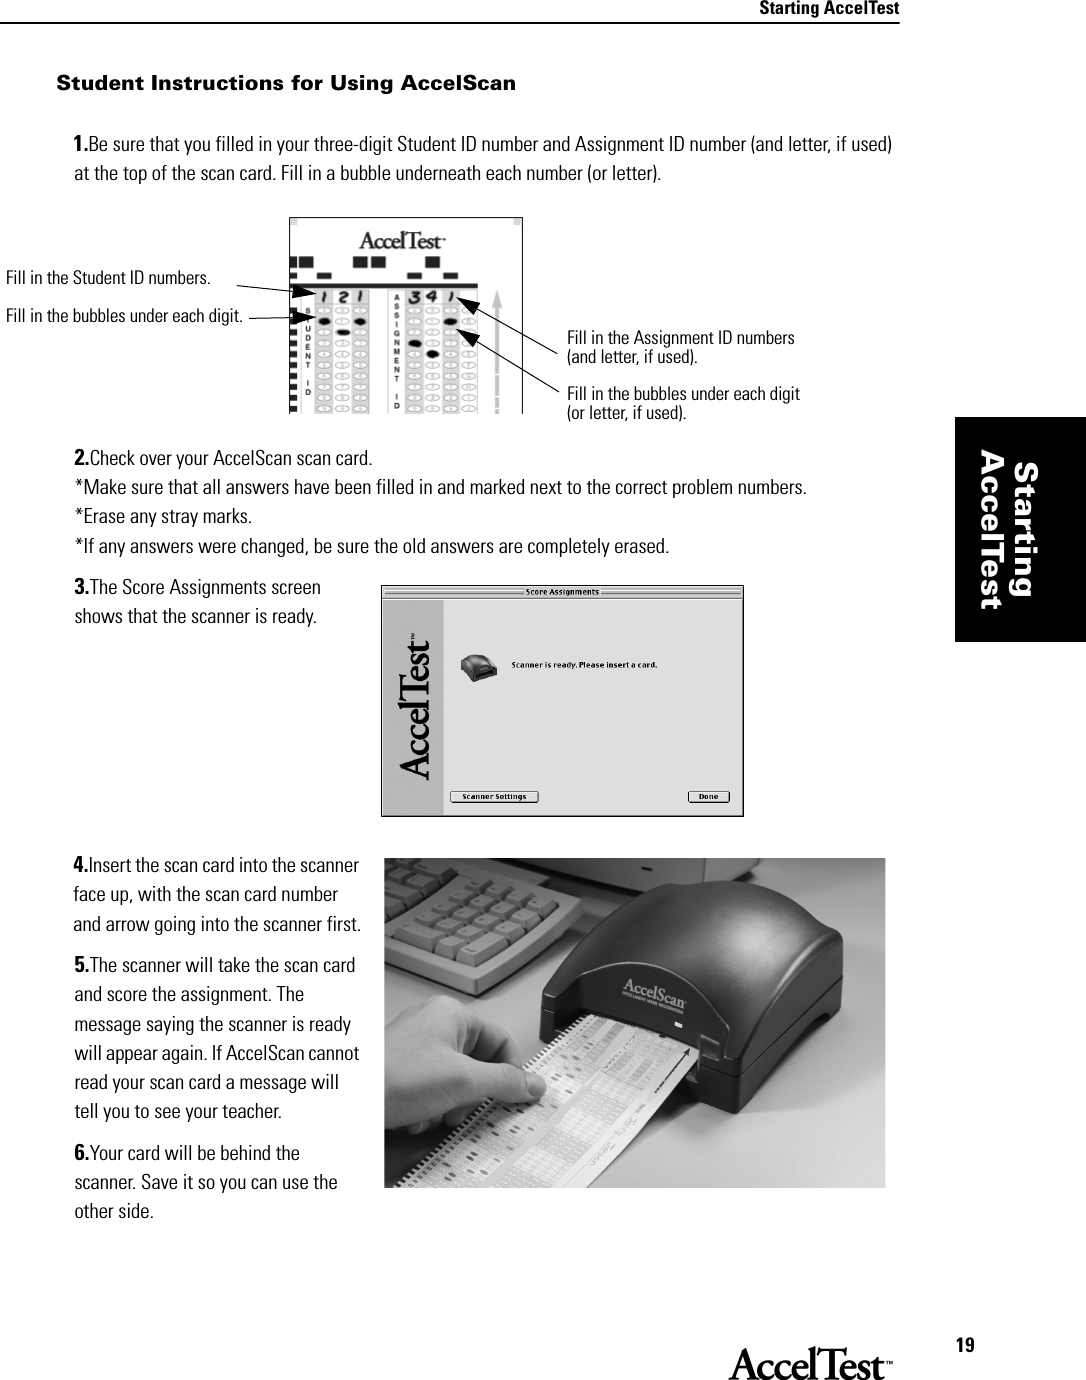
![Assignment32AssignmentUsing AccelScan from the Gradebook1. Be sure that students filled in their three-digit Student ID number and Assignment ID number (and letter, if used) at the top of the scan card. Fill in a bubble underneath each number (or letter). 2. Check over the students AccelScan scan card. *Make sure that all answers have been filled in and marked next to the correct problem numbers.*Erase any stray marks. *If any answers were changed, be sure the old answers are completely erased.3. From the Gradebook, click the [Score] button.4. The Score Assignments screen shows that the scanner is ready.5. Insert the scan card into the scanner face up, with the scan card number and arrow going into the scanner first.6. The scanner will take the scan card and score the assignment. The message saying the scanner is ready will appear again. If AccelScan cannot read your scan card a message will tell you to see your teacher. 7. The card will be behind the scanner. Save it so you can use the other side. Fill in the Assignment ID numbers (and letter, if used).Fill in the bubbles under each digit (or letter, if used).Fill in the Student ID numbers.Fill in the bubbles under each digit.](https://usermanual.wiki/Renaissance-Learning/REC-1001.Users-Manual-Part-1/User-Guide-588177-Page-32.png)
![Assignment34AssignmentGradebook Drop-down MenuFrom AccelTest’s Getting Started window, click the [Gradebook] button. The Gradebook drop-down menu provides access to many key Gradebook functions. When you start using AccelTest for the first time, you will need to do this in Gradebook:• First, you must create your class sections. See“New Section” on page 39. • Next, enter your students. See the New Students section below.New StudentsNote: To save time, you should create your class sections before you add or import students. See“New Section” on page 39. If you are adding students who are already in a database that you can import into AccelTest, see “Importing Student Data into AccelTest” on page 36.1. If you need to add new students who are not in a database at your school, go to the Gradebook menu and click New Students.2. In the New Students dialog box, under the Names tab, type in each student’s name in the “First Name” and “Last Name” boxes. Click [Add] and repeat for each student you are adding. Note: If you will be adding the student(s) to a class section, add all the students for the class section at one time, then go to step 3 to select the class section. If you are not adding the students to a class section, go to step 4.3. If you want to add the students to a class section at this time, click the Sections tab. Under “Sections to choose from,” click on the class section you want. Click [Add]. Click OK. 4. Repeat steps 1 - 3 to add more students. When you have finished adding students click [OK].](https://usermanual.wiki/Renaissance-Learning/REC-1001.Users-Manual-Part-1/User-Guide-588177-Page-34.png)
![Assignment35AssignmentEdit Student1. To edit information for a student, from the Gradebook screen, first click on the students name. Then click on Edit Student in the Gradebook drop-down menu.2. You can edit the student’s name, in the Edit Student dialog box Name tab. To add the student to a section or delete from a section, simply click on the Sections tab.In the Sections tab dialog box, under Sections to choose from, click on the section you want to add the student to. To delete the student from a section, under Sections enrolled in, click on the section you want to remove the student from. Click the [Remove] button.When you have finished, click [OK].Delete StudentNote: Deleting a student will result in the loss of all the information for that student, including class enrollment, grades, etc.1. To delete information for a student, click on the students name and then click on Delete Student in the Gradebook drop-down menu.2. When you are asked if you want to delete this student, click [Yes].](https://usermanual.wiki/Renaissance-Learning/REC-1001.Users-Manual-Part-1/User-Guide-588177-Page-35.png)