SKYPINE ELECTRONICS CNE6322A ALL IN ONE DVD PLAYER User Manual
SKYPINE ELECTRONICS (SHEN ZHEN) CO., LTD. ALL IN ONE DVD PLAYER
UserManual.wiki
>
SKYPINE ELECTRONICS
>
CNE6322A User Manual
User Manual
Navigation menu
Upload a User Manual
Namespaces
Wiki Guide
HTML
PDF
Info
Views
User Manual
Discussion / Help
Navigation
![Panel [1] The window to receive the signal from the remote-control. [2] The Indicator Light. It will be green when there is a disc in it or red when there is not any disc. [3] Disc Slot. [4]The Eject Button. [6] Press to select DVD mode. [7] What below it is the Micro-SD slot and the hole of reset. [8] Press to switch between Navigation and playback. [9] Press to select iPod mode. [10] Press to reduce the volume. [11] Press to increase the volume. [12] Long-press it to power off the device and short-press it to get mute. Remote Control Buttons 1 2 2 3 4 5 6 7 8 9 10 11 12](https://usermanual.wiki/SKYPINE-ELECTRONICS/CNE6322A/User-Guide-1877627-Page-1.png)
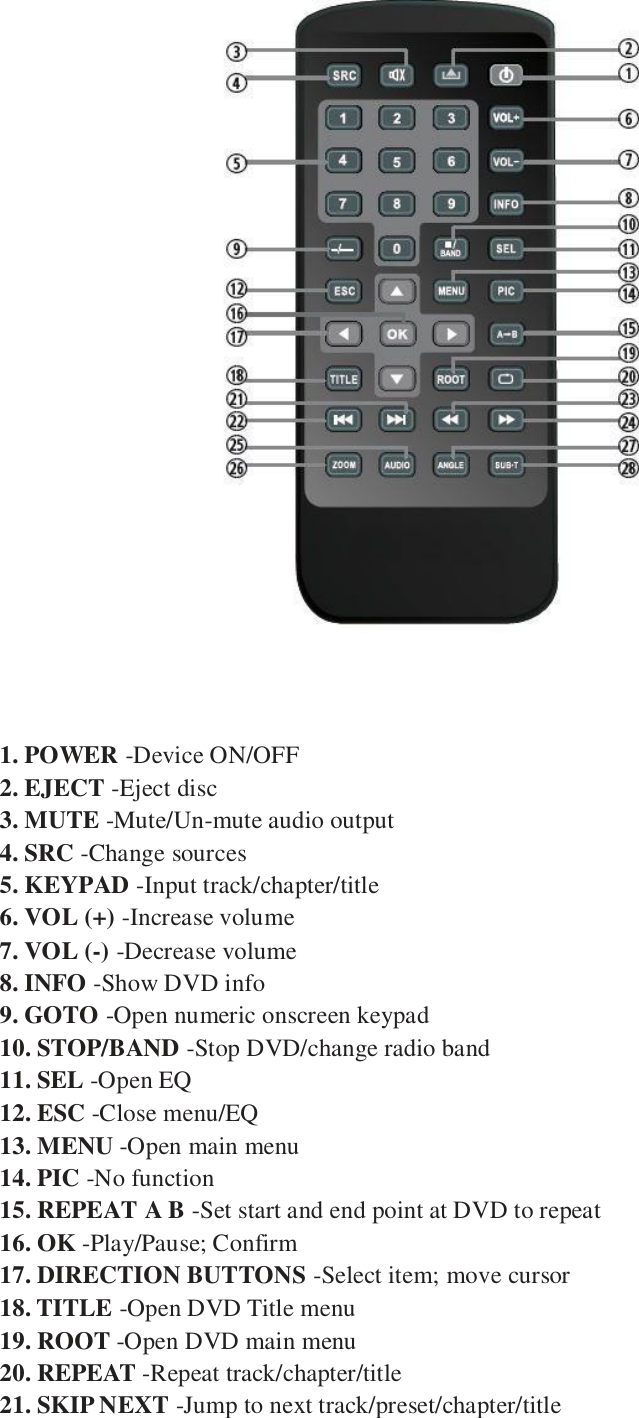


![Previous track. Play/Pause. Next track. To playlist menu of DVD. Full screen mode. Rotate picture. Tuner [ ]Loc/DX status;](https://usermanual.wiki/SKYPINE-ELECTRONICS/CNE6322A/User-Guide-1877627-Page-9.png)
![[ ]Frequency or station name; Press the [ ] icon to seek down; Press the [ ] icon to seek up; [ ]ManualTuning:Red line marks current frequency and tap to select frequency; Press the [ ] icon to increase the tuning frequency one step at a time; Press the [ ] icon to decrease the tuning frequency one step at a time; [ ]Function area. Press the [ ] icon to scroll right; Press the [ ] icon to scroll left; [ ]Storing a Station; Prsee it show the picture: Six numbered preset buttons stored and recall stations for each band.Six stored stations for the current band appear on the screen,touch the channel directly for use.You can press the other buttons on the Radio panel to see the other six stations. How to store a station: 1.Select a band(If needed),then select a station.Example:FM1103.6MHz 2.Touch and Hold for 3 seconds the desired preset number to store Radio station. [ ]To select a radio band tap on a center button. Touch it on the Radio Panel](https://usermanual.wiki/SKYPINE-ELECTRONICS/CNE6322A/User-Guide-1877627-Page-10.png)
![FM1,FM2,FM3 and AM1,AM2. [ ]Touch to activate/deactivate Scan Mode.Intro-scan of all stations in reception range.You can hear each station for a short moment. Lock to the one you like by pressing scan again. [ ] DX and Loc Stations Seeking(LOC).Touch LOC/DX to omit or allow reception of stations with weak signals.If LOC is activated,it will exclusively finds trong stations.The status appears on the screen. [ ] Auto store. Press the icon on the screen to automatically scan and store all stations in current six band. [ ] Program Scan. Press the icon on the screen for scan the stations in the six preset channels in the current band. [ ] Touch to display EQ setting. Bluetooth Bluetooth main menu: Tap icon to enter certain function. [] Onscreen keypad](https://usermanual.wiki/SKYPINE-ELECTRONICS/CNE6322A/User-Guide-1877627-Page-11.png)
![: [ ]The column to display dialed number. [ ]First incoming call [ ]Second incoming call. [ ]Back to BT Main menu [ ]Keypad [ ]Deletes last digit [ ]Pick up call/Switch to second call [ ]Hang up active call/Back to first call [ ]Toggle to shift call between hands free and mobile phone ( privacy mode ) [] Contacts](https://usermanual.wiki/SKYPINE-ELECTRONICS/CNE6322A/User-Guide-1877627-Page-12.png)
![[ ]Back to BT Main menu [ ]Tap a contact number to start a call [ ]Tap on star to save as favorite [ ]Search [ ]Display Input [ ]Tap to delete last character [ ]Quit keypad [ ]Switch to next page of keypad [ ]No function, when keypad is active [ ]Choose contact name from list [ ]Browse contact list up/down](https://usermanual.wiki/SKYPINE-ELECTRONICS/CNE6322A/User-Guide-1877627-Page-13.png)
![[ ]Call Log [ ]Back to BT Main menu [ ]Tap to display outgoing call list [ ]Tap to display incoming call list [ ]Tap to display missed call list [ ]Go to contacts page [ ]Go to favorites page [ ]Tap on entry to call [ ]Page up/down NOTE: If it’s the first time you use it,it will load informaintion from your cell phone. [] Favourites](https://usermanual.wiki/SKYPINE-ELECTRONICS/CNE6322A/User-Guide-1877627-Page-14.png)
![[ ]Tap any name to call favourite [ ]Delete favourite [] A2DP (de-)activation: [ ]A2DP On/Off (highlighted=ON) [ ]Control Playback [ ] Bluetooth Settings Function One: Pairing a mobile phone: ○1 Enter BT settings > Device](https://usermanual.wiki/SKYPINE-ELECTRONICS/CNE6322A/User-Guide-1877627-Page-15.png)
![○2 Tap on “Add” to trigger a search for BT devices ○3 Choose your mobile phone from the list or retry searching. Press “Add”. [ ]Back to BT settings [ ]Browse list (up/down) [ ]Tap to input PIN for pairing ○4 Enter pin code and tap OK or retry.](https://usermanual.wiki/SKYPINE-ELECTRONICS/CNE6322A/User-Guide-1877627-Page-16.png)
![[ ]Pin code [ ]Deletes the last digit [ ]Acknowledge pin code and continue ○5 Upon request enter identical pin code on your mobile and acknowledge.You should now get a screen saying "Device successfully paired". [ ]Tap it to back to the BT main menu. Fuction Two: Setup](https://usermanual.wiki/SKYPINE-ELECTRONICS/CNE6322A/User-Guide-1877627-Page-17.png)
![[ ]Back to BT Main menu []To set “Auto Connect” ON or OFF. [ ]Tap to change the pin code [ ]Tap +/-to adjust microphone gain USB 1.Accessing USB mode: Touch the USB icon on the TFT monitor. 2. Playback page of USB Audio:](https://usermanual.wiki/SKYPINE-ELECTRONICS/CNE6322A/User-Guide-1877627-Page-18.png)
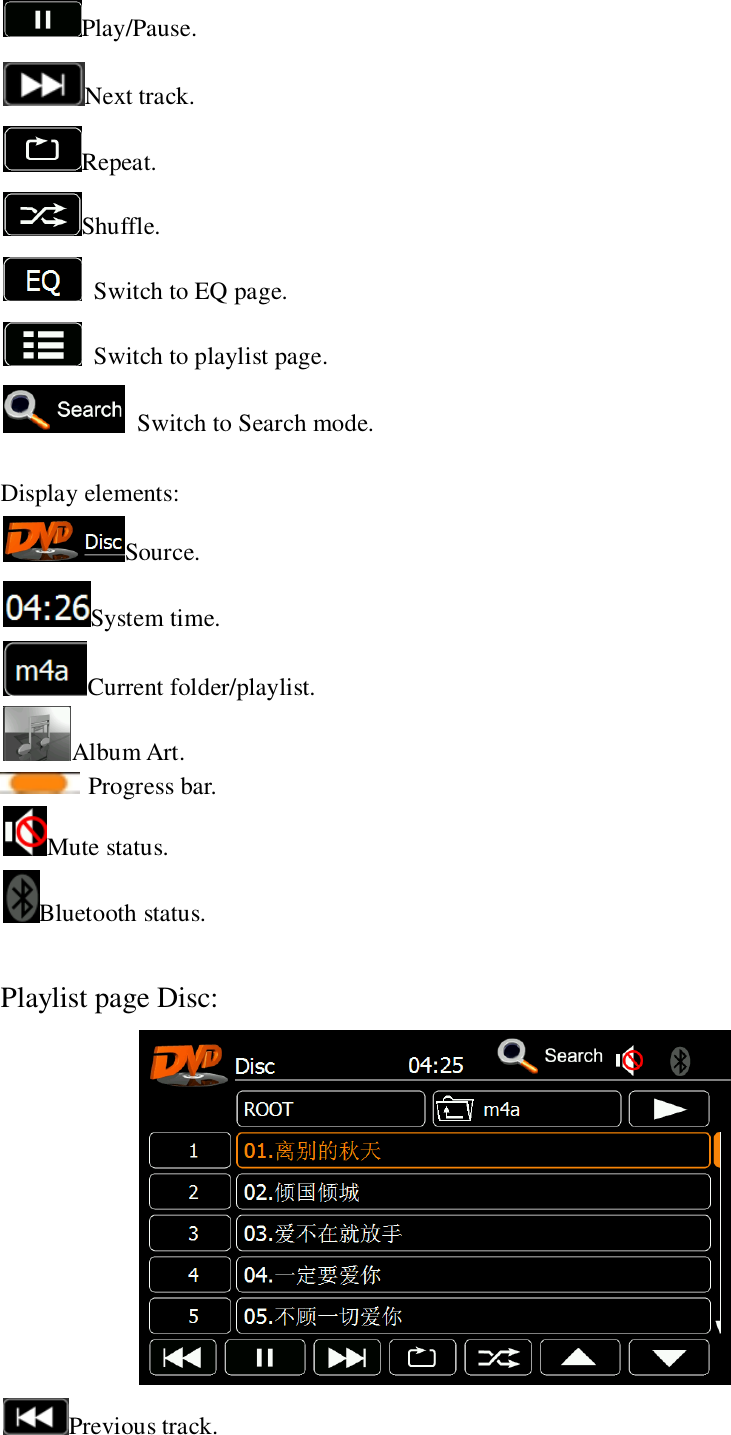
![(1) Display elements: [ ]:Current time. [ ]:Current Source. [ ]:Current folder/playlist. [ ]:Album Art. [ ]:Progress bar. []:Current temporal position in track. []:Total duration of track. [ ]:Track index. [ ]:ID3 tag information.(Note: Depends on the Disc your playing.) [ ]:BT icon. (2) Control elements: [ ]:Return to the Main Menu by press the icon. []:Previous track. [ ]or[]:Play/Pause.](https://usermanual.wiki/SKYPINE-ELECTRONICS/CNE6322A/User-Guide-1877627-Page-19.png)
![[]:Next track. [ ]:Repeat folder .Switch between [ ] and [ ] by press the icon. (Note:[ ]:Repeat track.) [ ]:Touch to Random play. []:Touch to go to Equalizer(EQ) setting. [ ]:Touch to view track list page. [ ]:Touch to display the numeric keypad on the screen and then use the numeric keypad to access a track directly. 3. Search function: []:Enter track numbers, then press the icon to start searching. [ ]:Return to playback page by press the icon. [ ]:Clear. 4.Playlist page of USB Audio/Picture/Video:](https://usermanual.wiki/SKYPINE-ELECTRONICS/CNE6322A/User-Guide-1877627-Page-20.png)
![(1) Display elements: [ ]:Track index. [ ]: Track/folder/playlist. Touch to select a song. (2) Control elements: [ ]: Touch to view Root Display. [ ]: Folder up (Note: Current folder is Music). [ ]: Switch to playback page. [ ]: Cursor down. [ ]: Cursor up. [ ]: Previous track. [ ]or[]:Play/Pause. []:Next track. [ ]:Repeat folder .Switch between [ ] and [ ] by press the icon. (Note:[ ]:Repeat track.) [ ]:Touch to Random play.](https://usermanual.wiki/SKYPINE-ELECTRONICS/CNE6322A/User-Guide-1877627-Page-21.png)
![[ ]:Press to access USB Audio search function. 5. Playback page of USB Picture: []:Previous picture. [ ]or[]:Play/Pause. []:Next picture. [ ]:Touch to view picture list page. [ ]:Touch to hide the locker bar. [ ]:Touch to revolve the picture. 5. Playback page of USB Video: []:Previous video. [ ]or[]:Play/Pause. []:Next video.](https://usermanual.wiki/SKYPINE-ELECTRONICS/CNE6322A/User-Guide-1877627-Page-22.png)
![[ ]:Touch to view picture list page. [ ]:Touch to hide the locker bar. [ ]:Progress bar. []:Current temporal position in track. []:Total duration of track. IPOD 1. Accessing IPOD mode: Touch the IPOD icon on the TFT monitor. 2. Playback page of IPOD AUDIO: (1) Display elements: [ ]:Current time. [ ]:Current Source.](https://usermanual.wiki/SKYPINE-ELECTRONICS/CNE6322A/User-Guide-1877627-Page-23.png)
![[ ]:Current folder/playlist. [ ]:Album Art. [ ]:Progress bar. []:Current temporal position in track. []:Total duration of track. [ ]:Track index. [ ]:ID3 tag information.(Note: Depends on the Disc your playing.) [ ]:BT icon. (2) Control elements: [ ]:Return to the Main Menu by press the icon. []:Previous track. [ ]or[]:Play/Pause. []:Next track. [ ]:Repeat folder . []:Repeat track. []:Repeat all track. [ ]:Touch to Random play. []:Touch to go to Equalizer(EQ) setting. [ ]:Touch to view track list page.](https://usermanual.wiki/SKYPINE-ELECTRONICS/CNE6322A/User-Guide-1877627-Page-24.png)
![[]:Tapping on Search pops up an alphabetic keyboard ,allowing you to enter an initial letter. Alphabetic search is unique for iPod mode. 3. Search function: []:Enter an initial letter, then press the icon to start searching. [ ]:Return to playback page by press the icon. [ ]:Clear. 4. Playlist page of IPOD Audio /Video: (2) Control elements: [ ]:For playlist of Video/Audio on iPod press the icon.. [ ]: Track/folder/playlist. Touch to select a video/audio. []:Touch to view Root Display.](https://usermanual.wiki/SKYPINE-ELECTRONICS/CNE6322A/User-Guide-1877627-Page-25.png)
![[]:.Folder up (Note: Current folder is Root). [ ]:Switch to playback page. [ ]:Cursor down. [ ]:Cursor up. []:Previous track. [ ]or[]:Play/Pause. []:Next track. [ ]:Repeat folder . []:Repeat track. []:Repeat all track. [ ]:Touch to Random play. [ ]:Press to access IPOD Audio search function. 5. Playback page of IPOD Video: NOTE: Please make sure the iPod video out is ON. []:Previous video. [ ]or[]:Play/Pause. [ ]: Next video. [ ]:Touch to view picture list page.](https://usermanual.wiki/SKYPINE-ELECTRONICS/CNE6322A/User-Guide-1877627-Page-26.png)
![[ ]:Touch to hide the locker bar. [ ]:Progress bar. []:Current temporal position in track. []:Total duration of track. AUXIN External peripheral devices, including a game console, camcorder, navigation unit, iPod/iPhone, etc. can be connected to the AUX-IN connector on the front or back of this unit using the A/V media cables. Switching to AUX-IN mode Touch [] button on Main Menu to select desired mode (when unit is reading). If the external device connected to AUX-IN input have audio signal, the unit will broadcast audio of external device. Touch [ ] area to return to the Main Menu.](https://usermanual.wiki/SKYPINE-ELECTRONICS/CNE6322A/User-Guide-1877627-Page-27.png)
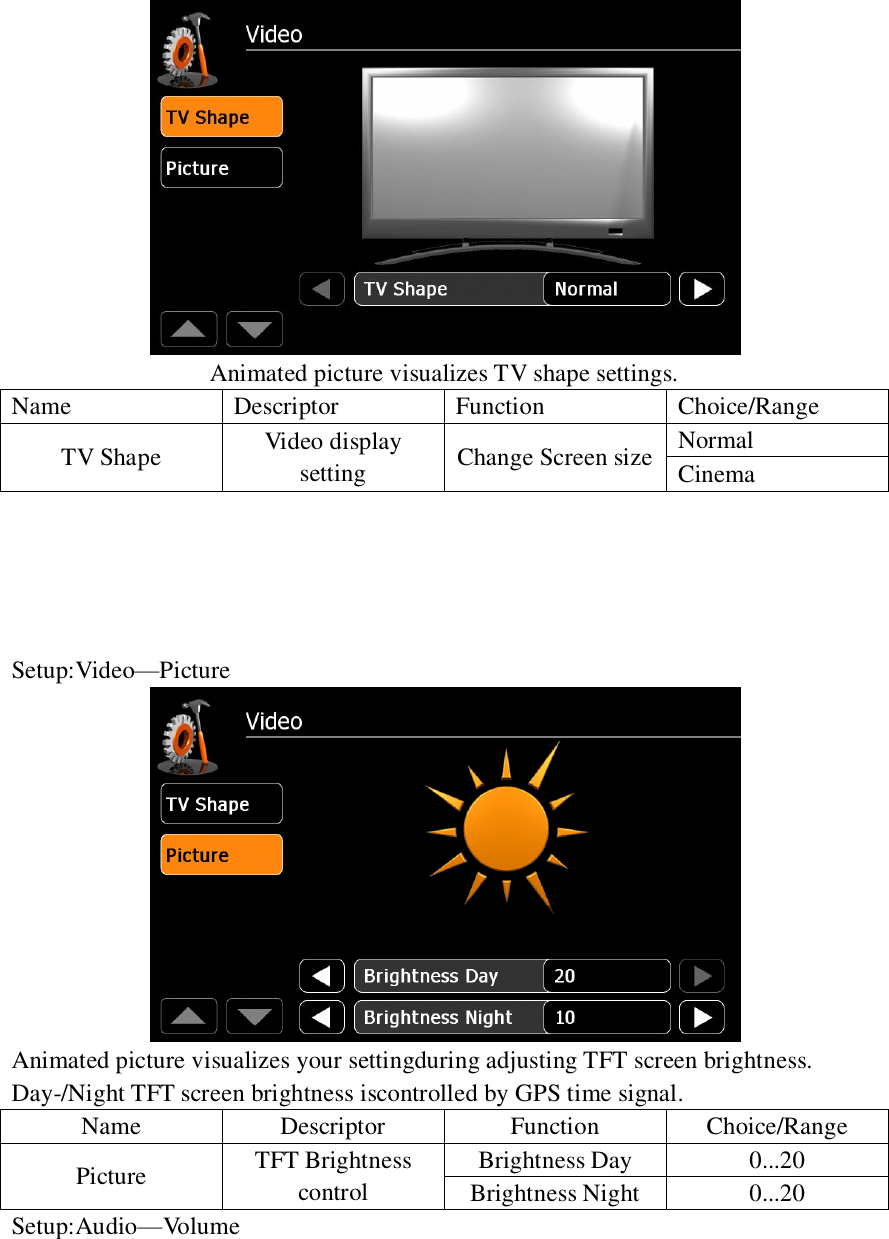
![*You cannot directly control external devices connected to AUX-IN input. Setup Main setup screen: [ ]See chapter Setup Video. [ ]See chapter Setup General. [ ]See chapter Setup Audio. [ ]See chapter Setup Misc. Setup:Video—TV Shape](https://usermanual.wiki/SKYPINE-ELECTRONICS/CNE6322A/User-Guide-1877627-Page-28.png)
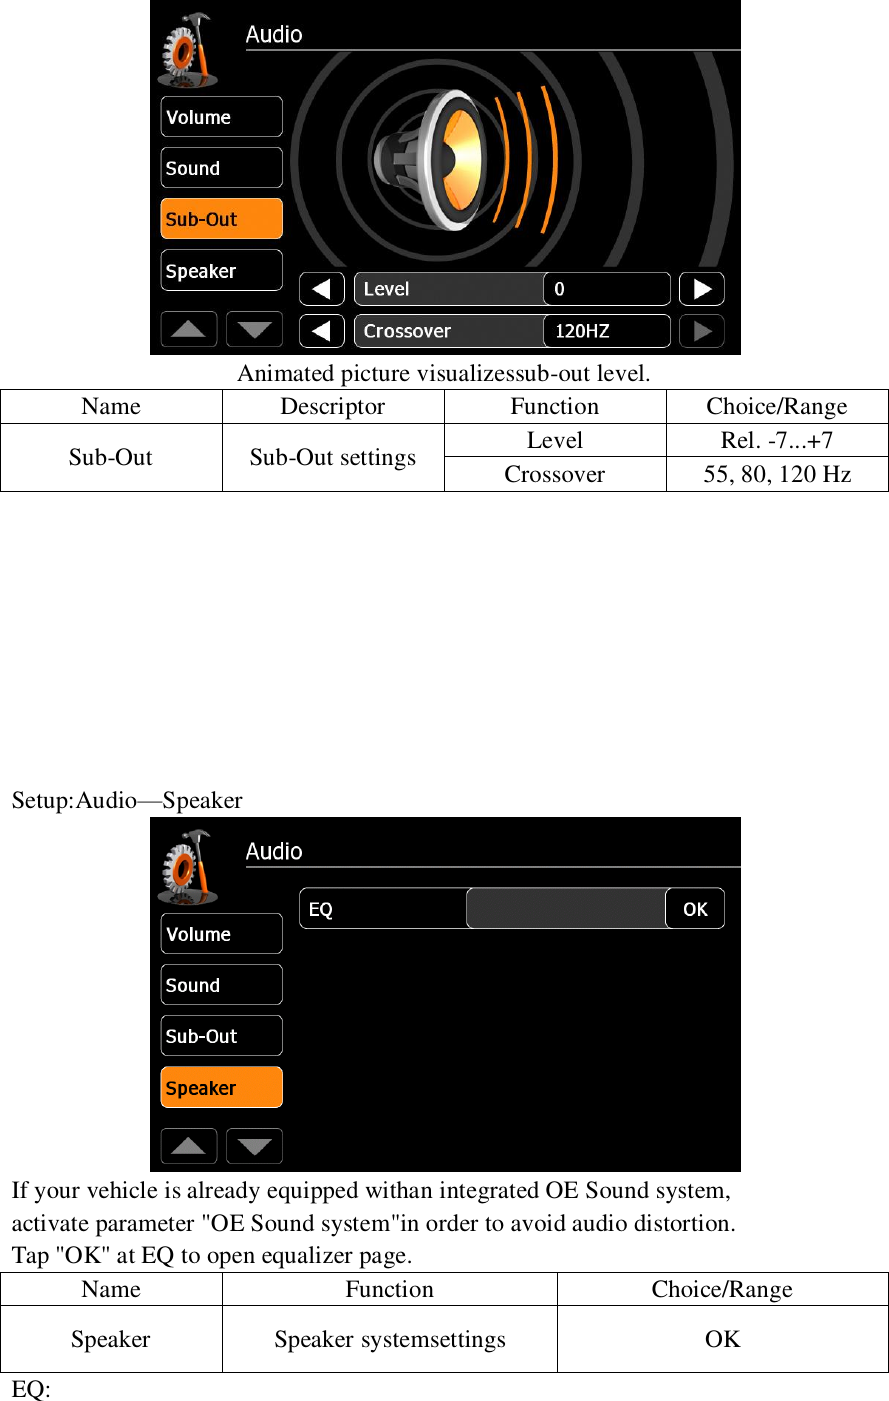
![Audio mixer: Choose "Last" to adjust to last volume. Choose "Set" to adjust to an arbitrary value. [ ]Level adjustments for sources:Adjust volume relative to other sources. Name Descriptor Function Choice/Range Volume Audio Mixer Start Volume Last,Set Set Start Volume 0...40 NAV Volume Last,Set Set NAV Volume 10...40 Level Adjustment of sources Tuner Volume Rel.0...14 CD/DVD Volume Rel.0...14 USB/iPod Volume Rel.0...14 A/V In Volume Rel.0...14 Setup:Audio—Sound](https://usermanual.wiki/SKYPINE-ELECTRONICS/CNE6322A/User-Guide-1877627-Page-30.png)
![Animated picture visualizes fader and balance settings. [ ]EQ frequency adjustments Adjust EQ bands. Name Descriptor Function Choice/Range Sound Level Assignment Fader front 9, center 0, rear -9 Balance Left -9,center0,right 9 EQ frequencies Set bass frequency 50, 100, 200Hz Set mid frequency 0.5, 1, 2kHz Set treble frequency 5, 10, 15 kHz Loudness On, Off Setup:Audio—Sub-Out](https://usermanual.wiki/SKYPINE-ELECTRONICS/CNE6322A/User-Guide-1877627-Page-31.png)
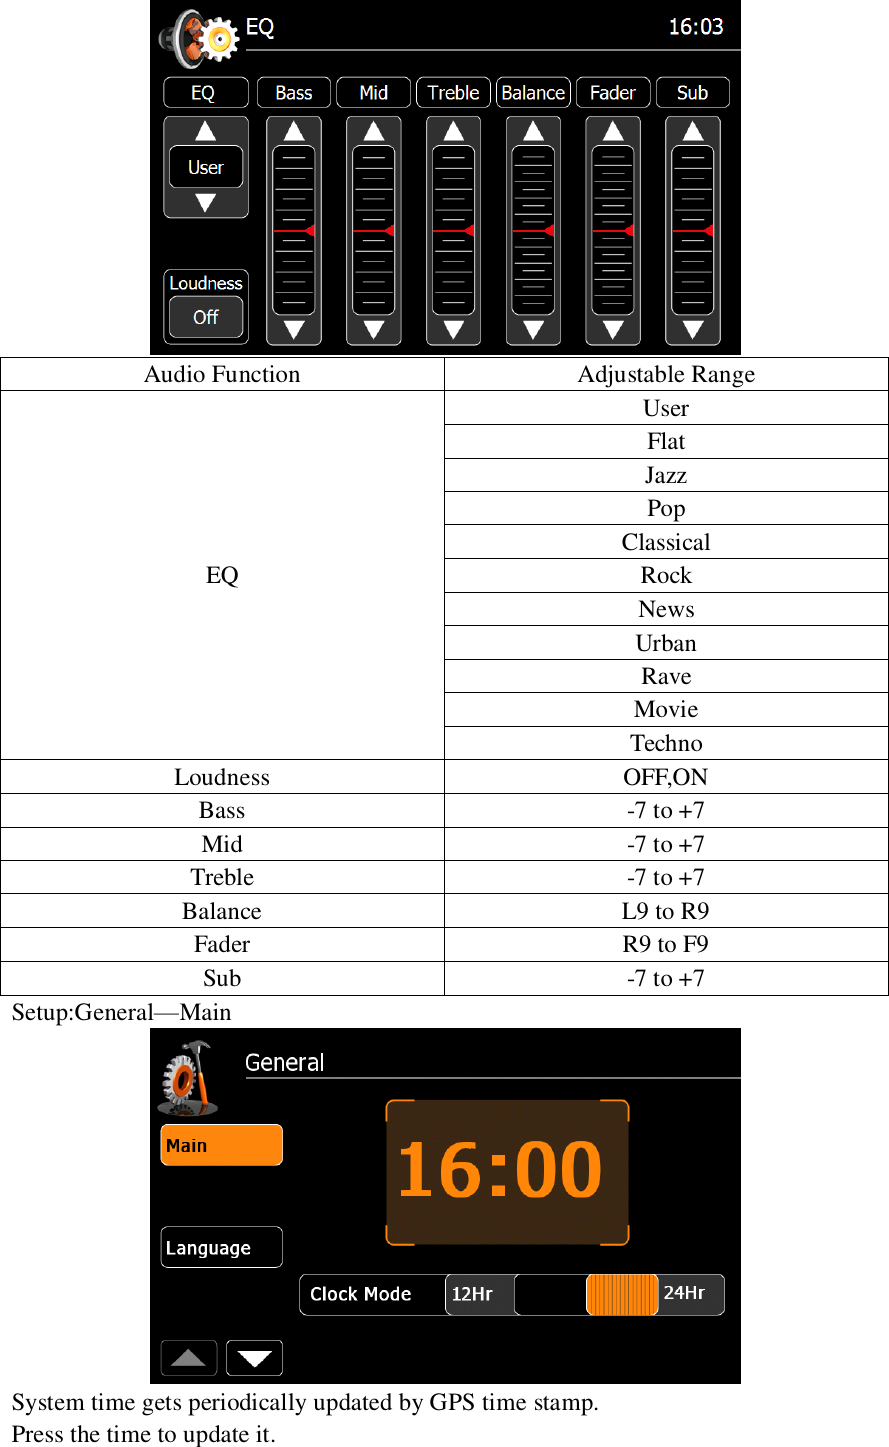
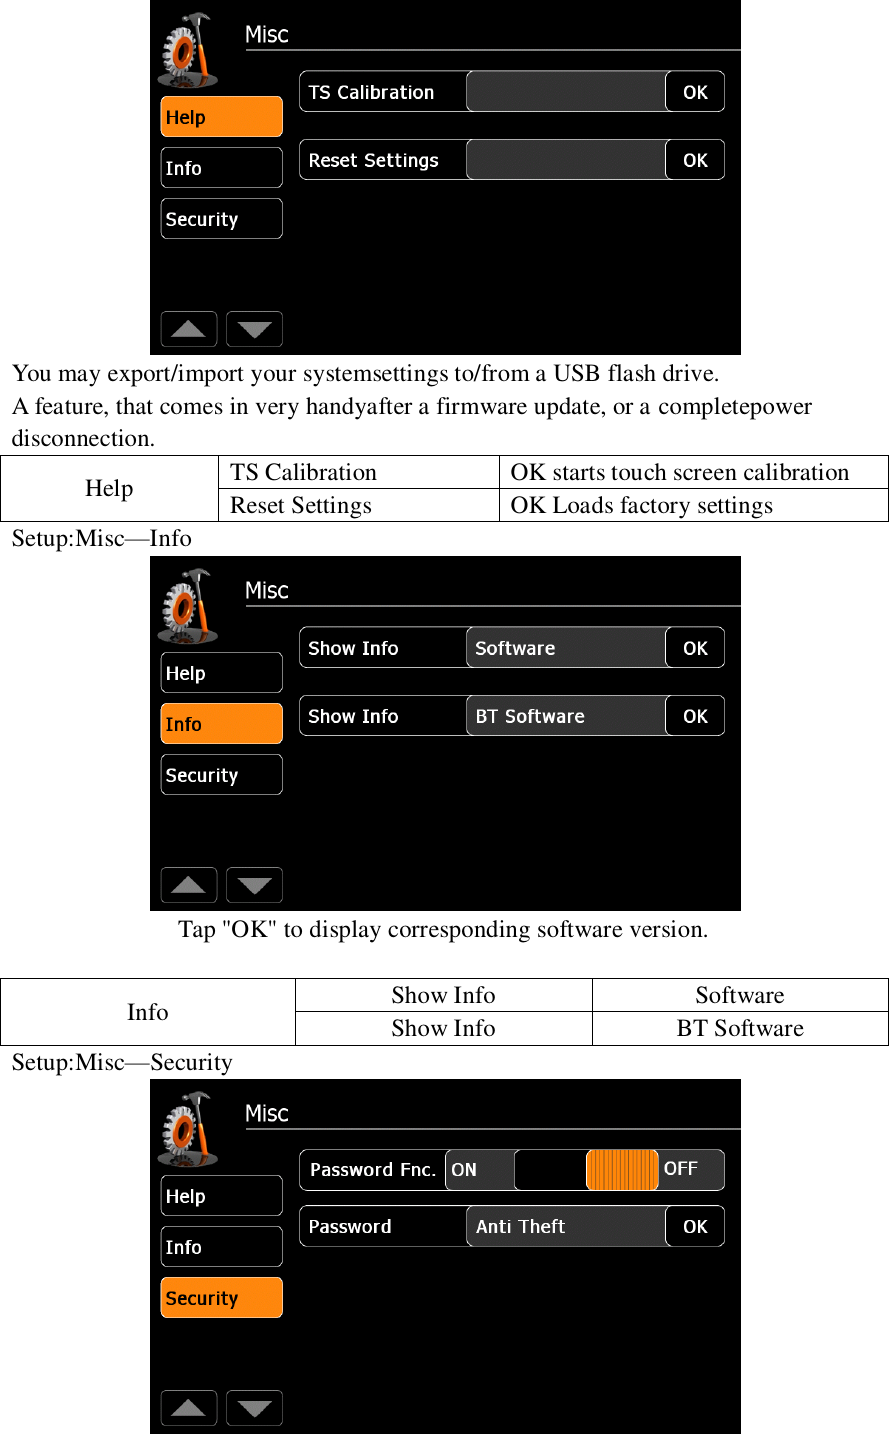
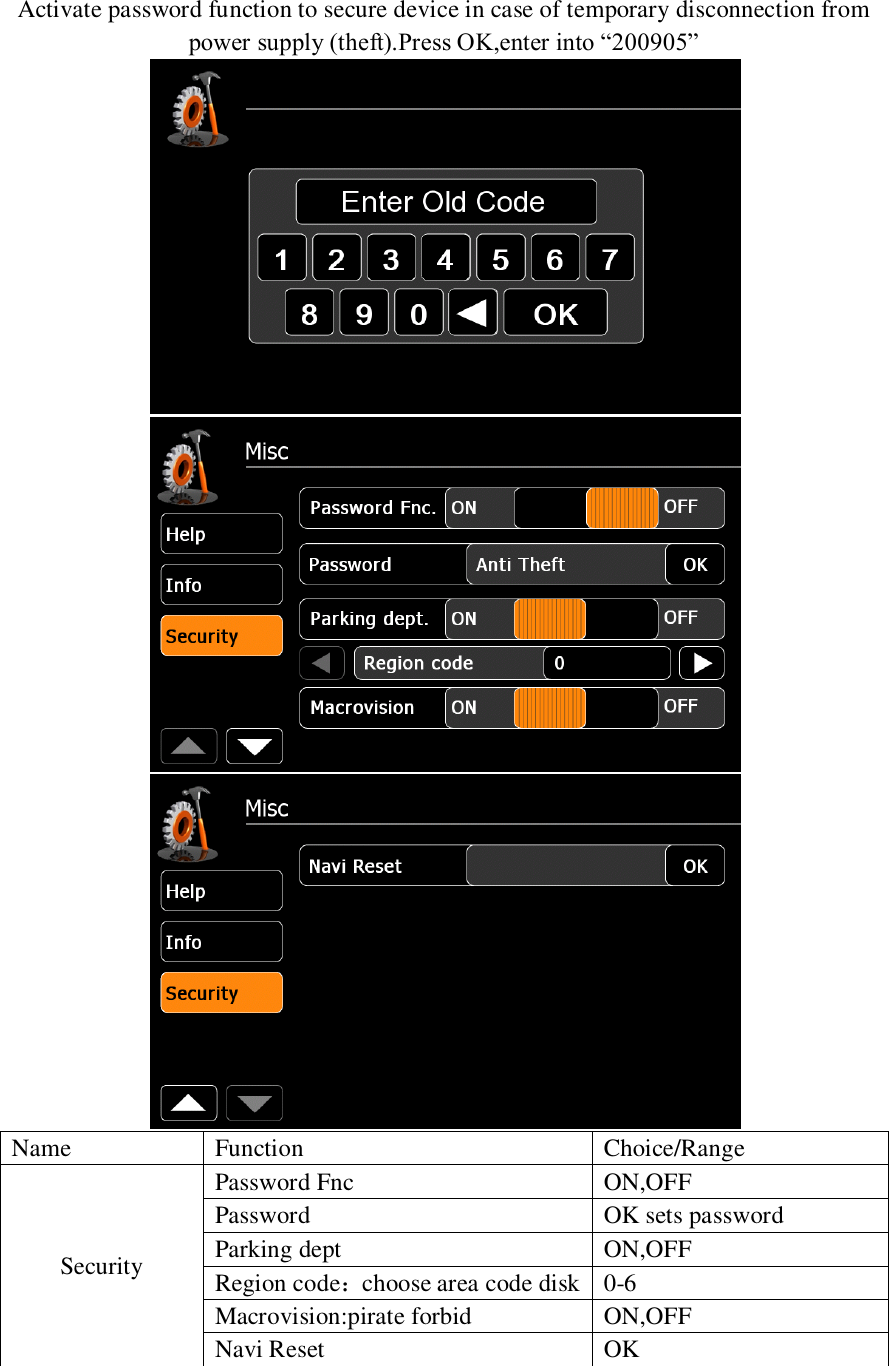
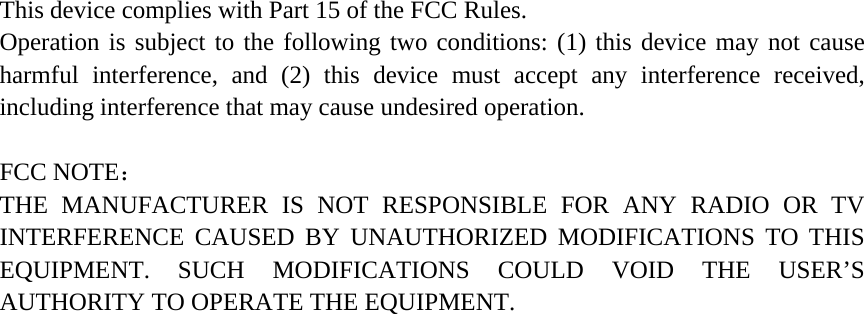
![]Press it to other sources. Name Function Choice/Range Main Clock Mode 12Hr,24Hr 12Hr:AM/PM AM,PM Bluetooth On, Off Volume Popup On, Off Beep On, Off Radio Area USA,Latin,Europe,Philippines Setup:General—Language Shown flag visualizes the chosen OSD language. Language OSD Set OSD Language Setup:Misc—Help](https://usermanual.wiki/SKYPINE-ELECTRONICS/CNE6322A/User-Guide-1877627-Page-34.png)