SKYPINE ELECTRONICS MW4 Marine Audio Systems User Manual
SKYPINE ELECTRONICS (SHEN ZHEN) CO., LTD. Marine Audio Systems
UserManual.wiki
>
SKYPINE ELECTRONICS
>
MW4 User Manual
>
User Manual
Contents
1.
User Manual 1
2.
User Manual 2
3.
User Manual
User Manual
Navigation menu
Upload a User Manual
Namespaces
Wiki Guide
HTML
PDF
Info
Views
User Manual
Discussion / Help
Navigation

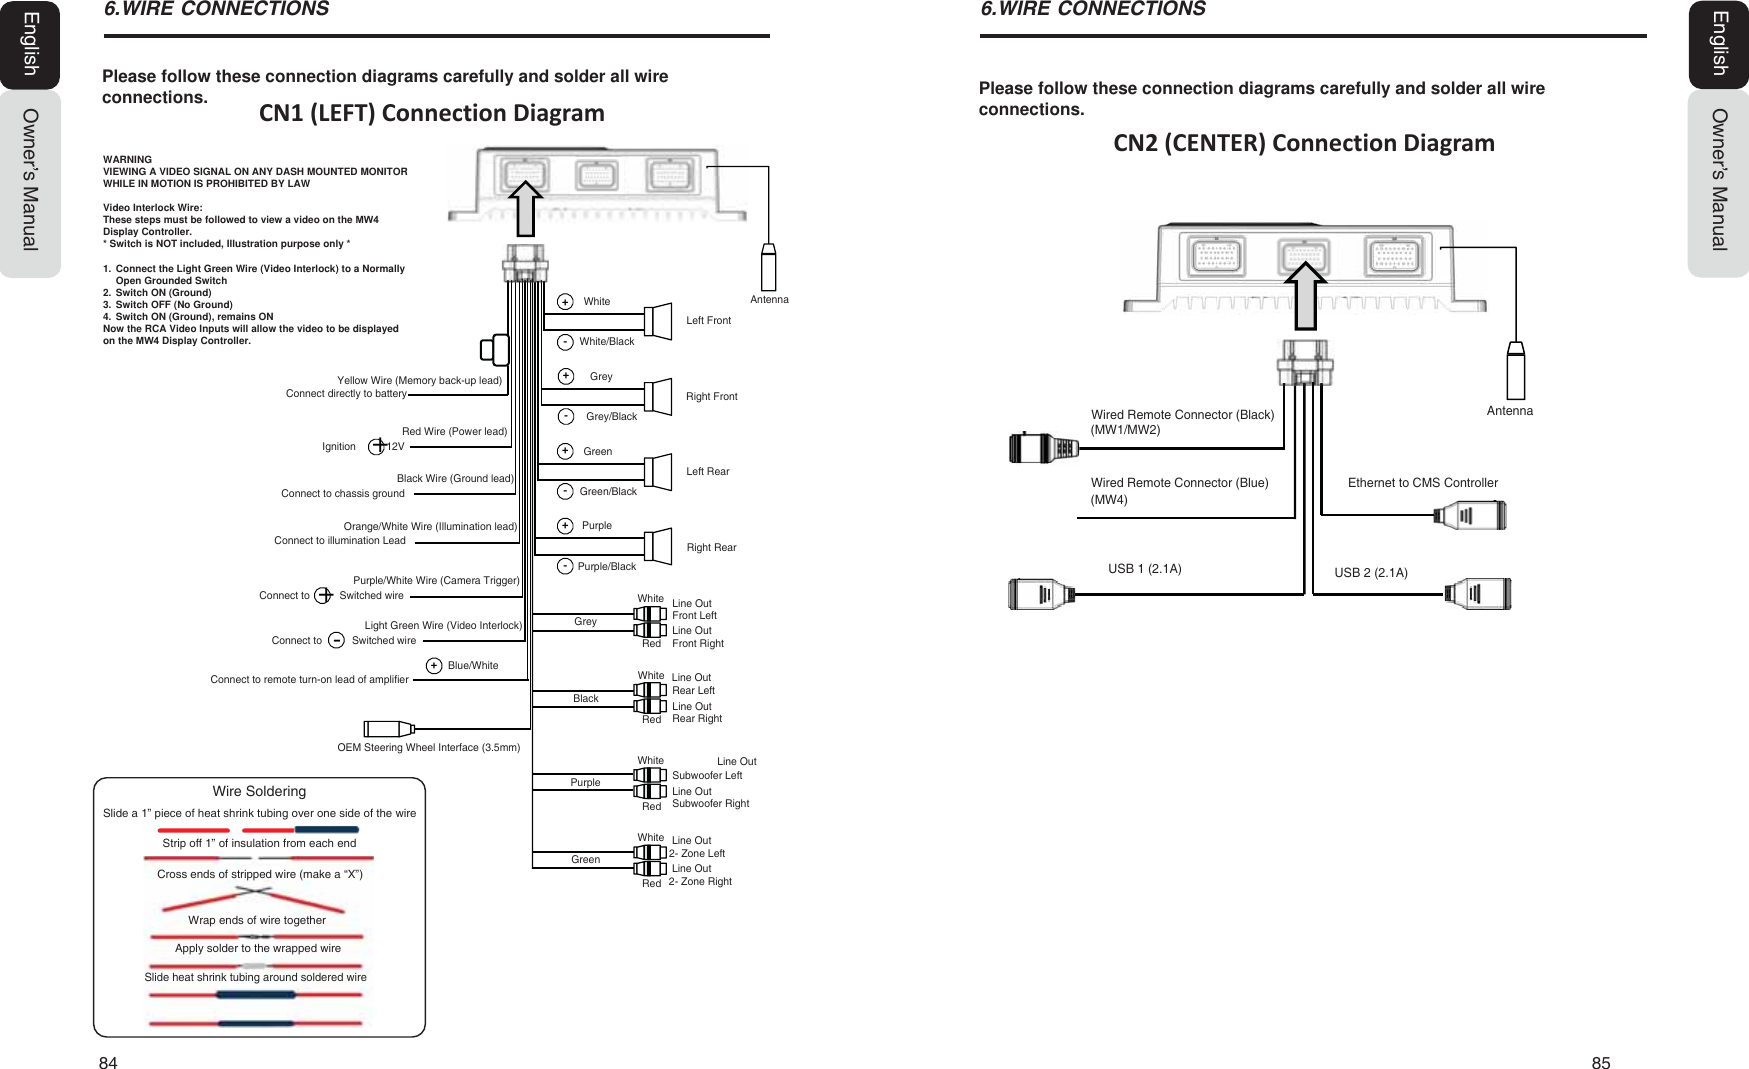
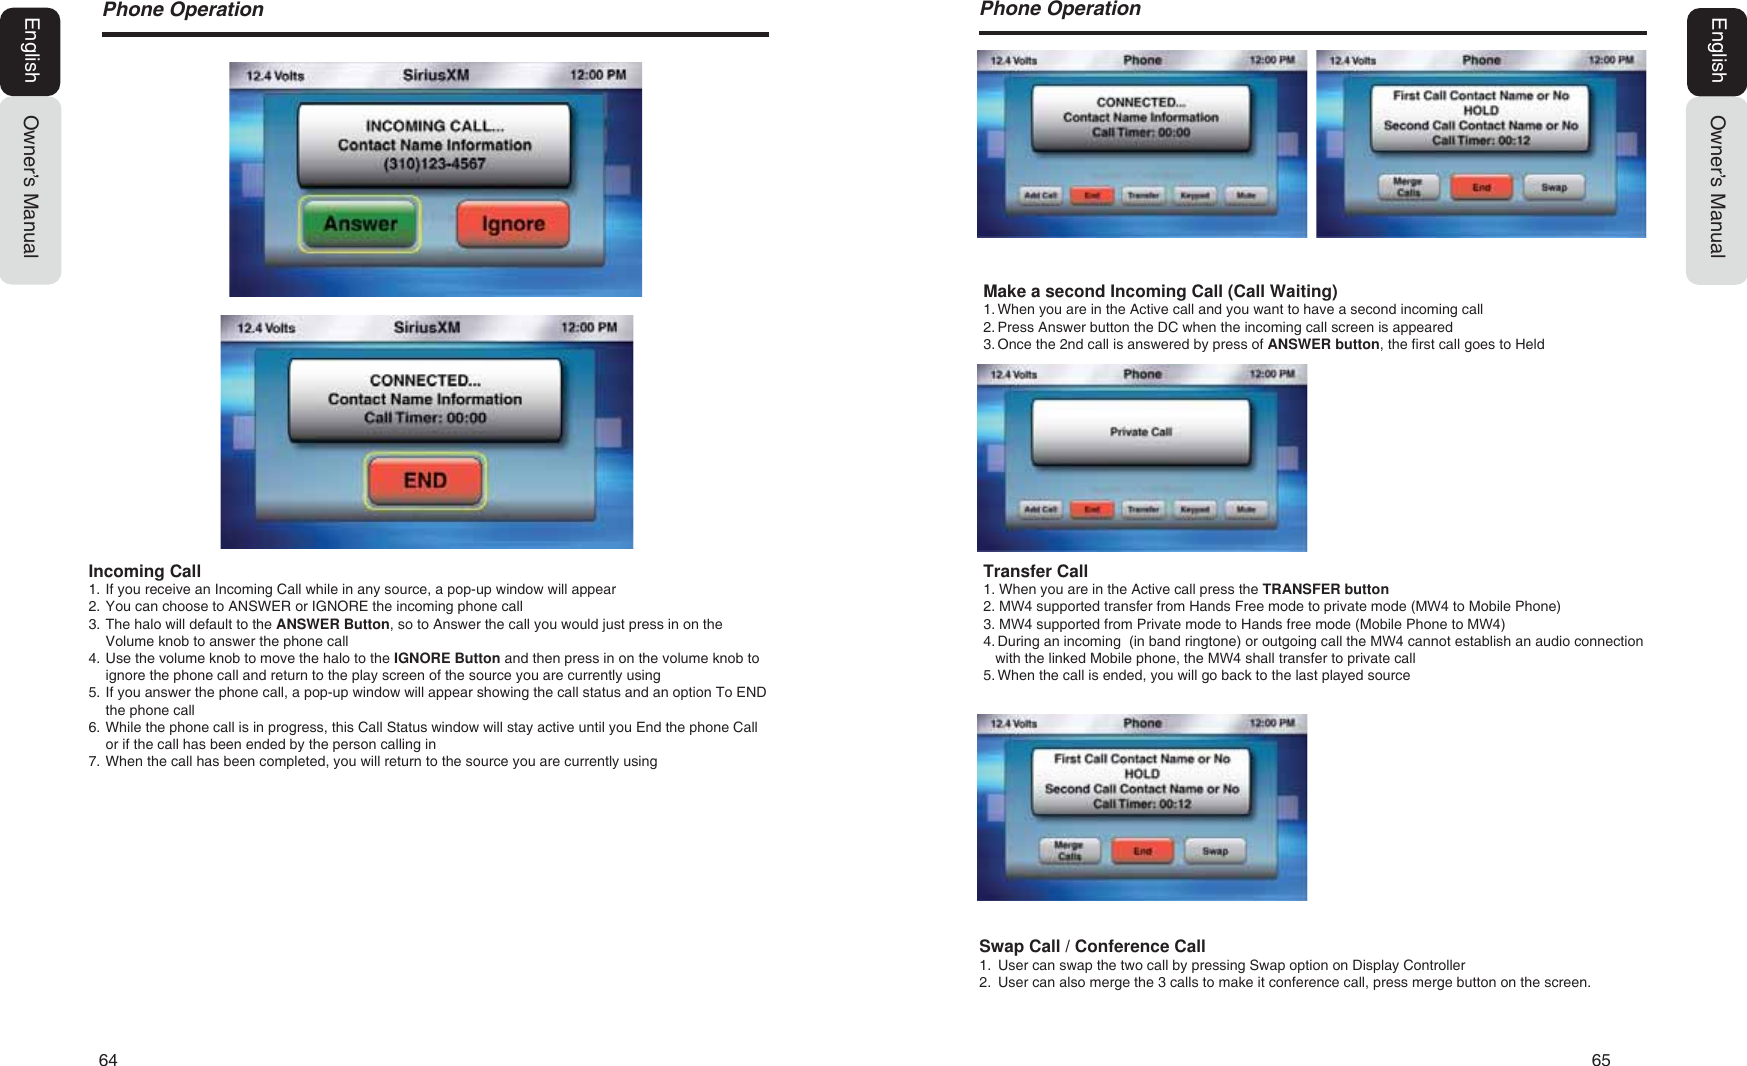
![4 5Owner’s ManualEnglish4. DISPLAY CONTROLLER BUTTONS$ERXWWKHUHJLVWHUHGPDUNVHWF“Made for iPod” means that an electronic accessory has been designed to connect specifically to iPod and has been certified by the developer to meet Apple performance standards.Apple is not responsible for the operation of this device or its compliance with safety and regulatory standards.iPod is a trademark of Apple Inc., registered in the U.S. and other countries.Sirius, XM and all related marks and logos are registered trademarks of Sirius XM Radio Inc. All Rights reserved.Volume KnobFunctions:Rotate Volume Knob = Adjust Volume Level (Play Screens).Press in on Volume Knob = Mute (Play Screens).Rotate Volume Knob = Scroll Through Options (Menus).Press in on Volume Knob = Select/Enter (Menu Options).Options ArrowThis double sided arrow will only appear when additional options are available.Owner’s ManualEnglish1DPHRI%XWWRQVDQGWKHLU)XQFWLRQV[ ] Power Button- Press and release button to turn ON.- Press and Hold for Three Seconds to turn OFF.Volume Knob- Rotate Volume Knob Clockwise to increase Volume.- Rotate Volume Knob Counter Clockwise to Decrease volume.Mute- Press In and Release Volume Knob to Mute and Rotate the Volume Knob to Un-Mute the Audio.[SRC] Source Button- Press SRC button to display the Main Menu.- Use Volume Knob to Scroll through Source Options, then Press In and Release Volume Knob to Select Source.[MENU] Menu Button- Press to access additional options.- Radio (AM/FM/WB/LO/DX).- SiriusXM (Search Functions, Direct, etc.).- iPod (Audio, Video Menu options, Search, Playlists, Artists, Songs, Genre, etc.).- USB (Folder, Song, Repeat, etc,).- Bluetooth (HFP-ON/OFF, Pairing, etc.).[AUDIO] Audio Button- Press to access Audio adjustment settings. Use Volume Knob to adjust by rotating Clockwise or Counter-Clockwise, then Press in and release Volume Knob to save Adjusted setting.- Treble/Mid/Bass (12kHz/1k/50Hz). Adjust Levels from “-10” to “+10”.- EQ Adjust Frequency for each of the 5-Bands.- Balance/FaderAdjust sound balance for Left and Right.Adjust sound fader for Front and Rear.- Subwoofer Subwoofer Volume from “-10” to “+10). Subwoofer Frequency (50/75/100/THROUGH). Subwoofer Phase (Normal and Reverse).1RWHBe sure to read this chapter while referring to the diagram in chapter “4. DISPLAY CONTROLLER BUTTONS”[AUDIO ] Audio Button- 2-Zone Adjust volume level for Zone 1, Zone 2 and Both Zones.- SVC (Source Volume Control) Adjust volume level for each source independently- Radio- iPod- Phone- SiriusXM- Bluetooth Audio- USB - AUX[DISP] Display Button- Press to access Display adjustment settings- Clock- ON = Large Clock will appear After 25 seconds of no action - Change Clock Font Color (White, Yellow, Red and Reverse)- OFF = Large Clock will Not appear after 25 Seconds of no action- Default = ON- Status Bar - Change Status Bar to appear at Top or Bottom of Screen- Default = Top- ModeChange Display preset color settings from: - Day Mode = Brighter ColorsNight Mode = Darker Colors Default = Day Mode- BrightnessAdjust display brightness from “-10” to “+10”[FAV] Favorites Button- Press to access saved stations/channels- Save up to 50 favorites- SiriusXM- Radio (AM/FM/Weather Band) - Pandora- Phone Contact - Paired and Connected Phone- Contacts have been synced - You can now save contact as a favorite Example: Home, Work, etc.Previous Song Seek Back Play / Pause Back Previous ScreenNext Song Seek ForwardFavoritesVolume Option ScrollEnter SelectionMenu OptionsAudio SettingsDisplay OptionsPowerON / OFFSource Main Menu](https://usermanual.wiki/SKYPINE-ELECTRONICS/MW4.User-Manual/User-Guide-2528086-Page-3.png)
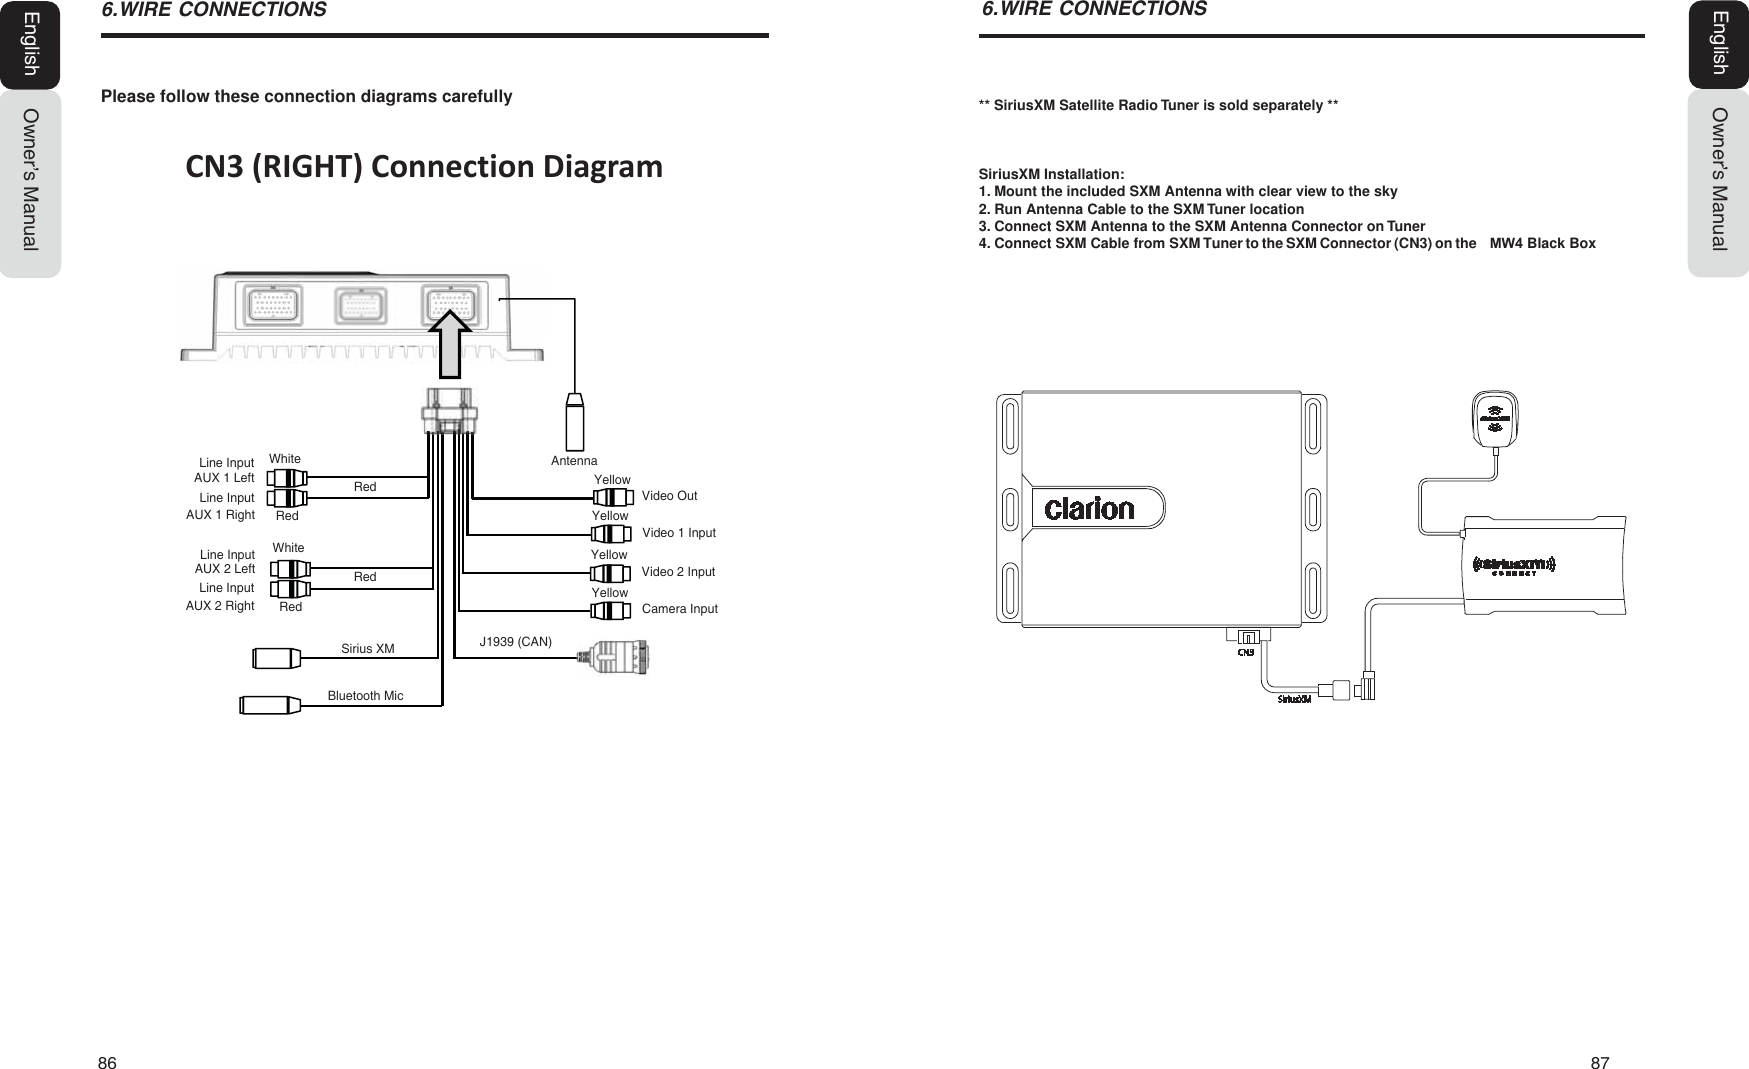
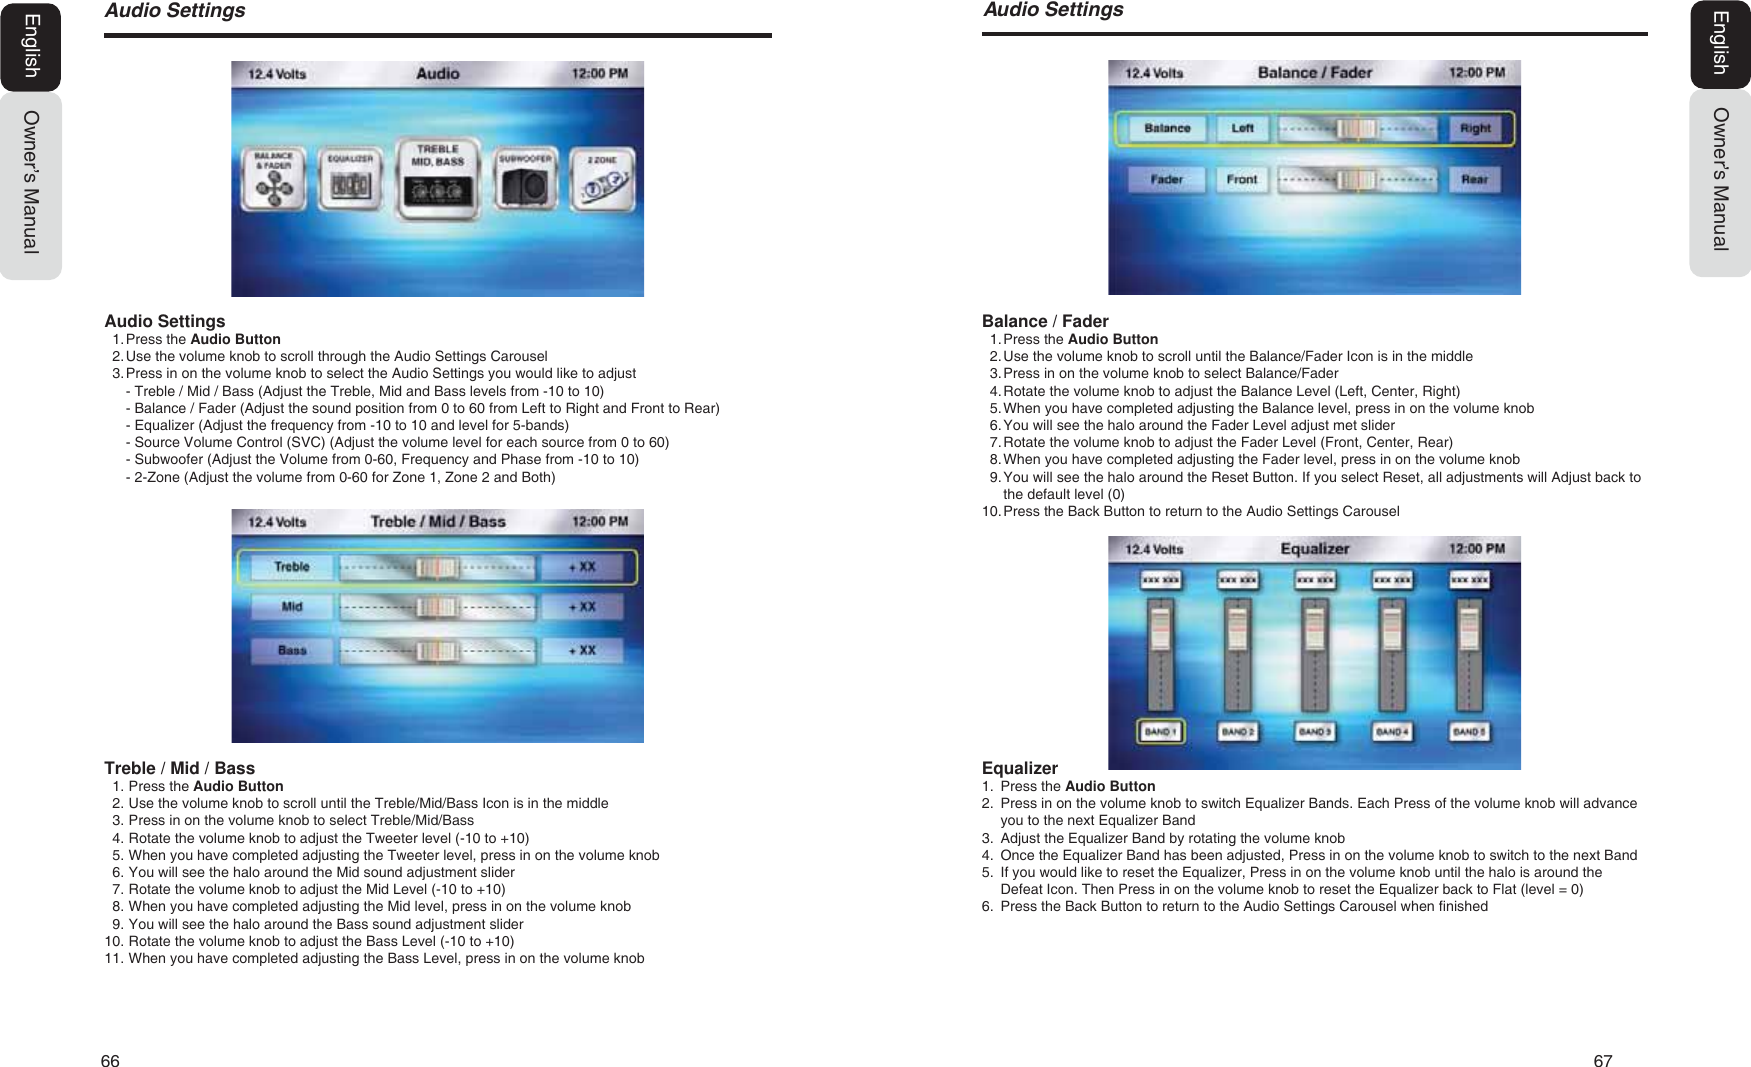
![6 71RWHBe sure to read this chapter while referring to the diagram in chapter 4 “DISPLAY CONTROLLER BUTTONS”Owner’s ManualEnglish[ SEEK] Seek Back Button- Press and release button to go back to previous song.- Press and Hold for Three Seconds to scan back through song, release and song will continue playing.[SEEK ] Seek Forward Button- Press and release button to advance to next song.- Press and Hold for Three Seconds to scan through song, release and song will continue playing.[ ] Play / Pause Button- Press to PAUSE current song.- When track is PAUSED, press again to continue playing current song (iPod, Bluetooth Audio, USB, and Pandora).[BACK] Back Button- Press to go back to previous Menu or Settings Screen.- Press to backwards in multiple Menu Screens.- Press to return to current source play screen from Menu or Settings Screen.Owner’s ManualEnglish5. OPERATIONSCAUTION1RWH- Start the engine before using this unit.- Be careful about using this unit without the engine running. If used for long periods of time without the engine running to charge the batteries, you may not be able to start the engine and this can reduce the life and performance of the batteries. A Warning will appear when voltage is 10V or below.When the unit is turned ON, and the volume has been increased to the maximum level May cause damage to your hearing.Please be aware and cautious of the volume level at all times.%DVLF2SHUDWLRQV7XUQLQJ21DQG2))WKH6\VWHP6HOHFWLQJD6RXUFH1. Rotate the Volume Knob Clockwise to increase the volume level.2. Rotate the Volume Knob Counter-Clockwise to decrease the volume level.$GMXVWLQJWKHYROXPH1. Press the [SRC] button to display the Main Menu Screen.* External add-on accessories will be required in order to use that source.- SiriusXM requires a SiriusXM Connect Tuner and Subscription (sold separately).- Pandora requires a iPod or iPhone to be connected to the 0:.- CCA750 is required for iPod Video Playback.- OEM Steering Wheel Interface Module is required for the steering wheel buttons to operatethe 0: audio features.2. Use the Volume Knob to scroll through the source carousel.3. Press in on the Volume Knob to select the source displayed in the middle of the sourceCarousel.* For your safety, while boating, keep the volume to a level at which external sounds can be heard.CAUTIONON1. Start the engine.2. Press and Release the Power Button. [ ]3. The Blue LED trim around the Volume Knobwill light up and the 0: Display Controller.-Clarion Splash Screen (10 Seconds).- Viewing Video Disclaimer (5 Seconds).OFF1. Press and Hold the Power Button for 3 sec. [ ]2. The Blue LED trim ring around the Volume Knobwill turn OFF.- System in Powering Down Screen (5 Seconds).- Clarion Splash Screen (10 Seconds).1DPHRI%XWWRQVDQGWKHLU)XQFWLRQV](https://usermanual.wiki/SKYPINE-ELECTRONICS/MW4.User-Manual/User-Guide-2528086-Page-4.png)
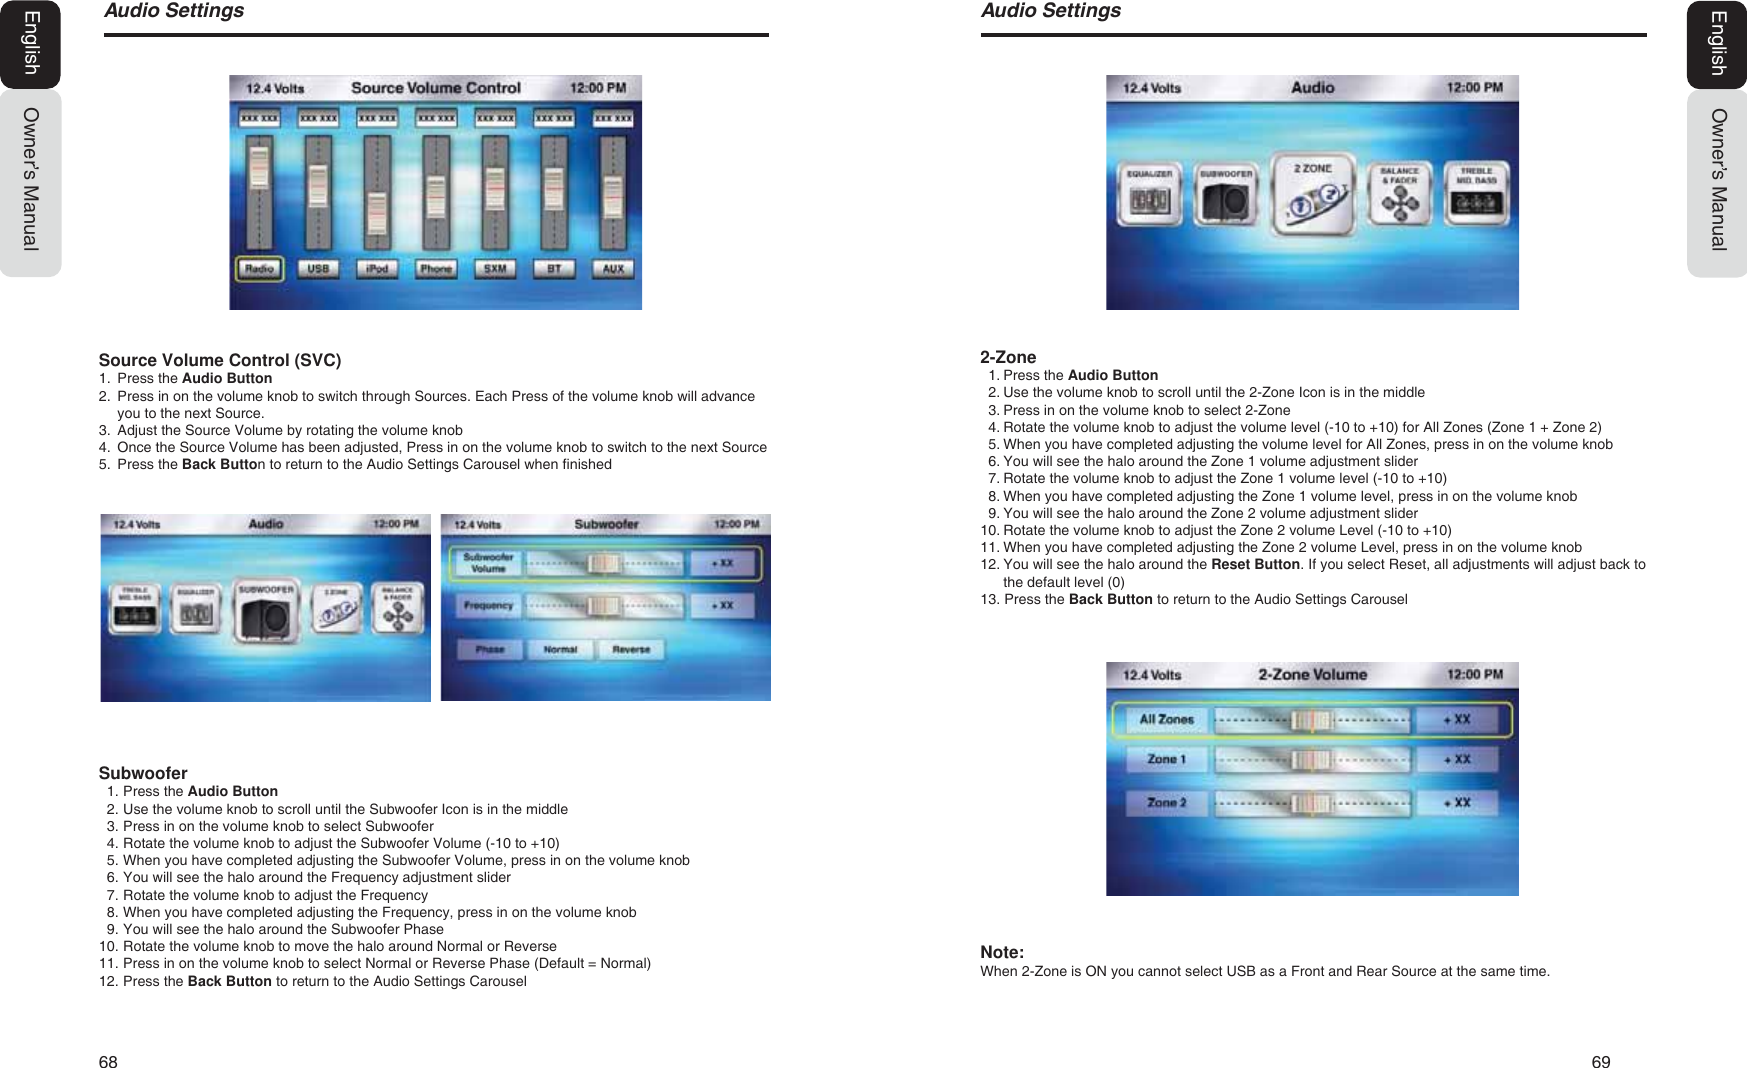
![8 95DGLR$0)0:HDWKHU%DQG2SHUDWLRQOwner’s ManualEnglish[ SEEK] Seek Back Button- Press and release button to tune down in frequency step by step.- Press and Hold for Three Seconds to scan back to the previous strongest station frequency.[SEEK ] Seek Forward Button- Press and release button to tune up in the frequency step by step.- Press and Hold for Three Seconds to scan to the next strongest station frequency.[MENU] Menu Button- Press to select AM, FM, Weather Band, Local (LO) or Distance (DX).- Use the volume knob to scroll through options.- Press in on the volume knob to select option in the middle of the carousel.- AM (Amplitude Modulation). - FM (Frequency Modulation). - Weather Band (NOAA - National Oceanic and Atmospheric Administration).- Local (LO).- Distance (DX).- Press the Region Setting option to select the Region.- Now a pop up window will appear providing 4 options.- Other Countries- USA- Europe- Australia*Default=USA- Use the volume knob to toggle between region options.- Press in on the volume knob to select your choice.- Press the BACK button to return to the previous Screen.Note: Sirius XM will be available in source screen when the Tuner region is set to USA. Pandora will be available when Region is set to USA/Australia. Else those options will be greyed out in Source list.[BACK] Back Button- Press to go back to previous Menu or Settings Screen.- Press to backwards in multiple Menu Screens.- Press to return to current source play screen from Menu or Settings Screen.Owner’s ManualEnglish6LULXV;06DWHOOLWH5DGLR2SHUDWLRQOnly SiriusXM® brings you more of what you love to listen to, all in one place. Get over 140 channels, including commercial-free music plus the best sports, news, talk, comedy and entertainment. Welcome to the world of satellite radio. A SiriusXM Vehicle Tuner and Subscription are required. For more information, visit www.siriusxm.com.Activating your SiriusXM SubscriptionAfter installing your SiriusXM Connect Vehicle Tuner and antenna, power on your Clarion 0: Marine Source Unit and select SiriusXM mode. You should be able to hear the SiriusXM preview channel on Channel 1. If you cannot hear the preview channels, please check the installation instructions to make sure your SiriusXM Connect tuner is properly installed.After you can hear the Preview channel, tune to Channel 0 to find the Radio ID of your tuner. In addition, the Radio ID is located on the bottom of the SiriusXM Connect Vehicle Tuner and its’ packaging. You will need this number to activate your subscription. Write the number down for reference.Note: the SiriusXM Radio ID does not include the letters I, O, S or F.In the USA, you can activate online or by calling SiriusXM Listener care:ŖVisit www.siriusxm.com/activatenowŖCall SiriusXM Listener Care at 1-866-635-2349For Canadian Subscriptions, please contact:ŖVisit www.siriusxm.ca/activatexmŖCall XM customer Care at 1-877-438-9677As part of the activation process, the SiriusXM satellites will send an activation message to your tuner. When your radio detects that the tuner has received the activation message, your radio will display:“<<Subscription Updated>>”. Once subscribed, you can tune to channels in your subscription plan. Note,the activation process usually takes 10 to 15 minutes, but may take up to an hour. Your radio will need to be powered on and receiving the SiriusXM signal to receive the activation message.](https://usermanual.wiki/SKYPINE-ELECTRONICS/MW4.User-Manual/User-Guide-2528086-Page-5.png)
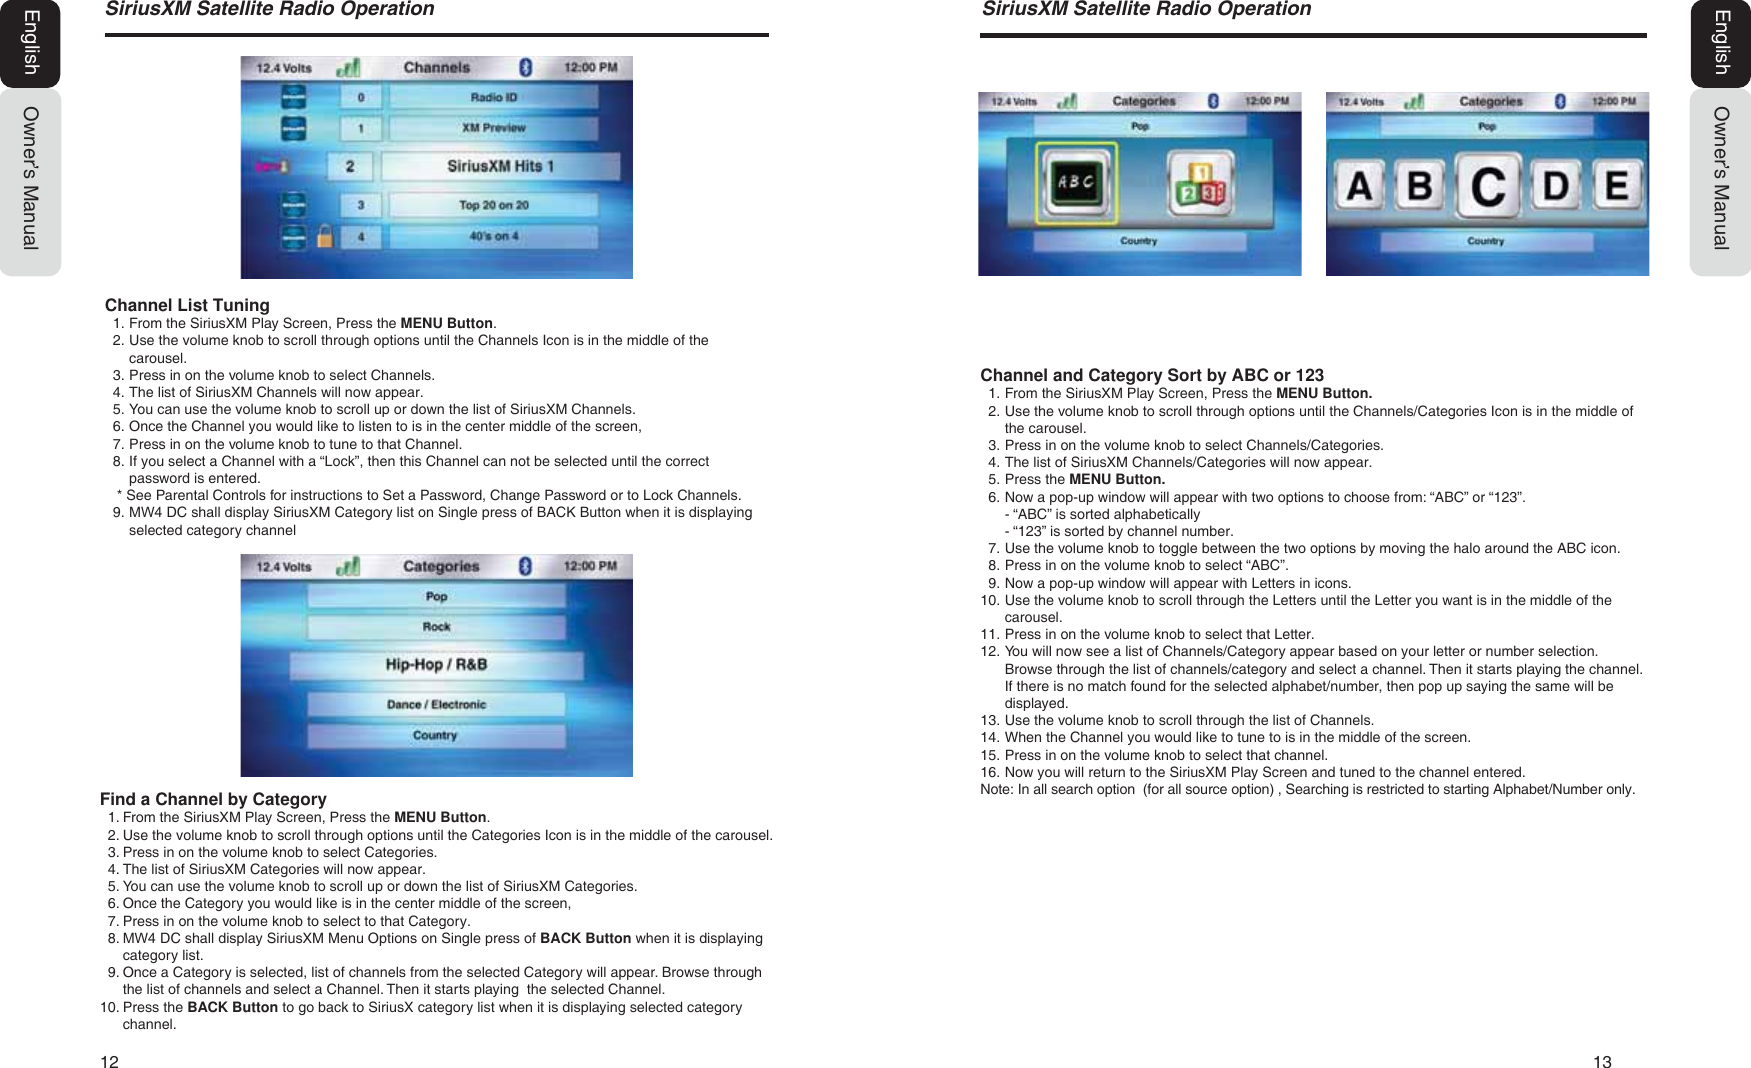
![10 116LULXV;06DWHOOLWH5DGLR2SHUDWLRQOwner’s ManualEnglishOwner’s ManualEnglish6LULXV;06DWHOOLWH5DGLR2SHUDWLRQDirect Channel Tuning1. From the SiriusXM Play Screen, Press the MENU Button.2. Use the volume knob to scroll through options until the Direct Icon is in the middle of the carousel.3. Press in on the volume knob to select Direct.4. Now a pop-up window will appear with a numbers for you to enter to directly tune to a SiriusXMChannel.5. Use the volume knob to scroll through the numbers until the halo is around the number you want toselect.6. Press in on the volume knob to select that number.7. If the channel you would like to tune to is a single digit number, then you can proceed to the bottomof the pop-up window and select OK. If you would like to tune to a two or three digit channel, thenproceed by selecting the additional numbers needed.8. Once all the channel numbers are displayed in the window, scroll down to the bottom of the pop-upwindow and select OK.9. Now you will return to the SiriusXM Play Screen and tuned to the channel entered.[ SEEK] Seek Back Button- Press and release button to tune to the previous channel.[SEEK ] Seek Forward Button- Press and release button to tune to the next channel.[MENU] Menu Button- Press to select Direct Channel, Parental Controls, Channel Search, Category Search and Tag.- Use the volume knob to scroll through options.- Press in on the volume knob to select option in the middle of the carousel.- Direct (Tune directly to channel by entering channel number).- Parental Controls (Lock Mature Content Channels, Manage Password).- Channel Search (Search by Number or Letters).- Category Search (Seach by Number or Letter). - Tag (Tag song to iPod/iPhone to purchase from iTunes when device is connected to iTunes).- Settings.[BACK] Back Button- Press to go back to previous Menu or Settings Screen- Press to backwards in multiple Menu Screens- Press to return to current source play screen from Menu or Settings Screen iTunes® Song Tagging 1. From the SiriusXM Play Screen, Press the MENU Button.2. Use the volume knob to scroll through options until the Tag Icon is in the middle of the carousel.3. Press in on the volume knob to select Tag.4. Now a pop-up window will appear asking you to confirm to Tag the current song to your iPod/iPhone.5. You will also see how many songs you can Tag are left (50 total).6. Select “YES” to Tag the song or “CANCEL” and the song will not be Tagged.7. When Tag limit is reached, a pop-up showing “Memory Full, Connect iPod” will be displayed.8. You will also see “Already Tagged” pop up on selecting YES option if the song is already tagged.9. Once the song is Tagged, you will return to SiriusXM Play Screen.* You will need to connect your iPod/iPhone to your home PC or MAC, launch iTunes to purchase theTagged Songs that have been saved to your iPod/iPhone. ** Tag icon will be greyed out when the song is not taggable or when the song has already been tagged.*** Tag ID’s will remain on the 0: until the iPod/iPhone is connected. They will automatically be deleted after they are transferred.](https://usermanual.wiki/SKYPINE-ELECTRONICS/MW4.User-Manual/User-Guide-2528086-Page-6.png)
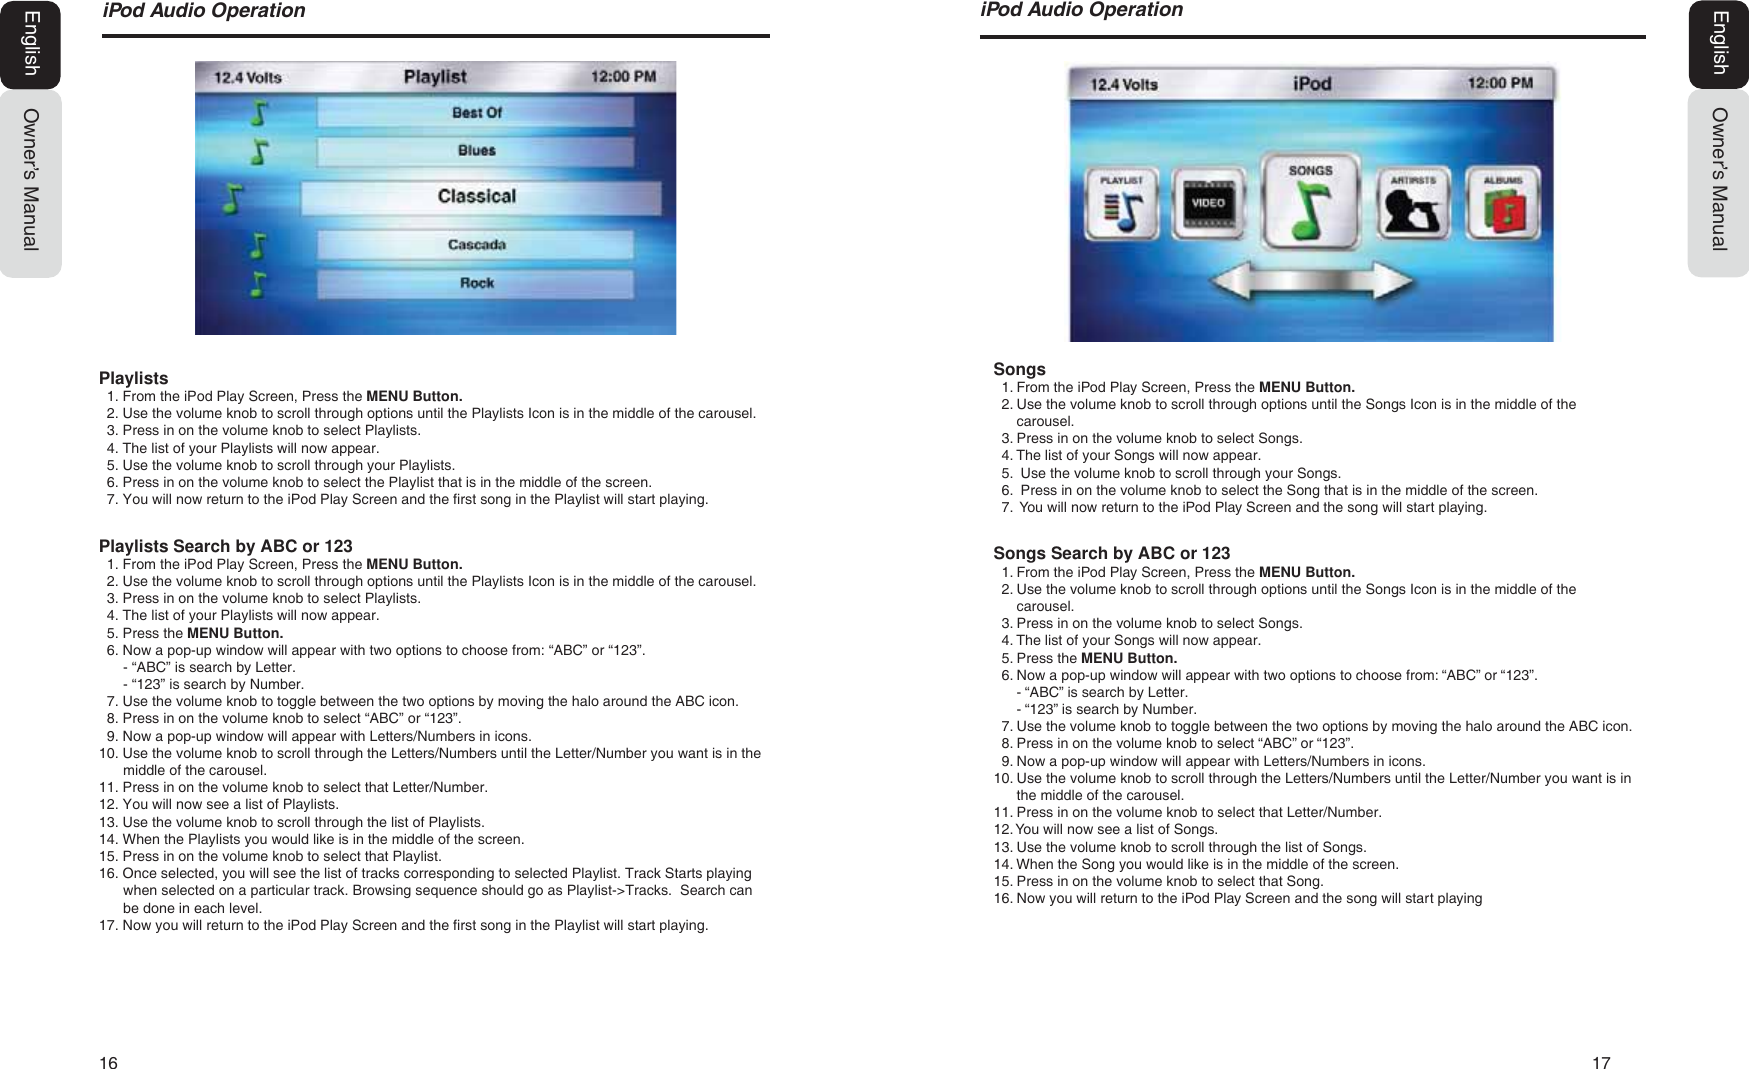
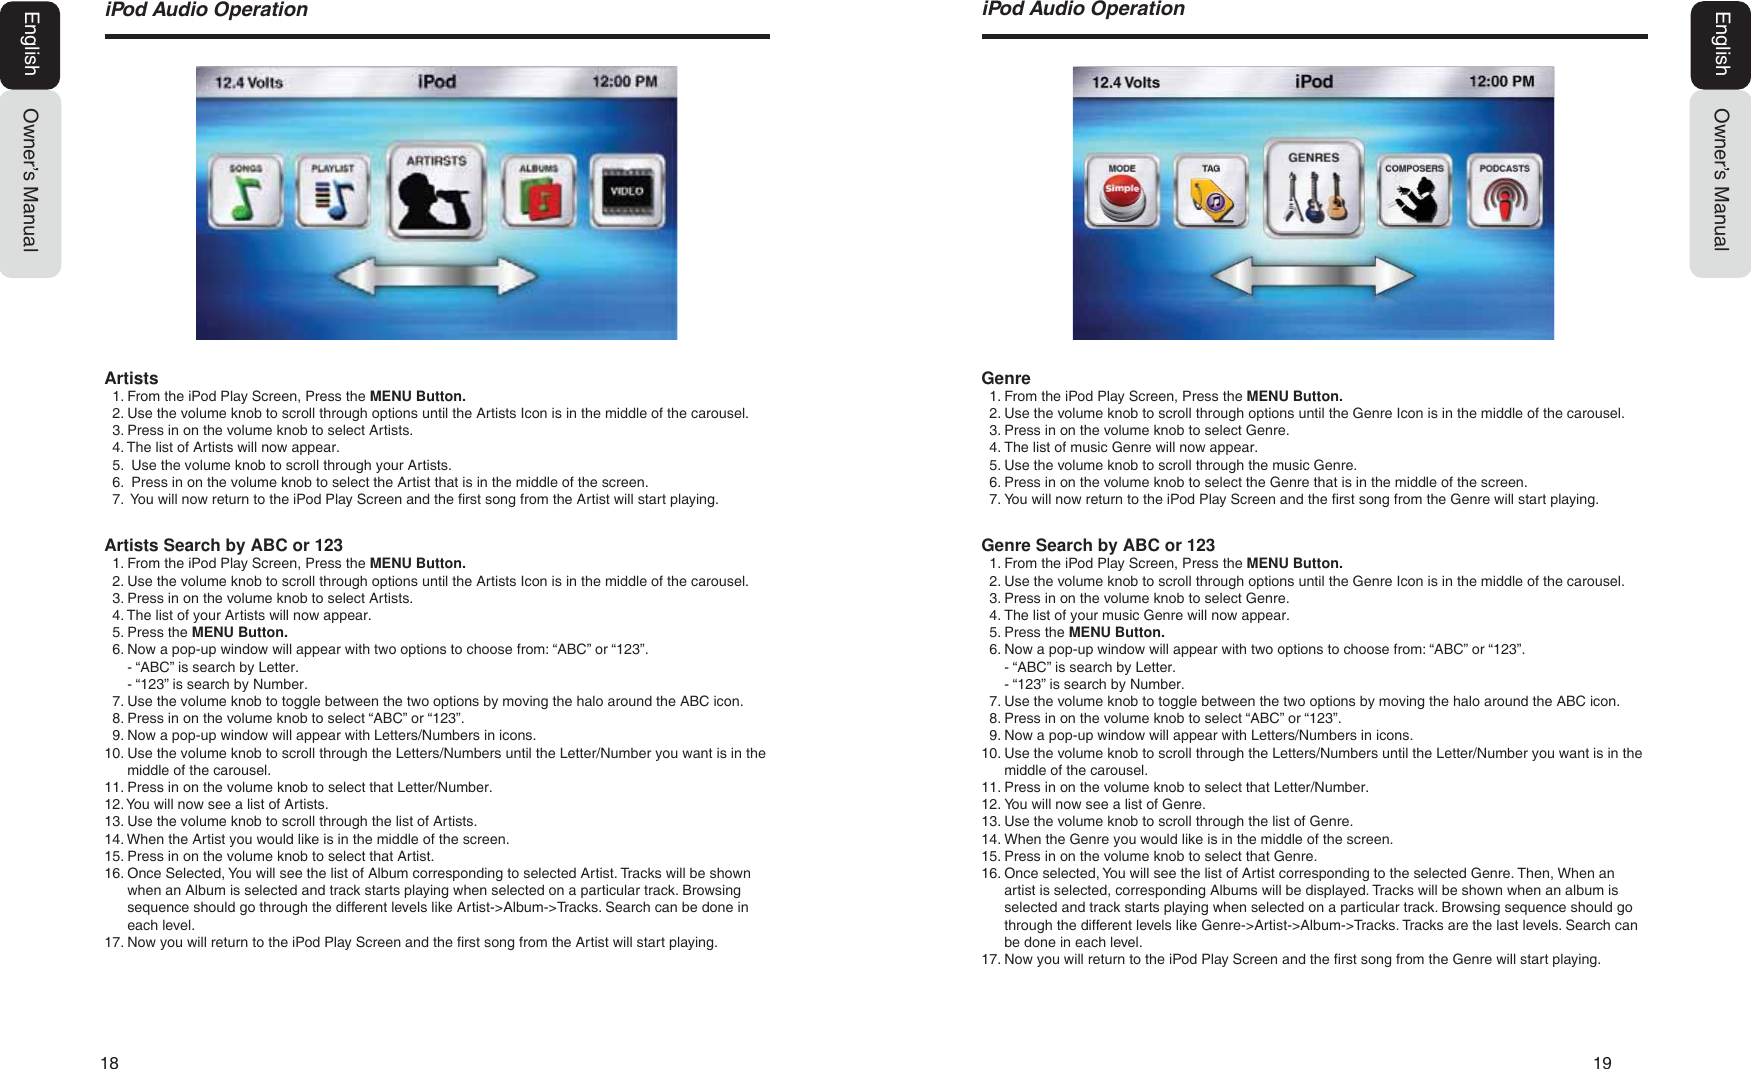
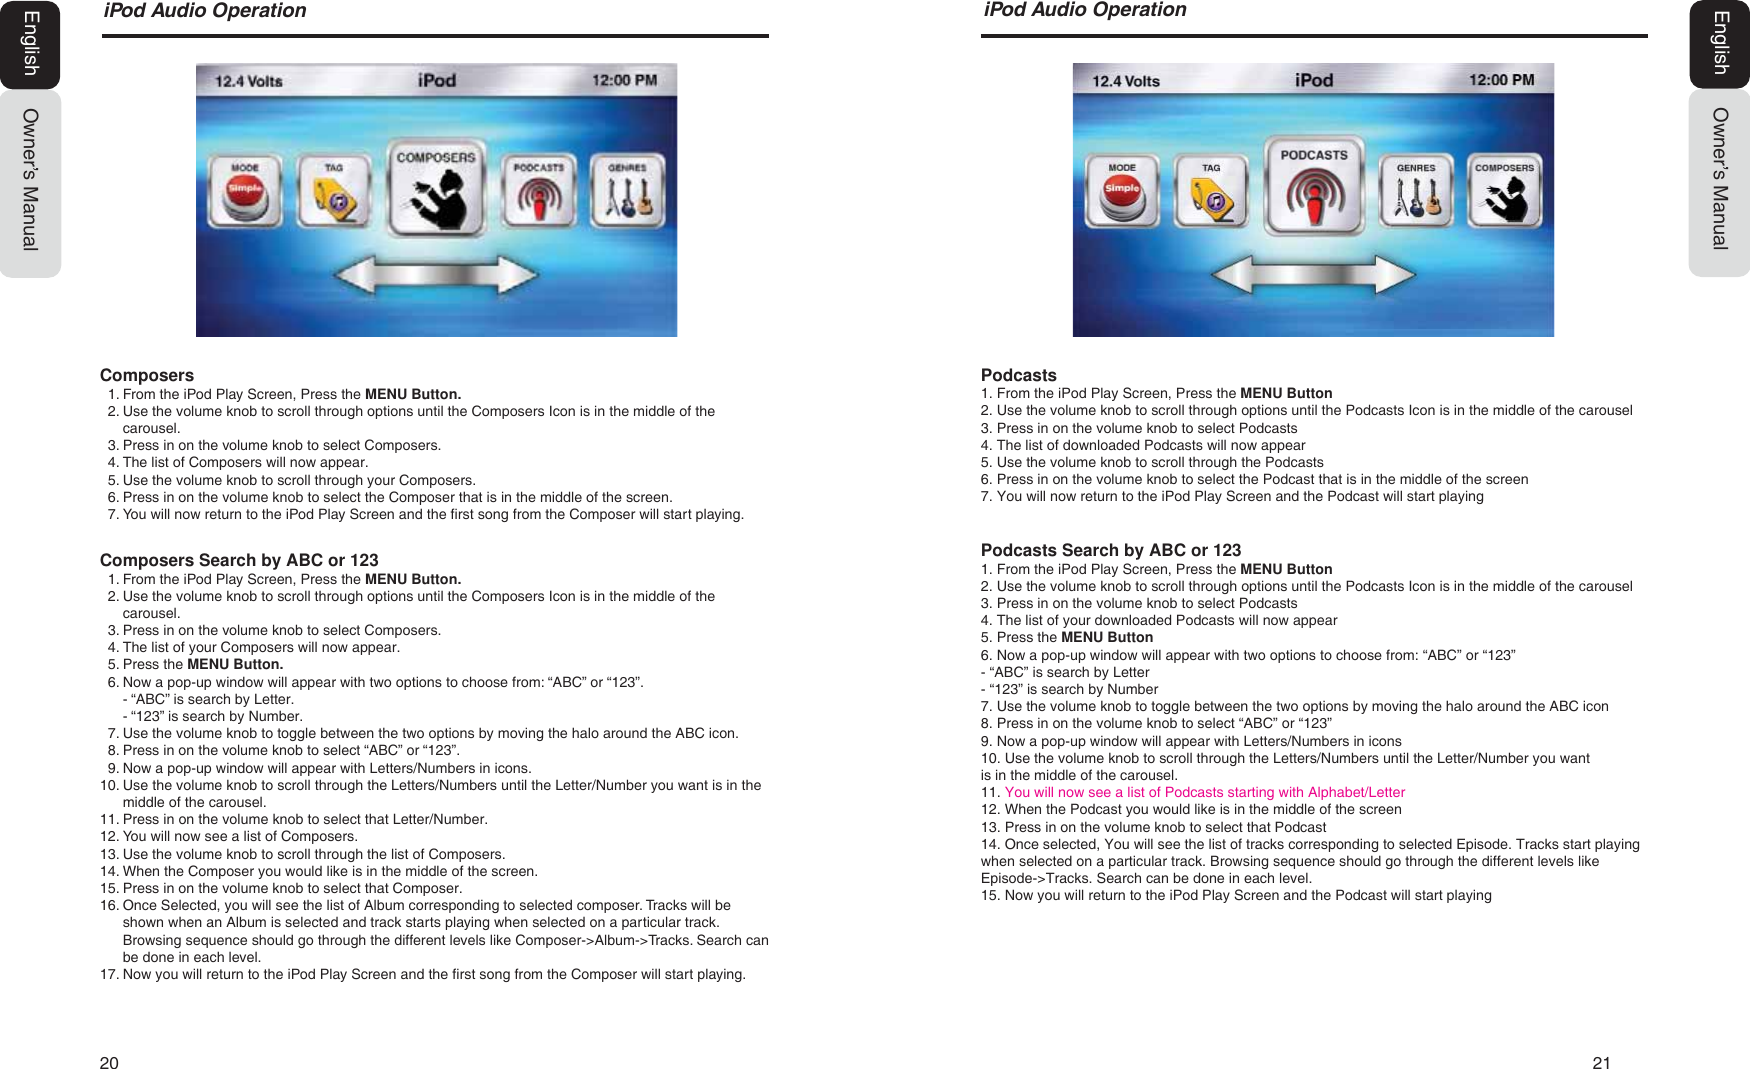
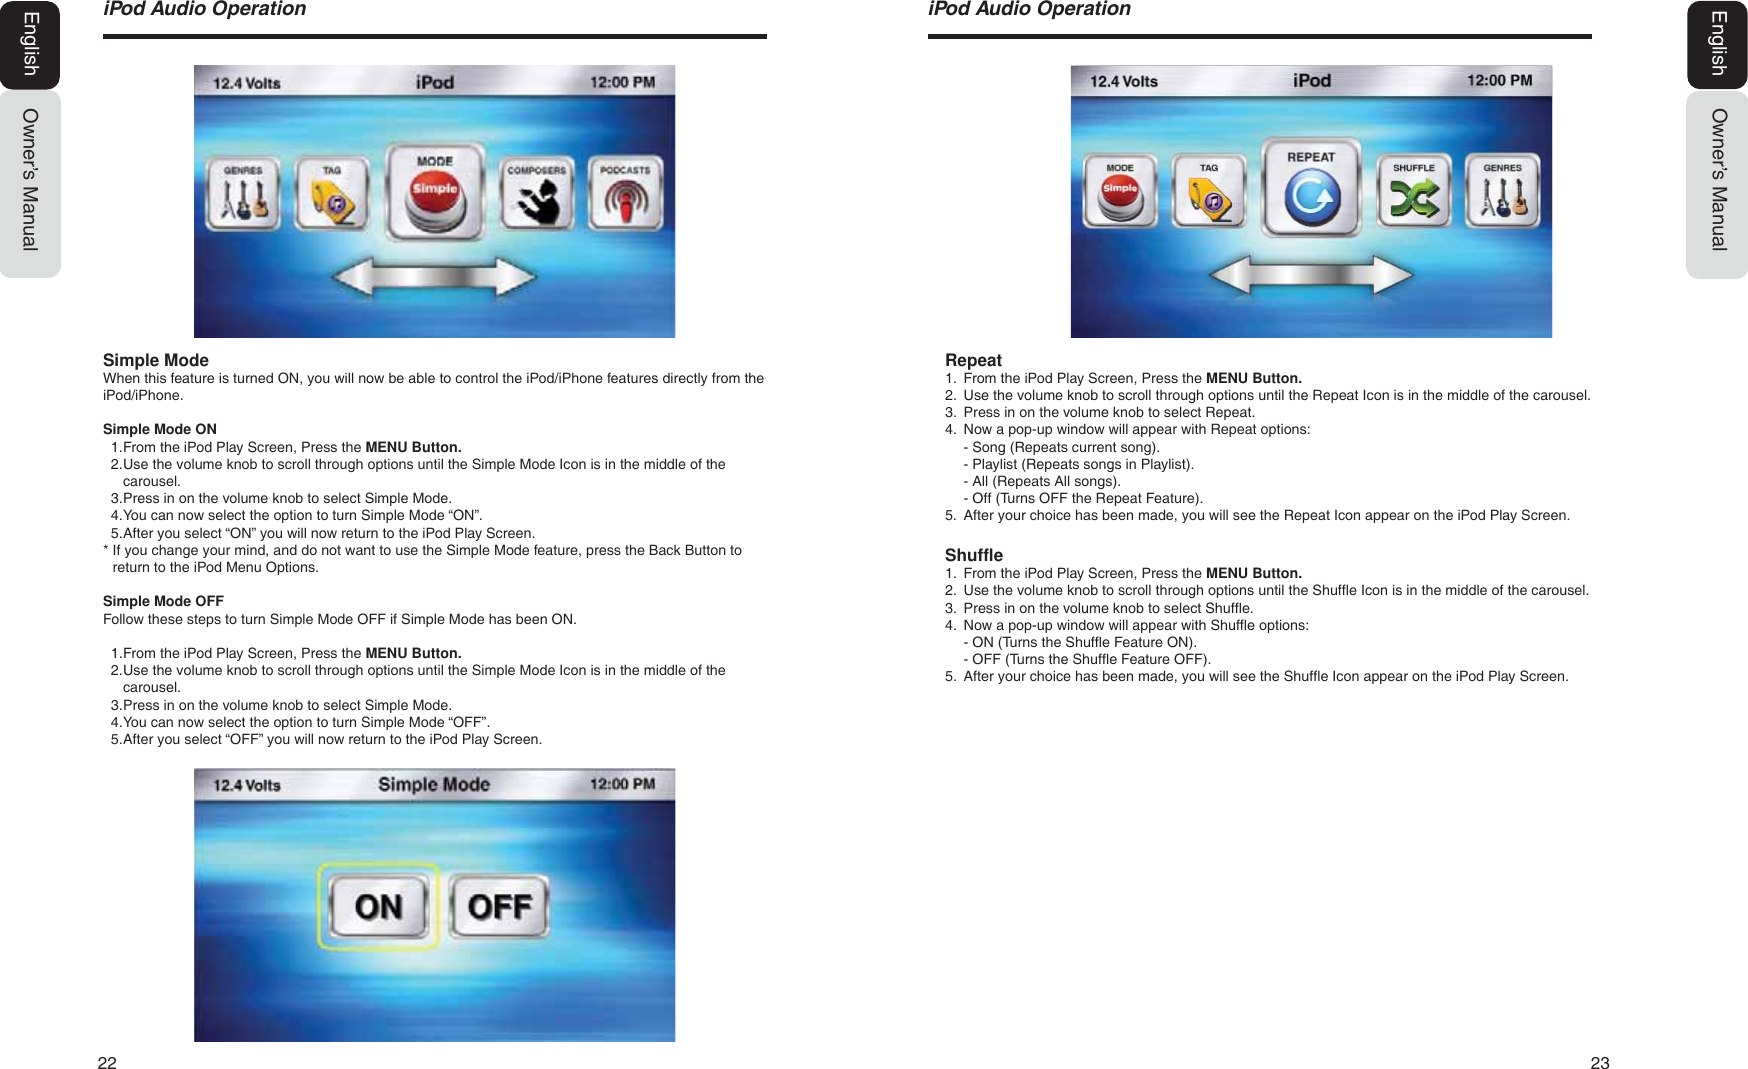
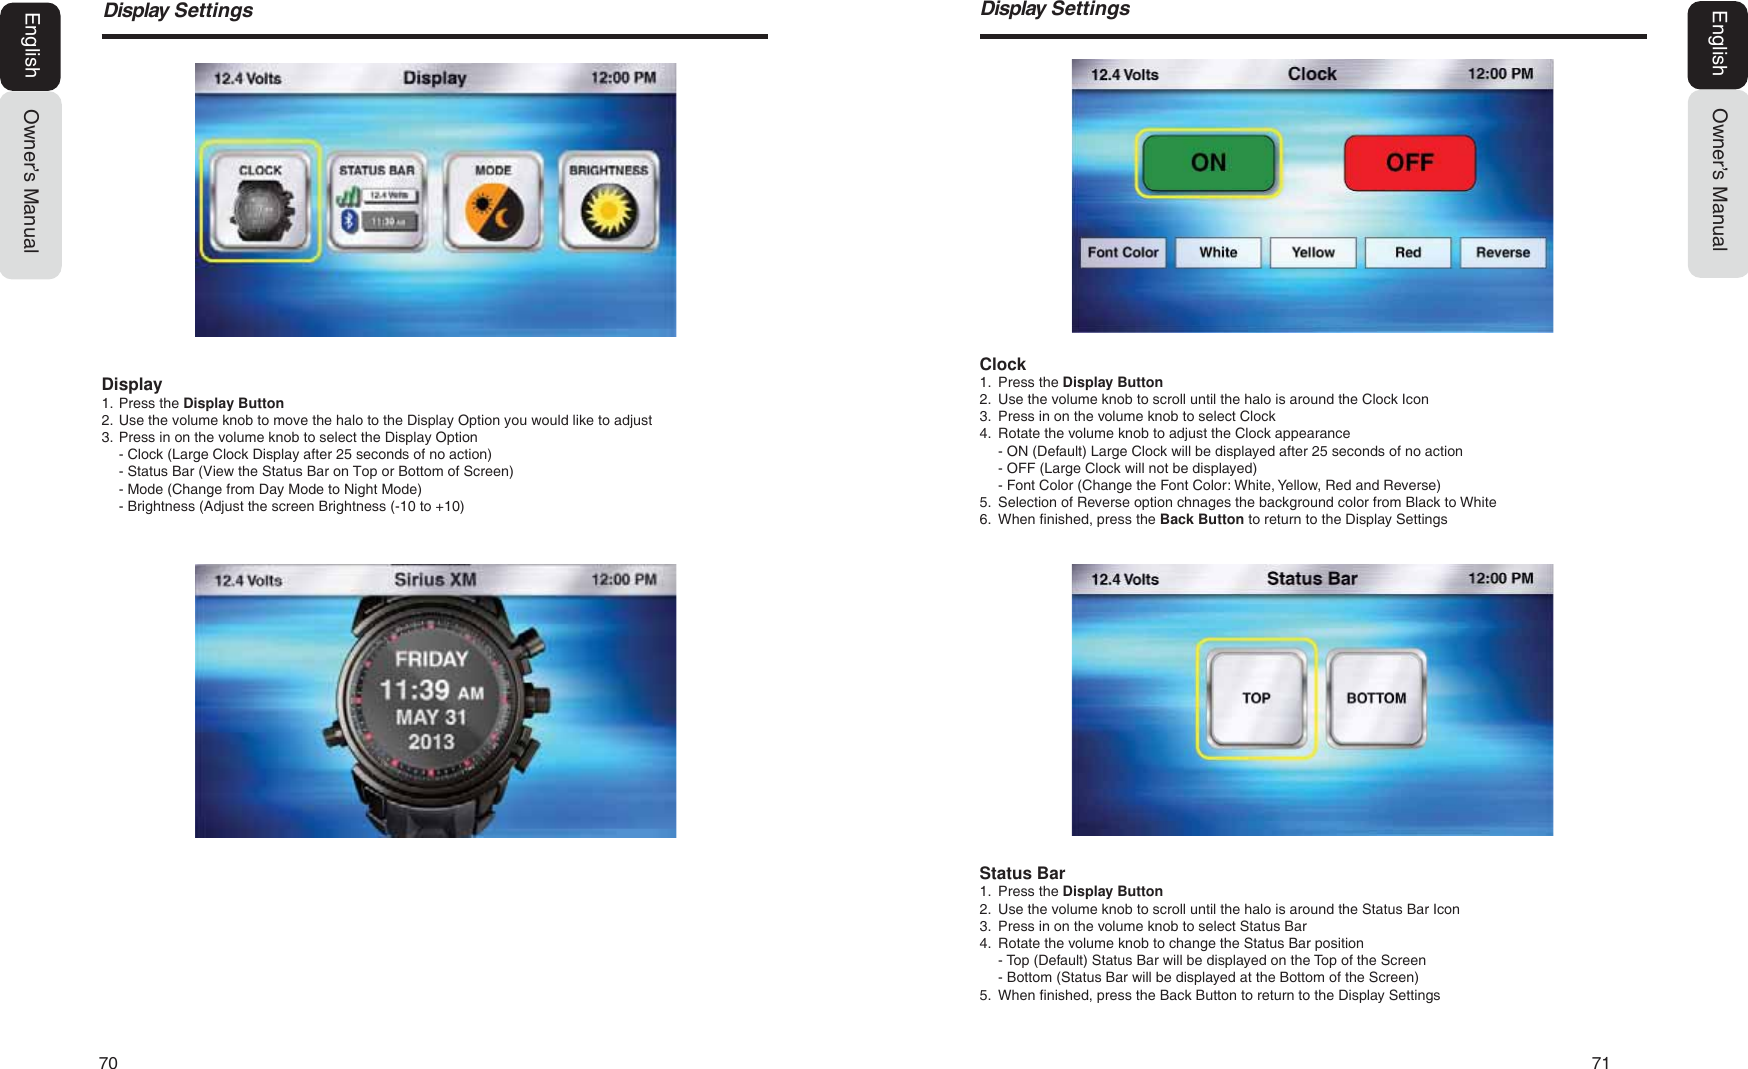
![14 156LULXV;06DWHOOLWH5DGLR2SHUDWLRQOwner’s ManualEnglish[ SEEK] Seek Back Button- Press and release button to go back to previous song.- Press and Hold for Three Seconds to scan back through song, release and song will continue playing.[SEEK ] Seek Forward Button- Press and release button to advance to next song.- Press and Hold for Three Seconds to scan through song, release and song will continue playing.[ ] Play / Pause Button- Press to PAUSE current song.- When track is PAUSED, press again to continue playing current song(iPod, Bluetooth Audio, USB, and Pandora).[BACK] Back Button- Press to go back to previous Menu or Settings Screen.- Press to backwards in multiple Menu Screens.- Press to return to current source play screen from Menu or Settings Screen.[MENU] Menu ButtonPress to access additional options.- Playlists (Search by “ABC” or “123”).- Songs (Search by “ABC” or “123”).- Artists (Search by “ABC” or “123”).- Genre (Search by “ABC” or “123”).- Composers (Search by “ABC” or “123”).- Podcasts (Search by “ABC” or “123”).- Simple Mode (ON or OFF) = Operation and Control directly from iPod/iPhone.- Tag (Tag song to iPod/iPhone for purchase through iTunes).- Repeat (Song, Playlist, All, Off).- Shuffle (ON or OFF).L3RG$XGLR2SHUDWLRQOwner’s ManualEnglishParental Controls1. From the SiriusXM Play Screen, Press the MENU Button.2. Use the volume knob to scroll through options until the Parental Controls Icon is in the middle of thecarousel.3. Press in on the volume knob to select Parental Controls.4. Now a pop-up window will appear with two options to choose from: “Lock Mature Content Channels”or “Manage Password”.- “Lock Mature Content Channels” locks the ability to tune to the “Mature Content” Channels.- “Manage Password” Provides the ability to Set a Password or to Change the Password to lock theMature Content Channels.- The default passcode set for the Parental lock is 1111. This can be changed with the help ofManage Password. Lock Mature Content Channels1. Press in on the volume knob to select “Lock Mature Content Channels”.2. A pop-up window will now appear asking you if you want to turn Lock the Mature Content Channelsfeature “ON” or “OFF”.3. Select “ON” by pressing in on the volume knob, to turn this feature “ON”.4. Now you will be asked to enter in a 4-digit Lock Code to Lock the Mature Content Channels.5. Using the volume knob, scroll through the numbers and Press in on the volume knob to select a4-digit Lock Code.* Write down the 4-digit Lock Code for future reference.6. Now the SiriusXM Mature Content Channels are Lock and can not be listened to.Unlock Mature Content Channels1. Press in on the volume knob to select “Lock Mature Content Channels”.2. A pop-up window will now appear asking you if you want to turn Lock the Mature Content Channelsfeature “ON” or “OFF”.3. Select “OFF” by pressing in on the volume knob, to turn this feature “OFF”.4. Now you will be asked to enter in a 4-digit Lock Code to Unlock the Mature Content Channels.5. Using the volume knob, scroll through the numbers and Press in on the volume knob to select your4-digit Code.Use the default passcode unless it is changed using Manage passcode.If the default passcode ischanged using Manage passcode, then enter the new chnaged passcode.6. Now the SiriusXM Mature Content Channels are Unlocked and can be listened to.Manage PasswordThis setting will allow you to change your existing password to Lock Mature Content Channels.1. From the SiriusXM Play Screen, Press the MENU Button.2. Use the volume knob to scroll through options until the Parental Controls Icon is in the middle of thecarousel.3. Press in on the volume knob to select Parental Controls4. Now a pop-up window will appear with two options to choose from: “Lock Mature Content Channels”or “Manage Password”.- “Lock Mature Content Channels” locks the ability to tune to the “Mature Content” Channels.- “ Manage Password” Provides the ability to Set a Password or to Change the Password to lock theMature Content Channels.5. Select “Manage Password”.6. Enter in your Current Lock Code. For the first time, current lock code is same as default passcode.7. Select Done when finished.8. Enter in a New Lock Code.9. Select Done when finished.10. You will now see a confirmation window appear displaying the new lock code.* Please remember this code. You will need it to listen to locked channels or to turn Off the Lock MatureContent Features.](https://usermanual.wiki/SKYPINE-ELECTRONICS/MW4.User-Manual/User-Guide-2528086-Page-8.png)
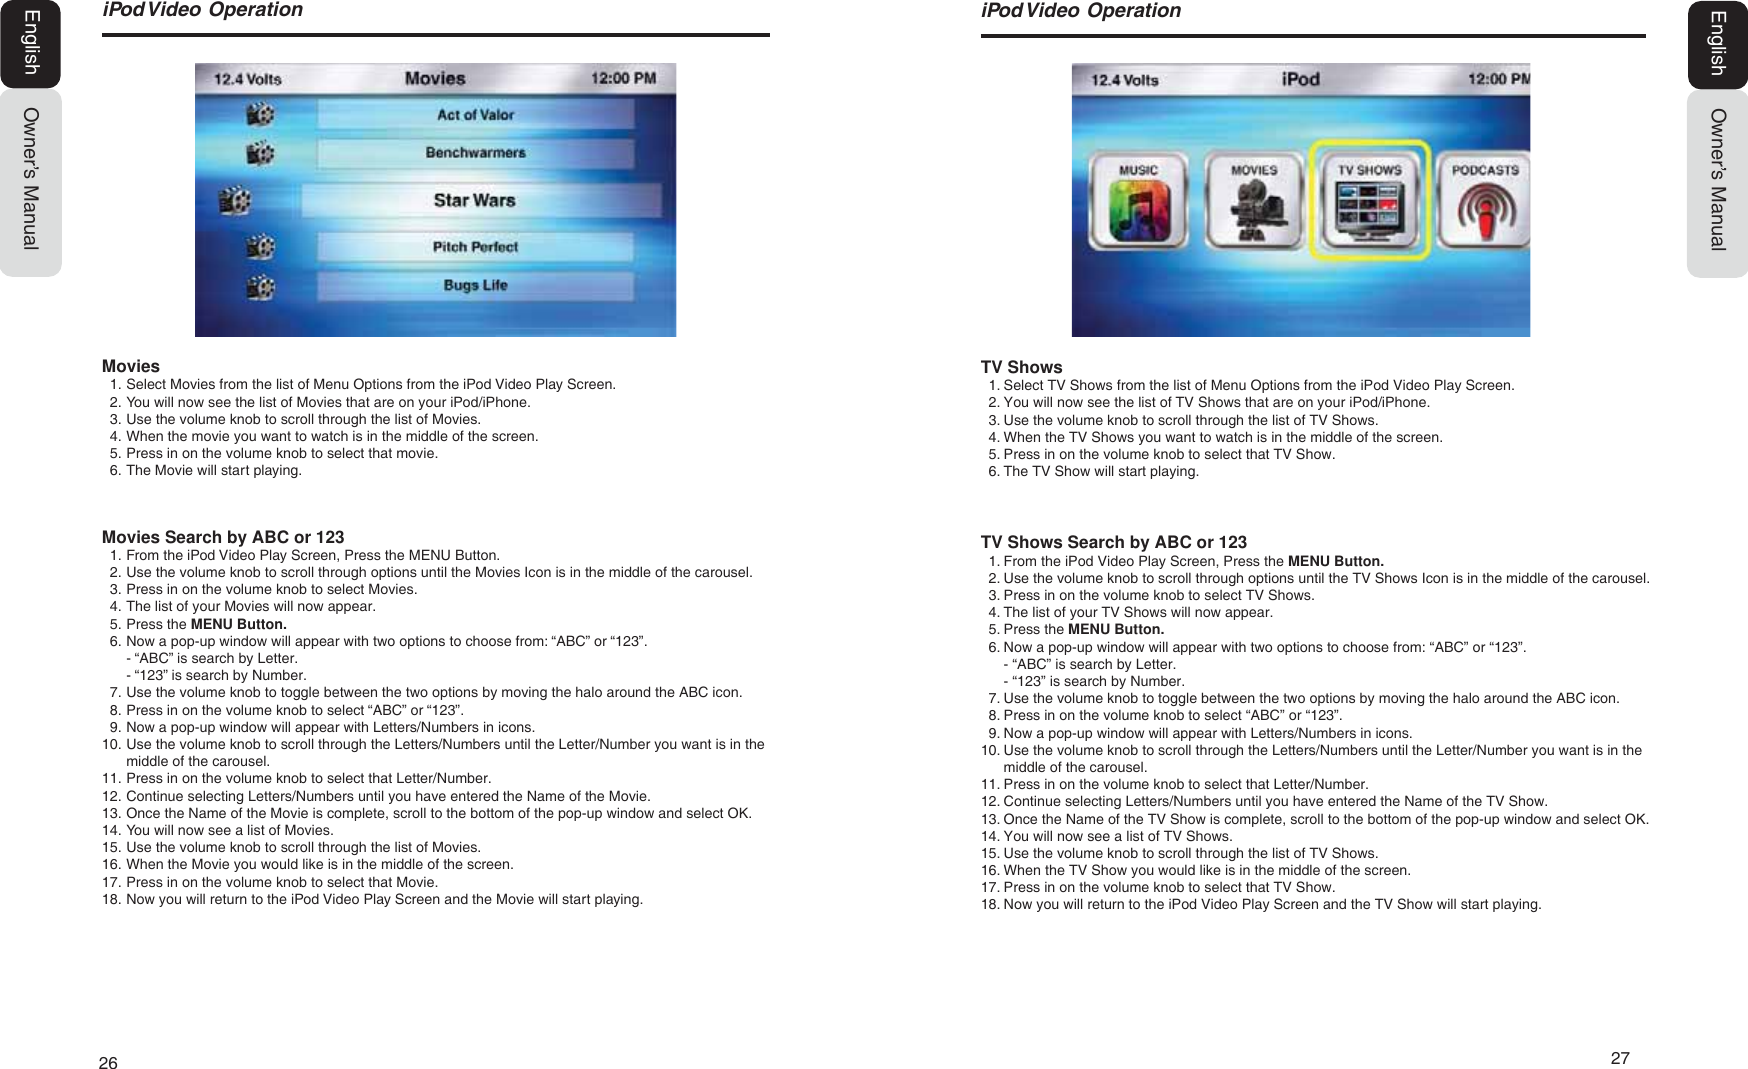
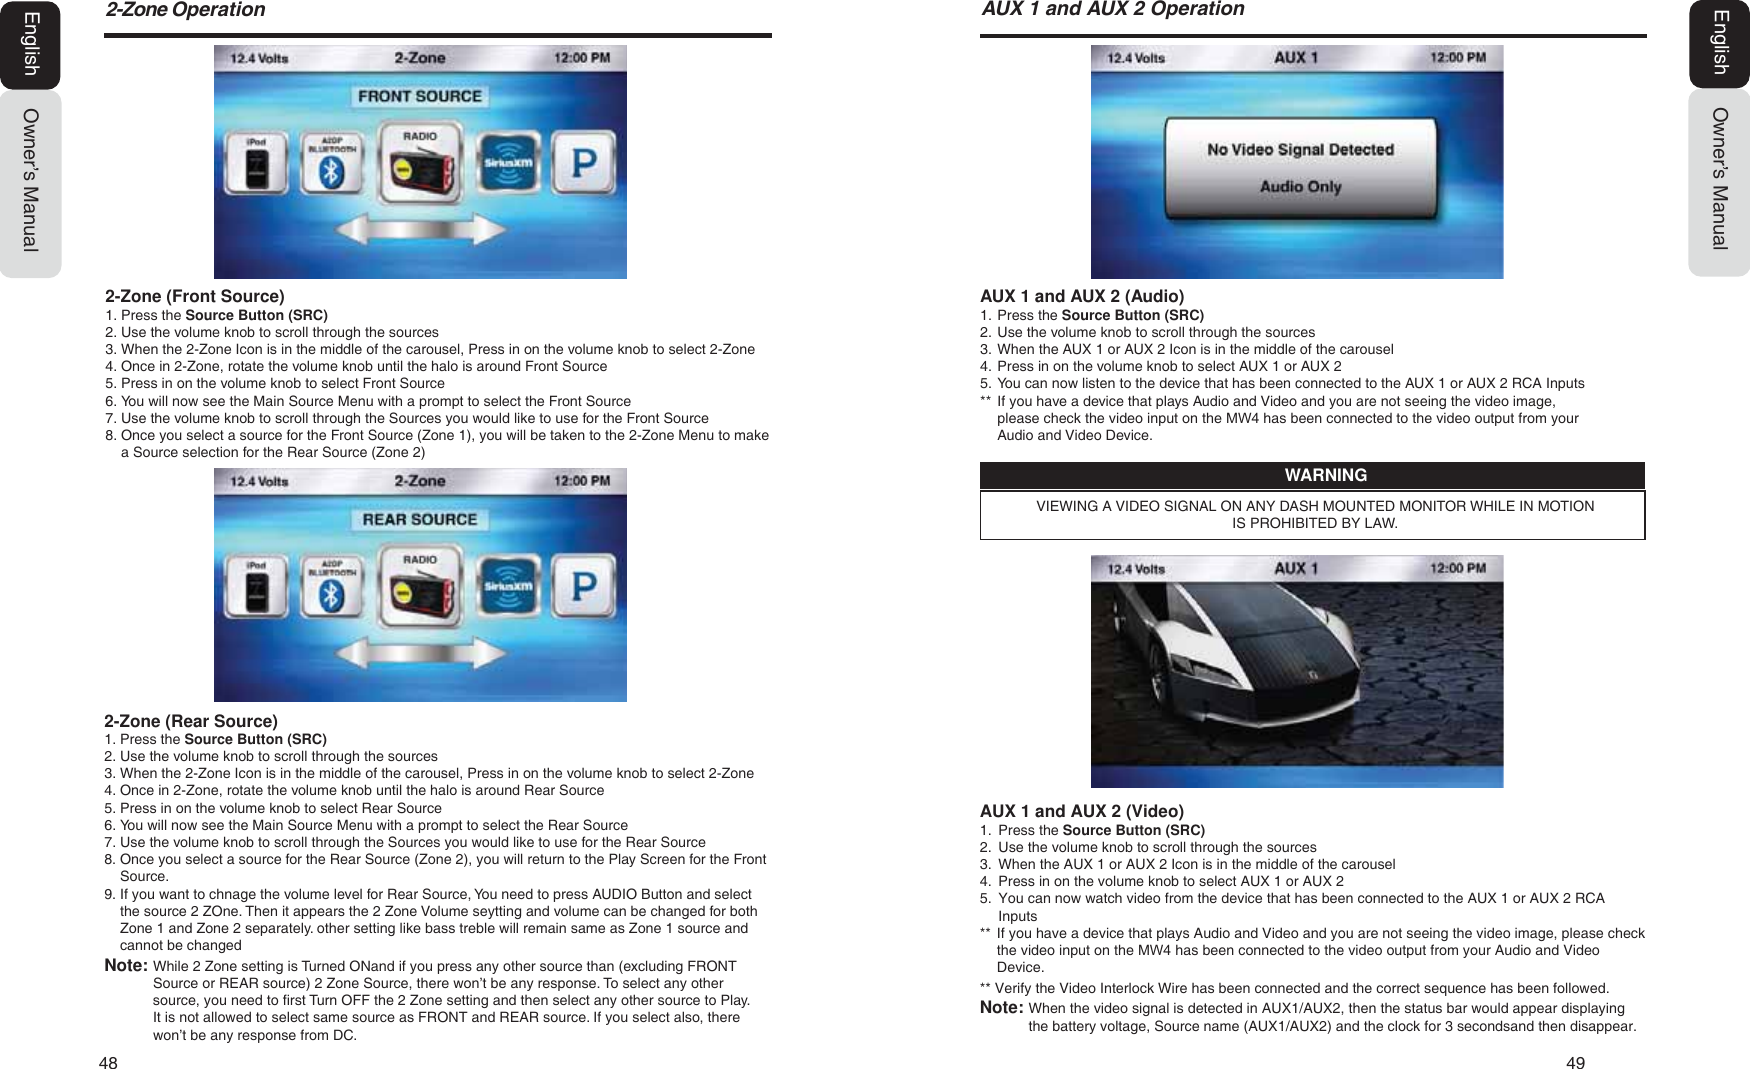
![24 25Owner’s ManualEnglishiPod Video1. From the iPod Audio Play Screen, Press the MENU Button.2. Use the volume knob to scroll through options until the Video Icon is in the middle of thecarousel.3. Press in on the volume knob to select Video.4. You will now switch to the iPod Video Play Screen.Select Video1. From the iPod Video Play Screen, Press the MENU Button.2. You will now see the following options:- Music (Returns you back to the iPod Audio Play Screen and Leaves iPodVideo).- Movies (Search by “ABC” or “123”). - TV Shows (Search by “ABC” or “123”). - Podcasts (Search by “ABC” or “123”).3. Use the volume knob to scroll through optionsVIEWING A VIDEO SIGNAL ON ANY DASH MOUNTED MONITOR WHILE IN MOTION IS PROHIBITED BY LAW.WARNINGIF YOU SEE A “AUDIO ONLY” SCREEN WHILE TRYING TO WATCH A MOVIE, PLEASE CHECK THE “VIDEO INTERLOCK” WIRE AND MAKE SURE IT IS CONNECTED.VIDEO INTERLOCKON (GROUND), OFF (NO GROUND), ON (GROUND)NOTEL3RG9LGHR2SHUDWLRQOwner’s ManualEnglish[ SEEK] Seek Back Button- Press and release button to go back to previous chapter.- Press and Hold for Three Seconds to scan back through chapter, release and video will continue playing.[SEEK ] Seek Forward Button- Press and release button to advance to next chapter.- Press and Hold for Three Seconds to scan through chapter, release and video will continue playing.[ ] Play / Pause Button- Press to PAUSE the video.- When track is PAUSED, press again to continue playing the video.[BACK] Back Button- Press to go back to previous Menu or Settings Screen.- Press to backwards in multiple Menu Screens.- Press to return to current source play screen from Menu or Settings Screen.[MENU] Menu Button (While Video is Playing)Press to access additional options.- Menu (Subtitles ON and OFF).- Top (Plays video from the beginning of the current chapter).- Chapters (Search Chapters by “123”).- Repeat (Chapter, All and OFF).[MENU] Menu Button (From iPod Video Play Screen)Press to access additional options.- Movies (Search by “ABC” or “123”).- TV Shows (Search by “ABC” or “123”).- Podcasts (Search by “ABC” or “123”).L3RG9LGHR2SHUDWLRQ](https://usermanual.wiki/SKYPINE-ELECTRONICS/MW4.User-Manual/User-Guide-2528086-Page-13.png)
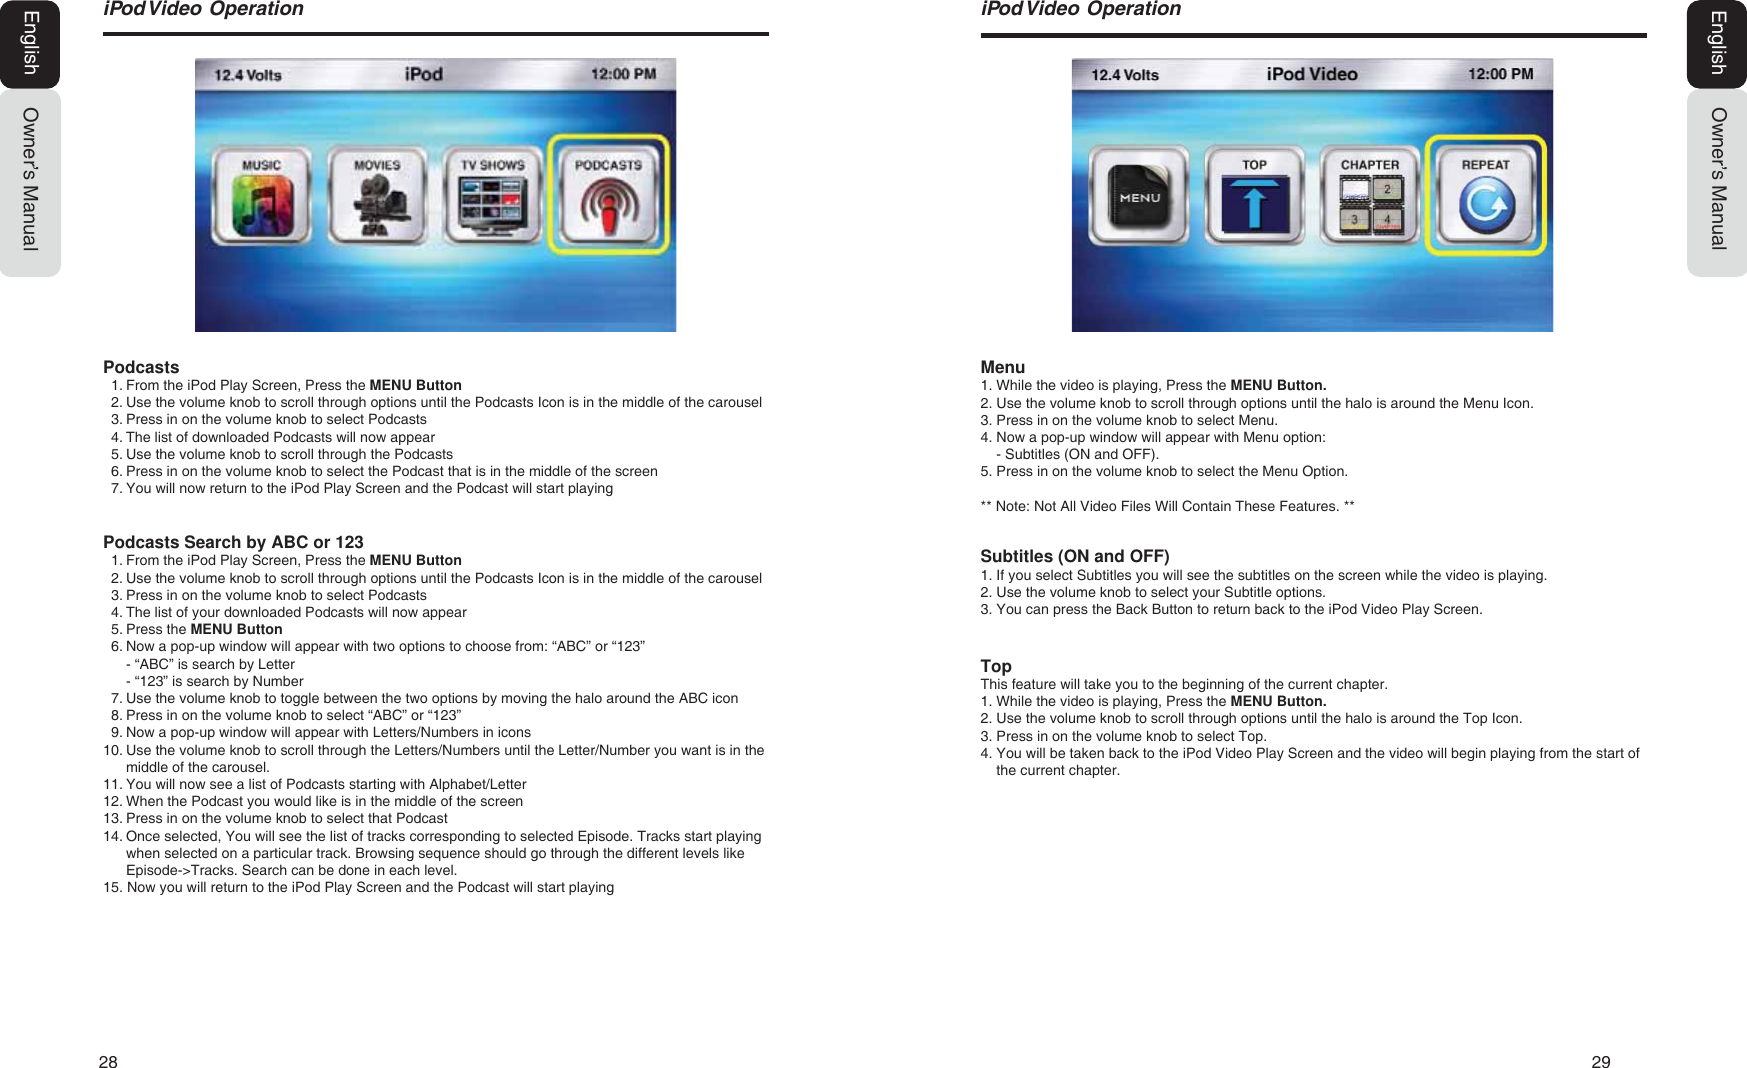
![30 31L3RG9LGHR2SHUDWLRQOwner’s ManualEnglish[ SEEK] Seek Back Button- Press and release button to go back to previous song- Press and Hold for Three Seconds to scan back through song, release and song will continue playing[SEEK ] Seek Forward Button- Press and release button to advance to next song- Press and Hold for Three Seconds to scan through song, release and song will continue playing[ ] Play / Pause Button- Press to PAUSE the song- When track is PAUSED, press again to continue playing the song[BACK] Back Button- Press to go back to previous Menu or Settings Screen- Press to backwards in multiple Menu Screens- Press to return to current source play screen from Menu or Settings Screen[MENU] Menu ButtonPress to access additional options- Repeat (Song, Folder, All or OFF)- Random (ON or OFF)- Shuffle (ON or OFF)- Folders (Access Music Folders)- Songs (Access Songs)- SCAN option for Intro Music SCAN86%DQG86%2SHUDWLRQOwner’s ManualEnglishRepeat1. While the video is playing, Press the MENU Button.2. Use the volume knob to scroll through options until the halo is around the Repeat Icon.3. Press in on the volume knob to select Repeat.4. Now a pop-up window will appear with Repeat options:- Chapter (Repeats current Chapter).- All (Repeats All Chapters).- Off (Turns OFF the Repeat Feature).5. Press in on the volume knob to select your Repeat function.* If you change your mind and do not want to use the Repeat function, press the Back Button and youwill return to the iPod Video Play Screen.Chapter1. While the video is playing, Press the MENU Button.2. Use the volume knob to scroll through options until the halo is around the Chapters Icon.3. Press in on the volume knob to select Chapters.4. Now a pop-up window will appear with a number pad for you to enter in the chapter number..5. Use the volume knob to scroll through the numbers.6. Press in on the volume knob to select the chapter number(s).7. When you have finished your chapter selection.8. Scroll to the bottom of the pop-up screen and select “OK”.9. You will now return to the iPod Video Play Screen and the video will start playing from the selectedChapter.](https://usermanual.wiki/SKYPINE-ELECTRONICS/MW4.User-Manual/User-Guide-2528086-Page-16.png)
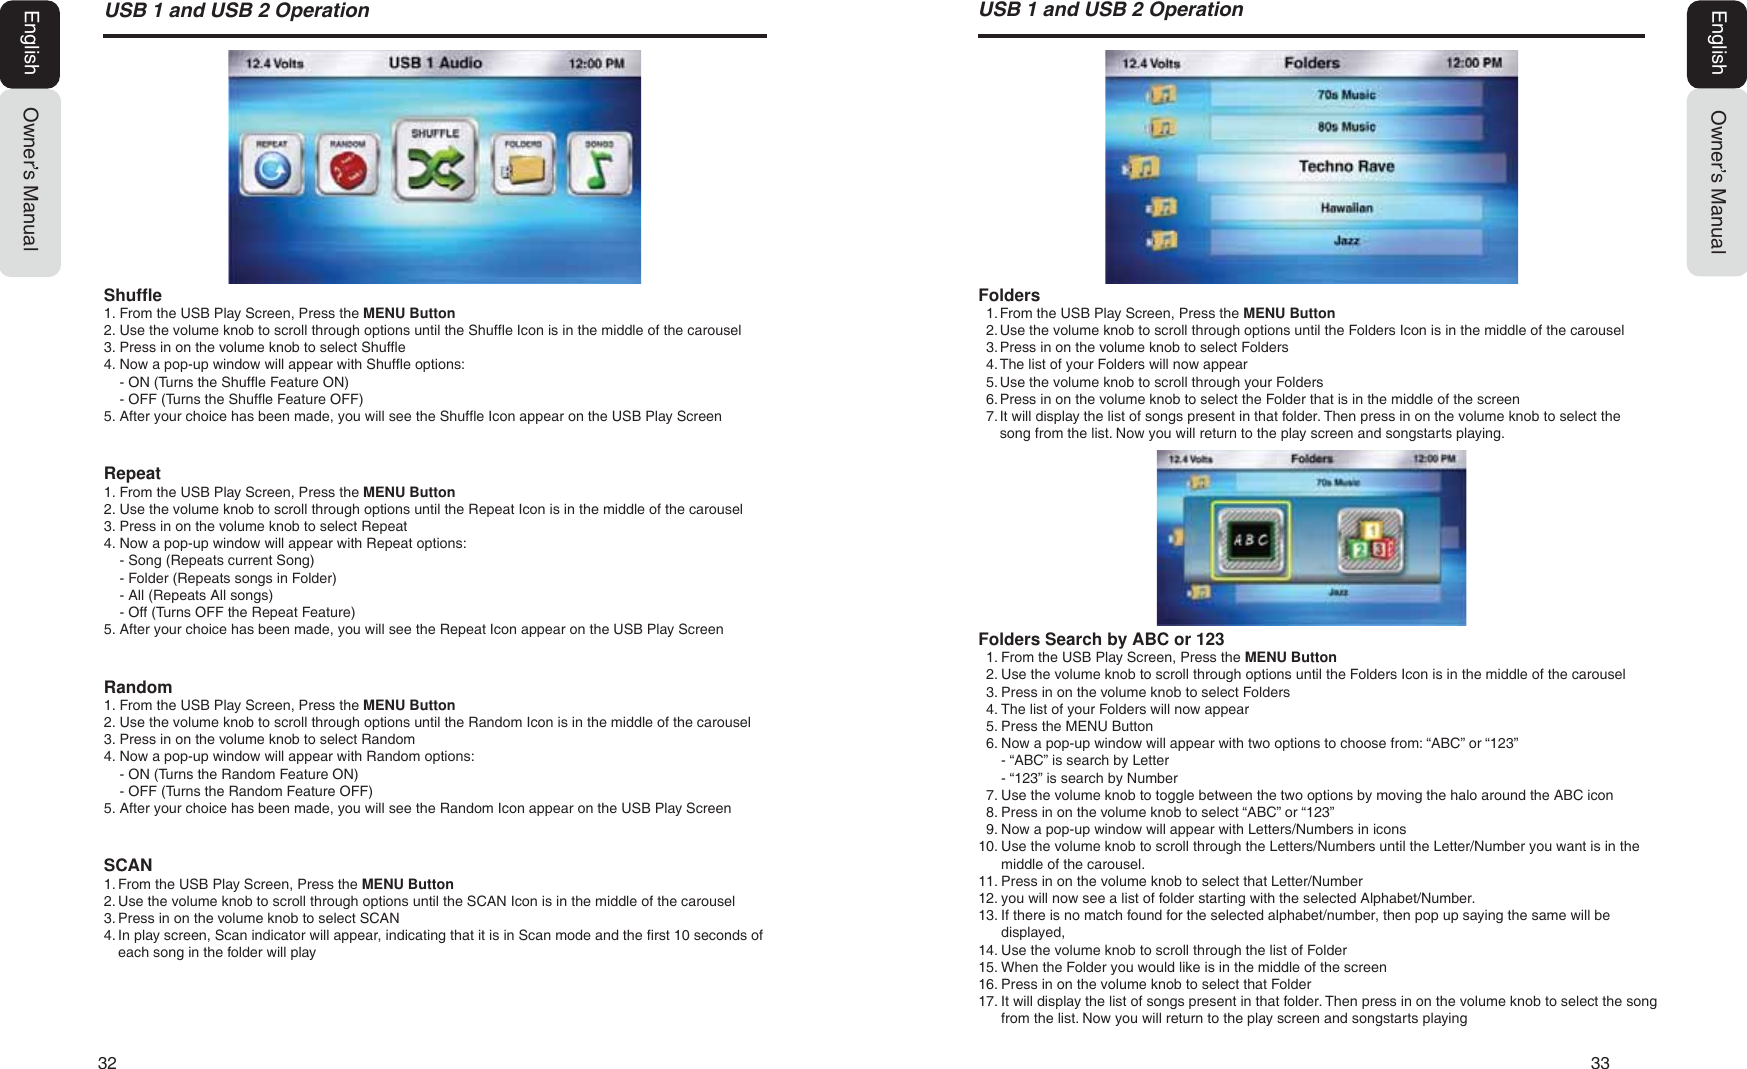
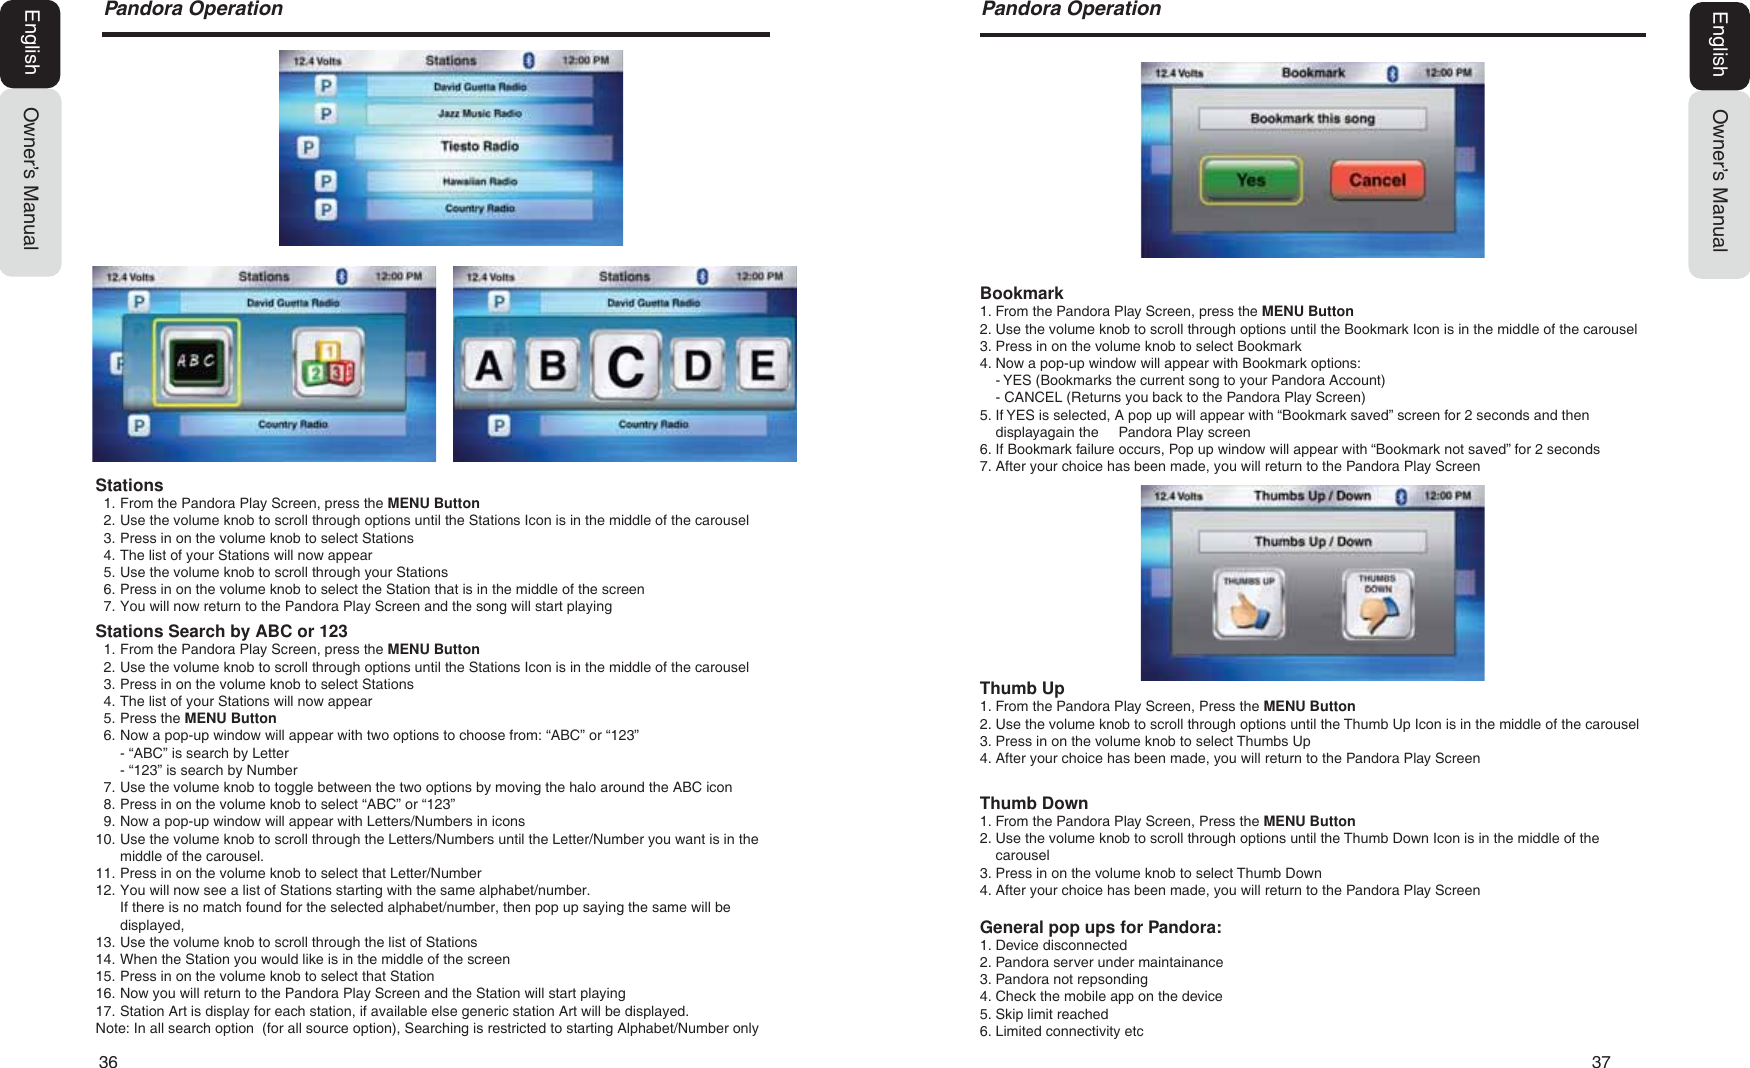
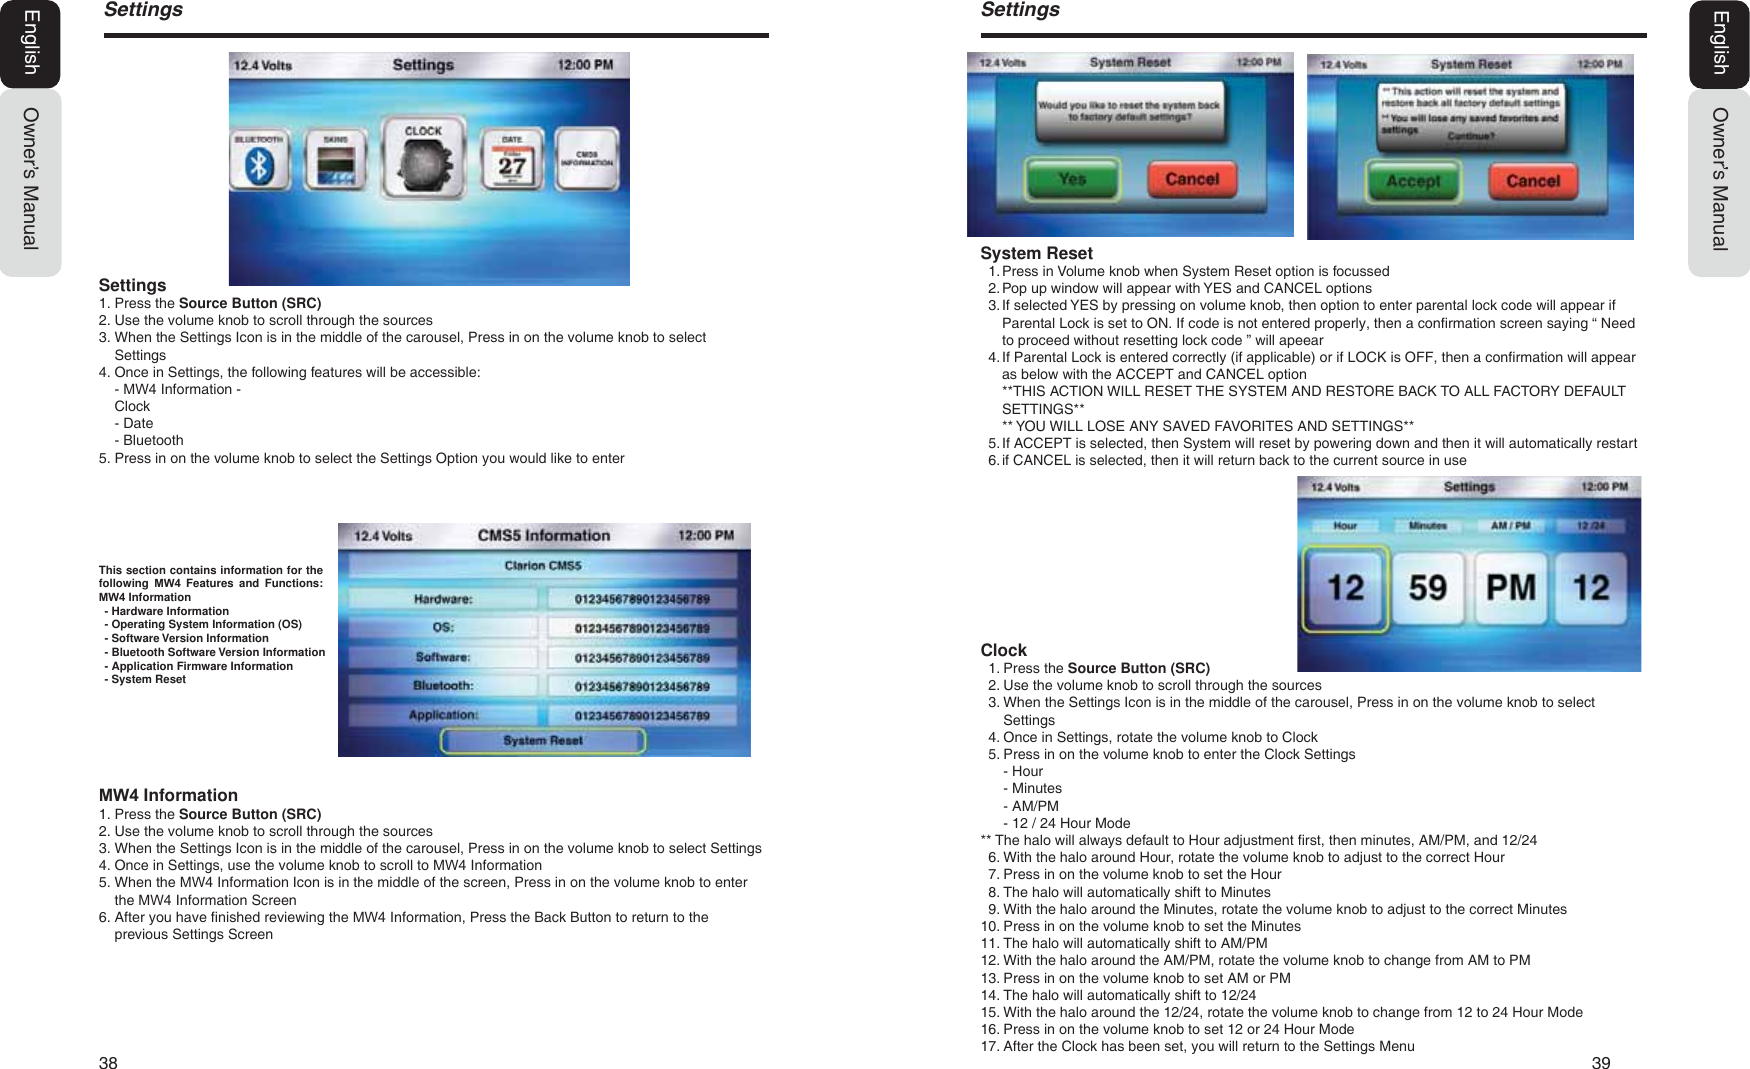
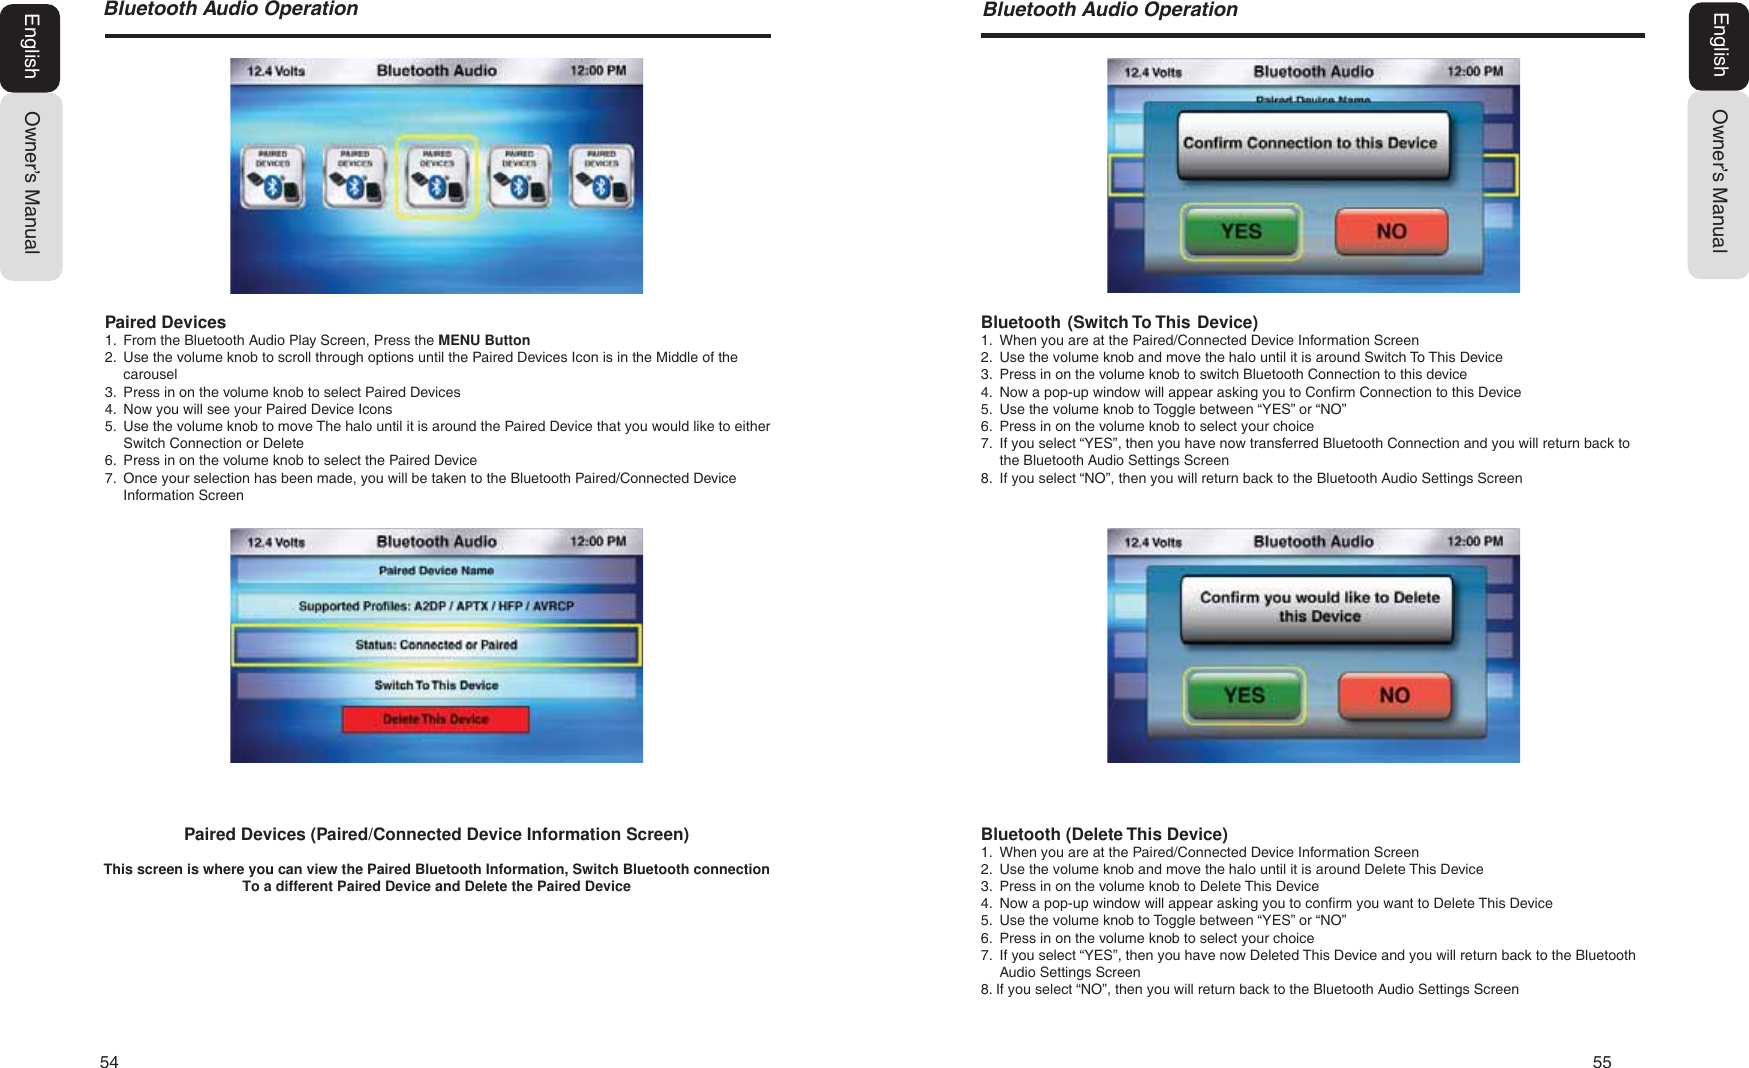
![34 3586%DQG86%2SHUDWLRQOwner’s ManualEnglish[ SEEK] Seek Back Button- No function[SEEK ] Seek Forward Button- Press and release button to advance to next song-[ ] Play / Pause Button- Press to PAUSE the song- When track is PAUSED, press again to continue playing the song[BACK] Back Button- Press to go back to previous Menu or Settings Screen- Press to go backwards in multiple Menu Screens- Press to return to current source play screen from Menu or Settings Screen3DQGRUD2SHUDWLRQOwner’s ManualEnglishSongs1. From the USB Play Screen, Press the MENU Button2. Use the volume knob to scroll through options until the Songs Icon is in the middle of the carousel3. Press in on the volume knob to select Songs4. The list of your Songs will now appear5. Use the volume knob to scroll through your Songs6. Press in on the volume knob to select the Song that is in the middle of the screen7. You will now return to the iPod Play Screen and the song will start playingSongs Search by ABC or 1231. From the USB Play Screen, Press the MENU Button2. Use the volume knob to scroll through options until the Songs Icon is in the middle of the carousel3. Press in on the volume knob to select Songs4. The list of your Songs will now appear5. Press the MENU Button6. Now a pop-up window will appear with two options to choose from: “ABC” or “123”- “ABC” is search by Letter- “123” is search by Number7. Use the volume knob to toggle between the two options by moving the halo around the ABC icon8. Press in on the volume knob to select “ABC” or “123”9. Now a pop-up window will appear with Letters/Numbers in icons10. Use the volume knob to scroll through the Letters/Numbers until the Letter/Number you want is in themiddle of the carousel.11. Press in on the volume knob to select that Letter/Number12. You will now see a list of folder starting with the selected Alphabet/Number.13. You will now see a list of Songs. If there is no match found for the selected alphabet/number, then popup saying the same will be displayed.14. Use the volume knob to scroll through the list of Songs15. When the Song you would like is in the middle of the screen16. Press in on the volume knob to select that Song17. Now you will return to the USB Play Screen and the song will start playingNote: In all search option (for all source option), Searching is restricted to starting Alphabet/Number only[MENU] Menu ButtonPress to access additional options- Stations (Music Stations from your Pandora Account)- Bookmark (ON or OFF)- Thumbs Up- Thumbs DownNote: The following Pandora connection status may appear:- Please login to Pandora on device - Unable to play due to music listening restrictions- Device disconnected - Pandora server under maintainace- Pandora not responding - Check the mobile app on device- Skip limit reached - Skip not allowed- Station does not exist - Select a station from station list- Limited connectivity - Track rating failed- Fetching stations information](https://usermanual.wiki/SKYPINE-ELECTRONICS/MW4.User-Manual/User-Guide-2528086-Page-18.png)
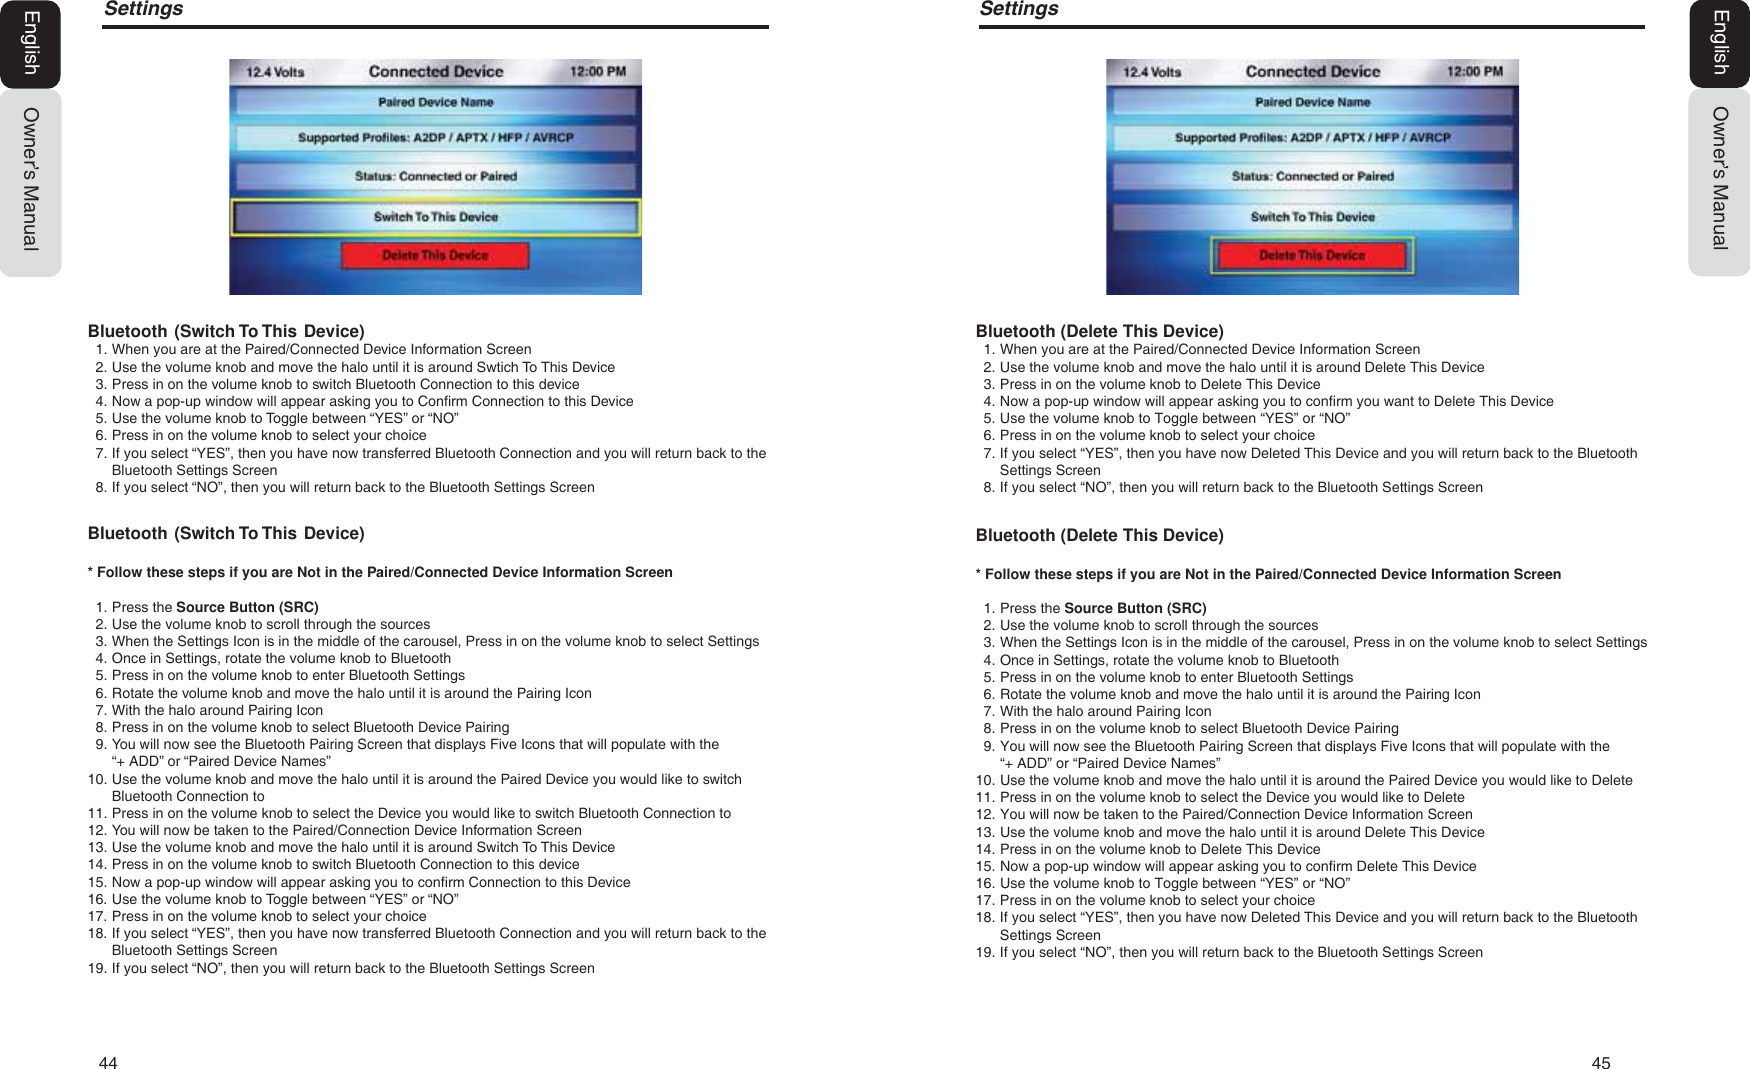
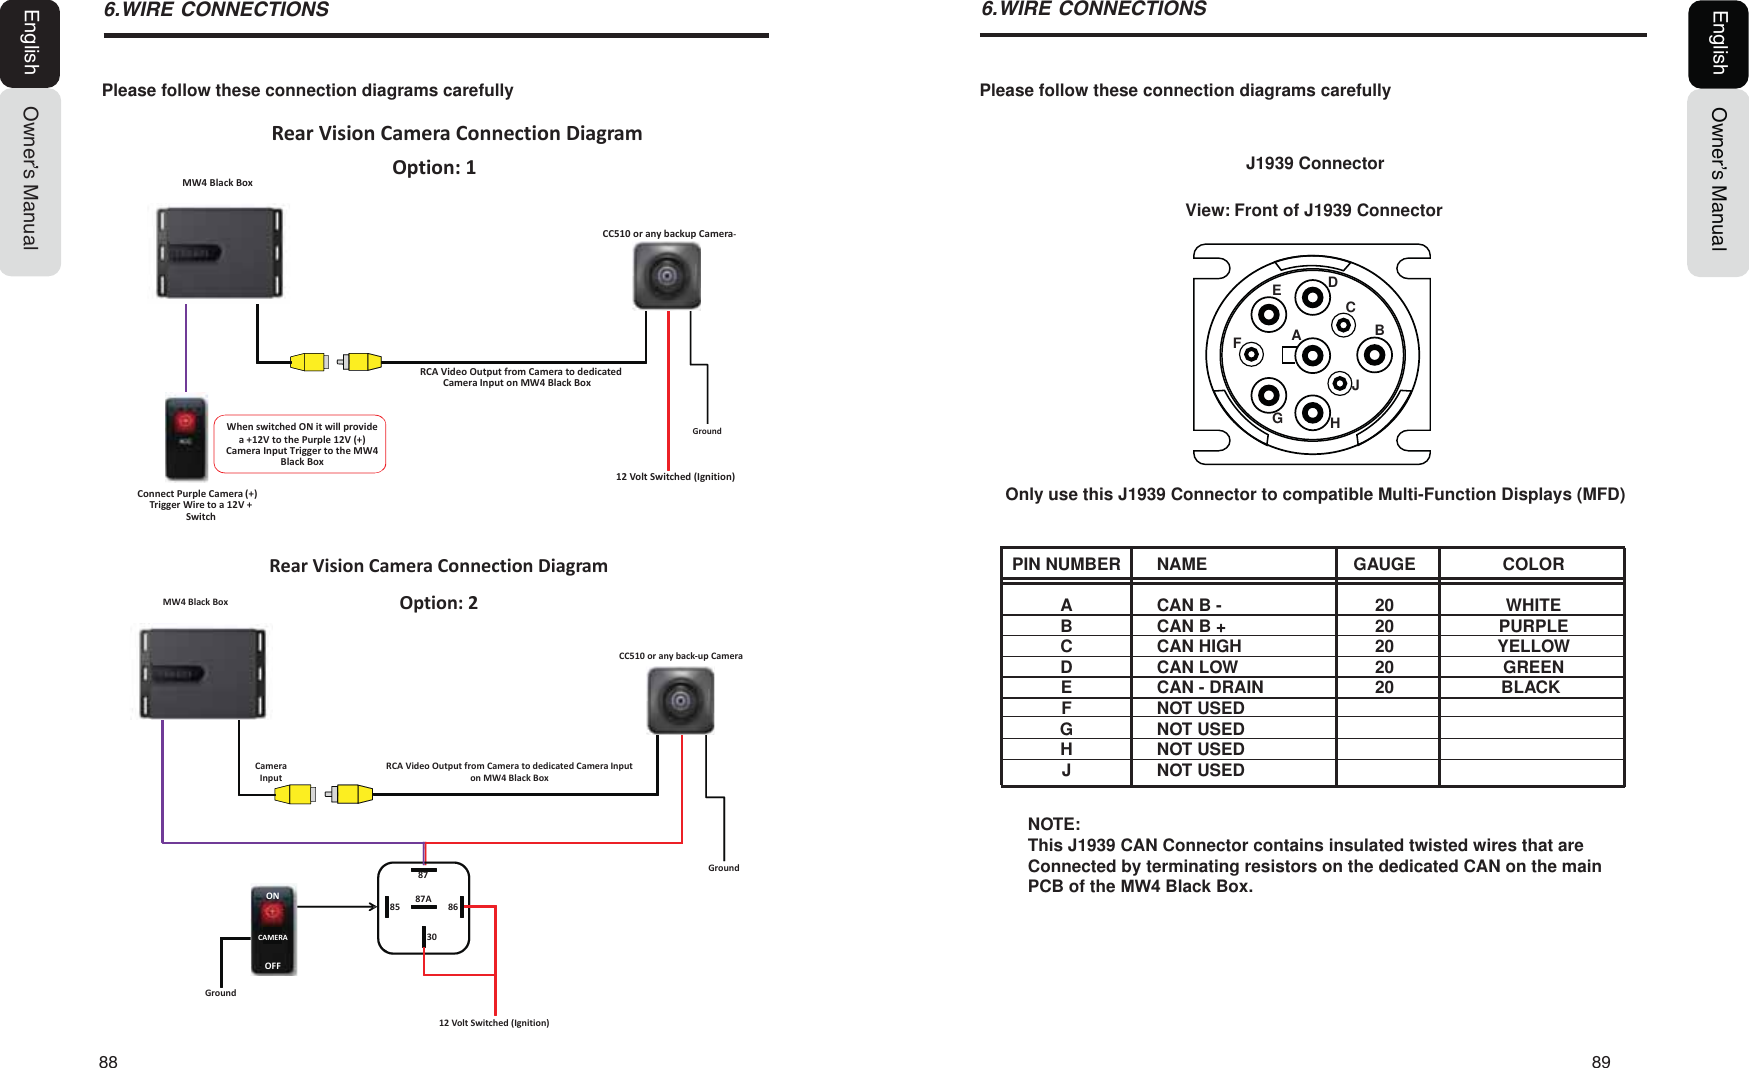
![50 51&DPHUD2SHUDWLRQ[ SEEK] Seek Back Button- Press and release button to go back to previous song- Press and Hold for Three Seconds to scan back through song, release and song will continue playing[SEEK ] Seek Forward Button- Press and release button to advance to next song- Press and Hold for Three Seconds to scan through song, release and song will continue playing[ ] Play / Pause Button- Press to PAUSE current song- When track is PAUSED, press again to continue playing current song (iPod, Bluetooth Audio, USB, and Pandora)[BACK] Back Button- Press to go back to previous Menu or Settings Screen- Press to backwards in multiple Menu Screens- Press to return to current source play screen from Menu or Settings ScreenBluetooth Audio1. Press the Source Button (SRC)2. Use the volume knob to scroll through the sources3. When the Bluetooth Audio Icon is in the middle of the carousel4. Press in on the volume knob to select Bluetooth Audio5. You will now be taken to the Bluetooth Audio Play ScreenOwner’s ManualEnglish%OXHWRRWK$XGLR2SHUDWLRQOwner’s ManualEnglishCamera1. Press the Source Button (SRC)2. Use the volume knob to scroll through the sources3. When the Camera Icon is in the middle of the carousel4. Press in on the volume knob to select Camera5. You can now view the image from the Camera** If you see a “No Video Signal Detected” message on the screen, please check the Camera RCA input on the 0: has been connected to the video output from your Rear Vision Camera (Page 88).** Verify the Video Interlock Wire has been connected and the correct sequence has been followed.Camera (Using Camera Trigger Wire)1. While in any source, listening to audio from that source and then view Camera Image2. Provide a +12v signal to the Camera Trigger Wire (Purple) on the 0: from a +12v Switch or an OpenAccessory Switch.3. When the switch is ON, you can view the Camera Image and listen to the audio source4. If you want to change channels or any other features for the source that is playing, you can place theSwitch to the OFF position and the Camera Image will go away and you will now see the source youWant to adjust or change.5. To return back to viewing the Camera Image, place the switch to the ON position** Refer to the Installation Guide for wiring a switch with and without using a SPDT Relay (Page 88).2-Zone with Camera1. Press the Source Button (SRC)2. Use the volume knob to scroll through the sources3. When the 2-Zone Icon is in the middle of the carousel4. Press in on the volume knob to select 2-Zone5. Select Camera for the Front Source (Zone 1)6. Select an Audio Source for the Rear Source (Zone 2)7. You can now view the image from the Camera8. Audio will only be heard out of the speakers connected to Zone 2.](https://usermanual.wiki/SKYPINE-ELECTRONICS/MW4.User-Manual/User-Guide-2528086-Page-26.png)
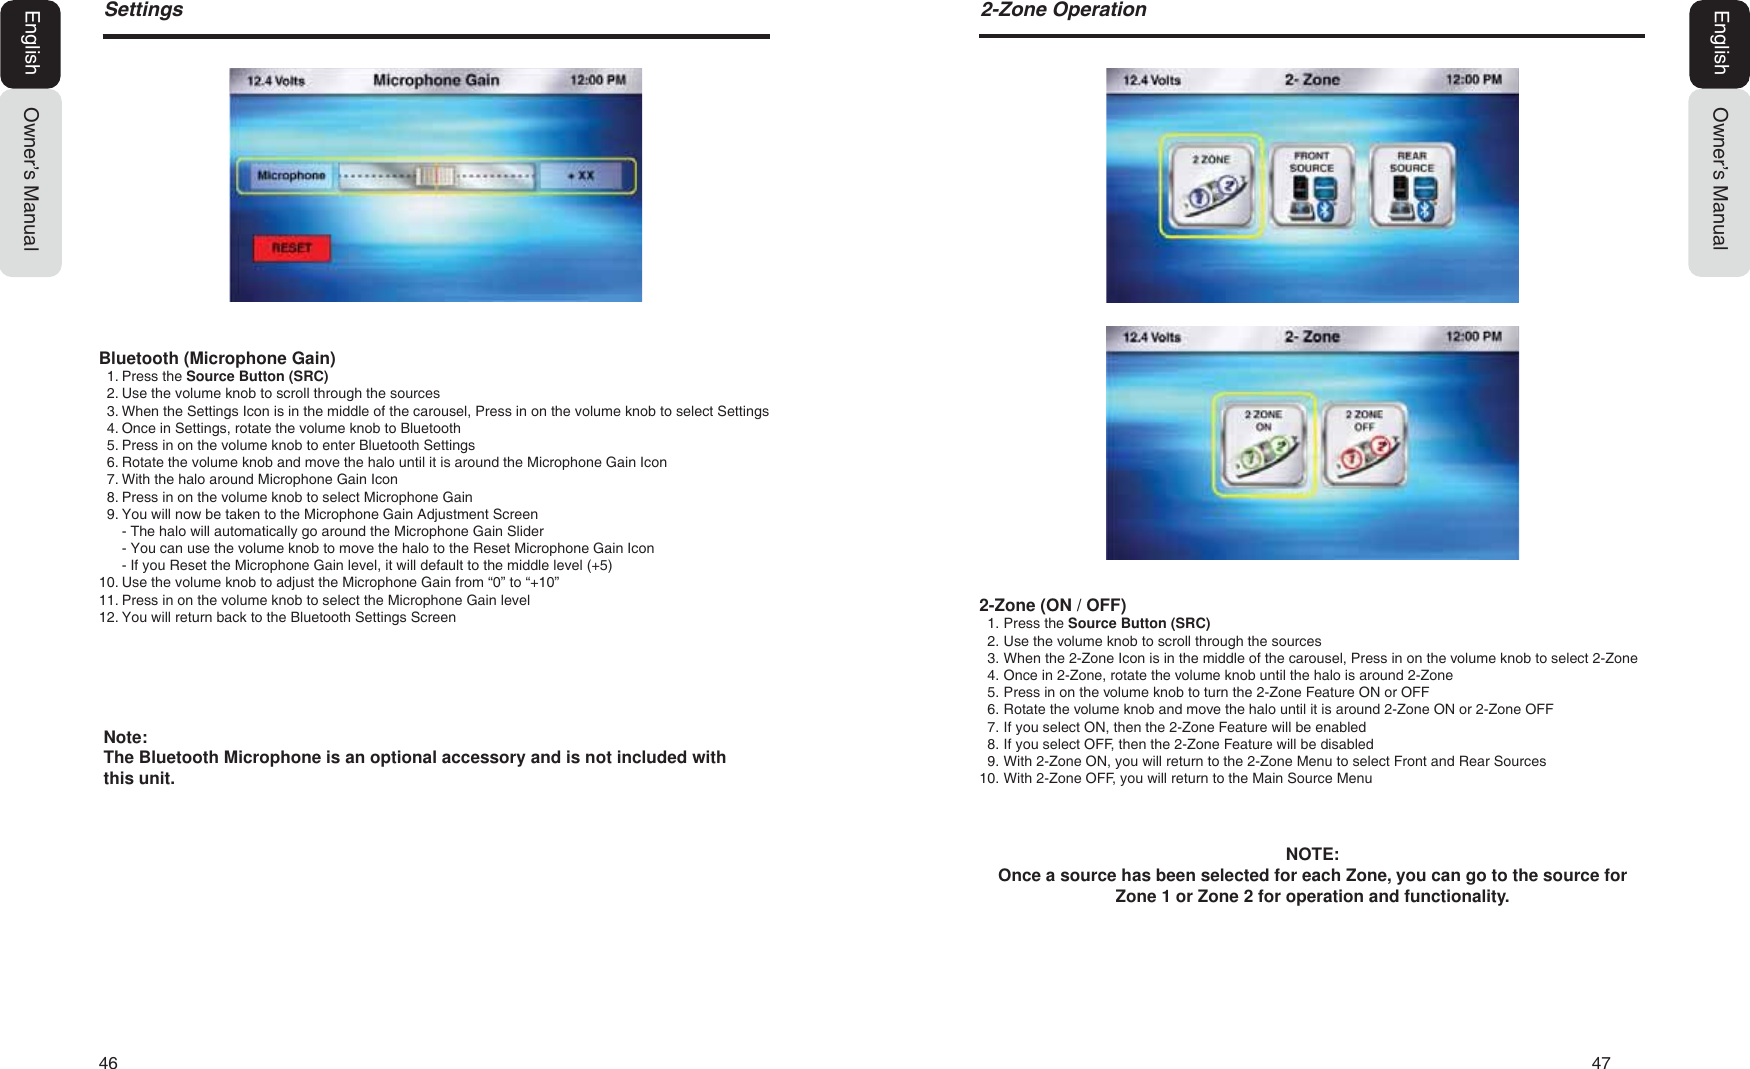
![52 53%OXHWRRWK$XGLR2SHUDWLRQOwner’s ManualEnglishShuffle1. From the Bluetooth Audio Play Screen, Press the MENU Button2. Use the volume knob to scroll through options until the Shuffle Icon is in the middle of the carousel3. Press in on the volume knob to select Shuffle4. Now a pop-up window will appear with Shuffle options:- ON (Turns the Shuffle Feature ON)- OFF (Turns the Shuffle Feature OFF)5. After your choice has been made, you will see the Shuffle Icon appear on the Bluetooth Audio PlayScreenFolder Browsing1. From the Bluetooth Audio Play Screen, Press the MENU Button2. Use the volume knob to scroll through options until the Folders Icon is in the middle of the carousel3. Press in on the volume knob to select Folders4. Now a pop-up window will appear with “AVRCP 1.4 not supported” when connected device does notsupport AVRCP 1.4 profile5. When AVRCP 1.4 profile is supported, then list of folder will appear when Folder Option is selected6. To search the folder, Press Menu and select alphabet/Numbers. Then list of folders starting wiithentered alphabet/number will appearRandom1. From the Bluetooth Audio Play Screen, Press the MENU Button2. Use the volume knob to scroll through options until the Random Icon is in the middle of the carousel3. Press in on the volume knob to select Random4. Now a pop-up window will appear with Random options:- ON (Turns the Random Feature ON)- OFF (Turns the Random Feature OFF)5. After your choice has been made, you will see the Random Icon appear on the Bluetooth Audio PlayScreen%OXHWRRWK$XGLR2SHUDWLRQOwner’s ManualEnglish[MENU] Menu ButtonPress to access additional options- Repeat (Song, Playlist, All, Off)- Random (ON or OFF)- Shuffle (ON or OFF)- Folder Browsing- Paired DevicesRepeat1. From the Bluetooth Audio Play Screen, Press the MENU Button2. Use the volume knob to scroll through options until the Repeat Icon is in the middle of the carousel3. Press in on the volume knob to select Repeat4. Now a pop-up window will appear with Repeat options:- Song (Repeats current song)- All (Repeats All songs)- Off (Turns OFF the Repeat Feature)5. After your choice has been made, you will see the Repeat Icon appear on the Bluetooth Audio PlayScreen](https://usermanual.wiki/SKYPINE-ELECTRONICS/MW4.User-Manual/User-Guide-2528086-Page-27.png)
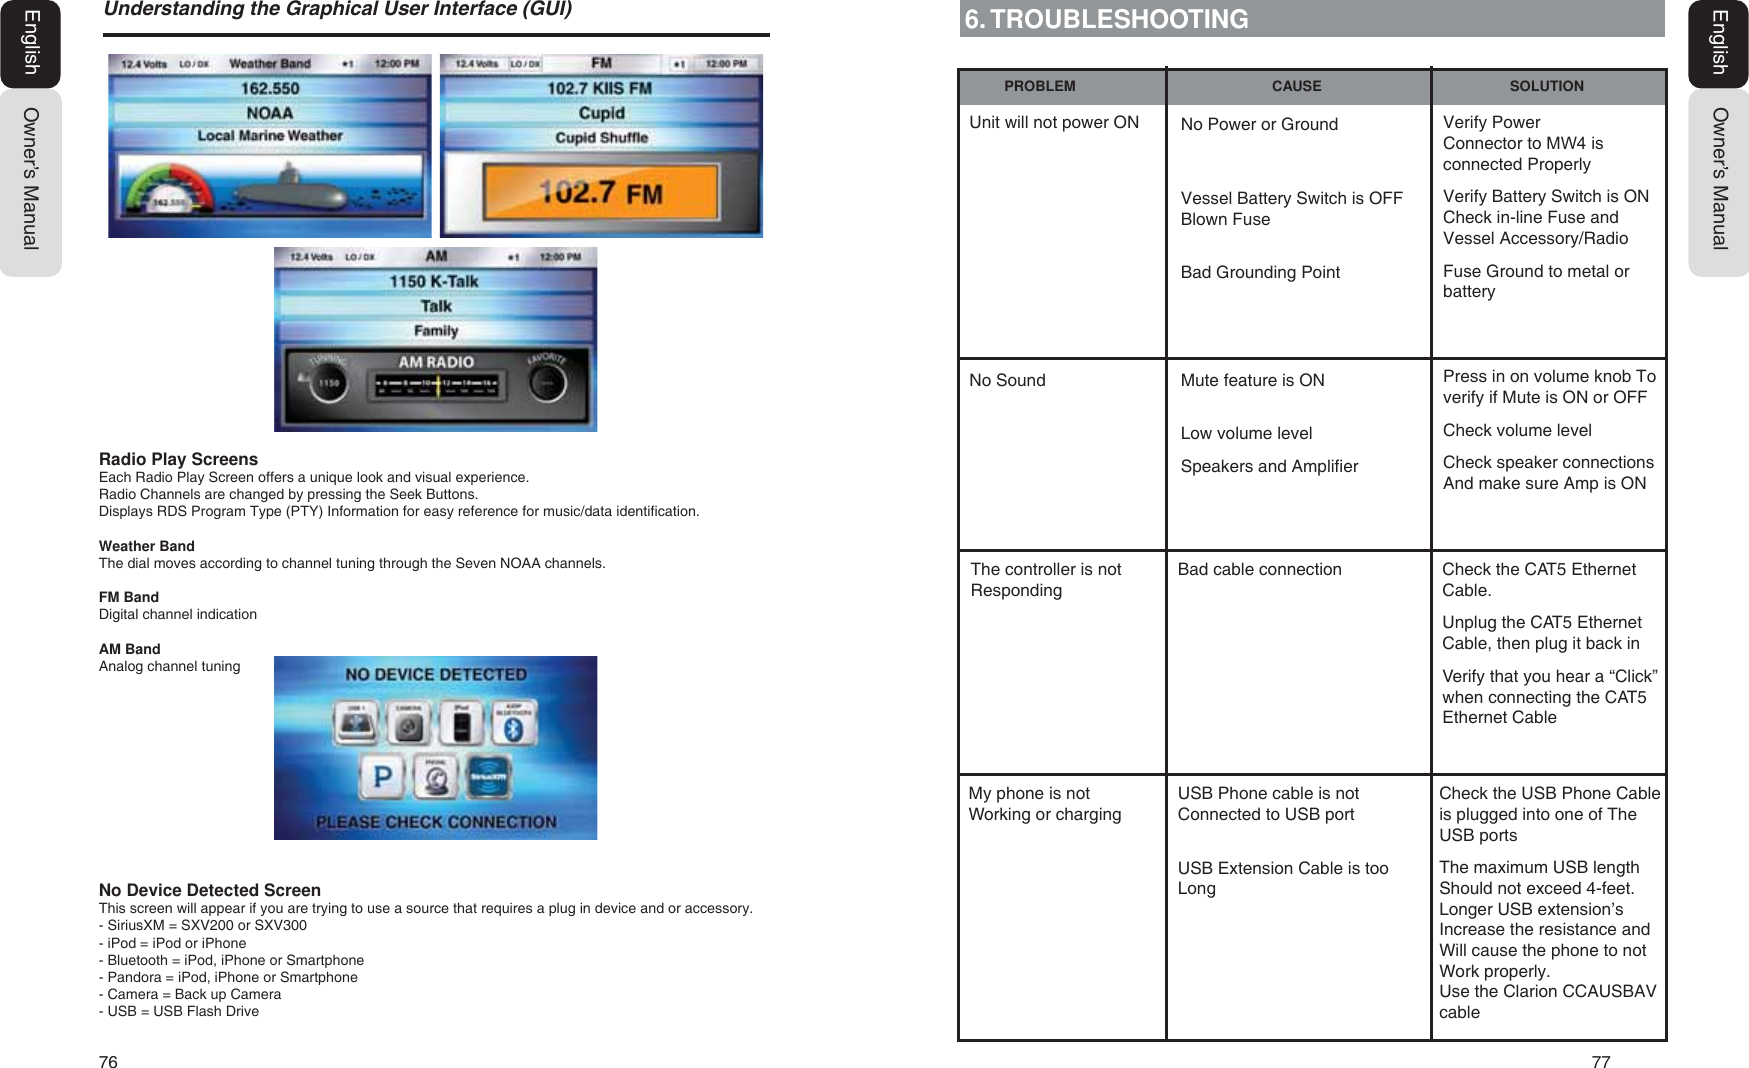
![74 758QGHUVWDQGLQJWKH*UDSKLFDO8VHU,QWHUIDFH*8,Owner’s ManualEnglish8QGHUVWDQGLQJWKH*UDSKLFDO8VHU,QWHUIDFH*8,Owner’s ManualEnglish7KLVVHFWLRQKHOSVGHILQHDQGH[SODLQWKHRSHUDWLRQDQGIXQFWLRQVRIWKH*UDSKLFDO8VHU,QWHUIDFHMain Menu ScreenThis carousel of Sources provides a simple and easy way to view Sources and can be accessed anytime by pressing the Source Button [SRC]Status BarThe Status bar will be displayed on either the Top or Bottom of the screen. The Status Bar will disappear when viewing a video to allow for optimal view area.The Status Bar provides several icon indicators that will appear when a source or feature requires it.- Time (Please refer to the Clock Settings to Set the Time)- Voltage Indication (This displays the voltage based on the Yellow +12v constant wire)- Bluetooth Logo (When a compatible Bluetooth Device is Paired and Connected)- Signal Strength Meter (SiriusXM, Phone)- LO/DX Indicator (Local and Distance for Radio Tuner)- Favorite Indicator (Star and number will appear if you tune to a station or channel that is a preset and which Favorite Number it is saved)Low Battery Voltage WarningThis screen will appear when the Battery Voltage drops to or below 10v. The audio will stop until voltage increases to 12v or above, then the audio will resume. This will help from draining too much current from the battery until the voltage increases.VolumeThis type of Volume indication provides a simple and easy way to adjust the volume level. Each detent “Click” of the Volume Knob represents one bar for volume indication.- 0 through 15 (Green)- 16 through 30 (Yellow)- 31 through 45 (Orange)- 46 through 60 (Red)When in a source play screen and the volume knob is rotated, this will adjust the volume level. After the volume has been adjusted, the volume indicator will stay displayed for 2 seconds, then it will disappear.Mute- When you are in a source play screen and would like to Mute the volume, simply press in and release the volume knob.- A volume mute indicator will appear letting to know that the volume is on Mute and will stay displayed until it is unmuted.- When the volume is muted and if user rotates the volume knob, first volume will be unmuted automatically and then the volume should change%H&DXWLRXVDQG$ZDUHRIWKH9ROXPH/HYHOZKHQ\RX0XWHDQG8Q0XWHWKH9ROXPH](https://usermanual.wiki/SKYPINE-ELECTRONICS/MW4.User-Manual/User-Guide-2528086-Page-38.png)