SOLT SOLTREPEATER AUXILIARY REPEATER User Manual
SOLT CO., LTD AUXILIARY REPEATER
UserManual.wiki
>
SOLT
>
SOLTREPEATER User Manual
User Manual
Navigation menu
Upload a User Manual
Namespaces
Wiki Guide
HTML
PDF
Info
Views
User Manual
Discussion / Help
Navigation
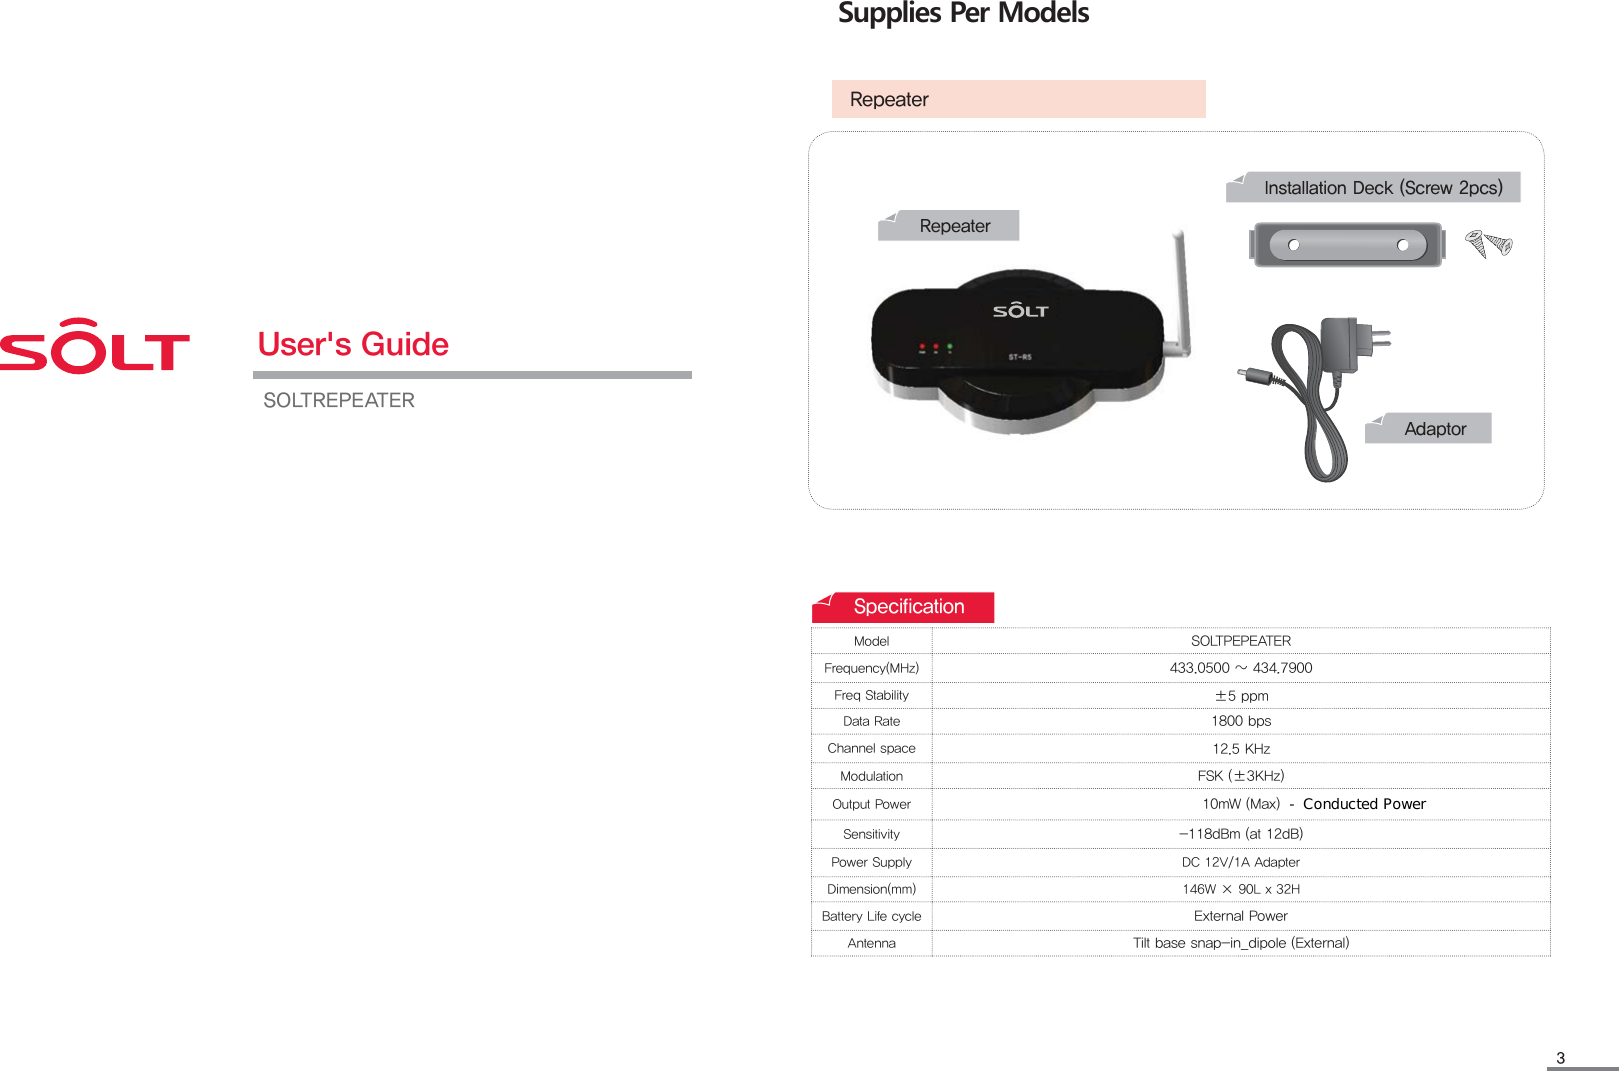
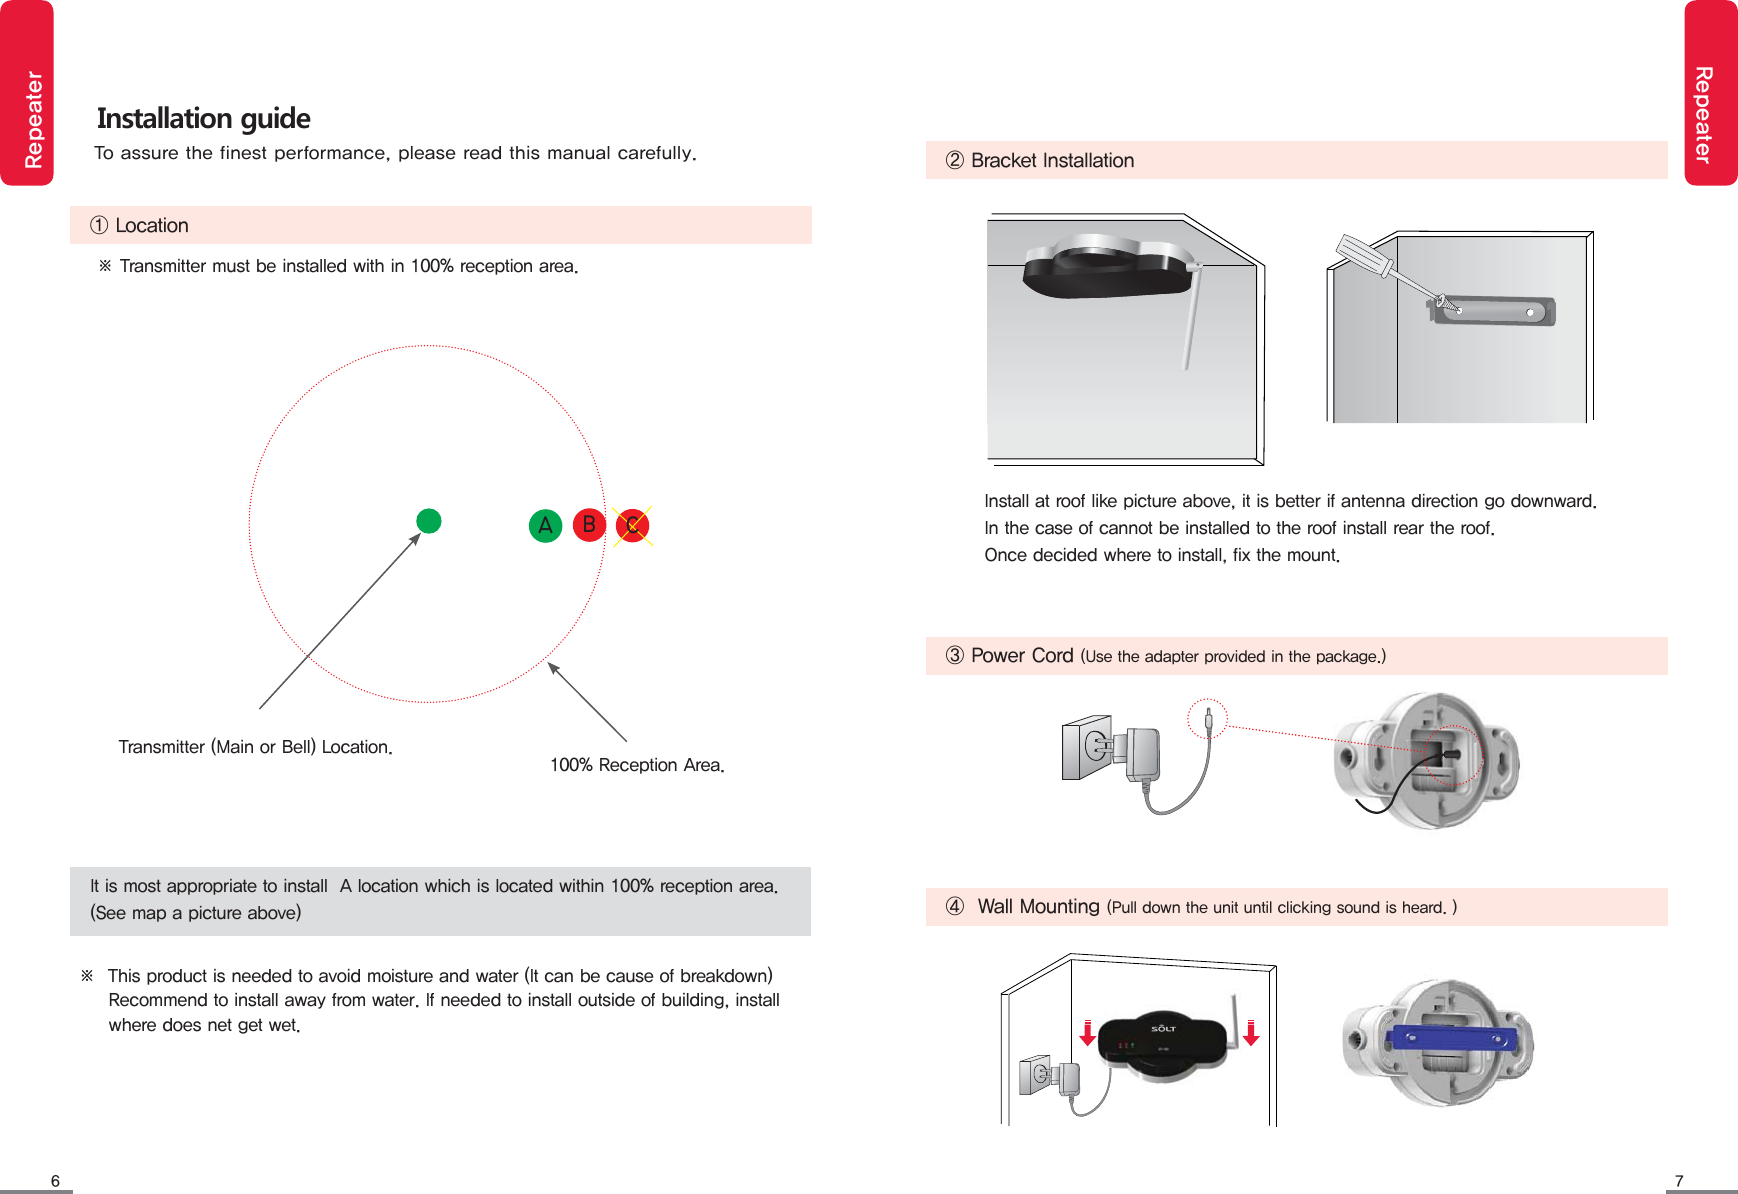
![4 5RepeaterRepeater/P3FDFJWF① Folding antenna : 180 degrees pivot ④ Setting buttons③ Wall mount holes : Refer to item 4 of Installation Guide in page 53.⑤ Display⑥ Adapter input: DC12V 1A (Use the supplied adapter)② Bell number indicator : activated led number varies by different models.Limited accessary warranty: malfunctioning ofsupplied adapter during its use is not covered bymanufactures' warranty.Purchasing an adapter with AC110~22OV input, DC12V 1A output is recommended.PWR Red led indicates power is onRX Blinking Red led indicates bell modelTX Blinking Green led indicates pager modelMENU / ESC ·Menu button in setting mode· alphabetic and numeric changing button▲ ▼ ·up /down◀ ▶ ·left / right buttonsSET / PWR ·Storing button for set value·Dower button[Wall mount bracket installation]Missed call icon.&/6&4$ ⶸⶼⶾ ⶺ4&5183/P3FDFJWF① Retractable antenna⑤ Call number Display② Status indicator[Back cover]④ Setting buttons⑥ Adapter input (DC 12V 1A)Name of each section③ Holes for wall mountFrontBackInput : AC110~220VOutput : DC12V 1A](https://usermanual.wiki/SOLT/SOLTREPEATER/User-Guide-2139281-Page-2.png)
![8 9RepeaterRepeaterRepeater selection mode (Cbr / CPr)·Sets the repeater as call bell repeater or pager repeater.·Entering setting mode as [E1 Rsel] is displayed.·[E1 Rsel] is displayed and returns to previous step.·[ST-r5] is displayed and ready for reception.⑴ Press and hold (MENU) button for 3 seconds.⑵ Press (SET) button. ⑶ Press (▲▼) buttons. (Cbr / CPr)⑷ Press (SET) button. ⑸ Press (MENU) button.MENUESC ▲◀ ▶ SETPWR▼MENUESC ▲◀ ▶ SETPWR▼MENUESC ▲◀ ▶ SETPWR▼MENUESC ▲◀ ▶ SETPWR▼MENUESC ▲◀ ▶ SETPWR▼※ Press (▲▼) buttons to select different setting mode.Cbr : Extends bell receiving range by relaying bell's data to main transceiver.CPr : Extends pager receiving range by relaying main transceiver data to pager.· [Cbr or CPr] is displayed.Repeater setting modesListed items below can be set by using user setting buttons.E1Repeater selection mode Sets the repeater as call bell repeater or pager repeater.E2Download modeDownloads registered call numbers from main transceiver.E3No receive call number setting modeSelects call numbers that are not desired to receive.E4Call redundancy interval setting modeSets interval for redundant calls. (default value is 3 seconds)E5Call number deleting modeDeletes registered call numbers.E6Call number registering modeRegisters new call numbers.E7TX delay time setting modeSets delay time for received call number from bell.[TBD]](https://usermanual.wiki/SOLT/SOLTREPEATER/User-Guide-2139281-Page-4.png)
![10 11RepeaterRepeater·Entering setting mode as [E1 Rsel] is displayed.·[E3 Daof] is displayed.·Registered call number is displayed.⑴ Press and hold (MENU) button for 3 seconds.⑵ Press (▲) button twice. ⑶ Press (SET) button. ⑷ Press (▲▼) buttons to select a Call number don't want to receive.MENUESC ▲◀ ▶ SETPWR▼MENUESC ▲◀ ▶ SETPWR▼MENUESC ▲◀ ▶ SETPWR▼MENUESC ▲◀ ▶ SETPWR▼No receive call number setting mode·Selects call numbers that are not desired to receive.·Selected call number is displayed.·[No Receive] button toggles each time SET button is pressed.⑸ Press (SET) button to select desired receiving mode.MENUESC ▲◀ ▶ SETPWR▼※ To set another receiving mode, repeat steps (4) to (5).⑹ Press (MENU) button.MENUESC ▲◀ ▶ SETPWR▼·[ST-r5] is displayed and ready for reception./P3FDFJWFe.g.) Call number 200 is set to not receive when [No Receive] icon is displayed. Download mode·Downloads registered call numbers from main transceiver.·[E2 Down] is displayed.·[---] is displayed.·[---] is displayed during downloading is in progress.·[E2 Down] is displayed when downloading is completed and returns to previous step. ⑵ Press (▲) button once. ⑶ Press (SET) button. ⑷ Press (SET) button. ⑸ Press (MENU) button.MENUESC ▲◀ ▶ SETPWR▼MENUESC ▲◀ ▶ SETPWR▼MENUESC ▲◀ ▶ SETPWR▼MENUESC ▲◀ ▶ SETPWR▼·Entering setting mode as [E1 Rsel] is displayed.⑴ Press and hold (MENU) button for 3 seconds.MENUESC ▲◀ ▶ SETPWR▼·[ST-r5] is displayed and ready for reception.※ Press (▲▼) buttons to select different setting mode.[TBD]](https://usermanual.wiki/SOLT/SOLTREPEATER/User-Guide-2139281-Page-5.png)
![12 13RepeaterRepeater·" It has been deleted." is played.·To delete another call number, repeat the processes from (4) to (5).⑸ Press (SET) button.⑹ Press (MENU) button.MENUESC ▲◀ ▶ SETPWR▼MENUESC ▲◀ ▶ SETPWR▼⑷ Press (▲▼) button. Select the call number you want to delete.MENUESC ▲◀ ▶ SETPWR▼MENUESC ▲◀ ▶ SETPWR▼Call number deleting mode·Deletes registered call numbers.·[E5 Dele] is displayed.⑵ Press (▲) button 4 times. ⑶ Press (SET) button. MENUESC ▲◀ ▶ SETPWR▼·Entering setting mode as [E1 Rsel] is displayed.⑴ Press and hold (MENU) button for 3 seconds.MENUESC ▲◀ ▶ SETPWR▼·Registered call number is displayed.·Selected call number is displayed.·[ST-r5] is displayed and ready for reception.⑸ Press (SET) button.⑹ Press (MENU) button.MENUESC ▲◀ ▶ SETPWR▼MENUESC ▲◀ ▶ SETPWR▼Repetition call setting mode·Sets interval for redundant calls.·[E4 Dupt] is displayed.·[3] is displayed. ·Selected number is displayed.⑵ Press (▲) button 3 times. ⑶ Press (SET) button. ⑷ Press (▲▼) buttons. Sets the desired number.MENUESC ▲◀ ▶ SETPWR▼MENUESC ▲◀ ▶ SETPWR▼MENUESC ▲◀ ▶ SETPWR▼·Entering setting mode as [E1 Rsel] is displayed.⑴ Press and hold (MENU) button for 3 seconds.MENUESC ▲◀ ▶ SETPWR▼·[ST-r5] is displayed and ready for reception.※ Press (▲▼) buttons to select different setting mode.·[E1 Rsel] is displayed and returns to previous step.※ 3 is set for default. (Unit : second)](https://usermanual.wiki/SOLT/SOLTREPEATER/User-Guide-2139281-Page-6.png)
![14 15RepeaterRepeater⑺ Press and hold (SET) button for 3 seconds when registration is finished.⑸ Press (SET) button.MENUESC ▲◀ ▶ SETPWR▼MENUESC ▲◀ ▶ SETPWR▼·Registration for selected call number is completed. ·The number of screen is again blinking.·To register another Bell, repeat the processes from (4) to (6).⑹ Press the button to register. 䌫䌬䌅䌚䌍·Selected-number from (4)section is displayed on the screen and the number stop blinking.·[ST-r5] is displayed and ready for reception.Call number registering mode·Registers new call numbers.·[E6 Breg] is displayed.⑵ Press (▲) button 5 times. ⑶ Press (SET) button. ⑷ Press (▲▼◀▶) buttons. sets desired to call number. MENUESC ▲◀ ▶ SETPWR▼MENUESC ▲◀ ▶ SETPWR▼MENUESC ▲◀ ▶ SETPWR▼· Press (◀▶) buttons to move to different digits.· Press (MENU) button to toggle input mode from / to numeric and English modes.Number modeEnglish mode%ODQN%ODQN·Entering setting mode as [E1 Rsel] is displayed.⑴ Press and hold (MENU) button for 3 seconds.MENUESC ▲◀ ▶ SETPWR▼·Blinking [0] is displayed.](https://usermanual.wiki/SOLT/SOLTREPEATER/User-Guide-2139281-Page-7.png)
![1716RepeaterTX delay time setting mode·Sets delay time for received call number from bell.·[E7 Txdt] is displayed.·[0] is displayed.·10(1Second), 20(2Second) ... 100(10Second)·Selected number is displayed.⑴ Press and hold (MENU) button for 3 seconds.⑵ Press (▲) button 6 times. ⑶ Press (SET) button. ⑷ Press (▲▼) buttons. Sets the desired number.MENUESC ▲◀ ▶ SETPWR▼MENUESC ▲◀ ▶ SETPWR▼MENUESC ▲◀ ▶ SETPWR▼MENUESC ▲◀ ▶ SETPWR▼※ '0' is default value : transmits as soon as receiving a call.·[ST-r5] is displayed and ready for reception.⑸ Press (SET) button.⑹ Press (MENU) button.MENUESC ▲◀ ▶ SETPWR▼MENUESC ▲◀ ▶ SETPWR▼·Entering setting mode as [E1 Rsel] is displayed.※ Press (▲▼) buttons to select different setting mode.· [E1 Rsel] is displayed and returns to previous step.FCC compliance InformationWhen used the This device complies with part 15 of FCC Rules. Operation is subject to the following two conditions: (1) This device may not cause harmful interference. and (2) This device must accept any interference received, including interference that may cause undesired operation. Cautions Modifications not expressly approved by the party responsible for compliance could void the user's authority to operate the equipment.Note: This equipment has been tested and found to comply with the limits for a Class A digital device, pursuant to part 15 of the FCC Rules. These limits are designed to provide reasonable protection against harmful interference when the equipment is operated in a commercial environment. This equipment generates, uses, and can radiate radio frequency energy and, if not installed and used in accordance with the instruction manual, may cause harmful interference to radio communications. Operation of this equipment in a residential area is likely to cause harmful interference in which case the user will be required to correct the interference at his own expense](https://usermanual.wiki/SOLT/SOLTREPEATER/User-Guide-2139281-Page-8.png)