Samsung Electronics Co CLP550N Laser Beam Printer User Manual 2
Samsung Electronics Co Ltd Laser Beam Printer Users Manual 2
UserManual.wiki
>
Samsung Electronics Co
>
CLP550N User Manual
>
Users Manual 2
Contents
1.
Users Manual 1
2.
Users Manual 2
Users Manual 2
Navigation menu
Upload a User Manual
Namespaces
Wiki Guide
HTML
PDF
Info
Views
User Manual
Discussion / Help
Navigation


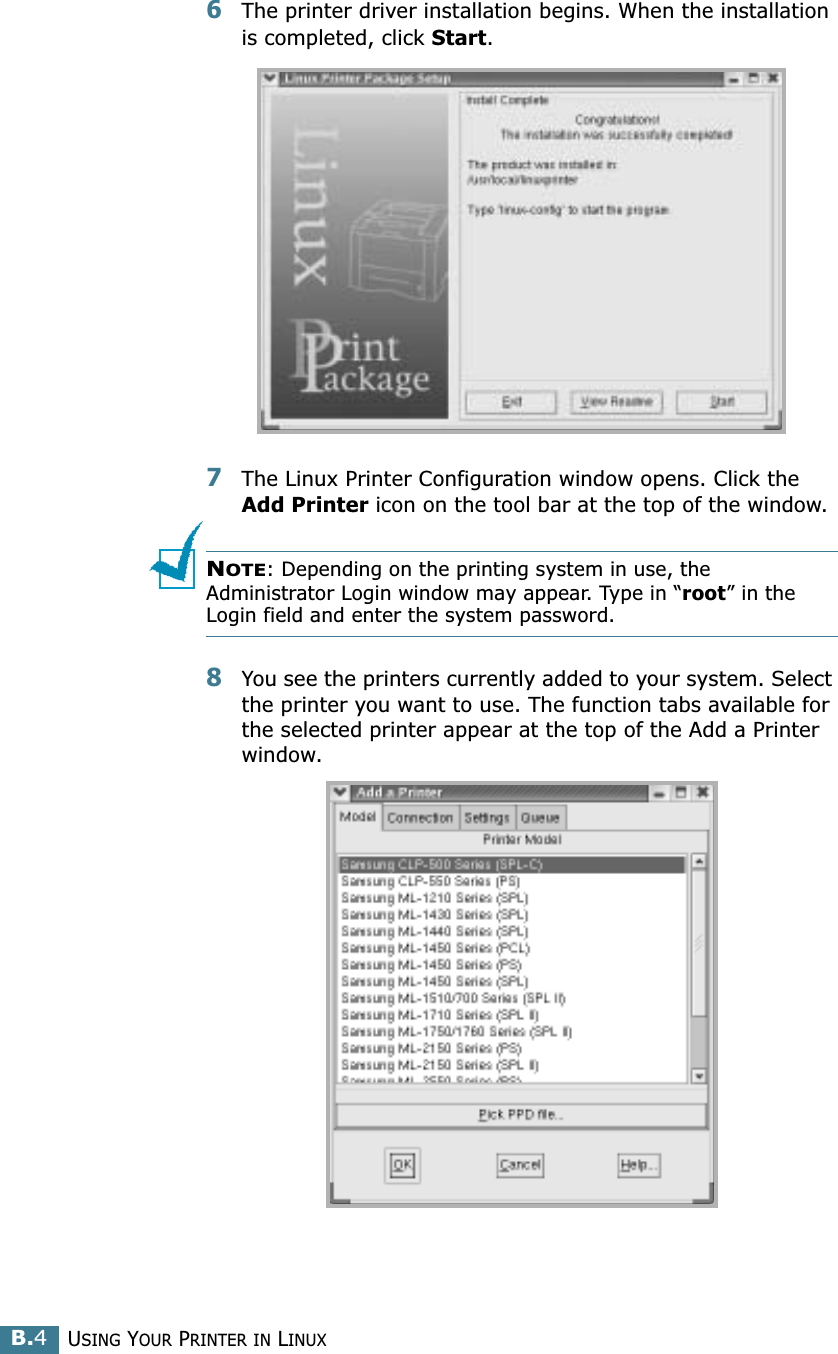
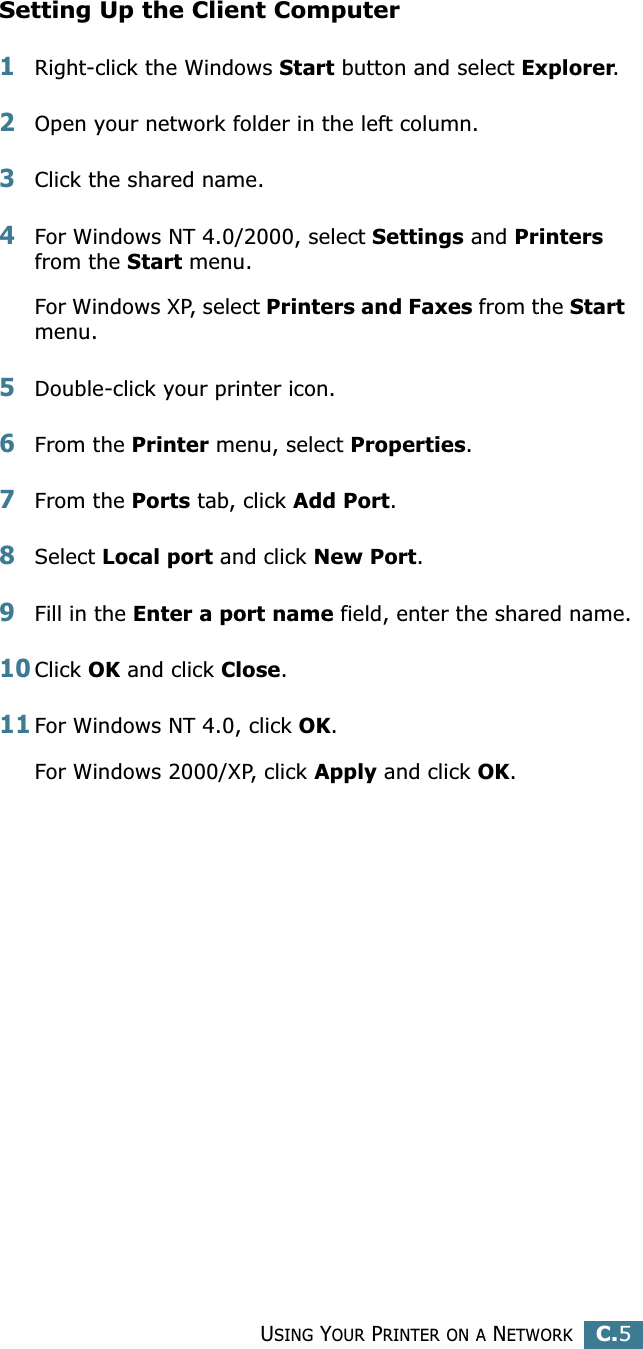
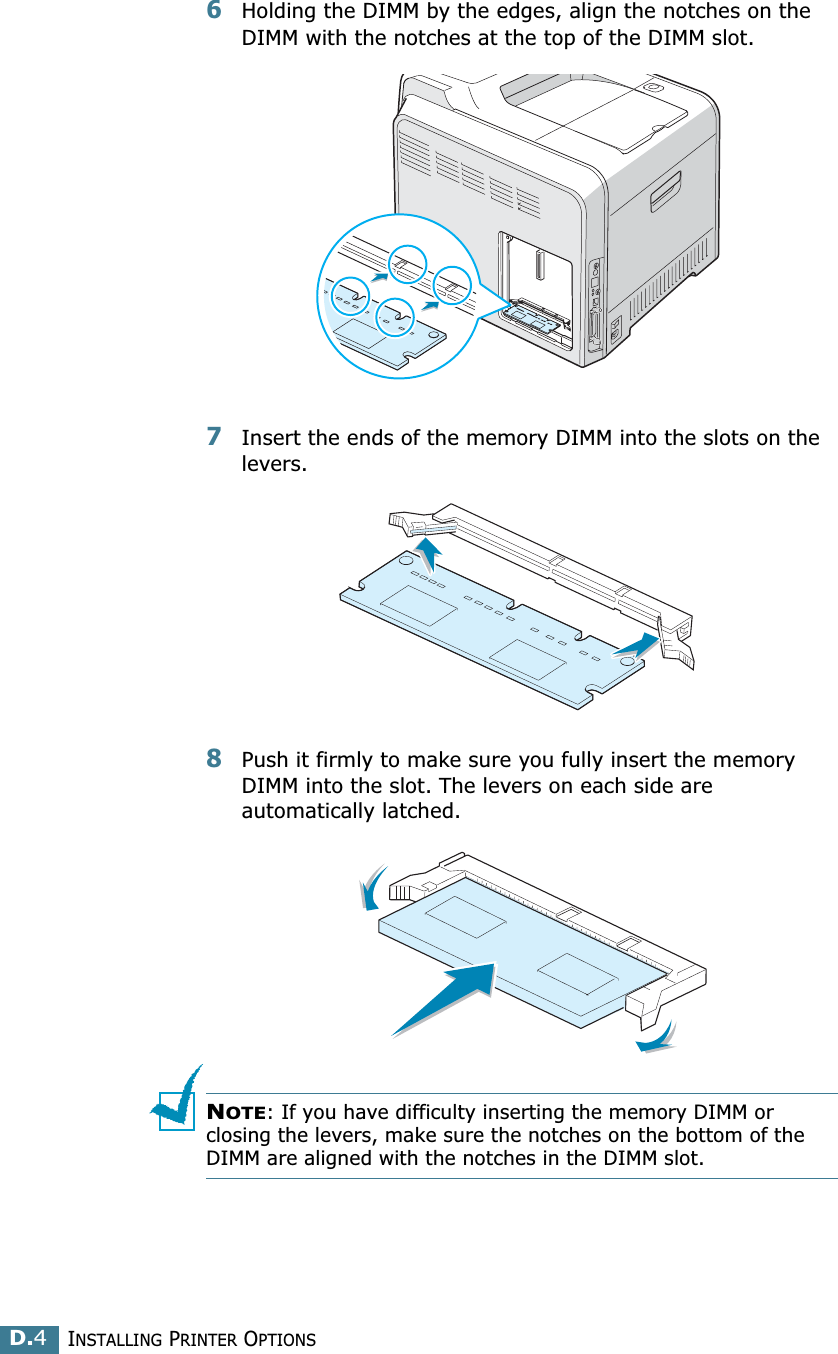
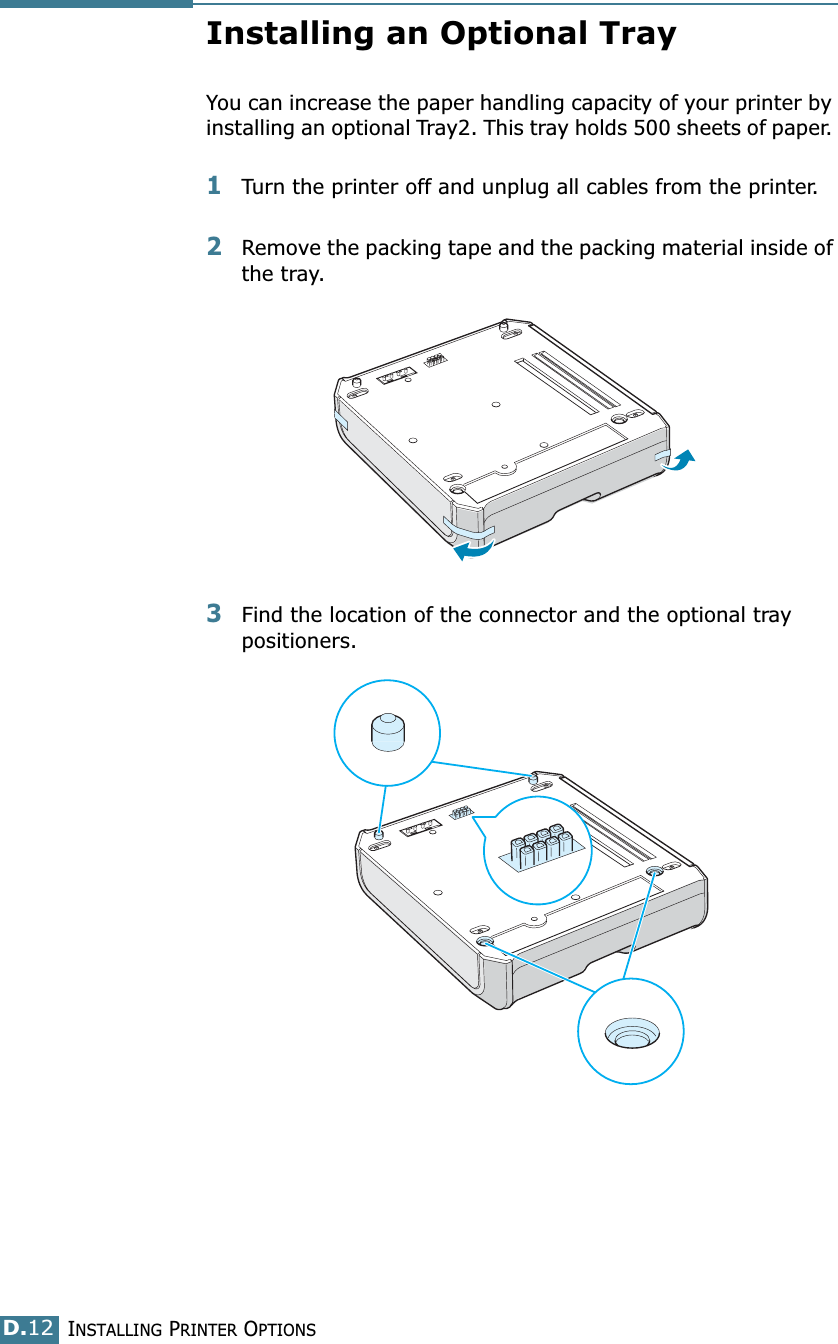
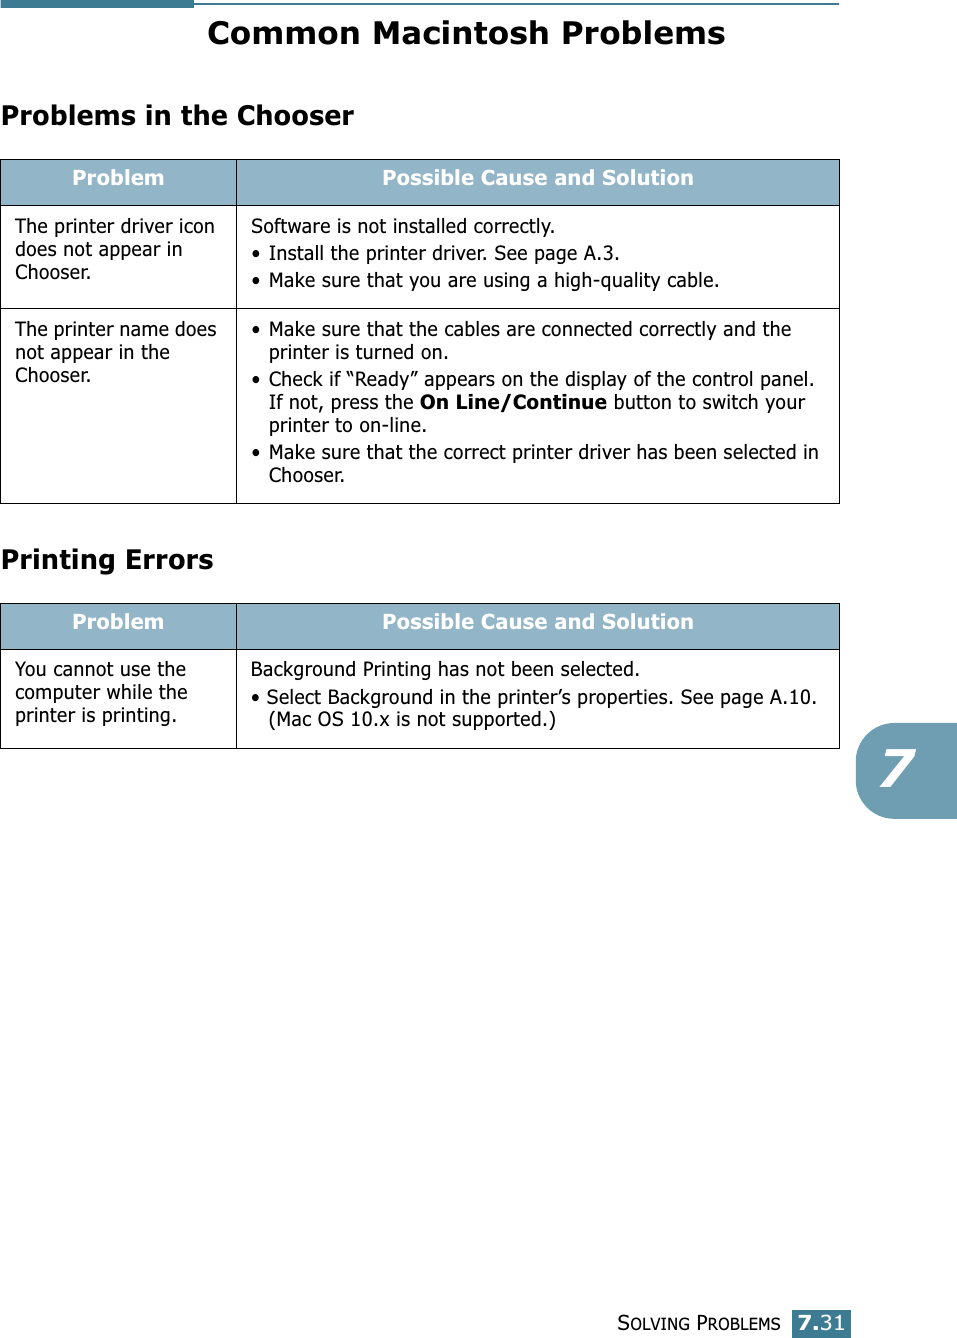
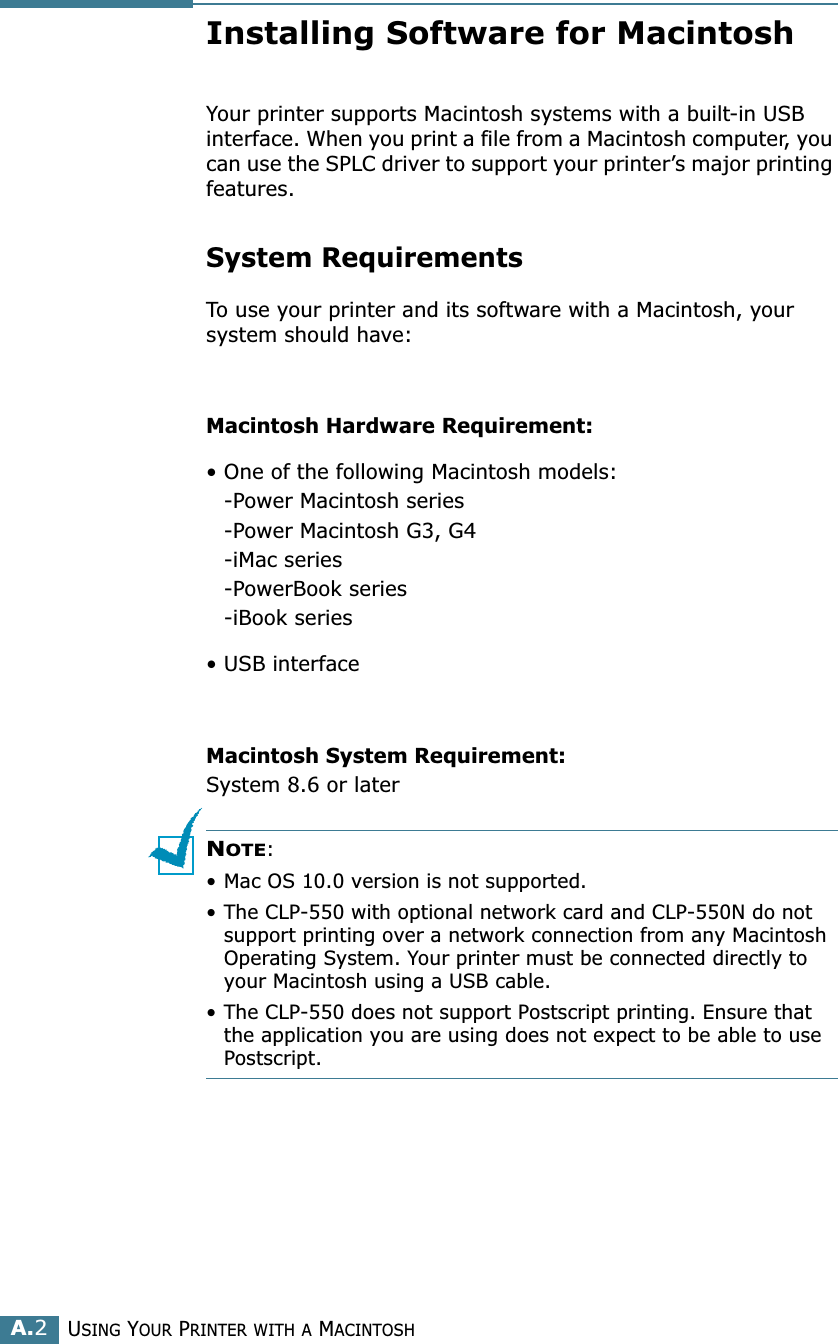
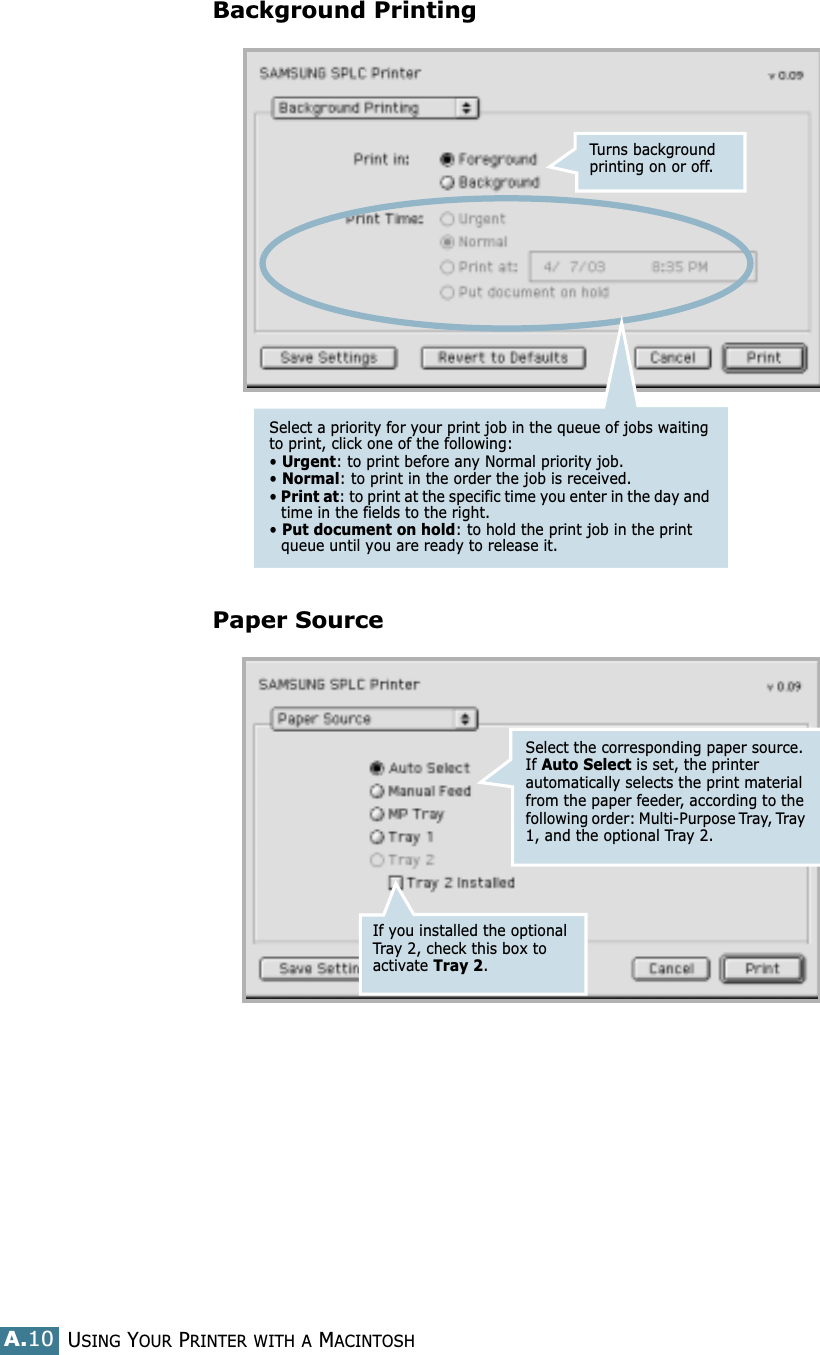
![SOLVING PROBLEMS7.26Understanding Display MessagesMessages appear on the display on the control panel to indicate the printer’s status or errors. Refer to the tables below to understand the message’s meaning and correct the problem if necessary. Messages and their meanings are listed in alphabetical order.NOTE: When you call for service, it is very helpful to tell the service representative the display message.Message Status Do this...ADC NotConfirm ErrorA problem has occurred in the ADC in the printer.Contact a service representative.Cover Open The top cover is open. Close the top cover firmly.CTD CalibrationErrorThe CTD sensor is polluted by dust or toner.Contact a service representative.Dev. Motor ErrorA problem has occurred in the development motor of the printer.Unplug the power cord and plug it in again. If the problem persists, please call for service.Engine FuserLow Heat ErrorThe temperature in the fuser is abnormally low.Unplug the power cord and plug it in again. If the problem persists, please call for service.Engine FuserOver Heat ErrorThe temperature in the fuser is abnormally high.Unplug the power cord and plug it in again. If the problem persists, please call for service.Engine LSU ErrorA problem has occurred in the LSU (Laser Scanning Unit) in the printer.Unplug the power cord and plug it in again. If the problem persists, please call for service.Install [Color] TonerThe indicated color toner cartridge is not installed in the printer.Install the corresponding color toner cartridge.InstallImaging UnitThe imaging unit is not installed in the printer.Install the imaging unit.InstallTransfer BeltThe transfer belt is not installed in the printer.Install the transfer belt.](https://usermanual.wiki/Samsung-Electronics-Co/CLP550N.Users-Manual-2/User-Guide-376419-Page-53.png)
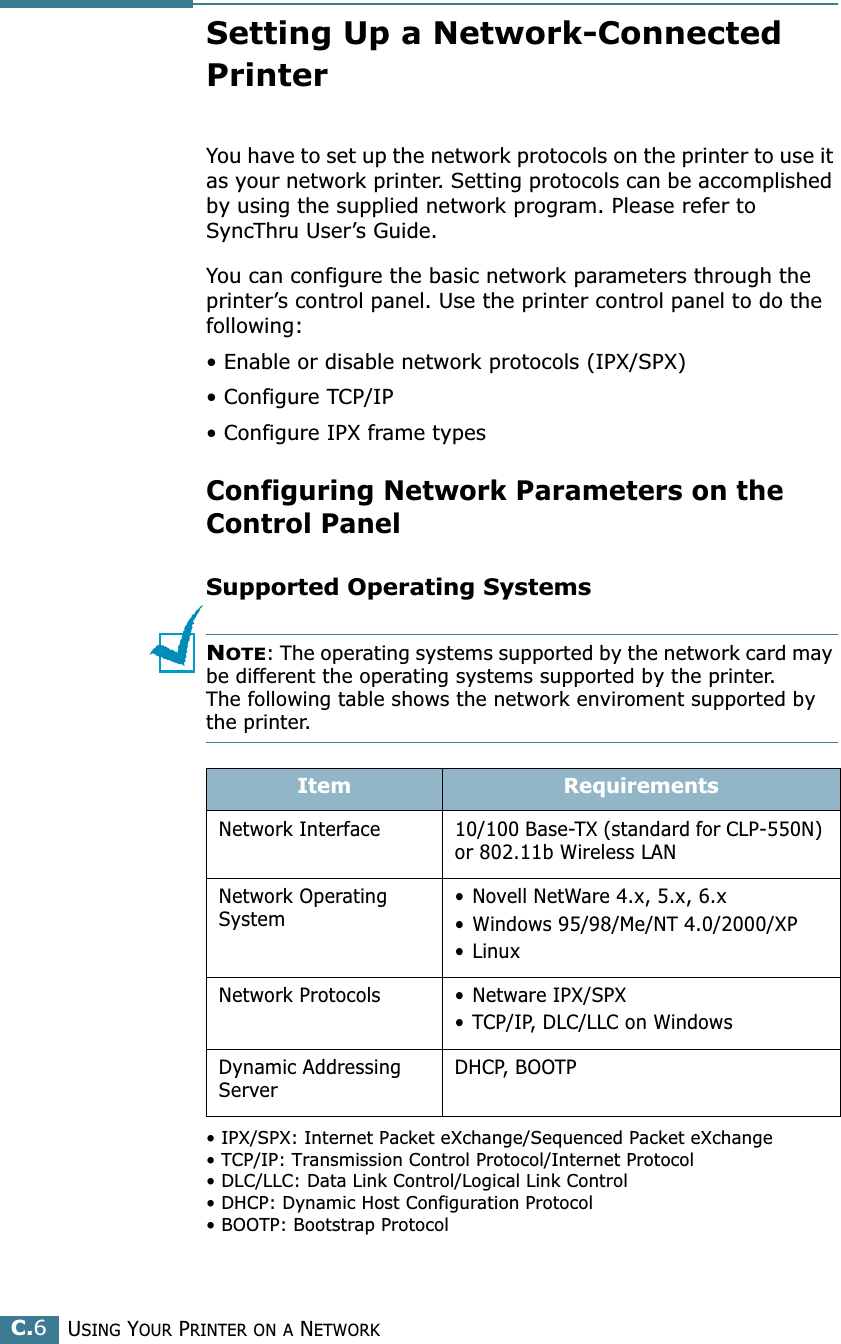
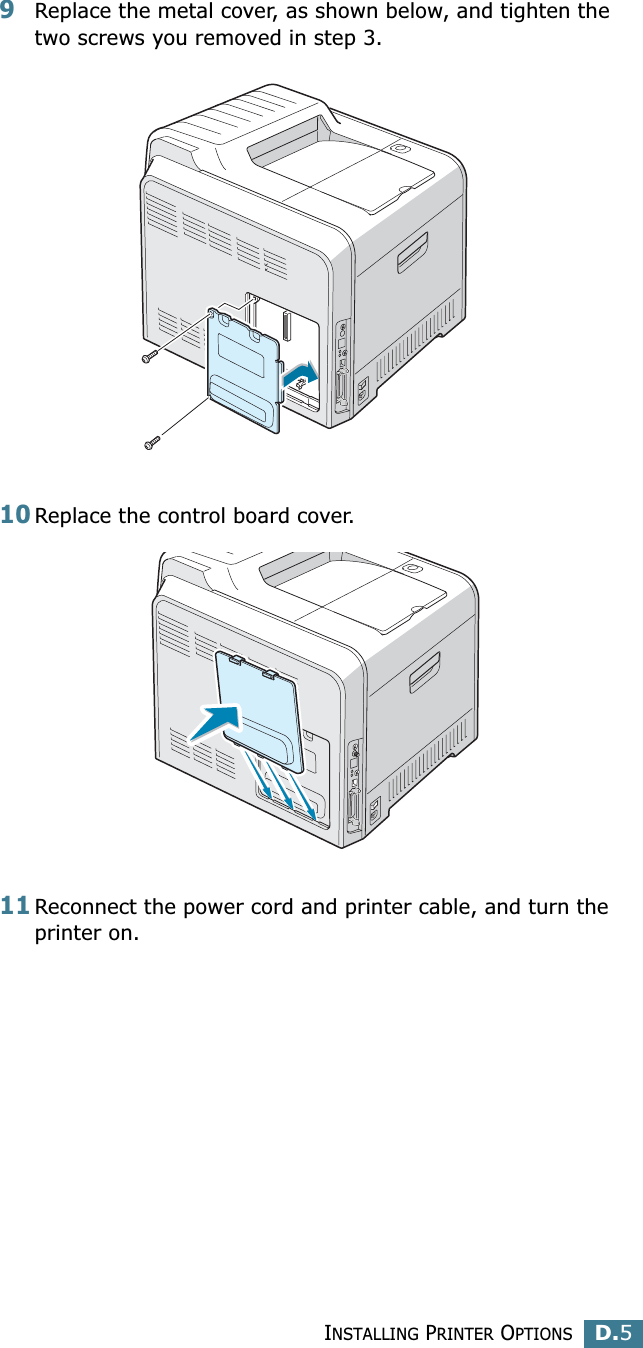
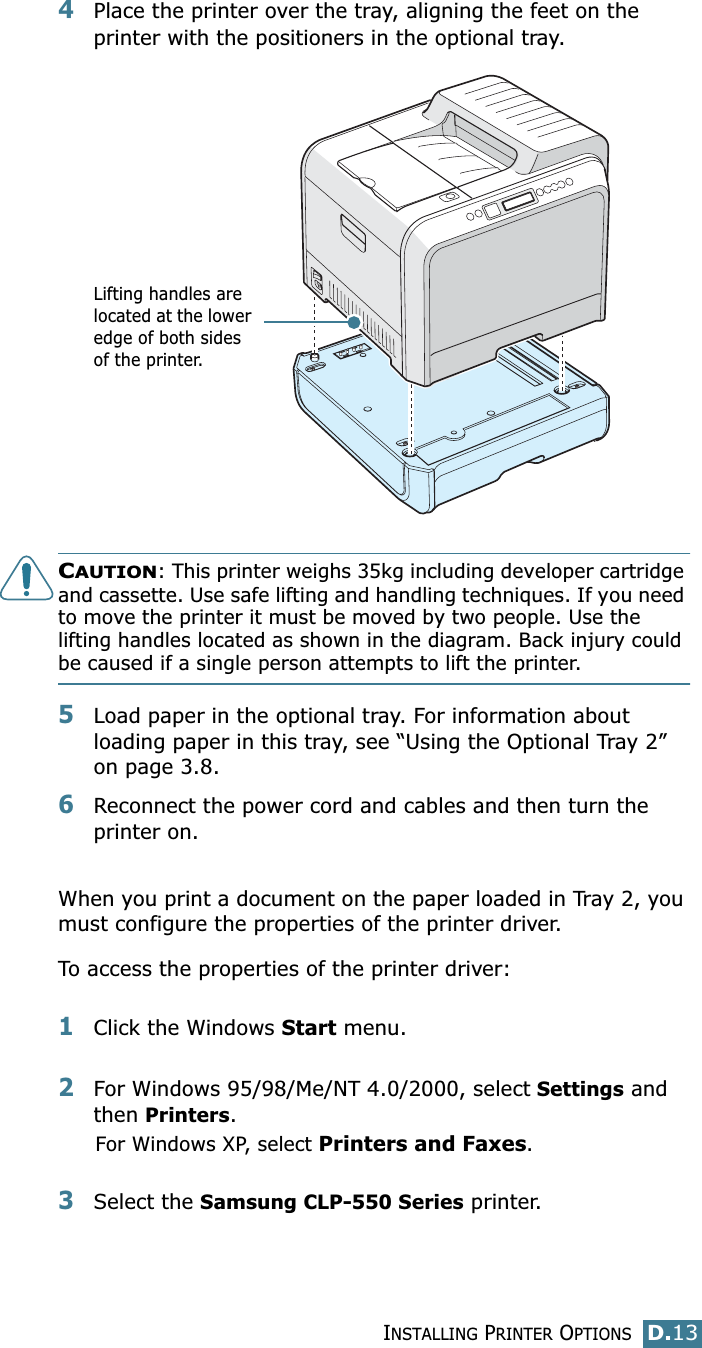
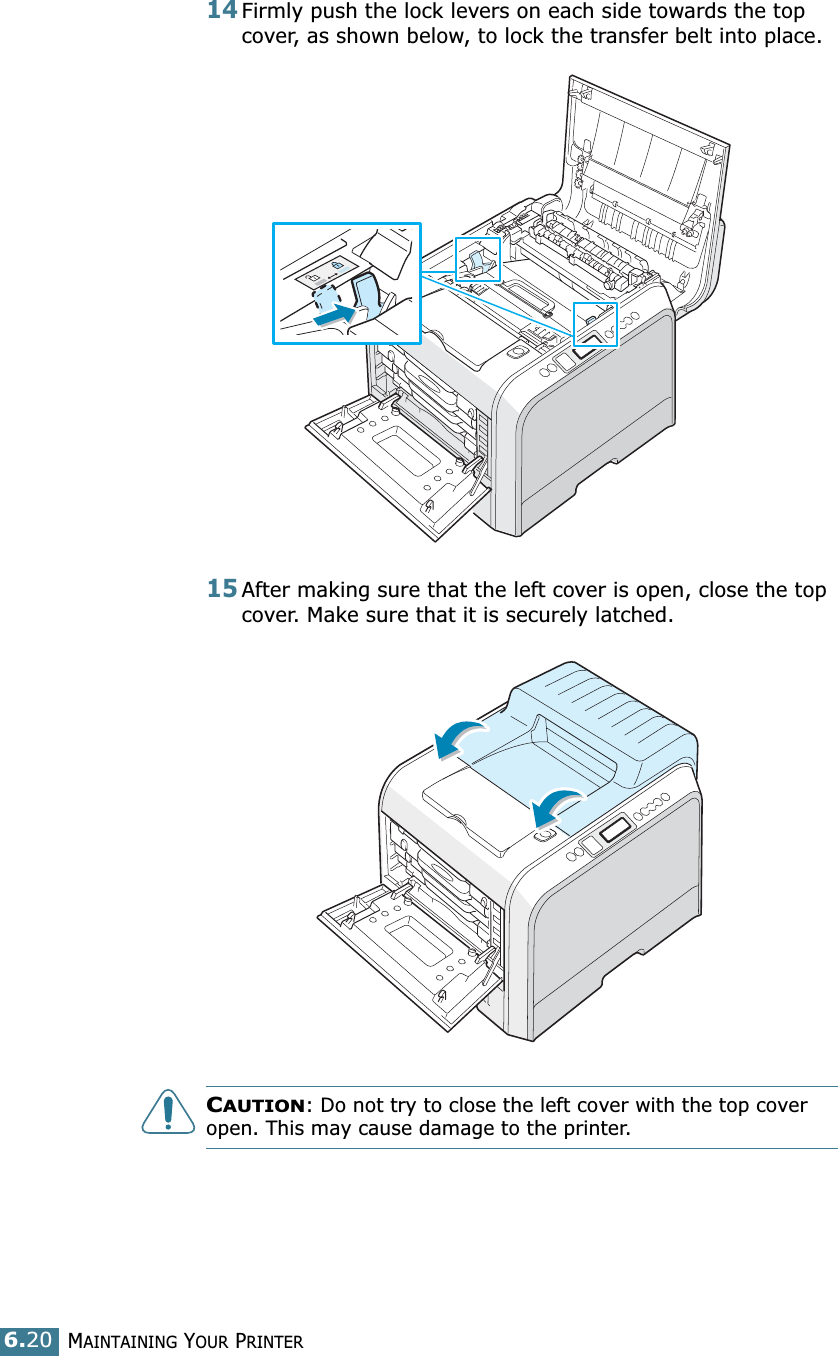
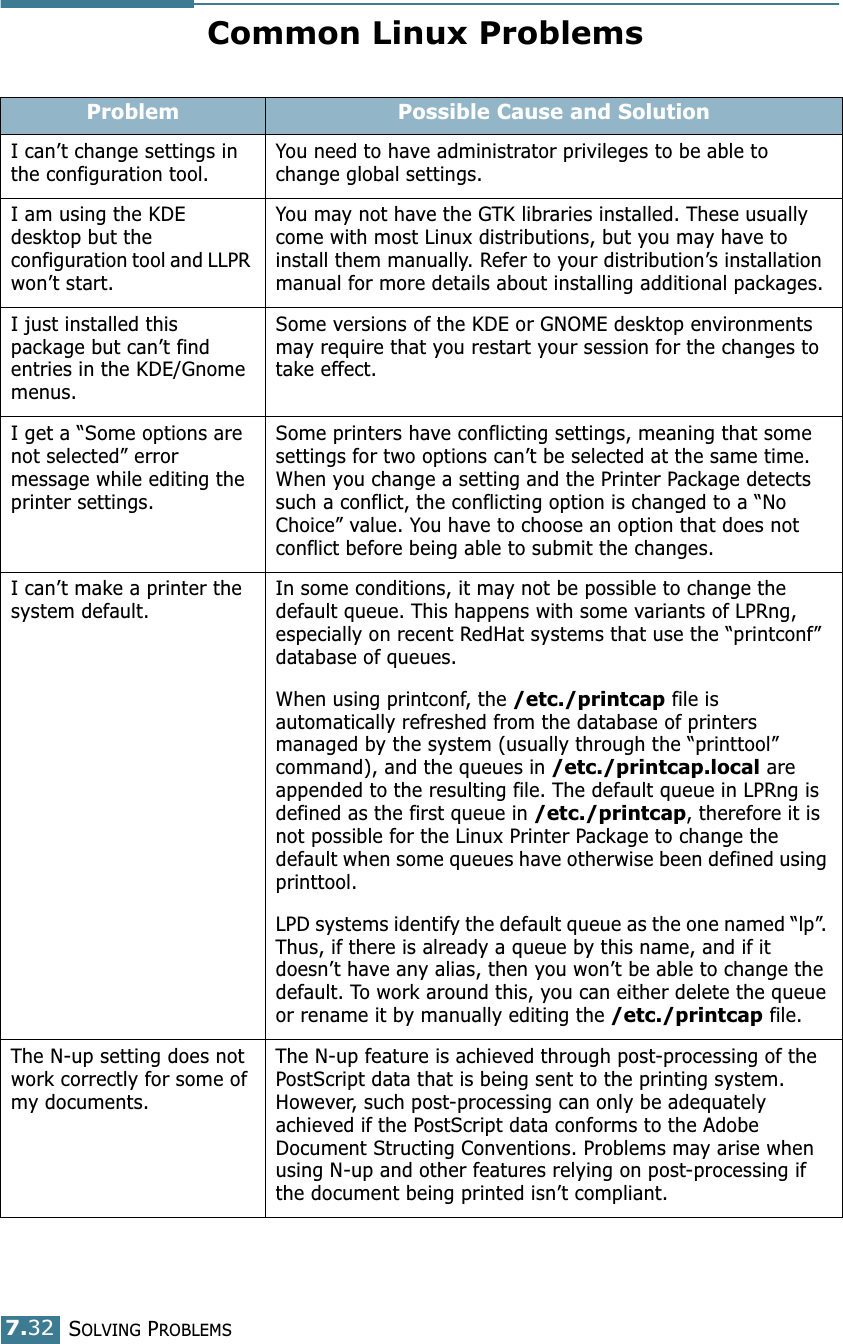
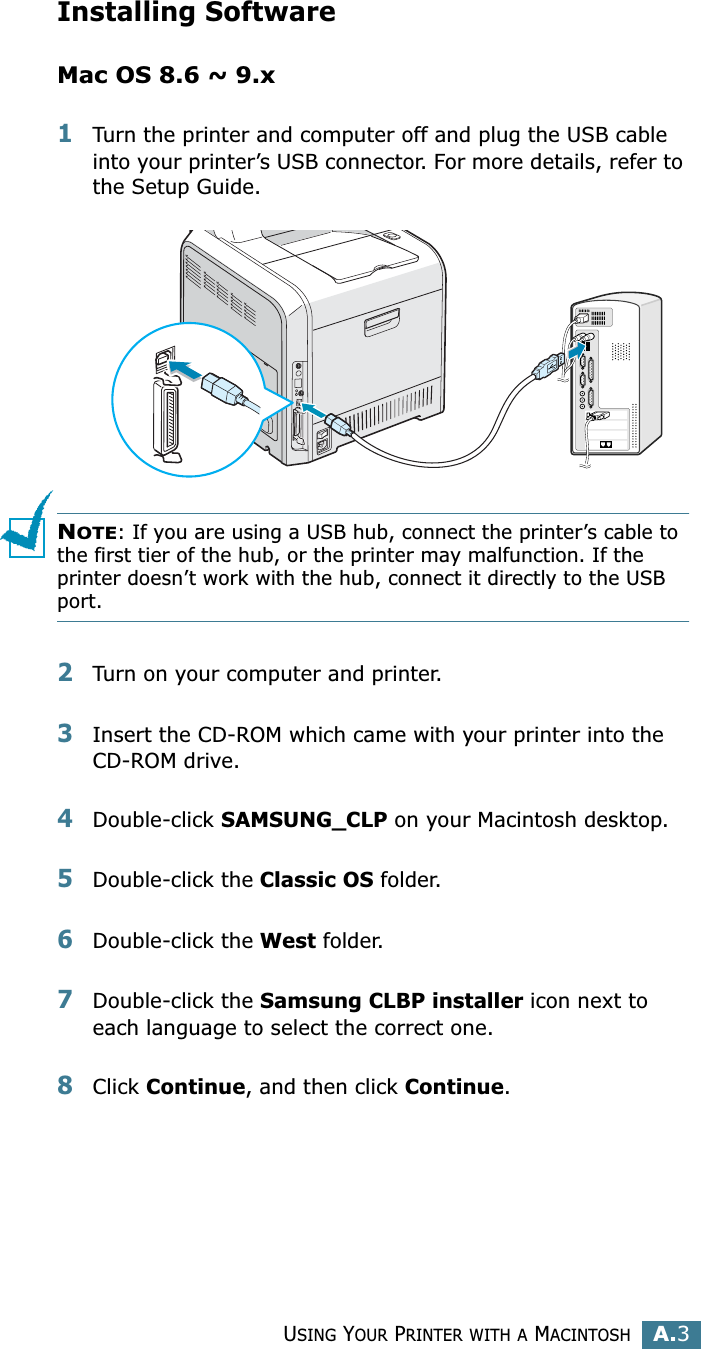
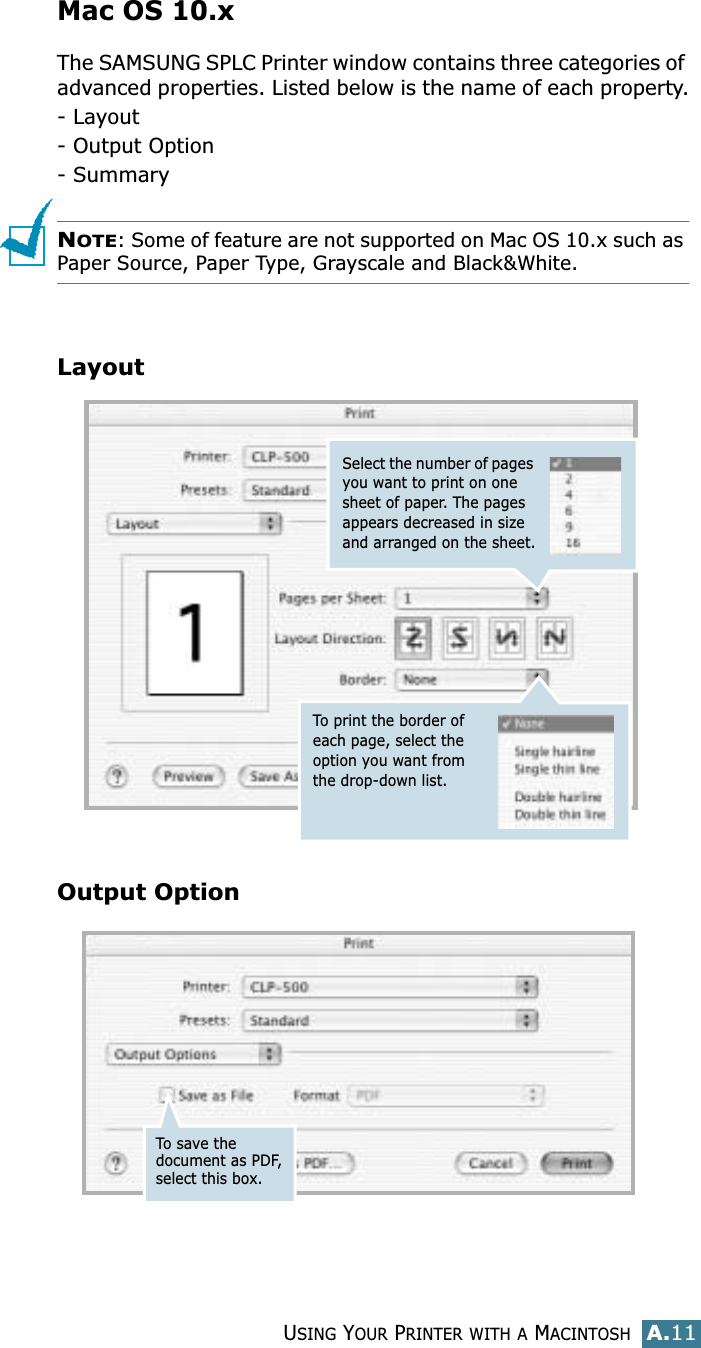
![SOLVING PROBLEMS7.277InvalidImaging UnitAn invalid imaging unit is installed.Only install a Samsung-approved imaging unit, designed for your printer. If you have installed an approved imaging unit and this error still occurs contact an authorized service agent.InvalidTransfer BeltAn invalid transfer belt is installed.Only install a Samsung-approved transfer belt, designed for your printer. If you have installed an approved transfer belt and this error still occurs contact an authorized service agent.Invalid NewToner[Color]An invalid new toner cartridge is installed.Only install a Samsung-approved toner cartridge, designed for your printer. If you have installed an approved toner cartridge and this error still occurs contact an authorized service agent.Invalid Toner[Color]An invalid toner cartridge is installed.Only install a Samsung-approved toner cartridge, designed for your printer. If you have installed an approved toner cartridge and this error still occurs contact an authorized service agent.Jam0 In Tray1ORJam0 In Tray2A paper jam has occurred from the indicated tray.Remove the jammed paper from the corresponding tray, referring to page 7.8.JamIn Duplex PathA paper jam has occurred while printing on both sides of the paper.Remove the jammed paper from the printer, referring to page 7.14.JamIn Exit AreaA paper jam has occurred in the paper exit area.Remove the jammed paper from the printer, referring to page 7.11.Jam Inside PrinterA paper jam has occurred inside the printer.Open the right cover and remove the jammed paper from the printer, referring to page 7.10.Lever UnlockingErrorAfter installing the transfer belt, the lock levers is not locked.Push the lock levers on each side away from you, referring to page 6.27.Message Status Do this...](https://usermanual.wiki/Samsung-Electronics-Co/CLP550N.Users-Manual-2/User-Guide-376419-Page-54.png)
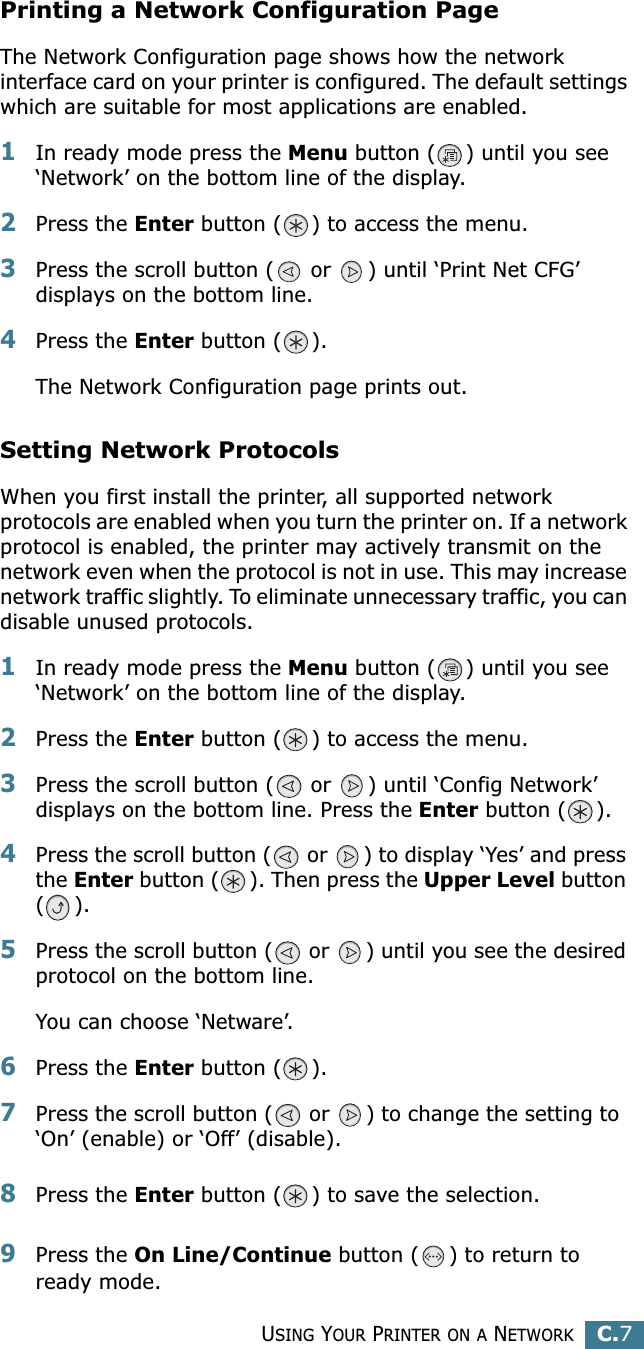
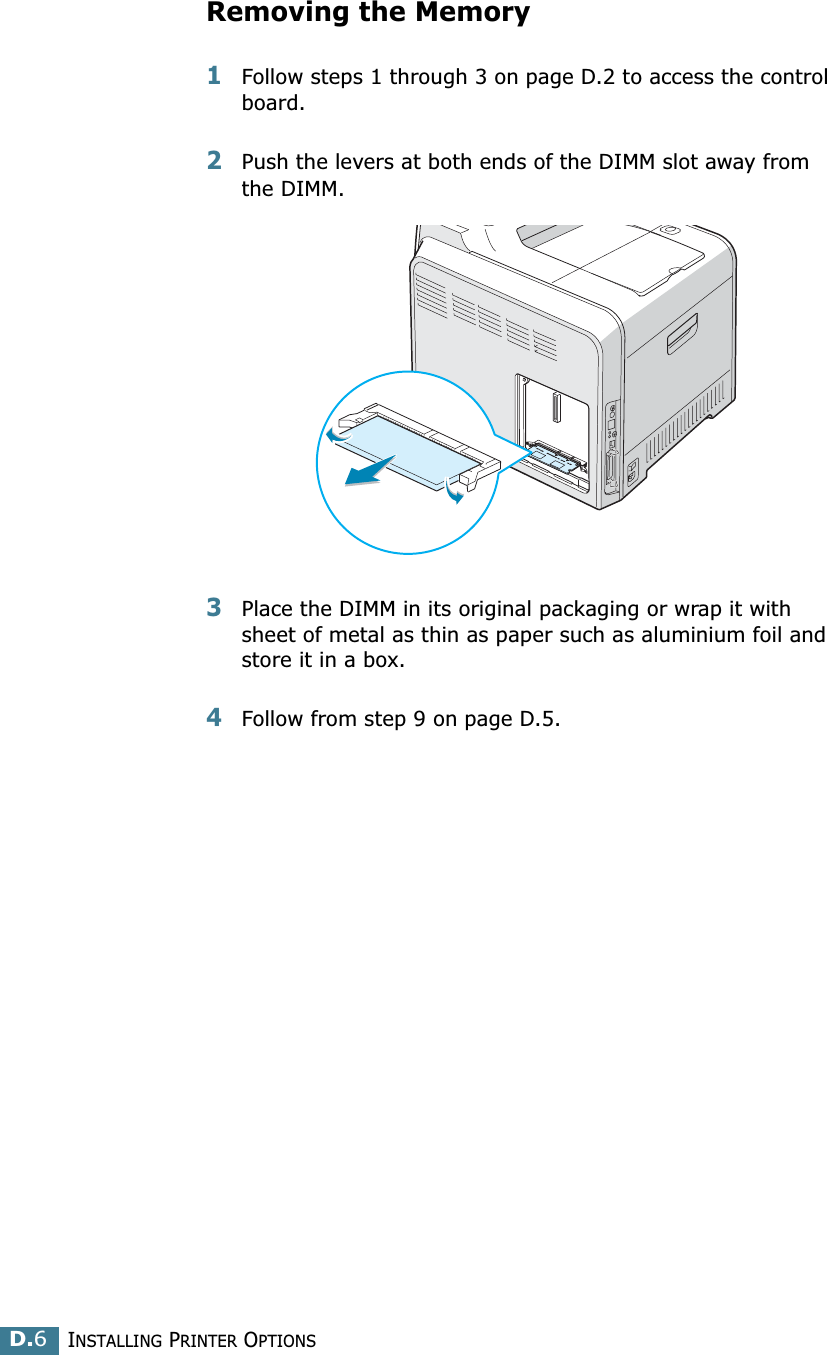
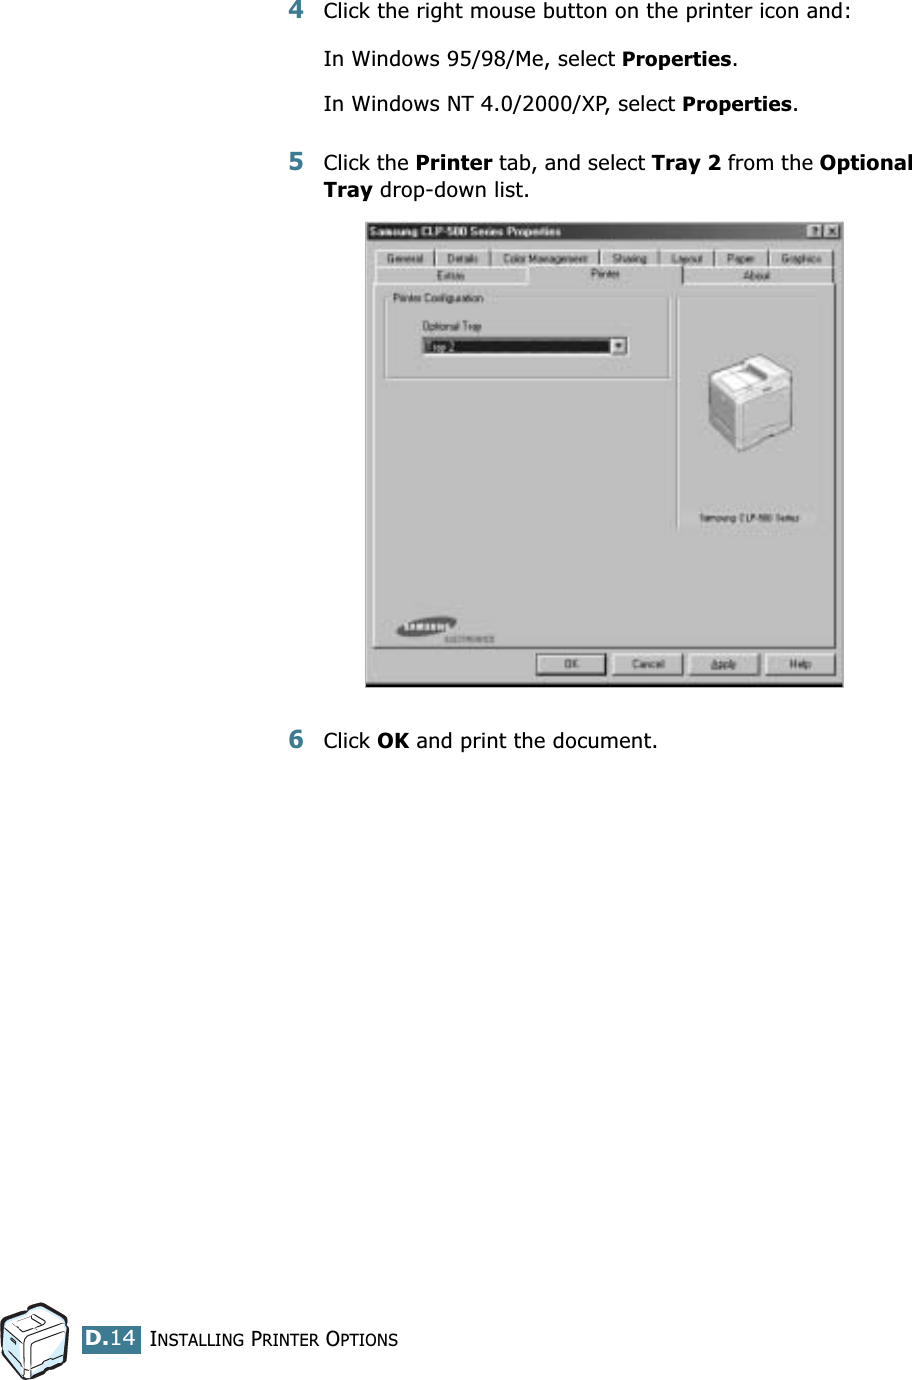
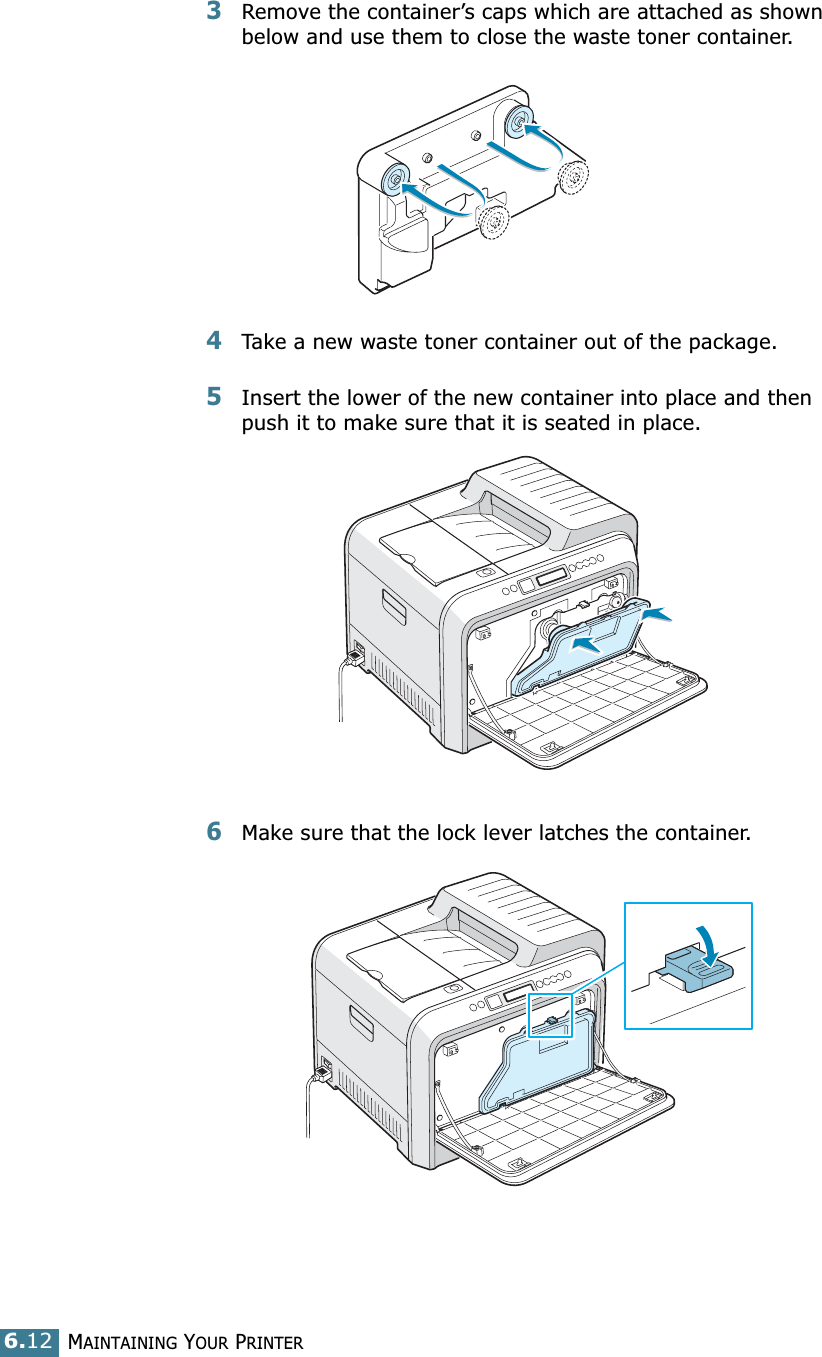
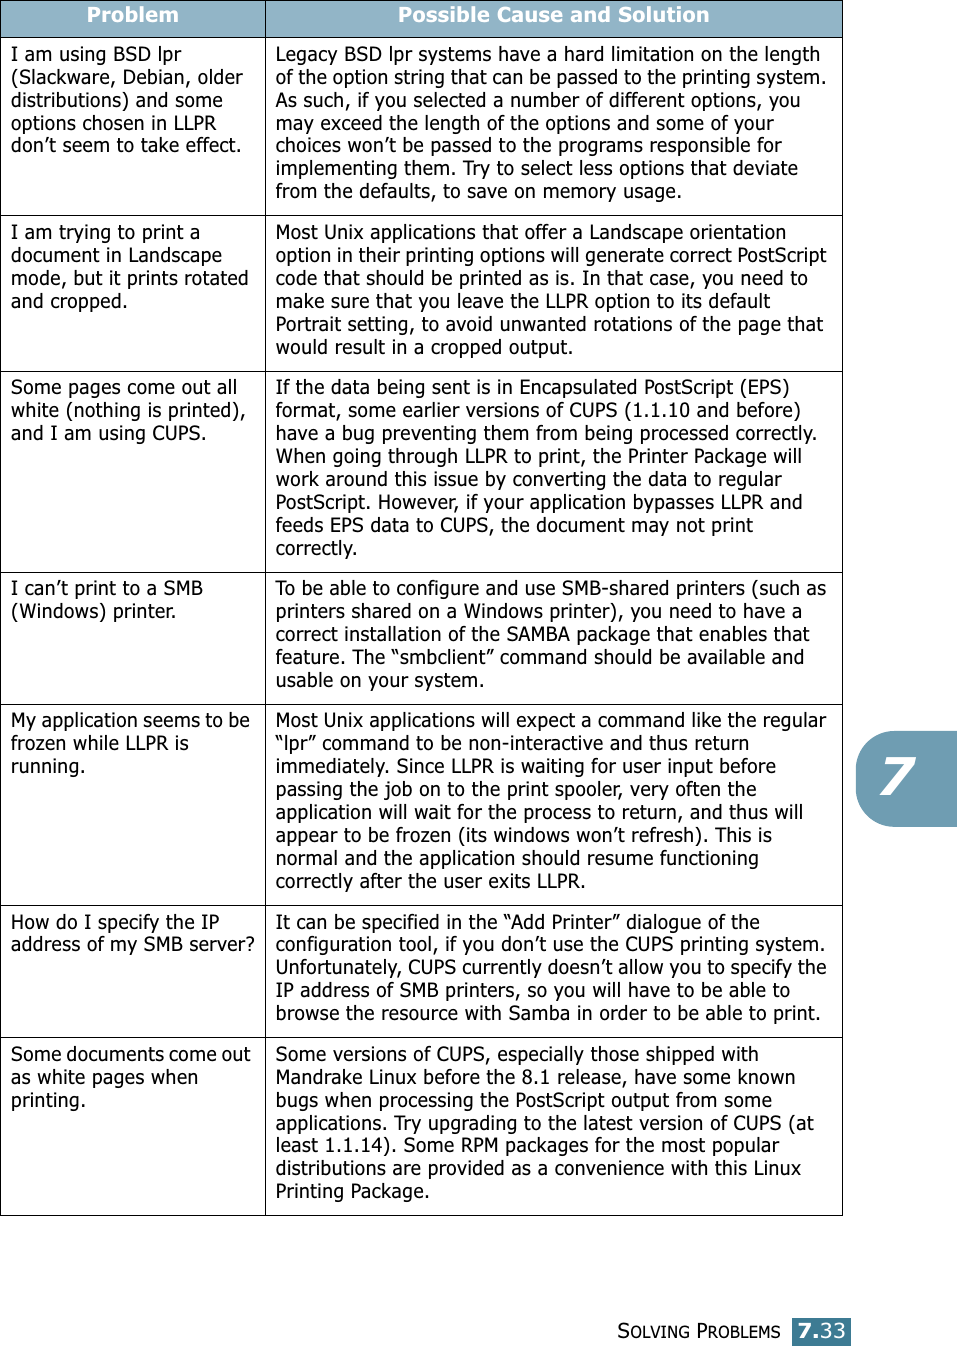
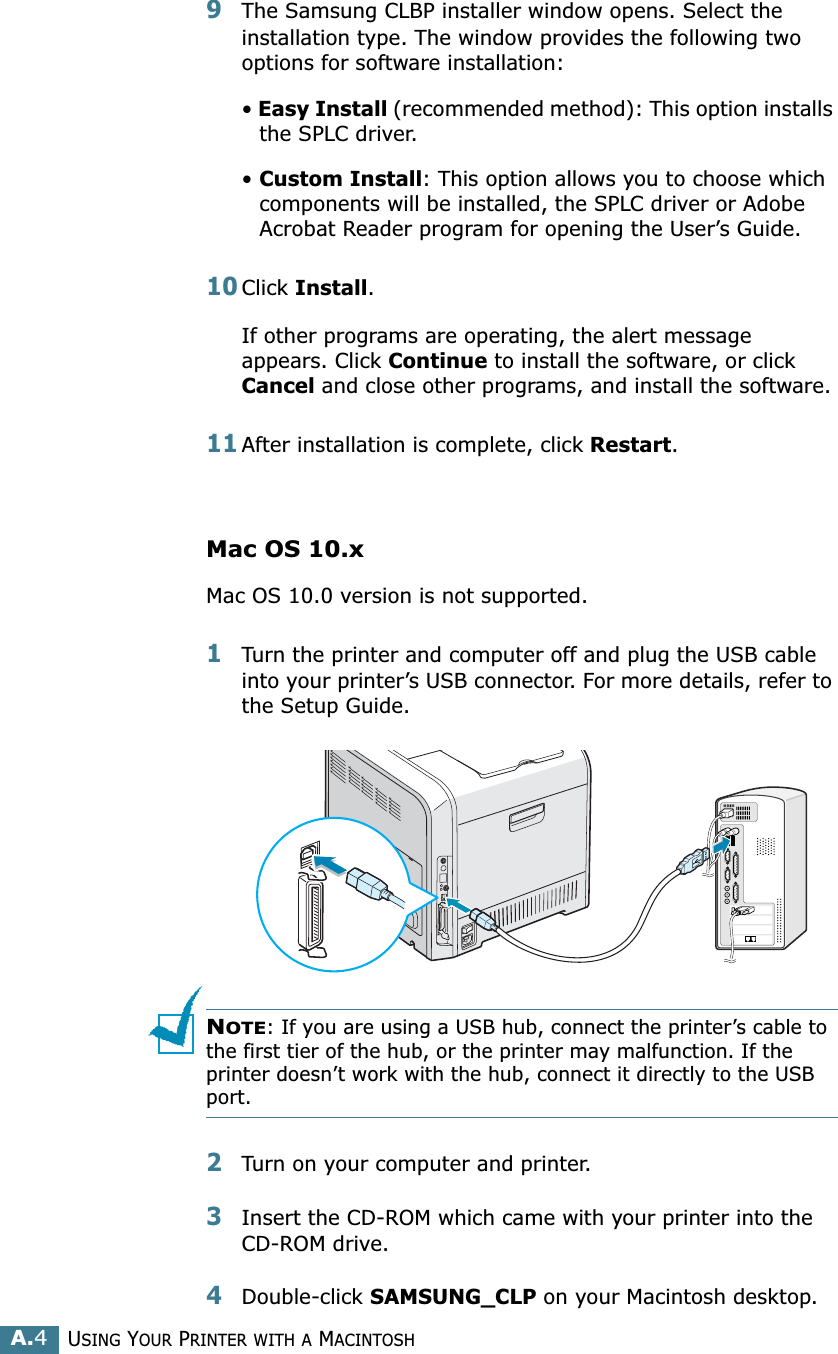
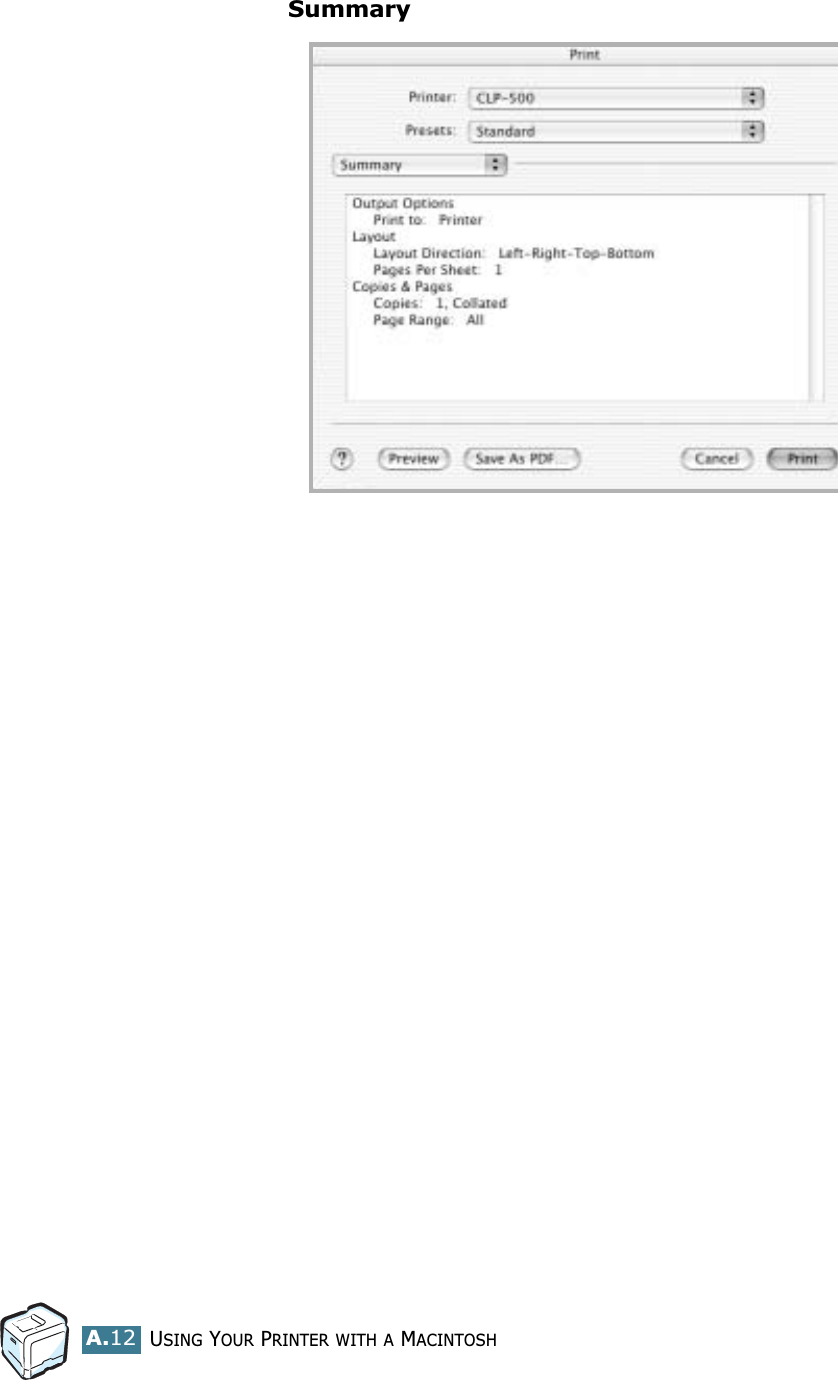
![SOLVING PROBLEMS7.28Load[Size] In Tray1ORLoad[Size] In Tray2The paper size specified in the printer properties does not match the paper you are loading.Load the correct paper in the tray.Load ManualPress Cont KeyThe Multi-purpose Tray is empty in the manual feed mode.Load a sheet of print material and press the On Line/Continue button. You need to press the button for each page to be printed.Main Motor ErrorA problem has occurred in the main motor of the printer.Unplug the power cord and plug it in again. If the problem persists, please call for service.Memory Overflow The printer does not have enough memory to print the current job.An error has occurred in the firmware program of the printer.The job automatically clears and the printer returns to Standby Mode.• Expand the memory in your printer. See “Installing Printer Memory” on page D.2.Page Too Complex Too much complicated data was sent to the printer.Simplify the page layout and remove unnecessary graphics from your document.To expand the memory in your printer, see “Installing Printer Memory” on page D.2.Ready [Color]Low TonerThe corresponding toner cartridge in your printer is nearly empty.Redistribute the toner in corresponding toner cartridge, referring to page 6.5.ReadyIP ConflictAn IP address conflicts with only other devices on the network.Contact your network administrator and choose an address within your subnet which will not conflict with any other devices.Replace [Color]TonerThe corresponding toner cartridge in your printer is empty.Replace the corresponding toner cartridge with a new one. See page 6.8.Replace Imaging UnitThe lifetime of the imaging unit is ended.Replace the imaging unit with a new one. See page 6.14.Replace Imaging Unit SoonThe lifetime of the imaging unit is nearly ended.When “Replace Imaging Unit” appears on the display, replace the imaging unit.Message Status Do this...](https://usermanual.wiki/Samsung-Electronics-Co/CLP550N.Users-Manual-2/User-Guide-376419-Page-55.png)
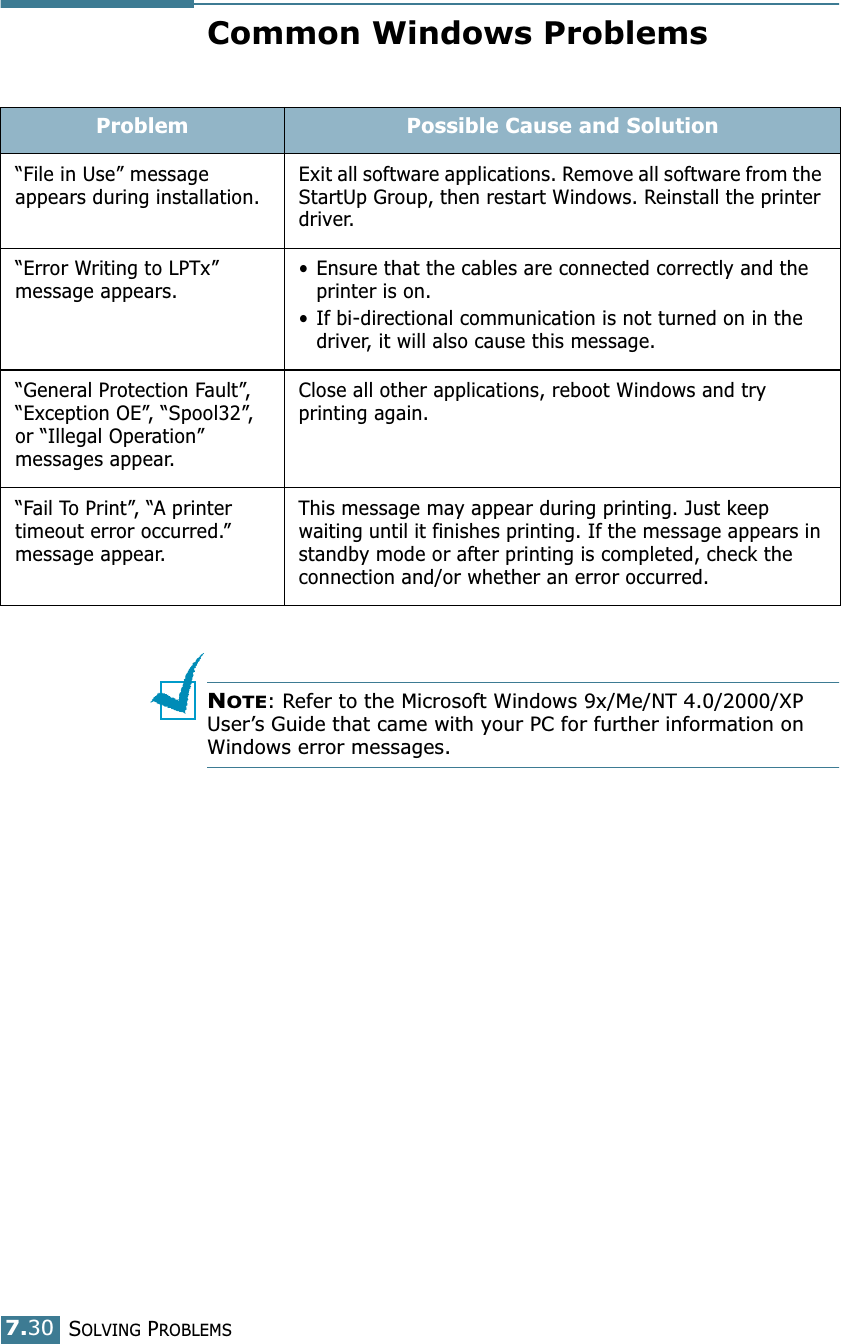
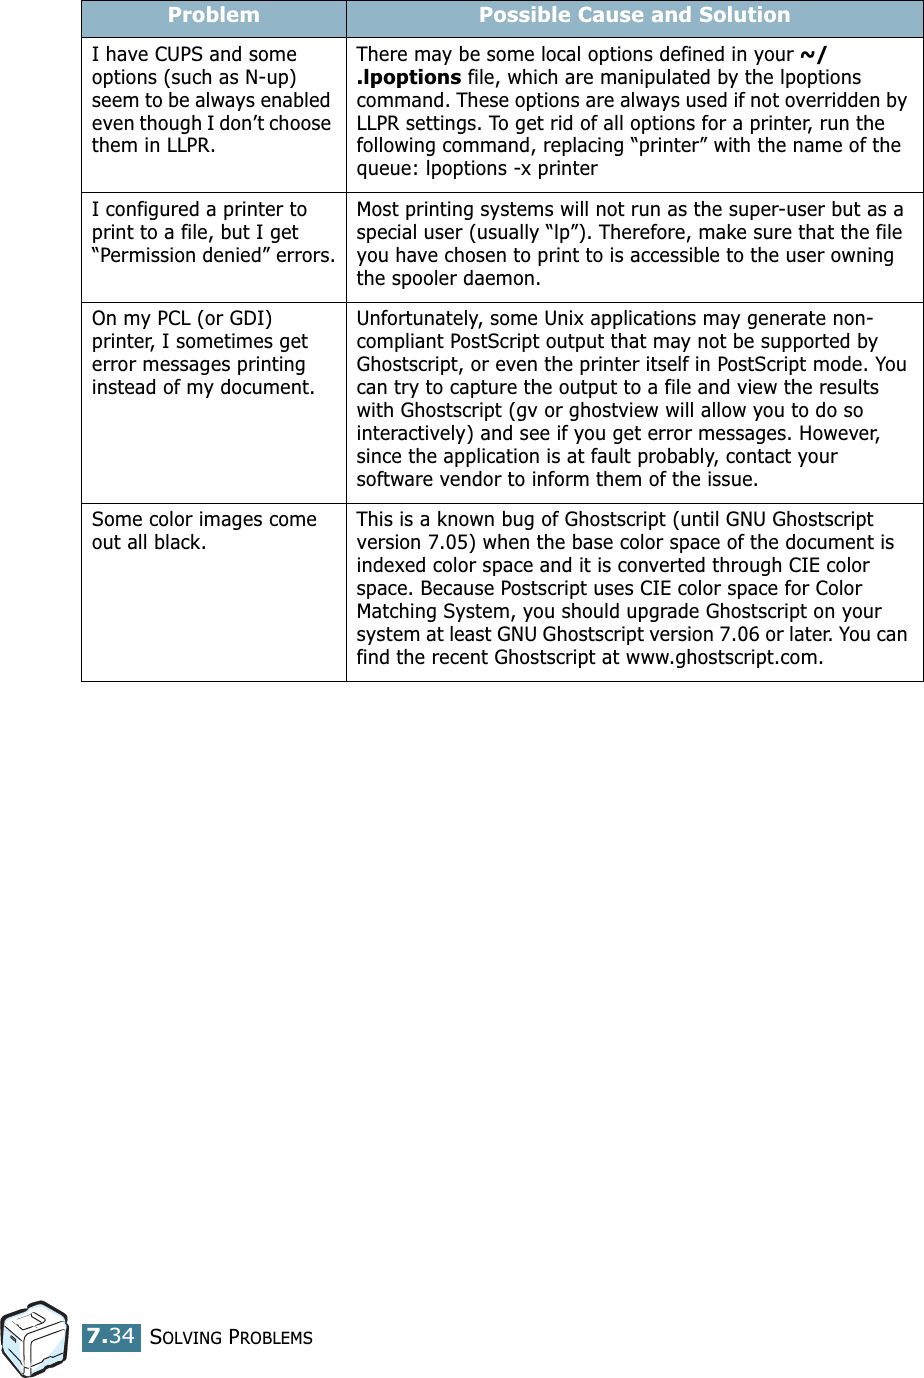

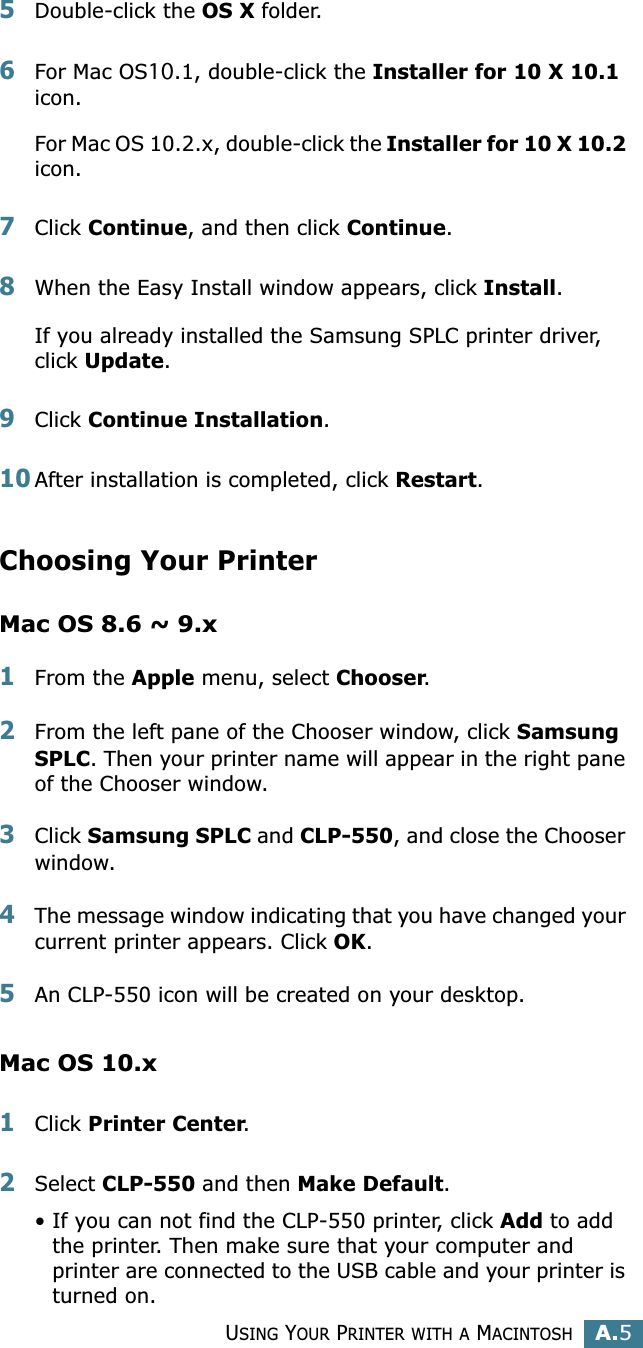
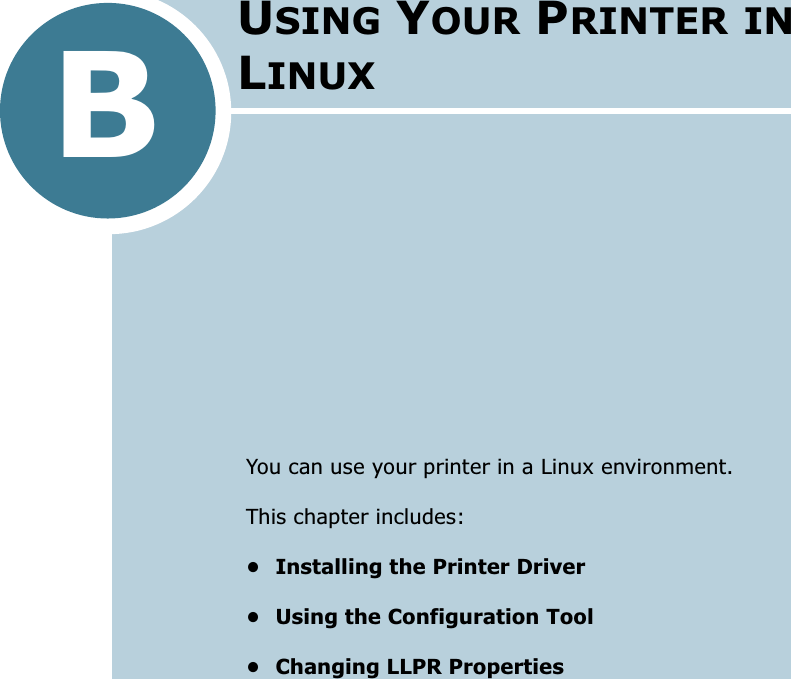
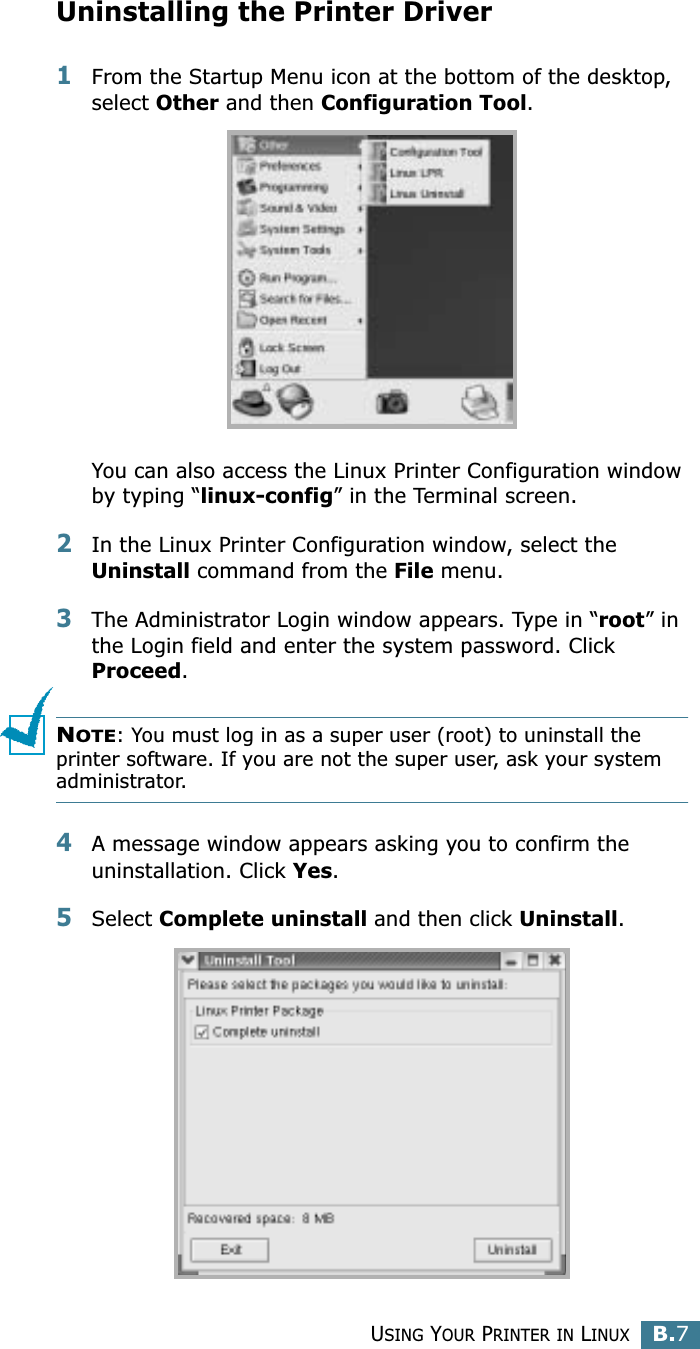
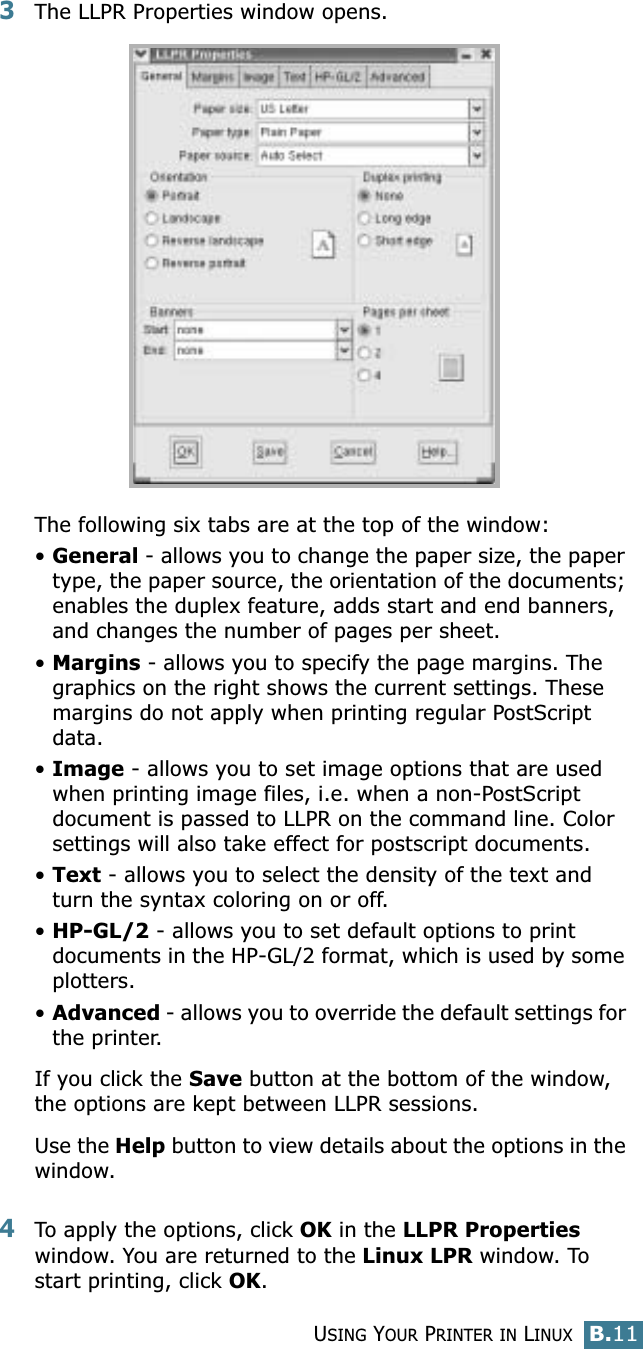
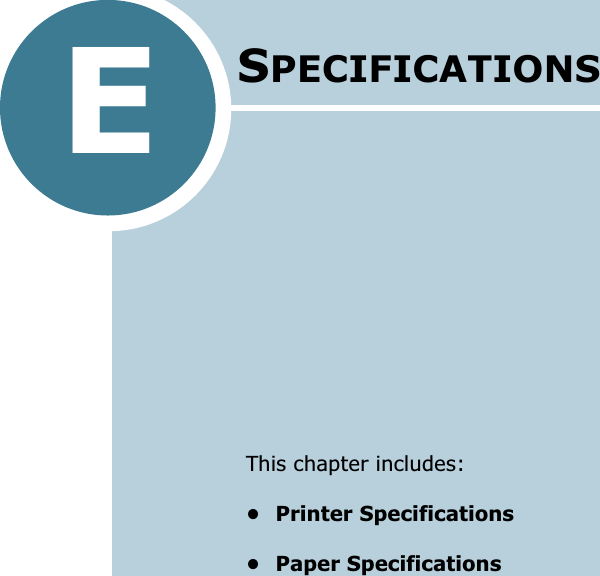
![USING YOUR PRINTER IN LINUXB.3B3Insert the printer software CD-ROM. The CD-ROM automatically runs.NOTE: If the CD-ROM does not automatically run, click the icon at the bottom of the window. When the Terminal screen appears, type in:[root@local /root]# cd /mnt/cdrom (the CD-ROM directory) [root@local cdrom]# ./setup.sh 4Select the installation type, either Recommended or Expert, and then click Continue.Recommended is fully automated and no interaction is required. Expert installation allows you to select the install path or printing system.5If you selected Recommended, go to Step 6.For Expert, select an option and then click Begin Install.](https://usermanual.wiki/Samsung-Electronics-Co/CLP550N.Users-Manual-2/User-Guide-376419-Page-76.png)