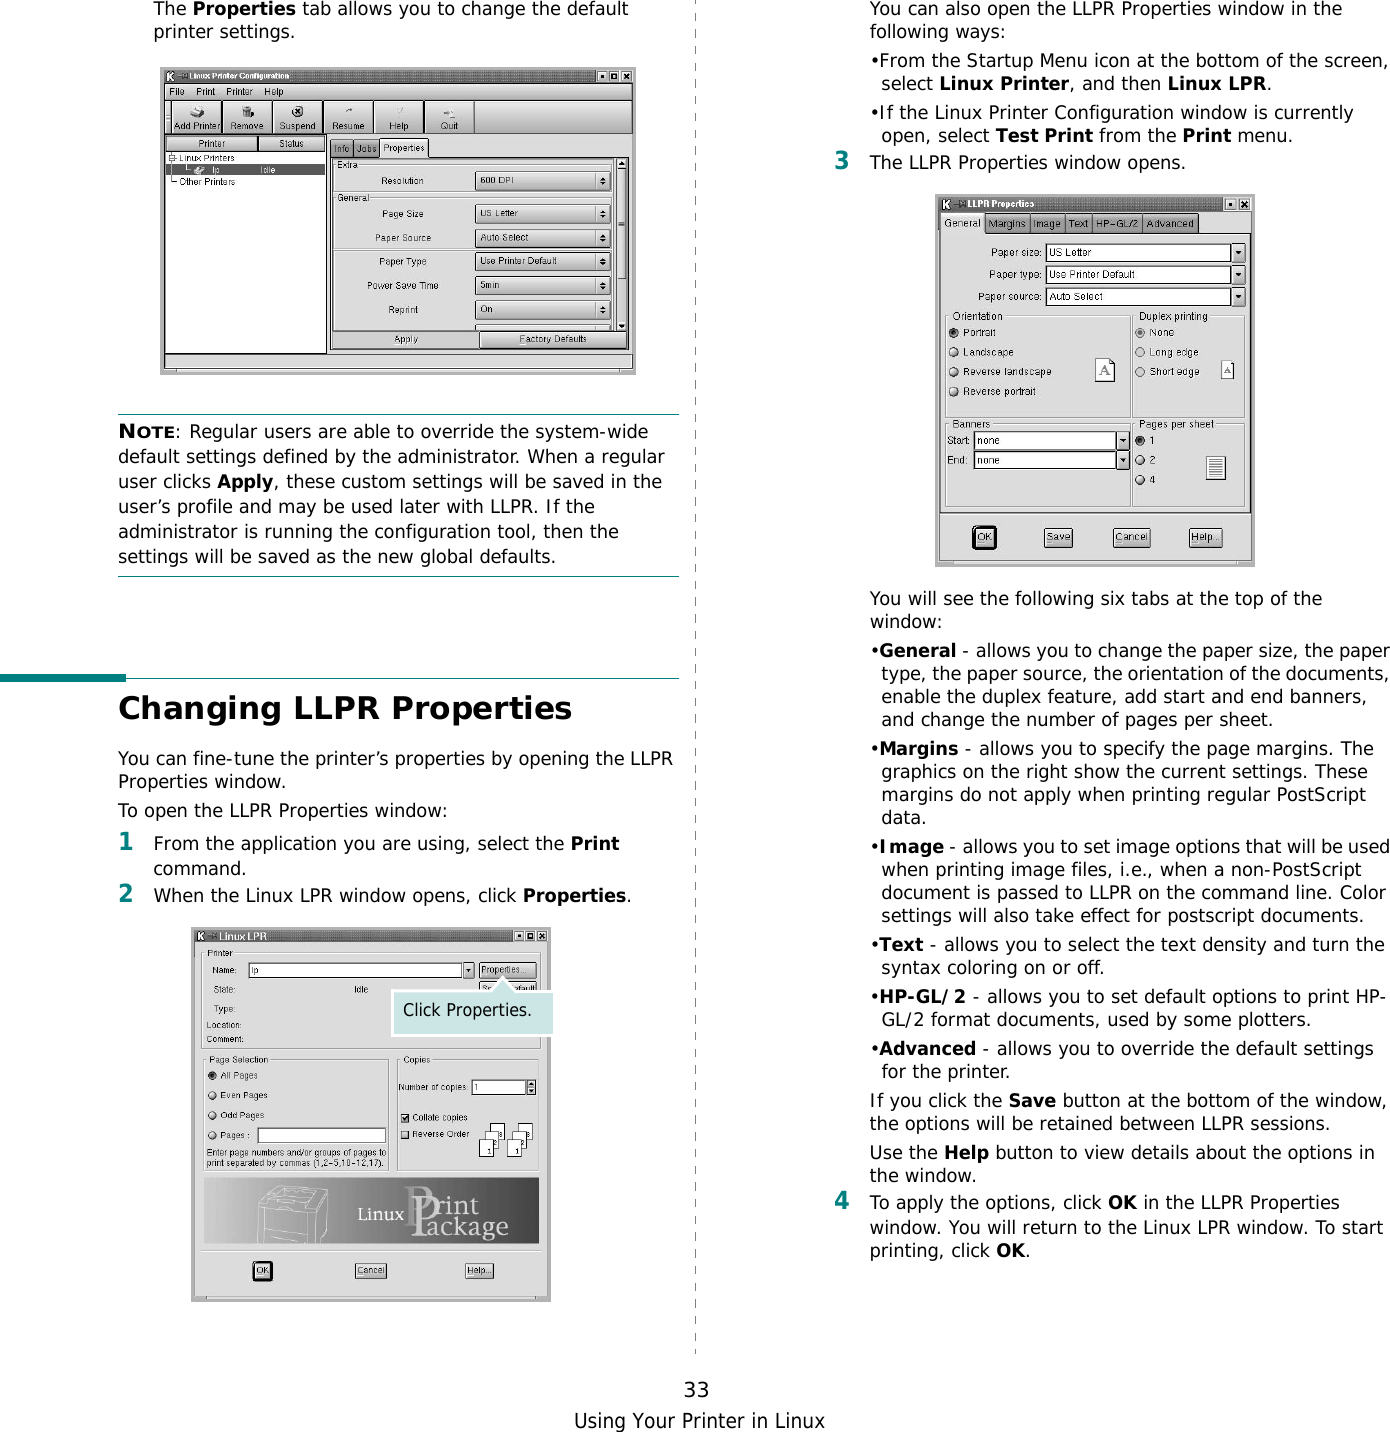
Samsung Electronics Co DC60CPS Laser Printer User Manual 600 EN USER
Samsung Electronics Co Ltd Laser Printer 600 EN USER
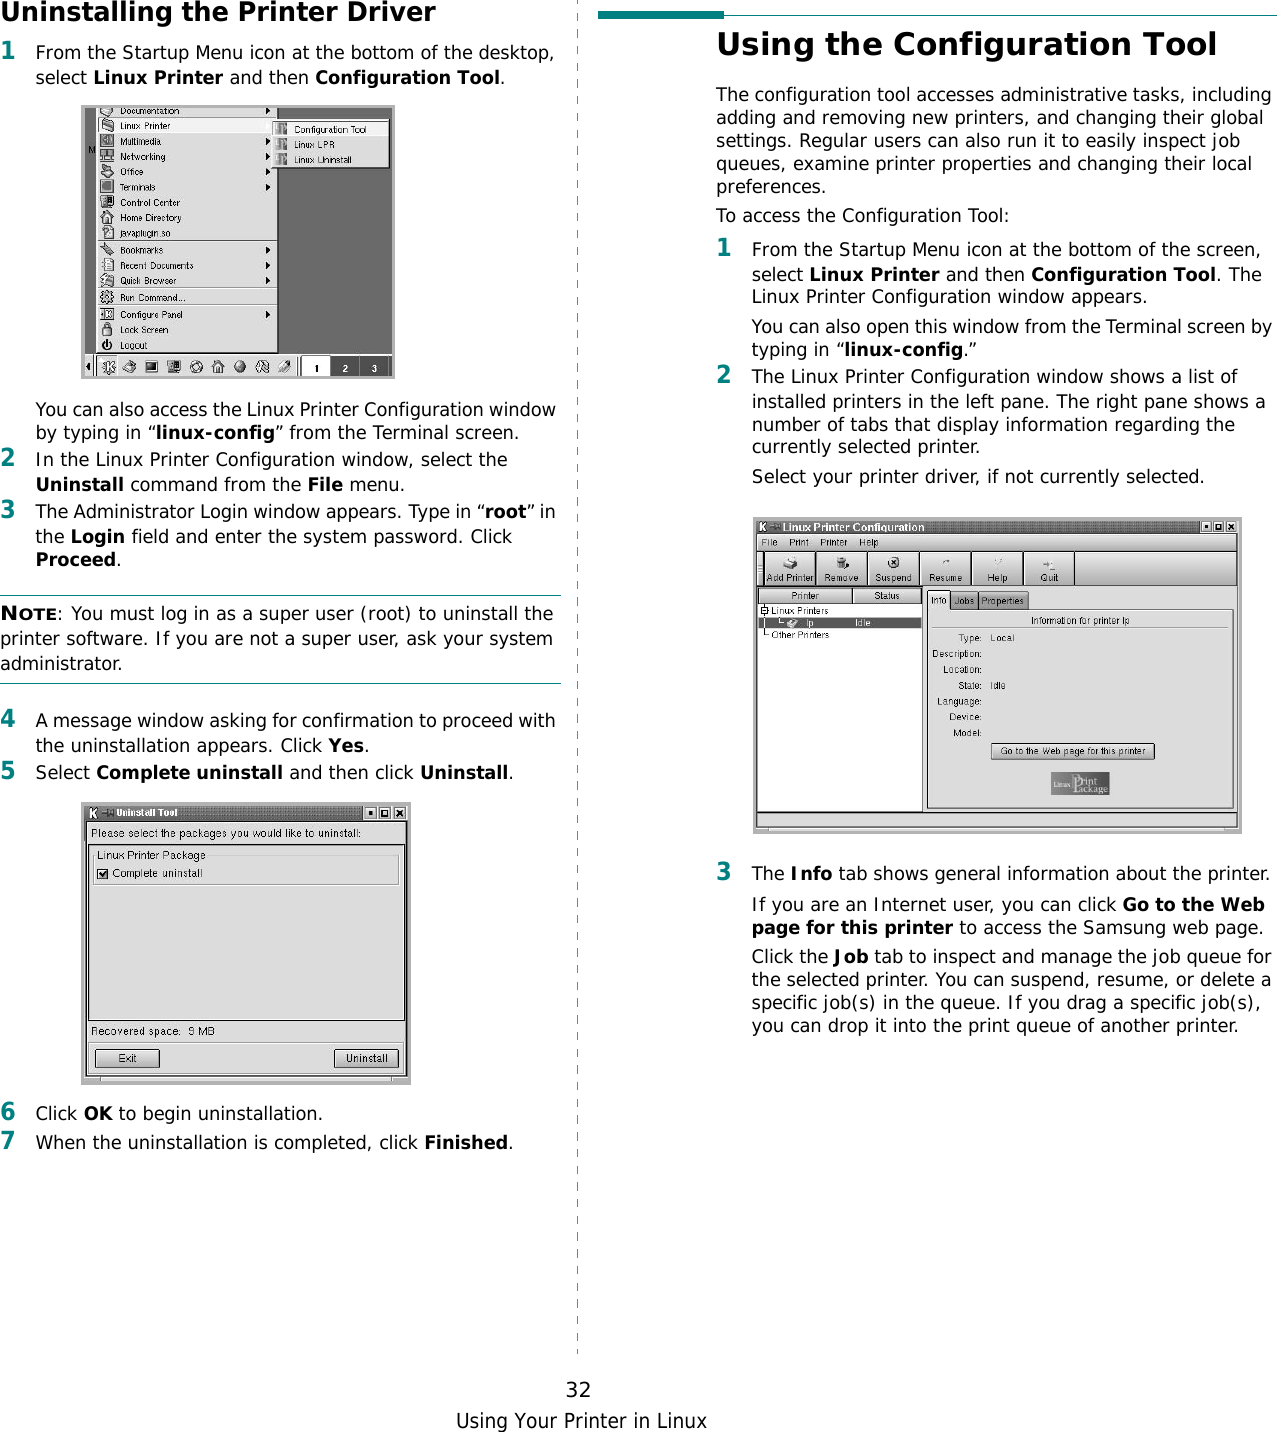
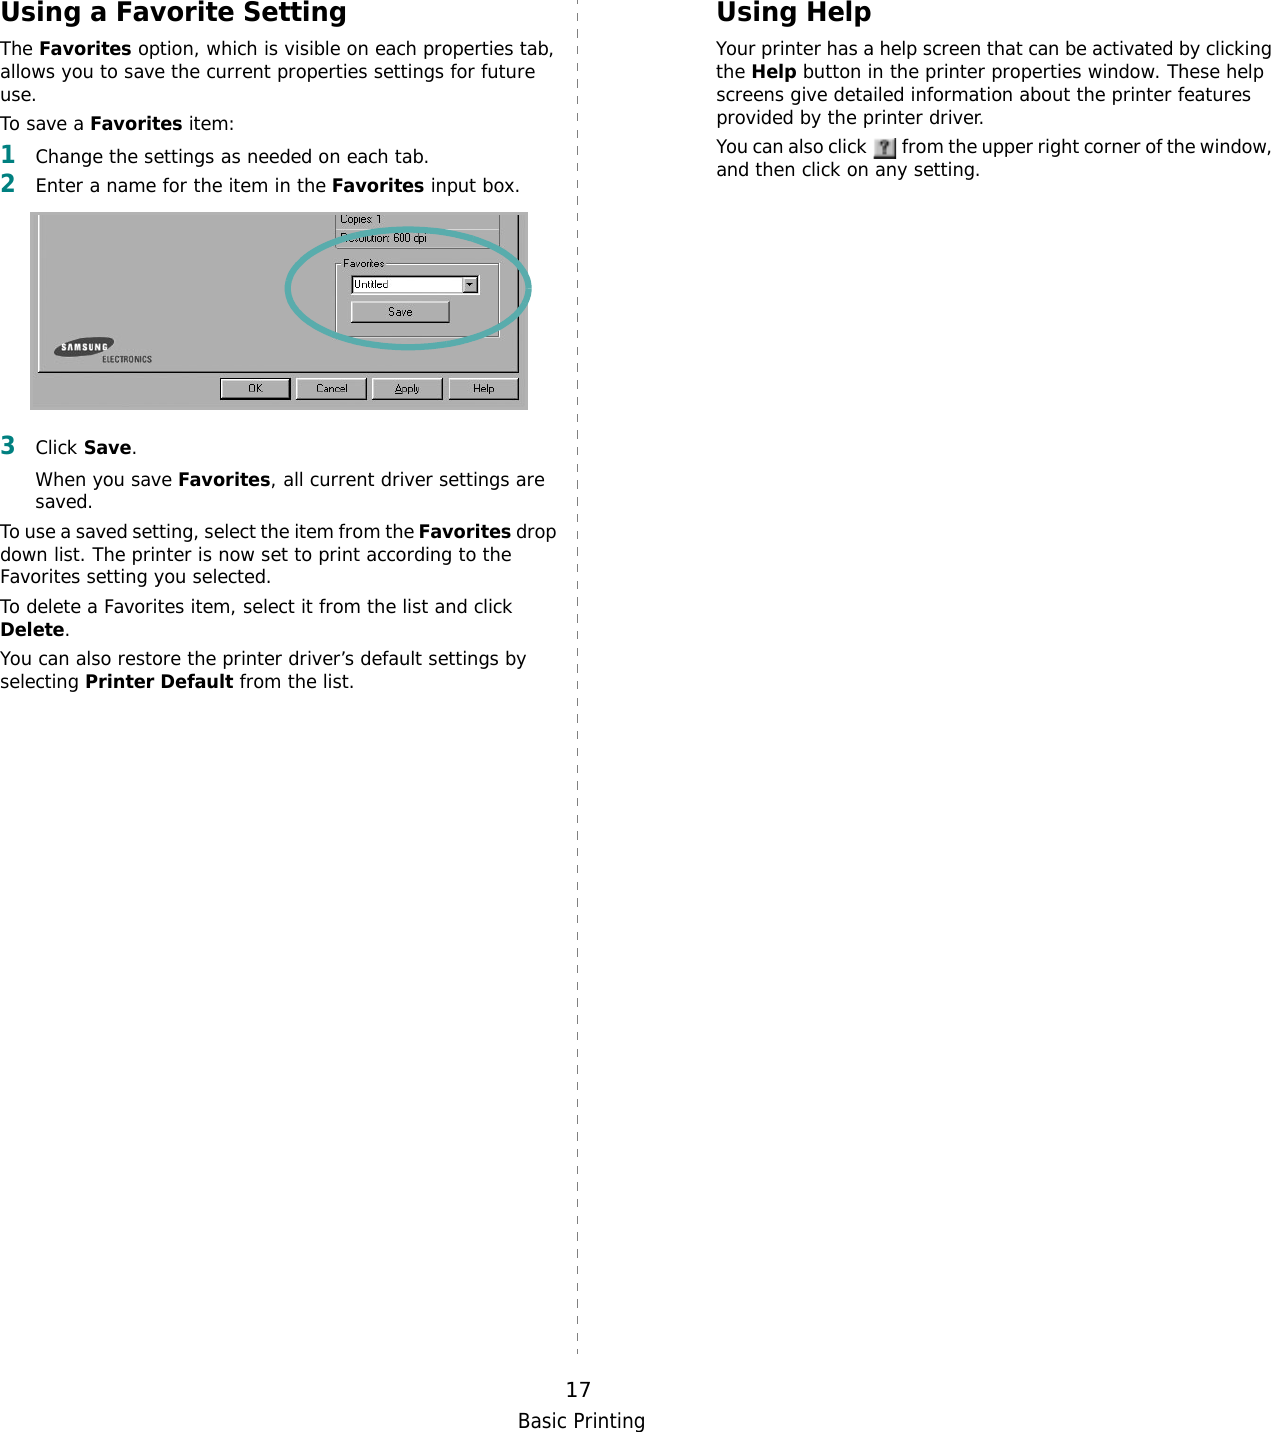
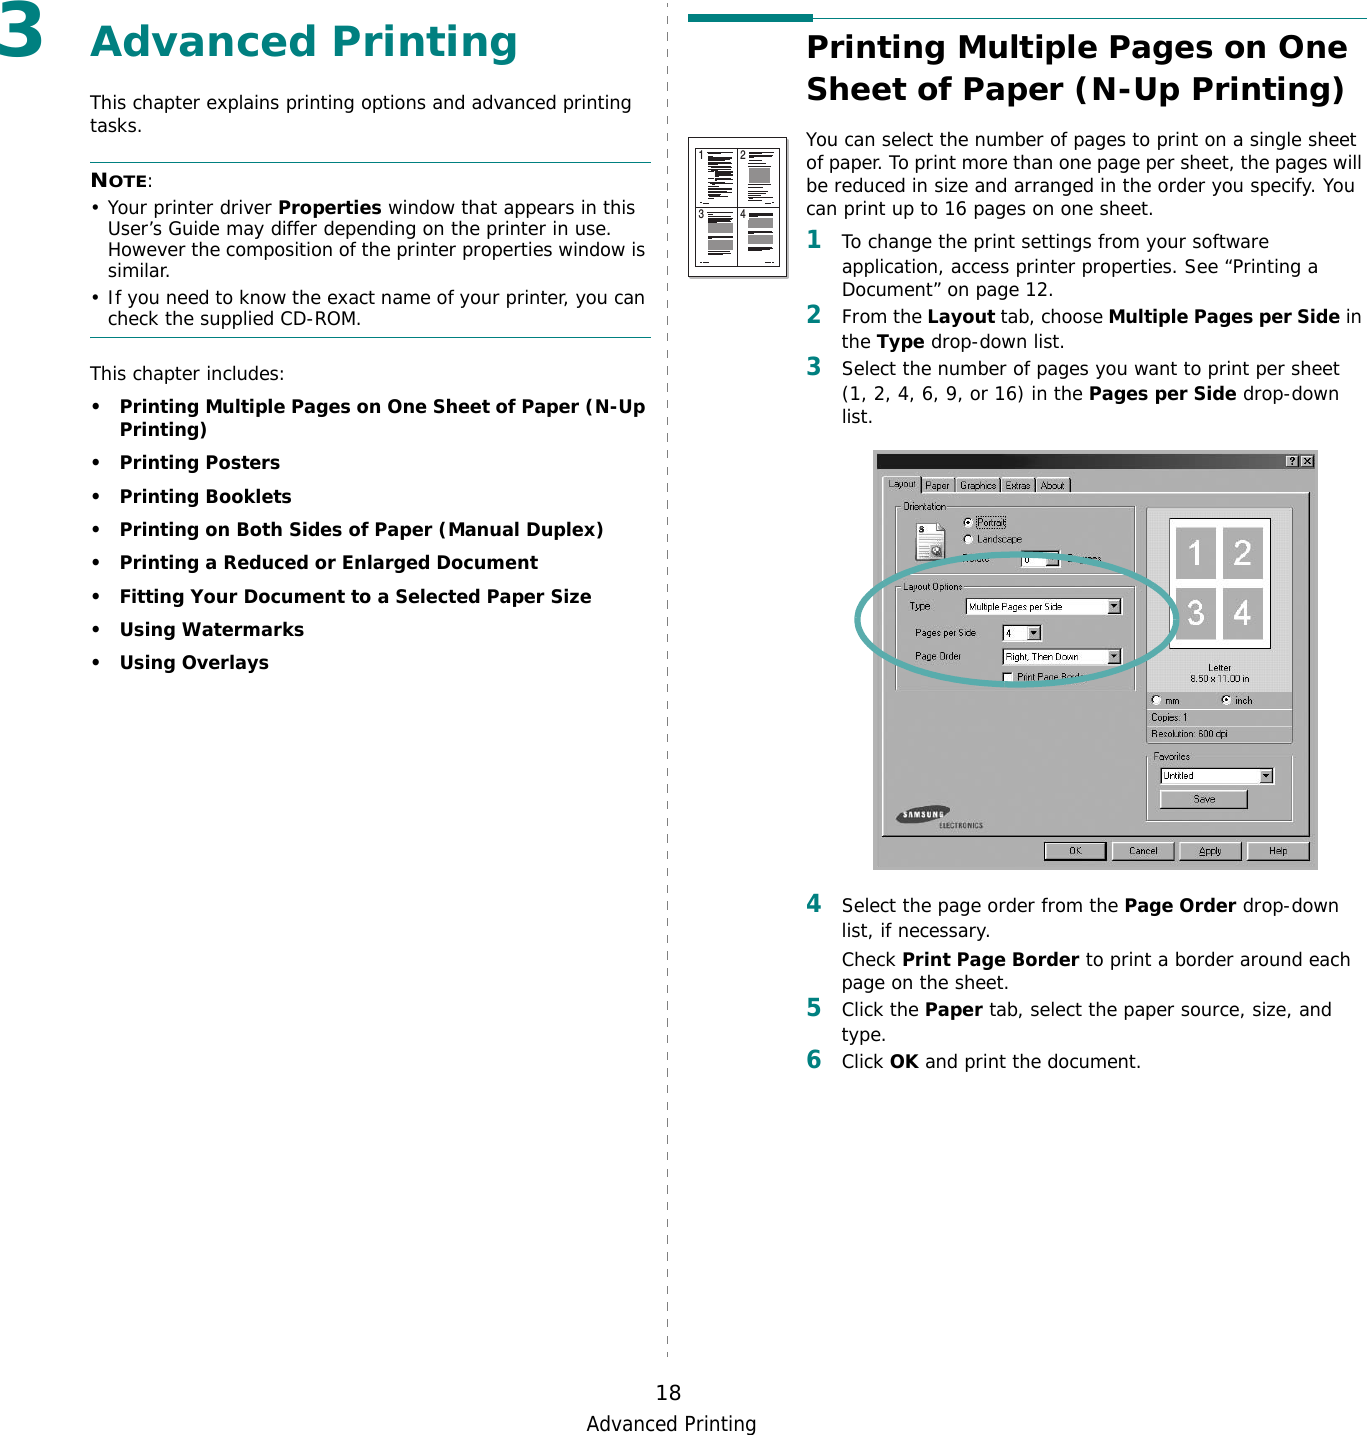
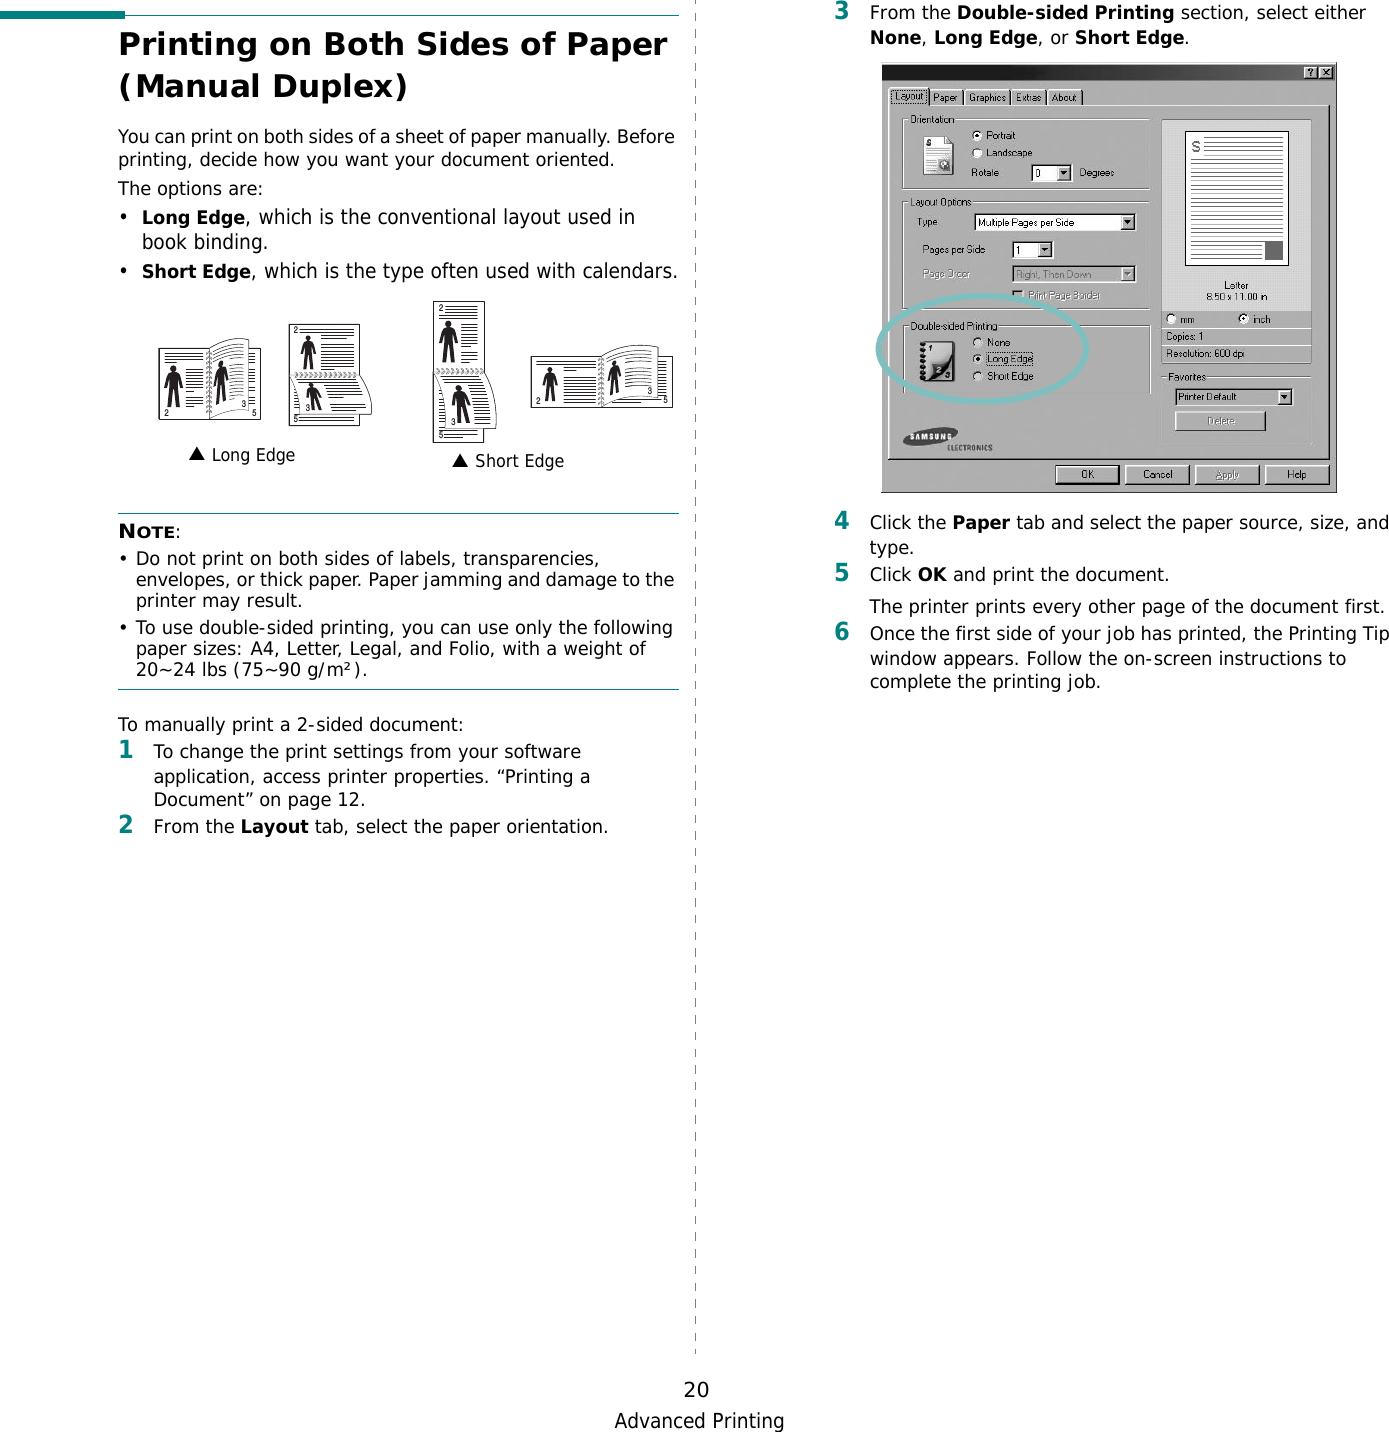
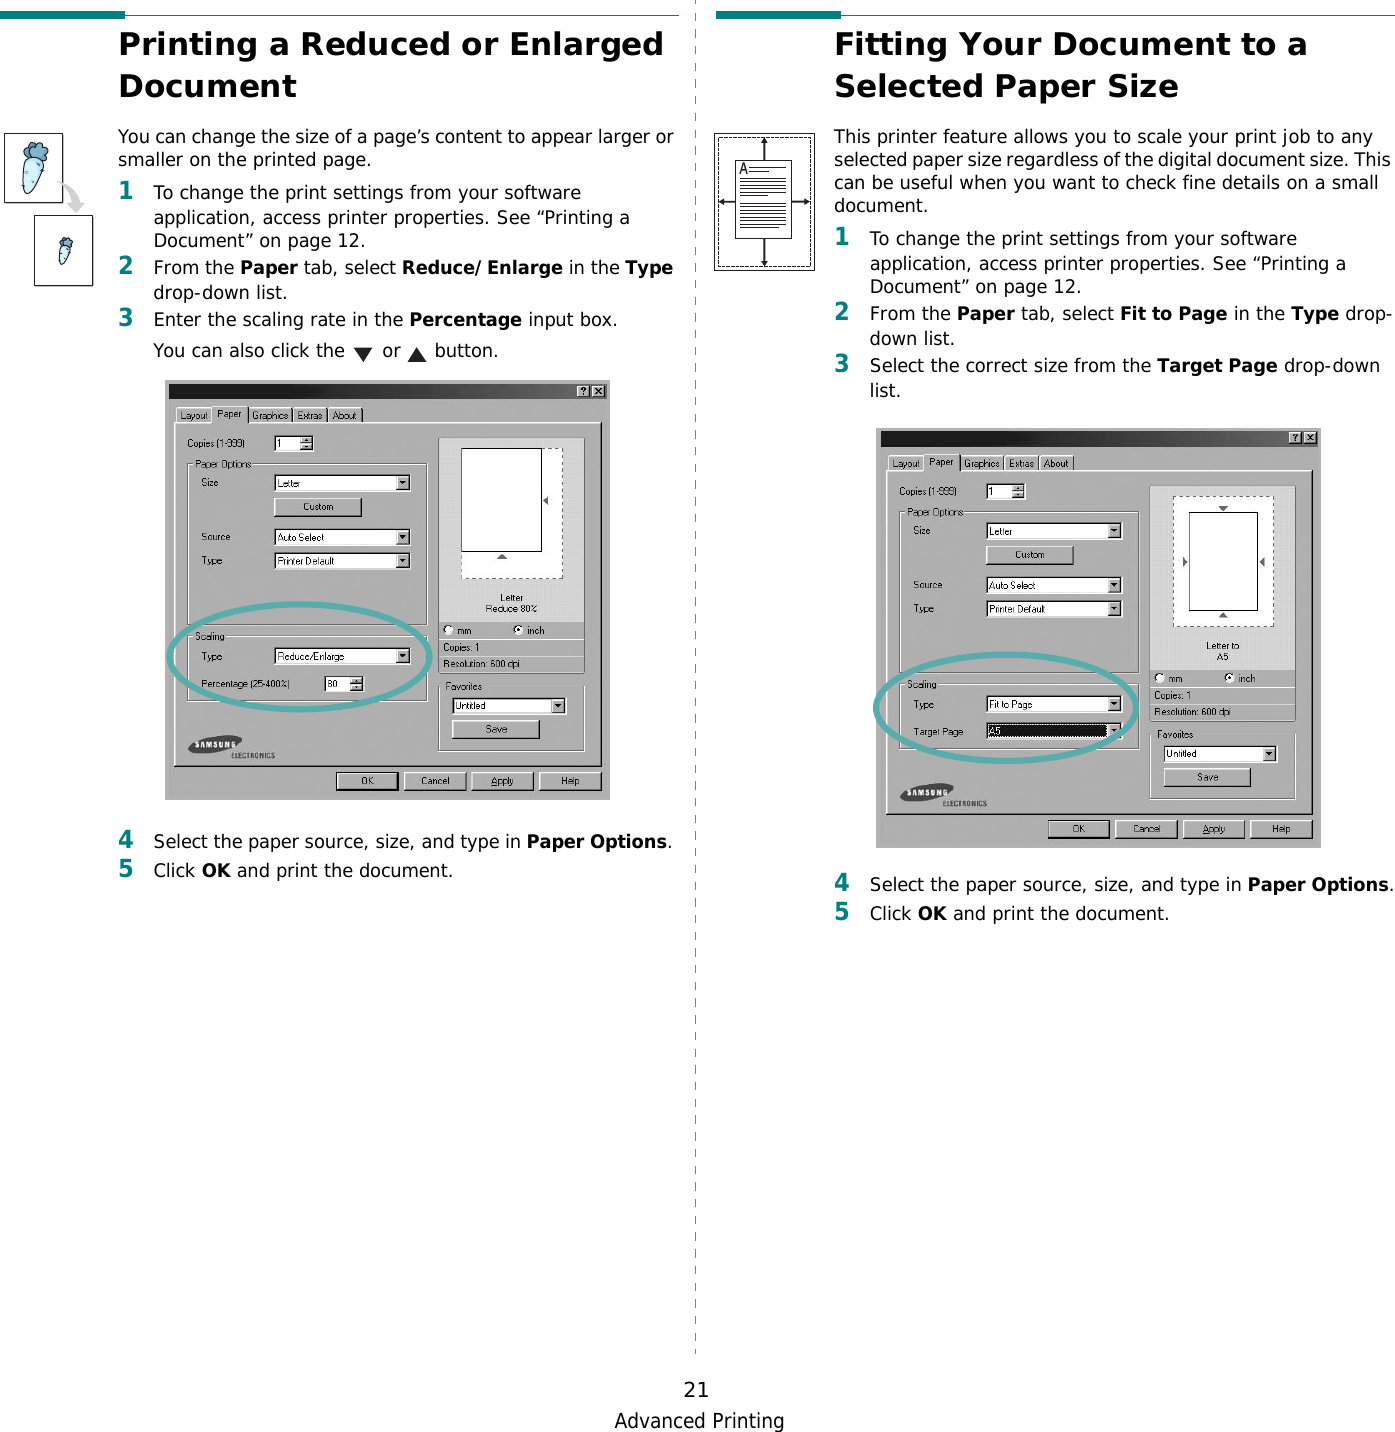
UserManual.wiki
>
Samsung Electronics Co
>
DC60CPS User Manual
>
Users Manual 2
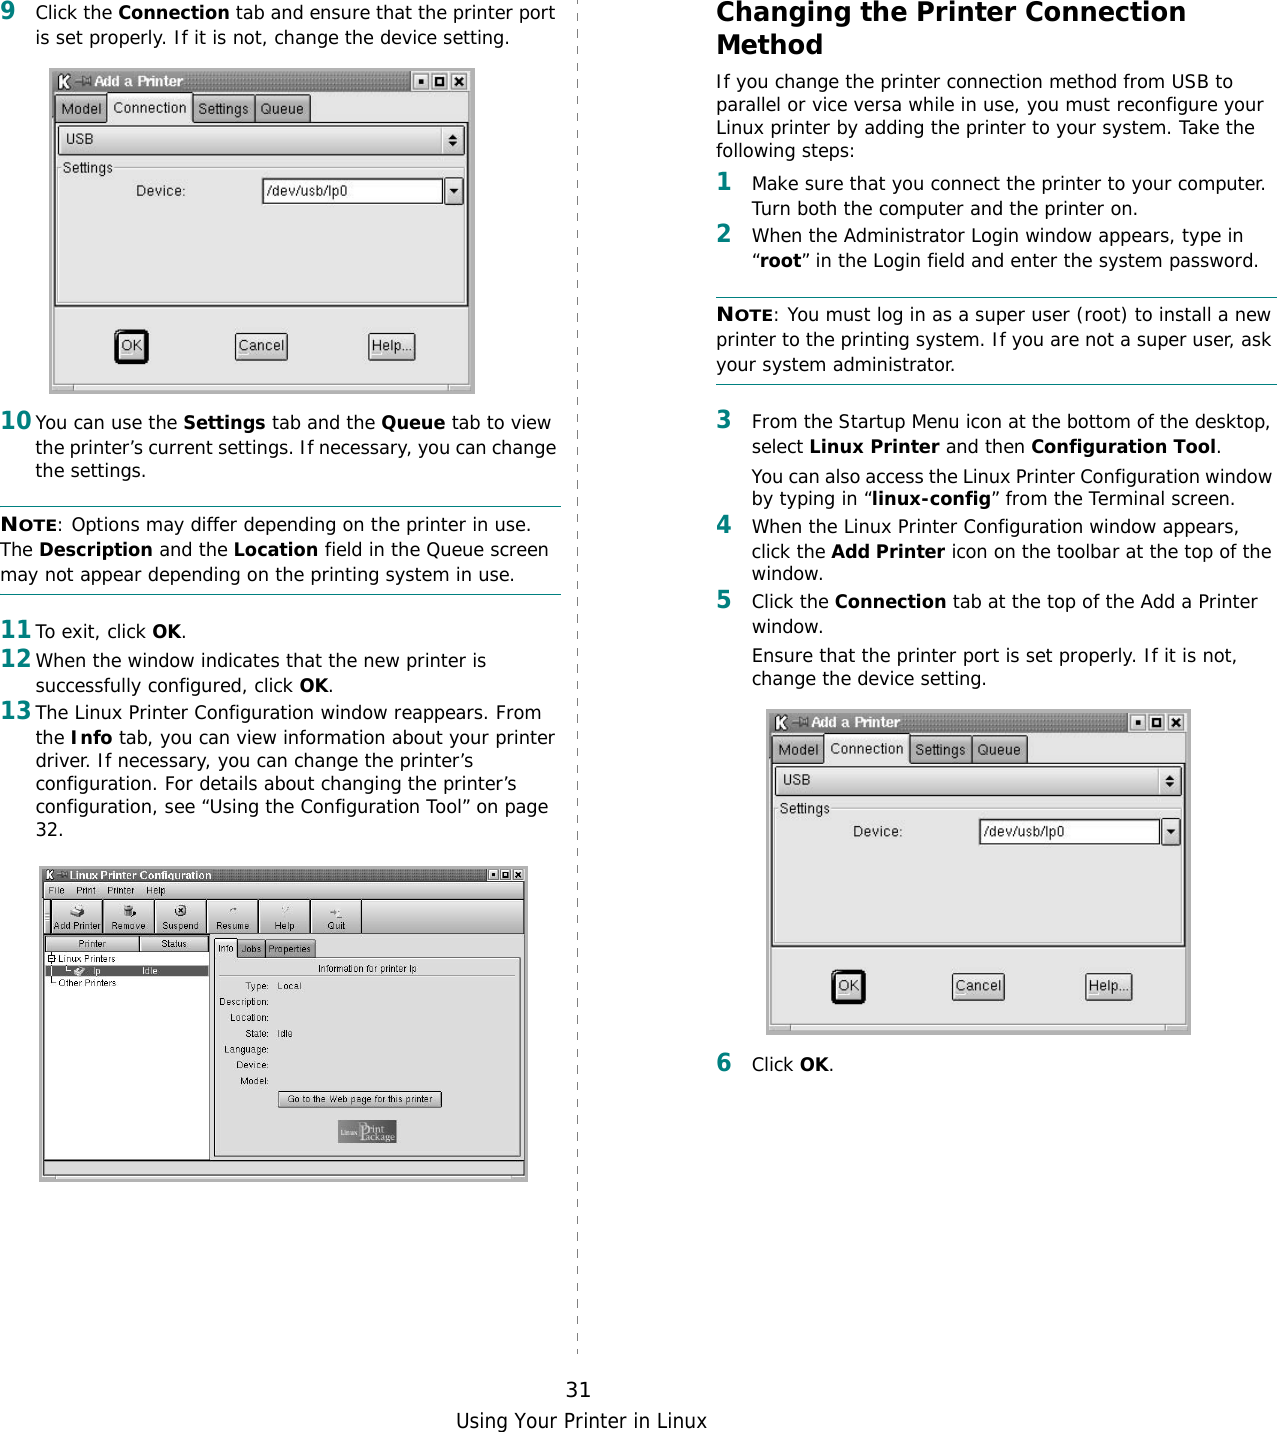
Contents
1.
Users Manual 1
2.
Users Manual 2
Users Manual 2
Navigation menu
Upload a User Manual
Namespaces
Wiki Guide
HTML
PDF
Info
Views
User Manual
Discussion / Help
Navigation
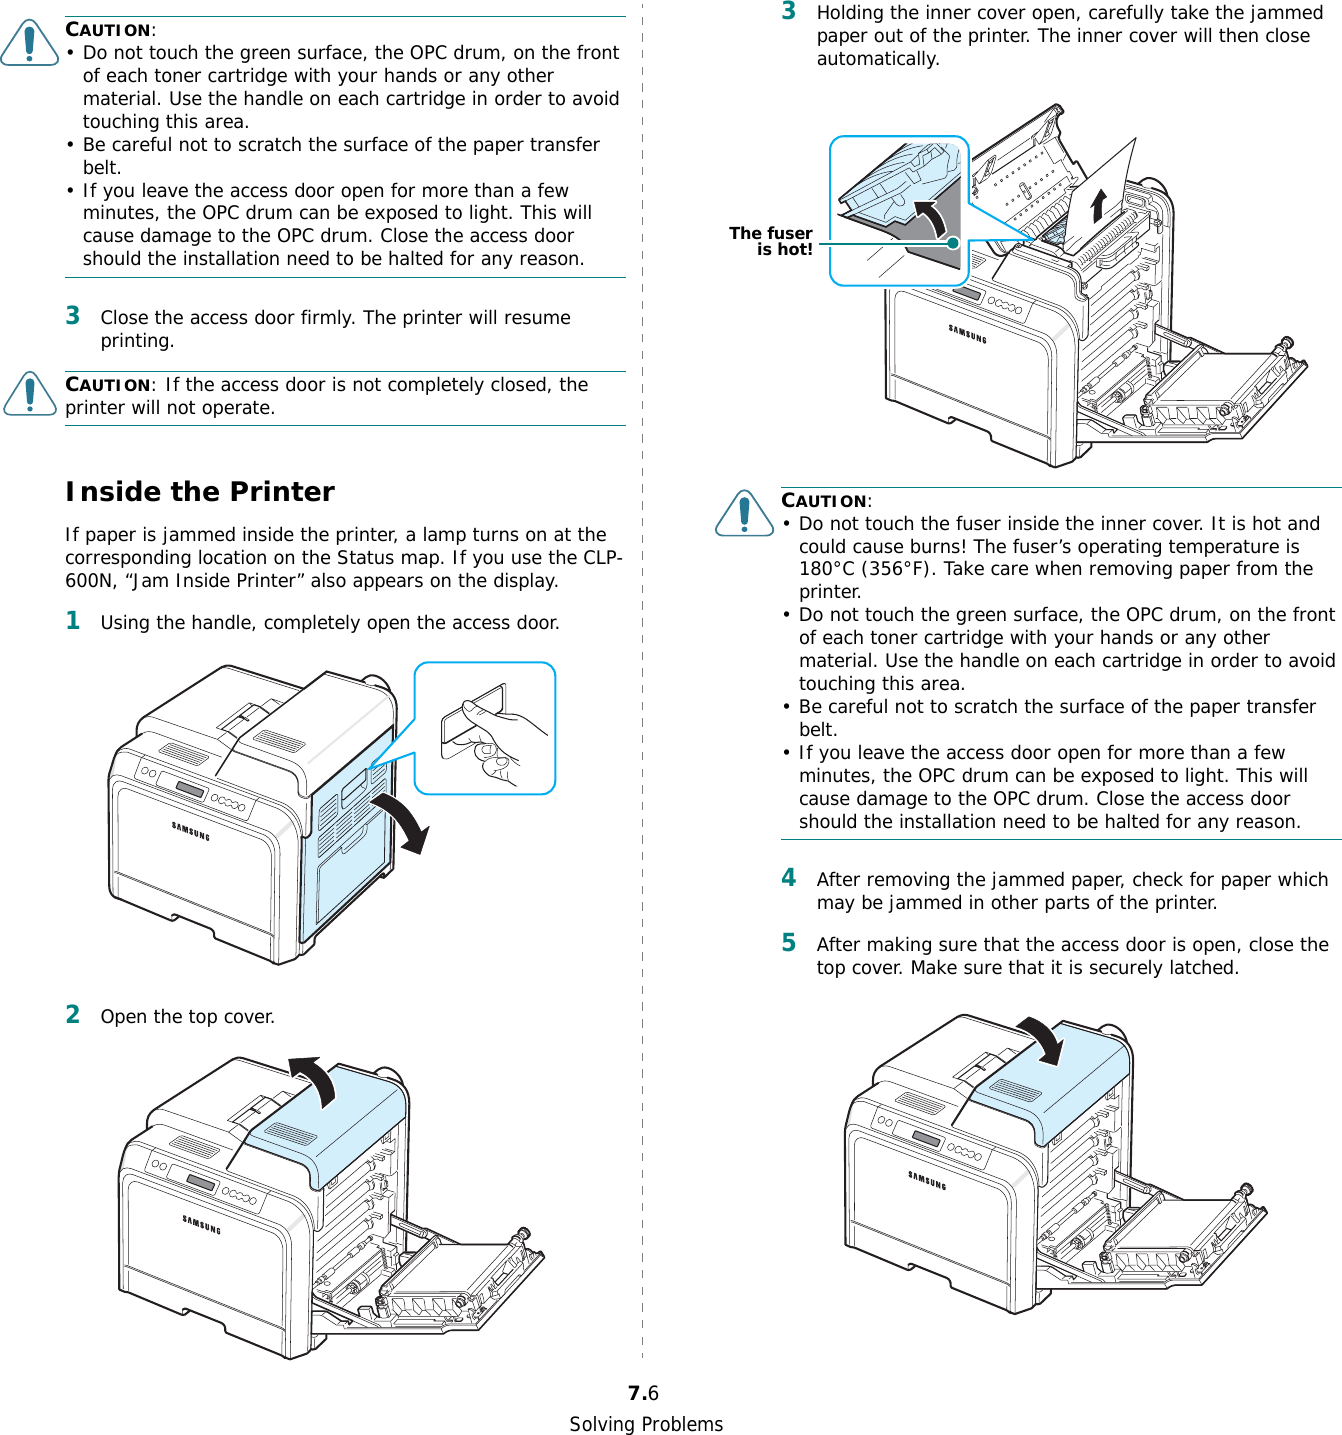

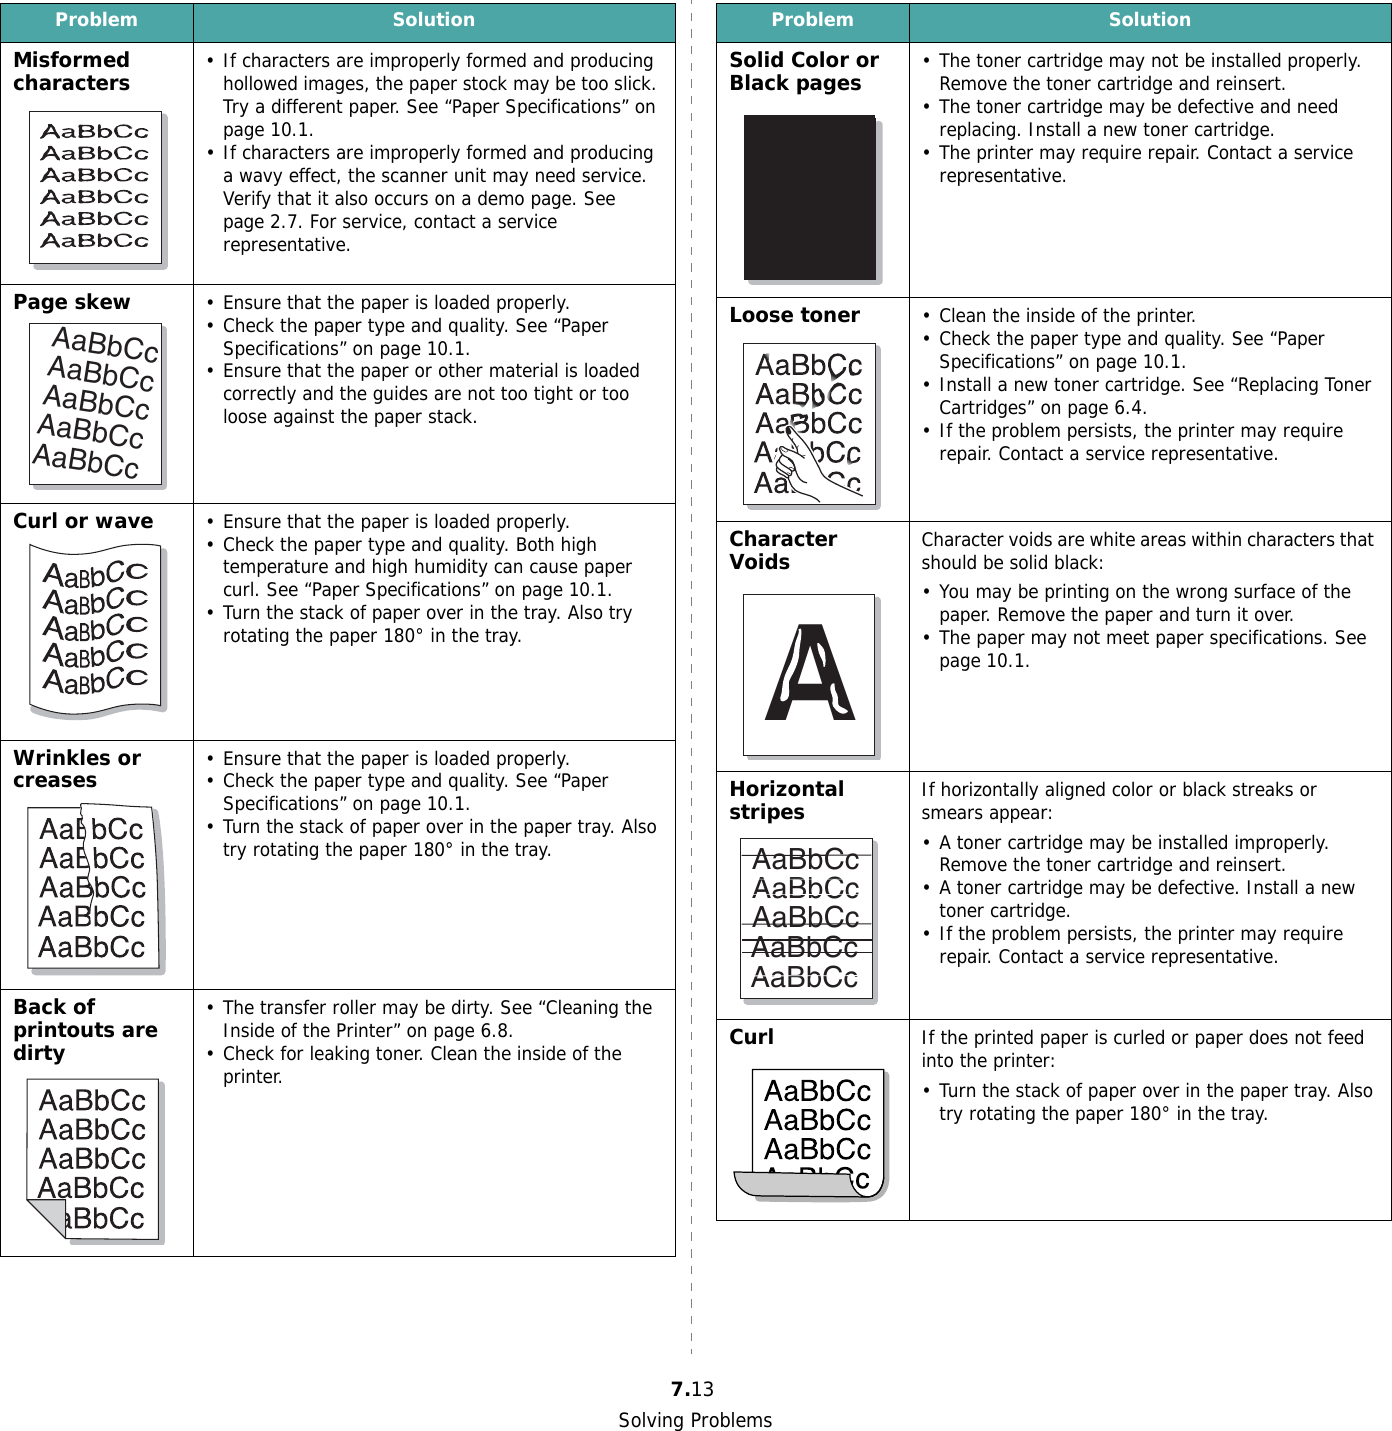
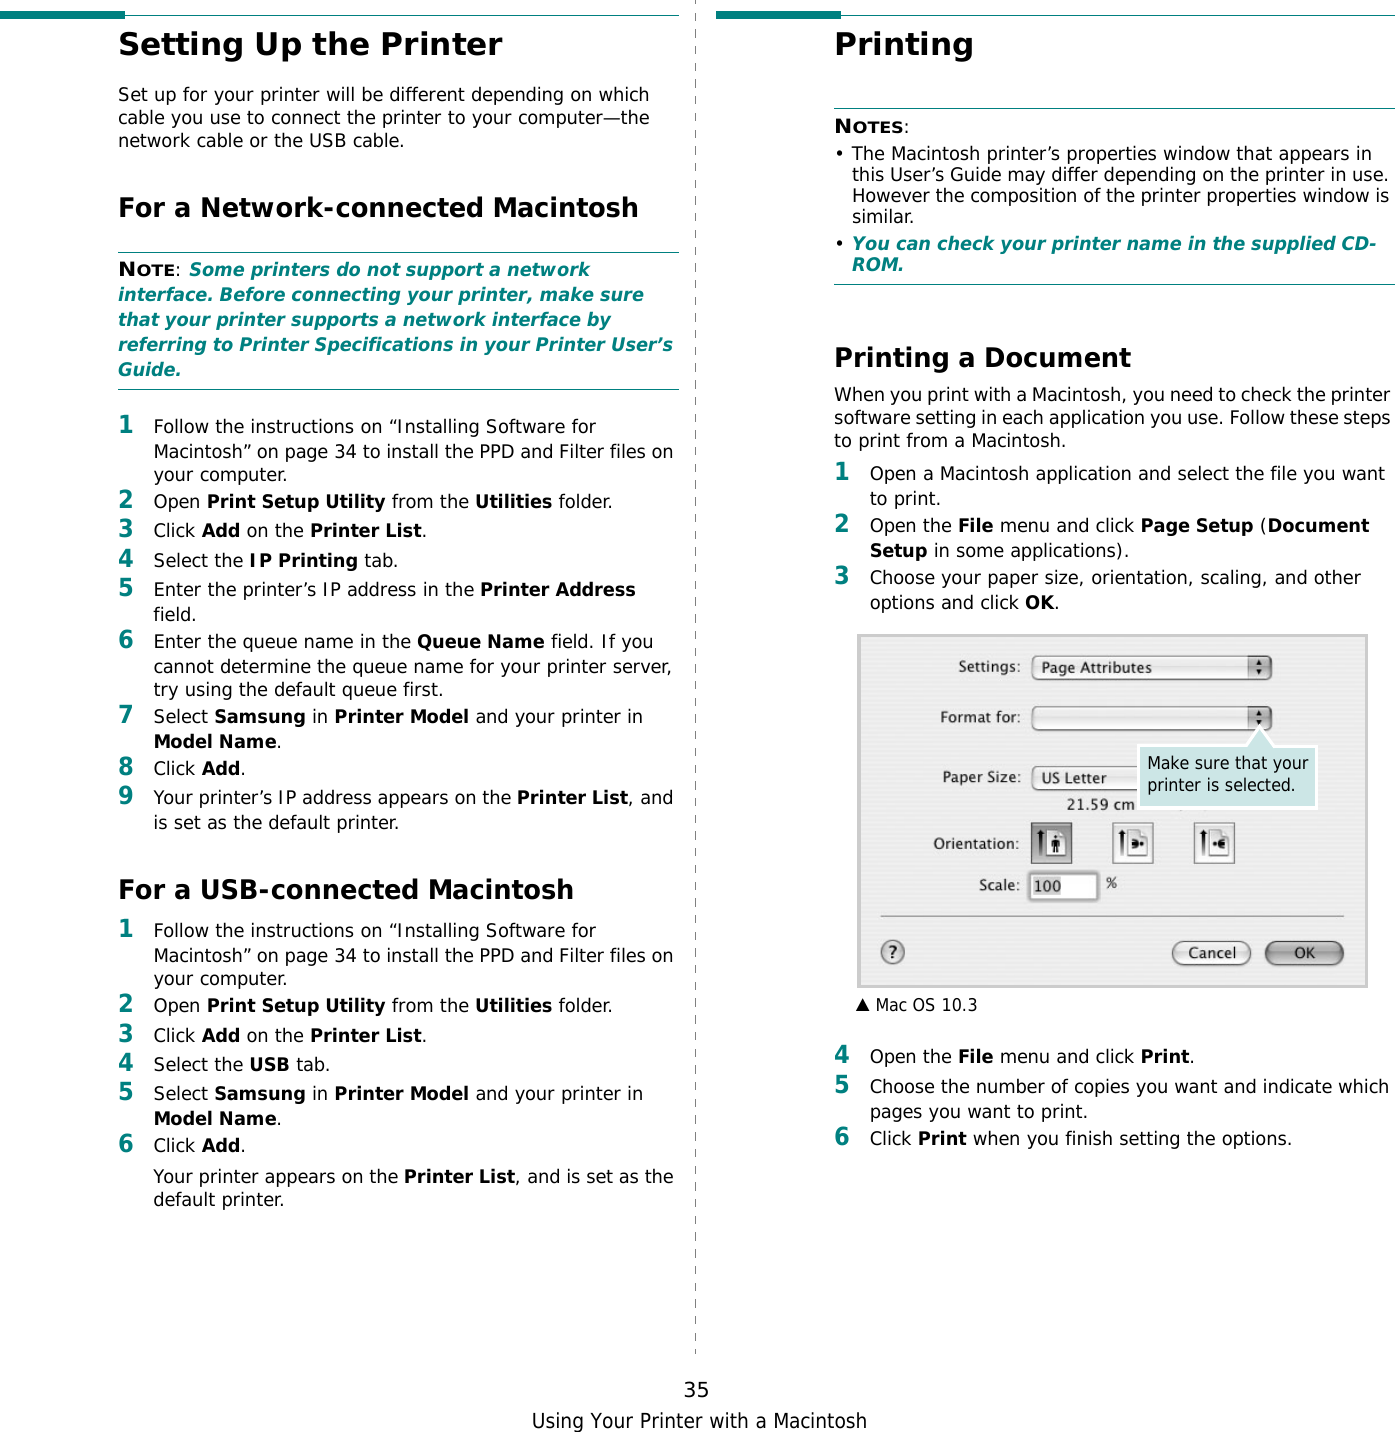
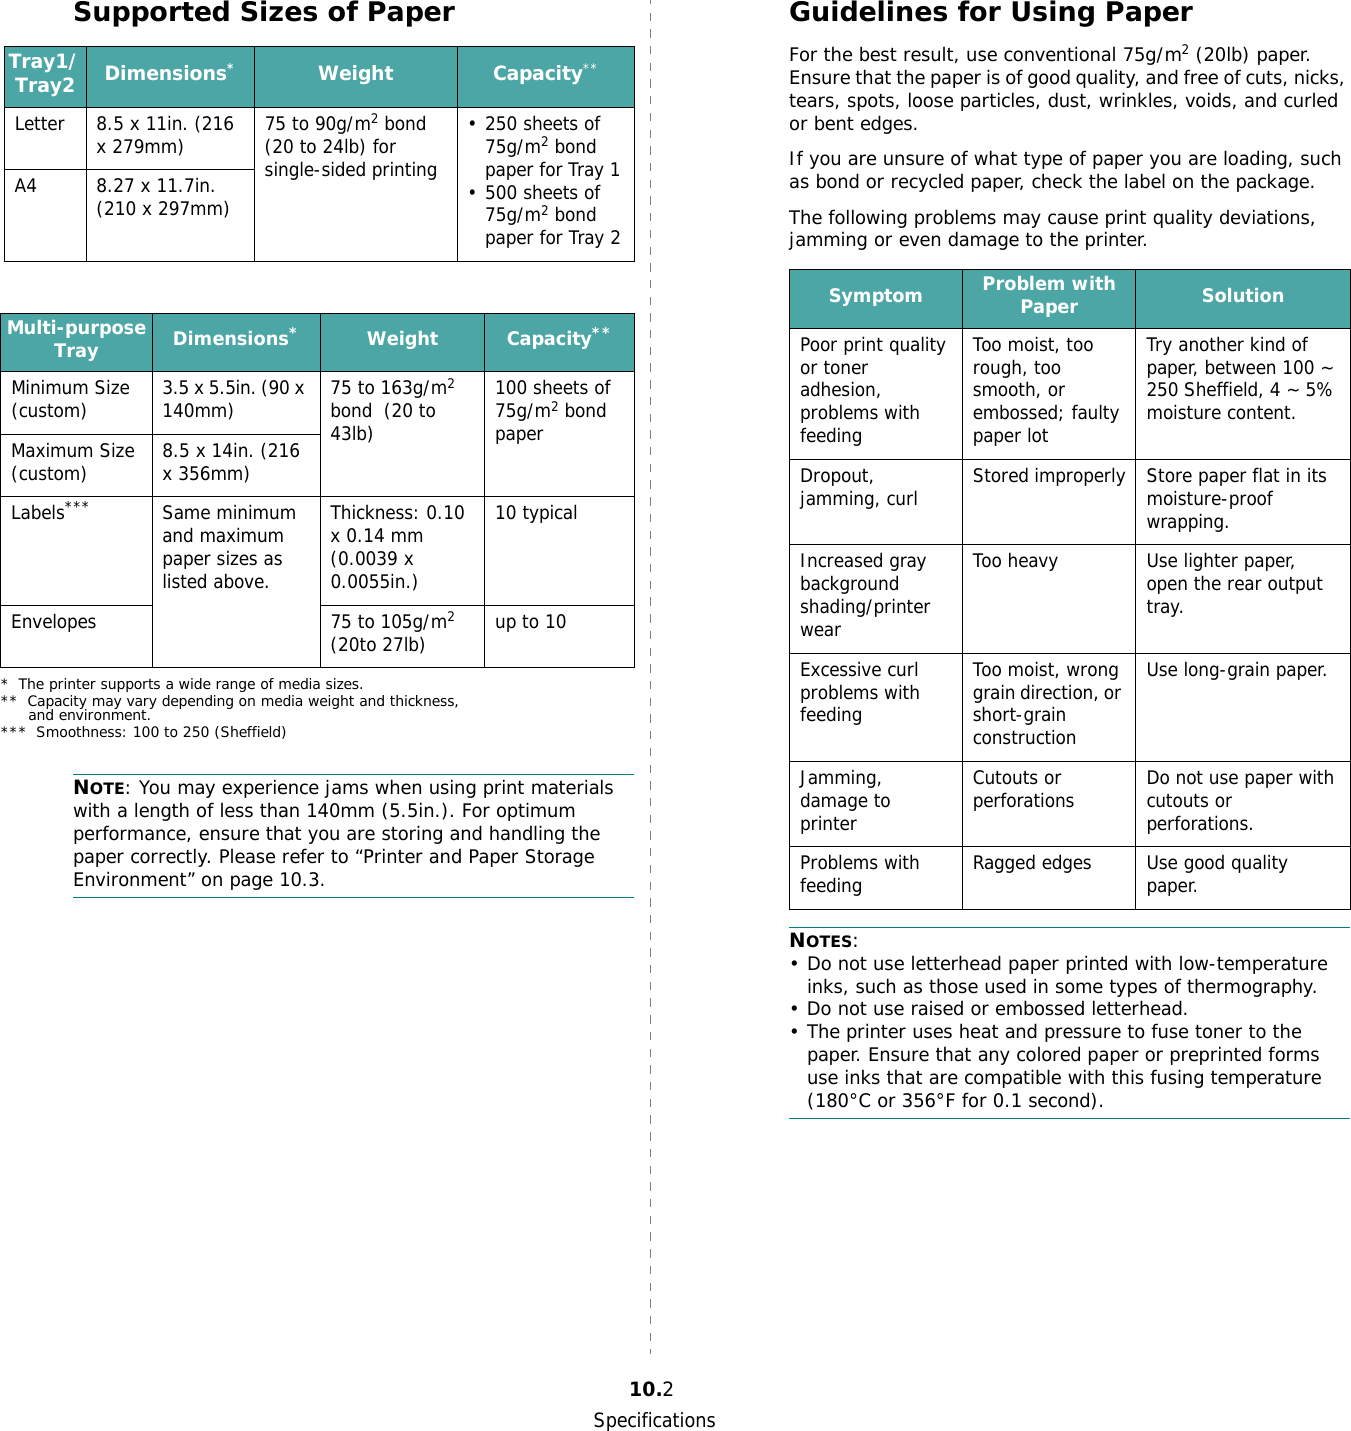
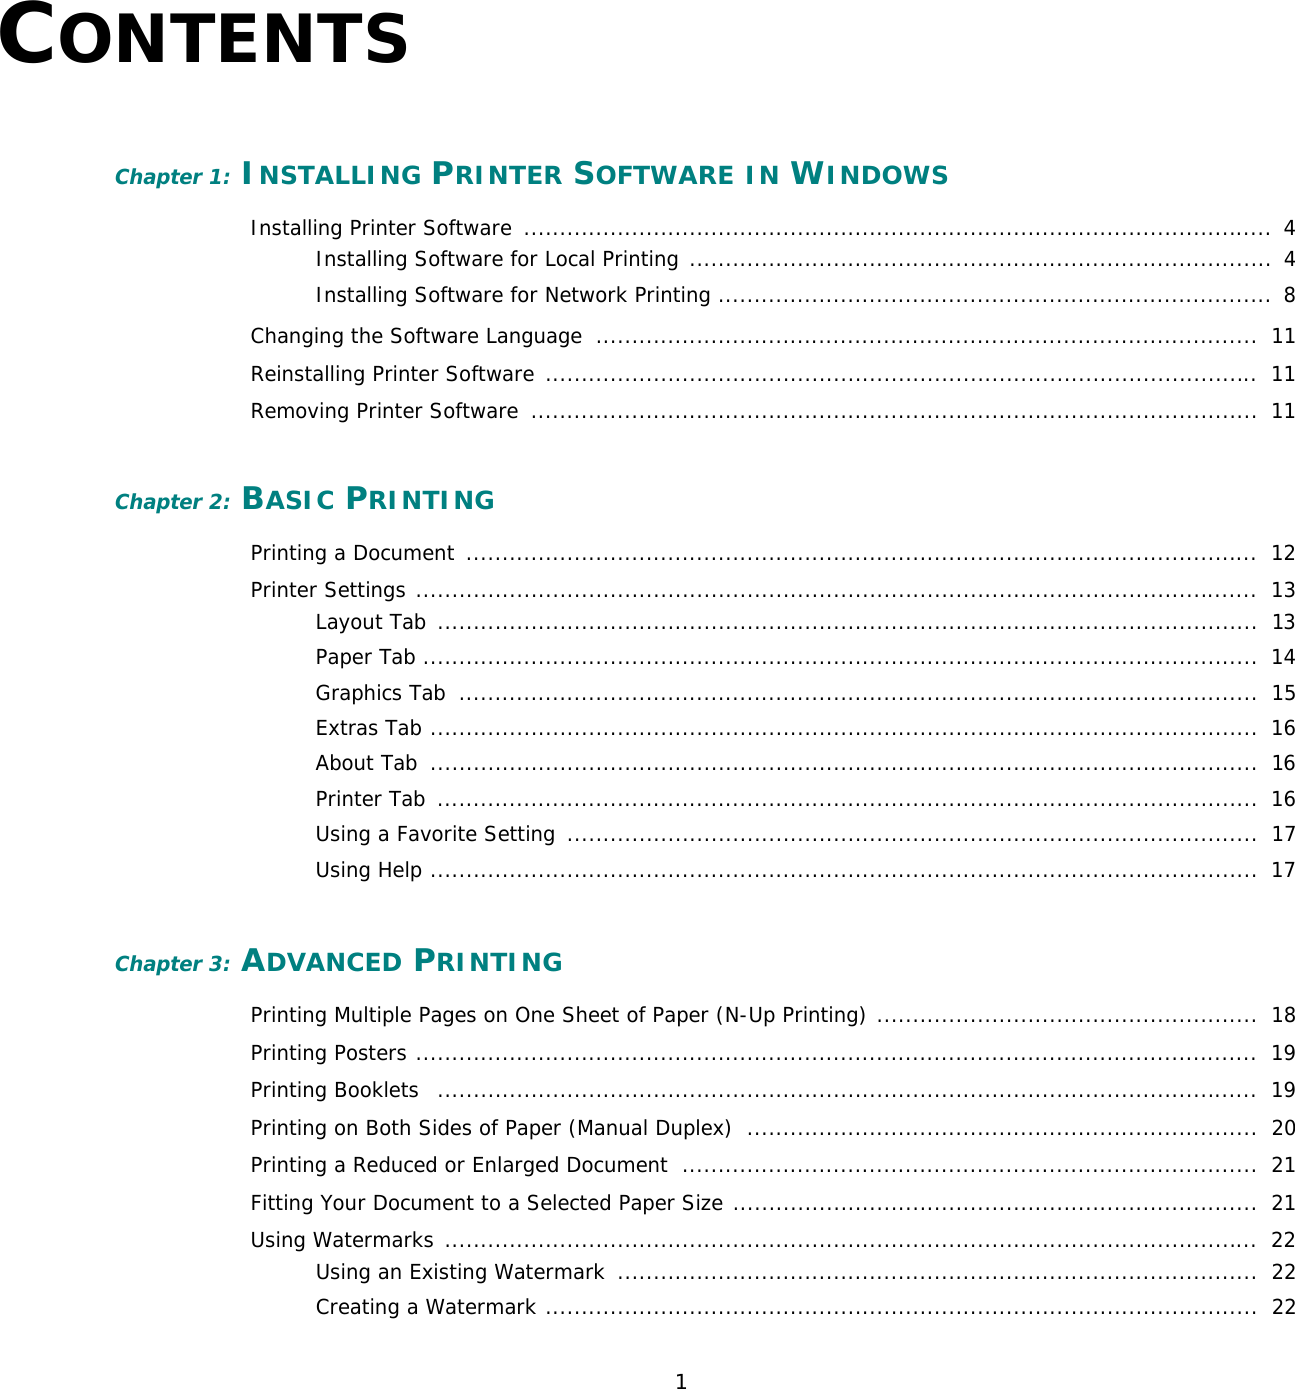
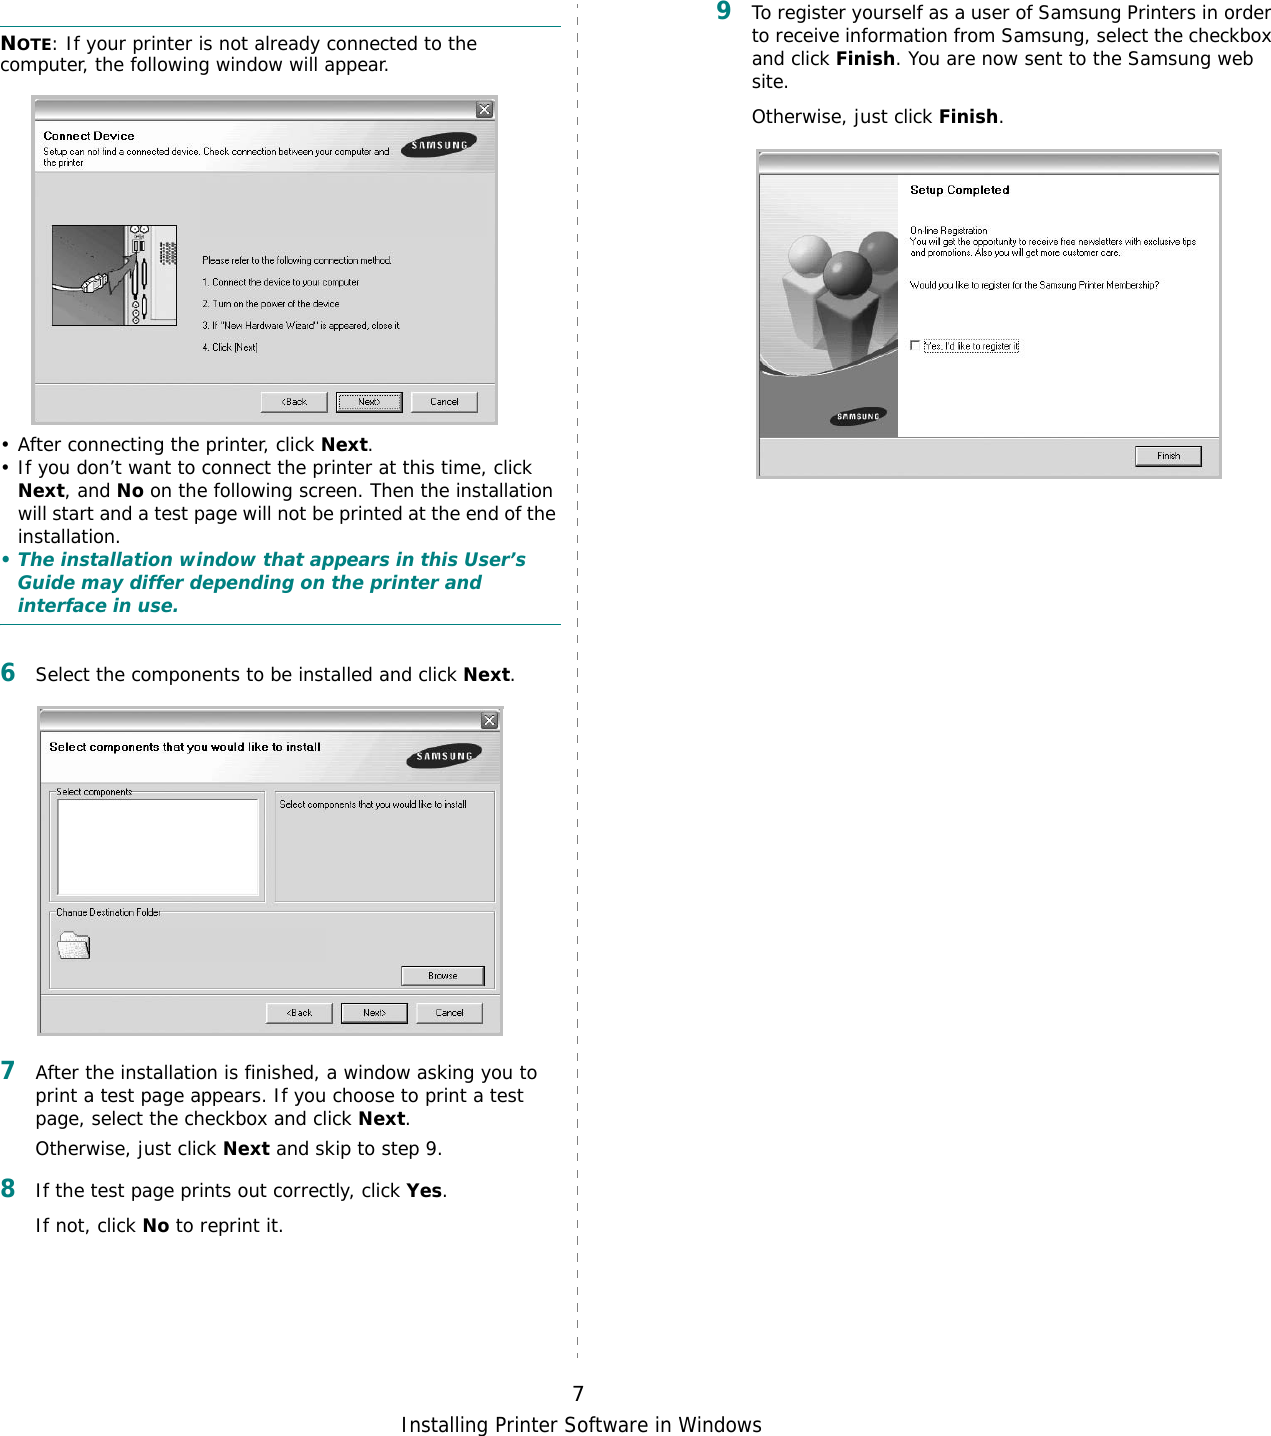
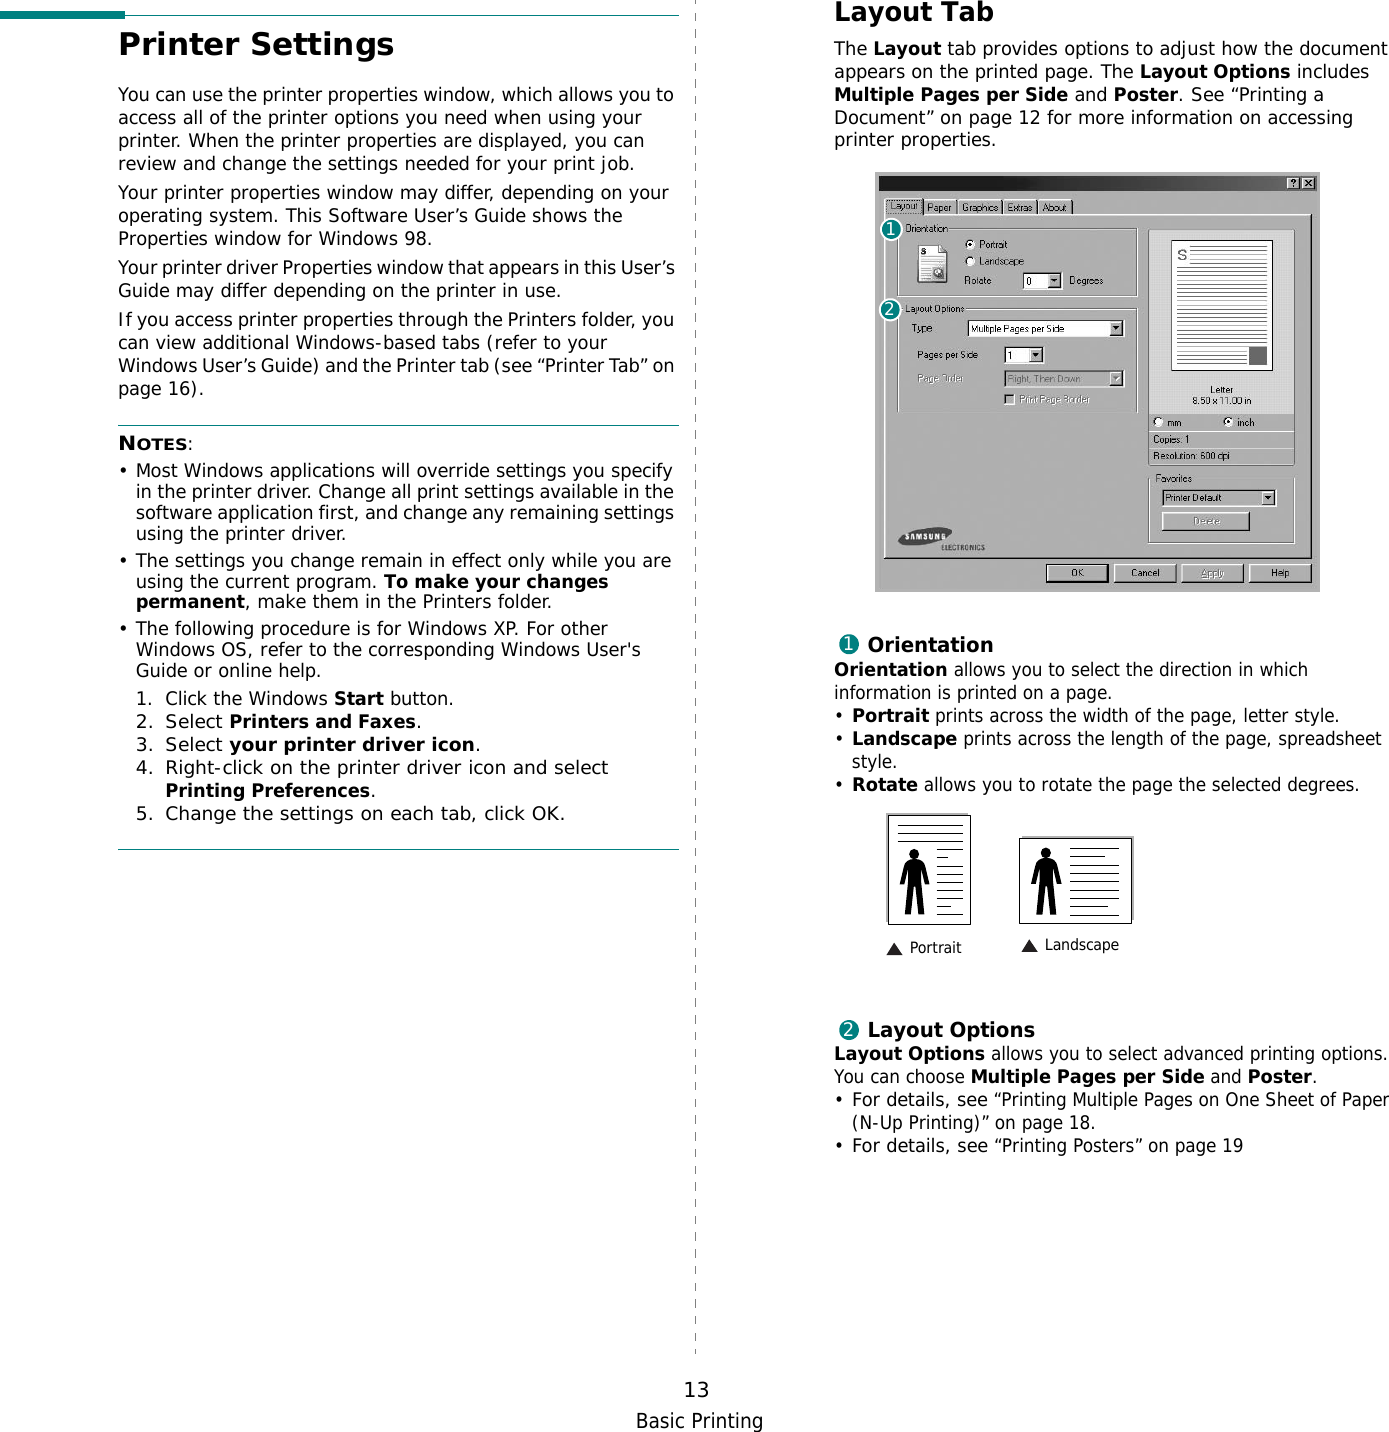
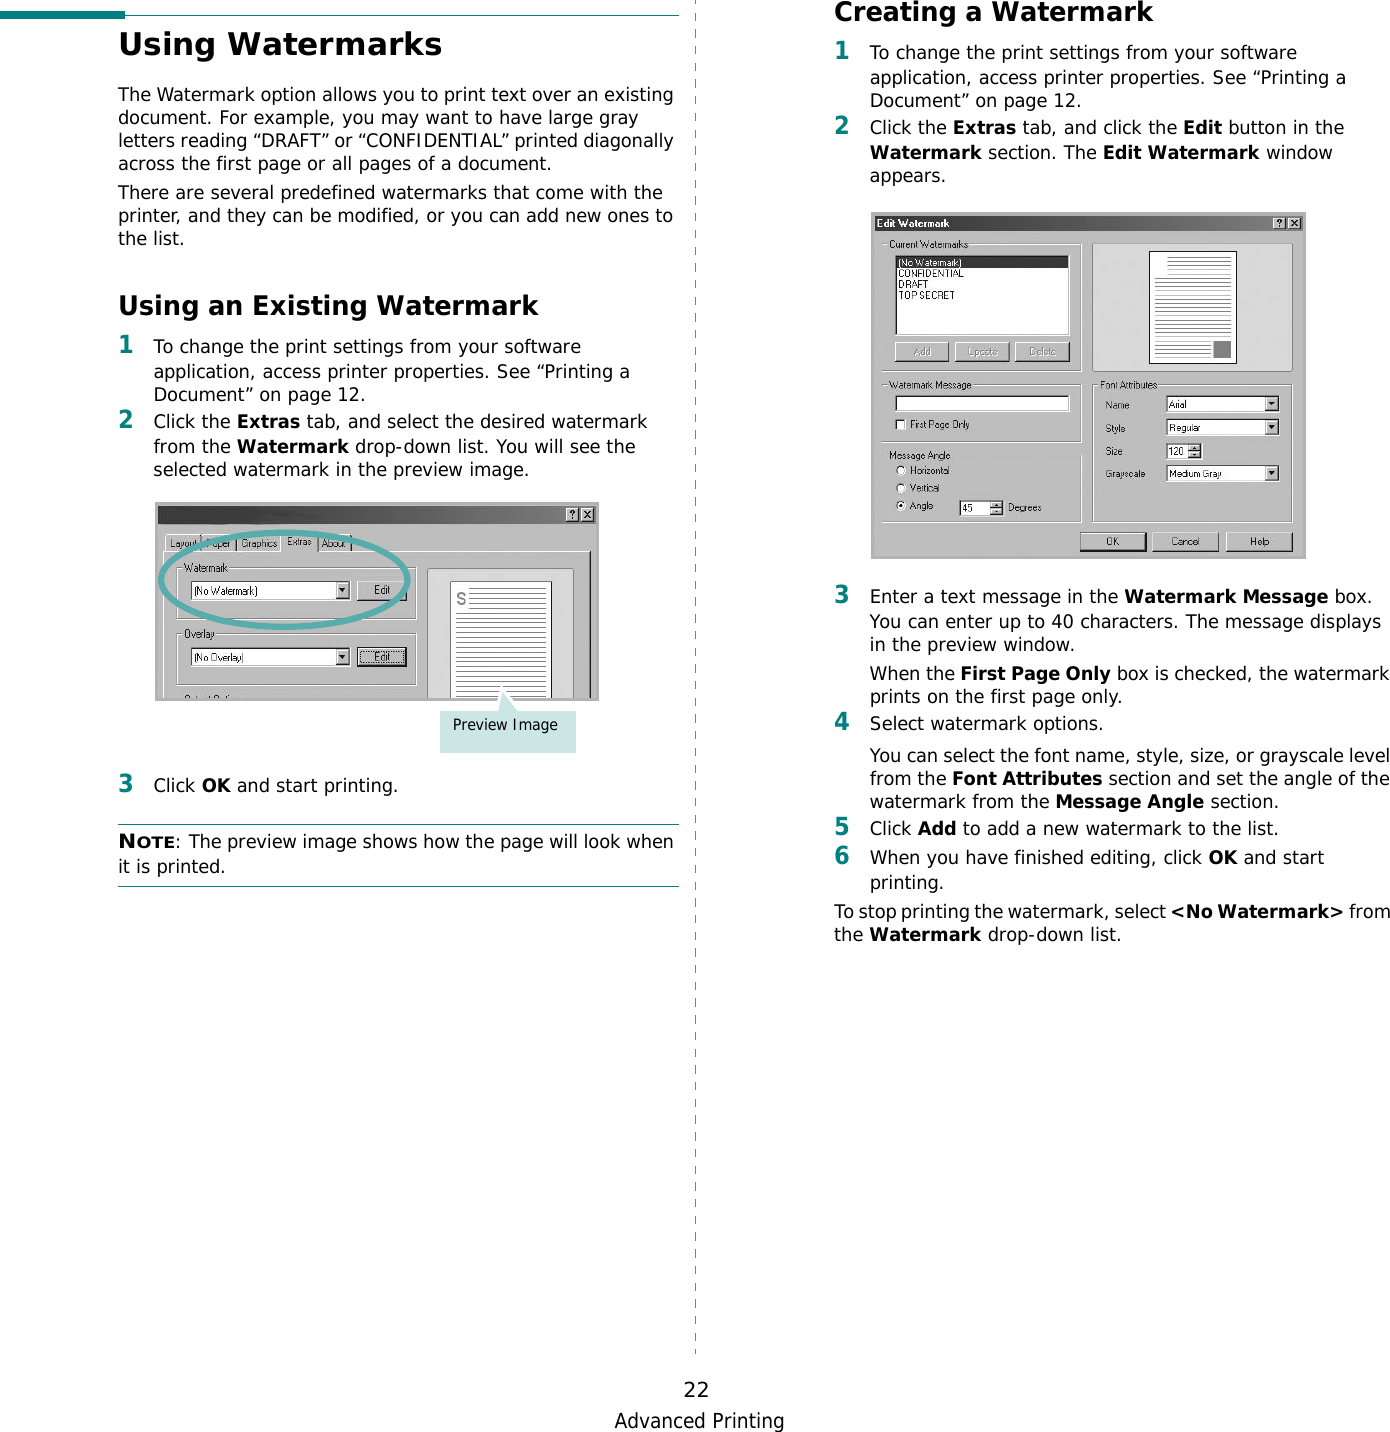
![Solving Problems7.14Understanding Display MessagesMessages appear on the SmartPanel program window or the control panel display (CLP-600N only) to indicate the printer’s status or errors. Refer to the tables below to understand the messages’ meanings and correct the problem if necessary. Messages and their meanings are listed in alphabetical order.NOTE: When you call for service, it is very helpful to tell the service representative the display message.Message Status Do this...ACR Calibration During auto color registration, a system error occurs so that the registration fails or does not run.Contact a service representative.ADC NotConfirm Error A problem has occurred in the ADC in the printer.Contact a service representative.Adjust Photo LED During auto color registration, the printer does not recognize the photo LED in the paper transfer belt assembly.Contact a service representative.Cover Open The top cover or access door is open. Close the top cover or access door firmly.[Color] Toner Empty The corresponding toner cartridge in your printer is empty and the printer does not operate.Replace the corresponding toner cartridge with a new one. See page 6.4.Engine FuserLow Heat Error The temperature in the fuser is abnormally low.Unplug the power cord and plug it in again. If the problem persists, call for service.Engine FuserOver Heat Error The temperature in the fuser is abnormally high.Unplug the power cord and plug it in again. If the problem persists, call for service.Engine LSU Error A problem has occurred in the LSU (Laser Scanning Unit) in the printer.Unplug the power cord and plug it in again. If the problem persists, call for service.Install [Color] Toner The indicated color toner cartridge is not installed in the printer.Install the corresponding color toner cartridge.InstallTransfer Belt The paper transfer belt is not installed in the printer.Install the paper transfer belt.Invalid Toner[Color] An invalid toner cartridge has been installed.Only install Samsung-approved toner cartridges, designed for your printer. If you have installed an approved toner cartridge and this error still occurs, contact an authorized service agent.InvalidTransfer Belt An invalid paper transfer belt has been installed.Only install Samsung-approved paper transfer belts, designed for your printer. If you have installed an approved paper transfer belt and this error still occurs, contact an authorized service agent.Jam0 In Tray1Jam0 In Tray2Jam0 In MP TrayA paper jam has occurred in or near the indicated tray.Remove the jammed paper from the corresponding tray, referring to page 7.4.JamIn Exit Area A paper jam has occurred in the paper exit area.Remove the jammed paper from the printer, referring to page 7.7.Jam Inside Printer A paper jam has occurred inside the printer.Open the access door and remove the jammed paper from the printer, referring to page 7.6.Load[Size] In Tray1Load[Size] In Tray2Load[Size] In MPThe paper size specified in the printer properties does not match the paper you are loading.Load the correct paper in the tray.Low Density The amount of the toner which is spread on the paper transfer belt for adjusting auto color registration is very small, so that the printer does not recognize the toner during auto color registration.Replace the toner cartridge(s) with a new one. See page 6.4. If you still have the same problem, contact a service representative.Message Status Do this...](https://usermanual.wiki/Samsung-Electronics-Co/DC60CPS.Users-Manual-2/User-Guide-577475-Page-9.png)
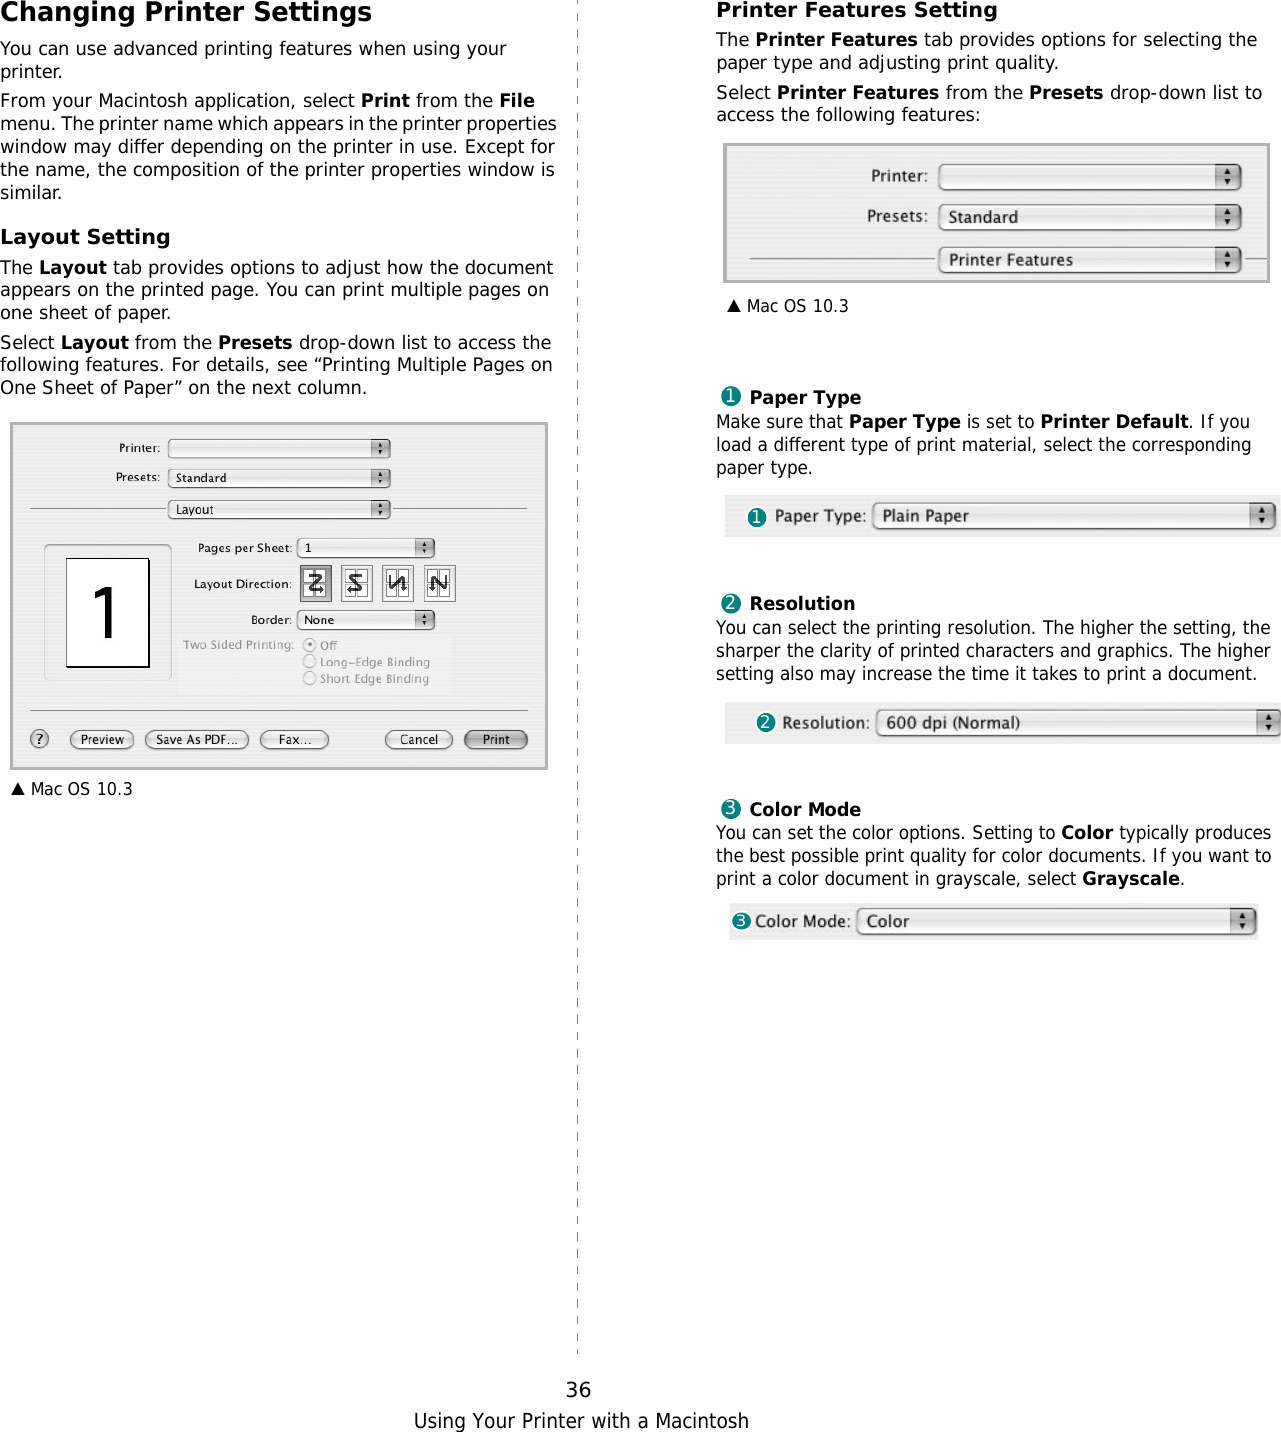
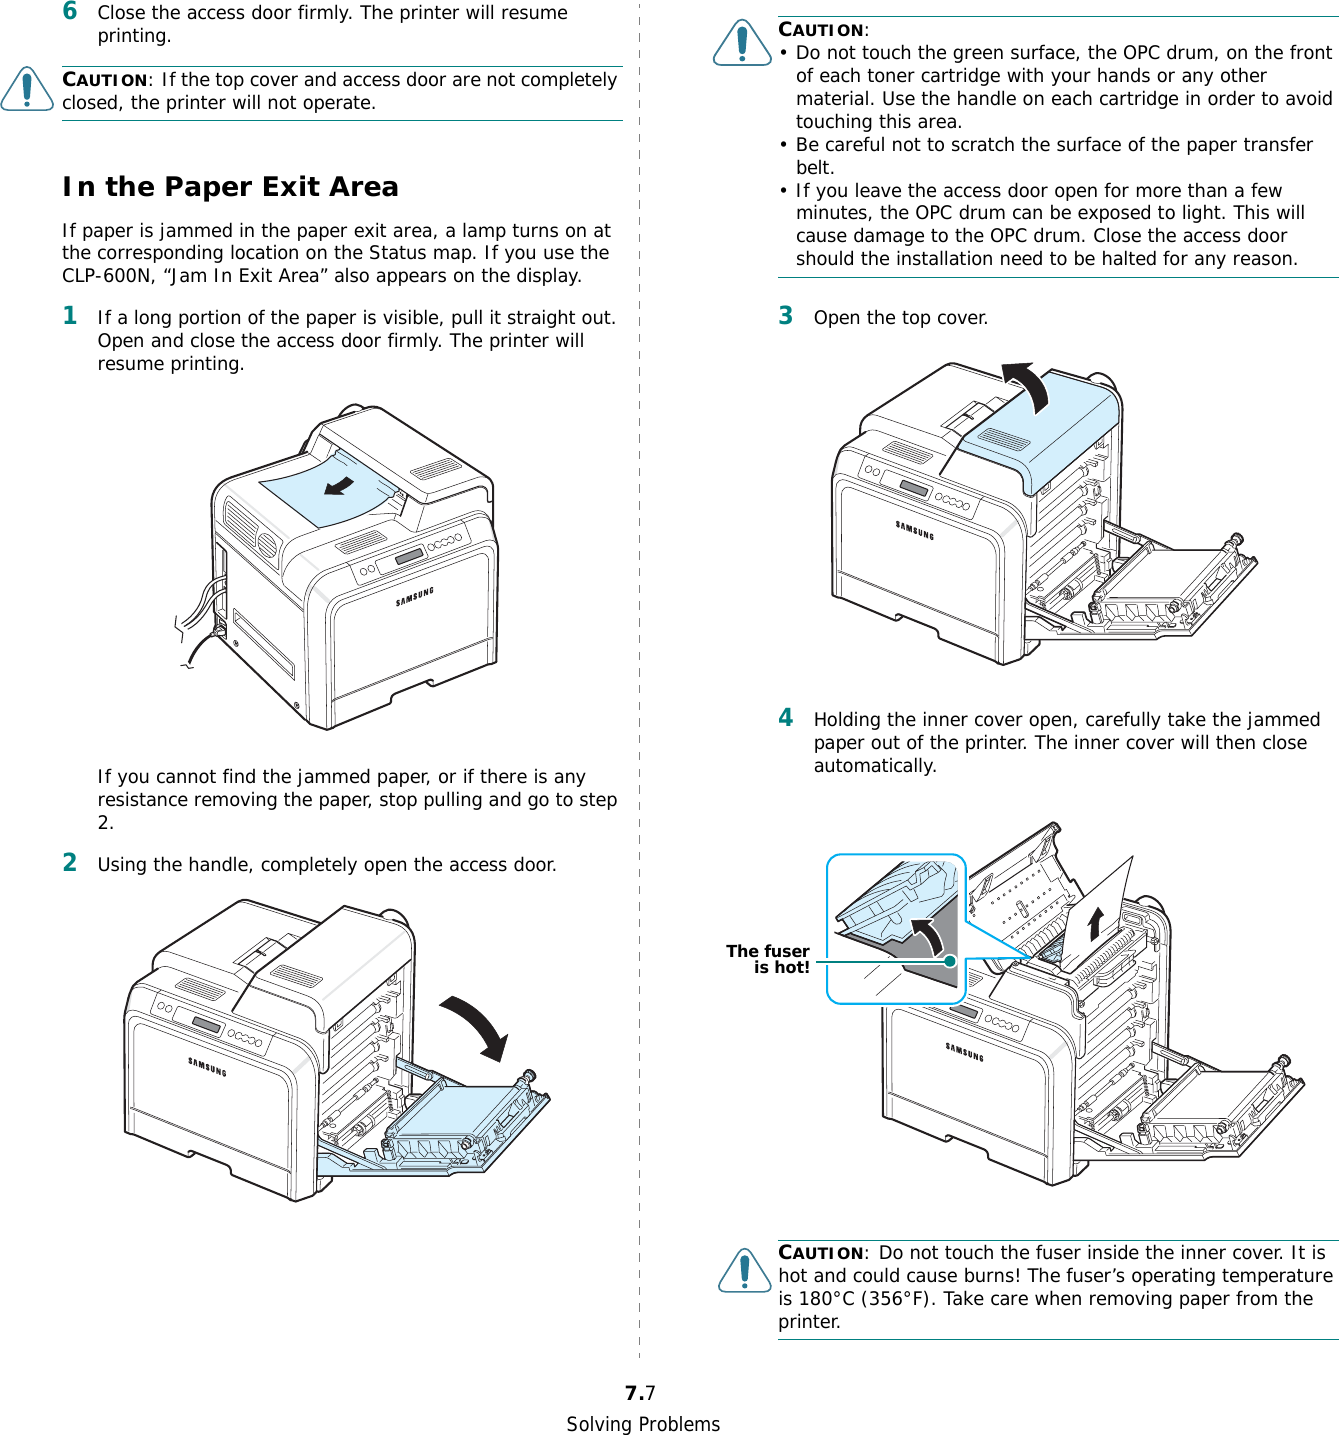
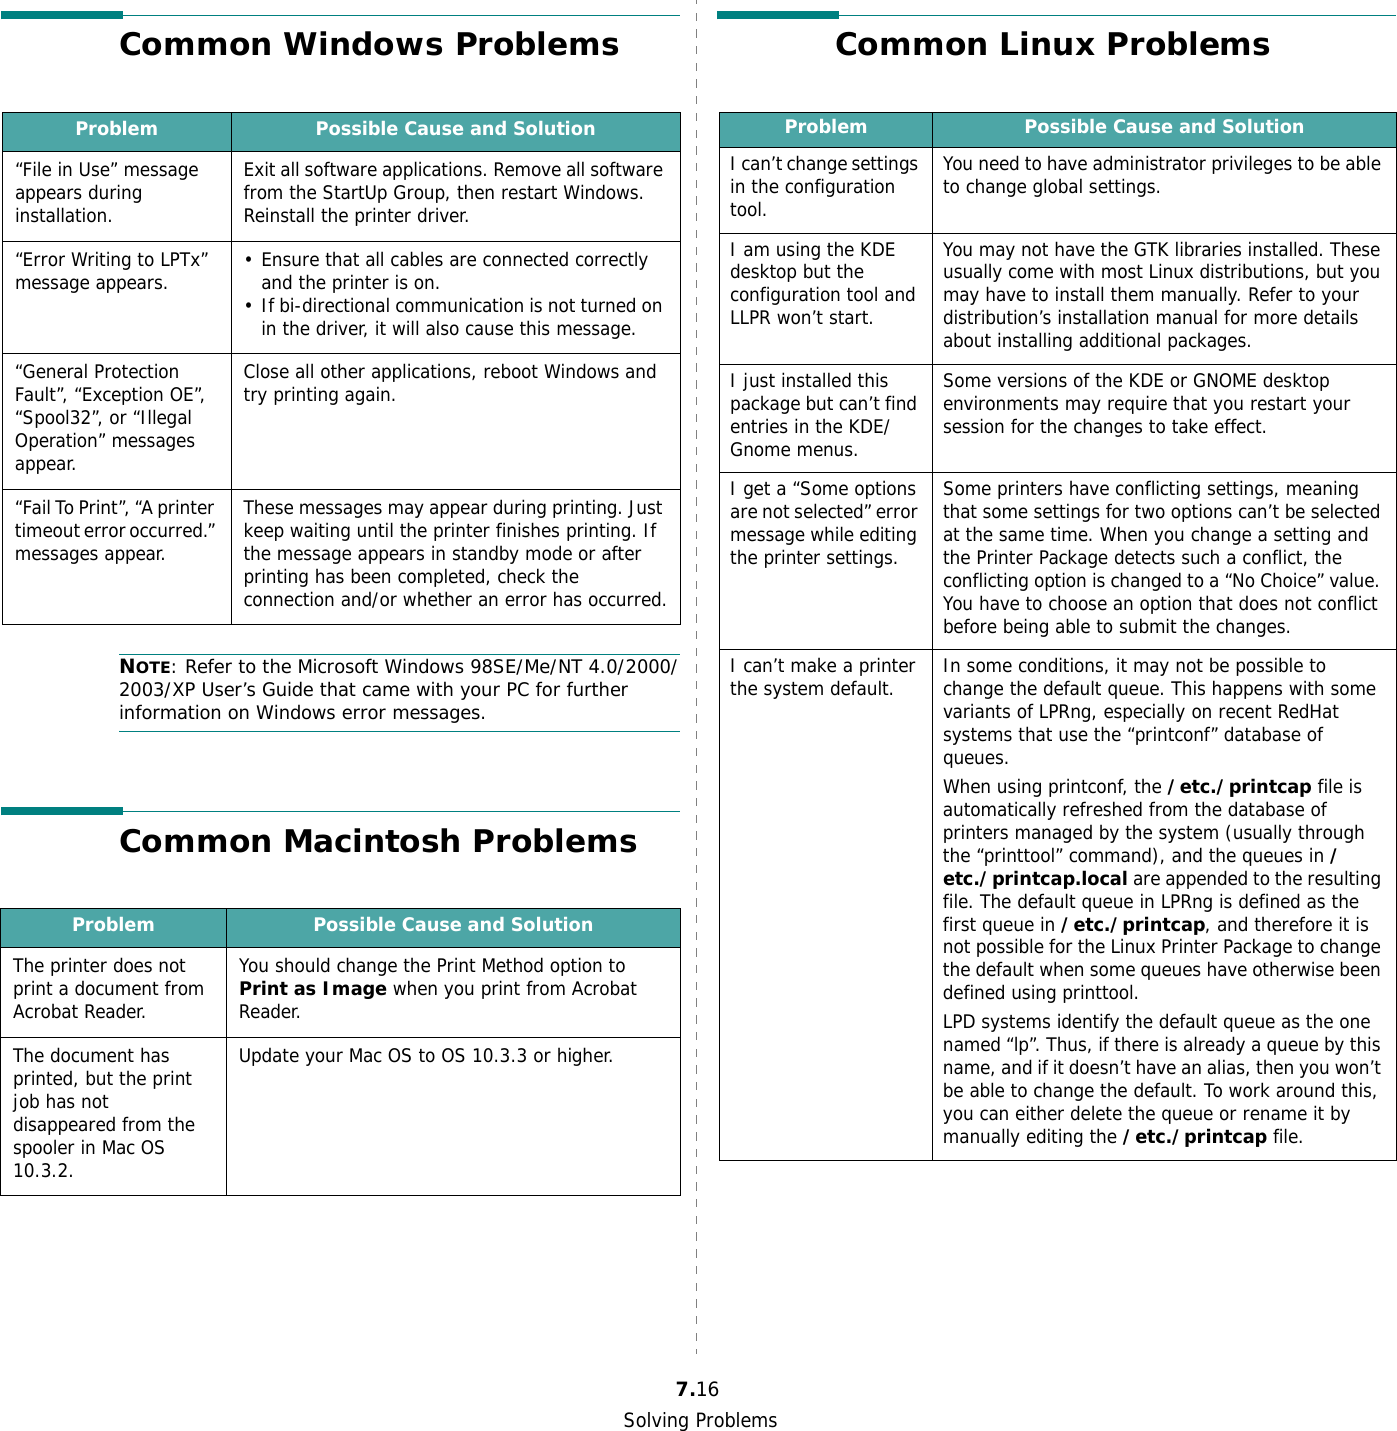
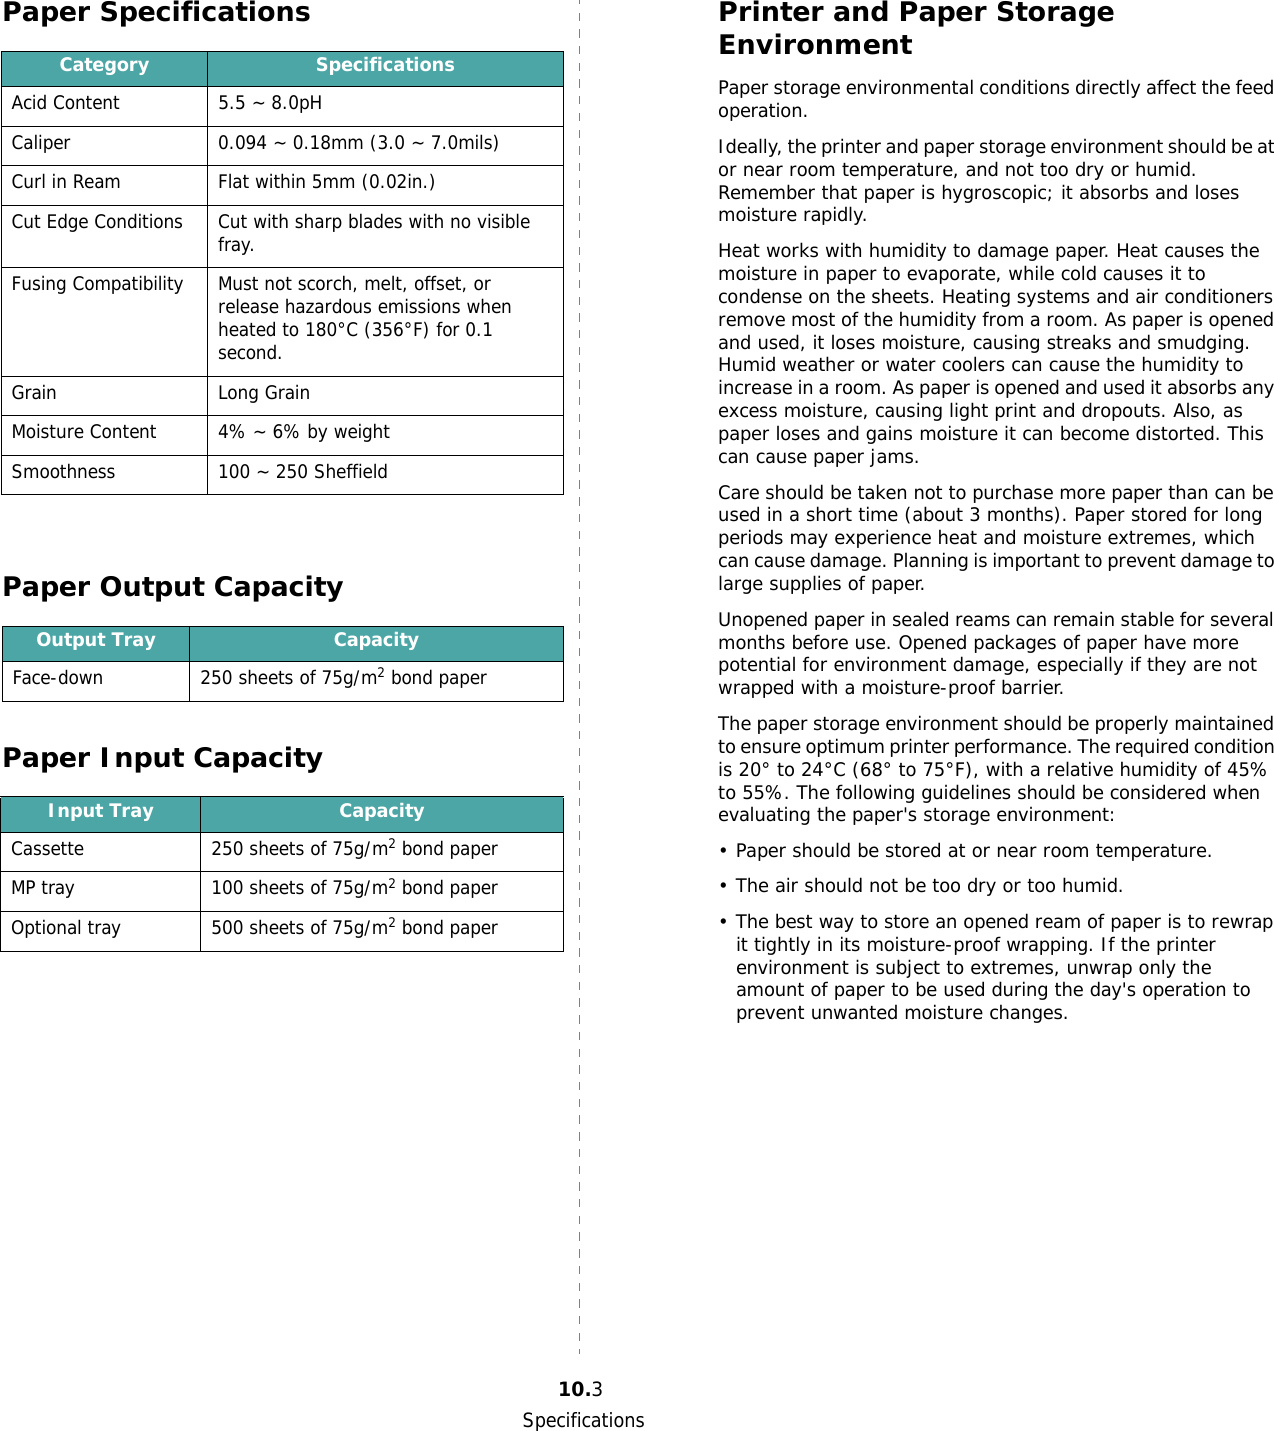
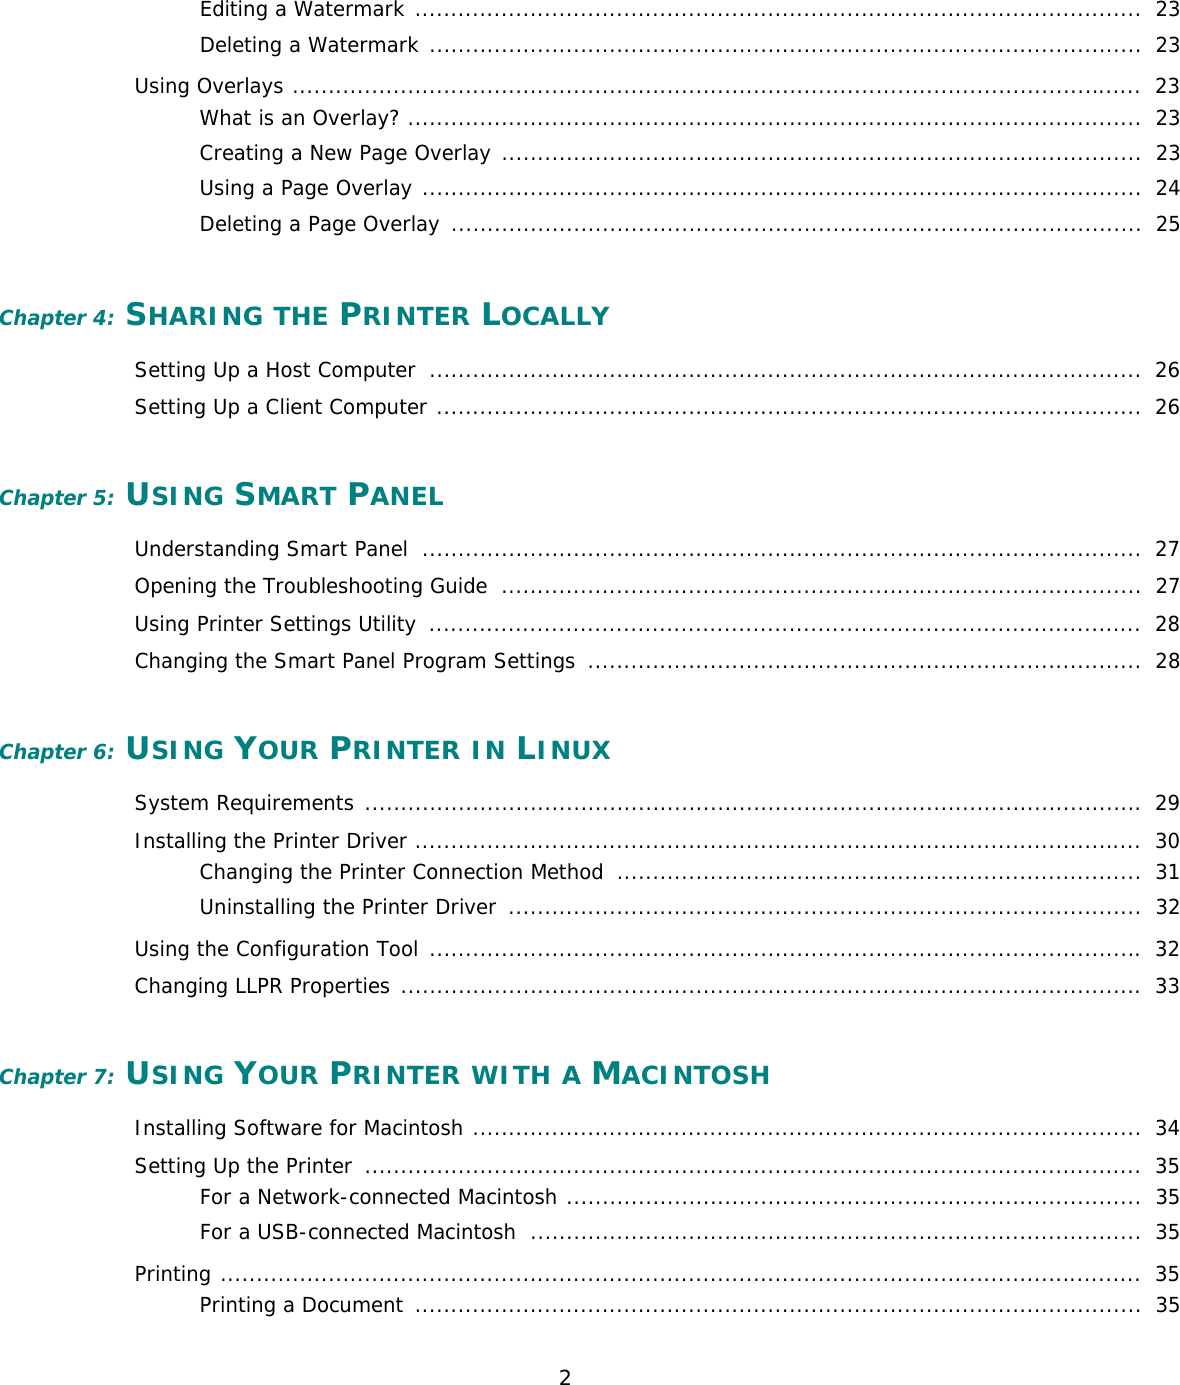
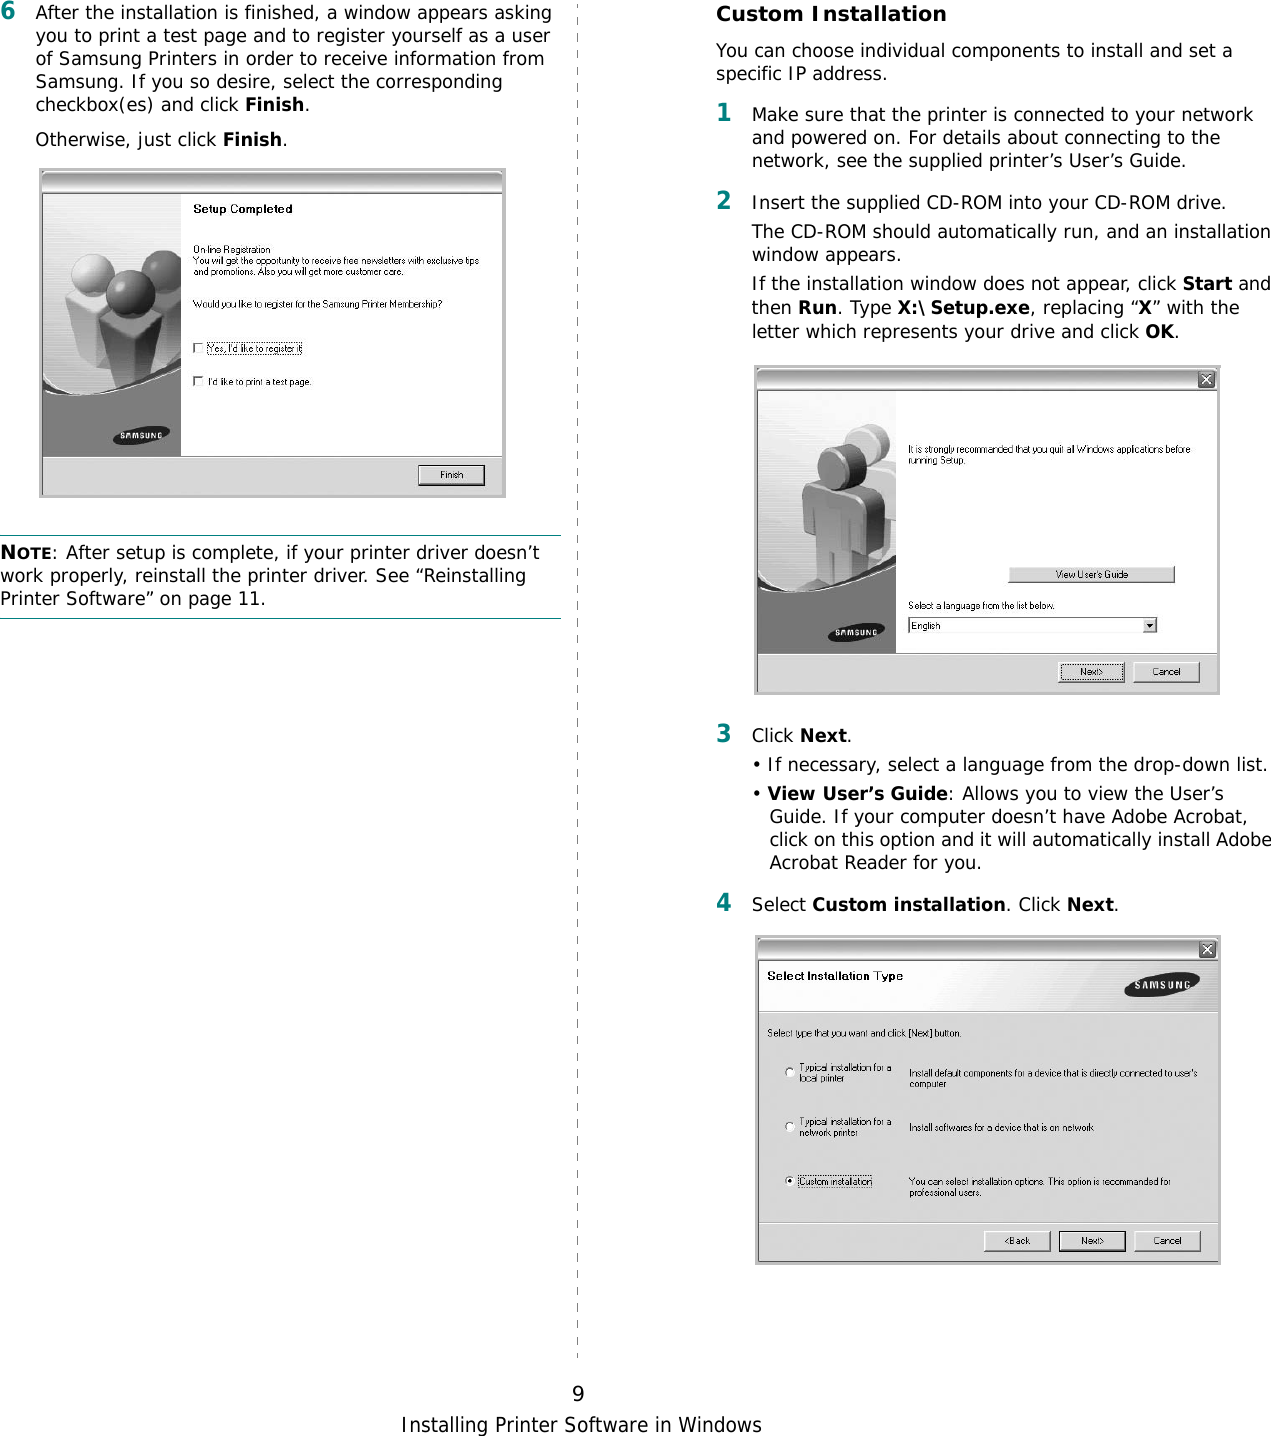
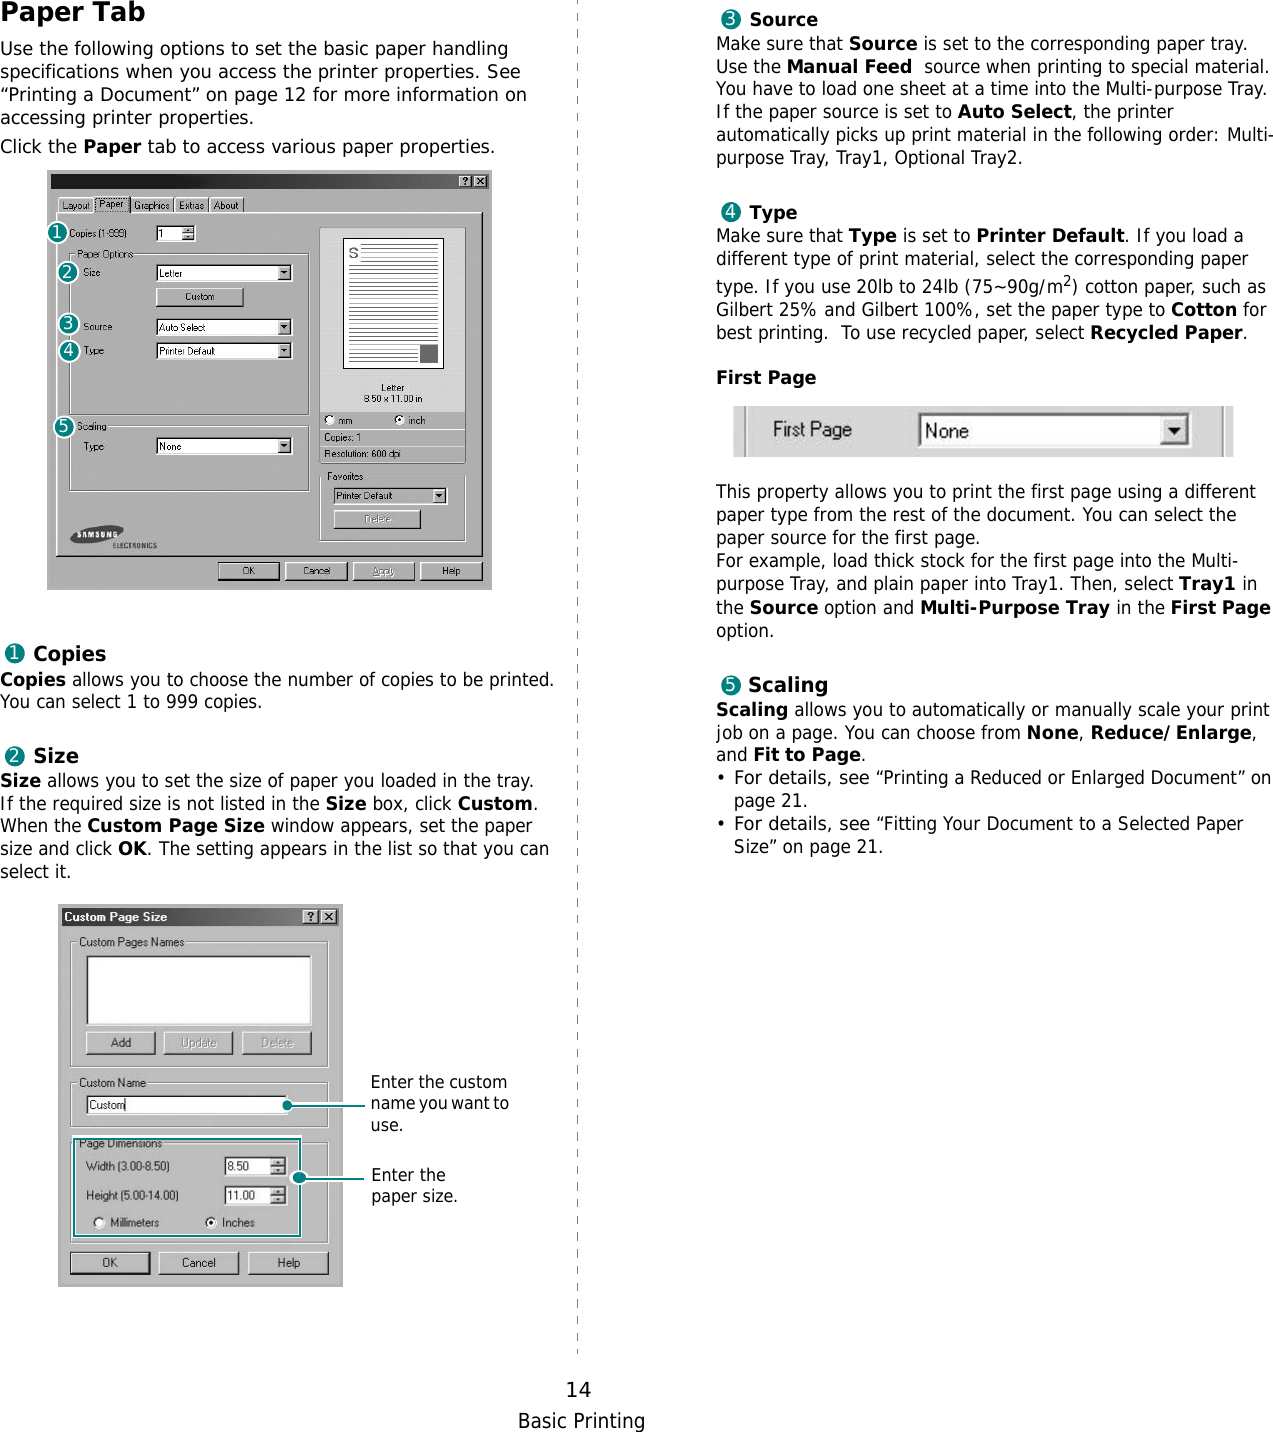
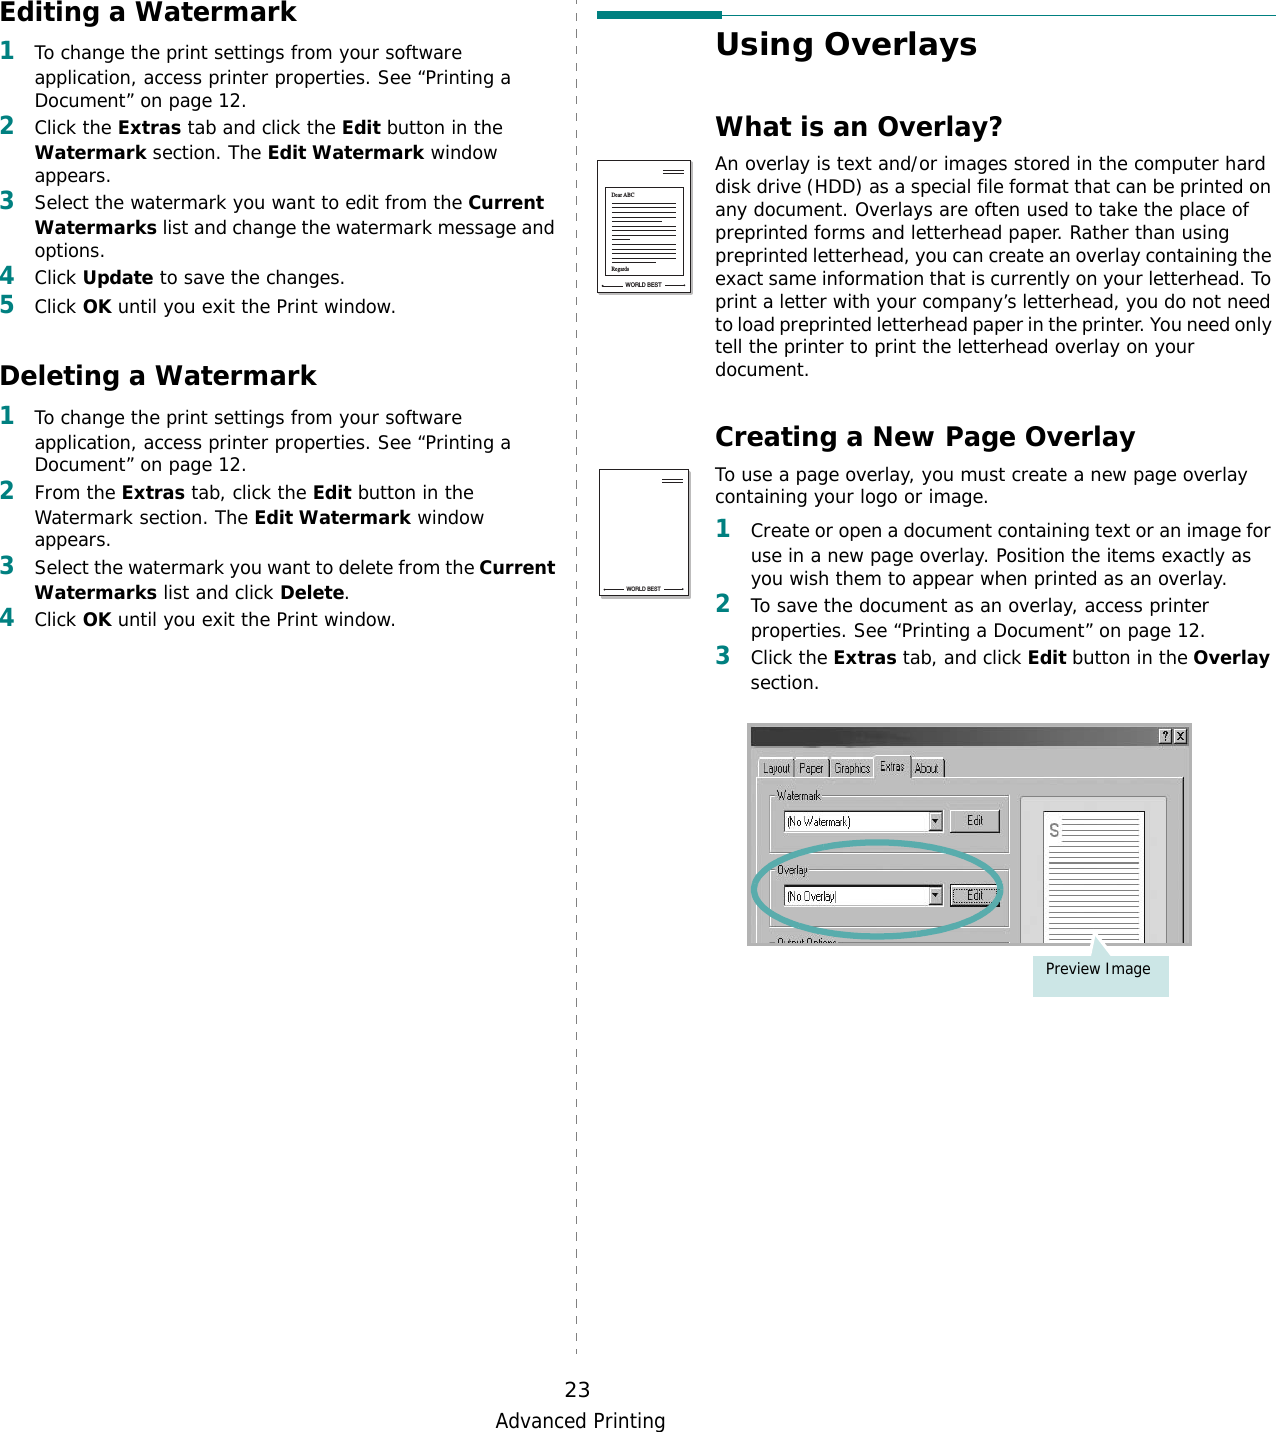
![Solving Problems7.15Main Motor Error A problem has occurred in the development motor of the printer.Unplug the power cord and plug it in again. If the problem persists, call for service.Memory Overflow The printer does not have enough memory to print the current job.An error has occurred in the firmware program of the printer.The job automatically clears and the printer returns to Standby Mode.Paper Empty[Size] In Tray1Paper Empty[Size] In Tray2Paper Empty[Size] In MpPaper Empty[Size] In ManualThe paper tray has run out of paper. Load paper in the paper tray. See page 4.2.Press Continue Button The printer is waiting for the user’s action before printing from the Multi-purpose Tray using the manual feed mode.Load a sheet of print material and press the On Line/Continue button. You need to press the button for each page.Ready [Color]Low Toner The corresponding toner cartridge in your printer is low on toner.Redistribute the toner in the corresponding toner cartridge, referring to page 6.2.ReadyIP Conflict The IP address of the printer conflicts with other devices on the network.Contact your network administrator and choose an address within your subnet which will not conflict with any other devices.Replace [Color]Toner The corresponding toner cartridge in your printer is nearly empty. However, the printer continues printing, even though print quality is not optimal.If necessary, replace the corresponding toner cartridge with a new one. See page 6.4.Replace Fuser The life span of the fuser unit has expired.Replace the fuser unit with a new one. See page 6.7.Message Status Do this...Replace Fuser Soon The life span of the fuser unit will expire soon.When “Replace Fuser” appears on the display, replace the fuser unit.Replace MPPick-roller The life span of the MP pickup roller has expired.Contact a service representative.ReplaceTransfer Belt The life span of the paper transfer belt has expired.Replace the paper transfer belt with a new one. See page 6.5.Replace Transfer Belt Soon The life span of the paper transfer belt will expire soon.When “Replace Transfer Belt” appears on the display, replace the paper transfer belt.Replace Tray1Pick-roller The life span of the Tray1 pickup roller has expired.Contact a service representative.Replace Tray2Pick-roller The life span of the Tray2 pickup roller has expired.Contact a service representative.Tray2 Error The optional tray 2 is not properly installed or connected to the printer.After turn the printer off and then back on, reinstall the optional tray 2. If the message persists, contact a service representative.Tray 2 Jam Cover Open The optional tray 2 jam cover is open. Close the tray 2 cover firmly.Message Status Do this...](https://usermanual.wiki/Samsung-Electronics-Co/DC60CPS.Users-Manual-2/User-Guide-577475-Page-10.png)


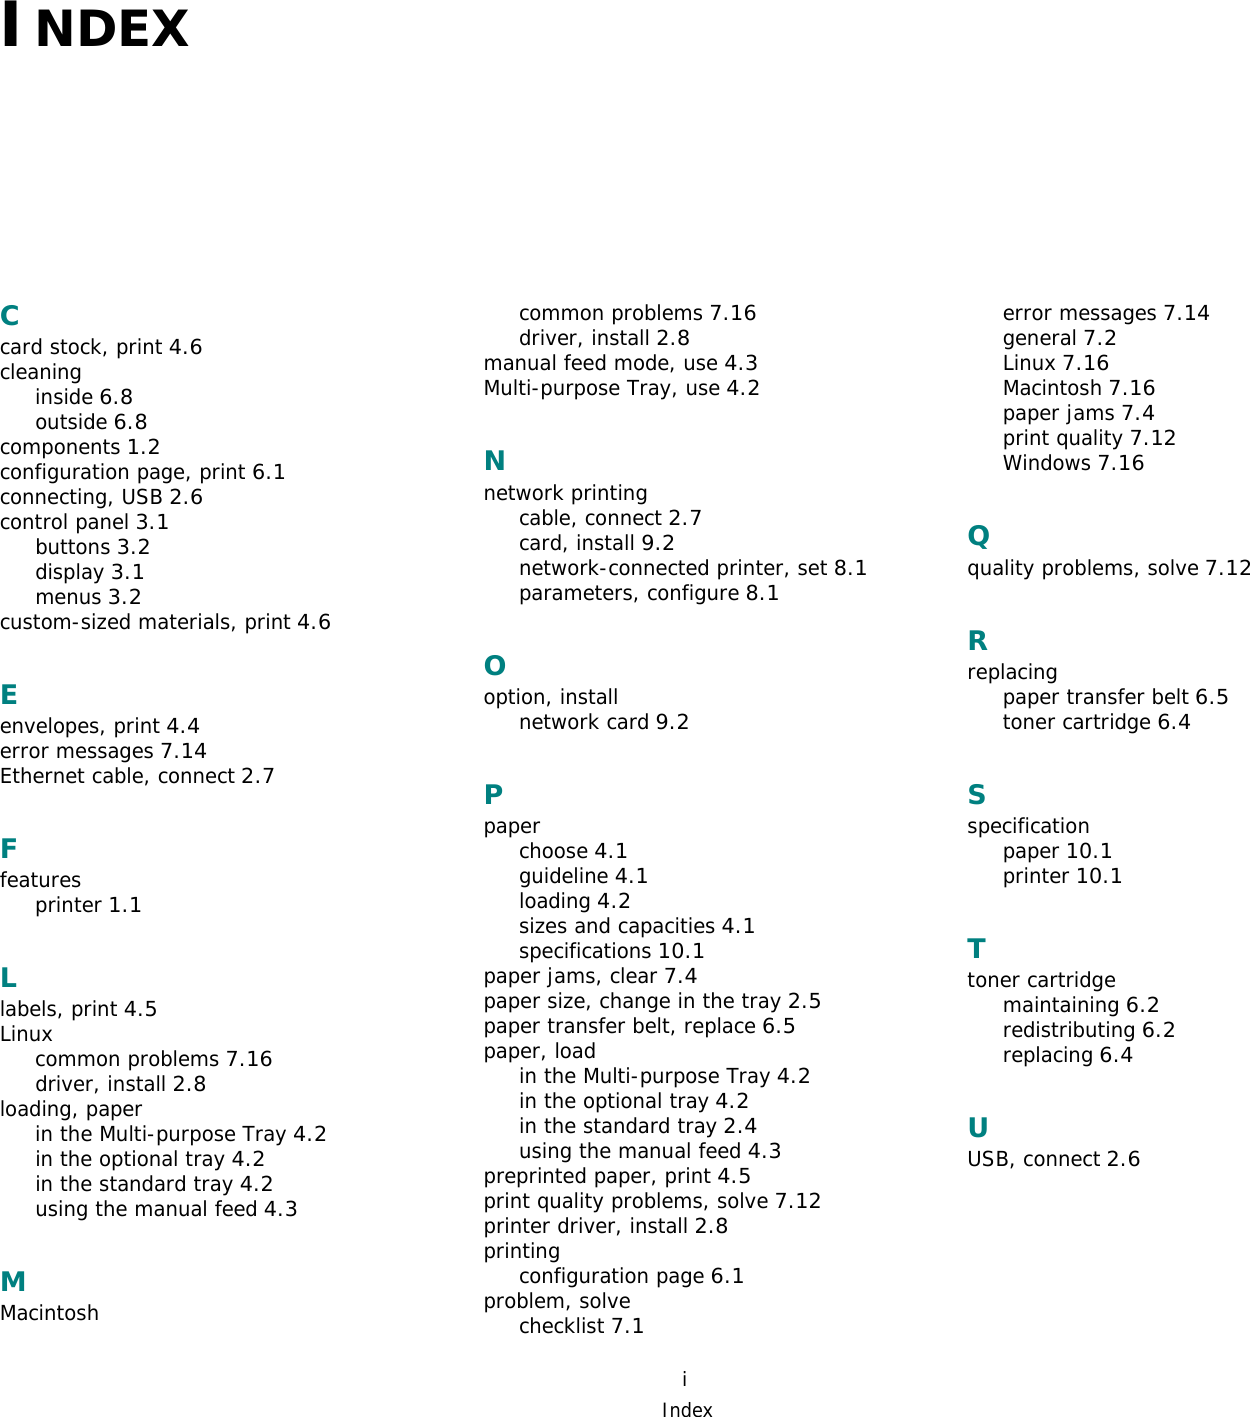


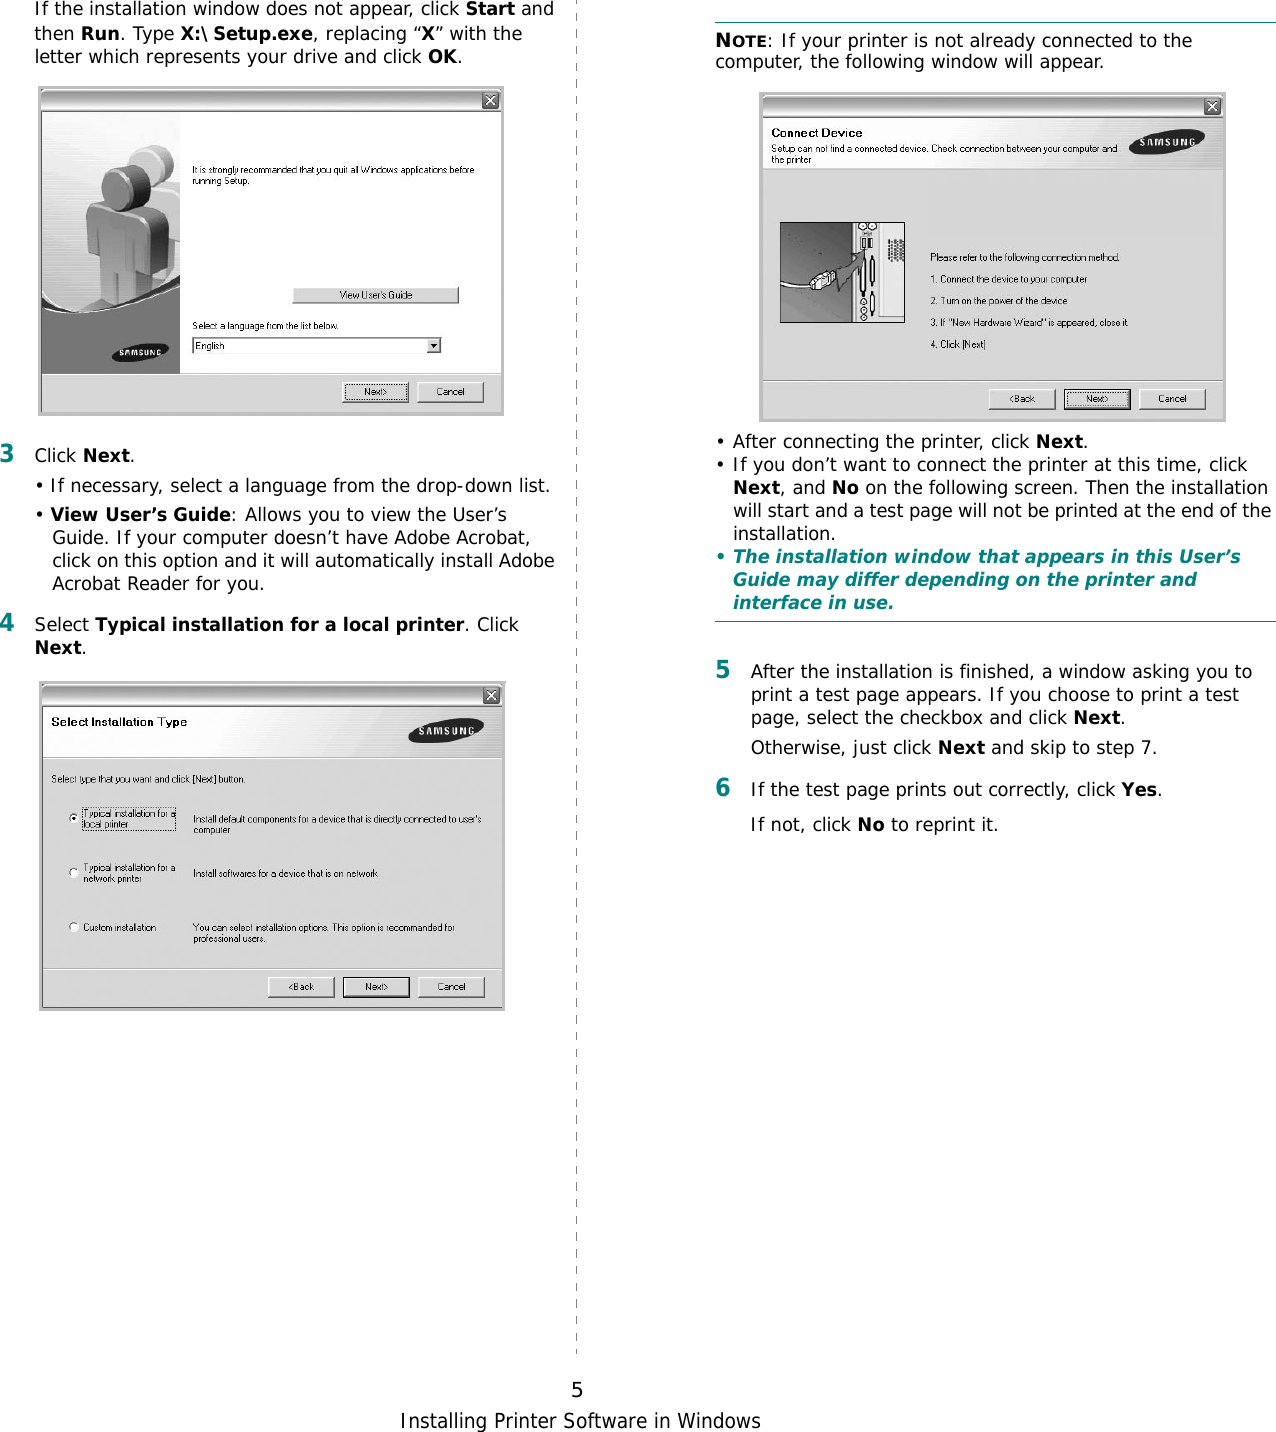
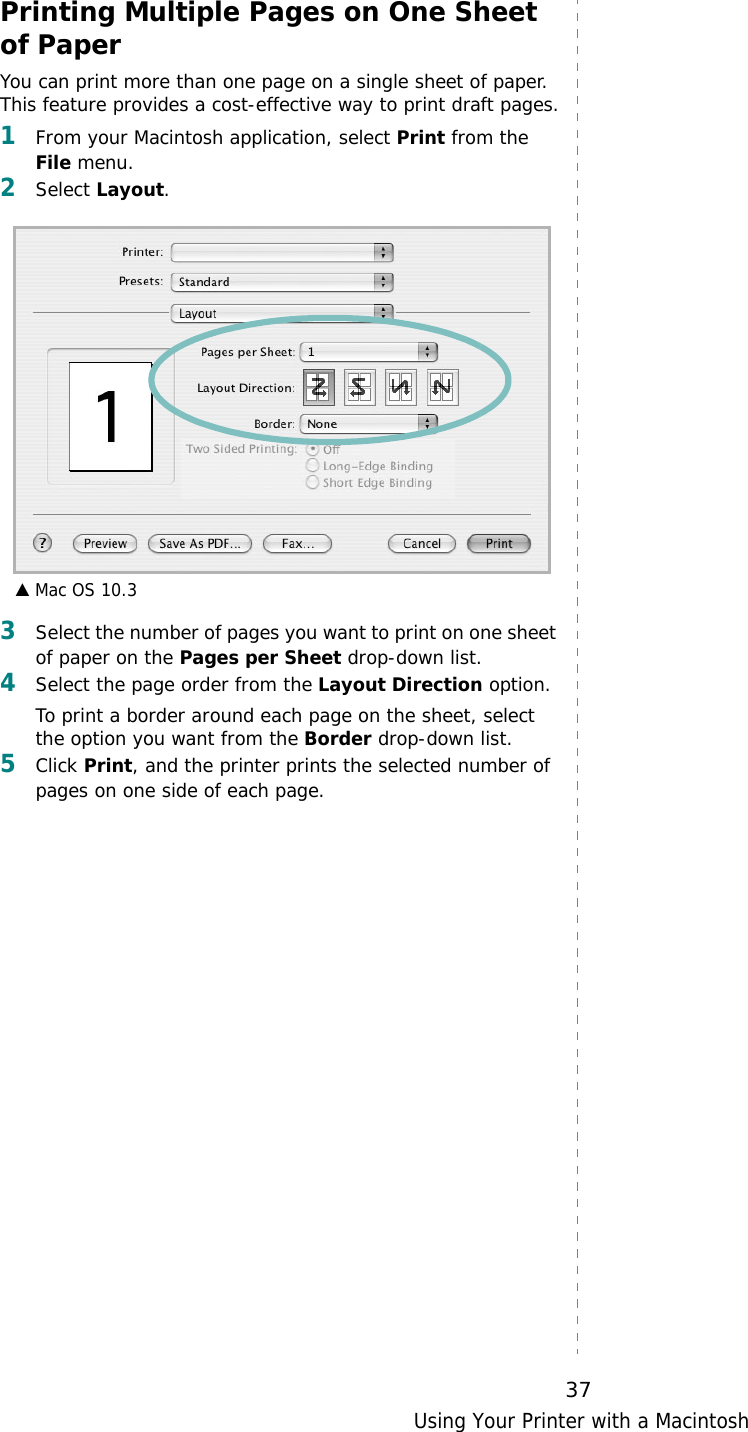
![Installing Printer Software in Windows8Installing Software for Network PrintingWhen you connect your printer to a network, you must first configure the TCP/IP settings for the printer. After you have assigned and verified the TCP/IP settings, you are ready to install the software on each computer on the network.You can install the printer software using the typical or custom method.Typical InstallationThis is recommended for most users. All components necessary for printer operations will be installed.1Make sure that the printer is connected to your network and powered on. For details about connecting to the network, see the supplied printer’s User’s Guide.2Insert the supplied CD-ROM into your CD-ROM drive.The CD-ROM should automatically run, and an installation window appears.If the installation window does not appear, click Start and then Run. Type X:\Setup.exe, replacing “X” with the letter which represents your drive and click OK.3Click Next. • If necessary, select a language from the drop-down list.• View User’s Guide: Allows you to view the User’s Guide. If your computer doesn’t have Adobe Acrobat, click on this option and it will automatically install Adobe Acrobat Reader for you.4Select Typical installation for a network printer. Click Next.5The list of printers available on the network appears. Select the printer you want to install from the list and then click Next. • If you do not see your printer on the list, click Update to refresh the list, or select Add TCP/IP Port to add your printer to the network. To add the printer to the network, enter the port name and the IP address for the printer.• To find a shared network printer (UNC Path), select Shared Printer [UNC] and enter the shared name manually or find a shared printer by clicking the Browse button.](https://usermanual.wiki/Samsung-Electronics-Co/DC60CPS.Users-Manual-2/User-Guide-577475-Page-36.png)
![Installing Printer Software in Windows105The list of printers available on the network appears. Select the printer you want to install from the list and then click Next. • If you do not see your printer on the list, click Update to refresh the list, or select Add TCP/IP Port to add your printer to the network. To add the printer to the network, enter the port name and the IP address for the printer.• To find a shared network printer (UNC Path), select Shared Printer [UNC] and enter the shared name manually or find a shared printer by clicking the Browse button.TIP: If you want to set a specific IP address on a specific network printer, click the Set IP Address button. The Set IP Address window appears. Do as follows:a. Select a printer to be set with a specific IP address from the list, or enter the MAC address of the printer manually.b. Configure an IP address, subnet mask, and gateway for the printer manually and click Configure to set the specific IP address for the network printer.c. Click Next.6Select the components to be installed. After selecting the components, the following window appears. You can also change the printer name, set the printer to be shared on the network, set the printer as the default printer, and change the port name of each printer. Click Next.To install this software on a server, select the Setting up this printer on a server checkbox.7After the installation is finished, a window appears asking you to print a test page and to register yourself as a user of Samsung Printers in order to receive information from Samsung. If you so desire, select the corresponding checkbox(es) and click Finish.Otherwise, just click Finish.NOTE: After setup is complete, if your printer driver doesn’t work properly, reinstall the printer driver. See “Reinstalling Printer Software” on page 11.](https://usermanual.wiki/Samsung-Electronics-Co/DC60CPS.Users-Manual-2/User-Guide-577475-Page-38.png)


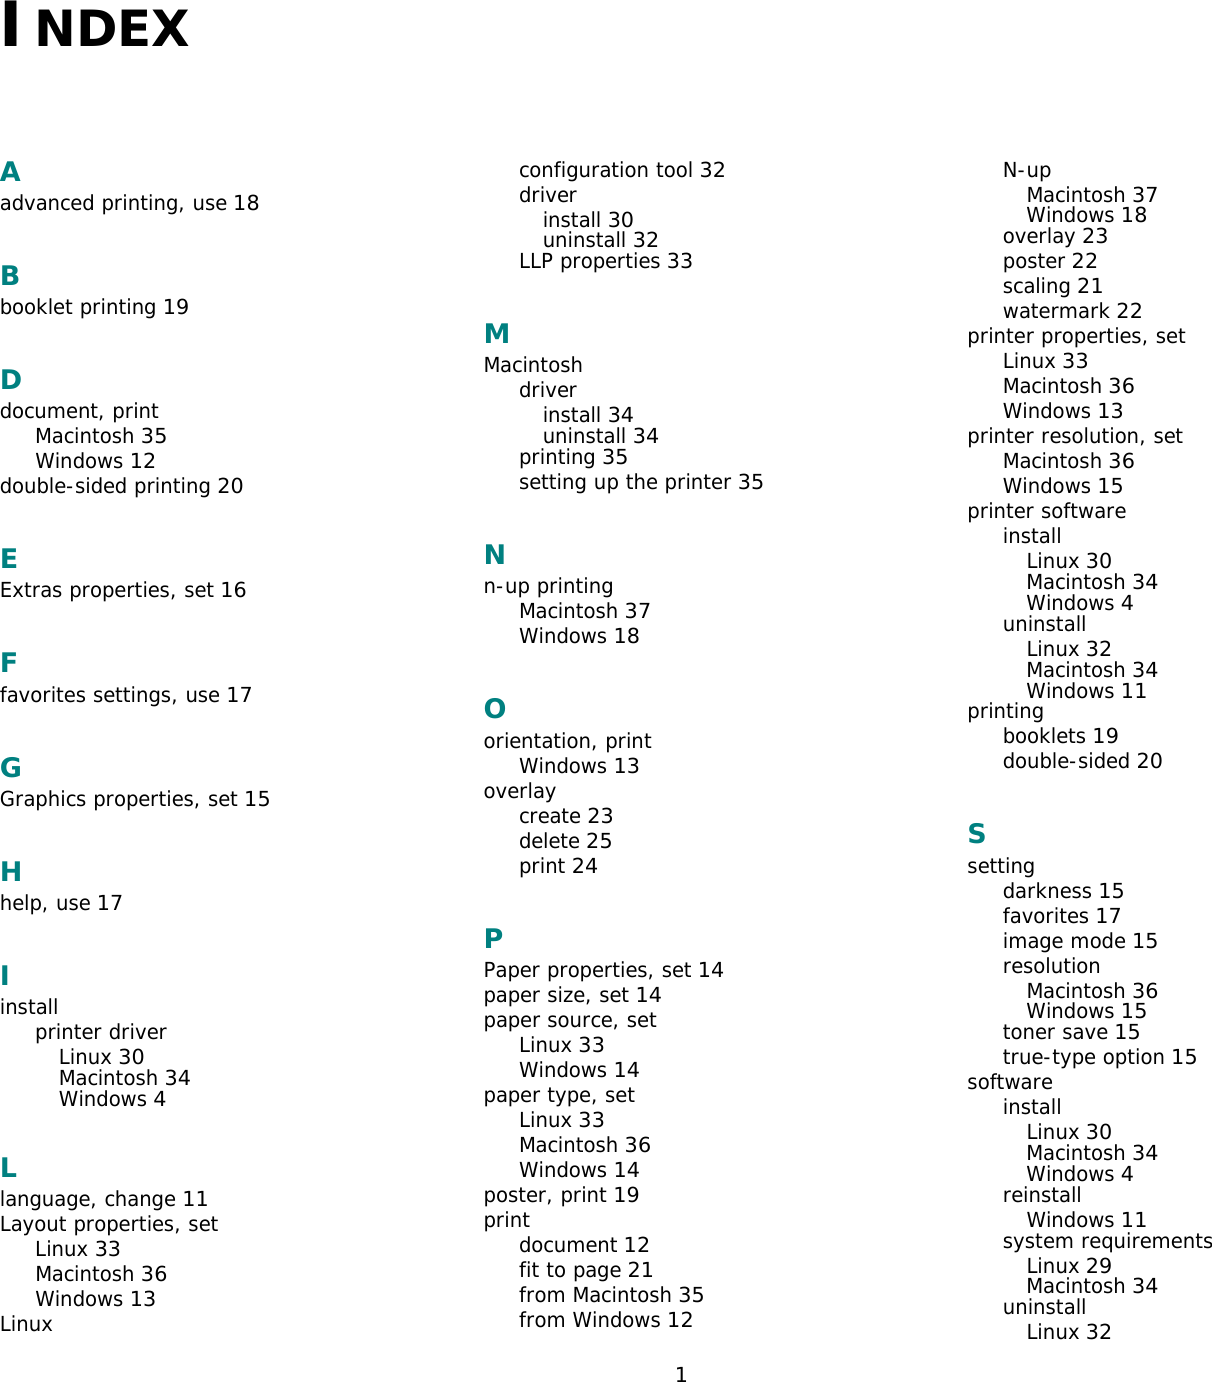
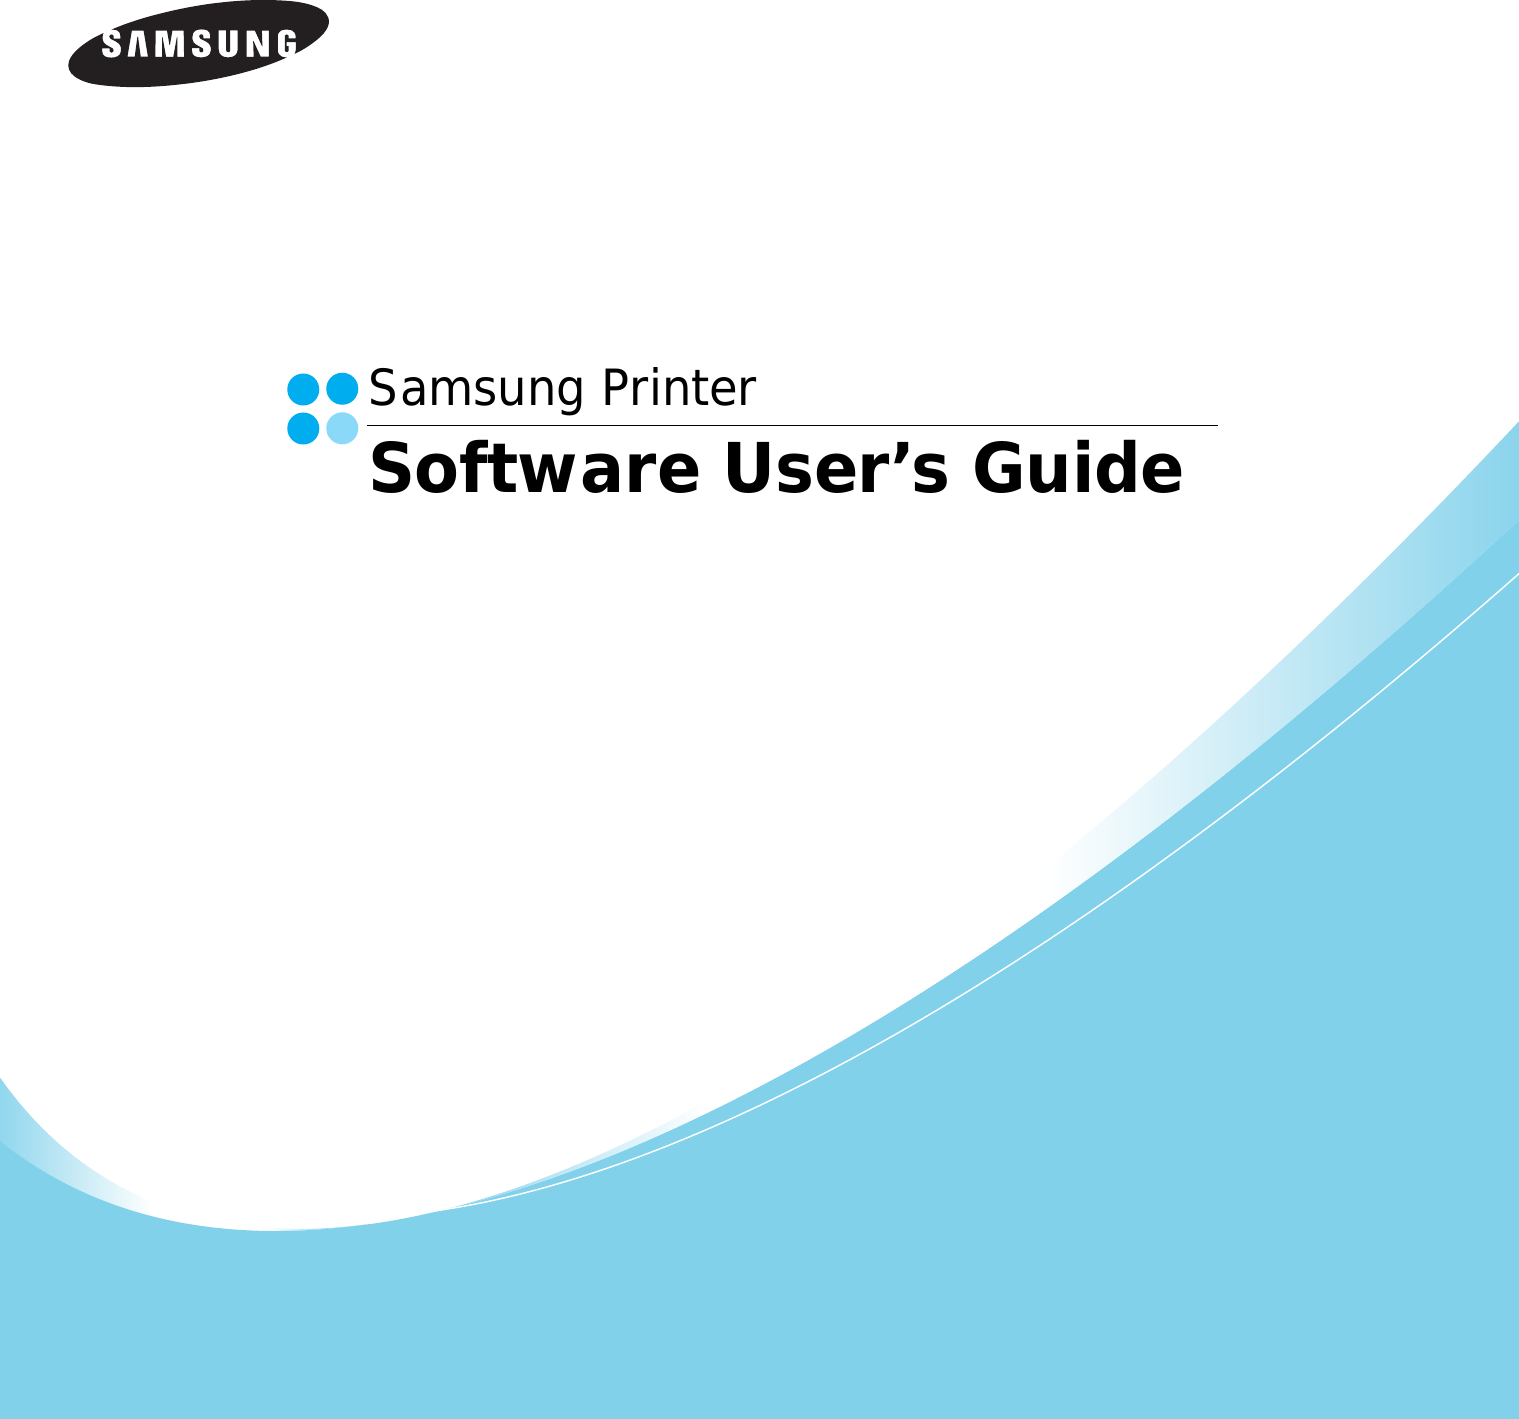
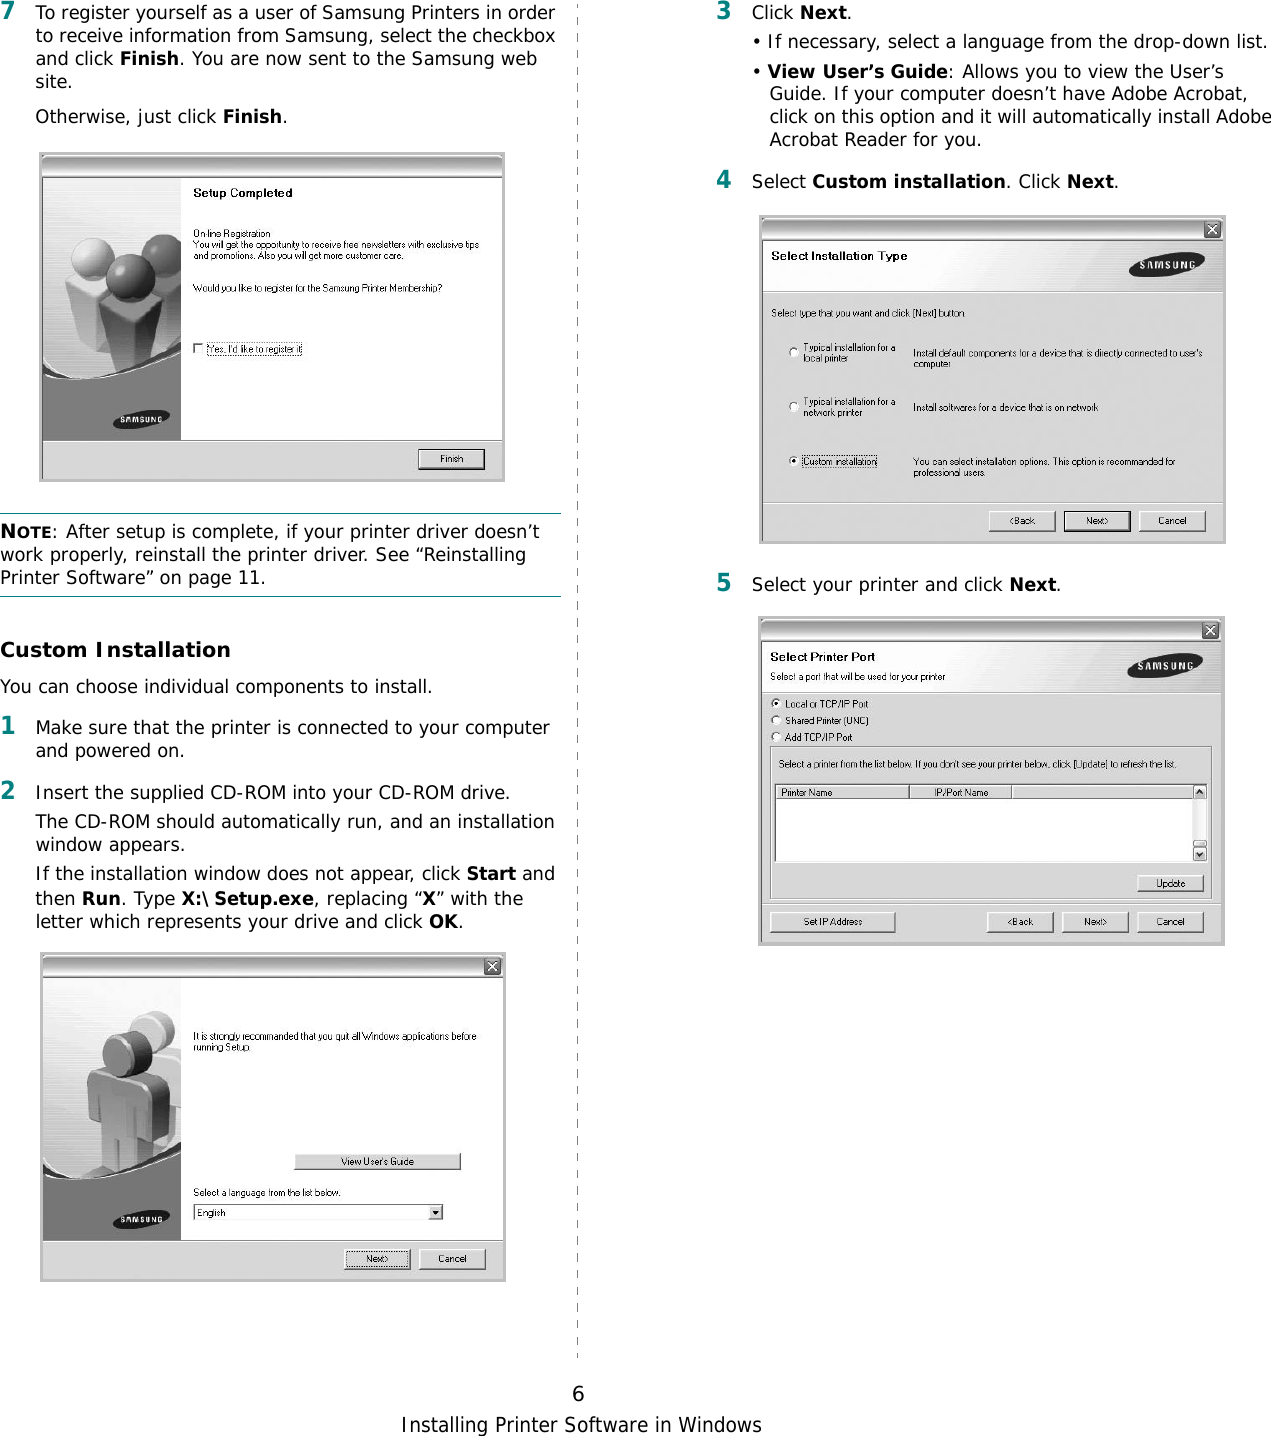
![Using Your Printer in Linux30Installing the Printer Driver1Make sure that you connect the printer to your computer. Turn both the computer and the printer on.2When the Administrator Login window appears, type in “root” in the Login field and enter the system password.NOTE: You must log in as a super user (root) to install the printer software. If you are not a super user, ask your system administrator.3Insert the printer software CD-ROM. The CD-ROM automatically runs.NOTE: If the CD-ROM does not automatically run, click the icon at the bottom of the window. When the Terminal screen appears, type in:[root@local /root]# cd /mnt/cdrom (the CD-ROM directory) [root@local cdrom]# ./setup.sh 4Select the type of installation, either Recommended or Expert, and then click Continue.Recommended is fully automated and does not require any interaction. Expert installation allows you to select the install path or printing system.5If you selected Recommended, go to step 6.For Expert, select the desired option and then click Begin Install. 6The printer driver installation begins. When the installation is completed, click Start.7The Linux Printer Configuration window opens. Click the Add Printer icon on the toolbar at the top of the window.NOTE: Depending on the printing system in use, the Administrator Login window may appear. Type in “root” in the Login field and enter the system password.8You see the printers currently installed in your system. Select the printer you want to use. The function tabs available for the selected printer appear at the top of the Add a Printer window. NOTE: If the printer supports PS printing, it is recommended to select the PS driver.](https://usermanual.wiki/Samsung-Electronics-Co/DC60CPS.Users-Manual-2/User-Guide-577475-Page-58.png)