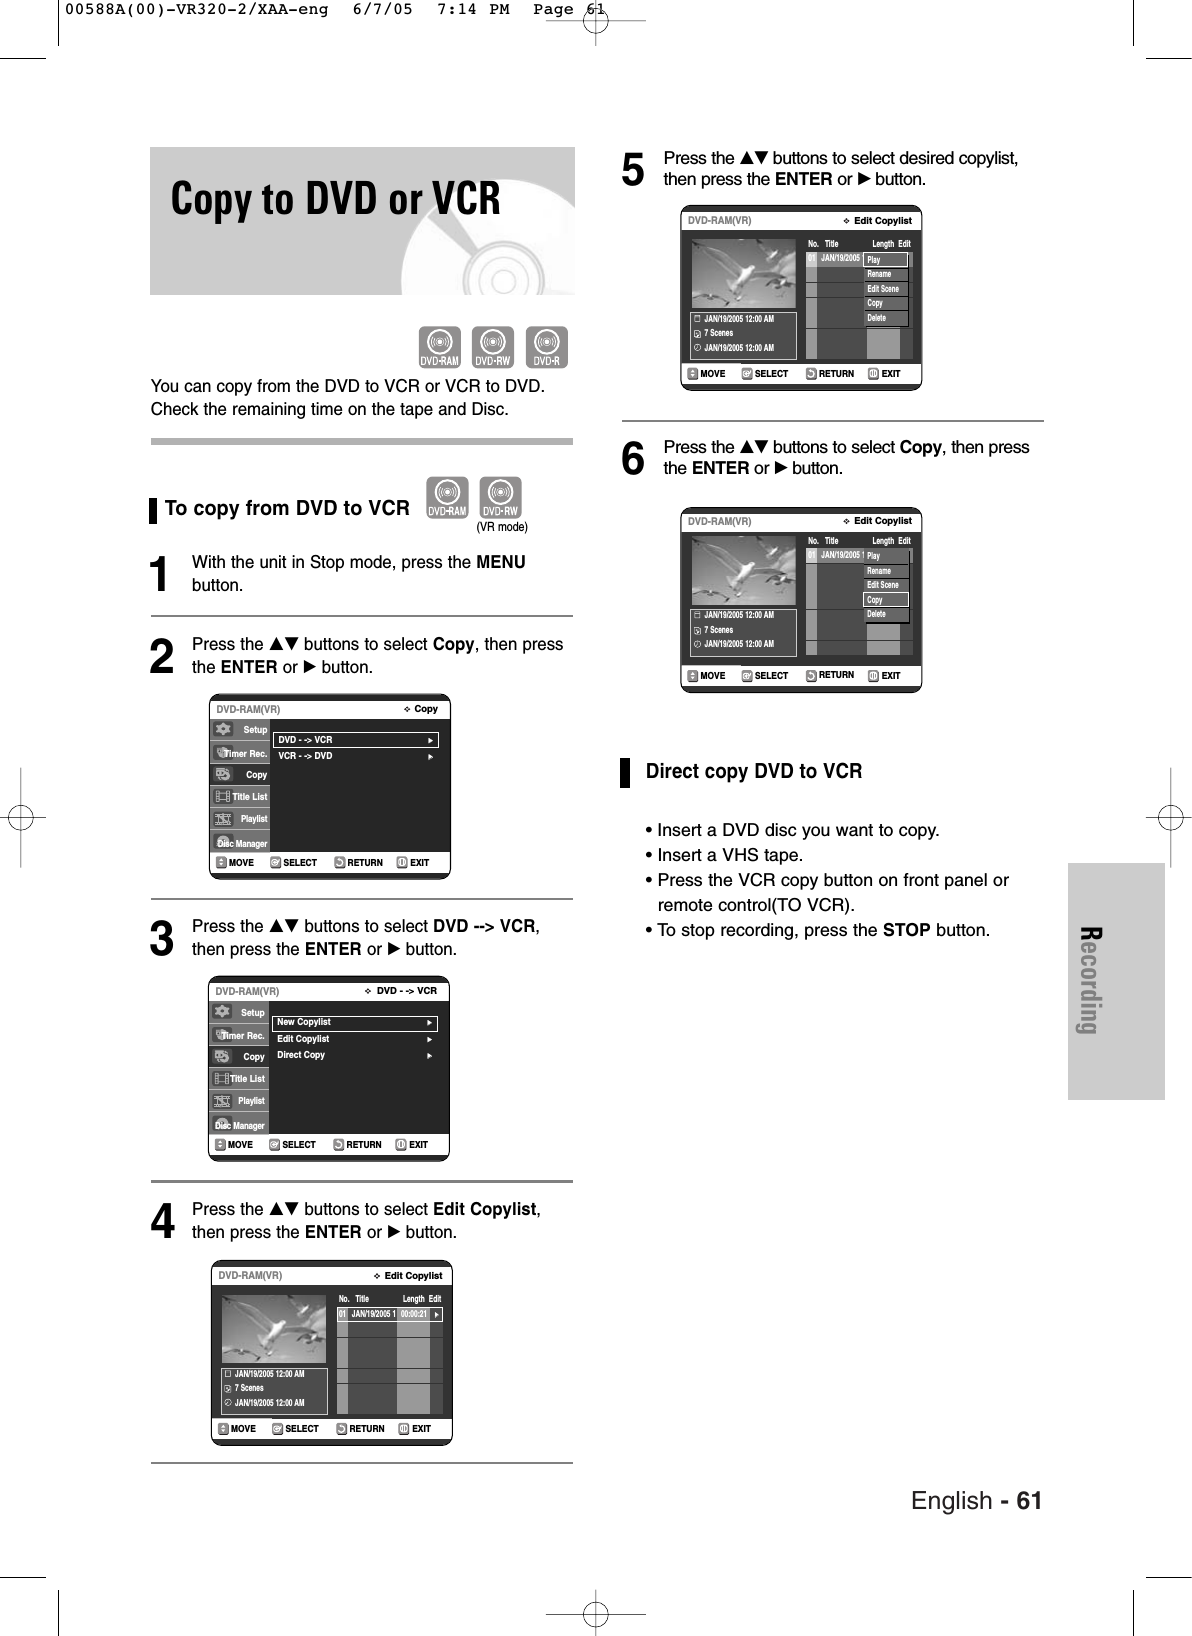
Samsung Electronics Co DVDVR320A DVD Recorder/ Video Cassette Recorder User Manual 00588A 00 VR320 1 XAA eng
Samsung Electronics Co Ltd DVD Recorder/ Video Cassette Recorder 00588A 00 VR320 1 XAA eng
Contents
- 1. Users Manual 1
- 2. Users Manual 2
Users Manual 2
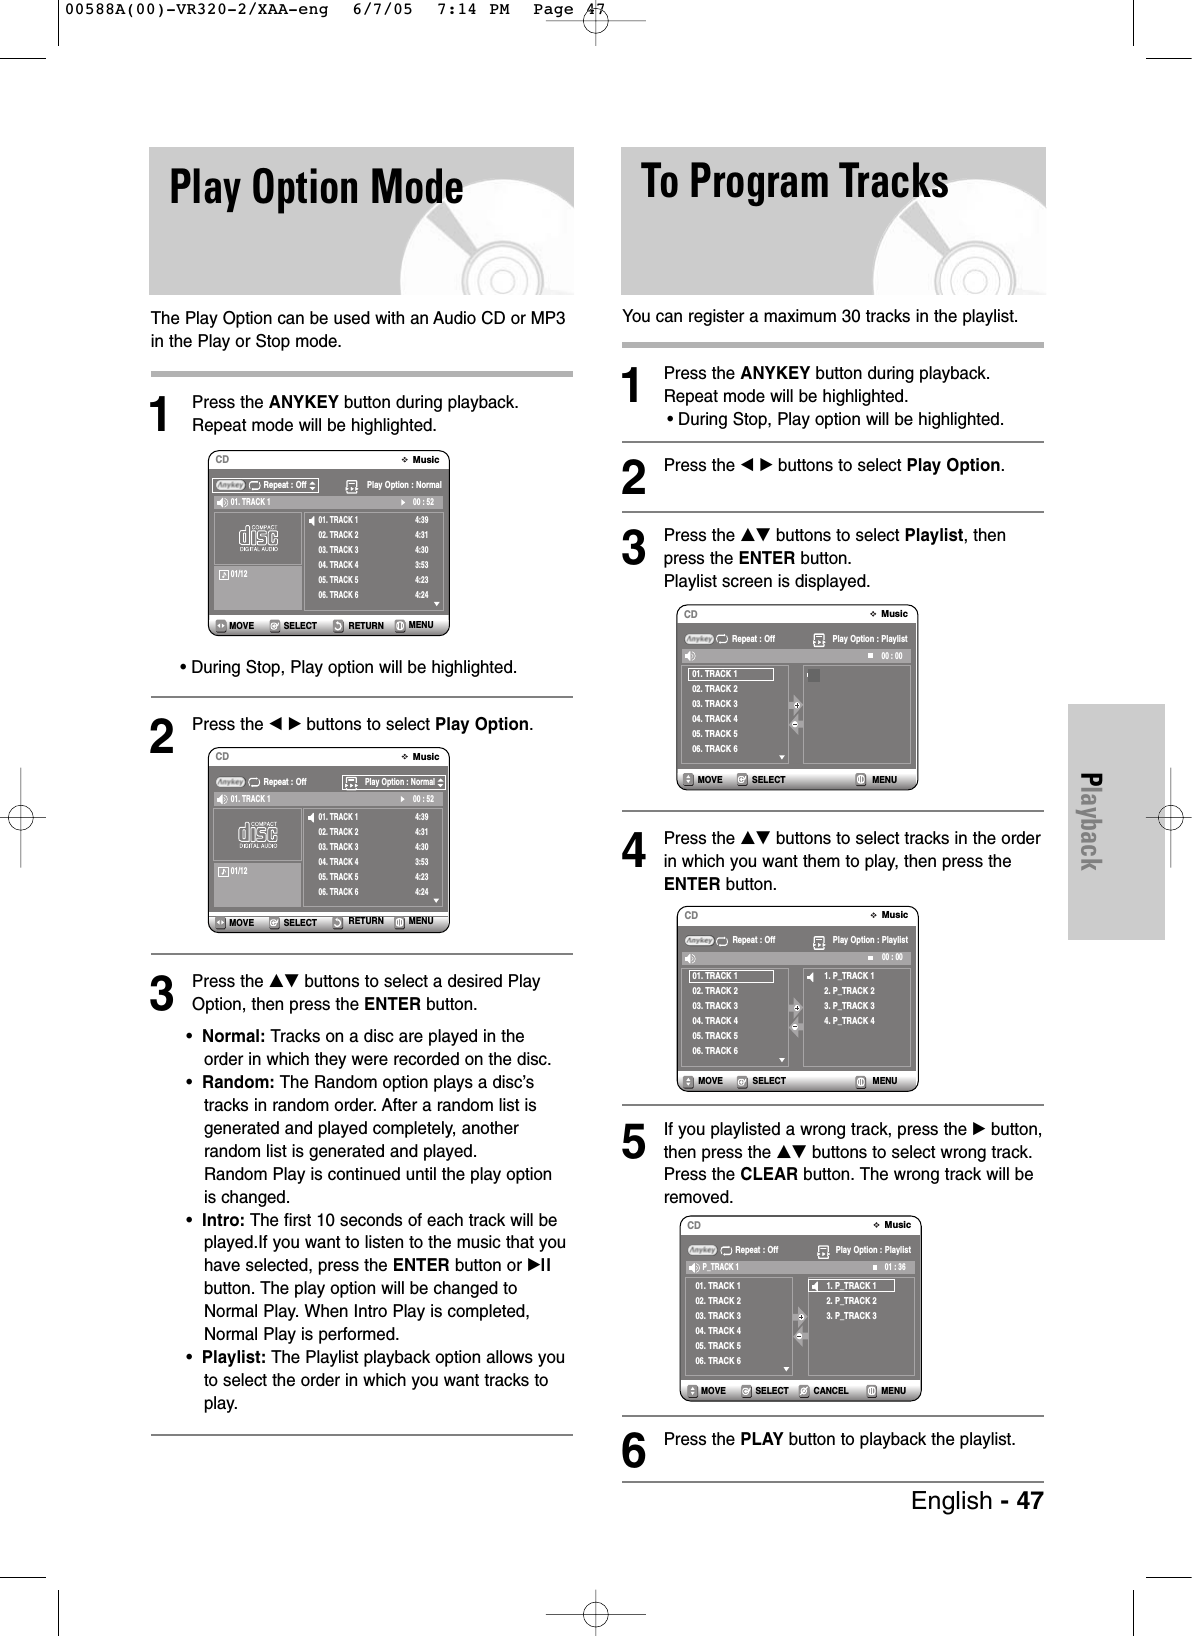
![48 - EnglishPlaybackPlaying a picture CDThere are two types of Picture CDs. One is a CDwith only JPEG files. The other one is a CD withJPEG files and MP3 files.(mixed CD) 1. When a mixed CD is played, a menu will beshown in order to let you choose which con-tents, either JPEG or MP3, you want to play. 1-1. If you want to play MP3 files on a mixed CD,choose Music on the menu, then it will takeyou to the MP3 play back screen. 1-2. If you want to play JPEG files on a mixedCD, choose Photo on the menu, then it willtake youto photo playback screen. See number 3 onthis page. 2. When a Picture CD(CD with only JPEG files) isplayed, the recorder will show the Albumscreen,with thumbnail images. See number 3on this page. 1Insert a Picture CD(JPEG only) or MixedCD(JPEG + MP3)into the disc tray. 2When playing a Mixed CD, press the …† buttonsto select Photo, then press the ENTER or √but-ton. (when playing a Picture CD, see number 3 onthis page.)3Press the …† œ √ buttons to select a picture.• To see the next 6 pictures, press the√√lbutton.• To see the previous 6 pictures, press the lœœ button.4-1If you press the √ll button, the Slide showscreen will appear.Press the œ √ buttons to set the slide showspeed, then press the ENTER button.4-2Press the œ √ buttons to select a picture file inAlbum screen and then press the ENTERbutton.: Returns to the Album screen.: The unit enters slide show mode.Before the slide show can begin, the pictureinterval (Slide show speed) must be set.: Each time the ENTER button is pressed, the picture rotates 90 degrees clockwise.: Each time the ENTER button is pressed, the picture is enlarged up to 4X(four times the normal size).Normal ➝2X ➝4X ➝2X ➝ Normal • Press the ANYKEY button to display menu bar.• Press the RETURN button to clear the menu bar.RETURNSELECTMOVE EXITPhotoJPEG+MP3Press [ENTER] or Right button :PhotoSELECT RETURN MENUMOVEPhotoJPEGIndex 6 / 73 Slide ShowROOT / DSC01189Page 2 / 13RETURNSELECTMOVEDSC01189Slide Show SpeedRETURNSELECTMOVE PHOTODSC01189SetupTimer Rec.PhotoMusic00588A(00)-VR320-2/XAA-eng 6/7/05 7:14 PM Page 48](https://usermanual.wiki/Samsung-Electronics-Co/DVDVR320A.Users-Manual-2/User-Guide-563431-Page-4.png)
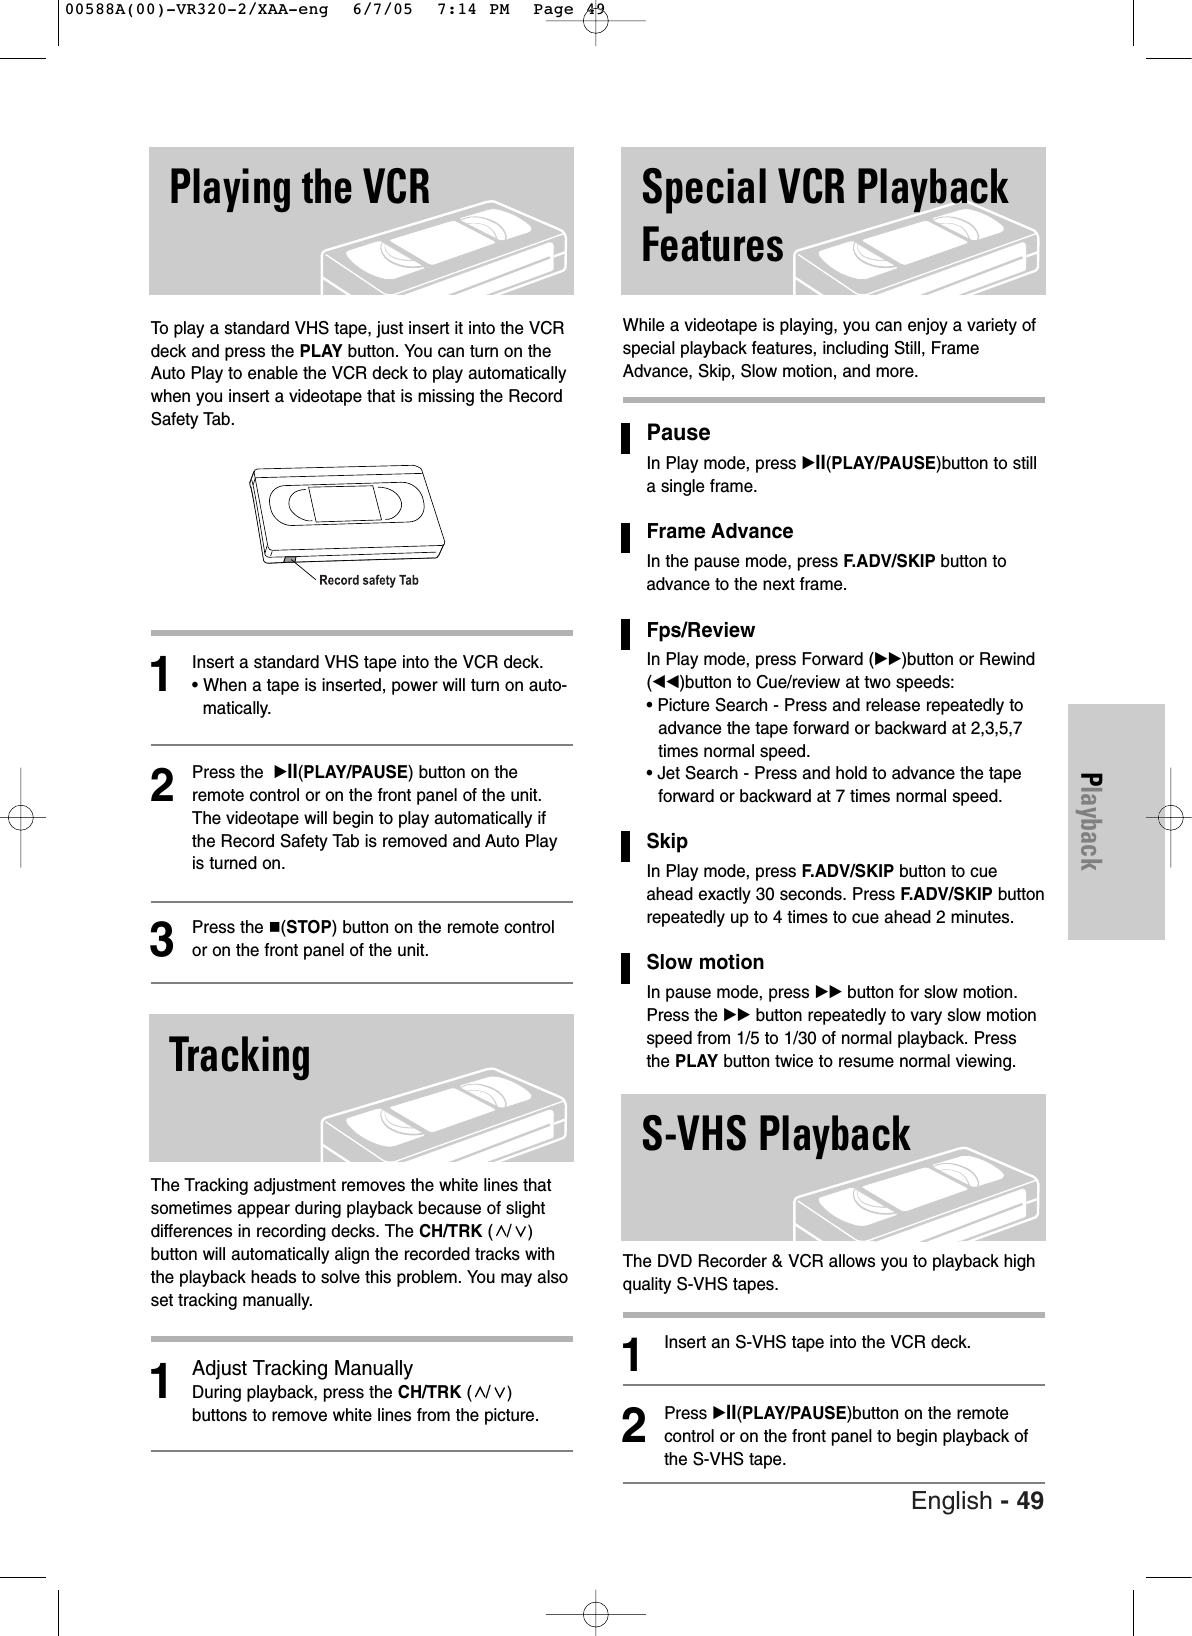
![Each time you record a cassette on this DVD Recorder& VCR, an “index” is automatically marked on the tapewhen recording starts.The Search function allows you tofast-forward or rewind to a specific index and start play-back from that point. Depending on the direction select-ed, the indexes are numbered as follows• This DVD Recorder & VCR uses a standard indexingsystem (VISS). As a result, it will recognize any index-es marked by other VCRs using the same system andvice versa.Go To [0:00:00] StopUse this feature when you want to search for the0:00:00 counter position on a cassette.1Press the CLEAR button at the point on the tapewhere you want to set the counter to 0:00:00.2While a cassette is stopped, press the ANYKEYbutton.3Press the …† buttons to select Go To Zero, thenpress the ENTER button.The VCR will rewind or fast forward, searching forthe 0:00:00 counter position, and then automati-cally stop at that position.End SearchUse this feature when you want to search for a blankposition to record a program on a cassette.50 - EnglishPlaybackVariable SearchSystem1While a cassette is stopped, press the ANYKEYbutton.2Press the …† buttons to select End Search, thenpress the ENTER button.The VCR will fast forward, searching for a blankposition, and then automatically stop at that posi-tion. If the VCR reaches the end of the tape duringend search, the tape will be ejected.Forward/Backward Intro ScanUse scan and play when you don’t know exactlywhere a program is located on a cassette tape.1While a cassette is stopped, press the ANYKEYbutton.2Press the …† buttons to select Forward IntroScan or Reverse Intro Scan, then press theENTER button. When an Index mark is found, theDVD Recorder & VCR will playback the tape for 5seconds, after which it will continue searching forthe next Index mark.Go To Zeroœœ0 : 00 : 03End Search√√0 : 00 : 03Scan and Play√√0 : 00 : 23SELECTMOVEVCRGo To ZeroEnd SearchForward Intro ScanReverse Intro ScanSELECTMOVEVCRGo To ZeroEnd SearchForward Intro ScanReverse Intro ScanSELECTMOVEVCRGo To ZeroEnd SearchForward Intro ScanReverse Intro Scan00588A(00)-VR320-2/XAA-eng 6/7/05 7:14 PM Page 50](https://usermanual.wiki/Samsung-Electronics-Co/DVDVR320A.Users-Manual-2/User-Guide-563431-Page-6.png)