Samsung Electronics Co DVDVR345 DVD Recorder / Video Cassette Recorder User Manual 2
Samsung Electronics Co Ltd DVD Recorder / Video Cassette Recorder Users Manual 2
UserManual.wiki
>
Samsung Electronics Co
>
DVDVR345 User Manual
>
Users Manual 2
Contents
1.
Users Manual 1
2.
Users Manual 2
Users Manual 2
Navigation menu
Upload a User Manual
Namespaces
Wiki Guide
HTML
PDF
Info
Views
User Manual
Discussion / Help
Navigation

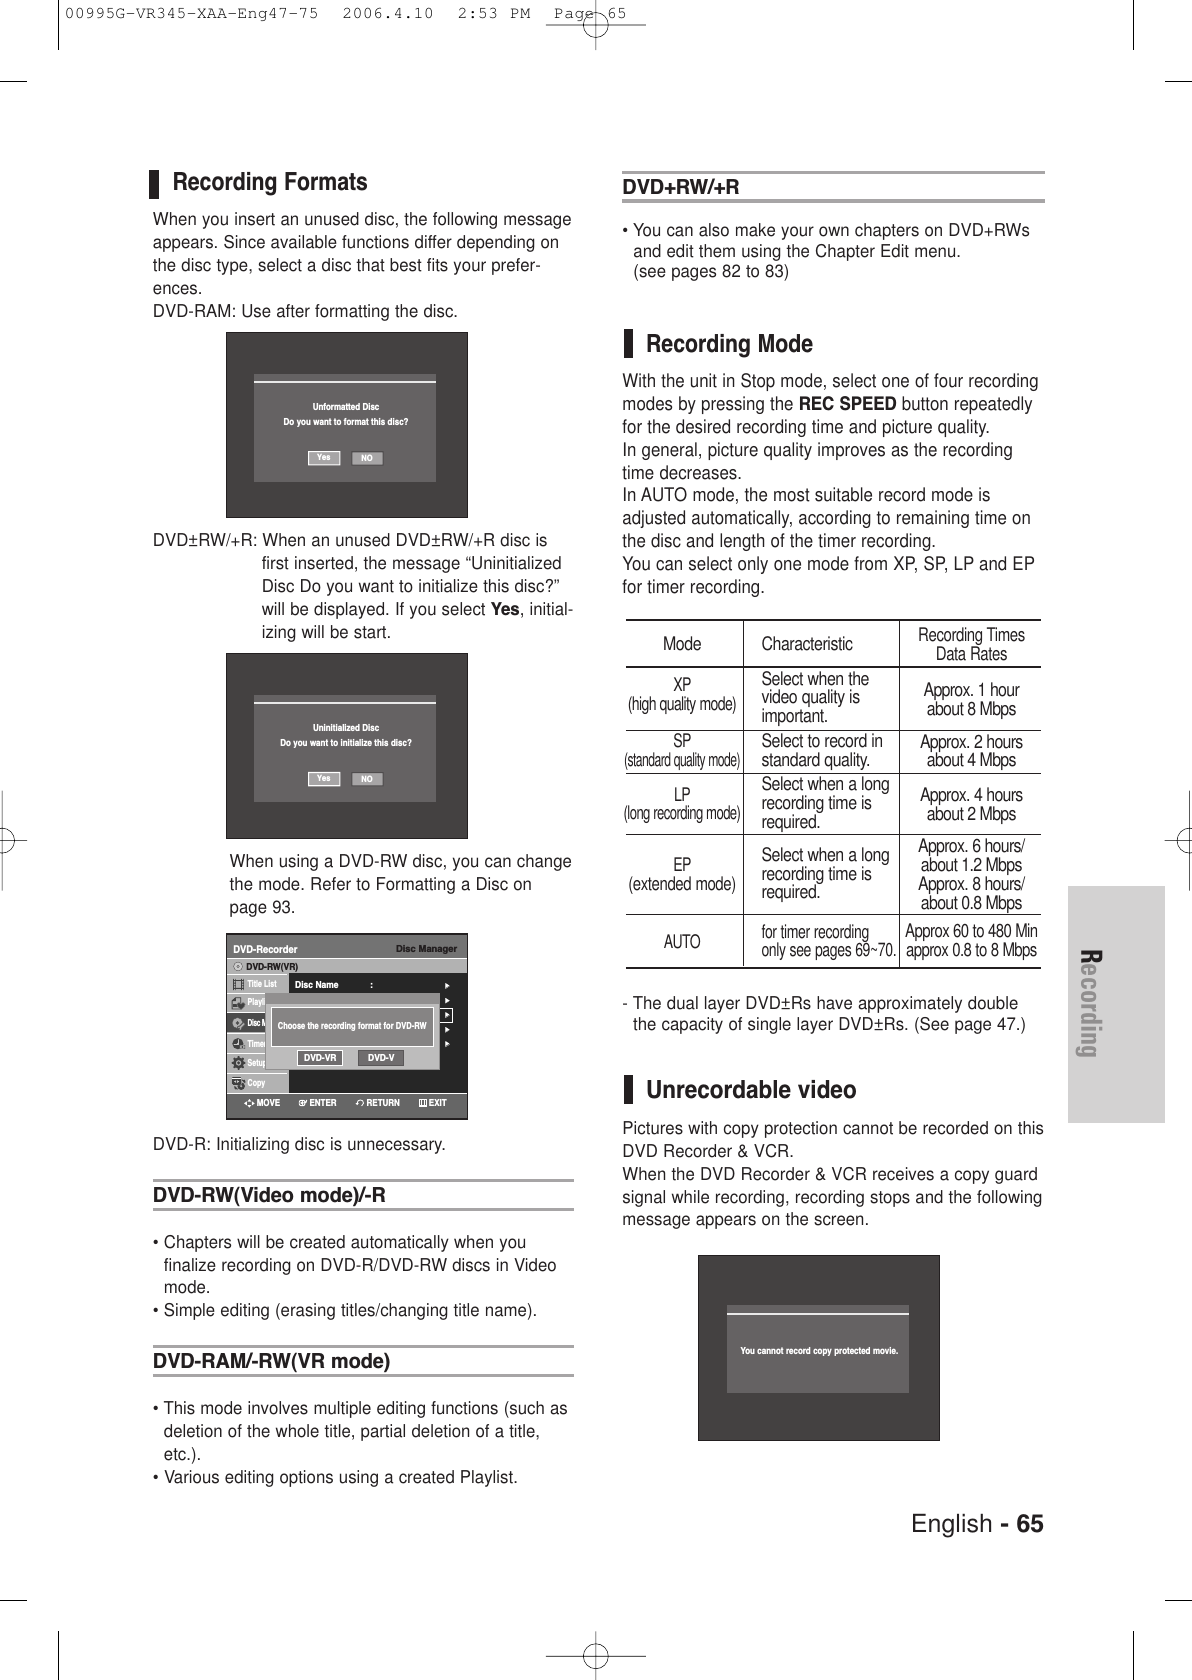
![58 - EnglishPlaybackPlay Option Mode1During Stop, Press the ANYKEY button.The Play option will be highlighted.2Press the œ √ buttons to select a desired PlayOption, then press the ENTER button.• Normal: Tracks on a disc are played in the order in which they were recorded on the disc.• Playlist: The Playlist playback option allows you toselect the order in which you want tracks to play.• Intro[ I]:The first 10 seconds of each track will beplayed. If you want to listen to the music that youhave selected, press the ENTER button or √ll but-ton. The play option will be changed to Normal Play.When Intro Play is completed, Normal Play is per-formed.• Random[ R]:The Random option plays a disc’stracks in random order. After a random list is gener-ated and played completely, another random list isgenerated and played. Random Play is continued until the play option ischanged.1During playback, press the ANYKEY button.The Repeat mode will be highlighted.2Press the œ √ buttons to select the desired repeatmode you want to play repeatedly, then press theENTER button.• Repeat Track (CD (CD-DA)/MP3)• Repeat Folder (MP3)• Repeat Disc (CD (CD-DA)/MP3)- To return to normal playback -3Press the CANCEL button to return to normal playback.Repeat Playback of anAudio/MP3 DiscMusic ListCDTRACK 1√√0:00:01001 TRACK 1 00:03:50002 TRACK 2 00:04:00003 TRACK 3 00:03:49004 TRACK 4 00:03:47005 TRACK 5 00:04:29006 TRACK 6 00:03:44007 TRACK 7 00:03:44No. Title LengthTRACK 101/15CDDAPLAY MODERepeat : OffPlay option : NormalPLAY MODERETURNENTERMOVE EXITMusic ListCD001 TRACK 1 00:03:50002 TRACK 2 00:04:00003 TRACK 3 00:03:49004 TRACK 4No. Title LengthTRACK 101/15PLAY MODERepeat : OffMusic ListCDTRACK 1√√0:00:01001 TRACK 1 00:03:50002 TRACK 2 00:04:00003 TRACK 3 00:03:49004 TRACK 4 00:03:47005 TRACK 5 00:04:29No. Title LengthTRACK 101/15CDDAPLAY MODERepeat : OffPlay option : NormalMusic ListCDTRACK 1√√0:00:01001 TRACK 1 00:03:50002 TRACK 2 00:04:00003 TRACK 3 00:03:49004 TRACK 4 00:03:47005 TRACK 5 00:04:29006 TRACK 6 00:03:44007 TRACK 7 00:03:44No. Title LengthTRACK 101/15CDDAPLAY MODERepeat : OffPlay option : NormalPLAY MODERETURNENTERMOVE EXIT00995G-VR345-XAA-Eng47-75 2006.4.10 2:53 PM Page 58](https://usermanual.wiki/Samsung-Electronics-Co/DVDVR345.Users-Manual-2/User-Guide-649704-Page-4.png)

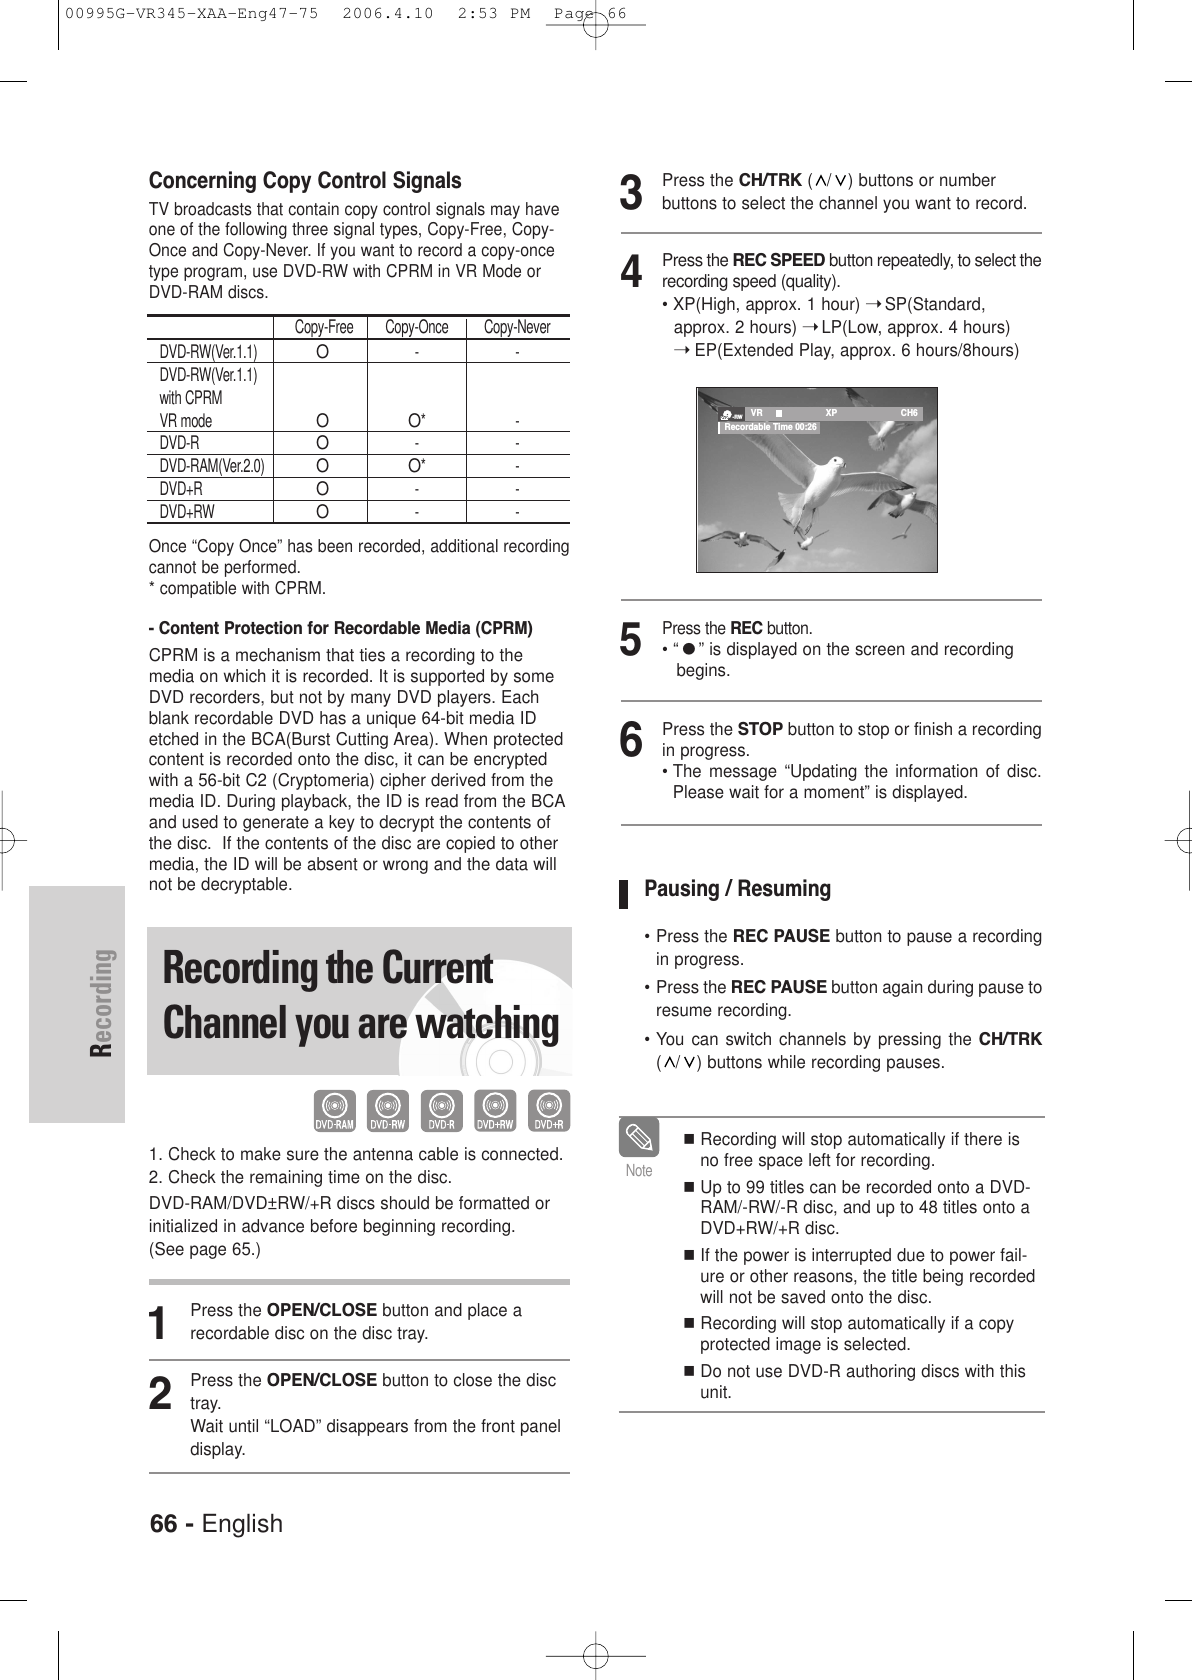


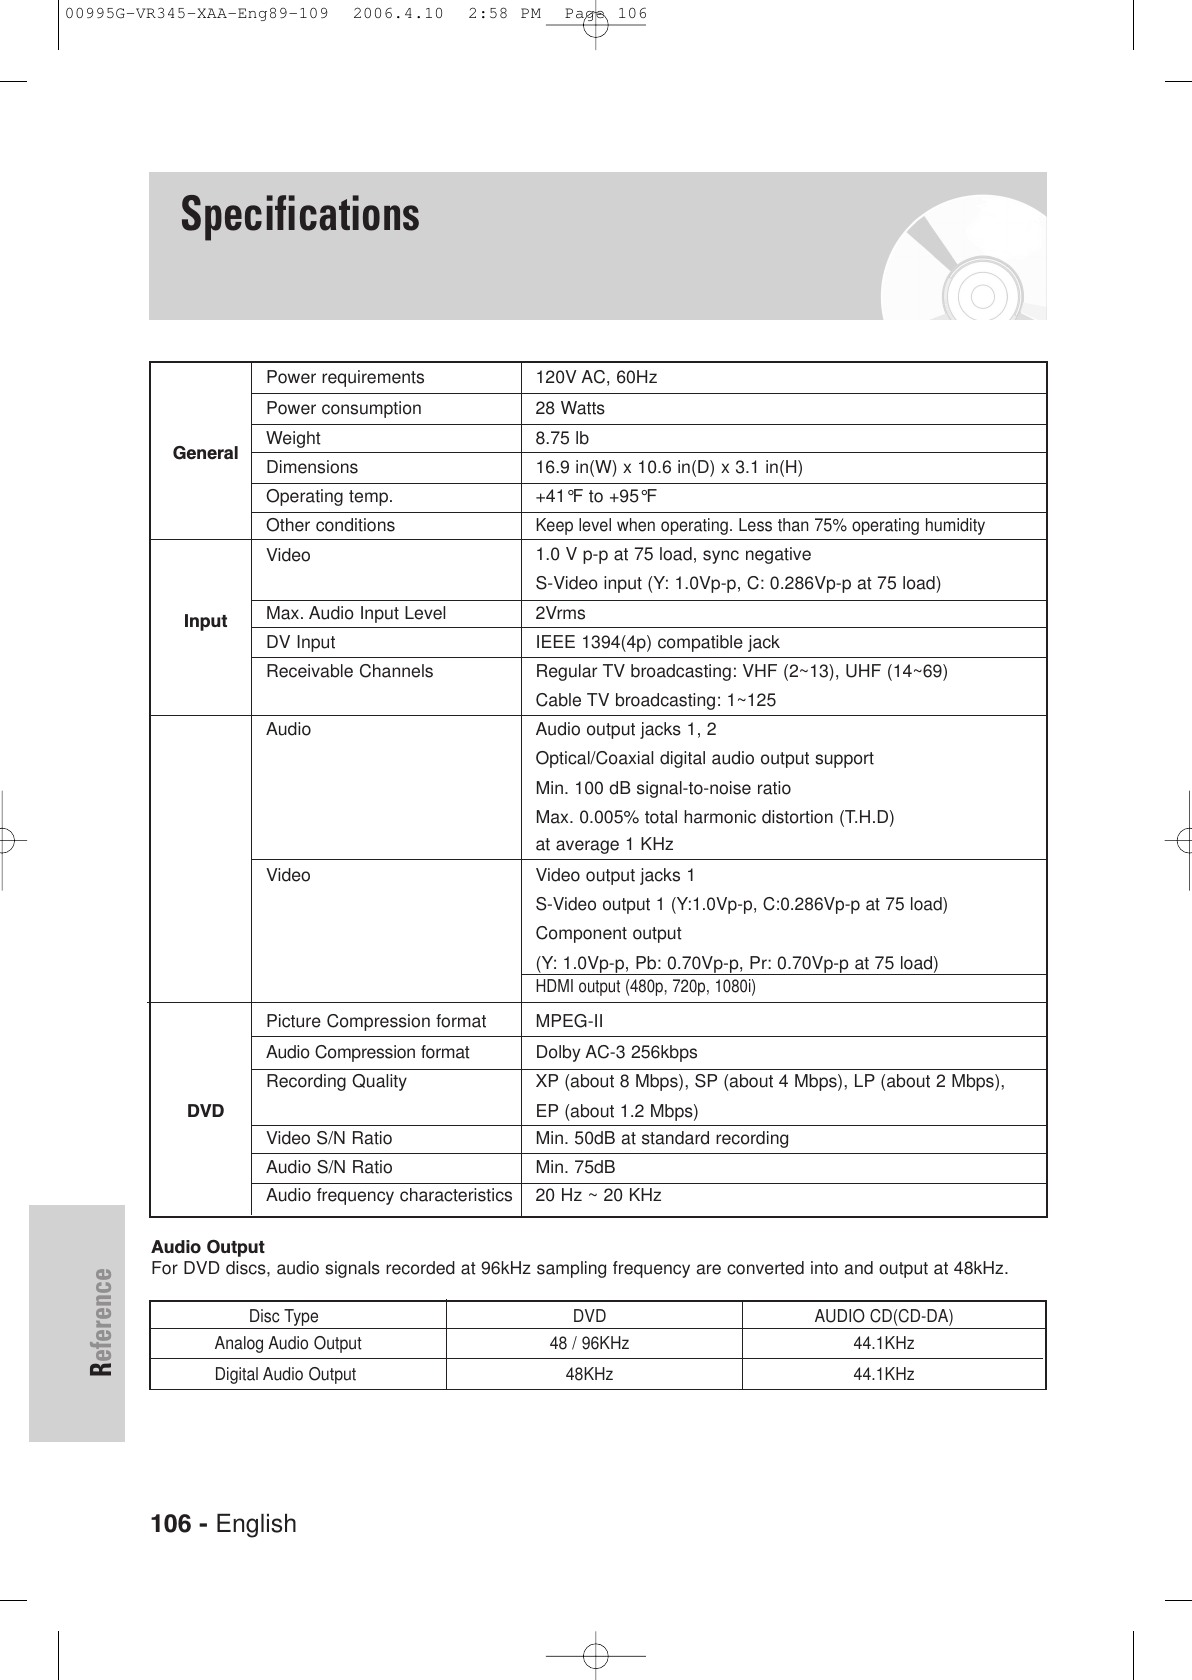
![104 - EnglishReferenceProblems and Solutions(Display error Message)Explanation / Solution• You can’t record the video since it is protected by copyright.• Disc you are using is protected. To record on this disc or usethis function, cancel the disc protection function. Refer topage 92. • The disc does not match the regional code for your area and cannot be played on this device.• Make sure there are no scratches or dirt on the disc.• The disc is PAL format and cannot be played on this unit.• Make sure there are no scratches or dirt on the disc. • You can’t use the disc because it contains errors from previous recordings.Use the disc after formatting.ProblemYou cannot record a copy protected movie.You cannot record. This disc is protected.This disc cannot be formatted (the disc isprotected).This disc cannot be renamed(the disc is protected).This disc cannot be finalized (the disc is protected).This [Menu] is not available (the disc is protected).The disc cannot be played,Please check the regional code of the disc.This disc cannot be formatted.Please check the disc.You could not format the discbecause of error detection.You could not finalize the discbecause of error detection.You could not unfinalize the discbecause of error detection.The disc cannot be played,Please check the TV system.The disc can be neither played nor recorded.The disc cannot be played, Please check thedisc.If the disc has invalid information, no more titles can be recorded. Please format the disc beforehand.Before contacting a Samsung authorized service center, perform the following simple checks.00995G-VR345-XAA-Eng89-109 2006.4.10 2:58 PM Page 104](https://usermanual.wiki/Samsung-Electronics-Co/DVDVR345.Users-Manual-2/User-Guide-649704-Page-50.png)