Samsung Electronics Co NP-Q1-C Notebook PC User Manual Samsung Q1b v1 0 English
Samsung Electronics Co Ltd Notebook PC Samsung Q1b v1 0 English
UserManual.wiki
>
Samsung Electronics Co
>
NP-Q1-C User Manual
>
Users Manual 2 of 2
Contents
1.
Users Manual 1 of 2
2.
Users Manual 2 of 2
Users Manual 2 of 2
Navigation menu
Upload a User Manual
Namespaces
Wiki Guide
HTML
PDF
Info
Views
User Manual
Discussion / Help
Navigation
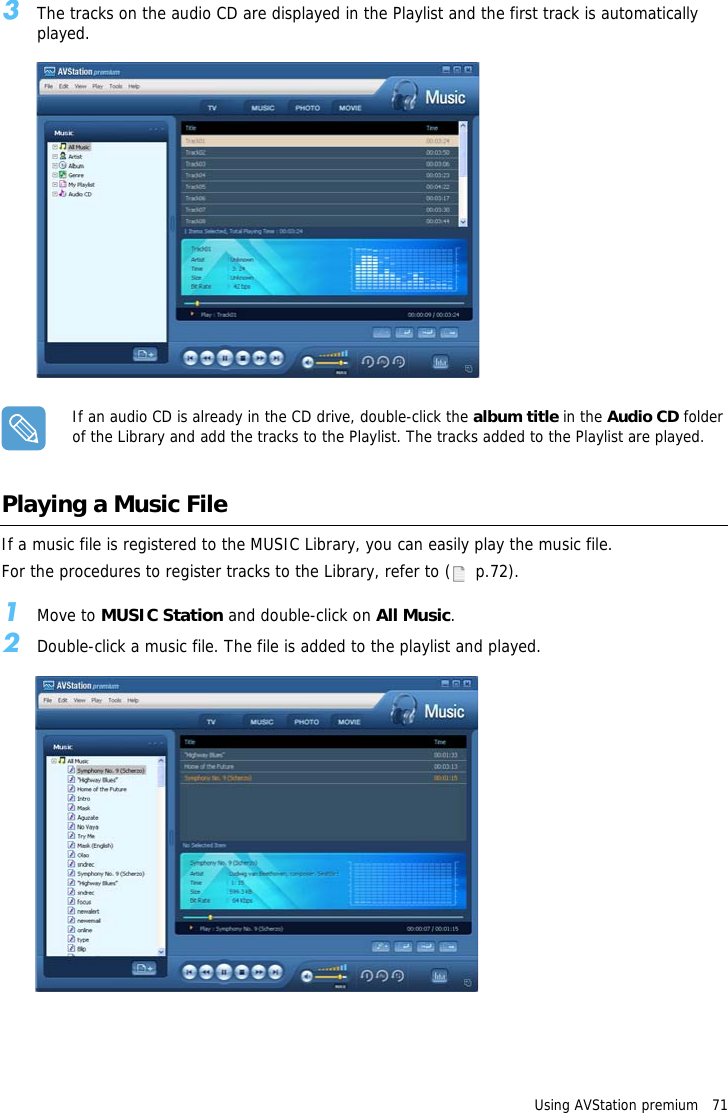


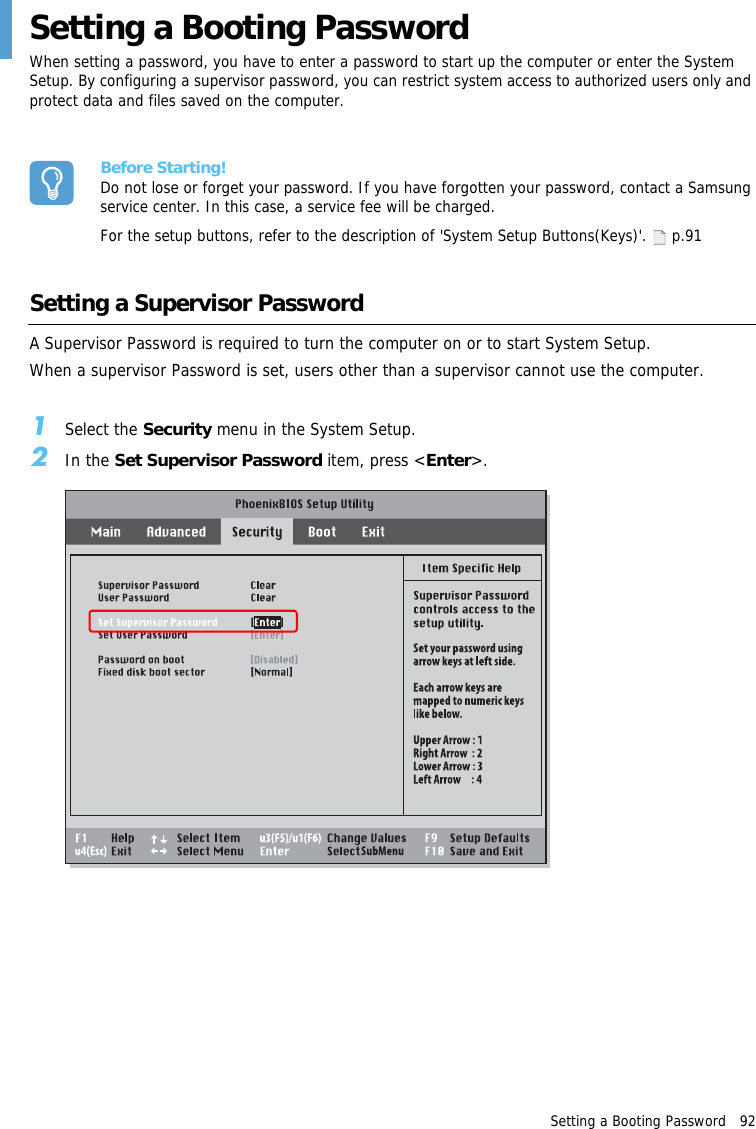
![Setting a Booting Password 933On the screen, the password setting buttons are described.You can set a password by entering numbers between 1 and 4 with the Joystick.Since the u2 button is used as the Delete (BackSpace) function and the u4 button is used as the Cancel (Esc) function, enter the password using the Joystick.Enter a password, press <Enter>, re-enter the password for confirmation, and press <Enter> again.4When a message confirming the password configuration appears in the [Setup Notice] win-dow, press <Enter>.The supervisor password has been set. The supervisor password is required to turn the com-puter on or to enter System Setup.Setting a User PasswordUsers can start the system with their user password, but cannot enter the System Setup.Before configuring a user password, a supervisor password must have been configured. Deactivating the supervisor password also deactivates the user password.However, please note that deactivating a user password does not deactivate the supervisor pass-word.In the Set User Password item, press <Enter> and complete the procedures of Step 3 for Setting a Supervisor Password.Activating the Booting PasswordBefore activating the booting password, a supervisor password must be configured.Set the Password on boot option to Enabled. From now on, system booting will not proceed with-out the password.Up: 1Right: 2Next: 3Left: 4](https://usermanual.wiki/Samsung-Electronics-Co/NP-Q1-C.Users-Manual-2-of-2/User-Guide-680324-Page-23.png)
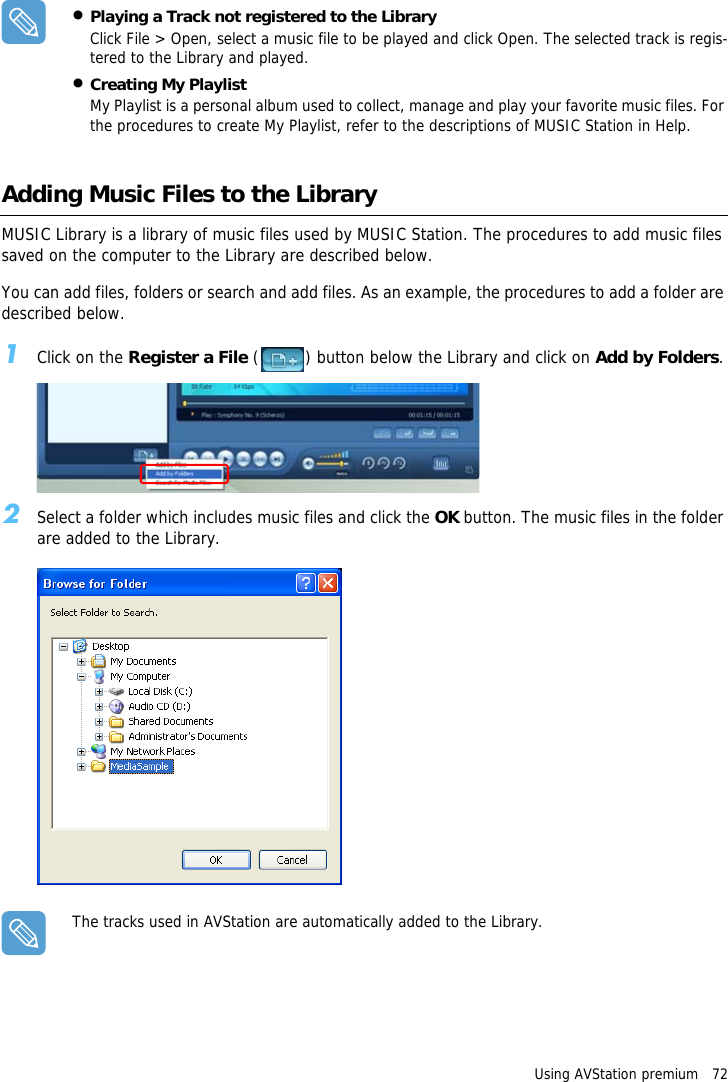
![Setting a Booting Password 94Deactivating the Password1On the password to be deactivated, press <Enter>. For example, to deactivate a supervisor password in the Set Supervisor Password item, press<Enter>.2In the Enter Current Password item, enter the currently configured password and press <Enter>.3Leave the Enter New Password item field empty, and press <Enter>.4Leave the Confirm New Password field empty, and press <Enter>.5In the [Setup Notice] window, press <Enter>.The password is deactivated.](https://usermanual.wiki/Samsung-Electronics-Co/NP-Q1-C.Users-Manual-2-of-2/User-Guide-680324-Page-24.png)
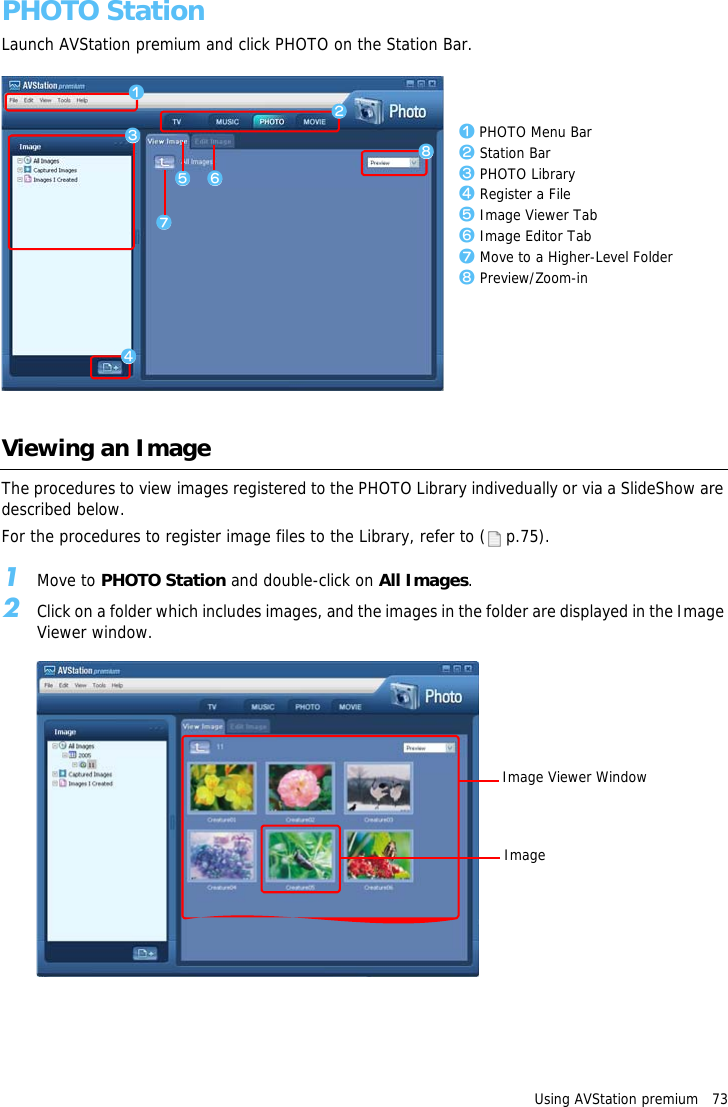
![Using the Battery 101Battery CalibrationWhen charging/discharging the battery repeatedly for only a short time, the battery usage time may be reduced by the difference between the actual battery charge and the remaining charge display. In this case, the actual battery charge and the remaining charge display will be the same by dis-charging the battery completely using the Battery Calibration function, and then recharging it again.1Disconnect the AC power adapter after turning off the system.2Restart your computer and press the Menu button when the SAMSUNG logo appears, to start System Setup.3Using the arrow keys, select Smart Battery Calibration in the Boot menu and press Enter.4Highlight Yes in the [Battery Calibration Confirmation] window and press Enter.The Battery Calibration function is activated and the battery is discharged by force. To stop the operation press the u4 (Esc) button.This operation requires 3~5 hours depending on the battery capacity and the remaining battery charge.](https://usermanual.wiki/Samsung-Electronics-Co/NP-Q1-C.Users-Manual-2-of-2/User-Guide-680324-Page-31.png)


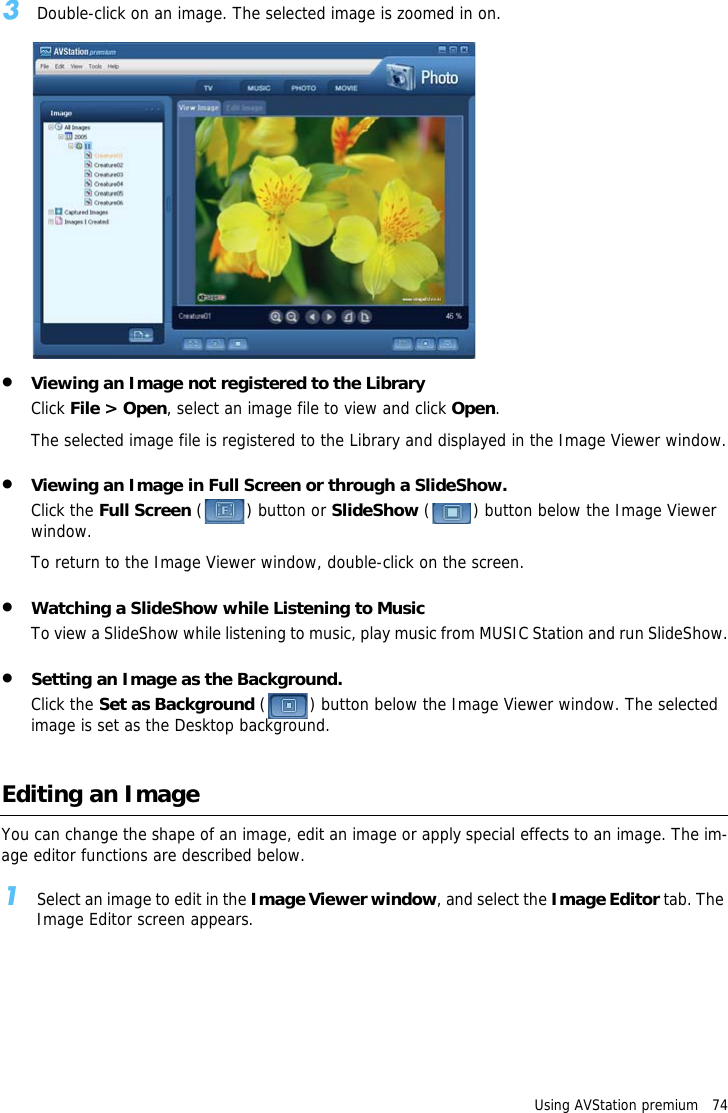
![Restoring the System 1073Select a restore date from the calendar restoration and select a restore point from the list, and then click Next.The date of the restore point is displayed in bold font.4Confirm the selected restore point and click Next. System Restore shuts down Windows, and starts the restoration processes. 5After the restoration is complete, Windows restarts. In the [System Restore completed] dialog, click OK.Your computer has been restored to the selected restore point.Undoing the last restorationThe procedures to undo a restoration are described below.1Click Start > All Programs > Accessories > System Tools > System Restore.2Select "Undo my last restoration", and then click Next. 3Confirm the restoration information to undo, and than click Next. System Restore shuts down Windows and starts undoing the restoration. 4After the undo restoration is complete, Windows restarts. In the [Undo the last restoration com-pleted] dialog, click OK.Your computer has been restored to the point prior to the last restora-tion.](https://usermanual.wiki/Samsung-Electronics-Co/NP-Q1-C.Users-Manual-2-of-2/User-Guide-680324-Page-37.png)
![Questions and Answers 114Questions and AnswersThis section provides information on possible problems, solutions and other references for system use.Windows RelatedQ1 The system does not shutdown properly.AWhen the system does not shutdown normally, press and hold the Power button until the sys-tem shuts down manually. If the Power-Saving Mode is configured into the Power button, press and hold for more than 4 seconds to shut the system off. When the system is turned on after such a manual shutdown, Scandisk will run to check errors in the system.Q2 The system freezes during a program operationA1 There is an error with the program currently being used. Press the <Ctrl>, <Alt>, and <Del> keys (Windows Security Button) simultaneously and select End Task in the [Windows Task Manager] window.A2 There is an error with the Windows OS. Reboot the system by using the Power button.Display RelatedQ1 The LCD screen is too dark or too brightAAdjust the LCD brightness. Press the Menu button and select either Brightness UP or Brightness Down.Alternatively, press the + or - Volume Control buttons at the top of the computer while hold-ing down the Menu button to adjust the LCD brightness.Q2 The screen saver is activated while Media Player is playing a movie or video clip.AUnselect Tools > Options > Player > Allow screen saver during playback in the Media Player.Q3 In the following cases, the screen blinks or displays noise for a short time.Clicking on the Graphics Related tab, Changing the Resolution, Changing the Display Device, Removing the AC Adapter, Restarting the System, Changing the Power Mizer level.AThis may happen while the video driver is examining the connected device. While busy detect-ing, any connected display devices may blink or some noise may occur.In addition, when pressing the Auto Scaler button, the screen may blink or display noise for a short time, while the resolution changes or the Down Scale (resolution zoom out) function op-erates.](https://usermanual.wiki/Samsung-Electronics-Co/NP-Q1-C.Users-Manual-2-of-2/User-Guide-680324-Page-44.png)
![Questions and Answers 115Q4 When I connect a projector, and change the settings to display the screen image on both the LCD and the projector by pressing the Menu button, the screen is not displayed properly.APress the Menu button and press the LCD/CRT twice to select LCD+CRT. If the screen image or some part of it is not displayed on the screen, this is because the LCD resolution is low or the current resolution is too wide and cannot be supported by the projector. Press the Auto Scaler button and change the resolution to 800x600 pixels.Q5 I have run a function from the menu program, but the corresponding shortcut icon does not appear on the screen.AThe shortcut icons only appear when both the Magic Keyboard and Samsung Display Manager programs are installed.Q6 When I connect an external monitor and select the monitor, no screen image is dis-played (Clone Mode).AThis may happen when the current resolution is inappropriate or Dual View (Extended Mode) is selected. Try the following methods.z When the current resolution is inappropriateThis computer supports the 800x480 WVGA resolution. Since this resolution is lower than that of the operating system, the above symptom may appear when the external monitor cannot support this resolution. Change the resolution to 800x600 pixels, press the Menu button and press the LCD/CRT twice to select LCD+CRT.x When Dual View (Extended mode) is selectedWhen Dual View is selected, Clone Mode is not supported. In this case, unselect Dual View, and press the Menu button to select the Clone Mode.For the procedures to deactivate Dual View, refer to (p.33).Q7 In the Display Properties window, the resolution starts from 800x600.AEven if the current resolution is 800x480 pixels, it may be represented as 800x600 in the Dis-play Properties. This is because the lowest resolution of the operating system is 800x600 and is unable to show the 800x480 resolution in the Display Properties window.Q8 Pressing [Start] displays a [Some items cannot be shown] message.AThis message appears when all start menu items cannot be displayed in the default resolution (800x480 pixels). In this case, change the screen resolution to 800x600 pixels or press the Auto Scaler button to change the resolution.Q9 When I press the Auto Scaler button, the letters on the screen are blurry.AFor the resolutions provided by Auto Scaler, the letters on the screen may be blurred because these are not the optimal resolutions of the LCD panel.In this case, press the Auto Scaler button again and change the screen resolution to 800x480 pixels which is the default resolution of the LCD panel.](https://usermanual.wiki/Samsung-Electronics-Co/NP-Q1-C.Users-Manual-2-of-2/User-Guide-680324-Page-45.png)
![Questions and Answers 119If your network does not support DHCP, you have to manually configure an IP address by ask-ing your network administrator.In addition, even if your network supports DHCP, the Internet connection may not be available if the DHCP server fails to allocate an IP address to your computer.Q4 I have configured both wired and wireless connections with the same IP address, but the network connections do not work properly.AYou cannot use the same IP address for wired and wireless connections. To use only one IP address for both wired and wireless connections, you must disable one of them according to your requirements in Network Connections in the Control Panel.Q5 After installing the Wireless LAN Setting program, the "AEGIS Protocol (IEEE 802.1x)" protocol appears in the [Local Area Connect Properties] window.AThe protocol is a security authentication protocol that is automatically installed when the Wire-less LAN Settings program is installed and does not affect the program operation.Q6 I want to use the Wireless LAN power saving function to extend the system battery use time.AYou can configure this in the Samsung Battery Manager program. Run the Samsung Battery Manager and select Options > Wireless LAN Power Saving > On from the menu.However, this setting may affect the performance of the Wireless LAN.In addition, the wireless LAN connection might be disconnected while configuring this.](https://usermanual.wiki/Samsung-Electronics-Co/NP-Q1-C.Users-Manual-2-of-2/User-Guide-680324-Page-49.png)
![Questions and Answers 124Visit the Microsoft Web site (www.microsoft.com) regularly to check the latest list.OtherQ1 I cannot run any functions.A1 This may happen when the computer is in the HOLD status. When pressing a button or switch in the HOLD status, the Charge LED () blinks for a moment. Slide the HOLD switch down-wards and try again.A2 If the computer is running on battery power, check the battery charge status.Q2 The [Power Switch] and the [AVStation NOW] switch do not work.A1 This may happen when the computer is in the HOLD status. When pressing a button or switch in the HOLD status, the Charge LED () blinks for a moment. Slide the HOLD switch down-wards and try again.A2 To use the switch, you have to slide and hold the switch for more than 0.1 seconds. Slide and hold the switch for more than 0.1 seconds before releasing it.A3 If the computer is running on battery power, check the battery charge status.Q3 I've hidden the Taskbar, but I cannot display it again.AIf the Taskbar is behind the screen, you cannot display it with the Stylus Pen. In this case, press the Menu button to display the Taskbar again.Q4 How can I install a program onto my computer?ATo install a program to the UMPC, you have to purchase one of the following devices.For more information, refer to the Installing Programs of the 'Getting Started Guide'.● External USB ODD Designed for UMPC or other compatible external USB ODD● External USB HDD● USB Data CableQ5 Precautions for Using a Portable USB KeyboardA●When using a Portable USB Keyboard Designed for UMPC, which is sold separately, if you selected Backlit OFF (Screen Off) by pressing the <Fn>+<F5> keys, you must press the <Fn>+<F5> keys on the USB keyboard to select Backlit ON (Screen On) because if the backlight is off while using the USB keyboard, the backlight does not turn on even if you touch the computer screen. ●The Portable USB Keyboard is equipped with a Pointing Stick that can be used instead of a mouse. Another pointing stick cap is supplied with the USB keyboard. If you need to replace the cap, pull the cap out and install the new cap.](https://usermanual.wiki/Samsung-Electronics-Co/NP-Q1-C.Users-Manual-2-of-2/User-Guide-680324-Page-54.png)
![Regulatory Compliance Statements 136Translated Statements of ComplianceEuropean Economic Area RestrictionsLocal Restriction of 802.11b/802.11g Radio Usage[Note to integrator: The following statements on local restrictions must be published in all end-user documentation provided with the system or product incorporating the Wireless product.]Due to the fact that the frequencies used by 802.11b/802.11g wireless LAN devices may not yet be harmonized in all countries, 802.11b/802.11g products are designed for use in specific coun-tries or regions only, and are not allowed to be operated in countries or regions other than those designated.As a user of these products, you are responsible for ensuring that the products are used only in the countries or regions for which they were intended and for verifying that they are configured with the correct selection of frequencies and channels for the country or region of use. Any de-viation from permissible settings and restrictions in the country or region of use could be an in-fringement of local law and may be punishable as such.](https://usermanual.wiki/Samsung-Electronics-Co/NP-Q1-C.Users-Manual-2-of-2/User-Guide-680324-Page-66.png)

![Contact SAMSUNG WORLD WIDE 139Contact SAMSUNG WORLD WIDE[U.S.A. / U.K. / AUSTRALIA / HONG KONG / INDIA / MALAYSIA / SINGAPORE]Contact SAMSUNG WORLD WIDEIf you have any comments or questions regarding a Samsung product, contact the SAMSUNG Cus-tomer Care Center.[FRANCE] Comment contacter Samsung dans le mondeSi vous avez des suggestions ou des questions concernant les produits Samsung, veuillez contacter le Service Consommateurs Samsung.[GERMANY] Kontakt zu SamsungFalls Sie Fragen oder Anregungen zu Samsung-Produkten haben, wenden Sie sich bitte an den Sam-sung-Kundendienst.[SPAIN] Contacte con SAMSUNG WORLD WIDESi tiene alguna pregunta o comentario referente a nuestros productos, por favor contacte con nues-tro Servicio de Atencion al Cliente.Customer Care Center TEL WebSiteU.S.A. 1 800 SAMSUNG (7267864) www.samsung.comU.K. 0870 242 0303 www.samsung.com/ukAUSTRALIA 1300 362 603 www.samsung.com/auHONG KONG 2862 6001 www.samsung.com/hkINDIA 3030 8282 / 1600 1100 11 www.samsung.com/inMALAYSIA 1800-88-9999 www.samsung.com/mySINGAPORE 1800-SAMSUNG(7267864) www.samsung.com/sgCustomer Care Center TEL WebSiteFRANCE 08 25 08 65 65 www.samsung.frCustomer Care Center TEL WebSiteGERMANY 01805 121213 www.samsung.deCustomer Care Center TEL WebSiteSPAIN 902 10 11 30 www.samsung.com/es](https://usermanual.wiki/Samsung-Electronics-Co/NP-Q1-C.Users-Manual-2-of-2/User-Guide-680324-Page-69.png)
![Contact SAMSUNG WORLD WIDE 140[PORTUGAL] Contacte SAMSUNG GLOBALSe tem algumas dúvidas ou comentários sobre os produtos Samsung, contacte por favor a nossa linha de apoio a clientes Samsung.[RUSSIA / UKRAINE] Связывайтесь с SAMSUNG по всему мируЕсли у вас есть предложения или вопросы по продуктам Samsung, связывайтесь с информационным центром Samsung.[CHINA] [THILAND] Rev.1.1Customer Care Center TEL WebSitePORTUGAL 808 200 128 www.samsung.ptCustomer Care Center TEL WebSiteRUSSIA 8-800-200-0400 www.samsung.ruUKRAINE 8-800-502-0000 www.samsung.com/urCustomer Care Center TEL WebSiteCHINA 800-810-5858 / (010) 64751880 www.samsung.com.cnCustomer Care Center TEL WebSiteTHAILAND 1800-29-3232 / 02-689-3232 www.samsung.com/th](https://usermanual.wiki/Samsung-Electronics-Co/NP-Q1-C.Users-Manual-2-of-2/User-Guide-680324-Page-70.png)