Samsung Electronics Co NP-X11 Notebook PC User Manual Hainan English
Samsung Electronics Co Ltd Notebook PC Hainan English
UserManual.wiki
>
Samsung Electronics Co
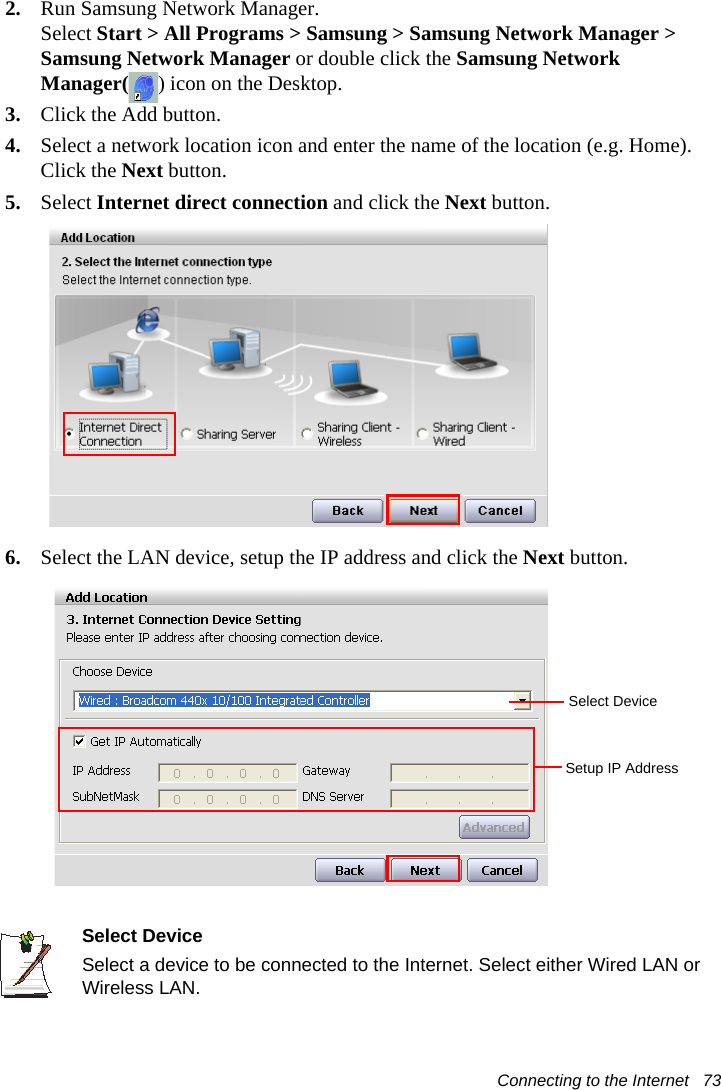
>
NP-X11 User Manual
>
Users Manual 2
Contents
1.
Users Manual 1
2.
Users Manual 2
3.
Users Manual 3
Users Manual 2
Navigation menu
Upload a User Manual
Namespaces
Wiki Guide
HTML
PDF
Info
Views
User Manual
Discussion / Help
Navigation
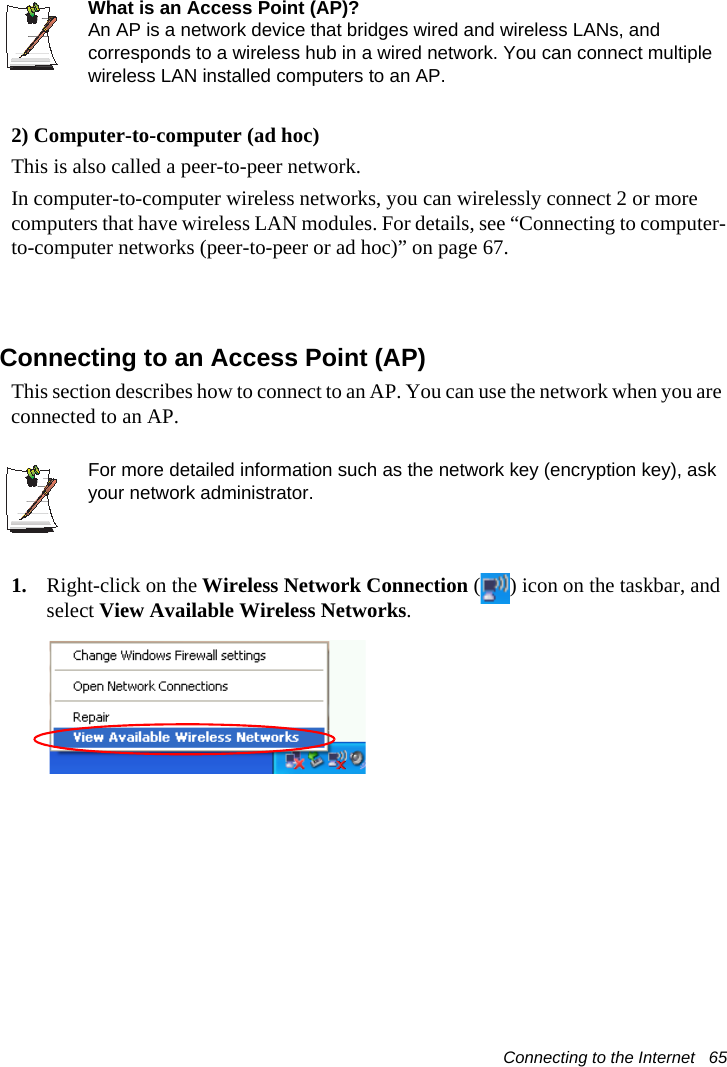
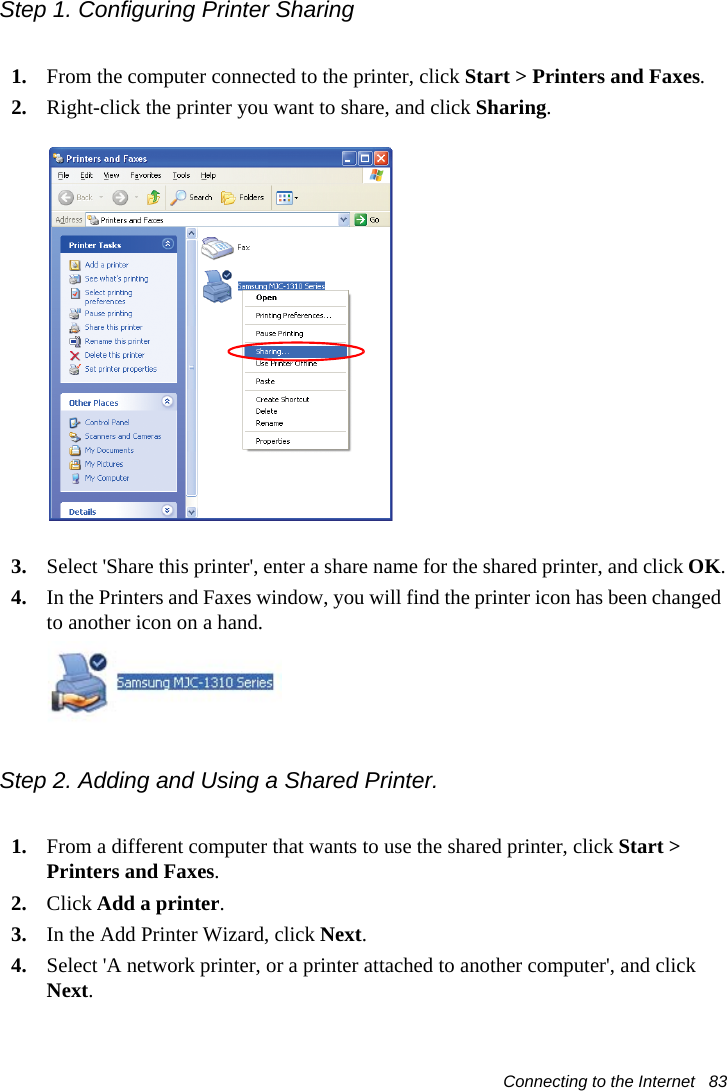
![62 Users ManualConnecting Through a Wired LAN1. Connect a LAN cable to the computer’s LAN port.2. Click Start > Control Panel.3. Click Network and Internet Connections in the [Control Panel] window.4. Click Network Connections in the [Network and Internet Connections] window.5. Right-click the Local Area Connection icon and click Properties.](https://usermanual.wiki/Samsung-Electronics-Co/NP-X11.Users-Manual-2/User-Guide-745856-Page-16.png)

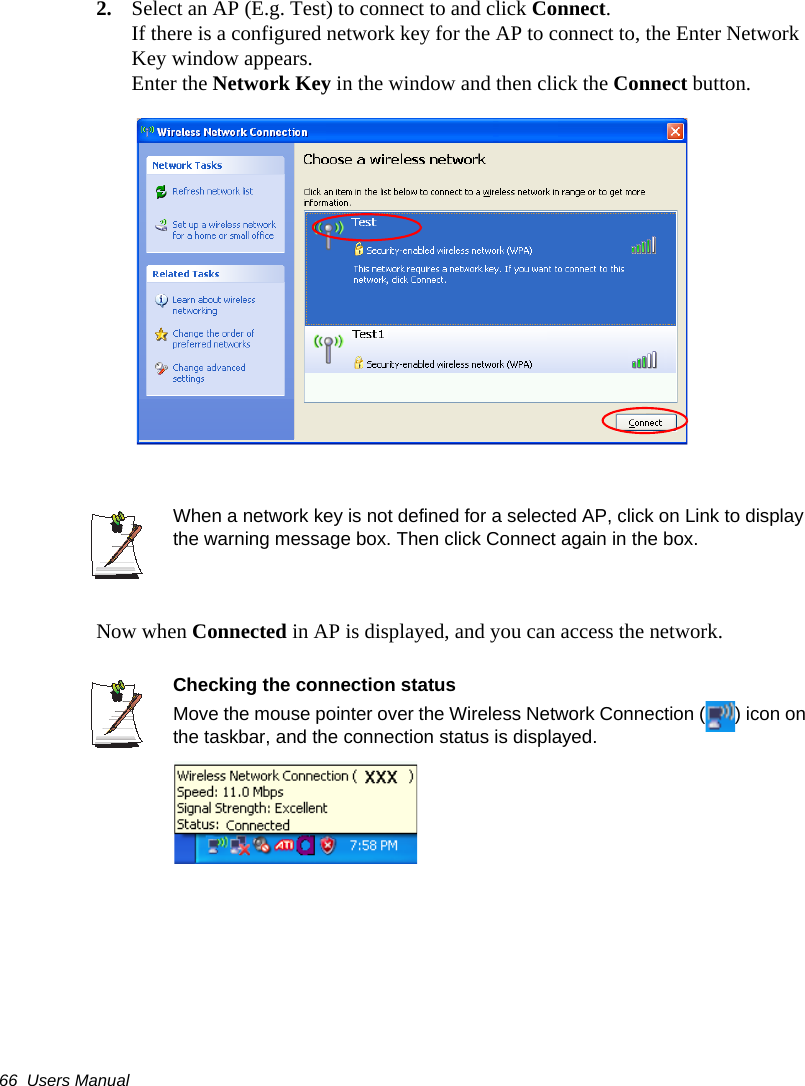
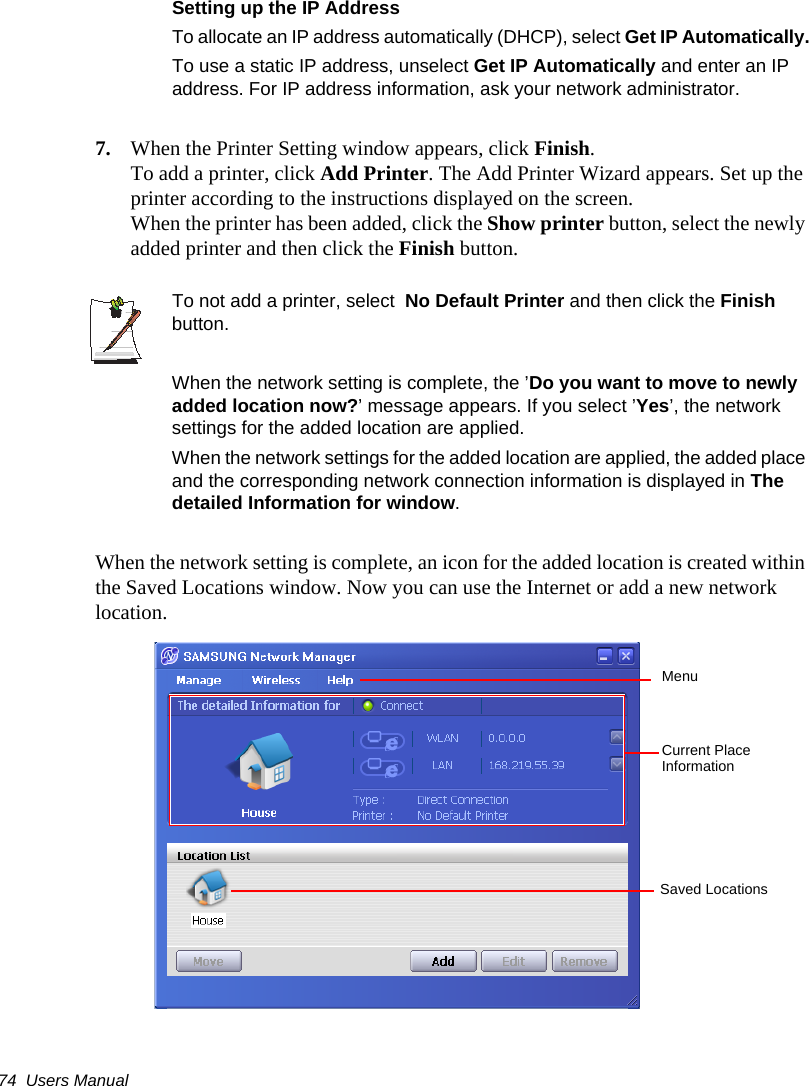
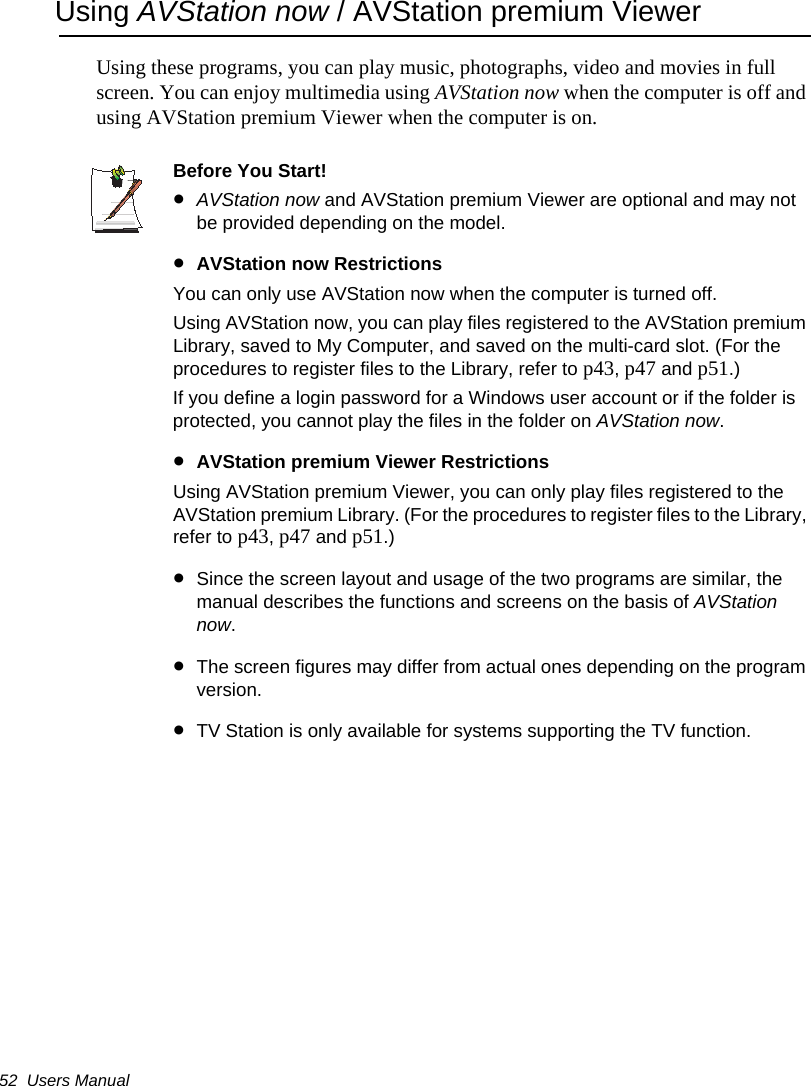
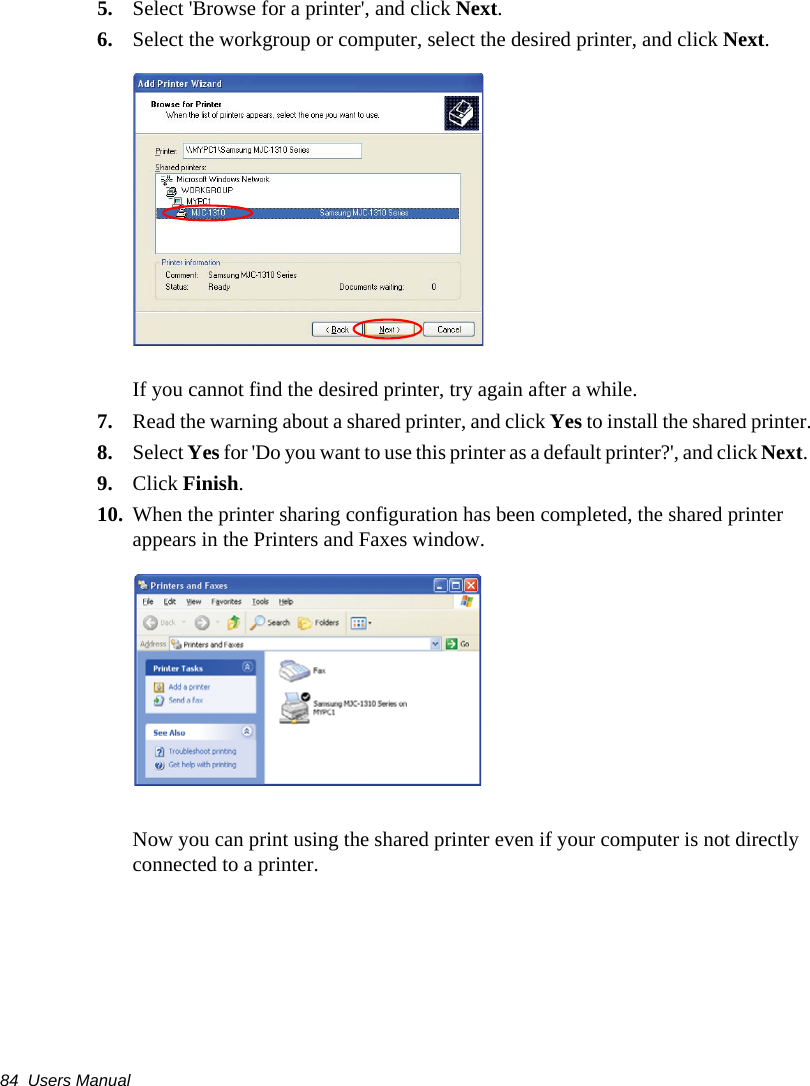
![76 Users Manual2. Select an icon that represents the corresponding location from the Saved Locations window and then click Move.3. When the network settings of the selected location are applied, the new location and the network connection information are displayed in The detailed Information for window.Sharing Internet AccessThis section describes the procedures to share Internet Access.To share Internet Access, you first have to set a sharing server and a sharing client. When the setup is complete, you can access the Internet from the sharing client by connecting to the sharing server.Sharing Server : A computer with a direct connection to the internet and a local network connection.Sharing Client : A computer that uses the Internet by connecting to a sharing server without itself having a direct connection to the Internet.You can connect a sharing server and a sharing client as follows.(See Figure 5 on page (p73))For Connection 3, you have to connect a LAN card in advance.To connect a sharing server and a sharing client using a wired LAN, connect the computers with a crossover LAN cable or network hub first.To use a wireless LAN, slide the Wireless LAN Latch into the ON position, if the wireless LAN is turned off.When the wireless LAN is turned on, the Wireless LAN Operation LED ( ) lights up.As an example, Internet sharing procedures for [Connection 1], which connect the sharing server and the Internet through a wired LAN and connect the sharing server and the sharing client through a wireless LAN, are described below.Sharing Server Sharing ClientExternal Internet Device Client DeviceConnection 1 Wired LAN Wireless LAN Connect a sharing client with the Connection 2 Wireless LAN Wired LAN device that is the same as the Connection 3 Wired LAN Wired LAN client device of the sharing server.](https://usermanual.wiki/Samsung-Electronics-Co/NP-X11.Users-Manual-2/User-Guide-745856-Page-30.png)

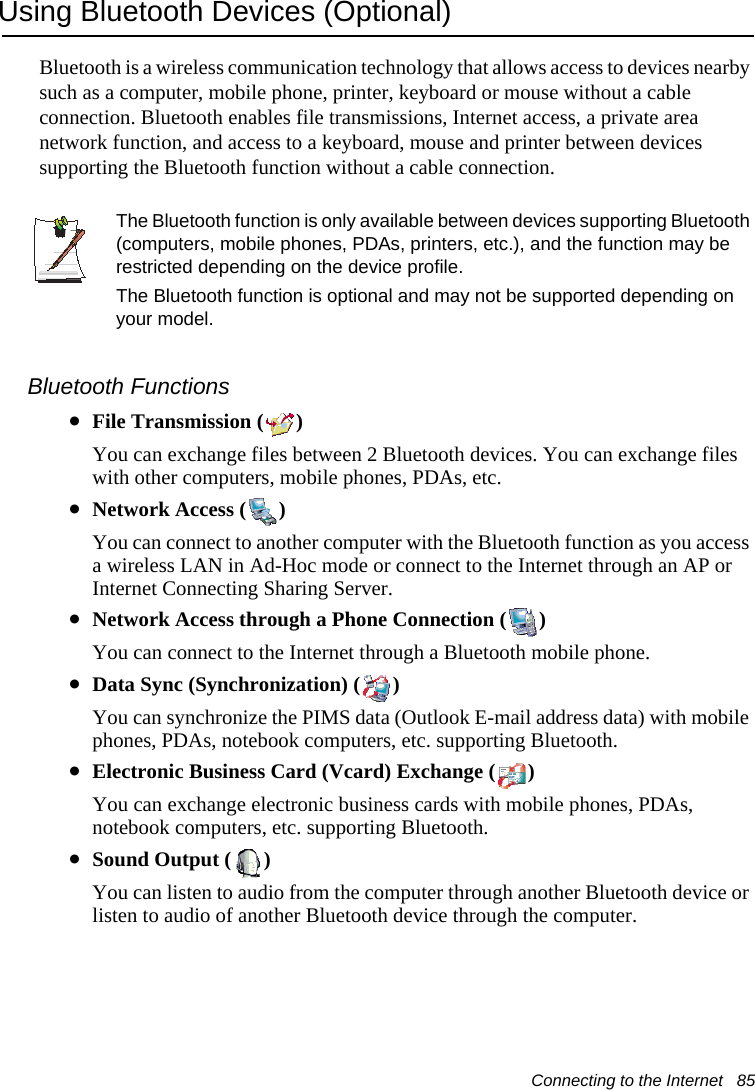

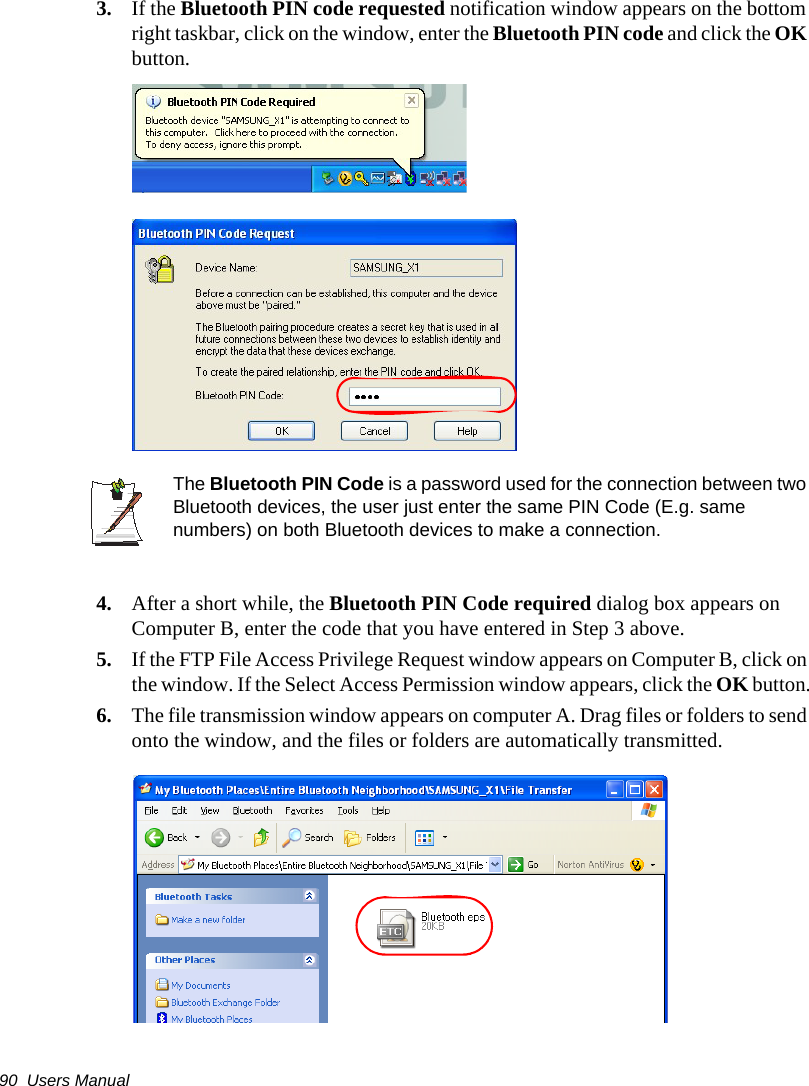
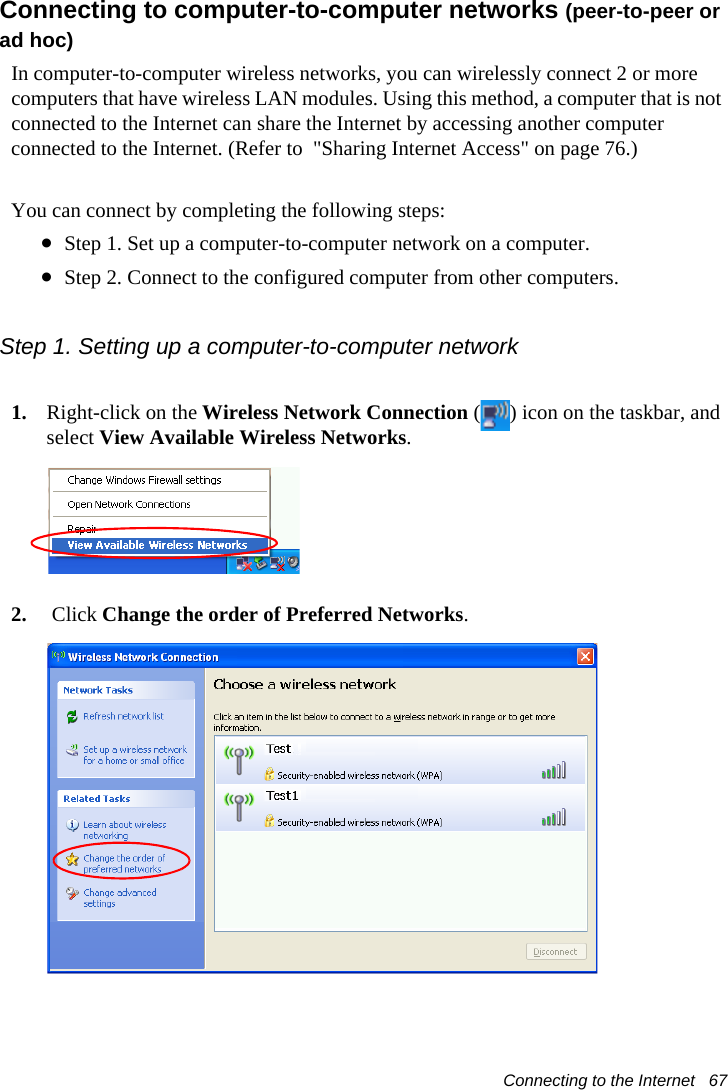
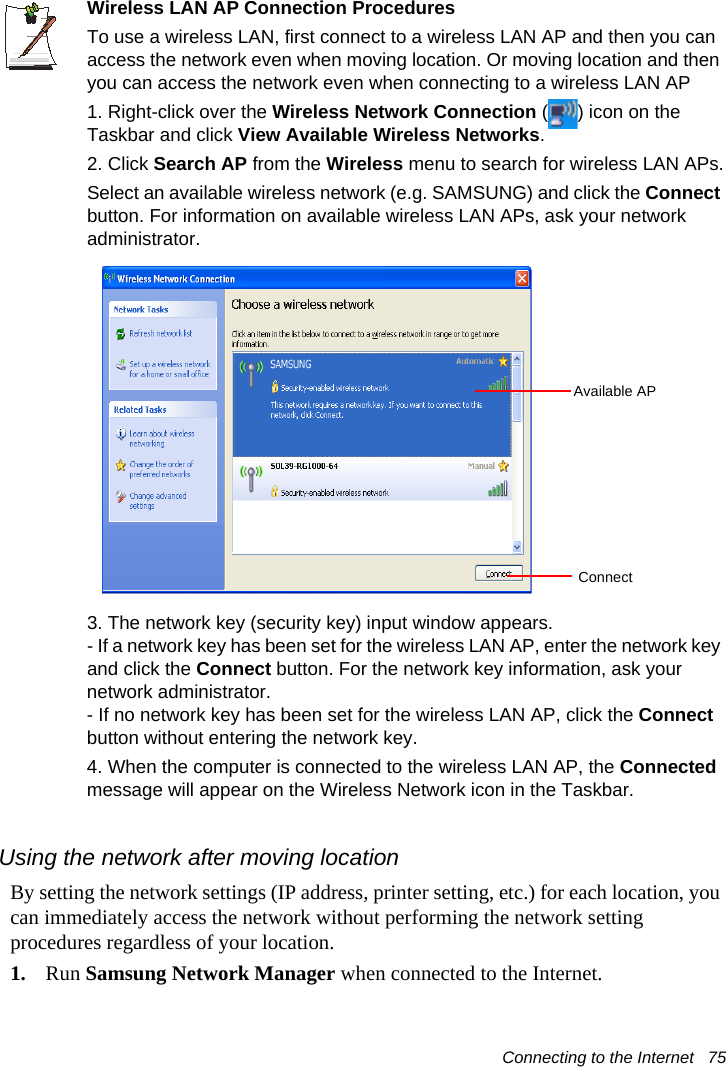
![Connecting to the Internet 917. If the file transmission is complete, close the File Transmission window.The received files are saved in the C:\Documents and Settings\[user name]\My Documents\Bluetooth Exchange folder.Connecting Keyboard, Mouse, Joystick and Headset devicesThe procedures to use Bluetooth HID devices (keyboard, mouse, joystick, etc.) or a headset, etc. on the computer are described below.The Bluetooth PIN Code is a password used for the connection between two Bluetooth devices, the user just enter the same PIN Code on both Bluetooth devices to make a connection.1. Turn on the Bluetooth function on the device to connect to (mouse, keyboard, joystick or headset).Some devices have a button to turn on the Bluetooth function, so refer to the corresponding device manual.2. Double-click on the My Bluetooth Settings icon ( ) on the Desktop.3. If the My Bluetooth Settings window appears, click on View Devices within Coverage.If the device to connect to appears, click on the device. (E.g. mouse)If the device does not appear, click the View Devices within Coverage. If the device has not appeared yet, since this menu changes to Search Devices within Coverage, click the Search Devices within Coverage to show the device.](https://usermanual.wiki/Samsung-Electronics-Co/NP-X11.Users-Manual-2/User-Guide-745856-Page-45.png)
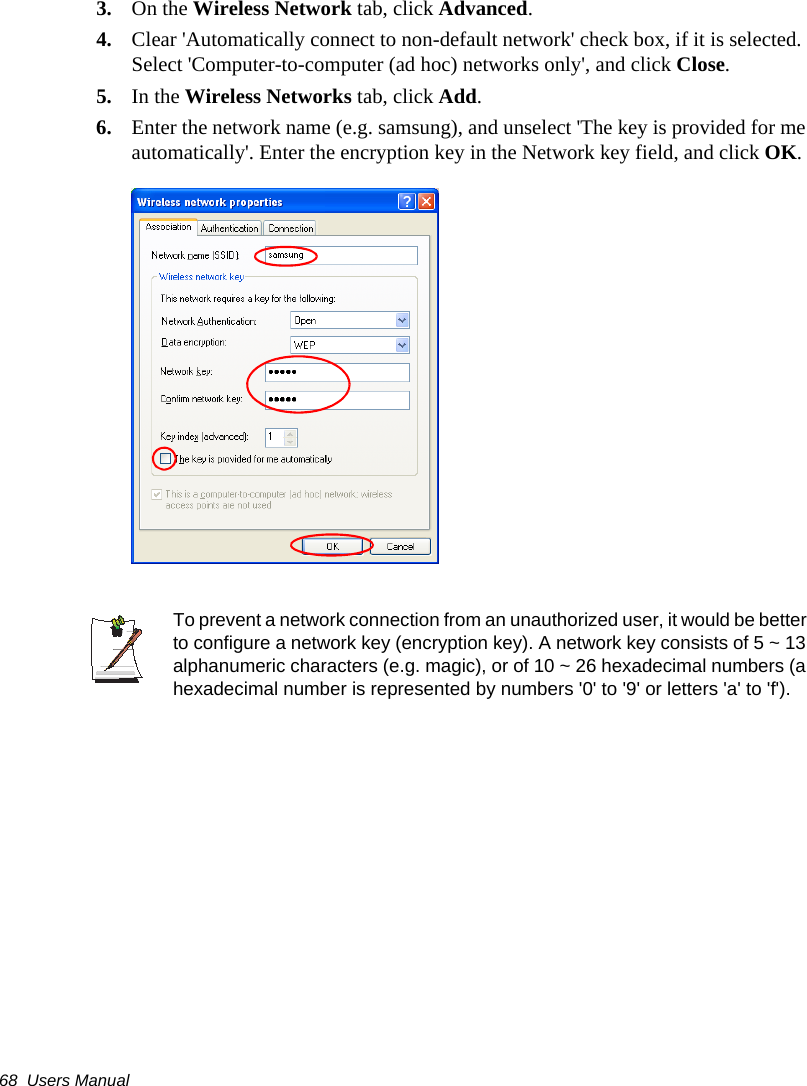
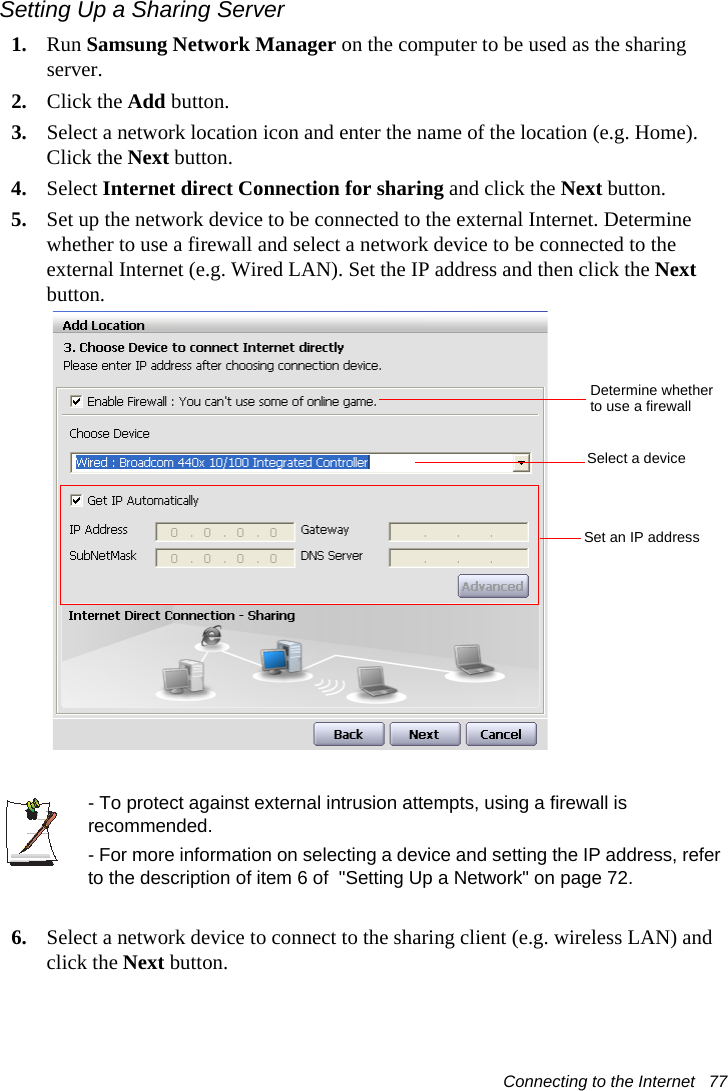
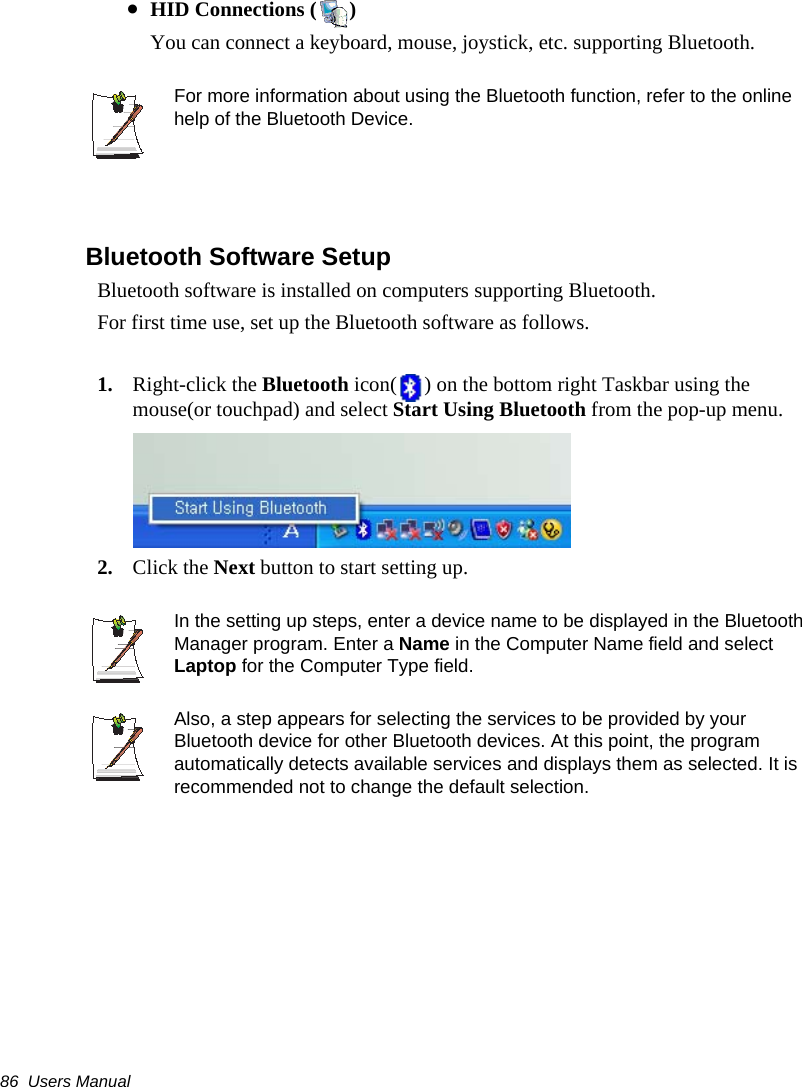
![96 Users ManualConfiguring the PasswordSetting the Supervisor PasswordBy configuring a supervisor password, you can restrict system access to authorized users only.Do not lose or forget your password. If you have forgotten your password, contact the Samsung service center. 1. Select the Security menu in the System Setup. To enter System Setup, see “Starting System Setup” on page 94.2. On the Set Supervisor Password item, press <Enter>. 3. Enter a password, press <Enter>, re-enter the password for confirmation, and press <Enter> again.4. When a message confirming the password configuration appears in the [Setup Notice] window, press <Enter>.Setting the User PasswordYou can configure user passwords so that other users can use the system.Before configuring a user password, a supervisor password must have been configured.Users can start the system with their user password, but cannot enter into the System Setup.Deactivating the supervisor password also deactivates the user password.On the Set User Password item, press <Enter>, and complete step 3-4 of "Setting the Supervisor Password".](https://usermanual.wiki/Samsung-Electronics-Co/NP-X11.Users-Manual-2/User-Guide-745856-Page-50.png)