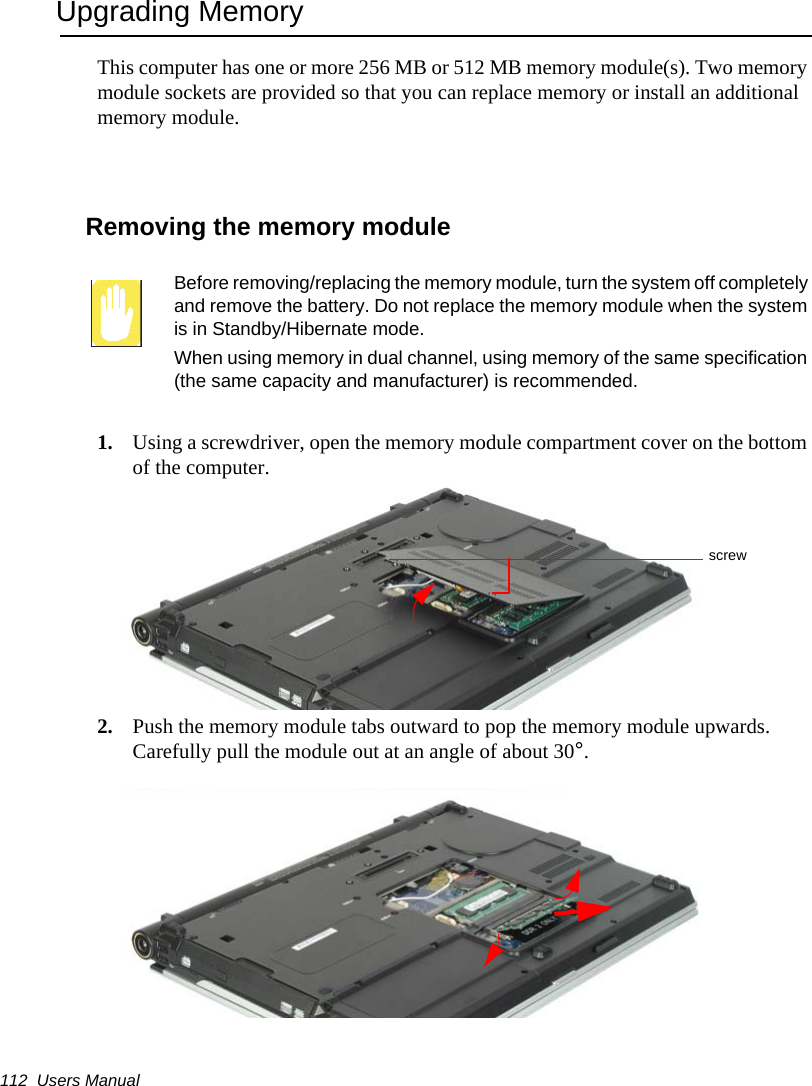
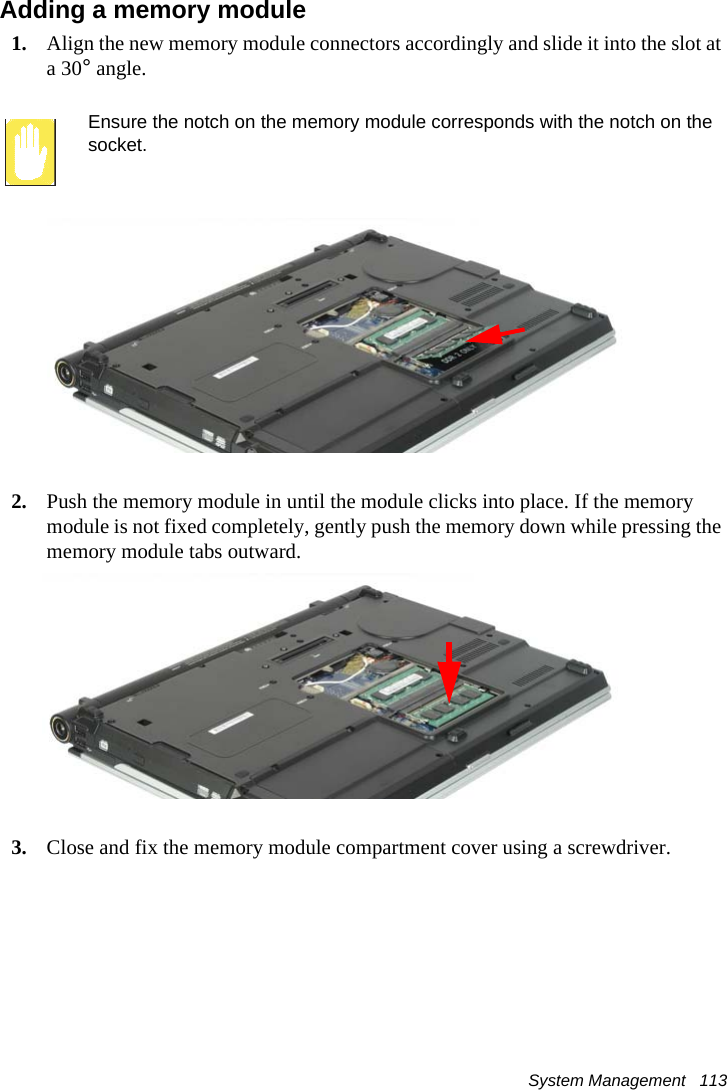
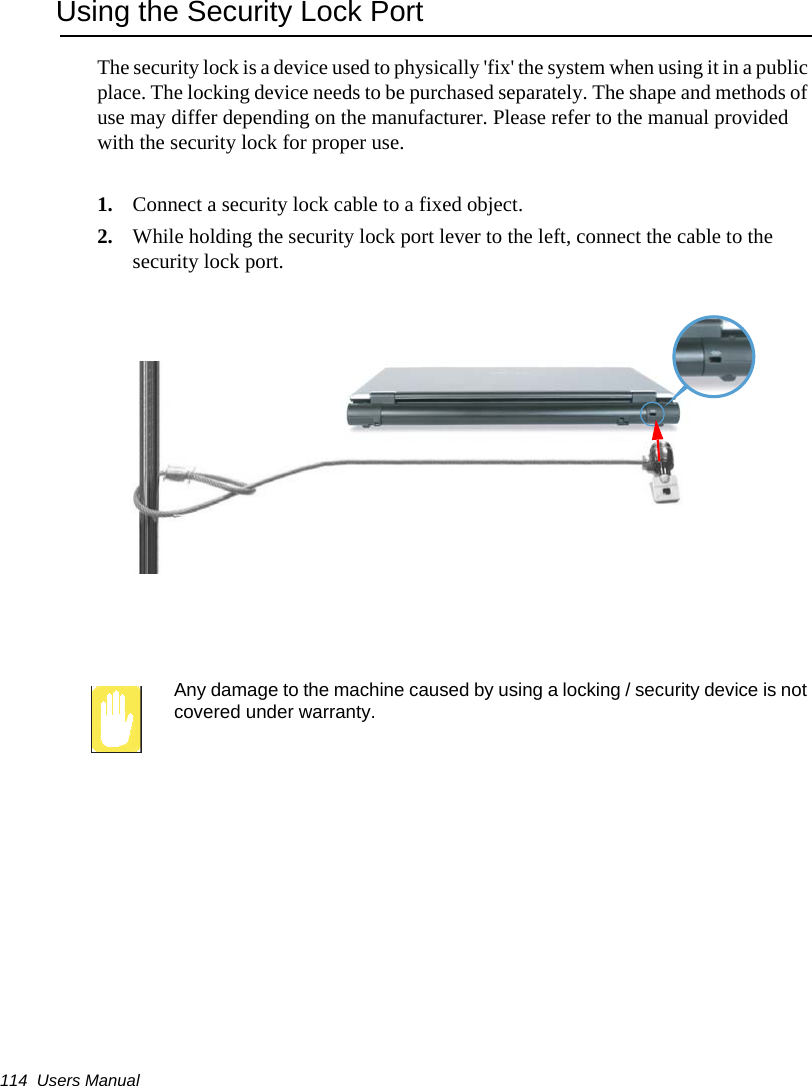
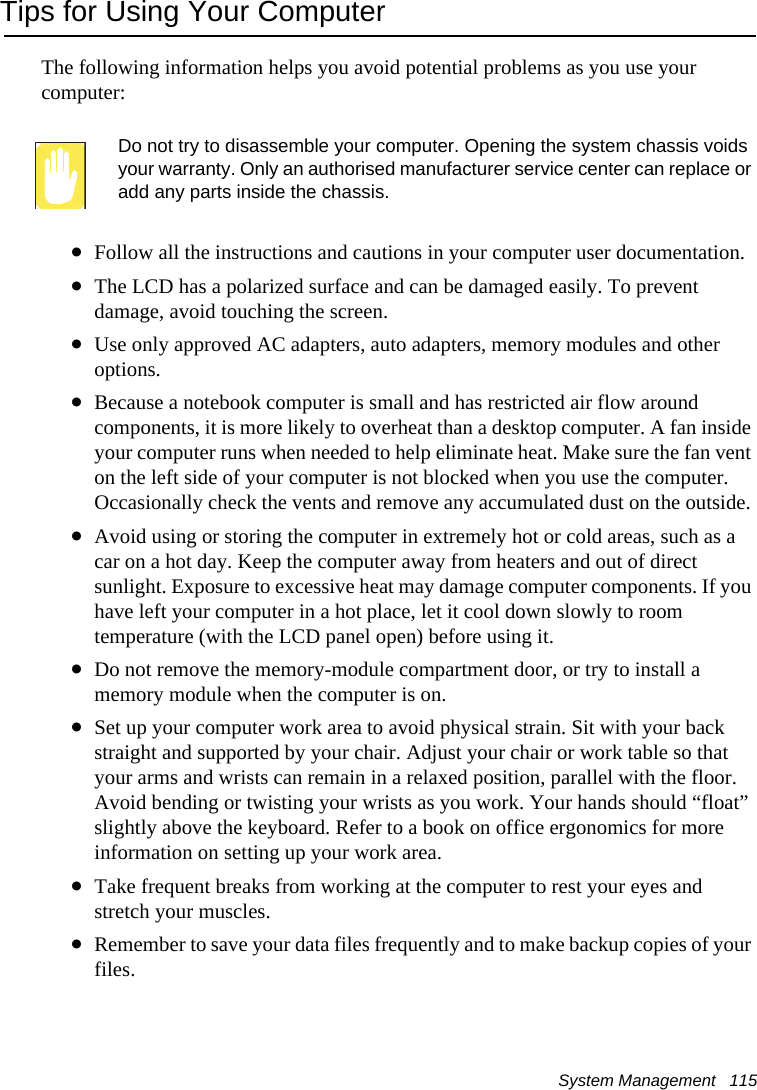
Samsung Electronics Co NP-X11 Notebook PC User Manual Hainan English

Samsung Electronics Co Ltd Notebook PC Hainan English

Contents

Users Manual 3

Customizing Your Computer   97Activating the Booting PasswordBefore activating the booting password, the supervisor password must have been configured.Set the Password on boot option to [Enabled]. From now on, system booting will not proceed without the password.Deactivating the Password1. On the password to delete, press <Enter>. (e.g. supervisor password)2. Enter the current configured password, and press <Enter>.3. Leave the 'Enter New Password' and 'Confirm New Password' field empty, and press <Enter> to deactivate the password.
98  Users ManualConfiguring Resolution and Color DepthScreen resolution is the number of pixels displayed on the screen. High resolution makes the overall screen area large, although individual items appear small. Color quality is determined by the number of bits used to represent a pixel on the screen. High color quality displays more number of colours on your screen.1. Select Start > Control Panel > Appearance and Themes > Change the screen resolution.2. Make changes on the Settings tab of the [Display Properties] dialog box.3. When you have completed configuration, click Apply.The following resolution and color quality settings are recommended depending on the LCD screen of the system.- WXGA: Screen resolution: 1280 x 800, Color quality: Very high (32bit)To change the number of colors displayed on a monitor, select an appropriate colour quality.To change your screenresolution, move the sliderto select an appropriateresolution.You can view the graphicschipset.
Customizing Your Computer   99Using External Display DevicesUsing external display devices such as monitors, projectors, TVs, etc allows you to view screen images alternatively or simultaneously on each device. Additionally, you can extend the screen onto two display devices to use a larger workspace. Using external display devices is especially useful when you are giving a presentation or watching a movie through your TV.Switching Display Devices Using the Shortcut KeyYou can watch the screen through either the LCD or an external display device, or you can even watch the screen through both the LCD and an external display device simultaneously.1. Connect the external display device (e.g. a monitor or a projector) to the corresponding port of the system. To connect a TV, connect the TV to the TV output port of the system.2. If you press the <Fn>+<F4> key combination once, the Samsung Display Manager screen appears where you can select a screen.Whenever you press the <F4> key while pressing the <Fn> key, selection moves to the next item. Select a mode.Example) Select LCD+CRTLCD: Notebook Screen   CRT: External Monitor Screen         LCD+CRT: Notebook + External Monitor Screen TV: TV Screen (connected to the TV OUT port)In the MS-DOS environment, the picture is displayed to the LCD > CRT, in turns, and output to a TV/DVI is not supported. In full screen MS-DOS mode of Windows, you cannot change the display device by pressing the shortcut key.
100  Users ManualUsing Dual View to View Extended ScreenDual View is a function that enables you to view a computer screen over two display devices. This is convenient when needing a wide screen for work.In Dual View mode, you can select the screen resolution and colour quality for each display device, as if there were two separate graphics cards.1. Connect the external display device (e.g. a monitor or a projector) to the corresponding port of the system. To connect a TV, connect the TV to the TV output port of the system.2. Press touchpad right button on the desktop, click Properties, and then click the Settings tab.3. Click the monitor '2' icon, select the 'Extend my Windows desktop onto this monitor' check box, and then click Apply.4. When the configuration is complete, click Identify on the left side of Troubleshoot. The primary display device(the LCD) is indicated as '1', and the
Customizing Your Computer   101secondary display device is indicated as '2'. Now you can view the screen through two monitors.   When you use Dual View, configuring the LCD as the 'Primary' monitor is recommended.If the screen of the secondary display device is displayed at 640x480 pixels, with 256 colours, change the settings to the desired screen resolution and colour quality in the [Display Properties] dialog box.When Dual view is not properly set up, refer to Q&A. (p123)Deactivating Dual View ModeClick the monitor '2' icon, clear the 'Extend my Windows desktop onto this monitor' check box, and then click Apply.To move a window between display devices in Dual View modeClick the title bar of the window in the primary display device (1, the LCD), and drag it to the secondary display device (2). The window is moved to the secondary display device.2 : Secondary1 : Primary
102  Users ManualSystem ManagementUsing Power Management OptionsYour computer includes Power Management options that can help the battery charge last longer and extend the life of the battery. Power-management options will slow down or shut off system components when the components are not being used. Power management may slow down system performance. Your computer runs fastest with the power cord attached, whereby power management is disabled.In the next sections, basic and advanced methods of power management will be discussed.Basic Power Management SchemesThis section discusses the basic schemes of power management when the computer is operating on battery power or using AC power.Standby vs. HibernationHibernation is a state where the contents of memory are stored in a special file on the hard disk, and Standby simply keeps a small holding current through the memory to keep the data. You are more likely to sustain loss of data in Standby mode so it is recommended to save all open files before entering Standby. Changing Devices:Do not change PC Cards while in standby or hibernate modes.To enter the power management window complete the following:1. Click Start > Control Panel > Performance and Maintenance.2. Click   icon to display the Power Options Properties window.
System Management   1033. Click the Power Schemes tab to display the basic power management options.By default, the power scheme is configured to BatteryMgr-normal mode. BatteryMgr-normal mode extends the battery life and optimizes the Intel Speedstep function. Since the CPU power consumption is automatically optimized to conserve power when the computer is operating on battery power, an application may be executed slower than when it is operating on AC power.To use BatteryMgr-normal mode after reinstalling Windows, install the Battery Manager program using the system software Media.4. Select the time that you wish each of the following actions to occur in Battery and AC power mode.•Turn off monitor•Turn off hard disks•System standby•System hibernatesTurning off the monitor and HDDs will save a substantial amount of battery power, therefore when in battery only mode select the shortest time practical.You can also reserve Turning Computer Off, Hibernation state, Hold Mode, etc. by selecting System > Computer Scheduling in the EasyBox program. (see “Using EasyBox” on page 35.)If you change the power settings in the Battery Manager program, the settings of the 'Power Options Properties' window are automatically changed accordingly ("Using the Battery Manager" (p110)).
104  Users ManualHibernate Mode (Power Management or Manual Method)When hibernation is used, your computer turns off and when you power up again, everything is restored exactly as you left it—including programs and documents you may not have saved or closed. Everything in memory gets saved to the HDD, and the monitor and hard disk get turned off.If You Reinstall Windows:You should re-establish hibernate in power options by opening Power Options Properties window and click on the Hibernate tab then click “Enable Hibernation”.Frequent Interruptions:If you experience frequent interruptions, you might also consider putting your computer into automatic hibernation after a specified number of minutes using the power management options.Standby Mode (Power Management or Manual Method)Standby is used mainly for conserving battery power in your notebook computer. It also gives you the benefit of getting right back to your work without waiting for the computer to restart. Standby turns off your monitor and hard disks, placing your entire system in a low-power state. When you return to your computer, restores your desktop exactly as you left it. It is recommended that you do not enter standby mode with less than 20% battery power.5. Click OK to set your power management options and close the window.Hibernate Tab
System Management   105Rest Key:The manual <Fn+Esc/ > key combination will not activate Standby or Hibernate modes while you are playing a multimedia program or have an active USB device connected.Advanced Power Management SchemesThis section discusses the advanced power management schemes. There are two buttons that you can use to manually conserve power.To enter the power management window complete the following:1. Click Start > Control Panel > Performance and Maintenance.2. Click   icon to display the Power Options Properties window.3. Click the Advanced tab to display the advanced power management options.4. Select the mode (Do nothing/Ask me what to do/Standby/Hibernate/Shut down) assigned to the Power button and/or Rest <Esc/ > key. Also select the action (Do nothing/Standby/Hibernate) associated with closing the computer lid.Advanced TabPower  & Sleep Button Programming Windows
106  Users ManualThe “Rest” key is assigned to the <Fn+Esc/ > key combination.  "Basic Power Management Schemes" on page 102 for a better understanding of Standby and Hibernate modes.5. Click OK to set your power management options and close the window.You can return to normal operation after you have used one of the “Power Management” buttons by quickly pushing and releasing the Power button.
System Management   107Using the BatteryPlease refer to the following instructions when running the computer on battery power without connecting the AC power.Precautions•Use only chargers specified in the User Manual.•Never heat the battery pack, put it near or in a fire or use at a temperature higher than 60°C, as this may cause fire.•Never cause a short circuit between the battery pack terminals or disassemble the battery pack. •Carefully read and follow the precautions printed on the battery and the safety instructions in the User Manual before using the battery.Please read the instructions on the battery before use.Please refer to the system operation environment (p153) of this manual and operate and store the battery at room temperature.Ejecting and Attaching Battery1. Shutdown the system and close LCD.2. Put the computer upside down on a flat surface.3. Pull the two battery latches outward.( ), then remove the battery.
108  Users Manual4. To install the battery again, slide the battery into the system as below. The battery latches move inward, and fix the battery automatically.Monitoring the Battery ChargeYou can view the battery charge status by completing the following procedures.To use the shortcut key to viewIf you press the <Fn>+<F2/ > key combination on the keyboard, the remaining battery charge appears on the screen for a while. It appears only when the Samsung Display Manager program is installed on your computer. To view on the batteryClick the PUSH button on the battery. The remaining battery charge (%) will be displayed.Push button
System Management   109To view through the Control PanelSelect Start > Control Panel > Performance and Maintenance > Power Option > Power Measure tab.Then you can view the current power source and the current remaining battery charge.Using the batteryBattery is an expendable supply, so when you use it for a long time, the capacity/battery life is shortened. If the battery life is reduced to under half of the initial time, we recommend that you purchase a new battery to use.Battery WarningYou will hear an alarm when the remaining battery charge is under 10%. Connect the power cable or turn off the computer and install a fully charged battery.When the remaining battery charge is under 3%, the computer automatically saves current work and turns off. This may be different according to the settings in Control Panel > Performance and Maintenance > Power Options > Alarms tab.Power Supply StatusRemaining Battery Charge
110  Users ManualExtending the battery use timeDecreasing the LCD BrightnessDecreasing the LCD brightness by pressing the <Fn>+< > key combination on the keyboard or adjusting the brightness in the Battery Manager program extends the battery use time. Decreasing the LCD brightness by one level extends the battery use time by 3~5% (10~20 minutes). (The battery use time is determined by the corresponding model.)Using the Battery ManagerBattery Manager is a power management program that enables using battery power efficiently.You can easily change the power mode by selecting an optimized power mode and manually optimizing the battery use time by setting each option.Click on Start > All Programs > Samsung > Samsung Battery Manager > Samsung Battery Manager.• Maximum Battery Saving Mode : This mode is appropriate for conditions which require the maximum battery use time. This may degrade the performance of the system.• Normal Mode : This mode is appropriate for normal conditions. Both system performance and battery use time are optimized.Change PowerModeYou can only change the detailed configuration in Custom Mode.Power Saving Effects
System Management   111• Maximum Performance Mode  : This mode is appropriate for conditions that require maximum system performance.Therefore, the battery usage time may be reduced in this mode.• Custom Mode : In this mode, a user can configure a detailed configuration to save the battery usage time. You can adjust the LCD brightness, the system standby time, the screen color quality, and the graphic mode values.Power Saving EffectThis shows the relative battery use time for each power mode. The more effective the power saving, the longer the graph will appear.When Running a Game or Multimedia ApplicationA game or multimedia application may not work smoothly in Maximum Battery Saving Mode. Using this is recommended when the AC adapter is connected or in Normal or higher modes.Turning Off Unnecessary DevicesTurning off unnecessary devices extends the battery use time.Select the Start > Control Panel > Performance and Maintenance > System > Hardware tab and click Device Manager. Right-click a device you are not using, and select 'Disable' (e.g. wireless LAN,  1394 etc.)Battery Calibration If you charge/discharge the battery repeatedly for only a short time, the battery use time may be reduced by the difference between the actual battery charge and the remaining charge display. In this case, the actual battery charge and the remaining charge display will be same by discharging the battery completely using the Battery Calibration function, and then recharging it again.1. Disconnect the AC power adapter after turning off the system.2. Restart your computer and press <F2> to enter BIOS setup.3. Using the arrow keys, highlight Smart Battery Calibration in the Boot menu. The Battery Calibration function is activated and the battery is discharged forcibly. This operation requires 3~5 hours depending on the battery capacity and the remaining battery charge.4. When the calibration process is complete, recharge the battery fully.
112  Users ManualUpgrading MemoryThis computer has one or more 256 MB or 512 MB memory module(s). Two memory module sockets are provided so that you can replace memory or install an additional memory module.Removing the memory moduleBefore removing/replacing the memory module, turn the system off completely and remove the battery. Do not replace the memory module when the system is in Standby/Hibernate mode.When using memory in dual channel, using memory of the same specification (the same capacity and manufacturer) is recommended.1. Using a screwdriver, open the memory module compartment cover on the bottom of the computer.2. Push the memory module tabs outward to pop the memory module upwards. Carefully pull the module out at an angle of about 30°.screw
System Management   113Adding a memory module1. Align the new memory module connectors accordingly and slide it into the slot at a 30° angle.Ensure the notch on the memory module corresponds with the notch on the socket.2. Push the memory module in until the module clicks into place. If the memory module is not fixed completely, gently push the memory down while pressing the memory module tabs outward.3. Close and fix the memory module compartment cover using a screwdriver.
114  Users ManualUsing the Security Lock PortThe security lock is a device used to physically 'fix' the system when using it in a public place. The locking device needs to be purchased separately. The shape and methods of use may differ depending on the manufacturer. Please refer to the manual provided with the security lock for proper use.1. Connect a security lock cable to a fixed object.2. While holding the security lock port lever to the left, connect the cable to the security lock port.Any damage to the machine caused by using a locking / security device is not covered under warranty.
System Management   115Tips for Using Your ComputerThe following information helps you avoid potential problems as you use your computer:Do not try to disassemble your computer. Opening the system chassis voids your warranty. Only an authorised manufacturer service center can replace or add any parts inside the chassis.•Follow all the instructions and cautions in your computer user documentation.•The LCD has a polarized surface and can be damaged easily. To prevent damage, avoid touching the screen.•Use only approved AC adapters, auto adapters, memory modules and other options.•Because a notebook computer is small and has restricted air flow around components, it is more likely to overheat than a desktop computer. A fan inside your computer runs when needed to help eliminate heat. Make sure the fan vent on the left side of your computer is not blocked when you use the computer. Occasionally check the vents and remove any accumulated dust on the outside. •Avoid using or storing the computer in extremely hot or cold areas, such as a car on a hot day. Keep the computer away from heaters and out of direct sunlight. Exposure to excessive heat may damage computer components. If you have left your computer in a hot place, let it cool down slowly to room temperature (with the LCD panel open) before using it.•Do not remove the memory-module compartment door, or try to install a memory module when the computer is on.•Set up your computer work area to avoid physical strain. Sit with your back straight and supported by your chair. Adjust your chair or work table so that your arms and wrists can remain in a relaxed position, parallel with the floor. Avoid bending or twisting your wrists as you work. Your hands should “float” slightly above the keyboard. Refer to a book on office ergonomics for more information on setting up your work area.•Take frequent breaks from working at the computer to rest your eyes and stretch your muscles. •Remember to save your data files frequently and to make backup copies of your files.
116  Users Manual•A walkie-talkie must be kept more than 1 meter away from the device.Since a walkie-talkie transmits a very strong signal, it may cause a computer malfunction.Travelling with Your ComputerAir TravelIf you are travelling by air, follow these tips:•Take the computer with you as carry-on luggage. Do not check the computer with your baggage.•Allow the computer and disks to go through the X-ray security devices. Do not hand-carry disks through the walk-through metal detectors, which can cause loss of data.•Be prepared to turn off the computer during take off and landing.Please follow the instruction of the corresponding facilities regarding the use of wireless devices (wireless LAN, Bluetooth , etc.) when in a wireless communication restricted area (e.g. airplane, hospital , etc.).Handling SpillsDo not spill anything on your computer. The best way to avoid spills is to avoid eating and drinking around your computer. If you do spill something on your computer, turn off your computer, unplug it immediately, and do the following:•If you spill liquid on the keyboard, drain as much of the liquid from the keyboard as possible. Be careful not to let the liquid drip onto the LCD panel. Allow the system to dry for several days before trying to use it.•If you spill liquid on an external keyboard or keypad, unplug it and drain as much of the liquid as possible. Allow the keyboard to sit at room temperature for a full day before trying to use it.
System Management   117Sweet liquids leave a sticky residue that may jam the keyboard despite your efforts to dry it.•If you spill liquid on the LCD panel, clean it immediately with a soft cloth and denatured alcohol or a proprietary LCD screen cleaner. Do not use water, window cleaner, acetone, aromatic solvent, or dry, rough towels to clean it.Some liquids damage the polarized LCD screen. If your screen is damaged, contact your authorized manufacturer’s service center for a replacement.Storing the Computer for Long PeriodsIf you will not be using the computer for a long period of time (a month or more), you should discharge the battery completely then remove the battery from the computer. This extends the life of the battery.
118  Users ManualTroubleshootingComplete the following in the order presented until your system is functioning properly. If all of the steps below fail then contact your local reseller for assistance.Questions and AnswersPlease see “Questions and Answers” on page 120 for assistance in correcting any computer operational problems.Check the ConnectionsVerify all of the power and peripheral cables are securely plugged into their sockets and that your system and power supply is on.Norton AntiVirus Run Norton AntiVirus to ensure a virus is not affecting your computer.To run Norton AntiVirus proceed as follows:Click Start > All Programs > Norton AntiVirus > Norton AntiVirus 20xx.Magic DoctorMagic Doctor is a program developed and distributed by Samsung Computer and is used to troubleshoot problems. Since this program enables you to diagnose your system with one-click, try to diagnosis your system with Magic Doctor. Click Start > All Programs > Samsung > Magic Doctor > Magic Doctor. (p142)Windows Help and SupportRun Windows Help and Support to find problem that may be affecting your computer.To run Windows Help and Support proceed as follows:Click Start > Help and Support.Frequently Asked QuestionsTo view FAQ’s on your computer, please visit www.samsungpc.com.Reinstalling SoftwareIf for some reason your system crashes you may corrupt your HDD, Windows operating system and/or some of your device drivers. If this is the case, use System Recovery CD to reinstall OS and System Software Media to reinstall the corrupt device drivers.
Troubleshooting   119System Recovery Precaution:Before you start restoring your windows operating system insure you backup all data on your hard drive. Samsung is NOT responsible for any data loss.
120  Users ManualQuestions and AnswersThis section provides information on possible problems, solutions and other references for system use.Windows Related Q1 The system does not shutdown properly.AWhen the system does not shutdown normally, press and hold the Power button until the system manually shuts off. If the Power-Saving Mode is configured into the Power button, press and hold for more than 4 seconds to shut the system off. When the system is turned on after such manual shutdown, Scandisk will run to check errors in the system. Q2 The system freezes during program operationA1 There is an error with the program currently being used. Press the <Ctrl>, <Alt>, and <Delete> keys simultaneously and click End Task in the [Windows Task Manager] window. A2 There is an error with the Windows OS. Reboot the system by using the Power button.
Troubleshooting   121Display RelatedQ1 The LCD screen is too dark or too brightATurn on the LCD backlight or adjust the screen brightness. Press <Fn>+<F5> to turn on the LCD backlight or press <Fn>+< >, <Fn>+< > to adjust the screen brightness.Q2 The screen saver disturbs screen viewing during Media Player or video file operation.AUnselect Tools > Options > Player > Allow screen saver during playback in the Media Player.Q3 In DOS mode, changing the full screen DOS mode by pressing <ALT>+<Enter> key displays a broken image for a short period.AThe DOS mode which supports 2 Byte characters such as Korean and Japanese runs in graphic not in text mode. In this case, a broken image may be displayed while changing the video mode settings.Q4 In the following cases, the screen blinks or displays noise for a short time (This only applies to nVidia graphics card.):(Click the Graphics Related tab, Change Resolution, Change Display Device, Remove the AC Adapter, Restart the System, Change PowerMizer level.)AThis may happen while the video driver is examining the connected device. While detecting, any connected display devices may blink or some noise may occur.Q5 When I connect a projector, and change the setting to display screen image on both the LCD and the projector by pressing <Fn>+<F4/ > keys, screen is not displayed properly.APress <Fn>+<F4/ > keys once again.If the same problem continues, it means the projector cannot support the resolution. Lower the resolution to 1024 x 768.
122  Users ManualQ6 The playback screen of a DVD title or an MPEG file is only displayed on the LCD. (This only applies to nVidia graphics card.)AVideo is displayed on a single display device by default, when LCD and CRT are selected simultaneously.1. Right-click over the Desktop and select Properties from the pop-up menu.2. In the [Display Properties] window, select the Settings tab > Advanced > GeForce Go xxxx tab.3. Select the Full Screen Video menu> Full Screen Video Control item, set the Full Screen Device to 'Auxiliary Display' and then click the Apply button. Then you can view video on both the LCD and CRT display devices.Q7 After connecting to a TV, some programs such as Debug, Mem, etc. do not run in full screen MS-DOS mode.AIf a TV is used as the display device, some programs such as Debug, Mem, etc. may not run properly in full screen MS-DOS mode. Run the programs in the MS-DOS window.Q8 The Taskbar on the bottom of the screen does not appear when a projector is used as the display device. AA This may happen, even though SXGA+ LCD supports the 1400°ø1050 mode, the projector does not support that mode. In this case change the resolution to 1024x768 (recommended) on your computer.Q9 Switching the MS-DOS command prompt to full screen mode or Windows mode by pressing the <Alt>+<Enter> keys does not operate properly.APressing the <Alt>+<Enter> keys using an USB keyboard, may cause the key input to be recognized as multiple key inputs depending on the keyboard input recognition time. In this case, the MS-DOS command prompt is repeatedly switched to full screen and then to Windows several times. Please press the <Alt>+<Enter> keys more quickly, or press the <Alt>+<Enter> keys using the system keyboard.Q10 When a TV is connected, the Turn off monitor power option is not performed.AWhen connecting a TV after booting up your computer, the Turn off monitor power option may not be performed. For it to operate properly, it is recommended to connect a TV and then booting up the computer.
Troubleshooting   123Q11 Pressing the shortcut key on the keyboard does not show the Samsung Display Manager icon.AThe Samsung Display Manager icon only appears when both the Magic Keyboard and the Samsung Display Manager program are installed.Q12 I cannot set up Dual View properly. (For Intel Graphics only.)AThis may happen when Clone mode is selected for an external monitor.Press the <Fn>+<F4> key combination to select LCD and try to set up Dual View again. Q13 The screen is rotated, but I cannot return it to the original orientation. AThis may happen when you have used the screen pivot function or pressed a wrong key while using the computer. For Intel Graphics, press the Ctrl+Alt+Direction Key ( ↑: rotate 0 degrees, →: rotate 270 degrees, ↓: rotate 180 degrees, ←: rotate 90 degrees) to return to the original orientation. For other graphics cards, use the rotation mode of the Advanced menu supported by the corresponding graphics card company.Q14 The color is strange when the picture is displayed on the connected monitor (or projector).A Check the monitor signal cable connection and reconnect the cable.
124  Users ManualSound RelatedQ1 How to install and uninstall the sound driverATo install or uninstall the sound driver from this system, please follow the procedures below.•Sound Driver ComponentsThe sound driver consists of the following 3 components and the 3 components are automatically installed during the installation.–High Definition Audio - KB888111: Microsoft UAA Bus Driver for High Definition Audio–SoundMAX: SoundMAX Integrated Digital HD Audio–WOW XT and TSXT Filter Driver: SRS•Uninstalling the Sound DriverTo remove the sound driver due to a problem or for an update, follow the procedures below.If you do not follow the sequence below, the sound driver may not be removed or the reinstalled driver, or may not work properly.1. Select Start > Control Panel > Add or Remove Programs.2. Remove WOW XT and TSXT Filter Driver first.3. Remove SoundMAX and restart the computer.Do not remove the High Definition Audio item. Removing this item also removes the modem device driver.If you have removed this item, you need to install the modem device driver again.•Reinstalling the Sound DriverIf there is an already installed sound driver, uninstall the driver according to the procedures above. The sound driver is included on the System Software Media.1. Insert the System Software CD-ROM into the CD-ROM drive.2. Select the Sound Driver on either Standard Installation or Custom Installation, then the 3 components of the sound driver are automatically installed.
Troubleshooting   125•Installing the Sound Driver after a Windows XP ReinstallationIf you install the sound driver after reinstalling Windows XP, the Add Hardware Wizard (Modem Device) window may appear during the sound driver installation. This happens because the High Definition Audio - KB888111 Hotfix, which has been installed on your system, has changed the settings to search for both sound and modem devices. If you install the modem device, this message will not appear. If necessary, install the modem device together.The number of the High Definition Audio - KB888111 Hotfix may differ if you have updated the Hotfix from the Microsoft web site.
126  Users ManualModem RelatedQ1 I cannot hear the modem sound.A1 Check that the telephone line is properly connected to the modem.A2 Check that the modem driver is installed properly.1.  Click Start > Control Panel > Performance and Maintenance > System.2.  Select Hardware tab > Device Manager > Modems in the System Properties window, and check if there is a yellow exclamation mark on the installed modem icon. If there is, delete the modem device driver and reinstall the driver, because the yellow exclamation mark represents a not properly installed driver.3.  If there is no yellow exclamation mark, double-click the installed modem, and click Diagnostics tab > Query Modem in the Modem Properties window to diagnose the modem.No message in either of Command and Response in the Diagnostics tab means that the modem is not operating properly. Diagnose the modem again after restarting the system or reinstalling the driver. (You have to exit all programs using modem in the advance of diagnostics of the modem).Q2 I cannot make a call using an extension line.AIn general, the dial tone of a PBX or a digital phone switching system is not a continuous one, unlike that of a trunk line. Therefore, the modem may not make a call because the modem mistakes the dial tone from a PBX or a digital phone switching system as a busy tone. In this case, complete the following procedures.- Using an AT commandAs an initialization command, use the command, ATX3. Otherwise, enter the ATX3 command manually before making a call. It can correct this problem by skipping the dial tone check step.- Configuring the Modem through the Control Panel1.  Click Start > Control Panel > Network and Internet Connections.2.  Under See Also, click Phone and Modem Options.3.  In the Modems tab, select the installed modem, and click Properties.
Troubleshooting   1274.  In the Modem tab of the Modem Properties window, clear the 'Wait for dial tone before dialing' check box.5.  When the configuration is completed, click OK.Q3 How do I use my modem when dialing from overseas?A1 Check that the modem is correctly configured according to the current country. Because the values for communication may differ according to the country, you may not be able to connect via the modem due to an incorrect modem configuration.    1.  Click Start > Control Panel > Network and Internet Connections.2.  Under See Also, click Phone and Modem Options.3.  In the Dialing Rules tab, click Edit.4.  In the General tab in the Edit Location window, select the current country from the Country/region radio box, specify the Area code, and click OK.A2 Because the shape of the telephone plug may differ according to the country, you have to purchase and use the appropriate telephone plug for that particular country.Q4 How do I receive a fax while the system is in power saving mode (Rest mode) ?ATo receive a fax in Standby Mode, you have to set it up as follows.1.  The automatic fax reception function of the fax program needs to be activated. (For more information, refer to the corresponding fax program manual.)2.  Click Start > Control Panel > Network and Internet Connections.3.  Under See Also, click Phone and Modem Options.4.  In the Modems tab, select the installed modem, and click Properties.5.  In the Power Management tab of the Modem Properties window, select the “With this device, exit the computer from stand-by mode” item and then click OK.    The above setting enables the modem to turn on the system and receive a fax when in power saving mode.
128  Users ManualWired LAN RelatedQ1 <Wake On LAN> functionA<Wake On LAN> is a function that activates the system in rest mode when a signal (such as ping or magic packet commands) arrives from network (wired LAN).To use <Wake On LAN> function:1. Select My Network Places > View network connections from the Desktop. 2. Click the right button on the touchpad over Local Area Connection, and select Properties.3. Click Configure, and select Power Management tab. Select ’Allow this device to bring the computer out of standby’, then click OK. Restart the system.- If the system in rest mode is activated when there is no received signal, use the system after disabling <Wake On LAN> function.- If you turn the power off when <Wake On LAN> is disabled, the LAN LED continues to be lit up.- Connecting wired LAN while using wireless LAN may not execute <Wake On LAN> function. Configure wireless LAN to ’Disable’ to use <Wake On LAN> function.1. Click on My Network Place> View network connections on the Desktop.2. Right-click over Wireless Network Connection and select Disable.Q2   When I connected 100Mbps wired LAN and the computer exits standby/hibernate mode, a message informing 10Mbps wired LAN connection appears.A   When the computer exits standby/hibernate mode, restoring the network takes about 3 seconds. When the network is restored, it operates in 100Mbps.
Troubleshooting   129Wireless LAN RelatedQ1  The Wireless LAN device is operating properly, but I cannot connect to the Internet or to another computer.This is due to an incorrect configuration, or a configuration error. Check the following check lists:A1  If you are using a computer-to-computer (Ad Hoc) network connection, check that the name of the configured network (SSID) is correct. The network name (SSID) is case sensitive.A2  If you are using a network key (encryption key), you have to use the same network keys for an AP (Access Point) or a computer-to-computer network (Ad Hoc). The network key of the AP is configured in the AP management program. Ask your network administrator or AP manager for more detailed information.A3  Check that the device driver is properly installed. If the driver is not properly installed, you will find a yellow exclamation mark on the network icon by clicking Start > Control Panel > Performance and Maintenance > System > Hardware tab > Device Manager > Network adapters > Wireless LAN adapter. If there is a yellow exclamation mark, please reinstall the device driver with the system software Media. A4  Referring to A2 of Q3, Check that the network bridge configuration is correct.Q2  The signal strength is excellent, but I cannot connect to the network.Even if the signal strength is excellent, the network connection may not operate properly if the TCP/IP properties are not properly configured, or the network key (encryption key) is incorrect.A1  Check that the TCP/IP properties are configured properly. When you connect to an AP, click the Wireless Network Connection icon on the taskbar and select the Support tab. If the IP is not allocated properly, the IP address will be displayed as follows (e.g. 169.254.xxx.xxx).If the network does not provide DHCP, you have to specify the correct IP address by asking your network administrator.Even if the network provides DHCP, the server may not allocate an IP address to the client properly, and the client station cannot connect to the network.A2  Referring to A2 of Q1, check that the network key is correct.A3 Referring to Q4, check that AP is operating properly.
130  Users ManualQ3  I cannot share an Internet connection.A1  It may require some time to synchronize the computers to share an Internet connection after the Internet connection sharing configuration is completed. If you cannot share Internet connection even after a longer period, restart the computer.A2  Check if the connection between the network adapters is configured to bridge. If there is a configured bridge connection between the network adapters through the network configuration wizard, remove the network bridge, and reconfigure the Internet connection sharing.A bridge connection is created when you ran Network Setup Wizard from the [Network Connections] window, and selected both the internal connection adapter and another adapter in the wizard.Q4 I cannot connect to the AP.Check the Computer SettingsA1 Verify whether the wireless LAN function of the computer is on by doing the following. If the wireless LAN function is off, turn it on. - For Windows XP, verify that the wireless network connection has been set to "Enable" in Start > Control Panel > Network Connections.- Check if the wireless LAN is turned on.A2 Verify whether the same network key (encryption key) has been entered in both the AP and the computer. The network key is an encryption key for encrypting data transmitted between the AP and the computer. It is recommended setting the network key manually.Check the AP SettingsFor the AP settings, refer to the User's Guide provided by the AP manufacturer.A3 Verify whether the environment is suitable for using a wireless LAN.The use of a wireless LAN may be restricted according to the environment and distance. Obstacles such as walls or doors affect the use of a wireless LAN. Install the AP in a high and open space 50cm from the wall and far removed from any other radio signal sources.
Troubleshooting   131A4 Verify whether the AP is operating properly. - When the AP is not operating normally, turn off the AP and after a short while turn it on again. - Verify whether the AP's firmware is the most recent version. (Contact the AP manufacturer or the place where you purchased the AP for details of the AP firmware.) A5 Verify whether the AP has been properly connected to the network. Verify whether the network is operating normally by connecting the wired network cable, which has been connected to the AP, to your computer.A6 Check the network key settings (encryption key).When automatic code conversion (a passphrase function) has been selected and data communication is not functioning even with a normal wireless connection, it is recommended entering the network key (encryption key) manually.A7 Check the AP settings as follows. (The following is recommended for a standard environment and thus may differ according to the specific wireless network environment.)- When several APs are present simultaneously, check the channel setting for each AP. When different APs are using nearby channels, interference may occur between electronic waves. Set the APs' channels further apart from each other. (Ex: Ch1, Ch5, Ch9, Ch13)- When an AP's SSID (Service Set ID) option is set to "Hide", you cannot search for that AP on the computer. We recommend canceling the "Hide" option for an AP. The SSID is a name for distinguishing one wireless LAN from another wireless LAN. - It is recommended using Long Preamble. Preamble is a signal for data transmission synchronization. Short Preamble may be supported by some types of APs but may cause compatibility problems. - It is recommended using a static IP.- Since static channel selection is more reliable than auto channel selection, it is recommended setting a static channel.
132  Users ManualQ5  In the Windows XP 'Available wireless networks' window, the Wireless Network Connection is displayed as 'Not Available'.A1  Check if the wireless LAN is turned on.A2 Check if there is additional program for a wireless LAN connection installed. Windows XP supports wireless LAN connections through the Wireless Zero Configuration (WZC) service. Therefore, an additional program for wireless LAN connection is not required, unless the network requires a specific program. However, installation of some wireless LAN related programs may sometimes disable the [View Available Wireless Networks] window supported by WZC service. Exit the wireless LAN related program then check whether the window is enabled.A3   Initialize the device driver.Click Start > Control Panel > Performance and Maintenance > System > Hardware tab > Device Manager > Network adapters, and select the wireless LAN adapter. Right-click the network adaptor and select 'Disable'. Then right-click over the network adaptor and select 'Enable' after a short wait to check that the device is operating properly.A4 Right-click the My computer icon, and select Manage. When the Computer Management window appears, double-click Services and Applications on the left, and then click Services from the sub menu tree. Select the Standard tab in the right pane, double-click Wireless Zero Configuration and check that Startup Type is configured to Automatic, and the Service status is Started.A5 In the case of Windows XP, click Advanced in the [Wireless Network Connection] dialog box (see "Connecting to an Access Point (AP)" (p65)) and make sure that 'Use Windows to configure my wireless network settings' is selected.This may happen when a third-party wireless network setup program (e.g. PROSet) other than Windows XP default program is installed. For setting up a wireless network using the Windows XP program, this option should be selected.Q6  When connecting to a computer-to-computer (Ad Hoc) network, I cannot connect to another computer connected to the same computer-to-computer network. A1  Make sure that the security settings and network name of the computer-to-computer (Ad Hoc) network is correct.
Troubleshooting   133A2  Check the TCP/IP properties of the computers to be connected through the computer-to-computer (Ad Hoc) network. All of the computers to be connected through a computer-to-computer (Ad Hoc) network should be configured so that their IP addresses are within the same subnet range.- If the TCP/IP Settings are configured to DHCP, the address is automatically configured to an address within the subnet IP range. This will take about 2~3 minutes.- If the IP address is configured to static IP in TCP/IP properties, select Use the following IP address in the TCP/IP properties of the wireless adapter, configure IP address:10.0.0.1~10.0.0.254, and Subnet mask: 255.255.0.0, and then try again.- A fixed IP is recommended for a small-size network.Q7  When using a computer-to-computer (Ad Hoc) network, sometimes I cannot search the access point. A  It may happen occasionally when you are using a computer-to-computer (Ad Hoc) network connection. Even if you cannot find some access points, the computer-to-computer (Ad Hoc) network is operating properly. Click Refresh to view the latest search result. Q8  Running Help file while running Profile Wizard in the wireless LAN program (PROSet) makes the PROSet window white.A  It will be displayed properly when you finish the profile wizard. It dose not affect the program operation.Q9 The network does not operate properly when both the wireless and the wired network connections are simultaneously configured with the same IP address.AYou cannot use the wireless and the wired network connections using the same IP address simultaneously. To use either the wireless or the wired network in turn with the same IP address, you have to Disable whichever network device will not be using in the network connection of the Control Panel.
134  Users ManualQ10 The wireless LAN does not work properly when there is a device operating on an adjacent frequency in the vicinity of the product.A1 Channel interference may occur when a wireless video transceiver or a microwave oven is being used.If you experience channel interference from other equipment, it is recommended changing the channel to connect to the AP. For more information about AP settings, refer to the User Manual supplied by the APmanufacturer.A2 Since IEEE802.11g equipment operates in hybrid mode when there is active IEEE802.11b equipment, the data rate may be degraded.Q11 An established wireless LAN connection is disconnected after 2~3 minutes, and the connection is not recovered.A1 This may be caused by channel interference. Change the channel of the AP, and reconnect.A2 This may be caused by selecting the ’Use IEEE 802.1x network authentication’ option when IEEE 802.1x authentication is not available.Check the properties of the AP in the wireless network settings. If the ’Use IEEE 802.1x authentication in this network’ option is selected, deselect the option on the Authentication tab.For more detailed information about authentication server, ask your network administrator.A3 If the AP is configured to ’Use network authentication (Shared Key)’If the AP is configured to authentication shared mode, all computers to be connected should be configured as follows:- If you are using Windows XP, select network authentication(shared mode) in the wireless network settings. Select Start > Control Panel > Network and Internet Connections > Network Connections, right-click the Wireless Network Connection icon and then select View Available Wireless Networks. Select Change Advanced Settings from the left menu, select an AP from Preferred networks window in the Wireless Networks tab, and click the Properties button. Select Shared Mode in the Network Authentication field of the Association tab, and then click the OK button.If the Preferred networks window in the Wireless Network tab is empty, click View Wireless Networks, select an AP to connect to, and select Shared Mode in the Network Authentication field of the Connection Information tab as described above.
Troubleshooting   135For more detailed network authentication procedures, ask your AP (Access Point) administrator.Q12 After PROSet is installed, The “AEGIS Protocol (IEEE 802.1x) v2.2.1.0” appears in the [Local Area Connection Properties] window.AThe AEGIS Protocol is a security authentication protocol that is automatically installed when PROSet is installed and does not affect the operation of other programs.Q13 Although I have turned the wireless LAN off using the Off Button on thePROSet, the wireless LAN operating light is still on.AThis is normal. The Off Button for the Wireless LAN on the PROSet only turnsoff the S/W and not the H/W for the Wireless LAN.Q14 After installing the PROSet, I cannot manage the wireless network underWindows.AClick on "Use Microsoft Client" in the Tools menu of the PROSet program tomanage a wireless network in Windows.To manage a wireless network in the PROSet program, click on "Use InterPROSet/Wireless" in the Tools menu of the PROSet program.
136  Users ManualGames and Programs RelatedQ1 3D game is not executed, or some functions are not working.AChange the graphic setting of the game to '2D' or 'Software Renderer', then execute the program again.Q2 I launched a game right after installing it, and the game is not executed.AThis problem may occur when the game is not compatible with Windows XP.Launch the game again, and it will be executed properly.Q3  <Fn+F4/  > Key combination does not work.A  While displaying video of VCD or MPEG, or the display setting is Dual View, you cannot toggle display devices. Also the installation of NetWare Client 32 program disables the function of <Fn+F4/  >.Q4While playing a game, pressing the <Fn>+<F4 / >keys does not work or the screen is not properly displayed.ASome games and 3D application programs may change the display device control. Therefore, pressing the <Fn>+<F4 / > keys may terminate the running program or may display an abnormal screen.Press the <Fn>+<F4 / > keys before launching a program and do not press them while running the program.Q5Running speed of a game is too slow or fast.AChange the setting of Power Schemes to 'Always On'.(Click Start > Control Panel > Performance and Maintenance > Power Options > Power Schemes tab, then configure the Power schemes field to 'Always On'.)Q6Some part of a game image is not displayed or is displayed in black.AThis may happen when running a game designed for DirectX 8.1, such as NHL 2003, MVP Baseball 2003, etc.
Troubleshooting   137Q7The game screen is displayed small.A[nVidia Graphics]This may happen when the display settings are set to zoom out mode ('Use center output'). Change the settings as follows to fit the game screen to the LCD screen.1. Right-click over the Desktop and select Properties from the pop-up menu.2. In the [Display Properties] window, select the Settings tab > Advanced > GeForce Go 6600 tab.3. In the Digital Flat Panel Settings field, select 'Display adapter scaling' and click the Apply button.[Intel Graphics]1.Right-click on the Desktop and select Properties from the pop-up menu.2. In the [Display Properties] window, select the Settings tab > Advanced > Intel Graphics Media Accelerator Driver for Mobile tab. 3. Select the Display Device menu and click on 'Notebook' in the 'Single Display' field.4. Select the Display Setting menu, click 'Full Screen' in the Extended Display field and click the Apply button.Q8The game play screen frequently stops and starts.A [nVidia Graphics]This may occur when the PowerMizer Setting is set to 'Maximum Power Saving Function' or 'Balanced'.1. Right-click on the Desktop and select Properties from the pop-up menu.2. In the [Display Properties] window, select the Settings tab > Advanced > GeForce Go xxxx tab.3. Select the PowerMizer item, slide the AC outlet and the battery sliders to Maximum Performance and then click the Apply button.[Intel Graphics]This may occur when 'Intel Dual Frequency Graphics Technology' is selected. 1. Right-click on the Desktop and select Properties from the pop-up menu.2. In the [Display Properties] window, select the Setting tab > Advanced > Intel Graphics Media Accelerator Driver for Mobile tab.3. Select the Graphic Properties item, select 'Single Display' and set the Current Display to 'Notebook'.
138  Users Manual4. Click the Display Settings menu and the 'Power Settings'.5. Unselect 'Intel Dual Frequency Graphics Technology' and then click the Apply button.Q9The picture is not displayed properly for some games.ASome games such as 'Harry Potter and the Sorcerer's Stone', 'Harry Potter and the Chamber of Secrets', etc. may not display the picture properly when the screen resolution is set to 1024x768 and the color quality is set to 32 bit.For these games, set the screen resolution to 1024x768, and the color quality to 16 bit.Q10Game play is not displayed smoothly on the screen.AFor 3D games, the texture data for the 3D screen display is saved to the system memory. If there is insufficient system memory, the data is saved to the hard disk drive and loaded to memory when required. This operation may temporarily stop displaying the picture on the screen.In this case, lower the game resolution or the screen settings. (For Delta Force: Black Hawk Down, Medal of Honor, Battle Field, 1942, etc.)
Troubleshooting   139Security CenterQ1 To change the popup window display settings when connected to the Internet.In the Windows XP SP2 environment, you can decide whether to display a popup window when connected to the Internet, for user convenience and security.A1 To display most of the popup windows when connected to the Internet:1. Click on Internet Options in Start > Control Panel > Security Center > Manage security settings for.2. In the Privacy tab of Internet Properties, clear Block pop-ups.A2 To display popup windows only from the current site when connected to the Internet:Place the cursor on the notification area at the bottom of the Internet address bar and right-click to display a menu, from which you can select Temporarily Allow Pop-ups or Always Allow Pop-ups from This Site.A3 To display popup windows from a particular site:1. Click on Internet Options in Start > Control Panel > Security Center > Manage security settings for. 2. In the Privacy tab of Internet Properties, click on Settings from Block pop-ups. 3. Enter a URL to want to allow pop-ups  into Address of Web site to allow and click on Add. 4. You will find that the entered address is added to the allowed sites list. The next time you connect to the Web site, you will see pop-ups appearing. When you need to re-block a permitted site, select the Web site address that you want to block from the Allowed Sites and click on Remove. Q2 When you connect to a Web site, you see the message, “To help protect your security, Internet Explorer stopped this site from installing an ActiveX control on your computer” or “This site might require the following ActiveX control” below the address bar.AWindows XP SP2 blocks unsigned ActiveX controls from being installed when connected to certain Web sites for security reasons. On some Web sites that have no ActiveX controls installed, applications are not started or do not display properly.In this case, to install ActiveX controls, right-click the notification area to display a menu from which you can select Install ActiveX control.
140  Users ManualQ3 When you see a Windows Security Alert icon ( ) appear on the right part of the task bar.With the Security Center feature added, Windows XP SP2 checks the Firewall, the automatic updates configuration and installation of virus-checking programs to display a Windows Security Alert icon on the right part of the task bar when it judges that the computer is vulnerable to attacks from the Internet. In this case, check the following to install the necessary components. A1 Set up the Windows Firewall.When you set up the Windows Firewall, you will be protected from unauthorized access through the Internet or the network. 1. Click on Windows Firewall in Start > Control Panel > Security Center > Manage security settings for. 2. From the General tab of Windows Firewall, select ON (recommended). 3. If you want to allow a certain program or service to gain access to your computer using the Firewall, select and check the program or service that you want to allow access from, in the Exceptions tab of the Windows Firewall. If you want to add a program to Programs and Services, click on Add Program and select it. A2 Set up Windows Automatic Updates.This automatically downloads and installs critical updates via the Internet to keep your computer up to date. 1. Click on Automatic Updates in Start > Control Panel > Security Center > Manage security settings for.  2. From general tab of Automatic Updates window, select Automatic (recommended). A3 Keep your computer current with the latest virus updates. (ex: Norton Antivirus)Even when you have installed Norton AntiVirus on your computer, Windows cannot recognize the program until you configure the settings, displaying a Security Alert icon.When you first use or install Norton AntiVirus for the first time, follow the Registration Wizard steps to configure the registration settings. To protect your computer from virus attacks with the latest updates, click on Options to display the Norton AntiVirus Options window. From the left menu of the window, check Run Automatic Protection to select Automatic Protection and check Run LiveUpdate to select LiveUpdate. A4 Two virus scanning programs on one computer may cause system conflicts. Remove one of the programs from the system.
Troubleshooting   141A5 If Windows does not recognize the existence of an anti-virus program even when it has been installed, your computer could be vulnerable to attacks from the Internet. You should install an anti-virus program that your computer is able to identify. Check the following programs which Windows can detect and select one from the list. A list of anti-virus programs that Windows can detect:-Symantec Norton Anti-Virus-NetworkAssociates (McAfee) -TrendMicro -ComputerAssociates -Panda -Kaspersky -Ahnlabs (AhnLab)  Visit the Microsoft Web site (www.microsoft.com) regularly to check the latest list.OtherQ1 4GB memory capacity is not properly recognized by Windows.AWindows XP SP2 cannot display a memory capacity over 4GB due to license and driver compatibility problems. Even if the system information shows only 3GB of memory, the system memory capacity is 4GB and is normal.
142  Users ManualUsing Magic DoctorMagic Doctor is troubleshooting software provided by Samsung Computer. A user can diagnose system problems via one-click or by selecting diagnostic items. 1. Click Start > All Programs > Samsung > Magic Doctor > Magic Doctor. 2. Click on an icon at the top of the screen.–OneClick Diagnosis: You can diagnose problems affecting the system connections and system operations via one-click.  –User Diagnosis: You can select the necessary diagnostic items and diagnose system problems. –System Recovery: Launches the Restoring the System function of Windows XP. (p143)3. When the system diagnosis is completed, the diagnostic result appears.If problems are found, click the Cure button to correct the problem. Magic Doctor starts the correction operations.
Troubleshooting   143Restoring the SystemThis description is only for models running Window XP.The System Restore function allows you to restore your computer to an earlier copy (called restore point), and restores the settings if a problem occurs.The System Restore function is provided by Windows XP to enable the resolution of various problems without reinstalling Windows XP completely.You can use System Restore in the following cases. •The system files are deleted or damaged by mistake.•The system is unstable or a problem occurs in a device driver.•A problem occurs after changing system files such as the registry.•A problem occurs after installing a new program.Creating a Restore PointRestore points are created at predetermined times and at times of significant system events such as when a program or a driver is installed. You can also decide when to create your own restore points.There has to more than 200MB of free space on the hard disk drive. If the disk space is insufficient, a saved restore point might be deleted.You are recommended to create a restore point when you have purchased a new computer and before installing new programs or device drivers. Before creating a restore point, check that the computer is operating properly.The procedures to create your own restore point are described below.1. Click Start > All Programs > Accessories > System Tools > System Restore.
144  Users Manual2. Select "Create a restore point", and click Next.Since changes made after the Recovery Point may not be maintained, please back-up all necessary files to another location before performing system recovery.3. In the Restore point description box, type a name to identify the restore point, and than click Create. A restore point has been created.
Troubleshooting   145Returning your computer to an earlier restore pointThe procedures to return your computer to an earlier restore point when a problem has occurred are described below.1. Click Start > All Programs > Accessories > System Tools > System Restore.2. Select "Restore my computer to an earlier time", and then click Next.3. Select the desired restore date from the calendar restoration and select the desired restore point from the list, and then click Next.
146  Users ManualThe date of the restore point is displayed in bold font.4. Confirm the selected restore point and click Next. System Restore shuts down Windows, and starts the restoration processes. 5. After the restoration is complete, Windows restarts. In the [System Restore completed] dialog, click OK.Your computer has been restored to the selected restore point.Undoing the last restorationThe procedures to undo a restoration are described below.1. Click Start > All Programs > Accessories > System Tools > System Restore.2. Select "Undo my last restoration", and then click Next. 3. Confirm the restoration information to undo, and than click Next. System Restore shuts down Windows and starts undoing the restoration. 4. After the undo restoration is complete, Windows restarts. In the [Undo the last restoration completed] dialog, click OK.Your computer has been restored to the point prior to the last restoration.
Troubleshooting   147Reinstalling SoftwareIf you have reinstalled the Windows operating system, or the system and program do not operate properly, you can re-install the driver and program using the system software Media.This computer is optimized for Microsoft Windows XP, therefore drivers for other operating systems are not included on the System Software Media.Running the system software MediaInsert the system software Media into the CD-ROM drive. The initial screen appears automatically.•Standard Installation: This displays a list of drivers or programs that are not currently installed on your computer from the system software Media provided. All necessary components are installed using the factory defaults. •Minimum Installation: This displays the components (driver, Windows programs, etc) that, if not installed, may cause problems with the system performance. You can install only required components.  •Custom Installation: You can customize the installation of drivers and programs.
148  Users Manual Installing drivers and programs1. Click Standard Installation in the main window of the System Software Media. (Standard Installation is recommended)2. The system is scanned to display the drivers and programs that need to be installed.3. Click OK. The drivers and programs are automatically installed as factory defaults.4. When done, restart the system.
Troubleshooting   149Reinstalling Windows XPIf the Windows XP does not operate properly due to an error in the system, or if you have replaced the hard disk drive, you can reinstall Windows XP using the system recovery CD.With the system recovery CD, you can reinstall Windows XP only. To return the system to the state of shipment, reinstall the device drivers and programs with the system software Media after reinstalling Windows XP with the system recovery CD.Reinstalling Window may delete the data on the hard disk drive such as files, programs, etc. In order to minimize damage from data loss, please remember to always back up data. Samsung Electronics is not liable in the case of data loss, please consult your warranty statement for clarification.When you have set a booting passwordYou are asked to enter your booting password after restarting the system during the Windows installation. Enter the password to continue to the next steps.Reinstalling WindowsExplain Standard installation option as a standard.1. Insert the system recovery CD into the CD-ROM drive.2. In the initial screen, click Standard Installation.
150  Users Manual•Standard installation: You can change the settings for partitioning, the installation folder, etc. during the Windows installation. However, reinstalling Windows may delete the data on the hard disk drive such as files, programs, etc. In order to minimize damage from data loss, please remember to always back up data.•Quick Installation: This re-installs Windows with the user data and the system configuration intact. The user data in the already existing Windows folders may be preserved as the existing Windows folders are overwritten.3. The description for the standard installation appears. Click Yes.The installation starts, and the system will be restarted after a while.When Quick Installation is selected, Setup proceeds with Step 3 before automatically installing Windows. Quick Installation overwrites the existing Windows version, so that drivers or applications do not need to be reinstalled.4. After the system has restarted, the message ’Press any key to boot from CD’ appears. Do not press any key at this time. After a while the partition configuration screen appears.To not change the partition, press <Enter>.What is partition configuration?Partition configuration is a function that devides the hard disk drive into one or several partitions. Note that changing the partition deletes all of the data on the hard disk drive.5. Select the folder to install the Windows operating system.To delete the previous version of Windows and install in the current folder, press <L> on the keyboard.If you press ESC to select another folder for the installation, new Windows folders are created causing a risk of dual booting.    6. After the installation process copies the necessary folders for the Windows installation, restart the system, and the message “Press any key to boot from CD” is displayed. You do not need to enter anything. In a moment, the Windows XP installation screen will appear to proceed with the installation.
Troubleshooting   1517. When the Regional and Language Options window appears, click Next.8. When a window that requires your name and organization pops up, enter your name and the organization and click Next. In the Windows XP Professional edition, an additional window that requires the computer name and the administrator password appears. Enter the computer name and the administrator password and click Next.  9. When the Date and Time Settings window appears, click Next. Setup will continue. 10. When the system restarts to display  Press any key to boot from CD, do not press any key. When you see the Windows desktop, this means that the installation process is completed. Remove the system recovery CD and install the device drivers and applications from the system software Media.
152  Users ManualIf You Cannot Run WindowsIf you cannot run Windows, you have to boot the system with the system recovery CD, and reinstall Windows. If you boot the system from the system recovery CD, you can install Windows only with the user installation option. You cannot install with the standard installation option.1. Insert the system recovery CD into the CD-ROM drive and start the computer.2. If the following message appears on the screen, press any key from the keyboard.This message appears only when the CD drive has booting priority. If the message does not appear, configure the CD drive as the first booting device referring to ”Changing Booting Priority” on page 95.3.  Do not press any key at this time. After a while the partition configuration screen appears.To not change the partition, press <Enter>.4. Select the desired file system ( format ).To maintain the current file system, press <Enter>.5. Select the folder to install the Windows operating system.To delete the previous version of Windows and install in the current folder, press <L> on the keyboard.6. After the installation process copies the necessary folders for the Windows installation, restart the system, and the message “Press any key to boot from CD” is displayed. You do not need to enter anything. In a moment, the Windows XP installation screen will appear to proceed with the installation. 7. Follow the instructions of the Windows XP installation wizard to continue with the installation.8. When the installation is complete, the computer will restart.When the system has restarted, the Press any key to boot from CD message appears. Ignore the message.The system boots and the Windows and Windows Registration screen appears. Register Windows, following the instructions to finish the Windows installation. Remove the System Recovery CD and install the device drivers and application programs using Standard Installation from the System Software Media.Press any key to  boot from CD.....
Specifications   153SpecificationsSystem SpecificationThe system specifications will be described below. The system specifications may differ depending on the derived models.The system specifications are subject to change without notice. For detailed system specifications, refer to the product catalog.The capacity of the hard disk drive with Samsung Recovery Solution will be displayed as less than the specified capacity.Item Specification RemarksCPU Intel Core ™ processor DuoIntel Core ™ processor Solo OptionalCache memory 2MBMain memory 256/512MB / Max 4GB, Memory type : DDR2 SODIMM OptionalMain Chipset Intel 945PM / 945GM , ICH7M OptionalHard disk drive (HDD) 9.5mmH 2.5" HDD40GB/60GB/80GB/100GB/120GB OptionalCD drive CD-ROM, DVD-ROM, RW-Combo, DVD Super Multi OptionalGraphics NVIDIA Geforce Go 7300/7400 (64MB/128MB)Intel 945GM Graphics (DVMT 64MB/128MB) OptionalSound High Definition Audio Codec AD1986ANetwork Interface Modem: V.92Wired LAN: Broadcom BCM5751M 1G+ASFBroadcom BCM4401E 10/100Wireless LAN: 802.11ABGBluetooth 2.0+EDROptionalOptionalOptionalOptionalMemory Card Slot Memory Stick, Memory Stick Pro, SD Card, MMC, xD card Supported OptionalPC Card Slot PCMCIA Type I and, II CompatiblePorts IEEE 1394 (4 Pin), USB 2.0 x 3, Microphone, Headphone(S/PDIF supported), Modem(RJ-11), LAN(RJ-45), Monitor and TV Out(S-Video), Serial Port, DC Jack, Security Lock Port, 120 Pin Dock PortOptionalDimensions (mm) 339.5 x 256.6 x 25.9~32.9 W x D x HLCD 14.1" WXGA(1280 x 800)Weight 2.05~2.1Kg OptionalBattery Lithium-Ion smart battery: 4 CellsOperation Environment Temperature (storage) : -5 ~ 40°C   (operation) : 10 ~ 32° C Humidity (storage) : 5% ~ 90%        (operation) : 20% ~ 80%Operation Voltage 100 - 240 VACFrequency 50 - 60 HzOutput Power  60/90W  OptionalOutput Voltage 19.0VDC
154  Users ManualWireless LAN Specification (Optional)Intel(R) PRO/Wireless 3945ABG Network ConnectionProduct Specification* This piece of equipment supports the Wi-Fi wireless LAN security standard, WPA (Wi-Fi Protected Access) and CCX (Cisco Compatible eXtensions). To connect to a wireless network consisting of the WPA and CCX, certificates or PROSet may be required depending on the network settings. For driver update, visit www.samsung.com and for information on the PROSet installation, refer to "Wireless Network Setup Using the Wireless LAN Setup Program" (p70). For more information, ask your network administrator.Radio Specifications                      * The transmission rate may differ from the actual transmission rate.                      ** 11a mode is supported only when the device is connected with an IEEE802.11a device (e.g. IEEE802.11a compatible Access Point).                      ***11g mode is supported only when you are connected to an IEEE 802.11g device (e.g. An Access Point supporting IEEE 802.11g).Item Detailed SpecificationsPhysical Specifications Dimensions (Width X Height) 30.0 x 50.95 mmoperation temperature and humidity Same as system operation Temperature: 0°C ~ 70°CHumidity: less than 85%Power Specification Power Saving Mode 70 mWReceiving Mode 0.95 WTransmission Mode 1.4 WPower 3.3VNetwork Specifications Compatibility IEEE802.11a, IEEE802.11b, IEEE802.11gOperating System Microsoft Windows XP- NDIS5 Miniport DriverMedia Access Protocol CSMA/CA (Collision Avoidance) with Acknowledgement(ACK)Security Wired Equivalent Privacy support (WEP) 64bit / 128bitWPA*, CCX*RF Band 2.4GHz, 5GHzSupport Channels Channels allowed per country.Device TransceiverStandard Output Power 5 mWTransmission Method 11a mode: OFDM11b mode: DSSS11g mode: OFDMTransmission Rate (Mbps) * 11a mode** : 54, 48, 36, 24, 18, 12, 9, and 611b mode: 11, 5.5, 2, and 111g mode*** : 54, 48, 36, 24, 18, 12, 9, and 6Antenna Type Internal Antenna 2 EA (Main/Aux)
Abbreviations   155Abbreviations A . . . . . . . . . AmperesAC . . . . . . . . Alternating currentACPI . . . . . . Advanced Configuration and Power management InterfaceAPM . . . . . . Advanced Power ManagementATA. . . . . . . AT attachment (refers to the hard-drive interface in an AT-compatible computer)ATAPI. . . . . AT attachment packet interfaceBBS . . . . . . . Bulletin board systemBIOS . . . . . . Basic input/output systemC . . . . . . . . . CentigradeCD . . . . . . . . Compact discCD-ROM  . . Compact disc read-only memorycm . . . . . . . . CentimetersCOM . . . . . . Communication (as in communication port)CMOS. . . . . Complementary metal-oxide semiconductorDC . . . . . . . . Direct currentDMA . . . . . . Direct memory accessDPMS . . . . . Display power-management signalingDRAM. . . . . Dynamic random access memoryDSTN  . . . . . Double layer super twist nematicECP . . . . . . . Extended capabilities portEPP . . . . . . . Enhanced parallel portg. . . . . . . . . . gramG . . . . . . . . . GravityGB . . . . . . . . Gigabyteshr . . . . . . . . . hourHz  . . . . . . . . HertzIDE . . . . . . . Integrated drive electronics I/O . . . . . . . . Input/outputIRQ . . . . . . . Interrupt request line
156  Users ManualISA  . . . . . . . Industry Standard ArchitectureKB . . . . . . . . Kilobyteskg. . . . . . . . . KilogramsLAN. . . . . . . Local-area networklb.. . . . . . . . . PoundsLBA. . . . . . . Logical block addressingLCD. . . . . . . Liquid-crystal displaym . . . . . . . . . MetersmA. . . . . . . . MilliamperemAhr. . . . . . Milliampere hourMB. . . . . . . . Megabytemm  . . . . . . . millimeterMPEG . . . . . Motion Picture Experts GroupMPU . . . . . . Microprocessor unitms  . . . . . . . . MillisecondPDF . . . . . . . Portable document formatPC . . . . . . . . Personal computerPCI  . . . . . . . Peripheral component interconnectPCMCIA. . . Personal Computer Memory Card International AssociationPOST. . . . . . Power-on self-testPNP . . . . . . . Plug and playPS/2 . . . . . . . Personal System/2RAM . . . . . . Random-access memoryROM . . . . . . Read-only memorySVGA . . . . . Super video graphics arrayTFT . . . . . . . Thin-film transistorUSB . . . . . . . Universal serial busV . . . . . . . . . VoltVAC  . . . . . . Voltage alternating currentVCC  . . . . . . Voltage collector currentVDC  . . . . . . Voltage direct currentwhr  . . . . . . . Watt hour
Glossary   157GlossaryAC adapterThe AC (or alternating current) adapter regulates current coming into your computer from the wall outlet. The current at the wall outlet is alternating current and needs to be changed by the adapter to DC (direct current) before your computer can use it for power.ACPIACPI (Advanced Configuration and Power Interface)- a method for describing hardware interfaces in terms abstract enough to allow flexible and innovative hardware implementations and concrete enough to allow shrink-wrap OS code to use such hardware interfaces.BIOSBIOS stands for basic input/output system. The BIOS is software (often called firmware) that is independent of any operating system. It enables the computer to communicate with the screen, keyboard, and other peripheral devices without using programs on the hard disk. The BIOS on your computer is flash BIOS, which means that it has been recorded on a flash memory chip that can be updated if needed. BootTo start your computer. A cold boot resets the entire computer and runs through all computer self-tests. A warm boot clears out computer memory only.Boot diskA disk containing operating system programs required to start your computer. A boot disk can be a floppy disk, hard drive, or compact disc.ByteThe basic unit of measure for computer memory. A character—such as a letter of the alphabet—uses one byte of memory. Computer memory is often measured in kilobytes (1,024 bytes) or megabytes (1,048,576 bytes).Each byte is made up of eight bits. For more information on bytes and bits, see an introductory book on computers.Cache memoryCache is very fast, zero-wait-state memory located between the microprocessor and main memory. Cache reduces the average time required by the microprocessor to get the data it needs from the main memory by storing recently accessed data in the cache.
158  Users ManualCardBusCardBus technology enables the computer to use 32-bit PC Cards. Hardware in the computer and the Windows operating system provide support for the 32-bit cards. The voltage of 32-bit cards (3.3 volts) is lower than that of 16-bit cards (5 volts). The 32-bit cards can transmit more data at a time than the 16-bit cards, thus increasing their speed. CMOS memoryCMOS (complementary metal oxide semiconductor) memory is powered by the CMOS battery. The System Setup settings and other parameters are maintained in CMOS memory. Even when you turn your computer off, the information in CMOS memory is saved.COM portCOM stands for communication. COM ports are the serial ports in your computer.Compact DiscA compact disc (CD).Conventional memoryThe first 640 KB of system memory. Operating systems and application programs can directly access this memory without using memory-management software.DiskThe device used by the computer to store and retrieve information. Disk can refer to a floppy disk, hard disk, or RAM disk.Disk cacheA software device that accumulates copies of recently used disk sectors in RAM. The application program can then read these copies without accessing the disk. This, in turn, speeds up the performance of the application.A cache is a buffer for transferring disk sectors in and out of RAM. Data stored in a disk cache is a copy of data already stored on the physical disk.DMA (direct memory access)A method of transferring data from a device to memory without having the data pass through the microprocessor. Using DMA can speed up system performance.DPMSDisplay Power Management Signalling. Displays or monitors that comply with this can be managed by the Power Management features found in the system setup.Floppy diskA removable disk, also called floppy or diskette.
Glossary   159Hard driveAlso called fixed disk. A hard drive is connected to the computer and can be installed or removed. Data written to a hard drive remains until it is overwritten or corrupted.The 2.5-inch hard drive in your computer was designed for use in a notebook computer. Because hard drives in notebook computers are smaller than those in desktop computers, their maximum storage capacity may be less than that of desktop hard drives. However, because of their smaller size, the drives handle shock and vibration better than larger drives, which is important for a notebook computer.I/OInput/output. Refers to peripheral devices, such as printers, that are addressed through an I/O address.I/O addressI/O stands for input/output. Peripheral devices, such as printers, are addressed through the I/O port address.IRQ (interrupt request line)The IRQ is a hardware line that a device uses to signal the microprocessor when the device needs the microprocessor’s services. The number of IRQs is limited by industry standards. LCD (liquid-crystal display)The LCD screen on your computer differs from the display screen of a desktop monitor. Most desktop monitors use CRT (cathode-ray tube) displays, which work by moving an electron beam across phosphor dots on the back of the screen. The phosphor dots light up to show the image. LCDs use a liquid-crystal solution between two sheets of polarizing material. Electric current passing through the liquid aligns the crystals so that light can or cannot pass through them, creating an image.MB (megabyte)1,024 kilobytes.Megabit1,048,576 bits or about 128 kilobytes.Operating systemA program that supervises the computer's operation, including handling I/O. Application programs and users can request operating-system services. A user might request operation-system services to copy files or format a disk. An application program might use the operating system to obtain keyboard input, write data to a file, or write data to a screen.
160  Users ManualPC CardPC Card stands for personal computer card. The Personal Computer Memory Card International Association (PCMCIA) defines the standards used to develop all PC Cards. PC Card types include: modems, Ethernet adapters, SCSI adapters, ATA cards, and memory cards.PC slotThe PC slot is the hardware slot in the computer where the PC Card is placed. PixelA pixel is an individual dot in a graphic displayed on your computer. The pixels are so close together that they look as though they are connected. An LCD screen displays thousands or millions of pixels. Plug and PlayA plug and play operating system automatically configures computer components to work with your system. With this type of operating system, you normally do not need to set jumpers on devices or set memory addresses or IRQs.RAM (random access memory)The computer's system memory, including conventional and extended memory. You can write to and read from RAM. Information stored in RAM is temporary, and is erased when the system is turned off.Refresh rateThe refresh rate is the rate at which the image on the LCD screen is rewritten to the screen. A fast refresh rate helps keep the image from flickering.ResolutionThe resolution is the sharpness or clarity of the image on your LCD screen. Resolution is measured by the number of pixels the computer’s screen can display. For example, a resolution of 800 x 600 means that the screen can display 800 pixels in row and can display 600 rows. The more pixels displayed, the higher the resolution and the better the image. ROM (read-only memory)Permanent computer memory dedicated to a particular function. For example, the instructions for starting the computer when you first turn on power are contained in ROM. You cannot write to ROM. (ROM is not the same as RAM).SectorAlso known as disk sector. The portion of a track that is numbered and can hold a specified number of characters (usually 512 KB).
Glossary   161Shadow RAMA write-protected area of RAM that contains a copy of the BIOS. As the computer boots, the BIOS is copied from its permanent location in ROM to RAM. The BIOS can be executed much faster in RAM than in ROM. The BIOS remains in shadow RAM until you turn off the computer.TFT (thin film transistor) LCDA TFT LCD uses a separate transistor circuit to control each pixel. This technology provides the best resolution for an LCD screen. A TFT LCD is also sometimes called an active matrix LCD.
144  ¤ÙèÁ×ͼÙéãªé˹èǤÇÒÁ¨Ó CMOS˹èǤÇÒÁ¨Ó CMOS (complementary metal oxide semiconductor) ä´éÃѺ¾Åѧ§Ò¹¨Ò¡áºμàμÍÃÕè¢Í§ CMOS ¡ÒÃμÑ駤èÒ System Setup áÅоÒÃÒÁÔàμÍÃìÍ×è¹æ ä´éÃѺ¡ÒÃà¡çºäÇéã¹Ë¹èǤÇÒÁ¨Ó CMOS áÁéàÁ×èͤس»Ô´¤ÍÁ¾ÔÇàμÍÃì ¢éÍÁÙÅ㹠˹èǤÇÒÁ¨Ó CMOS ¨Ð¶Ù¡ºÑ¹·Ö¡äÇé¾ÍÃìμ COMCOM ÂèÍÁÒ¨Ò¡ communication COM ¾ÍÃìμ ¤×;ÍÃìμ͹ءÃÁã¹à¤Ã×èͧ¤ÍÁ¾ÔÇàμÍÃì¤ÍÁá¾ç¤´ÔÊ¡ì¤ÍÁá¾ç¤´ÔÊ¡ì (CD)˹èǤÇÒÁ¨Ó Conventional˹èǤÇÒÁ¨Ó 640 ¡ÔâÅäºμìáá ˹èǤÇÒÁ¨ÓáÅÐâ»Ãá¡ÃÁá;¾ÅÔपѹÊÒÁÒöà¢éÒãªé§Ò¹Ë¹èǤÇÒÁ¨Ó¹Õéä´éâ´Âμç â´ÂäÁèμéͧãªé«Í¿μìáÇÃì¨Ñ´¡ÒÃ˹èǤÇÒÁ¨ÓáμèÍÂèÒ§ã´´ÔÊ¡ìÍØ»¡Ã³ì·Õèãªéâ´Â¤ÍÁ¾ÔÇàμÍÃìà¾×èͺѹ·Ö¡áÅÐàÃÕ¡¢éÍÁÙÅ¡ÅѺÁÒãªéä´éÍÕ¡ ´ÔÊ¡ì ÊÒÁÒöãªéÍéÒ§¶Ö§¿ÅçÍ»»Õé´ÔÊ¡ì ÎÒÃì´´ÔÊ¡ìËÃ×ÍáÃÁ´ÔÊ¡ìDisk cache«Í¿μìáÇÃì·Õèà¡çº¢éÍÁÙÅ¡ÒÃãªé´ÔÊ¡ìÅèÒÊØ´äÇéã¹à«¡àμÍÃìã¹ RAM â»Ãá¡ÃÁá;¾ÅÔपѹ¹ÕéÊÒÁÒöãªéÍèÒ¹ÊÓà¹Ò¹Õéä´éâ´Â äÁèμéͧà¢éÒãªé´ÔÊ¡ì «Öè§ÁÕ¼Å㹡ÒêèÇÂà¾ÔèÁ»ÃÐÊÔ·¸ÔÀÒ¾ãËé¡Ñºá;¾ÅÔपѹãËé·Ó§Ò¹ä´éàÃçÇ¢Öé¹á¤ª¤×ͺѿà¿ÍÃìÊÓËÃѺ¶èÒÂâ͹´ÔÊ¡ìà«ç¡àμÍÃìà¢éÒáÅÐÍÍ¡¨Ò¡ RAM ¢éÍÁÙÅ·ÕèºÑ¹·Ö¡äÇéã¹´ÔÊ¡ìᤪ¤×ÍÊÓà¹Ò¢Í§¢éÍÁÙÅ ·Õèä´éºÑ¹·Ö¡äÇ麹´ÔÊ¡ì¨ÃÔ§æDMA (direct memory access)ÇÔ¸Õ¡ÒÃ㹡ÒöèÒÂâ͹¢éÍÁÙÅ¨Ò¡ÍØ»¡Ã³ìä»Âѧ˹èǤÇÒÁ¨Óâ´ÂäÁèμéͧ¼èÒ¹äÁâ¤Ãâ»Ãà«Êà«ÍÃì ¡ÒÃãªé DMA ÊÒÁÒöªèÇÂà¾ÔèÁ»ÃÐÊÔ·¸ÔÀÒ¾¢Í§Ãкºä´éDPMSDisplay Power Management Signalling ¨ÍáÊ´§¼ÅËÃ×ÍÁ͹ÔàμÍÃì·Õèãªéä´éÊÒÁÒö¨Ñ´¡ÒÃä´éâ´Â¤Ø³ÊÁºÑμÔ Power Management ·Õ辺ä´éã¹ system setup¿ÅçÍ»»Õé´ÔÊ¡ì´ÔÊ¡ìẺ¶Í´ä´é ËÃ×Í·ÕèàÃÕ¡ÇèÒ¿ÅçÍ»»Õé ËÃ×Í ´ÔÊà¡çμμìÎÒÃì´´ÔÊ¡ìËÃ×Í·ÕèàÃÕ¡ÇèÒ ¿Ô¡«ì ´ÔÊ¡ì ÎÒÃì´´ÔÊ¡ìàª×èÍÁμè͡Ѻ¤ÍÁ¾ÔÇàμÍÃìáÅÐÊÒÁÒöμÔ´μÑé§ËÃ×ͶʹÍÍ¡ä´éàªè¹¡Ñ¹ ¢éÍÁÙÅ·Õèà¢Õ¹ä»Âѧ ÎÒÃì´´ÔÊ¡ì¨ÐÂѧ¤§ÍÂÙ訹¡ÃзÑè§¶Ù¡á·¹·ÕèËÃ×ÍËÒÂä»ÎÒÃì´´Ôʡ좹Ҵ 2.5 ¹ÔéÇ㹤ÍÁ¾ÔÇàμÍÃì¢Í§¤Ø³ä´éÃѺ¡ÒÃÍ͡ẺÁÒà¾×èÍãªé¡Ñº¤ÍÁ¾ÔÇàμÍÃìâ¹éμºØê¤â´Â੾ÒÐ à¹×èͧ¨Ò¡ ÎÒÃì´´ÔÊ¡ì㹤ÍÁ¾ÔÇàμÍÃìâ¹éμºØê¤ÁÕ¢¹Ò´àÅç¡¡ÇèÒ¤ÍÁ¾ÔÇàμÍÃìà´Ê¡ì·Í» ´Ñ§¹Ñ鹤ÇÒÁ¨ØÊÙ§ÊØ´ÍÒ¨¨Ð¹éÍ¡ÇèÒÎÒÃì´´ÔÊ¡ì¢Í§ à´Ê¡ì·Í» ÍÂèÒ§äáçμÒÁ à¹×èͧ¨Ò¡¢¹Ò´·ÕèàÅç¡ ä´Ã¿ìẺ¹Õé¨Ö§ÃͧÃѺ¡ÒáÃÐá·¡áÅÐÊÑè¹ä´éÁÒ¡¡ÇèÒ´Ôʡ좹ҴãË−è «Öè§ ÁÕ¤ÇÒÁÊÓ¤Ñ−¡Ñºâ¹éμºØê¤ÍÂèÒ§ÂÔè§I/OÍÔ¹¾Øμ/àÍÒμì¾Øμ ãªéÍéÒ§¶Ö§ÍØ»¡Ã³ìμè;èǧμèÒ§æ àªè¹ à¤Ã×èͧ¾ÔÁ¾ì «Öè§ÁÕ¡ÒÃãªéáÍ´à´ÃÊ I/OI/O addressI/O ÂèÍÁÒ¨Ò¡ input/output ÍØ»¡Ã³ìμè;èǧμèÒ§æ àªè¹à¤Ã×èͧ¾ÔÁ¾ì ¨ÐÁÕ¡ÒÃãªéáÍ´à´ÃʼèÒ¹·Ò§¾ÍÃìμáÍ´à´ÃÊ I/O
»·Ò¹Ø¡ÃÁ   145 IRQ (interrupt request line)IRQ ¤×ÍÊÒÂÎÒÃì´áÇÃì·ÕèÍØ»¡Ã³ìÊÒÁÒöãªéà¾×èÍÊè§ÊÑ−−Ò³äÁâ¤Ãâ»Ãà«Êà«ÍÃìàÁ×èÍÁÕÍØ»¡Ã³ìμéͧ¡ÒÃãªéà«ÍÃìÇÔʢͧ äÁâ¤Ãâ»Ãà«Êà«ÍÃì ËÁÒÂàÅ¢ IRQs ÁÕ¤èÒ¨Ó¡Ñ´â´ÂÁÒμÃ°Ò¹ÍØμÊÒË¡ÃÃÁ LCD (liquid-crystal display)¨Í LCD ¢Í§¤ÍÁ¾ÔÇàμÍÃì¢Í§¤Ø³μèҧ仨ҡ¨Í¢Í§¤ÍÁ¾ÔÇàμÍÃìà´Ê¡ì·Í» ¨Íà´Ê¡ì·Í»ÊèǹãË−è¨Ðãªé¨Í CRT (cathode-ray tube) «Öè§·Ó§Ò¹â´Â¡ÒÃÂÔ§ÅÓáʧÍÔàÅç¡μÃ͹¼èÒ¹¨Ø´μèÒ§æ ´éÒ¹ËÅѧ¢Í§¨Í ¨Ø´ÊÕ´éÒ¹ËÅѧ¨ÐÊÇèÒ§¢Öé¹áÅÐáÊ´§ÀÒ¾ LCD ãªéâ«Å٪ѹ liquid-crystal ÃÐËÇèÒ§ÊͧªÕ·¢Í§ÇÑÊ´ØàÃ×ͧáʧ ¡ÃÐáÊä¿¿éÒ·ÕèÊè§¼èÒ¹¼ÅÖ¡àËÅÇ·ÓãËé¼ÅÖ¡¤ÃÔÊμÑÅ·ÓãËéáʧ ÊÒÁÒö¼èÒ¹ä´éËÃ×ÍäÁèä´é ·ÓãËéà¡Ô´ÀÒ¾MB (àÁ¡Ðäºμì)1,024 ¡ÔâÅäºμìàÁ¡ÐºÔμ1,048,576 ºÔμËÃ×Í»ÃÐÁÒ³ 128 ¡ÔâÅäºμìÃкº»¯ÔºÑμÔ¡ÒÃâ»Ãá¡ÃÁ·Õè¤Çº¤ØÁ¡Ò÷ӧҹ¢Í§¤ÍÁ¾ÔÇàμÍÃì ÃÇÁ·Ñé§¡ÒèѴ¡ÒÃàÃ×èͧ I/O â»Ãá¡ÃÁá;¾ÅÔपѹμèÒ§æ áÅмÙéãªéÊÒÁÒö àÃÕ¡ãªéà«ÍÃìÇÔʢͧÃкº»¯ÔºÑμÔ¡Òà ¼ÙéãªéÍÒ¨àÃÕ¡ãªéà«ÍÃìÇÔʢͧÃкº»¯ÔºÑμÔ¡ÒÃà¾×èͤѴÅÍ¡ä¿ÅìËÃ×Í¿ÍÃìáÁμ´ÔÊ¡ì â»Ãá¡ÃÁá;¾ÅÔपѹÍÒ¨ãªéÃкº»¯ÔºÑμÔ¡ÒÃà¾×èÍÃѺÍÔ¹¾Øμ¢Í§á»é¹¾ÔÁ¾ì à¢Õ¹¢éÍÁÙÅŧä¿Åì ËÃ×Íà¢Õ¹¢éÍÁÙÅä»Âѧ ˹éҨ;իաÒÃì´PC Card ÂèÍÁÒ¨Ò¡ personal computer card â´Â Personal Computer Memory Card International Association (PCMCIA) Ãкض֧ÁÒμðҹ·Õèãªéà¾×è;Ѳ¹Ò¾Õ«Õ¡ÒÃì´·Ñé§ËÁ´ »ÃÐàÀ·¢Í§ PC Card »ÃСͺ´éÇÂ: âÁà´çÁ, ¡ÒÃì´ÍÕà¸ÍÃìà¹çμ, ÍÐá´»àμÍÃì SCSI, ¡ÒÃì´ ATA áÅСÒÃì´Ë¹èǤÇÒÁ¨ÓPC slotPC slot ¤×ÍÊÅçÍμÎÒÃì´áÇÃì㹤ÍÁ¾ÔÇàμÍÃìÊÓËÃѺãÊè PC Card ¾Ô¡à«Å¾Ô¡à«Å¤×ͨش㹨͡ÃÒ¿Ô¡¢Í§à¤Ã×èͧ¤ÍÁ¾ÔÇàμÍÃì ¾Ô¡à«Å¤×ͨش·ÕèÍÂÙèã¡Åé¡Ñ¹ÁÒ¡æ ¨¹´ÙàËÁ×͹àª×èÍÁμè͡ѹ ¨Í LCD áÊ´§¾Ô¡à«Åà»ç¹¨Ó¹Ç¹ËÅÒ¾ѹËÃ×ÍËÅÒÂÅéÒ¹¾Ô¡à«Å »ÅÑê¡á͹´ìà¾ÅÂìÃкº»¯ÔºÑμÔ¡ÒûÅÑê¡á͹´ìà¾ÅÂì¨Ð·Ó¡ÒáÓ˹´¤èҤ͹¿Ô¡ãËé¡ÑºÍØ»¡Ã³ìμèÒ§æ ¢Í§¤ÍÁ¾ÔÇàμÍÃì à¾×èÍãËéÊÒÁÒö·Ó§Ò¹ä´é¡ÑºÃкº¢Í§¤Ø³ ´éÇÂÃкº»¯ÔºÑμÔ¡ÒûÃÐàÀ·¹Õé ¤Ø³äÁèμéͧà«çμ¨ÑÁà»ÍÃì·ÕèÍØ»¡Ã³ì ËÃ×Í¡Ó˹´áÍ´à´ÃÊ˹èǤÇÒÁ¨ÓËÃ×Í IRQsRAM (random access memory)˹èǤÇÒÁ¨Ó¢Í§¤ÍÁ¾ÔÇàμÍÃì ÃÇÁ·Ñé§ÀÒÂã¹áÅÐÀÒ¹͡ ¤Ø³ÊÒÁÒöà¢Õ¹áÅÐÍèÒ¹¢éÍÁÙÅä´é¨Ò¡ RAM ¢éÍÁÙÅ·Õè¶Ù¡ ¨Ñ´à¡çºäÇéã¹ RAM ¨Ðà»ç¹¡ÒèѴà¡çºäÇéªÑèǤÃÒÇ áÅШж١źä»àÁ×èͻԴà¤Ã×èͧä»ÍÑμÃÒ¡ÒÃÃÕà¿ÃªÍÑμÃÒ¡ÒÃÃÕà¿Ãª¤×ÍÍÑμÃÒ·ÕèÁÕ¡ÒÃÊÃéÒ§ÀÒ¾ãËÁ躹¨Í LCD ÍÑμÃÒ¡ÒÃÃÕà¿Ãª·ÕèàÃçǪèÇÂÅ´¡ÒÃÊÑè¹äËǢͧÀÒ¾ä´é¤ÇÒÁÅÐàÍÕ´¤ÇÒÁÅÐàÍÕ´¤×ͤèÒ¤ÇÒÁ¤ÁËÃ×ͤÇÒÁªÑ´à¨¹¢Í§ÀÒ¾º¹¨Í LCD ¤ÇÒÁÅÐàÍÕ´ (Resolution) ÇÑ´â´Âãªé¨Ó¹Ç¹¾Ô¡à«Å ·Õè˹éҨͤÍÁ¾ÔÇàμÍÃìÊÒÁÒöáÊ´§ä´é μÑÇÍÂèÒ§àªè¹ ¤ÇÒÁÅÐàÍÕ´ 800 x 600 ËÁÒ¶֧¡Ò÷Õè˹éÒ¨ÍÊÒÁÒöáÊ´§¼Åä´é
146  ¤ÙèÁ×ͼÙéãªé800 ¾Ô¡à«Åã¹á¹ÇμÑé§áÅÐ 600 á¶Çã¹á¹Ç¹Í¹ ÂÔ觨ӹǹ¾Ô¡à«ÅÁÕÁÒ¡¢Öé¹à·èÒäËÃè ¤ÇÒÁÅÐàÍÕ´¡ç¨ÐÁÒ¡¢Öé¹ áÅÐáÊ´§¼Åä´é´Õ¢Öé¹´éÇ ROM (read-only memory)˹èǤÇÒÁ¨Ó¶ÒÇâͧ¤ÍÁ¾ÔÇàμÍÃìãªéÊÓËÃѺ¿Ñ§¡ìªÑ¹à©¾ÒÐÍÂèÒ§ μÑÇÍÂèÒ§àªè¹ ¤ÓÊÑè§ÊÓËÃѺ¡ÒÃàÃÔèÁãªéà¤Ã×èͧ ¤ÍÁ¾ÔÇàμÍÃìàÁ×èͤسà»Ô´à¤Ã×èͧà»ç¹¤ÃÑé§áá¨ÐÍÂÙèã¹ ROM ¤Ø³äÁèÊÒÁÒöà¢Õ¹¢éÍÁÙÅŧ㹠ROM ä´é (ROM áμ¡μèÒ§ ¨Ò¡ RAM)૤àμÍÃìËÃ×Í·ÕèàÃÕ¡ÇèÒ ´Ô¡Êì૤àμÍÃì Êèǹ¢Í§á·Ã礤×ͨӹǹ·ÕèÁÕ¡ÒÃÃкØËÁÒÂàÅ¢ä´é áÅÐÊÒÁÒöºÑ¹·Ö¡ÍÑ¡¢ÃÐä´é (»¡μÔ¤×Í 512 ¡ÔâÅäºμì)Shadow RAM¾×é¹·Õè»éͧ¡Ñ¹¡ÒÃà¢Õ¹¢Í§ RAM »ÃСͺ´éÇÂÊÓà¹Ò¢Í§ BIOS àÁ×èÍà¤Ã×èͧºÙμ BIOS ¨Ð¶Ù¡¤Ñ´ÅÍ¡¨Ò¡μÓá˹觶ÒÇÃã¹ ROM ä»Âѧ RAM BIOS ¨ÐÊÒÁÒö·Ó§Ò¹ä´éàÃçÇ¡ÇèÒ·Ó§Ò¹¨Ò¡ ROM ÁÒ¡àÁ×èÍ·Ó§Ò¹¨Ò¡ RAM BIOS ¨ÐÂѧÍÂÙèã¹  Shadow RAM ¨¹¡ÃзÑ觤س»Ô´à¤Ã×èͧ¤ÍÁ¾ÔÇàμÍÃìTFT (thin film transistor) LCD¨Í TFT LCD ãªéǧ¨Ã·ÃÒ¹«ÔÊàμÍÃìᡨҡ¡Ñ¹à¾×èÍãªé¤Çº¤ØÁáμèÅоԡà«Å à·¤â¹âÅÂÕ¹ÕéãËé¤ÇÒÁÅÐàÍÕ´ ·Õè´Õ·ÕèÊØ´ÊÓËÃѺ¨Í LCD  ºÒ§¤ÃÑé§àÃÕ¡¨Í TFT LCD ÇèÒ active matrix LCD
Contact SAMSUNG WORLD WIDE[U.K / AUSTRALIA / HONG KONG / INDIA / MALAYSIA / SINGAPORE] Contact SAMSUNG WORLD WIDEIf you have any comments or questions regarding a Samsung products, contact the SAMSUNG cus-tomer care center.- Customer Care Center ☎: (U.K) 0870 242 0303 Web Site:  www.samsung.com/uk- Customer Care Center ☎: (AUSTRALIA) 1300 362 603   Web Site:  www.samsung.com/au- Customer Care Center ☎: (HONG KONG) 2862 6001 Web Site:  www.samsung.com/hk- Customer Care Center ☎: (INDIA) 3030 8282 / 1600 1100 11Web Site:  www.samsung.com/in- Customer Care Center ☎: (MALAYSIA) 1800-88-9999 Web Site:  www.samsung.com/my- Customer Care Center ☎: (SINGAPORE) 1800-SAMSUNG(7267864)Web Site:  www.samsung.com/sg[FRANCE] Comment contacter Samsung dans le mondeSi vous avez des suggestions ou des questions concernant les produits Samsung, veuillez contacter le Service Consommateurs Samsung.- Customer Care Center ☎: 08 25 08 65 65 Web Site:  www.samsung.fr[GERMANY] Kontakt zu SamsungFalls Sie Fragen oder Anregungen zu Samsung-Produkten haben, wenden Sie sich bitte an den Sam-sung-Kundendienst.- Customer Care Center ☎: 01805 121213 Web Site:  www.samsung.de[SPAIN] Contacte con SAMSUNG WORLD WIDESi tiene alguna pregunta o comentario referente a nuestros productos, por favor contacte con nuestro Servicio de Atencion al Cliente.- Customer Care Center ☎: 902 10 11 30 Web Site:  www.samsung.com/es[PORTUGAL]Contacte SAMSUNG GLOBALSe tem algumas dъvidas ou comentбrios sobre os produtos Samsung, contacte por favor a nossa linha de apoio a clientes Samsung.- Customer Care Center ☎: 808 200 128 Web Site:  www.samsung.pt
[RUSSIA / UKRAINE] Связывайтесь с SAMSUNG по всему мируЕсли у вас есть предложения или вопросы по продуктам Samsung, связывайтесь с информационным центром Samsung.- Customer Care Center ☎: (RUSSIA) 8-800-200-0400 Web Site:  www.samsung.ru- Customer Care Center ☎: (UKRAINE) 8-800-502-0000 Web Site:  www.samsung.com/ur- Customer Care Center ☎: 800-810-5858 / (010) 64751880 Web Site:  www.samsung.com.cn- Customer Care Center ☎: 1800-29-3232 / 02-689-3232 Web Site:  www.samsung.com/thRev. 1.0

Navigation menu